
Accurate time synchronization is vital for the smooth operation of computer systems, especially in environments where multiple devices interact over a network. Network Time Protocol (NTP) ensures that all devices maintain the correct time, which is crucial for logging events, security protocols, and the proper functioning of time-dependent applications. In Windows, NTP settings can be managed through the Windows Registry, providing advanced users and IT professionals with granular control over time synchronization behaviors. This guide will walk you through understanding and configuring NTP settings via the Windows Registry.
Understanding NTP and Its Importance
Network Time Protocol (NTP) is a networking protocol designed to synchronize the clocks of computers over packet-switched, variable-latency data networks. Accurate timekeeping is essential for:
- Security: Ensures the validity of authentication tokens and encryption protocols.
- Logging: Provides accurate timestamps for system and application logs.
- Data Integrity: Prevents issues in databases and file systems that rely on precise time stamps.
- Network Operations: Coordinates tasks and schedules across multiple devices.
Without proper time synchronization, discrepancies can lead to security vulnerabilities, data inconsistencies, and operational inefficiencies.
Windows Time Service Overview
Windows uses the Windows Time Service (W32Time) to synchronize the system clock with configured time sources. By default, Windows Time Service is configured to use NTP servers to keep the system time accurate. The service can operate in different modes, such as:
- NTP Client: Synchronizes the system time with external NTP servers.
- NTP Server: Provides time synchronization services to other devices on the network.
Understanding and configuring the Windows Time Service via the Registry allows for customized synchronization settings tailored to specific network environments.
Locating NTP Settings in the Windows Registry
The NTP settings are primarily located within the Windows Registry under the following path:
HKEY_LOCAL_MACHINE\SYSTEM\CurrentControlSet\Services\W32Time\Parameters
Within this key, several values determine how the Windows Time Service operates, including the NTP server addresses, synchronization frequency, and other related settings.
Key Registry Values for NTP Configuration:
- NtpServer: Specifies the list of NTP servers the system will synchronize with.
- Type: Defines the synchronization type (e.g., NTP, NT5DS).
- AnnounceFlags: Determines the role of the computer in the time synchronization hierarchy.
- SpecialPollInterval: Sets the interval between synchronization attempts.
Warning: Editing the Windows Registry can have significant impacts on your system. Always back up the Registry before making any changes.
Steps to Configure NTP Settings:
1. Open Registry Editor
To edit the Registry, you’ll use the Registry Editor (regedit), a built-in Windows utility.
- Press
Win + Rto open the Run dialog box. - Type
regeditand pressEnter. - If prompted by User Account Control (UAC), click
Yesto allow Registry Editor to make changes.
2. Navigate to the NTP Settings
In Registry Editor, browse to:
HKEY_LOCAL_MACHINE\SYSTEM\CurrentControlSet\Services\W32Time\Parameters
3. Modify the NtpServer Value
- Double-click on
NtpServerin the right pane. - Enter the NTP servers you wish to use, separated by spaces. Each server should be followed by a comma and a flag. For example:
time.windows.com,0x9 time.nist.gov,0x9- The flag
0x9indicates that the server should be used for synchronization and that it’s a reliable time source.
- The flag
4. Set the Synchronization Type
- Double-click on
Type. - Set the value to
NTPto specify that the system should use the NTP server(s) defined inNtpServer.NTP- Other possible values include:
NT5DS: Synchronizes with the domain hierarchy.AllSync: Allows synchronization with all available time sources.
- Other possible values include:
5. Adjust the Polling Interval (Optional)
- Navigate to:
HKEY_LOCAL_MACHINE\SYSTEM\CurrentControlSet\Services\W32Time\TimeProviders\NtpClient - Double-click on
SpecialPollInterval. - Set the value (in seconds) to define how often the system will poll the NTP server. For example, to set it to 1 hour:
3600
6. Enable the NTP Client
- Navigate to:
HKEY_LOCAL_MACHINE\SYSTEM\CurrentControlSet\Services\W32Time\TimeProviders\NtpClient - Double-click on
Enabled. - Set the value to
1to enable the NTP client.
Example Configuration
Suppose you want to configure your system to synchronize with pool.ntp.org every 2 hours. Here’s how you can set it up:
- Set NtpServer:
pool.ntp.org,0x9 - Set Type:
NTP - Set SpecialPollInterval:
7200 - Ensure Enabled is set to 1.
Restarting the Windows Time Service
After making changes to the Registry, it’s essential to restart the Windows Time Service to apply the new settings.
Steps to Restart the Service:
- Open Command Prompt as Administrator:
- Press
Win + Xand select Command Prompt (Admin) or Windows PowerShell (Admin).
- Press
- Stop the Windows Time Service:
net stop w32time - Start the Windows Time Service:
net start w32time - Resynchronize the Time (Optional):
w32tm /resync- Note: If you encounter errors, ensure that the Windows Time Service is configured correctly and that there are no network issues preventing synchronization.
Precautions and Best Practices
- Backup the Registry: Before making any changes, create a backup to prevent potential system issues.
- In Registry Editor, right-click on the
W32Timekey and select Export. Save the.regfile to a safe location.
- In Registry Editor, right-click on the
- Use Trusted NTP Servers: Only use reputable NTP servers to ensure accurate and secure time synchronization.
- Avoid Frequent Polling: Setting the polling interval too low can lead to unnecessary network traffic and may be flagged as suspicious activity.
- Limit Registry Editing to Advanced Users: Incorrect modifications can cause system instability. If unsure, seek assistance from IT professionals.
Troubleshooting NTP Issues
If you encounter problems with time synchronization after configuring NTP settings, consider the following troubleshooting steps:
1. Verify NTP Server Accessibility
Ensure that the NTP servers you specified are reachable and operational.
- Use the
pingcommand to test connectivity:ping pool.ntp.org
2. Check Windows Time Service Status
Ensure that the service is running:
sc query w32time
3. Review Event Logs
- Open Event Viewer (
Win + X> Event Viewer). - Navigate to Windows Logs > System and look for events related to W32Time.
4. Force Time Synchronization
Use the following command to force synchronization:
w32tm /resync /force
5. Reset Windows Time Service Configuration
- Stop the service:
net stop w32time - Unregister the service:
w32tm /unregister - Register the service again:
w32tm /register - Start the service:
net start w32time - Reconfigure NTP settings as needed.
Conclusion
Proper time synchronization is essential for the reliable and secure operation of Windows systems within any networked environment. By configuring NTP settings through the Windows Registry, advanced users can tailor time synchronization behaviors to meet specific requirements. However, caution must be exercised when editing the Registry to prevent system instability. Always ensure you have backups and understand the implications of the changes you make.
howto:ntp_server_activation
по материалам сайта http://windowsnotes.ru
Операционные системы семейства Windows содержат службу времени W32Time. Эта служба предназначена для синхронизации времени в пределах организации. W32Time отвечает за работу как клиентской, так и серверной части службы времени, причем один и тот же компьютер может быть одновременно и клиентом и сервером NTP (NTP — Network Time Protocol).
По умолчанию служба времени в Windows сконфигурирована следующим образом:
-
При установке операционной системы Windows запускает клиента NTP, который синхронизируется с внешним источником времени;
-
При добавлении компьютера в домен тип синхронизации меняется. Все клиентские компьютеры и рядовые сервера в домене используют для синхронизации времени контроллер домена, проверяющий их подлинность;
-
При повышении рядового сервера до контроллера домена на нем запускается NTP-сервер, который в качестве источника времени использует контроллер с ролью PDC-эмулятор;
-
PDC-эмулятор, расположенный в корневом домене леса, является основным сервером времени для всей организации. При этом сам он также синхронизируется с внешним источником времени.
Такая схема работает в большинстве случаев и не требует вмешательства. Однако структура сервиса времени в Windows может и не следовать доменной иерархии и надежным источником времени можно назначить любой компьютер.
В качестве примера приведем настройку NTP-сервера в Windows Server 2008 R2, по аналогии можно настроить NTP сервер и в Windows 7.
Запуск NTP сервера
Служба времени в Windows Server не имеет графического интерфейса и настраивается либо из командной строки, либо путем прямой правки системного реестра. Рассмотрим второй способ:
Необходимо запустить сервер NTP. Открываем ветку реестра:
HKLM\System\CurrentControlSet\services\W32Time\TimeProviders\NtpServer.
Для включения сервера NTP параметру Enabled надо установить значение 1. Затем перезапускаем службу времени командой net stop w32time && net start w32time.
После перезапуска службы NTP, сервер уже активен и может обслуживать клиентов. Убедиться в этом можно с помощью команды w32tm /query /configuration. Эта команда выводит полный список параметров службы. Если раздел NtpServer содержит строку Enabled :1 , то все в порядке, сервер времени работает.
Для того, чтобы NTP-сервер мог обслуживать клиентов, в брандмауэре необходимо открыть UDP порт 123 для входящего и исходящего трафика.
Основные настройки NTP сервера
Открываем ветку реестра:
HKLM\System\CurrentControlSet\services\W32Time\Parameters.
Здесь в первую очередь нас интересует параметр Type, который задает тип синхронизации. Он может принимать следующие значения:
-
NoSync — NTP-сервер не синхронизируется с каким либо внешним источником времени. Используются системные часы, встроенные в микросхему CMOS самого сервера (в свою очередь эти часы могут синхронизироваться от источника NMEA по RS-232 например);
-
NTP — NTP-сервер синхронизируется с внешними серверами времени, которые указаны в параметре реестра NtpServer;
-
NT5DS — NTP-сервер производит синхронизацию согласно доменной иерархии;
-
AllSync — NTP-сервер использует для синхронизации все доступные источники.
Значение по умолчанию для компьютера, входящего в домен — NT5DS, для отдельно стоящего компьютера — NTP.
В параметре NtpServer указываются NTP-сервера, с которыми будет синхронизировать время данный сервер. По умолчанию в этом параметре прописан NTP-сервер Microsoft (time.windows.com, 0×1), при необходимости можно добавить еще несколько NTP-серверов, введя их DNS имена или IP адреса через пробел. В конце каждого имени можно добавлять флаг (напр. ,0×1) который определяет режим для синхронизации с сервером времени.
Допускаются следующие значения режима:
-
0×1 – SpecialInterval, использование временного интервала опроса;
-
0×2 – режим UseAsFallbackOnly;
-
0×4 – SymmetricActive, симметричный активный режим;
-
0×8 – Client, отправка запроса в клиентском режиме.
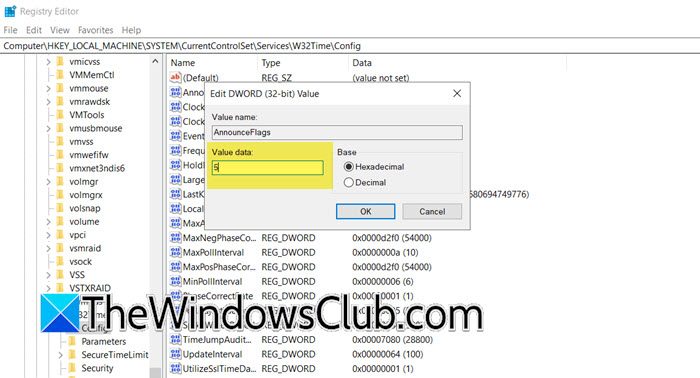
Еще один важный параметр AnnounceFlags находится в разделе реестра:
HKLM\System\CurrentControlSet\services\W32Time\Config.
Он отвечает за то, как о себе заявляет NTP-сервер. Чтобы заявить рядовой сервер (не домен-контроллер) как надежный источник времени, нужен флаг 5.
Если настраиваемый сервер в свою очередь является клиентом NTP (получает время от GPS-приемника по NTP, например), можно настроить интервал между обновлениями. Этот параметр может быть актуальным и для клиентских РС. За время обновления отвечает ключ SpecialPollInterval, находящийся в ветке реестра:
HKLM\System\CurrentControlSet\services\W32Time\TimeProviders\NtpClient.
Он задается в секундах и по умолчанию его значение равно 604800, что составляет 1 неделю. Это очень много, поэтому стоит уменьшить значение SpecialPollInterval до разумного значения — 1 часа (3600).
После настройки необходимо обновить конфигурацию сервиса. Сделать это можно командой w32tm /config /update.
И еще несколько команд для настройки, мониторинга и диагностики службы времени:
-
w32tm /monitor– при помощи этой опции можно узнать, насколько системное время данного компьютера отличается от времени на контроллере домена или других компьютерах. Например:w32tm /monitor /computers:time.nist.gov -
w32tm /resync– при помощи этой команды можно заставить компьютер синхронизироваться с используемым им сервером времени. -
w32tm /stripchart– показывает разницу во времени между текущим и удаленным компьютером. Команда w32tm /stripchart /computer:time.nist.gov /samples:5 /dataonly произведет 5 сравнений с указанным источником и выдаст результат в текстовом виде. -
w32tm /config– это основная команда, используемая для настройки службы NTP. С ее помощью можно задать список используемых серверов времени, тип синхронизации и многое другое. Например, переопределить значения по умолчанию и настроить синхронизацию времени с внешним источником, можно командойw32tm /config /syncfromflags:manual /manualpeerlist:time.nist.gov /update -
w32tm /query— показывает текущие настройки службы. Например команда w32tm /query /source покажет текущий источник времени, а w32tm /query /configuration выведет все параметры службы. -
net stop w32time— останавливает службу времени, если запущена. -
w32tm /unregister— удаляет службу времени с компьютера. -
w32tm /register– регистрирует службу времени на компьютере. При этом создается заново вся ветка параметров в реестре. -
net start w32time— запускает службу.
Особенности, замеченные в Windows 7 — служба времени не запускается автоматически при старте Windows. Исправлено в SP1 для Windows 7.
· Последнее изменение: 2022/02/24 17:39 —
Dmitriy Sazhin
If you manage an organization’s IT infrastructure, configuring NTP is essential to ensure proper and accurate time synchronization, which enables event logging, network security, and other computer operations. In this post, we will discuss how to configure an NTP Server on a Windows Server.
Network Time Protocol (NTP) is a highly scalable internet protocol that helps determine the most accurate time information and synchronizes the time settings on a computer system.
In order to configure NTP Server on Windows Server, you can use the Windows Registry or PowerShell.
1] Configure the NTP Server using Registry Editor
First, we will see how you can configure the NTP Server with the Registry Editor. We are going to configure the Windows Registry, which is a hierarchical database used to set up your computer’s settings. To do so, you can follow the steps mentioned below.
- Take a backup of your registry.
- Then, we will enable NtpServer using the registry key and configure Win32Time’s AnnounceFlags.
- Next up, we need to restart the NTP Server.
- Finally, we will open the appropriate UDP port in Firewall.
To open the Registry Editor, we can open Run, type “regedit”, and click on Ok. Once the UAC prompts, click on Yes to continue. Now, we will take a backup of the registry that will be used if you want to revert back to the previous state in case something goes wrong. To do so, in Registry Editor, go to File > Import, go to the location where you want to store the import, and save it.

After taking the import, navigate to the following location in the Registry Editor.
Computer\HKEY_LOCAL_MACHINE\SYSTEM\CurrentControlSet\Services\W32Time\TimeProviders\NtpServer
Look for the value called Enabled, double-click on it, and set its Value data to 1. This will enable the NTP protocol on your server.
Once done, we need to go to the following location.
Computer\HKEY_LOCAL_MACHINE\SYSTEM\CurrentControlSet\Services\W32Time\Config
You need to look for AnnounceFlags, double-click on it, and set its Value data to 5.
Next, we need to restart the NTP Server, which can be done just by restarting the Time service. So, hit Win + S, search for Services, and open the utility. Now, scroll down and search for Windows Time service, right-click on it, and select Restart. Wait for the service to restart and we can move to our final step.
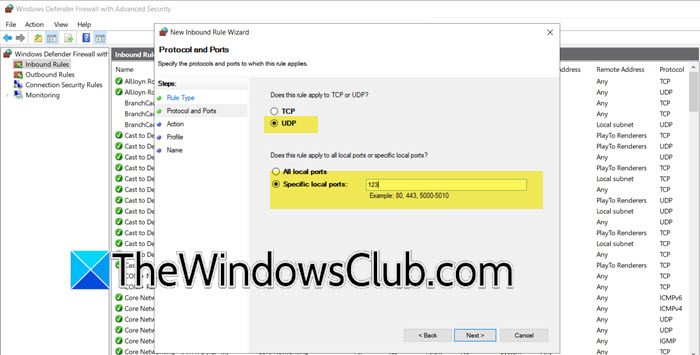
Finally, we are going to open the UDP Port 123 as it is used for the Network Time Protocol (NTP). To do so, you can follow the steps mentioned below.
- Open Run by Win + R, type “wf.msc”, and hit Enter to open the Windows Defender Firewall with Advanced Security utility.
- Click on Inbound Rules > New Rule.
- Select Port and click on Next.
- Next up, you need to select the UDP checkbox and in the Specific local port field, enter 123; click on Next.
- Select Allow the connection and click on Next.
- You need to select the profile where this rule is supposed to be applied; Domain, Private, or Public. Click on Next.
- Give a name of your choice along with the description and click on Next.
This will open the UDP Port 123 which will allow the NTP traffic to pass.
That’s how you can configure an NTP Server on a Windows Server.
2] Configure the NTP Server using PowerShell

The aforementioned method allows you to configure the NTP server using the GUI, but we have a CLI-based method as well. Here, we require you to open PowerShell on your machine and then run the following commands.
- In order to enable the Registry key for NTP Server, you need to run the following command.
Set-ItemProperty -Path "HKLM:\SYSTEM\CurrentControlSet\Services\w32time\TimeProviders\NtpServer" -Name "Enabled" -Value 1
- Next up, we need to make AnnounceFlags value 5 by running the command mentioned below.
Set-ItemProperty -Path "HKLM:\SYSTEM\CurrentControlSet\services\W32Time\Config" -Name "AnnounceFlags" -Value 5
- To restart the Time service, run – Restart-Service w32Time.
- Now, we need to configure the Firewall, for that, run the following commands.
New-NetFirewallRule ` -Name "Allow NTP" ` -DisplayName "NTP Server Port" ` -Description 'Allow NTP Server Port' ` -Profile Any ` -Direction Inbound ` -Action Allow ` -Protocol UDP ` -Program Any ` -LocalAddress Any ` -LocalPort 123
Now, you have configured an NTP Server.
Read: Change Internet Time Update interval in Windows
How to configure NTP server in Windows Server?
To configure the NTP Server in Windows Server, you must enable the related registry key. Also, you need to configure the AnnounceFlags registry value under W32Time. Once done, we need to restart the Time service and configure the UDP port to allow NTP traffic. To do all this, we recommend you follow the steps mentioned above.
Read: NTP client shows incorrect Time on Windows
How do I setup my own NTP server?
On Windows, setting up the NTP Server is actually pretty simple, all you need to do is configure the registry settings, and once that is done, you can reboot the Windows Time service and then configure the UDP port settings, as mentioned in this post above.
Also Read: Add or change Time Server in Windows.
A Time Server or NTP Server is used to synchronize the time across devices in a network. For example, in Windows, your time automatically gets synchronized with time.windows.com. The time.windows.com is the time server or NTP server created by Microsoft. Similarly, you can also make your computer a time server or NTP server. And then, you can synchronize the time of all devices in your local (LAN) network with your PC.
In this tutorial, we are going to show you how to make your computer an NTP or Time Server. And, you don’t need to install any software to do this. We will be using Windows Registry Editor to turn your computer into Time Server.
SEE ALSO: How to Make Your Computer a Web Server?
Follow these steps to configure your Windows 10 or Windows 11 PC as a Time Server.
Step 1: Open Services and Stop Windows Time Service
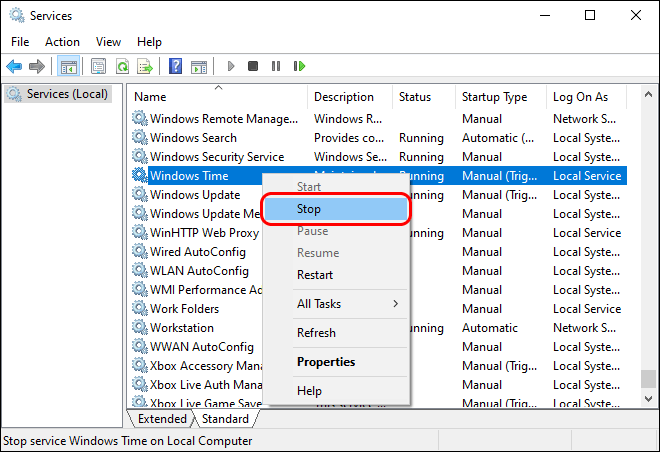
To make your computer a time server, we will need to make some changes to Windows Time Service. So, first of all, we will need to stop the Windows Time service in the Windows services console.
Go to Start > Control Panel > System & Security > Administrative Tools > Services to open the Windows Services console. Alternatively, you can type services.msc in RUN and press ENTER.
Now, the Windows Services console will open. Here, look for the ‘Windows Time‘ service. After that, right-click on Windows Time service and select Stop to stop this service. But if the service is already in the stopped state, you can move to the next step.
Step 2: Open Registry Editor and Create LocalNTP DWORD
Now, open Registry Editor. Go to RUN, type regedit , and press the Enter button to launch Registry Editor.
You may see UAC Prompt, click on Yes to continue. Registry Editor will open. In Registry Editor, go to the following registry key:
HKEY_LOCAL_MACHINE\SYSTEM\CurrentControlSet\Services\W32Time\Parameters
If you don’t see the LocalNTP DWORD on the right side, you will have to create it to make your computer a time server. So, to create the DWORD, right-click in the blank space and select New > DWORD (32-bit) Value.
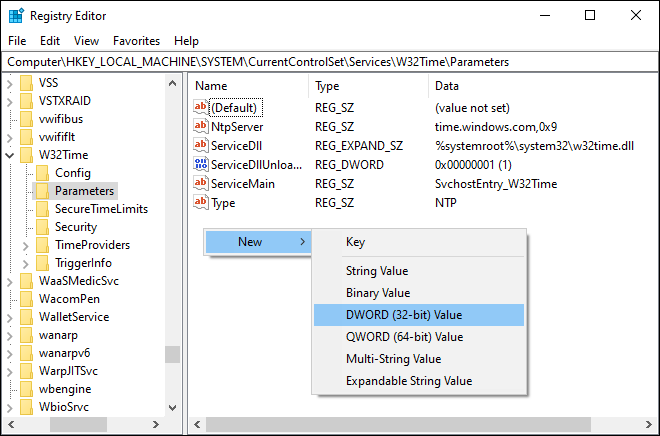
Now, type the name of the new DWORD as LocalNTP (case sensitive).

After creating the DWORD, double-click on it to modify its value. Then set the DWORD value to 1 (Hexadecimal).
Step 3: Enable NTP Server in Windows
This is one of the most important steps to make your PC an NTP server. Do not close the Registry Editor yet, go to the following key in the Registry Editor.
HKEY_LOCAL_MACHINE\SYSTEM\CurrentControlSet\services\W32Time\TimeProviders\NtpServer
Here, on the right side, you will find a DWORD named Enabled. Right-click and select Modify to change its value.

Now, set the value data of Enabled DWORD to “1” (Hexadecimal).
Step 4: Set Announce Flags
Now, go to the following key in Registry Editor.
HKEY_LOCAL_MACHINE\SYSTEM\CurrentControlSet\services\W32Time\Config
Here, we will change the value of AnnounceFlags DWORD. So, right-click on it and select Modify.
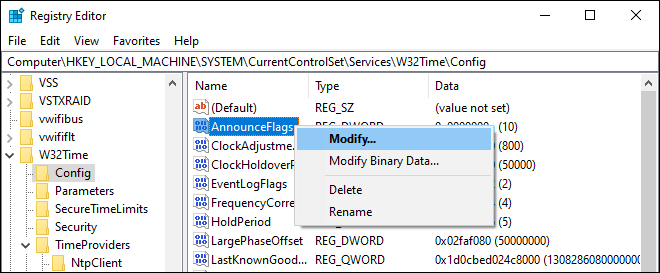
Now, set the value of AnnounceFlags DWORD to “5” (Hexadecimal). Now, your PC will advertise itself as an NTP server.
Step 5: Start Windows Time Service
Go to Start > Control Panel > System and Security > Administrative Tools > Services again. Now, double-click on the “Windows Time” service to open its Properties. Here, set the Startup type to Automatic, start the service, and then click OK.
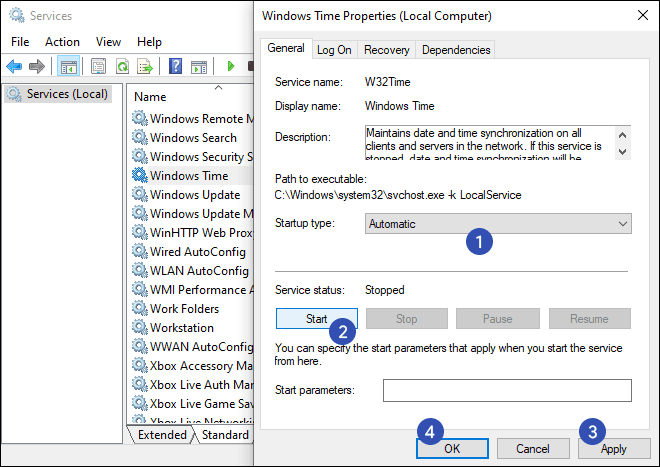
Now, you can use your computer as an NTP server. You can now synchronize the time of other computers in your LAN/Local network with your PC.
SEE ALSO: Check these 10 Cool Command Prompt Tricks for you.
Step 6: Synchronize Time with NTP Server
Let’s see how to synchronize the time of any other PC using this newly created NTP Server. First, you need to find the IP address of your PC. You can check your IP in Network Settings or via Command prompt using the ipconfig command. In this tutorial, the IP address of our PC is 192.168.56.101. This is just an example, it may be different for you.
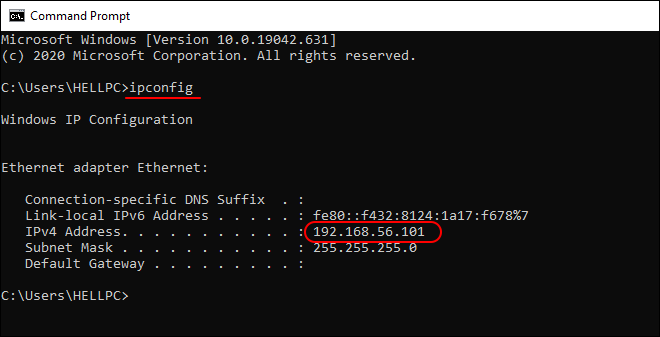
ipconfig command to find the IP Address of Your PCNow, go to another computer whose time you want to synchronize. Open the Control Panel and search for date time and click on Set the time and date link from the search results.
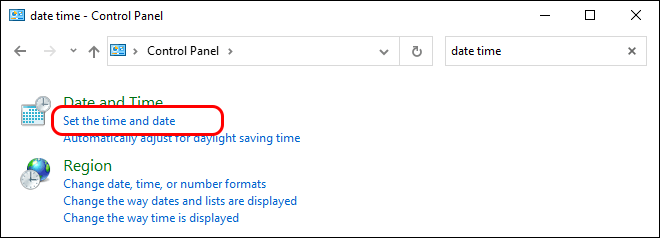
Date and Time settings will open. Go to the Internet Time tab and click on Change Settings.
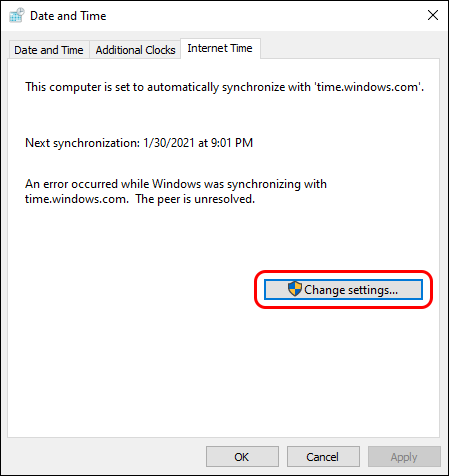
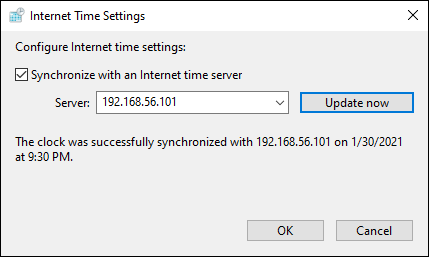
A small Internet Time Settings window will open. Here, enter the IP address of your NTP server (192.168.56.101 in our case) in the box and click on Update Now to synchronize time. It may give you an error on the first attempt. Click on Update Now again and your time will be synchronized successfully. Now, you can click OK to close the time settings window.
SEE ALSO: How to Set up Minecraft Server on Android Phone?
Turn your PC into an NTP Server without Any Software
Now, you have successfully turned your computer into an NTP or Time Server without any software. You can synchronize the time of every device on your network using this NTP server. You can also synchronize the time of any remote device using this NTP server by forwarding the NTP port on your router. NTP port is “123” by default. The process of forwarding a port in your router depends on the type of router you use. You can check your router’s manual for more details.
We hope you liked this tutorial. In case you have any problems, feel free to write them down in the comment section below. Feel free to subscribe to our newsletter to get the latest tutorials directly into your inbox.
…в среде Active Directory разница в часах более 5 минут приводит к проблемам аутентификации Kerberos…
В данной заметке речь пойдет о настройке синхронизации времени в доменной среде Windows 2008 – 2012 R2.
Основой нормального функционирования доменной среды AD является корректная работа службы времени Windows (W32Time).
Как работает синхронизация времени в доменной среде?
1. пользователи получают точное время от ближайшего контроллера домена, на котором они зарегистрировались;
2. все доменные контроллеры запрашивают об этом DC с ролью PDC-эмулятор (одна из ролей FSMO);
3. PDC-эмулятор, в свою очередь, должен синхронизироваться с более авторитетным источником времени;
На практике PDC-эмулятор обычно синхронизируется с выделенным NTP-сервером организации, либо с NTP-сервером провайдера, или же с внешним источником точного времени, такие как: 0.ru.pool.ntp.org, 1.ru.pool.ntp.org, 2.ru.pool.ntp.org
Пример настройки контроллера домена с ролью PDC-эмулятора.
Для настройки нам потребуется консоль PowerShell запущенная от имени администратора.
1. Определим имя PDC-эмулятора – самый простой способ выполнить команду:
netdom query FSMO

Когда мы подключили к DC с ролью PDC можно начинать настраивать.
2. Конфигурируем внешние источники синхронизации – указываем с какими источниками PDC будет синхронизироваться.
w32tm /config /syncfromflags:manual /manualpeerlist:”0.ru.pool.ntp.org 1.ru.pool.ntp.org 2.ru.pool.ntp.org”
где, параметры:
/syncfromflags:manual — синхронизация с узлами из заданного вручную списка.
manualpeerlist:<узлы> — список (адреса DNS или IP) источников времени
Важно! Имя каждого источника времени (если их несколько) должно быть разделено пробелом. А на брандмауэре должно быть разрешено прохождение трафика UDP на порт 123 в обе стороны.
3. Объявляем PDC-Emulator надежным источником времени для клиентов:
w32tm /config /reliable:yes
4. После внесения изменений перезапускаем службу времени:
Restrat-Service W32Time
Или обновляем конфигурацию командой: w32tm /config /update
Если вы перенесли роль PDC-эмулятор на другой контроллер домена, то старый DC все еще продолжает считает считать себя авторитетным сервером времени для всего домена, что может стать причиной ошибок в системных логах. Исправить эту ситуацию можно командой:
w32tm /config /syncfromflags:domhier /reliable:no /update
Несколько, на мой взгляд, полезных команд:
# Настройки для PDC эммулатора: w32tm /config /syncfromflags:manual /manualpeerlist:”0.ru.pool.ntp.org 1.ru.pool.ntp.org 2.ru.pool.ntp.org” w32tm /config /reliable:yes Restart-Service W32Time Get-Service W32Time w32tm /monitor # Настройки для остальных DC в домене: icm -ComputerName DC02 -ScriptBlock {w32tm /config /syncfromflags:domhier /reliable:no /update} icm -ComputerName DC02 -ScriptBlock {Restart-Service W32Time} icm -ComputerName DC02 -ScriptBlock {w32tm /resync /rediscover} # Принудительная синхронизация времени w32tm /resync # Просмотр конфигураций: w32tm /monitor w32tm /query /configurationw32tm /query /configuration — посмотреть текущие настройки службы времени;

Где:
SpecialPollInterval: 3600 — интервал синхронизации в секундах, 3600 – сутки. Синхронизиция будет проводиться раз в сутки.
NtpServer — указывает сервреры, с которым может синхроинизировать время компьютер.
Type: NTP – вид синхронизации времени.
Параметр Type может иметь следующие параметры:
NoSync — служба времени вообще не синхронизируется ни с чем.
NTP — служба времени синхронизируется с серверами, указанными в параметре NtpServer.
NT5DS — служба времени синхронизируется, используя доменную иерархию (характерно для членов домена Active Directory).
AllSync — служба времени использует все возможные механизмы для синхронизации.w32tm /monitor — отобразит текущую иерархию синхронизации времени по домену;
w32tm /stripchart /computer:0.ru.pool.ntp.org /samples:5 /dataonly — произвести 5 попыток сравнения времени с авторитетным источником времени 0.ru.pool.ntp.org (полезно при проверке доступности источника времени);
w32tm /resync – заставить компьютер синхронизироваться с используемым им сервером времени;
w32tm /unregister — удаляет службу времени с компьютера;
w32tm /register – регистрирует службу времени на компьютере;
Если кому интересно настраивать NTP-сервер через реестр, то милости просим в эту ветку: HKLM\System\CurrentControlSet\services\W32Time\Концепция ярусов STRATA или STRATUM
Где:
Stratum 0 – эталонные или авторитетные источники точного времени, такие как: путники GPS, цезиевые атомные часы, радио волны WWVB. Авторитетны они потому, что имеют способ поддержания высокоточного хронометража – когда секунда не потеряется за 300 000 лет.
Stratum 1 – компьютеры, которые напрямую берут время у Stratum 0, т.е. Stratum 1 используют аппаратное (проводом) подключение к Stratum 0!
Stratum 2 – уровень компьютеров, берущие время по сети у Stratum 1.
Как уже, наверное, понятно из схемы, Stratum 3 будет брать время у Stratum 2, а Stratum 4 у Stratum 3 и т.д. Самым нижним ярусов является Stratum 16 и время в нем считается не синхронизированным.
Опять же, на практике, самыми распространенными внешними источниками времени являются Stratum 2, Stratum 3, ибо синхронизироваться с Stratum 1 простым пользователям не разрешается, да и это не к чему.

