
В этой статье мы рассмотрим, как в Linux смонтировать общую сетевую папку, расположенную на хосте Windows. В Windows для доступа к общим сетевым папкам используется протокол SMB (Server Message Block), который ранее назывался CIFS (Сommon Internet File System). В Linux для доступа к сетевым папкам Windows по протоколу SMB можно использовать клиент cifs-utils или Samba.
- Смонтировать сетевую папку в Linux с помощью cifs-util
- Автоматическое монтирование сетевой папки в Linux
- Linux: подключиться к сетевой папке с помощью клиента samba
Содержание:
Совет. Для доступа к сетевым папкам по SMB/CIFS используется порт TCP/445. Для разрешения имени используются порты UDP 137, 138 и TCP 139. Если эти порты закрыты, вы сможете подключиться к сетевой папке Windows только по IP адресу.
Смонтировать сетевую папку в Linux с помощью cifs-util
Вы можете смонтировать сетевую папку, находящуюся на Windows хосте, с помощью утилит из пакета cifs-util. Для установки пакета выполните команду:
- В Ubuntu/Debian:
$ sudo apt-get install cifs-utils - В CentOS/Oracle/RHEL:
$ sudo dnf install cifs-utils
Создайте точку монтирования:
$ sudo mkdir /mnt/share
Теперь вы можете смонтировать сетевую папку с компьютера Windows под пользователем User03с помощью команды:
$ sudo mount.cifs //192.168.31.33/backup /mnt/share -o user=User03
Укажите пароль пользователя Windows для подключения к сетевой папке.
При подключении сетевой SMB папки можно задать дополнительные параметры:
$ sudo mount -t cifs -o username=User03,password=PasswOrd1,uid=1000,iocharset=utf8 //192.168.31.33/backup /mnt/share
- //192.168.31.33/backup – сетевая папка Windows
- /mnt/share – точка монтирования
- -t cifs – указать файловую систему для монтирования
- -o опции монтирования (эту опцию можно использовать только с правами root, поэтому в команде используется sudo)
- username=User03,password=PasswOrd1 – имя и пароль пользователя Windows, у которого есть права доступа к сетевой папке. Можно указать имя пользователя guest, если разрешен анонимный доступ к сетевой папке
- iocharset=utf8 – включить поддержку кодировки UTF8 для отображения имен файлов
- uid=1000 – использовать этого пользователя Linux в качестве владельца файлов в папке

По умолчанию шары Windows монтируются в Linux с полными правами (0755). Если вы хотите изменить права по-умолчанию при монтировании, добавьте в команду опции:
dir_mode=0755,file_mode=0755
Если вы хотите использовать имя компьютера при подключении сетевого каталога Windows, добавьте в файл /etc/hosts строку:
IP_АДРЕС ИМЯ_КОМПЬЮТЕРА
Чтобы не указывать учетные данные пользователя Windows в команде монтирования сетевой папки, их можно сохранить в файле.
Например:
$ mcedit ~/.windowscredentials
Добавьте в файл:
username=User03
password=PasswOrd1
Для подключения к папке под анонимным пользователем:
username=guest
password=
Если нужно указать учетную запись пользователя из определенного домена Active Directory, добавьте в файл третью строку:
domain = vmblog.ru
Измените права на файл:
$ chmod 600 ~/.windowscredentials
Теперь при подключении сетевой папки вместо явного указания имени пользователя и пароля можно указать путь к файлу:
$ sudo mount -t cifs -o credentials=/home/sysops/.windowscredentials,uid=1000,iocharset=utf8 //192.168.31.33/backup /mnt/share
Отмонтировать сетевую SMB папку:
$ sudo umount /mnt/share
Автоматическое монтирование сетевой папки в Linux
Можно настроить автоматическое монтирование сетевой папки Windows через /etc/fstab.
$ sudo mcedit /etc/fstab
Добавьте в файл следующую строку подключения SMB каталога:
//192.168.31.33/backup /mnt/share cifs user,rw,credentials=/home/sysops/.windowscredentials,iocharset=utf8,nofail,_netdev 0 0
- rw – смонтировать SBM папку на чтение и запись
- nofail – продолжить загрузку ОС если не удается смонтировать файловую систему
- _netdev – указывает что подключается файловая система по сети. Linux не будет монтировать такие файловые системы пока на хосте не будет инициализирована сеть.
Вы можете указать версию протокола SMB, которую нужно использовать для подключения (версия SMB 1.0 считается небезопасной и отключена по-умолчанию в современных версиях Windows). Добавьте в конец строки с настройками подключения параметр vers=3.0.
//192.168.31.33/backup /mnt/share cifs user,rw,credentials=/home/sysops/.windowscredentials,iocharset=utf8,nofail,_netdev,vers=3.0 0 0
Если на стороне хоста Windows используется несовместимая (старая версия) SMB, при подключении появится ошибка:
mount error(112): Host is downилиmount error(95): Operation not supported
Чтобы сразу смонтировать сетевую папку, выполните:
$ mount -a
Linux: подключиться к сетевой папке с помощью клиента samba
Установите в Linux клиент samba:
- В Ubuntu/Debian:
$ sudo apt-get install smbclient - В CentOS/Oracle/RHEL:
# dnf install smbclient
Для вывода всех SMB ресурсов в локальной сети:
$ smbtree -N
Вывести список доступных SMB папок на удаленном хосте Windows:
smbclient -L //192.168.31.33 -N
Если в Windows запрещен анонимный доступ, появится ошибка:
session setup failed: NT_STATUS_ACCESS_DENIED
В этом случае нужно указать учетную запись пользователя Windows, которую нужно использовать для подключения:
smbclient -L //192.168.31.33 -U User03
Если нужно использовать учетную запись пользователя домена, добавьте опцию –W:
smbclient -L //192.168.31.33 -U User03 –W Domain

Для интерактивного подключения к сетевой папке Windows используется команда:
smbclient //192.168.31.33/backup -U User03 -W Domain
или
smbclient //192.168.31.33/backup -U User03
Для анонимного доступа:
smbclient //192.168.31.33/backup -U Everyone
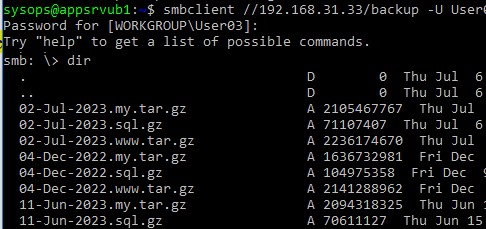
После успешного входа появится приглашение:
smb: \>
Вывести список файлов в сетевой папке:
dir
Скачать файл из сетевой папки Windows:
get remotefile.txt /home/sysops/localfile.txt
Сохранить локальный файл из Linux в SMB каталог:
put /home/sysops/localfile.txt remotefile.txt
Можно последовательно выполнить несколько команд smbclient:
$ smbclient //192.168.31.33/backup -U User03 -c "cd MyFolder; get arcive.zip /mnt/backup/archive.zip"
Полный список команд в smbclient можно вывести с помощью команды help. Команды smbclient схожи с командами ftp клиента.
При использовании команды smbclient может появиться ошибка:
Unable to initialize messaging contextsmbclient: Can't load /etc/samba/smb.conf - run testparm to debug it.
Чтобы исправить ошибку, создайте файл /etc/samba/smb.conf.
Если на хосте Windows отключен протокол SMB 1.0, то при подключении с помощью smbclient появится ошибка:
Reconnecting with SMB1 for workgroup listing.
protocol negotiation failed: NT_STATUS_CONNECTION_RESET
Unable to connect with SMB1 -- no workgroup available.
Learn how to access Windows SMB shares on Ubuntu 22.04 in this comprehensive guide. With step-by-step instructions and clear explanations, this guide is perfect for beginners and experts alike.
Are you struggling to access Windows SMB shares on your Ubuntu 22.04 machine? Do you feel lost in the sea of technical jargon and complicated instructions? Fear not, as this comprehensive guide will walk you through the process step-by-step and make it as easy as possible for you to access Windows SMB shares on Ubuntu 22.04.
Introduction
Ubuntu 22.04 is a popular open-source operating system that has gained a lot of popularity in recent years. Many users are switching to Ubuntu from other operating systems like Windows and macOS. One of the common issues that Ubuntu users face is accessing Windows SMB shares on Ubuntu. This is especially important for those who work in a mixed environment where some machines are running Windows and others are running Ubuntu. In this guide, we will explore how to access Windows SMB shares on Ubuntu 22.04.
To access Windows SMB shares on Ubuntu 22.04, follow the steps below:
1. You can either SSH to your Ubuntu 22.04 Server or if you have a GUI version you can open the Terminal on your Ubuntu machine by pressing the Ctrl+Alt+T keys.
2. Install the cifs-utils package by running the following command:
sudo apt-get install cifs-utils
3. Create a folder where you want to mount the Windows SMB share. For example, you can create a folder named win_share in your home directory by running the following command:
4. Mount the Windows SMB share by running the following command:
sudo mount -t cifs //windows-machine-name/share-name ~/win_share -o username=windows-username,password=windows-password,domain=windows-domain
Replace windows-machine-name, share-name, windows-username, windows-password, and windows-domain with the appropriate values. You may also use the IP address of the Windows machine instead of the machine name.
For example, if the Windows machine name is mywinpc, the share name is myshare, the Windows username is myuser, the password is mypassword, and the domain is mydomain, the command will look like this:
sudo mount -t cifs //mywinpc/myshare ~/win_share -o username=myuser,password=mypassword,domain=mydomain
5. Once you have successfully mounted the Windows SMB share, you can access it like any other folder on your Ubuntu machine. You can copy files to and from the Windows SMB share and perform other file operations.
Why Can’t I Access Windows SMB Shares on Ubuntu 22.04?
If you are unable to access Windows SMB shares on Ubuntu 22.04, there could be several reasons for it. Here are some common reasons:
- Incorrect credentials: Make sure you are using the correct Windows username, password, and domain in the mount command.
- Firewall settings: Check if the firewall on the Windows machine is blocking access to the SMB share.
- Network connectivity: Ensure that both the Ubuntu and Windows machines are on the same network and can communicate with each other.
- SMB version: Make sure that the Windows SMB share is using a version of SMB that is supported by your Ubuntu machine.
FAQs
Q1. What is SMB?
SMB stands for Server Message Block and is a protocol used for sharing files, printers, and other resources of a network. It is commonly used in Windows-based networks.
Q2. What is cifs-utils?
cifs-utils is a package in Ubuntu that provides utilities for mounting and managing SMB shares.
Q3. Can I mount multiple SMB shares on Ubuntu 22.04?
Yes, you can mount multiple SMB shares on Ubuntu 22.04. You just need to create different folders for each share and use a different mount command for each share.
Q4. Can I access Windows SMB shares without using the Terminal?
Yes, you can access Windows SMB shares without using the Terminal by using the Files application. Open the Files application and click on Other Locations. In the Connect to Server dialog, enter the address of the SMB share in the format smb://windows-machine-name/share-name and click Connect.
Q5. How do I unmount a Windows SMB share in Ubuntu 22.04?
To unmount a Windows SMB share in Ubuntu 22.04, use the following command:
sudo umount /path/to/mount/folder
Replace /path/to/mount/folder with the actual path to the folder where the Windows SMB share is mounted.
Q6. How do I make the Windows SMB share mount automatically on startup?
To make the Windows SMB share mount automatically on startup, you need to add an entry to the /etc/fstab file. Open the /etc/fstab file in a text editor and add the following line at the end of the file:
//windows-machine-name/share-name /path/to/mount/folder cifs username=windows-username,password=windows-password,domain=windows-domain 0 0
Replace windows-machine-name, share-name, windows-username, windows-password, windows-domain, and /path/to/mount/folder with the appropriate values. Save the file and reboot your Ubuntu machine.
Conclusion
Accessing Windows SMB shares on Ubuntu 22.04 may seem daunting at first, but with the right instructions and a little patience, it can be a breeze. In this guide, we have walked you through the steps required to access Windows SMB shares on Ubuntu 22.04, as well as provided some common troubleshooting tips. With this knowledge, you can now work seamlessly in a mixed environment with both Windows and Ubuntu machines.
Remember, the key to success is to take it one step at a time, and don’t be afraid to ask for help if you need it. Now, go ahead and access those Windows SMB shares on your Ubuntu 22.04 machine!
I hope this article was helpful, if you have any questions, please feel free to contact me. If you would like to be notified of when I create a new post you can subscribe to my blog alert.
Discover more from Patrick Domingues
Subscribe to get the latest posts sent to your email.
/etc/hosts:
# The «order» line is only used by old versions of the C library.
order hosts,bind
multi on
/etc/samba/smb.conf:
#
# Sample configuration file for the Samba suite for Debian GNU/Linux.
#
#
# This is the main Samba configuration file. You should read the
# smb.conf(5) manual page in order to understand the options listed
# here. Samba has a huge number of configurable options most of which
# are not shown in this example
#
# Some options that are often worth tuning have been included as
# commented-out examples in this file.
# — When such options are commented with «;», the proposed setting
# differs from the default Samba behaviour
# — When commented with «#», the proposed setting is the default
# behaviour of Samba but the option is considered important
# enough to be mentioned here
#
# NOTE: Whenever you modify this file you should run the command
# «testparm» to check that you have not made any basic syntactic
# errors.
# A well-established practice is to name the original file
# «smb.conf.master» and create the «real» config file with
# testparm -s smb.conf.master >smb.conf
# This minimizes the size of the really used smb.conf file
# which, according to the Samba Team, impacts performance
# However, use this with caution if your smb.conf file contains nested
# «include» statements. See Debian bug #483187 for a case
# where using a master file is not a good idea.
#
#======================= Global Settings =======================
[global]
## Browsing/Identification ###
# Change this to the workgroup/NT-domain name your Samba server will part of
workgroup = workgroup
# server string is the equivalent of the NT Description field
server string = %h server (Samba, Ubuntu)
# Windows Internet Name Serving Support Section:
# WINS Support — Tells the NMBD component of Samba to enable its WINS Server
# wins support = no
# WINS Server — Tells the NMBD components of Samba to be a WINS Client
# Note: Samba can be either a WINS Server, or a WINS Client, but NOT both
; wins server = w.x.y.z
# This will prevent nmbd to search for NetBIOS names through DNS.
dns proxy = no
# What naming service and in what order should we use to resolve host names
# to IP addresses
; name resolve order = lmhosts host wins bcast
#### Networking ####
# The specific set of interfaces / networks to bind to
# This can be either the interface name or an IP address/netmask;
# interface names are normally preferred
; interfaces = 127.0.0.0/8 eth0
# Only bind to the named interfaces and/or networks; you must use the
# ‘interfaces’ option above to use this.
# It is recommended that you enable this feature if your Samba machine is
# not protected by a firewall or is a firewall itself. However, this
# option cannot handle dynamic or non-broadcast interfaces correctly.
; bind interfaces only = yes
#### Debugging/Accounting ####
# This tells Samba to use a separate log file for each machine
# that connects
log file = /var/log/samba/log.%m
# Cap the size of the individual log files (in KiB).
max log size = 1000
# If you want Samba to only log through syslog then set the following
# parameter to ‘yes’.
# syslog only = no
# We want Samba to log a minimum amount of information to syslog. Everything
# should go to /var/log/samba/log.{smbd,nmbd} instead. If you want to log
# through syslog you should set the following parameter to something higher.
syslog = 0
# Do something sensible when Samba crashes: mail the admin a backtrace
panic action = /usr/share/samba/panic-action %d
####### Authentication #######
# «security = user» is always a good idea. This will require a Unix account
# in this server for every user accessing the server. See
# /usr/share/doc/samba-doc/htmldocs/Samba3-HOWTO/ServerType.html
# in the samba-doc package for details.
# security = user
# You may wish to use password encryption. See the section on
# ‘encrypt passwords’ in the smb.conf(5) manpage before enabling.
; encrypt passwords = yes
# If you are using encrypted passwords, Samba will need to know what
# password database type you are using.
passdb backend = tdbsam
obey pam restrictions = yes
# This boolean parameter controls whether Samba attempts to sync the Unix
# password with the SMB password when the encrypted SMB password in the
# passdb is changed.
unix password sync = yes
# For Unix password sync to work on a Debian GNU/Linux system, the following
# parameters must be set (thanks to Ian Kahan <<kahan@informatik.tu-muenchen.de> for
# sending the correct chat script for the passwd program in Debian Sarge).
passwd program = /usr/bin/passwd %u
passwd chat = *Entersnews*spassword:* %n
*Retypesnews*spassword:* %n
*passwordsupdatedssuccessfully* .
# This boolean controls whether PAM will be used for password changes
# when requested by an SMB client instead of the program listed in
# ‘passwd program’. The default is ‘no’.
pam password change = yes
# This option controls how unsuccessful authentication attempts are mapped
# to anonymous connections
map to guest = bad user
########## Domains ###########
# Is this machine able to authenticate users. Both PDC and BDC
# must have this setting enabled. If you are the BDC you must
# change the ‘domain master’ setting to no
#
; domain logons = yes
#
# The following setting only takes effect if ‘domain logons’ is set
# It specifies the location of the user’s profile directory
# from the client point of view)
# The following required a [profiles] share to be setup on the
# samba server (see below)
; logon path = \%Nprofiles\%U
# Another common choice is storing the profile in the user’s home directory
# (this is Samba’s default)
# logon path = \%N\%Uprofile
# The following setting only takes effect if ‘domain logons’ is set
# It specifies the location of a user’s home directory (from the client
# point of view)
; logon drive = H:
# logon home = \%N\%U
# The following setting only takes effect if ‘domain logons’ is set
# It specifies the script to run during logon. The script must be stored
# in the [netlogon] share
# NOTE: Must be store in ‘DOS’ file format convention
; logon script = logon.cmd
# This allows Unix users to be created on the domain controller via the SAMR
# RPC pipe. The example command creates a user account with a disabled Unix
# password; please adapt to your needs
; add user script = /usr/sbin/adduser —quiet —disabled-password —gecos «» %u
# This allows machine accounts to be created on the domain controller via the
# SAMR RPC pipe.
# The following assumes a «machines» group exists on the system
; add machine script = /usr/sbin/useradd -g machines -c «%u machine account» -d /var/lib/samba -s /bin/false %u
# This allows Unix groups to be created on the domain controller via the SAMR
# RPC pipe.
; add group script = /usr/sbin/addgroup —force-badname %g
########## Printing ##########
# If you want to automatically load your printer list rather
# than setting them up individually then you’ll need this
# load printers = yes
# lpr(ng) printing. You may wish to override the location of the
# printcap file
; printing = bsd
; printcap name = /etc/printcap
# CUPS printing. See also the cupsaddsmb( manpage in the
# cupsys-client package.
; printing = cups
; printcap name = cups
############ Misc ############
# Using the following line enables you to customise your configuration
# on a per machine basis. The %m gets replaced with the netbios name
# of the machine that is connecting
; include = /home/samba/etc/smb.conf.%m
# Most people will find that this option gives better performance.
# See smb.conf(5) and /usr/share/doc/samba-doc/htmldocs/Samba3-HOWTO/speed.html
# for details
# You may want to add the following on a Linux system:
# SO_RCVBUF=8192 SO_SNDBUF=8192
# socket options = TCP_NODELAY
# The following parameter is useful only if you have the linpopup package
# installed. The samba maintainer and the linpopup maintainer are
# working to ease installation and configuration of linpopup and samba.
; message command = /bin/sh -c ‘/usr/bin/linpopup «%f» «%m» %s; rm %s’ &
# Domain Master specifies Samba to be the Domain Master Browser. If this
# machine will be configured as a BDC (a secondary logon server), you
# must set this to ‘no’; otherwise, the default behavior is recommended.
# domain master = auto
# Some defaults for winbind (make sure you’re not using the ranges
# for something else.)
; idmap uid = 10000-20000
; idmap gid = 10000-20000
; template shell = /bin/bash
# The following was the default behaviour in sarge,
# but samba upstream reverted the default because it might induce
# performance issues in large organizations.
# See Debian bug #368251 for some of the consequences of *not*
# having this setting and smb.conf(5) for details.
; winbind enum groups = yes
; winbind enum users = yes
# Setup usershare options to enable non-root users to share folders
# with the net usershare command.
# Maximum number of usershare. 0 (default) means that usershare is disabled.
; usershare max shares = 100
# Allow users who’ve been granted usershare privileges to create
# public shares, not just authenticated ones
usershare allow guests = yes
username map = /etc/samba/smbusers
security = user
; guest ok = no
; guest account = nobody
#======================= Share Definitions =======================
# Un-comment the following (and tweak the other settings below to suit)
# to enable the default home directory shares. This will share each
# user’s home directory as \serverusername
;[homes]
; comment = Home Directories
; browseable = no
# By default, the home directories are exported read-only. Change the
# next parameter to ‘no’ if you want to be able to write to them.
; read only = yes
# File creation mask is set to 0700 for security reasons. If you want to
# create files with group=rw permissions, set next parameter to 0775.
; create mask = 0700
# Directory creation mask is set to 0700 for security reasons. If you want to
# create dirs. with group=rw permissions, set next parameter to 0775.
; directory mask = 0700
# By default, \serverusername shares can be connected to by anyone
# with access to the samba server. Un-comment the following parameter
# to make sure that only «username» can connect to \serverusername
# This might need tweaking when using external authentication schemes
; valid users = %S
# Un-comment the following and create the netlogon directory for Domain Logons
# (you need to configure Samba to act as a domain controller too.)
;[netlogon]
; comment = Network Logon Service
; path = /home/samba/netlogon
; guest ok = yes
; read only = yes
; share modes = no
# Un-comment the following and create the profiles directory to store
# users profiles (see the «logon path» option above)
# (you need to configure Samba to act as a domain controller too.)
# The path below should be writable by all users so that their
# profile directory may be created the first time they log on
;[profiles]
; comment = Users profiles
; path = /home/samba/profiles
; guest ok = no
; browseable = no
; create mask = 0600
; directory mask = 0700
[printers]
comment = All Printers
browseable = no
path = /var/spool/samba
printable = yes
; guest ok = no
; read only = yes
create mask = 0700
# Windows clients look for this share name as a source of downloadable
# printer drivers
[print$]
comment = Printer Drivers
path = /var/lib/samba/printers
; browseable = yes
; read only = yes
; guest ok = no
# Uncomment to allow remote administration of Windows print drivers.
# You may need to replace ‘lpadmin’ with the name of the group your
# admin users are members of.
# Please note that you also need to set appropriate Unix permissions
# to the drivers directory for these users to have write rights in it
; write list = root, @lpadmin
# A sample share for sharing your CD-ROM with others.
;[cdrom]
; comment = Samba server’s CD-ROM
; read only = yes
; locking = no
; path = /cdrom
; guest ok = yes
# The next two parameters show how to auto-mount a CD-ROM when the
# cdrom share is accesed. For this to work /etc/fstab must contain
# an entry like this:
#
# /dev/scd0 /cdrom iso9660 defaults,noauto,ro,user 0 0
#
# The CD-ROM gets unmounted automatically after the connection to the
#
# If you don’t want to use auto-mounting/unmounting make sure the CD
# is mounted on /cdrom
#
; preexec = /bin/mount /cdrom
; postexec = /bin/umount /cdrom
папку я уже сумел присоединить запустил GUIDE и через меню файл-соединиться с сервером-выбрал тип сервиса:Ресурс ОС Windows, заполнил окошки Сервер и папки и увидел расшаренную папку (файлы читаются, копируются туда и обратно), правда после выключения-включения компьютера соединение пропадает и его нужно установить по новой
осталась проблема с сетевым принтером
Пользователь решил продолжить мысль 19 Октября 2009, 14:20:16:
ValSub, идентификация виндовых машин в свойствах «моего компьютера», нажать «изменить», там что?
Для ArcFi : где? на Windows компе?
If you need to access Windows shared folders from Ubuntu, it can be done easily by installing and configuring Samba. Samba is a software suite that provides file and print services for Windows clients, and it allows Linux and Windows machines to share files and printers. By using Samba, you can create Linux shares that can be accessed by Windows clients, as well as access Windows shares from Linux machines.
In this guide, we will walk you through the process of accessing Windows shared folders from Ubuntu using Samba. We will cover the following steps:
- Install Samba on Ubuntu
- Configure Samba on Ubuntu
- Access Windows shared folder from Ubuntu
By following these steps, you will be able to access Windows shared folders from Ubuntu and easily transfer files between the two operating systems.
Step 1: Update Ubuntu
Before installing Samba, it’s always a good idea to update Ubuntu to ensure that you have the latest software and security patches. You can do this by opening a terminal and running the following commands:
sudo apt-get update
sudo apt-get upgrade
Step 2: Install Samba
Before you can mount a Windows shared folder on Ubuntu, you need to make sure that Samba is installed on Ubuntu. If you have not already installed Samba, you can do so by running the following command in the terminal:
sudo apt-get install samba
Step 3: Find the IP address of the Windows machine
Before you can mount the Windows shared folder on Ubuntu, you need to know the IP address of the Windows machine. You can find this by opening a Command Prompt on the Windows machine and running the command:
ipconfig
Look for the IPv4 address, which should look something like “192.168.1.10”. Note down this IP address.
Step 4: Create a mount point
Before you can mount the Windows shared folder on Ubuntu, you need to create a mount point on Ubuntu. This is the folder where the Windows shared folder will be mounted. You can create a mount point by running the following command in the terminal:
sudo mkdir /mnt/windows
This will create a folder called “windows” in the “/mnt” directory.
Step 5: Mount the Windows shared folder
To mount the Windows shared folder on Ubuntu, you need to run the following command in the terminal:
sudo mount -t cifs //windows_ip/shared_folder /mnt/windows -o username=windows_username,password=windows_passwordReplace “windows_ip” with the IP address of the Windows machine that you noted down earlier, “shared_folder” with the name of the shared folder on the Windows machine, “windows_username” with your Windows username, and “windows_password” with your Windows password.
Step 6: Verify the mount
Once you have mounted the Windows shared folder on Ubuntu, you can verify the mount by running the following command in the terminal:
ls /mnt/windows
This should display the contents of the Windows shared folder.
Step 7: Automate the mount
If you want the Windows shared folder to be automatically mounted every time you start Ubuntu, you can add the mount command to the “/etc/fstab” file. To do this, open the “/etc/fstab” file in a text editor using the following command:
sudo nano /etc/fstabAdd the following line to the end of the file:
//windows_ip/shared_folder /mnt/windows cifs username=windows_username,password=windows_password 0 0Save the file and exit the text editor.
Now, every time you start Ubuntu, the Windows shared folder will be automatically mounted to the “/mnt/windows” directory.
By following these steps, you can easily mount a Windows shared folder on Ubuntu using Samba, and access files on the Windows machine from Ubuntu.
You may visit websites homepage for coding related article.
In the Windows operating system, there is a feature called file sharing. On one computer, you can set up windows-shared folder that will be accessible to all computers on the local network. This is done using the SMB protocol, which has several versions. In Linux, you can open and create shared folders using Samba.
The Samba server supports all versions of the SMB protocol. However, there are some compatibility issues. In this article, I will explain how to access a Windows Shared folder in Linux using popular desktop environments and the command line.
Table of Contents
- Why It May Not Work?
- Ensure that Everything is Set Up Correctly in Windows
- Finding Shares in Linux Terminal
- Open Shared Folder in KDE Dolphin
- Open Share in GNOME Nautilus
- Mounting a Shared Folder in the Terminal
- Wrapping Up
Why It May Not Work?
In older versions of Linux distros and Windows 7 everything worked fine because they used the SMB1 protocol. However, there have been several changes recently. In 2017, the Wannacry virus emerged, which exploited vulnerabilities in the SMB1 protocol. As a result, modern versions of Windows have disabled support for SMB1 and now use SMB3 by default. Samba has also disabled SMB1 since version 4.11. However, SMB2 and SMB3 lack support for device discovery in the local network.
In general, this is no longer necessary because there is a network discovery protocol called Zeroconf. In Linux, its open-source implementation, Avahi, is used. Linux servers and NAS storage can publish themselves on the local network using this protocol. So that, there is no need to support it in SMB. However, Microsoft decided to use its own protocol called WS-Discovery, and that’s where the problems began.
At the time of writing this article, Linux system has issues with discovering shared folders in the local network. The Nautilus file manager in GNOME does not support WS-Discovery at all, and there are no production-ready terminal utilities for it either. You can track the current status of implementing WS-Discovery support in this GVFS issue. However, in 2020, the KDE team added support for this protocol in the Dolphin file manager using kdsoap-ws-discovery-client.
Later, a program for KDE called Smb4k appeared, which can discover network resources using Avahi and the WS-Discovery protocol, but it needs to be compiled with a special option. So that, in GNOME, you can only open a Windows shared folder by knowing the IP address of the computer where it is located. Whereas in KDE, it is a bit more convenient to do so.
Ensure that Everything is Set Up Correctly in Windows
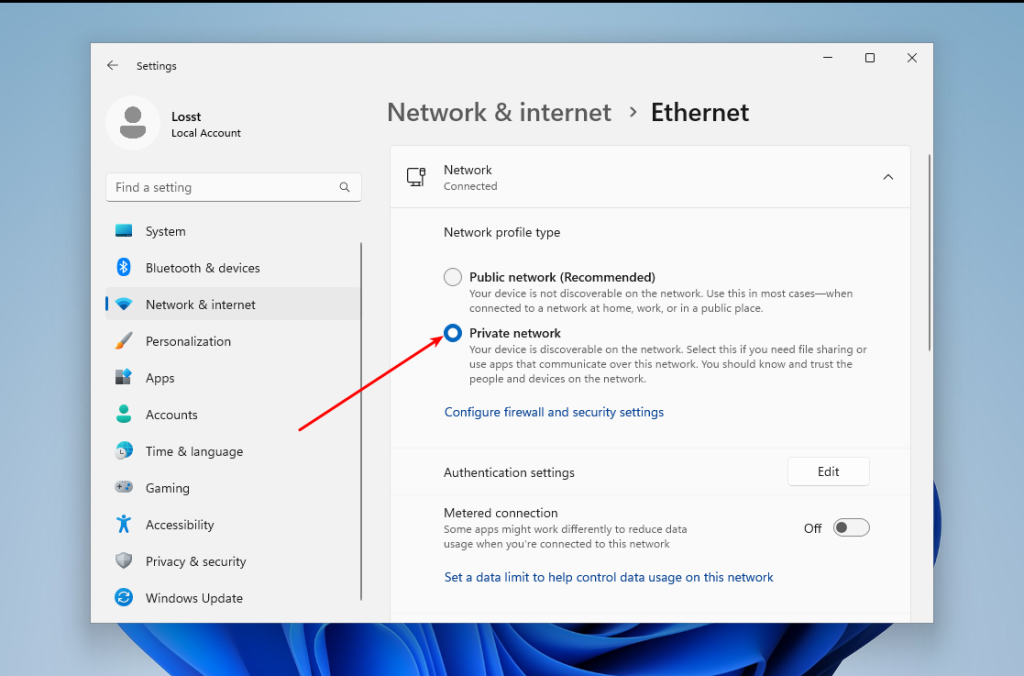
Previously, it was enough to go to File Explorer and enable file sharing there. But it no longer works that way. First, you need to make your current network private in Windows. By default, only private networks are considered secure, and Windows machines can be discovered in them. To do this, open Settings -> Network & Internet -> Ethernet and select Network Profile Type -> Private Network:
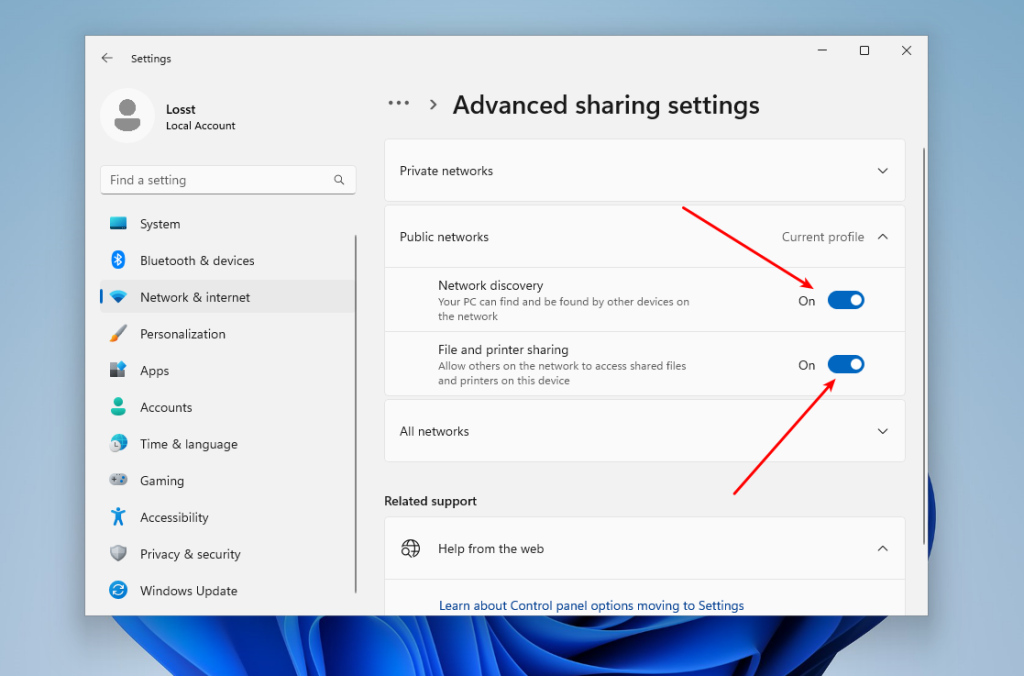
If your current network is wireless, you should do the pretty same thing. Next, go back and select Advanced Sharing Settings. In this window, enable Network discovery and File and printer sharing:
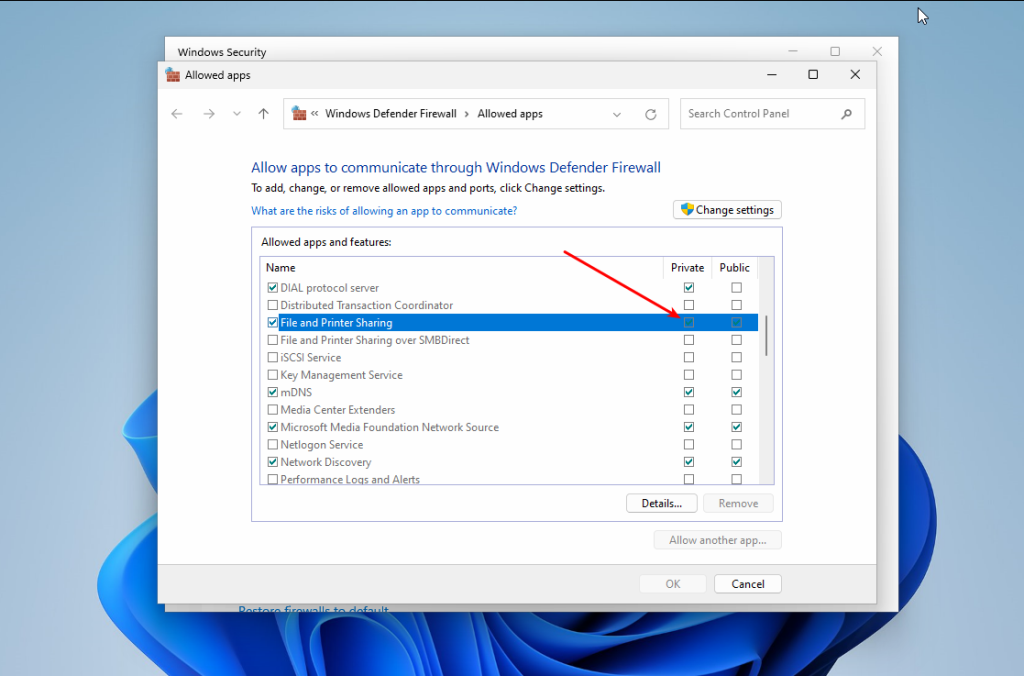
Finally, you need to ensure that the firewall is configured correctly and allows SMB connections. To do this, go back to the main Settings menu, then open Privacy & Security -> Firewall & network protection. Click on Allow an app through the firewall:
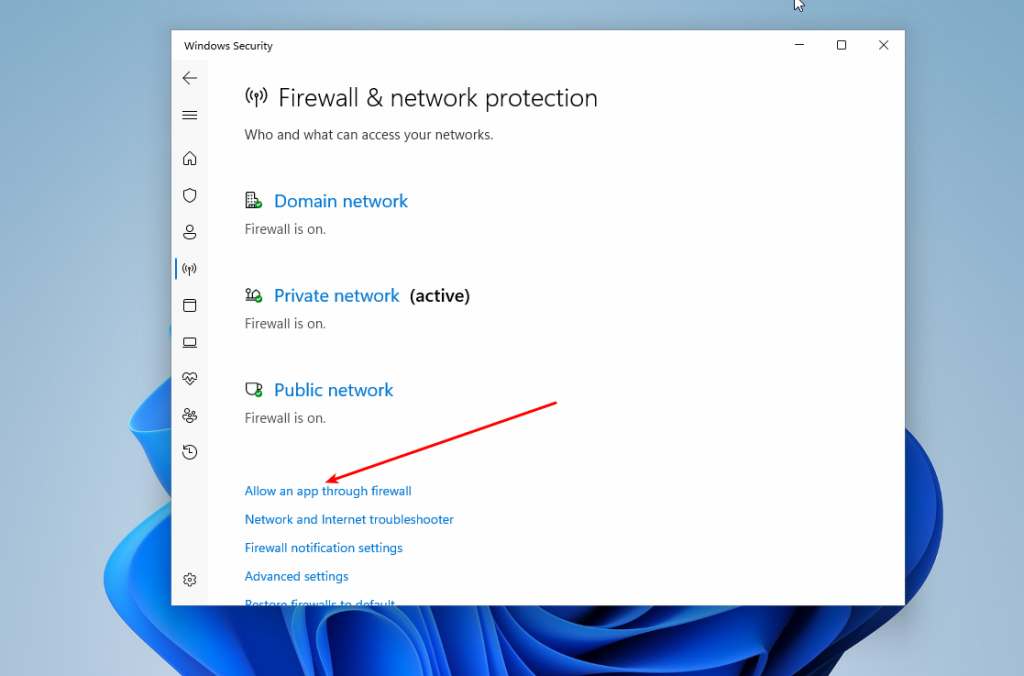
Make sure that File and printer sharing and Network discovery are enabled for Private networks:
That’s it. Now you can go to your Linux machine.
Although there are no command-line tools for working with WS-Discovery, you can try to find devices with shared resources using Nmap. This program cannot search for resources like Avahi does, but it can help you find IP addresses with an open port 445. This port is used by SMB. To do this, you need to install the following packages (Ubuntu):
sudo apt install nmap smbclient
Or Fedora:
sudo dnf install nmap samba-client
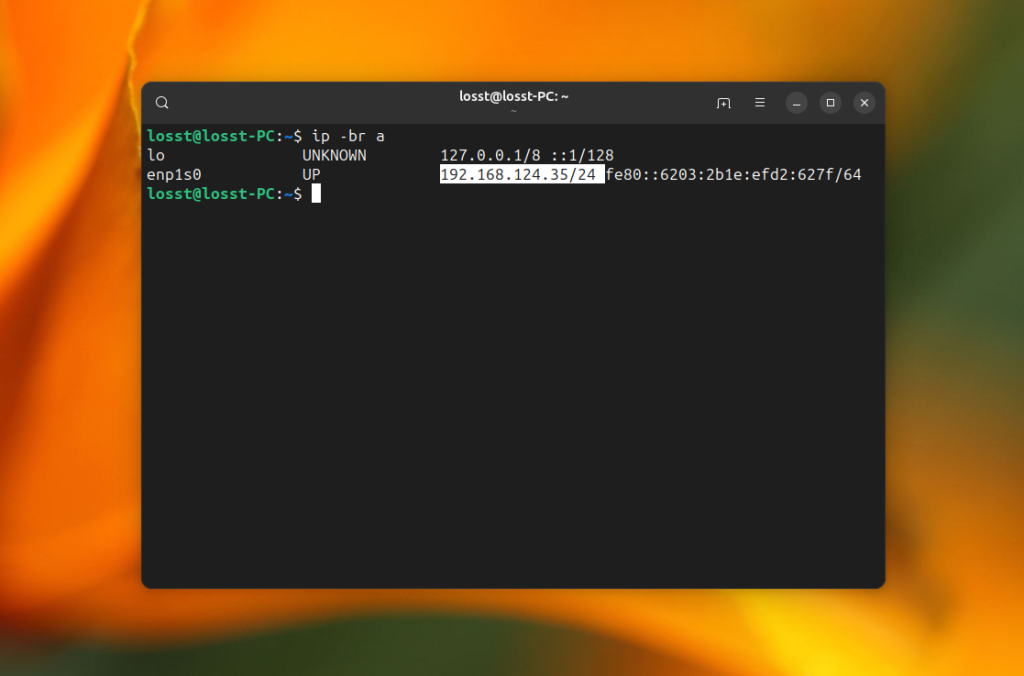
Also, you need to find out the IP address range of your local network. You can take your IP address and mask and just replace the fourth digit with zero. For example:
ip -br a
The command for the search will look like this. Replace 192.168.124.0/24 with your local network address range and run it in the the terminal window with sudo privileges:
nmap -p 445 --open -n -Pn 192.168.124.0/24
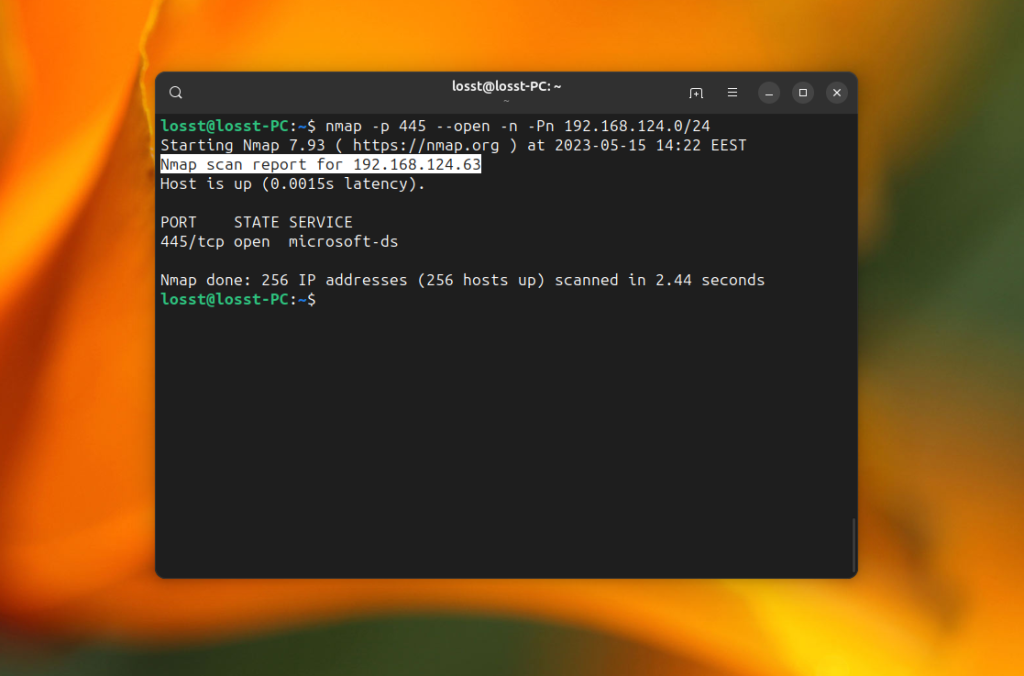
The -p option specifies the port 445, -Pn option disables ICMP discovery and treats all IP addresses as alive, -n disables DNS hostname resolution. The command may take quite a while, but as a result, it will find hosts with open port 445 if such hosts exist in your local network:
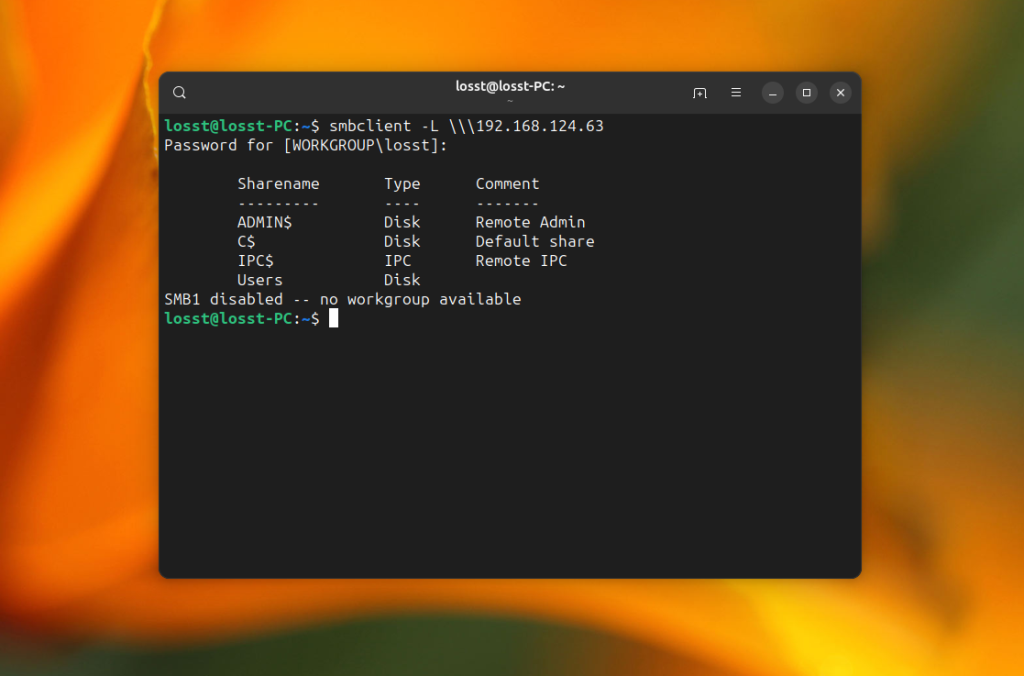
This can’t be considered as normal network discovery, but it works. Now you can use smbclient to see which shared folders are on the server that you found. For example:
smbclient -L 192.168.124.63
The command will ask you to enter the share password. Usually, it is password for your Windows user, and then it will show all available shared folders:
Now let’s have a look at how to mount them.
To open a shared folder in KDE, you can use the Dolphin file manager. As I mentioned earlier, here you can see all available computers that have network drive on the local network. To do this, run Dolphin, then open Network, and then Shared Folders (SMB):
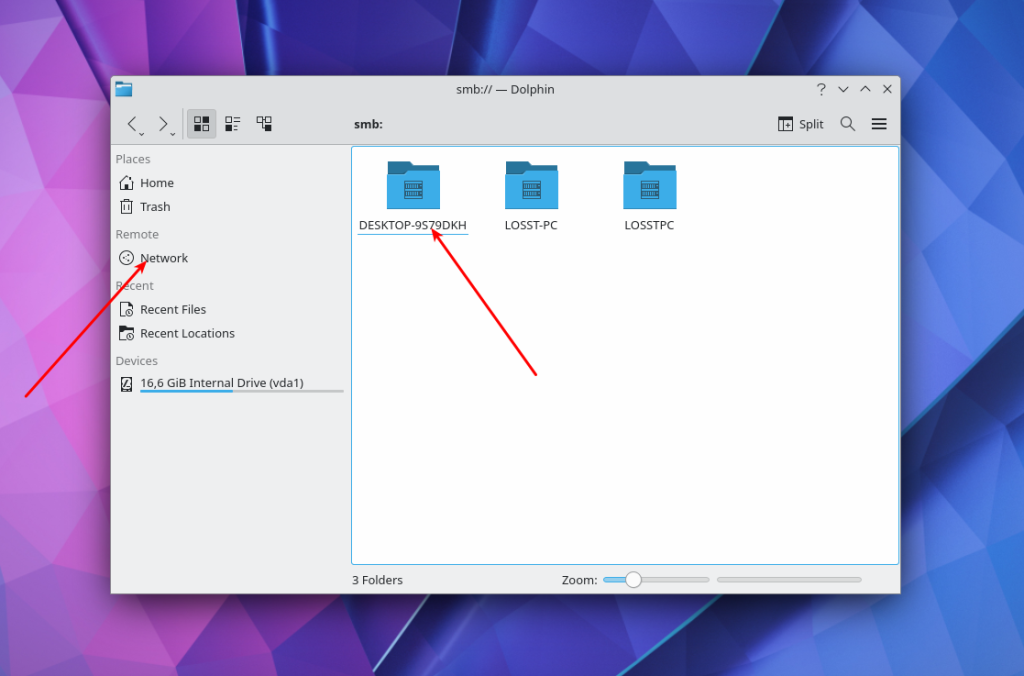
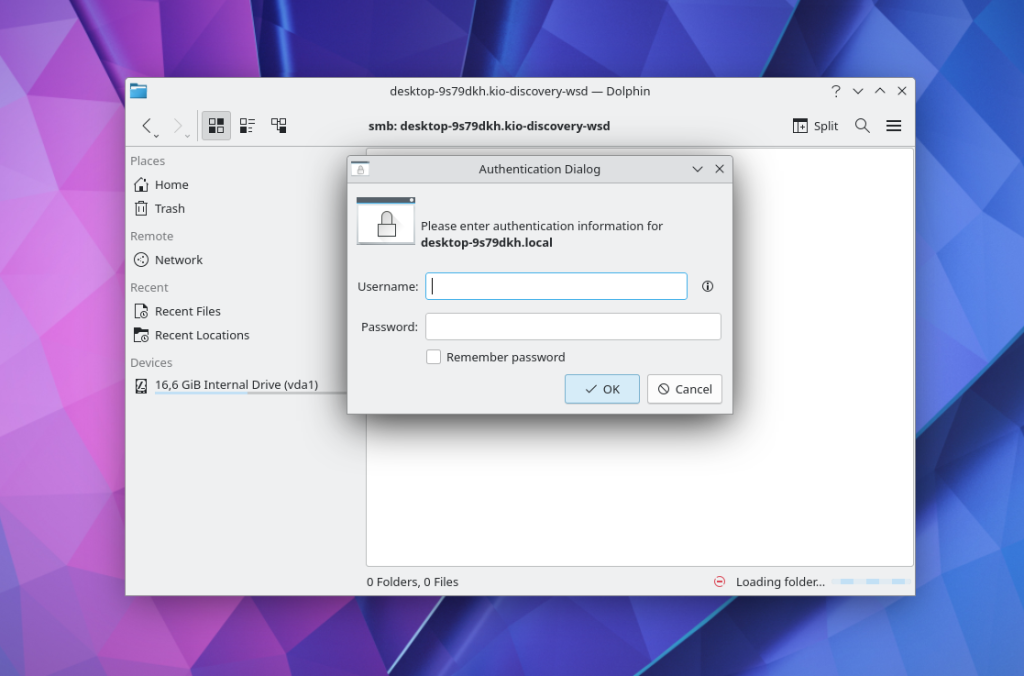
Click on one of the resources and enter the username and password to view the available folders:
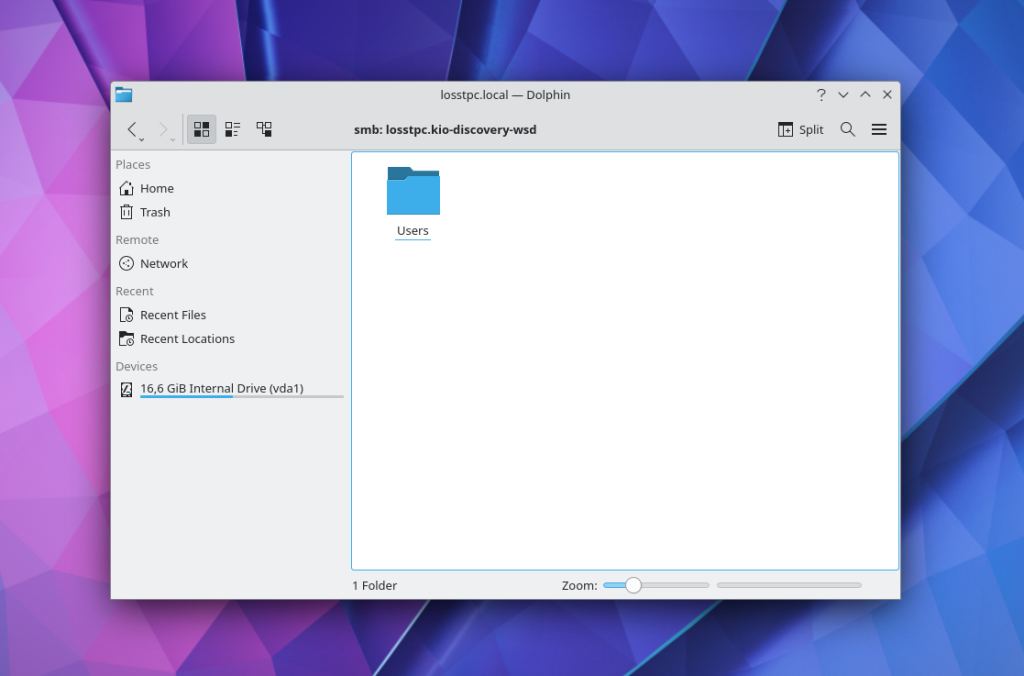
This is what shared folders from Windows 11 look like. Here you can find windows files:
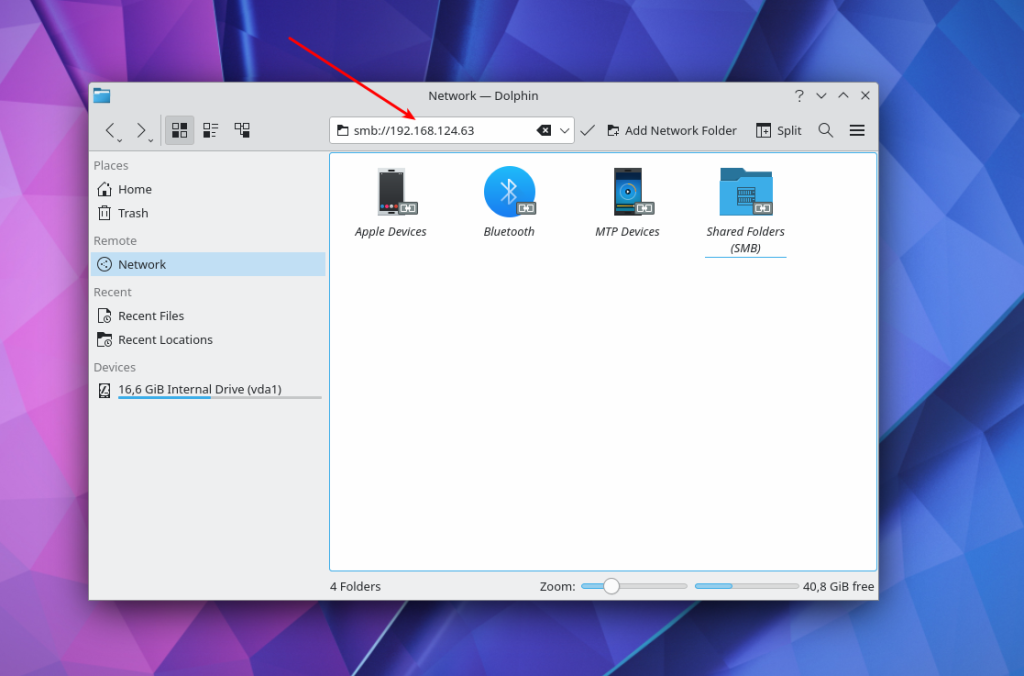
If network discovery does not work in your case, you can still enter the IP address of the resource in the text field at the top of the window and connect to it. For example, smb://192.168.124.63/
If you want to connect to a Windows shared folder in the GNOME graphical interface, you can use the Nautilus file manager. Open Other Locations and find at the bottom of the window the inscription Connect to Server and a field for entering an address.
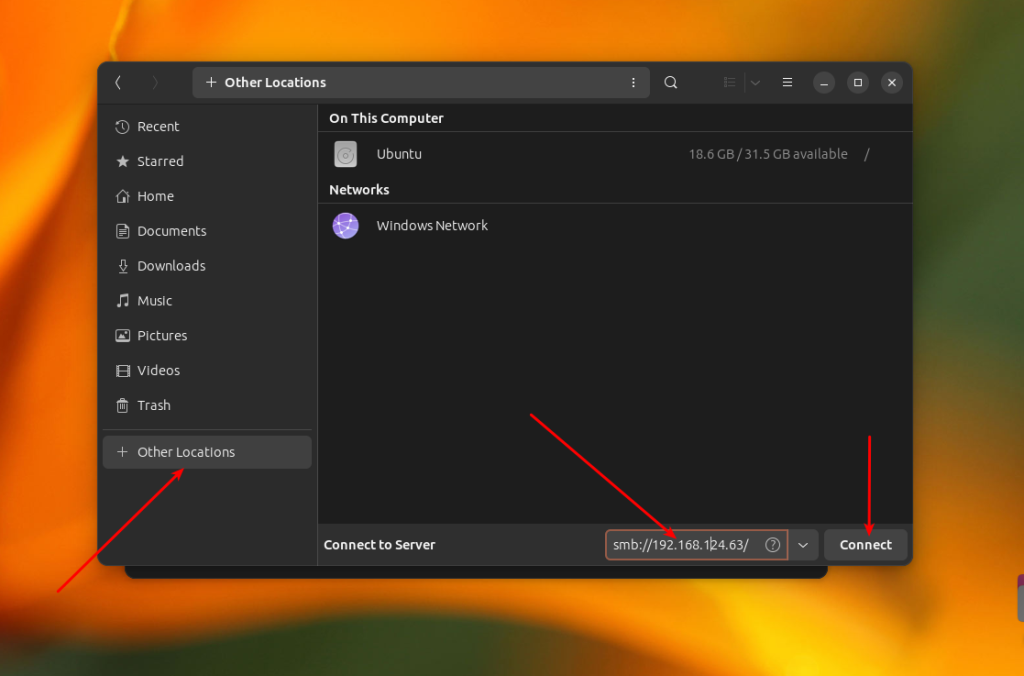
There’s no point in opening the Windows Network item, because GVFS, which is used in GNOME for disk mounting, does not support the WS-Discovery protocol. To connect to a remote windows share located on a server with IP 192.168.124.63, enter this address and press the Connect button:
smb://192.168.124.63
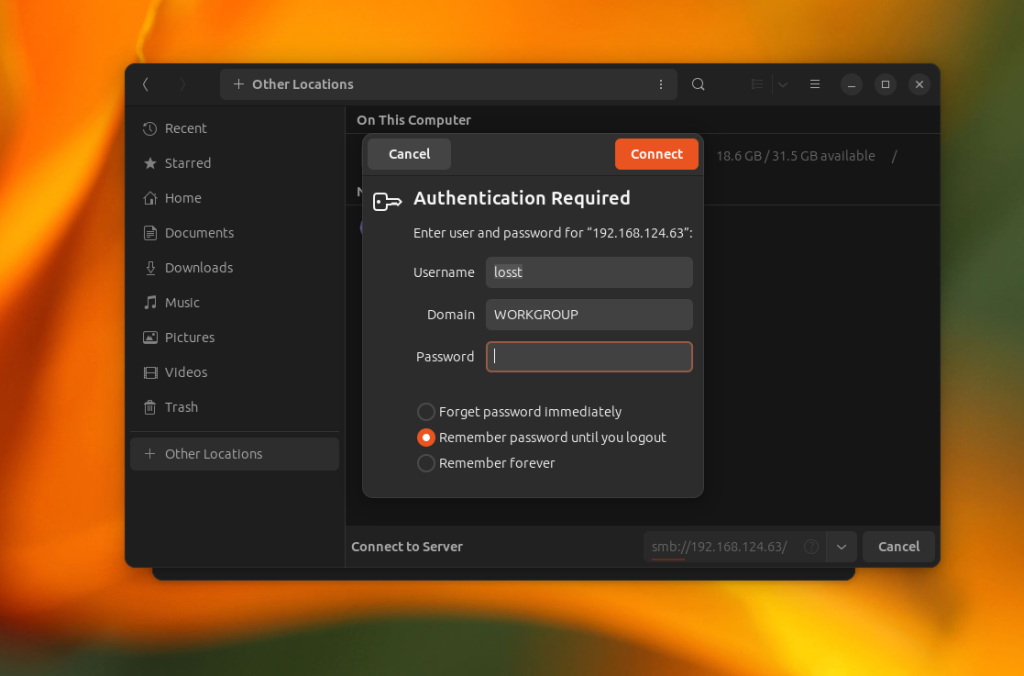
In the next window, you need to enter a password and after that, you can view the files of the shared folder:
After this, you can browse your windows folders.
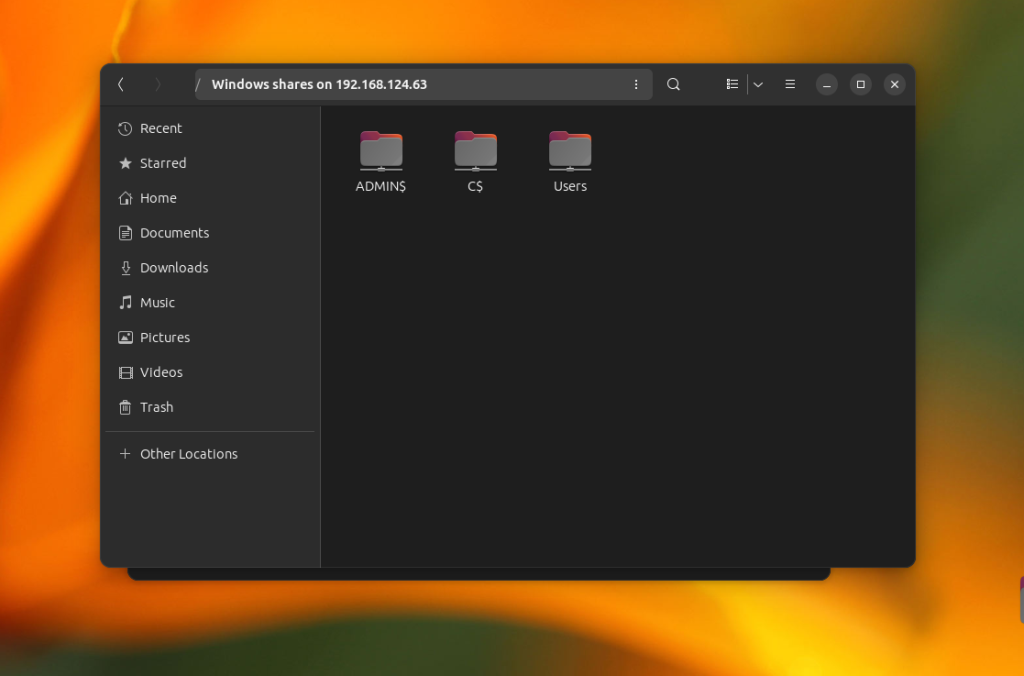
Additionally, you can use a shortcut on the left panel to access a remote share which is already mounted.
If you want to mount windows share in the terminal, you can use cifs-utils and the mount command. Firstly, install the cifs-utils package. The command for Ubuntu:
sudo apt install cifs-utils
In Fedora:
sudo dnf install cifs-utils
Now, you can execute the mount command specifying the cifs file system type and the username option. Note that you can’t mount the root of the cifs share, you need to add any folder in the path. For example, Users on 192.168.124.63:
sudo mount -t cifs -o username=losst //192.168.124.63/Users /mnt/
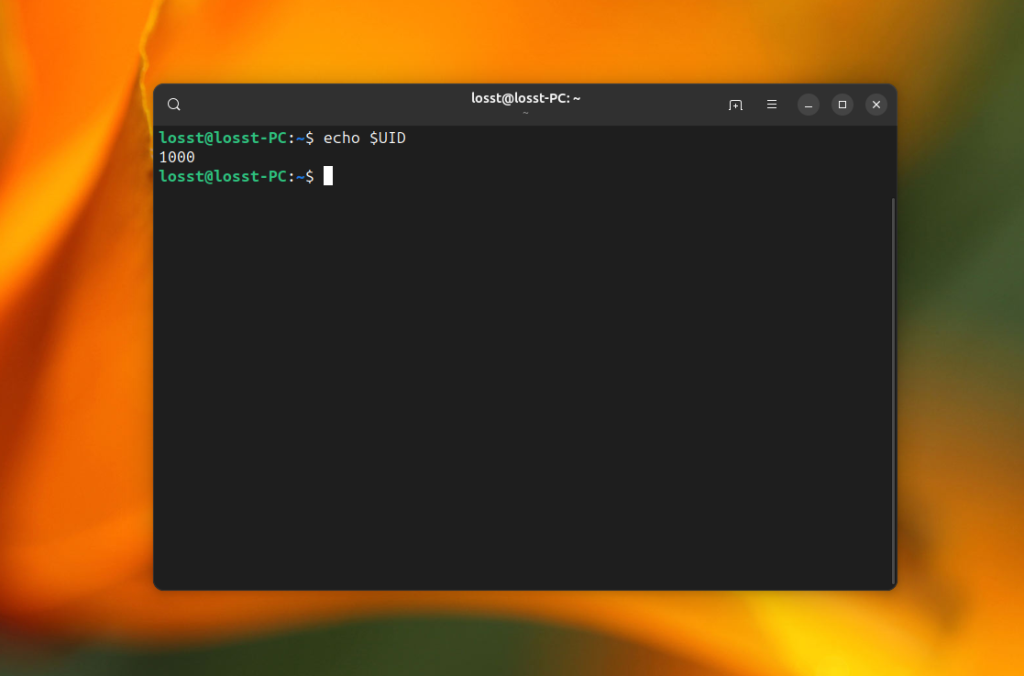
If you want to have write access to the windows share folder, you need to add the uid option with the identifier of your user. For the first user, it’s usually 1000:
sudo mount -t cifs -o username=losst,uid=1000 //192.168.124.63/Users /mnt/
You can find the identifier of the current user in the UID environment variable:
echo $UID
If you want to mount share automatically at system startup, you need to save the share username and password in a credentials file, for example, /etc/share/windows-credentials. For instance:
sudo mkdir -p /etc/share/
username=losst

password=password

domain=workgroup
And then add the following line to the /etc/fstab file:
//192.168.124.63/Users /mnt/share cifs credentials=/etc/share/windows-credentials,uid=1000,nofail 0 0
The nofail option is needed to allow your computer to boot even if the remote folder could not be mounted. After this, reload systemd settings:
sudo systemctl daemon-reload
Create the mount point directory:
sudo mkdir -p /mnt/share
You can check that everything is working using the following command:
sudo mount /mnt/share
If everything is ok, you could see contents of mounted share in the /mnt/share folder:
Wrapping Up
In this article, we looked at how to mount Windows network share in Linux using a graphical interface or in the terminal. Despite some difficulties, this can be used quite effectively. Do you know any other applications or scripts which can help with that? Share their names in the comments section below.
The article is distributed under Creative Commons ShareAlike 4.0 license. Link to the source is required.