
My webcam on my Spin SP513-51 abruptly seems to no longer work. It appears in my Device Manager, but says it is disabled (Code 22). When I try to enable it, it says «Windows was not able to enable this device.» When I try to update driver, it says I have the best driver already installed. When I looked at the Acer Support website for drivers, I don’t seem to find any drivers available specifically for the webcam. What should I try next?
0
Best Answer
-
It’s possible the driver you have has corrupted portions. Try uninstalling the device and have it remove the files, then reboot and let Windows reinstall it. That should clear things up if it’s a driver issue. If you stil get the same error then it is more likely to be hardware. Are you still in warranty?
Click on «Like» if you find my answer useful or click on «Yes» if it answers your question.
0
Answers
-
It’s possible the driver you have has corrupted portions. Try uninstalling the device and have it remove the files, then reboot and let Windows reinstall it. That should clear things up if it’s a driver issue. If you stil get the same error then it is more likely to be hardware. Are you still in warranty?
Click on «Like» if you find my answer useful or click on «Yes» if it answers your question.
0
-
Yes, thank you that did it!
0
Assistance by Acer
В случае, если рядом с именем устройства в диспетчере устройств Windows отображается желтый восклицательный знак, а в свойствах устройства указано «Запуск этого устройства невозможен. (Код 10)». Также может показываться дополнительная информация, например «Такой запрос не поддерживается», «Превышение времени ожидания устройства» или другая, как правило, проблему можно исправить, но не всегда сделать это легко.
В этой инструкции подробно об исправлении ошибки «Запуск этого устройства невозможен» код 10 для различных типов устройств в Windows 11/10 и предыдущих версий системы, с большой вероятностью один из методов позволит решить возникшую проблему.
Простые способы исправить ошибку «Код 10» в диспетчере устройств

Прежде всего стоит попробовать следующие простые шаги для исправления рассматриваемой проблемы:
- Если ошибка «Запуск этого устройства невозможен» возникает в Windows 11/10 или 8.1, при этом только после завершения работы или режима сна, но исчезает после перезагрузки, причем независимо от того, о каком устройстве идет речь, помочь может одно из следующих действий:
- Отключение функции «Быстрый запуск».
- Ручная установка драйверов чипсета, Intel Management Engine (для Intel компьютеров и ноутбуков), управления электропитанием (часто необходимы для ноутбуков). Следует скачать эти драйверы с официального сайта производителя ноутбука или материнской платы (если у вас ПК) и вручную установить их. Важно: даже если у вас установлена Windows 11/10, а на официальном сайте драйверы для предыдущей версии системы, все равно следует их установить.
- Если проблема возникла с USB устройством, попробуйте подключить его в другой разъем на компьютере или ноутбуке, можно также попробовать другой тип разъема (USB 2.0 вместо 3.0 и наоборот). При использовании USB-хабов, попробуйте подключить устройство напрямую к разъему.
- Для некоторых устройств, в свойствах которых в диспетчере устройств присутствует вкладка «Управление электропитанием» помогает снятие отметки «Разрешить отключение этого устройства для экономии энергии», применение настроек и перезагрузка компьютера.
- Откат драйвера устройства. Откройте свойства устройства в диспетчере устройств, на вкладке драйвер проверьте активность кнопки «Откатить». Если кнопка активна — используйте её.
- Обновление драйвера устройства. Важно: обновление — это не нажать «Обновить драйвер» в диспетчере устройств (он с большой вероятностью сообщит, что драйвер не требует обновления, даже если это не так), а вручную скачать последнюю версию драйвера с сайта производителя устройства и установить его.
- Удаление проблемного устройства в диспетчере устройств (правый клик по устройству — удалить), а затем использование пункта «Действие» — «Обновить конфигурацию устройства» в главном меню диспетчера устройств.
Дополнительно в случае, если проблема возникает с USB устройством или Wi-Fi адаптером, при этом не регулярно (то есть может исчезать), попробуйте такой вариант: зайдите в Панель управления — Электропитание, нажмите «Настройка схемы электропитания» рядом с названием текущей схемы, а затем перейдите в раздел «Изменить дополнительные параметры питания».
В следующем окне обратите внимание на параметры адаптера беспроводной сети (если проблема с Wi-Fi адаптером) и «Параметры USB».
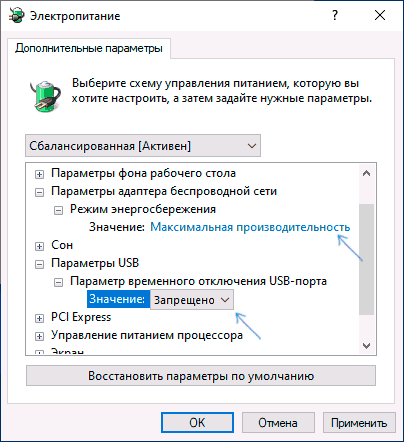
Установите значения «Максимальная производительность» и «Запрещено», как на изображении выше, а затем примените настройки и перезагрузите компьютер.
Исправление ошибки «Запуск этого устройства невозможен» в редакторе реестра
Следующий метод решения проблемы — использование редактора реестра. Перед этим рекомендую создать точку восстановления системы или резервную копию реестра, они помогут в случае, если что-то пойдет не так.
Шаги будут следующими:
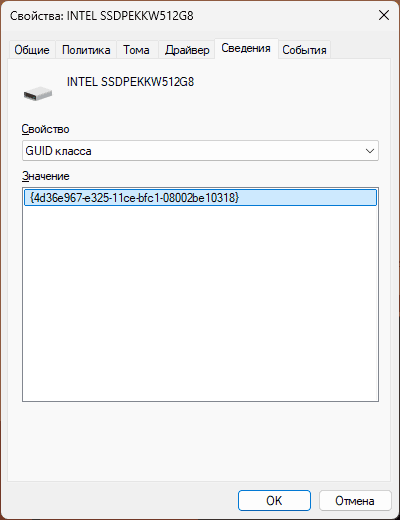
- В диспетчере устройств откройте свойства устройства с ошибкой, перейдите на вкладку «Сведения» и выберите пункт «GUID класса». Не закрывайте окно, эти сведения нам потребуются на 3-м шаге.

- Запустите редактор реестра, для этого можно нажать клавиши Win+R и ввести regedit.
- Перейдите в раздел реестра (папки слева):
HKEY_LOCAL_MACHINE\SYSTEM\CurrentControlSet\Control\Class\GUID_класса
- В правой части окна реестра удалите значения UpperFilters и LowerFilters при их наличии, нажав по ним правой кнопкой мыши и выбрав пункт «Удалить».

- Закройте редактор реестра и перезагрузите компьютер.

Наиболее часто требуемые разделы (но лучше уточнить в диспетчере устройств):
- {36fc9e60-c465-11cf-8056-444553540000} — USB-контроллеры
- 4d36e972-e325-11ce-bfc1-08002be10318 — сетевые адаптеры
- 4d36e968-e325-11ce-bfc1-08002be10318 — видеокарты
- 4d36e96c-e325-11ce-bfc1-08002be10318 — аудио и видео устройства
- 4d36e96f-e325-11ce-bfc1-08002be10318 — мыши
- 4d36e96b-e325-11ce-bfc1-08002be10318 — клавиатуры
- 6bdd1fc6-810f-11d0-bec7-08002be2092f — камеры и сканеры
- 4d36e967-e325-11ce-bfc1-08002be10318 — жесткие диски
- 4d36e96a-e325-11ce-bfc1-08002be10318 — контроллеры жестких дисков
- 4d36e96d-e325-11ce-bfc1-08002be10318 — модемы
- 4d36e978-e325-11ce-bfc1-08002be10318 — последовательные и параллельные порты
- 4d36e97b-e325-11ce-bfc1-08002be10318 — контроллеры SCSI и RAID
- 4d36e97d-e325-11ce-bfc1-08002be10318 — системные шины и мосты
После внесения изменений не забывайте о перезагрузке компьютера.
В случае, если предложенные решения не сработали, но у вас есть точки восстановления системы на дату, когда проблема не проявляла себя, можно попробовать использовать их, возможно, это поможет исправить проблему. Также вы можете выполнить сброс системы или автоматическую переустановку.
Does Windows 11 or Windows 10 display a “This device is disabled. (Code 22)” error in the Device Manager utility? If so, the device in question may be disabled on your PC. There are various reasons this happens, including both automatic and manual device deactivation. We’ll show you a few easy ways to re-enable your device and fix your issue.
The most common reason you get the above error is that someone has manually disabled your device in Device Manager. Another reason is that your Windows system was forced to disable your device for some reason. Some minor reasons include a faulty port on your machine, an incorrect system change, faulty device drivers, and more.

Re-Enable the Disabled Device in Device Manager
One easy way to fix a “This device is disabled. (Code 22)” error is to manually re-enable your disabled device in Device Manager. Doing so re-activates your device on your PC and allows your PC to communicate with the device.
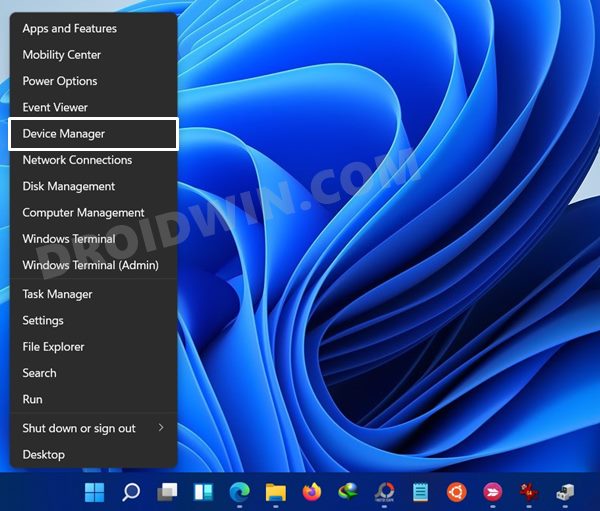
- Open your PC’s Start menu, find Device Manager, and launch the utility.
- Expand your device’s category and find your disabled device.
- Right-click your device and choose Enable device.

Windows will immediately re-activate your selected device, allowing you to work with your device on your PC.
Restart Your Windows 11 or Windows 10 PC
If re-enabling the device from Device Manager didn’t fix your issue, restart your computer and see if that resolves your problem. This is because your machine may be experiencing minor glitches, causing your attached devices not to work. You can resolve those minor issues by rebooting your operating system.
- Open the Start menu on your Windows 11 or Windows 10 PC.
- Select the Power icon in the menu.
- Choose Restart to turn off and back on your computer.

Connect Your Device to Another Port or Slot on Your Computer
If your device remains disabled and unusable on your PC, one fix you can apply is to unplug the device from the current port or slot and plug it into a different port or slot on your machine. This helps resolve the issue if a faulty port or slot caused it.
Simply unplug your device from the port you’ve currently plugged it into. Then, plug the device into another but the same kind of port on your computer. You should then see the device on your PC.
Roll Back Your Device’s Driver Update
If your device has started malfunctioning after you installed a specific driver update, that update might be faulty. Sometimes, device manufacturers end up pushing faulty drivers, causing various random issues on consumers’ computers.
Luckily, Windows allows you to roll back the driver updates you’ve installed on your computer. This lets you get back to the previous state of your drivers.
- Open Device Manager by right-clicking your Start menu icon and choosing the utility name.
- Expand your device category in the utility.
- Right-click your device and choose Properties.

- Access the Driver tab in Properties.
- Select the Roll Back Driver option.

- When you’ve finished uninstalling your driver updates, reboot your PC.
Bring Your Device Drivers to the Latest Version
One reason you get a “This device is disabled. (Code 22)” error is that your device drivers are outdated. Older drivers sometimes don’t work well with modern Windows systems, causing many problems.
You can resolve that issue by updating your device’s drivers to the latest version.
- Launch your PC’s Device Manager utility.
- Expand your device category, right-click your device, and choose Update driver.

- Select Search automatically for drivers on the following page.

- Wait for Device Manager to find and install the latest drivers for your device.
- Restart your PC.
If that doesn’t fix your issue, you can manually download and install your device’s latest drivers on your PC. Most device manufacturer websites offer the driver download option, allowing you to grab the required drivers from outside the Windows environment.
Use System Restore to Fix Your Error Code 22
Sometimes, a device stops working and becomes unusable because of a change made to your system. You or someone else may have incorrectly specified an option on your PC, causing your device not to work.
You can fix that by rolling back your changes using Windows’ System Restore utility.
- Open the Start menu, find Recovery, and select that item.
- Choose Open System Restore on the following page.

- Select Next on the utility’s first screen.
- Choose the most recent restore point on the list and select Next.

- Select Finish to start undoing your changes.
Remove and Reinstall Your Device’s Drivers
If your device still hasn’t started working with your PC, your device’s installed drivers might be corrupted. Such drivers prevent your device from correctly communicating with your PC, causing many issues.
You can resolve that by uninstalling and reinstalling your device’s drivers.
- Open Device Manager on your PC.
- Expand your device category, right-click your device, and choose Uninstall device.
- Enable the Attempt to remove the driver for this device option and choose OK.

- Let Device Manager finish removing your device.
- Reboot your PC, and Windows will automatically install the correct drivers for your device.
Reset Your BIOS Settings
Your BIOS settings affect the devices you’ve connected to your computer. If you’ve recently changed your BIOS settings, and you think that has caused your device problem, reset your BIOS to the factory settings.
You can check out our guide on how to reset your BIOS settings to learn how to bring your settings to the default values. Once you’ve done that, turn on your PC, and your issue will likely be fixed.
Replace Your Hardware Device
If your device still remains disabled, the issue may be with your device. Your device may be defective or damaged, not being able to properly work with your computer. In this case, your best solution is to visit your device maker’s official store and troubleshoot the problem.
You may have to fix your device’s issue or replace your faulty device with a new one.
Forcing Windows to Enable the Disabled Device on Your PC
Windows’ “This device is disabled. (Code 22)” error occurs for various reasons. The message tells you that your device is disabled, but it doesn’t tell you why. Luckily, you don’t have to scratch your head for too long as our guide above shows you a few easy ways to fix your problem.
Once you’ve resolved your issue, your device will show up on your PC, and you can use that device for your tasks. Enjoy!
Related Posts
- How to Fix a “This file does not have an app associated with it” Error on Windows
- How to Fix an Update Error 0x800705b4 on Windows
- How to Resolve “A JavaScript error occured in the main process” Error on Windows
- How to Fix the Network Discovery Is Turned Off Error on Windows
- How to Change Folder Icons in Windows
In this guide, we will show you various methods to fix the USB Device Not Recognized Error in Windows 11. If you create a list of issues that are most frequent in nature and at the same time the most infuriating as well, then the inability of the OS to read the connected device would definitely occupy among the top spots. Now, there could be quite a few plausible reasons as to why the issue happened in the first place.
Right from using old drivers to issues with the USB device itself, from using corrupt drivers to issues with the USB Port on your PC, or even the FAT-32 File System, any of them could result in this error. Fortunately, in a majority of the cases, this error is linked with a software side issue and could easily be rectified via a few handy tweaks. And this is where this guide shall help you out. Given here are the various methods that shall help you fix the USB Device Not Recognized Error on your Windows 11 PC.
- How to Fix Internet or WiFi Not Working in Windows 11
- How to Create and Restore a System Restore Point in Windows 11
- 5 Methods to Fix Windows 11 Search Not Working Issue
- How to Enable or Disable Network Adapters in Windows 11
Table of Contents
Do keep in mind that there’s no universal fix as such. You will have to try out each of the below-mentioned workarounds until one of them spells our success for you. So keeping that in mind, let’s get started.
Fix 1: Use USB 2.0 Port | Official USB Cable
To begin with, you should try connecting your device to the USB 2.0 Port. There are still some compatibility issues with the faster USB 3.0 Ports. So it’s better to stick with the traditional 2.0 ports. Along the same lines, it is highly recommended that you use the official USB cables that came shipped with your device.
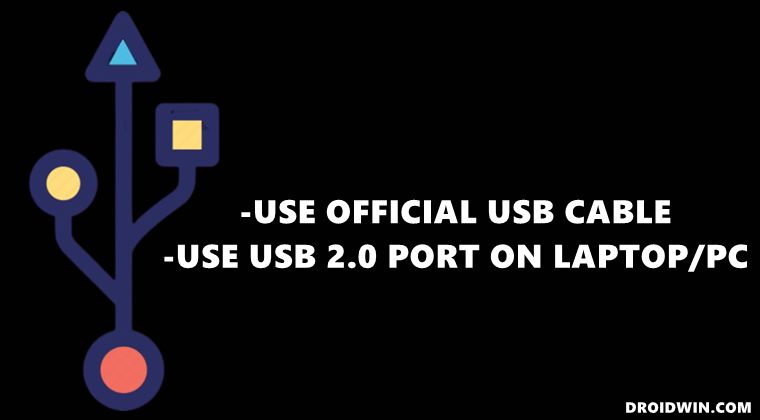
This is written keeping in mind the smartphones, as the local USBs are only capable enough to charge your device, they wouldn’t be able to support File Transfer, let alone the ADB or Fastboot Modes. So try out these tweaks and see if they are able to fix the USB Device Not Recognized Error on your Windows 11 PC.
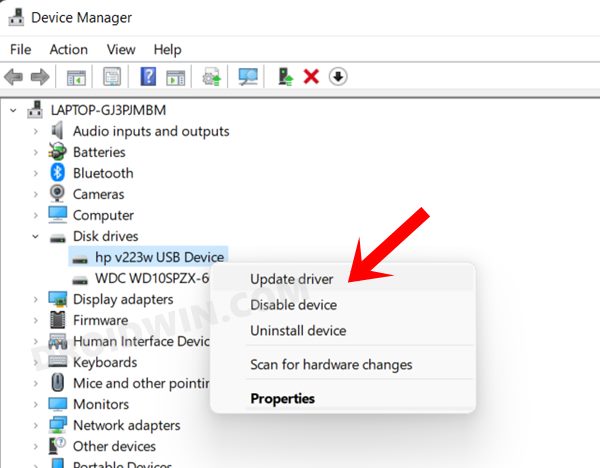
Fix 2: Update Device Drivers
If you are using old or outdated drivers, then they are bound to cause a few issues. Therefore, it is recommended to update these drivers right away. Here’s how it could be done:
- Head over to the Start menu and search Device Manager.
- Then open it and expand the Disk Drives section.
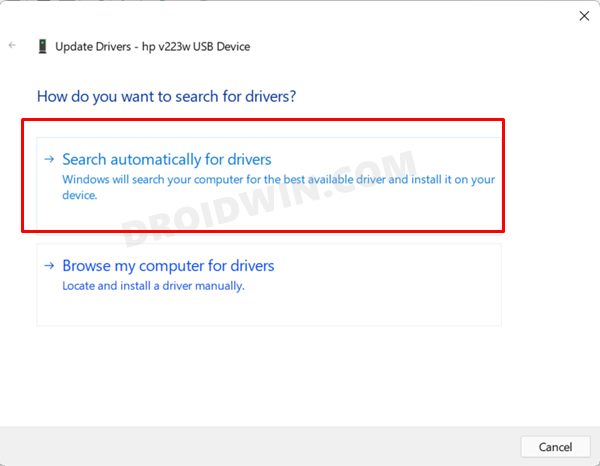
- Right-click on your device and select Update Driver.

- Then click on Search automatically for drivers.

- Windows will now search for the latest drivers online, and if found will download and install them right away.
- Once done, remove your device and then re-insert it. Check if it fixes the USB Device Not Recognized Error on Windows 11.
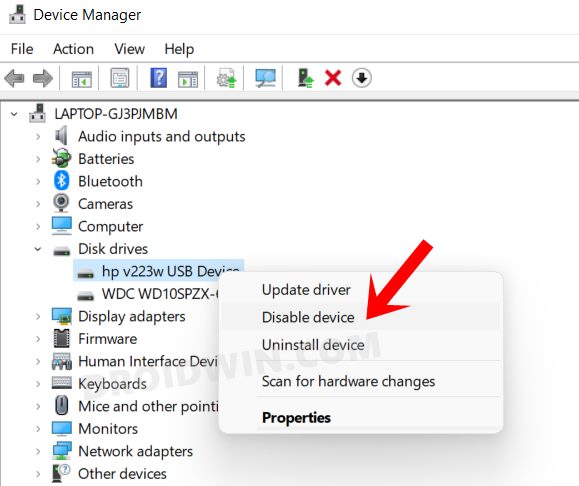
Fix 3: Re-Enable Device
In some instances, restarting the device by giving it a fresh instance to work upon is enough to rectify the underlying issues. So let’s try out this workaround in this scenario as well and see if it spells out success or not:
- Right-click on the Windows icon present on the Taskbar and select Device Manager.
- Go to the Disk Drives section and click on it to further expand it.
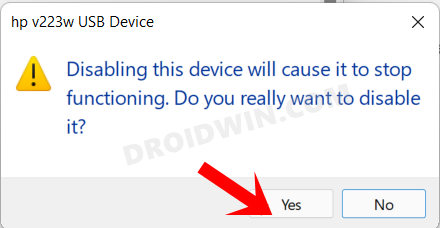
- Then right-click on your device and select Disable Device.

- Click Yes in the confirmation dialog box that appears.

- Wait for a minute or two and then again right-click on your device and this time select the Enable Device option.
- See if it fixes the USB Device Not Recognized Error on your Windows 11 PC.
Fix 4: Re-Install Device Drivers
If any of the data associated with your device gets corrupted, then simply updating it will do no good. Rather, you should then have to make the device start afresh from scratch. Here’s how:
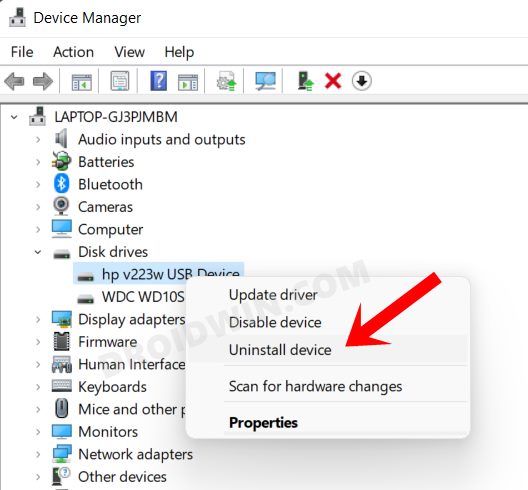
- Use the Windows+X shortcut keys and select Device Manager from the menu that appears.
- Go to the Disk Drives section and click on it to further expand it.
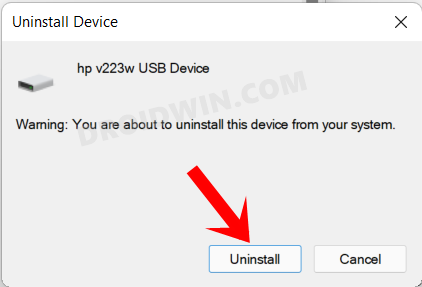
- Then right-click on your device and select Uninstall Device.

- Again, click on Uninstall in the confirmation dialog box that appears.

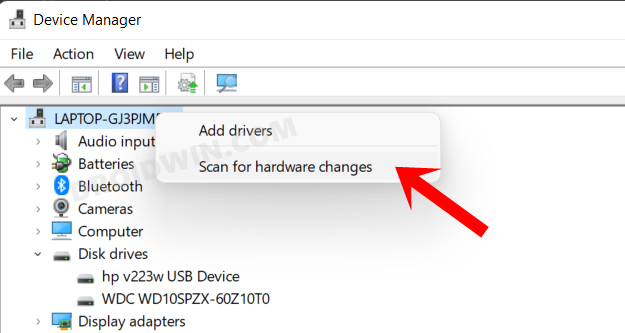
- Now unplug your device from the PC and replug it back in. Windows shall now re-install the drivers.
- However, if that doesn’t happen, then right-click on your PC name situated at the top and select Scan for hardware changes.

- Windows will now find the missing drivers and would then install them as well.
- Once that is done, verify if it fixes the USB Device Not Recognized Error on your Windows 11 PC.
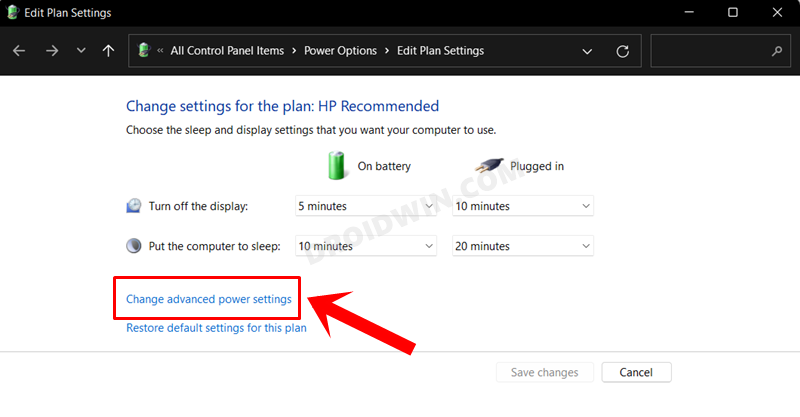
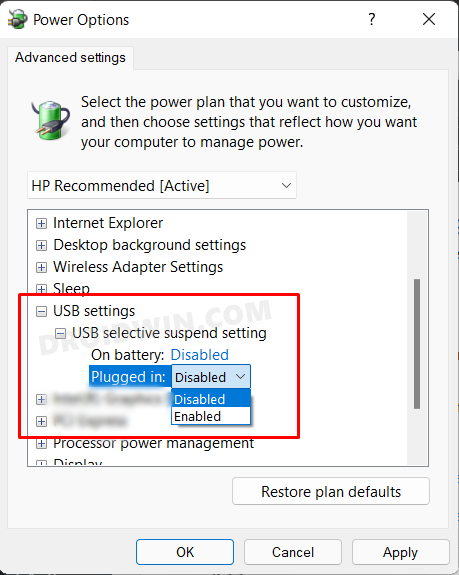
Fix 5: Disable USB Selective Suspend Setting
In order to conserve your laptop’s battery juice, there’s a power setting that suspends the functionality of the USB ports. As of now, it is advised that you turn off this feature for both scenarios: when charging and while on battery. Here’s how it could be done:
- Head over to the Start Menu and search Edit power plan.
- Open it and click on the Change advanced power settings option.

- Now expand the USB Setting option followed by the USB selective suspend setting.

- Click on the Enabled keyword next to both ‘On battery’ and ‘Plugged in’ and select Disabled.
- Finally, click OK to save the changes and then check if it fixes the USB Device Not Recognized Error on your Windows 11 PC.
Fix 6: Use Hardware Device Troubleshooter
Windows comes built-in with quite a few troubleshooting apps, and one of them focuses specifically on hardware devices. And in this guide, we will be putting it to the test. But to do so, you will have to take an alternate route. This is because while all the other troubleshooter apps are located under Settings > System > Troubleshooter > Other Troubleshooter. However, that isn’t the case with Hardware Device Troubleshooter. But why is that so?
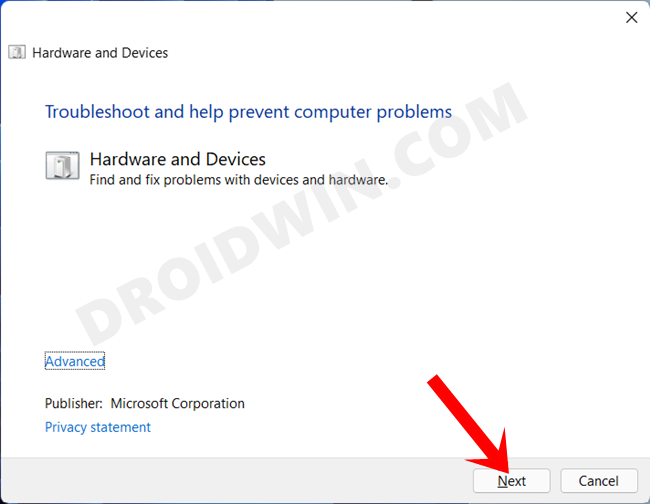
Well, for some reason best known to them, Microsoft decided to hide this feature from the general users. However, you could still get hold of it by carrying out a few additional steps on your PC. To try it out, please refer to our guide Enable and Use Hardware and Devices Troubleshooter in Windows 11. Just keep in mind that before starting the Hardware Troubleshooter, you should connect the USB device to your computer that is currently throwing the USB Device Not Recognized Error on your Windows 11 PC.
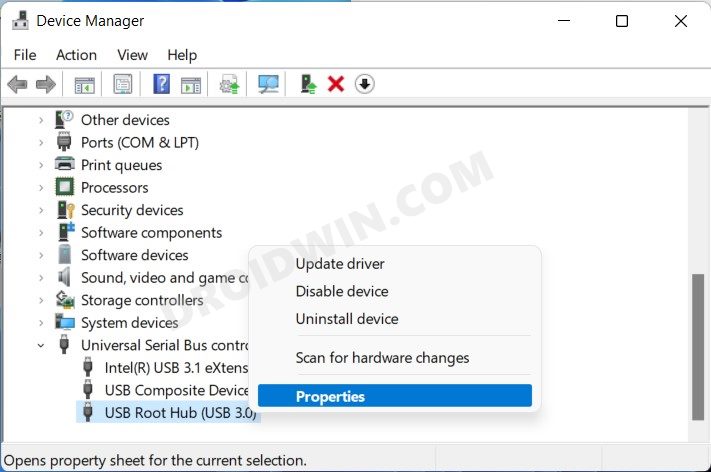
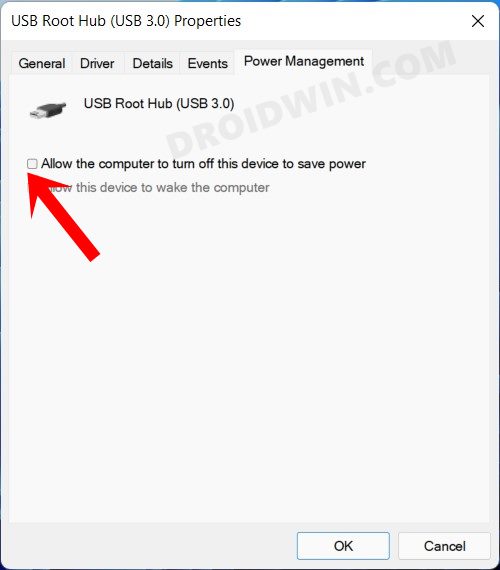
Fix 7: Change Power Management of USB Root Hub
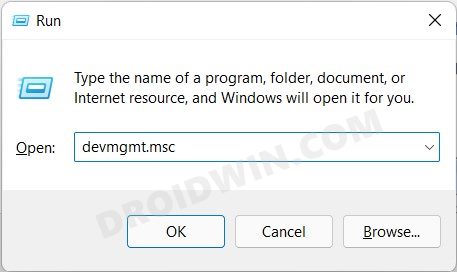
In some instances, when your laptop is low on battery, then your PC might turn off the USB Root Hub corresponding to the port to which your device is connected. As a result, your PC wouldn’t be able to identify the connected device. To prevent this from happening, you should change this behavior and disallow it to have full control over the USB’s Power Management. Here’s how it could be done:
- To begin with, use the Windows+R shortcut keys to launch the Run dialog box.
- Then type in the below command and hit Enter. It shall open the Device Manager.
devmgmt.msc

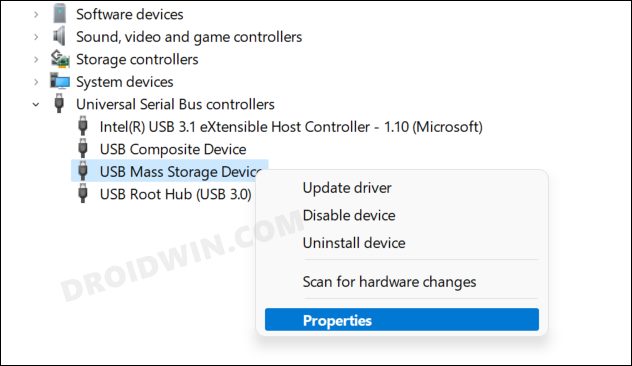
- Now click on the Universal Serial Bus controllers section to expand it.
- Then right-click on USB Root Hub and select Properties.

- Go to the Power Management tab and uncheck “Allow the computer to turn off this device to save power”.

- Finally, click OK to save the changes. Now verify if the USB Device Not Recognized Error on your Windows 11 PC has been fixed or not.
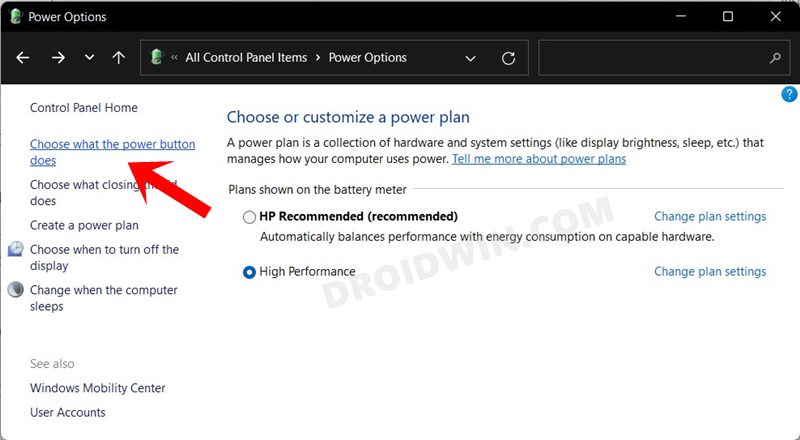
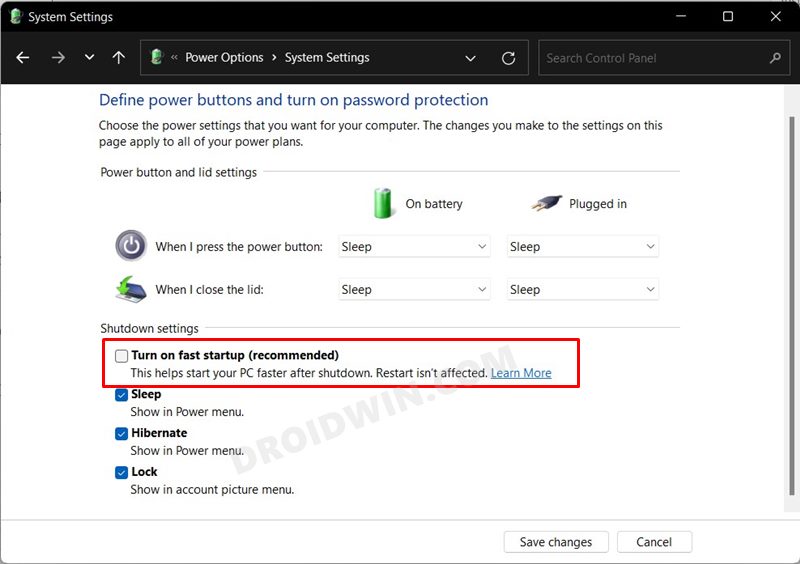
Fix 8: Disable Fast Startup
Windows comes with a Fast Startup feature that speeds up the boot-up time of your PC after a shutdown. However, in some instances, this feature has been known to conflict with USB Drive as well. Therefore, it is recommended to disable this feature as of now.
- To do so, open Control Panel from the Start Menu and go to the “Power Options” section.
- Then click on “Choose what the power button does from the left menu bar.”

- After that, click on “Change settings that are currently unavailable”.
- Now uncheck “Turn on fast startup” and hit the “Save changes” button.

- Finally, restart your PC and then check if it fixes the USB Device Not Recognized Error on your Windows 11 PC.

FIX 9: Disable Enhanced Power Management
When a USB device is treated as a Human Interface Device (HID) and there is no third-party app or service currently accessing this device, then Windows will suspend this USB device. Then as soon as any program initiates an interaction with this device, the OS will re-enable this USB device.
However, in some instances, Windows isn’t able to re-enable the device and hence you might get the “Device not recognized” error message. To rectify this issue, you will have to disable the Enhanced Power Management using Device Manager and Registry Editor. So proceed ahead with the below instruction steps.
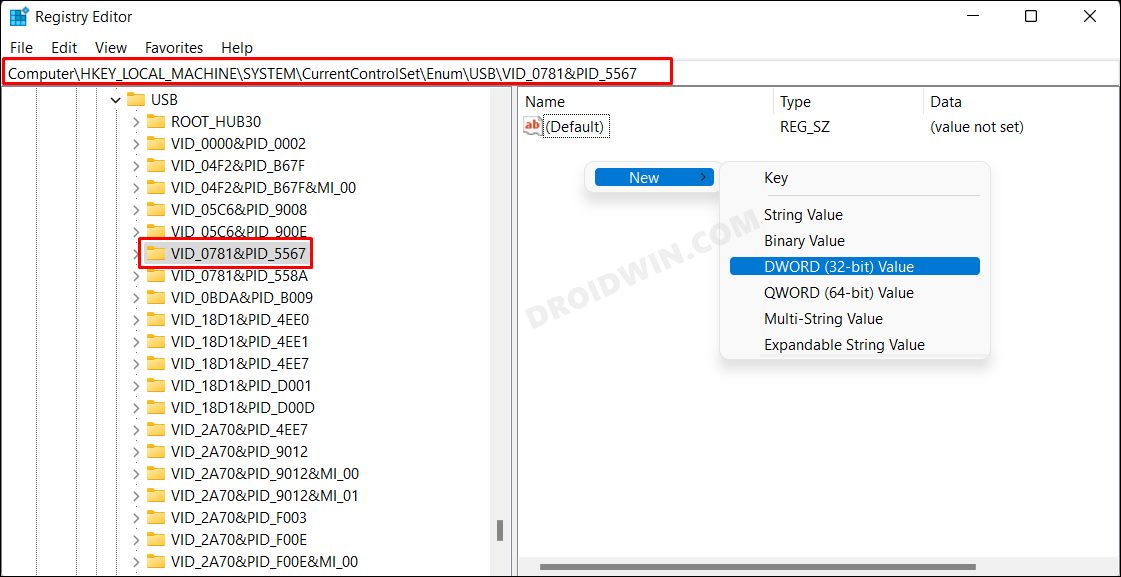
- To begin with, connect your USB device to the PC. Then right-click on the Windows icon and select Device Manager.

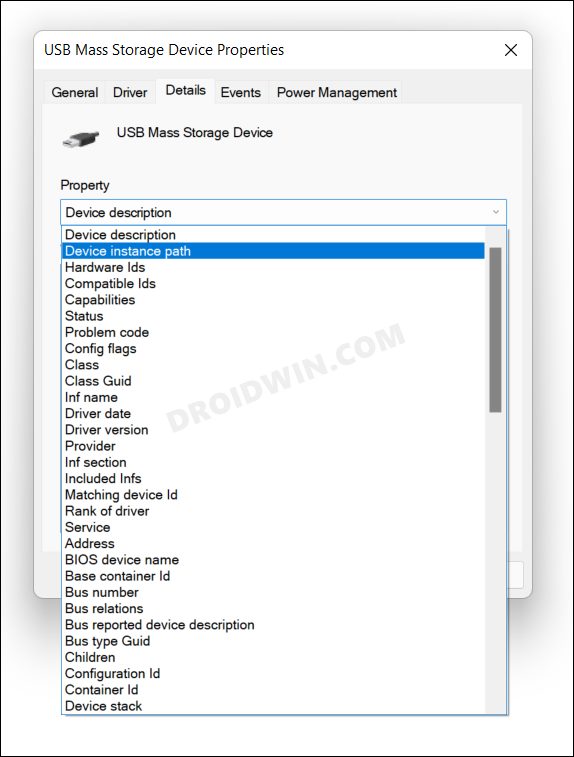
- After that, expand the Universal Serial Bus controllers section, right-click on your USB device, and select Properties.

- Then switch to the Details tab and change the Property to Device Instance Path.

- Now right-click on the data under the Value field and select Copy. It is generally a combination of three values: Vendor ID (VID)\Product ID (PID)\Instance ID.

- After that, head over to the Start menu, search Registry Editor and open it.
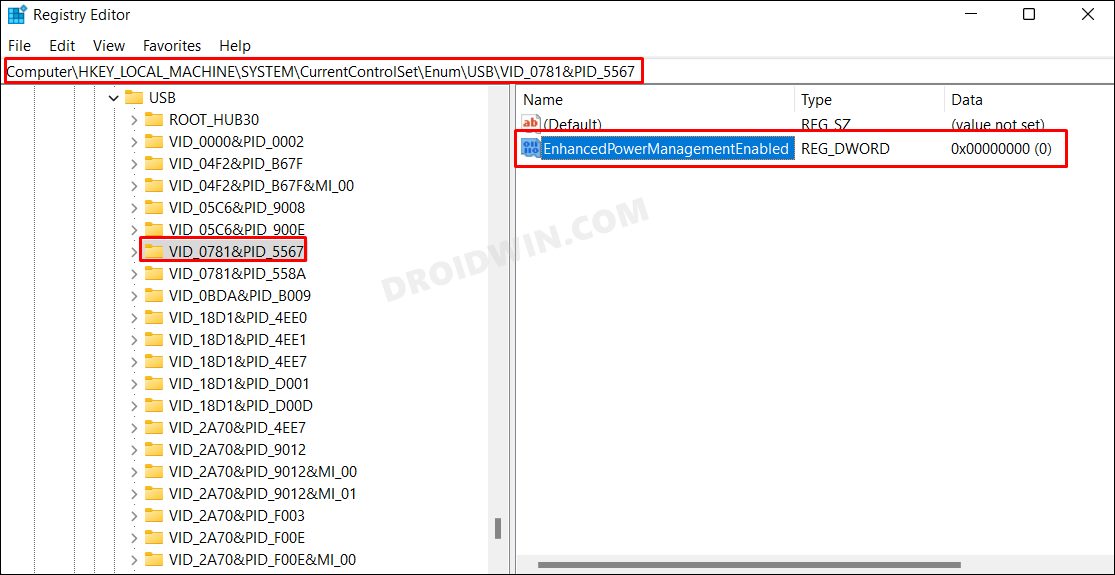
- Then head over to the below location via the Registry Editor. Make sure to replace the DeviceInstancePath with the value that you had copied from the above step.
HKEY_LOCAL_MACHINE\SYSTEM\CurrentControlSet\Enum\USB\DeviceInstancePath\Device Parameters

- On the right-hand side, you should see the EnhancedPowerManagementEnabled file. Double click to open it.
If it is not there, then right-click in an empty location, select New > DWord (32-bit) Value and name it EnhancedPowerManagementEnabled

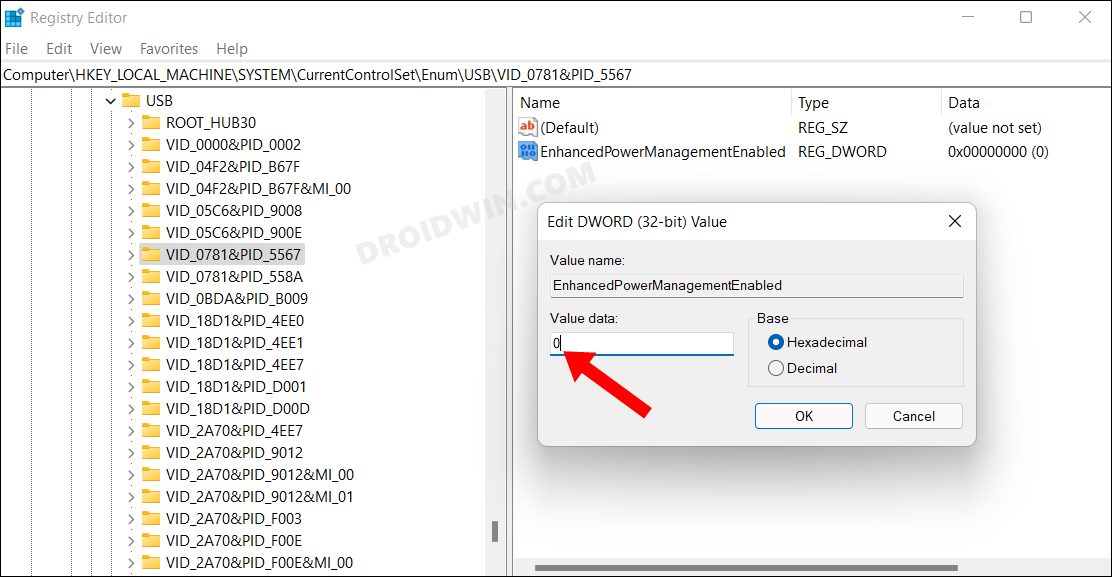
- Then change its Value Data to 0 and hit OK to save the changes. Once done, restart your PC for the changes to take place.

- Check if it fixes the USB Device Not Recognized Error on your Windows 11 PC.

Fix 10: Assign Drive Letter to your Device
As minuscule as it may sound, but if your device hasn’t been assigned a drive letter, then the PC might not be able to identify it. So let’s assign a drive letter to your device right away. [DO READ: Windows 11 Unable to Assign Drive Letter: How to Fix?]
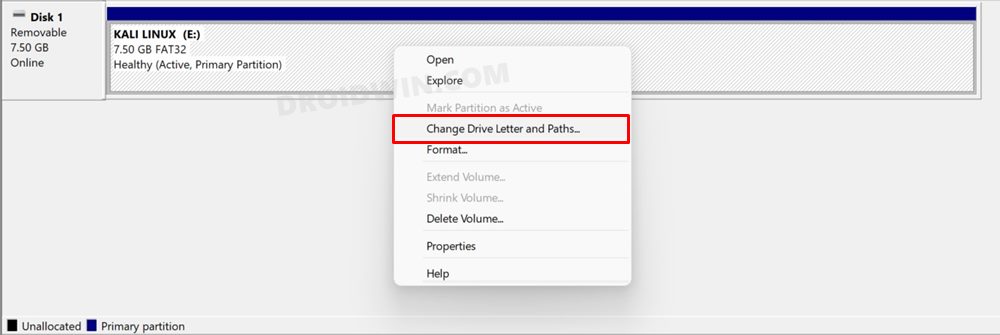
- Head over to the Start menu and search Disk Management.
- Open Create and Format hard disk partitions from the search results.
- Now right-click on your device from the bottom menu bar and select Change Drive Letter and Paths.

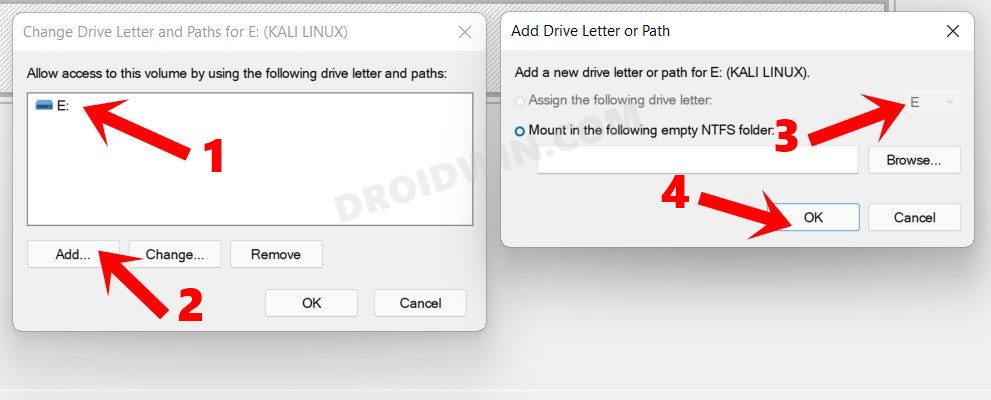
- After that, click on the Add button in the Change Drive Letter and Paths dialog box that appears.
- Windows will now automatically assign the next available drive letter. If that’s well and good, click OK.

- However, if you wish to change it, then select Assign the following drive letter option, choose the desired letter from the drop-down, and hit OK.
- Once done, verify if the USB Device Not Recognized Windows 11 error has been fixed or not.
Fix 11: Switch to NTFS File System
If your device is using the older File Allocation Table and storing data in 32-bits (FAT-32), then it is recommended that you switch over to the powerful and efficient New Technology File System (NTFS). Do keep in mind that the below process will format your device.
There do exist a few FAT-32 to NTFS tools that claim to carry out this process without the data format, but I haven’t used them so cannot vouch for their claim. Below is the tried and tested traditional method that works to this date without any issues. So let’s stuck with this approach itself.
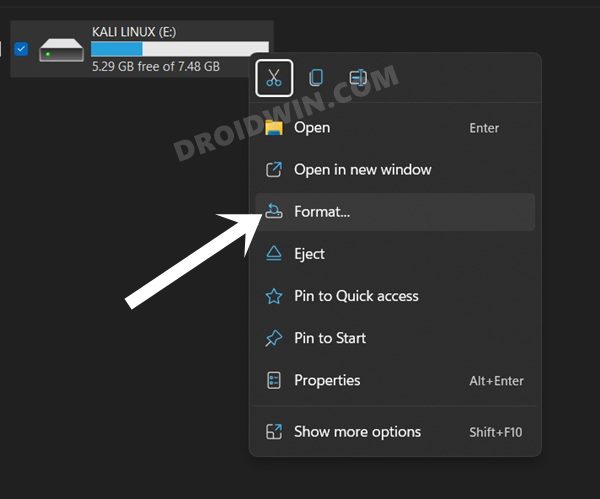
- Open File Explorer, right-click on your device, and select Format.

- Then choose NTFS under the File System drop-down menu.
- Finally, enable the Quick Format option and hit Start.
- Wait for the process to complete which might take up to a minute.
- Once done, check if it was able to fix the USB Device Not Recognized error on your Windows 11 PC.
Fix 12: Format Device via CMD
If none of the aforementioned methods managed to work out in your favor, then you should consider formatting your device via Command Prompt. As you might have guessed, this process will wipe off all the data from your device. So if that’s well and good, then let’s get started:
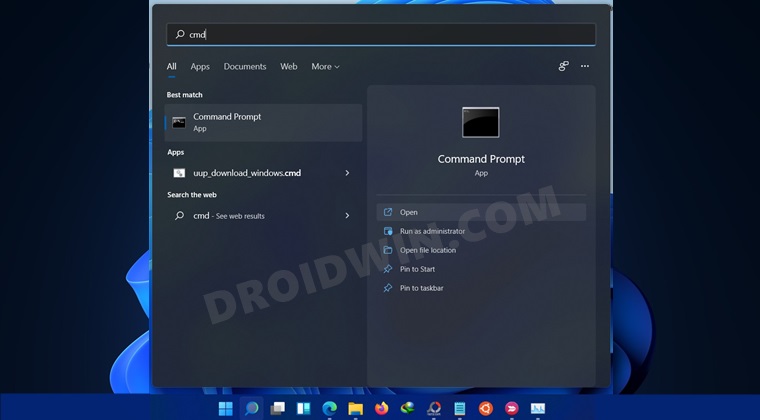
- Head over to the Start menu, search CMD, and launch Command Prompt as an administrator.

- Type in the below command to open the Diskpart Tool:
diskpart
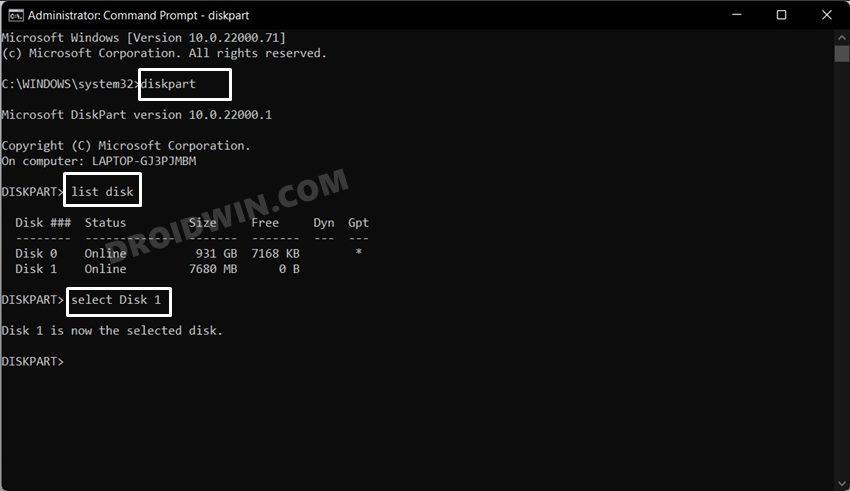
- Now type in the following command to bring up the list of all the available drives on your PC:
list disk
- Next up, use the following command to select your device that is currently facing issue (replace * with the disk number that you got from the above command):
select Disk *

- Now type the following command to format your device:
clean
- After that, use the below command to re-create the partition
create part pri
- Then make it the active partition via the following command:
active
- Finally, convert your device to the NTFS format via the below command:
format fs=NTFS
- Wait for the process to complete. Once done the underlying issue would have been fixed.
Fix 13: Disable USB 3.0 support from BIOS
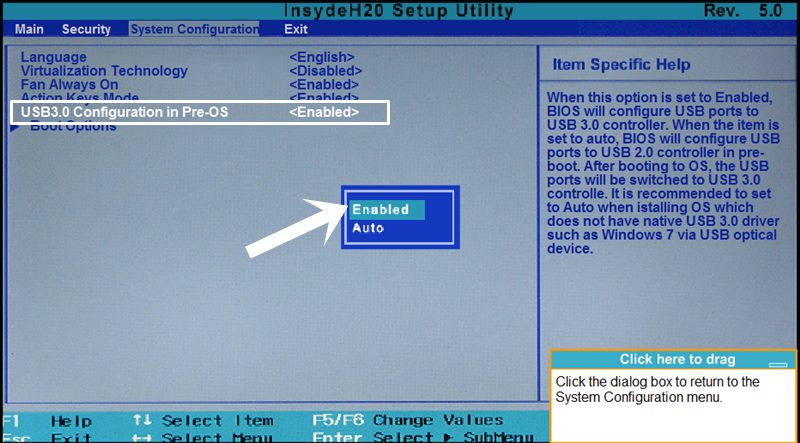
If none of the aforementioned methods worked out in your favor, then you could consider temporarily disabling the USB 3.0 Port on your PC. This could be carried out from the BIOS screen, as explained below (we are taking the example of an HP laptop, other OEMs instructions would be along similar lines as well):
- To begin with, power off your PC.
- Then turn it back on. As soon as it is booting up, keep tapping the F10 key, your PC will boot into BIOS.
- Now go to the System Configuration tab, select USB 3.0 configuration in Pre-OS, and choose Auto.

- Finally, press F10 to save the changes and exit.
- Now boot your PC to the OS and then try connecting the USB device to one of the USB 2.0 Ports, the issue would have been rectified.
So this was all from this guide on how you could fix the USB Device Not Recognized error on your Windows 11 PC. We have shared eight different fixes for the same. Do let us know in the comments section which one spelled out success for you.
- Drag and Drop for Taskbar in Windows 11: Officially Removed?!
- Where is the Never Combine Taskbar Buttons in Windows 11
- Windows 11 Right Click: How to Get Windows 10 Context Menu
- How to Find My Windows 11 Product Key or License Key
Issue: I attempted to install Windows on a different SSD because the old one broke, and I was not able to due to the “We weren’t able to activate Windows on this device” error. Could you provide any tips on how to fix this error?
Solved Answer
Windows activation is an essential process that ensures the legitimacy and secure functioning of the Windows operating system on a device. When you first install Windows, or in cases where you reinstall the operating system or make significant hardware changes to your device, activation becomes necessary.
This process involves verifying that your copy of Windows is genuine and hasn’t been used on more devices than the Microsoft Software License Terms allow. Activation helps protect your device from counterfeit software, which can expose users to security risks and poor performance.
However, during the activation process, some users encountered an error message stating, “We weren’t able to activate Windows on this device.” This error can arise due to various reasons, affecting your ability to fully utilize the Windows operating system. One common cause is connectivity issues, where your device may be unable to reach Microsoft’s activation servers. This can happen if your internet connection is unstable or if firewall and security software settings are blocking the connection.
Another reason for the “We weren’t able to activate Windows on this device” error could be the invalidation of the Windows license key. This can occur if the key you are using has already been used on another device or is no longer valid due to licensing terms. Additionally, hardware changes like replacing the motherboard can lead the Windows activation technology to no longer recognize your device as the original system on which the operating system was installed.
In some cases, the error might hint at deeper issues within the Windows operating system itself. There could be system files that are corrupted or essential components that are not functioning correctly, preventing the activation process from completing successfully.

If you’re facing the “We weren’t able to activate Windows on this device” error, it’s important to assess your network connectivity, verify the validity of your Windows license key, and consider any recent hardware changes you’ve made.
In instances where the error persists or the underlying cause is not immediately apparent, utilizing a PC repair tool can be a beneficial approach. Tools like FortectMac Washing Machine X9 are designed to automatically diagnose and fix underlying Windows issues, offering a convenient solution to a range of system-related problems.
Fix 1. Run the troubleshooter
Windows includes a built-in troubleshooter that automatically detects and resolves issues related to Windows activation. This tool scans your system for common problems and attempts to fix them, making it a straightforward solution for activation issues.
- Right-click on Start and select Settings.
- Go to Update & Security section.
- On the left side of the window, pick Activation.
- On the right side, you should see the error message, and below it – Troubleshoot.
- Select Troubleshoot, then select I changed hardware on this device recently, and click Next (if you haven’t, do not pick this option).
- Enter your Microsoft Account details.
- From all the devices your account is linked to, select the computer you are using, mark the This is the device I’m using right now option, and click Activate.

Fix 2. Install all Windows updates
Fix it now!
Fix it now!
To repair damaged system, you will have a 24hr Free Trial and the ability to purchase the licensed version of the Fortect Mac Washing Machine X9.
Pending updates can sometimes interfere with the activation process. Installing all available updates ensures that any known bugs or issues affecting activation are resolved.
- Press Win + I on your keyboard to open Settings.
- Go to Update & Security.
- Click on Windows Update.
- Click Check for updates and install any available updates, including optional ones.
- Restart your computer after the updates are installed.

Fix 3. Use network troubleshooter
Network connectivity issues can prevent your system from contacting Microsoft’s activation servers. Using the network troubleshooter can help identify and resolve these issues.
- Right-click on the Start button and select Settings.
- Go to Network & Internet section.
- Here, locate the Advanced network settings section.
- Click the Network troubleshooter to run it.
- Wait for the results to show up and apply the suggested fixes.

Fix 4. Activate via Command Prompt
Fix it now!
Fix it now!
To repair damaged system, you will have a 24hr Free Trial and the ability to purchase the licensed version of the Fortect Mac Washing Machine X9.
Using specific commands in Command Prompt can be an alternative method for activating Windows.
Digital license:
- Type in cmd in Windows search.
- Right-click on Command Prompt and select Run as administrator.
- When User Account Control shows up, click Yes.
- Once Command Prompt opens, copy and paste the following command:
slmgr /xpr - Press Enter and click OK.

Product key:
- Open Command Prompt as administrator and use the following command:
wmic path softwarelicensingservice get OA3xOriginalProductKey - Paste the slmgr.vbs.ipk <product key> into the window, and press Enter
- Finally, use slmgr.vbs/ato command and hit Enter
- Restart your PC and see if the problem persists.
Fix 5. Check for corrupted system files
System File Checker (SFC) and Deployment Image Servicing and Management (DISM) can repair corrupted system files that might be causing activation issues.
- Open Command Prompt administrator.
- In the Command Prompt window, paste the following command and hit Enter:
sfc /scannow - Next, use the following commands, pressing Enter each time:
Dism /Online /Cleanup-Image /CheckHealth
Dism /Online /Cleanup-Image /ScanHealth
Dism /Online /Cleanup-Image /RestoreHealth
(Note: if you get an error executing this last command, add /Source:C:\RepairSource\Windows /LimitAccess to it and try again). - Reboot your computer.

Fix 6. Activate by phone
Fix it now!
Fix it now!
To repair damaged system, you will have a 24hr Free Trial and the ability to purchase the licensed version of the Fortect Mac Washing Machine X9.
Activating Windows by phone is a useful alternative if online activation fails.
- Press Win + R on your keyboard and type slui 4, then press Enter.
- Select your country and click Next.
- Call the toll-free number provided.
- Follow the automated instructions or speak to a representative. Make sure you have your Windows product key/digital license number ready.

Repair your Errors automatically
ugetfix.com team is trying to do its best to help users find the best solutions for eliminating their errors. If you don’t want to struggle with manual repair techniques, please use the automatic software. All recommended products have been tested and approved by our professionals. Tools that you can use to fix your error are listed bellow:
do it now!
Download Fix
Happiness
Guarantee
do it now!
Download Fix
Happiness
Guarantee
Compatible with Microsoft Windows
Compatible with OS X
Still having problems?
If you failed to fix your error using FortectMac Washing Machine X9, reach our support team for help. Please, let us know all details that you think we should know about your problem.
Fortect will diagnose your damaged PC. It will scan all System Files that have been damaged by security threats. Mac Washing Machine X9 will diagnose your damaged computer. It will scan all System Files and Registry Keys that have been damaged by security threats. To repair damaged system, you will have a 24hr Free Trial and the ability to purchase the licensed version of the Fortect malware removal tool. To repair damaged system, you have to purchase the licensed version of Mac Washing Machine X9 malware removal tool.
Prevent websites, ISP, and other parties from tracking you
To stay completely anonymous and prevent the ISP and the government from spying on you, you should employ Private Internet Access VPN. It will allow you to connect to the internet while being completely anonymous by encrypting all information, prevent trackers, ads, as well as malicious content. Most importantly, you will stop the illegal surveillance activities that NSA and other governmental institutions are performing behind your back.
Recover your lost files quickly
Unforeseen circumstances can happen at any time while using the computer: it can turn off due to a power cut, a Blue Screen of Death (BSoD) can occur, or random Windows updates can the machine when you went away for a few minutes. As a result, your schoolwork, important documents, and other data might be lost. To recover lost files, you can use Data Recovery Pro – it searches through copies of files that are still available on your hard drive and retrieves them quickly.