
Некоторые пользователи при отсутствии звука на компьютере, сталкиваются с тем, что в Параметрах Windows указано «Устройства вывода не найдены», одновременно с этим при наведении указателя мыши на значок динамика показывается «Нет установленных аудиоустройств» либо «Выходное аудиоустройство не установлено», а в устройствах записи и воспроизведения — «Звуковые устройства не установлены».
В большинстве случаев проблему сравнительно легко решить. В этой пошаговой инструкции подробно о том, что делать, если устройства вывода не найдены в Windows 11 или Windows 10.
Диспетчер устройств и драйверы звуковой карты

В большинстве случаев проблема «Устройства вывода не найдены» обусловлена отсутствующими драйверами для звуковой карты, при установке которых, в свою очередь, в системе появляются и устройства вывода.
На этом этапе рекомендую следующий порядок действий:
- Прежде чем приступить и в ситуации, если проблема возникла на системе, где звук перед этим работал, проверьте, подключены ли колонки/наушники к соответствующему выходу звуковой карты — иногда причина проблемы именно в случайно отключенном устройстве.
- Зайдите в диспетчер устройств, для этого в Windows 11/10 можно нажать правой кнопкой мыши по кнопке «Пуск» и выбрать соответствующий пункт контекстного меню.
- Проверьте, присутствует ли раздел «Звуковые, игровые и видеоустройства» в диспетчере устройств и есть ли в нем аудиоустройства, не имеющие отношения к вашей видеокарте (они предназначены для вывод звука по HDMI). Чаще всего — Realtek или устройство с поддержкой High Definition Audio.
- При наличии такого устройства попробуйте простой путь: нажать правой кнопкой мыши по устройству, выбрать «Удалить», подтвердить удаление, а затем в меню диспетчера устройств выбрать «Действие» — «Обновить конфигурацию оборудования».
- Если это не помогло или нужные устройства отсутствуют (или же отображаются с желтым восклицательным знаком), зайдите на страницу поддержки вашей модели материнской платы (для ПК) или ноутбука, найдите раздел загрузки драйверов и скачайте драйверы Audio (могут называться Realtek или иначе, но слово Audio обычно присутствует). Учитывайте: может оказаться, что драйверы на звук доступны только при выборе одной из предыдущих версий системы на официальном сайте, например, 7 или 8 — смело загружайте их, в большинстве случаев они исправно работают и на актуальных версиях Windows. Установите скачанные драйверы.

- Если в разделах диспетчера устройств «Аудиовходы и аудиовыходы» или «Звуковые, игровые и видеоустройства» есть отключенные устройства (на значке отображена стрелка) нажмите по таким устройствам правой кнопкой мыши и выберите пункт «Включить».

- Если простая установка драйверов не помогла, при этом в диспетчере устройств есть какие-то устройства с ошибками (с желтыми восклицательными знаками), попробуйте решить проблемы с ними: бывают ситуации, когда без установленных драйверов на другие системные устройства не работает и звуковая карта. Чаще всего это те или иные драйверы чипсета или управления электропитанием.
- Нажмите правой кнопкой мыши по кнопке «Пуск», выберите пункт «Выполнить», введите mmsys.cpl и нажмите Enter. Проверьте список устройств на вкладке «Воспроизведение». Если есть отключенные устройства, нажмите по ним правой кнопкой мыши и выберите пункт «Включить».


Обычно проблема «Устройства вывода не найдены» решается именно решением проблем с драйверами звуковой карты и, в некоторых случаях — других устройств.
При этом следует учитывать, что «Обновить драйвер» в самом диспетчере устройств — не то, что требуется: Windows не всегда может предложить нужный вариант драйвера, правильный путь — ручная загрузка с официального сайта производителя.
Звуковая карта в БИОС/UEFI
При отсутствии нужного раздела в диспетчере устройств, проверьте, не отключена ли звуковая карта в БИОС/UEFI вашего ПК или ноутбука. Обычно нужная настройка находится в разделах Advanced, Chipset, Onboard Devices, Integrated Peripherals и может называться Onboard Audio, HD Audio Controller, HD Audio Configuration, SB HD Azalia Configuration. Во всех случаях нужно переключить соответствующий параметр в Enabled (включено).

На некоторых старых материнских платах есть возможность переключения режима работы звуковой карты — AC97 Audio или HD Audio. При наличии такой опции, выберите второй вариант.

Если какие-либо действия по обновлению драйверов звуковой карты не помогли, возможны следующие варианты решения:
- Убедитесь, что колонки или наушники подключены к выходу звуковой карты (иногда коннектор может случайно отключиться), если подключаете их к передней панели компьютера, попробуйте выполнить подключение к задней панели.
- При наличии в диспетчере устройств нужных пунктов в разделе «Аудиовходы и аудиовыходы», если Windows при этом сообщает, что «Устройства вывода не найдены», попробуйте удалить устройства в диспетчере устройств, а затем использовать пункт меню «Действие» — «Обновить конфигурацию оборудования».
- Если до недавнего времени проблема не наблюдалась, а система не переустанавливалась, могут помочь точки восстановления системы на дату, когда звук работал.
- Если вы не можете найти нужные драйверы, попробуйте использовать SDI.
- При наличии звуковой карты в диспетчере устройств вы можете: нажать правой кнопкой мыши по звуковой карте, выбрать пункт «Обновить драйвер» — Найти драйверы на этом компьютере — Выбрать драйвер из списка доступных драйверов на компьютере и посмотреть, есть ли совместимые драйверы помимо того, который уже установлен. При наличии таковых, попробуйте выбрать их и нажать «Далее» для установки, а потом проверить, решило ли это проблему.

- При наличии программ для управления звуком от Realtek, Nahimic, Maxx Audio и других, изучите их параметры — возможно, что-то настроено не так (например, выставлен многоканальный звук, а подключены обычные стерео-колонки).
- Можно использовать встроенные средства устранения неполадок со звуком, но они редко срабатывают: Устранение неполадок Windows 11, Устранение неполадок Windows 10.

Некоторые другие способы и сведения вы можете найти в статьях: Не работает звук Windows 11, Что делать, если не работает звук в Windows 10.
Introduction
Navigating through the digital space, audio output is a crucial element that enhances our interactive experience on Windows 10/11. However, encountering the “No Audio Device Installed or Found” error can throw us off balance, hindering our smooth sail through the digital sphere. Fear not! This piece serves as a beacon, guiding you through a step-by-step method to resolve this common but vexing issue. By the end of this tutorial, the sweet sound of resolution will echo through your speakers, marking a victorious end to the silence imposed by this error. So, let’s march forward and reclaim the audio realm that rightfully belongs to us!
Check Windows Audio Services
We’ll start by checking if the Windows Audio service is running properly:
-
Click on the
Start Menu(the little windows icon on the bottom left corner of your screen), typeservices, and then pressEnter. -
A new window will open showing a list of services. Look for
Windows Audioin this list. You can press the letterWon your keyboard to quickly jump to services starting with the letter W. -
Once you find
Windows Audio, right-click on it and selectProperties. -
In the new window, look for
Startup Typeand make sure it is set toAutomatic. -
Also, check if the
Service statusisRunning. If not, click on theStartbutton. -
Click
Applyand thenOKto save any changes.

Windows Services Manager > Windows Audio Properties
Check Realtek Audio Service
Now, we’ll check another service:
-
In the same list of services, press the letter
Ron your keyboard to findRealtek Audio Universal Service. -
Right-click on
Realtek Audio Universal Serviceand selectProperties. -
Make sure the
Startup Typeis set toAutomaticand theService statusisRunning. -
Click
Applyand thenOKto save any changes.
Now, try playing a sound to see if enabling these two services has fixed the audio issue on your PC.
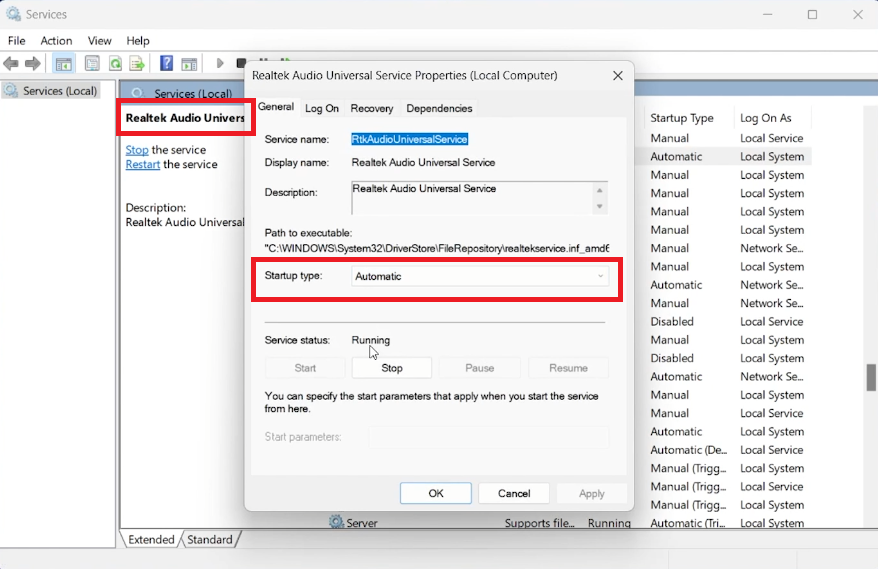
Windows Services Manager > Realtek Audio Universal Service Properties
Check for Updates
It’s possible that a new Windows update might have changed the drivers on your PC. Let’s check if there are any new updates:
-
Click on the
Start Menuand typeSettings, then pressEnter. -
Go to
Windows Updatesettings. -
Click on
Advanced Options. -
Under
Additional Options, find the section calledOptional Updates. Click on it to see if there are any available updates. -
Download any updates you find, especially if they are related to audio.
After the updates are installed, restart your PC to see if the audio issue is resolved.

Windows Update > Advanced Options > Optional Updates
Update Audio Driver in Device Manager
If the problem is still there, let’s check the audio drivers:
-
Click on the
Start Menu, typeDevice Manager, and pressEnter. -
In the Device Manager window, find and expand the
Audio Inputs and Outputssection. -
Right-click on your audio output device listed there, and select
Update Driver. -
Choose
Search automatically for updated driver softwareand wait for the process to complete.
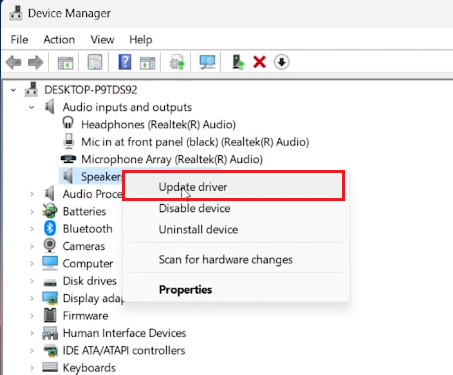
Device Manager > Audio inputs and outputs > Update Driver
Enable Audio Device
If the audio device is disabled, you can enable it easily:
-
In the same
Device Managerwindow, right-click on your audio device underAudio Inputs and Outputs. -
Select
Enable Devicefrom the menu. -
If your audio device isn’t showing, check the connections. If it’s a USB device, try a different USB port. If it’s a Bluetooth device, pair it again with your PC.
Reinstalling Audio Driver
Sometimes the audio driver might need a fresh install to work properly. Here’s how you do it:
Step 1: Check Your Audio Device
-
Go to the
Device Manager(you can find it in theStart Menu). -
Look for
Sound, Video, and Game Controllersand click on it to see the devices. -
Find your audio device in the list. If it’s disabled, right-click on it and select
Enable Device.
Step 2: Update Driver
-
Right-click on your audio device again, but this time select
Update Driver. -
Choose
Search automatically for updated driver softwareto find and install any new drivers.
Step 3: Reinstall Driver
If the issue still isn’t fixed:
-
Right-click on your audio device in the
Device Manager. -
Select
Uninstall devicefrom the menu. -
A new window will pop up asking for confirmation, click
Uninstall. -
After uninstalling, restart your PC.
When your PC starts again, it will automatically look for and install the missing audio driver. This step often fixes the «No Audio Device Installed or Found» error on Windows PCs.
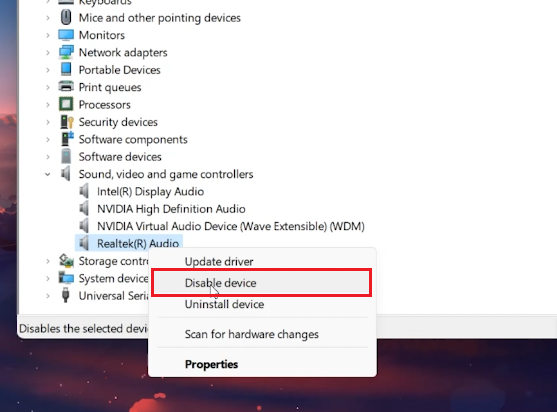
Device Manager > Audio Device > Disable Device
Troubleshoot Your Audio Issues with PassFab FixUWin
Encountering the ‘No Audio Device Installed or Found’ error on Windows 10 or 11 can be a major setback, especially if you rely on your PC for entertainment or work. PassFab’s FixUWin application offers a robust solution for this and other Windows-related issues. Capable of diagnosing and rectifying over 200 common problems, including audio device errors, FixUWin is an essential tool for any Windows user. It ensures that your system’s audio capabilities are running smoothly, thus enhancing your overall experience on Windows. Whether it’s driver conflicts or system errors causing the issue, FixUWin is designed to get to the root of the problem and provide an effective fix.

-
This error often occurs due to issues with your audio drivers or Windows services. The article guides you through various steps to resolve this issue including checking Windows audio services, updating drivers, and reinstalling audio drivers.
-
Navigate to the Windows Services Manager, locate Windows Audio and Realtek Audio Universal Service, ensure both are set to Automatic and are currently Running.
-
Use the Device Manager to locate your audio device under Sound, Video, and Game Controllers, right-click on it, select Update Driver, and follow the prompts to search for and install updated drivers automatically.
-
Right-click on the disabled audio device and select Enable Device. If it’s not appearing, ensure it’s properly connected or try switching USB ports or re-pairing for Bluetooth devices.
-
In the Device Manager, right-click on your audio device, select Uninstall device, confirm the action, and restart your PC. Upon restarting, Windows will automatically reinstall the missing drivers.
Affiliate Disclosure: This section contains affiliate links. By using these links to get PassFab’s FixUWin, you’re not only solving your audio issues but also supporting our website, all at no extra cost to you.
Readers help support Windows Report. We may get a commission if you buy through our links.
Read our disclosure page to find out how can you help Windows Report sustain the editorial team. Read more
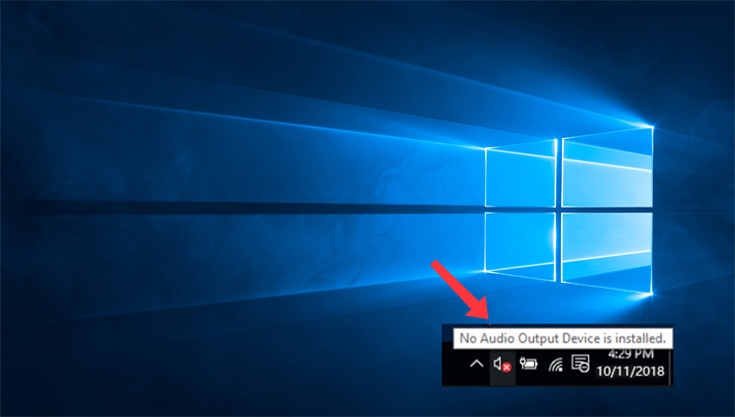
The No audio output device is installed error occurs when Windows can’t find the audio device. You can see this notification above the system tray when hovering the cursor over the sound icon.
Consequently, no sound plays when Windows can’t find audio device hardware. Unfortunately, the issue often arises after system upgrades.
There are, however, a few potential resolutions for the Windows can’t find audio device problem, and we’ll discuss them here.
Why is my audio device not detected in Windows 10?
One of the most common reasons behind the We can’t find an audio device error in Windows 10 is improper connections, be it wired or wireless.
For wired audio devices, check that it is plugged in properly to the PC and that the cable or the port is not damaged. For wireless ones, check for issues with Bluetooth, run the dedicated troubleshooter, and other relevant ones.
Also, drivers have often been found to lead situations where your computer doesn’t recognize the audio device. In addition to that, the third-party apps installed on the computer may create conflicts.
Why am I getting We can’t find an audio device 0xc00d36 error message?
These types of errors are somewhat common, and many reported Music/Video error 0xc00d36c4. If this issue occurs, check your audio drivers, and update them if needed.
Another common reason is running unsupported video formats, which can be fixed by installing the required codecs.
Apart from that, there are many problems with sound, but you can always fix issues with audio devices in Windows.
How do I fix No audio output device is installed error?
1. Reinstall the sound card’s driver
- Press Windows + R to open Run, enter devmgmt.msc in the text field, and click OK.
- Double-click Sound, video and game controllers.

- Right-click the audio adapter and select Uninstall device.
- Click the Uninstall button in the confirmation prompt.
- After removing the device, restart the computer, and Windows will automatically locate and install the best available drivers.


Alternatively, you can replace corrupted audio adapter drivers with a dedicated third-party tool.
These tools will recommend compatible updates not just for your audio driver but for any outdated software it will find so that you can choose the preferred ones.
2. Run the Playing Audio troubleshooter
- Press Windows + I to open Settings, and select Update & Security from the left.

- Next, select Troubleshoot from the navigation pane, and click on Additional troubleshooters on the right.
- Select Playing Audio and click the Run the troubleshooter button under it.
- Now, follow the on-screen instructions, and choose the appropriate response when prompted to complete the process.


The built-in troubleshooter is an effective way of dealing with things when Windows can’t find the audio device and should eliminate the issue. Though it only works for problems reported to Microsoft and a patch introduced for it.
3. Re-enable the sound adapter
- Press the Windows + X and choose Device Manager.
- Double-click Sound, video and game controllers to expand that category.
- Then right-click the audio adapter listed there and select Disable device.
- Click Yes in the confirmation prompt.
- To re-enable it, right-click the audio adapter and select Enable device.


If it’s a minor bug or trivial issues with the audio device, simply reinstalling it should fix things if you come across I couldn’t find your audio device. Then, make sure it’s connected and try again.
4. Check the Windows Audio Services are Enabled
- Press Windows + R, type services.msc in the text field, and click OK or hit Enter.
- Locate and double-click on Windows Audio to open its Properties.

- Select Automatic from the Startup type drop-down menu, and click on Start if the service is not running.

- Click OK to save the changes and close the window.
- Then double-click Windows Endpoint Audio Builder.
- Again, select Automatic from the Startup type drop-down menu, and click the Start button.
- Finally, click on OK to save the changes.


Keep in mind that Windows Audio and Windows Audio Endpoint Builder are two services that need to be enabled for audio devices. And if the two are not running, you may encounter a bunch of issues, including We can’t find an audio device: 0x8889000f.
- Audio device is disabled on Windows 10/11 PC [BEST FIXES]
- FIX: No speaker or headphones are plugged in [Full Guide]
- How to fix problems with Bose headphones on Windows 10/11
5. Perform a system restore
- Press Windows + R to open Run, type rstrui.exe in the text field, and click OK.
- Press the Next button to open the list of restore points.

- Select a restore point from the list, and click on Next.
- Finally, click Finish to start the restore process.


System Restore is an effective tool to fix many issues with Windows. It simply reverts the system to a state where the error didn’t exist by modifying the configured settings and installed apps, though it doesn’t affect the files stored on the PC.
Choosing a restore point created before you first encountered the Windows can’t find audio device error is critical. And that’s why it’s recommended that you manually create restore points every once in a while to be able to revert things to normal in case of issues.
6. Factory reset Windows
If nothing else worked, you are left with no option but to factory reset Windows. And we recommend you clear everything from the PC when given the option since there’s a higher possibility of the error being eliminated in this case.
You may create a backup for the files using reliable cloud storage services to recover things after the reset, but that’s a personal preference.
Once the reset process is complete, things should be up and running, with Windows can’t find audio device error fixed.
How do I reinstall an audio device in Windows 10?
- Type Device Manager in the Search menu and click on the relevant search result.

- Locate the audio device you want to reinstall, right-click on it, and then select Uninstall device.
- Now, click Uninstall in the confirmation prompt.
- Once done, click on the Scan for hardware changes icon to reinstall the device and the relevant driver.


That’s it! These are some resolutions that should fix the No audio output error when Windows can’t find audio device hardware.
If the above solutions don’t work, you may need to install an effective and reliable sound card.
This issue is related to No output devices found in Windows 11 message, so you might want to check that guide for more solutions.
We hope that this article was helpful. Please tell us what solutions worked for you using the comments section.
Matthew Adams
Windows Hardware Expert
Matthew is a freelancer who has produced a variety of articles on various topics related to technology. His main focus is the Windows OS and all the things surrounding it.
He is passionate about the tech world, always staying up-to-date with the latest and greatest. With an analytical view, he likes problem-solving, focusing on errors and their causes.
In his free time, he likes to read and write about history and tries to always develop new skills.
Download Article
Quick fixes for the “no audio output device is installed” error
Download Article
It’s frustrating when you aren’t getting sound on your computer. It’s even more so when you get an error that says “no audio output device is installed.” This is usually a problem with the audio drivers, though it could be a hardware problem with your soundcard. Luckily, there are a few things you can do to fix this issue. This wikiHow article teaches you how to troubleshoot and fix a “no audio output device is installed” error on your Windows computer.
Disconnect and reconnect your audio devices. Restart your computer. Make sure all your audio devices are enabled and updated in Device Manager. Check for Windows updates. Replace your sound card if nothing else works.
-

Sometimes your audio device may stop working after a change in your configuration. If you connect an audio device before Windows boots up, it may not detect it. You can fix these minor problems by restarting your computer.

Advertisement
-
If you are attempting to connect an external audio device, such as headphones or speakers, Windows may not have detected it initially. You can force Windows to try to establish a connection by disconnecting your audio device and plugging it back in. This will also help you ensure that your audio device is properly connected.

-
Windows frequently releases Windows updates to patch bugs and security flaws. It also updates your drivers. If Windows is out of date, you may experience issues with your Windows system. Use the following steps to check for updates and update Windows:
- Click the Windows Start menu.
- Type Windows updates.
- Click Windows update settings.
- Click Check for updates.
- Click Download & install all

Advertisement
-
Use the following steps to make sure you aren’t missing any optional updates:
- Click the Windows Start menu.
- Type Windows updates.
- Click Windows update settings.
- Click Advanced options.
- Click Optional updates.
- Expand Driver updates.
- Click the checkbox next to any audio driver updates.
- Click Download and Install.

-
You can enable your audio devices in Device Manager. Use the following steps to do so:
- Right-click the Windows Start menu.
- Click Device Manager.
- Click Audio input and outputs.
- Right-click an audio device.
- Click Enable if it is not enabled.
- If they are enabled, you may try disabling them and then re-enabling them.
- Repeat for all audio devices.
- Expand Sound, video and game controllers.
- Repeat the steps above.

Advertisement
-
Use the following steps to ensure that your Windows audio services are set to start automatically and start them if they are not started:[1]
- Click the Windows Start menu.
- Type Services.
- Click Services.
- Scroll down and double-click Windows audio.
- Use the drop-down menu next to «Startup Type» to select Automatic.
- Click Start if it’s not already started.
- Click Apply
- Double-click Windows audio endpoint builder.
- Repeat the steps above.
- Double-click any Realtek Audio devices.
- Repeat the steps above.

-
If you have a different device set as your default audio device that’s not currently installed. Use the following steps to ensure your primary audio device is set as your default audio device:
- Click the Windows Start menu.
- Click Settings.
- Click System.
- Click Sound
- Scroll down and click More audio settings below “Advanced.”
- Click Set Default at the bottom of the screen.
- Click Apply
- Click Ok

Advertisement
-
Most devices today are plug-and-play, meaning your computer will detect them and install the drivers automatically when you plug it in. However, some devices require additional software or drivers to be installed. Check the user’s manual or manufacturer’s website for any audio devices you are connecting to make sure they don’t require any additional drivers to be installed.

-
You can manually update your audio drivers in Device Manager. Use the following steps to do so:
- Right-click the Windows Start menu.
- Click Device Manager.
- Click Audio input and outputs.
- Right-click an audio device.
- Click Update driver
- Click Search automatically for drivers.
- Follow the prompts to install any drivers.
- Repeat for any additional drivers.
- Expand Sound, video and game controllers.
- Repeat the steps above.

Advertisement
-
Use the following steps to run the Windows Troubleshooter:
- Right-click the speaker icon in the taskbar.
- Click Troubleshoot sound problems.
- Click Yes to run the automatic diagnostic tool.
- Follow any prompts during the diagnostic process.

-
Use the following steps to disable any audio enhancements:
- Click the Windows Start menu.
- Click Settings.
- Click System.
- Click Sound
- Scroll down and click More audio settings below “Advanced.”
- Double-click your primary sound device under the “Playback” tab.
- Click Properties.
- Click the Enhancements tab.
- Click Disable all Enhancements
- Click Apply.
- Click Ok.

Advertisement
-
If you are using an older audio device, it may not be supported by newer versions of Windows. However, you can add legacy audio devices in Device Manager to enable support for older devices. Use the following steps to do so:
- Right-click the Windows Start menu.
- Click Device Manager.
- Double-click Audio input and outputs.
- Click Action in the menu bar at the top.
- Click Add legacy hardware.
- Click Next on the Welcome screen.
- Select “Search for and install hardware automatically.”
- Click Next.
- Click Next if no device is detected but you know your hardware model.
- Select Sound, video and game controllers and click Next.
- Select your audio device manufacturer (or select “Generic USB audio”)
- Select your audio device model.
- Click Next.
- Click Finish.

-
You can uninstall your audio drivers in Device Manager. Then Windows will automatically search for and install the drivers automatically when you restart your computer. Use the following steps to uninstall and reinstall your audio drivers:[2]
- Right-click the Windows Start menu.
- Click Device Manager.
- Expand Audio input and outputs.
- Right-click an audio device.
- Click Uninstall device
- Repeat for any additional audio devices.
- Expand Sound, video and game controllers
- Repeat the steps above.
- Restart your computer.

Advertisement
-
If you’ve tried everything and you are still not able to get your audio device working, it’s possible your sound card or hardware may not be working. If this is the case, check any cables connected to your audio hardware. Make sure they aren’t damaged. Try connecting your speakers or headphones to other devices to make sure they work. Make sure your headphone or speaker jack isn’t damaged. If your external hardware is working, you may need to replace your sound card. If your sound card is integrated, you’ll need to take your device to a computer repair technician and have it repaired.
- If your computer is still under warranty, you may be able to have your device repaired by the manufacturer for a free or discounted price.

Ask a Question
200 characters left
Include your email address to get a message when this question is answered.
Submit
Advertisement
Video
Thanks for submitting a tip for review!
References
About This Article
Thanks to all authors for creating a page that has been read 2,656 times.
Is this article up to date?
When the sound icon in your taskbar has a red x on it (as illustrated above), your computer won’t play any sound.
This is usually caused by one of two problems: either Windows has disabled your audio device or your PC doesn’t have the latest correct device drivers installed, and Windows therefore can’t ‘talk’ to the device.
If you see No Audio Output Device is installed when you hover your mouse over the the sound icon, your audio problem is probably caused by one of these issues, and there are three repair methods you can try that have helped other users. You may not need to try them all; just start at the top of the list and work your way down.
- Automatically update your audio device drivers
- Manually uninstall & reinstall the device driver
- Re-enable the device
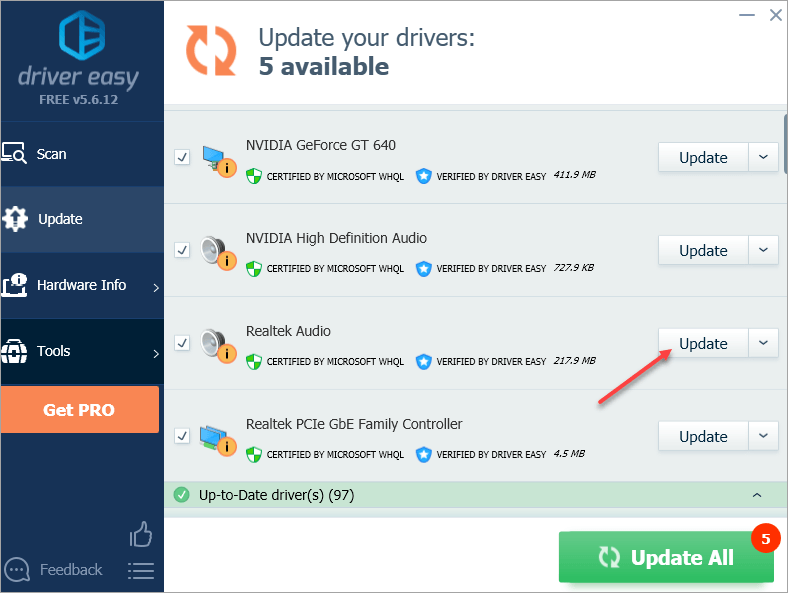
Method 1: Automatically update your audio device drivers
Your sound problem is probably being caused by driver issues. If you don’t have the time, patience, or computer skills to update the drivers manually, you can do it automatically with Driver Easy.
Driver Easy will automatically recognize your system and find the correct drivers for it. You don’t need to know exactly what system your computer is running, you don’t need to risk downloading and installing the wrong driver, and you don’t need to worry about making a mistake when installing.
You can update your drivers automatically with either the FREE or the Pro version of Driver Easy. But with the Pro version, it takes just 2 clicks (and you get full support and a 30-day money-back guarantee):
1) Download and install Driver Easy.
2) Run Driver Easy and click Scan Now. Driver Easy will then scan your computer and detect any problem drivers.

3) Click the Update button next to a flagged audio driver to automatically download the correct version of this driver, then you can manually install it (you can do this with the FREE version).
Or click Update All to automatically download and install the correct version of all the drivers that are missing or out of date on your system (this requires the Pro version – you’ll be prompted to upgrade when you click Update All).
Method 2: Manually uninstall & reinstall the device driver
If a driver update doesn’t fix your issue, try to reinstall your audio driver:
1) On your keyboard, press the Windows logo + R keys simultaneously to open the Run box. Then type devmgmt.msc and hit Enter to open the Device Manager.
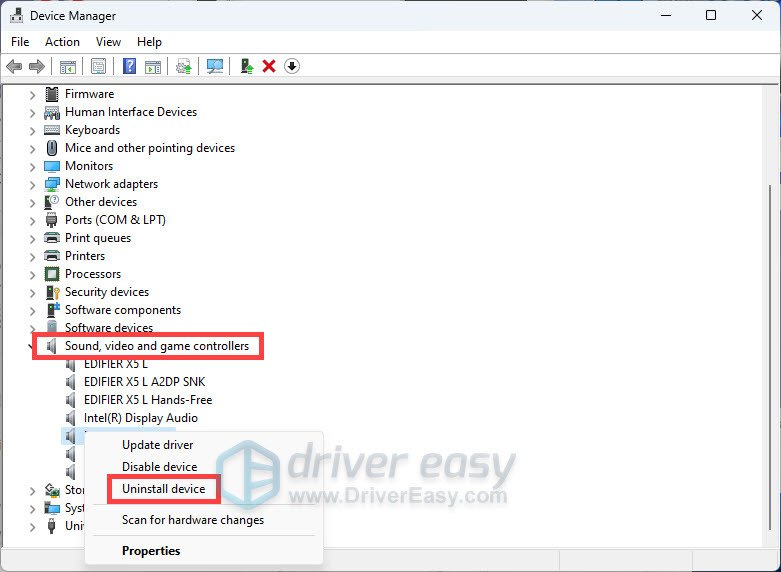
Find Sound, video, and game controllers, then double-click on it to expand the list. Right-click on your audio device and select Uninstall device.
2) Restart your PC. After restarting, Windows should automatically re-install the sound driver. Assuming it installs the latest correct driver, this may resolve the problem.
Method 3: Re-enable the device
To fix the problem, follow these steps (Steps below are for your reference. The specific steps in different system versions may be different. ):
1) On your keyboard, press the Windows logo key + R keys at the same time to invoke the Run box. Type devmgmt.msc hit Enter.
2) Locate the Sound, video, and game controllers category in the list.
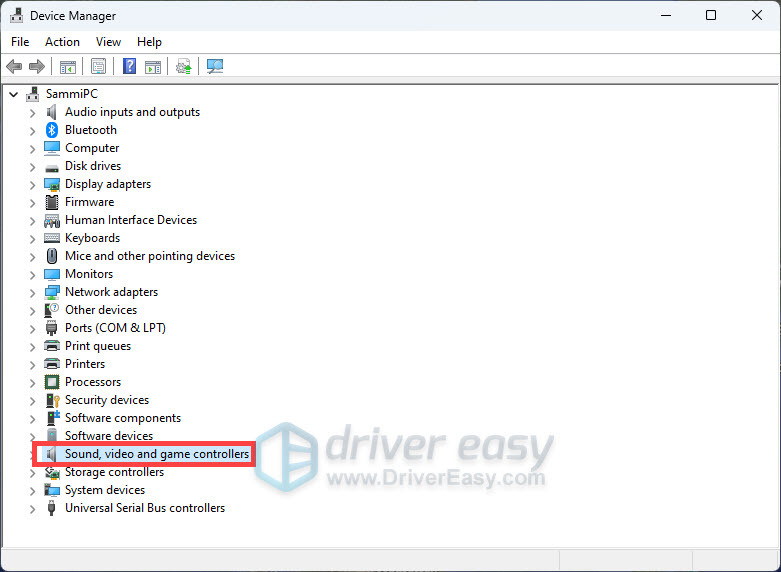
If you don’t see this category in your list, continue with step 2a) below. Otherwise, skip to step 3.
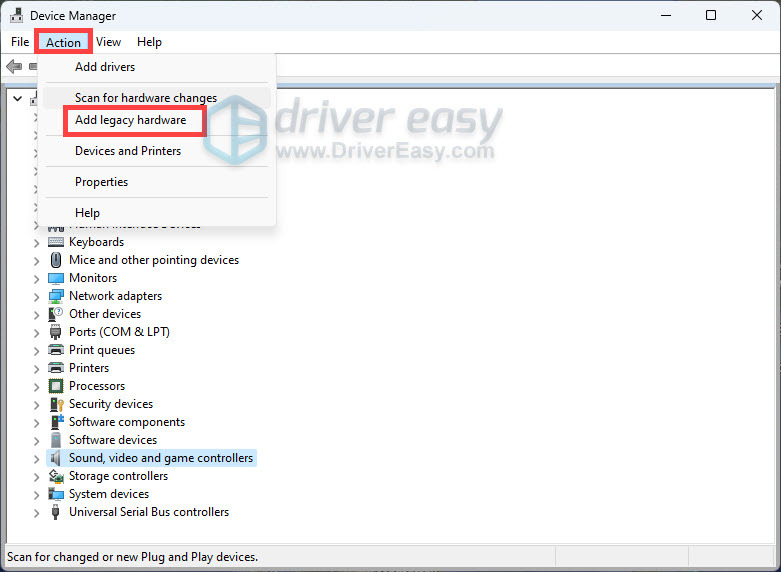
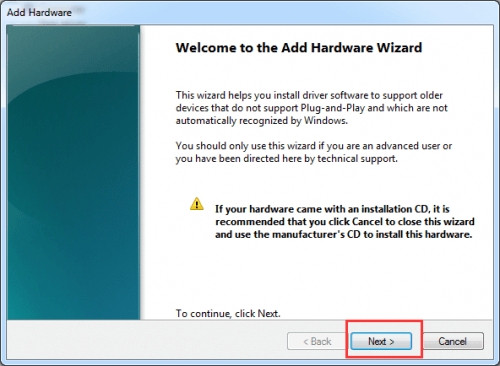
2a) Click the Action menu and select Add Legacy hardware (if you see only the Help in this menu, click somewhere in the white space around the list (i.e. make sure nothing in the tree is selected), then click the Action menu again)
2b) Click Next to start the Add Hardware wizard. (If the Add Hardware wizard doesn’t display at all, you can try Method 3.)
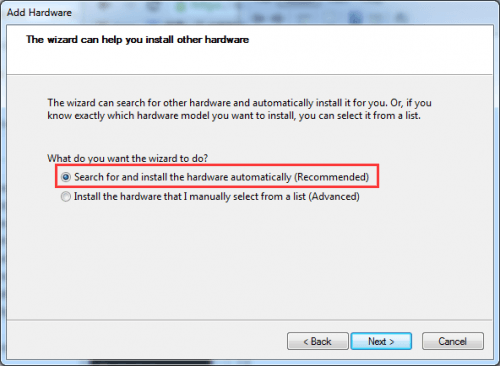
2c) Select Search for and install hardware automatically (Recommended).
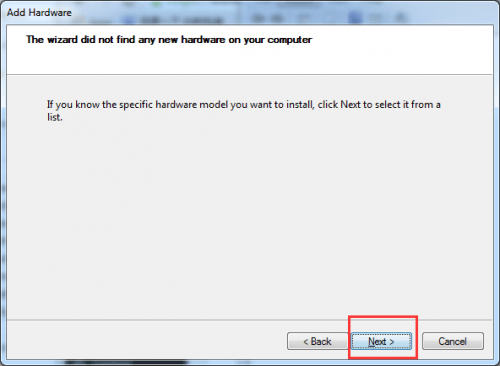
2d) If the wizard tells you it can’t find any new hardware, click Next.
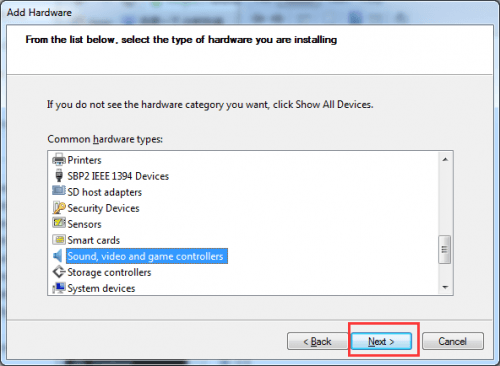
2e) You should now see a list of hardware types. Scroll down until you see Sound, video and game controllers. Select it and click Next.
2f) Select the manufacturer and model of your sound card, then click Next.
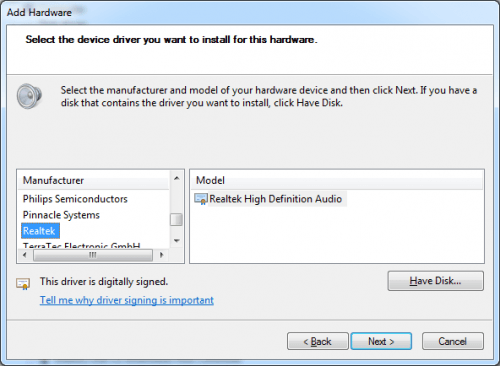
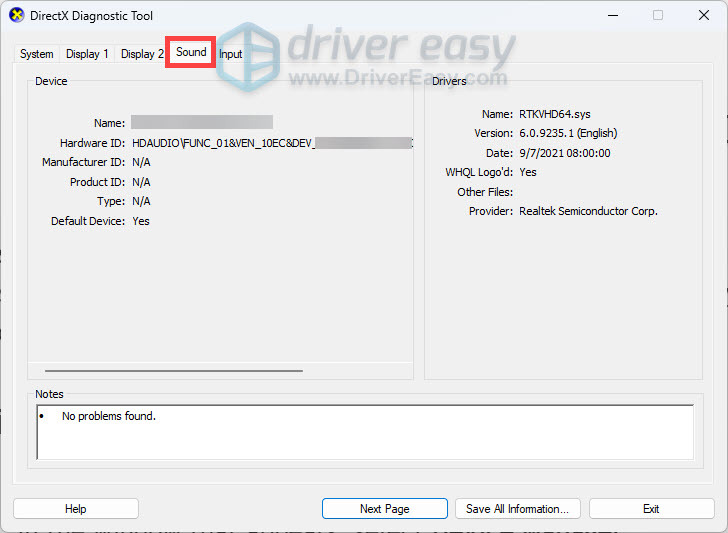
If you’re not sure what manufacturer and model to select, press the Windows logo + R keys simultaneously to open the Run box, type dxdiag, and hit Enter to open the DirectX Diagnostic Tool. Select the Sound tab and you should be able to see your sound card.
2g) Click Next to install the device, then when the installation is complete, click Finish.
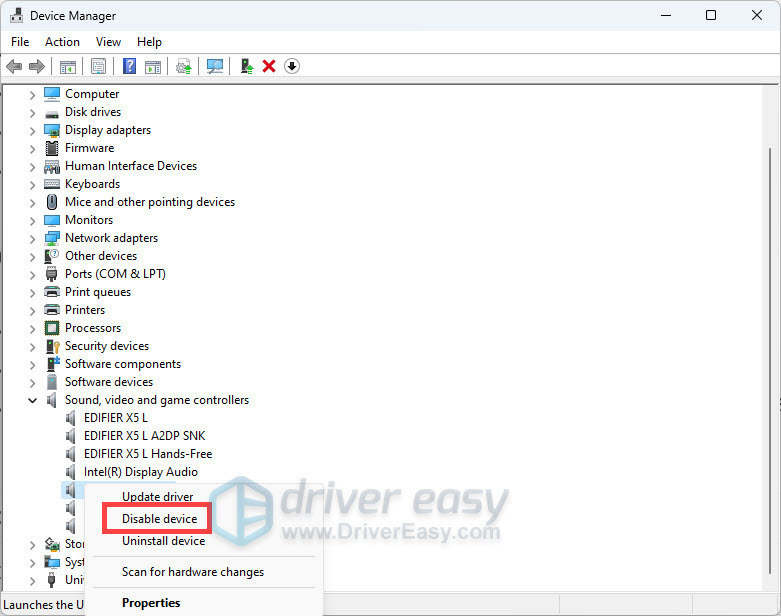
3) Expand the Sound, video and game controllers category, right-click on your audio device, and select Disable device.
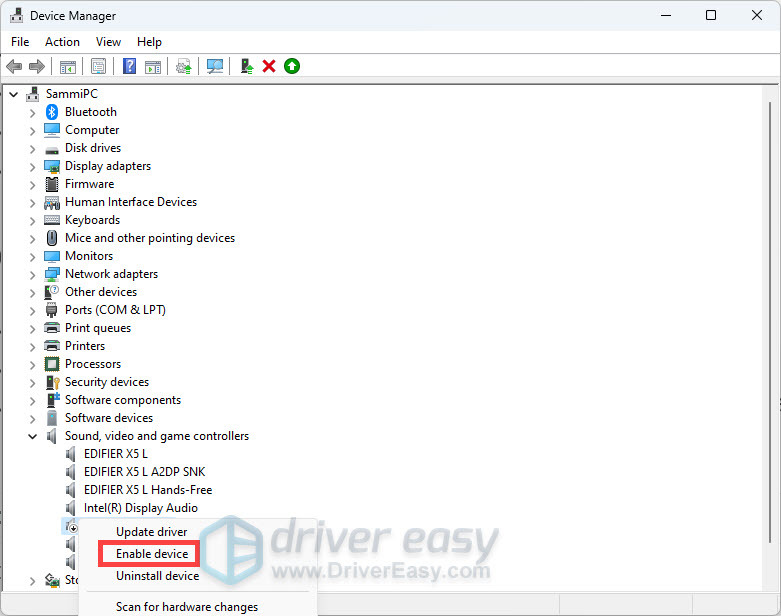
Once again, right-click your audio device and select Enable device.
After making the changes, restart your device and check if the error still occurs.
1167
1167 people found this helpful
Available in other languages
Kein Sound aus Ihrem PC kommt und Sie bekommen die Meldung Es ist kein Audioausgabegerät installiert? Hier finden Sie 5 Lösungen!
Vous rencontrez l’erreur « Aucun périphérique de sortie audio n’est installé » ? Ne paniquez pas ! Suivez-nous pour la réparer rapidement !