
In this post I will explain how you can configure an NFS Server on a Windows 2016 Server and connect/mount the NFS exports on Linux clients, in my case I wanted to run a Linux virtual machine whist ensuring that the actual data resides on physical disks on my host machine ensuring that the data is automatically part of my nightly backup routine and did not need to run separate backup scripts on the VM(s).
A bit of background first…
In my home network I have a single (in an attempt to be eco-friendly) Intel i7 server running Windows Server 2016 Standard edition, I use this server for hosting my family media, files and various database engines and ActiveDirectory for local development (I’m a software engineer by trade!) in addition to several Hyper-V virtual machines that do various tasks, all of the virtual machines are running a derivative of Linux.
I currently have the following virtual machines setup and running on it (under Hyper-V):
- A Web Server and reverse proxy running Ubuntu Server 16.04 LTS – Hosting Gogs, Minio and various Nginx reverse proxy configurations for sites, services and API’s that sit on other VM’s in my network.
- An OpenVPN server running CentOS 7 – Providing secure VPN tunnel access for me when away from home.
- A Jenkins server running Ubuntu Server 16.04 LTS– Used for automated code testing and continuous integration.
- A MineCraft server running Ubuntu Server 16.04 LTS – Used by my daughter and friend to play online together.
In the past I used to run VMWare ESXi and hosted everything in their own virtual machine for better isolation and performance although since then, I had tested and was extremely happy with the performance of running virtual machines on top of Hyper-V and Windows Server so when I re-built my home server several months ago I decided to go down that route instead.
Anyway, enough of all that, let me explain why I have such a need for this kind of set-up…
My home server has 1x SDD (500GB for the host operating system and local applications) in addition to 2x WD Red 4TB hard drives in a hardware RAID1 configuration, I periodically backup this array over my LAN to a Buffalo NAS device.
My plan is to install a new VM running Ubuntu Server 16.04 that will host an instance of NextCloud, this will provide me, my family and friends with a free alternative to DropBox with masses of space in addition to all the other cool things that NextCloud offer such as encrypted video calls and the like.
By setting up an NFS server on the host operating system, instead of provisioning this Linux VM with a massive virtual hard disk (and taking drive space away from the host OS) I have instead provisioned it with a single 20GB virtual hard drive and will then use NFS shares on my Windows Server to host the files on the physical disk and thus be automatically part of my backup routine and alleviate the need for using rsync or rsnapshot etc. on the VM and transferring it at regular intervals.
Installing NFS Server on Windows Server 2016
First up, we need to login to our Windows Server and open up the Server Management tool, once open, click on the large text link labelled “Add Roles and Features” as shown here:
Once you have clicked on the “Add Roles and Features” link you should then be presented with this wizard:
Accept the default “Role-based or feature based installation” and then click Next…
On the next screen you’ll be asked to choose the server that you want to add the role or feature to, select your server from the list that appears (you’ll probably only have one in the list anyway!) and then click Next…
You will now be presented with a screen titled “Select server roles“, expand the following sections, then check the “Server for NFS” option as shown in the screenshot below:
Once checked, click on the “Next” button…
The next screen will just ask you to “Select features“, you can simply click “Next“!
Finally, you’ll be shown a screen asking you to confirm the installation items, we now choose “Install“, this screen and the selection of features and roles to add should look as follows:
Great! We now have an NFS server running on our Windows 2016 Server!
Creating an NFS share (export)
Now that we have the NFS server installed we can now go and share (or “export” as NFS likes to call it) a directory, as per my intro notes to this blog post, I plan to add this to my data RAID array.
So first up, lets go and create a new directory on our data disk (in my case this is my D: drive), I’ve decided to call the directory “NFS” and then, inside that folder we’ll create another directory called “VSVR-WEB040_data” – This folder will be explicitly shared with my VM (that is named ‘VSVR-WEB040‘, the “_data” portion I’ve just named as that is what I will mount the share locally on the VM as eg. /data).
Now that you have an NFS server installed you can share/export numerous directories to individual or multiple VM’s or even other physical servers in your network.
The result of setting up this directory structure is as follows:-
Next up, we’ll right-click on the newly created folder and choose “Properties” – This will enable us to “Share” it as well as lock down the access to only a specific IP address (that being my NextCloud VM)…
From the Properties window, select the “NFS Sharing” tab and then click on the button named “Manage NFS Sharing” this should then display the following window:
Ensure that the above screenshot matches your folder (eg. select all the checkboxes as per the above)
Next we’ll configure the permissions for the share, clicking on the “Permissions” button in the above screenshot will then display the following window:
As you can see from the above screenshot, the permissions for this share are very restrictive by default, this is basically saying that for ALL MACHINES trying to access this share they WILL NOT be granted any access.
We should leave the defaults as is as we will instead create another permission only granting our specific VM access, to do this click on the “Add” button, the following screen should then appear:
I’ve entered my virtual server IP address in to the “Add names” field already (172.25.87.40), you’ll then need to change the “Type of access” drop-down box to “Read/Write” and check the “Allow root access” checkbox.
Once completed, click the “OK” button!
That’s great, our Permissions form should now look as follows:-
Perfect! – We’re all done on the NFS server side configuration now!
Mounting the NFS share on the client-side
We can now mount the NFS share on our Ubuntu Server (the virtual machine), first we need to install the NFS tools, so we’ll login to our server (I’m using root but you should really use a user with sudo rights!)…
sudo apt-get install -y nfs-common
So before we configure fstab to automatically mount our NFS share at system boot, we’ll first test using the command line to make sure everything works as expected…
Before we can mount the NFS share we must first create a mount point, we will do this like so:
sudo mkdir /data
Now that we have created the mount point, we can mount the remote file-system as follows:
sudo mount -t nfs 172.25.87.20:/VSVR-WEB040_data /data
Once mounted you should be able to run the following commands, these commands will essentially create a file on our server and a text file with some content…
echo "This is a test file" > /data/test.txt
We can now jump back over to our Windows server and check our NFS server directory, we should see a file named test.txt and when we open it in Notepad, the contents should appear as follows:-
All going well, that has hopefully worked a charm for you and we can now move on to ensuring that our VM automatically mounts the NFS share at boot.
If for whatever reason wish to un-mount the share you can do it like so:
umount /data
Configuring fstab to mount our NFS share on system boot
Using a text editor on the Linux VM we will open up the /etc/fstab file and add the following line to the bottom of the file:
172.25.87.20:/VSVR-WEB040_data /data nfs auto,nofail,noatime,nolock,intr,tcp,actimeo=1800 0 0
You’ll obviously need to replace your server’s IP address with your own 😉
The result should look something like the below:
Once completed, save the file and you can now either attempt to automatically mount the share using this command:
sudo mount -a
…or you can reboot your server!
Once rebooted, login and you can then check and confirm that you have re-mounted your /data directory to the remote server by checking the output of:
df -h
You should be able to see and confirm the remote disk usage as demonstrated here:
OK, well that’s it, I hope this has been useful for you 🙂

Servers used: RHEL 7.6 as NFS server & Windows 2016 as NFS Client
In this scenario, we have NFS server up and running with shares mounted across different Linux clients. The requirement here is, one of the share or a new share need to be mounted in Windows server with read/write access to AD user.
Installing NFS Client on Windows Server
Windows has built-in feature available to support NFS. However often this will not be enabled by default. We need to install this “optional feature” first.
Login to the client server. Ensure that you have admin rights to that server in order to do this.
- Start the command console as the administrator (Click Start > All Programs > Accessories > Windows Powershell or Command Prompt)
- Right-click the Windows Powershell or Command Prompt, and select Run as administrator.
- Verify that the feature is available using the command Get-WindowsFeature -Name NFS*
- You should be getting output as shown below:
Display Name                                            Name                       Install State
 ------------                                            ----                       -------------
[ ] Client for NFS NFS-Client Available- This shows, you have the feature available, but not installed.
- Run the command Install-WindowsFeature -Name NFS-Client to install the feature. Alternatively you can go through Add Roles and Features options with plenty of clicks. Command line are always easier way.
PS C:\Users\Admin_test> Install-WindowsFeature -Name NFS-Client

Success Restart Needed Exit Code      Feature Result
 ------- -------------- ---------      --------------
 True    No             Success        {Client for NFS}
Now that you have NFS Client features enabled. This now need to configure.
Configure NFS Client on Windows server
By default, NFS Client in windows uses Anonymous UID and GID value with -2. Often this works for just mounting, but give troubles while you try to insert / update contents.
- Open command prompt as admin and run command
nfsadmin client stop. This will stop NFS client services on your system. - We need to fix Anonymous
UIDandGIDto0to work better. Startregedit(Click search windows button, typeregedit) to enter registry editor. - Navigate to,
HKEY_LOCAL_MACHINE\SOFTWARE\Microsoft\ClientForNFS\CurrentVersion\Default- In the main window, right-click and select New > DWORD 32-bit Value. Set the name as
AnonymousGID. - Right-click and select New > DWORD 32-bit Value again. Set the name as
AnonymousUID. - Double-click on
AnonymousGIDandAnonymousUID, set the value as0and the base as Decimal respectively. - Click OK.
- Close Regedit.
- In the command prompt opened as admin, type
nfsadmin client start - Run the following command in a command prompt (not Powershell) to set the NFS configuration:
nfsadmin client localhost config fileaccess=755 SecFlavors=+sys -krb5 -krb5iNow that you have configured your NFS Client. We now need to export the directory in Linux to share.
Exporting directory in Linux with correct parameters
If Linux is using AD authentication, the NFS export features may not be work well with AD. So, it is better to use anonymous user with correct permission settings. This way we can avoid security risk by giving full read-write access to all of them ( user, group and others ). People tend to give permission level 777 to folders for easy fix. However, this invites more security risk.
NFS server in Linux always have a user called nfsnobody. When we mount a share in other places with anonymous option, this nfsnobody can play well with that. However we need to set its UID and GID correctly with the share we exports.
- Find out nfsnobody UID and GID using command
grep nfsnobody /etc/fstab - Often this will be 65534.
- Now export your share with options
rw,sync,no_root_squash,all_squash,anonuid=65534,anongid=65534 - If you are using /etc/exports, the content will be like this:
 /etc/exports:
/test_nfs_share *(rw,sync,no_root_squash,all_squash,anonuid=65534,anongid=65534) - The “all_squash” option maps all client requests to a single anonymous uid/gid on the NFS server
- If you are using NFS cluster on RHEL native cluster, run update the pcs resource with following command:
pcs resource update NFS_test_Share options=rw,sync,no_root_squash,all_squash,anonuid=65534,anongid=6553 - Set the folder permission:
chown nfsnobody:nfsnobody /test_nfs_share
chmod 770 /test_nfs_share - If you are using NFS cluster as stated above, don’t forget to refresh the resource by using the command:
pcs resource refresh NFS_test_Share
That’s all. We are now ready to mount the share on a windows server where it allowed to mount. You can do this using either of 2 ways as given below:
- Via command line as
mount -o anon \\<nfs server>\<exported share path> <drive letter>: - Open my computer –> This PC –> From top computer –> Map Network Drive
Your share is now ready and you can write contents to it.
Disclaimer:
The views expressed and the content shared in all published articles on this website are solely those of the respective authors, and they do not necessarily reflect the views of the author’s employer or the techbeatly platform. We strive to ensure the accuracy and validity of the content published on our website. However, we cannot guarantee the absolute correctness or completeness of the information provided. It is the responsibility of the readers and users of this website to verify the accuracy and appropriateness of any information or opinions expressed within the articles. If you come across any content that you believe to be incorrect or invalid, please contact us immediately so that we can address the issue promptly.
Let’s start with the basic. So, what is a NFS server ?
Network File System (NFS) is a protocol developed by Sun Microsystems, which enables a user to access files on a different system as if the file is locally available over the network. It lets user to modify/copy files resided on a remote system. So its basically a protocol for a network drive. The create NFS server then can be accessed via another Windows or a Linux system.
As you might have already known that NFS server feature is not available on non-server versions of Windows and that’s the main reason you are here. But with the help of right tools we should be able to setup NFS server on non-server Windows.
We will be creating a NFS server on a Windows system using a free tool and accessing the server from a Linux system. I will be using Windows 10 Pro and a Arch Linux (Xfce) system in this article.
Read also: Fix Requested NFS version or transport protocol is not supported
So, without any further ado let’s jump into it.
Setuping NFS Server On Non-Server Windows System
First of all head to the below link and download winNFSd, our free NFS server program.
winNFSd GithHub (Source code if you need)
winNFSd (Binary)
Extract the downloaded WinNFSd.exe on C:/nfs (or where ever you like).
Now we will create two files namely paths.txt and start_server.bat within the winnfsd executable folder.
Contents of paths.txt
Open paths.txt using any text editor and write down any path that you want to share one per line, including an alias.
For example, my paths.txt looks like this.
C:\Users > /c
D:\ > /d
In the first line C:\Users would be the path that i want to share and /c would be the alias for it, so i can access the path using alias from Linux system.
Contents of start_server.bat
This file is optional, but its really handy. We will run this bat file to run our winNFSd executable with all the needed parameters. We wont need to write that long arguments every time we run it. Below is what it looks like in my start_service.bat.
c:\nfs\WinNFSd.exe -addr 192.168.1.64 -pathFile "c:\nfs\paths.txt"
Where,
in place of 192.168.1.64, put your own local IP address. You can get your local IP address using cmd by entering ipconfig command.
And you know about the paths.txt file.
Now create a shortcut of start_service.bat (if you want) on your desktop. You are ready to run your NFS server on your non-server Windows system.
After running the start_server.bat, you should get a window like below.
Now we have a working NFS server running from a non server Windows. You can connect to this server via any NFS client that supports NFS v2 or v3.
winNFSd doesn’t support NFS v4.
Mount NFS Drive on Linux Using Terminal (nfs-utils)
We have already setup NFS server on non server Windows now lets mount the remote drive and access the files from our Linux system. I am using Arch Linux with Xfce desktop environment but it should apply to any distribution out there.
First of all we will need the nfs-utils package, install it if not already.
To install the package on Arch Linux issue the following command as root, if any other Linux distro, search on respective sites.
sudo pacman -S nfs-utils
After that we will need to edit nfsmount.conf file.
By default it will try to connect using nfs v4 protocol. We will set the default version to 3 because as i have already told you, WinNFSd does not support nfs v4.
Use your favourite text editor to edit the file, i am using nano here.
sudo nano /etc/nfsmount.conf
Find the line with #Defaultvers=4 and instead of 4 or anything else write 3 and also remove the # to uncomment the line and save the file. Control + S will save the file on nano.
Lets create a folder on our root directory where we will mount our network drive. I have create a folder named mountc on my root dir ie: /mountc. To create the dir,
cd /
sudo mkdir mountc
Now that we are all set, lets mount the nfs drive. Issue the following command,
sudo mount -t nfs 192.168.1.64:/c /mountc -v
Where,
Put the nfs server IP instead of 192.168.1.64 and instead of /c put your own alias that you have assigned on your paths.txt file. And /mountc is the path where /c will be mounted.
Now you can access the nfs drive by navigating to /mountc from your file manager.
After you have issued the following command you will get something like below.
On NFS server terminal,
On NFS client terminal,
To unmount the mounted drive issue the following command,
sudo umount /mountc -lf
Where /mountc is the mount point. And i am using -f just to force the unmounting.
Note: I am not using any kind of firewall. You might need to disable or create rules on your firewall. Good luck.
And this is how you setup nfs server on non-server windows 10, 7 and mount it on a Linux system.
If you faced any issue or want to appreciate just comment below. I will try to be helpful.
In this short guide I will talk about how to mount a shared drive that is in Ubuntu or Debian that will be the server with the NFS (Network File System) drive, on a network drive accessible from Windows 10 who will play the role of client.
Table of Contents
-
Installation and configuration in Ubuntu or Debian as a server
- Drive options
-
Client installation and configuration in Windows 10
- Mounting the network drive
- Write permissions for the anonymous user
⇧
Installation and configuration in Ubuntu or Debian as a server
In the case of Debian, remove sudo from each command (it can even be executed the same).
Install the package «nfs-kernel-server»:
sudo apt install nfs-kernel-server⇧
Drive options
Then we edit the file /etc/exports with nano or with the editor of our preference:
sudo nano /etc/exportsThe file contains comments such as the following:
# /etc/exports: the access control list for filesystems which may be exported
#               to NFS clients.  See exports(5).
We add a line at the end with the following:
/home/user/folder 192.168.0.10(rw,sync,all_squash,anonuid=1000,anongid=1000)In the example above:
/home/user/folder it is the folder that will be shared by the network.
192.168.0.10 it is the IP of the client or clients that access the network resource. Only a static IP is shown, but we can use 192.168.0.1/24 to match between 192.168.0.1 and 192.168.0.254.
Mount options are in parentheses.
rwallow reading and writing.syncis optional in case we want a little more file integrity and avoid data loss, sacrificing a bit of performance.all_squashdowngrades the permissions of the files created from the client to the nobody user. For example, if in Windows 10 I am logged in as Administrator and created a new file, it will belong to user nobody.anonuidis the ID of the nobody user, or whatever user we want.anongidis The group ID of the user nobody.
In this case, I set anonuid and anongid to 1000, which is the user who owns the folder, /home/user/folder to preserve execute and write permissions.
With the changes made, we save the file CTRL + O, then Enter, and then we close with CTRL + X, this only if we use the nano editor from the terminal.
We restart the NFS server:
sudo service nfs-kernel-server restartWith this, the configuration on the server will be ready, any error that appears when restarting is necessary to check the configuration and obviously the description of the error.
⇧
Client installation and configuration in Windows 10
Windows comes with a default client, but it needs to be installed. The only detail is that I don’t remember if it is available in the Windows 10 Home version.
The easiest way to install it is to use the search bar and type Control Panel, because Windows 10 has several modern panels that hide the older options. Open Programs › Programs and Features and in the left panel we open Turn Windows features on or off.
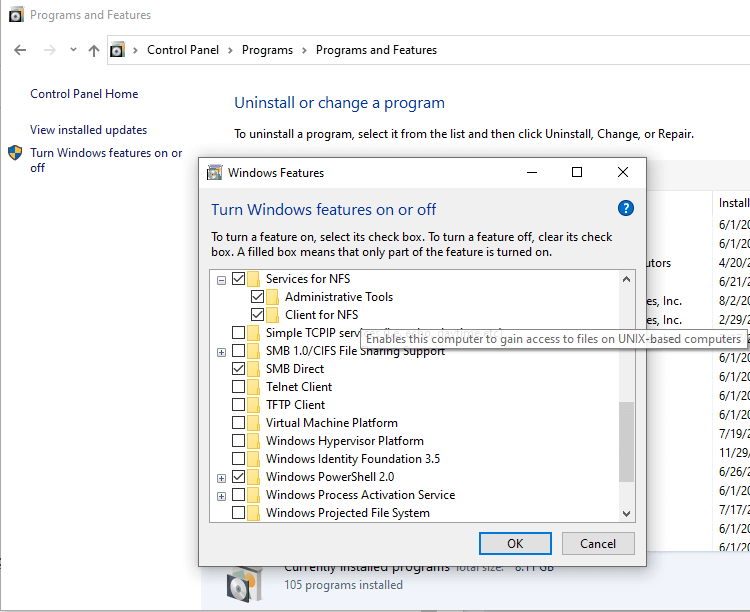
Mark the box Service for NFS with his two descendants Client for NFS and Administrative Tools. We click on OK and after some time the client will be installed.
⇧
Mounting the network drive
To mount the unit, we open the cmd (do not use PowerShell). We use the command:
mount -o anon \\192.168.0.20\home\user\folder k:The IP 192.168.0.20 is the server, followed by the shared folder and the drive letter that will be used. It is important to use the real full path of the resource as if we were personally on the server with the folder /home/user/folder, otherwise it won’t work. I have tried hiding the part of the path when mounting the drive, but it is a complicated process and not worth the extra effort.
The message, The command completed successfully. will indicate that everything is working properly.
⇧
Write permissions for the anonymous user
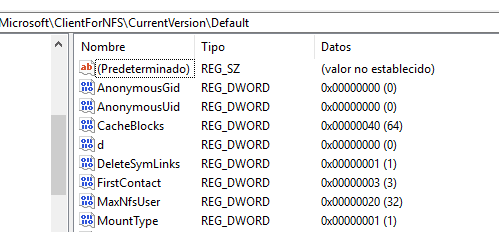
Normally and by default, Windows does not allow writing to this type of drive with the anonymous user. To enable writing, we have to open the Windows registry Regedit, and we headed towards: HKEY_LOCAL_MACHINE\SOFTWARE\Microsoft\ClientForNFS\CurrentVersion\Default.
There we will create a DWORD (32-bit) Value with the name AnonymousUid with the value of 0 with Base Decimal. Then create a DWORD (32-bit) Value with the name AnonymousGid with the value 0 with Base Decimal.
We have to restart the computer or the service Client for NFS, we can find it in the task manager in the Services tab.
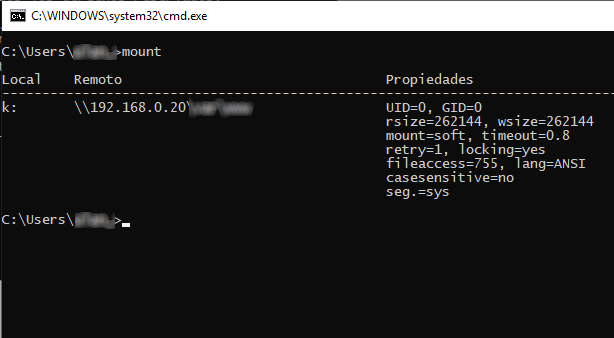
If we follow all the previous steps, and we already have the unit mounted, we open the CMD and execute the command mount, the mount will appear and in properties it will show UID=0 y GID=0. If any other number appears, check the entire procedure above.
Note: the procedure is almost the same in both Ubuntu and Debian, or any other variation like Kubuntu. No need to use Ubuntu Server. The NFS version to be used is 3 with Ubuntu 18.04 — 64-bits and Windows 10.
⇧
Related content
Posted by
on September 22, 2016
Here we’re going to show you how to mount an NFS file share in Windows Server 2016 both temporarily and persistently so that it will automatically mount after a reboot.
There are a couple of different ways this can be done, including mapping a network drive or adding a network location, which we’ll discuss here.
Our NFS Server: In this example we already have an NFS server setup on a CentOS 7 Linux system which is available at 192.168.1.14 and we have exported the /root/nfs directory with NFS. See our guide on creating an NFS server in Linux here if you need information on how to do this.
Install NFS Client
Before we can mount any NFS shares on our Windows server, we must first install the NFS client feature. This can be done through the graphical user interface (GUI) using server manager, however that takes a lot longer so we’ll use some PowerShell.
First we’ll use the Get-WindowsFeature cmdlet to search for available features that contain the string ‘NFS*’ in the Name field.
PS C:\> Get-WindowsFeature -Name NFS*

As we can see NFS-Client is available for install but not currently installed.
Next we use the Install-WindowsFeature cmdlet to install the NFS-Client feature, as shown below.
PS C:\> Install-WindowsFeature -Name NFS-Client

Once complete we should see that the installation has completed successfully, no reboot is required for this feature, we can begin using it straight away.
Mount NFS Temporarily
We can use the mount command in command prompt to quickly mount our NFS share and confirm that it’s working. Note that the mount command used here is in command prompt rather than PowerShell, using it in PowerShell will fail as it is a different command.
C:\Users\Administrators> mount \\192.168.1.14\root\nfs X:
X: is now successfully connected to \\192.168.1.14\root\nfs

The command completed successfully.

At this point we can browse to “This PC” and we should see the NFS share mounted under Network Locations.
There is an issue with this however, this mount is not persistent meaning that if we perform a restart of the Windows server it will not be there afterwards. Luckily there are a few ways we can permanently map to the NFS file share.
Mount NFS Persistently
Most of the time we will want our NFS mount to survive a system reboot and mount automatically after boot so that we don’t have to manually mount it every time.
There are a couple of different ways that we can achieve this task:
- Map Network Drive
- Add A Network Location
Map Network Drive
I personally prefer this method, as we can see the space remaining much more easily.
-
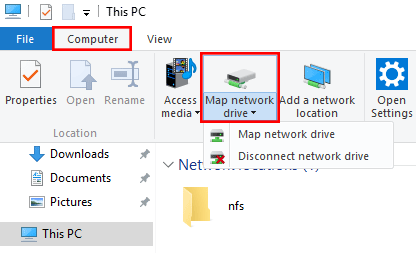
First open up “This PC” and select Computer from the menu at the top. From here click on Map network drive, as shown below.

-
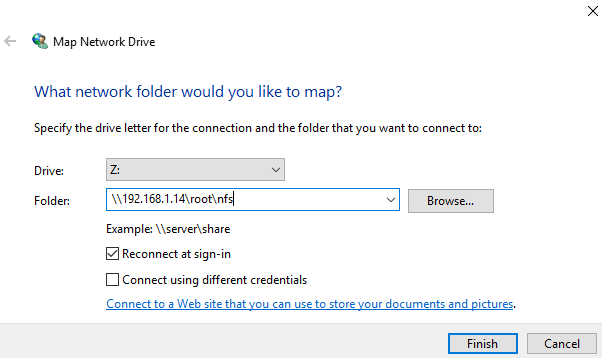
The Map Network Drive window will open, select the drive letter that you want to assign to the NFS share, followed by the IP address or hostname of the NFS server as well as the path to the exported NFS directory. Click the Finish button when complete.

You may see a pop up window showing that the connection is being attempted. Once complete the shared NFS folder will open up.
-
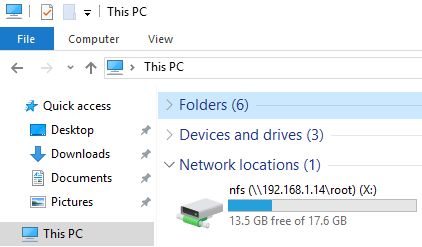
When you view “This PC” you will see the mapped network drive under Network location. This method is better than adding the network location as we’ll discuss next as it clearly shows how much disk space on the NFS share is in use and how much is still available.

Add A Network Location
This will basically create a shortcut to the mounted NFS directory for you to access at any time, it will also be available after restart just like the map network drive method above.
-
First open up “This PC” and right click in the white space area and select “Add a network location”.

-
On the welcome screen click Next to proceed.

-
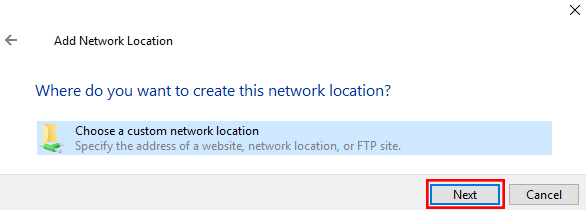
Select that you want to choose a custom network location, followed by the Next button.

-
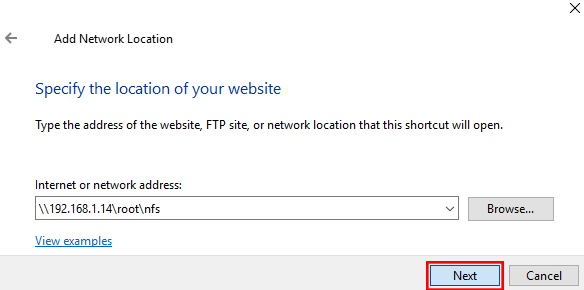
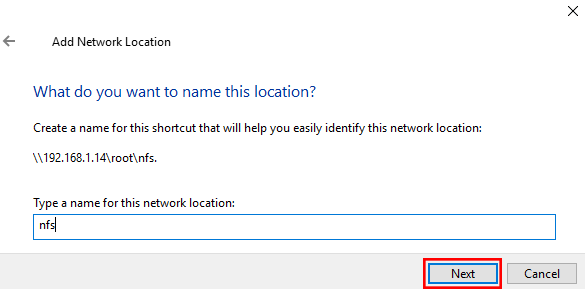
Enter in two back slashes, followed by the IP address or hostname of your NFS server, followed by the path that is being exported by the NFS server. Click Next once you’ve filled this in.

-
You can now select a custom name for the network location, click Next once you’ve set one.

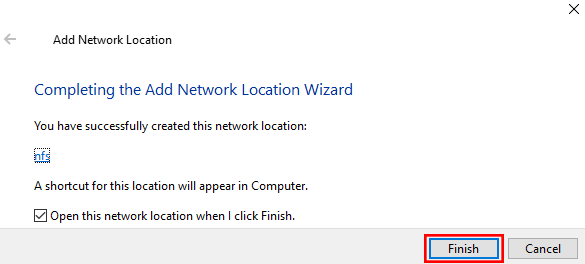
-
To complete the process, simply click the Finish button on the completion screen.

-
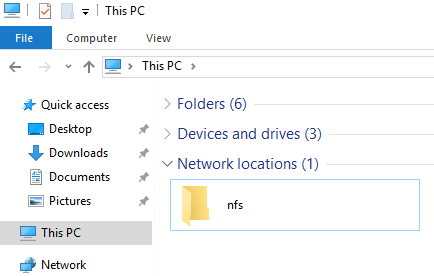
We can optionally open the NFS mount now, or we can browse to “This PC” and see the folder shortcut listed under the “Network locations” setting as shown below.

As mentioned note that this does not show the disk space in use like the network drive mapping option.


Summary
We have shown you how to install the NFS client feature in Windows Server 2016, and then mount an NFS share from a Linux server both temporarily through command prompt with the mount command, and persistently so that the NFS share is mounted automatically after the server has been restarted.
By doing this we can easily access files from a Unix or Linux based operating system over NFS from Windows.