
Adding users from command line is much easier rather than going through UI. It saves lot of time for Windows admins to add users in bulk using CLI commands/script. Net user command is the one that Windows users can use to manage user accounts, read on to know how to add users from CMD.
To add a new user account on local computer:
net user username password /ADD
Example: To add a new user account with the loginid John and with password fadf24as
net user John fadf24as /ADD
Hide password
If you do not want the password to be visible while adding new user account, you can use ‘*’ as shown below.
C:\>net user /add John *
Type a password for the user:
Retype the password to confirm:
The command completed successfully.
C:\>
To add a new user account to the domain:
net user username password /ADD /DOMAIN
Note that the command does not include the name of the domain, it automatically adds to the domain the computer belongs to.
Example:
net user John fadf24as /ADD /DOMAIN
Rename a user account
Net use command does not have any switches to rename a user account. But we can do that using wmic commands. Please check this – Rename user accounts on Windows
Few more advanced uses of net user command.
To set user full name while creating the user account
net user username password /ADD /FULLNAME:"User_Fullname"
To allow user to change password:
net user username password /ADD /PASSWORDCHG:Yes
To restrict user not to change the password:
net user username userpasswd /ADD /PASSWORDCHG:NO
To set account expiry time we can use /EXPIRES switch. This can also be used to set that the account never expires.
To specify if the user must have a password set we can use /PASSWORDREQ switch. For more information on all net user options, read this – Net user command: syntax and examples
How to create a new administrator account?
An administrator account can’t be created directly. We first need to create a user account and then add the user to the administrators group.
Errors:
- If you don’t have privileges to add new user account to the system, you would get an error like below.
C:\>net user John /add
System error 5 has occurred.
Access is denied.
C:\>
- While adding user to domain, make sure that your computer is connected to the domain. Otherwise it throws up below error.
C:\>net user testuser testpassword /ADD /DOMAIN
The request will be processed at a domain controller for domain mydomain.com.
System error 1355 has occurred.
The specified domain either does not exist or could not be contacted.
Related Posts:
Remove user from group
Загрузить PDF
Загрузить PDF
Учетные записи пользователей управляются через Панель управления Windows. Если у вас нет доступа к Панели управления, прочитайте эту статью.
-

Откройте «Мой компьютер» и в строке поиска введите «Панель управления» (без кавычек). Если это не сработало, переходите к шагу 2.
-
Если это не сработало (или Панели управления нет в меню), переходите к шагу 3.
-

Введите Control Panel. Если это не сработало, переходите к шагу 4.
-

Нажмите «Пуск» — «Выполнить» и введите cmd. В окне командной строки введите Control Panel. Если это не сработало, переходите к шагу 5, но окно командной строки не закрывайте.
-

В командной строке введите net для получения информации об этой команде.
- Чтобы изменить пароль, введите net user (имя_пользователя) * (не забудьте про символ «звездочка»).
- Для добавления пользователя введите net user (имя_пользователя) /ADD
- Для удаления пользователя введите net user (имя_пользователя) /DELETE
- Введите net accounts/? Для получения информации о команде net accounts. Вы можете использовать эту команду для принудительного выхода из системы и установления сроков действия учетных записей пользователей.
- Если вам нужны дополнительные опции, в конце каждой описанной команды введите /?. Или поищите в интернете информацию об использовании той или иной команды.
Реклама


-
![Step 1 net user [username [password | *] [options]] [/domain]](data:image/svg+xml,%3Csvg%20xmlns='http://www.w3.org/2000/svg'%20viewBox='0%200%20460%20341'%3E%3C/svg%3E)
-
-
Реклама
![Step 1 net user [username [password | *] [options]] [/domain]](https://www.wikihow.com/images_en/thumb/f/f0/Add-Users-from-CMD-Step-6-Version-4.jpg/v4-460px-Add-Users-from-CMD-Step-6-Version-4.jpg)
![Step 2 username {password | *} /add [options] [/domain]](https://www.wikihow.com/images_en/thumb/0/0e/Add-Users-from-CMD-Step-7-Version-4.jpg/v4-460px-Add-Users-from-CMD-Step-7-Version-4.jpg)
![Step 3 username [/delete] [/domain]](https://www.wikihow.com/images_en/thumb/b/b6/Add-Users-from-CMD-Step-8-Version-4.jpg/v4-460px-Add-Users-from-CMD-Step-8-Version-4.jpg)
Советы
- Вы должны войти в систему как администратор, чтобы создать еще одну учетную запись с правами администратора.
Реклама
Об этой статье
Эту страницу просматривали 26 459 раз.
Была ли эта статья полезной?
In this tutorial, you will learn how to use the net user command to create, delete and change user accounts in the Windows command prompt (CDM).
We can perform the following tasks using the net user command:
- View user accounts.
- Add and Remove user accounts.
- Activate and Deactivate user accounts.
- Change the user password.
If you are operating in an Active Directory domain environment, always use the /domain command switch to execute the net user command on the domain controller rather than on the local computer.
Examples
List users on the local computer:
net userList users on the domain controller:
net user /domainThis command displays detailed information about the Administrator account:
net user AdministratorCreate a user named user1 with a password of strongPassword:
net user /add user1 "strongPassword"Delete the user user1 from the computer:
net user /delete user2This command enables the built-in Administrator account on Windows 10/11:
net user Administrator /active:yesThis command sets (changes) the Administrator account password:
net user Administrator "adminPassWord"Execute the following command to disable the Administrator account on Windows 10/11:
net user Administrator /active:noThis command forces the user user1 to change the password at the next logon:
net user user1 /logonpasswordchg:yesCreate a user; the user must change the password at the next logon:
net user /add user1 "strongPassword" /logonpasswordchg:yesCreate a new user; the account expires on January 31st:
net user /add user1 "strongPassword" /expires:01/31/2023Command Options
| username | The name of the user to create, delete, view, or modify. |
| password | Password for the user. |
| * | Use this option to produce a prompt for the password. |
| /add | Use this option when you want to create a new user. |
| /delete | Use this option to remove a user from the Windows system. |
| /active:{yes | no} | Activates or Deactivates a user. The default is yes when creating a new user. |
| /expires:{date | never} | Use this option to set the expiration date (mm/dd/yy) for an account. The default is never. |
| /fullname:»name» | Full name of the user. |
| /passwordchg:{yes | no} | Specifies whether users can change their own password. The default is yes. |
| /passwordreq:{yes | no} | No means the user can log in without a password. The default is YES. |
| /logonpasswordchg:{yes|no} | Specifies whether the user should change the password at the next logon. The default is NO. |
| /homedir:path | The home directory location. |
| /comment:»text» | Use this option to add a description to the user’s account. |
You can view the manual page by typing net help user at the command prompt.
View a User
When you execute the net user command without any options, it displays a list of user accounts on the computer.
net userYou will see an output similar to the following:
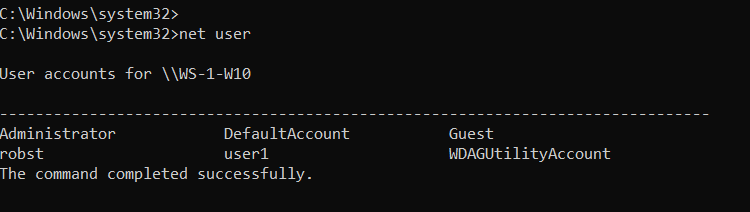
Add the /domain command switch if you want to list users on the Active Directory Domain controller.
net user /domainTo see detailed information about a particular user, execute the command net user Username, where the Username is the name of the user you want to view. For example, you can view the Administrator account by running the following command:
net user AdministratorCreate and Delete User Accounts
To create a user account, use the following syntax:
net user /add UserName PasswordFor example, the following command creates a user named user1 with a password of strongPassword:
net user /add user1 "strongPassword"Use an asterisk (*) in place of the password to produce a prompt, as shown in the following example:
net user /add user1 *
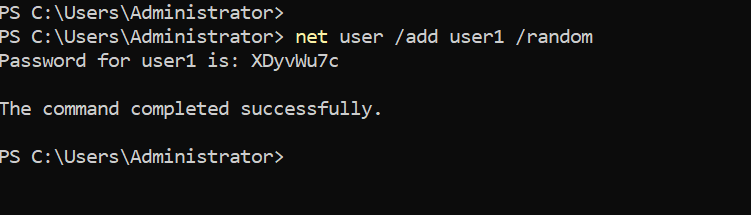
Alternatively, you can also use the /random option to generate a strong random password, as shown in the following example:
net user /add user1 /randomThe randomly generated password will be displayed on the command prompt after you execute the command.
To delete a user, use the following syntax:
net user /delete UserNameThe following command deletes the user user1 from the computer:
net user /delete user2Change Passwords
To change passwords, use the following syntax:
net user UserName New-PasswordUse an asterisk (*) or /random in place of the password to produce a prompt or generate a random password:
net user UserName *
net user user1 /random
Notes
The net user command is most of the time used in Windows Server to manage Active Directory users.
Windows 10/11 uses a new Settings pane to manage users, but the net user command is still useful for some tasks. For example, if you want to activate the built-in Administrator account, it is easy to do that using this command.
While working at the command prompt, run the net help user command to see all available command options.
In the next tutorial, we are going to learn how to manage Windows groups using the net localgroup CMD command.
The command Net User allows you to manage your local and even your domain users from the command line. It’s mainly used to quickly add, delete or disable user accounts from the command line. But it can do more than just that. The tool can be used in both command prompt and PowerShell.
For managing domain users, I recommend using the PowerShell ActiveDirectory module. It comes with more options and allows you to filter, copy and search users and set or change all properties. But as mentioned, you can also perform basic tasks with the Net User command for domain users.
In this article
In this article, we are going to take a closer look at the Net User command. I will explain how you can add, and remove accounts, change passwords, and more.
The Net User command is a command-line utility that you can run in any terminal on Windows. But to use it you will need to have Administrator permissions on the computer. Without it, you won’t be able to create new user accounts for example. Also, make sure that you open Windows PowerShell or Windows Terminal in Admin mode.
Note
If you get the error “System error 5 has occurred. Access is denied” Then you haven’t start the command prompt or PowerShell with administrator privileges.
The most important parameters of the Net User command are:
| Parameter | Description |
|---|---|
| <username> | Specify the username to the account you want to perform the action on |
| <password> | Set or change the password for the specified user account. Use * to get a prompt for the password. |
| /domain | Used for managing domain accounts |
| /add | Create a new user account |
| /delete | Delete a user account |
| /active | Enable or disable the user account. Options are yes or no. |
| /expire | Set the date when the account expires |
| /time | Specifies the times that a user is allowed to log in |
| /homedir | Set the home directory path of the user account. |
List all users
When you enter the command Net User without any parameters, then it will list all user accounts on the computer. If you run the command on the Domain Controller, then it will list all domain accounts.
Net User

# Or you can also type
Net Users
In the first screenshot above you will see the results on a local computer, the second one are all the users from the local domain.
When you specify the username you will see all the details from the user account
# Get the user details for Zoe Tucker
net user ztucker

Net User Add Account
The Net User command can be used to create new user accounts on your computer and in your domain. To create a user account you will need to add the /add parameter and specify the username. A password is by default not required on a local computer. For domain accounts, however, you will need to specify the password as well.
# Create a new local user account with the login name lazyadmin
Net User /Add lazyadmin
For entering the password you have two options, you can type it in plain text in the command line or use the * which will show you a prompt to enter the password.
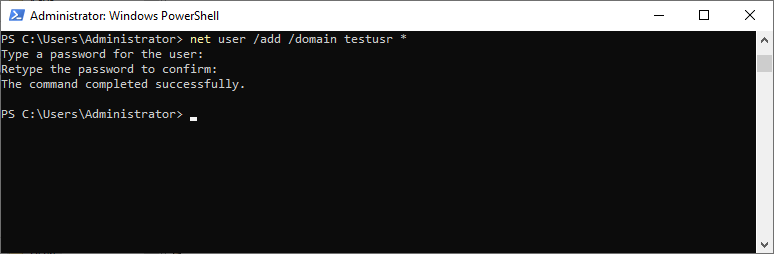
# Create a new domain user with username testusr and passswd123
Net User /add /domain testusr passwd123

# Prompt for the password
Net User /add /domain testusr *
The new domain user is placed in the built-in OU “Users”.
When creating a user we can also specify login details, home directory path, etc of the user. I will explain each command later in the article. But to give you an idea of the possible options, we are going to create a user with the following details:
- Username: testusr
- Password: prompt
- Full name: Test User
- Password required: yes
- Allowed to login between: Monday to Friday between 08:00 and 17:00
- Home folder directory: \\lazyadmin.local\home\testusr
- Script path: \\lazyadmin.local\netlogon\welcome.bat
Net User /add /domain testusr * /fullname:"Test User" /passwordreq:yes /time:M-F,08:00-17:00 /homedir:"\\lazyadmin.local\home\testusr" /scriptpath:"\\lazyadmin.local\netlogon\welcome.bat"
Net User Delete User Account
We can also use the command line tool to delete user accounts, both local and from the domain. For this, you will need to use the parameter /delete and enter the username. Important to note is that the command tool won’t ask for confirmation. So be careful when using the delete option.
# Delete the local user Lazyadmin
Net User /delete lazyadmin

# Delete a domain user
Net User /delete /domain testusr
Net User Change or Set Password
One of the common tasks for an IT Helpdesk is to reset a user’s password. Of course, you can reset the password in the Active Directory. But it’s also possible with the command Net User. Resetting passwords is not limited to domain accounts, you can also use this method for local computer accounts.
To reset a password you will need to specify the username and then either type in the password or type * after which you can securely type the password:
# Set the password for LazyAdmin to passwd123
Net User LazyAdmin passwd123

# Pormpt for the new password
Net User LazyAdmin *
When it’s a domain user, then just add the /domain parameter. Make sure that the password meets the complexity requirements of the domain
# Reset the password for the domain user tesusr
Net User /domain testusr *
Enable or Disable User accounts
We can also use the command-line tool to enable and disable accounts. This is particularly useful when a user is locked out or when you quickly need to disable an account. To do this we are going to use the parameter /Active:yes|no
The command can be used for local computer accounts as for domain accounts:
# Disable local account
Net User lazyadmin /active:no

# Disable domain user account
Net User tesusr /Domain /Active:no
To enable an account, simply replace /Active:no with /Active:yes
Set Expire date for User Account
If you know the data that an employee leaves the organization then it’s a good idea to set the expired date for the account. This way the account is automatically locked after the specified data. The date format depends on your region settings, but the options are:
- MM/DD/YYYY
- DD/MM/YYYY
- mmm,dd,YYYY
Account expiration settings are not limited to a domain account, you can also set the expired date on a local Windows 10 or 11 user account.
# Set expire date for local user
Net User lazyadmin /expires:21/09/2022

# Set expire data for domain user
Net User testusr /domain /expires:09/20/2022
Set login times for User Account
Some accounts are only allowed to be used between specific hours, office hours for example. We can specify these hours with the /time parameter. To specify the time we will need to enter the days and hours between the account is allowed to log in.
You can use different notions for the days and hours (12-hour or 24-hour notation), and we can specify multiple time blocks by separating them with the semi-column ;.
# Allow login during office hours only
Net User lazyadmin /time:M-F,08:00-17:00

# Or in 12-hour notation
Net User lazyadmin /time:M-F,8am-5pm

# Specify multiple blocks
Net User lazyadmin /time:M,08:00-17:00;W,08:00-13:00;F,08:00-17:00
Net User Password settings
When you create a new account you can set a password for the account as well. But when it comes to passwords we have two other interesting parameters, passwordchg and passwordreg. The first determines if the user can change the password. This setting is really useful for kiosk accounts. The user can’t change the password when this is set to no.
# User lazyadmin can't change it's password
net user lazyadmin /passwordchg:no
The parameter passwordreg is used to specify it a user account must have a password. If this is set to no, then the user can remove their password, making the device vulnerable.
net user lazyadmin /passwordreg:yes
Home Directory Path
The last parameter that I want to mention is the home directory path. If you want to store the home directory of the user on a network share then you can set the path to the folder with the parameter /homedir. But make sure that the full path, including the user’s folder, exists.
# Set the home directory for testusr
net user testusr homedir:"\\lazyadmin.local\home\testusr"
Wrapping Up
The Net User command is great when wanting to quickly enable or disable a user account or reset a password. Also, it’s great to manage local computer accounts on small networks. When working with domain accounts I prefer to use the Active Directory module in PowerShell.
I hope you found this article useful, if you have any questions, just drop a comment below.
В версиях Windows, отличных от Professional (например Windows 10 Home) отсутствует раздел «Локальные пользователи и группы» в оснастке «Управление компьютером». Однако иногда возникает необходимость создать/удалить/изменить ещё одного пользователя в данной операционной системе. Разберём, как это сделать.
Самым простым вариантом создать пользователя в не-Pro редакциях Windows – через командную строку.
Открытие командной строки
Для следующих манипуляций необходимо запустить командную строку от имени администратора.
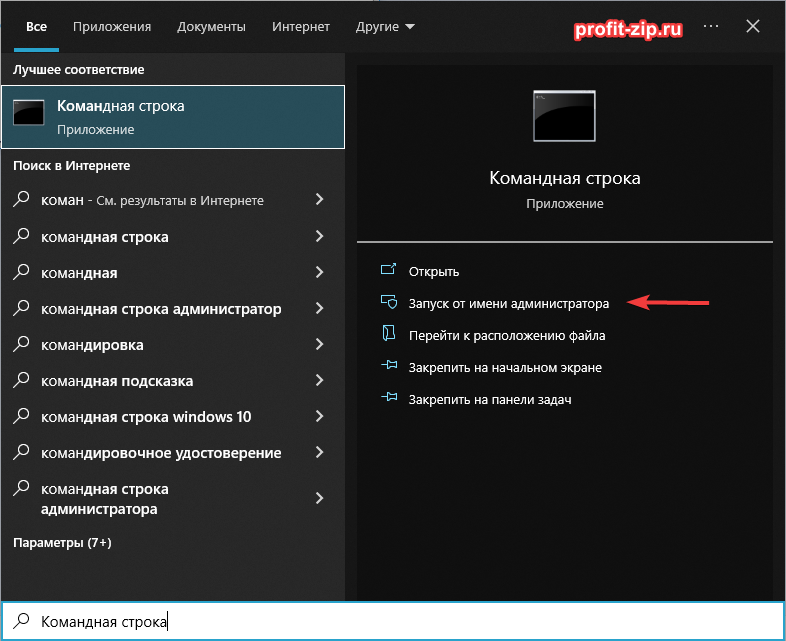
Открыть командную строку можно несколькими способами:
-
Для версий Windows 8-11
Нажмите по кнопке «Пуск» правой кнопкой мыши и выберите «Командная строка (администратор)», «Powershell (администратор)» или «Терминал (администратор»).
При появлении диалога UAC – согласитесь на запуск. -
Для всех версий Windows
Найдите «Командная строка» в списке программ в меню «Пуск» или через Поиск среди приложений. Нажмите правой кнопкой мыши по приложению «Командная строка» и/или в контекстном меню выберите «Запуск от имени администратора».

-
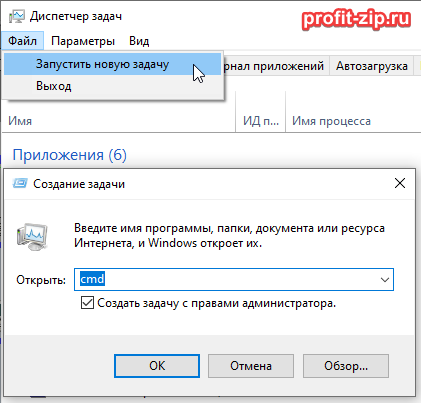
Для всех версий, через Диспетчер задач
Запустите Диспетчер задач. Сверху нажмите Файл – Запустить новую задачу.
В появившемся окне «Создание задачи» введите напротив поля «Открыть» –cmd, установите галочку «Создать задачу с правами администратора» и нажмите «ОК»
Команды управления пользователями через CMD
Заполните данные и команды изменятся автоматически:
- Создать пользователя:
net user "Пользователь" /add
- Создать пользователя с установленным паролем:
net user "Пользователь" "Пароль" /add
- Удалить пользователя:
net user "Пользователь" /delete
- Отключить пользователя:
net user "Пользователь" /active:no
/active:yes – включает пользователя.
Отключенный пользователь остаётся стандартным пользователем системы, но действия от его имени становятся недоступны. Авторизоваться от имени отключенного пользователя также нельзя. - Изменить пароль уже существующего пользователя:
net user "Пользователь" "Пароль"
- Отключить обязательную смену/установку пароля при первом входе пользователя:
net user "Пользователь" /passwordreq:no
/passwordreq:yes – включает обязательную смену/установку пароля.
- Установить срок действия пароля пользователя – неограниченным (убрать срок действия пароля):
wmic useraccount where "name='Пользователь'" set passwordexpires=false
set passwordexpires=true – включает ограничение срока действия пароля
- Изменить срок действия пароля:
net accounts /maxpwage:30
Вместо 30 – количество дней. Применяется ко всем пользователям системы, у которых срок действия пароля – НЕ неограничен.
Значение по умолчанию – 42 дня, максимальное – 999 дней. - Запретить смену пароля пользователем:
net user "Пользователь" /passwordchg:no
/passwordchg:yes – разрешить смену пароля пользователем
- Добавить пользователя в локальную группу:
net localgroup "Администраторы" "Пользователь" /add
- Удалить пользователя из локальной группы:
net localgroup "Администраторы" "Пользователь" /delete
- Установить рабочее время учётной записи:
net user "Пользователь" /times:X
/times:X – отвечает за установку времени, в которое учётной записью можно пользоваться.
X может принимать значения вида:
Дни_недели, диапазон_времениилиДни_недели, диапазон_времени; Дни_недели, диапазон_времени
Дни недели принимают следующие значения и указываются через символ «дефис» ( — ):- M – понедельник
- T – вторник
- W – среда
- Th – четверг
- F – пятница
- Sa – суббота
- Su – воскресенье
Время может быть в формате
8:00-17:00или8am-5pmКроме того, можно перечислять несколько интервалов через точку с запятой ( ; )
Пример:
M-F,8:00-17:00– учетная запись будет доступна с понедельника по пятницу, с 8:00 до 17:00M-F,8:00-17:00;Sa,8:00-12:00– учетная запись будет доступна с понедельника по пятницу, с 8:00 до 17:00, а также в субботу с 8:00 до 12:00M-F,8:00-17:00;Sa,8:00-15:00;Su,8:00-12:00– учетная запись будет доступна с понедельника по пятницу с 8:00 до 17:00, в субботу с 8:00 до 15:00, в воскресенье – с 8:00 до 12:00M-F,8:00-12:00;M-F,13:00-17:00– учетная запись будет доступна с понедельника по пятницу, с 8:00 до 12:00 и с 13:00 до 17:00 (стандартная рабочая неделя, исключая обеденное время)
Несколько деталей
При создании пользователя, каталог пользователя (по умолчанию C:\Users\Username) не создаётся. Каталог создастся в момент первого входа пользователя в систему.
Создать пользователя с именем уже существующего пользователя нельзя.
При удалении пользователя, каталог удаляемого пользователя не удалится. Все файлы пользователя останутся доступны в каталоге пользователей.
При создании пользователя с именем уже существовавшего ранее пользователя (при условии, что папка удалённого пользователя не удалена), папка пользователя приобретёт название вида Username.PCname (где Username – имя пользователя, а PCname – имя компьютера), а если такая уже существует – название каталога будет иметь вид Username.PCname.000 (где Username – имя пользователя, PCname – имя компьютера, а 000 – порядковый номер папки)
Имя пользователя, пароль и названия групп пользователей, по хорошему, должны обрамляться в кавычки (например: ««Пользователь»»), однако не запрещается ими не пользоваться, но только при условии, что в выражении нет пробелов. В случае, если в имени пользователя, пароле или названии группы пользователей присутствует пробел, использование кавычек обязательно, т.к. иначе команды могут сработать неправильно или не сработать вовсе.