
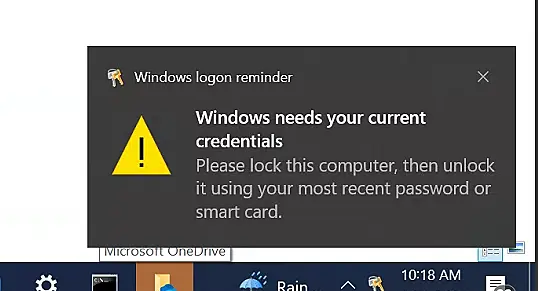
После входа в Windows 10/11 на компьютере, который добавлен в домен Active Directory или Azure AD, пользователь может увидеть всплывающее сообщение в нижнем правом углу:
Операционной системе требуются ваши учетные данные.
Заблокируйте компьютер и разблокируйте его, используя последний пароль или смарт карту.
Windows needs your current credentials.
 Please lock this computer, then unlock it using your most recent password or smart card.
Если заблокировать экран компьютера (Win+L) и ввести пароль/PIN от вашего аккаунта, сообщение опять появляется через некоторое время.
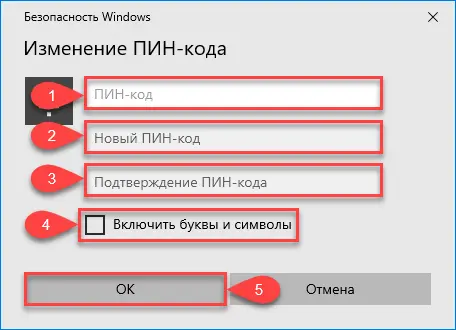
Если проблема возникает при входе на компьютер с помощью учетной записи Microsoft (или Azure AD) с настроенным PIN (через Windows Hello), скорее всего причина в том, что ваш текущий PIN создан с помощью вашего предыдущего пароля. Попробуйте пересоздать PIN для вашего аккаунта.
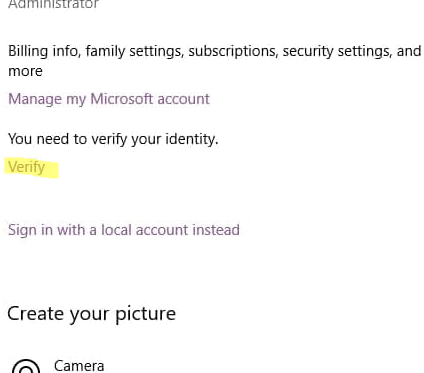
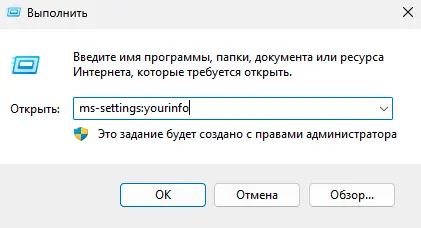
- Перейдите в раздел Settings -> Accounts -> You info (команда быстрого доступа
ms-settings:yourinfo
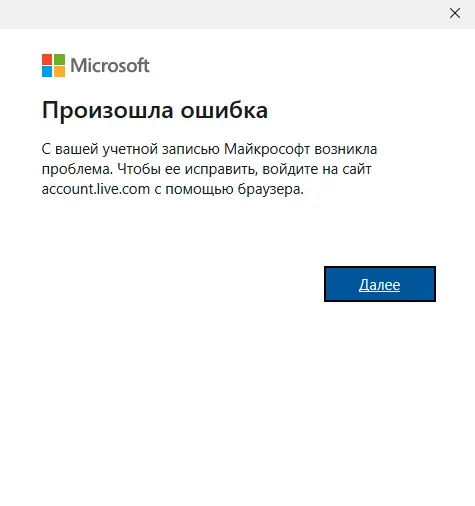
) и нажмите на кнопку Verify;Опция доступа если вы вошли с учетной записью Microsoft. Если нет, здесь нужно нажать кнопку “Sign in with a Microsoft Account instead”.

- Выполните повторную верификацию и перезагрузите компьютер. После это Windows должна перестать требовать от вас учетные данные.
Если вы вошли на компьютер с учетной запись Azure, а на устройстве есть подключенные сетевые диски с помощью учетной записи локальной Active Directory, Windows может требовать выполнить проверку учетных данных AD. В этом случае нужно удалить все подключенные сетевые диски с помощью команды:
net use * /delete
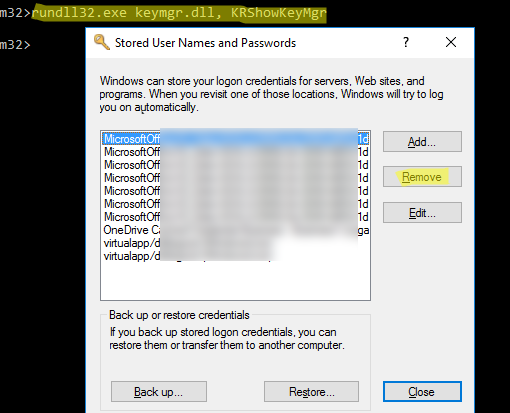
Также рекомендует очистить сохраненные учетные данные в диспетчере паролей Windows. Выполните команду
rundll32.exe keymgr.dll, KRShowKeyMgr
и удалите все записи.
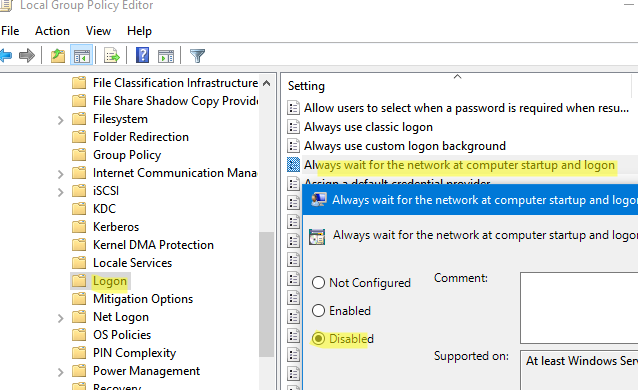
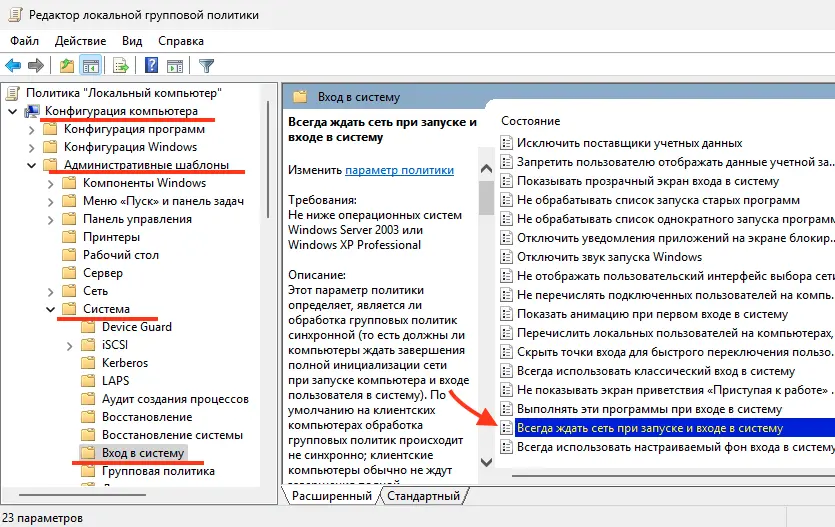
На компьютере в домене Active Directory можно отключить требовать повторный ввод учетных данных (не путать с автоматическим входом в Windows) с помощью параметра GPO.
- Вы можете использовать локальный редактор GPO на компьютере (
gpedit.msc
) или редактор доменных GPO (
gpmc.msc
); - Перейдите в раздел Computer Configuration -> Administrative Templets -> System -> Logon и найдите параметр “Always wait for the network at computer startup and logon”;
- Измените параметр политики на Disable и сохраните изменения.
- Перезагрузите компьютер чтобы применить настройки групповой политики.
Можно настроить этот параметр реестра с помощью PowerShell:
$null = Set-ItemProperty -Path 'Registry::HKEY_LOCAL_MACHINE\SOFTWARE\Policies\Microsoft\Windows NT\CurrentVersion\Winlogon' -Name 'SyncForegroundPolicy' -Value 0 -Type 'DWord'
Также проверьте в настройках учетной записи в AD, что для пользователя не настроено ограничение на часы входа (Logon Hours).
На компьютерах в домене Active Directory уведомление о необходимости повторно ввести учетные данные возникает, когда срок действия билета Kerberos истек. Вы можете вывести информацию о билетах Kerberos пользователя с помощью команды:
klist
Введите пароль чтобы обновить ваш билет Kerberos. В данном случае после блокировки экрана и повторного ввода пароля, ваш билет Kerbero будет обновлен и повторный запрос учетных данных не будет появляться. Вы можете убедиться, что проблема связана с Kerberos, если с помощью редактора атрибутов AD включите в настройках учетной записи пользователя (атрибут userAccountControl) параметр “Do not require Kerberos Preauthentication”. После этого Windows престанет повторно требовать ваши учетные данные (не рекомендуется оставлять этот параметр включенным по соображениям безопасности).
Если в вашей сети используется гибридная аутентификация (AAD и AD), или вы выполняете миграцию в облако, то чтобы избавиться от надоедливого запроса учетных данных на компьютерах в AAD, нужно сменить настройки DNS на компьютерах на внешние DNS сервера вместо локальных DNS серверов Active Directory.
Сообщение с ошибкой «Операционной системе требуются ваши учетные данные. Заблокируйте компьютер и разблокируйте его, используя последний пароль или смарт карту.» (Windows needs your current credentials.) появляется на компьютерах под управлением Windows 10 или Windows 11, подключенных к домену Active Directory или Azure AD. Оно отображается в правом нижнем углу экрана и предлагает заблокировать компьютер (комбинация Win+L), а затем разблокировать его, используя актуальный пароль или смарт-карту. Однако даже после ввода пароля ошибка может возвращаться через некоторое время. В ряде случаев попытка разблокировки приводит к блокировке учетной записи в Active Directory, что усложняет работу.
Приобрести оригинальные ключи активации Windows 11 можно у нас в каталоге от 1690 ₽
Ошибка может быть вызвана устаревшим PIN-кодом в Windows Hello, истекшими билетами Kerberos, конфликтами между локальными и облачными учетными записями или некорректными настройками сети. В этой статье рассмотрим все возможные решения с пошаговой инструкцией.
Способ 1: Обновление PIN-кода для учетной записи Microsoft или Azure AD
Если вы используете учетную запись Microsoft или Azure AD с PIN-кодом, созданным на основе старого пароля, это может быть причиной ошибки. Пересоздание PIN-кода часто устраняет проблему.
1. Откройте настройки Windows: нажмите Win+I или выполните команду в окне «Выполнить» (Win+R).
ms-settings:yourinfo
2. Перейдите в раздел Учетные записи -> Сведения (Accounts -> Your Info).
3. Нажмите кнопку Подтвердить (Verify) для проверки учетной записи.
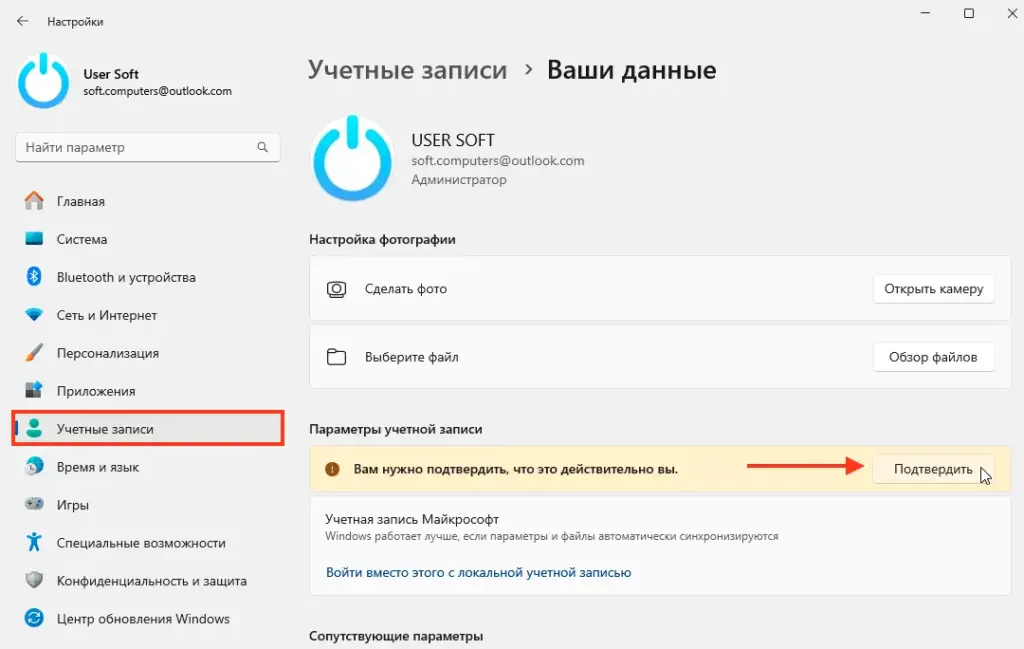
4. Если вы вошли с учетной записью Microsoft, выберите опцию Войти с учетной записью Microsoft (Sign in with a Microsoft Account instead), если она доступна.
5. Завершите процесс верификации и создайте новый PIN-код.
6. Перезагрузите компьютер.
После этих действий запрос учетных данных должен исчезнуть. Этот метод особенно эффективен для учетных записей, использующих Windows Hello.
Способ 2: Отключение сетевых дисков и очистка сохраненных учетных данных
Конфликт между учетной записью Azure AD и локальной Active Directory может возникать из-за подключенных сетевых дисков. Для устранения выполните следующие шаги:
1. Отключите все сетевые диски, выполнив в командной строке команду:
net use * /delete
2. Очистите сохраненные учетные данные в Диспетчере учетных данных Windows:
– Выполните команду
rundll32.exe keymgr.dll, KRShowKeyMgr
– В открывшемся окне удалите все записи, связанные с сетевыми подключениями или учетными данными Active Directory.

3. Перезагрузите компьютер.
Этот метод устраняет конфликты аутентификации, вызванные устаревшими учетными данными для сетевых ресурсов.
Способ 3: Отключение ожидания сети через групповые политики
На компьютерах в домене Active Directory запрос учетных данных может быть связан с настройками, требующими ожидания полной загрузки сети при входе. Отключите эту функцию через групповые политики (GPO):
1. Откройте редактор групповых политик:
– Для локальных настроек выполните
gpedit.msc
– Для доменных настроек используйте
gpmc.msc
2. Перейдите в раздел Конфигурация компьютера -> Административные шаблоны -> Система -> Вход в систему (Computer Configuration -> Administrative Templates -> System -> Logon).
3. Найдите параметр Всегда ждать сеть при запуске и входе в систему (Always wait for the network at computer startup and logon).
4. Установите значение Отключено (Disabled) и сохраните изменения.
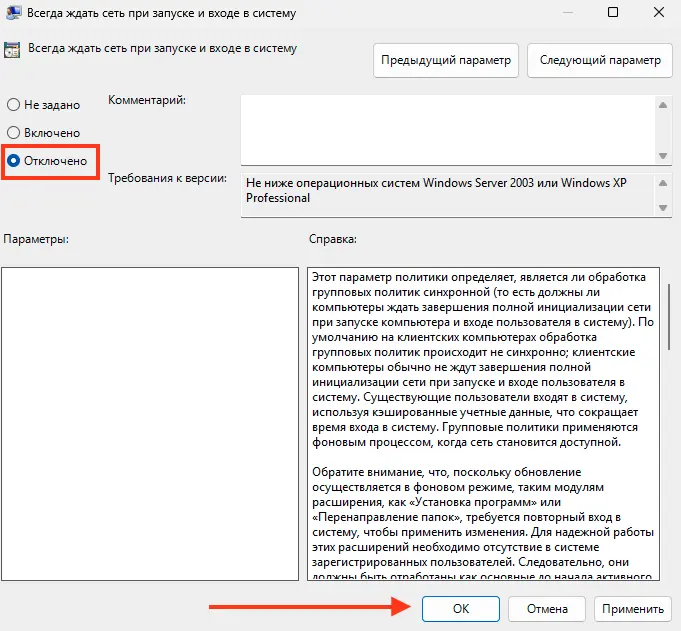
5. Перезагрузите компьютер.
Альтернативно, настройте этот параметр через реестр с помощью PowerShell:
$null = Set-ItemProperty -Path 'Registry::HKEY_LOCAL_MACHINE\SOFTWARE\Policies\Microsoft\Windows NT\CurrentVersion\Winlogon' -Name 'SyncForegroundPolicy' -Value 0 -Type 'DWord'
Эти изменения устраняют необходимость повторного ввода учетных данных при загрузке системы.
Способ 4: Проверка ограничений учетной записи в Active Directory
Ошибка может быть вызвана ограничениями учетной записи в Active Directory, такими как настройки часов входа (Logon Hours). Для проверки:
1. Откройте консоль Пользователи и компьютеры Active Directory (Active Directory Users and Computers).
2. Найдите учетную запись пользователя.
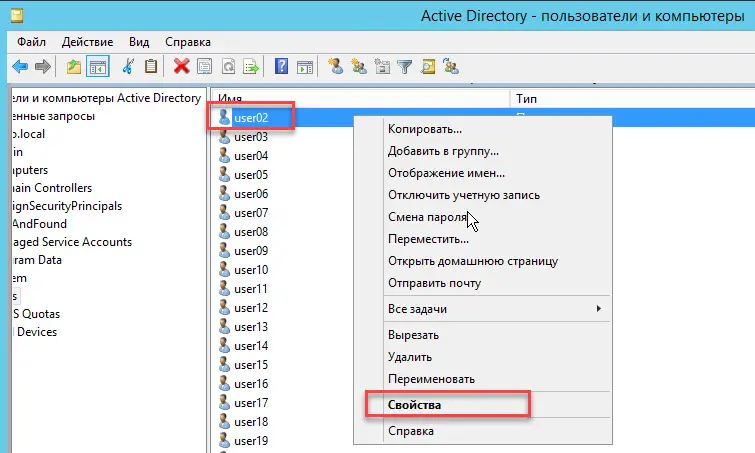
3. Проверьте параметр Часы входа (Logon Hours) и убедитесь, что нет временных ограничений.
4. Если ограничения есть, удалите их или настройте корректно.
5. Примените изменения и перезагрузите компьютер.
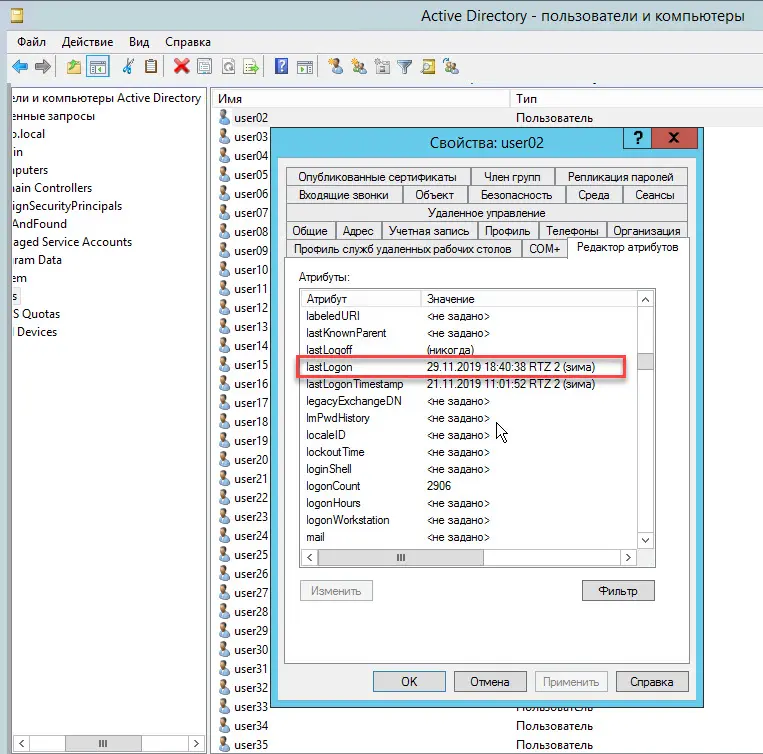
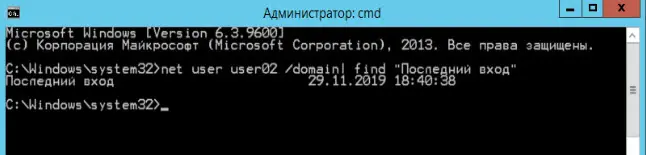
Вы так же можете узнать время последнего входа пользователя в домен из командной строки, используя инструмент net.
Откройте командную строку (вам не нужны права администратора домена для получения информации о пользователе AD) и выполните команду:
net user user2 /domain| find "Последний вход"
Способ 5: Управление билетами Kerberos
В домене Active Directory ошибка часто связана с истечением срока действия билетов Kerberos. Чтобы проверить и обновить их:
1. Откройте командную строку и выполните:
klist
Команда покажет текущие билеты Kerberos и их статус.
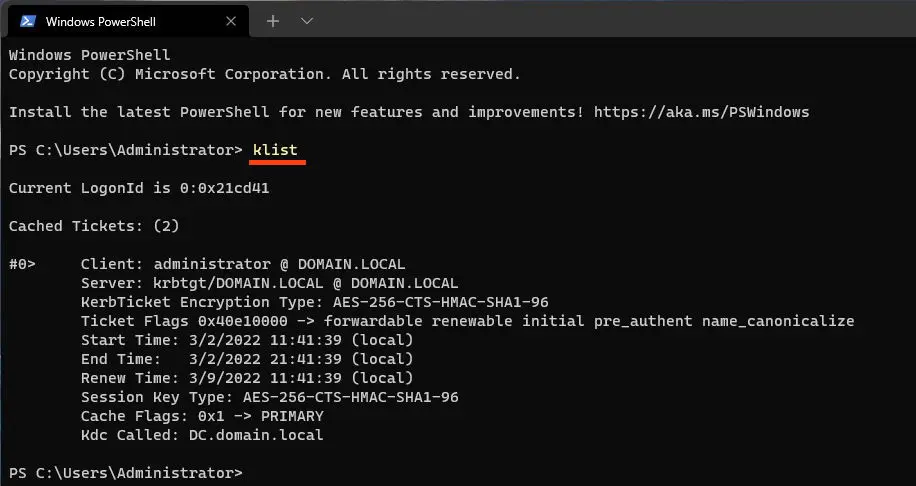
2. Для обновления билетов заблокируйте экран (Win+L) и введите пароль учетной записи.
3. Проверьте, исчезла ли ошибка.
Для диагностики можно временно отключить предварительную аутентификацию Kerberos:
1. В консоли Пользователи и компьютеры Active Directory откройте настройки учетной записи.
2. В редакторе атрибутов найдите userAccountControl.
3. Установите флаг Не требовать предварительной аутентификации Kerberos (Do not require Kerberos Preauthentication).
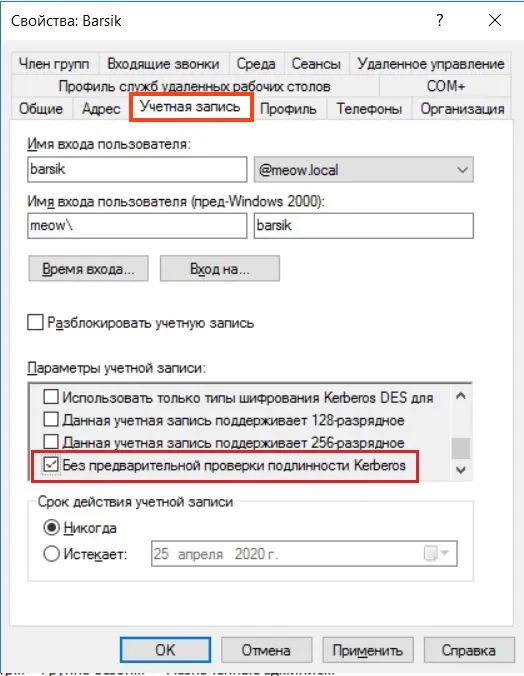
4. Примените изменения и проверьте результат.
Внимание: Отключение предварительной аутентификации Kerberos снижает безопасность. Используйте этот метод только для тестирования и отключайте после проверки.
Способ 6: Настройка DNS для гибридной аутентификации
При использовании гибридной аутентификации (Azure AD и Active Directory) или миграции в облако ошибка может быть вызвана локальными DNS-серверами. Для решения:
1. Настройте внешние DNS-серверы (например, Google DNS: 8.8.8.8 и 8.8.4.4) вместо локальных DNS-серверов Active Directory.
2. Для этого:
– Откройте настройки сетевых подключений, выполнив
ncpa.cpl
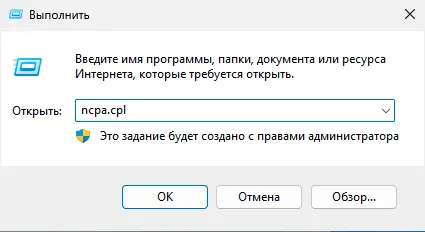
– Выберите активное подключение и откройте его свойства.
– В разделе Протокол Интернета версии 4 (IPv4) укажите внешние DNS-серверы.
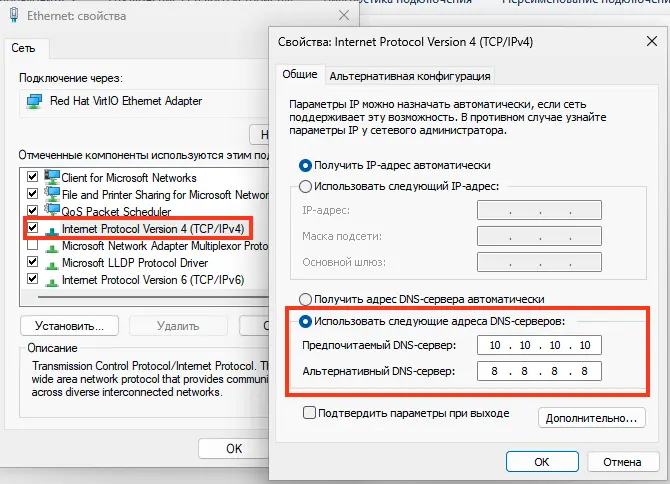
3. Перезагрузите компьютер и проверьте, исчезла ли ошибка.
Дополнительные советы
– Регулярно проверяйте состояние учетных записей в Active Directory и Azure AD, чтобы избежать проблем с устаревшими паролями или блокировками.
– Установите последние обновления Windows, так как они могут содержать исправления для ошибок аутентификации.
– Если проблема не решается, изучите журналы событий Windows (Просмотр событий, Event Viewer) для выявления ошибок, связанных с аутентификацией.
Эти шаги помогут устранить ошибку «Операционной системе требуются ваши учетные данные» и обеспечат стабильную работу в доменной или облачной среде.
In today’s digital age, maintaining security while using computers and digital devices is paramount. Microsoft Windows is known for integrating stringent security measures to protect user data and privacy. One such measure can sometimes result in the frustrating notification: “Windows needs your current credentials.” This message may pop up unexpectedly and can lead to inconvenience, especially if you are in the midst of completing an important task.
This article will examine the reasons behind this notification, why it occurs, and, most importantly, how you can fix it effectively. We will delve into multiple methods that can help you resolve this issue, as well as preventative measures to keep it from recurring in the future.
Understanding the Notification
Before diving into the solutions, it’s crucial to understand the context in which the “Windows needs your current credentials” notification appears. This message generally indicates that Windows is prompting for authentication to safeguard your account. The most common scenarios include:
- Network Connections: If you are trying to access shared resources over a network, Windows may request confirmation that you are authorized to do so.
- Software Updates: When updating specific software or Windows itself, certain privileges are required, triggering the need for current credentials.
- Password Changes: If you’ve recently changed your Windows account password, other instances of the operating system may still be operating under the old password.
- Group Policy Changes: In enterprise environments, changes to group policies can lead to requests for authentication when accessing shared files or services.
Understanding the environment in which this message appears can help streamline the troubleshooting process.
Common Causes of the Issue
-
Changes in User Accounts: Users often face this issue after manually changing their account settings or performing an upgrade in Windows.
-
Network Configuration Changes: Modifications to network settings can interfere with connectivity and prompt credential requests when accessing shared resources.
-
SPN or Kerberos Issues: Service Principal Names and Kerberos authentication issues can lead to failures during resource requests, resulting in credential prompts.
-
Credential Manager Issues: If the Windows Credential Manager has corrupt entries or if credentials have been incorrectly cached, users may encounter this message frequently.
-
User Profile Corruption: A corrupted user profile can lead to inconsistent behaviors within Windows, including problems with authentication requests.
Fixing “Windows Needs Your Current Credentials”
Now that we have identified the common causes of this issue, let’s explore several methods to resolve the problem. Each solution caters to different scenarios to ensure that you can find a resolution that works for your situation.
Method 1: Restart Your PC
While it may seem simple, restarting your computer can often resolve many temporary glitches and refresh the system. Many users report that a simple reboot can clear up authentication issues and enable them to access their accounts smoothly.
Method 2: Re-enter Your Credentials
If the issue arose after a password change:
-
Open Credential Manager:
- Type
Credential Managerin the search bar and click on it.
- Type
-
Manage Windows Credentials:
- In the Credential Manager, navigate to «Windows Credentials.»
- Here, you can see several saved credentials.
-
Remove Old Credentials:
- Look for any outdated credentials related to the resource you are trying to access.
- Click on them and select “Remove.”
-
Add New Credentials:
- Click on “Add a Windows credential.”
- Input the network address, your username, and the new password.
-
Restart the Computer:
- Restart your computer and check if the issue persists.
Method 3: Check and Renew Your Password
If you suspect that there is a mismatch between your password and the credentials that Windows is trying to use:
-
Change Your Password:
- Go to “Settings” > “Accounts” > “Sign-in options.”
- Select “Password” and follow the prompts to change your password.
-
Synchronize Accounts:
- If you are using a Microsoft account, log into your account online and ensure that your credentials are consistent.
Method 4: Use Local Group Policy Editor
If you are using Windows Pro or higher, you can modify settings through the Local Group Policy Editor:
-
Access GP Editor:
- Press
Windows + R, typegpedit.msc, and hit Enter.
- Press
-
Navigate to Local Policies:
- Go to “Computer Configuration” > “Windows Settings” > “Security Settings” > “Local Policies” > “Security Options.”
-
Find Interactive Logon Policy:
- Locate “Interactive logon: Require Windows Hello for business authentication” and ensure that it is set to “Disabled.”
-
Restart Your Computer:
- Apply the changes and restart your computer.
Method 5: Updating Windows
Keeping your Windows operating system updated is essential not only for security but also for performance and resolving software bugs:
-
Open Settings:
- Navigate to “Settings” > “Update & Security.”
-
Check for Updates:
- Click on “Check for updates” and install any pending updates.
-
Restart After Updating:
- Once updates have been applied, restart your computer and test again.
Method 6: Check Network Connections
If issues arise while accessing shared files or network services, it may be related to your network connection:
-
Open Network and Sharing Center:
- Right-click on the network icon in the system tray and select “Open Network & Internet settings.”
-
Network Reset:
- Under the “Status” section, click on “Network reset.”
- This will remove any previous network connections and reset them to defaults.
-
Reconnect to Network:
- Reconnect to your network, ensuring you re-enter your credentials if needed.
Preventive Measures
Once you have resolved the issue, consider taking preventive measures to avoid recurrence:
-
Regularly Update Passwords: Update passwords at regular intervals and ensure that all credentials are consistent across platforms.
-
Backup Credential Information: Keep a secure, backed-up record of important credentials to minimize the need to reset or recover them.
-
Maintain System Updates: Regularly install updates for your operating system and applications to keep security measures up to date.
-
Monitor Network Settings: Be vigilant about network changes and configurations to avoid unforeseen connection issues in the future.
-
Utilize a Password Manager: Using a password manager can help you securely store and manage all your credentials, thus minimizing errors that lead to such issues.
Conclusion
Receiving the notification “Windows needs your current credentials» can be a frustrating experience. However, understanding the reasons behind it and utilizing the aforementioned methods can lead to a swift resolution. Whether through managing your credentials, restarting your PC, or ensuring network settings are optimized, you can get back to using your Windows environment effectively.
Lastly, remember that proper troubleshooting often involves a series of steps, so don’t hesitate to explore multiple solutions if necessary. With a little patience and persistence, you can ride out the waves of technical difficulties and secure your digital experience.
Readers help support Windows Report. We may get a commission if you buy through our links.
Read our disclosure page to find out how can you help Windows Report sustain the editorial team. Read more
Say that every time you log into Windows, a Windows needs your current credentials message appears in the lower right corner.
This can get tedious rather quickly, and this issue may occur because your credentials couldn’t be verified. However, there are ways to fix this issue, and today we’re going to show you how to do it.
Why does Windows keep asking for my current credentials?
- Group Policy isn’t properly configured, which leads to this issue.
- Microsoft hasn’t correctly verified your account.
- Your Windows installation isn’t activated.
How can I fix Windows needs your current credentials error?
1. Change Group Policy Setting
- Go to Run and type gpedit.msc and click OK to open the Local Group Policy Editor.
- A window appears where you will need to follow this path:
Computer Configuration\Administrative Templates\System\Logon - Once you select Logon, in the right pane double-click the Always wait for the network at computer startup and logon option.

- If this option is Enabled, click to Disable it. You can also set it to Not Configured.
- Click Apply and then click OK.
- Exit the Group Policy Editor and restart the device.

2. Verify your account
- Go to the Start Menu.
- Right-click on your user profile.
- Go to Change account settings.

- Go to Your info.

- Hit the Verify link and you will be lead to a series of on-screen instructions that you will need to follow to complete the process.
- Reboot the device after you’re done with the verification process.


After verifying your account check if Windows needs your current credentials, please lock this computer message on Windows 10 is gone.
- Fix: PRIMARY_TRANSPORT_CONNECT_FAILED Error
- ERROR_IO_PRIVILEGE_FAILED: How to Fix
3. Active the trial version of Windows
- Click Start then click Settings.
- Next, go to Update & security and select Activation.

- Click the Change product key option.
- When prompted, enter the following product key VK7JG_NPHTM_C97JM_9MPGT_3V66T and press Enter. This will only activate the trial version.
- Complete the installation until a login screen for the upgraded OS appears with the following message: Edition upgrade completed.
- You’re all good to go.

We hope you solved Windows needs your current credentials message using one of our solutions.
If the problem persists, you might want to check our guide on Credential Manager not working for additional solutions.
For more similar problems and their solutions, visit our Solved: Windows Command Line Generates Random Password article.
In the meantime, let us know in the comment section below what solution you came up with.
Madalina Dinita
Networking & Security Specialist
Madalina has been a Windows fan ever since she got her hands on her first Windows XP computer.
She is interested in all things technology, especially emerging technologies — AI and DNA computing in particular.
Prior to joining the WindowsReport team, she worked in the corporate world for a number of years.
Fix: Windows Needs Your Current Credentials
In the world of technology, encountering issues that hinder productivity can be frustrating. One such issue that Windows users face is the dreaded message: «Windows needs your current credentials.» This alert can manifest in various scenarios—be it during a software update, when accessing shared files over a network, or while trying to utilize certain features of Windows. Understanding the reasons behind this notification and how to resolve it is crucial for seamless workflow. This article will comprehensively explore the reasons behind this problem and provide step-by-step solutions to fix it.
Understanding the Issue
When you receive the message «Windows needs your current credentials,» it typically indicates that the operating system requires you to re-enter your password or log in again to confirm your identity and permissions. This feature is part of Windows’ built-in security mechanism to protect user data and settings, particularly in environments where multiple users have access to the same device or files. The issue may arise from network configurations, credential manager settings, or software inconsistencies.
Common Scenarios Leading to This Error
-
Network Disruptions: If you are trying to connect to a network resource (like a shared folder) and your credentials are not recognized, you may encounter this error.
-
Windows Updates: After major updates, Windows may require you to re-log into applications or services that utilize your Windows credentials.
-
Credential Manager Issues: If the credentials stored in Windows Credential Manager have become corrupted or mismatched, you might see this message.
-
Account Settings Changes: Changes made to your account settings, including password alterations and permission changes, can trigger this error.
-
Remote Desktop Connections: Using Remote Desktop Protocol (RDP) can also lead to this error, especially if you haven’t recently connected to the remote machine.
Solutions to «Windows Needs Your Current Credentials»
Now that we understand the common causes, let’s delve into the solutions to fix the issue. There are several methods you can employ to restore normal functionality.
Method 1: Reboot Your Computer
Before diving into more complex solutions, a simple restart can sometimes resolve the issue. During reboot, temporary issues related to your session can also clear out.
Method 2: Update Windows to the Latest Version
It’s crucial to ensure your system is running the latest version of Windows. Microsoft frequently releases updates that fix bugs and improve system performance.
- Open Settings by pressing
Windows + I. - Navigate to Update & Security.
- Click on Check for updates.
- If any updates are available, download and install them, then restart your computer.
Method 3: Re-enter Your Credentials
If you’re prompted for credentials, try logging in with the appropriate username and password. This step might seem elementary but often resolves miscommunication between Windows and the network resource.
Method 4: Use the Credential Manager
The Windows Credential Manager can sometimes hold outdated or incorrect credentials. Here’s how to manage them:
- Press
Windows + Sand search for «Credential Manager,» then select it. - Click on Windows Credentials.
- Look for any entries that might be causing the problem—these could be entries related to your network drives or applications.
- Click on the entry and choose Remove or Edit to adjust the credentials.
- Restart your computer and see if the issue persists.
Method 5: Change Account Settings
Changing account settings can sometimes resolve permissions issues. Here’s how:
- Go to Settings.
- Select Accounts.
- Navigate to Your info and ensure your account is set up correctly, particularly if you’re using a Microsoft account.
- Try switching to a local account, then back to a Microsoft account if applicable.
Method 6: Reset Network Settings
If you suspect network issues may be causing the credential problem, resetting your network settings may help.
- Open Settings.
- Click on Network & Internet.
- Navigate to Status and click on Network reset.
- Follow the prompts to reset your network settings and restart your computer.
Method 7: Use Group Policy Editor (for Windows Pro and Enterprise)
For users running Windows Professional or Enterprise, the Group Policy Editor can be utilized to configure security policies that dictate credential usage.
- Press
Windows + Rto open the Run dialog. - Type
gpedit.mscand press Enter. - Navigate to: Computer Configuration > Windows Settings > Security Settings > Local Policies > Security Options.
- Find the policy that reads «Interactive logon: Require Windows Hello for Business authentication» and ensure it is set to Disabled.
- Close the Group Policy Editor and restart Windows.
Method 8: Modify the Registry
Warning: Modifying the registry can cause irreversible damage to your operating system if not done properly. Please follow these steps cautiously and back up your registry before making changes.
- Press
Windows + Rto open the Run dialog. - Type
regeditand press Enter. This launches the Registry Editor. - Navigate to the following path:
HKEY_LOCAL_MACHINESOFTWAREMicrosoftWindowsCurrentVersionAuthenticationLogonUI - Locate «DisableLogonBackgroundImage». If not found, right-click on the side pane, select New > DWORD (32-bit) Value, and name it DisableLogonBackgroundImage.
- Set the value to 0.
- Close the Registry Editor and restart your computer.
Method 9: Check Remote Desktop Settings
If the error appears with Remote Desktop, ensure your session settings are appropriately configured to accept the current credentials.
- Open Remote Desktop Connection.
- Click on Show Options.
- Navigate to the Advanced tab and select Settings under Connect from anywhere.
- Ensure the settings align with the current state of your network and credentials.
Method 10: Disable Password Protected Sharing
If you encounter this problem when accessing shared folders over the network, you might want to adjust your sharing settings.
- Open Control Panel and navigate to Network and Sharing Center.
- Click on Change advanced sharing settings from the left panel.
- Under your current profile (Private or Public), scroll down to Password protected sharing.
- Select Turn off password protected sharing and save changes.
Method 11: Run Windows Troubleshooter
Windows has built-in troubleshooters that can help find and fix problems with your computer. Here’s how to access it:
- Open Settings.
- Navigate to Update & Security.
- Click on Troubleshoot, then Additional troubleshooters.
- Find relevant troubleshooters like Internet Connections or Network Adapter, and run them.
Method 12: System File Checker
Corrupted system files can lead to a variety of issues, including credential prompts. To check for and repair these files:
- Open Command Prompt as an administrator by searching for
cmd, right-clicking, and selecting Run as administrator. - Type the command
sfc /scannowand press Enter. - Wait for the process to complete and follow any on-screen instructions.
Method 13: Check for Third-Party Software Conflicts
Sometimes, third-party antivirus or security software can intervene with Windows’ functionality. Temporarily disable or uninstall such software to test if it resolves the credential message.
Conclusion
The message «Windows needs your current credentials» can be an impediment to productivity, but fortunately, it can be resolved through various methods. By understanding the underlying causes—be it network issues, credential manager errors, or account-related problems—you can tackle the situation effectively. Whether you choose basic steps like restarting your system or more advanced solutions involving the Group Policy Editor or Registry, you can restore normalcy to your Windows experience.
Take time to analyze your situation, follow the outlined steps carefully, and continually update your operating system to minimize the chances of encountering such issues in the future. If the problem persists despite trying these methods, consider reaching out to Microsoft Support or a professional technician for further assistance.