
I downloaded Razer Synapse 3 due to my Razer Kraken headset mic not working—as in, not showing up at all. Not in the control panel, not in input devices, nothing. My audio jack on my laptop works with input devices, and I tried using the splitter that came in the box, but nothing worked. The audio component works fine, as does the surround sound, but not the mic.
In Razer Synapse 3, the headset isn’t detected at all.
I am using a Windows 11 laptop with an Intel Core i5. Any fixes?
Did you already try the steps here for further isolation? If that didn’t help, PM me the serial number so I can validate its model and check for other workarounds to help you resolve the mic issue of your Razer Kraken headset. Thanks!
*Thread locked to curb conversation to PM.
Skip to content Skip to blog sidebar
Your Razer Kraken headset microphone is not working properly? Don’t fret! Here is a list of effective tips that can help you fix it:
- Check the mute button on your headset
- Check your sound settings
- Check the microphone settings for your apps
1. Check the mute button on your headset
Your Razer Kraken headset microphone may not be working properly because it was muted. Usually this happens when you accidentally turn on the mute button on your headset. You should check it to make sure it’s not on.
2. Check your sound settings
You should make sure your Razer Kraken headset mic is enabled and set to the default mic on your Windows computer.
Step 1: Press the Win and R keys on your keyboard, then enter “mmsys.cpl“.
Step 2: Select the Recording tab.
Step 3: Make sure your headset microphone is enabled (right click it and select Enable).

Step 4: Make sure your headset microphone is set to the default microphone (right click it and select Set as Default Device).
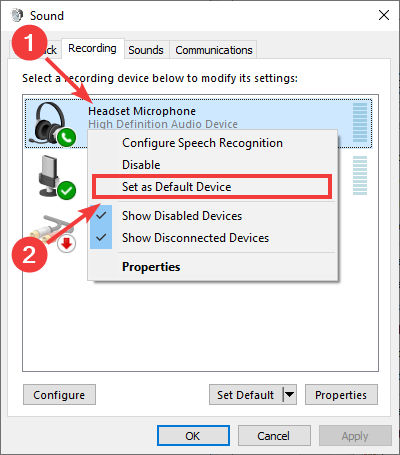
Step 5: Click OK.
See if you can use your Razer Kraken mic now.
3. Check the microphone settings for your apps
* This fix is for Windows 10 users only.
You should allow your apps to access your Razer Kraken mic, so you can use the mic on your Windows 10 computer.
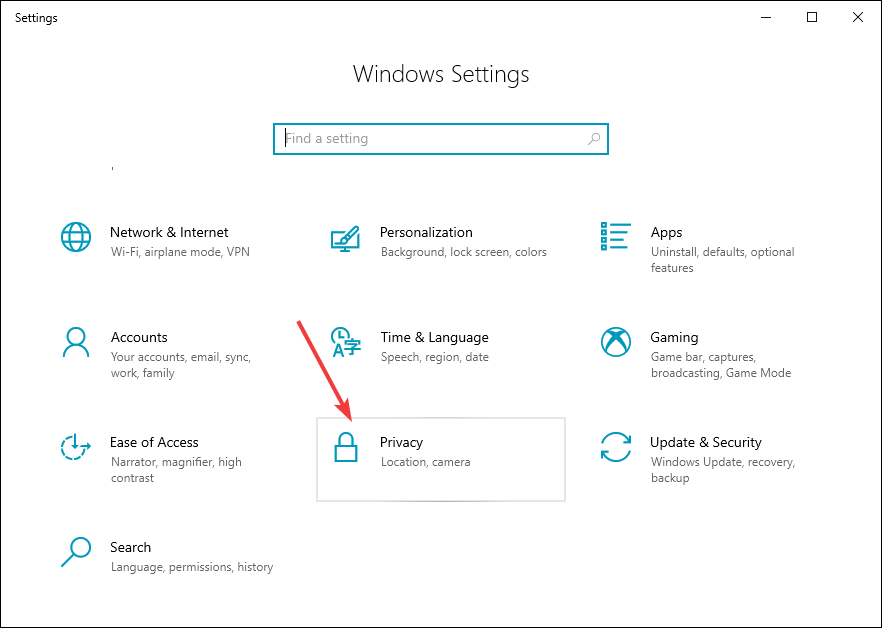
Step 1: Press the Win and I keys on your keyboard.
Step 2: Select Privacy.
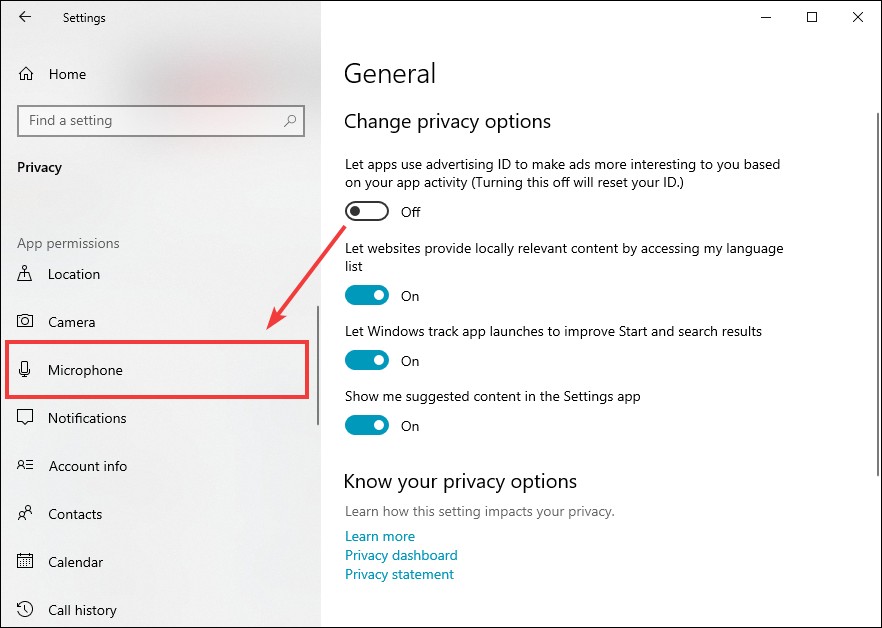
Step 3: Select Microphone.
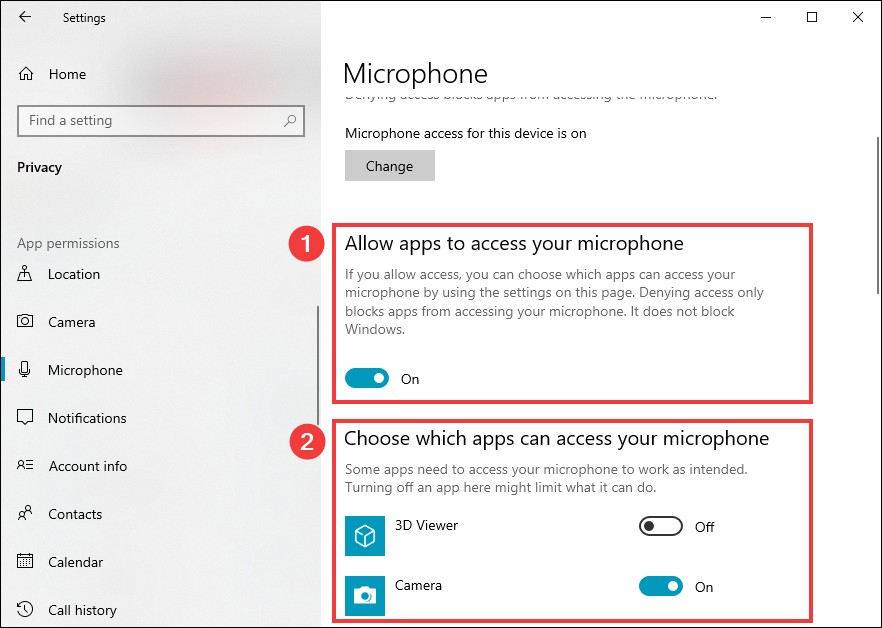
Step 4: Make sure you’ve allowed apps to access your microphone, and make sure the apps you want to use with your headset microphone have the access to it.
Now check your app and see if you can hear sound from your headset mic on the app.
Has any of the tips above helped you? Or do you know any other effective fixes? Tell us by leaving a comment below.
Don’t dig up your receipt and run to make a return just because your Razer Kraken microphone isn’t working. You can make many adjustments to fix the problem and start using the mic.
Often the problem lies in Windows settings or some issue with the Razer Synapse software. Once you track it down, a few clicks could have your headphones functioning normally.
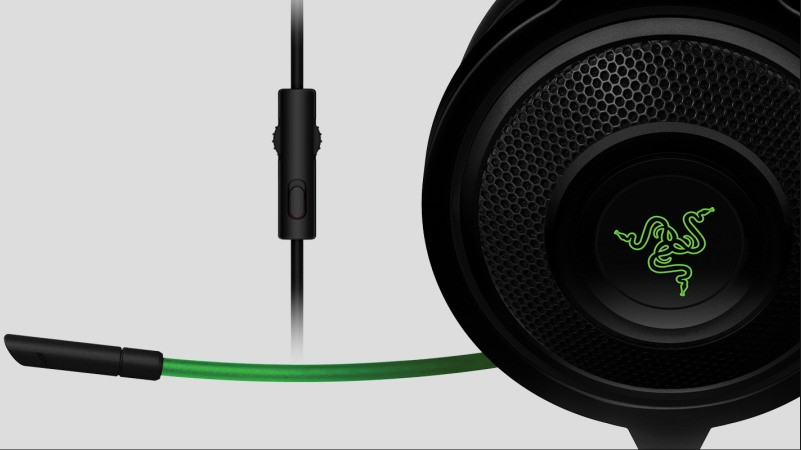
Razer Kraken

There are a few different versions of the Razer Kraken. For example, here are the most recent models and their features.
- The Razer Kraken X is the only Kraken without a detachable mic. Unlike the others, it also runs on 7.1 surround sound instead of THX Spatial Audio.
- The Razer Kraken V3 uses a triforce driver to reduce muddy sound and make the sounds more dynamic.
- The Razer Kraken V3 Hypersense has haptic drivers to create vibrations in the headset, making it more immersive.
- The Razer Kraken Pro is wireless, has Razer Hypersense, and features a Supercardioid microphone.
However, many people still use older models, like the V2 or the Tournament edition.
Most of the steps you take to troubleshoot the Kraken work the same for any version of the headset. However, the models with the removable mic might take a bit of extra work to ensure all the parts are plugged in and functioning correctly.
Razer Kraken Mic Not Working
To troubleshoot your Kraken, start with the most likely issues. Things like settings and connections often create a situation in which your mic won’t work, even though it’s functioning in and of itself.
Check the Mute Toggle

Most Razer Kraken models have a mute button somewhere on the headset or cable. Locate yours and make sure it isn’t switched to mute.
Check Connections and Clean Headset

Sometimes your connections just aren’t working, so the headset isn’t getting the complete attachment to the computer that it needs to work. Clean your headset and check your connections to eliminate common problems quickly.
- Unplug the Kraken from the computer. Remove any cables still attached and the mic, if it’s a removable one on your model.
- Remove the ear cushions. Depending on your model, you might be able to slide them off by grasping the outer edge. You may also have to pry open snap joints around the edges to remove them.
- Dampen a cloth with warm, soapy water. It should not be dripping. You want it to be just barely wet.
- Clean the earcups and then the surfaces of the headset. Don’t use water on anything with openings or connections, like the surface of the mic.
- Check the connector ports for any corrosion or damage. Make sure they look clean and useable.
- Allow the headset to dry for two hours.
- Put the Kraken back together and plug it into the computer. The method of connection will vary by model.
- If it still isn’t working, try using a different port. You can use the sound in the earcups to determine whether or not that function is working, at least.
Once you know the headset is working and connected to the computer, you can focus on more microphone-specific fixes.
Test Cables
If you’re having trouble connecting with your Kraken, test its cables. Computer headset cables are often twisted, yanked, or pulled around and have a shorter lifespan than many other headset parts.
All you have to do is get a replacement cable that will function with your Kraken and swap it out for the one you already use. If the microphone still isn’t working and nothing has changed, then your cables are probably fine to use.
While you’re troubleshooting, make sure you’re using the Razer V3 Pro in wired mode. It just eliminates an additional source of uncertainty.
Remember to make sure the cables are plugged all the way in. Some PS4 players had difficulty getting the mic to work only to find that the audio works if it isn’t completely plugged in, but the microphone doesn’t.
Make sure the device is active
Sometimes a peripheral device is connected to the system but isn’t active. It’s disabled in favor of other devices. There’s a difference between enabling a device and setting it as your default. To do the latter, you first must do the former.
- Press Windows key + X.
- Choose Settings.
- Search for sound.
- Click on Sound Settings from the drop-down.
- Click Manage Sound Devices under the Input menu.
- Scroll down to find the Kraken in the Disabled list.
- Click the Kraken entry.
- Click Enable.
You can also perform this operation from the taskbar.
- Click the speaker icon on the taskbar.
- Click Sounds.
- Choose the Recording tab.
- Right-click the Kraken.
- Click Enable.
Now the device is ready to work on your system. If you don’t see disabled devices listed, right-click in the space on the Recording tab area and choose Show Disabled Devices.
Set Your Default Device
You can have multiple sound input devices connected to your computer, but they can’t all be the active default at the same time. If your Razer Kraken microphone isn’t working, it might be because another microphone is set as the primary for your system.
You can make the adjustments through the Sound option in Settings.
- Press Windows key + X.
- Choose Settings.
- Search for sound.
- Click on Sound Settings from the drop-down.
- Scroll down to Input.
- Select your Kraken from the drop-down menu.
You can also do this from the taskbar.
- Right-click on the speaker icon on the taskbar.
- Click Sounds.
- Choose the Recording tab.
- Right-click the Kraken.
- Click Set as the Default Device.

- Click OK.

Once you change this setting, your Kraken should be set as the default until you manually adjust it again. However, it isn’t unusual for Windows to decide another device should be the default without asking, likely due to other programs that use the mic. If you start experiencing the issue again, check whether the Kraken is still the default device.
I like to disable other microphones after selecting one to work as the default. It removes any uncertainty that another mic could be displacing the Kraken. Just right-click on them in the Sound menu and choose Disable to do so.
Enable Microphone Access in Windows
Your privacy settings in Windows can prevent your microphone from working.
- Press Windows key + X.
- Choose Settings.
- Click Privacy.
- Choose Microphone under App Permissions in the left sidebar.
- Turn on the microphone access by clicking “Change” if device access is turned off.

- Toggle On to allow apps to access your microphone.
- Scroll down through the list and make sure microphone access is enabled on the apps you use it for.

If these settings were incorrect, they could be the root of your Kraken’s microphone problems.
Update Your Drivers
For most Kraken headset models, you can update your drivers through Windows. Only the Kraken Tournament model has drivers that you should install by downloading files from Razer. Others will work with the standard driver update method.
- Press Windows key + X.
- Choose Device Manager.
- Open the Audio Inputs and Outputs category.
- Right-click on Microphone.
- Click Update Driver.

- Choose Search Automatically for Drivers.
- Follow the prompts to install a new driver, if necessary.

Once you’re done, shut down the computer, power it on, and check to see whether your mic is working. Check again to make sure it’s still the default device, too.
Check Your Microphone Levels
Sometimes the problem is that the mic doesn’t pick up your voice. Your microphone levels can be adjusted so that people hear you better – but it can be a little difficult to fine-tune.
If the problem with your Kraken microphone was that the levels were wrong and it wasn’t picking up your voice, it should work now. I have to set my pickup around 50 and my boost at 20 to keep my voice clear without any background noise, personally.
Change Pop-up Behavior
Some users have fixed the problems with their Kraken mics by changing the pop-up behavior of Realtek Audio Manager. Your Audio Manager determines whether or not your computer reacts with a pop-up when a new device is plugged in. Changing that setting sometimes fixes those experiencing problems with the Razer Kraken microphone.
Keep in mind that the Realtek HD Audio Manager might be listed as Realtek Audio Console or something similar – if you can’t find it via the Control Panel, try searching from the Windows start menu.
Now try testing the Razer Kraken microphone to see whether it works. If it still isn’t working, go back to your Realtek settings and make sure the microphone is checked and enabled.
Some systems also can choose Headset with Microphone in the Realtek advanced settings. If only the headset is selected, then the microphone won’t work. Check this setting while you’re in the Realtek area as well.
If you’re using the Realtek Audio Console, you can also use the advanced settings to change the device type from headphones to headset by the Analog option. This could also make the Kraken microphone start working.
Run the Microphone Troubleshooter
The troubleshooter can help fix issues keeping your Kraken microphone from functioning correctly.
- Press the Windows key and type “sounds” without quotes.
- Click on Sound Settings.
- Scroll down to Input.
- Click Troubleshoot.

- Click Yes to give the scan permission to run.
- Listen for the test tone. Answer whether you heard it.
- Follow the prompts to test your microphone and headset. Don’t do any other work in outside programs while trying it.

After the troubleshooter is complete, you may have the option to send a diagnostic report to Microsoft. You can, but it won’t affect your troubleshooting in any way.
Reset the Connection
Resetting the USB audio connection and reestablishing it can also make the Kraken work correctly. If you don’t see it appear in Synapse, this is one way to make it visible.
- Press the Windows key.
- Type Bluetooth.
- Click the Bluetooth and other devices app.
- Scroll down to the Audio category.
- Click on Razer USB Audio Controller.
- Click Remove Device.

- Unplug your Razer Kraken.
- Plug it back in.

If that doesn’t work to make it appear, install a fresh copy of Synapse and try again.
Troubleshooting in Synapse
Synapse is Razer’s peripheral management program, and it also manages headphones. It might be the source of the issue with your Kraken microphone.
- Launch Synapse.
- Right-click the icon in the taskbar.
- Click Check for Updates.

- Restart Synapse after the updates are installed.

Once you know you’re completely up-to-date, you can work on the settings in Synapse itself.
- Launch Synapse.
- Click the USB Audio Controller listing.
- Choose the Mic category.
- Toggle the Microphone on.

- Set the volume to 100.
- Turn on the Mic Sensitivity and adjust the setting.

The mic sensitivity setting just helps keep the background noise from bleeding through with your voice.
Once you’ve set this up, you can ensure the Kraken microphone is still the default communication device.
Frequently Asked Questions
Does the Razer Kraken Have a Retractable Mic?
The hardware on each version of the Razer Kraken varies depending on which model you get. However, the Razer Kraken Ultimate does come with a retractable mic. It also has active-noise canceling tech built into the headset.
Why Is My Mic Not Working, but My Headset Is?
Your microphone or the cable that controls it may be damaged, and the parts connected to the headset are still working. However, the problem could also be related to microphone-specific settings.
Why Is My Mic Not Working in Games?
Some games have options to choose the default mic for that game only. Check your audio settings to make sure the correct microphone is enabled.
The Razer Kraken microphone might appear in audio settings but not pick up sound due to incorrect audio settings or driver conflicts. Outdated drivers and compatibility issues with Razer Synapse software can also cause problems. Additionally, physical issues like damaged cables might prevent the mic from working correctly.
Now that you know the causes, let’s discuss the solutions.
1. Roll Back Realtek High Definition Audio
This issue can be caused by conflicts between newer Realtek audio drivers and the Razer Kraken microphone. Rolling back the driver helps the system recognize the mic and stabilizes the connection, preventing disruptions.
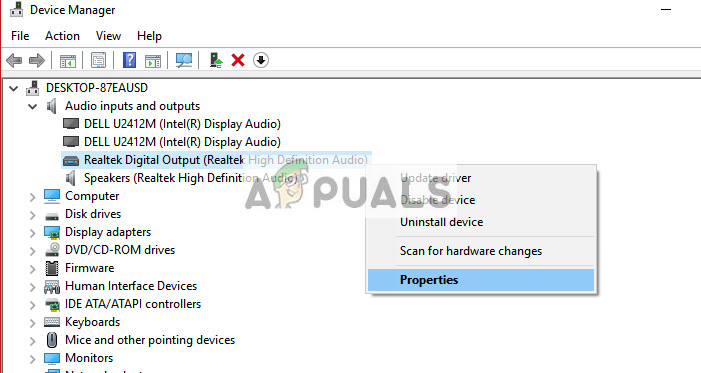
- Press Windows + R, type “devmgmt.msc” in the dialogue box, and press Enter.
- In Device Manager, expand “Audio inputs and outputs” and click on Realtek Digital Output. Then select “Properties”.
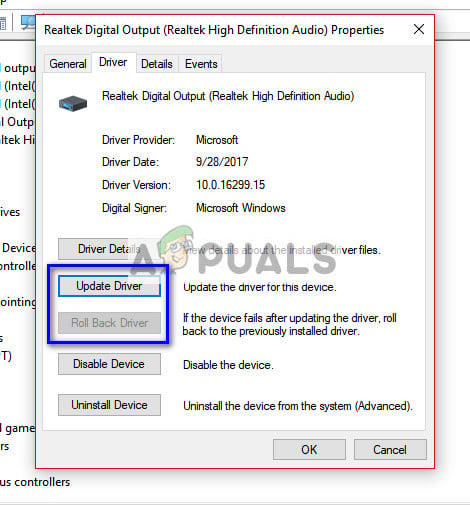
- In the properties window, click the “Driver” tab and select Roll Back Driver if available. If not, download another version online, click Update Driver, and update manually.
- After updating, restart your computer and check if the problem is solved.
- If this doesn’t work, in Device Manager, right-click your Kraken headset and select “Uninstall” to remove it. Disconnect the headset, plug it back in, and reinstall the drivers.
2. Uninstall All Razer Software
Removing all Razer software can fix mic issues by resetting settings. Razer Synapse may interfere with audio settings. Uninstalling helps Windows use standard drivers to resolve the problem.
- Press Windows + R, type “appwiz.cpl” in the dialogue box, and press Enter. Right-click on all Razer software and uninstall them one by one.
After uninstalling the software, restart your computer and check if the problem is solved. “Razer Synapse” is one particular software known to cause issues.
3. Check if the Correct Mic is Active
Ensure the correct microphone is selected in audio settings. Systems often default to another mic, like an internal one, causing the Razer Kraken to be inactive. Set it as the default to use the correct mic.
- Right-click the sound icon in your taskbar and select “Properties”.
- Go to the “Recording” tab. Select Razer Kraken, right-click it, set it as the default device, and disable other microphones.
- Press Apply to save changes. Right-click the microphone and select “Properties”.
- Go to the Advanced tab and select the lowest default format, like “2 channel, 16 bit, 44100 Hz (CD Quality)”.
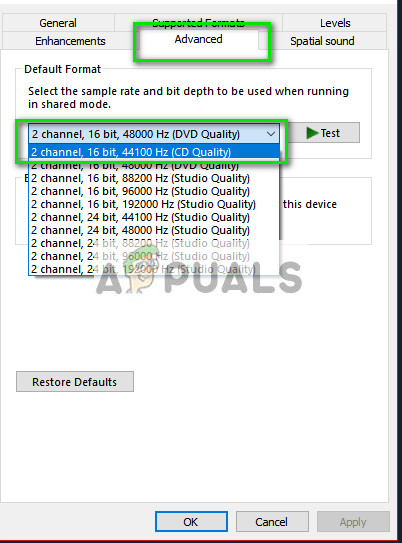
- Restart your computer, reconnect the headset, and check if the issue is resolved.
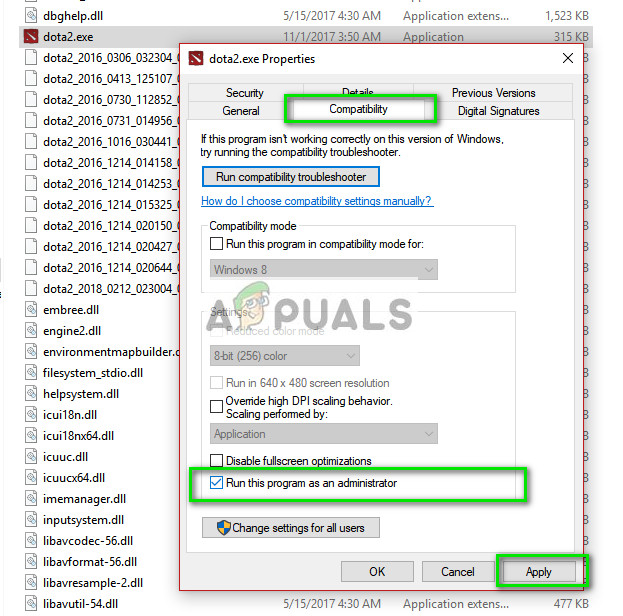
4. Run the Application as Administrative
If your Razer Kraken mic stops working mid-game or in an app, run the software in elevated mode for admin permissions. This allows it to change audio settings and mic access, ensuring accurate voice pickup.
- Go to the application’s directory (e.g., “C:\Program Files (x86)\Steam\steamapps\common\Comedy Night”).
- Click the Compatibility tab and check Run this program as an administrator.

- Press Apply to save changes. Restart your computer, re-plug your headphones, and check the mic.
5. Check Ports and Hardware
Ensure the headset is plugged into the correct ports, as incorrect connections can stop the mic from working. Some Razer Kraken models need a splitter. This simple check helps identify connection problems.
6. Select Appropriate Microphone in Realtek Audio Manager
Set the correct microphone in Realtek Audio Manager. When multiple devices are connected, it may default to another input. By selecting the Kraken mic, you make it the main audio source and fix any conflicts.
- Open Realtek Audio Manager and click the “Microphone” tab.
- Select your microphone from the dropdown list.
- Save changes and check if the issue persists.
Kevin Arrows
Kevin Arrows is a highly experienced and knowledgeable technology specialist with over a decade of industry experience. He holds a Microsoft Certified Technology Specialist (MCTS) certification and has a deep passion for staying up-to-date on the latest tech developments. Kevin has written extensively on a wide range of tech-related topics, showcasing his expertise and knowledge in areas such as software development, cybersecurity, and cloud computing. His contributions to the tech field have been widely recognized and respected by his peers, and he is highly regarded for his ability to explain complex technical concepts in a clear and concise manner.
In the world of gaming, crystal-clear audio is essential for an immersive experience. The Razer Kraken headset, renowned for its exceptional sound quality, has become a popular choice among gamers.
However, even the best equipment can encounter issues, and one recurring problem that users face is the Razer Kraken mic not working during intense gameplay.
This article aims to provide some practical solutions to get your Razer headset microphone up and running again.
Possible Fixes for Razer Kraken Mic Not Working Issue
Fix 1: Roll Back Realtek High Definition Audio
Incompatibility or issues with the Realtek High Definition Audio driver can cause the Razer Kraken mic to not work properly.
Rolling back the driver to a previous version can help resolve compatibility issues.
Steps to Fix:
- Right-click on the Start button on your Windows computer and select Device Manager from the menu that appears.
- In the Device Manager window, expand the ‘Sound, video, and Game Controllers category by clicking on the arrow next to it.
- Look for the Realtek High Definition Audio driver in the list. It may have a similar name, such as ‘Realtek Audio’ or ‘Realtek High Definition Audio.’
- Right-click on the Realtek High Definition Audio driver and select Properties from the context menu.
- In the Properties window, navigate to the Driver tab.
- Click on the Roll Back Driver button. If the button is grayed out or unavailable, it means that there is no previous driver version to roll back to.
- A prompt will appear asking for confirmation to roll back the driver. Read the information carefully and click “Yes” to proceed with the rollback process.
- After rolling back the Realtek High Definition Audio driver, restart your computer. This allows the system to complete the driver rollback and apply the previous version.
Incompatibilities or problems with the current driver version may hinder the microphone’s performance. After the driver rollback and computer restart, test the microphone using MicTester to ensure it works properly.
Fix 2: Check the Microphone Levels
Incorrect microphone levels can lead to improper audio. If the microphone levels are set too low or muted, it can result in the microphone not picking up sound or producing very low audio.
Steps to Fix:
- Locate the speaker icon in the system tray on your computer’s taskbar. Right-click on the speaker icon to open the sound settings menu.
- Depending on your operating system, choose the option that allows you to access the sound settings. It may be labeled as Sounds or Sound Settings.
- In the sound settings window, navigate to the Input or Recording tab. This tab controls the settings for your microphone.
- Locate the microphone device associated with your Razer Kraken headset. It may have a name like Microphone or Razer Kraken. Click on the microphone device to select it, and then click on the Device Properties or Properties button.
- In the microphone properties window, go to the Levels tab. Ensure that the microphone volume is not set too low or muted. Adjust the slider to increase the microphone volume if necessary. Make sure the microphone is not set to a level of 0 or muted.
- After adjusting the microphone levels, click on the OK or Apply button to save the changes and close the microphone properties window.
Incorrect microphone levels, such as low volume or being muted, can result in the microphone not picking up sound or producing very low audio. By following the aforementioned steps, you can ensure that the microphone is set to an appropriate volume.
Fix 3: Make Razer Kraken the Default Input Device
Incorrect default input device settings can cause the Razer Kraken mic not to work. If another microphone or device is set as the default input, it can prevent the Kraken microphone from being recognized and utilized.
Steps to Fix:
- Locate the speaker icon in the system tray on your computer’s taskbar. Right-click on the speaker icon to open the sound settings menu.
- Depending on your operating system, choose the option that allows you to access the sound settings. It may be labeled as Sounds or Sound Settings.
- In the sound settings window, navigate to the Input or Recording tab. This tab controls the settings for your audio input devices.
- Locate the Razer Kraken microphone device in the list of available input devices. It may have a name like Razer Kraken or Microphone. Right-click on the Razer Kraken microphone device and select Set as Default Device or Set as Default Input from the context menu.
- After setting the Razer Kraken as the default device, click on the OK or Apply button to save the changes and close the sound settings window.
This ensures that it is recognized and utilized as the primary microphone on your computer. After applying the changes, test the microphone in your preferred application to confirm that it is working as expected.
Fix 4: Update Audio Drivers
Outdated or incompatible audio drivers can often cause problems with the mic. These drivers act as the communication bridge between the hardware and the operating system. So, if they are outdated or incompatible, it can result in microphone malfunctions.
Steps to Fix:
- On your Windows computer, right-click on the Start button and select Device Manager from the menu that appears.
- In the Device Manager window, locate and click on the arrow next to the ‘Sound, video, and game controllers’ category to expand it. This will display the audio devices installed on your computer.
- Look for the audio device that is associated with your Razer Kraken headset. It might have a name like ‘Realtek High Definition Audio’. Right-click on the audio device and select ‘Update driver’ from the context menu that appears.
- In the Update Driver Software window, choose the option to automatically search for updated driver software. Windows will search online for the latest driver for your audio device and install it if one is found. Follow the on-screen instructions to complete the driver update process.
- After the driver update is complete, restart your computer to apply the changes. This allows the system to recognize and properly configure the updated audio driver.
- Once your computer restarts, test your Razer Kraken microphone to check if it is working correctly. Open your preferred communication or recording application and perform a test to verify if the issue has been resolved.
Outdated or incompatible drivers can cause malfunctions, including problems with the microphone. Following these steps and checking for driver updates can help maintain optimal performance. Remember to always download drivers from official sources to ensure compatibility and reliability.
Fix 5: Check Ports and Hardware
Sometimes, the mic’s functioning can be attributed to faulty or improperly connected ports and hardware. Issues with the audio jacks or USB connections can disrupt the communication between the headset and the computer.
Steps to Fix:
- Ensure that your Razer Kraken headset is securely plugged into the correct ports. If you are using an analog connection, ensure that the audio jacks are properly inserted into the corresponding audio ports. For USB connections, verify that the USB cable is firmly connected to both the headset and an available USB port on your computer.
- If possible, try connecting your Razer Kraken headset to different audio or USB ports on your computer. This helps determine whether the issue is specific to a particular port. Sometimes, ports can become damaged or malfunction, causing microphone problems.
- Carefully examine the cables and connectors of your Razer Kraken headset for any signs of damage or wear. Bent or broken pins, frayed cables, or loose connectors can affect the microphone’s functionality. If you notice any issues, consider replacing the cables or contacting Razer’s customer support.
- Dust, dirt, or debris can accumulate in audio jacks or USB ports over time, causing connectivity issues. Use compressed air or a soft brush to gently clean the ports and connectors. Ensure that the ports are completely dry before reconnecting your Razer Kraken headset.
- Try connecting your Razer Kraken headset to another compatible device, such as a smartphone or another computer. This helps determine if the problem is specific to your computer or if it persists across multiple devices.
Faulty connections or damaged ports can disrupt the communication between the headset and PC. By following these steps, you get your Razer Kraken microphone working properly again.
Fix 6: Enable Microphone Access
Your Kraken headset may not work due to insufficient or disabled microphone access settings on your computer. This can prevent applications from recognizing and utilizing the microphone.
Steps to Fix:
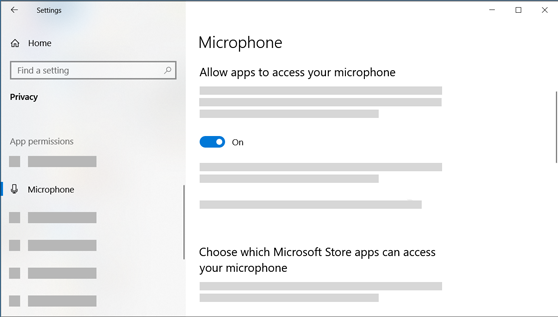
- On your Windows computer, click on the Start button, and then select Settings (the gear icon) from the menu. In the Settings window, type Privacy in the search bar.
- Choose Microphone Privacy Settings from a list of keyword-specific options. This will display the microphone settings and permissions options on the right.
- Ensure that the microphone access for the device toggle switch is turned on. If it’s off, click on the toggle switch to enable microphone access.
- Scroll down to the ‘Let apps access your microphone’ section. Make sure the toggle switch is turned on.
- Scroll further down to the ‘Let desktop apps access your microphone’ section. Ensure that the toggle is turned on.
- Once you have enabled microphone access and adjusted the app permissions, test your Razer Kraken microphone.
By allowing system-wide microphone access, you eliminate restrictions hindering the microphone’s functionality.
Fix 7: Uninstall Razer Software
In some cases, conflicts or compatibility issues with Razer software can result in the Razer Kraken mic not working. Uninstalling the Razer software and its associated drivers can help resolve such conflicts.
Steps to Fix:
- On your Windows computer, click on the Start button, and then select Control Panel from the menu.
- In the Control Panel, search for the Razer software installed on your computer. It may have a name like Razer Synapse or Razer Surround. Click on the software to select it.
- Once the Razer software is selected, click on the Uninstall or Remove option, typically located at the top of the window. Follow the on-screen instructions to uninstall the software from your computer.
- After uninstalling the Razer software, it is recommended to remove any associated drivers as well. Open the Device Manager by right-clicking on the Start button and selecting Device Manager from the menu.
- Locate the Razer audio device under the ‘Sound, video, and game controllers’ category. Right-click on it and choose ‘Uninstall device’ from the context menu. Confirm the uninstallation if prompted.
- After uninstalling the Razer software and associated drivers, restart your computer. This allows the system to complete the removal process and refresh its settings.
- Once your computer restarts, test your Razer Kraken microphone to check if it is working correctly. Open your preferred communication or recording application and perform a test to verify if the problem has been resolved.
If you still require the Razer software for other features, reinstall the latest version from the official Razer website.
Frequently Asked Questions (FAQs)
Q1. Why isn’t my mic working on Razer Kraken?
Ans: Incorrect settings, faulty connections, or driver issues are potential culprits. Try checking audio settings, ensuring proper connections, and updating drivers.
Q2. How do I get my Kraken mic to work?
Ans: To get your Kraken mic working, first, check the physical connection between the headset and your device. Ensure that the headset is properly plugged into the correct ports. Next, adjust your device’s audio settings and ensure the microphone is not muted or set to low volume. Updating headset drivers and firmware can also help resolve any software-related issues.
Q3. How do I unmute my Kraken mic?
Ans: To unmute the Kraken mic, locate the microphone control on the headset cable or inline remote. Slide the mute switch or button to the “unmuted” position. Alternatively, adjust the microphone volume settings on your computer or device, ensuring it is not muted or set to a low volume level.
Q4. How do I fix my headset mic not working?
Ans: To fix a headset mic not working, start by checking the physical connections between the headset and your device. Ensure that all cables are securely plugged in. Next, verify that the microphone is not muted or set to a low volume level in the audio settings of your device. Try updating audio drivers, restarting the device, and trying the headset on another device.
Q5. How do I reset my Razer headset?
Ans: To reset a Razer headset, follow these general steps:
- Disconnect the headset from your device.
- Locate the reset button or pinhole on the headset or its dongle.
- Use a small pin or paperclip to press and hold the reset button for a few seconds.
- Release the button and wait for the headset to reset.
- Reconnect the headset to your device and check if the issue persists.
The Bottom Line
While issues with the Razer Kraken can be frustrating, there are always troubleshooting steps. From checking the connections to adjusting settings, you can identify the underlying cause and rectify the issue.
If all else fails, reaching out to Razer’s customer support can provide further assistance and guidance. By following the techniques discussed above, you can get the most out of your Razer Kraken headset.