
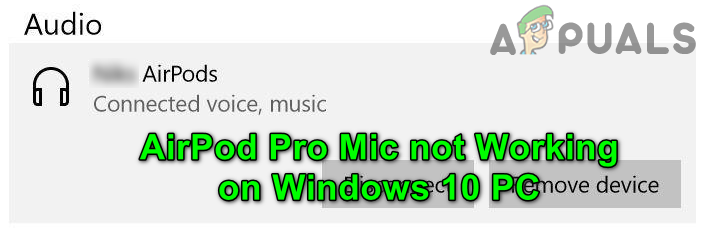
Your AirPods microphone may sometimes stop working on Windows. The earbuds can play sound fine, but there’s no option to select the AirPods mic. That can be a major issue, especially if you need to regularly attend video meetings. Let’s explore how you can quickly solve this annoying issue.
Contents
- 1 What to Do If Your AirPods Mic Won’t Work on Windows
- 1.1 Unpair Your Devices
- 1.2 Allow Apps to Access Your Mic
- 1.3 Set Your AirPods as Your Default Device
- 1.4 Run the Audio Troubleshooter
- 1.5 Use the Hands-Free AG Audio Option
- 1.6 Conclusion
What to Do If Your AirPods Mic Won’t Work on Windows
Unpair Your Devices
To solve the problem, unpair your devices. Navigate to Windows Settings, select Bluetooth & Devices, and locate your AirPods. Click on the three-dots, and choose Remove device.
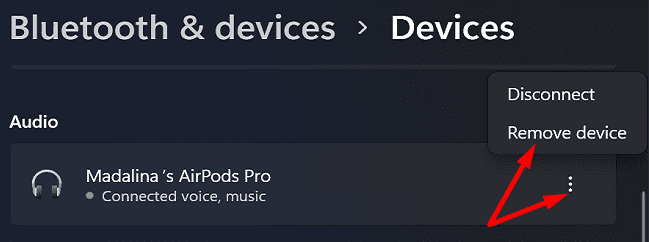
Put the earbuds back into the case, and restart your Windows computer. Then, pair your AirPods with your Windows computer again, and check if you notice any improvements.
Allow Apps to Access Your Mic
Check your privacy settings, and make sure apps can access your AirPods microphone.
- Go to Settings.
- Select Privacy & Security.
- Scroll down to Microphone.
- Make sure to enable Microsoft Access.
- Then, let apps access your mic.
- Scroll down to the app that doesn’t capture your AirPods mic input.
- Make sure to toggle on the app so that it can access your mic.
- Additionally, allow desktop apps to access your microphone.
Set Your AirPods as Your Default Device
Be sure to set your AirPods as your default playback and recording device.
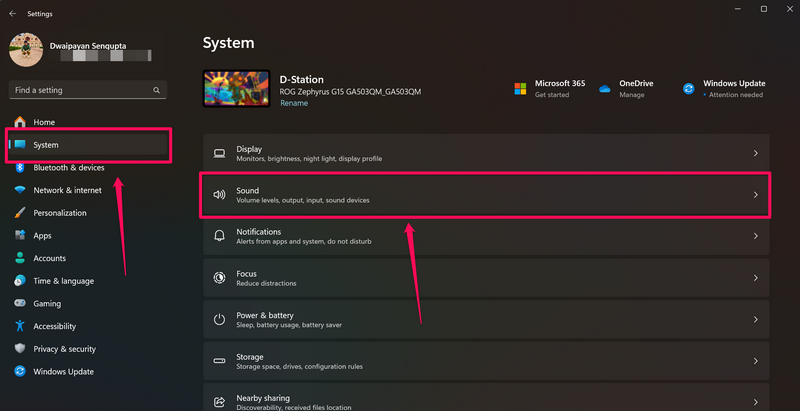
- Navigate to Settings.
- Select System.
- Then, click on Sound.
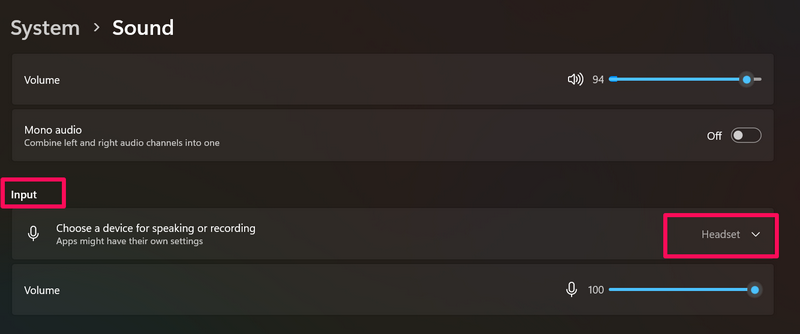
- Scroll down to Input.
- Set your AirPods as your default device for speaking and recording.
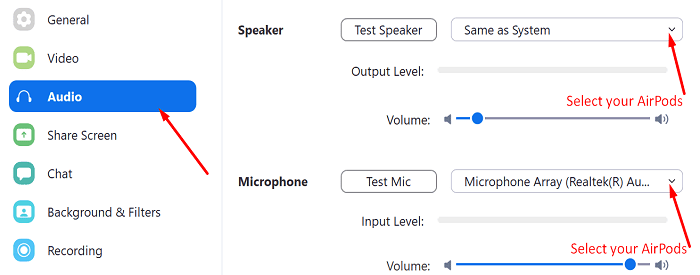
Additionally, go to your app’s settings, and set your AirPods as your default microphone. For example, if you’re using Zoom, go to Settings, select Audio, and select your AirPods as your default microphone.
Run the Audio Troubleshooter
- Go back to System → Sound → Input.
- Scroll down to Advanced.
- Under Troubleshoot common sound problems, select Input.
- Follow the on-screen steps to run the troubleshooter.
Use the Hands-Free AG Audio Option
Click on your Speaker icon. Then, select the Headset (AirPods Hands-Free AG Audio) option. Check if you can use your AirPods mic on Windows 11.
Even if this workaround does the trick for you, the sound will probably be pretty terrible, as many users have confirmed. But at least you’ll be able to use your AirPods mic.
Conclusion
If you can’t use your AirPods microphone on Windows 11, first unpair your devices. Then, put the earbuds back into the case, and restart your computer. Additionally, check your Privacy settings, and let apps access your AirPods microphone. Set your AirPods as your default input device, and run the Audio Input troubleshooter. If the issue persists, use the AirPods Hands-Free AG Audio option.
We hope you managed to solve your AirPods mic issues with the help of this guide. Leave a comment below and let us know which solution worked for you.
I can get my Airpods to connect to my windows desktop and music playback works but the microphone does not work. Any suggestions? Ive tried to pair and unpair and also restarted the machine.
Posted on Mar 19, 2017 7:14 PM
Posted on Oct 6, 2017 4:36 PM
The problem is that windows detects the airpods as a combination device. That means it detects the mic and the sound output separately. You can use the mic with no sound at the current time, but you can’t use both at once. really want apple to actually release a driver for windows to fix this problem
My Airpods mic isn’t working with Windows 10.
Apple’s AirPods are great wireless earphones that one can use not only with their iPhones and all other Apple devices but with Windows 11 PCs and laptops as well. I have been using the AirPods Pro 2 with my Windows 11 laptop since I got them last year and am quite satisfied with the outcome. However, like many other users, I have also experienced the microphone not working issue with the AirPods while using them with my Windows 11 device.
So, if you were looking for an in-depth guide on how to fix the AirPods microphone not working issue on Windows 11, you have come to the right page. In this article, we have listed some of the most effective troubleshooting methods and simple fixes that you can try when you are faced with the AirPods mic not working issue on your Windows 11 PC or laptop. Check out the following sections for all the details!
Fix AirPods Microphones Not Working on Windows 11 PC or Laptop
Now, when it comes to the AirPods microphone not working issue on Windows 11 PCs and laptops, it could arise due to a variety of factors. The reason could be as simple as the AirPods not being connected to the Windows 11 device, or it could be complex such as a glitch in the AirPods firmware. However, if the microphones of the AirPods are somehow physically damaged, you might need to replace the TWS earphones.
With all that said, take a look at some of the fixes and suggestions that we think should help you resolve the AirPods microphone not working issue on your Windows 11 PC or laptop listed below. You will also find easy-to-follow, step-by-step guides to execute some of the mentioned fixes on your device. Check them out right below!
1. Make Sure Your AirPods are Updated
One of the first things that you must check when you experience the AirPods mic not working issue on your Windows 11 PC or laptop is the AirPods firmware version. You see, much like iPhones and Apple’s other devices, the AirPods also have their firmware that should be kept up to date. Failing to do so can cause various unexpected issues with the earphones such as the microphones not working issue on Windows 11 devices.
Hence, it is important to make sure that the AirPods firmware is up to date on your TWS earphones. However, to check the AirPods firmware and update it, you will require an iPhone or a compatible Apple device. You can check out the Check Your AirPods Firmware section in our fix-guide for how to fix AirPods not working on Windows 11 via the link for reference.
If you find that your AirPods firmware is updated, you can skip this part and go to the next section. However, if it is not up to date, you must update the AirPods firmware using an iPhone or any other compatible Apple device.
Unfortunately, there is no way to manually update the AirPods firmware. The firmware update for your AirPods will be automatically downloaded and installed as long as the earphones are connected to your iPhone with an active internet network, charged, and inside their charging case.
Once the AirPods firmware is updated, you can reconnect your AirPods to your Windows 11 device and check whether or not the microphone not working issue for the AirPods has been fixed.
2. Make Sure AirPods Are Selected for Input in Windows 11
Now, if you are getting output on your AirPods when connected to Windows 11 but not being able to use the mics within any app, you must ensure whether or not the earphones are selected for Input in Windows 11 settings. To do this, you can follow the steps right below:
1. Use Windows + I to launch the Settings app on your Windows 11 PC or laptop.
2. Under the System tab on the left nav bar, go to the Sound menu.
3. Scroll down to the Input section. You can click the down arrow at the far right to expand the section and view all the connected devices for input.
4. Here, make sure the AirPods are selected for input on the list.
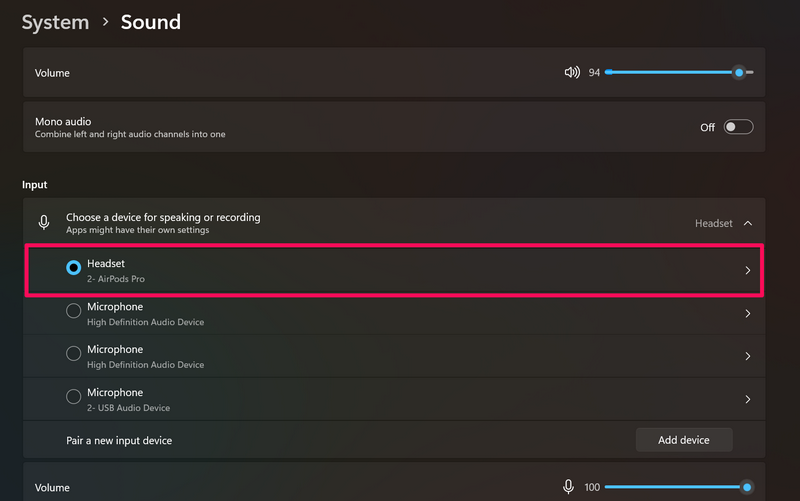
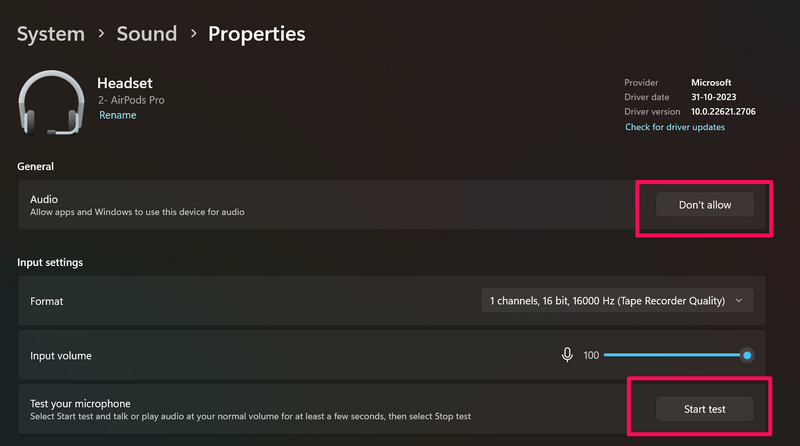
5. You can also click the AirPods title (or the arrow next to it) to open it.
6. On the following page, you can allow/disallow apps to use the AirPods for audio and test your AirPods microphone.
After you select your AirPods to take input on your Windows 11 PC or laptop, the AirPods microphone should be working again. If it is not working, proceed to the next fix right away!
3. Make Sure Apps Have Access to Microphone in Windows 11
If you are experiencing the AirPods microphone not working issue within a specific app on your Windows 11 PC or laptop, chances are that the app does not have mic access on your device. So, if you are trying to use the AirPods mic, say, on a WhatsApp call on your Windows 11 PC or laptop but cannot, you must check whether or not WhatsApp has access to the microphone in Windows Settings.
You can follow the steps right below to make sure Windows or third-party apps have access to the microphone on your Windows 11 PC or laptop:
1. Use Windows + I to open the Settings app in Windows 11.
2. Go to the Privacy & security tab on the left navigation bar.
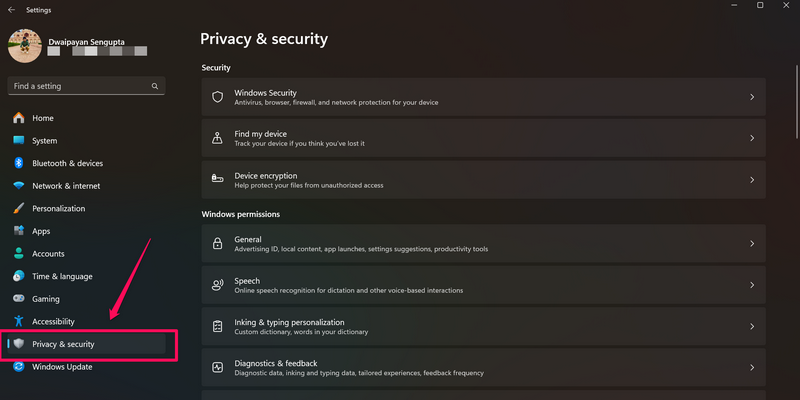
3. Scroll down to the App permissions section on the right pane and click the Microphone option.
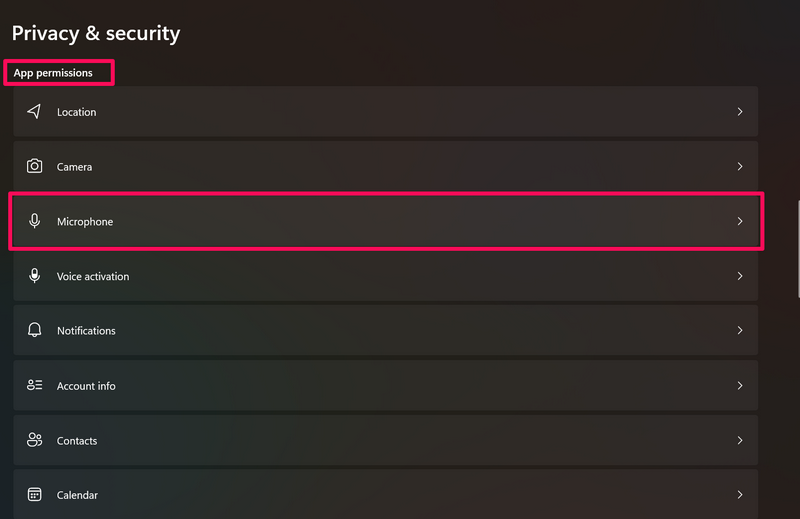
4. On the following page, make sure the toggles for Microphone access and Let apps access your microphone are enabled. Expand the Let apps access your microphone section to view all the apps that can use the microphone.
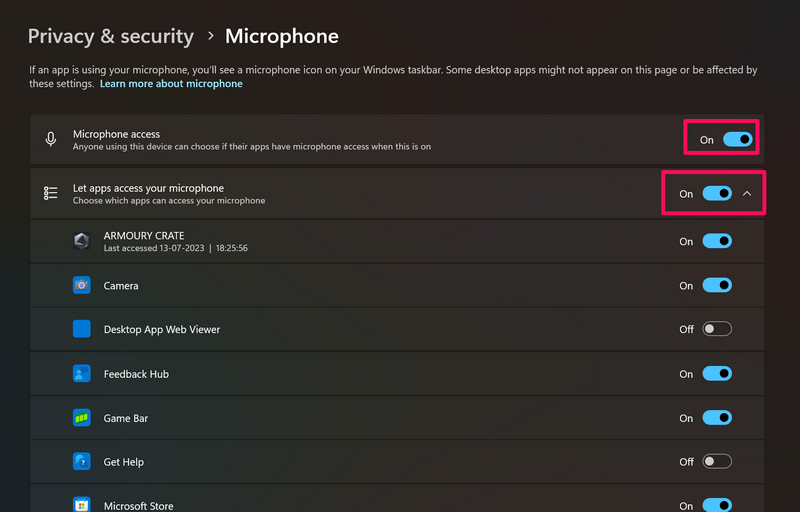
5. Now, you can go through the list of apps on your PC or laptop that are capable of using the mic and enable the toggle for the app (in this case, WhatsApp) to allow it to access the mic.
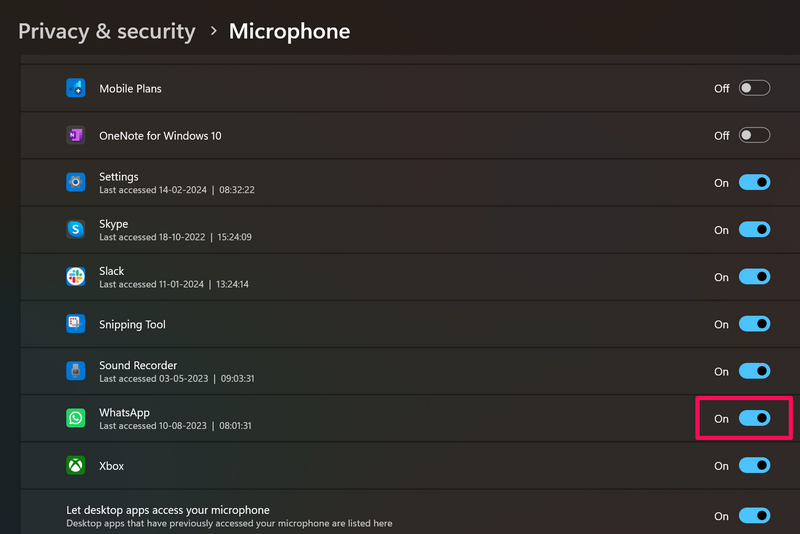
Once you enable the app to access the microphone of your AirPods on your Windows 11 PC or laptop, it should be working as usual.
4. Reset Your AirPods
Now, if the above-mentioned did not resolve the AirPods microphone not working issue on your Windows 11 PC or laptop, you can try resetting your AirPods. The process of resetting the AirPods is pretty simple, though you should keep in mind that after the reset you need to pair the earphones with your Windows 11 device from scratch.
With that said, check out the steps right below to learn how to reset your AirPods and get it up and running on your Windows 11 PC or laptop once again:
1. Open the lid of the AirPods charging case with the earbuds inside.
2. Press and hold the circular button at the back of the AirPods charging case.
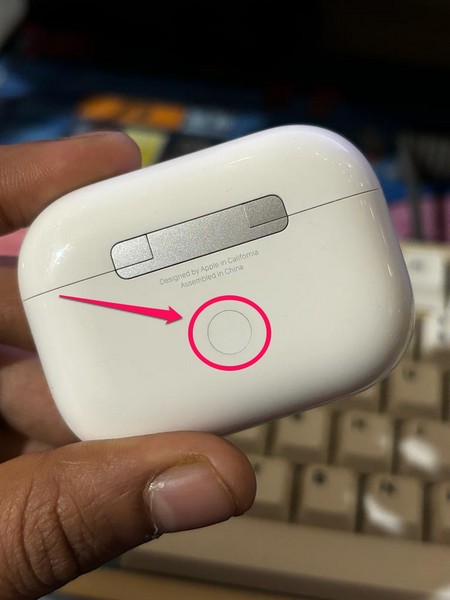
3. Keep holding the button until the LED indicator of the AirPods case flashes amber (or orange), and then white.
4. Once you reset the AirPods, use our guide on how to connect AirPods with your Windows 11 PC or laptop to re-connect them.
After they are connected to your PC or laptop, try using the AirPods microphone in an app in Windows 11, and check whether or not the AirPods mic not working issue has been fixed.
5. Re-install AirPods Drivers using Device Manager in Windows 11
Another long but effective fix that you can try to resolve the AirPods mic not working issue in Windows 11 is to re-install all the AirPods drivers using Device Manager. This fix proved useful for many users who experienced the AirPods microphone not working issue on their Windows 11 PC or laptop. So, there is a high chance that it would resolve the AirPods mic not working issue for you as well.
Follow the steps right below to use the Device Manager to re-install the AirPods drivers on your Windows 11 PC or laptop:
1. Use Windows + X to open the Quick Links menu and select the Device Manager option on the list to open it on your Windows 11 PC or laptop.
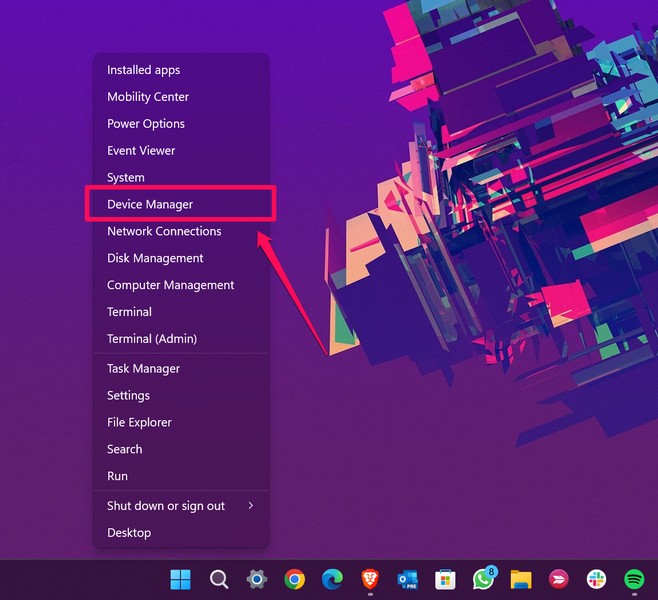
2. Now, expand the Audio inputs and outputs section, Bluetooth section, and the Sound, video and game controllers section using the arrow button beside each of them.
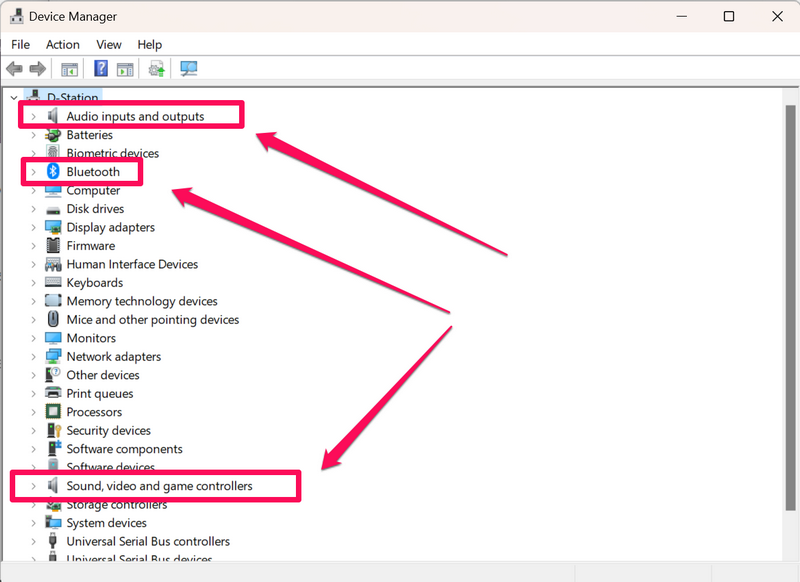
3. Locate all the drivers that are listed with the name of your AirPods under each of the above-mentioned sections.
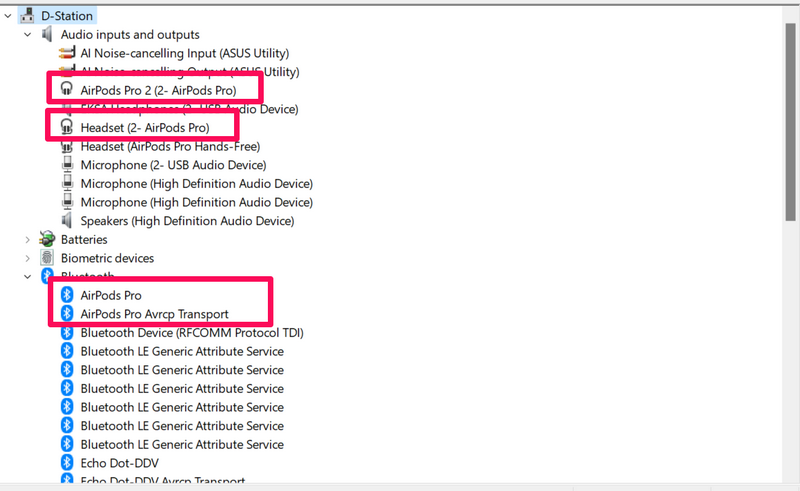
4. Right-click on them, and select the Uninstall option.

4. Confirm your action in the confirmation prompts.
5. Once you uninstall all the AirPods drivers from the Device Manager on your Windows 11 PC or laptop, give it a restart.
6. While your PC or laptop restarts, use the previous fix (Fix #4) to reset your AirPods.
7. After your Windows 11 device restarts, pair and reconnect your AirPods from scratch.
Once the earbuds are connected, put them on, make sure they are selected for audio and mic on your Windows 11 PC or laptop, and check whether or not the AirPods mic not working issue on your device is fixed.
6. Run the Audio Troubleshooter in Windows 11
Now, if the AirPods mic not working issue on your Windows 11 PC or laptop is a result of an in-system audio issue in Windows itself, you might want to run the Audio troubleshooter. The Audio troubleshooter will scan your device to detect any anomaly that might cause the AirPods mic to malfunction and also fix it for you.
So, use the following steps to run the Audio troubleshooter on your Windows 11 PC or laptop and hopefully, resolve the AirPods microphone not working issue:
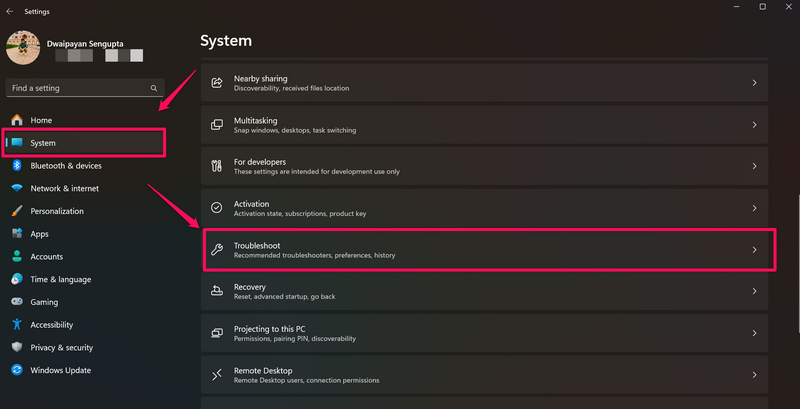
1. Use Windows + I to open the Settings app in Windows 11.
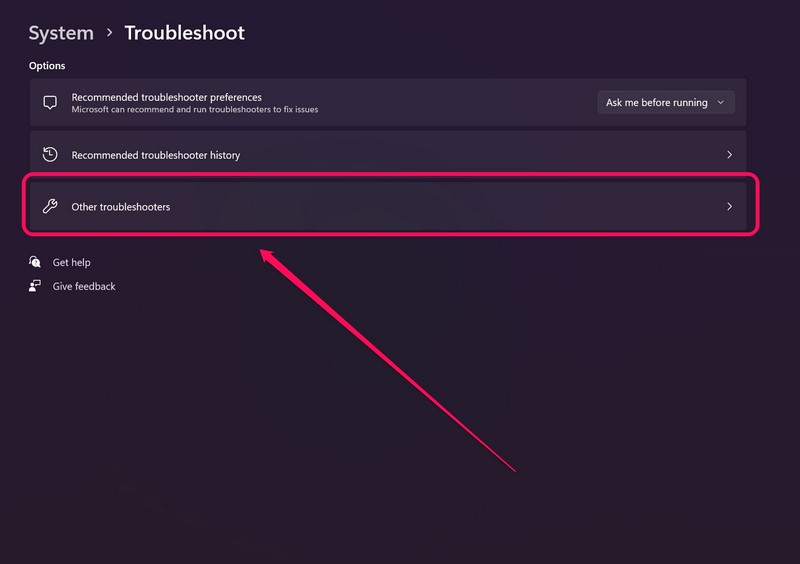
2. Under the System tab on the left nav bar, go to the Troubleshoot menu.
3. Click the Other troubleshooters option.
4. Now, click the Run button beside the Audio option on the following page to initiate the troubleshooting process.

5. Follow the on-screen instructions to complete the troubleshooting process, and apply the suggested fix (if there is any).
6. After the process is completed, restart your Windows 11 PC or laptop.
Following the restart, connect your AirPods to your Windows 11 PC or laptop, and check whether the microphone is working on your Apple earbuds.
7. Check for Windows 11 Updates
One more major reason behind the AirPods microphone not working issue in Windows 11 could be an outdated Windows 11 version. You see if you have not updated your Windows 11 PC or laptop in a while, now might be a good time to check for the latest updates as there is a high chance you are running an outdated Windows 11 version on your device.
You can use the steps right below to check for the latest Windows 11 updates on your PC or laptop and install them right away:
1. Open the Settings app on your Windows device using the Windows + I shortcut.
2. Go to the Windows Update tab on the left navigation bar and click the Check for updates button on the right pane.

Note: Make sure your PC or laptop is connected to an active and stable internet network during this stage.
3. Once the Windows updates are available, click the Download and install button to initiate the update process.
4. Wait for the updates to install on your PC or laptop.
5. After the process is completed, you might be prompted to restart your computer for the updates to apply.
Following the restart, connect your AirPods and check whether the microphone is working on the earbuds or not. At this stage, the AirPods microphone should be working normally with your Windows 11 PC or laptop.
8. Contact Apple Support
Now, in case the AirPods microphone not working issue in Windows 11 is a result of damaged mic units inside the earbuds, it might be a significant issue. If you recently dropped your AirPods earbuds on a rough or hard surface, chances are the microphone(s) inside the earbuds have been damaged. In that case, there is nothing you can do other than replace the Apple earbuds.
So, other than using the AirPods with your Windows 11 PC or laptop, use another device to check whether the mic is working on the secondary device or not. If it is not, you can be sure that the AirPods microphone not working issue is a result of damaged hardware.
You can download the Apple Support app on your iPhone or go to the official Apple Support page to explore all your options. You can also take your AirPods to a nearby Apple Store or Apple-authorized service center to consult an expert.
FAQs
Do AirPods not work with Windows 11?
Although AirPods are designed to work with iPhones and other Apple devices, they do work on Windows 11 PCs and laptops. Even though the sound quality might not be on par when using the AirPods with non-Apple devices, they work quite well with them.
Why is the AirPods microphone not working in Windows 11?
The AirPods microphone not working issue on Windows 11 PCs and laptops could be a result of misconfigured Windows settings, an in-system audio glitch, outdated AirPods firmware and/or Windows versions, and other similar issues.
How to test AirPods microphone in Windows 11?
Users can test the AirPods microphone on their Windows 11 PC or laptop within the Settings app. They can go to the Sound settings, select the connected AirPods from under the Input section, and use the Start Test button to start testing their AirPods mic.
Wrapping Up
There you have it, folks! This was our comprehensive guide on how to fix AirPods microphone not working in Windows 11. The AirPods are great TWS earbuds to use with any device, and users mainly use them during calls or virtual meetings to keep their hands and desks clutter-free. So, we understand how much of a problem it can be when the AirPods mic stops working in Windows 11.
We hope this article helps you resolve the AirPods microphone not working issue on your Windows 11 PC or laptop. If it did, don’t forget to let us know in the comments below. We will see you in our next guide!
The Airpods Pro microphone might not work on your Windows PC if the PC’s Windows/drivers or firmware of the AirPods are outdated. Moreover, the corrupt or incompatible Bluetooth Windows driver may also cause the issue.
The issue arises when the user fails to use the AirPod mic on his Windows PC (sometimes after a Windows update and sometimes when trying for the first time), although the AirPods work perfectly as the sound output device.
Before proceeding with the solutions to use the AirPods Pro mic on Windows, check if disconnecting and reconnecting the AirPods and PC resolves the mic issue. Moreover, ensure the “Allow Access to Your Microphone” and “Choose Which Apps Can Access Your Microphone” settings are enabled in the Privacy Settings of your System.
Also, check if the AirPods Pro is the Default Communication Device in the Sound Control Panel. Furthermore, ensure the Telephony service is enabled in the Services tab of the headset Properties in Settings>> Devices>> Devices and Printers.
1. Update Windows, Drivers, and Firmware of Airpods
The AirPod’s mic might not work if its firmware or Windows/device drivers are outdated as it can create incompatibility between the devices (i.e., the PC and AirPods). In this context, updating the Windows drivers and firmware of the AirPods may solve the problem.
- Update your System’s Windows and device drivers (especially Bluetooth drivers). Make sure no optional update is pending uninstall. Also, if you are using an OEM utility (like Dell Support Assistant), then use it to update the drivers.
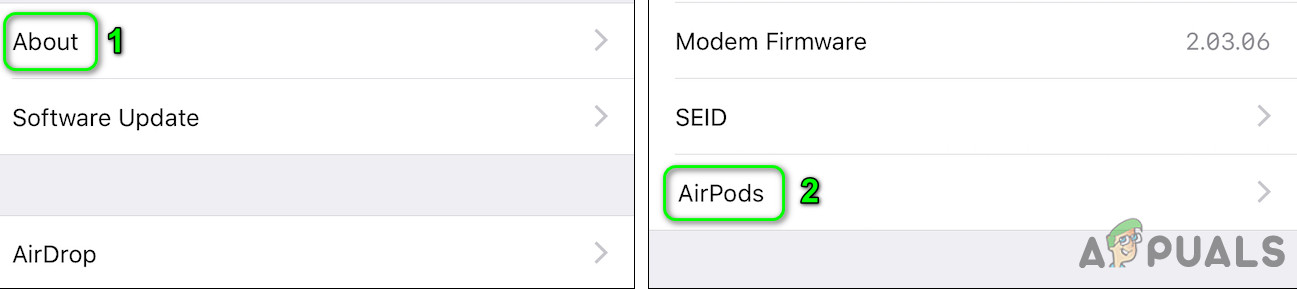
- After updating, check if the AirPod mic is working fine. If the issue persists, put the AirPods in their case, bring the case close to your iPhone, open the case’s lid, and dismiss the notification on the iPhone. Then update the firmware of the AirPods in the iPhone’s Settings>> General>> About>> AirPods>> Firmware Version.

Open AirPods in the About of Your iPhone - After updating the firmware of the AirPods, check if the AirPods mic is clear of the issue.

Check Firmware Version of AirPods

2. Re-add the AirPods Pro to the System
The AirPods Pro mic issue could be a result of a temporary glitch of the communication/Bluetooth modules of the System. In this case, re-adding the AirPods Pro to the System may solve the problem.
But before proceeding, make sure there is no Bluetooth interference from any other device (e.g., disable Bluetooth of your iPhone) and unpair both devices (i.e., your PC and the AirPods).
- Put your AirPods in their charging case and held the pairing button of the case.
- Now, without releasing the pairing button, open the AirPods case’s lid and wait until the green light blinks.
Press the Pairing Button on the AirPods’ Case - Then release the pairing button and on the Windows system, press the Windows key.
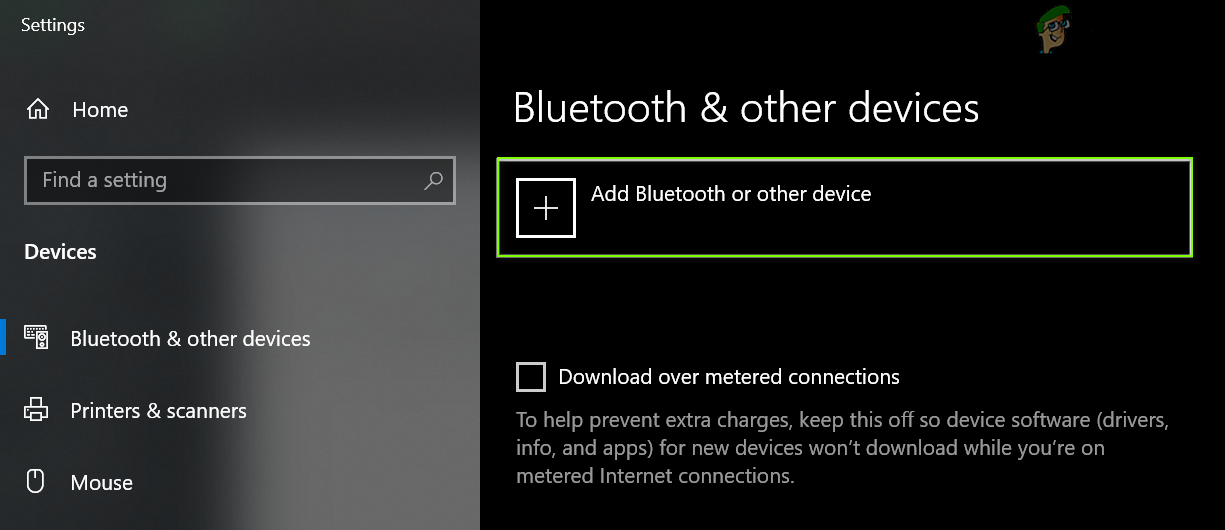
- Now type ‘Bluetooth and Other Devices Settings‘ and click on Add Bluetooth or Other Device.
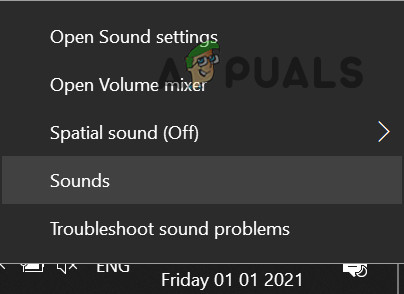
Open Bluetooth and Other Devices Settings - Then click on Headset and right-click on the Speaker icon (in the System’s tray) after successfully pairing oSystem’svices.

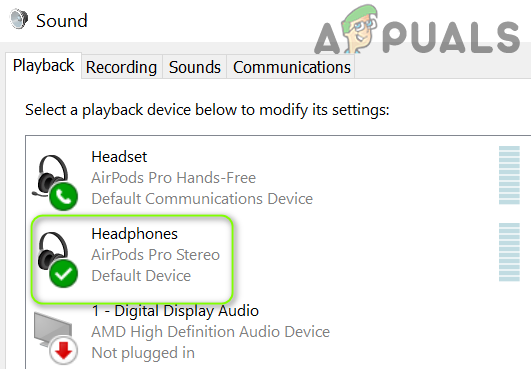
Click on Add Bluetooth or Other Device - Now choose Sounds and then head to the Recording tab.

Open Sound - Then right-click on the AirPods Pro Stereo and choose the Default Device.

Set AirPods Pro Stereo as the Default Device - Repeat the same in the Playback tab and check if the mic works fine. If not, then try the steps again after a system reboot.
3. Change the Applications’Settings
If the issue is only with some applications, then that application may not have been properly configured to use the AidPod Pro mic. In this context, making the relevant changes in the application’s settings may solve the problem. For elucidation, we will discuss the process for the Zoom application.
- Launch the Zoom Settings and head to the Audio tab.
- Now expand the dropdown of Speaker and choose Headset Airpod.
- Then expand the dropdown of Microphone and choose Headset Airpod.

Set Headset Airpod as the Speaker and Microphone in the ZZoom’sSettings - Now relaunch the application and check if it is working fine.
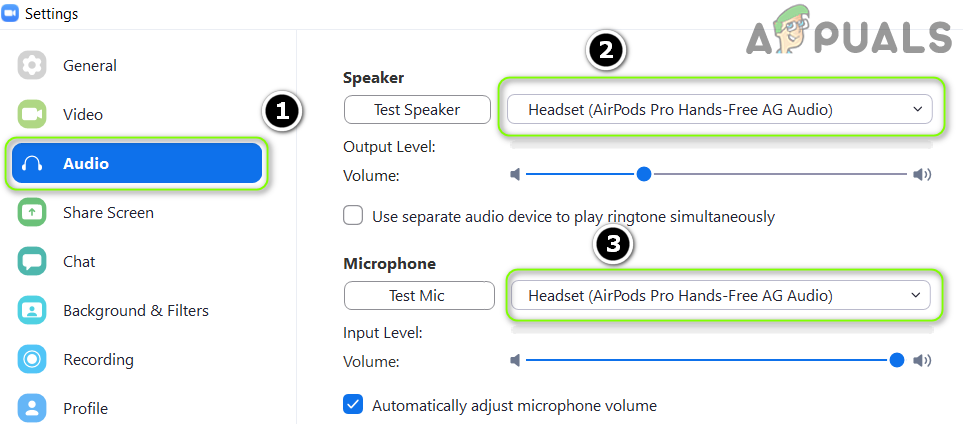
If the issue persists, check if choosing Stereo as Speaker and Microphone as ‘’Same as System’‘resolves the problem.
4. Run the Built-in Troubleshooters
The AirPod Pro mic might fail to work if essential OS modules (like Bluetooth, audio, etc.) are stuck in operation. In this scenario, running the Windows built-in troubleshooters may clear the glitch and thus solve the problem.
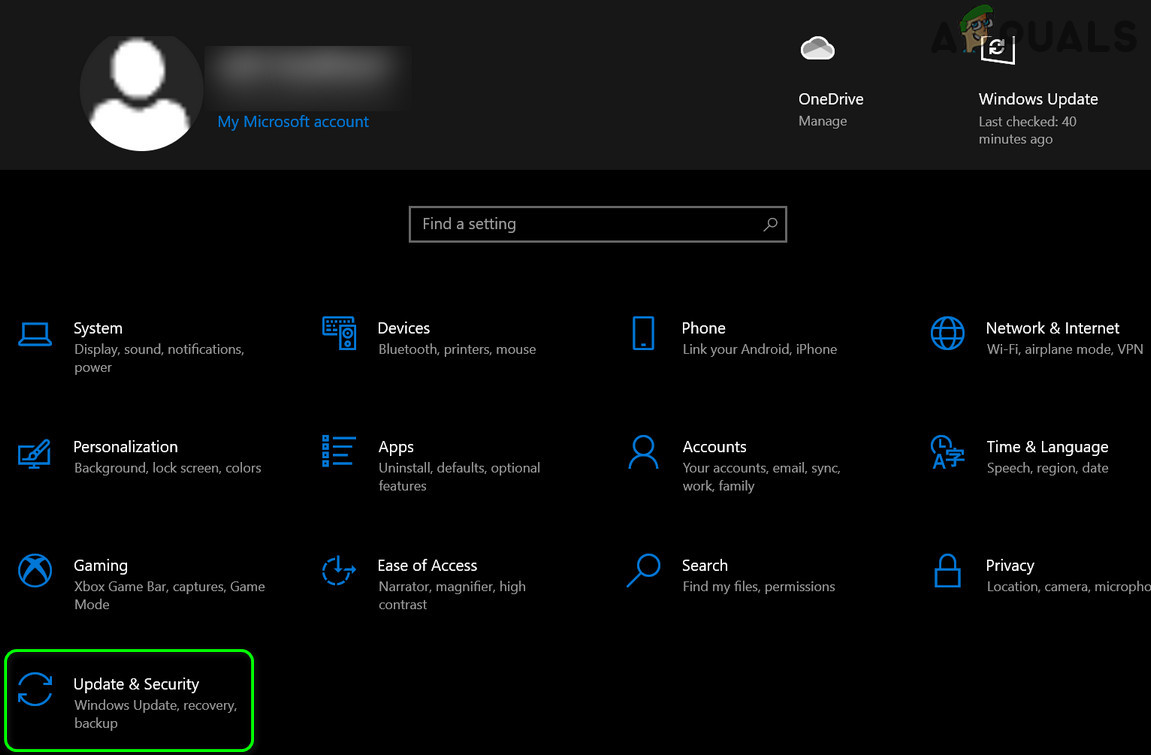
- Press the Windows key and open Settings.
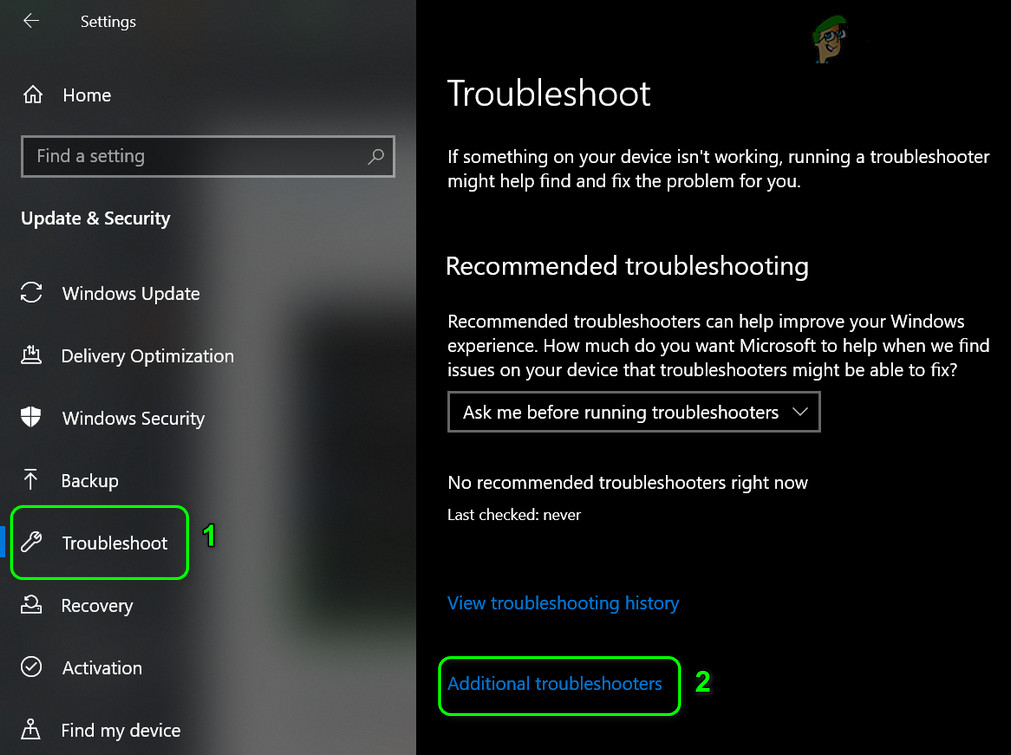
- Now select Update & Security, and in the left pane, navigate to the Troubleshoot tab.

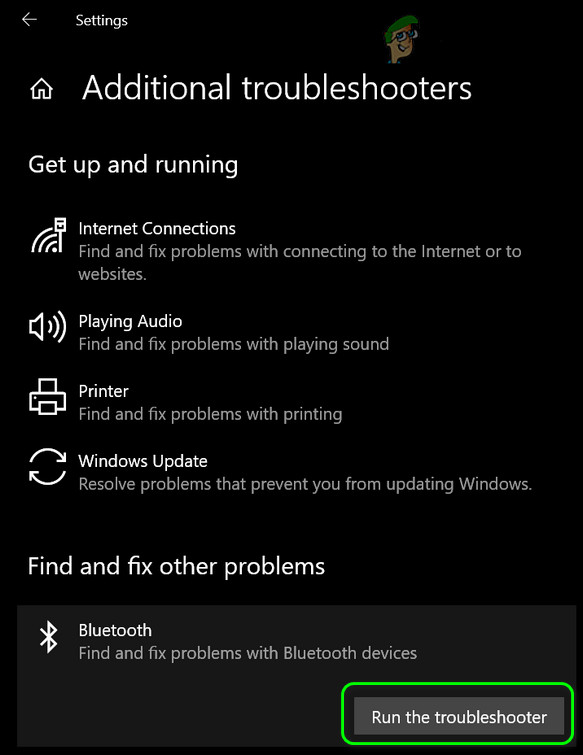
Open Update & Security - Then, in the right pane, open Additional Troubleshooters and click on Bluetooth to expand it.

Open Additional Troubleshooters - Now click on the Run the Troubleshooter button and let its process complete.

Run the Bluetooth Troubleshooter - Then apply the troubleshooter suggestions and check if the AirPod Pro mic is operating fine.
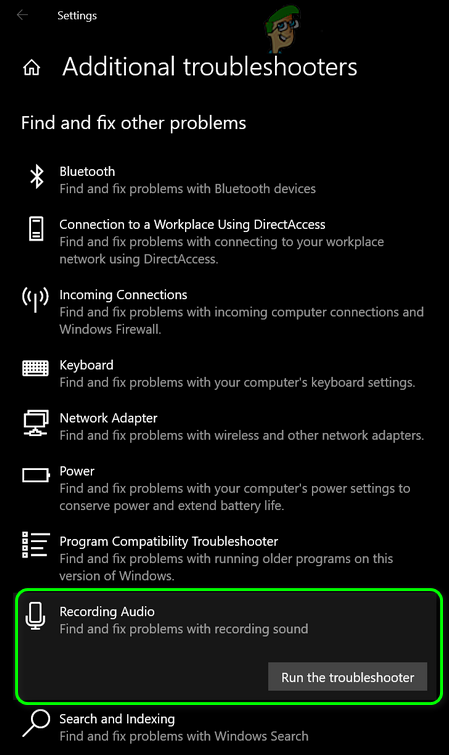
- If the issue persists, run the Recording Audio troubleshooter and check if that resolves the mic issue.

Launch the Recording Audio Troubleshooter
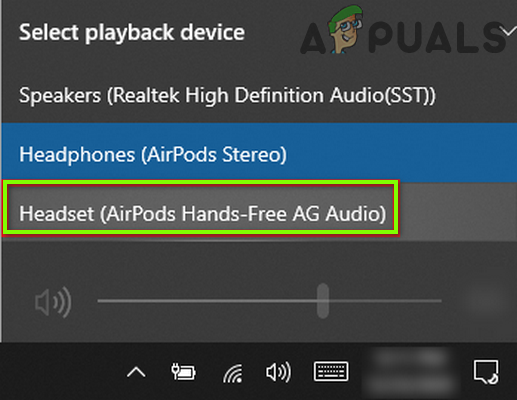
5. Use the Hands-Free Mode
Suppose your Bluetooth adapter (mainly internal adapters) does not support the Stereo mode operation of the AirPods Pro. In that case, switching to the Hands-Free AG Audio option may solve the problem (but the sound quality may be a bit deteriorated).
- Click on the Speaker icon in the SSystem’sTray to expand the sound devices panel.
- Select the Headset (AirPods Hands-Free AG Audio) option and check if the AirPod mic is working fine.

Select Headset (AirPods Hands-Free AG Audio) - If the issue persists, right-click Windows and select Device Manager.
- Now expand the Sound, Video, And Game Controllers option and right-click on the AirPods Stereo.
Disable AirPods Stereo in the Device Manager - Then select Disable Device and confirm to disable the AirPods Stereo device.
- Now exit the Device Manager and reboot your PC.
- Upon reboot, check if the AirPod Pro mic is working fine.
6. Reinstall the Bluetooth Driver
If your System’s Bluetooth driver is corrupt or incompatible, your AirPods mic won’t work. In this case, reinstalling the Bluetooth driver may solve the problem.
- First, launch a web browser and download the latest Bluetooth driver version from the OEM website.
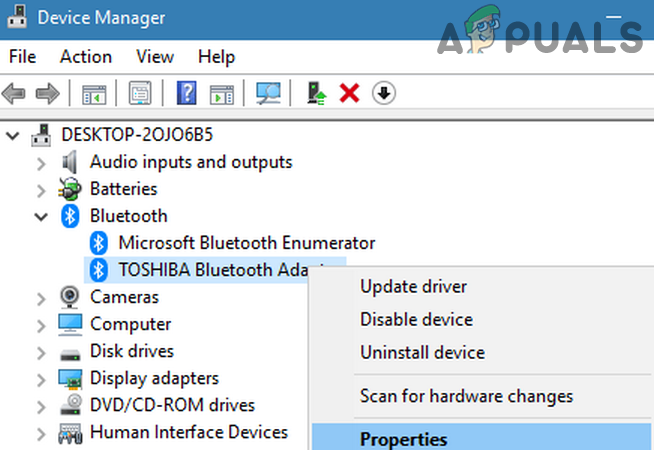
- Then right-click the Windows logo button and open Device Manager.
- Now expand Bluetooth and right-click on the Bluetooth device.

Uninstall the Bluetooth Device in the Device Manager - Then, in the menu shown, choose Uninstall Device, and on the next window, checkmark the option of Delete the Driver Software for This Device.
Delete the Driver Software of This Device for the Bluetooth Driver - Now click on Uninstall and let the uninstallation complete.
- Then reboot your PC and upon reboot, let Windows install a generic driver (if it does so).
- Now check if the mic issue is resolved. If not (or the Windows did not install a generic driver), install the latest driver (downloaded at step 1) and check if the mic has started functioning.
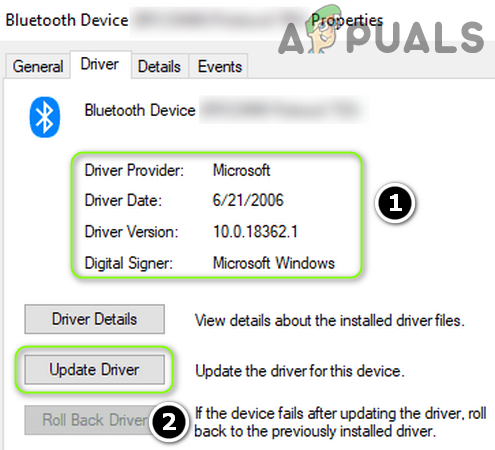
- If the issue persists, right-click on the Device MManager’sBluetooth device (repeat steps 2 to 3) and choose Properties.

Open Properties of the Bluetooth Device in the Device Manager - Now, head to the Driver tab and note the Bluetooth driver in use. After that, click on the Update Driver button.

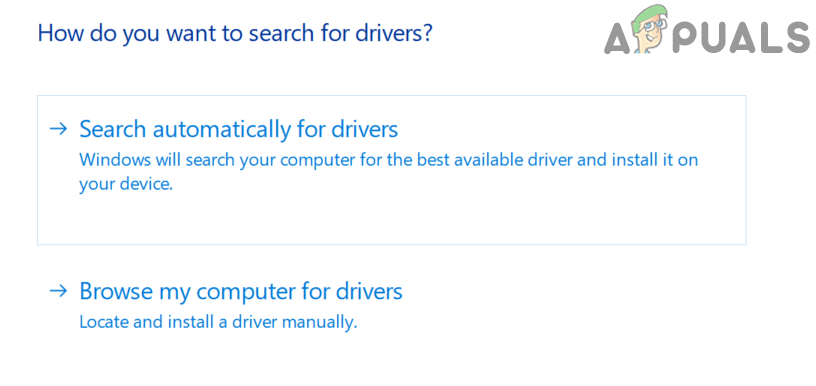
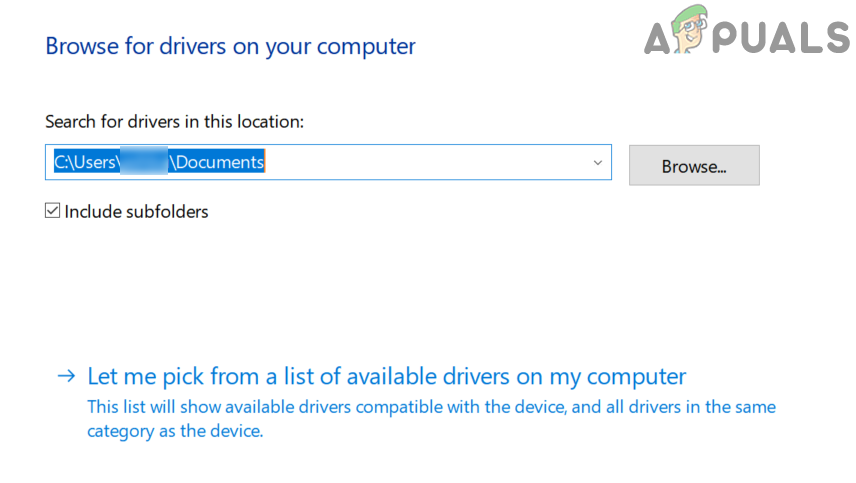
Note Down the Bluetooth Driver and Click on Update Driver - Now choose Browser My Computer for Drivers, and on the next window, select Let Me Pick from a List of Available Driver on My Computer.

Browse My Computer for Drivers - Then, in the list of drivers, select a driver (but not the one currently in use) and click on the Next button.

Let me pick from a list of available drivers on my computer - Now reboot your PC and check if the AirPod Pro mic is working fine.
- If the issue persists, you may try another driver at step 11 (you may have to uncheck Show Compatible Driver) and check if that resolves the mic issue (you may try all the drivers one by one).

If none of the drivers does the trick for you, check if using the Bluetooth Headset Helper by Broadcom resolves the mic issue. If the problem persists, you may try to use an external (or another Bluetooth adapter using Bluetooth 5.0 like Jabra Link 380) to resolve the issue.
Kamil Anwar
Kamil is a certified MCITP, CCNA (W), CCNA (S) and a former British Computer Society Member with over 9 years of experience Configuring, Deploying and Managing Switches, Firewalls and Domain Controllers also an old-school still active on FreeNode.
AirPods are known for their sound quality and other exceptional features, and the best part is that they can even be enjoyed by Windows users as well. We have already talked about how you can connect Apple AirPods to your Windows PC.
But, what if despite trying everything in your capacity, you find that AirPods are not connecting to Windows 10? Worry not, in this blog we’ll have a look at some effective steps that will help you get over the “AirPods not working windows 10” issue.
Before we proceed with the troubleshooting steps, here are the kind of issues that you might face when trying to connect AirPods to Windows 10 –
Kinds of Issues You Might Face When AirPods Don’t Work Correctly On Windows 10 –
When AirPods cease to work as they should, users come across the following types of issues.
- AirPods are connected but no sound can be heard on Windows 10 laptop or PC
- AirPods are paired but not connected to Windows 10
- One AirPod is working whereas the other is not
- AirPods frequently disconnecting from Windows 10
Ways To Fix AirPods Not Connecting To Windows 10
The below mentioned fixes can cater to a variety of issues that can stop you from enjoying AirPods on your Windows 10 PC –
– Check If You Have The Latest Firmware
Agreed that updating Windows to the latest version or even upgrading Windows 10 Bluetooth drivers is one of the best ways to fix AirPods not connecting to Windows 10. Having said that, if your AirPods’ firmware is outdated, it might become incompatible with devices, for instance, Windows 10.
So, how do you check your AirPods firmware and update it?
- Open Settings on your iPhone
- Head to the Bluetooth menu
- Locate your AirPods in the given list of devices
- Tap on the i next to your AirPods. You will get the About section. Check the firmware.
Note: However, if your AirPods are connected, click i next to your AirPods. On the next screen, locate the About section to check the Firmware.
- If your Firmware is updated to the latest version, it’s perfectly fine, but, if not, the update should install when you connect your iPhone via Bluetooth
– Update Bluetooth Drivers
Now, we have mentioned that upgrading Bluetooth drivers is one of the best moves to resolve AirPods not working on Windows 10 or even if you face issues like AirPods seen connected but you still can’t hear sounds. One of the easiest ways to update or install the latest Bluetooth drivers is to use third-party driver updater software.
Advanced Driver Updater, for instance, is undoubtedly one of the best driver updater utilities out there. So, what is Advanced Driver Updater?
It is one utility that can take the headache of searching for the right drivers. Using this driver updater tool, you can easily install and update the right drivers for Windows, and that too in just a few simple clicks.
How Does Advanced Driver Updater Work?
Download Advanced Driver Updater
- Download, install and launch Advanced Driver Updater
- Click on Start Scan Now

- From the list of outdated drivers select your outdated Bluetooth driver

- Click on the Update driver option and wait for the process to complete.


Other Reasons To Choose Advanced Driver Updater
- You can create a backup of old drivers before updating them
- Restore backup in case something goes wrong
- Schedule driver scan at your desired time
- Exclude unused or unwanted drivers from the scanning list
– Set Your AirPods As Your Default Communications Device
Quite possibly, you have not set AirPods as your default communications device. This step is especially known to be effective in case AirPods not connecting to Windows 10 or AirPods mic not working –
- Right-click on the sound icon present at the bottom right corner of your Taskbar

- Click on Sounds
- Click on the Playback tab (if you haven’t yet) and then right-click on the AirPods and choose Set as Default Communication Device


Note: Your Device (AirPods) must be connected for the set as default function to work, or it will be greyed out
– Keep Your Windows Up To Date
With every update, Microsoft aims at patching issues and vulnerabilities. And, as reported by many users, AirPods not connecting to Windows 10 could be one of them. To update Windows 10, steps are mentioned below –
- Press Windows + I to open Settings
- Click on Update & Security and click on Windows Update

- From the right-hand side click on Check for updates

- If the update is available, fetch the updates


Restart your PC and now check if you can connect AirPods to Windows 10 and if they are working just fine on your computer.
– Pair AirPods To Your Computer Again
Maybe you are not able to connect AirPods to your computer because of some fault in the Bluetooth module of your computer. If that is the case, you can again try and add AirPods Pro to your computer and check if you have been able to resolve the issue –
- First, unpair your AirPods and make sure that they are not connected to any other device as well
- Put the AirPods back in the case and hold the pairing button. While holding the pairing button, open the case’s lid and wait till you see a green light blinking
- Now, release the pairing button
- In your Windows search bar type Bluetooth and other devices settings
- From the right-hand side click on Add Bluetooth or other device
- Select Sounds and then move to the Playback tab
- Right-click on AirPods Pro Stereo and select Default Device
- Repeat the process mentioned check if now your microphone is working correctly
– Use A Third-Party Bluetooth Adapter
It’s quite a possibility that your inbuilt Bluetooth adapter is unable to accommodate AirPods which is why you are facing all the different kinds of issues. And, if even after trying the above steps, you find that the AirPods are still not working on your Windows 10 laptop or PC, you can give a third-party Bluetooth adapter a spin. Many users have reported that buying and using a Bluetooth adapter fixed issues.
Wrapping Up:
Are your AirPods working fine on Windows 10? Or, more specifically, are you now able to connect AirPods to Windows 10? If yes, which of the above methods worked wonders for you. If you liked what you read, do give this blog a thumbs up and for more such updates keep reading Tweak Library.