
SanDisk Cruzer/Ultra USB Not Showing Up (Cruzer Blade, Ultra usb 3.0 included) — Best 6 free Fixes
Quick fix -> 6 efficient ways for Sandisk usb not working fix
«My SanDisk ultra usb 3.0 flash drive is not showing up nor detected in My Computer or Disk Management, but I want to get back my data stored on this flash drive. Can anyone tell me why does my SanDisk flash drive stops working? Is there any way to get back lost files from an unreadable SanDisk flash drive?«
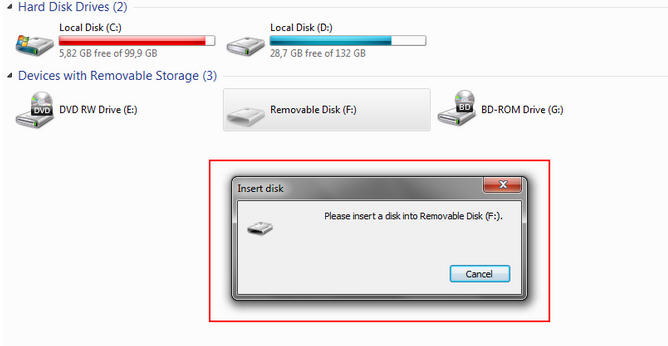
Sandisk cruzer usb drive not recognized please insert a disk into removable disk
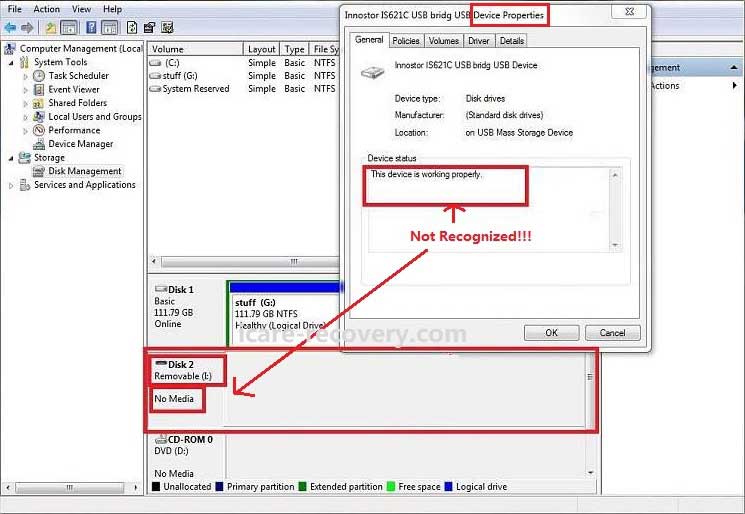
«Today, I inserted my SanDisk flash drive to my PC to transfer some data, but Windows system said flash drive is in RAW format and did not allow me to open the drive. Then, I removed the flash drive from my computer and reconnected it to another computer, this time my SanDisk flash drive is not showing up and Sandisk reported no media in disk management. What can I do to get back my lost data?«
Sandisk usb drive not detected in computer disk management
«Is it able to rescue data from a SanDisk ultra usb 3.0 that is not working on my computer? I have a 128GB SanDisk flash drive, but it is not readable on my computer. I have tried all my best to resolve this problem, but I still cannot read any data. If anybody knows the solution, please tell me.«
Sandisk usb drive not recognized in computer
My sandisk flash memory won’t open in my computer when I clicked the removable disk icon in this computer, however it just won’t work.
Sandisk usb drive not working in computer
Solution 1 — Uninstall Sandisk USB Stick in Device Manager and Reload
This is to update Sandisk cruzer driver in Windows 10 or 7 when the usb is not detected in Windows computer or my computer. Uninstalling the sandisk from device manager by a right click uninstall option, and then reinsert sandisk usb to computer, and scan for new changes from ACTION and get the new sandisk usb driver downloaded automatically on Windows pc.
Step 1 — Open device manager by right click ‘This PC’ -> Manage
Step 2 — Click ‘Device Manage’ -> Right click Sandisk device -> Uninstall
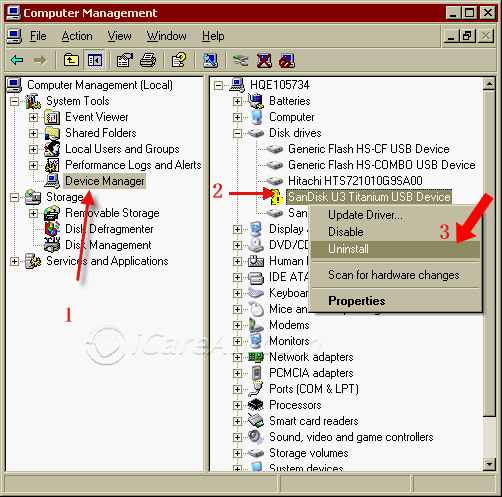
Uninstall Sandisk device in computer
Step 3 — Reconnect your Sandisk to computer, scan for hardware changes under computer management in the same window. This would reload Sandisk driver by this step. The computer would automatically download sandisk driver on windows computer.

Scan to recognize Sandisk device
Solution 2 — Sandisk usb driver update by changing its driver letter
The drive letter conflict between sandisk flash drive and other hard drive or other flash drives may result in a undetected problem for sandisk cruzer or usb. You may change a new drive letter in Windows pc for your sandisk usb and test whether it may work.
- Insert sandisk usb stick to computer, open it in disk management
- Right click sandisk usb, change drive letter and path
- Assign a new drive letter for your sandisk usb
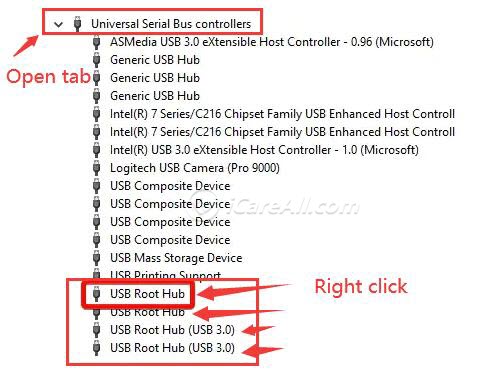
Solution 3 — Enable usb root under device manager
- Go to «Start»>» Control Panel»>» Hardware & Sound»>» Device Manager»>» Universal Serial Bus»
- Double-tap on the first «USB Root Hub»

Right click and go to its properties
- Go to the «Power Management» tab. Uncheck «Allow this computer to turn off this device to save power» option and tap on «Ok».
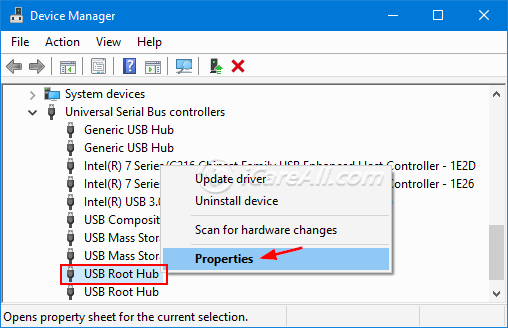
Note: Apply this change to every USB ROOT HUB
Solution 4 — Enable Sandisk usb in bios
As you see in the above image that Bios has a setting that can control whether to display usb or not. To make sure this usb controller setting is enabled, you may do the following in bios.
- Restart pc, press pause break before the os Windows logo appears
- Check the instruction screen to see which button you need to press to enter BIOS, some times F8, you need to read carefully to press the right button to enter bios
- Press pause break button and press the instructed key to go to the system setup
- Select ADVANCED -> ONBOARD DEVICES/INTEGRATED PERIPHERALS and press enter
- Select ‘USB Controller’, press + or _ to change it to get it ‘Enabled’
- Save the setting and exit the BIOS
Video — how to enable usb port in bios
Solution 5 — Sandisk Pendrive Not Detected Fix by Regedit Change
The following fix method is provided by Sandisk official.
STEP 1 — Backup the registry
1. Unplug the device from the USB port.
2. Run regedit.
- Window 10: Type regedit, in the ‘Search the web and Windows’ field (lower-right) and then select ‘Regedit — Run Command’.
- Windows 7, 8 and Vista: Click the Start button, type regedit in the search box, and then press Enter.
- Windows XP: Go to Start > Run, type in regedit and then click OK.
3. From the registry menu, choose File > Export.
4. Name the file SNDK.reg and save it to your desktop.
STEP 2 — Remove SanDisk info from the registry
WARNING: DO NOT delete any registry key other than keys that include VID_0781. Deleting registry keys other than keys that include VID_0781 MAY cause your computer to not boot properly.
1. From the registry menu, click Edit and choose Find.
2. Type in VID_0781 and click Find Next.
3. Once the search finishes, right-click the highlighted registry key and select delete.
4. Press the F3 key to find the next registry key that includes VID_0781.
5. Right-click the highlighted registry key and select delete.
6. Repeat this process until the search returns with No results Found.
NOTE: Under Windows 7, 8 and Vista, some registry keys may be protected and cannot be deleted. Simply skip over these keys if you receive a message that the key cannot be deleted.
7. Once all registry keys containing VID_0781 have been deleted, reboot your computer.
8. Plug the device into the computer after it’s finished rebooting.
Solution 6 — Sandisk usb driver update by Chipgenius
- Download chipgenius from the internet, unzip it
- Insert your usb stick to computer, open chipgenius, and detect sandisk usb driver information and locate its driver software
- Download sandisk proper driver software (according to what has been detected in chipgenius), install it on the computer for your sandisk, open it, run it to get sandisk usb drive updated
Usually the above sandisk usb driver update would work for most sandisk flash drives such as sandisk cruzer blade, sandisk cruzer glide 64gb when you want to download sandisk driver.
More ways to fix usb not detecting on computer [10 free ways]; or sandisk usb driver download
6 Ways to fix Sandisk USB/HD not showing up or detected error — Video Guide
Also read: 9 free usb repair kit
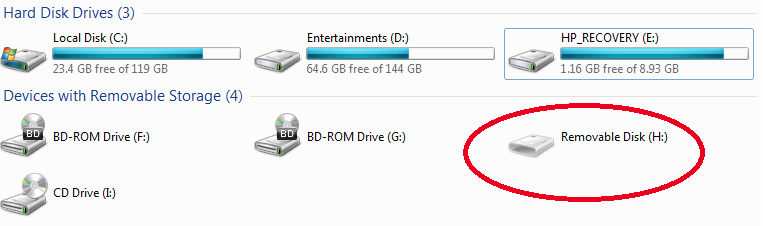
Usually, a flash drive shows as a removable disk after it is connectted to computer. When your SanDisk flash drive is not showing up, you might believe that the flash drive is corrupted or damaged.
The solutions offered on this page may work for your Sandisk usb when
- Sandisk not detected by mac
- Sandisk usb not lighting up
- ixpand not detected by pc
- sandisk 32 otg pendrive not detected on android…
Data Recovery When SanDisk Flash Drive Is Unreadable
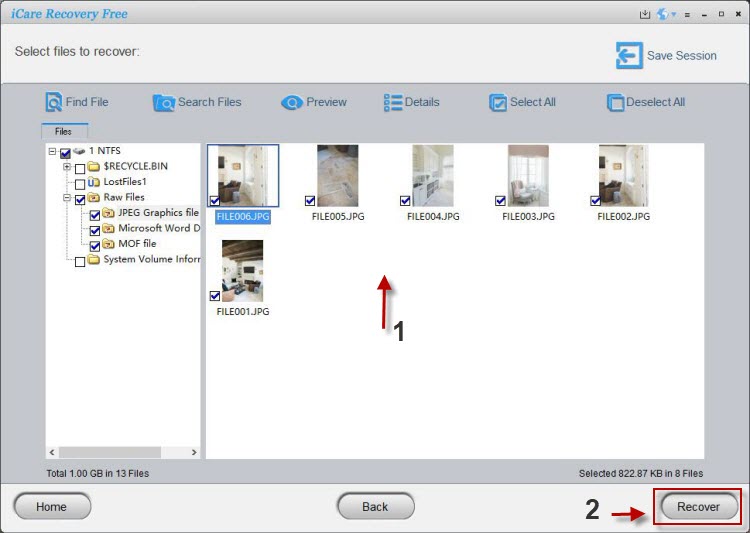
This free data recovery software allows you to recover various kinds of files even when SanDisk flash drive is not showing up in my computer with just 3 simple steps.
Step1. Download and install iCare Recovery Pro Free on computer. Launch the software and choose a scan mode.
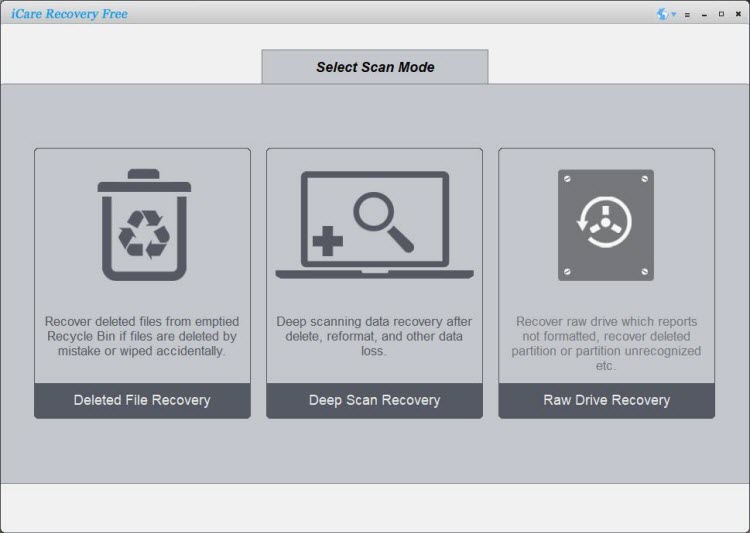
Step2. Select the detected device and wait the software to scan it for lost data.
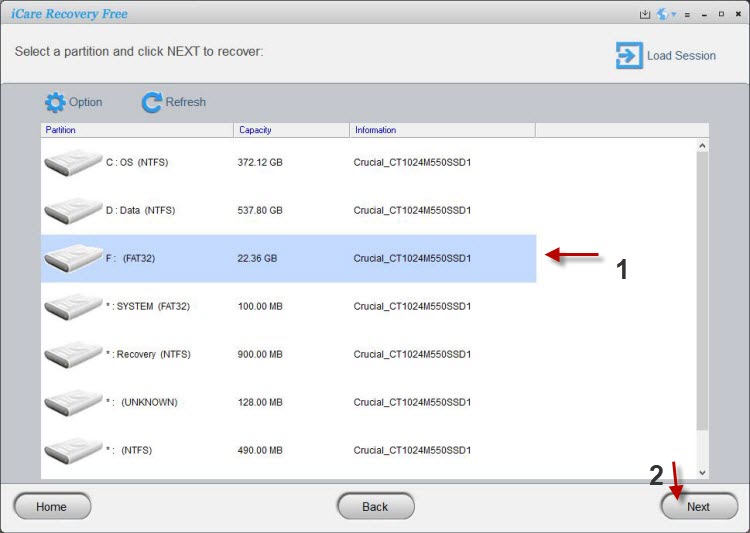
Step3. You can preview the lost data and recover it to another drive after scanning.
Also read: free sandisk cruzer data recovery
Hot FAQs
- 1, Q: My sandisk 32gb otg pendrive not detected in Android, how to fix it?
- A: When the sandisk pendrive was not recognized in Android via otg, the file system may not match, you may backup data onto somwhere else, and then format the pendrive in Android with otg cable connected; if it still did not work, connect it to a Windows computer and try the above methods; or your sandisk pendrive is probably dying.
- 2, Q: My sandisk usb is not lighting up
- A: You may try it on another usb port, or try it on another computer, backup the data to somewhere else at first, and then try formatting it or try the above methods to fix it.
- 3, Q: Sandisk cruzer won’t open; sandisk us not accessible, not working, logical error or physical error?
- A: Logical errors can be repaired with usb repair tools or you may update its driver to get it show in your computer or device while phsical bad cannot be repaired by any resource.
- 4, Q: Sandisk usb 3.0 flash drive not working?
- A: It may contains logical errors or physical errors. You may firstly repair the logical errors on Windows computer with as many ways as possible; if the flash stick is still not working, you may try it on another pc or use another socket to test if it’s physically damaged.
- 5, Q: Sandisk cruzer blade not showing up in my computer
- A: When my computer or this pc does not show sandisk cruzer blade or sandisk ultra usb, you may update its driver as a first repairing. If the Windows driver update does not work for your Sandisk cruzer, you may use the usb driver update tools that were introduced in the above page as a second repairing. If it still does not work, then you may try it on another computer to see whether it was damaged, or you may try reformat the usb since usually a formatting can make a damaged flash drive work from many logical damages.
Last updated on March 26, 2025
Related Articles
- usb flash drive not showing up in windows 10
- How to recover deleted photos from SanDisk memory card
- sandisk flash drive not detected in windows 10
- sandisk usb driver download
- Sandisk sd card not detected
- SD card reader download
- 简体中文
- Deutsch
- 日本語
- HGST Support
Are you faced with the problem of the SanDisk SD card not showing up or recognizing by phone or PC? Try the methods here to fix it and recover data.
| Workable Solutions | Step-by-step Troubleshooting |
|---|---|
| Fix 1. Repair the SD card not working or not detecting | Method 1. Apply SD card repair software…Full steps Method 2. Update the driver and format it into NTFS…Full steps |
| Fix 2. Recover the SanDisk SD card data for free | Step 1. Run free SD card recovery software Step 2. Scan the SD card Step 3. Select files and recover…Full steps |
Problem: SanDisk SD card not found by phone or PC
«My SD card was working flawlessly in the past few days. Suddenly, I went into the media on my phone today, and it showed nothing. I go into my phone settings, and it says there is no memory card detected. I tried SD cards from three other friends, and they all registered fine on my phone, so that isn’t the issue. I then tried my SD on my laptop, and the laptop won’t even recognize I inserted a memory card. What could I do? This is a pressing matter because I need one of those videos off of my SD card by next week.»
This is a snippet we picked up on forums.sandisk.com, one customer’s SD card has a seriously malfunctioning problem, and soon this post was followed by other old and new customers. They all have this common question: why is my SanDisk memory card not working as it was? And mostly, they are using types like SanDisk Extreme Pro/Plus micro SD/SDHC/SDXC card, and a small Digital camera group is using XQD card.
No matter how large capacity you’re using, the minimum 2GB/4GB to medium 32GB/64GB/128GB to maximum 256GB/512GB, it’s the same consequence when the memory card is reading, detected or recognized by a device. You cannot take pictures, install apps, transfer files to the computer, or simply cannot open the SD card.
Fix SanDisk SD card not working or detected in Windows 10/8.1/8/7
To repair not working or undetectable SanDisk memory card, you have two choices here. You follow either one to restore the SanDisk memory card to reusable status again.
Method 1. Run a disk checkup to repair the SanDisk memory card failed error
You can try CMD to run a disk check to fix all internal errors on the SanDisk memory card to repair the card. Or you can directly run a free partition manager software for help.
Option 1. Use free partition manager software to check and repair SanDisk memory card
If you prefer simple methods, you can apply EaseUS Partition Master Free with its Check partition feature to repair your SanDisk memory card now:
Option 2. Run CMD command to check and repair SanDisk memory card
Note that the CMD CHKDSK command will erase all data on the SanDisk memory card. So make sure that you recover data from the SD card first with reliable Sandisk recovery software.
Step 1: Press the Windows + X keys to bring up a dialogue, and click Command Prompt (Admin)
Step 2: Type: chkdsk /f c: (replace c with a drive letter of your external hard drive). Hit Enter to let the checking process run.
Step 3: When it’s finished, type: exit and hit Enter to finish the process.
Most of the time, checking and repairing bad sectors and file system corruption on the SanDisk SD card will revive the memory card and make it appear on the phone, camera, or PC normally. If it’s still not working and it’s invisible in Windows Disk Management or Windows command prompt, move on to the next method.
Method 2. Update SanDisk memory card driver and format it into NTFS
Step 1: Update the SanDisk memory card driver
- Open «Computer» and choose «System Properties».
- In the taskbar on the left, click «device manager» and next to «USB controller» click «+».Then, you’ll see a yellow exclamation mark.
- Right-click and choose «update driver software», then click «automatically search for driver software online».

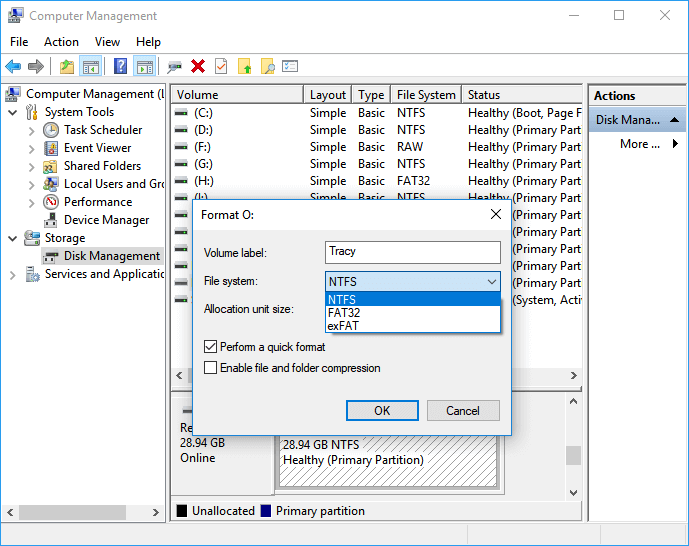
Step 2: Format and reset the SanDisk memory card to NTFS/FAT32
If updating the driver makes it appear in Disk Management but shows invalid, unallocated, or something else wrong, you can try to format it into NTFS or FAT32 so that the computer can recognize it eventually. (You can RECOVER DATA before or after performing a quick format)
- In Windows 10/8.1/8/7, press the Windows + R keys and type diskmgmt.msc to open Disk Management.
- You can then right-click on the SanDisk memory card and select «Format».
- Then, you can set file system NTFS or FAT/FAT32 for your SanDisk memory card.
Video Tutorial of Repairing Not Working or Undetectable SD Card
Here is a video tutorial guide that you can also follow to repair the not-working or not-detected SD card on your own. Let’s see:
How to Recover data from not working SanDisk memory card free
When your SanDisk memory card, USB drive, external hard drive SD card, etc, storage devices become inaccessible, undetectable, or unrecognized, don’t do anything to your device. Keep it safe, and then follow the steps below to recover important data.
Download professional data recovery software
Professional recovery software — EaseUS Data Recovery Wizard is highly recommended for you. Activate the full version to restore unlimited data from SanDisk memory cards or other storage devices. You can download it for free right here.
Recover data from SanDisk memory card
When the SanDisk memory card is not working or not detectable, don’t worry. EaseUS Data Recovery Wizard can help you scan, display, and restore all data with ease.
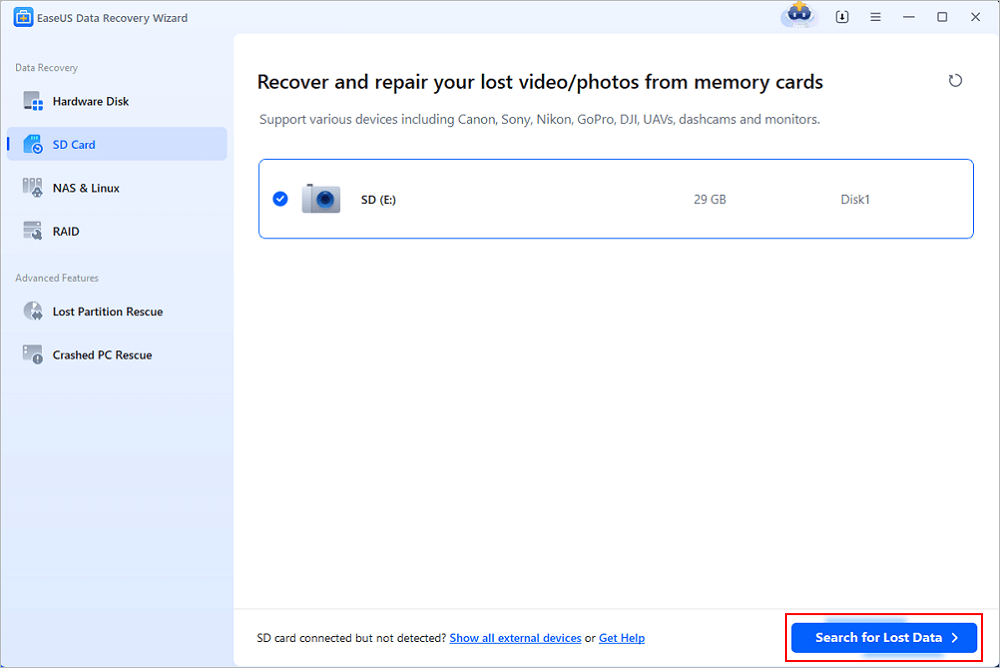
Step 1. Select the SD card to scan
- Download and install EaseUS Data Recovery Wizard on your Windows PC.
- Use the proper way to connect your SanDisk/Lexar/Transcend SD card to the computer.
- Open EaseUS SD card recovery software and choose SD Card Recovery on the left panel. All connected drives will display here. Select your SD card and click «Scan for lost data».
Step 2. Check for scan results
- Wait for the scanning process to complete.
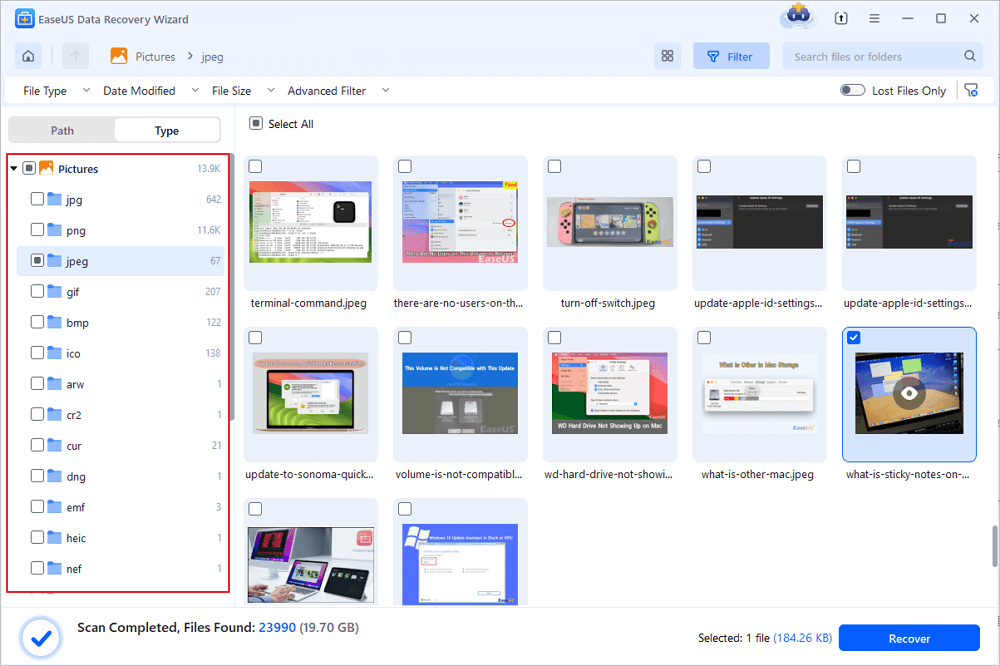
- Specify one or several file types to show up, like Pictures or Videos.
- Click «Preview» to check if they are the wanted files.
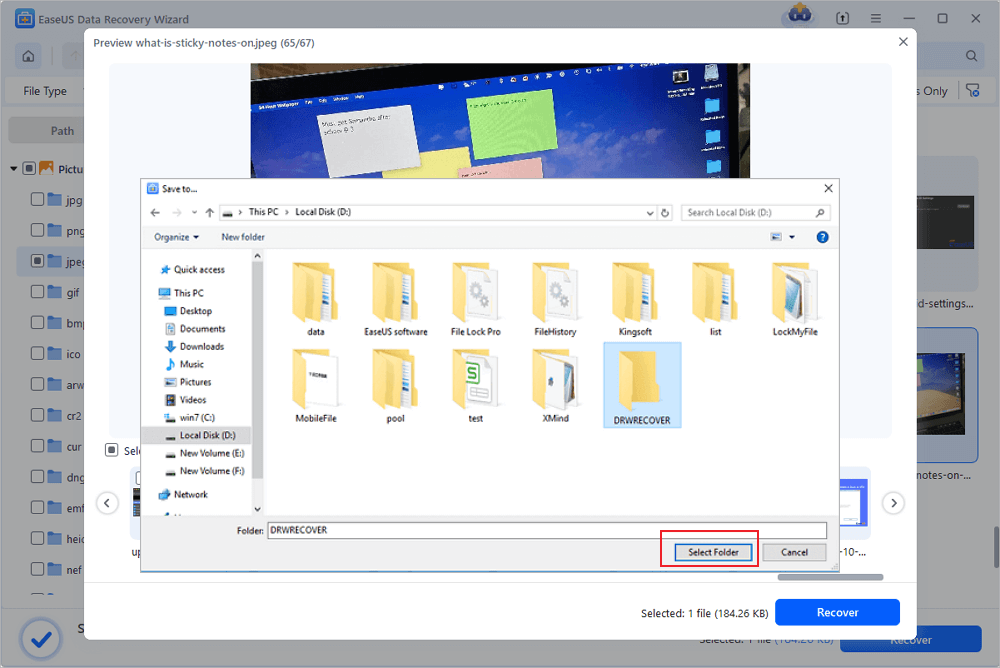
Step 3. Recover SD card data
- Preview the recovered files and click «Recover».
- Choose a different location to save the recovered files instead of the original SD card.
Using SanDisk Ultra USB 3.0 flash drive lets you transfer your files faster from one computer to another. But, when you encounter errors while using your SanDisk USB drive, it can be frustrating! Some users reported that their SanDisk Ultra USB 3.0 flash drive is not working or showing up when they try to plug it into their computer. It is not detected and won’t show as available removable storage on Windows 10 PC. If it happens to you, there are several ways you can do to fix it.
Fixing SanDisk Ultra USB 3.0 Flash Drive Not Working or Won’t Show Up in Windows 10 PC

There are different reasons why your SanDisk USB thumb drive is not working or not recognized hence it won’t appear on PC. It may be due to issues with a corrupted registry entry on your computer, a broken or bad USB port problem on the hardware side, or a series of corrupted files. Your SanDisk USB storage device may also not be formatted properly to the format recognizable in Windows.
Whatever the cause of the error on your USB flash drive, you can try each of the solutions below until you fix the problem.
#1 – Update Device Drivers
- First, launch the Device Manager on your computer. You can use the Search option to enter Device Manager.
- Look for Disk drives and click the arrow to expand the menu.
- Right-Click on SanDisk USB.
- Click Update Driver.
#2 – Reinstall your SanDisk Driver
- Open the Device Manager.
- Expand Disk drives option.
- Look for SanDisk USB and right-click on the filename.
- Click Uninstall Device.
- To reinstall, go back to Device Manager.
- Navigate to the Action tab on the top of the screen.
- Click Scan for hardware changes.
- It will reload and reinstall your SanDisk Driver.
#3 – Restart Windows Plug and Play Services

- On the Search option, enter services.msc.
- Look for the Plug and Play services.
- Click to open it.
- Click Restart the service.
- Once done, restart your computer.
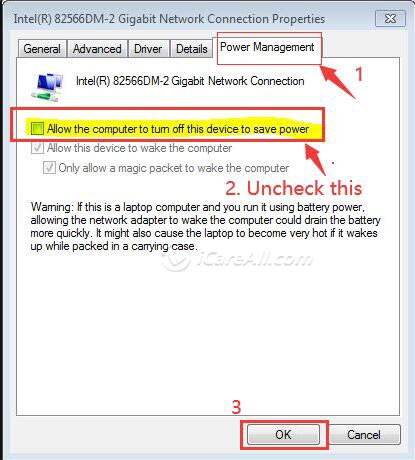
#4 – Edit Power Management Settings
- Open the Control Panel.
- Go to Hardware and Sound.
- Select Device Manager.
- Expand the Universal Serial Bus option.
- Look for USB Root Hub and double-click the first entry.
- Go to the Power Management tab.
- Look for Allow this computer to turn off this device to save power.
- Uncheck the box.
- Click OK.
- Repeat the same process for all USB Root Hub entries.

#5 – Format your SanDisk USB
- On the Search menu, type Windows Disk Management and press Enter.
- Look for your SanDisk USB and right-click on it.
- Click Format.
- Click OK.
What other methods do you know that will help fix the SanDisk USB error? You can share them below so that other users can benefit as well.
Windows Dispatch is a website supported by its readers & community. Some pages may contain affiliate links which may allow us to earn a little money when you buy through them.
Eddie Mendoza Jr
Eddie has a degree in Information Technology with a natural inclination towards troubleshooting devices. With more than 10 years of blogging experience in different niches, he has found it most satisfying when writing easy-to-follow guides and simplified articles related to computers, smart TVs, mobile devices and Internet-based services.