
Общие сведения:
Эта статья — пошаговая инструкция по установке драйвера USB-UART преобразователя на чипе от FTDI для операционной системы Window 7.
Внимание! Для установки драйверов необходимы права администатора. Зайдите от имени пользователя с правами администратора или попросите администатора компьютера дать повышенные права аккаунту, от имени которого будет производиться установка драйвера.
Драйвер — исполняемая программа-модуль, предоставляющая интерфейсы высокого уровня для управления устройствами на низком уровне.
Шаг 1. Подключение устройства.
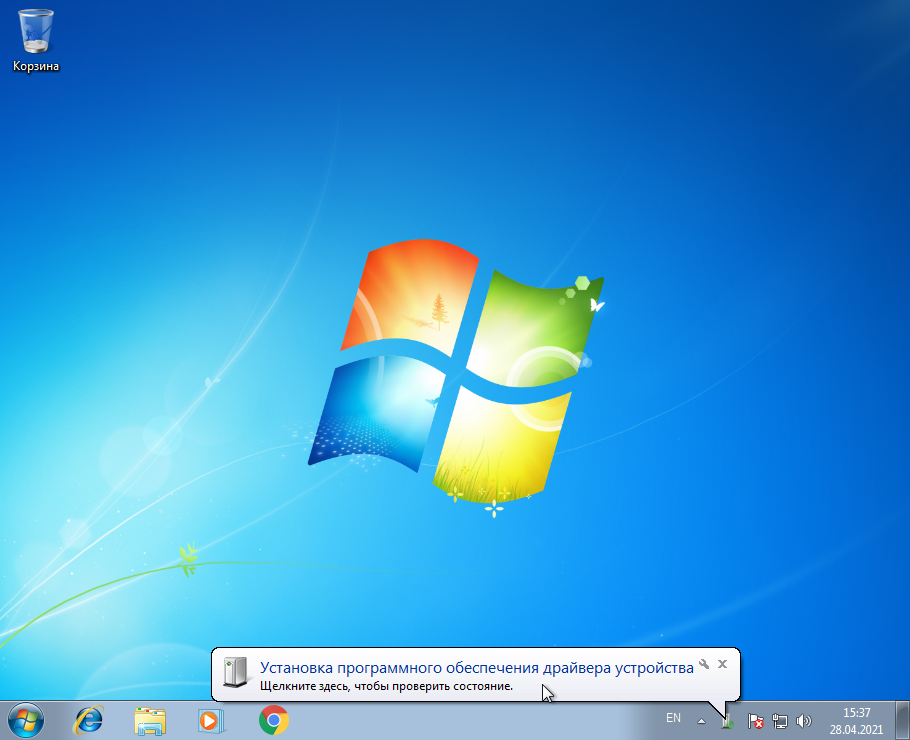
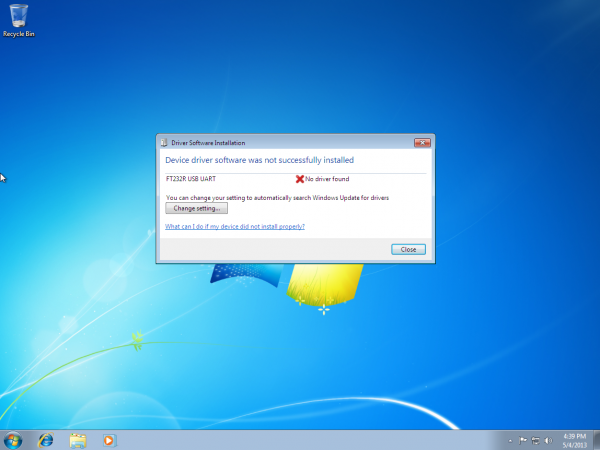
После подключения устройства с FTDI преобразователем появится сообщение об установке драйвера.
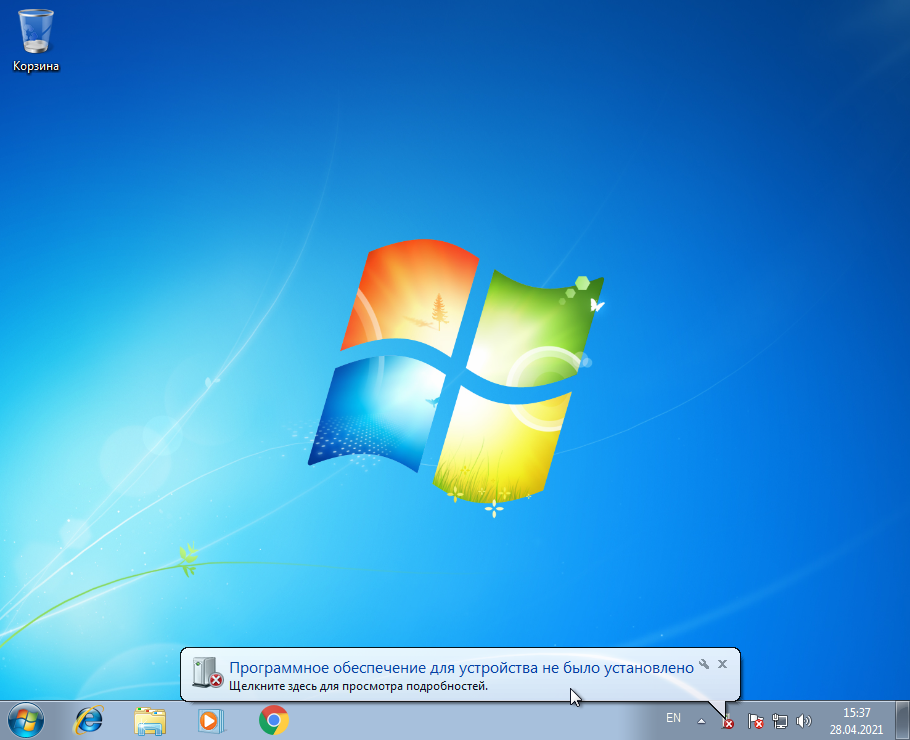
Через некоторое время появится сообщение о том, что драйвер не был успешно установлен. Если данное сообщение не появилось, скорее всего драйвер уже установлен, перейдите к шагу 5 и проверьте присутствие драйвера.
Шаг 2. Диспетчер устройств.
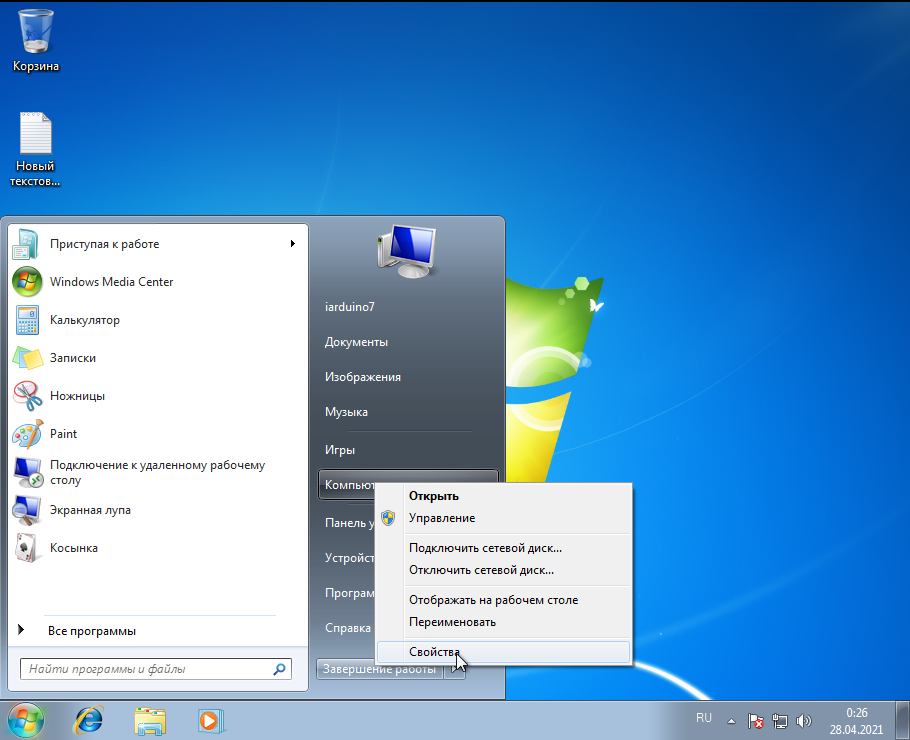
В меню Пуск (Кнопка с четырёхцветным логотипом Windows в левом нижнем углу экрана) нажмите правой клавишей мыши на «Компьютер», далее нажмите «Свойства».
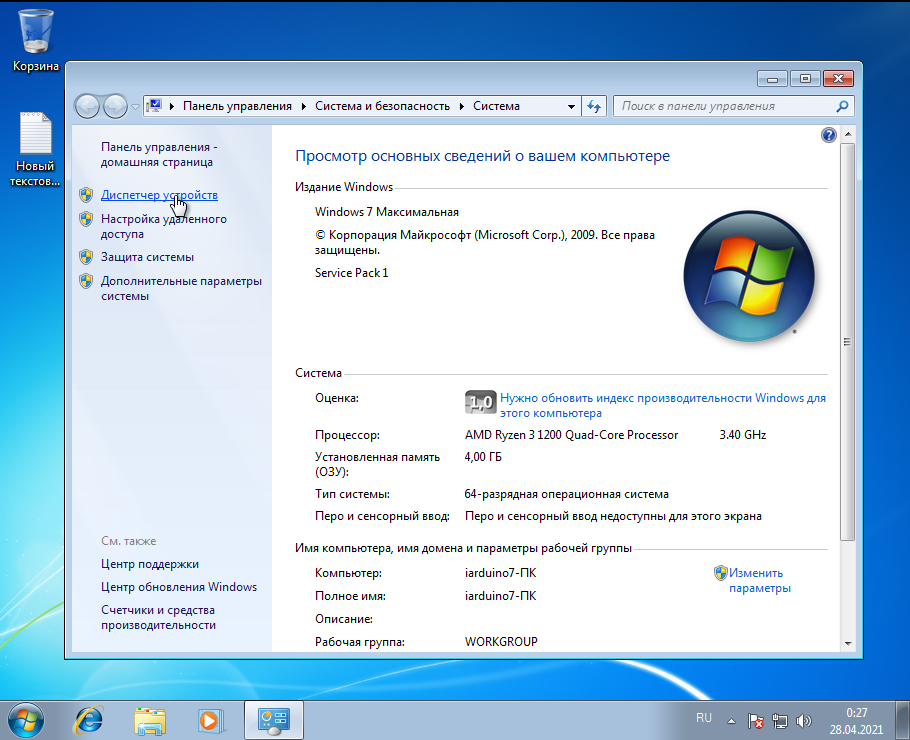
Во вновь открывшемся окне нажмите «Диспетчер устройств».
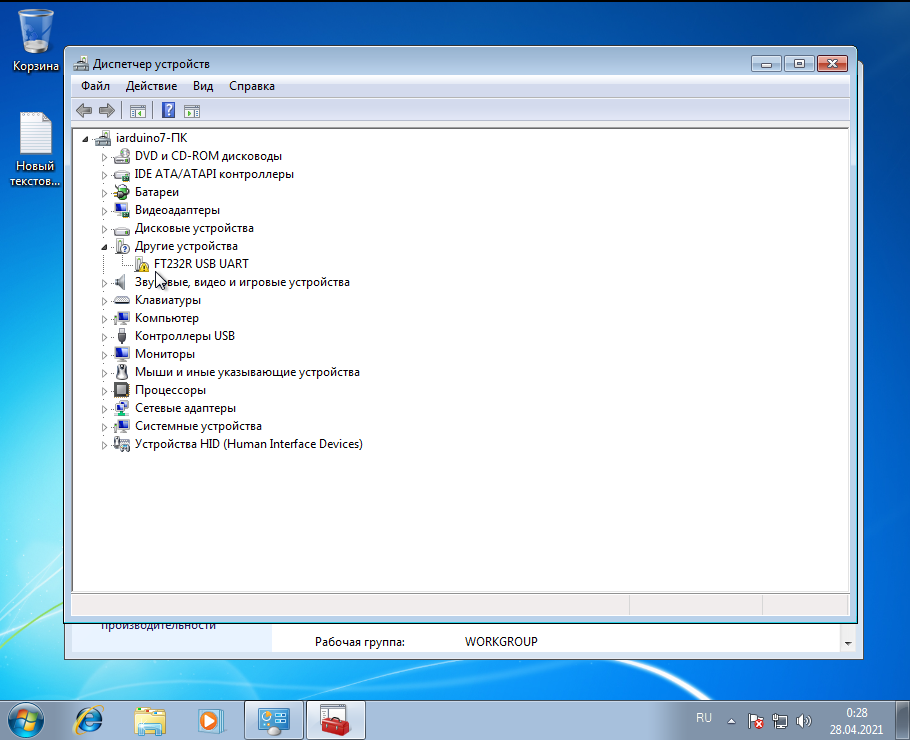
Откроется новое окно, в нём должен быт пункт «Другие устройства -> FT232R USB UART» с пиктограммой в виде жёлтого треугольника с восклицательным знаком.
Шаг 3. Скачивание драйвера.
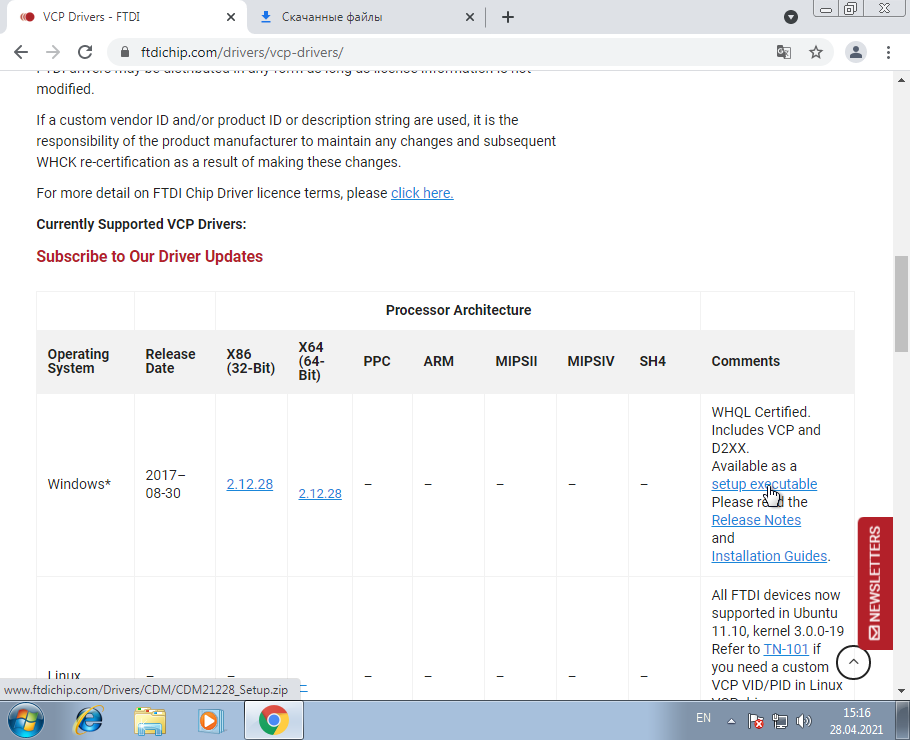
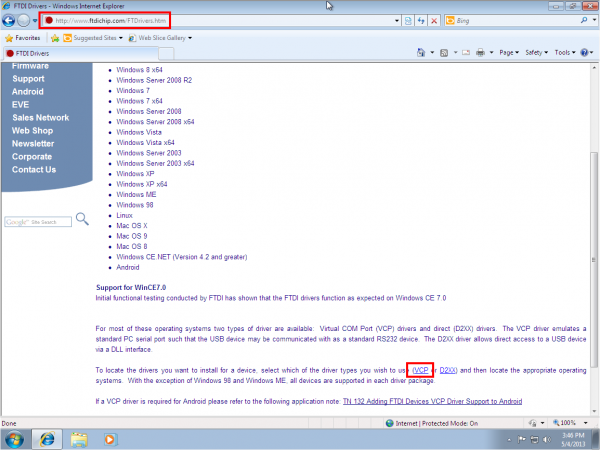
Кликните по ссылке ftdichip.com и проскрольте вниз до таблицы. В ней кликнете на «setup executable» как на рисунке. Начнётся скачивание драйвера. Или скачайте драйвер с нашего сайта, в случае, если сайт производителя по каким-либо причинам не работает.
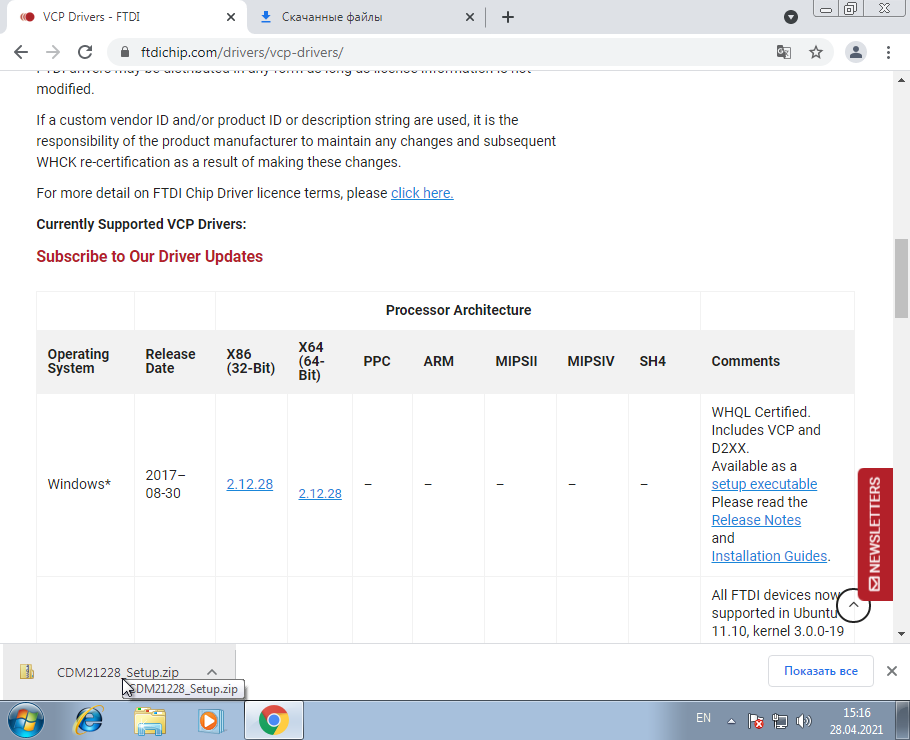
После того как файл скачался, откройте его (можно прямо в браузере нажать на .zip файл).
Шаг 4. Установка драйвера.
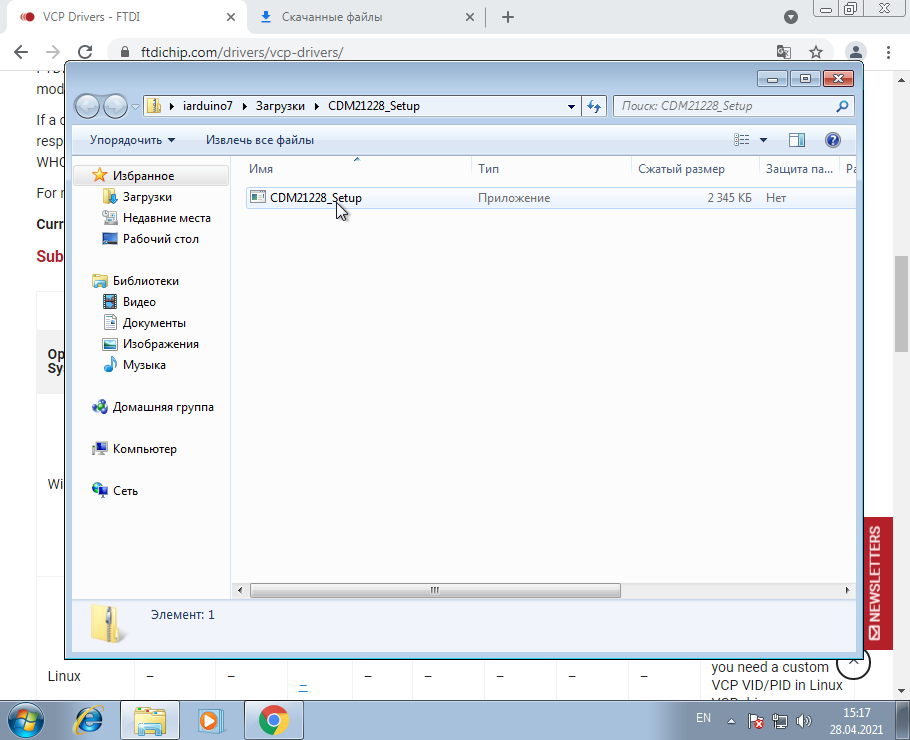
Откроется окно с исполняемым файлом. Кликните на него мышью двойным щелчком.
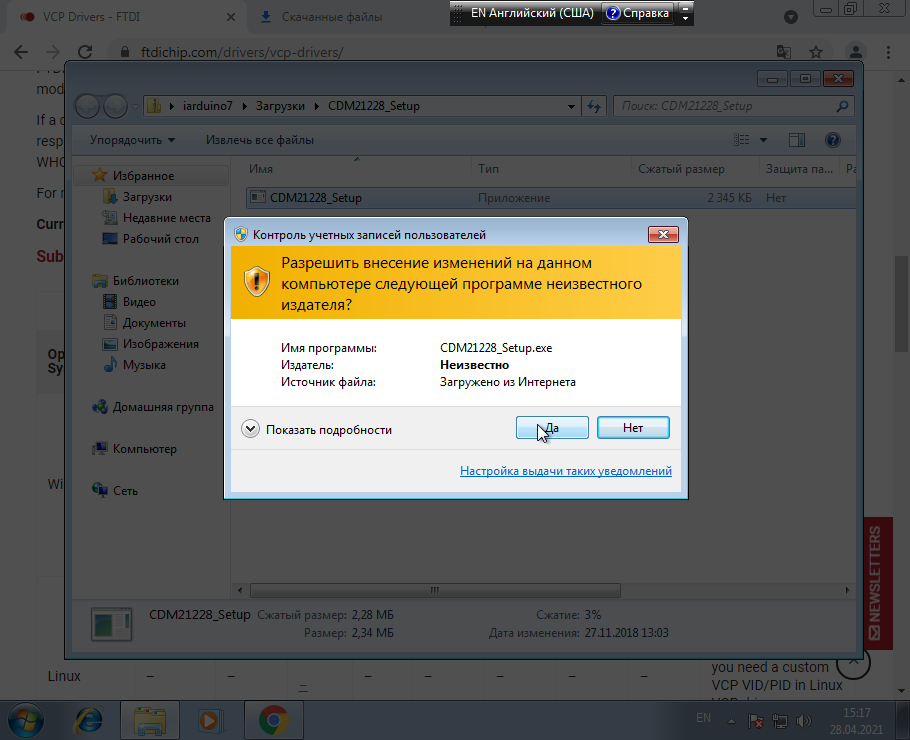
Нажмите «Да».
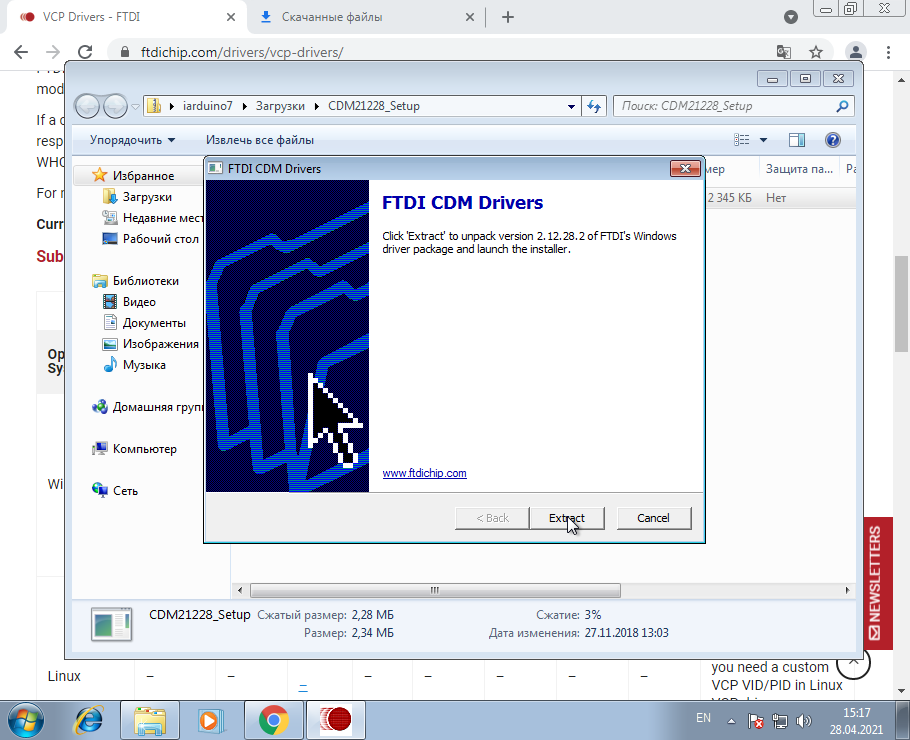
Откроется окно распаковщика, нажмите «Extract».
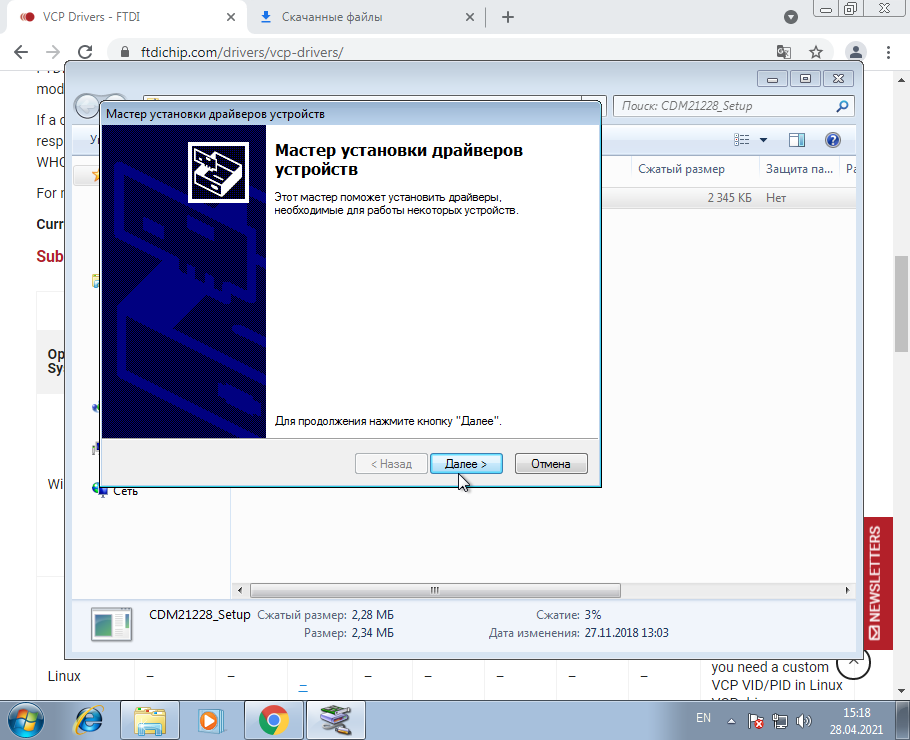
После распаковки будет открыт мастер установки драйвера. Нажмите «Далее».
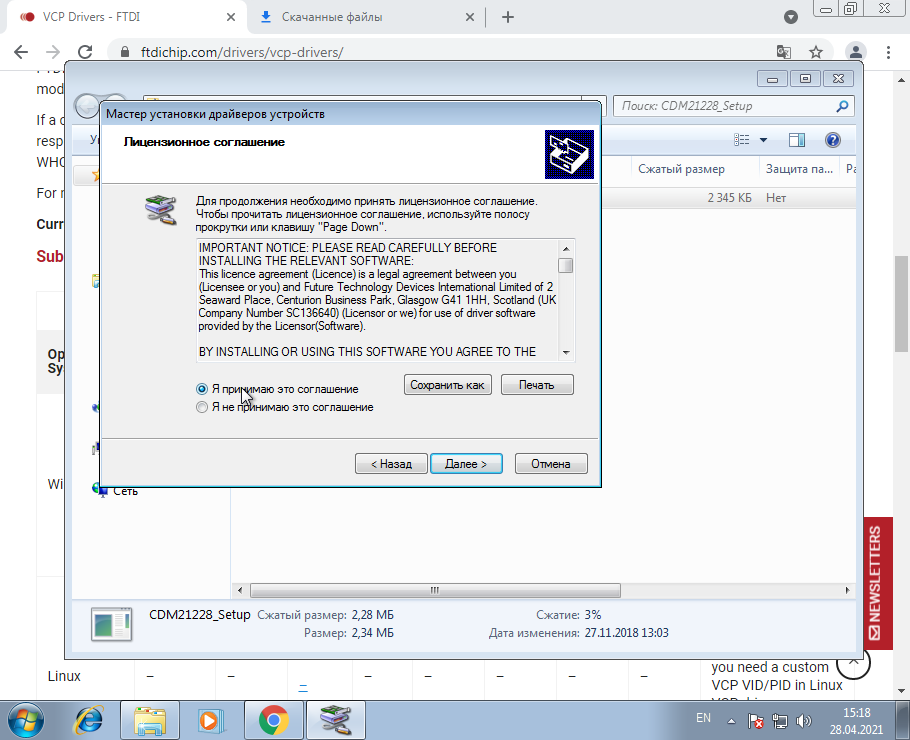
Внимательно прочитайте лицензионное соглашение и кликните на фразу «Я принимаю это соглашение», если Вы с ним согласны.

Нажмите далее.
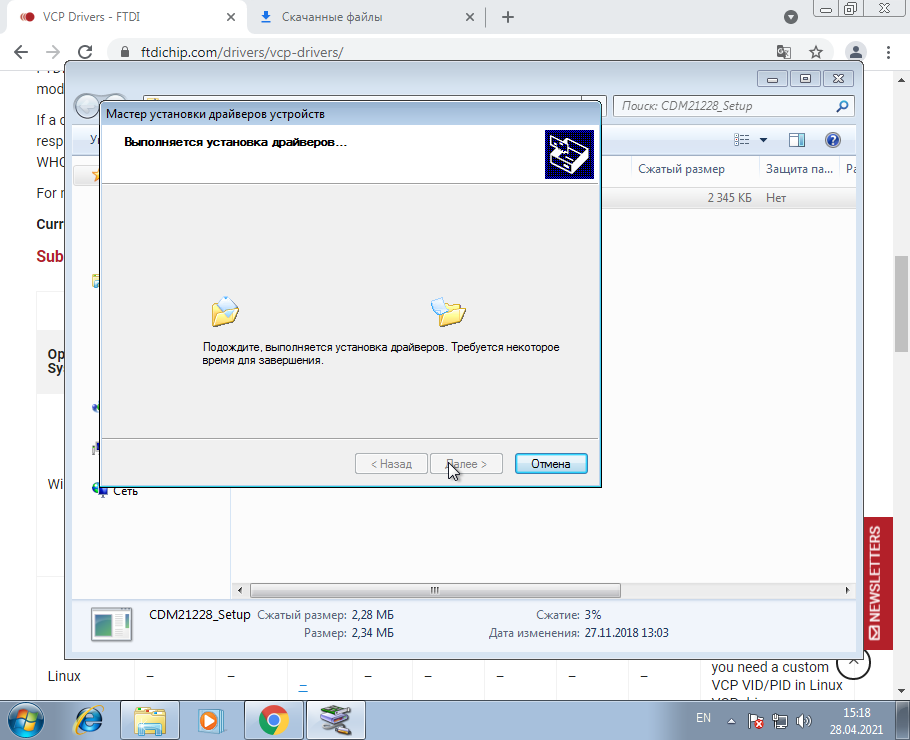
Начнётся процесс установки.

После завершения установки нажмите «Готово».
Шаг 5. Проверка.
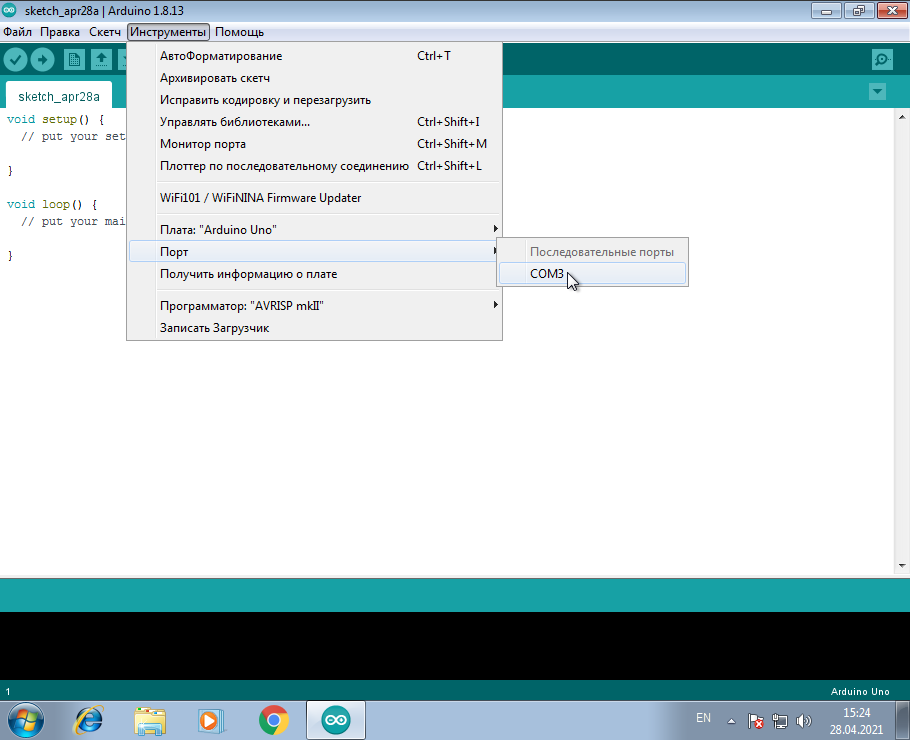
После установки драйвера откройте Arduino IDE и убедитесь, что появился новый виртуальный COM-порт.
Learn how to reset your Epson L3150 printer and access official firmware downloads and tools. This guide provides step-by-step instructions to troubleshoot common issues, restore factory settings, and ensure your device operates smoothly. Discover trusted sources for firmware updates, essential software, and tips to avoid errors during the process. Perfect for users seeking to maintain printer performance or resolve technical glitches efficiently.
Unlock the full potential of Android Debug Bridge (ADB) with expert-level tips and tricks. Discover advanced commands, automation shortcuts, and hidden features to streamline app testing, debug complex issues, and supercharge your Android development workflow. Learn wireless debugging, logcat mastery, and app control hacks for peak efficiency.
**Step-by-Step Guide to Installing Epson L3250 Wi-Fi Printer** 1. **Unbox & Setup**: Remove packaging, install ink cartridges, and power on the printer. Select your language on the screen. 2. **Connect to Wi-Fi**: Press the Wi-Fi button on the control panel. Navigate to network settings, choose your Wi-Fi, and enter the password. 3. **Install Software**: Download the Epson driver from the official website (or use the included CD). Run the installer and select Wireless Connection when prompted. 4. **Complete Setup**: Follow on-screen instructions to finalize installation. Test print a page to confirm connectivity. Troubleshooting tip
Need a Bluetooth driver for Windows 10? Get secure, official download links here for hassle-free installation. Ensure seamless device connectivity with trusted drivers, step-by-step guides, and automatic setup tips. Fix pairing issues fast!
Transform your everyday photos into stunning visual stories with Snap Camera. Explore a world of filters, effects, and lenses designed to amplify your unique style. Whether you’re streaming, video calling, or capturing memories, every shot becomes a canvas for your imagination. Elevate your creativity—one click at a time.
Struggling with Bluetooth problems on Windows 11? Learn quick, step-by-step solutions to resolve driver issues—from updating drivers and using built-in troubleshooters to manual fixes. Get your devices connected smoothly again with this easy-to-follow guide.
Encountering an Unknown USB Device: Device Descriptor Request Failure error? This issue often arises when a connected USB device isn’t properly recognized by your computer, due to corrupted drivers, faulty hardware, or connection problems. Learn how to troubleshoot driver updates, port checks, and device resets to resolve this frustrating connectivity glitch.
Ensure seamless connectivity and optimal performance for your 802.11n Wi-Fi adapter with the latest driver. This essential software enhances compatibility, boosts wireless speeds, and resolves connectivity issues, keeping your device running smoothly on modern networks. Install to unlock stable, high-speed internet access and maximize your adapter’s capabilities.
The IDT High Definition Audio Codec delivers premium sound quality, offering crystal-clear audio reproduction for immersive listening experiences. Leveraging advanced signal processing and low-distortion technology, it ensures rich, detailed acoustics across music, gaming, and multimedia. Compatible with a wide range of devices, this codec elevates audio performance for audiophiles and professionals seeking studio-grade fidelity.
Realtek HD Audio Drivers ensure optimal sound performance for your PC, delivering high-definition audio quality and compatibility with Windows systems. These drivers support advanced features like noise suppression, speaker configuration, and immersive effects for headphones, enhancing music, gaming, and multimedia experiences. Regularly updated for stability and device compatibility.
See all queries
Форум РадиоКот • Просмотр темы — нужен драйвер под китайскую ft232
Сообщения без ответов | Активные темы
| ПРЯМО СЕЙЧАС: |
| Автор | Сообщение | ||
|---|---|---|---|
|
Заголовок сообщения: нужен драйвер под китайскую ft232 Добавлено: Пт мар 04, 2016 20:22:22 |
|||
Карма: 107 Рейтинг сообщения: 0
|
поделитесь драйвером работающим с китайскими ft232(должен поидее подойти любой с версией 1) |
||
| Вернуться наверх |
Профиль
|
||
| Реклама | |
|
|
|
|
mastercom |
Заголовок сообщения: Re: нужен драйвер под китайскую ft232 Добавлено: Сб мар 05, 2016 07:06:31 |
||
Карма: 42 Рейтинг сообщения: 0
|
nds писал(а): поделитесь драйвером работающим с китайскими ft232(должен поидее подойти любой с версией 1) Раз Вы уже пытались ставить новые драйвера под китайский FT232, то перед установкой нужного драйвера (старой версии) Вам нужно сделать следующее: Цитата: 1. Самым первым делом, нужно отключить автоматическое обновление драйверов в ОС. Т.к. у меня установлена Windows7, то нижепреведенный способ именно под Windows7, под Windows XP не знаю. 2. Требуется удалить эти злобные дравера, которые и убили вашу FT-шку. Идем в диспетчер устройств (запустить меню и поиске забить «диспетчер», а там и найдете), и найти не определенное устройство. Оно отображается как FT232R USB UART. Нажимаем на него и удаляем сначала драйвера, а потом отключаем само устройство. Все, выдернули адаптер из USB-порта, и пока не подключаем… 3. Не определяется адаптер, что же делать?! 4. Теперь можно покурить и действовать дальше. 5. Распаковываем программатор в удобное для вас место, программатор называется MProg. Распаковали, запустили файл MProg.exe Все пустые белые окошки должны автоматически забиться (если этого не произошло, и внизу в окне программа пишет «No device», то внимательно читаем 2 и 3 пункт) . Далее… В окне «Product ID» вместо 0000 вбиваем 6001. Вбили? Отлично. Теперь выполняем «File» => «Save as…», сохраняем, желательно на рабочий стол. И вот теперь выполняем «Device» => «Program». ВСЕ! Почти… Windows7 опять выдает «Драйвера для этого устройства не установлены». Не пугайтесь, ничего страшного…. 6. Отключаем адаптер и снова подключаем, идем в диспетчер устройств, и опять как в пункте 4 устанавливаем драйвера, НО уже указав путь к папке с оригинальными (не модернизированными) драйверами версии 2.8.14. Драйвера и проги могу приложить… если надо (сам уже сталкивался с этим, поэтому всё что надо для это действа — у меня уже есть). 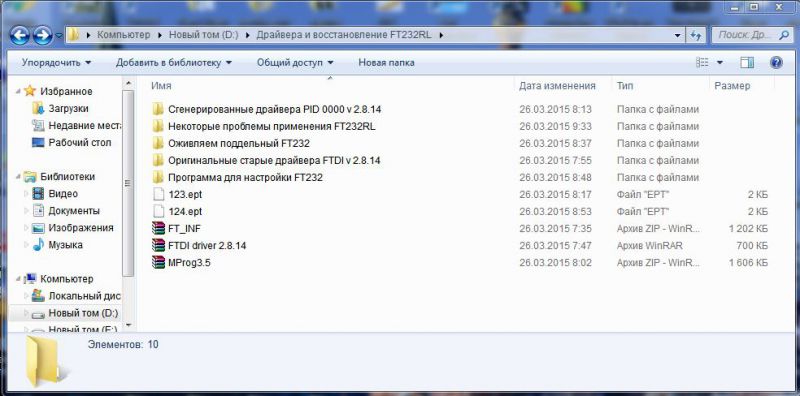
|
||
| Вернуться наверх | |||
| Реклама | |
|
|

|
|
nds |
Заголовок сообщения: Re: нужен драйвер под китайскую ft232 Добавлено: Сб мар 05, 2016 07:47:38 |
||
Карма: 107 Рейтинг сообщения: 0
|
адаптеры определяются Цитата: Драйвера и проги могу приложить… если надо надо, потому что ни с одним из уже скачанных не работает |
||
| Вернуться наверх | |||
|
mastercom |
Заголовок сообщения: Re: нужен драйвер под китайскую ft232 Добавлено: Сб мар 05, 2016 08:05:20 |
||
Карма: 42 Рейтинг сообщения: 0
|
Действуйте по инструкции: Спойлер1. Самым первым делом, нужно отключить автоматическое обновление драйверов в ОС. Т.к. у меня установлена Windows7, то нижепреведенный способ именно под Windows7, под Windows XP не знаю. 2. Требуется удалить эти злобные дравера, которые и убили вашу FT-шку. Идем в диспетчер устройств (запустить меню и поиске забить «диспетчер», а там и найдете), и найти не определенное устройство. Оно отображается как FT232R USB UART. Нажимаем на него и удаляем сначала драйвера, а потом отключаем само устройство. Все, выдернули адаптер из USB-порта, и пока не подключаем… 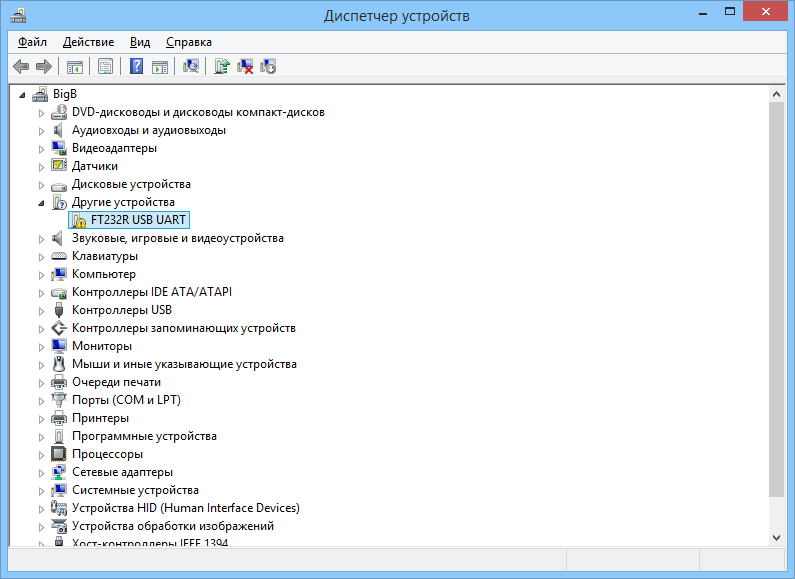
3. Не определяется адаптер, что же делать?! 4. Теперь можно покурить и действовать дальше. 5. Распаковываем программатор в удобное для вас место, программатор называется MProg. Распаковали, запустили файл MProg.exe 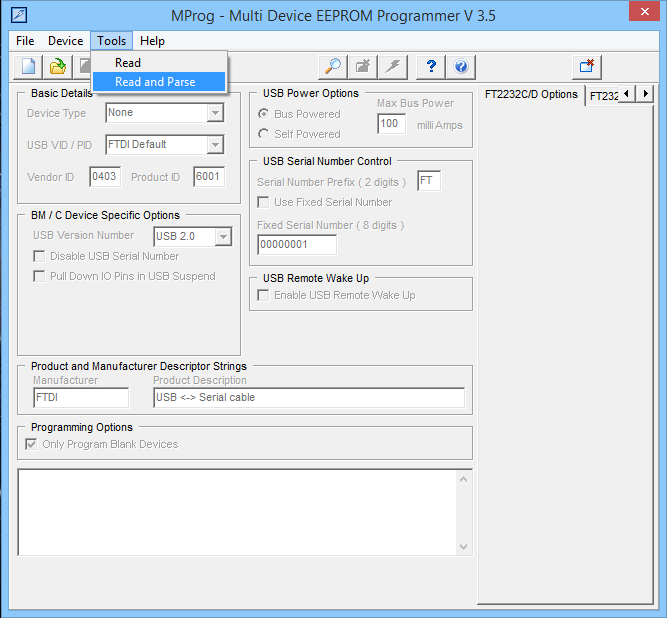
Все пустые белые окошки должны автоматически забиться (если этого не произошло, и внизу в окне программа пишет «No device», то внимательно читаем 2 и 3 пункт) . 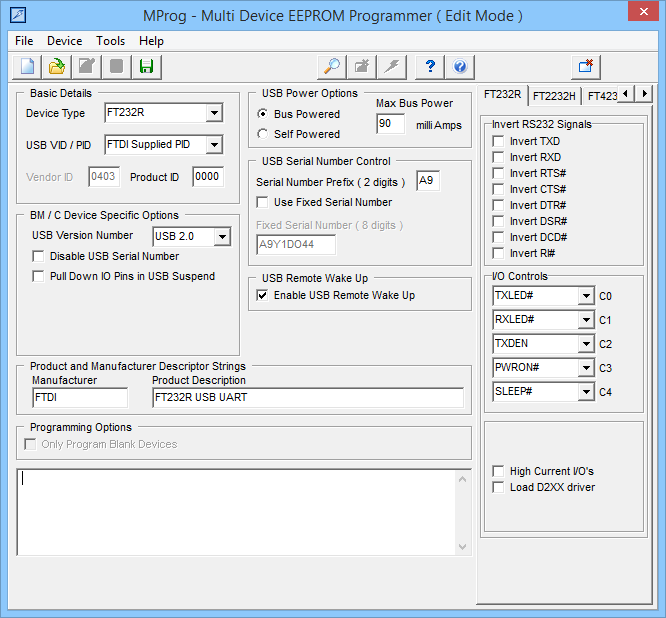
Далее… В окне «Product ID» вместо 0000 вбиваем 6001. Вбили? Отлично. Теперь выполняем «File» => «Save as…», сохраняем, желательно на рабочий стол. И вот теперь выполняем «Device» => «Program». 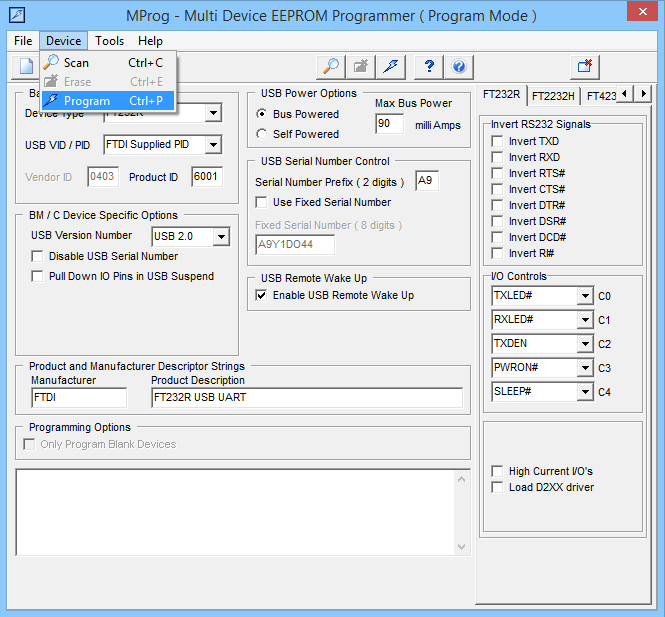
ВСЕ! Почти… Windows7 опять выдает «Драйвера для этого устройства не установлены». Не пугайтесь, ничего страшного…. 6. Отключаем адаптер и снова подключаем, идем в диспетчер устройств, и опять как в пункте 4 устанавливаем драйвера, НО уже указав путь к папке с оригинальными (не модернизированными) драйверами версии 2.8.14. |
||
| Вернуться наверх | |||
| Реклама | |
|
|
Открыт интернет-магазин MEAN WELL.Market – весь ассортимент MEAN WELL, выгодные цены
Открыта удобная площадка с выгодными ценами, поставляющая весь ассортимент продукции, производимой компанией MEAN WELL – от завоевавших популярность и известных на рынке изделий до новинок. MEAN WELL.Market предоставляет гарантийную и сервисную поддержку, удобный подбор продукции, оперативную доставку по России. Подробнее>> |
|
mastercom |
Заголовок сообщения: Re: нужен драйвер под китайскую ft232 Добавлено: Сб мар 05, 2016 17:43:48 |
||
Карма: 42 Рейтинг сообщения: 0
|
nds Ну как — удалось установить нужный драйвер ? |
||
| Вернуться наверх | |||
| Реклама | |
|
|
|
| Реклама | |
|
|
LED-драйверы MOSO — надежные решения для индустриальных приложений
Продукция MOSO предназначена в основном для индустриальных приложений, использует инновационные решения на основе более 200 собственных патентов для силовой электроники и соответствует международным стандартам. LED-драйверы MOSO применяются в системах наружного освещения разных отраслей, включая промышленность, сельское хозяйство, транспорт и железную дорогу. В ряде серий реализована возможность дистанционного контроля и программирования работы по заданному сценарию. Разберем решения MOSO |
|
nds |
Заголовок сообщения: Re: нужен драйвер под китайскую ft232 Добавлено: Сб мар 05, 2016 21:04:26 |
||
Карма: 107 Рейтинг сообщения: 0
|
только на чистую систему |
||
| Вернуться наверх | |||
Кто сейчас на форуме |
|
Сейчас этот форум просматривают: Аурита, ручнойтигр и гости: 129 |
| Вы не можете начинать темы Вы не можете отвечать на сообщения Вы не можете редактировать свои сообщения Вы не можете удалять свои сообщения Вы не можете добавлять вложения |

ft232rl не встают драйвера
- Войдите на сайт для отправки комментариев
usup
Offline
Зарегистрирован: 21.04.2015
есть фтди с фт232рл на борту,при подключении к компу определяется как фт232 уарт,светики на рх тх кратковремено перемигивают,при подсовывании ему дров в ду,пишет что это оборудование установить не удалось,и так на трех разных компах и с кучей разных дров включая exe с оффсайта,проблемы в винде или в самом фтди?
- Войдите на сайт для отправки комментариев
Пт, 24/04/2015 — 14:59
#1
dimax
Offline
Зарегистрирован: 25.12.2013
- Войдите на сайт для отправки комментариев
Пт, 24/04/2015 — 15:50
#2
usup
Offline
Зарегистрирован: 21.04.2015
спасибо огромное помогло))
- Войдите на сайт для отправки комментариев
Пнд, 11/05/2015 — 11:55
#3
usup
Offline
Зарегистрирован: 21.04.2015
на рабочем компе все норм,а вот на домашнем постоянно при перетыкании устройства,опять ид устройства сбрасывается на 0000 приходится опять востанавливать мпрогом,обновлении винды отключено,новые дрова вроде из установки удаления программ удалил,в чем может быть проблема?
- Войдите на сайт для отправки комментариев
Пнд, 11/05/2015 — 16:03
#4
dimax
Offline
Зарегистрирован: 25.12.2013
usup, очевидно винда ставит дрова без разрешения. Стало быть нужно ей запретить самостоятельно устанавливать драйвера. В свойствах системы-оборудование- «параметры установки устройств»
- Войдите на сайт для отправки комментариев
Пнд, 11/05/2015 — 20:04
#5
usup
Offline
Зарегистрирован: 21.04.2015
автоматическую установку отключил,теперь при подключении фтди система не ломится за драйвером в центр обновления а говорит что драйвер не найден,и ид также сбрасывается на 0000,может новые версии дров в системе гдде то остались,что интерессно винда при каждом включении пытается установить дрова,на первое устройство ставит а на второе нет,вот интерессна где она берет драйвер для первого устройства?
- Войдите на сайт для отправки комментариев
Пнд, 11/05/2015 — 20:13
#6
dimax
Offline
Зарегистрирован: 25.12.2013
usup, моя винда тоже категорически отказывалась расставаться с новыми дровами. Уже не упомню все моменты, но точно помню что я вычищал новые дрова из системы, стирал все файлы, где фигурировала аббревеатура ftdi, затем в папке c:\windows\inf стирал файлы oem*.inf oem*.pnf с упоминаниями о тех драйверах. Только после тотальной вычистки установил старые дрова и зажил прежней спокойной жизнью 
- Войдите на сайт для отправки комментариев
Пнд, 11/05/2015 — 21:44
#7
usup
Offline
Зарегистрирован: 21.04.2015
спасибо буду копать дальше))
- Войдите на сайт для отправки комментариев
Вс, 17/05/2015 — 10:02
#8
usup
Offline
Зарегистрирован: 21.04.2015
нашел кучу файлов с таким названием,но так как файлы лежат в системной папке винды,удалить не получается,пишет запросите разрешение от системы,захожу под учеткой админа,даже безопасный режим не помог,как быть?винда семерка.
- Войдите на сайт для отправки комментариев
Вс, 17/05/2015 — 10:50
#9
dimax
Offline
Зарегистрирован: 25.12.2013
usup, во первых нужно стирать не все эти файлы, а только те, в которых упоминается ftdi. Можно по дате создания посмотреть на свежие, и загнянуть к ним внутрь. Я и искал поиском по содержимому FAR ом, им же и удалял. Возможно в контроле учётных записей нужно дать больше прав. У меня вообще он выключен.
- Войдите на сайт для отправки комментариев
Introduction
In this tutorial, we’ll show you how to install FTDI drivers on multiple operating systems. Although this tutorial was written using Windows 7, Mac OS X 10.6, and Ubuntu 13.04, the process should be very similar, if not exactly the same, for other versions/variations of these operating systems.
Suggested Reading
Before you begin this tutorial, you should have the Arduino IDE installed on your computer. Check out our Installing Arduino tutorial for a step by step guide.
Here are some other tutorials and concepts you may want to familiarize yourself with before reading this tutorial:
- What is an Arduino?
- Serial Communication
- RS-232 vs TTL Serial Communication
- Logic Levels
- Connector Basics
Alright, let’s get to work! You can visit the next section to learn more about the FTDI Basic and why you need the FTDI drivers, or you can skip straight to the operating system of your choice!
Meet the FT232RL
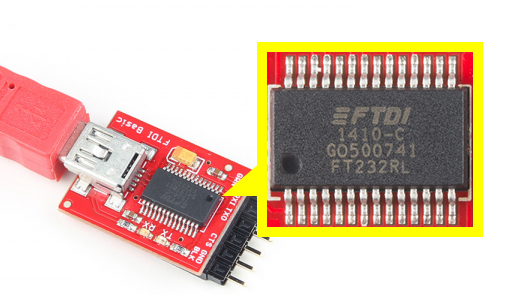
The FT232RL is one of the more commonly used ICs used to convert USB signals to UART signals. This process is very handy in that it allows you communicate with and upload code to an Arduino or other microcontroller without the need for an external programmer. SparkFun carries a board called the FTDI Basic that conveniently breaks out the necessary pins on the FT232RL to perform these actions.
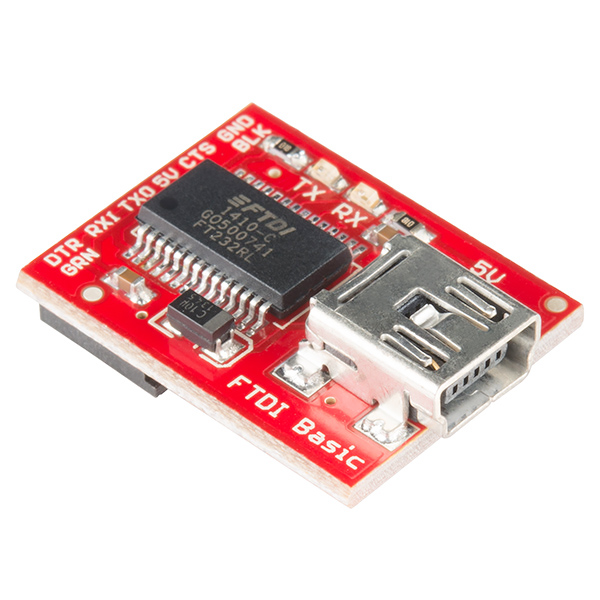
SparkFun’s 5V FTDI Basic. Notice the IC—FT232RL.
There are a few different flavors of the FTDI Basic:
If you are using a 5 volt device, you will need the 5 volt FTDI. If you have a 3.3 volt device, you guessed it, use a 3.3 volt FTDI. LilyPad boards all operate on 3.3V.
We also carry a complete breakout board for the FT232RL should you need access to more pins than the FTDI Basic provides.

Here is a list of some SparkFun products that require the use of an FTDI Basic, come with an FTDI Basic, or have an FT232RL chip on board:
- RedBoard
- Arduino Pro 5V and 3.3V
- Arduino Pro Mini 5V and 3.3V
- Mega Pro 5V and 3.3V
- Mega Pro Mini
- LilyPad Main Board
- LilyPad Simple Board
- Arduino FIO
- Protosnap — Pro Mini
- Protosnap — LilyPad Development Board
- Protosnap — LilyPad Development Board Simple
There are also some legacy Arduino boards that use the FT232RL. The Arduino Diecimila and Duemilanove main boards along with the original Arduino Mega all use the FT232RL IC. If you have one of these older versions, you’ll want to use the FDTI drivers as well. For a complete list of all Arduino boards, check out this page. Newer versions of Arduino boards, such as the Uno, use a different communication IC, and they will not be covered in this tutorial.
Now that you know why the FTDI Basic is important and what products it is used for, let’s learn how to install the drivers.
Windows — Quick and Easy
Note: The screen shots in this tutorial are from Windows 7. The process should be very similar for other versions of Windows.
For most late versions of windows, such as 8.1 through Windows 10, the hardware may work fine without any driver install. If you can’t locate a COM port for your hardware, then the set of instructions below is the possible fix.
The exception to this is Windows 8. For instructions on how to disable device driver signatures, [please visit this tutorial](https://learn.sparkfun.com/tutorials/disabling-driver-signature-on-windows-8).
Note for Educators: You will most likely need to obtain administrative privileges from your network or IT administrator in order to install these drivers.
-
By default, windows does not have FTDI drivers installed. If you plug in your FTDI, open the Arduino IDE, go to ‘Tools -> Serial Ports’, and see nothing, you need the drivers! Let’s go get them!

-
Download a copy of the v2.12.28 FTDI VCP Driver Executable here:
Windows FTDI VCP Driver Executable — v2.12.28 (CDM21228_Setup.exe)
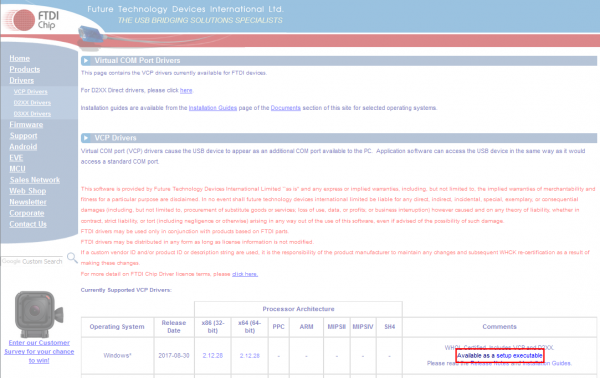
Otherwise, visit FTDI’s VCP Drivers page for the latest download of the Windows FTDI Driver executable and clicking on the Window’s «Available as a setup executable» link. Make sure to unzip the executable before proceeding to the next step.
-
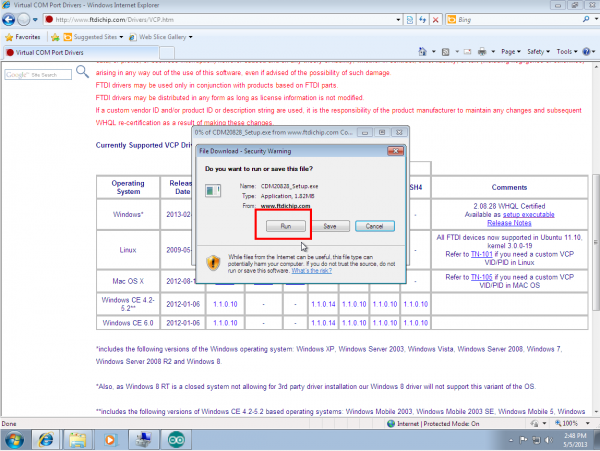
Choose ‘Run’ once it is has finished downloading, or find the file you just downloaded «CDM21228_Setup.exe» and double-click it to run it.
Note: At the time of this tutorial, the images were referencing the old “v2.12.00” FTDI VCP driver executable. The installation process will be the same regardless of the version number.
-
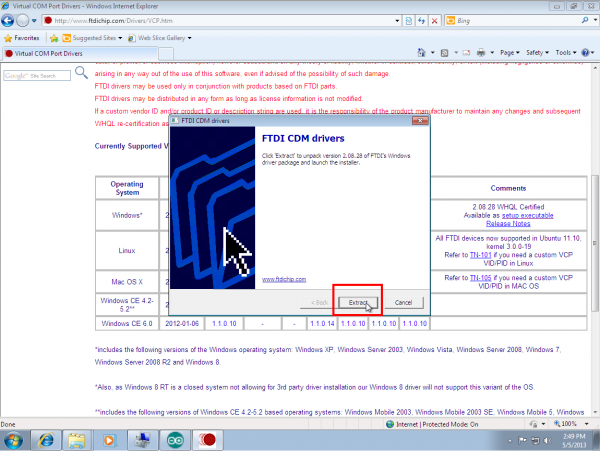
Choose ‘Extract’ and continue through the installation until it finishes.
-
If everything was successful, you should see some nice green check marks, indicating success!
Note: You may need administrator privileges on your machine in order for this to run properly. If things didn’t work out, try the next section of this tutorial: Windows — In Depth.
-
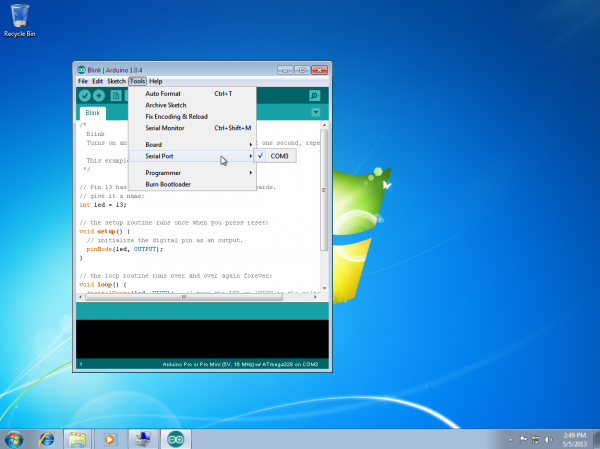
Open up the Arduino IDE, and go to ‘Tools -> Serial Port’. If you now have a COM port, congratulations! Again, if something went wrong, either retry this tutorial or give Windows — In Depth a try!

Windows — In Depth
Note: The screen shots in this tutorial are from Windows 7. The process should be very similar for other versions of Windows.
Note for Educators: You will most likely need to obtain administrative privileges from your network or IT administrator in order to install these drivers.
-
Plug in your FTDI using a USB cable. Windows doesn’t have the correct drivers, so let’s find them!
-
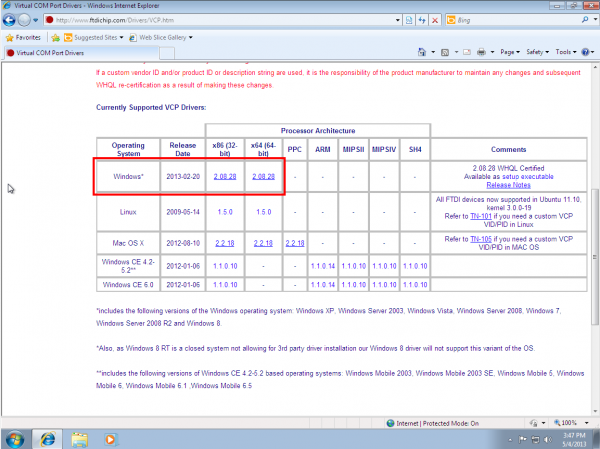
Navigate to the FTDI website, and choose the ‘VCP’ (Virtual Com Port) option near the bottom.
-
Now choose either the 32 bit version or the 64 bit version. Not sure which you have? The next steps will go over how to find that information. If you already know which version you are running, you may skip the next two steps.
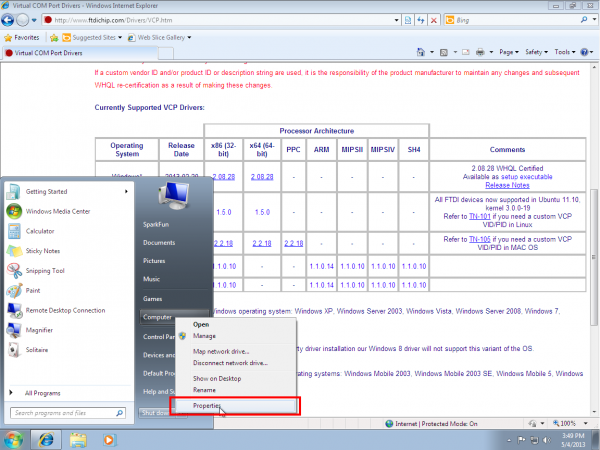
-
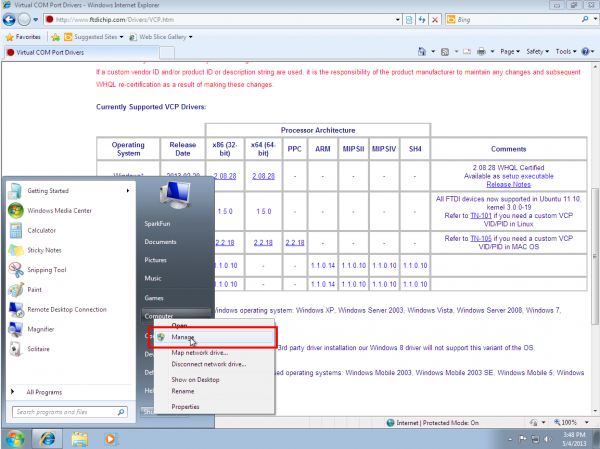
Open the start menu, right-click on ‘Computer,’ and left-click on ‘Properties’.
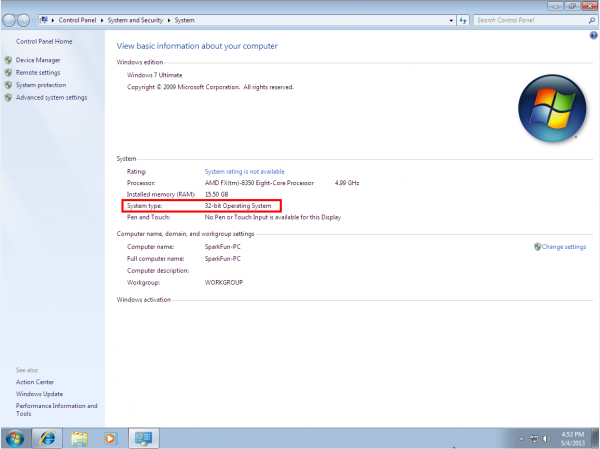
-
Look under ‘System type,’ to see which version you have.
-
Now go back to the FTDI site, right-click on the correct version, and save it to your computer. Remember where the files are saved. We’ll need them in the next step.
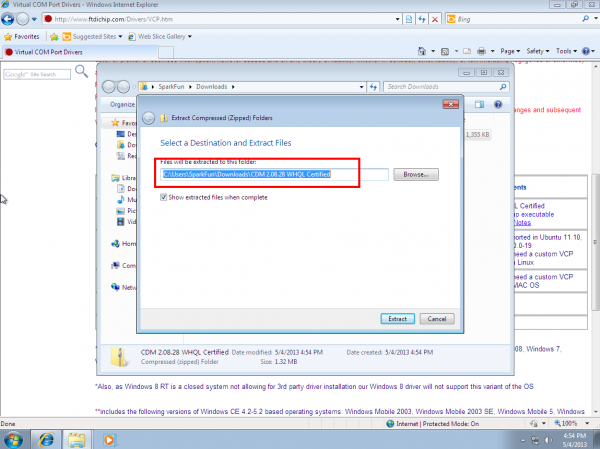
-
Navigate to the folder containing the files. They will be inside of a .zip file, so you’ll need to extract them. Right-Click on the .zip file, and choose ‘Extract All…’ When the next window appears, as shown above, pay attention to where it is extracting the files. Make sure that ‘Show extracted files when complete’ is checked, and click ‘Extract’.
-
When the extraction is complete, the folder is opened. Again, take note of this folder location. This is the one containing the drivers.
-
We’re almost there! Open the start menu, right-click on ‘Computer’, and left-click on ‘Manage’. You will need administrator rights to do this. If you aren’t an administrator on your computer, talk to the person who is and have them enter their credentials.
-
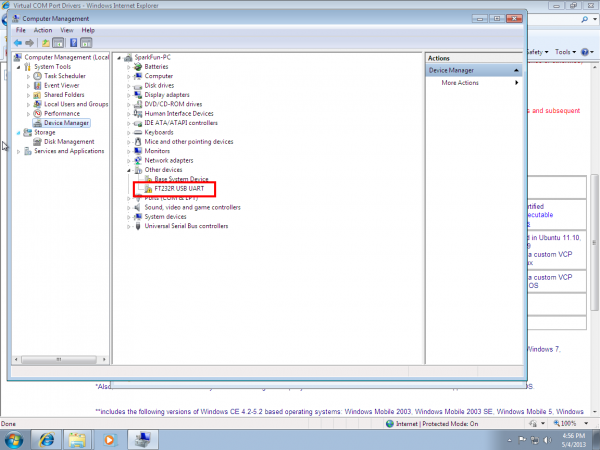
Left-click on ‘Device Manager’ in the leftmost column. Here is where we see the offending hardware. It has an exclamation mark next to it.
-
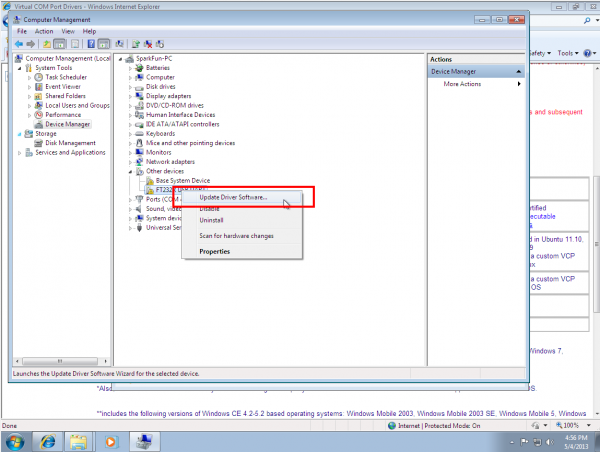
Right-click on ‘FT232R USB UART,’ and left-click ‘Update Driver Software…’
-
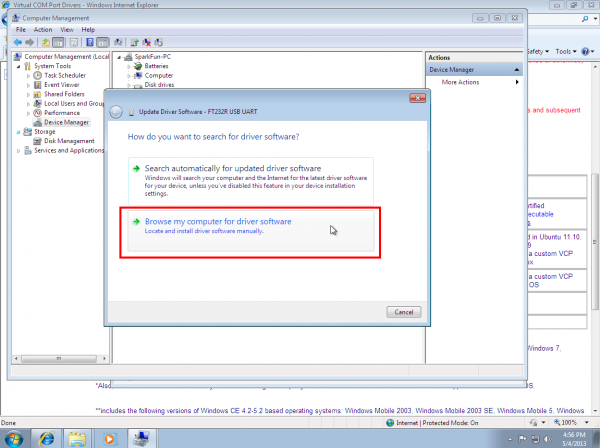
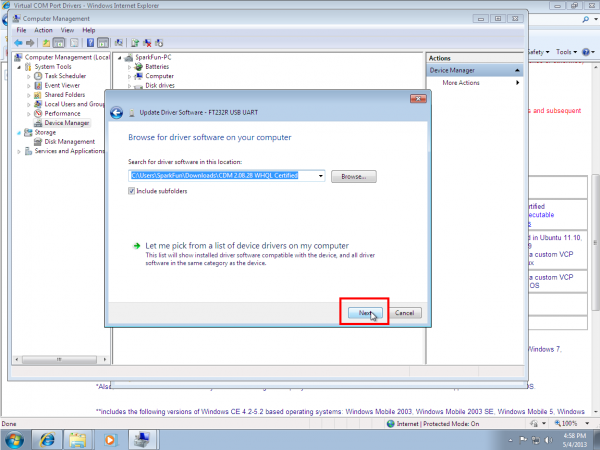
Now choose ‘Browse my computer for driver software’.
-
Left-click ‘Browse,’ and navigate to the location of the extracted files. Choose the extracted folder. There is no need to search any further in the folder. Then left-click ‘OK’.
-
Make sure ‘Include subfolders’ is checked (very important!), and left-click ‘Next’.
-
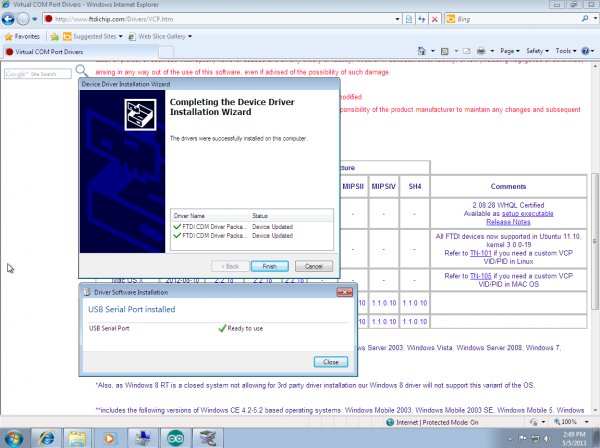
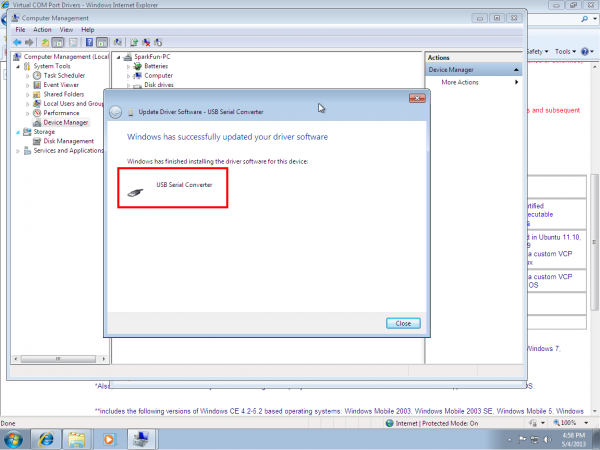
After a moment, you will see a success message! Left-click ‘Close’.
-
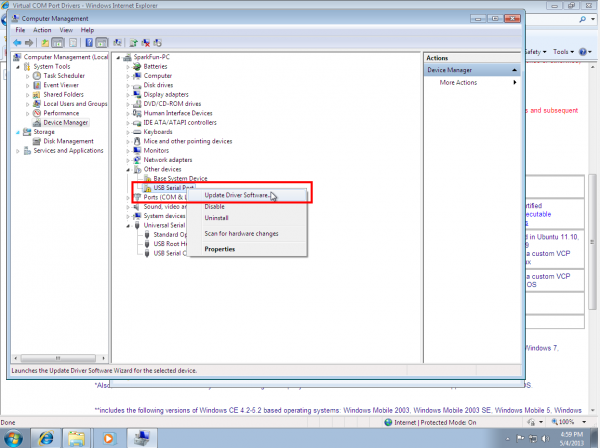
The Device Manager page will refresh and you will see a new item with an exclamation mark named ‘USB Serial Port’. You will need to install a second driver for the same device. Follow the steps 1-15, as before, and use the same driver folder too!
-
Once those steps are complete, you will see another success message! Left-click ‘Close’.
-
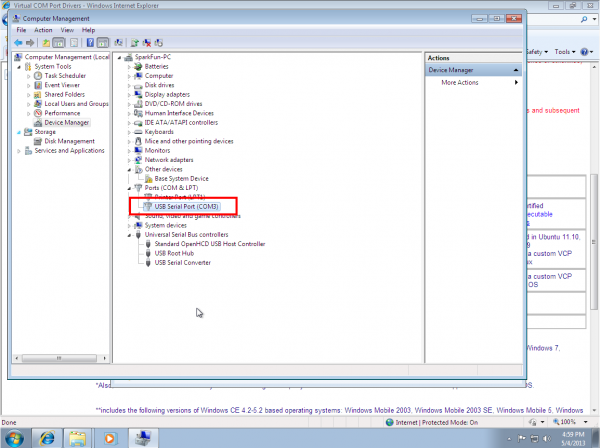
The Device Manager Page will refresh again and show ‘USB Serial Port (COMxx),’ where xx = some number. Congratulations, you now have the proper FTDI drivers and can begin to use your device!


Mac
Notice: The screen shots in this tutorial are from OS X 10.6. The process should be very similar, if not exactly the same, for other versions of Mac OS X. If you are on OS X 10.10 Yosemite, follow along to install the drivers. If you need to install drivers on Yosemite, please visit the bottom of this section. Most people will be using the VCP drivers and not the D2XX drivers.
Note for Educators: You will most likely need to obtain administrative privileges from your network or IT administrator in order to install these drivers.
-
Most of the time, when you install Arduino on Mac OS X, the drivers are installed automatically. However, if there was a problem with the installation and you don’t see any options that include ‘usbserial’ under the ‘Tools -> Serial Port’ menu, then you will need to install the drivers. You may also need to install the full FTDI drivers if you are running OSX 10.10 or later. The factory drivers are not complete.
-
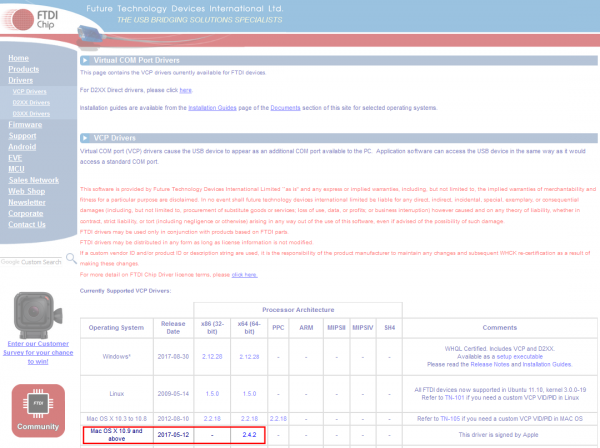
a.) OS X 10.9 (Mavericks) or above: Download this driver. Locate the file FTDIUSBSerialDriver_v2_4.2.dmg file that was downloaded to your computer, and double click on it to open \ run it.
You may need to visit FTDI’s VCP Drivers page for the latest download of the Mac OS X FTDI Driver. Click on the link for the «Mac OS X 10.9 and above» driver’s version. The image below shows version 2.4.2 so you would need to click on **2.4.2* to download the latest driver. If there is an update to the drivers by FTDI, the version number will change but it should be in the same location on the table.
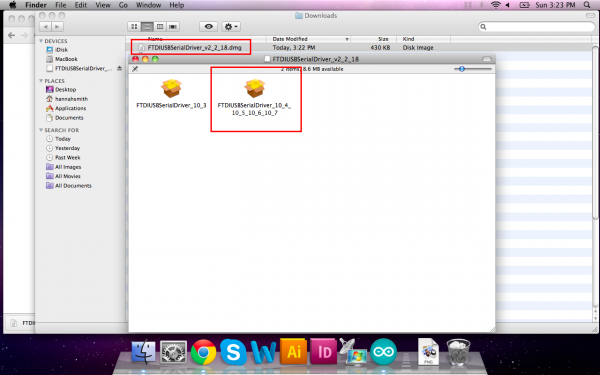
b.) OS X 10.8 (Mountain Lion) or lower: Download this driver. Locate the file FTDIUSBSerialDriver_v2_2_18.dmg file that was downloaded to your computer, and double click on it to open \ run it.
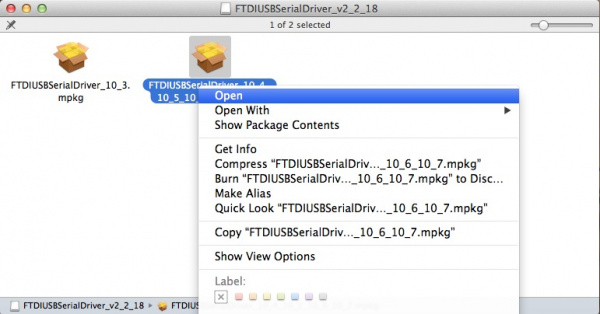
If you are using the driver for OS X 10.8 (Mountain Lion) or older, you will see two files. Open up the driver file that corresponds with your operating system. For most users, it will be the second file:
-
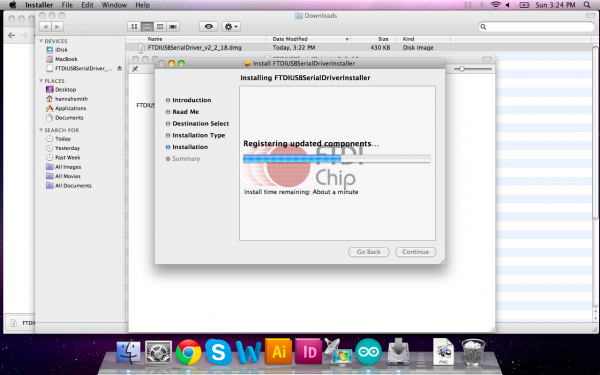
Continue through the installation, and wait for it to finish. Then click ‘Close.’
-
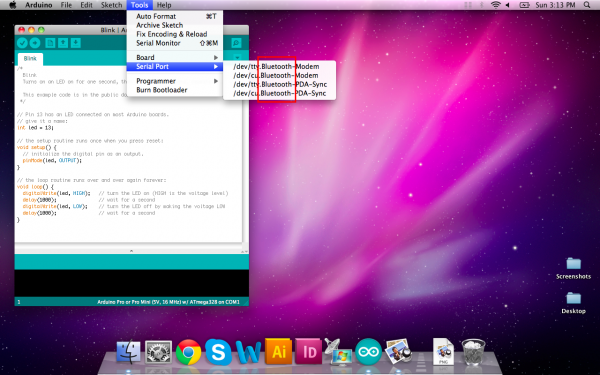
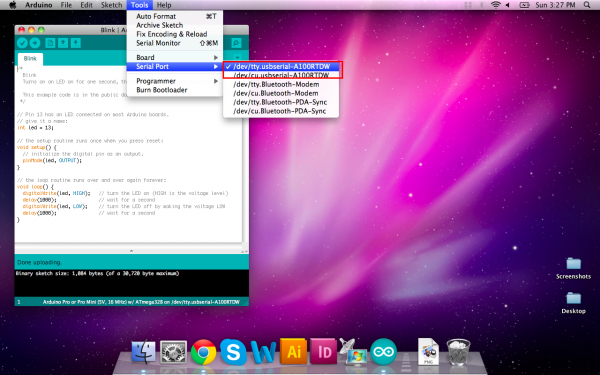
Now open the Arduino IDE. Under ‘Tools -> Serial Port’ you will now see a ‘usbserial’ option. Congratulations, you’re all set!
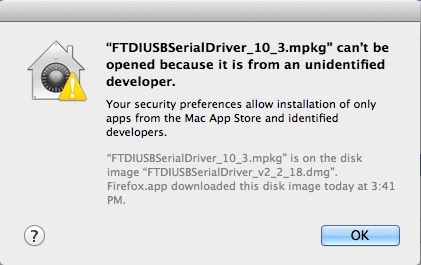
Troubleshooting: Unidentified Developer Error
On newer versions of OS X, when you double-click the install packages inside the FTDI disk image, you may be presented with a very Windows-esque type error about not being able to open the files because they are not from an identified developers. This is very similar to the unsigned driver issue in Windows 8.
Quick Fix
To get around this, simply right-click the package you want to install, or press CTRL + click, if you don’t have a right-click. Then select open from the menu.
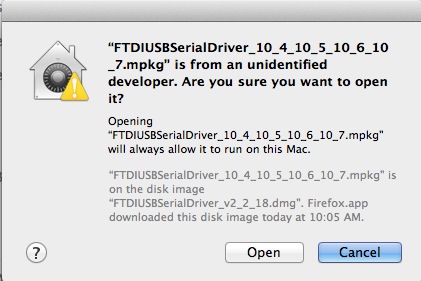
You will then be given another window asking if you are certain. Click Open, and proceed with the installation as stated above.
In-Depth Fix
For a more permanent fix, you can follow these instructions. **However, this method is not suggested as it leaves your computer vulnerable. **
Open your System Preferences.
Once open, click the Security & Privacy icon.
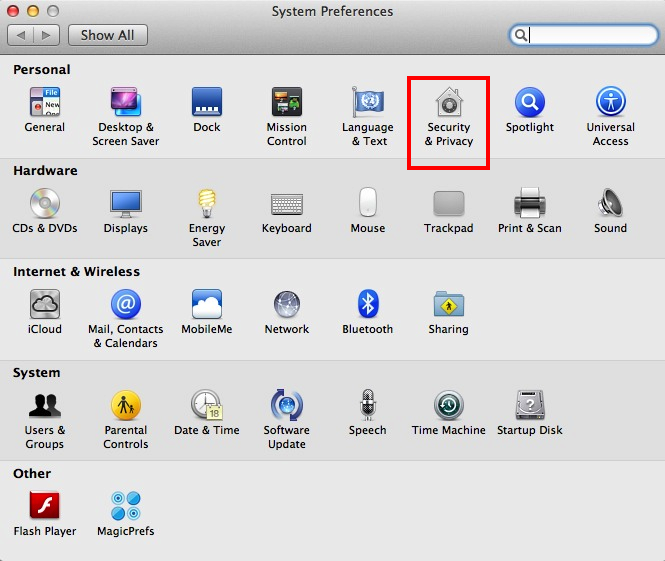
Under the General tab, you should see a section about allowing the running of downloaded applications from specific sources. In preveious version of OS X, the default was set to Anywhere. However, the defualt setting is now Mac App Store and identified developers.
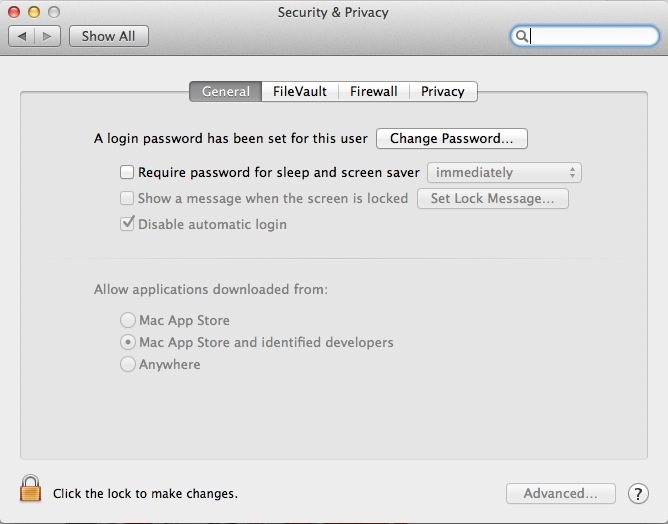
To use the FTDI drivers, you’ll need to set this back to Anywhere. First, you may need to click on the little lock icon and enter your admin password to make these changes.
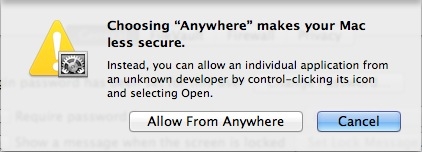
Once unlocked, click the Anywhere option. Another obnoxious window may appear asking you if you’re sure you want to allow this. Click Allow from Anywhere. Or, you can follow the directions in this window, if you don’t want to make your Mac «less secure.»
You should now be able to install the FTDI drivers.

Troubleshooting: FTDI Drivers and OS X Yosemite
With Mac OS 10.9 (Mavericks) and later, Apple has built their own version of the FTDI VCP driver into the operating system (AN134). However, there seems to be some conflict between drivers from FTDIchip.com and the ones inherent to Apple. Luckily, there is a solution to this problem, and it comes from FTDI directly.
Quick Fix
If you are trying to use the FTDI VCP Driver in your applications, it will not work due to a conflict between the VCP and D2XX drivers. In order to get around this, the Apple supplied Driver must be uninstalled. Plug in the FTDI device in question, and type the following command in a Terminal window:
sudo kextunload –b com.apple.driver.AppleUSBFTDI <ret>
In-Depth Fix
If the above doesn’t work, you may have better luck using this script from FTDI.
Clicking on this file will bring up the Script Editor on all Macs. The script can be run by clicking on the run icon (black triangle). Again, make sure your FTDI device is connected.
You can make this script into a clickable icon by exporting the script as an application. In the Script Editor, select Export… from the File pull down menu:
In the Export dialog, select Application as the File Format. You can choose any name for the application.
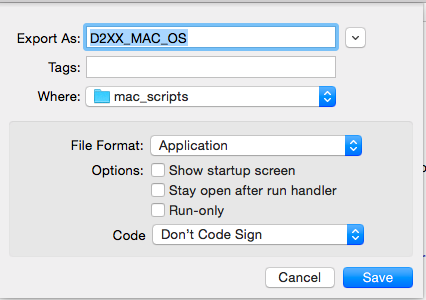
You should now have an automated Apple Script icon to use on your Mac. With the Apple supplied Drivers uninstalled, you may return to the top of this section and install the FTDI VCP Driver as needed. Repeat this process for any other FTDI devices you are using. You may need to repeat this every time you restart your computer.
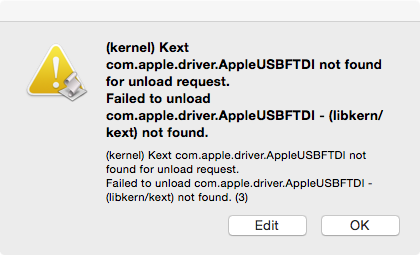
Troubleshooting: No FTDI Driver Installed
If you receive this error, it means that the driver has been uninstalled already, and you will need to install the FTDI VCP Driver, as stated above.
Linux
Note: The screen shot in this tutorial is from Ubuntu 13.04. The process should be very similar, if not exactly the same, for other versions/variations of this operating system.
Note: You will most likely need to obtain administrative privileges from your network or IT administrator in order to install these drivers.
-
Plug in the FTDI device to a USB cable.
-
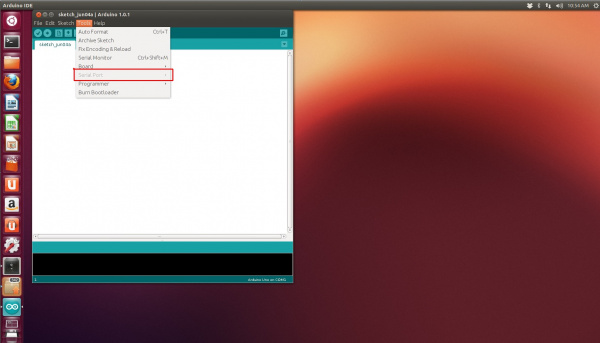
When you download the Arduino IDE in Linux, the download comes with the FTDI drivers bundled with the IDE. However, if you just open Arduino from the desktop, you’ll notice that, if you click on ‘Tools’, the ‘Serial Port’ option is grayed out.
-
Linux includes the drivers necessary to use Arduino, and no additional install is needed. However, permissions might need to be configured. For current instructions on how to set up these permissions, visit this page.
An alternative method is to run Arduino as root in the terminal with the following command:
sudo arduinoHowever, this method is encouraged only if you know what you are doing and should only be used as a last resort. You will also need to enter your administrative password to run as root.
-
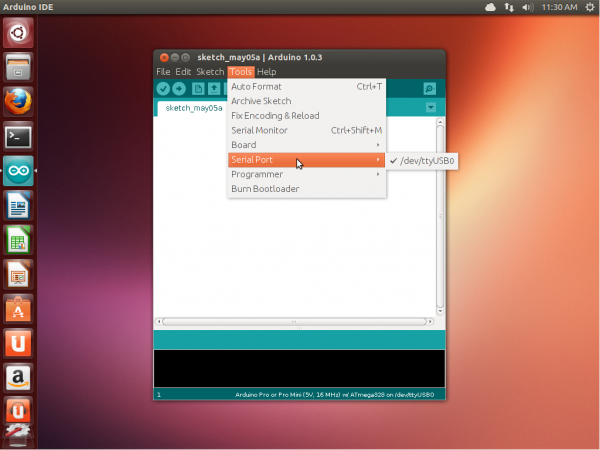
Arduino should open, and this time the ‘Serial Port’ menu is available.
-
The FTDI device will show up under this menu. It should be named /dev/ttyUSB0. The number may vary depending on how many USB devices you have plugged into your computer. That’s all.
Resources and Going Further
Now that you’ve successfully got your FTDI up and running, it’s time to incorporate it into your own project!
For more hardware specifications, check out the resource below:
For more information about the drivers, check out the resources below:
- In-depth FTDI Installation Guides — In-depth guides to install an FTDI for any OS.
- Latest FTDI Virtual COM PORT (VCP) Drivers — The latest VCP Drivers found on FTDI’s website.
- SparkFun’s USB Serial Driver Quick Install Tutorial — A condensed version of our «How to Install FTDI Drivers» tutorial.
Check out these tutorials to dive even deeper into the world of microcontrollers!
- Installing an Arduino Library — How do I install a custom Arduino library? It’s easy!
- Learn how to use a breadboard to interface your Arduino with circuits built by you.
- Learn the basics of e-textiles with this great tutorial
Or check out this blog post for more ideas.