
Readers help support Windows Report. We may get a commission if you buy through our links.
Read our disclosure page to find out how can you help Windows Report sustain the editorial team. Read more
Installing Android drivers on a PC should be a walk in a park. You connect your handset with the PC via the USB cable and, usually, the installation commence immediately. The generic driver provided automatically by Windows should be good enough for storage access.
The majority of users don’t need anything else, to be perfectly honest. However, what happens if Windows prompts you with the “Windows was unable to install your Android” prompt? How to make it work if a generic driver just won’t install? Find out below.
How to successfully install your Android device drivers
- Install OEM USB drivers manually
- Enable USB Debugging on your Android
- Switch the USB port
- Use Android SDK Generic driver
Solution 1 – Install OEM USB drivers manually
There are so many devices which don’t require manual driver installation and Android phones are not on that list. Especially if you want to use your device with the ADB and Android SDK.
Now, Windows 10 is usually able to install the device for the simplest of features (data transfer) automatically, but this doesn’t apply to earlier Windows iterations. That’s why we suggest installing drivers manually.
In order to find the best driver for your device, we’ll be looking at the OEM’s official support website. Say, Huawei device won’t do much with the Samsung driver. Therefore, make sure to find the appropriate driver. But, before that, let’s try and install the driver within the Device Manager.
- Connect your Android handset via the USB cable to a PC.
- Open Device Manager.
- Expand the Portable Devices (or Other devices).

- Right-click on your handset and choose Update driver.
- Search automatically for the driver.

If that doesn’t work, google your OEM and download drivers. Install the driver manually. If the problem is persistent, move to additional steps.
— RELATED: Huawei brings Windows 10 to Android with its new Cloud PC app
Solution 2 – Enable USB Debugging on your Android
Another important thing a lot of people ignore is related to Android permissions. In order for a PC to have access to your device (usually not necessary for storage access), you should enable USB Debugging in handset’s Developer options.
These are not accessible by default so you’ll need to follow through with a bit gimmicky step in order to unlock Developer options on your device.
Once there, you should be able to enable USB Debugging with ease. Firstly, let’s uninstall the failed driver from the Device Manager:
- Open Device Manager.
- Click on the View in the Main Menu and toggle on “Show hidden devices“

- Expand the Portable Devices (or Other devices).
- Right-click on your android device and uninstall it.

Here’s how to enable USB Debugging mode on your Android handset:
- Open Settings.
- Choose System > About phone.
- Tap 7 times on the Build number.
- Enter your Password or PIN to access the Developer options.
- You’ll find Developer options in the System section.
- In the Developer options menu, enable USB Debugging.
- Connect your device to your PC via USB and allow USB Debugging when prompted.
- Wait until the device’s driver is installed and reboot your PC.
Solution 3 – Switch the USB port
Simple but often so efficient solution. Sometimes a certain USB port won’t work and switching to an alternative one should do the job. In addition, make sure to reboot both your handset and PC after switching the port.
In addition, if you have an alternative Micro USB-to-USB or USB-C– to-USB cable, give it a try.
These are small and easily neglected things but can invoke the issue at hand. On the other hand, if these hardware tweaks are not helping, we advise you to try the last step.
— RELATED: Best apps to transfer Android/ iOS files to Windows 10, 8
Solution 4 – Use Android SDK Generic driver
Finally, there’s a chance you have an older device which isn’t supported by either official nor generic drivers. What to do if that’s the case? The only remaining solution we can suggest is going for Android SDK generic driver.
They are usually required in order to run ADB and they might help your PC establish the initial connection with your device before installing a functional MTP driver.
Here’s how to install Android SDK Generic driver on your device:
- Download and install Android SDK, here.
- Connect your Android handset via the USB cable to a PC.
- Open Device Manager.
- Expand the Portable Devices (or Other devices).
- Right-click on your device and choose Update driver from the contextual menu.
- Select “Browse my computer for driver software“.

- Choose “Let me pick from a list of device drivers on my computer“.
- Double-click All devices.
- Choose MTP USB device if available.
- If not, click “Have disk…“.
- Navigate to this path: C:Program Files (x86)Androidandroid-sdkextrasgoogleusb_driver.
- Install driver and you should be good to go.


With that said, we can conclude this article. In case you have any questions or suggestions, feel free to tell us in the comments section below. We look forward to hearing from you.
If you’re an advanced user, we have a great article on how to install Fastboot drivers for Windows 11 in order to customize your phone, so don’t miss it.
Aleksandar Ognjanovic
Aleksandar’s main passion is technology. With a solid writing background, he is determined to bring the bleeding edge to the common user. With a keen eye, he always spots the next big thing surrounding Microsoft and the Windows OS.
Focused on Windows errors and how to solve them, he also writes about the OS’s latest features as well as its interface.
In his free time, he likes to read, listen to music, and enjoy the nature. Hiking is one of his newly found passions.
It’s a quite common issue that Android USB driver not working properly on computer. USB driver errors we may encounter including “USB device not recognized”, “USB driver failed to installed”, “MTP USB device driver failed” etc. Here we provide a few options to fix the problem of Android USB driver.
Part 1. Solutions for Android USB Devices Driver Failed to Install
Option 1. Check and Restart USB Devices
Before we get started, check if USB port damaged to exclude the hardware issues. Try the android device in another USB cable/port to check if the outcome is the same. If either the front or rear connectors are working, it probably due to a fault in the connection between the USB ports. You can restart android device and try it again.
Also, you can see if it mentions any problems with the device by: Go to “Universal Serial Bus Controllers” > Right click on the items listed > “Properties” > “General” > in “Device status”box, you can check the device status. Commonly, if the USB port not working well, you will see the yellow symbol.
Option 2: Update and Reinstall Driver for Android Device
Update driver for android device:
1.Using Windows Update service. If you didn’t use automatic updating, you can go to “Control Panel” > “Windows Update” > “Check for updates”. After search is finished, simply select the “Android device driver” to update(for Windows 8.1).
2.Installing software from the Android device manufacturer. Or you can download driver from the manufacturer’s website and update by yourself.
Reinstall android USB driver:
If Windows still cannot find the driver you need after you updated it, try to reinstall the Android USB driver.
1. Navigate to Start > Control Panel.
2. Hit “System and Security” > Double click “System”.
3. Click “Device Manager” on the left list.
4. Click + next to “Universal Serial Bus Controllers” and right click on the Android device driver and tap “uninstall”.
5. After the driver is removed, restart computer. When computer reboots, the Android USB driver will be reinstalled.
Part 2: Tips for MTP-USB Driver Failed to Install
Many android phones (Android 4.0 or later) like Samsung S4/S5/Note 4, HTC One M7/M8, Sony, Motorola etc. support Media Transfer Protocol(MTP). If MTP USB driver failed to install, you are not allowed to transfer media files from/to android devices. If you still failed to install MTP USB driver in the ways of part 1, the following tips may help:
Samsung MTP USB driver:
1.Remove the problematic failed applications and download the latest Samsung Kies.
2.Reboot phone to Recovery Mode and wipe Cache Partition.
3.Download Samsung Android USB driver to update/install USB driver.
Motorola MTP USB driver:
Some Motorola phones don’t mount after android update, you need to update driver by yourself. In the step of updating driver, do not select “Search Automatically…” but “Browse my computer…”
That’s it. Your Android USB driver still cannot be installed? Feel free to contact us via email support@jihosoft.com
Fix MTP USB Device Driver Installation Failed: If you’re trying to connect your mobile phone to your PC but instead you receive the error message “Device driver software was not successfully installed” and “MTP USB Device Failed” then you’re at the right place as today we are going to discuss on how to fix this issue. Well, MTP is a short form for Media Transfer Protocol which is an extension to Picture Transfer Protocol (PTP) communications protocol that allows media files to be transferred atomically to and from portable devices.

If you’re facing the MTP USB Device Failed Installation error then you won’t be able to transfer media files to or from a number of USB devices such as Smartphones, cameras, etc. So without wasting any time let’s see how to actually Fix MTP USB Device Driver Installation Failed Error with the help of the below-listed troubleshooting guide.
Table of Contents
Make sure your device isn’t faulty, you could check your device via connecting it to another PC and see if it’s working. Also, create a restore point just in case something goes wrong.
Method 1: Install Windows Media Feature Pack
Go here and download Media Feature Pack. Simply install the update and reboot your PC. And see if you are able to Fix MTP USB Device Driver Installation Failed Error. This Media Feature Pack is primarily for Windows N and Windows KN edition.
Method 2: Update Device Driver
1. Press Windows Key + R then type devmgmt.msc and hit Enter to open Device Manager.

2. Look for your device name or device with a yellow exclamation mark.

Note: Most probably your device will be listed under Portable Devices. Click on View then select Show hidden devices in order to see Portable Devices.
3. Right-click on it and select Update Driver.
4. Now select Browse my computer for driver software.

5. Next, click on “Let me pick from a list of available drivers on my computer“.

6. Select MTP USB Device from the list and click Next.
Note: If you can’t see the MTP USB device then uncheck “Show compatible hardware” and from the left-hand window pane select Android Devices or Mobile Devices or Standard MTP Device and then select MTP USB Device.

7. Wait for the installation to complete then reboot your PC to save changes.
Method 3: Run Hardware & Device Troubleshooter
1. Press the Windows key + R button to open the Run dialogue box.
2. Type ‘control‘ and then press Enter.
3. Search Troubleshoot and click on Troubleshooting.
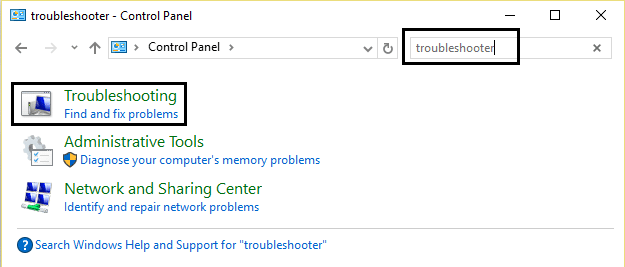
4. Next, click on View all in the left pane.
5. Click and run the Troubleshooter for Hardware and Device.
6. The above Troubleshooter may be able to Fix the MTP USB Device Driver Installation Failed Error.
Method 4: Manually Install wpdmtp.inf
1. Press Windows Key + R then type the following and hit Enter.
%systemroot%\INF
2. Now inside the INF directory type wpdmtp.inf in the search bar and hit Enter.
3. Once you find the wpdmtp.inf, right-click on it and select Install.

4. Reboot your PC and again try to connect your device.
Method 5: Wipe Cache Partition
Note: Deleting Cache Partition will not delete your files/data as it will simply delete the temporary junk files.
1. Reboot your Mobile into Recovery Mode. In Android devices, the most common way to go to Recovery Mode is to press & hold the Volume Down button and then press & hold the Power button. Only Release the buttons when you boot into Recovery Mode.

Note: Search (Google) your model number and add how to go to recovery mode, this will give you exact steps.
2. Using the Volume Up & Down button navigate and select WIPE CACHE PARTITION.
3. Once Wipe Cache Partition is highlighted press the Power button in order to select the action.
4. Reboot your PC and again connect your phone to your PC.
Method 6: Registry Fix
1. Press Windows Key + R then type regedit and hit Enter to open Registry Editor.
2. Navigate to the following registry key:
HKEY_LOCAL_MACHINE\SYSTEM\CurrentControlSet\Control\Class\{EEC5AD98-8080-425F-922A-DABF3DE3F69A}
3. Select the {EEC5AD98-8080-425F-922A-DABF3DE3F69A} key and then in the right window pane find UpperFilters.

4. Right-click on UpperFilters and select Delete.
5. Exit Registry and reboot your PC to save changes.
6. If the error is still not resolved then again open Registry Editor.
7. Navigate to the following registry key:
HKEY_LOCAL_MACHINE\SYSTEM\CurrentControlSet\Control\Class
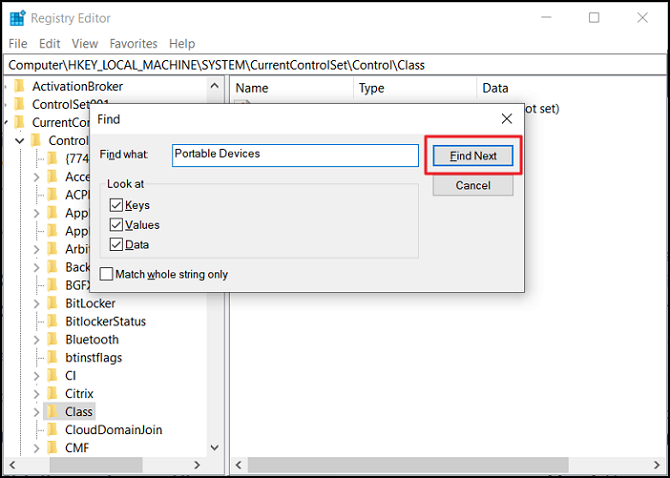
8. Make sure to select Class, then press Ctrl + F and type Portable Devices and hit Enter.

9. On the right-hand window pane, you will find the (Default) value as a Portable Device.
10. Right-click on UpperFilters in the right window pane and select Delete.
11. Reboot your PC and see if you’re able to Fix MTP USB Device Driver Installation Failed Error.
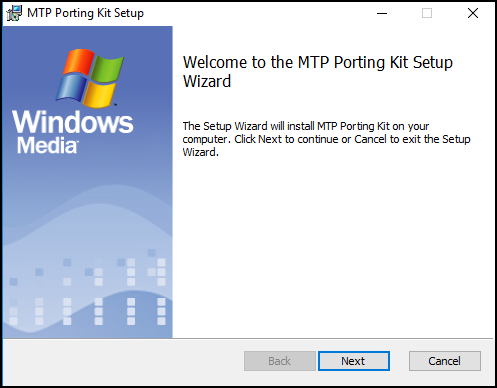
Method 7: Install MTP Porting Kit
Download the official MTP Porting Kit from the Microsoft website and then install it using the setup file. Once the installation finishes reboot your PC and again try to connect your device.
Recommended for you:
- Fix Windows couldn’t complete the requested changes
- Fix The Windows Installer service could not be accessed
- How To Fix The select task “{0}” no longer exists error
- Fix Please Insert a Disk into Removable Disk USB Error
That’s it you have successfully Fix MTP USB Device Driver Installation Failed Error but if you still have any question regarding this guide then feel free to ask them in the comment’s section.
Updated by Cici on Apr 15, 2025
Transferring data from an Android smartphone to a Windows computer only requires a USB cable. The driver in Windows which ensures this facility is MTP USB Device Driver. If it becomes corrupted, you won’t be able to connect your Android device to your computer. So, in case you have been having issues connecting your Android phone to your computer, a corrupted MTP USB device driver is the likely cause.
Learn why the MTB USB device driver problem occurs in this article. It will also teach you how to fix the MTP USB device driver problem in Windows 7 and later.
While it is important to know how to fix the MTP USB device driver problem in Windows 7 and above, first, you need to understand what caused it. Media Transfer Protocol, or MTP, is the main algorithm that allows Android devices to transfer media to your computer. The MTP USB driver is what enables the media or data transfer.
The reasons behind MTP USB device driver problems mainly concern the MTP driver itself. Below we have explained a few of the most common reasons:
- Outdated Drivers: If the MTP USB device driver problem arises, there is a high chance that the drivers related to MTP are outdated. Sometimes other outdated drivers can also start conflicting with the MTP USB device driver, causing it to fail.
- Incorrect MTP Device Settings: You may have configured the MTP device in a way that cannot recognize external devices. As long as incorrect settings persist, you cannot use an Android device on your computer.
- Faulty Android MTP Driver: A defective or corrupted Android MTP Driver can also cause the installation of the MTP USB device driver to fail when you connect your Android. The driver can be corrupted or damaged due to malware or heavy falls.
- Damaged USB Ports: In case of issues with your computer’s USB ports, connecting your Android device to your computer can lead to MTP USB device driver failure. A damaged USB port can also cause the drivers depending on it to get corrupted or damaged.
How to Fix MTP USB Device Driver Problem in Windows
If facing the MTP USB device driver problem, it is not a serious issue, as it can be resolved easily. A single search online will open up many fixes to resolve this issue. Given below are the five best solutions to help you find out how to fix the MTP USB device driver problem in Windows 7 in a matter of minutes:
1. Update MTP USB Device Driver
2. Change UAC Settings via Command Prompt
3. Repair Registry Settings
4. Run Hardware & Device Troubleshooter
5. Install MTP Porting Kit
1. Update MTP USB Device Driver
A corrupted or outdated MTP USB device driver is the most likely reason your Android cannot connect to your computer. Thus, the first thing you need to do is either update or reinstall the MTP USB device driver. EaseUS DriverHandy is the best tool to update and repair your Windows drivers. With it, you can easily scan, update and repair all drivers on your computer.
All of the drivers provided by EaseUS DriverHandy are original and completely safe. They are all certified by the Windows Hardware Quality Labs (WHQL) testing process of Windows.
Key Features:
- It will automatically scan all your Windows drivers and update all outdated ones.
- If any driver is damaged or corrupted, this tool will help you repair it using a one-click process.
- EaseUS DriverHandy also enables you to back up all of your drivers quickly and securely if needed.
- With this tool, you can pre-download and store all the important drivers if you intend to change your system or travel somewhere with internet issues.
Steps to Use EaseUS DriverHandy to Fix MTP USB Device Driver Problem
EaseUS DriverHandy has a clean and easy-to-understand interface, making running the MTP USB device repair process easier. The steps for how to fix the MTP USB device driver problem in Windows 7 and other versions are given below:
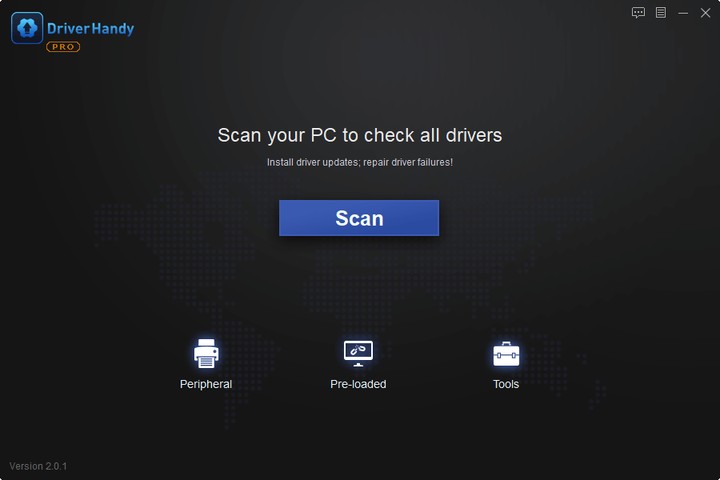
Step 1. Launch EaseUS DriverHandy on your PC and click «Scan» button.
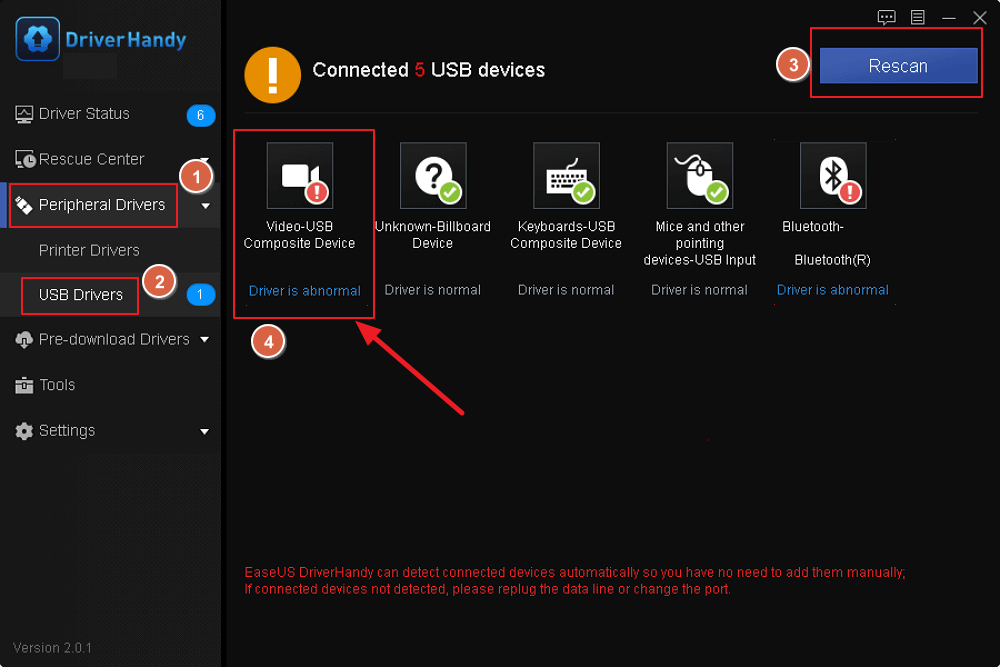
Step 2. Choose «USB Drivers» under the «Peripheral Drivers,» and click «Rescan.»
Step 3. If there is anything abnormal, navigate to the Driver Statuas and update it by updating the corresponding driver.
EaseUS DriverHandy is one of the best driver updaters. It can also help you fix the following issues:
- Fix Windows 10 external speakers not working
- Fix the laptop USB mouse not working
- Fix the USB to HDMI adapter not working
- Fix the power surge on USB port
Whatever problems you face regarding driver updates, you can resort to EaseUS DriverHandy. It can meet all your needs and solve your problem efficiently.
2. Change UAC Settings via Command Prompt
The Use Account Control or UAC settings of your Windows are essential for it to work smoothly and securely. However, sometimes the UAC settings can block external devices from getting installed on your system if they are perceived as a threat. It can be due to bugs or other settings conflicts. Learn how to fix the MTP USB device driver problem in Windows 7/10/11 by changing UAC settings in CMD:
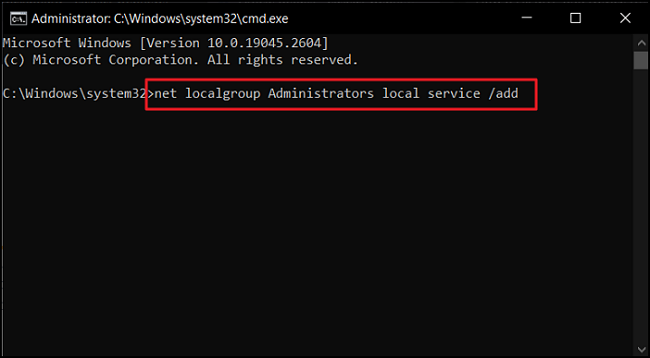
Step 1: Launch the Run function using the «Win + R» key and type «CMD.» Use the «Ctrl + Shift + Enter» key to open Command Prompt as administrator on your Windows computer.
Step 2: Now you will need to run the following command to change the UAC settings and resolve this issue:
«net localgroup Administrators local service /add«
3. Repair Registry Settings
Your computer’s registry settings can also be responsible for MTP USB device driver failure if set up improperly. If the registry settings are set not to recognize and install any external device, you cannot connect your Android device. Use the following steps to repair the registry settings to allow the installation of external devices:
Step 1: Use the «Win + R» key to open the Run function on Windows and type «regedit.» Now hit the «Enter» button to launch the Registry Editor.
Step 2: Here, click «HKEY_LOCAL_MACHINE» and navigate to «CurrentControlSet» through «SYSTEM.» Now, tap «Control» and locate «Class» to move there.
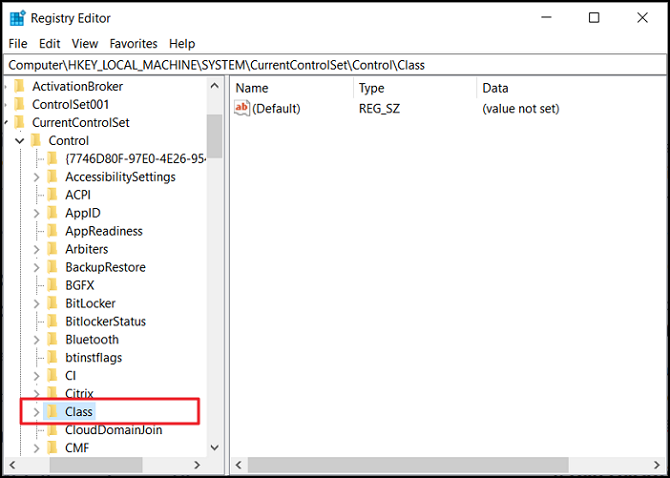
Step 3: Once you are in the «Class» tab, use «Ctrl + F» to open the search dialogue box and type «Portable Devices.» Click «Find Next» to search for the folder, and once it appears, delete the «UpperFilters» file if it is present there.
4. Run Hardware & Device Troubleshooter
There may be some bugs or glitches in your computer that are causing the MTP USB device driver installation to fail. Windows comes with many troubleshooters to resolve such problems. You will need to run the Hardware and Devices troubleshooter to resolve this issue. Here is how to fix the MTP USB device driver problem in Windows 7 and above:
Step 1: Right-click on your Windows Taskbar and select «Task Manager» from the ensuing menu. Now, click «File» and tap «Run new task.» Type «CMD» and check the box below to launch CMD as Administrator.
Step 2: In Command Prompt, run the following command to open the «Hardware and Devices» troubleshooter interface.
«msdt.exe -id DeviceDiagnostic«
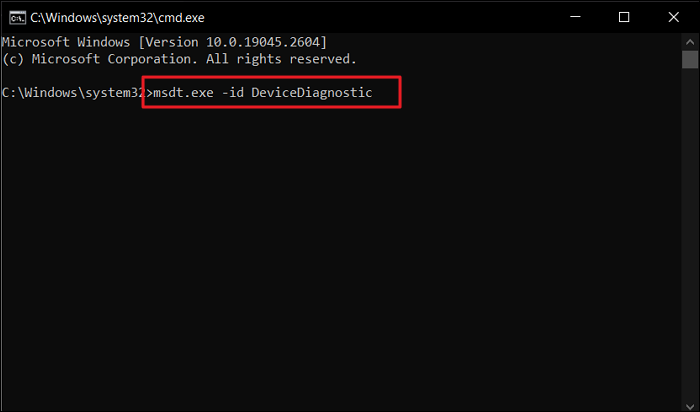
Step 3: Click «Next» to run the Hardware and Devices troubleshooter and wait for it to complete. Afterward, try connecting your Android to see if the problem is resolved.
5. Install MTP Porting Kit
Installing MTP Porting Kit on your Windows is a great way to resolve the MTP USB device driver error. Doing it is especially helpful if other solutions haven’t resolved this issue. If you are a Windows 7 user, installing MTP Porting Kit will most likely resolve the MTP device problem. Given below are the steps needed to download and install MTP Porting Kit:
Step 1: Open your computer’s web browser and visit the Sofpedia website to download the MTP Porting Kit. Once it is downloaded, double-click the installer to start the installation process.
Step 2: Follow the on-screen instruction to complete the MTP Porting Kit installation process. Once it is done, connect your Android device to confirm if the issue is solved.
Note: MTP Porting Kit is no longer available on Microsoft Download Centre. Microsoft is the original developer of the MTP Porting Kit, which has incorporated it in the latest Windows versions.
You May Also Like:
Conclusion
Being unable to transfer data from your Android to your computer will lead to many issues. Smartphones have limited storage, and you need to transfer data to your system. Regarding how to fix the MTP USB device driver problem in Windows 7/10/11, you mainly need to deal with MTP Device Driver. That’s why using EaseUS DriverHandy is the best solution to this and similar problems regarding drivers.
FAQs About How to Fix MTP USB Device Driver Problem
Have more questions about how to fix the MTP USB device driver problem in Windows 7/10/11? To satisfy your curiosity, below are answers to some commonly asked questions regarding it from the internet:
1. How do I fix my MTP USB driver?
To fix the MTP USB driver on your Windows, follow these steps:
Step 1: Use the search bar to find Command Prompt and select «Run as administrator» to launch it with admin authority.
Step 2: Run the «net localgroup Administrators local service /add «command to change the UAC settings to fix your MTP USB driver on Windows.
2. How to install the MTP driver in Windows 7?
To install the MTP driver in Windows 7, you have first to install the MTP driver installation file from this link. After this, run the installer and follow the on-screen instructions to install the MTP driver in Windows 7.
3. What is MTP USB device code 10 Windows 7?
In Windows 7, the MTP USB device code 10 is a Device Manager error that occurs when a device fails to start. It could occur for many reasons, like defective or outdated drivers, faulty USB ports, etc. The error can also appear if the device is incompatible with Device Manager.
Windows не удалось установить Android
Установка Android на компьютер с операционной системой Windows может быть сложной задачей. Многие пользователи сталкиваются с ошибкой «Windows не удалось установить Android», которая может вызывать множество проблем и затруднений. Чтобы решить эту проблему и успешно установить Android, вам необходимы определенные знания и опыт. В этой статье вы найдете подробную информацию о причинах ошибки «Windows не удалось установить Android» и эффективные способы ее устранения.
Проблемы с драйверами
Одной из основных причин ошибки «Windows не удалось установить Android» являются проблемы с драйверами. Драйверы – это программное обеспечение, которое позволяет операционной системе взаимодействовать с устройствами. Если драйверы не установлены или устарели, операционная система может столкнуться с проблемами при попытке установить Android.
Решение этой проблемы – установка новых драйверов или обновление существующих. Для этого вам понадобится зайти на сайт производителя вашего компьютера или материнской платы и найти последние версии драйверов для вашей модели.
После загрузки и установки новых драйверов, не забудьте перезагрузить компьютер, чтобы изменения вступили в силу. Это может помочь решить проблему «Windows не удалось установить Android».
Проблемы с BIOS
Еще одной распространенной причиной ошибки «Windows не удалось установить Android» являются проблемы с настройками BIOS. BIOS – это программное обеспечение, которое отвечает за запуск компьютера и контроль аппаратных средств.
Если в BIOS отключена возможность установки операционных систем с внешних носителей, то Windows не сможет установить Android. Чтобы решить эту проблему, вам нужно зайти в BIOS и включить опцию «Загрузка с USB» или «Загрузка с внешних устройств».
Для входа в BIOS нажмите определенную клавишу при загрузке компьютера (обычно это Del, F2 или F10). После входа в BIOS найдите соответствующую опцию и включите ее. Сохраните изменения и перезагрузите компьютер.
Проблемы с образом Android

Еще одной возможной причиной ошибки «Windows не удалось установить Android» может быть поврежденный или неправильно подготовленный образ Android. Образ Android – это файл, содержащий операционную систему Android, который необходим для установки на компьютер.

При загрузке образа Android убедитесь, что вы используете официальный и проверенный источник. Скачивайте образ Android только с официальных сайтов или из надежных источников, чтобы избежать поврежденных или модифицированных файлов.
Также убедитесь, что вы правильно подготовили образ Android и следовали всем инструкциям. Неправильно подготовленный образ может вызвать ошибку «Windows не удалось установить Android».
Итог
Ошибку «Windows не удалось установить Android» можно решить с помощью ряда действий. Установка новых драйверов, проверка настроек BIOS и правильная подготовка образа Android – вот основные шаги для решения этой проблемы.
Если одно из этих действий не помогло, рекомендуется обратиться за помощью к специалисту или проконсультироваться на форумах и сообществах, где опытные пользователи делятся своими знаниями и опытом.
Теперь, когда вы знаете, как решить проблему «Windows не удалось установить Android», вы можете продолжить установку Android и наслаждаться всеми ее преимуществами. Удачи в вашем путешествии по миру Android!
Windows не удалось установить Android: причины и решения проблемы
В мире современных технологий многие пользователи стремятся использовать операционные системы, которые наиболее соответствуют их потребностям и предпочтениям. Иногда это может привести к попыткам установить Android на компьютер с операционной системой Windows. Однако, в ходе такой попытки могут возникать проблемы, и Windows может не справиться с установкой Android. В данной статье мы рассмотрим причины, по которым Windows не может установить Android, и предложим несколько решений для исправления этой проблемы.
Причины, по которым Windows не может установить Android
- Несовместимость аппаратного обеспечения
- Неверные настройки BIOS
- Ошибка в процессе установки
Первой причиной, по которой Windows не может установить Android, может быть несовместимость аппаратного обеспечения. Android, как операционная система, требует определенных характеристик компьютера, чтобы исправно функционировать. Если компьютер не обладает необходимыми параметрами, установка Android может быть невозможной или привести к ошибкам в работе.
Вторая причина, по которой Windows не может установить Android, связана с неверными настройками BIOS. BIOS (Basic Input/Output System) является программным обеспечением, которое отвечает за основные операции во время загрузки компьютера. Если настройки BIOS не соответствуют требованиям установки Android, процесс может быть нарушен и привести к ошибкам в установке.

Третьей причиной, по которой Windows не может установить Android, является ошибка в процессе установки. Это может быть вызвано неправильно подготовленным загрузочным USB-накопителем, поврежденным образом операционной системы или другими факторами. Ошибки в процессе установки могут привести к сбоям и неспособности Windows установить Android.
Решения проблемы
Важно отметить, что перед попыткой установить Android на компьютер с Windows, рекомендуется выполнить резервное копирование всех важных данных, чтобы в случае возникновения проблем не потерять их.
Если Windows не может установить Android из-за несовместимости аппаратного обеспечения, вам придется проверить, соответствуют ли параметры вашего компьютера требованиям Android. Обратитесь к документации операционной системы Android или посетите официальный сайт разработчика, чтобы узнать требования к аппаратуре.
Если неверные настройки BIOS являются причиной проблемы, вам придется войти в BIOS и изменить настройки. Перед этим убедитесь, что вы ознакомились с документацией, связанной с вашим компьютером, чтобы избежать нежелательных последствий. Изменение настроек BIOS может быть сложной задачей, поэтому если вы не уверены в своих навыках, лучше обратиться к специалисту или поддержке производителя.
Если ошибка в процессе установки является причиной проблемы, вам придется перекачать образ операционной системы Android и подготовить новый загрузочный USB-накопитель. Возможно, также потребуется проверить целостность загрузочного носителя или использовать другой образ операционной системы.
Итог

В заключение можно сказать, что причины, по которым Windows не может установить Android, могут быть разными, включая несовместимость аппаратного обеспечения, неверные настройки BIOS и ошибки в процессе установки. Однако, существуют решения, которые помогут преодолеть эти проблемы, включая проверку аппаратных требований, изменение настроек BIOS и повторную подготовку загрузочного носителя. Важно помнить, что при попытке установки Android на компьютер с Windows всегда рекомендуется быть осторожным и делать резервное копирование данных для предотвращения потери информации.
Windows не удалось установить Android
Если вы столкнулись с проблемой установки операционной системы Android на компьютере с Windows, не отчаивайтесь! В этой статье я расскажу вам о возможных причинах этой проблемы и предложу несколько способов ее решения.
Возможные причины проблемы
- Несовместимость драйверов
- Отсутствие необходимого программного обеспечения
- Ошибка в процессе установки
- Конфликт с уже установленной операционной системой

Существует несколько типичных ситуаций, в которых пользователи сталкиваются с проблемой «Windows не удалось установить Android». Это может быть вызвано несовместимостью драйверов. В таком случае рекомендуется обновить драйверы на вашем компьютере до последних версий.
Также возможно, что у вас отсутствует необходимое программное обеспечение для установки Android. Убедитесь, что у вас установлены все необходимые драйверы и программы, предоставляемые производителем устройства, с которым вы пытаетесь установить Android.
Ошибка в процессе установки может быть еще одной возможной причиной проблемы. Проверьте, что вы следуете инструкциям по установке, предоставленным производителем операционной системы Android. Если необходимо, переустановите операционную систему и повторите попытку установки.
Наконец, конфликт с уже установленной операционной системой может привести к сбоям в процессе установки Android. В этом случае рекомендуется создать резервную копию всех ваших данных и выполнить чистую установку операционной системы Android.
Способы решения проблемы
- Обновите драйверы на вашем компьютере.
- Установите необходимое программное обеспечение для установки Android.
- Повторите процесс установки согласно инструкциям.
- Выполните чистую установку операционной системы Android.
Первым шагом в решении проблемы «Windows не удалось установить Android» является обновление драйверов на вашем компьютере. Посетите официальный сайт производителя вашего компьютера и найдите последние версии драйверов. Загрузите и установите их, после чего повторите попытку установки Android.
Если у вас нет необходимого программного обеспечения для установки Android, вам необходимо его установить. Проверьте документацию, предоставленную производителем вашего устройства, и загрузите все необходимые программы и драйверы.

В случае, если процесс установки Android прерывается с ошибками, рекомендуется повторить установку, следуя инструкциям, предоставленным производителем операционной системы. Убедитесь, что вы выполняете все необходимые шаги в правильном порядке.
Если все вышеперечисленные способы не помогли, последним решением может быть чистая установка операционной системы Android. Выполните резервное копирование всех важных данных и выполните чистую установку, следуя инструкциям производителя.
Итог
В данной статье мы рассмотрели причины и способы решения проблемы «Windows не удалось установить Android». Это может быть вызвано несовместимостью драйверов, отсутствием необходимого программного обеспечения, ошибкой в процессе установки или конфликтом с уже установленной операционной системой.
Для решения проблемы мы предложили следующие шаги: обновление драйверов на компьютере, установку необходимого программного обеспечения, повторную установку согласно инструкциям и, при необходимости, чистую установку операционной системы Android.
Будьте настойчивы и следуйте указанным рекомендациям, чтобы успешно установить операционную систему Android на ваш компьютер с Windows. Удачи!