
Provide feedback
Saved searches
Use saved searches to filter your results more quickly
Sign up
21/01/2021
Been debugging like crazy the last day with this symptom:
When you run the gpupdate /force command on a hybrid Azure Active Directory (Azure AD)-joined Windows device that’s enrolled in Microsoft Intune, you receive the following warning message:
Updating policy…
Computer Policy update has completed successfully.
The following warnings were encountered during computer policy processing:
Windows failed to apply the MDM Policy settings. MDM Policy settings might have its own log file. Please click on the “More information” link.
User Policy update has completed successfully.For more detailed information, review the event log or run GPRESULT /H GPReport.html from the command line to access information about Group Policy.
Should have Googled it though, because this is “Expected behavior” 🙂
Cause
This issue occurs if the Auto MDM Enrollment with AAD Token Group Policy Object (GPO) is applied to the Windows device. In this case, it tries to enroll the device in MDM when you run the gpupdate /force command. Because the device was already enrolled, you receive the warning message.
This behavior is expected. You can safely ignore the warning message.
Source: Windows failed to apply MDM Policy settings – Intune | Microsoft Docs
🙂
By continuing to use the site, you agree to the use of cookies. more information
Dealing with Windows MDM (Mobile Device Management) policy settings can sometimes feel like navigating a labyrinth. When you encounter errors, it can be frustrating, but don’t worry! This guide will help you understand what these errors mean and how to resolve them quickly and effectively.
Understanding Windows MDM Policies
MDM policies are designed to manage devices across an organization seamlessly. These policies ensure that devices comply with corporate guidelines and security standards. However, errors can arise due to various reasons, including configuration problems, connectivity issues, or even user error. Identifying the root cause is crucial for troubleshooting.
Common Error Messages
Here are some of the common Windows MDM policy settings errors you might encounter:
- Error Code 0x80070005: Access Denied
- Error Code 0x87D1B00C: Policy Failure
- Error Code 0x80072EE2: Network-related issues
Understanding these codes will help guide your troubleshooting efforts.
Troubleshooting Steps
Step 1: Check Your Internet Connection 🌐
Before diving into more complex solutions, ensure that the device has a stable internet connection. Since MDM policies rely on internet connectivity for communication with management servers, this is a crucial first step.
- Verify that other internet-based applications are working.
- Restart your router or modem if necessary.
Step 2: Verify User Permissions 🔑
Make sure that the user account has the necessary permissions to apply MDM policies. This often includes:
- Administrative access
- Compliance with organizational guidelines
If you’re unsure, consult your IT administrator to confirm that your account has the right permissions.
Step 3: Update Group Policy Settings
Updating group policies can solve numerous MDM-related issues. Here’s how to do it:
- Press
Win + Rto open the Run dialog. - Type
gpedit.mscand hit Enter. - Navigate to Computer Configuration > Administrative Templates > Windows Components > MDM.
- Review each policy setting to ensure they are configured correctly.
- Update any policies that are misconfigured or disabled.
Step 4: Review MDM Enrollment Settings
If you’re facing issues during the enrollment process, double-check these settings:
- Ensure your device meets the minimum hardware and software requirements.
- Verify that the correct MDM server URL is entered in your settings.
- Check if the device is not already enrolled in another MDM.
Step 5: Reset MDM Settings 🔄
If all else fails, consider resetting the MDM settings. Here’s how to perform this action:
- Go to Settings > Accounts > Access work or school.
- Select the account linked to your MDM and click on Disconnect.
- Restart your device.
- Re-enroll the device using your MDM provider’s enrollment instructions.
<p class=»pro-note»>🚀Pro Tip: Always back up your data before making significant changes to your device settings!</p>
Helpful Tips & Shortcuts
- Keyboard Shortcuts: Familiarize yourself with Windows shortcuts (like
Win + Ifor Settings) to navigate faster. - Monitoring Tools: Use monitoring tools that allow you to check device status and compliance easily.
- Training Resources: Leverage online resources and tutorials related to MDM to enhance your understanding.
Common Mistakes to Avoid
- Skipping Internet Checks: Always verify your internet connection first.
- Neglecting Updates: Keep both Windows and your MDM solution updated to avoid compatibility issues.
- Ignoring Documentation: Consult your organization’s MDM documentation for specific instructions related to your setup.
FAQ
<div class=»faq-section»>
<div class=»faq-container»>
<h2>Frequently Asked Questions</h2>
<div class=»faq-item»>
<div class=»faq-question»>
<h3>What should I do if I get the «Access Denied» error?</h3>
<span class=»faq-toggle»>+</span>
</div>
<div class=»faq-answer»>
<p>Check user permissions and ensure you are logged in with an account that has administrative access.</p>
</div>
</div>
<div class=»faq-item»>
<div class=»faq-question»>
<h3>How can I tell if my device is enrolled in MDM?</h3>
<span class=»faq-toggle»>+</span>
</div>
<div class=»faq-answer»>
<p>Navigate to Settings > Accounts > Access work or school to see if an MDM account is listed.</p>
</div>
</div>
<div class=»faq-item»>
<div class=»faq-question»>
<h3>Can I remove MDM from my device?</h3>
<span class=»faq-toggle»>+</span>
</div>
<div class=»faq-answer»>
<p>Yes, but you will need administrative permissions to disconnect the MDM account.</p>
</div>
</div>
<div class=»faq-item»>
<div class=»faq-question»>
<h3>What if my device is stuck during enrollment?</h3>
<span class=»faq-toggle»>+</span>
</div>
<div class=»faq-answer»>
<p>Restart your device and try re-enrolling, ensuring all settings are correct.</p>
</div>
</div>
</div>
</div>
Recap of Key Takeaways
Navigating MDM policy settings and their associated errors can be challenging, but armed with this guide, you can tackle them with confidence. Always check your internet connection, review your user permissions, and ensure your settings are correctly configured. And remember, don’t hesitate to reach out for help if you’re stuck!
Exploring the nuances of MDM settings can greatly enhance your device management skills, so keep practicing and looking into related tutorials. If you encounter any issues, refer back to this guide for quick resolutions.
<p class=»pro-note»>💡Pro Tip: Regularly check for updates to both Windows and your MDM software to prevent compatibility issues!</p>
На одном из компьютеров перестали применяться новые параметры групповых политик. Для диагностики я вручную обновил параметров GPO с помощью команды
gpupdate /force
и увидел такую ошибку в консоли:
Не удалось успешно обновить политику компьютера. Обнаружены следующие ошибки:
Ошибка при обработке групповой политики. Windows не удалось применить основанные на данных реестра параметры политики для объекта групповой политики "LocalGPO". Параметры групповой политики не могут быть применены, пока не будет исправлена эта ситуация. Сведения об имени и пути файла, вызвавшего эту ошибку, содержатся в подробностях об этом событии.
Computer policy could not be updated successfully. The following errors were encountered:
 The processing of Group Policy failed. Windows could not apply the registry-based policy settings for the Group Policy object LocalGPO. Group Policy settings will not be resolved until this event is resolved. View the event details for more information on the file name and path that caused the failure.

При этом в журнале System появляется событие с EvetID 1096 с тем же описанием (The processing of Group Policy failed):
Log Name:     System
Source:       Microsoft-Windows-GroupPolicy
Event ID:     1096
Level:         Error
User:         SYSTEM
Если попробовать выполнить диагностику применения GPO с помощью команды gpresult (
gpresult.exe /h c:\tempt\gpresultreport.html
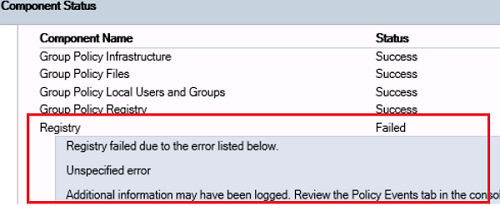
), видно что не применяется только настройки из раздела Group Policy Registry —
Failed
:
Registry failed due to the following error listed below.
Additional information may have been logged. Review the Policy Events tab in the console or the application event log.
Получается, что к компьютеру не применяются только GPO с настройками клиентских расширений групповых политик CSE (client-side extension), которые отвечают за управление ключами реестра через GPO.
Расширение Registry client-side не смогло прочитать файл registry.pol. Скорее всего файл это поврежден (рекомендуем проверить файловую систему на ошибки с помощью chkdsk). Чтобы пересоздать этот файл, перейдите в каталог c:\Windows\System32\GroupPolicy\Machine и переименуйте его в registry.bak.
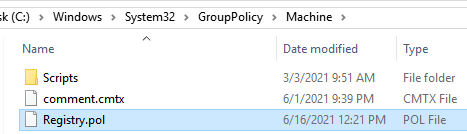
Можно переименовать файл из командой строки:
cd "C:\Windows\System32\GroupPolicy\Machine"
ren registry.pol registry.bak
Обновите настройки групповых политик командой:
gpupdate /force
Windows должна пересоздать файл registry.pol (настройки локальных GPO будут сброшены) и успешно применить все настройки GPO.
Если в журнале вы видите событие Event ID 1096 (
The processing of Group Policy failed. Windows could not apply the registry-based policy settings for the Group Policy object LDAP://
) c ErrorCode 13 и описанием “
The data is invalid
”, значит проблема связана с доменной GPO, указанной в ошибке.
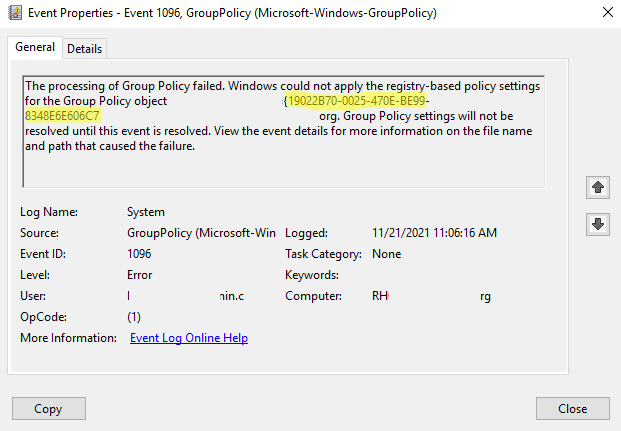
Скопируйте GUID политики и найдите имя GPO с помощь команды PowerShell:
Get-GPO -Guid 19022B70-0025-470E-BE99-8348E6E606C7
- Запустите консоль управления доменными GPO (gpmc.msc) и проверьте, что политика существует;
- Проверьте, что в каталоге SYSVOL политики есть файлы registry.pol и gpt.ini и они доступны на чтение (проверьте NTFS права);
- Проверьте, что версия политики на разных контроллерах домена одинакова (проверьте корректность работы домена и репликации в AD);
- Удалите файлы GPO в SYSVOL на контроллере домена, с которого получает политику клиент (
$env:LOGONSERVER
), и дождитесь ее репликации с соседнего DC - Если предыдущие способы не помогут, пересоздайте GPO или восстановите ее из бэкапа.
Introduction
I recently configured some custom profiles in Microsoft Intune, and it turned out that one of the policies failed hard on all devices. I had not seen this error before and went to search on the big internet for the error code to understand more about the return code.
I went to this website and the error says “the requested command is not allowed on the target”
All right, so I must have configured something wrong in my policy…
Let’s have a look!
Debug time
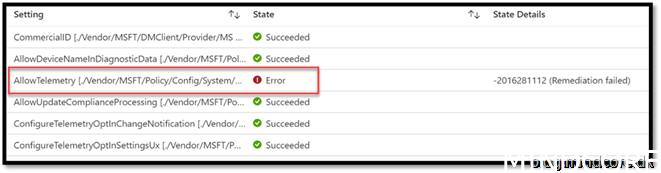
This is how the error looks like in Intune.
If we deep dive into the client’s event log we can better see what happens
(The event log can be found in Applications and Services Logs -> Microsoft -> Windows -> DeviceManagement-Enterprise-Diagnostics-Provider -> Admin)
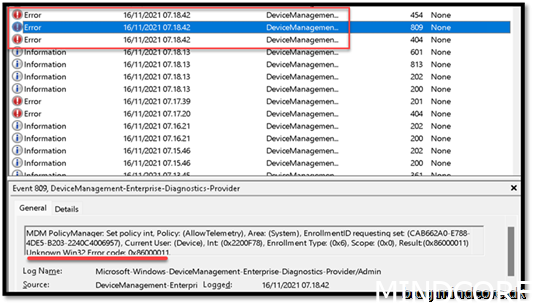
MDM PolicyManager: Set policy int, Policy: (AllowTelemetry), Area: (System), EnrollmentID requesting set: (CAB662A0-E788-4DE5-B203-2240C4006957), Current User: (Device), Int: (0x2AFE388), Enrollment Type: (0x6), Scope: (0x0), Result:(0x86000011) Unknown Win32 Error code: 0x86000011.
We have discovered the problem. Now to the configuration in Microsoft Intune to see what we configured.
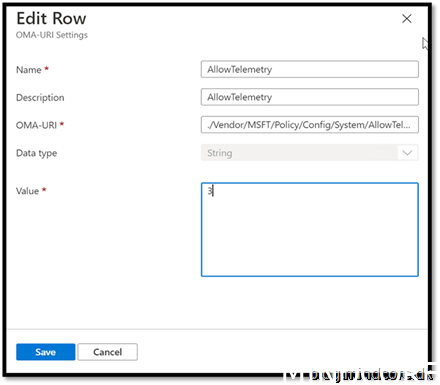
I have configured AllowTelemetry and set the Data type to a string.
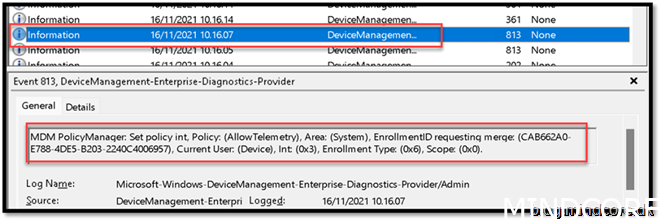
To troubleshoot further I went to the registry of a device and searched for “AllowTelemetry” until I found this

Did you notice what I missed?
Yes, I had by accident set the custom profile to a “String” and not an “integer”, that’s why the policy cannot apply to the client.
I went back to Microsoft Intune and into the policy with error.
Deleted the old row and changed the data type to “Integer” and saved it.
Manually synced a client with the policy assigned and THEN the policy applied as supposed.
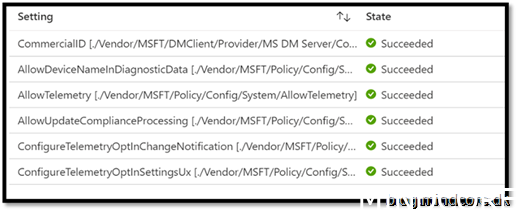
Jobs done!
This article was created to show how to debug such error.
To configure telemetry going forward you should use the Settings Catalog.
Summary
Microsoft Intune is very good at reporting back; however, it could have been a better error message to easier understand the issue without too much searching around.
Hope this helped you along with your troubleshooting.