
Summary: In this blog, we’ll try different methods to fix the error “Windows cannot run disk checking because it is write protected.” You can also try using a professional data recovery software like Stellar Data Recovery Professional to recover your inaccessible data due to this error.
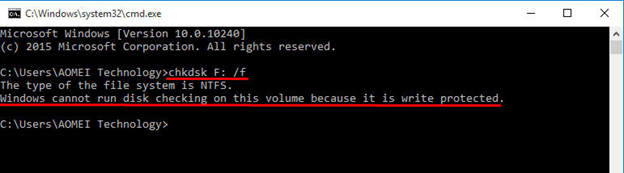
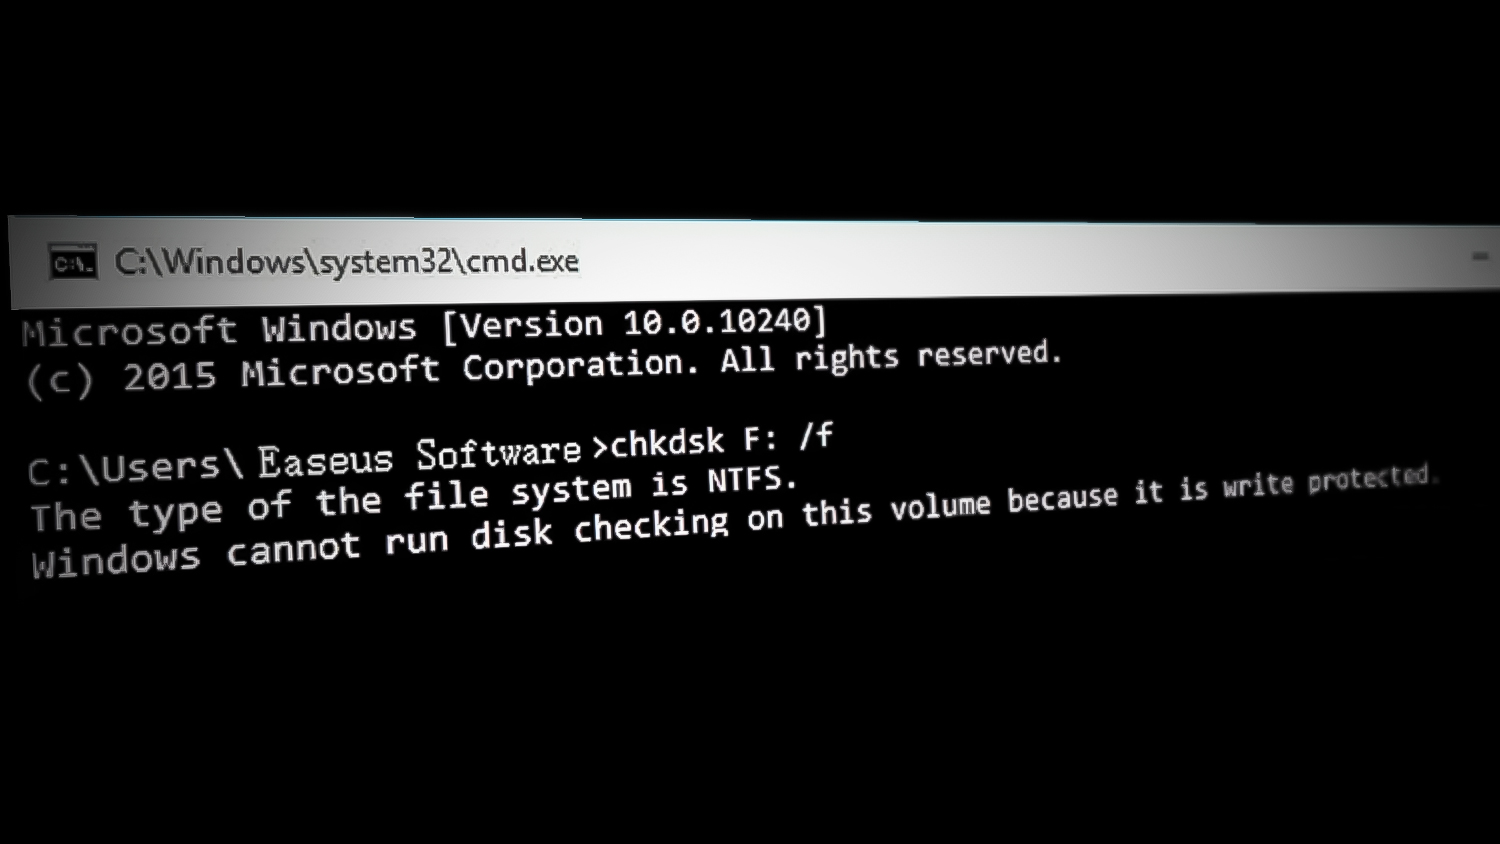
The error message “Windows cannot run disk checking because its write protected” may appear when you’re trying to repair a disk error using the CHKDSK (Check Disk) command in Windows.
The error is caused due to corruption in the volume or when the volume appears as “Read Only”. Let’s look at some possible resolutions to fix the error.
Method 1: Remove Write Protection using Command Prompt
This command removes any write protection status by unmounting the drive/volume, USB, or SD card in question.
1. Go to Search box in your Windows and type cmd. A dialog box will open. Choose the option, Run as an administrator.
2. Enter chkdsk E: /f /r /x in the command prompt window and press Enter. Replace “E” with the letter of your specific drive/volume.
Now try to rerun CHKDSK program again to check if the error persists.
Method 2: Use Diskpart to remove Write Protection
Diskpart is a function that can help you remove the “read-only” attribute from your hard drive. Use the steps below to use this feature.
1. Go to Search box in your Windows and type cmd. A dialog box will open. Choose the option, Run as an administrator.
2. A code window will open. Enter the command as stated below
list disk
select disk X (In place of “X”, write the disk letter of the drive/USB/SD card in question)
attributes disk clear read-only
On running the command, you should get a message “Disk message cleared successfully.” If you see that message, then exit the screen and rerun the CHKDSK program.
If this still doesn’t resolve the error, try the next method.
Method 3: Use Registry Editor to clear Read-Only
You can also clear the “Read-only” attribute of the drive by using the Registry Editor. Follow the steps below:
Step 1. Enter Regedit by pressing Windows+R.
Step 2. Navigate to: HKEY_LOCAL_MACHINE\SYSTEM\CurrentControlSet\Control\StorageDevicePolicies.
Step 3. Look for the WriteProtect key. Right-click on it and set the value as “0”.
By using one of the above methods, you should be able to resolve the error. But, there might be cases when the file system is so corrupt that it would be impossible to fix the error. To make the disk reusable again, we recommended to wipe the data from the disk. Before wiping though, you should recover all existing files so that you do not lose any valuable/sensitive information.
This is where a data recovery software comes into the picture.
Recover data from a corrupted drive using a Data Recovery Software
A data recovery software works by recovering your data from various loss scenarios, including from a corrupted drive. One of the prominent data recovery software is Stellar Data Recovery Professional for Windows. It uses advanced techniques to scan and securely extract all your data. In the scenario described in the blog, data recovery software will allow you to recover your valuable data before you wipe the drive clean. These two steps, recovery of data and then wiping the drive will let you reuse your hard drive without losing any data.
How to use Stellar Data Recovery to recover your data from a corrupted drive?
1. Download and install Stellar Data Recovery Professional software.
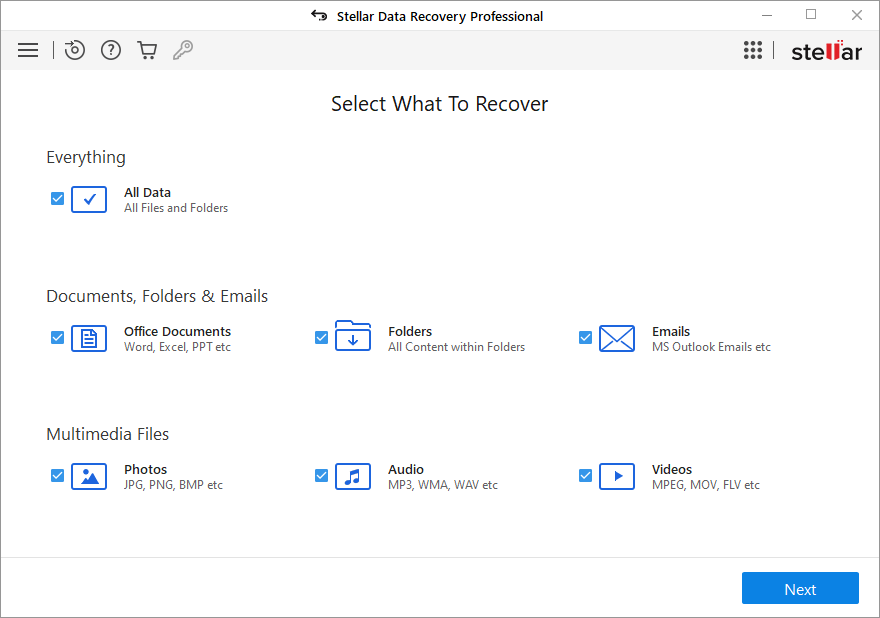
2. Next, select the type of data you wish to recover.
3. Choose the drive in your PC from where you want to recover the data.
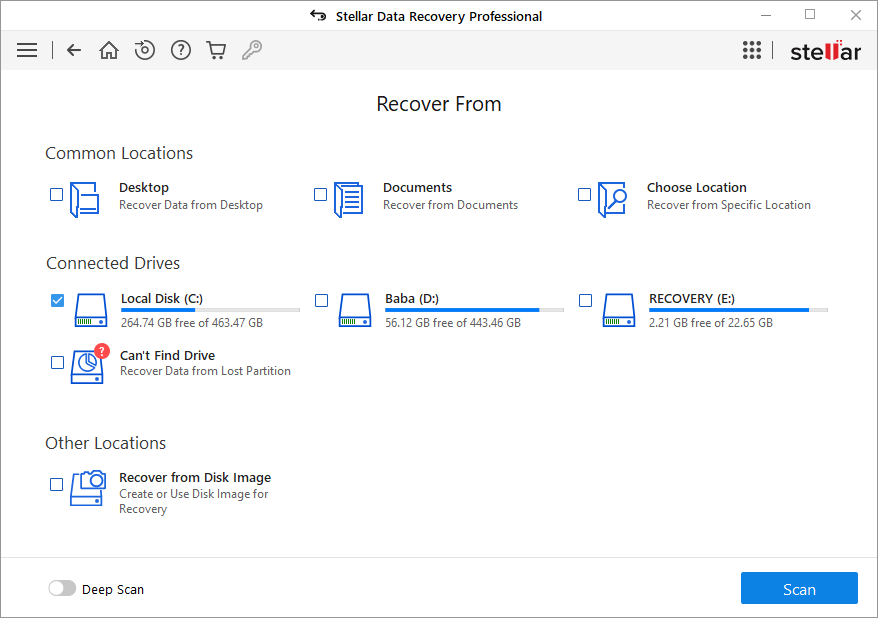
4. Once you have selected the drive, click Scan. You can also preview the files before recovering at the time of scanning.
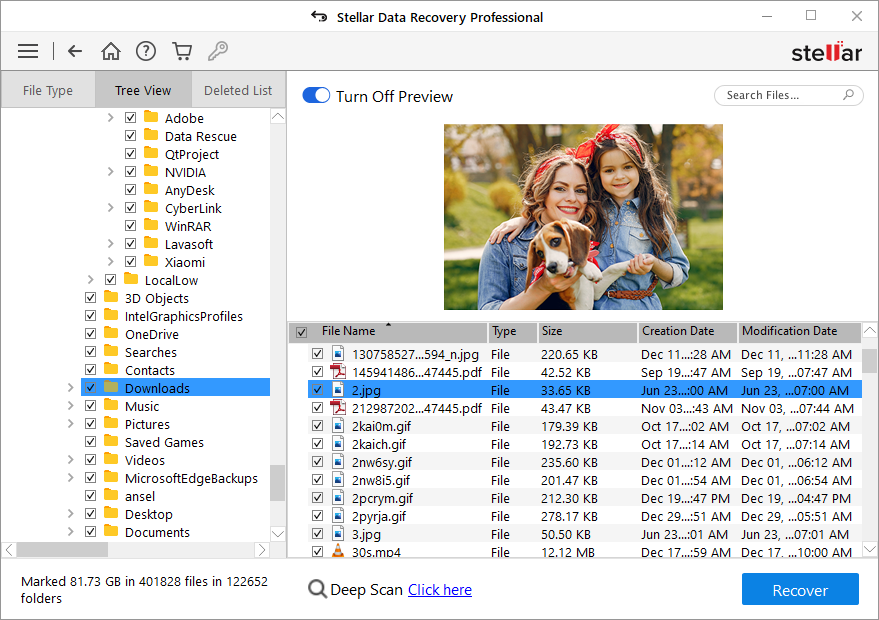
5. After scan completion, click Recover and choose a location to save the recovered files. (See Image 5)
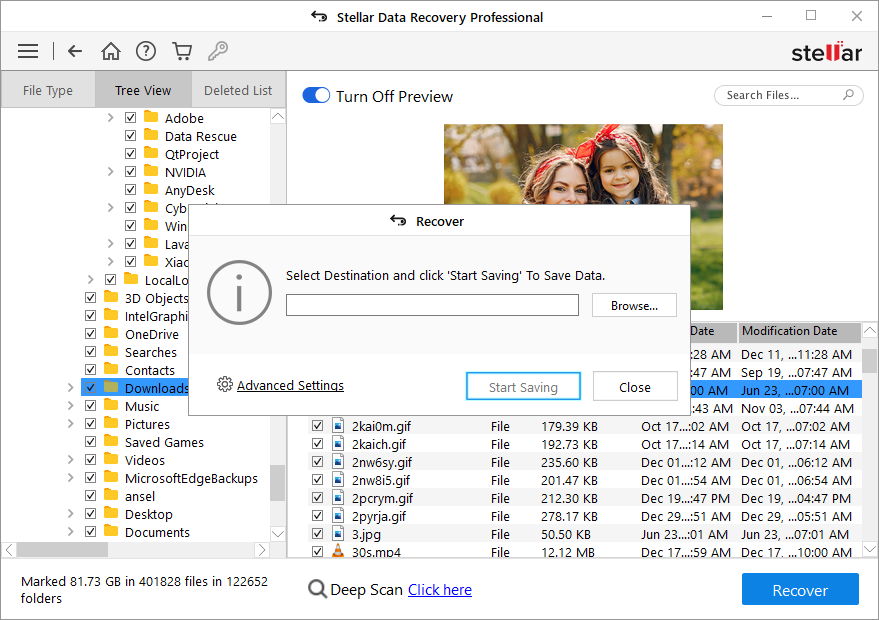
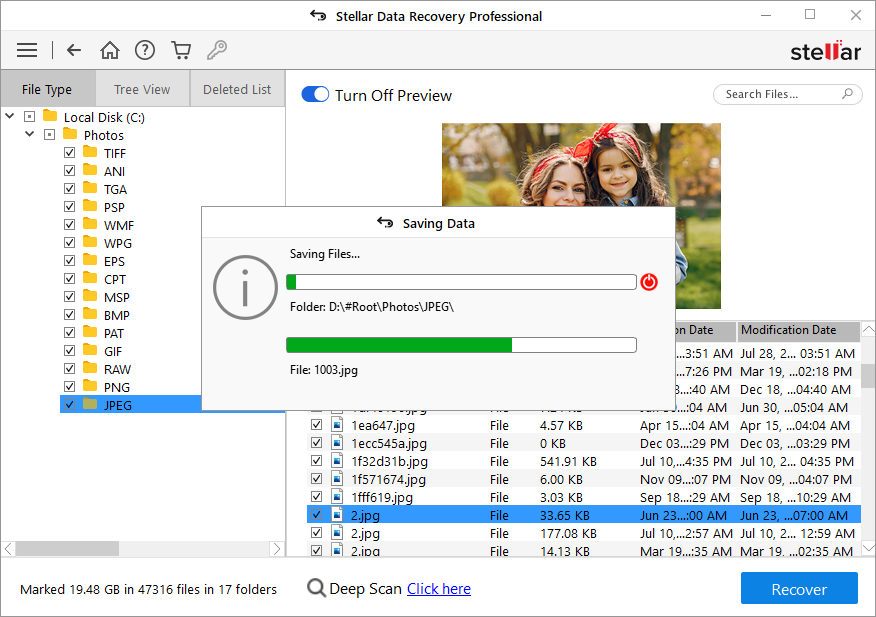
6. Finally, click ‘Start-Saving’ to save the data. (See Image 6)
Wiping the drive clean
Once you have recovered your data, the next step is to erase your drive to make it reusable again. The most effective way to permanently and securely erase the files is to use a professional file erasure software like Stellar File Eraser. Stellar File Eraser is a professional DIY tool, designed to erase files permanently from your drive.
Read this article for a step-by-step guide on permanently erasing files from a drive using Stellar File Eraser software.
Conclusion
The error “Windows cannot run disk checking on this volume because it is write protected” can occur due to a variety of reasons. We hope that the methods described in the blog help you resolve the error. If the remedies don’t work then it is advisable to use a data recovery software like Stellar Windows Data Recovery Professional and restore the computer to an earlier date.
Was this article helpful?
YES0
NO
Encountering an error while attempting to run a disk checking command (CHKDSK) on Windows often results in the command failing to execute properly. This issue typically occurs when the disk is flagged as “write-protected” or when Windows cannot access the disk, indicating that the system is unable to perform the check due to restrictions or corruption.
The most frequent cause is a write-protection attribute set on the drive, either through a physical switch, a corrupted file system, or registry settings.
Other common reasons include file system errors that necessitate a restart to fix, disk corruption, or the need for administrative privileges.
This error can also occur on memory cards. If that’s the case, you can easily remove the write protection using the lock on the memory card.
1. Clear Read Only Attributes
You can easily clear the Read-Only attribute by using the diskpart utility, which allows users to manage disks efficiently.
- Click Start Menu and type Command Prompt.
- Right-click on the command prompt and then select Run As Administrator.
Running Command Prompt As Administrator - Once the terminal is launched, type the following command to use the diskpart utility:
diskpart
- After entering diskpart, type the following command to list all your volumes:
list volume
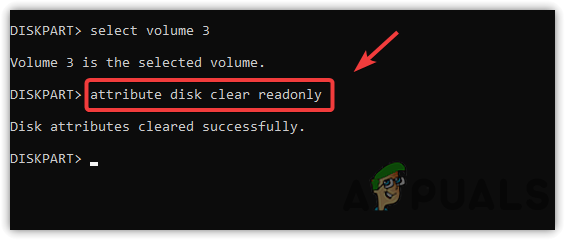
- Select the volume causing the error by replacing # with the volume number:
select volume #

Using Diskpart Volume - Before making any changes, check the current attributes:
attributes volume
- If the volume is marked as Read-Only, clear the Read-Only mode:
attribute disk clear readonly

Leaving Read Only Mode - If you’re dealing with the entire disk, list all the disks and select the appropriate one:
list disk
select disk #
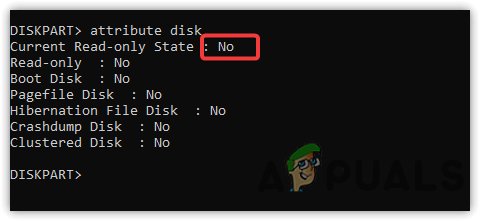
- Check the current disk attributes:
attribute disk
- If the disk is marked as Read-Only, clear the Read-Only mode:
attributes disk clear readonly
- After that, type the following command to check the current state of the disk. If the Read Only mode value is No, the disk is no longer write-protected:
attribute disk

Checking Disk Attributes - After that, run the disk-checking commands to see if the error is fixed.

2. Remove Write Protection Via Registry Editor
You may also try removing the write protection using the Registry Editor. The Registry Editor is a database for the operating system to store and manage all the tasks. This error might not appear after disabling the write protection using the Registry Editor.
Note: Please make a backup of your registry before making any changes to it, as improper changes can cause instability issues on your system. Follow our detailed guide on how to backup and restore Registry in Windows.
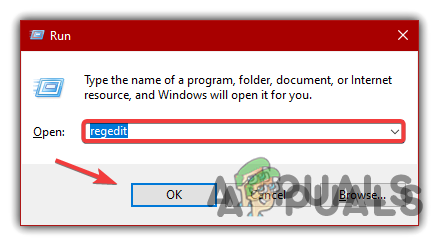
- Press Windows + R on the keyboard to open the Run program.
- Type Regedit and click OK.

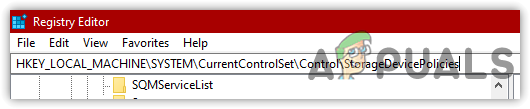
Opening Registry Editor - Once the Registry Editor is launched, navigate to the following path:
HKEY_LOCAL_MACHINE\SYSTEM\CurrentControlSet\Control\StorageDevicePolicies
Note: You can paste the following path in the address search bar for faster navigation.

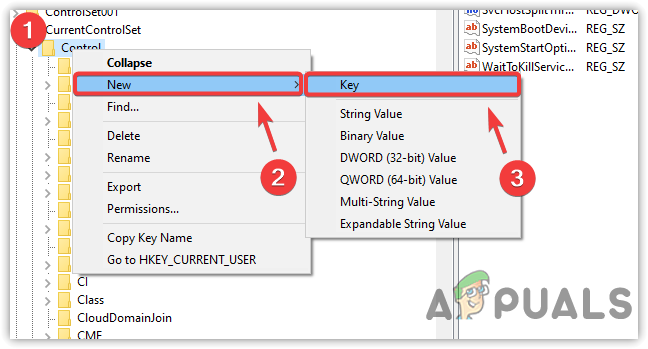
Navigating to a Path in the Registry Editor - If the Storage Device Policies key is not there, create one under Control.
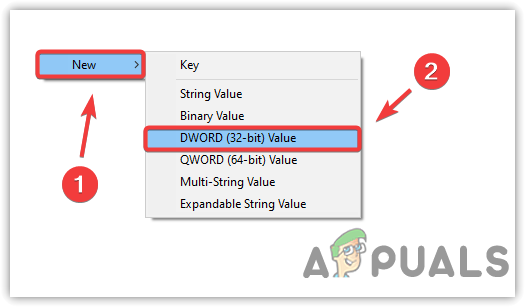
- Right-click Control, hover over New, and then click on Key.

Making A Registry Key - Once the entry is created, name it StorageDevicePolicies.
- Right-click on the right pane, hover over New, and then click DWORD (32-bit) Value.

Creating A Subkey - Name it Writeprotect, then double-click on it and change its value data to 0.
- When done, click OK.
Changing Value Data to 0 - Restart your computer and run the disk-checking commands to see if the error persists.
3. Repair Disk Errors
If you have any disk errors in your target drive, it can lead to this issue. However, if you use some commands to ensure there is no disk error, then you can consider other potential solutions. Regardless of checking the drive for bad sectors, we have done everything that can fix this issue.
To check for disk errors, use chkdsk, a command-line utility that allows users to check for bad sectors and verify the integrity of system files in the target volume.
- Press the Windows key and type command prompt.
- Right-click on the terminal and choose Run As Administrator to launch with administrative privileges.
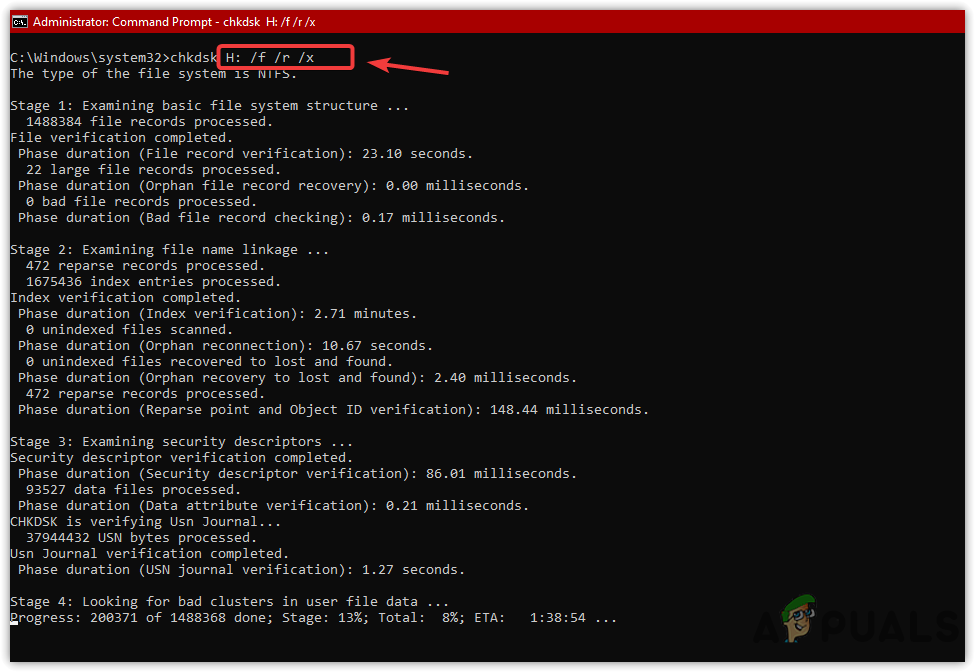
Opening Command Prompt As Administrator - Once it is launched, type the following command to check for disk errors and bad sectors:
chkdsk D: /f /r /x
Note: Make sure to replace D with the faulty drive.
/f: Fixes errors on the disk.
/r: Locates bad sectors and recovers readable information.
/x: Forces the volume to dismount first if necessary.
Important: The
/xparameter forces a dismount, which should not be used on the root partition (usually the C: drive) or other active system partitions because it can interrupt system operations and cause instability. Always ensure you have saved and closed any open work on the drive before using this parameter.
Running CHKDSK - If errors are found, the utility will automatically fix them, so don’t worry.
- Once done, check if the error is still occurring.
If none of the methods have successfully removed the write protection from your drive, there are three potential factors that could be causing this issue:
- Encryption: Your drive might be encrypted. If this is the case, you will need to unlock the drive using the appropriate decryption key.
- Third-Party Software: The write protection may have been applied by a third-party application. To remove the write protection, you will need to utilize the same software that imposed it.
- Corruption or Physical Damage: It is also possible that your drive is corrupted or physically damaged.
If one of these scenarios applies to your situation, follow the corresponding solution mentioned above. However, if none of these methods resolve the issue, it may be necessary to consult a local data recovery center to retrieve your data.
Kevin Arrows
Kevin Arrows is a highly experienced and knowledgeable technology specialist with over a decade of industry experience. He holds a Microsoft Certified Technology Specialist (MCTS) certification and has a deep passion for staying up-to-date on the latest tech developments. Kevin has written extensively on a wide range of tech-related topics, showcasing his expertise and knowledge in areas such as software development, cybersecurity, and cloud computing. His contributions to the tech field have been widely recognized and respected by his peers, and he is highly regarded for his ability to explain complex technical concepts in a clear and concise manner.
Position: Resource — Disk Utilities — Fixed: Windows Cannot Run Disk Checking on This Volume Because It Is Write Protected
CHKDSK is a free command-line tool built in Windows operating system, and it is provided to help users check file system and file system metadata of a volume for either logical or physical errors. The single command «chkdsk» shows the status of the volume being scanning, and if it is used with parameters like /f, /r, /x, or /b, it will fix errors on the volume.
The error «The type of the file system is NTFS. Windows cannot run disk checking on this volume because it is write protected» occurs when the user attempts to check and repair errors on a storage device, for example a hard drive, using the CHKDSK command. If the disk to be checked is write-protected, it is likely to end up with the error message.

What causes the error? Much of the time the error occurs due to following reasons:
- The drive is write-protected: When a drive is set as write-protected, also called read-only, which means you can only view content on the drive. In other words, you cannot make changes, for example, reformatting, remove data, edit files, etc. are not allowed.
- Corrupted drive: The drive is damaged due to either logical or hardware errors, such as, bad sectors, virus attack, internal components are damaged, etc.
How do I run chkdsk on write protected and how do I unprotect my hard drive? Chkdsk command cannot run on storage device before write protection is disabled. Next, we’ll discuss 5 troubleshoots regarding how to clear write protection as well as how to rescue data from read-only hard drives. Before executing following fixes, it is recommended to restart computer first, which can refresh the computer and get rid of corrupted temporary data that may has something to so with the problem.
Important: some of the solutions listed below will cause data loss, and you should backup or recover data in advance if you do not want to lose them. As to restoring files from write-protected disks, skip to: Recover Files From Write-Protected or Corrupted Hard Drive
Solution #1: Remove Write Protection Using Diskpart
Step 1. Type «Command Prompt» in the searching box next to Start menu. Right-click «Command Prompt» in searching result and choose «Run as administrator».
Step 2. In Command Prompt, type diskpart and press Enter key.
Step 3. Type following commands one by one, and press Enter key after each command.
List volume
Select volume # (replace # with the number of the drive you want to remove write protection)
attributes disk clear readonly

When you see the message «Disk attributes cleared successfully», you can run chkdsk to see if it still reports the error. If you are not good at using command lines, you can use third-party partition manager software DiskGenius Free Edition to do the task.
Solution #2: Remove Read-only Status Using DiskGenius Free Edition
Step 1. Install and run DiskGenius Free edition on your computer and connect the hard drive.
Step 2. Select the drive that is write-protected, click Disk > Change Device State. Then you will see the «Read-only» option is selected, click it to cancel the selection.

Step 3. Click OK to confirm the action and the read-only state will be disabled.

Solution #3: Clear Write Protect in Registry Editor
Step 1. Press Windows and R keys to open Run dialog box. Type regedit and click OK button to open Windows Registry Editor.
Step 2. Navigate the entries and locate StorageDevicePolices via: Computer\HKEY_LOCAL_MACHINE\SYSTEM\CurrentControlSet\Control\StorageDevicePolicies.
Step 3. Double-click the «WriteProtect» key and change its value from 1 to 0.
Solution #4: Repartition the hard drive
Since the volume you want to run disk checking is write-protected, you can simply remove it and recreate a new one. In case all volumes on the hard drive are in the same status, you can simply repartition the hard drive. The disk repartitioning process removes all current partitions and creates new ones. Moreover, it will format all newly created partitions. Therefore, you will lose all files on the hard drive. If you want to keep files, then backup files in advance. DiskGenius provides the function «Quick Partition» which is able to repartition a disk rapidly and easily.
Step 1. Launch DiskGenius Free Edition, select the hard drive you want to clear write protection, and click Quick Partition button.
Step 2. Set partition table type to either MBR or GUID and select the number of partitions to be created. Then click «OK» button.

Step 3. Click «Yes» to start the repartition task.
Solution #5: Check and Repair Bad Sectors for the Drive
DiskGenius Free Edition is a good alternative to check and repair bad sectors on hard drive and USB drive when Windows disk checking cannot run. Let’s get to know how to check bad sectors with DiskGenius.
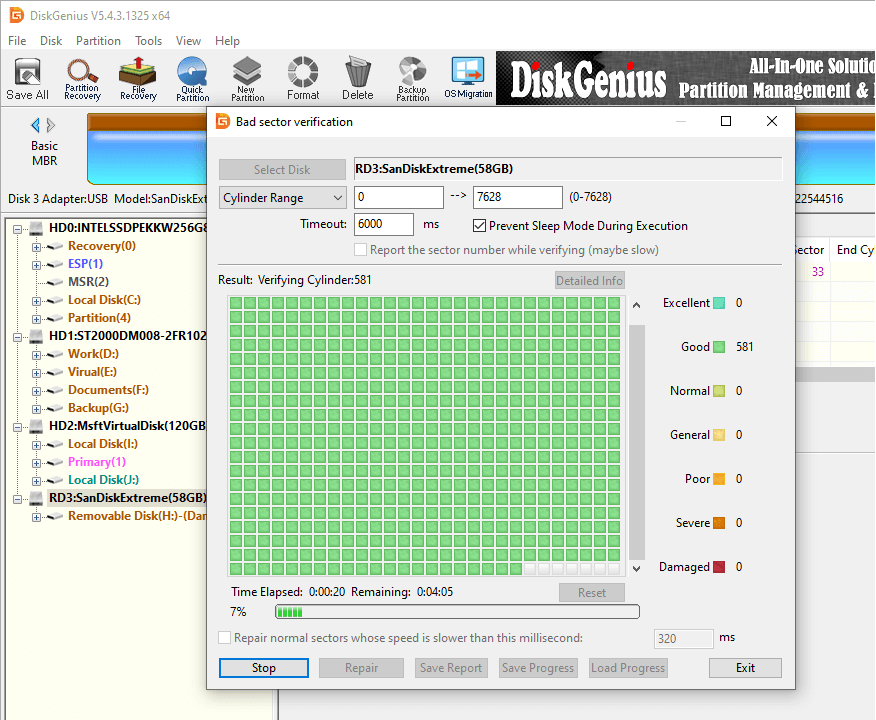
Step 1. Run DiskGenius, select the drive you want to check bad sectors and click Disk > Verify Or Repair Bad Sectors.
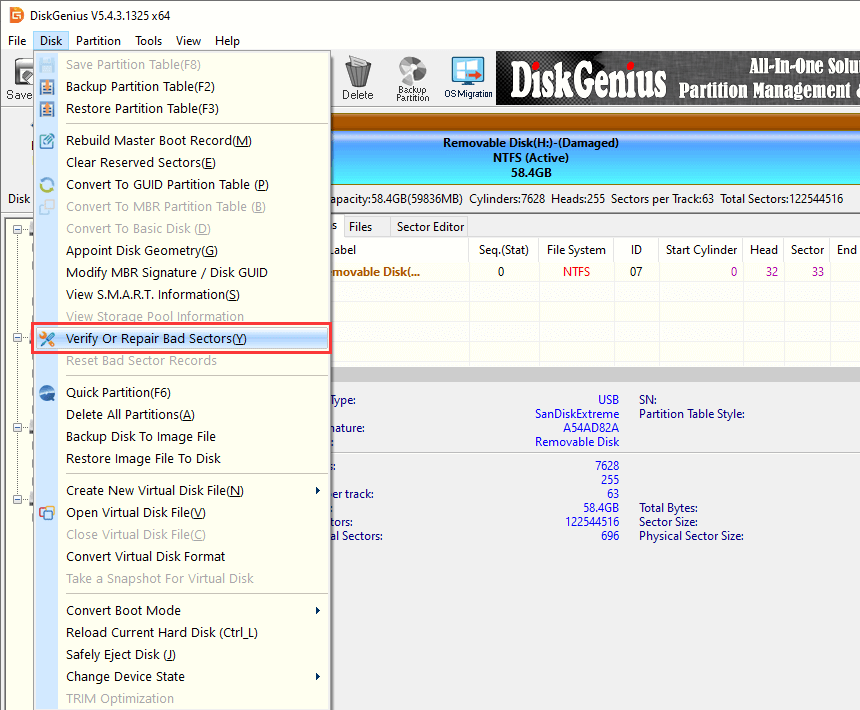
Step 2. Click «Start Verify» button and the software starts to scan the disk.
The above are five effective ways of removing write protecting on hard drives and USB drives. Most often, the error «Windows cannot run disk checking on this volume because it is write protected» will be fixed by one of the solutions. If disk checking still cannot on the disk, you will have to pay attention whether the disk is physically damaged. When the storage device is corrupted due to hardware damages, it is hard to repair it with certain software, and you need to send it to a professional repair center or the manufacturer of the hard drive.
As end users, undoubtedly, we are more concerned about files stored on the disk instead of the disk itself. Hence, it is important to know how to retrieve files from hard drives or USB drives that are write-protected, corrupted or even formatted. When it comes to data recovery, DiskGenius will be a good assistant, for it supports to perform RAW drive recovery, format recovery, deleted file recovery, lost partition recovery and so on.
How to Recover Files from Write-Protected or Corrupted Hard Drive?
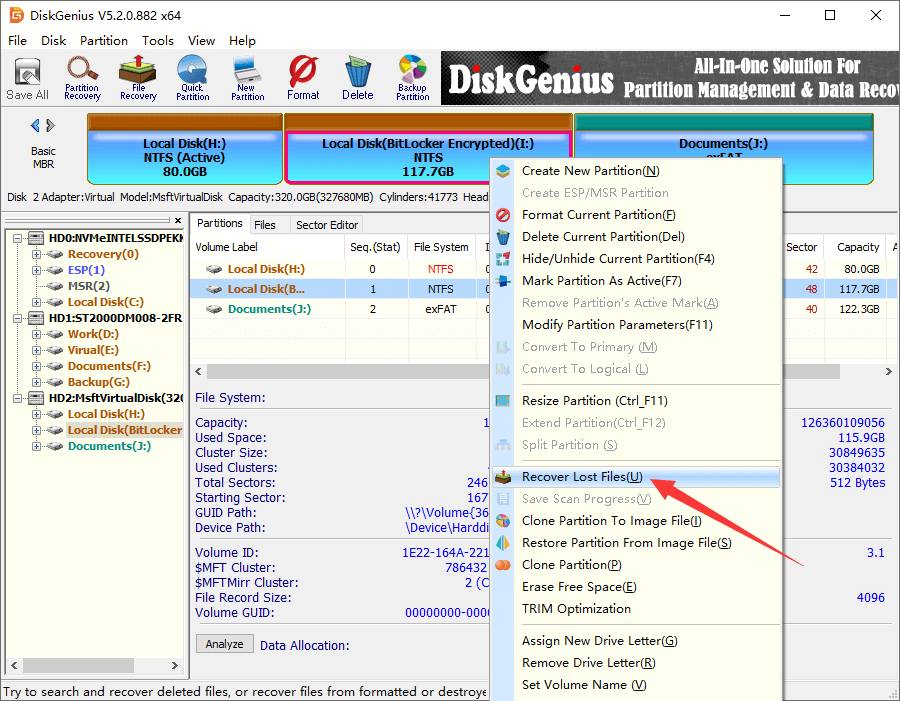
Step 1. Download and install DiskGenius on your computer. Right-click on the volume where you want to restore data and choose «Recover Lost Files».
Tip: It is possible that all files of this volume are displayed in DiskGenius after the software is launched. In that case, you can begin copying files to another drive directly without performing rest steps.
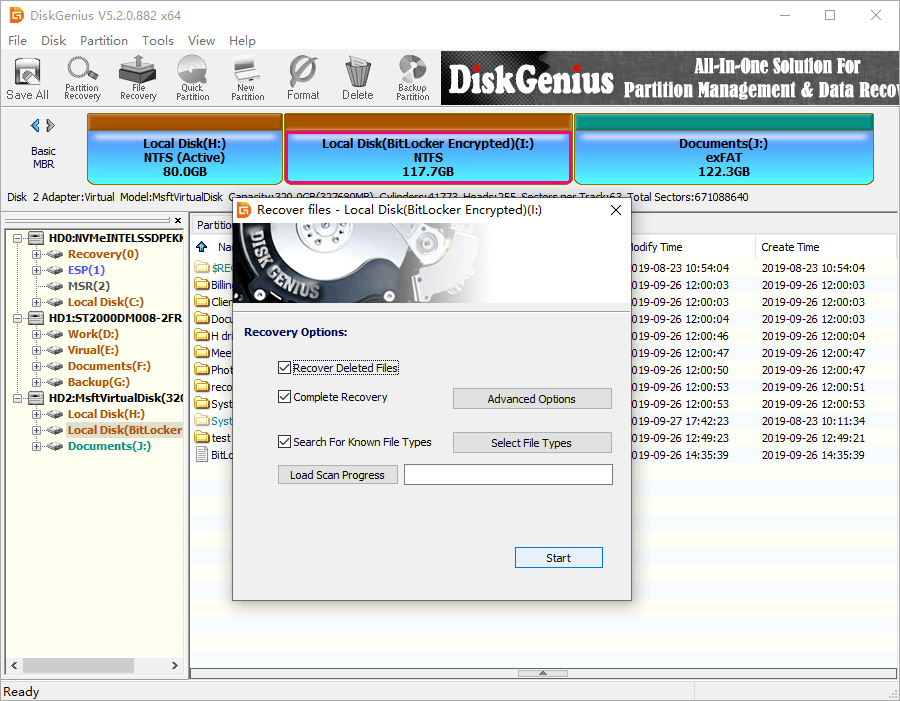
Step 2. Click «Start» button to let the software scan the selected disk area and look for lost files.
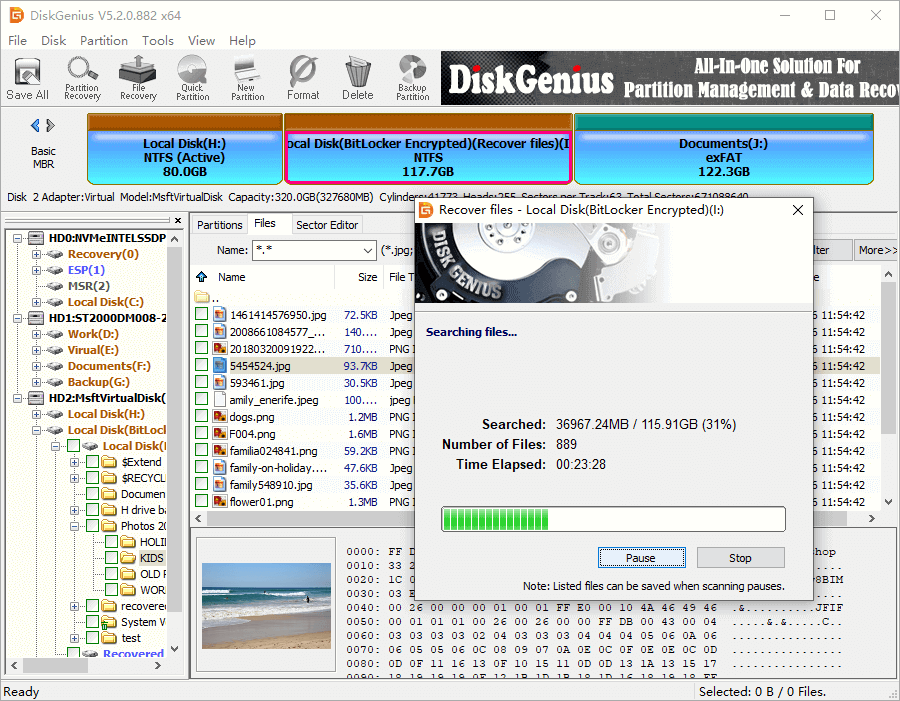
The scanning process may take a while if the capacity to be scanned is very large or the disk has bad sectors. Anyway, what you need to do is just waiting with patience.
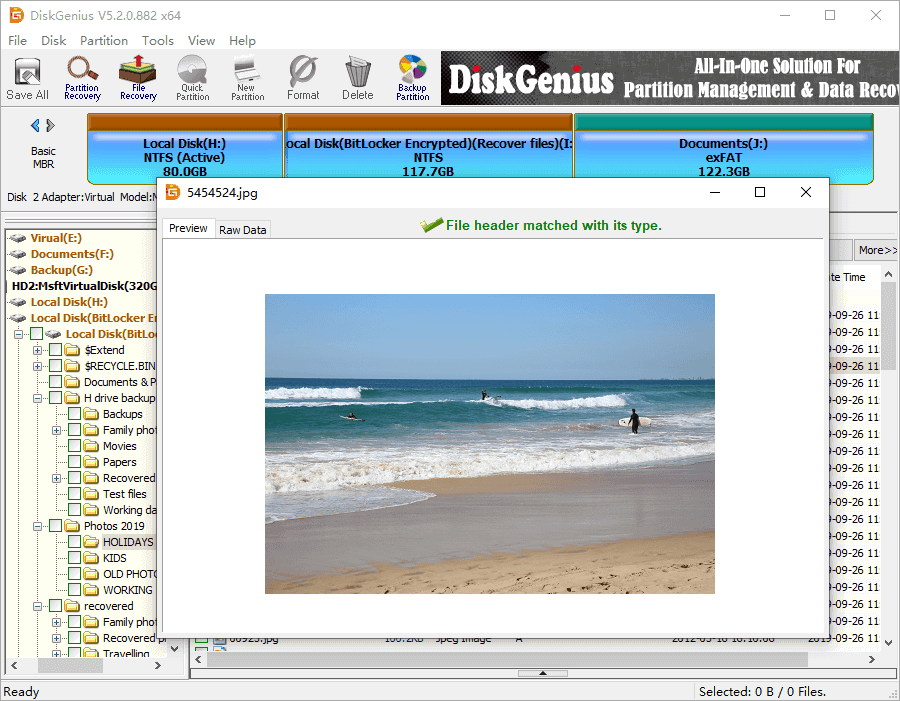
Step 3. Preview files to check recovery quality.
Once the scanning completes, you can preview files (double-clicking a file opens the preview window) and check if files to be recovered are correct. File preview helps to evaluate whether files are corrupted prior to final recovery.
Step 4. Register the software and copy lost files to another drive.
By way of file preview, you have a clear understanding of the recovery quality. If you are satisfied with the scanning result, then register the software with a license key and start copying files.

FAQs regarding cannot run disk checking
1. How do I run chkdsk on write protected?
Users are not allowed to perform write-related action to the write-protected drive, to run chkdsk on such drives, you need to remove write protection first. A couple of methods can remove the protection for you, just refer to solutions described above.
2. Can’t run chkdsk because drive is locked?
To run chkdsk successful, you just need to unlock the drive. First, restart computer to refresh the Windows operating system, and then run command «chkdsk E: /f /r /x» in Command Prompt.
3. How do you fix Windows can’t check the disk while it’s in use?
The error «chkdsk cannot run because the volume is in use by another process» tends to appear when the device you want to run disk checking is used by other program. To get rid of the error, you can try running chkdsk in Windows PE. With the help of DiskGenius Free edition, you can easily reboot to WinPE from Windows.
4. How do I unprotect my hard drive?
Write protection prevents hard drive from being erased or written, and the feature can be enabled by users manually or by virus. To unprotect hard drive and other USB drives, you can try these solutions:
- Use DiskGenius to remove read-only attribute
- Execute «attributes disk clear readonly» command with Diskpart
- Remove write protection in Registry Editor
5. How do I fix Diskpart failed to clear disk attributes?
The error «Diskpart failed to clear disk attributes» appears in Command Prompt when the command «Attribute disk clear readonly» fails to remove the write protection on the selected disk. Refer to this guide to fix the error: Six Solutions to DiskPart Virtual Disk Service Error
Conclusion
A variety of reasons can give write to the error «Windows cannot run disk checking on this volume because it is write protected», and we need to try different solutions to get it fixed. Since some of the solutions will cause data loss, it is highly recommended to create backups or perform data recovery in advance. Should you need any help on hard drive data recovery, feel free to contact our technical support team.
Quick links
- Fix «Windows Was Unable to Complete the Format» in Windows 10/8/7
- Fixed: You Need to Format the Disk in Drive Before You Can Use It
- How To Fix «The Disk Is Write Protected» Error on USB Drives?
- The Type of The File System Is RAW. CHKDSK Is Not Available for RAW Drives
Когда ваш том/диск поврежден или переведен в режим только для чтения,
возникает ошибка
«Windows не удается запустить проверку диска, так как он защищен от
записи».
CHKDSK – это служба командной строки в Windows, которая позволяет вам
выполнять поиск поврежденных секторов и проверять целостность системных
файлов, хранящихся на вашем диске. При запуске утилиты иногда может появляться
сообщение об ошибке, указывающее на то, что диск поврежден или защищен от
записи. Если один из ваших дисков защищен от записи, это означает, что вы не
сможете изменять файлы или удалять их с диска. Проще говоря, функция защиты от
записи показывает, что файлы на диске доступны только для чтения. В этом
руководстве вы узнаете о методах устранения проблемы, из-за которой Windows не
удается запустить проверку диска.
Часть 1. Почему возникает сообщение: «Windows не удается запустить проверку
диска, так как он защищен от записи?»
Хорошей иллюстрацией может служить защита от записи на USB-накопителях и
SD-картах, с которой сталкиваются многие, и это не позволяет скопировать
содержимое накопителя на рабочий стол или наоборот. Можно с уверенностью
сказать, что каждый время от времени сталкивается с этой ошибкой, которая,
как правило, вызвана тем, что:
-
Включена защита от записи на диске. Если ваш диск настроен только для
чтения, из-за ограничения разрешений появится сообщение об ошибке – «Не
удается запустить проверку диска, так как он защищен от записи». -
Неисправен диск. Ваш диск может стать неисправным или повредиться в
результате системной ошибки или неисправного системного файла.
Часть 2: Как исправить проблему: «Windows не удается запустить проверку
диска, так как он защищен от записи?»
Способ 1. Снимите защиту от записи с помощью командной строки
PRAM расшифровывается как Parameter Random Access Memory, то есть это вид
оперативной памяти, в которой хранятся такие параметры, как конфигурация
системы, настройки дисплея, конфигурация жесткого диска и т.д. Аналогично
устройство NVRAM (Энергозависимая память), дисплея и других постоянных
системных компонентов. Вы можете сбросить настройки PRAM и NVRAM в 3 простых
шага.
Изначально нужно сказать, что ошибка может быть устранена с помощью
отдельной инструкции для chkdsk. Это рекомендация службы поддержки
Microsoft, так что попробовать, безусловно, стоит. Что вы должны сделать,
так это:
-
Запустите командную строку с правами администратора, нажав Win + X и
затем выбрав в меню пункт Командная строка. -
Когда она откроется, введите следующее: Chkdsk D: /f /r /x
-
Нажмите кнопку выключения, чтобы выключить ваш компьютер.
«D» означает неисправный диск, замените его по мере необходимости.
Параметры означают следующее:
- Параметр /f сканирует ваш диск на наличие ошибок и пытается их устранить.
-
Параметр /r проверит ваш диск на наличие поврежденных секторов и
восстановит их -
Параметр /x отключает ваш диск, что означает, что если ваш диск в данный
момент используется, то он будет недоступен до завершения процесса.
Стоит отметить, что некоторые пользователи сообщали, что их проблема не
устранялась даже после этих действий, так что в этом случае вам нужно будет
попробовать другие решения, перечисленные ниже.
Способ 2. Снимите защиту от записи с помощью Diskpart
DiskPart – это утилита командной строки для создания разделов на вашем
жестком диске. Ее можно использовать для изменения свойств диска, что мы и
сделаем. Вот как ее использовать:
-
Перейдите в меню «Пуск» и введите «diskpart».
-
Как только утилита загрузится, введите: List volume
-
Просмотрите список томов на вашем жестком диске и введите: Select volume
# -
Все, что вам нужно сделать, это заменить # буквой вашего диска.
-
После этого введите: Attributes disk clear read-only
-
Дождитесь завершения
Способ 3: Снимите защиту от записи в редакторе реестра
Если утилита от Microsoft не помогла, вы можете попробовать снять защиту от
записи через реестр Windows. Ошибки в реестре Windows могут вызвать
серьезные проблемы, поэтому обязательно внимательно следуйте инструкции. Вот
что вам следует сделать:
-
Откройте «Выполнить», нажав комбинацию клавиш Win + R.
-
Введите Regedit.
-
Как только реестр Windows откроется, скопируйте и вставьте следующее:
HKEY_LOCAL_MACHINE\SYSTEM\CurrentControlSet\Control\StorageDevicePolicies -
Измените значение параметра ‘WriteProtect’ с 1 на 0, дважды щелкнув по
нему.
Если вы не можете найти папку StorageDevicePolicies в вашем реестре Windows,
тогда сделайте следующее:
-
Скопируйте и вставьте данный путь в адресную строку:
HKEY_LOCAL_MACHINE\SYSTEM\CurrentControlSet\Control -
Щелкните правой кнопкой мыши на средней панели и выберите Создать >
Раздел. -
Будет сформирована новая папка под названием «StorageDevicePolicies».
Убедитесь, что вы не ошиблись в написании названия. -
Далее выберите только что созданную папку, щелкните правой кнопкой мыши
на средней панели и выберите «Параметр DWORD (32 бита)». -
Присвойте ему имя WriteProtect и измените значение на 0.
Способ 4: Сканирование диска на наличие повреждений
Последнее, что вы можете сделать, чтобы устранить ошибку «Не удается
запустить проверку диска с защитой от записи», – это проверить ваш жесткий
диск на наличие поврежденных файлов. Вот как это сделать:
-
Кликните на иконку «Этот компьютер».
-
Выберите пункт «Свойства» в контекстном меню, щелкнув правой кнопкой
мыши по неисправному диску. -
Перейдите на вкладку «Сервис».
-
Когда вы окажетесь там, выберите опцию «Выполнить проверку».
-
При появлении диалогового окна «Контроль учетных записей» выберите “Да”.
-
Дождитесь завершения сканирования.
Способ 5. Восстановите файлы с жесткого диска и отформатируйте его (Hot)
В цифровой среде потеря данных неизбежна. Очень просто непреднамеренно
удалить важную информацию, а после начать беспокоиться о том, как
восстановить эти файлы
Tenorshare 4DDiG Data Recovery
– это ваш лучший вариант для восстановления всех потерянных данных на
компьютерах Windows / Mac в результате сбоя, случайного удаления,
форматирования, а также при
-
проблеме «Windows не удалось запустить проверку диска, так как он защищен
от записи». И результат вас не разочарует.4DDiG поддерживает более 1000
форматов файлов, включая NTFS, FAT, APFS, HFS+, HFS X и другие. -
4DDiG может извлекать данные с любого носителя, включая USB-накопители,
жесткие диски, карты памяти и так далее. -
Данные будут восстановлены полностью с использованием запатентованной
технологии с сохранением исходного формата и размера. -
Быстрое сканирование предоставляет бесплатный предварительный просмотр,
после чего вы сможете в один момент вернуть свои удаленные файлы. - 4DDiG гарантирует 100%-ую защиту файлов от перезаписи.
-
Выберите локальный диск
Как только установка Tenorshare
4DDiG Windows Data Recovery будет завершена, вы увидите начальный экран.
Чтобы отформатировать защищенный диск для последующего извлечения
данных, выберите диск и нажмите «Сканировать». -
Сканирование жесткого диска
DDiG мгновенно просканирует
выбранный вами жесткий диск на наличие потерянных данных. В процессе
обнаружения удаленных файлов 4DDiG выведет оцифрованные копии на вкладке
«Просмотр» и «Просмотр файлов». В нижней части экрана можно видеть
прогресс. Вы также можете подождать или остановить сканирование в любое
время, особенно если вы обнаружили файлы, которые хотите восстановить.После этого вы можете увидеть файлы, которые были обнаружены. Если вы не
нашли нужные данные, вы можете выполнить глубокое сканирование (кнопка в
нижней части интерфейса), это может занять некоторое время. -
Сначала просмотрите, а затем выберите файлы для восстановления
4DDiG имеет возможность предварительного просмотра многих типов
файлов перед их восстановлением. Вы можете выбрать нужные вам файлы по
категориям и просмотреть их для получения дополнительной информации, а
затем восстановить их, нажав на кнопку «Восстановить”. Когда вы нажмете
«Восстановить», появится диалоговое окно с запросом о том, куда вы
хотите восстановить файлы. Нажмите кнопку «ОК» после выбора желаемого,
но отличного от текущего, местоположения. Поздравляем! Ваш локальный
диск был восстановлен и теперь доступен для просмотра. Для избежания
перезаписи диска и необратимой потери данных, пожалуйста, никогда не
сохраняйте файлы в том же разделе, откуда они были утеряны.
Часто задаваемые вопросы (FAQs)
1. Как мне запустить chkdsk на диске с защитой от записи?
Когда вы увидите сообщение от CHKDSK /f: «диск защищен от записи», служба
поддержки Microsoft рекомендует попробовать другую команду для командной
строки: chkdsk / f / r / x. Например, Chkdsk F: /f /r / x, и нажмите
«Enter». Вы можете изменить букву «F» на другую букву диска.
2. Как исправить проблему: «Windows не может проверить диск, который в
данный момент используется?»
Если вы получили сообщение: «Windows не может проверить диск, который в
данный момент используется», вы можете либо нажать «Расписание проверки
диска», либо отменить сканирование. Мы рекомендуем запланировать проверку
диска и перезагрузить ваш компьютер. Когда он перезагрузится, у вас будет
всего 10 секунд, чтобы отменить операцию нажатием любой клавиши.
3. Как мне снять защиту с моего жесткого диска?
-
Выполните проверку диска. Вставьте загрузочный диск или USB-накопитель и
зайдите на рабочий стол. -
Проверьте системные файлы. Как и на первом этапе, загрузите компьютер с
диска или USB-накопителя. -
Выполните восстановление при запуске.
-
Выполните восстановление системы.
-
Перезагрузите компьютер.
4. Почему я не могу запустить Chkdsk?
Запустите командную строку от имени администратора. Запустите Chkdsk с
параметрами «/f» (исправление ошибок данных файловой системы) или «/r»
(исправление физических ошибок диска). Как вы увидите, результатом будет
«Chkdsk не может быть запущен, поскольку том используется другим процессом».
Chkdsk должна быть единственной программой, которая имеет доступ к диску для
его исправления. В сообщении об ошибке «том» – это просто другое обозначение
диска, или, точнее, раздела; «процесс» – это обозначение программы. Если у
другой программы есть доступ к файлу на диске, он считается «используемым»,
и Chkdsk не сможет получить прямой доступ, который ему требуется.
Заключение:
Решение зависит от того, почему вы столкнулись с проблемой «Windows не
удается запустить проверку диска, так как он защищен от записи». Мы обсудили
различные способы решения для снятия защиты от записи с помощью Chkdsk.
Причина ошибки «Windows не удается запустить проверку диска, так как он
защищен от записи» в Windows 10 довольно понятная. В результате ваши
действия сводятся к следующему: снимите защиту от записи или исправьте
ошибки файловой системы. Мы надеемся, что хотя бы один из описанных способов
поможет вам полностью восстановить неисправный жесткий диск. Тем не менее,4DDiG Data Recovery
– это рекомендуемый профессиональный инструмент, который поможет вам с
восстановлением ваших данных с поврежденного диска всего за несколько
простых шагов.
Александр Кокин (старший редактор)
Александр Кокин, главный редактор 4DDiG, занимается предоставлением наилучших решений для проблем, связанных с Windows и Mac, включая восстановление данных, ремонт, исправление ошибок.
Are you getting the ‘Windows cannot run disk checking on this volume because it is write protected’ error on your computer? Don’t worry, we have solutions for you to fix it, but first, let’s find out the reason behind it. It usually occurs because of the following reasons: damaged disks or drives attributed to read-only.
We can find out about the bad sectors in the drive using the CHKDSK command on the command line. If there is an issue with any file folder or drive on your PC, you will get the error and figure out which Drive is Write Protected or Corrupted. If you find an error, it means you cannot add new files to that drive or cannot make changes to already existing files.
Reasons for “Windows Cannot Run Disk Checking on this Volume Because It Is Write Protected” Error
One can also consider the write-protected status of the disk or drive as the read-only option. It means you have the read access only but cannot add files or make changes to the existing ones. There can be below possible reasons for this:
- The hard drive has the write protection tab. Check it for disk enclosure. If it is, switch this off.
- The partition file system is damaged or corrupted because of a virus or other reasons. Such a damaged file system can be a reason for the file to be read-only.
- The drive has the respective attribute as read-only. You might have done it unknowingly and be unaware of it.
These are some reasons Windows cannot run disk checking because it is written protected” if you face this CHKDSK error, let us discover how to fix it. In the upcoming section, you will learn various solutions to fix this issue.
Solutions to Fix “Windows Cannot Run Disk Checking on this Volume Because It Is Write Protected” Error
Below are the various solutions to fix the Write Protected Error. You can have a go on any of them as per your requirements.
Fix 1: Remove Write Protection Error using Diskpart
Using the Diskpart option, remove the write-protected mode from the disk. You need to follow the below steps on the command prompt.
Step 1: Type Windows key and search diskpart.
Step 2: Click on Yes in the notification prompt to open it.
Step 3: Once Diskpart opens, enter the following command –
list volume

Step 4: Type the below command:
Select volume <X>
Here, X represents the drive letter.

Step 5: Now type
“attributes disk clear readonly”
Then press Enter.
Step 6: “Disk attributes cleared successfully.” message will appear.
Also Read: Clean and Format Disk Using DiskPart On Windows 10
Fix 2: Use EaseUS CleanGenius
If you are not used to accessing the command line, using third party software can help you. EaseUS CleanGenius can help you resolve the WriteProtected Hard drive, USB, External Drive, or SD Card issues.
It provides a perfect alternative to the command line fixes for ‘cannot run chkdsk because it is write protected’ error. It offers a graphical-based solution for users unfamiliar with the command line.
Read the full review of EaseUS CleanGenius here.
Follow the below steps to use EaseUS CleanGenius and replace the above-given methods using the command line:
Step 1: Download EaseUS CleanGenius from the download button given below and finish the installation.
Step 2: Launch EaseUS CleanGenius. Select the Optimization from the left toolbar and click on the Write Protection option.
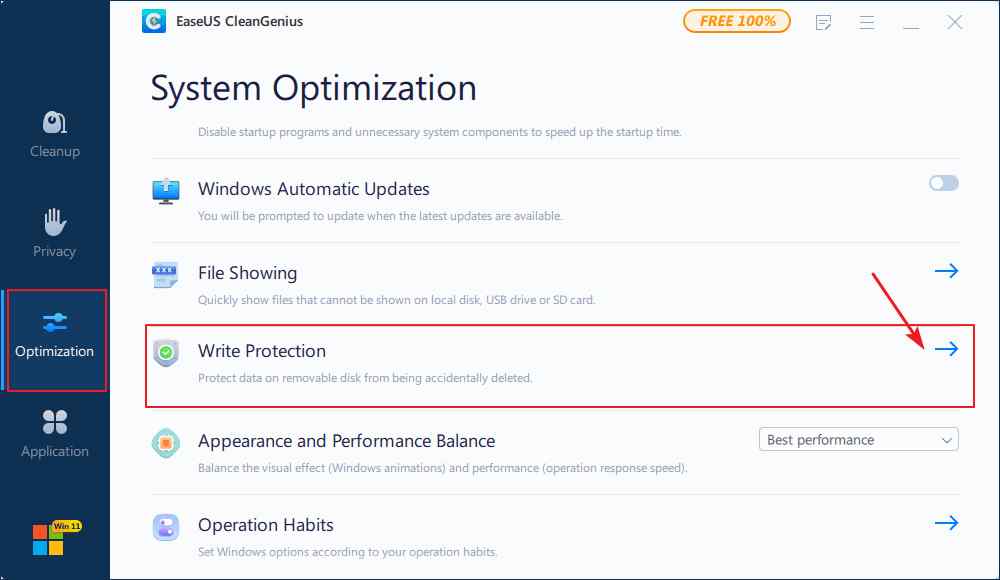
Step 3: Select the device or the drive that is Write Protected, and click on disable the option to remove it.

That’s it! EaseUS CleanGenius makes your tedious job of fixing the error easy in 2 steps.
Fix 3: Fix the CHKDSK error in the CMD
If the previous method does not work for you, you can try this method.
Step 1: Press the Windows key and search CMD in the search bar.
Step 2: Open the command prompt with the Run as administrator option.
Step 3: Run the below command:
Chkdsk F:/f/r/x
Here you can replace F with the drive letter in your PC, USB drive, or SD card.

The above steps will unmount the drive or disk you entered in place of F and remove the write protection mode. As a result, the error saying “Windows cannot run disk checking on this volume because it is write protected” will get resolved.
In case the error still materializes, try other methods.
Fix 4: Modify Attribute using Registry
If the above two methods do not work, use Windows Registry to remove the “Windows cannot run disk checking because it is write protected” error. Follow the below steps to perform the same.
Note: Follow the steps carefully as Windows Registry may cause critical issues, such as losing important data or complete system failure. Also, remember to take a backup of all the important data you need before proceeding with the steps. Open Registry Editor, click on File>Export and select a safe location to save this file. If things go wrong, you can always import the .reg backup, (Open Registry Editor, click on File>Import, and select the previously saved file.)
Step 1: Press keys Windows + R. Run window will open.
Step 2: Type regedit in Run to open the Registry Editor window.

Step 3: Enter the below address in the address bar:
HKEY_LOCAL_MACHINE\SYSTEM\CurrentControlSet\Control\StorageDevicePolicies.
Step 4: Double-click on the WriteProtect key and update its value from 1 to 0.
In case the StorageDevicePolicies folder is not present, follow the below steps:
Step 1: Open the Registry editor window and paste the below address in the location bar:
HKEY_LOCAL_MACHINE\SYSTEM\CurrentControlSet\Control
Step 2: In the Mid Pane, right-click and select the options New > Key.

Step3: A new folder will be created with the name StorageDevicePolicies.
Step4: Highlight the new folder just created. Again, right-click in the Mid Pane, and select the option DWORD (32-bit) Value.
Step5: Rename it as WriteProtect and set its value as 0.
Fix 5: Format the Write Protected Volume
There are different ways to format a hard drive. You can follow any method or go for the steps written below:
Step 1: Open the folder named This PC.
Step 2: Right-click on the drive you want to format.
Step 3: Select the Format option.
Step 4: On the Format window, set the options and click on Start.
Fix 6: Scan the drive to check if it is corrupted
If the above methods do not work for you, you can go for the below ones:
Follow the steps to go ahead with this method:
Step 1: Open the folder called This PC on your PC.
Step 2: Right-click on the drive causing the problem and choose the Properties option from the menu thus opened.
Step 3: Select the Tool tab, and click on the Check button.
Step 4: Click Yes if the dialogue appears. Wait so that the scan completes.
Frequently Asked Questions –
Q1. How do you fix “Windows cannot run disk checking on this volume because it is write protected”?
This article discusses several solutions, such as using registry, diskpart using cmd, or formatting the drive. You can implement any of these methods to fix this error.
Q2. How do I run chkdsk if the disk is write-protected?
If the disk is write-protected and you run chkdsk, you will get the error “Windows cannot run disk checking on this volume because it is write protected.”
Q3. I cannot run chkdsk because the drive is locked. What does it mean?
Drive is locked implies that you have no access to the drive. In such a case, if you run the chkdsk command, you will get the write-protected error saying “cannot run chkdsk because it is write protected”.
Q4. How do I remove write protection from the command prompt?
To remove the write protection using a command prompt, follow the below steps:
Step1: Open the command prompt as an administrator.
Step2: Run the below command:
Chkdsk F:/f/r/x
Note: Write the drive causing the problem in place of the letter F.
Also Read : Common Windows 11 Problems and Ways To Fix Them
Conclusion –
CHKDSK error is a common error that can occur due to many reasons, as discussed in this article. You need first to check the cause of the error in your PC and try the solution accordingly to fix it. We have discussed various solutions to fix this.
If you are not comfortable using the command prompt solutions, use EaseUS CleanGenius. As it offers a quick solution to the problem.
We hope the article was helpful to you in resolving the CHKDSK error. We would like to know your views on this post to make it more useful. Your suggestions and comments are welcome in the comment section below. Share the information with your friends and others by sharing the article on social media.
We love to hear from you!
We are on Facebook, Twitter, Instagram, and YouTube. Please let us know of any queries or suggestions in the comments section below. We love to get back to you with a solution. We regularly post tips and tricks and answers to common issues related to technology.
Related Topics –
How To Clean Junk Files With Advanced PC Cleanup
How To Recover Deleted Restore Points In Windows 11/10