
Настройка безопасности препятствует загрузке этого драйвера — решение
При установке драйвера или программы, устанавливающей свои драйверы на компьютере с Windows 11 или 10 вы можете получить сообщение об ошибке в окне «Помощник по совместимости» — «Невозможно загрузить драйвер на это устройство. Настройка безопасности препятствует загрузке этого драйвера».
В этой инструкции о том, чем вызвано такое сообщение, как исправить ситуацию и установить драйвер, если это необходимо.
Почему невозможно загрузить драйвер на это устройство и как это исправить

В большинстве случаев рассматриваемое сообщение «Невозможно загрузить драйвер на это устройство» появляется при установке неподписанных драйверов, когда вы уже отключили проверку цифровой подписи драйверов, при этом устанавливаемый драйвер не совместим с ещё одной функцией безопасности Windows 11/10 — «Целостность памяти». Возможные варианты решения:
- Найти другой, более новый, в идеале — подписанный, драйвер этого устройства
- Отключить функцию «Целостность памяти» в параметрах изоляции ядра Microsoft Defender
Первый способ не всегда подходит: для некоторых устройств набор драйверов ограничен. В этом случае придётся выполнить отключение соответствующей функции защиты, для этого:
- Откройте окно «Безопасность Windows» используя значок Microsoft Defender в области уведомлений, поиск в панели задач или «Параметры».
- Перейдите в раздел «Безопасность устройства» и нажмите «Сведения об изоляции ядра».

- Отключите опцию «Целостность памяти», подтвердите отключение и перезагрузите компьютер.
- Повторно установите требуемый драйвер или ПО, которое его устанавливает — сообщение «Невозможно загрузить драйвер на это устройство» не должно появиться.


Учитывайте, что описанное действие отключает одну из функций безопасности Windows 11/10 и, если в дальнейшем вам потребуется её включить, вы можете увидеть сообщение о том, что не удается включить функцию целостности памяти. Решением будет удаление несовместимых драйверов, подробнее на тему в отдельной инструкции: Как устранить несовместимость драйверов с функцией «Целостность памяти».
Надеюсь, инструкция была полезной. Если у вас остались вопросы на тему, вы можете задать их в комментариях к статье ниже, я постараюсь помочь.
Windows 10/11 won’t install drivers is a common issue and many users are bothered by it. MiniTool Software collects some methods that are proved to be effective and shows them in this article. You can select a suitable method to help you solve the issue.
Windows 10/11 Won’t Install Drivers on PC
The device drivers are very important parts of a computer. When you want to use a device on your PC, you need to make sure the device driver is properly installed and you’d better keep it up-to-date. However, some users report that Windows 10/11 won’t install drivers on their computers. For example, they receive the error message saying cannot complete the device driver installation wizard during the installation process.
This problem will affect your normal use of the computer device. So, you need to take active measures to solve the issue.
Well then, what should you do when you are unable to install drivers on Windows 10/11? You can use the Windows built-in troubleshooter to find and fix errors. You can also run a DISM and SFC scan to fix the issue. Besides, you can update the device driver or clean boot your device to have a try. If all of the fixes don’t work for you, you will need to reset your computer.
In this article, we will show you how to use these methods to solve the issue. We will also show you how to use the best free data recovery software to help you recover your missing files on a Windows computer.
MiniTool Power Data Recovery FreeClick to Download100%Clean & Safe
How to Fix: Windows 10/11 Won’t Install Drivers
- Fix 1: Run the Hardware and Device Troubleshooter
- Fix 2: Update the Device Driver
- Fix 3: Run DISM and SFC
- Fix 4: Clean Boot Your Computer
- Fix 5: Reset Your PC
Fix 1: Run the Hardware and Device Troubleshooter
Windows has a built-in tool that can help you solve the device driver issue. It is a hardware and device troubleshooter. This tool is available on both Windows 11 and Windows 10. You can open it via Control Panel. Yes, Control Panel is still available on Windows 11.
Way 1: Run the Hardware and Device Troubleshooter via Control Panel
- Click the search icon from the taskbar and search for control panel.
- Select Control Panel from the search result to open it.
- Expand View by and select Large icons.
- Click Troubleshooting to continue.
- Click View all from the left panel.
- Click Hardware and Devices.
- Click Advanced.
- Click Run as Administrator.
- Click Next to run this tool.
This tool can automatically find and fix found errors on the devices. You should wait until the whole process ends.
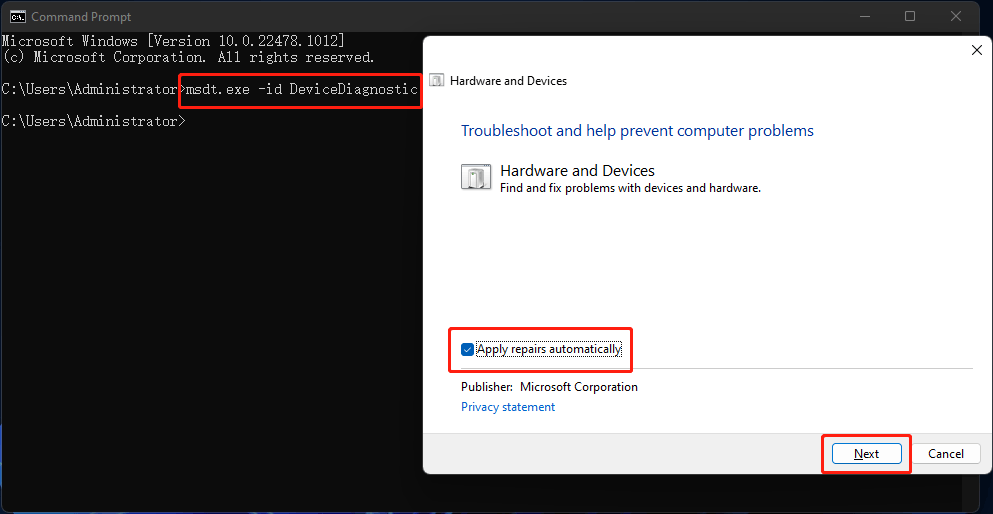
Way 2: Run the Hardware and Device Troubleshooter via Command Prompt
If you can’t find the hardware and devices troubleshooter via Control Panel, you can use Command Prompt instead. Here is a guide:
- Click the search icon from the taskbar and type cmd.
- Select Command Prompt from the search result to open it.
- Type exe -id DeviceDiagnostic into Command Prompt and press Enter.
- The Hardware and Devices troubleshooter will open. You can click Advanced to make sure Apply repairs automatically is selected.
- Click Next to run this tool. This tool will begin to detect problems. You should wait until the process ends. If necessary, you need to follow the on-screen guide to complete the fix. For example, you may need to restart your computer to finish installing drivers and updates.
After running this tool, you can go to check if your needed device drivers are installed successfully.
Fix 2: Update the Device Driver
If you can’t install the device driver on your computer, you can update it to have a try. This can also fix the missing, broken, or outdated device driver. It is easy to do this:
- Right-click on Start and select Device Manager.
- Find the target device and right-click it.
- Select Update driver.
- On the pop-up page, click Search automatically for drivers to search for the best available driver and install it on your computer.
Fix 3: Run DISM and SFC
At times, the issues of Windows 10/11 won’t install drivers are caused by missing or corrupted system files. You can run DISM (inbox Deployment Image Servicing and Management) and SFC (System File Checker) in Command Prompt to repair the system files.
Here is what you can do:
1. Click the search icon from the taskbar and search for cmd.
2. Right-click Command Prompt from the search result and select Run as administrator.
3. Type the following commands one by one and press Enter after each.
- DISM /Online /Cleanup-Image /ScanHealth
- DISM /Online /Cleanup-Image /CheckHealth
- DISM /Online /Cleanup-Image /RestoreHealth
4. After running DISM completely, you need to type sfc /scannow and press Enter to run SFC on your device. This tool can scan your Windows OS and then restore your missing & corrupted system files. You should wait until the process is 100% completed.
Fix 4: Clean Boot Your Computer
Software conflicts can also cause driver installation issues like Windows 10/11 won’t install drivers. It is impossible to uninstall all software from your computer. But this doesn’t mean that you can’t solve this issue. You can clean boot your computer and then find out if it is a software conflict issue. If yes, you can take further steps to find the culprit.
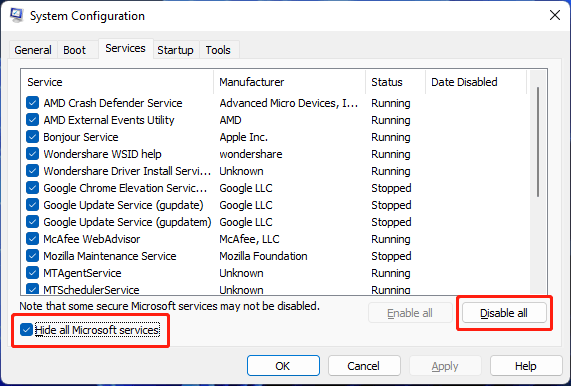
How to Clean Boot Your Windows 10/11 Computer?
1. Click the search icon from the taskbar.
2. Type msconfig into the search box.
3. Click System Configuration from the search result to open it.
4. On the System Configuration interface, you need to check the option of Hide all Microsoft services. This can make sure that all the Microsoft services are still running after you clean boot your Windows 10/11 computer.
5. Click the Disable all button to continue.
6. Switch to the Startup section.
7. Click the Open Task Manager link.
8. On Task Manager, you can select the startup program that may interface with your system and then click the Disable Then, repeat this step to disable all the suspected programs.
9. Close Task Manager.
10. Close System Configuration.
11. Restart your computer.
12. Check if you can install your needed device driver. If you can, it means that third-party software prevents you from installing device drivers. To find out which is the cause, you can repeat step 1 to step 5 but enable half of the listed services. The recently installed software should be considered. You can try this way until you find the culprit.
If Windows 10/11 still won’t install drivers, the next fix may help you.
Fix 5: Reset Your PC
If you can’t use the above methods to solve the device driver installation issue, you may need to reset your PC. To protect your files on the computer, you’d better back up your device before resetting your PC. In this part, we will show you a full guide on how to reset your PC.
Step 1: Back up Your Computer
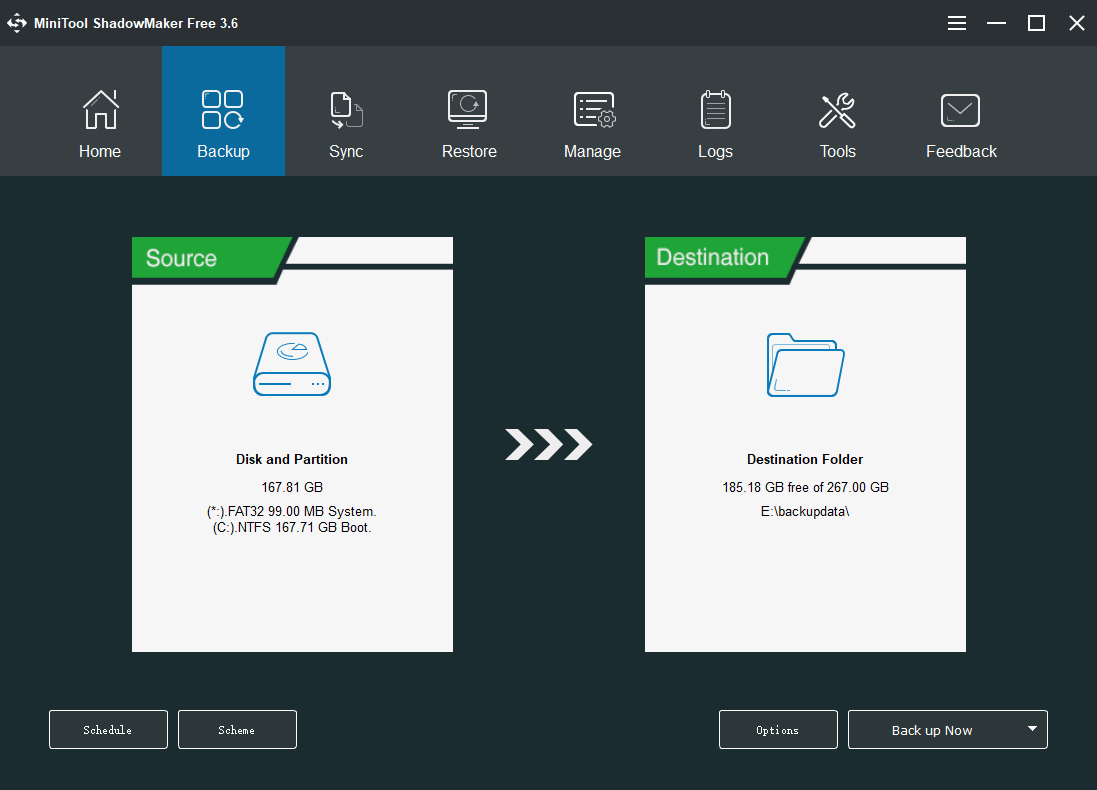
You can use MiniTool ShadowMaker, a professional Windows backup software, to back up your files, folders, partitions, disks, and systems. This software supports automatic backup, differential and incremental backup. With it, you can also schedule a backup based on your requirements.
This software has a trial edition. You can use it for free within 30 days. If you want to try it, you can click the following button to download and install it on your device. It works on all versions of Windows, including Windows 11, Windows 10, Windows 8.1/8, and Windows 7.
MiniTool ShadowMaker TrialClick to Download100%Clean & Safe
After the installation, you can open this software, switch to the Backup section, and select the disk or partition, files or folders to backup.
After backing up your computer, you can feel free to reset your PC.
Step 2: Reset Your Computer
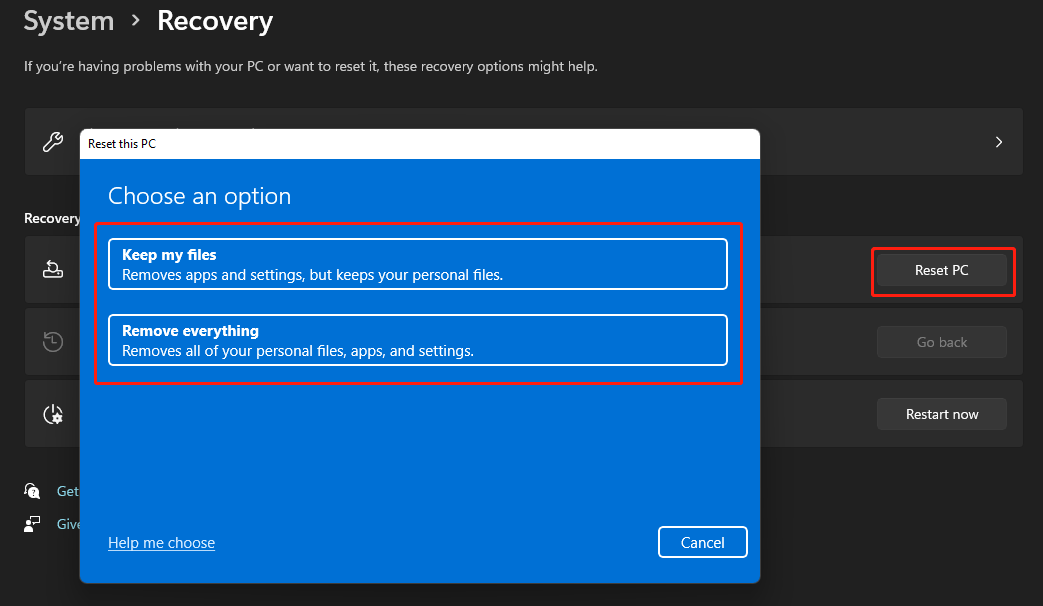
- Click the Start button from the taskbar.
- Go to Settings > System > Recovery.
- Under the Recovery options section, you need to click the Reset PC button to continue.
- On the pop-up page, click Keep my files or Remove everything based on your situation to continue.
- On the next page, click Cloud download or Local reinstall based on your requirements to continue.
- Follow the on-screen instructions to reset your PC.
Step 3: Recover Your Lost Files if There Is No Available Backup
When you use your Windows computer, some of your files may get deleted or lost by mistake. For example, your files are removed accidentally after you reset your computer and you want to get them back. In this situation, you can use professional data recovery software to get them back.
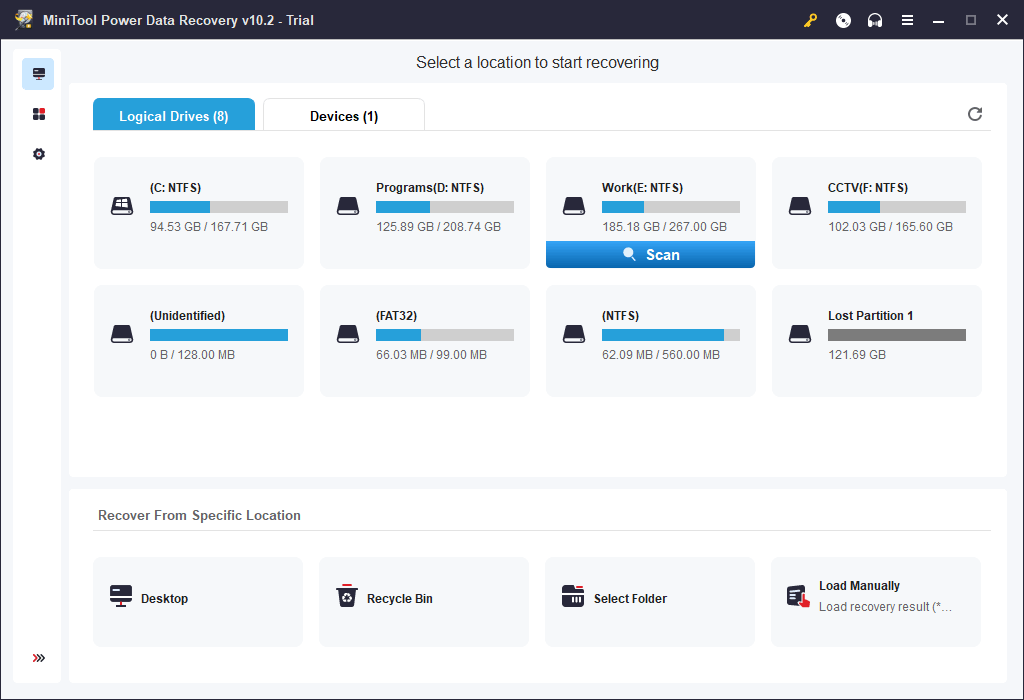
MiniTool Power Data Recovery is a professional data recovery tool for Windows. It can be used to recover pictures, documents, videos, movies, music files, and more from all kinds of data storage devices like hard drives, SSDs, memory cards, SD cards, USB flash drives, etc.
Tip: No matter which data recovery software you are using, it can only recover deleted and lost files that are not overwritten by new data.
This software also has a trial edition. You can use it to scan the drive you want to recover data from. Then, you can see if it can find your needed files. If yes and you want to recover them, you can use a full edition to do this.
MiniTool Power Data Recovery TrialClick to Download100%Clean & Safe
After downloading and installing this software on your PC, you can follow this guide to rescue your files:
- Open the software to enter its main interface.
- This software shows you all the available partitions under Logical Drives. You can hover over the target partition and click the Scan button to start scanning it. If you want to directly scan the whole disk, you need to switch to the Devices section and select the target drive to scan.
- When the scanning process ends, you can see the scan results. You can check if your needed files are there. To recover them, you need to upgrade this software to a full edition. Then, you can select all your needed files and click the Save button to select a suitable location to save them. When selecting the destination folder, you should not select the original location. Otherwise, the deleted files might be overwritten and become unrecoverable.
Although there is a chance to recover your lost data, you’d better form a good habit of regularly backing up files in case the lost files are overwritten.
Unable to Install Drivers on Windows 10/11
If you can’t install drivers on your Windows 10/11 computer, you can just try the methods mentioned in this article to help you out. You should find a suitable method here. In addition, if you want to recover deleted files on your computer, you can try the software introduced in this blog.
Should you have any other related issues, you can let us know in the comments. You can also contact us via [email protected].
Quick Tips
- Download and copy the necessary drivers to the USB.
- Use the 32-bit version of Windows 11/10 as a temporary fix.
- Use Diskpart to change the disk format from MBR to GPT.
Preliminary Fixes
- Check/Switch the USB Ports: One common cause of this error is the USB port being used. Some USB ports may not be compatible with the installation process, especially if they are USB 3.0 ports. Check and fix it.
- Check the USB Drive on Another System: Sometimes, the issue might be with the USB drive itself. Verifying the USB drive on another system can help determine if the drive is faulty or if the installation media is corrupted.
Method 1: Disable CSM and Secure Boot
CSM and Secure Boot features can interfere with the installations, so you must disable them using the BIOS settings. You can install Windows 11 without Secure Boot if you have TPM 2.0 and UEFI on your PC. Here’s how to disable Secure Boot in the BIOS:
Step 1: Restart your PC.
Step 2: Press the designated F-key (usually the F2 or Esc key) to access the BIOS.
You need to check the key assigned by the PC manufacturer to access the BIOS.
Step 3: After you enter the BIOS, switch to the Security tab.
Note: Your PC’s BIOS option may differ. Look for the Secure Boot option in all the tabs in the BIOS.

Step 4: Click on the Secure Boot option.

Step 5: Click on the Secure Boot Control option and select the Disabled option.

Step 6: Press the F10 key to save the changes and exit the BIOS.
Step 7: Your PC will reboot, and you must boot using the Windows USB installation media. Proceed with the installation and check if the Windows setup encounters the same error.
Similarly, disable the CSM mode, which is also a feature in the BIOS that enables support for installing older operating systems.
Method 2: Download and Install the Missing Drivers
If your PC uses an Intel processor, download and extract the Intel Rapid Storage Technology (IRST) driver for your PC model. AMD users will have to do the same and download and extract the AMD RAID Driver (SATA, NVMe RAID) drivers.

After that, copy the extracted drivers folder to the Windows USB installation media.

Repeat the following steps:
Step 1: Power on your PC and boot using the Windows USB installation media till you reach where the setup asks you to load drivers. If you copied the drivers to another USB drive, plug it in.
Step 2: Click on the Browse button.

Step 3: Select the appropriate driver folder and click on the OK button.

Step 4: Click on the driver to select it and then click on the Next button.

Step 5: After the driver installs successfully, pick a drive for installation and continue with the setup.
Method 3: Try Installing the 32-Bit Version (For Windows 10)
If you are having trouble with the Windows 10 installation, try the 32-bit version of the operating system instead of the 64-bit version. This is a temporary workaround that worked for many users, but you will have to stick with the 32-bit version on the OS. And whenever you wish to change, you’ll have to clean install the 64-bit version of Windows.
Corrupt USB installation media is also a reason why the error pops up when you try to select the drive and proceed with the Windows installation. So, you must recreate the Windows USB installation media with the help of either the Windows Media Creation tool or Rufus.
Ensure you download the latest ISO file from the official Windows website and use it to create the Windows USB installation media. Connect the USB drive to your PC and check if the installation proceeds without any errors.
Method 5: Convert Disk to GPT
Windows 11 requires the PC to support UEFI, and the storage drive must be in the GPT format. If the primary storage disk is in MBR format, you must convert it to GPT before installing the operating system.
Step 1: Press the Shift + F10 keyboard shortcut to open the Command Prompt on the Windows Setup page.
Step 2: Type the following command and press Enter to launch the Diskpart utility:
diskpart
Step 3: After that, execute the following command:
list disk
Step 4: You will see a list of all the disks, including the Windows USB installation media. Note the number of your system disk. The command to select the disk is:
select disk disknumberStep 5: Replace the disknumber part with the actual number of the disk from the list. So, the final command in our case becomes:
select disk 0
Step 6: After selecting the disk, execute the following command:
clean
Step 7: The selected disk is wiped clean. Execute the following command to convert it to GPT:
convert gpt
Step 8: After you see the successful command execution message, execute the following command:
list disk
Step 9: You will notice that an asterisk (*) appears in front of the disk under the GPT column. It indicates that the disk is in GPT format now.
Step 10: Close the Command Prompt window and continue the Windows installation.
That’s it. This should fix the no device drivers were found error from your Windows 10/11 PC once and for all.
Was this helpful?
Thanks for your feedback!
The article above may contain affiliate links which help support Guiding Tech. The content remains unbiased and authentic and will never affect our editorial integrity.
В этой публикации, друзья, рассмотрим, как устранить ошибку «Нам не удалось найти драйверы…», возникающую в процессе установки Windows. Когда мы подходим к этапу выбора места установки Windows, установщик может не определить нужный нам диск или RAID-массив, на раздел которого мы хотим установить операционную систему. По причине отсутствия драйверов дискового устройства. Но не всегда причина в драйверах, и давайте рассмотрим, из-за чего вообще установщик может не видеть диски и массивы.
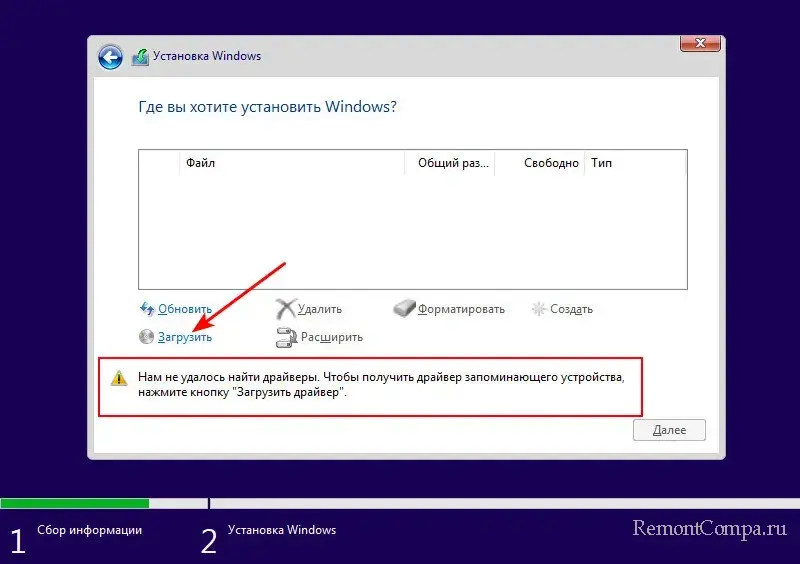
Итак, друзья, ошибка «Нам не удалось найти драйверы…». Возникает при установке Windows. Мы доходим до этапа указания места установки Windows, но не видим разделов или нераспределённого места на нужном диске или RAID-массиве. Если дисковое устройство у нас одно, на этапе выбора места установки вообще не будет ничего. Внизу окошка нам сообщается:
«Нам не удалось найти драйверы. Чтобы получить драйвер запоминающего устройства, нажмите кнопку «Загрузить драйвер».»
Это значит, что у установщика Windows нет драйверов для нашего дискового устройства, и он не может определить его. Установщик предлагает нам указать место на компьютере, откуда он может загрузить эти драйверы. Мы должны нажать опцию «Загрузить».
Далее — «Обзор».
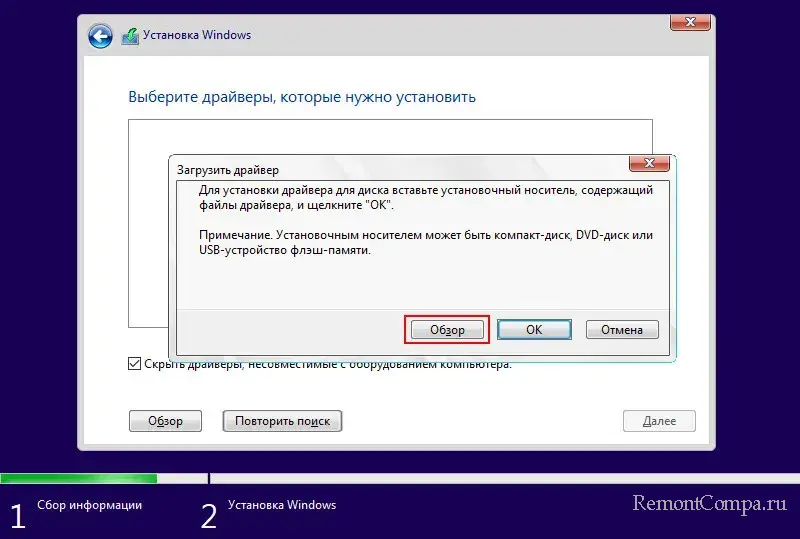
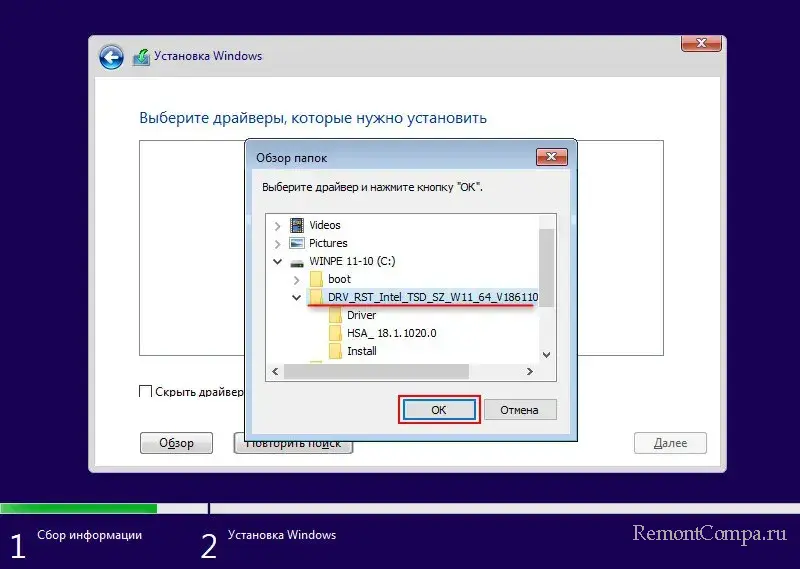
И в окошке обзора указать папку с драйверами дискового устройства.
Примечание: друзья, на следующем этапе может быть так, что установщик не захочет принимать драйверы, которые мы ему подсовываем, по той причине, что они не подписаны. Что это за ситуация, и как её разрешить – в статье «Ошибка «Не найдены подписанные драйверы устройства».
Если мы указали правильный подписанный драйвер, он отобразится в окошке установщика. Жмём «Далее».
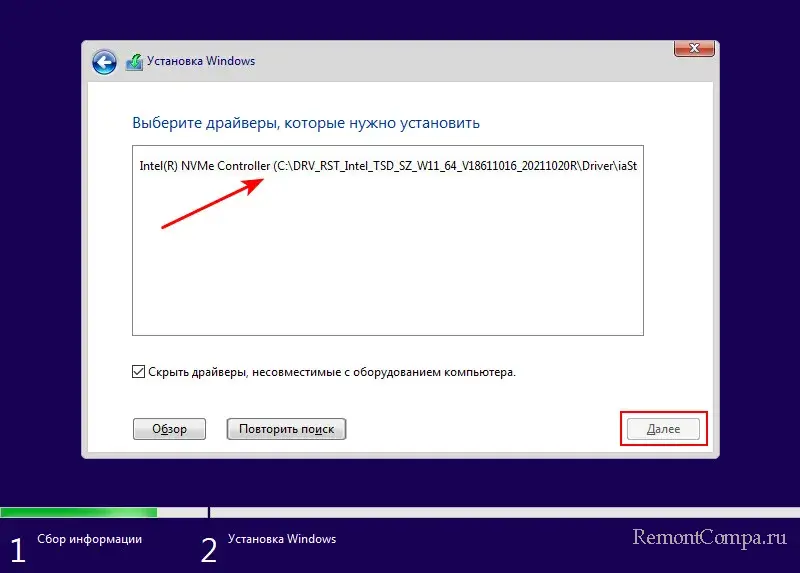
Дисковое устройство будет определено, мы получим доступ к его разделам и сможем выбрать один из них для установки Windows.

Но это если причина в драйверах дискового устройства. Могут быть и другие причины.
Дисковые устройства в процессе установки Windows обычно определяются без проблем. Установщик сам может определить даже RAID-массивы, если они обеспечены популярными аппаратными RAID-контроллерами, например, интегрированными в материнские платы от Intel или AMD. Но бывают случаи, когда у установщика Windows нет драйверов дискового устройства. В частности, если:
- Для RAID используется редкий аппаратный RAID-контроллер;
- Для RAID от Intel используется технология Intel VMD и установщику винды нужно подсунуть драйвера Intel Rapid (Intel RST).
- Используется жёсткий диск с нестандартным интерфейсом, например, NVMe или SCSI, для которого нужны специальные драйверы.
В таких случаях нам нужно самим обеспечить драйверы дискового устройства – скачать их и поместить на диск компьютера, который будет автоматически обнаруживаться установщиком Windows, либо на установочную флешку Windows
Важно: драйверы дискового устройства должны быть не в формате EXE-файла установки, а в формате файлов INF, SYS и пр. И подсовать установщику Windows эти файлы мы должны в разархивированной папке.
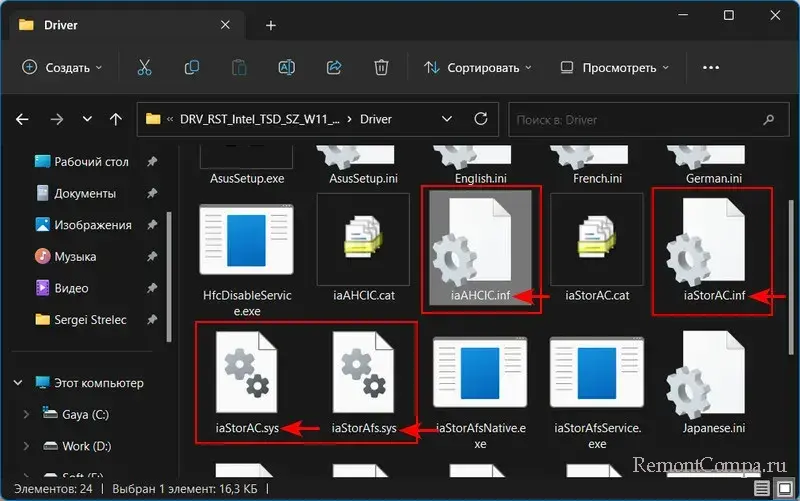
Где взять драйверы дискового устройства? Взять их можно:
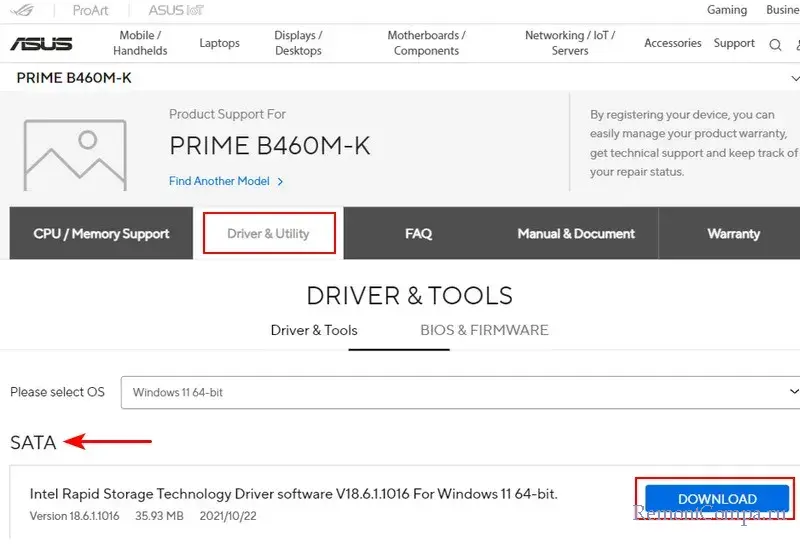
- Для интегрированных RAID-контроллеров — на сайтах Intel и AMD, на сайтах производителей материнских плат или ноутбуков. В разделе поддержки материнских плат драйверы RAID обычно поставляются в блоке «SATA»;
- Для отдельных RAID-контроллеров – на сайтах их производителей;
- Для нестандартных жёстких дисков – на сайтах их производителей, материнских плат или ноутбуков;
- С помощью менеджеров драйверов, например, программы Snappy Driver Installer. В ней содержится огромнейшая база всевозможных драйверов, и эта программа позволяет хранить локальные базы драйверов только для используемого компьютера;
- Методом экспорта драйверов дисковых устройств из работающей Windows.
Друзья, как ещё можно решить вопрос с ошибкой «Нам не удалось найти драйверы…» при установке Windows? Вдруг вы не сможете найти драйверы вашего дискового устройства, и такое может быть. Поиску драйверов и подсовыванию их установщику Windows есть альтернатива – установка Windows в среде WinPE от Sergei Strelec. Этот WinPE загружается с некоторыми драйверами вашего компьютера и, возможно, сможет автоматически определить RAID-массив или проблемный диск. Если не сможет, можно выполнить в нём автоматическую установку драйверов или их установку из хост-системы, т.е. установленной на других дисках Windows.

Возможно, у вас не будет драйверов в формате файлов INF, SYS и пр., которые нужны установщику Windows. Но будет EXE-файл установки драйвера. Этот EXE-файл можно запустить в среде WinPE и установить, как в среду Windows.
Если WinPE от Sergei Strelec определит дисковое устройство, можно будет установить на него Windows. Для этого WinPE предусматривает много разных способов, детально о них — в статье «Как установить Windows с помощью Live-диска от Sergei Strelec».
Друзья, если при установке Windows вы сталкиваетесь с ошибкой «Нам не удалось найти драйверы…», но у вас обычный жёсткий диск, который ранее без проблем определялся установщиком Windows, возможно, дело в повреждённом установочном носителе Windows. Может быть, что:
- Повреждён дистрибутив, например, вы взяли кривую сборку Windows;
- При создании установочной флешки произошли сбои, и запись произошла некорректно;
- На флешке имеются сбойные секторы.
И эти моменты коснулись файлов драйверов.
Создайте установочную флешку Windows официальным способом – с помощью специальной утилиты от Microsoft. Прим. о таком способе смотрим в статьях для Windows 11 и Windows 10. Проверьте флешку, нет ли на ней сбойных секторов – сделайте тест поверхности, например, программой Victoria. Или попробуйте другую флешку.
Ошибка «Нам не удалось найти драйверы…» при установке Windows появляется, если установщик не может определить жёсткий диск или RAID-массив из-за того, что у них имеются проблемы. Жёсткий диск может быть неправильно подключён, неисправен, по иным причинам не определяться в BIOS. RAID может рассыпаться, в том числе из-за выхода из строя RAID-контроллера. Детально по этой теме – в статье «БИОС не видит жёсткий диск».
Друзья, по теме проблем с драйверами при установке Windows также смотрите статью «Не найден необходимый драйвер носителя при установке Windows».