
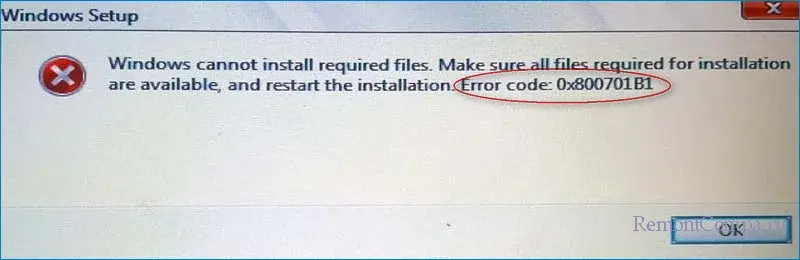
В процессе установки Windows некоторые пользователи могут столкнуться с ошибкой «Windows не удается установить необходимые файлы. Убедитесь, что имеются все файлы, необходимые для установки и перезапустите установку. Код ошибки: 0x800701b1». Повторный запуск установки обычно не решает проблему.
В этой инструкции подробно о том, как можно исправить ошибку 0x800701b1 при установке Windows 11/10 на компьютере или ноутбуке и дополнительная информация, которая может быть полезной.
Простые способы исправить ошибку 0x800701b1 «Windows не удается установить необходимые файлы»

Ошибка 0x800701b1 «Windows не удается установить необходимые файлы» обычно бывает вызвана одной из следующих причин:
- Проблемы с образом Windows или установочным накопителем: фактического отсутствие нужных файлов на нем или невозможность их чтения. В редких случаях это бывает вызвано не неисправностью USB-накопителя, а проблемами с USB-разъемами и контроллерами.
- Проблемы с записью данных на диск, на который производится установка системы. Учитывайте: если на вашем компьютере присутствует несколько физических дисков, при выборе одного из них для установки, загрузчик может записываться на другой. В такой ситуации к ошибке может приводить неисправность как первого, так и второго из дисков.
Простые варианты решения для первого случая, которые часто срабатывают, если вы столкнулись с рассматриваемой ошибкой:
- Попробуйте создать установочный USB накопитель с помощью другой программы (например, Rufus или Media Creation Tool вместо Ventoy), используя другой ISO образ системы, в идеале — скачанный с официального сайта Майкрософт.
- Попробуйте использовать другую флешку для установки.
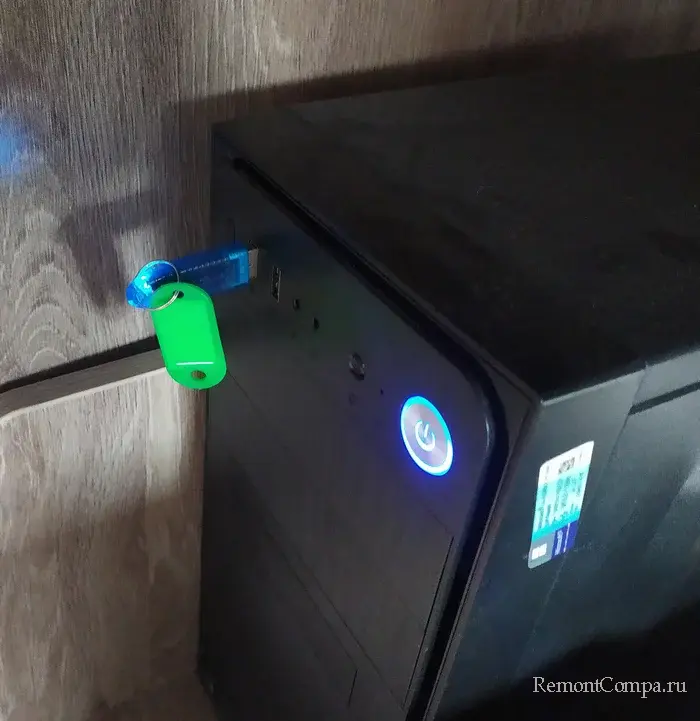
- Имеет смысл попробовать другой разъем для подключения USB-накопителя: USB 2.0 версии вместо 3.0 или наоборот, на задней панели вместо передней, без использования USB-хаба.
- Отключите все ненужные в процессе установки USB-устройства.
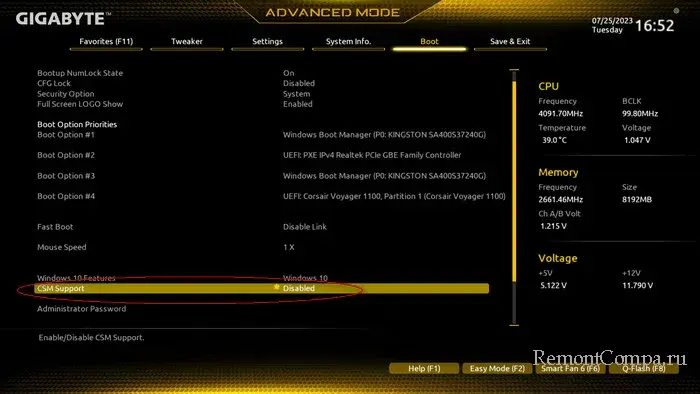
- По возможности используйте режим загрузки UEFI, а не Legacy (переключается в БИОС/UEFI, либо путем выбора флешки с пометкой EFI в Boot Menu, при условии, что установочный накопитель поддерживает этот тип загрузки).
- При наличии доступа к другому компьютеру, попробуйте создать установочный накопитель на нем: в некоторых случаях ошибки оперативной памяти или вредоносное ПО на компьютере может приводить к повреждению данных при записи загрузочного образа на флешку.
По второй группе причин можно порекомендовать следующие способы исправить ошибку:
- При наличии нескольких физических HDD и SSD, отключите все диски, кроме того, на который производится установка.
- Если на целевом диске нет важных данных, на этапе выбора раздела для установки, удалите с него все разделы (включая системные), выберите образовавшееся «Незанятое пространство на диске» и нажмите «Далее», не создавая разделов вручную.

- Для SATA-диска может быть разумным попробовать поменять кабель его подключения.

Часто один из предложенных способов помогает решить проблему, но не всегда.
Дополнительные варианты решения
В случае, если подходы из предыдущего раздела не позволили успешно завершить установку Windows, далее — несколько дополнительных методов, которые иногда срабатывают:
- Попробуйте сбросить настройки БИОС на настройки по умолчанию (в идеале — оптимизированные настройки). Если включены какие-либо профили разгона памяти, отключите их.
- Если на вашем компьютере установлено более одного модуля оперативной памяти, попробуйте оставить подключенным лишь один из них на время установки. Если ошибка снова появится — замените его на один из снятых модулей и повторите попытку.
- При наличии обновлений БИОС для вашего компьютера, выполните обновление.
- Если проблема возникает на ноутбуке, при этом он работает от батареи, попробуйте выполнить установку при работе от сети.
- Если установка производится с подключенным Ethernet-кабелем, отключите его.
- Для больших по объему дисков HDD и SSD (обычно более 2 Тб), установка на которые производится без разделения на разделы, может помочь подход, обратный тому, который описывался выше: после очистки разделов вручную создайте раздел для Windows около 100 Гб прямо в программе установки и попробуйте установить систему в него.
Надеюсь, какой-то из вариантов поможет вам решить проблему. Буду благодарен, если вы сможете поделиться в комментариях сработавшим способом.
Установка Windows дело не сложное, но зачастую могут возникать проблемы, которые даже опытных пользователей заводят в тупик. Иногда помогает повторная попытка установки, но случается и так, что она ни к чему не приводит. В этом материале рассмотрим как поступить в случае если при установке системы возникла ошибка с кодом 0x800701b1.
Ошибка 0x800701b1 при установке Windows
Причин появления ошибки может быть несколько. В основном это некачественный образ системы, неисправность накопителей или флешки, поврежденные разъемы USB.
Первым делом необходимо проверить появится ли ошибка если использовать другой порт USB. Часто помогает переключение флешки в порт на задней панели системника или изменение порта с USB 3.0 на USB 2.0.
Если это не помогло, то следует создать установочную флешку с помощью другой программы и другого образа. Образ рекомендуется скачать с официального портала Microsoft. Приложений для создания загрузочного накопителя множество, например, Rufus, UltraISO, Media Creation Tool и т.д.
В случае если проблема не решена придется переходить к другим способам.
Чтобы исключить неисправность флешки, необходимо использовать другой накопитель. Просто записываем загрузочный образ на внешний жёсткий диск или другую флешку и пробуем установить систему с нее.
Иногда срабатывает отключение всех ненужных в данный момент USB устройств. Оставляем только загрузочную флешку и пытаемся запустить установку.
Изредка вирусы могут мешать создать образ и записать его на флешку. То есть, нам необходимо выполнить полную проверку системы на наличие опасного ПО, устранить вирусы и повторить запись, а вследствие и установку системы. Можно сделать проще и для записи образа использовать другой, заведомо исправный ПК.
Пользователи сообщают, что переключение на UEFI с Legacy также иногда решает проблему. Сделать это можно в BIOS.
Следующий вариант решения проблемы подразумевает физическое вмешательство в системный блок. В этом случае придется отсоединить все накопители, кроме того, на который планируется установка системы. Если накопитель подключен с помощью SATA, то возможно решением проблемы будет замена кабеля. Иногда такие способы тоже имеют место быть.
Уже при установке Windows, когда выбираем куда его установить, удаляем все разделы и в «Незанятом пространстве на диске» создаем заново разделы. Если у вас достаточно большой накопитель, 2 Тб и более, то желательно под систему создать небольшой раздел, размером около 100 Гб.
Сброс BIOS до заводских настроек также может решить вопрос. Зачастую такой метод срабатывает, когда пользователь занимался до этого разгоном памяти, повышением частот и т.д. Также обновление BIOS до последней версии не будет лишним.
Неисправность плат оперативной памяти также может быть виновником появления ошибки 0x800701b1. В таком случае лучше на время операций с установкой Windows оставить одну плашку. Проверить решило ли это проблему. Если нет, то меняем плашку на другую.
Вот такие варианты решения проблем, являются достаточно действенными в решении ошибки с кодом 0x800701b1.
Работая на своем компьютере, выполняя одно из самых простых действий, таких как копирование-вставка файла или папки, вы внезапно получаете сообщение об ошибке 0x800701b1. Даже когда вы работаете в продвинутой операционной системе, такой как Windows 10 или 11, вы все равно можете столкнуться с этой ошибкой. это может произойти независимо от действия, происходящего внутри внутреннего диска или с использованием внешнего диска. Кроме того, размер файла / папки также не имеет значения. В этой статье мы поможем вам избавиться от этой ошибки, показав 14 способов ее исправления.
- Часть 1: Обзор кода ошибки 0x800701b1
- Часть 2: Что вы должны сделать перед исправлением ошибки 0x800701b1?HOT
-
Часть 3: Как исправить ошибку 0x800701b1 в Windows 11/10?
- Исправление 1: Подключите поврежденный диск к другому USB-порту
- Исправление 2: Используйте управление дисками для повторного сканирования дисков
- Исправление 3: Переустановите драйверы вашего устройства
- Исправление 4: Обновите блок питания ПК
- Исправление 5: Проверьте настройки безопасности вашего диска
- Исправление 6: Убедитесь, что последняя версия драйвера Windows совместима с вашим USB-накопителем
- Исправление 7: Запустите CHKDSK для сканирования вашего USB-накопителя
- Исправление 8: Создайте новую учетную запись локального пользователя для доступа к любым данным
- Исправление 9: Запустите антивирусное программное обеспечение для проверки на наличие вредоносных программ
- Исправление 10: Изменение формата жесткого диска
- Исправление 11: Отключите режим диска только для чтения
- Исправление 12: Создайте новый раздел формата NTFS на вашем жестком диске
- Исправление 13: Удалите другие периферийные устройства
- Исправление 14: Избегайте передачи файлов огромными порциями
Что такое код ошибки 0x800701b1?
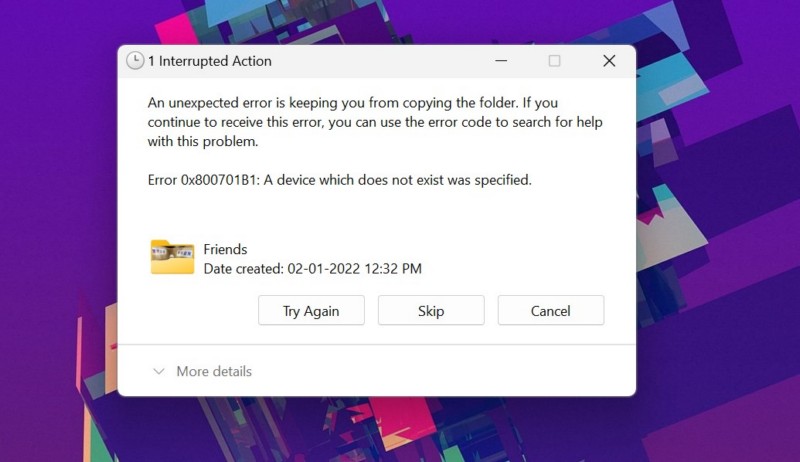
Ошибка 0x800701b1 — это ошибка Windows, обнаруженная в Windows 10 и 11, которая может появляться при копировании / вставке файлов и папок. Эта ошибка обычно возникает, когда некоторые DLL-файлы не регистрируются в системе, хотя для этого есть и другие причины. Сообщение об ошибке сопровождается следующим сообщением: “Было указано несуществующее устройство”, что означает, что требуемый диск недоступен. Компьютер выдаст эту ошибку, когда попытается, но не сможет перенести какие-либо данные на указанный диск, либо из-за того, что он не распознается вашим компьютером, либо просто не работает должным образом. Иногда ошибка может возникать, когда вы пытаетесь установить Windows на жесткий диск, подключенный через USB.
Причины кода ошибки 0x800701b1
В дополнение к паре примеров, упомянутых выше, существуют и другие причины, по которым может отображаться код ошибки 0x800701b1.
- Владелец файлов или папок изменился, и вы не можете получить к ним доступ
- Перенесите более 4 ГБ файлов / папок на диск FAT32
- Открыт режим, защищенный от записи или доступный только для чтения
- Компьютерный вирус вызывает повреждение целевого диска или шифрует файлы
- Множество ненужных периферийных устройств, подключенных к вашему компьютеру
- Подключите внешний накопитель к порту USB 2.0 вместо порта USB 3.0
- Используйте универсальный драйвер для внешнего накопителя, подключенного к их ПК
- У вас недостаточно свободного места
- Системные ограничения
Часть 2: Что вы должны сделать перед исправлением ошибки 0x800701b1?
Рекомендуется всегда сохранять резервную копию своих данных, поскольку весьма возможно, что при возникновении ошибок, таких как 0x800701b1, вы можете потерять свои данные из-за того, что операция никогда не завершается должным образом и данные повреждаются на полпути. В случае, если вы не сохраняете обновленную резервную копию своих данных и теряете ее во время такой ошибки или при попытке ее исправить, существует относительно простой способ вернуть ее с помощью программного обеспечения для восстановления данных Tenorshare 4DDiG. Используя это программное обеспечение, вы можете вернуть свои данные в 3 простых шага.
Вот некоторые ключевые особенности Tenorshare 4DDiG:
- Поддержка восстановления потерянных / поврежденных данных из-за ошибки Windows
- Поддерживает восстановление данных с Windows, Mac, SD-карты, USB и так далее
- Поддерживает восстановление данных после случайного удаления, вирусной атаки, взлома системы, ошибки Windows, форматирования и так далее
- Поддержка восстановления более 1000 различных типов файлов, включая документы, видео, фотографии и так далее
Следуйте приведенному ниже руководству, чтобы восстановить потерянные данные из-за ошибки Windows 0x800701b1:
- Запустите 4DDiG в вашей Windows, и затем вы найдете множество вариантов, включая восстановление данных. Просто нажмите на поврежденный диск, чтобы выполнить сканирование. Кроме того, вы можете выбрать определенный тип файла для сканирования в правом верхнем углу.
- 4DDiG мгновенно начнет поиск потерянных файлов на диске, который вы выбрали ранее. Вы можете прекратить поиск файла в любое время, если вы уже нашли его или вам просто нужно сделать перерыв, и возобновить позже, если потребуется.
- Следующее, что вам нужно сделать, это определить нужные вам файлы и проверить, все ли с ними в порядке, предварительно просмотрев их. если все в порядке, поместите их в другое место, чтобы избежать возможности их повторной потери из-за перезаписи диска и потери данных с поврежденного диска.
Часть 3: Как исправить ошибку 0x800701b1 в Windows 11/10?
Мы покажем вам 14 способов попытаться устранить проблему, вызванную ошибкой 0x800701b1. Однако, даже прежде чем вы начнете их применять, есть несколько вещей, которые вы должны попробовать в первую очередь. Вам следует начать с копирования файла другого типа в выбранное вами место назначения. Если файл копируется, это может означать, что основной файл уже поврежден. однако, если вы не можете скопировать в пункт назначения, это будет означать, что, скорее всего, причиной ошибки является проблема с программным обеспечением. Вы можете перезагрузить свой компьютер, чтобы посмотреть, исчезнет ли проблема, в случае, если вы столкнулись с этой ошибкой в первый раз. Если по-прежнему ничего не получается, приостановите защиту вашей системы безопасности / антивируса в режиме реального времени и повторите попытку. Все еще сохраняется ошибка? Попробуйте исправления, приведенные ниже:
Исправление 1: Подключите поврежденный диск к другому USB-порту
Одним из самых простых, но эффективных способов устранения ошибки 0x800701b1 является использование другого USB-порта для подключения устройства, с которым вы столкнулись с ошибкой. Вы могли бы просто попробовать подключиться к более свежему порту USB 3.0 вместо старой версии, которая обеспечивает подключение только по USB 2.0. Это поможет гарантировать, что накопитель получает достаточное количество энергии из порта или сможет передавать файлы на максимально доступной скорости.
Исправление 2: Используйте управление дисками для повторного сканирования дисков
Другое исправление ошибки 0x800701b1, которое вы можете попробовать, — это выполнить повторное сканирование с помощью Windows Disk Management. Метод очень прост, откройте «Управление дисками», набрав «Управление дисками» в поиске, выберите его. После открытия перейдите в меню действий и выберите пункт Повторное сканирование дисков. Перезагрузите свой компьютер. Если ошибка повторяется, повторите процедуру.
Исправление 3: Переустановите драйверы вашего устройства
Вы могли бы попробовать переустановить драйвер устройства, с которым у вас возникла проблема. Это обычное явление для внешних устройств, на которых отсутствуют совместимые драйверы. Чтобы решить эту:
- Перейдите в диспетчер устройств, введя его в поиске Windows (в качестве альтернативы, введите “devmgmt.msc” в появившемся окне набора, нажав клавишу Windows и R вместе и нажмите enter.
- Нажмите на дисковод, чтобы развернуть его, выберите устройство, вызывающее ошибку, и удалите его. Нажмите “Обновить конфигурацию оборудования”, что позволит Windows переустановить его с помощью универсального драйвера.
При необходимости перезагрузите компьютер и проверьте, сохраняется ли ошибка по-прежнему. Если это исправлено, вы можете сохранить драйвер, установленный Windows для вашего устройства, или просто установить соответствующий драйвер для вашего устройства. Если все еще не исправлено, ознакомьтесь со следующим решением.
Исправление 4: Обновите блок питания ПК
Проведите диагностику вашего блока питания. Убедитесь, что он способен обеспечить достаточное количество энергии, необходимое вашей системе, особенно в случае настольного ПК. Если у вас есть съемные компоненты, потребляющие питание и не необходимые для запуска вашей системы, отсоедините их. Если это останавливает выдачу вашей системой ошибки 0x800701b1, это означает, что ваш блок питания недостаточно мощный, чтобы обеспечить питанием все ваши компоненты, или просто неисправен. Замена / модернизация блока питания — это единственное решение.
Исправление 5: Проверьте настройки безопасности вашего диска
Если вы не можете получить доступ к диску из-за ограничений безопасности, на флэш-накопителе USB отобразится сообщение об ошибке «устройство не существует». Следуйте приведенным ниже инструкциям, чтобы сменить владельца, изменив настройки безопасности.
Важно: Вкладка Безопасность доступна не во всех системах
- Откройте проводник, затем щелкните на этом компьютере слева, выберите Свойства, щелкнув правой кнопкой мыши на целевом диске, где вы найдете вкладку Безопасность.
- Нажмите вкладку Дополнительно, затем измените перед владельцем.
- Нажмите Дополнительно в левом углу, а затем Найдите сейчас.
- В расширенных настройках безопасности вы увидите изменение, нажмите его. Как только вы увидите свое имя пользователя, нажмите его дважды.
- Теперь найдите пункт Заменить все записи разрешений дочернего объекта на записи разрешений, наследуемых от этого объекта, установите флажок рядом с ним, чтобы выбрать его, и нажмите применить.
Теперь, когда разрешения изменились, ошибка 0x800701b1 может больше не отображаться, как только вы снова подключите поврежденный диск.
Исправление 6: Убедитесь, что последняя версия драйвера Windows совместима с вашим USB-накопителем
Несовместимость драйверов является распространенной причиной отображения ошибки 0x800701b1 при подключении внешнего флэш-накопителя. Чтобы исправить это, перейдите в диспетчер устройств, выполнив действия, упомянутые ранее.
- Выберите USB-накопитель в разделе Универсальный контроллер последовательной шины, нажмите Свойства, затем перейдите на вкладку Драйвер. Пожалуйста, напишите где-нибудь версию драйвера, прежде чем нажимать Обновить драйвер.
- Поскольку вы будете выбирать драйверы, отличные от указанных вами, нажмите «Просмотреть драйверы на моем компьютере», а затем «Позвольте мне выбрать из списка доступных драйверов на моем компьютере».
- После нажатия next нажмите на любой драйвер, отличный от указанного, и снова нажмите Next, что обеспечит установку выбранного драйвера. Надеюсь, это устранит ошибку. Но если нет, повторите ту же процедуру, но каждый раз выбирайте другой драйвер.
Исправление 7: Запустите CHKDSK для сканирования вашего USB-накопителя
Возможно, вам потребуется выполнить CHKDSK-сканирование вашего USB-накопителя, если на нем обнаружена ошибка логической файловой системы. В таких случаях будет показан код ошибки 0x800701b1. Если ошибка все еще отображается после выполнения сканирования, извлеките USB-накопитель и выключите компьютер. Снова включите его без каких-либо других ненужных периферийных устройств, чтобы проверить, работает ли привод. Если нет, проверьте диск в другой системе. Если диск продолжает выдавать ту же ошибку, самое время проверить его на наличие аппаратных неполадок или использовать специальное программное обеспечение для устранения такой проблемы.
Исправление 8: Создайте новую учетную запись локального пользователя для доступа к любым данным
Рассмотрите возможность создания новой учетной записи локального пользователя на случай, если ваш компьютер не позволяет вам просматривать определенные данные из-за ошибок разрешения, которые не так уж редки в системах Windows 10/11.
- Чтобы создать новую локальную учетную запись, просто откройте консоль управления Microsoft, введя mmc в поиске. вы должны предоставить свой административный пароль от вашей текущей учетной записи, когда вас попросят.
- Нажмите на локального пользователя и группы, за которыми следует Пользователь-Действие-Новый пользователь. Ответьте на запросы, необходимые для открытия новой учетной записи, затем нажмите Создать.
Затем войдите в свою новую учетную запись, чтобы проверить, устранена ли ошибка 0x800701b1.
Исправление 9: Запустите антивирусное программное обеспечение для проверки на наличие вредоносных программ
Всегда рекомендуется обновлять программное обеспечение безопасности вашего компьютера и позволять ему регулярно сканировать вашу систему, чтобы избежать атак со стороны вирусов, вредоносных программ, руткитов и так далее. Хорошее антивирусное программное обеспечение может помочь предотвратить нанесение вреда вашей системе подобными угрозами. Однако важно, чтобы вы использовали надежное программное обеспечение для защиты вашей системы. Всегда устанавливайте у надежного поставщика с высоким рейтингом, который регулярно обновляет свое программное обеспечение. Если ваше антивирусное программное обеспечение обнаружит какую-либо проблему в вашей системе, вы всегда можете удалить ее или отправить на карантин.
Исправление 10: Изменение формата жесткого диска
Изменение формата рассматриваемого диска может устранить ошибку 0x800701b1, особенно форматирование NTFS, которое является надежным и более новым форматом файлов и позволяет передавать файлы большего размера. Однако имейте в виду, что форматирование диска приведет к безвозвратному удалению всего, что находится на нем.
- Вы можете изменить файловую систему диска, щелкнув его правой кнопкой мыши в проводнике и выбрав Формат.
- Выберите NTFS и нажмите Пуск. После завершения нажмите Закрыть и перезагрузите систему. Теперь вы должны иметь возможность скопировать и вставить свой файл на этот диск.
Исправление 11: Отключите режим диска только для чтения
Если вы пытаетесь скопировать-вставить в папку или на диск, доступный только для чтения, вы не сможете этого сделать, и в результате может появиться ошибка 0x800701b1. Файлы / папки / диски, доступные только для чтения, позволяют вам только читать или просматривать содержимое, но не вносить в них никаких изменений. Если адресат, который вы пытаетесь изменить, доступен только для чтения, вы можете просто изменить его.
- Для этого сначала вам нужно открыть «Run» и ввести CMD, а затем нажать ctrl, shift и enter вместе. Вы можете открыть «Run», просто введя его в поиске Windows или нажав клавишу Windows и R вместе.
- Вам необходимо утвердить управление учетными записями пользователей, нажав «Yes», чтобы убедиться, что у вас есть необходимые административные права для выполнения намеченных задач.
- Попав в командную строку, пожалуйста, введите соответственно следующие команды и нажимайте enter каждый раз, когда вы это делаете: diskpart — list disk — select disk 1 (1 — буква диска, статус которого вы хотите изменить) — атрибуты disk очистить только для чтения — это должно гарантировать, что необходимые изменения внесены но сначала вам нужно будет перезагрузить вашу систему, чтобы изменения вступили в силу.
Исправление 12: Создайте новый раздел формата NTFS на вашем жестком диске
Иногда вы пробуете все исправления, которые можете найти, и ни одно из них не может сработать. Что ж, отчаянные времена требуют отчаянных мер!. В таких случаях вы можете рассмотреть возможность создания нового раздела NTFS на вашем жестком диске. Не забудьте создать резервную копию ваших файлов и папок в другое место, поскольку разбиение вашего диска на разделы означает, что все его содержимое будет полностью удалено.
- Создать новый раздел NTFS относительно просто. вы можете просто повторить шаги, описанные в непосредственно предыдущем исправлении (FIX 11), до тех пор, пока не появится надпись “Select Volume X” (X указывает на целевой диск).
- После этого вам просто нужно ввести несколько дополнительных команд, которые являются следующими: — clean — create partition primary — Не забывайте нажимать enter после каждой команды.
- Теперь вам нужно будет выбрать диск 0, а затем ввести еще несколько команд, которые являются: — list disk — Select partition 1 — Active — Как всегда, нажимайте enter после каждой команды.
- Система покажет вам доступные диски в вашей системе, как только вы введете команду “list disk”. Используйте список, чтобы определить номер вашего целевого диска, и введите этот номер вместо “1” в команде «Select Partition».
- Затем вы введете следующую команду “format fs=ntfs label=Y”, без запятых. Вы можете поместить любую букву, кроме Y, в качестве метки, если хотите.
- Просто выделите букву диска для нового раздела, которая может быть любой буквой по вашему выбору, если ни один другой диск в вашей системе в данный момент ее не использует. просто наберите и введите следующую команду : assign letter=L (вместо L это может быть любая буква по вашему выбору). Закройте командную строку перед перезагрузкой системы.
Исправление 13: Удалите другие периферийные устройства
Ошибка 0x800701b1 может появиться в случае, когда ваша система не в состоянии обеспечить достаточное питание соответствующего накопителя. Чтобы проверить, так ли это, вам следует удалить все остальные устройства из вашей системы, проверить и повторить попытку. То же самое касается ноутбуков, если это устраняет проблему, это указывает на то, что ваша система недостаточно мощная или к вашей системе подключено слишком много периферийных устройств.
Исправление 14: Избегайте передачи файлов огромными порциями
Если вы сталкиваетесь с кодом ошибки 0x800701b1 только при попытке скопировать и вставить файлы очень большого размера, скажем, 10 гигабайт или больше, то, возможно, вам следует пересмотреть свое решение. Некоторым системам может быть трудно обрабатывать такие большие файлы, особенно если система не имеет надлежащей конфигурации. Постарайтесь выполнить задачу в меньшем размере, особенно если вы знаете, что используемое вами запоминающее устройство использовалось в течение длительного времени.
Вывод
Коды ошибок, такие как 0x800701b1, всегда появляются неожиданно, когда пользователь меньше всего этого ожидает. Когда это происходит, это вызывает большие опасения у пользователей, поскольку это может привести к потере ценных данных, резервной копии которых у них может не быть. Потеря важных данных всегда является большой проблемой для любого человека. Если вы из тех, кто не создает резервные копии своих данных часто и неукоснительно, то вам следует рассмотреть возможность приобретения эффективного программного обеспечения для восстановления файлов, такого как Tenorshare 4DDiG data recovery, которое может эффективно восстановить потерянные данные и поможет вам избежать больших хлопот при починке вашей системы.
Are you getting an “Error: 0x800701B1: A device which does not exist was specified” message while trying to copy files to an external hard drive, SSD drive, or USB storage device? Your PC may have trouble locating and transferring files to your device, leading to the above error message. We’ll show you a few ways to resolve this problem on your Windows 11 or Windows 10 PC.
Some items that prevent transferring files from your PC to your storage device include your device’s loose connection with your PC, your PC’s USB port being faulty, your storage device being locked, your storage device having file system errors, and more.

1. Use a Different USB Port on Your Microsoft Windows Computer
When you have trouble working with an external device, unplug that device and plug the device back into another USB port on your computer. This helps resolve the device’s loose connection with your machine, and ensures a faulty port isn’t causing the problem.
You can use this method to fix not only the 0x800701B1 error but any other issues occurring with an external device.
2. Unplug Other Peripherals Devices From Your PC
If you’ve plugged in other removable hardware devices to your PC, unplug those devices when you find that your storage device isn’t working. This helps resolve any conflicts created by those devices on your Windows system.

The other hardware devices may include an external webcam, gaming pad, USB flash drives, SD cards, and more. You only need a keyboard and a mouse connected to your PC to use your computer.
3. Unlock Connected HDD, SSD, or USB Drive to Fix an Error Code 0x800701B1
One reason you can’t copy files from your PC to your storage device is that your device is locked. You can’t add new files or remove existing files from a device that’s in this state.
Many storage makers offer their own tools, letting you enable protection on your drives. If you’ve used such a tool and have password-protected your drive, turn off the protection to allow your PC to add files to your drive.
How you disable protection varies by the tool you use. You’ll find the option to remove the lock on your storage device app’s main menu. Once you’ve unlocked your drive, try transferring your files from your PC to your device, and that should work.
4. Fix Error 0x800701B1 by Removing Your Drive’s Read-Only Attribute
One fix to apply when you can’t add new files to your storage drive is to remove the existing read-only attribute from your drive. This attribute makes your drive read-only, which means you can only see the contents of the drive and can’t add new files.
Removing the read-only attribute requires using a few commands in Command Prompt on your Windows operating system. Here’s how you can do that step-by-step.
- Connect your storage device to your PC.
- Open the Start menu, find Command Prompt, and select Run as administrator.

- Choose Yes in the User Account Control prompt.
- Type the following command in CMD and press Enter: diskpart
- Use the following command to retrieve a list of your disk drives:
list disk

- Make a note of the number displayed for your storage device in the Disk ### column.
- Run the following command replacing X with the number you noted above. This selects your specific disk to perform actions.
select disk X

- Now, run the following command to remove the read-only attribute from your drive:
attributes disk clear readonly - Close Command Prompt and try to copy files to your storage device.
5. Reinstall Storage Device Drivers to Fix Windows Error 0x800701B1
If you still can’t copy files to your device and keep getting a 0x800701B1 error, your storage device’s drivers may be faulty or outdated. In this case, reinstalling the device drivers should fix your issue.
You can remove your storage device from your PC, and Windows will automatically install the correct device drivers for you.
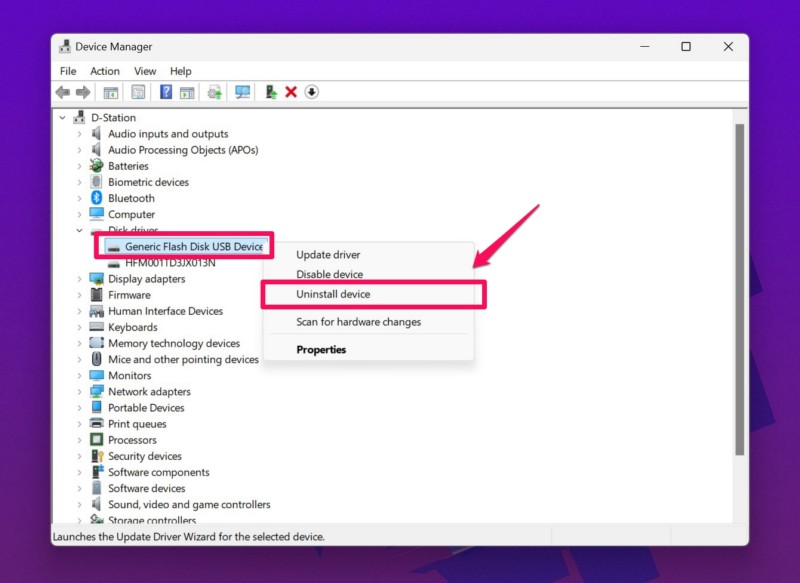
- Open Start, find Device Manager, and launch the utility.
- Expand Disk drives, right-click your storage device, and choose Uninstall device.

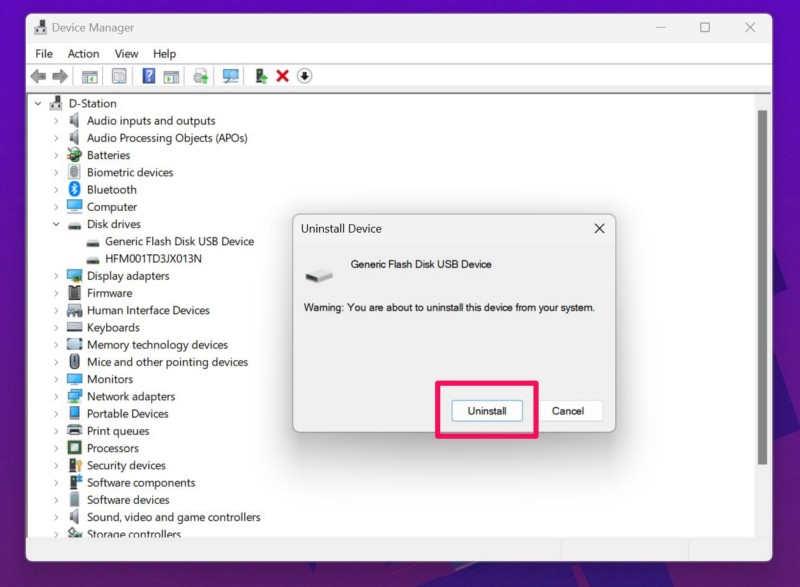
- Select Uninstall in the menu to remove the device.

- Unplug the device from your PC.
- Restart your PC.
- Plug your device back into your PC and let Windows install the required drivers.
6. Check Your Drive for File System Errors
File system errors on your storage device can prevent you from adding new files. You can check if this is the case with your device by using a built-in option on your Windows PC.
- Open File Explorer by pressing Windows + E.
- Right-click your drive in File Explorer and choose Properties.
- Access the Tools tab and select Check in the Error checking section.

- Choose Scan drive to find issues with your drive. The tool will then allow you to fix any errors that it finds.

7. Transfer Small Files to Your Storage Device
If your file transfers continue to fail, we advise copying smaller files to your device, which improves your chances of successfully transferring files. Instead of sending a 5 GB ZIP archive to your device, send individual files from that archive at a time to possibly resolve your issue.
This doesn’t resolve your issue for good but helps you get your job done while you wait to get your problematic drive repaired or replaced.
Eliminate a 0x800701B1 Windows Error and Copy Files Successfully
Windows’ 0x800701B1 error indicates that your PC can’t find the device where you want to copy your files. This usually happens when your PC has trouble recognizing your device, for various reasons.
The guide above walks you through the methods to fix that very problem so you can move your files to your preferred device without any issues. Enjoy!
Related Posts
- How to Fix a “This file does not have an app associated with it” Error on Windows
- How to Add OneDrive to Windows File Explorer
- How to Fix an Update Error 0x800705b4 on Windows
- How to Resolve “A JavaScript error occured in the main process” Error on Windows
- How to Fix the Network Discovery Is Turned Off Error on Windows
Transferring files and documents from a Windows computer to an external or USB flash drive can be significant for professional and personal tasks. However, Windows users often encounter the annoying “Error 0x800701B1: A device which does not exist was specified” when copying files and data from their computer to an external drive or SD card.
As you are already here, reading this article, we presume that you encountered the Error 0x800701B1 during one of the transferring sessions on your Windows 11 PC or laptop. Well, fret not, as we will discuss everything about this specific error on Windows 11 PCs and laptops. We will also show you some of the most effective ways to fix the “Error 0x800701B1: A device which does not exist was specified” on your Windows 11 device. So, check out the following sections for all the details!
What is the “Error 0x800701B1: A device which does not exist was specified” on Windows 11?
Now, the Error 0x800701B1 is a system error on the Windows platform that is related to the USB functions of a PC or laptop. It usually occurs when a Windows PC or laptop cannot find the external USB drive to which it is trying to copy a file, document, or folder.
The situation usually arises if the USB connection gets interrupted mid-way and the external USB accessory loses connection with the Windows PC or laptop. However, there can be other factors at play that might trigger the “Error 0x800701B1: A device which does not exist was specified” on a Windows 11 PC or laptop.
With the fixes provided in this guide, we have tried to address every possible reason that might cause the Error 0x800701B1 on a Windows 11 PC or laptop. So, check them out in the following section.
Fix “Error 0x800701B1: A device which does not exist was specified” on Windows 11 PCs and Laptops
Below, you will find some of the most effective fixes for the “Error 0x800701B1: A device which does not exist was specified” on your Windows 11 PC or laptop. We started off with some of the basic troubleshooting methods to resolve the issue and proceeded toward some complex ones in the latter half.
To help you execute every fix on your Windows 11 PC or laptop, we have also provided easy-to-follow, step-by-step guides where it is necessary. So, try them out one by one on your device and check which one resolves the Error 0x800701B1.
1. Disconnect the USB Drive and Reconnect
As mentioned before, the “Error 0x800701B1: A device which does not exist was specified” is often triggered due to a loss of connection between an external USB drive and a Windows 11 PC or laptop. So, if you encounter the Error 0x800701B1 during a file transfer session, chances are that the USB connector has gotten a bit loose and lost the connection while the data was transferring.
In this case, you can first try and push in the USB connector of your external drive to the USB port of your Windows 11 PC or laptop to re-establish the connection. If the connection is re-established, the error window will automatically go away.
However, if that does not happen, completely disconnect the USB connector of your external drive from your Windows 11 device and reconnect it. After that, click the Try Again button in the Error 0x800701B1 dialog box to check if the data transfer resumes or not.
If the USB connection between the USB drive and your Windows 11 PC or laptop is back to an operating state after the reconnection, the “Error 0x800701B1: A device which does not exist was specified” should not resurface.
2. Clean the USB Port of Your Windows 11 PC or Laptop
Much like how the charging port of a smartphone can collect dust, debris, and pocket lint over a period, the same can happen to USB ports of computers. These dust particles and debris, collected over time, can prevent the proper connection between an external USB drive and the computer and cause interruptions during usage.
Now, if you have not thoroughly cleaned your Windows 11 PC or laptop in a long time, the USB ports of your device can become clogged with dust and debris. In that case, when you connect an external USB drive to your computer, the connection can get interrupted from time to time and trigger the “Error 0x800701B1: A device which does not exist was specified” during file transfers.
So, to avoid the Error 0x800701B1 on your Windows 11 PC or laptop, try cleaning the USB ports of your device. You can use a small object such as a pin or an earbud to scoop out the dust and debris from inside the USB port of your device. When you do that, make sure to turn off your Windows 11 PC or laptop and do it very carefully to avoid unintentional hardware damage.
3. Check for Hardware Issues
Now, one unfortunate factor that might trigger the “Error 0x800701B1: A device which does not exist was specified” on your Windows 11 PC or laptop is a damaged USB port. The USB port of a Windows computer is essentially a hardware component that is a part of the entire internal hardware ecosystem.
So, if the USB port of your Windows 11 PC or laptop that you are using for transferring data is somehow damaged and becomes inoperable, you might encounter the Error 0x800701B1 during the transfer process. In this case, you can the other USB ports, if there are any, to connect your external drive and transfer data. Otherwise, you can take your Windows 11 PC or laptop to a nearby service center and replace the damaged USB port module.
4. Scan for Drive Errors on External Drive in Windows 11
Apart from connection and hardware issues, the “Error 0x800701B1: A device which does not exist was specified” can also show up due to minor errors on your external drive. In this case, you can use the built-in error-checking tool for drives to check for errors and let Windows automatically resolve them.
So, follow the steps right below to use the Windows error-checking tool for internal and external drives to scan the external drive for errors on your Windows 11 PC or laptop:
1. With the external USB drive connected to your Windows 11 device, use Windows + E to open the File Explorer window.
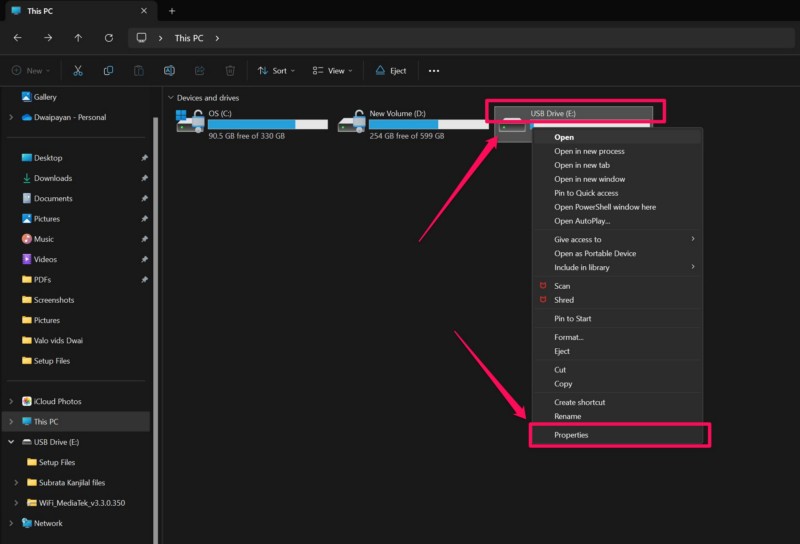
2. Go to the This PC tab from the left navigation bar.
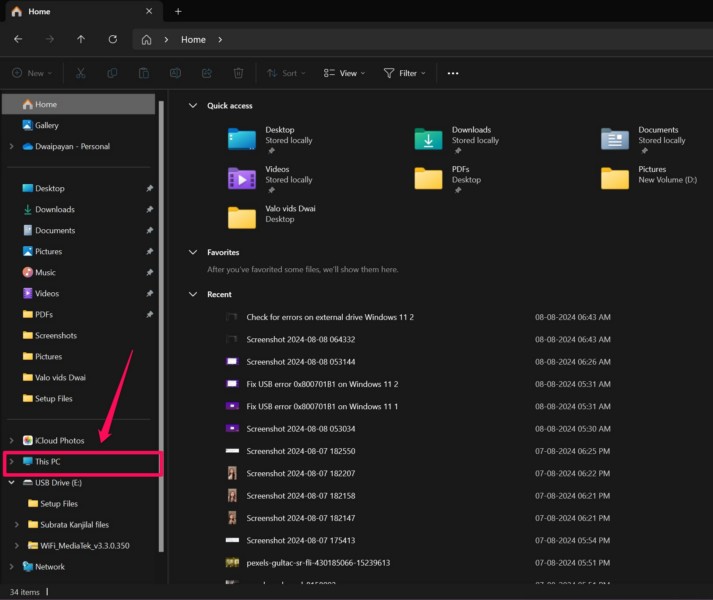
3. Next, right-click on the external drive and select the Properties option on the context menu.
4. In the Properties window, go to the Tools tab from the above tab bar.

5. Under the Error checking section, click the Check button.
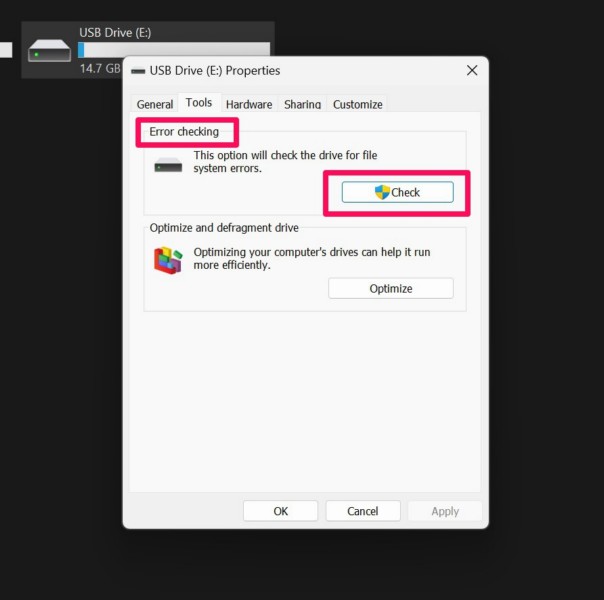
Note: You will require administrative rights to do this on your Windows 11 PC or laptop.
6. On the following prompt, click the Scan and repair drive button and wait for the error-checking process to complete.
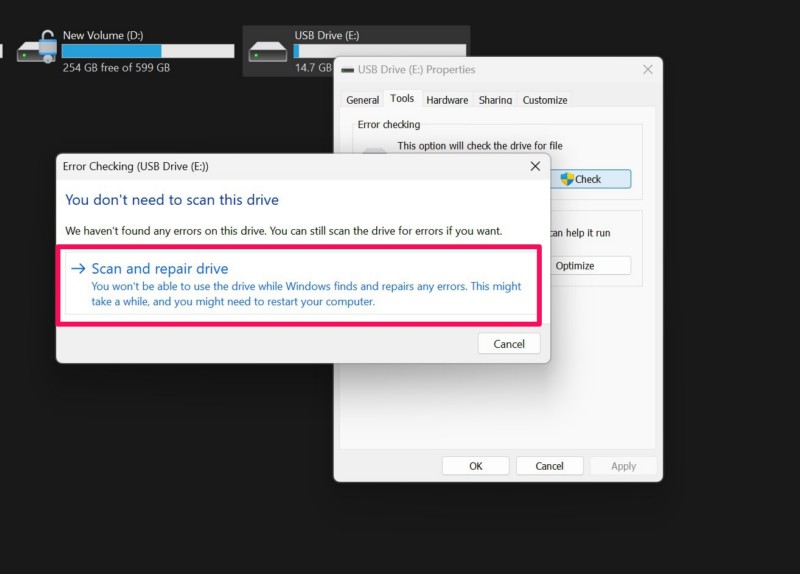
7. After the completion, you might need to restart your Windows 11 PC or laptop, in case the tool needs to resolve any error that has been found.
Once that is done, disconnect your external drive and reconnect it. Then, try transferring files from your Windows 11 PC or laptop to the connected external drive and check whether you are getting the “Error 0x800701B1: A device which does not exist was specified” or not.
5. Update the Disk Driver on Your Windows 11 PC or Laptop
Another fix that you can try to resolve the “Error 0x800701B1: A device which does not exist was specified” on your Windows 11 PC or laptop is updating the driver for the external drive. An outdated driver for your external drive may trigger unwanted errors such as the one you are getting while transferring files to the affected drive.
So, follow the steps right below to update the disk driver of your external drive on your Windows 11 PC or laptop:
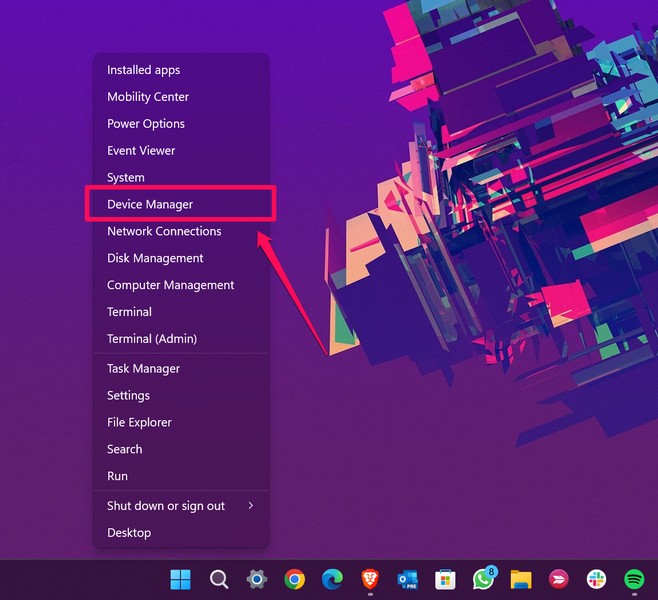
1. With the external drive connected to your Windows device, use Windows + X to open the Quick Links menu.
2. Choose the Device Manager option from the list.
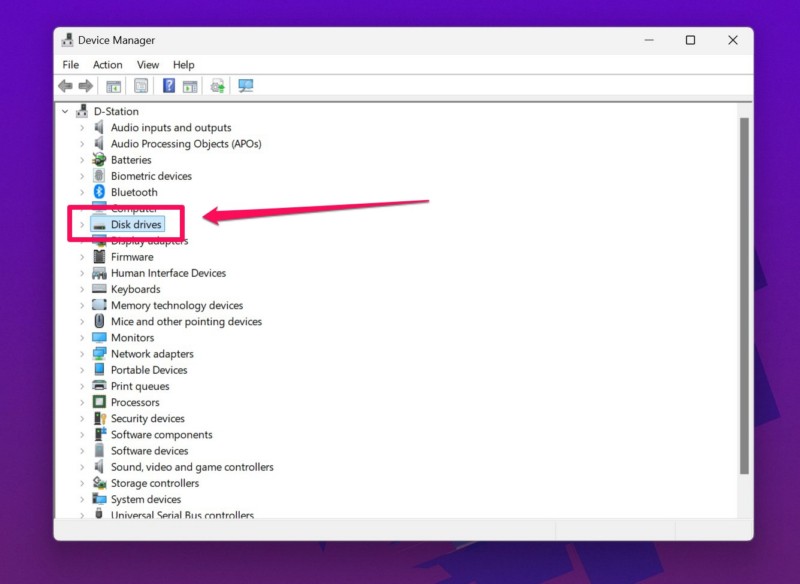
3. Locate the Disk drives option on the list and click the arrow next to it to expand it.
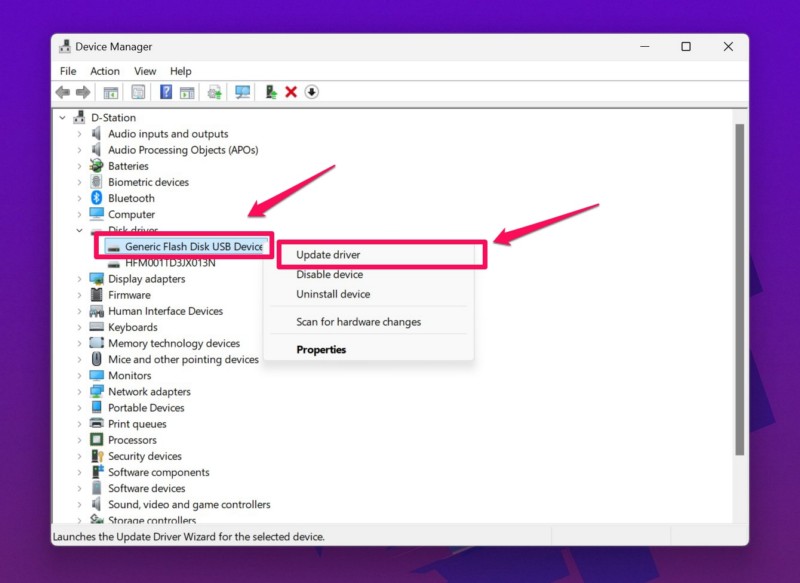
4. Now, right-click on the external disk drive that is connected to your PC or laptop and hit the Update driver option on the context menu.
5. Click the Search automatically for drivers button on the following prompt.
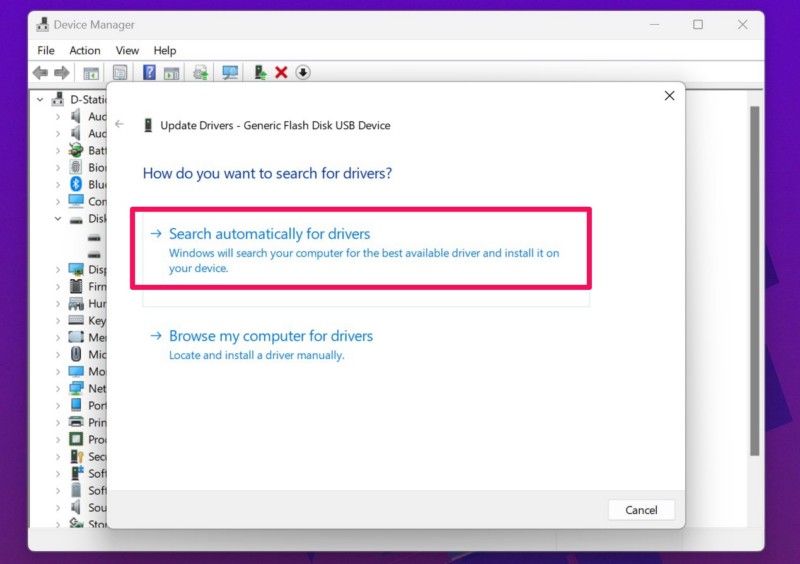
6. Wait for the process to complete.
7. Restart your Windows 11 device after completion.
Following the restart, try transferring data from your computer to the external drive and check whether the “Error 0x800701B1: A device which does not exist was specified” is fixed or not.
6. Reinstall the Disk Driver on Your Windows 11 PC or Laptop
If updating the disk driver for your external drive did not resolve the “Error 0x800701B1: A device which does not exist was specified” on your Windows 11 PC or laptop, you can try reinstalling the same. This will get rid of any unwanted issues within the driver of your external drive and resolve the Error 0x800701B1.
You can follow the steps right below to reinstall the disk driver for your external drive on your Windows 11 device:
1. Use steps 1-3 from the previous fix (Fix #5) to open the disk driver list in Device Manager on your PC or laptop.
2. Right-click on the disk driver for your external drive and click the Uninstall device option on the context menu.
3. Confirm your action on the following prompt and wait for the driver to uninstall.
4. Restart your Windows 11 PC or laptop after the process is completed. Restarting your device will automatically install the missing disk driver.
Following the restart, make sure to properly connect your external drive to your Windows device and try transferring data to it. If the “Error 0x800701B1: A device which does not exist was specified” was a result of a driver problem, you should not encounter it further.
7. Run a BCD Edit Command on Your Windows 11 PC or Laptop
Now, another unusual fix that has worked in resolving the “Error 0x800701B1: A device which does not exist was specified” on Windows 11 PC or laptop for many users is the BCD Edit command. It is a command-line tool that resolves boot issues on Windows computers and can be a handy fix for the said Error 0x800701B1 on Windows devices with HDD drives.
So, take a look at the steps right below to run the BCD Edit command on your Windows 11 PC or laptop:
1. Use Windows + S to invoke Windows search and type in cmd in the text field.
2. Click the Run as administrator option for the Command Prompt tool in the search results.

3. Click Yes on the following User Account Control (UAC) prompt.
4. In the elevated Command Prompt window, type in or copy-paste the following command and press Enter:
bcdedit /v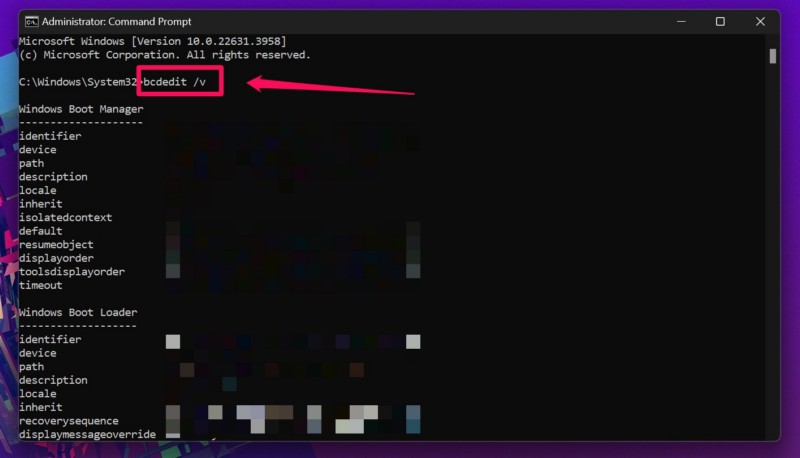
5. Wait for the command to execute on your device.
6. After it is executed, restart your PC or laptop.
Following the restart, check whether or not the “Error 0x800701B1: A device which does not exist was specified” is resolved on your Windows 11 computer.
8. Use the CHKDSK Tool for External Drive in Windows 11
The CHKDSK tool is another command-line tool that has worked in resolving the “Error 0x800701B1: A device which does not exist was specified” in Windows 11 for various users who experienced it. So, you can follow the steps right below to use the CHKDSK tool on your device and hopefully, get rid of the Error 0x800701B1:
1. With your external drive connected to your Windows 11 PC or laptop, use Windows + E to open File Explorer.
2. Go to the This PC tab on the left nav bar.
3. Note down the letter that represents the connected external drive. In our case, it is the E drive.
4. Now, use steps 1-4 from the previous fix (Fix #7) to open an elevated Command Prompt window on your device.
5. In the Command Prompt window, type in or copy-paste the following command, replace the letter d with the drive letter, and press Enter:
chkdsk d: /f /r /x6. Wait for the process to complete.
7. After it is completed, restart your Windows 11 PC or laptop.
Following the restart of your device, try transferring files from your internal drive to the external drive and check whether you are getting the same Error 0x800701B1 or not.
9. Use Disk Management to Rescan External Drive in Windows 11
The USB Error 0x800701B1 can also be resolved by rescanning the external drive using the Disk Management tool on your Windows 11 PC or laptop. So, follow the steps right below to do that:
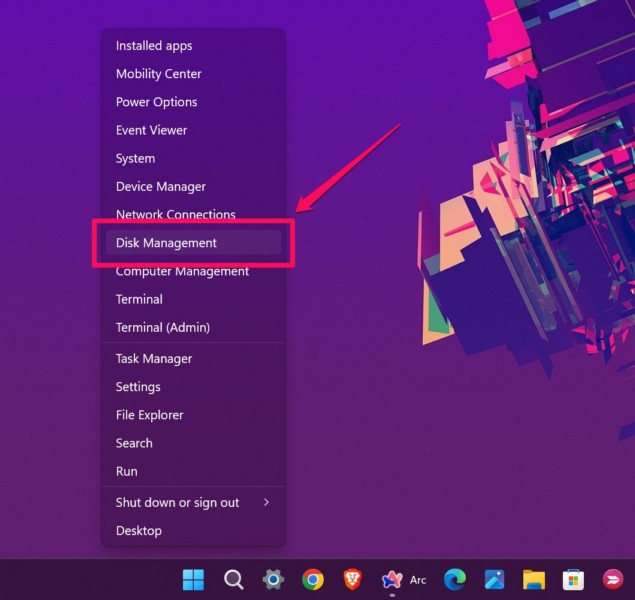
1. With the external drive connected, use Windows + X to open the Quick Links menu on your Windows computer.
2. Select the Disk Management option on the overflow menu.
4. Now, click the Action menu on the above menu bar and hit the Rescan option on the drop-down list.
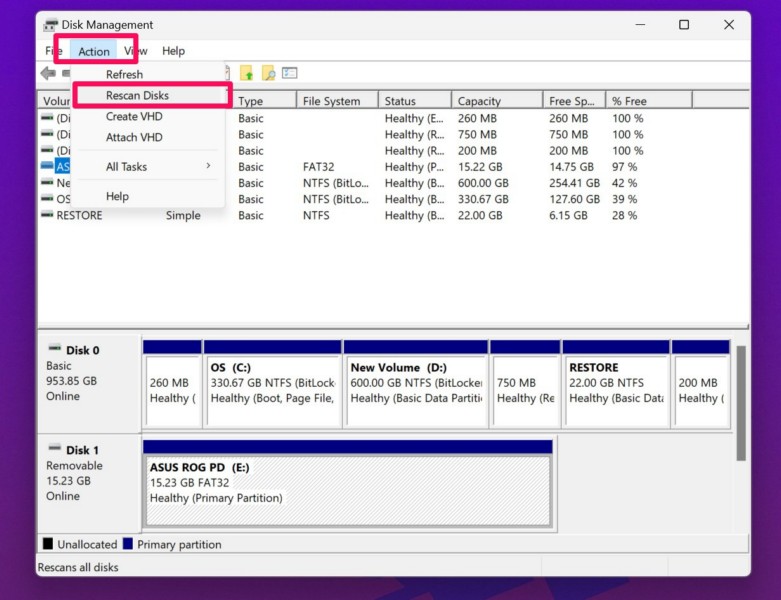
5. Wait for the process to complete.
Following the completion of the process, disconnect your external drive and reconnect it to your Windows 11 PC or laptop, and then, try transferring files to it.
10. Change the Security Settings of Your External Drive in Windows 11
Now, if the external drive to which you are trying to transfer data is not allowed to be accessed by your Windows 11 PC or laptop, you may come across the Error 0x800701B1. In this case, you must edit the security settings for the external drive and provide your Windows 11 device access.
You can follow the steps right below to change the security settings of your external drive in Windows 11:
1. With the external drive connected to your computer, use Windows + E to open File Explorer.
2. Go to the This PC tab.
3. Right-click on the problematic drive and select the Properties option on the context menu.
4. Now, go to the Security tab from the above tab bar and click the Advanced button below.
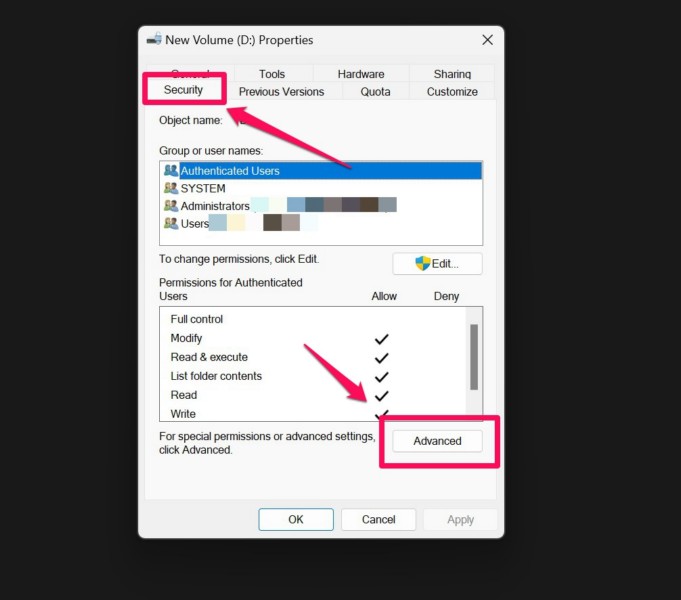
5. In the following window, click the Change button next to the Owner name.
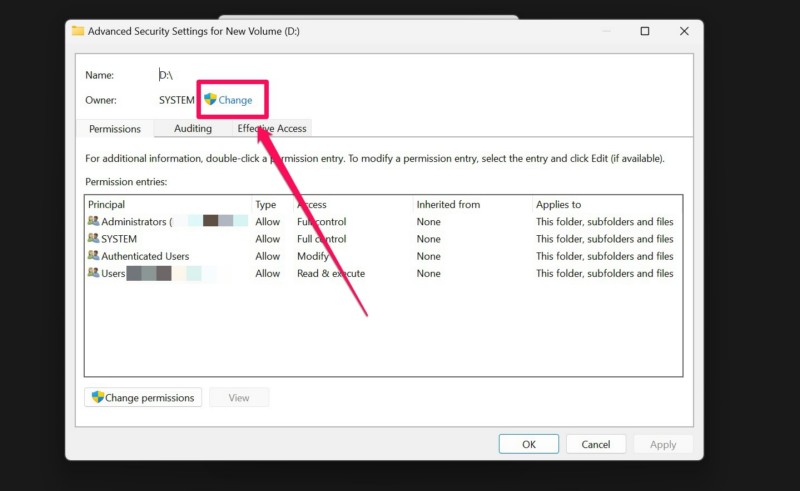
6. Next, click the Advanced button in the following dialog box.
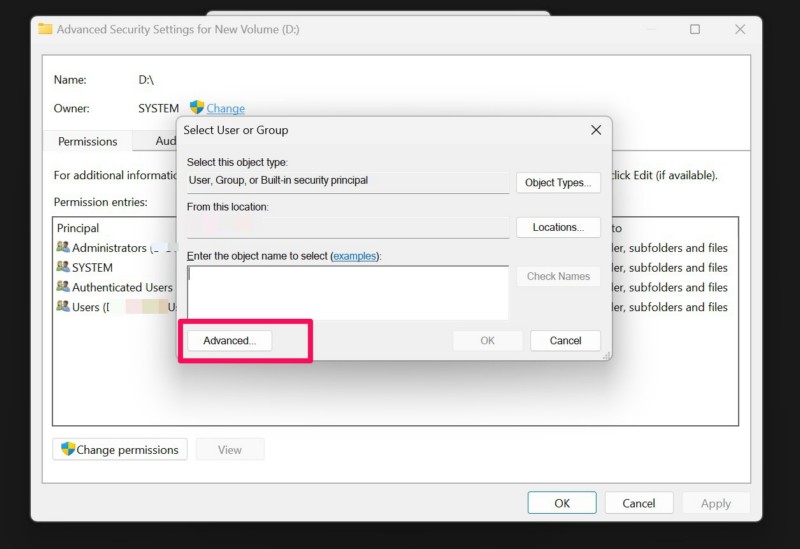
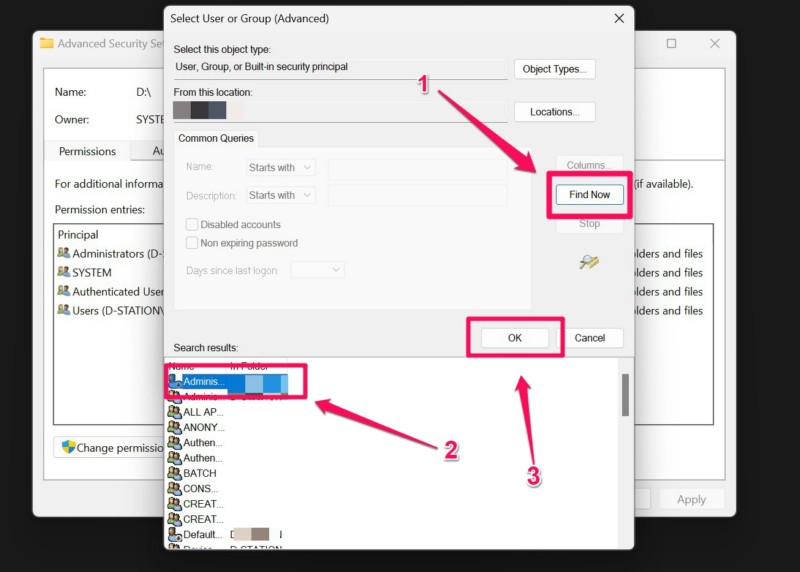
7. Click the Find Now at the right side of the following window, select your PC or laptop name from the list below, and click the OK button.
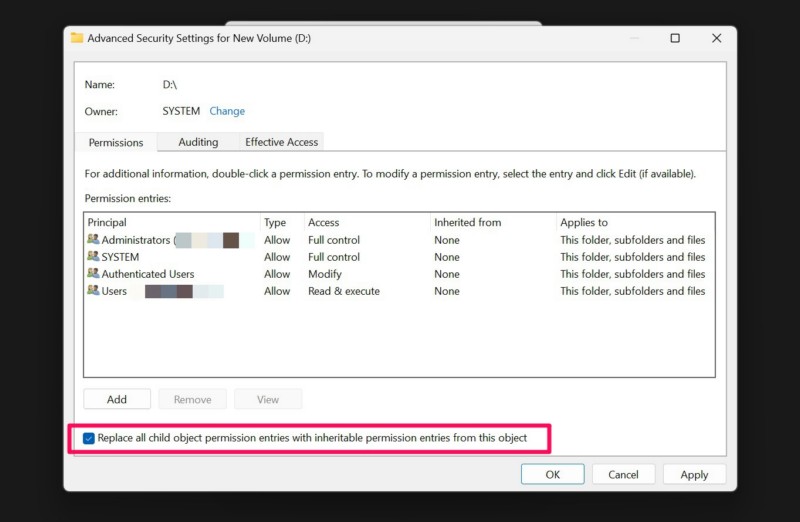
8. Finally, within the Advanced Security Settings window for the external drive, check the Replace all child object permission entries with inheritable permission entries from this object option.
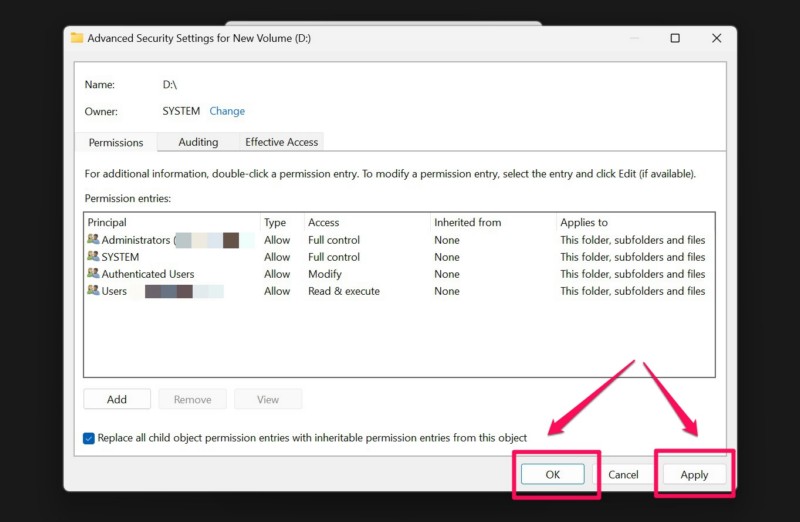
9. Click the Apply button and then, hit the OK button to exit the window.
After this change, transfer data from your internal disk drives to the external drive and check whether or not you are getting the “Error 0x800701B1: A device which does not exist was specified” on your Windows 11 PC or laptop.
11. Create a New Windows User Account on Your PC or Laptop
Another resolution for the “Error 0x800701B1: A device which does not exist was specified” in Windows 11 is to create a new Windows user account and use it to transfer data. You can try this fix if you believe that the said error is a result of an account issue on your Windows 11 PC or laptop.
So, follow the steps right below to create a new Windows user account in Windows 11:
1. Use Windows + I to launch the Settings app on your Windows 11 PC or laptop.
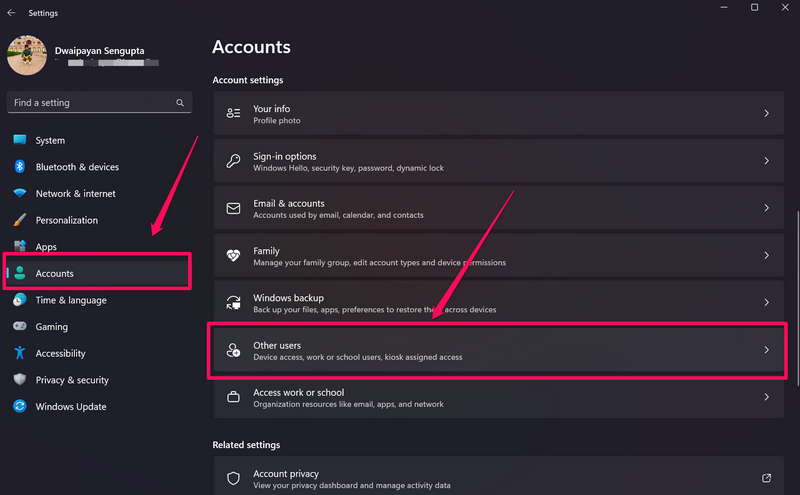
2. Go to the Accounts tab on the left navigation bar and click the Other users option on the right pane.
3. On the following page, click the Add account button.

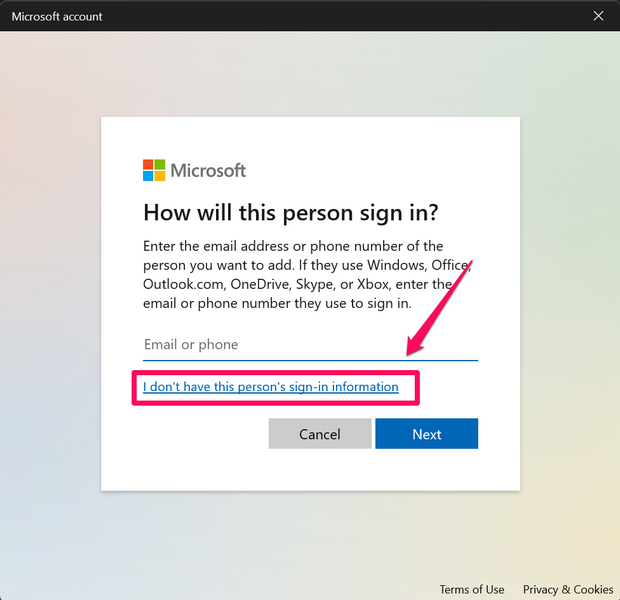
4. In the following window, select the I don’t have this person’s sign-in information button.
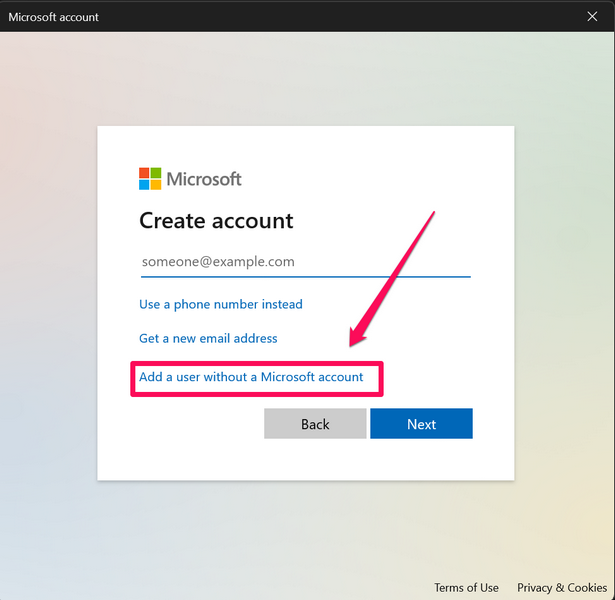
5. Next, click the Add a user without a Microsoft account button.
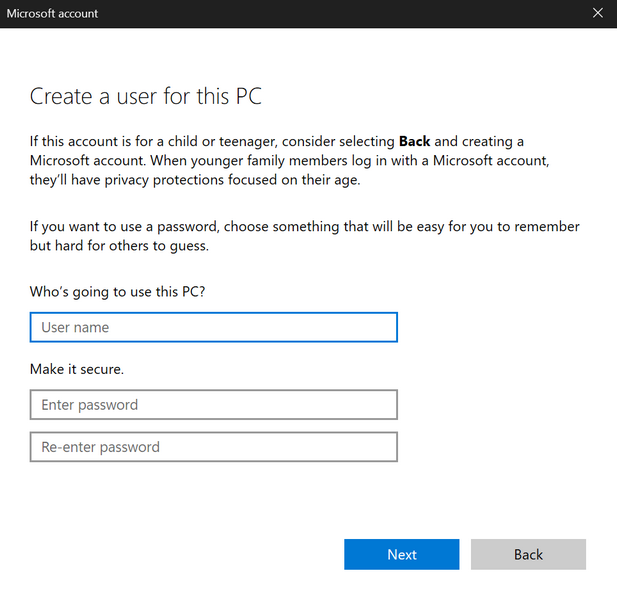
6. Now, provide the necessary information and follow the on-screen instructions to create a new Windows user account on your PC or laptop.
Once that is done, restart your device, sign into the new Windows account, and use it to transfer files to your external drive. If the “Error 0x800701B1: A device which does not exist was specified” is a result of an account-related issue, it should be resolved on your Windows 11 computer.
12. Disable Read Only Mode for External Drive in Windows 11
Now, if the external drive that you are using is formatted as a read-only drive, you might encounter the “Error 0x800701B1: A device which does not exist was specified” while transferring data to it on your Windows 11 PC or laptop. In this case, you will have to disable the read-only mode for the external drive in Windows 11 to avoid getting the error when transferring data to it.
So, follow the steps right below to disable the read-only format of the external drive on your Windows 11 PC or laptop:
1. With the external drive connected to your Windows device, use Windows + S to open Windows search and type in cmd.
2. Click the Run as administrator button for the Command Prompt tool.
3. Click Yes on the following User Account Control (UAC) prompt.
4. In the elevated Command Prompt window, type in the following command and press Enter:
diskpart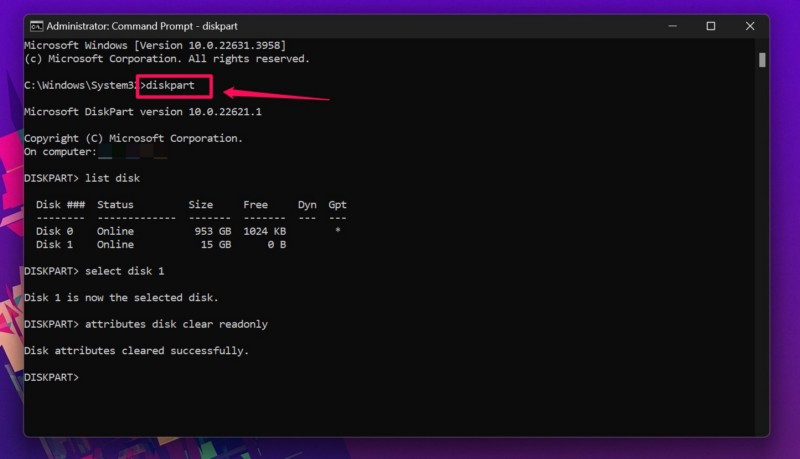
5. This will activate the DiskPart environment in the Command Prompt window. Next, type in the following command and press Enter:
list disk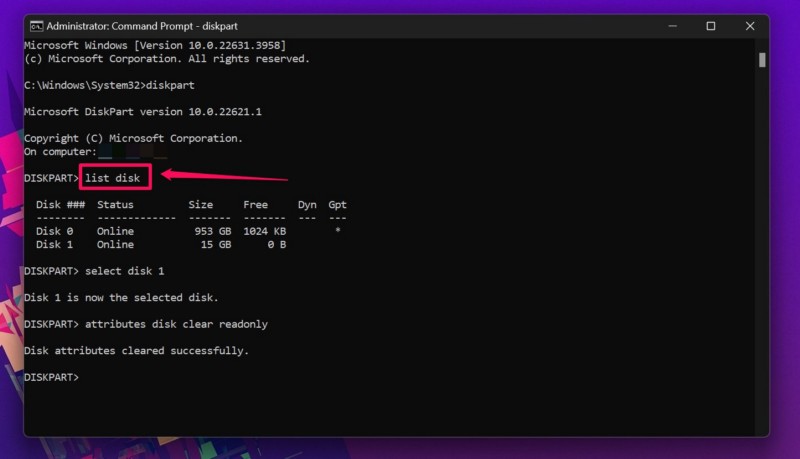
6. You will now see a list of the connected disk drives on your device along with an index number. Go through the list to locate the disk number for your external drive, type in the following command, and press Enter:
select disk #xNote: Replace the #x with the disk number of your external drive.
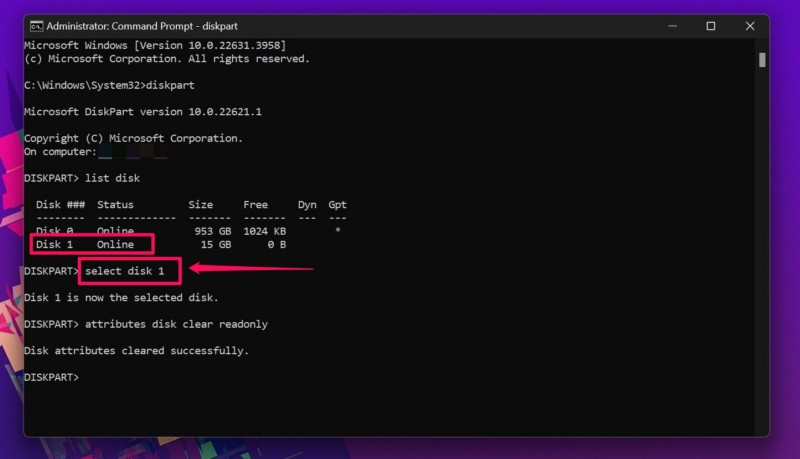
7. Once the external disk drive is selected in DiskPart, type in the following command and press Enter to disable the read-only format for it:
attributes disk clear readonly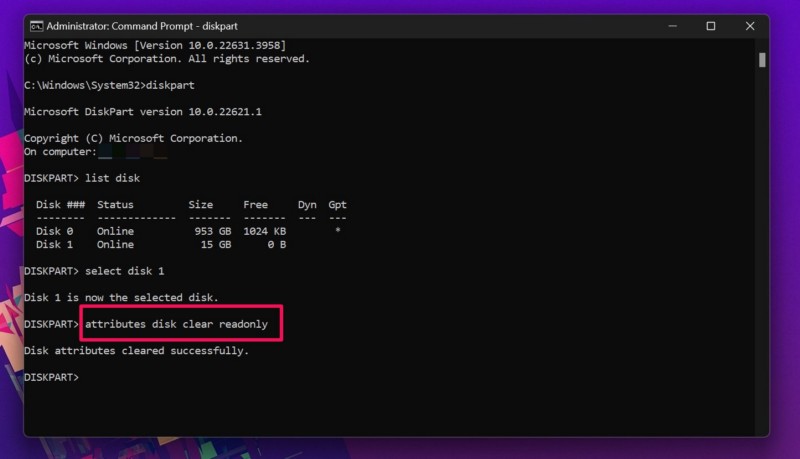
8. You will then get a confirmation message for the execution of the command.
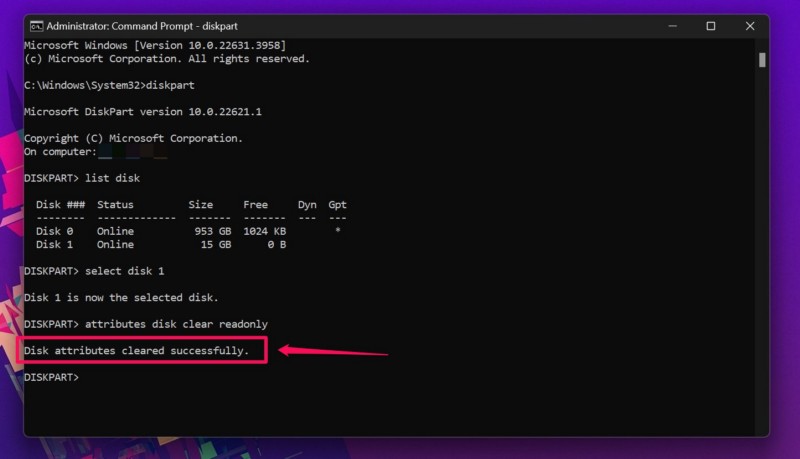
Now, you can close the Command Prompt window, and transfer data to your external drive without getting the “Error 0x800701B1: A device which does not exist was specified” on your Windows 11 PC or laptop.
13. Change the File System of Your External Drive in Windows 11
Another thing you can do to resolve the “Error 0x800701B1: A device which does not exist was specified” on your Windows 11 PC or laptop is to change the file system of your external drive. It has worked for many users, though changing the file system of the external drive will require you to format it. This means that all the data stored within your external drive will be permanently removed.
Having said that, you can follow the steps right below to format your external drive and change the file system for it on your Windows 11 PC or laptop:
1. With your external drive connected to your Windows computer, use Windows + E to open File Explorer.
2. Go to the This PC tab from the left nav bar.
3. Right-click on the external drive and click the Format option on the context menu.
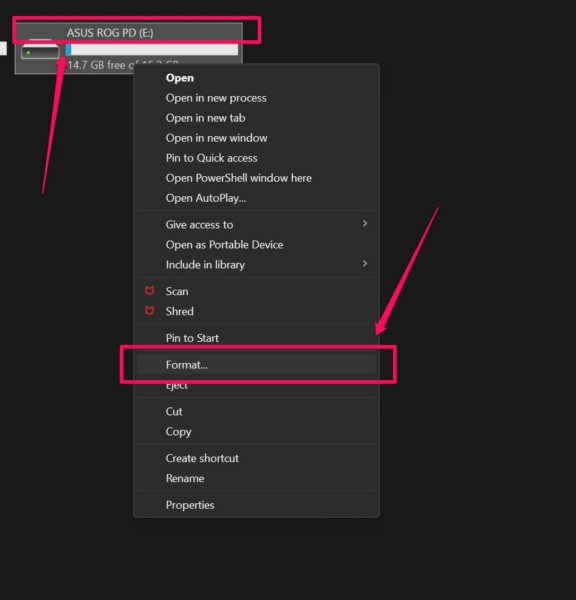
4. In the following window, click the File system field.
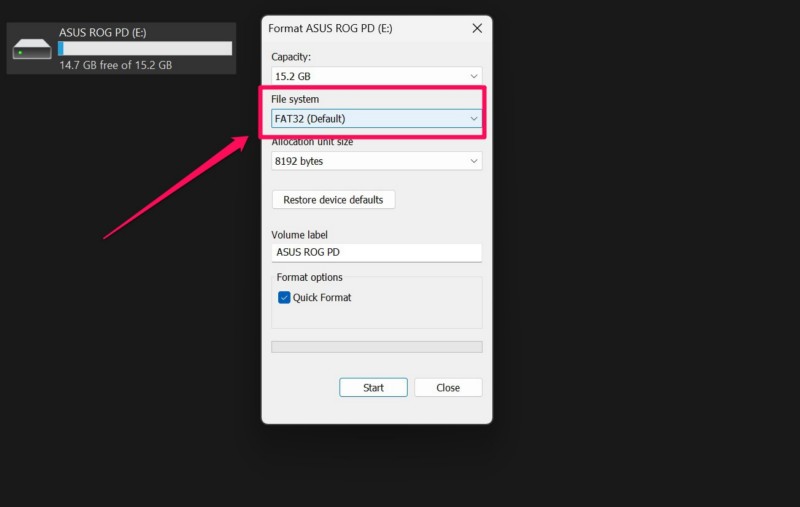
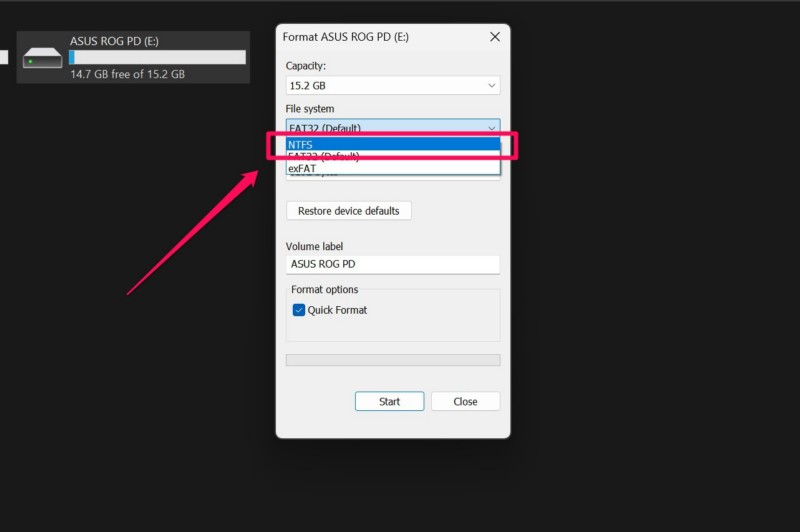
5. On the following drop-down menu, select the NTFS option, which is an upgraded file system than the default FAT32.
6. Now, click the Start button below to initiate the formatting process.
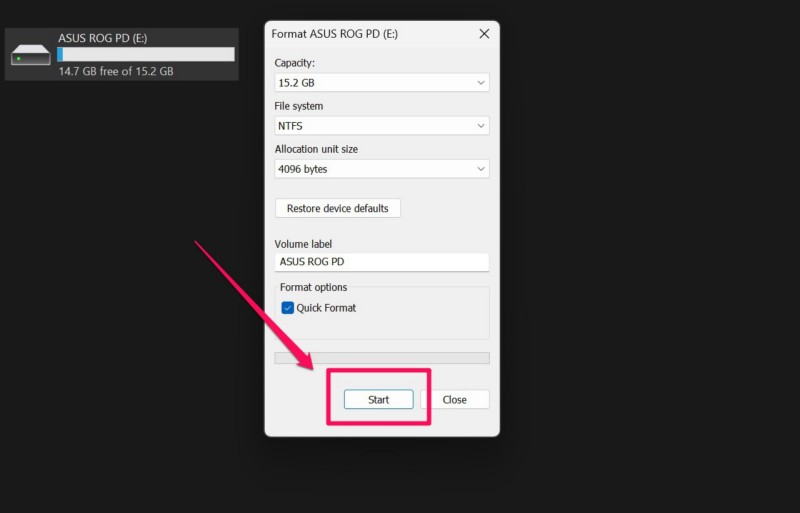
7. Wait for the process to complete on your Windows 11 PC or laptop.
After completion of the process, disconnect the external drive and reconnect it to your device. Then, try transferring data to it and check whether you are getting the “Error 0x800701B1: A device which does not exist was specified” or not.
14. Avoid Transferring Massive Files in One Go
Now, if you are getting the “Error 0x800701B1: A device which does not exist was specified” while transferring folders with massive files on your Windows 11 PC or laptop, it can mean that your external drive is facing issues dealing with the folder size. So, when transferring folders containing massive files from your internal drive to an external one, try not to transfer them in one go.
You can open the folder and select the files individually to break down the task and in turn, reduce the size of the data you want to transfer. Although it is more of a suggestion than a fix, it can hugely help in avoiding the “Error 0x800701B1: A device which does not exist was specified” on your Windows 11 PC or laptop.
15. Disconnect Other External Peripherals and Accessories
Another factor that can contribute to getting the “Error 0x800701B1: A device which does not exist was specified” in Windows 11 is an excess of external accessories and peripherals connected to your PC or laptop. When you connect your external drive to a system that is already powering many other USB devices and accessories such as mouse, keyboards, and other storage devices, it can fail to deliver the necessary power to the external drive for the file transfer process.
In this case, try disconnecting some of the external USB devices that are connected to your Windows 11 PC or laptop. If necessary, you can keep the other USB accessories disconnected until the file transfer is completed on your external drive.
16. Try Using a USB 3.0 Port on Your Windows 11 PC or Laptop
Now, if you are using a USB 2.0 port to connect your external drive on your Windows 11 PC or laptop, you can try switching to a USB 3.0 port, if your device has one. USB 3.0 ports have much better transfer speeds and power supply compared to USB 2.0 ports, and hence, you can use them for high-volume data transfers with more reliability.
So, switching from a USB 2.0 port to a USB 3.0 port to transfer files on your Windows 11 device can help you avoid getting the “Error 0x800701B1: A device which does not exist was specified” and transfer relatively bigger files and folders without any hindrances.
FAQs
What causes the “Error 0x800701B1: A device which does not exist was specified” in Windows 11?
The “Error 0x800701B1: A device which does not exist was specified” in Windows 11 is usually due to a loose connection between a PC or laptop and an external USB drive. It can also arise due to power supply issues, misconfigured settings for external drives in Windows 11, hardware damage, and other similar causes.
Why is my USB drive not connecting in Windows 11?
If a USB drive or accessory is not connecting to your Windows 11 PC or laptop, the problem could be hardware-related. If the USB port you are using to connect your USB drive is damaged or malfunctioning, it will not recognize the external drive or accessory. The same can happen if the USB cable of the external drive or USB accessory is damaged.
How to format an external USB drive in Windows 11?
With the external USB drive connected to a Windows 11 PC or laptop, locate it in File Explorer, right-click on it to open the context menu, and select the Format option. From there on, follow the on-screen instructions to format the USB drive in Windows 11.
Wrapping Up
With that, we wrap up our comprehensive guide on how to fix the “Error 0x800701B1: A device which does not exist was specified” on Windows 11 PCs and laptops. The said USB error can be quite annoying when you want to transfer important data from your Windows 11 device to an external drive for safekeeping or otherwise. Hence, we understand how frustrating it can be when the same error pops up repeatedly.
So, we hope this article helped you resolve the Error 0x800701B1 on your Windows 11 PC or laptop and get back to transferring your data without interruptions. If it did, don’t forget to let us know in the comments below. You can also subscribe to our website and YouTube channel for more informational guides such as this one. As always, thank you for reading this article till the very end, and we will see you again in our next guide.