
Как это не странно, но код ошибки 0x80070070 при установке Windows Vistaимеет возможность возникнуть в любой момент даже на том компьютере, на котором ранее уже была установлена аналогичная версия операционной системы. В такой ситуации, пользователь ПК начинает не понимать, что именно происходит с его компьютером, пытается проделывать одинаковые операции по установки ОС и раз за разом видит ошибку 0x80070070.
Конечно, если юзер более или менее продвинуты, то он совершенно по иному постарается отнестись к свое проблеме и будет искать ее решение различными способами, но вот новички в мире компьютерной техники и программного обеспечения окажутся в самой настоящей ловушке из которой им, без посторонней помощи не выбраться. Именно это и подталкивает нас к тому, чтоб рассказать вам о том, как можно справиться проблемой, которая выглядит, как код ошибки 0x80070070 именно при установке операционной системы.
Почему возникает код ошибки 0x80070070 в Windows Vista?
Основных причин, по которым может возникнуть вышеназванная шибка, не так уж и много, а следовательно, с ними необходимо попытаться разобраться в первую очередь, ведь велик шанс, что как только вы внесете изменения во все три нижеописанных пункта, то все кардинально изменится. Вот, что вам необходимо проверить в первую очередь:
- Пытаясь установить операционную систему Windows Vista, вам необходимо производить все настройки по запуску установки непосредственно в BIOS-е, так как это самый правильный вариант установки ОС. Если кто-то вам рекомендует устанавливать ОС прям из работающей системы, вам стоит отказаться от данного предложения и воспользоваться именно нашим советом.

- Обратите внимание на то, каким софтом вы создаете загрузочный носители для своей системы, который вы собираетесь использовать в последующем. Тут стоит помнить, что код ошибки 0x80070070 при установке Windows Vistaможет возникнуть даже при условии, что вы использовали не ту файловую систему, а именно «ntfs», которая не подходит! Для ОС Vista, как и для ОС XP, стоит использовать только файловую систему «fat32».

- Убедитесь в том, что на жестком диске, который используется для установки ОС, есть как минимум 20 Гб. свободного дискового пространства. Стоит так же отметить, что идеальный размер свободного дискового пространства в момент установки системы должен быть не мене 40 Гб. Если дискового пространства будет мало, то может возникать не только ошибка, но еще и может произойти удаление ваших личных данных, так что будьте с этим пунктом очень внимательны.

Как только вам удастся исключить описанные выше проблемы, которые реально могут присутствовать у вас в тот момент, когда возникает код ошибки 0x80070070 при установке Windows Vista, то тут же можно заметить, что ошибка пропала сама собой. Так что, будьте внимательны и осторожных во время установке ОС, ведь возникновения ошибки – это еще не на столько страшно, как удаление личных файлов
The error 0X80070070 is signaling that there isn’t enough space on the drive (ERROR_DISK_FULL). While the issue can indeed be related to low disk space, it’s usually caused by not enough contiguous free space in the hidden system partition (recovery partition).
Most of the time, you’ll encounter the error code 0X80070070 in one of the following scenarios:
- When accessing the Windows update page – “Windows Update has encountered a problem and cannot display the requested page. 0X80070070”
- After a Windows update fails – “Download Failed. Result code: 0X80070070”
- When installing Windows from DVD or USB – “Installation Failed” 0X80070070
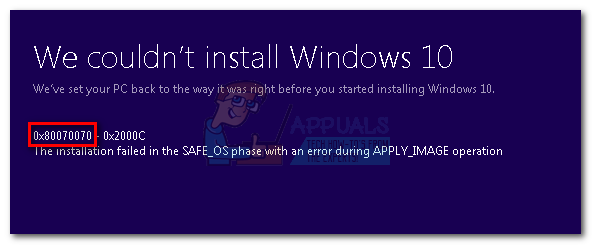
- After upgrade to Windows 10 fails – “The installation failed in the Safe_OS phase with an error. 0X80070070”
When prompted with this error code, it’s recommended that you begin your troubleshooting guide by making sure that your drive has enough disk space. If clearing space on the drive doesn’t fix the issue, the problem is almost certainly related to the system reserved partition.
Below you have a collection of fixes that have successfully helped users to eliminate the 0X80070070 error. Please follow them in order until you encounter a solution that works in your scenario.
Note: Depending on the scenario in which you encounter the 0X80070070 error, you might or might not have access to some of the solutions featured in the methods below. Only follow those fixes that are applicable to your situation.
Method 1: Clearing disk space
Before you try anything else, it’s important to make sure you have enough disk space for the windows upgrade or installation to install. This can either mean uninstalling apps that you don’t use, deleting big files, or adding additional storage space.
If that’s not enough, let’s try cleaning up the system files using Disk Cleanup. Here’s what you need to do:
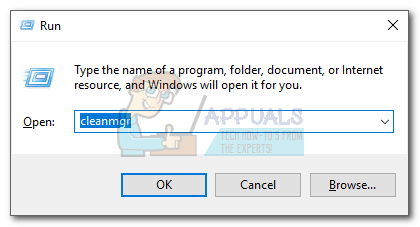
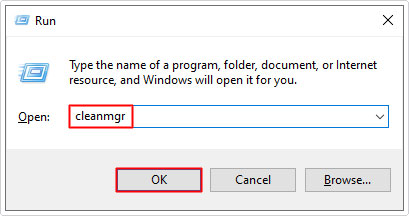
- Press Windows Key + R to open a Run window and type “cleanmgr“. Hit Enter to open a Disk Cleanup dialog box.

- Click the Cleanup system files button. You might be asked to provide the admin password at this point.
- You can run the cleanup tool for the file types already selected by clicking Ok. If you need even more free space, you can also check the box next to Windows Update Cleanup, Temporary Files and Windows Update log files.
- Confirm and kickstart the tool by clicking on Delete Files.
- Reboot your system and attempt to upgrade or download the update again. If you’re presented with the same error message, move to Method 2.
Method 2: Moving the Temp Folder
Some users have managed to fix the error 0X80070070 by moving the temp folder to a different partition/disk. This method is effective if you didn’t manage to clear enough disk space using Method 1.
When the system needs to manipulate large files, the temp folder is used to store those files temporarily. If it doesn’t have enough space to store them, the user will be prompted with the 0X80070070 error. However, you can avoid this issue by moving the Temp folder to a different partition that has more space to work with. Here’s a quick guide on how to do it:
- Press Windows key + R to open a Run window. Type “sysdm.cpl” and hit Enter to open System Properties.
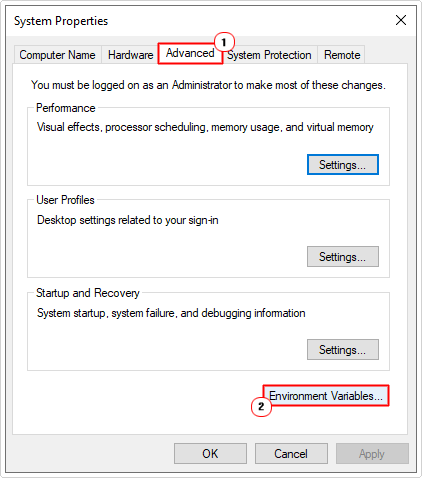
- Under System Properties, Go to the Advanced tab and click on Environment variables.

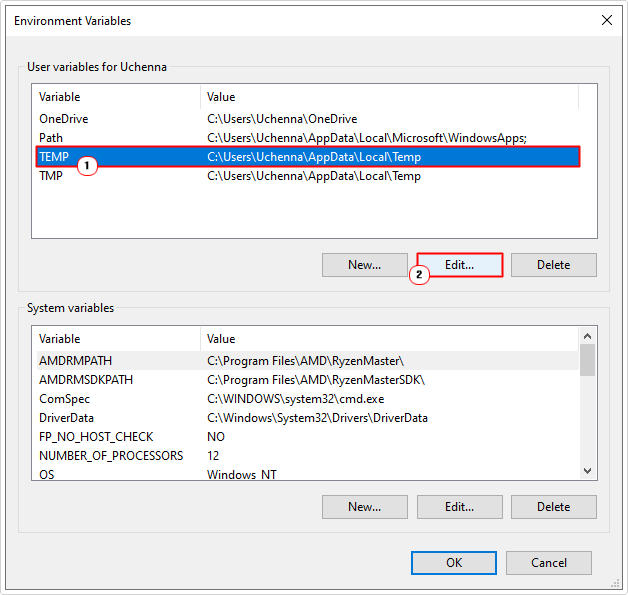
- Select the Temp folder and click the Edit button.

- Then, use the Browse Directory button to move the Temp folder to another partition where you have more space. Hit Ok to confirm.

- Reboot your system and attempt to perform the update/upgrade again. If you’re still seeing the 0X80070070 error, move to Method 3.


Method 3: Disabling Disk Quotas
A disk quota is a limit imposed by the system administrator with the purpose of tracking and controlling disk usage on a per-user or per-volume basis. Using disk quotas is beneficial in allocating limited disk space in a reasonable way. However, a 0X80070070 error can be triggered if you have Disk Quotas enabled on your drive and you’re over the limit.
Here’s a quick guide on disabling disk quotas on your system:
- Press Windows key + R to open a Run command and type “diskmgmt.msc“. Hit Enter to open the Disk Management dialog box.
- Right-click on your Windows partition and select Properties.

- Access the Quota tab and uncheck the box next to Enable quota management. Hit Apply to confirm.
Note: If you need to keep using disk quotas, try adjusting the limit disk space instead of disabling quota management. - Restart your system and attempt to re-apply the upgrade/update. If it’s still failing with the 0X80070070 error, proceed to the next method.


Method 4: Repartitioning the Hard drive from Disk Management
Some users have reported seeing the 0X80070070 error when trying to apply the Windows 10 upgrade. If you have enough storage space on your OS drive, this typically happens because the upgrade wizard is trying to copy files on the recovery drive. If that’s the case, one solution would be to enlarge the recovery drive so that it has enough space to store the new files.
To repartition the hard drive so that it has sufficient space for the installation, follow the steps below:
- Press Windows key + R to open a Run Window. Type “diskmgmt.msc” and hit Enter to open Disk Management.
- Right-click on C (or whatever your Windows drive is lettered) and click on Shrink Volume. It might take a while for the query to complete.
- Next, use the box next to Enter the amount of space to shrink in MB to extract the space required for the upgrade wizard. Just to be sure, free over 15 Gb (15000 MB). Next, hit Shrink and wait for the process to complete.

- Once you extracted space from the Windows drive, let’s rename the recovery drive to something else. To do this, right-click on the recovery drive and click on Change Drive Letter and Paths.
- If the drive doesn’t have any letter assigned (usually it’s labeled as D), click on Add and assign the letter G. If the letter D is already assigned, use the Change button to modify it.
Note: You can assign any letter besides G. The point is to rename the recovery drive to something other than D. This step is necessary since the upgrade setup is keen on writing on the D drive. - Finally, right-click on the unallocated space that you’ve previously freed from the C drive and select New Simple Volume.
- Follow along with the volume wizard and make sure you use all the unallocated space left. When you reach the Assign Drive Letter or Path stage, choose to Assign the following drive letter and select the letter D from the drop-down menu.

- Click Next at the two following prompts, then click Finish to complete the process.
- Reboot your device and run the upgrade wizard again. If it fails with the same error, move to the next method.


Method 5: Using the Media Creation Tool to upgrade Windows
If you were unable to remove the 0X80070070 error with the methods above, let’s try using the Media Creation tool. This Microsoft-developed tool is usually capable of completing the installation even if the Upgrade Assistant previously failed. If you’re seeing the 0X80070070 error when the Windows 10 upgrade fails, this method should allow you to complete the upgrade.
Besides downloading the files required for a clean installation, the Media Creation Tool is also capable of upgrading the version of your Windows. Here’s a quick guide to using Media Creation Tool to upgrade Windows:
- Download Media Creation Tool from this official link (here).
- Open the tool and choose Upgrade this PC now at the first prompt.
- The software will download the required files and check if the system requirements are being met. If your specs are enough, the setup will begin installing the upgrade on your PC. Your system will restart several times during this process.
If the Media Creation Tool returns the same 0X80070070 error, move down to Method 6.
Method 6: Deleting the reserved partition (Clean Install)
Most of the time, the error 0X80070070 is shown when Windows does not have enough space to install the required files on the recovery drive. Windows 7, Windows 8 and Windows 10 all have in common a special System Reserved partition that is created when you install the OS on a clean drive. However, Windows will not automatically assign a drive letter to this partition (unless you force it). Because of this, you’ll not see this drive unless you’re in Disk Management (or other similar utility), or when booting from the Windows Installation media.
Under normal conditions, deleting the System Reserved partition is not a good idea since it contains boot manager and boot configuration data. However, if you’re trying to perform a clean installation of Windows or when upgrading to another Windows version, the partition recovery will be recreated anyways.
If you encounter the 0X80070070 error when trying to do a clean installation of Windows, follow the guide below to delete the reserved partition before attempting a clean installation:
Warning: Do not attempt the steps below unless you’re already planning on doing a clean Windows installation. Deleting the system reserved partition will remove important boot files and might make your system incapable of booting up.
- Boot from the Windows installation media. If you don’t have the appropriate installation media for your Windows version, follow this guide for Windows 7 (here) or this guide for Windows 10 (here).
- Click Next at the first installation window and then select Install Windows.
Note: If you’re installing Windows 10, you will also be asked to insert the product key.

- Check the box next to I accept the license terms and hit Next.
Note: When installing Windows 10, you might need to select the operating system that you want to install before agreeing to the license.

- When asked which type of installation do you want, choose Custom (advanced).

- Select the System Reserved Partition ( Disk 0 Partition 1) and click on Drive options (advanced).

- Click the Delete button and then OK to confirm.


Note: If you want to upgrade to another Windows version, close the wizard after deleting the recovery partition and start again with Step 1. Then, at Step 4 select Upgrade instead of Custom(advanced).

That’s it. Once the recovery partition is removed you can proceed forward with the installation. It should complete without the 0X80070070 error.
Kevin Arrows
Kevin Arrows is a highly experienced and knowledgeable technology specialist with over a decade of industry experience. He holds a Microsoft Certified Technology Specialist (MCTS) certification and has a deep passion for staying up-to-date on the latest tech developments. Kevin has written extensively on a wide range of tech-related topics, showcasing his expertise and knowledge in areas such as software development, cybersecurity, and cloud computing. His contributions to the tech field have been widely recognized and respected by his peers, and he is highly regarded for his ability to explain complex technical concepts in a clear and concise manner.
Существует множество причин, по которым при обновлении или установке Windows 11 может появиться сообщение об ошибке, но распространенные ошибки можно исправить с помощью нескольких действий, которые можно выполнить самостоятельно. Примечание. При обновлении устройство с более старой версии Windows, например Windows 7, Windows 8.1 или Windows 10, будет Windows 11.
Прежде чем искать определенный код ошибки, воспользуйтесь советами в разделе Общие решения. Если они не помогут решить проблему с обновлением или установкой, воспользуйтесь таблицей кодов ошибок в конце этой статьи.
Общие решения
Вот несколько советов, которые помогут вам исправить ошибки обновления и установки:
Отсоедините все ненужные устройства. Это могут быть наушники, принтеры, сканеры, динамики, USB-устройства флэш-памяти и внешние жесткие диски.
Если вы используете ноутбук, подключенный к стыковочному узлу, отстыкуйте его.
Прежде чем пытаться обновить Windows, убедитесь, что на устройстве установлены все важные обновления, в том числе обновления драйверов оборудования.
Чтобы убедиться, что на устройстве установлены все обновления, просмотрите статью Центр обновления Windows: вопросы и ответы.
Используйте Защитник Windows для защиты своего устройства во время обновления — антивирусное программное обеспечение не от Майкрософт может вызывать проблемы с обновлением. Если у вас есть установочный носитель и вся необходимая информация для активации, вы можете переустановить программное обеспечение после обновления.
Чтобы удалить антивирусное приложение, перейдите в раздел Панель управления\Программы\Программы и компоненты. Выберите программу и нажмите Удалить. Нажмите кнопку Да, чтобы подтвердить операцию.
Устаревшее программное обеспечение может мешать обновлению Windows, поэтому попробуйте удалить старые или ненужные приложения.
Если вы хотите переустановить приложение позже, перед удалением убедитесь, что у вас есть установочный носитель и вся необходимая информация для активации.
Чтобы удалить программное обеспечение, перейдите в раздел Панель управления\Программы\Программы и компоненты. Выберите программу и нажмите Удалить. Нажмите кнопку Да, чтобы подтвердить операцию.
Чтобы выполнить обновление до Windows 11, на жестком диске требуется достаточно места для установки.
Чтобы просмотреть объем свободного места на жестком диске на компьютере, выберите проводник на панели задач (в Windows 7 она называется Обозреватель Windows) или нажмите клавишу с логотипом Windows + E.
Затем выберите Компьютер или Этот компьютер и найдите раздел Жесткие диски или Устройства и диски. Системным считается диск, на значке которого есть логотип Microsoft Windows. Количество свободного места будет указано под диском.
Если свободное место на диске заканчивается, ознакомьтесь с советами по освобождению места на диске компьютера.
Ошибки 0xC1900101
Ошибка, начинающаяся с 0xC1900101 — это, как правило, ошибка драйвера. При отображении какого-либо из этих кодов ошибок, попробуйте сначала выполнить следующие действия, чтобы устранить проблему. Если эти действия не помогли, дополнительные технические сведения см. в статье Устранение ошибок обновления Windows .
-
0xC1900101 — 0x2000c
-
0xC1900101 — 0x20017
-
0xC1900101 — 0x30018
-
0xC1900101 — 0x3000D
-
0xC1900101 — 0x4000D
-
0xC1900101 — 0x40017
-
Убедитесь, что на вашем устройстве достаточно свободного места. На вашем устройстве требуется не менее 16 ГБ свободного места для обновления 32-разрядной ОС или 20 ГБ для 64-разрядной ОС. Дополнительные сведения см. в статье Освобождение места на диске в Windows.
-
Запустите Центр обновления Windows несколько раз. Скачайте и установите все доступные обновления в Центре обновления Windows, в том числе обновления программного обеспечения, обновления для оборудования и некоторые сторонние драйверы. Используйте средство устранения неполадок клиентский компонент Центра обновления Windows для исправления ошибок обновления Windows 11.
-
Проверьте сторонние драйверы и скачайте все обновления. Сторонние драйверы и инструкции по установке для любого оборудования, которое вы добавили к устройству, можно найти на веб-сайте изготовителя.
-
Отключите дополнительное оборудование. Удалите все внешние устройства хранения данных и диски, док-станции и другое оборудование, подключенное к устройству, которое не нужно для основных функций.
-
Проверьте диспетчер устройств на наличие ошибок. В поле поиска на панели задач введите диспетчер устройств. Выберите в результатах Диспетчер устройств. В появившемся окне найдите все устройства с желтым восклицательным знаком рядом (может потребоваться выбрать каждую категорию, чтобы перейти в список устройств). Нажмите и удерживайте (или щелкните правой кнопкой мыши) имя устройства и выберите один из вариантов Обновить драйверы или Удалить, чтобы исправить ошибки.
-
Удалите программы безопасности сторонних разработчиков. Убедитесь, что вы знаете как переустановить программы, а все необходимые ключи под рукой. Защитник Windows защитит ваше устройство на это время.
-
Исправьте ошибки жесткого диска. В поле поиска на панели задач введите командная строка. Выберите из списка результатов Командная строка. В появившемся окне введите chkdsk/f C: и нажмите клавишу ВВОД. Исправление ошибок на жестком диске начнется автоматически, и вам будет предложено перезапустить устройство.
Примечание: Чтобы выполнить это действие, у вас должны быть разрешения администратора.
-
Выполните корректный перезапуск в Windows. См. раздел Выполнение «чистой» загрузки в Windows.
-
Восстановление и восстановление системных файлов. В поле поиска на панели задач введите командная строка. Выберите из списка результатов Командная строка. В появившемся окне введите DISM.exe /Online /Cleanup-image /Restorehealth и нажмите клавишу ВВОД. (Узнайте, как восстановить образ Windows)
Примечание: Чтобы выполнить это действие, у вас должны быть разрешения администратора.
Другие распространенные ошибки
В следующей таблице перечислены наиболее распространенные ошибки обновления и установки, а также некоторые действия, которые можно попытаться исправить. Если у вас по-прежнему возникают проблемы с обновлением или установкой Windows, обратитесь в службу поддержки Майкрософт.
|
Ошибка |
Что она означает и как ее исправить |
|---|---|
|
0xc1900223 |
Это означает, что возникла проблема с загрузкой и установкой выбранного обновления. Центр обновления Windows повторит попытку позже, при этом вам не потребуется выполнять никаких действий. |
|
0xC1900208 — 0x4000C |
Эта ошибка может означать, что на компьютере установлено несовместимое приложение, которое не позволяет завершить процесс обновления. Удалите все несовместимые приложения, а затем попробуйте выполнить обновление снова. |
|
0xC1900107 |
Операция очистки предыдущей попытки установки по-прежнему ожидает завершения, для продолжения обновления требуется перезагрузка системы. Перезагрузите устройство и снова запустите программу установки. Если перезапуск устройства не решил проблему, воспользуйтесь программой очистки диска для удаления временных и системных файлов. Дополнительные сведения см. в статье Очистка диска в Windows. |
|
0x80073712 |
Файл, необходимый Центру обновления Windows, поврежден или отсутствует. Попробуйте восстановить системные файлы. В поле поиска на панели задач введите командную строку. Выберите из списка результатов Командная строка. В появившемся окне введите DISM.exe /Online /Cleanup-image /Restorehealth и нажмите клавишу ВВОД. |
|
0xC1900200 — 0x20008 0xC1900202 — 0x20008 |
Это может означать, что ваш компьютер не соответствует минимальным требованиям для скачивания или установки обновления до Windows 11. Узнайте больше о минимальных требованиях для Windows 11. |
|
0x800F0923 |
Это может означать, что драйвер или другое программное обеспечение на компьютере несовместимо с обновлением до Windows 11. Чтобы узнать, как устранить эту проблему, обратитесь в службу поддержки Майкрософт. |
|
0x80200056 |
Эта ошибка может означать, что процесс обновления был прерван, поскольку вы случайно перезагрузили компьютер или вышли из системы. Попробуйте снова выполнить обновление и убедитесь, что компьютер подключен к электросети и остается включенным. |
|
0x800F0922 |
Эта ошибка может означать, что вашему компьютеру не удалось подключиться к серверам Центра обновления Windows. Если вы используете VPN для подключения к рабочей сети, отключитесь от сети и выключите программное обеспечение VPN (если применимо), а затем попробуйте снова выполнить обновление. Эта ошибка также может означать, что в разделе, зарезервированном системой, недостаточно свободного места. Возможно, эту проблему удастся решить, используя стороннее программное обеспечение для увеличения размера раздела, зарезервированного системой. |
|
Ошибка: нам не удалось завершить обновления. Отмена изменений. Не выключайте компьютер. Ошибка: не удалось настроить обновления Windows. Отмена изменений. |
Это общие ошибки, которые могут возникать в случае сбоя обновления Windows. Чтобы выбрать оптимальный способ решения проблемы, необходимо определить конкретный код ошибки. Код ошибки, вызвавшей сбой обновления, можно найти в журнале обновлений. Найдите обновление, которое не было установлено, запишите код ошибки и обратитесь в службу поддержки Майкрософт. Чтобы просмотреть журнал обновлений в Windows 11, выполните приведенные далее действия.
|
|
Ошибка: обновление не применимо к этому компьютеру. |
Эта ошибка может означать, что на компьютере не установлены обязательные обновления. Убедитесь, что на вашем компьютере установлены все важные обновления, прежде чем пытаться выполнить обновление. |
|
0x80070070 — 0x50011 0x80070070 — 0x50012 0x80070070 — 0x60000 |
Эта ошибка может означать, что на компьютере недостаточно свободного места для установки обновления. Освободите место на диске и повторите попытку. Советы по освобождению места на диске |
|
0x80300024 |
Конечный диск, раздел или том не поддерживает указанную операцию с диском. Убедитесь, что компьютер соответствует минимальным требованиям для установки Windows. |
|
0x80070002 0x20009 |
Системе не удается найти указанный файл. Если у вас есть диск или диски, на которых вы не устанавливаете Windows 11, удалите эти диски. |
|
0xC1900101 0x20017 0xC1900101 0x30017 |
Драйвер вызвал проблему. Отключите или удалите все сторонние антивирусные или антишпионские программы в системе. Отключите все периферийные устройства, подключенные к системе, за исключением мыши, клавиатуры и дисплея. Обратитесь к поставщику оборудования за обновленными драйверами устройств. |
|
0x8007042B 0x4000D |
Программа установки Windows непредвиденно завершена из-за другого процесса, запущенного в фоновом режиме. Во время загрузки Windows в штатном режиме автоматически запускается несколько приложений и служб, которые потом работают в фоновом режиме. К ним относятся основные системные процессы, антивирусные программы, системные служебные программы и другое ранее установленное ПО. Эти приложения и службы могут вызвать помехи при попытке обновления до последней версии Windows 11. Чтобы определить, мешает ли фоновая программа обновлению, может потребоваться «чистая загрузка». См . статью Как выполнить чистую загрузку в Windows. |
|
0x800700B7 0x2000a |
Программа установки Windows непредвиденно завершена из-за другого процесса, запущенного в фоновом режиме. Удалите антивирусное или антишпионское программное обеспечение и повторите попытку обновления. |
Attention Before you read this post, I highly recommend you check out my resources page for access to the tools and services I use to not only maintain my system but also fix all my computer errors, by clicking here!
Is your Windows operating system preventing you from upgrading to its latest iteration (Windows 10/11) due to error 0x80070070?
Or are you experiencing error 0x80070070 while attempting to carry out a standard Windows Update?
In other circumstances, error 0x80070070 is known to occur while attempting to install a Fall Creators Update or anything similar.
When error 0x80070070 occurs, it typically indicates that there is insufficient space on your hard disc drive (ERROR_DISK_FULL). However, while in some situations, the error is as a result of insufficient space, oftentimes it is caused by other scenarios, some more and oftentimes less related scenarios.
When error 0x80070070 occurs, it’ll usually appear in one of several situations:
- When attempting to update Windows via the Windows Update page – “Windows Update has encountered a problem and cannot display the requested page. 0X80070070”
- After a failed Windows Upgrade – “The installation failed in the Safe_OS phase with an error. 0X80070070”
- When attempting to install Windows via USB or DVD – “Installation Failed – 0X80070070”
What Causes Error 0x80070070?
As is typically the case with Windows errors, there are a wide range of possible causes. The most common of which are outlined below:
- The computer system has been infected with a virus.
- Windows registry is corrupted.
- The system lacks the necessary resources (memory), to complete the desired action.
In addition to the error message and its possible causes, there are also several symptoms commonly associated with it. These are:
- An inability to install any and all available Windows Updates: the error message will present it every time you attempt to run an update.
- You are unable to add additional apps to the system.
- If your system has been infected with a malicious file, then this virus could corrupted other areas of your system.
Fortunately, there are several fixes that you can apply to rectify this problem. All of which will be described below. So continue reading for those much desired solutions.
How to Fix It
When it comes to error 0x80070070, there are several possible solutions. The solution that you’ll be forced to adopt, will depending greatly on the severity of the error.
With that said, all solutions have been arranged in order of effectiveness and ease of execution. So please do attempt them in the order that they are arranged in.
Before attempting any of the more advanced manual solutions, I’d have to recommend a more palatable approach.
This is, the Windows repair tool called Advanced System Repair Pro.
This, advanced multifaceted tool comes with a wide range of features and capabilities. Which including fixing a plethora of error types, including Update errors. In addition to that, it’s also equally adept at fixing registry corruption, BSOD errors, DLL errors and more.
It’s also capable of speeding your system up, by removing virus files, cleaning out system clutter and optimising your systems settings.
With that said, you can learn more about this powerful tool, from the link highlighted below:
CLICK HERE TO CHECK OUT ADVANCED SYSTEM REPAIR PRO
Run a Virus Scan
As previously noted, error 0x80070070 is known to occur, due to a virus infection of your Windows operating system.
Therefore, it’s recommend that you carry out a full scan of your system, using your current internet security solution. However, if you do not have an antivirus scanner or are interested in something better, then I’d recommend you gave SpyHunter a try.
SpyHunter is amongst the most effective and efficient antimalware tools in the marketplace today. You can learn more about this tool, and how it can help you, from the link below:
CLICK HERE TO CHECK OUT SPYHUNTER
Use Disk Cleanup
If you’re attempting to upgrade your Windows operating system, then you’re going to need at least 20GB of free space to successfully complete the installation. If your system lacks sufficient space on its primary partition, then this can cause error 0x80070070.
As a viable solution, you can look to free up space, by removing redundant and unneeded files from your system.
To do this, you’re going to want to use the built-in Windows tool called Disk Cleanup. To use this tool, simply do the following:
1. First, boot into your system as a full administrator.
2. Next, press + R, type cleanmgr and click on OK.
3. This will bring up the Disk Cleanup : Drive Selection applet, from here, select your primary drive (C:\) then click on OK.
4. Disk Cleanup will now scan your system for available files that can be removed. Once completed a Disk Cleanup for C:\ applet will appear. Simply tick the box next to the corresponding areas of the system that you’d like emptied. Then click on OK, to begin the removal process.
Free Up Space Using Storage Sense
If error 0x80070070 occurs when attempting to install a Creators Update, then you should use Storage sense to free up hard drive space. This is another built-in Windows tool that you can access by doing the following:
1. Boot into your system as a full administrator.
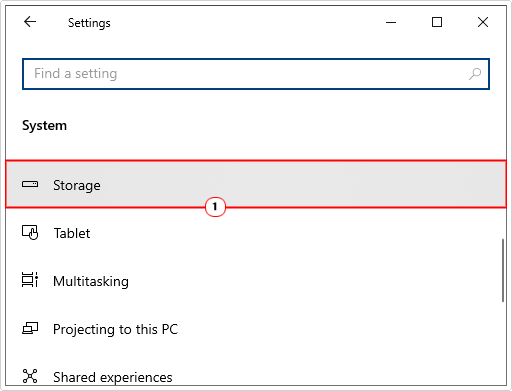
2. Next, press + I, then click on System.
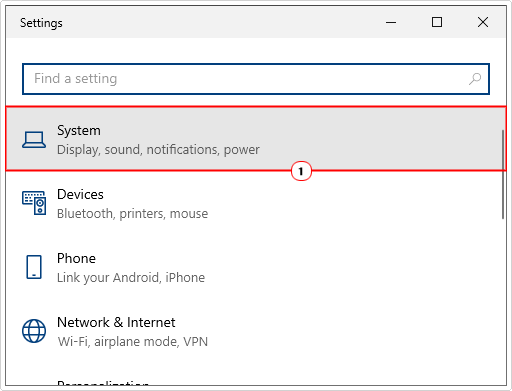
3. This will bring up the Systems applet, from here, click on Storage.
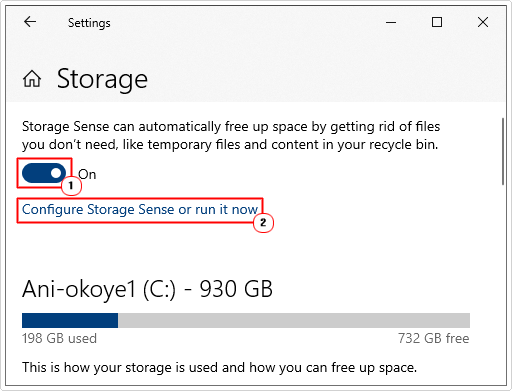
4. When Storage Sense loads up, enable it, by clicking on the Enable button. Then click on Configure Storage Sense or run it now.
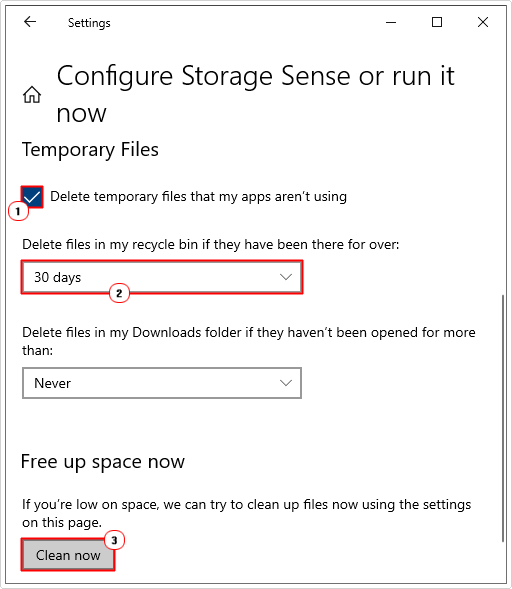
5. Next, make sure the box next to Delete temporary files that my apps aren’t using is checked, and set Delete files in my recycle bin if they have been there for over: to 30 days, then click on Clean now.
Move Temp Folder
Some end users have reported that they were able to fix error 0x80070070 by moving their temp folder to a different location. If you tried all the solutions above and error 0x80070070 continues to persist, then I recommend you attempt this method.
The temp folder is used for storing temporary app files. These files can be big or small. However, when the hard drive runs out of free space, and in turn, the operating system is unable to store data within the temp folder, this can cause error 0x80070070 to rear its ugly head. To avoid this problem, you can simply move the temp folder to a different partition entirely.
To do that, follow the instructions below:
1. First, make sure you’ve booted into your computer as a full administrator.
2. Then press + R, type sysdm.cpl and click on OK.
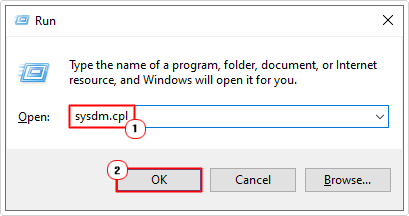
3. This will bring up the Systems Properties applet, from here, click on the Advanced Tab, then click on Environment Variables.
4. Now, click on the TEMP folder, then click on Edit.
5. This will bring up an Edit User Variable applet, from here, click on Browse Directory.
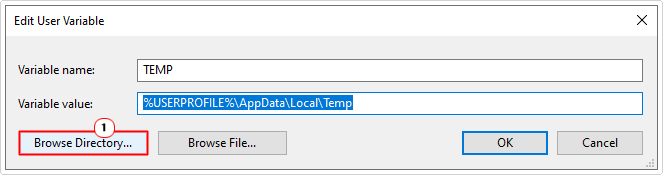
6. Now select a new location for the TEMP folder. Make sure it’s a different partition. Then click on OK.
7. Finally, reboot your system, then check whether or not it has fixed error 0x80070070.
If error 0x80070070 prevents you from upgrading your operating system to the latest version, then you could try using the Media Creation Tool, as a bypass. This tool, ordinarily, will allow you to upgrade Windows, even when it previously failed, via other methods.
The Media Creation tool, comes with a fresh set of files, independent of your OS, which should ensure it completes the process, smoothly and without hiccup.
Anyway, to use this tool, simply do the following:
1. First, you will need to download the Media Creation Tool. This can be done from the official Microsoft link, here: https://www.microsoft.com/en-gb/software-download/windows10
2. Once you’ve done that, run it, then select Upgrade this PC.
3. This software will check that your system meets the recommended minimal system specifications, then it’ll attempt to download the required files. If your system meets the requirements, the process should go through.
Note: Your system will restart several times before the process is complete.
Reset Windows Update
It’s not uncommon for the corruption of one or more Windows Update components to cause error 0x80070070. Hence, to successfully overcome this dilemma, end users can reset all of the individual components that make up Windows Update.
For step-by-step instructions on how to do that, check out my post on fixing error 0x80244010.
Are you looking for a way to repair all the errors on your computer?
If the answer is Yes, then I highly recommend you check out Advanced System Repair Pro.
Which is the leading registry cleaner program online that is able to cure your system from a number of different ailments such as Windows Installer Errors, Runtime Errors, Malicious Software, Spyware, System Freezing, Active Malware, Blue Screen of Death Errors, Rundll Errors, Slow Erratic Computer Performance, ActiveX Errors and much more. Click here to check it out NOW!