
Во время подключения сетевого принтера к очередному ПК-клиенту или же ПК из другой сети вы можете столкнуться с ошибкой 0x00000006. В попытках найти какое-то решение многие пользователи пытаются подключиться по его имени или по сетевому адресу TCP/IP, но результат все равно один и тот же. Перезагрузка компьютера или диспетчера очереди печати(spooler’а), как правило, тоже не приносит положительного результата.
Вследствие экспериментов, некоторые пользователи могут прибегнуть к переустановке драйвера для принтера на проблемном ПК, после чего тот вроде бы корректно подключается к принтеру, но когда его пользователь пытается распечатать какой-то документ в той или иной программе(или выполнить тестовую печать), он снова натыкается на ошибку 0x00000006. Проблема достаточно запутанная и решить ее крайне непросто.
Тем не менее пользователями все же был найден достаточно эффективный способ решения этой проблемы с подключением принтера. Давайте на него посмотрим.
Решение ошибки 0x00000006
Как правило, проблема в виде постоянно возникающей ошибки 0x00000006 все же заключается по большей части именно в драйвере для сетевого принтера, установленного на ПК-клиенте. Следуйте указанной инструкции на проблемном ПК:
- нажмите Windows+R;
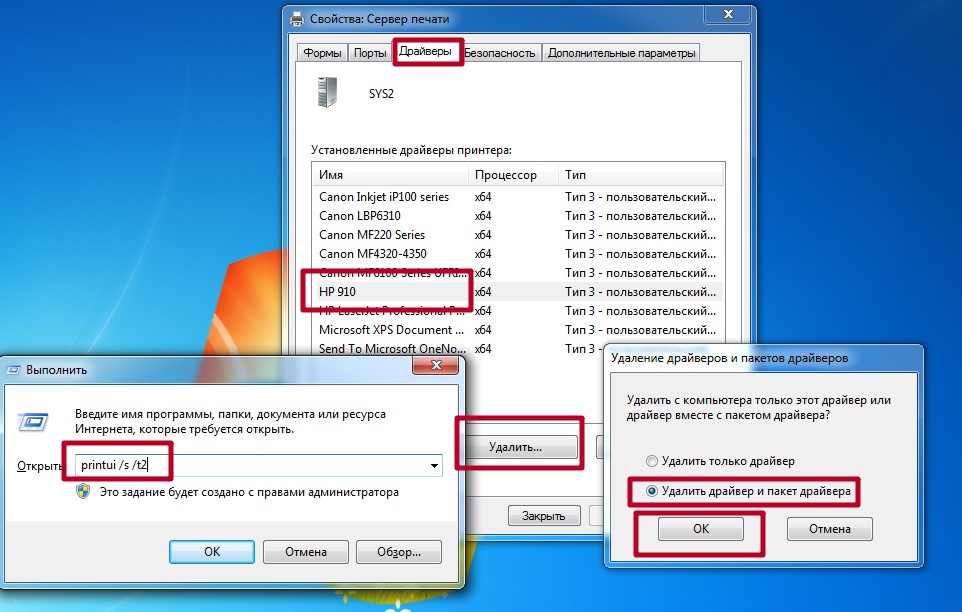
- впишите команду printui.exe /s /t2 и нажмите Enter;
- перейдите во вкладку «Драйверы»;
- выберите из списка драйвер принтера, к которому вы пытались подключиться и произвести печать;
- нажмите на кнопку «Удалить»;
- поставьте галочку возле опции «Удалить драйвер и пакет драйвера»;
- снова нажмите Windows+R;
- впишите regedit и нажмите Enter;
- перейдя в реестр, удалите в ней ключ HKEY_LOCAL_MACHINE\SYSTEM\CurrentControlSet\Control\Session Manager\PendingFileRenameOperations;
Попробуйте подключить сетевой принтер снова. Драйвера должны стать как родные и все заработает без проблем. Ошибка 0x00000006 должна быть устранена.
Applies ToWindows 8.1 Enterprise Windows 8.1 Pro Windows 8.1 Windows RT 8.1 Windows Server 2012 R2 Datacenter Windows Server 2012 R2 Essentials Windows Server 2012 R2 Foundation Windows Server 2012 R2 Standard Windows 8 Enterprise Windows 8 Pro Windows 8 Windows RT Windows Server 2012 Datacenter Windows Server 2012 Datacenter Windows Server 2012 Essentials Windows Server 2012 Foundation Windows Server 2012 Foundation Windows Server 2012 Standard Windows Server 2012 Standard
This article describes an issue that occurs when you connect to an IPP printer server in Windows RT 8.1, Windows 8.1, Windows Server 2012 R2, Windows RT, Windows 8, or Windows Server 2012. The issue is resolved by hotfix 2973940. This hotfix has a prerequisite.
Symptoms
Consider the following scenario:
-
You have a computer that is running Windows RT 8.1, Windows 8.1, Windows Server 2012 R2, Windows RT, Windows 8, or Windows Server 2012.
-
You use the computer as an IPP (Internet Printing Protocol) client.
-
You try to connect to the IPP printer server from a URL.
In this scenario, you cannot connect to the IPP printer server, and you receive the following error message:
0x00000006
Resolution
Hotfix information
A supported hotfix is available from Microsoft. However, this hotfix is intended to correct only the problem that is described in this article. Apply this hotfix only to systems that are experiencing this specific problem.
If the hotfix is available for download, there is a «Hotfix Download Available» section at the top of this Knowledge Base article. If this section does not appear, submit a request to Microsoft Customer Service and Support to obtain the hotfix.
Note If additional issues occur or if any troubleshooting is required, you might have to create a separate service request. The usual support costs will apply to additional support questions and issues that do not qualify for this specific hotfix. For a complete list of Microsoft Customer Service and Support telephone numbers or to create a separate service request, visit the following Microsoft website:
http://support.microsoft.com/contactus/?ws=supportNote The «Hotfix Download Available» form displays the languages for which the hotfix is available. If you do not see your language, it is because a hotfix is not available for that language.
Prerequisites
To apply this hotfix, you must first install the update 2919355 on Windows 8.1 or Windows Server 2012 R2. For more information, click the following article number to view the article in the Microsoft Knowledge Base:
2919355 Windows RT 8.1, Windows 8.1, and Windows Server 2012 R2 Update April, 2014
Registry information
To use the hotfix in this package, you do not have to make any changes to the registry.
Restart requirement
You must restart the computer after you apply this hotfix.
Hotfix replacement information
This hotfix does not replace a previously released hotfix.
The global version of this hotfix installs files that have the attributes that are listed in the following tables. The dates and the times for these files are listed in Coordinated Universal Time (UTC). The dates and the times for these files on your local computer are displayed in your local time together with your current daylight saving time (DST) bias. Additionally, the dates and the times may change when you perform certain operations on the files.
Windows 8.1 and Windows Server 2012 R2 file information and notes
Important Windows 8.1 hotfixes and Windows Server 2012 R2 hotfixes are included in the same packages. However, hotfixes on the Hotfix Request page are listed under both operating systems. To request the hotfix package that applies to one or both operating systems, select the hotfix that is listed under «Windows 8.1/Windows Server 2012 R2» on the page. Always refer to the «Applies To» section in articles to determine the actual operating system that each hotfix applies to.
-
The files that apply to a specific product, milestone (RTM,SPn), and service branch (LDR, GDR) can be identified by examining the file version numbers as shown in the following table:
Version
Product
Milestone
Service branch
6.3.960 0.16xxx
Windows 8.1 and Windows Server 2012 R2
RTM
GDR
6.3.960 0.17xxx
Windows 8.1 and Windows Server 2012 R2
RTM
GDR
-
The MANIFEST files (.manifest) and the MUM files (.mum) that are installed for each environment are listed separately in the «Additional file information» section. MUM, MANIFEST, and the associated security catalog (.cat) files, are very important to maintain the state of the updated components. The security catalog files, for which the attributes are not listed, are signed with a Microsoft digital signature.
For all supported x86-based versions of Windows 8.1
|
File name |
File version |
File size |
Date |
Time |
Platform |
|---|---|---|---|---|---|
|
Inetpp.dll |
6.3.9600.17197 |
129,536 |
02-Jun-2014 |
22:29 |
x86 |
|
Inetppui.dll |
6.3.9600.16384 |
19,456 |
22-Aug-2013 |
03:53 |
x86 |
|
Wpnpinst.exe |
6.3.9600.16384 |
17,920 |
22-Aug-2013 |
04:03 |
x86 |
For all supported x64-based versions of Windows 8.1 and of Windows Server 2012 R2
|
File name |
File version |
File size |
Date |
Time |
Platform |
|---|---|---|---|---|---|
|
Inetpp.dll |
6.3.9600.17197 |
162,304 |
02-Jun-2014 |
22:29 |
x64 |
|
Inetppui.dll |
6.3.9600.16384 |
22,016 |
22-Aug-2013 |
11:20 |
x64 |
|
Wpnpinst.exe |
6.3.9600.16384 |
20,992 |
22-Aug-2013 |
11:31 |
x64 |
For Windows RT 8.1
|
File name |
File version |
File size |
Date |
Time |
Platform |
|---|---|---|---|---|---|
|
Inetpp.dll |
6.3.9600.17197 |
113,664 |
02-Jun-2014 |
22:28 |
Not applicable |
|
Inetppui.dll |
6.3.9600.16384 |
17,920 |
22-Aug-2013 |
03:03 |
Not applicable |
|
Wpnpinst.exe |
6.3.9600.16384 |
17,920 |
22-Aug-2013 |
03:09 |
Not applicable |
Windows 8 and Windows Server 2012 file information and notes
Important Windows 8 hotfixes and Windows Server 2012 hotfixes are included in the same packages. However, hotfixes on the Hotfix Request page are listed under both operating systems. To request the hotfix package that applies to one or both operating systems, select the hotfix that is listed under «Windows 8/Windows Server 2012» on the page. Always refer to the «Applies To» section in articles to determine the actual operating system that each hotfix applies to.
-
The files that apply to a specific product, milestone (RTM,SPn), and service branch (LDR, GDR) can be identified by examining the file version numbers as shown in the following table:
Version
Product
Milestone
Service branch
6.2.960 0.16xxx
Windows 8 and Windows Server 2012
RTM
GDR
6.2.960 0.17xxx
Windows 8 and Windows Server 2012
RTM
GDR
-
The MANIFEST files (.manifest) and the MUM files (.mum) that are installed for each environment are listed separately in the «Additional file information» section. MUM, MANIFEST, and the associated security catalog (.cat) files, are very important to maintain the state of the updated components. The security catalog files, for which the attributes are not listed, are signed with a Microsoft digital signature.
For all supported x86-based versions of Windows 8
|
File name |
File version |
File size |
Date |
Time |
Platform |
|---|---|---|---|---|---|
|
Inetpp.dll |
6.2.9200.17017 |
125,440 |
02-Jun-2014 |
22:42 |
x86 |
|
Inetppui.dll |
6.2.9200.16384 |
18,432 |
26-Jul-2012 |
03:18 |
x86 |
|
Wpnpinst.exe |
6.2.9200.16384 |
17,408 |
26-Jul-2012 |
03:21 |
x86 |
For all supported x64-based versions of Windows 8 and of Windows Server 2012
|
File name |
File version |
File size |
Date |
Time |
Platform |
|---|---|---|---|---|---|
|
Inetpp.dll |
6.2.9200.17017 |
159,232 |
02-Jun-2014 |
22:33 |
x64 |
|
Inetppui.dll |
6.2.9200.16384 |
22,016 |
26-Jul-2012 |
03:05 |
x64 |
|
Wpnpinst.exe |
6.2.9200.16384 |
20,992 |
26-Jul-2012 |
03:08 |
x64 |
For Windows RT
|
File name |
File version |
File size |
Date |
Time |
Platform |
|---|---|---|---|---|---|
|
Inetpp.dll |
6.2.9200.17017 |
112,640 |
02-Jun-2014 |
22:31 |
Not applicable |
|
Inetppui.dll |
6.2.9200.16384 |
18,944 |
26-Jul-2012 |
01:29 |
Not applicable |
|
Wpnpinst.exe |
6.2.9200.16384 |
18,432 |
26-Jul-2012 |
01:31 |
Not applicable |
Status
Microsoft has confirmed that this is a problem in the Microsoft products that are listed in the «Applies to» section.
More Information
For more information about software update terminology, click the following article number to view the article in the Microsoft Knowledge Base:
824684 Description of the standard terminology that is used to describe Microsoft software updates.
Additional file information
Need more help?
Want more options?
Explore subscription benefits, browse training courses, learn how to secure your device, and more.
Readers help support Windows Report. We may get a commission if you buy through our links.
Read our disclosure page to find out how can you help Windows Report sustain the editorial team. Read more
When you try to add a printer on a shared network, you may receive an error message with the error code 0x00000006. This problem may occur if you try to add a printer on a server, but the computers are not on the same network.
For further information on resolving this error, keep reading to find out how to troubleshoot it.
What is Windows error code 0x00000006?
This error code means you cannot connect or add a printer on a server. This is a generic Windows error and can be caused by many factors, such as:
- Insufficient permissions – The most common cause of this error is not having the correct permissions to access the specified printer.
- Poor connection – The network connection between your computer and the server may be interrupted or down.
- Incompatible drivers – The specified printer may not be compatible with the current driver.
- Wrong group policy settings – When deploying printers using a group policy, you need to ensure they are the right ones. Otherwise, they won’t be applied.
- Restrictive firewall settings – If there are problems connecting to network printers, it may be because your firewall has been set up too restrictively to provide additional security against hackers.
How do I fix Windows error code 0x00000006?
Attempt the following workarounds before any technical steps:
- Disconnect all other peripherals that could be causing conflicts and reconnect only for the printer.
- Check for any loose or damaged cables and replace them where necessary.
- Verify that your PC and printer are on the same network.
- Change your internet connection if possible and see if the error persists.
- Log in as an administrator or use a different user account to access the printer.
- Perform a system file check to check for corrupt files.
- Restart or reset your printer and see if it works.
- Finally, restart your PC and try printing again.
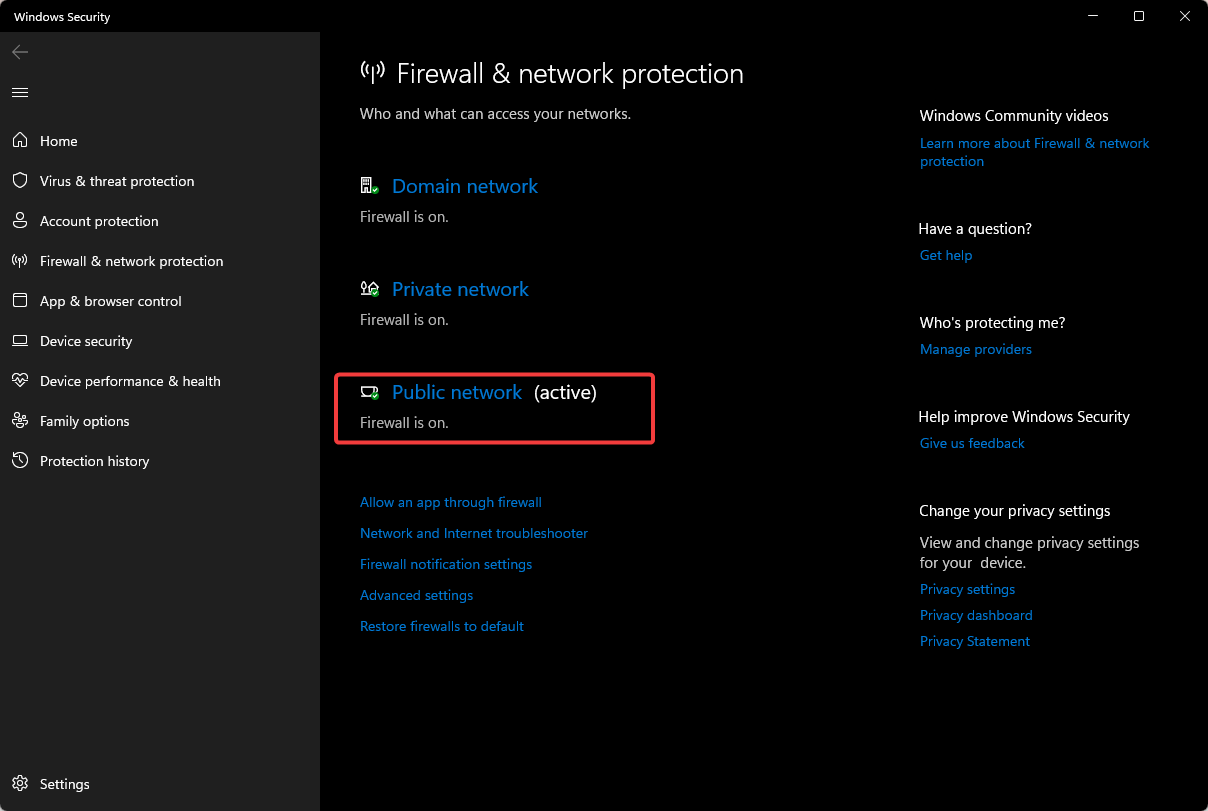
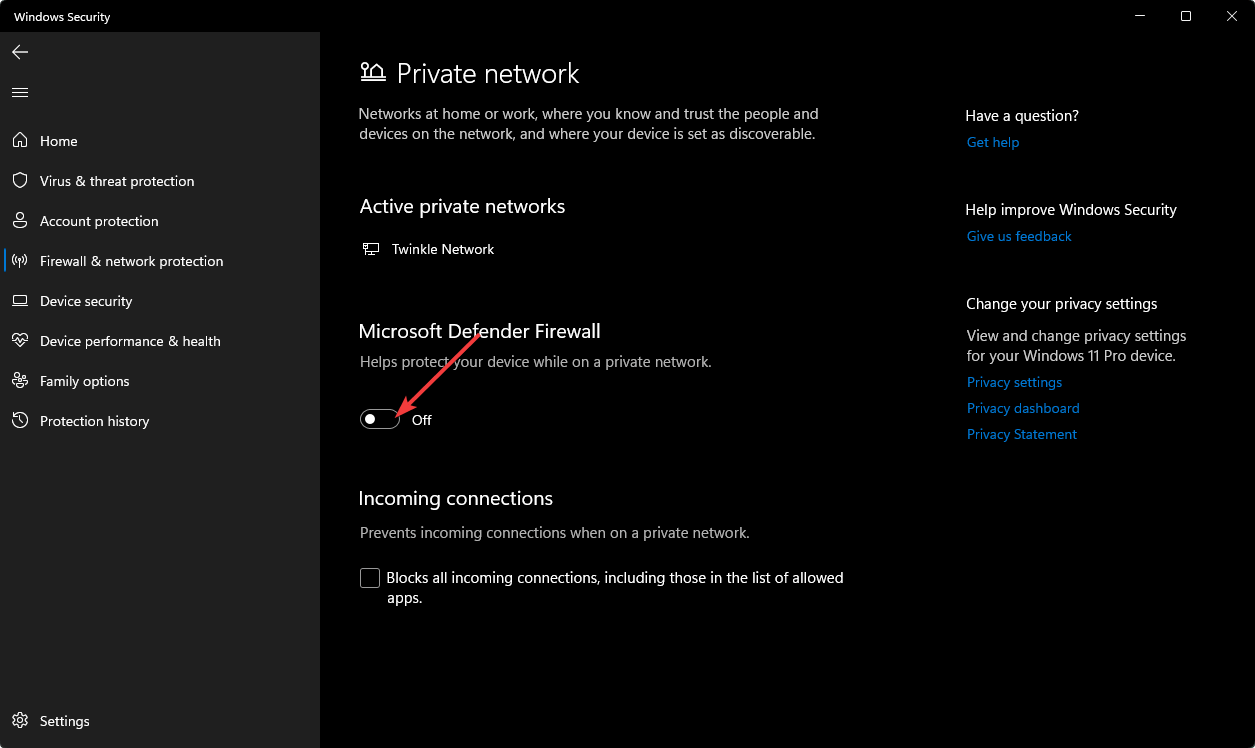
1. Disable your antivirus temporarily
- Hit the Start menu icon, type Windows Security in the search bar, and click Open.

- Click on Firewall & network protection, then select Public network.

- Locate Microsoft Defender Firewall and toggle the off button.


2. Delete the Printer Spooler folder
- Hit the Windows + E keys to open File Explorer.
- Navigate to the following location:
C:\Windows\System32\spool - Locate the Printers folder and click to open.

- Select all items in the folder and delete them.
- Restart your PC.

- Solved: Epson FastFoto ff-680w images not showing
- How to Fix Brother ADS-1350W Scanner if it’s Not Working
- How to Fix Epson WorkForce ES-60W Portable Scanner if it’s Not Working
- 5 Best Microsoft Teams Conference Room Equipment for Seamless Meetings
- FIX: Canon imageFORMULA R40 Cannot Load Driver
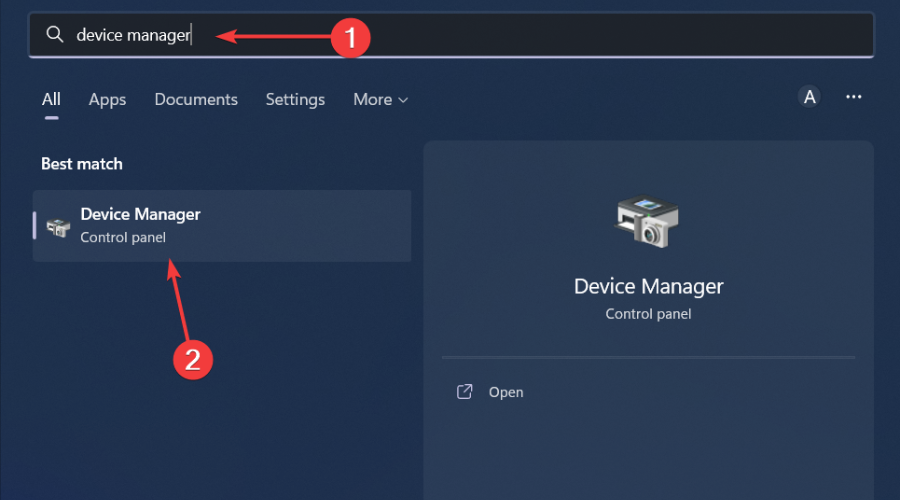
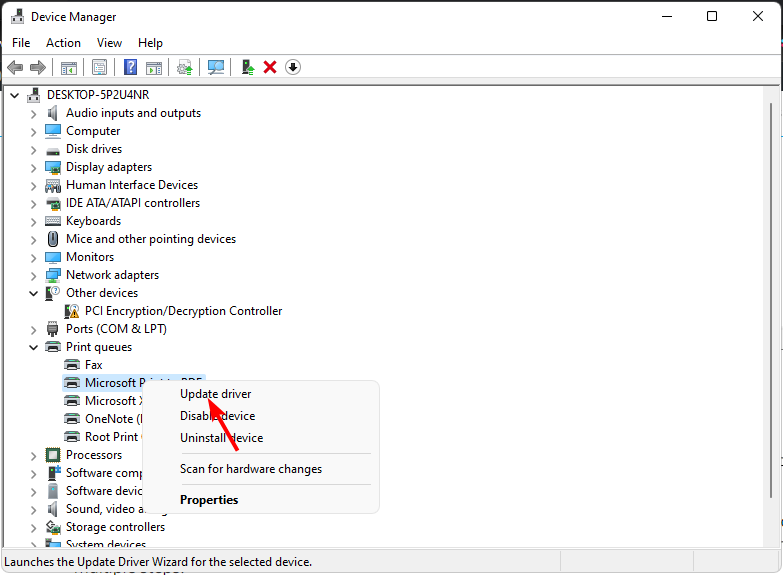
3. Update Printer drivers
- Hit the Windows key, type Device Manager in the search bar, and click Open.

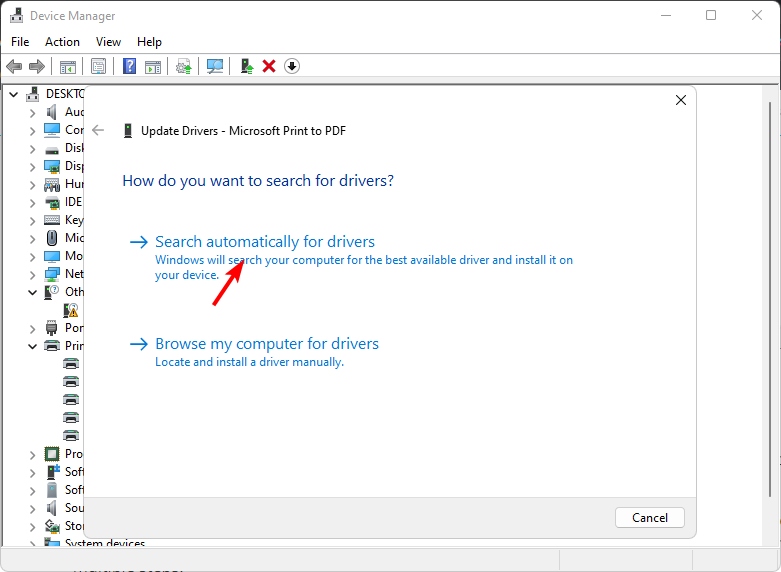
- Navigate to Printers, find your printer, right-click on it, and select Update driver.

- Select Search automatically for updated drivers.

- Windows will find the most suitable driver and recommend you install it.
In some peculiar but still possible cases, Windows may be unable to find the right driver for your printer. In such cases, you’ll have to consider another way of getting the correct drivers.
We recommend you try the Outbyte driver updater as it will automatically scan and match you with the right driver. As a bonus, you will also get a system optimization.
⇒ Get Outbyte Driver Updater
4. Run the Printer troubleshooter
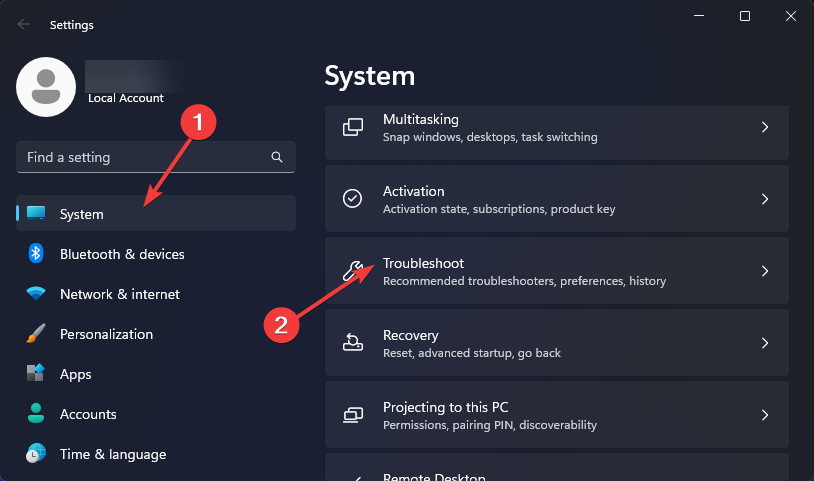
- Hit the Windows key and click on Settings.
- Select System on the left pane, then click Troubleshoot on the right.

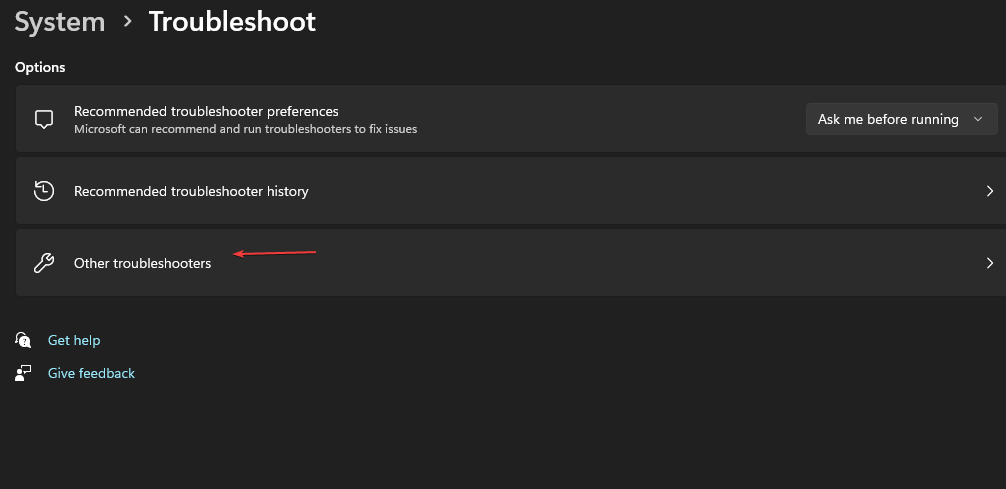
- Click on Other troubleshooters.

- Find the Printer troubleshooter and click the Run button next to it.


5. Restart the Print Spooler service
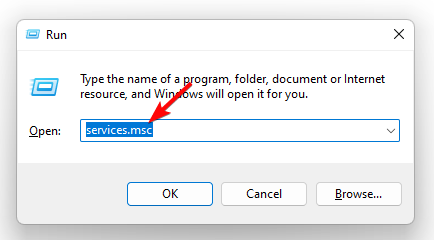
- Hit the Windows + R keys to open the Run command.
- Type services.msc in the dialog box and hit Enter.

- Locate the Print Spooler service, right-click on it, and select Stop.

- Right-click on it again, then select Start.


6. Delete a registry key
- Press the Windows + R keys to open the Run command.
- Type regedit in the dialog box and click Enter to open the Registry Editor.
- Navigate to the following path:
HKLM\Software\Microsoft\Windows NT\CurrentVersion\Print\Providers\Client Side Rendering Print Provider\Servers\ - Right-click on the server key and hit Delete.
Remember that editing the registry is not recommended unless it is absolutely necessary. Since this is the most upvoted solution by users who encountered the error 0x00000006, you may have to try it if you find that other actions don’t bear fruit.
Ensure you back up your registry and create a restore point. This way, you can have a safe point of return in case anything goes wrong.
Don’t hesitate to check out our other articles on printer errors, such as the error code 0x00003e3, and see our recommended fixes.
That brings us to the end of this article. Keep it interactive in the comment section by letting us know of any other solutions not mentioned here that may have helped you get out of this error.
Claire Moraa
Windows Software Expert
Claire has a knack for solving problems and improving the quality of life for those around her. She’s driven by rationality, curiosity, and simplicity, and always eager to learn more about Microsoft’s products.
With a background in teaching and reviewing, she breaks down complex topics into easily understandable articles, focusing mostly on Windows 11, errors, and software.
Issue: Hello. When I try connecting the printer to my Windows PC, I get the 0x00000006 error code with the “Windows cannot connect to the printer” message. Is there a way to fix this?
Solved Answer
When attempting to add a printer to a shared network, Windows users frequently encounter the 0x00000006 printer error. This error typically occurs when users attempt to connect to a server printer but their computers are not on the same network.
This problem may have a number of consequences for users. For starters, it prevents users from adding and accessing shared network printers, limiting their ability to print documents. This is especially aggravating in office settings or shared workspaces where efficient printing capabilities are critical for daily tasks. Furthermore, the error message itself can cause confusion and disrupt workflow, resulting in lost time and productivity.
There are several options for dealing with the 0x00000006 printer error. Generally, these solutions entail ensuring that the computers attempting to connect to the shared printer are on the same network or resolving network connectivity issues. Users may need to verify network connections, check network settings, or contact their network administrator for assistance. To resolve the issue, it may also be necessary to update printer drivers[1] or restart relevant services.
It is important to note that resolving the 0x00000006 printer error may necessitate technical knowledge, and the specific solution may differ depending on the network configuration and system configuration. This guide will walk you through 6 steps that should help you resolve the 0x00000006 Printer error.
You can also try running a maintenance tool like FortectMac Washing Machine X9. It can fix most system errors, BSODs,[2] corrupted files, and registry[3] issues. Otherwise, follow the step-by-step instructions below.

Method 1. Run the Printer Troubleshooter
- Press the Windows key on your keyboard.
- Click on Settings in the menu that appears.
- In the Settings window, select System from the options on the left side.
- On the right side of the System window, click on Troubleshoot.

- Locate and click on Other troubleshooters.
- Look for the Printer troubleshooter in the list.
- Click on the Run button next to the Printer troubleshooter.
Method 2. Restart the Print Spooler Service
Fix it now!
Fix it now!
To repair damaged system, you will have a 24hr Free Trial and the ability to purchase the licensed version of the Fortect Mac Washing Machine X9.
- Press the Windows key + R key together to open the Run command.
- In the Run dialog box, type services.msc.
- Press Enter or click OK.
- In the Services window, locate the Print Spooler service.
- Right-click on the Print Spooler service.
- Select Stop from the context menu that appears.
- Right-click on the Print Spooler service again.
- Select Start from the context menu.

Method 3. Disable Antivirus
- Click on the Start menu icon.
- Type Windows Security in the search bar.
- Click on the Windows Security app to open it.
- In the Windows Security window, click on Firewall & network protection.
- Select Public network from the options.

- Locate Microsoft Defender Firewall in the Firewall & network protection settings.
- Toggle the off button to turn off the Microsoft Defender Firewall.
Method 4. Update Printer Drivers
Fix it now!
Fix it now!
To repair damaged system, you will have a 24hr Free Trial and the ability to purchase the licensed version of the Fortect Mac Washing Machine X9.
- Press the Windows key on your keyboard.
- Type Device Manager in the search bar.
- Click on Device Manager to open it.
- In the Device Manager window, locate and click on Printers to expand the category.
- Find your printer in the list.
- Right-click on your printer.
- Select Update driver from the context menu.
- Choose the option Search automatically for updated drivers.
- Windows will search for the most suitable driver for your printer.
- If a suitable driver is found, Windows will recommend installing it.

You can also use a dedicated utility, like DriverFix, that can find the best drivers for your machine and install them automatically.
Method 5. Delete the Printer Spooler Folder
- Press the Windows key + E together to open File Explorer.
- In File Explorer, navigate to the following location: C:\Windows\System32\spool.
- Locate the Printers folder within the spool directory and click to open it.
- Select all items within the Printers folder.

- Delete the selected items (files). You can do this by right-clicking and choosing the Delete option or by pressing the Delete key on your keyboard.
- Restart your PC to complete the process.
Method 6. Delete a Registry Key
Fix it now!
Fix it now!
To repair damaged system, you will have a 24hr Free Trial and the ability to purchase the licensed version of the Fortect Mac Washing Machine X9.
- Press the Windows key + R key together to open the Run command.
- In the Run dialog box, type regedit.

- Press Enter or click OK to open the Registry Editor.
- Navigate to the following path in the Registry Editor:
HKLM\Software\Microsoft\Windows NT\CurrentVersion\Print\Providers\Client Side Rendering Print Provider\Servers\
- Right-click on the server key within the Servers folder.
- Select Delete from the context menu.
Repair your Errors automatically
ugetfix.com team is trying to do its best to help users find the best solutions for eliminating their errors. If you don’t want to struggle with manual repair techniques, please use the automatic software. All recommended products have been tested and approved by our professionals. Tools that you can use to fix your error are listed bellow:
do it now!
Download Fix
Happiness
Guarantee
do it now!
Download Fix
Happiness
Guarantee
Compatible with Microsoft Windows
Compatible with OS X
Still having problems?
If you failed to fix your error using FortectMac Washing Machine X9, reach our support team for help. Please, let us know all details that you think we should know about your problem.
Fortect will diagnose your damaged PC. It will scan all System Files that have been damaged by security threats. Mac Washing Machine X9 will diagnose your damaged computer. It will scan all System Files and Registry Keys that have been damaged by security threats. To repair damaged system, you will have a 24hr Free Trial and the ability to purchase the licensed version of the Fortect malware removal tool. To repair damaged system, you have to purchase the licensed version of Mac Washing Machine X9 malware removal tool.
Access geo-restricted video content with a VPN
Private Internet Access is a VPN that can prevent your Internet Service Provider, the government, and third-parties from tracking your online and allow you to stay completely anonymous. The software provides dedicated servers for torrenting and streaming, ensuring optimal performance and not slowing you down. You can also bypass geo-restrictions and view such services as Netflix, BBC, Disney+, and other popular streaming services without limitations, regardless of where you are.
Don’t pay ransomware authors – use alternative data recovery options
Malware attacks, particularly ransomware, are by far the biggest danger to your pictures, videos, work, or school files. Since cybercriminals use a robust encryption algorithm to lock data, it can no longer be used until a ransom in bitcoin is paid. Instead of paying hackers, you should first try to use alternative recovery methods that could help you to retrieve at least some portion of the lost data. Otherwise, you could also lose your money, along with the files. One of the best tools that could restore at least some of the encrypted files – Data Recovery Pro.
Ошибка 0x00000006 – INVALID PROCESS DETACH ATTEMPT: причины и решение
Синий экран смерти с сообщением INVALID_PROCESS_DETACH_ATTEMPT – частый гость на Windows XP и 7. Появляется он вместе с ошибкой 0x00000006 и свидетельствует о том, что на ПК возникли неполадки с оперативной памятью, жестким диском, блоком питания или сетевым принтером. Также эта ошибка 0x00000006 может возникать и по другим причинам, которые можно определить благодаря малому дампу памяти и ряду диагностических действий.
На официальном форуме Microsoft имеется сообщение о синем экране смерти INVALID_PROCESS_DETACH_ATTEMPT с кодом 0x00000006. Причиной такой неполадки, по мнению разработчиков Windows 7, является вызов процедуры KeStackAttachProcess, а также KeUnstackDetachProcess. Связаны эти процедуры с ядром Windows Read Processes Memory. Они отвечают за переключение текущего потока к его адресному пространству.
Однако на многих форумах пользователи Windows указывают на то, что этот BSOD – это ошибка принтера 0x00000006, которым пытаются воспользоваться по сети. Также эта неполадка появляется при сбоях в работе ОЗУ, HDD и при неполадке блока питания.
Если вам не удается подключиться к принтеру и появляется ошибка 0x00000006, то нужно для начала переустановить драйвера к принтеру. Сначала их корректно удаляем. Для этого можно выполнить два несложных действия:
- Запускаем командную строку с правами Администратора.
- Вводим команду «printui.exe /s /t2», которая удалит программное обеспечение принтера.
Или же удаление драйверов принтера можно выполнить через правку реестра. Для этого выполняем следующее:
- Жмем «Win+R» и вводим «regedit».
- Откроется редактор реестра.
- Переходим по ветке «HKEY_LOCAL_MACHINE\SYSTEM\CurrentControlSet\Control\Session Manager\PendingFileRenameOperations» и удаляем последний раздел.
- Также нужно проверить директорию по адресу c:\Windows\System32\spool\prtprocs\x64. В последней будет подкаталог с именами от 1 до 499. Нужно удалить все эти подкаталоги и файлы, кроме winprint.dll.
После выполнения данных манипуляций нужно перезагрузить систему, чтобы изменения вступили в силу и заново инсталлировать программное обеспечение принтера, предварительно подключив устройство к компьютеру.
Также, при возникновении синего экрана смерти, стоит проверить оперативную память, жесткий диск на ошибки, блок питания на заявленную мощность и Windows на вирусы.
Источник
Ошибка 0x00000006 при подключении к принтеру: как исправить
Во время подключения сетевого принтера к очередному ПК-клиенту или же ПК из другой сети вы можете столкнуться с ошибкой 0x00000006. В попытках найти какое-то решение многие пользователи пытаются подключиться по его имени или по сетевому адресу TCP/IP, но результат все равно один и тот же. Перезагрузка компьютера или диспетчера очереди печати(spooler’а), как правило, тоже не приносит положительного результата.
Вследствие экспериментов, некоторые пользователи могут прибегнуть к переустановке драйвера для принтера на проблемном ПК, после чего тот вроде бы корректно подключается к принтеру, но когда его пользователь пытается распечатать какой-то документ в той или иной программе(или выполнить тестовую печать), он снова натыкается на ошибку 0x00000006. Проблема достаточно запутанная и решить ее крайне непросто.
Тем не менее пользователями все же был найден достаточно эффективный способ решения этой проблемы с подключением принтера. Давайте на него посмотрим.
Решение ошибки 0x00000006
Как правило, проблема в виде постоянно возникающей ошибки 0x00000006 все же заключается по большей части именно в драйвере для сетевого принтера, установленного на ПК-клиенте. Следуйте указанной инструкции на проблемном ПК:
- нажмите Windows+R;
- впишите команду printui.exe /s /t2 и нажмите Enter;
- перейдите во вкладку «Драйверы»;
- выберите из списка драйвер принтера, к которому вы пытались подключиться и произвести печать;
- нажмите на кнопку «Удалить»;
- поставьте галочку возле опции «Удалить драйвер и пакет драйвера»;
- снова нажмите Windows+R;
- впишите regedit и нажмите Enter;
- перейдя в реестр, удалите в ней ключ HKEY_LOCAL_MACHINE\SYSTEM\CurrentControlSet\Control\Session Manager\PendingFileRenameOperations;
Попробуйте подключить сетевой принтер снова. Драйвера должны стать как родные и все заработает без проблем. Ошибка 0x00000006 должна быть устранена.
Источник
Способы решения ошибки 0×00000006 при установке принтера в ОС Windows 7, 8, 10
В этом руководстве рассматриваются несколько вариантов устранения неполадок в Windows 7, 8, 10. Подробно описано, как добавить новый порт, удалить драйвер, очистить реестр, что удалить в папке Spool. Решение применимо к сетевым и локальным принтерам.
Ошибка Windows 0×00000006 «не удается подключиться к принтеру» может возникнуть при установке или подключении к печатающему устройству по сети. Часто это сопровождается различными уведомлениями, такими как: «ошибка во время работы», «доступ запрещен», «проверьте правильность имени», «обработчик печати не существует», «введено неправильное имя», «указанный принтер потерял соединение». Это помогает сделать некоторые выводы о том, как решить проблему.
Чтобы полностью удалить драйверы, используйте окно управления сервером печати.
- В том же окне введите printui /s /t2.
- Найдите модель своего устройства и нажмите на кнопку «Удалить».
- Выберите опцию «Весь пакет».
Чтобы полностью удалить драйверы, может потребоваться остановить службу очереди печати. Как это сделать, описано ниже.
Обратите внимание на другие способы полного удаления драйвера принтера в Windows 7, 10.
Чистка папки Spool
Если у вас возникли проблемы с локальным печатающим устройством, необходимо очистить специальную системную папку, в которой хранится информация о работе всех принтеров, подключенных к компьютеру.
- Перейдите к диску, на котором установлена «операционная система». В 99% случаев это будет диск «C:■».
- Найдите папку C:Windows32spoolprtprocsx64.
- Очистите все, кроме библиотечного файла winprint.dll.
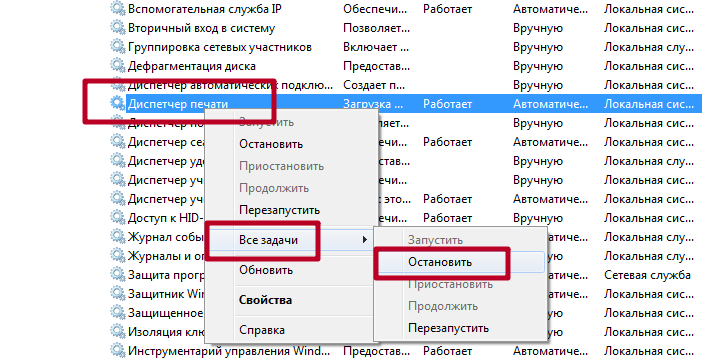
Если некоторые файлы не удаляются, возможно, необходимо остановить службу диспетчера печати. Для этого нажмите Windows+R, введите services.msc, найдите нужную службу и остановите ее.
Если это не помогло, запустите операционную систему в «безопасном режиме». Перезагрузите компьютер и нажмите F8, когда он запустится. Выберите нужную опцию из списка.
Чистка реестра системы
Прежде чем вносить изменения в реестр, сделайте резервную копию системного реестра с помощью меню Файл и Экспорт.
Чтобы внести изменения, сделайте следующее:
- Запустите окно быстрого запуска с помощью Win+R. Введите команду regedit.
- Найдите HKEY_LOCAL_MACHINE ®SYSTEM ®CurrentControlSet ®Session Manager ®PendingFileRenameOperations.
- Полностью удалите «PendingFileRenameOperations».
- Перезагрузите компьютер.
Установка порта
Чтобы оживить сетевой принтер, который не печатает, давайте попробуем добавить новый локальный порт. Это действие в большинстве случаев помогает повторно активировать устройство.
- Перейдите в раздел «Устройства и принтеры» с помощью кнопки «Пуск» и панели управления.
В следующем окне установите флажок «Создать новый порт». Нажмите кнопку «Далее».
Видеоинструкция
Источник
Исправление ошибки 0x00000006 при добавлении принтера (решено)
Please enable JavaScript
Последнее обновление 11 декабря 2018 г.
Обновлено 2023 января: перестаньте получать сообщения об ошибках и замедлите работу вашей системы с помощью нашего инструмента оптимизации. Получить сейчас в эту ссылку
- Скачайте и установите инструмент для ремонта здесь.
- Пусть он просканирует ваш компьютер.
- Затем инструмент почини свой компьютер.
При добавлении сетевого принтера может появиться сообщение об ошибке: «Windows не может подключиться к принтеру. Операция завершилась ошибкой 0x00000006 ». Пользователи не могли печатать на сетевом принтере из-за этой ошибки.
Как исправить ошибку операции печати 0x00000006:
Использование Regedit
- Чтобы решить эту проблему, откройте regedit и перейдите в HKLM \ SOFTWARE \ Microsoft \ Windows NT \ CurrentVersion \ Print \ Providers.
- Из соображений безопасности сделайте резервную копию основных поставщиков рендеринга на стороне клиента.
- Затем удалите ключ поставщиков печати на стороне клиента.
- Закрыть regedit.
- Перезапустите службу намотки печати.
Теперь попробуйте добавление принтера снова и у вас не должно быть никаких ошибок.
Удалите текущий драйвер принтера.
Этот шаг не является обязательным. Удалите драйверы сетевого принтера, к которым вы не можете подключиться, если они уже установлены.
Обновление за январь 2023 года:
Теперь вы можете предотвратить проблемы с ПК с помощью этого инструмента, например, защитить вас от потери файлов и вредоносных программ. Кроме того, это отличный способ оптимизировать ваш компьютер для достижения максимальной производительности. Программа с легкостью исправляет типичные ошибки, которые могут возникнуть в системах Windows — нет необходимости часами искать и устранять неполадки, если у вас под рукой есть идеальное решение:
- Шаг 1: Скачать PC Repair & Optimizer Tool (Windows 10, 8, 7, XP, Vista — Microsoft Gold Certified).
- Шаг 2: Нажмите «Начать сканирование”, Чтобы найти проблемы реестра Windows, которые могут вызывать проблемы с ПК.
- Шаг 3: Нажмите «Починить все», Чтобы исправить все проблемы.
1. Для этого перейдите по ссылке:
Windows 7 и Vista: Пуск> Панель управления.
Windows XP: Пуск> Настройка> Панель управления.
2. Дважды щелкните, чтобы открыть Устройства и принтеры.
3. Щелкните правой кнопкой мыши сетевой принтер (проблема) и выберите Удалить устройство.
Установить как локальный принтер
Вы можете попробовать установить принтер в качестве локального принтера и позже проверить, можете ли вы печатать в сети. Для этого выполните следующие действия:
а. Нажмите Пуск и выберите Устройства и принтеры.
б. Щелкните Добавить принтер> Добавить локальный принтер> Добавить локальный принтер.
с. Создайте новый порт и убедитесь, что в раскрывающемся списке выбран Local Port, и нажмите Next.
d. Введите путь к сетевому принтеру в поле «Введите имя порта» — \\ Имя компьютера \ Имя принтера и нажмите ОК.
е. Попробуйте распечатать и посмотреть, работает ли он.
Ошибка STOP 0x00000006 может возникнуть в любой операционной системе Microsoft Windows NT. К ним относятся Windows 10, Windows 8, Windows 7, Windows Vista, Windows XP, Windows 2000 и Windows NT.
Совет экспертов: Этот инструмент восстановления сканирует репозитории и заменяет поврежденные или отсутствующие файлы, если ни один из этих методов не сработал. Это хорошо работает в большинстве случаев, когда проблема связана с повреждением системы. Этот инструмент также оптимизирует вашу систему, чтобы максимизировать производительность. Его можно скачать по Щелчок Здесь
CCNA, веб-разработчик, ПК для устранения неполадок
Я компьютерный энтузиаст и практикующий ИТ-специалист. У меня за плечами многолетний опыт работы в области компьютерного программирования, устранения неисправностей и ремонта оборудования. Я специализируюсь на веб-разработке и дизайне баз данных. У меня также есть сертификат CCNA для проектирования сетей и устранения неполадок.
Источник
Способы решения ошибки 0×00000006 при установке принтера в ОС Windows 7, 8, 10
В этой инструкции рассмотрены несколько вариантов решения неисправности в Виндовс 7, 8, 10. Подробно рассказано как добавить новый порт, удалить драйвер, сделать чистку в реестре, что удалять в папке Spool. Решение применимо для сетевого и локального принтера.
Ошибка Windows 0×00000006 «не удается подключиться к принтеру» может возникать при установке или подключении к устройству печати по сети. Зачастую она дополнительно сопровождается разными уведомлениями, например: «в ходе операции произошла ошибка», «отказано в доступе», «проверьте правильно ли указано имя», «не существует обработчик печати», «введено неправильное имя», «указанный принтер утерял подключение». Это помогает сделать определенные выводы по поводу способов решения проблемы.
Удаление драйвера
Проведем процедуру полного удаление программного обеспечения для работы любого печатающего устройства — его драйвера. Действовать будет по такой схеме.
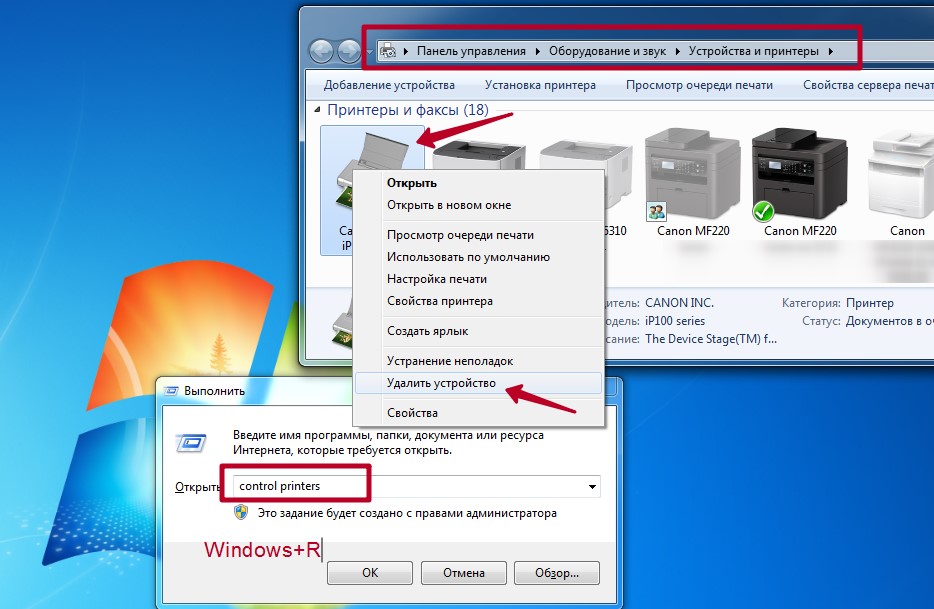
- Запускаем в окне Windows+R команду control printers.
- Находим свой аппарат в списке, который будет доступен после открытия окна панели управления принтерами.
- Через контекстное меню производим удаление устройства.
Чтобы удалить драйвера полностью используем окно управления сервером печати.
- В том же окне запуска программ набираем printui/s/t2.
- Находим модель своего девайса и нажимаем кнопку «Удалить».
- Выбираем вариант «Весь пакет».
Для полного удаления драйверов может понадобиться остановка службы очереди печати. Как это сделать, описано ниже.
Чистка папки Spool
В случае проблем с локальным печатающим устройством понадобиться очистить специальную папку системы, где хранится информация о работе всех принтеров, подключенных к ПК.
- Зайдите на диск, где установлена «операционка». В 99% случаев это будет диск «C:\.»
- Найдите папку C:\Windows\System32\spool\prtprocs\x64.
- Очистите все кроме библиотечного файла winprint.dll.
Если некоторые файлы не удаляются, то может потребоваться остановка службы диспетчера печати. Чтобы это сделать, нажмите Windows+R, введите команду services.msc, найдите нужную службу и остановите.
Если и это не помогло, тогда следует произвести загрузку ОС в режиме «Safe Mode». Перезагрузите ПК и при его включении нажмите клавишу F8. В списке выберите нужный вариант.
Чистка реестра системы
Перед внесением изменений в реестр системы сделайте его резервную копию через меню «Файл» и «Экспорт».
Вносим изменения так:
- Запускаем окно быстрого выполнения через Win+R. Вводим команду regedit.
- Находим ветку HKEY_LOCAL_MACHINE\SYSTEM\CurrentControlSet\Control\Session Manager\PendingFileRenameOperations.
- Удаляем полностью «PendingFileRenameOperations».
- Перезагружаем компьютер.
Установка порта
Чтобы «оживить» сетевой принтер, который отказывается печатать, попробуем добавить новый локальный порт. Такое действие помогает возобновить работу устройства в большинстве случаев.
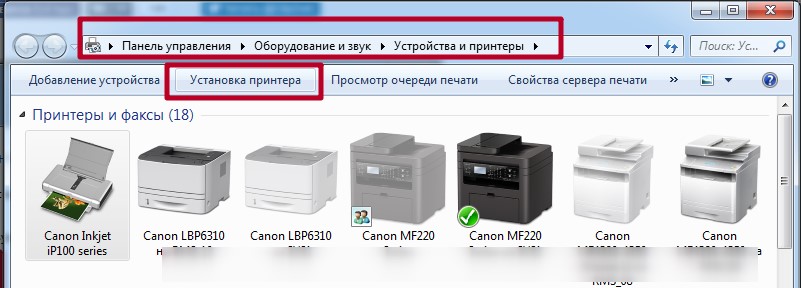
- Заходим в раздел с устройствами и принтерами через кнопку пуск и панель управления.

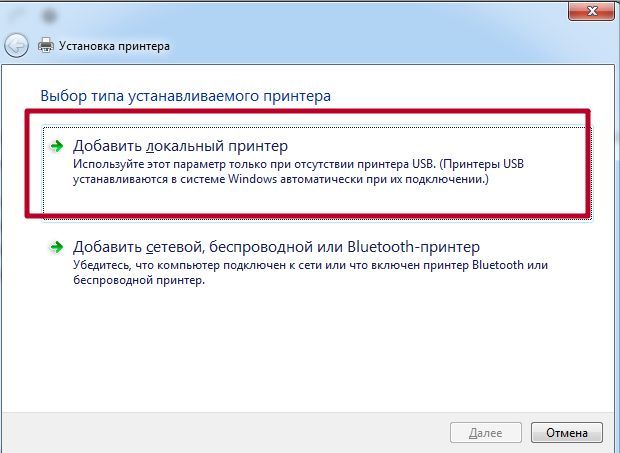
- Нажмите на кнопку «Установка принтера».
- Выберите первый вариант с добавлением локального устройства.
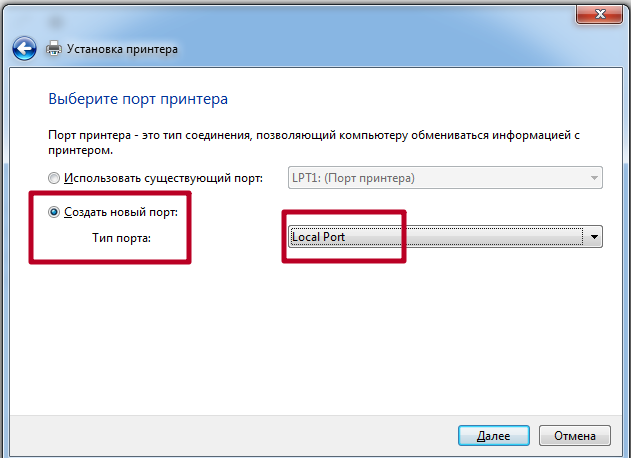
- В следующем окне отметьте «Создать новый порт». Нажмите кнопку «Далее».
- В имени укажите IP адрес устройства и собственно его имя. Инструкция по определению IP.
- Следуйте дальнейшим указаниям мастера установки.
Источник