
Реклама. АО «ТаймВэб». erid: 2W5zFGKdiEk
Проблемы с распознаванием геймпада в играх на ПК – распространенная ситуация, с которой сталкиваются многие геймеры. Причин может быть множество: от несовместимости контроллера с игрой до проблем с драйверами или настройками системы. Давайте разберемся со всем этим по порядку, чтобы найти оптимальное решение.
Проверка базовых настроек и подключения
Прежде чем переходить к более сложным методам, стоит убедиться в исправности базовых компонентов. Нередко проблема кроется в очевидных, но легко упускаемых из виду деталях – от банального разряда батареи до неправильного подключения.
-
Проверьте физическое подключение геймпада. Убедитесь, что USB-кабель надежно подключен к компьютеру и контроллеру. Если используете беспроводное подключение, проверьте уровень заряда батареи и качество соединения. Некоторые геймпады имеют световую индикацию состояния подключения – обратите внимание на нее. Попробуйте использовать другой USB-порт, предпочтительно напрямую к материнской плате, а не через хаб или переднюю панель.
-
Убедитесь, что геймпад включен и находится в правильном режиме. Некоторые контроллеры имеют несколько режимов работы (например, для ПК, консоли или мобильных устройств). Проверьте, установлен ли правильный режим. На геймпадах Xbox это может быть кнопка с логотипом Xbox, на контроллерах PlayStation – кнопка PS, которая должна гореть определенным цветом при успешном подключении.
-
Проверьте заряд батареи и питание. Низкий заряд может вызывать нестабильное поведение геймпада. Если используете проводной режим с контроллером, поддерживающим как проводной, так и беспроводной режимы, убедитесь, что кабель обеспечивает не только передачу данных, но и питание. Некоторые USB-кабели предназначены только для зарядки и не передают данные.
Комьюнити теперь в Телеграм
Подпишитесь и будьте в курсе последних IT-новостей
Подписаться
Диагностика распознавания геймпада в системе
Перед тем как переходить к настройке геймпада для конкретной игры, необходимо проверить, корректно ли система Windows распознает устройство. Если контроллер не определяется системой, игры тем более не смогут с ним работать.
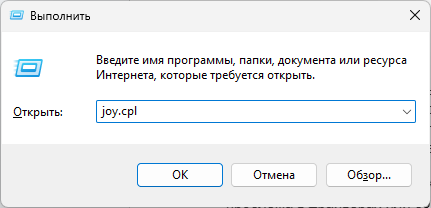
Проверка в «Игровых контроллерах» Windows:
-
Нажмите Win + R, введите joy.cpl и нажмите Enter.

-
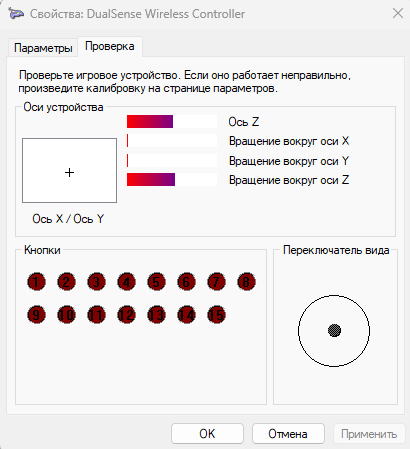
В открывшемся окне вы увидите список подключенных игровых устройств. Выберите ваш геймпад и нажмите «Свойства».
-
В окне свойств откроется панель тестирования кнопок и осей – проверьте работоспособность всех элементов управления.
Если ваш геймпад не отображается в списке или отображается некорректно, возможно, проблема в драйверах или совместимости с системой. Некоторые геймпады требуют установки специализированных драйверов, не входящих в стандартный набор Windows.
Проверка в Диспетчере устройств Windows:
-
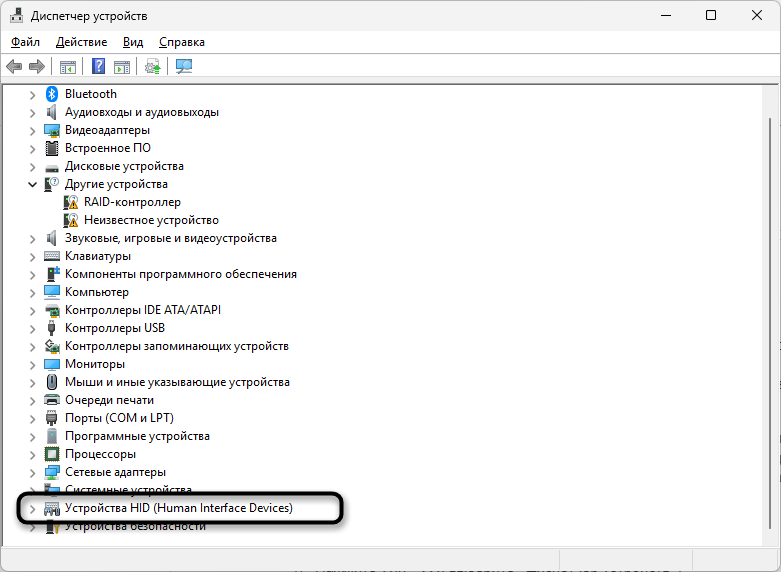
Нажмите Win + X и выберите «Диспетчер устройств».
-
Разверните категорию «Устройства HID» или «Игровые устройства».
-
Найдите ваш геймпад в списке – если рядом с ним есть желтый восклицательный знак, значит, есть проблемы с драйверами. Щелкните правой кнопкой мыши по устройству с проблемой и выберите «Обновить драйвер».
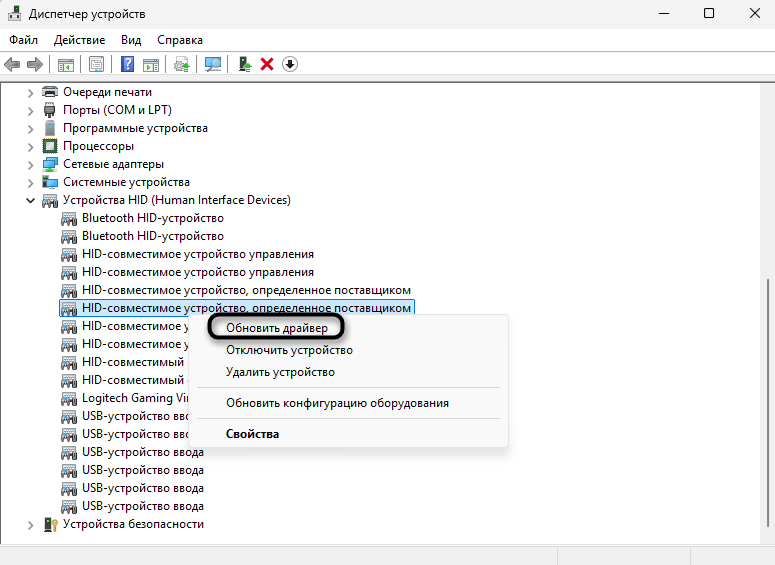
Иногда Windows некорректно определяет геймпад или использует общие драйверы HID вместо специализированных. В таком случае рекомендуется вручную загрузить и установить драйверы с официального сайта производителя.
Обновление драйверов геймпада
Устаревшие, поврежденные или несовместимые драйверы – одна из самых распространенных причин проблем с геймпадами. Каждый производитель предоставляет собственные драйверы, оптимизированные под конкретные модели контроллеров.
Обновление драйверов для геймпадов Xbox
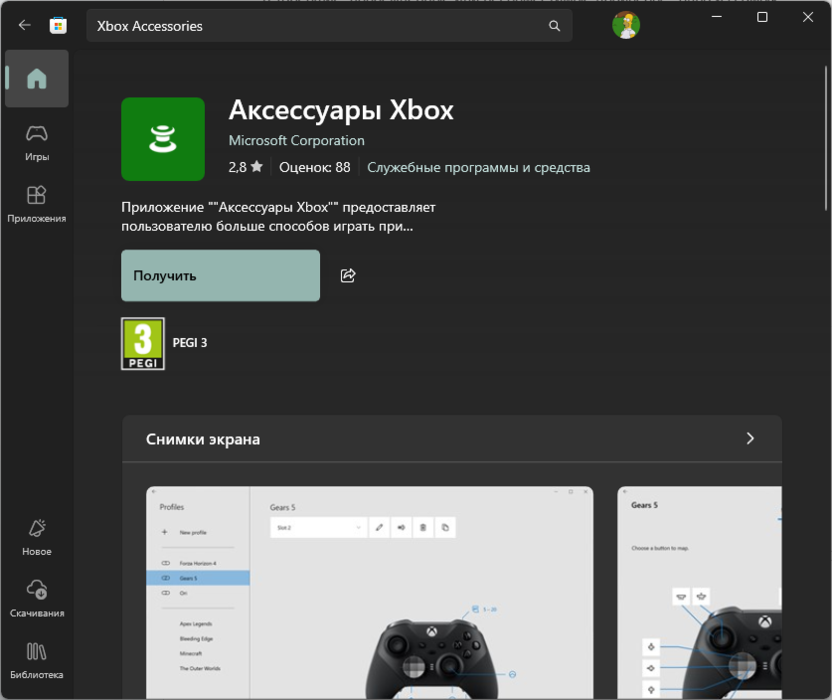
Контроллеры Xbox обычно автоматически распознаются в Windows и используют встроенные драйверы. Однако для новых моделей или при возникновении проблем рекомендуется скачать «Аксессуары Xbox» из Microsoft Store. Это приложение не только содержит последние драйверы, но и позволяет обновить прошивку контроллера, настроить кнопки и проверить работоспособность всех элементов управления.
Обновление драйверов для геймпадов PlayStation
Для контроллеров DualShock 4 (PS4) и DualSense (PS5) Windows не предоставляет специализированных драйверов. Система распознает их как общие HID-устройства, что ограничивает функциональность. Для полноценной работы рекомендуется установить специальные программы:
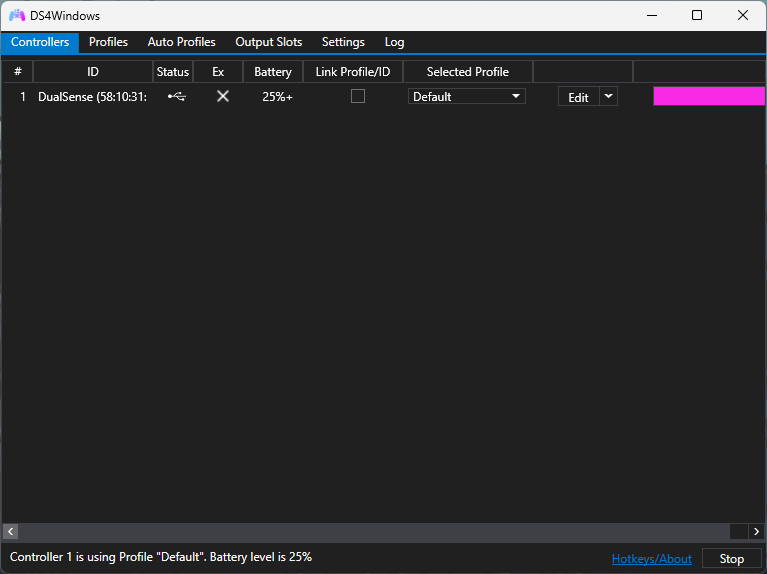
- DS4Windows – для контроллеров DualShock 4.
- DualSenseX – для контроллеров DualSense.
Эти программы эмулируют и контроллер Xbox, который имеет наилучшую поддержку в большинстве PC-игр.
Обновление драйверов для сторонних геймпадов
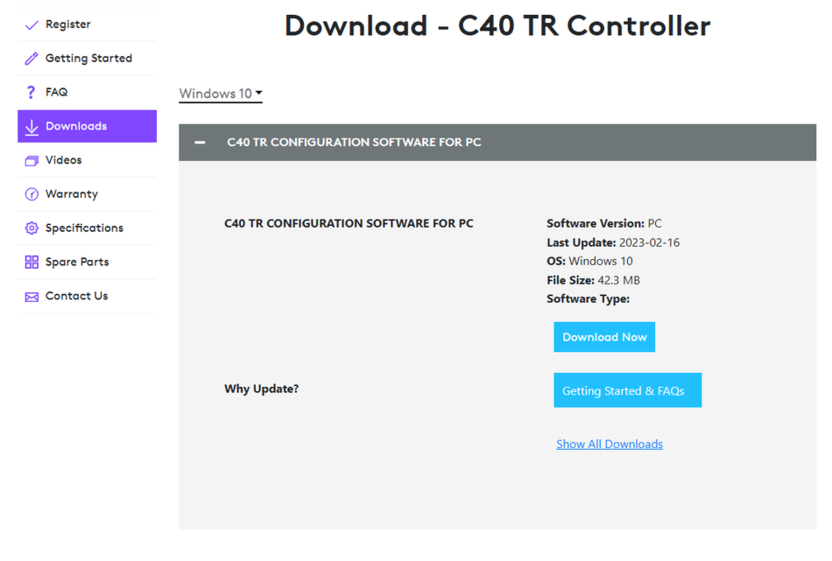
Для контроллеров от Logitech, Razer, Thrustmaster и других производителей следует загрузить драйверы и программное обеспечение с официальных сайтов. Многие из этих производителей предоставляют специальные утилиты для настройки геймпадов, которые также содержат необходимые драйверы.
Если после установки официальных драйверов проблема остается, попробуйте следующие шаги:
-
Полностью удалите драйверы устройства через Диспетчер устройств (щелкните правой кнопкой мыши по устройству и выберите «Удалить устройство», обязательно отметив пункт «Удалить драйверы для этого устройства»).
-
Перезагрузите компьютер.
-
Заново подключите геймпад и установите драйверы.
Использование эмуляторов для несовместимых геймпадов
Многие игры на ПК оптимизированы под контроллеры Xbox и могут не распознавать другие типы геймпадов. В таких случаях решением становятся программы-эмуляторы, которые преобразуют сигналы от вашего контроллера в формат, распознаваемый играми.
DS4Windows для контроллеров PlayStation 4
DS4Windows – популярный эмулятор, который преобразует сигналы от контроллера DualShock 4 в формат Xbox 360/One, обеспечивая совместимость с большинством PC-игр. После установки и запуска программы вам потребуется установить необходимые драйверы, следуя инструкциям на экране. При подключении контроллера DualShock 4 к компьютеру он автоматически определяется в программе, после чего вы можете настроить профили с различными конфигурациями кнопок.
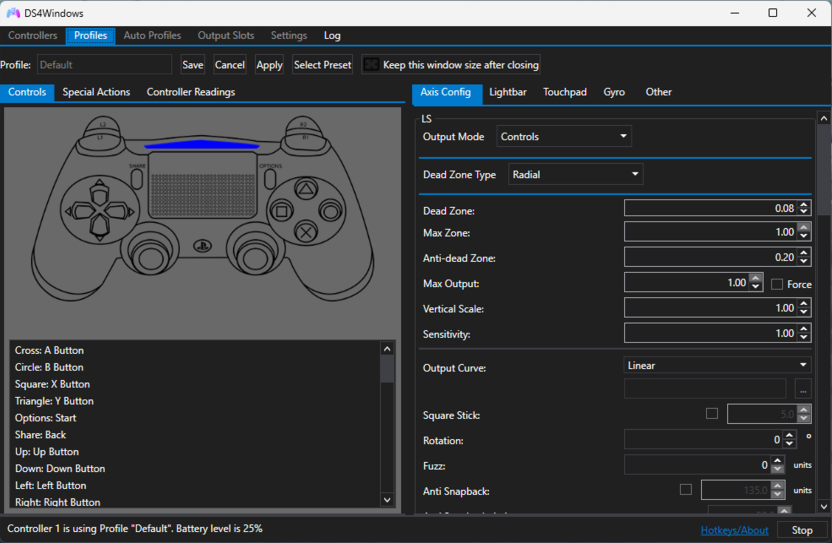
DS4Windows предлагает множество дополнительных функций, включая настройку световой панели, чувствительности стиков, мертвых зон, а также эмуляцию сенсорной панели через движения мыши. Для игр, которые не распознают геймпад даже через DS4Windows, программа предлагает режим «Hide DS4 Controller», который скрывает оригинальный контроллер от системы, овставляя только эмулируемый Xbox-контроллер. Эта функция особенно полезна в играх, которые могут конфликтовать при одновременном обнаружении нескольких типов контроллеров.
DualSenseX для контроллеров PlayStation 5
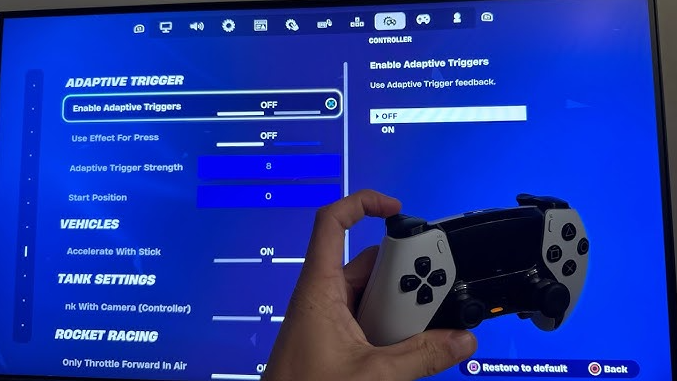
Контроллер DualSense от PlayStation 5 имеет расширенные функции, включая адаптивные триггеры и улучшенную тактильную отдачу. Программа DualSenseX позволяет не только эмулировать контроллер Xbox для совместимости с играми, но и настраивать эти уникальные функции на ПК. После запуска программы и подключения контроллера DualSense через USB или Bluetooth вы можете выбрать режим эмуляции (рекомендуется «Xbox 360 Controller») и настроить дополнительные параметры, такие как интенсивность вибрации, поведение адаптивных триггеров и световой полосы.
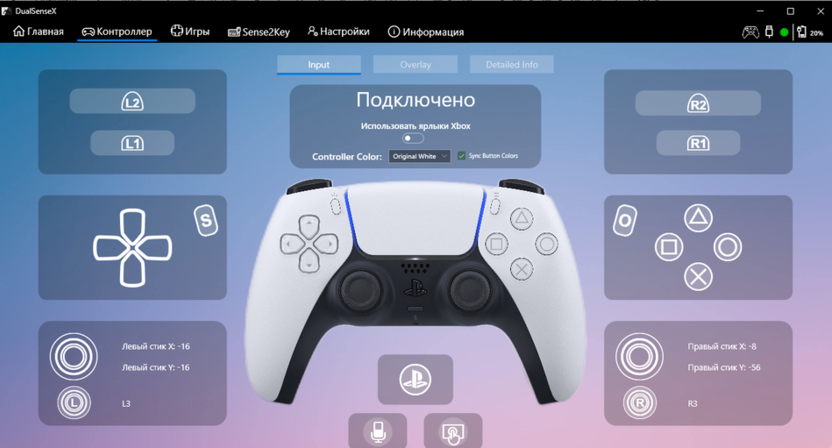
Обратите внимание, что полноценная поддержка уникальных функций DualSense (адаптивные триггеры, продвинутая тактильная отдача) доступна только в играх, специально оптимизированных для этого контроллера. В остальных случаях DualSenseX обеспечивает базовую совместимость на уровне кнопок и стиков. Программа регулярно обновляется, добавляя поддержку новых игр и расширяя функциональность для уже поддерживаемых, что делает ее незаменимым инструментом для владельцев DualSense на ПК.
x360ce для сторонних геймпадов
Для сторонних геймпадов и контроллеров, не имеющих специализированных эмуляторов, хорошим решением является программа x360ce (Xbox 360 Controller Emulator). Она позволяет преобразовать сигналы от практически любого геймпада в формат Xbox 360. Особенность x360ce в том, что исполняемый файл программы должен находиться в той же папке, что и исполняемый файл игры, с которой возникают проблемы. При первом запуске программа предложит создать необходимые файлы конфигурации, после чего вы сможете подключить ваш геймпад и следовать инструкциям по автоматической настройке.
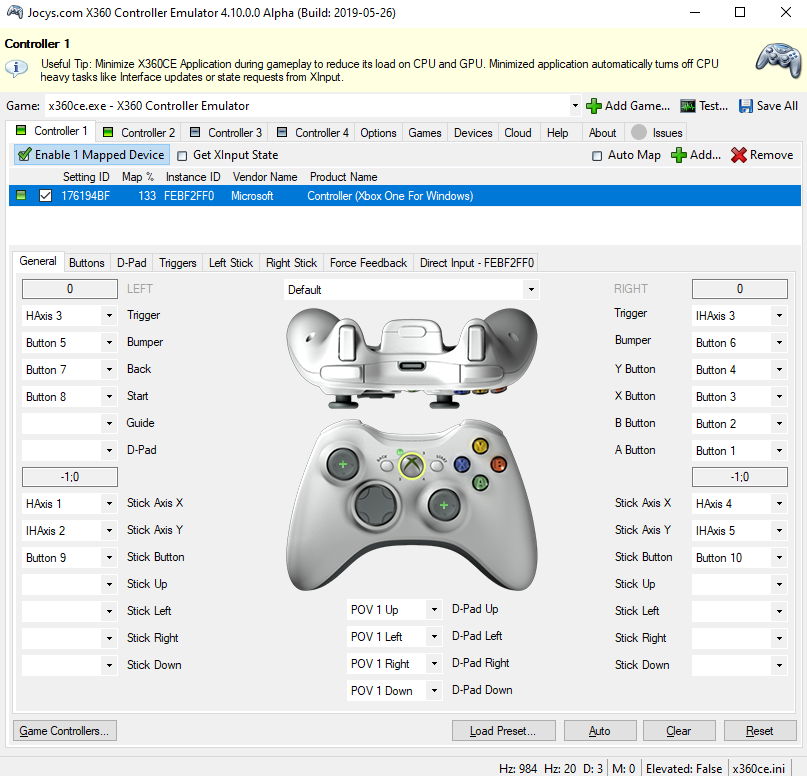
После настройки и сохранения конфигурации вы можете закрыть программу и запустить игру – она должна распознать ваш контроллер как Xbox 360. Если автоматическая настройка не обеспечивает корректной работы, в x360ce есть возможность ручной привязки каждой кнопки и оси. Это особенно полезно для нестандартных геймпадов или контроллеров с дополнительными кнопками. Программа x360ce особенно эффективна для работы со старыми играми, которые имеют ограниченную поддержку контроллеров, и с геймпадами от малоизвестных производителей.
Использование Steam для настройки геймпада
Платформа Steam предлагает полноценную систему конфигурации контроллеров, которая может решить большинство проблем совместимости. Steam поддерживает широкий спектр геймпадов, включая контроллеры Xbox, PlayStation, Nintendo Switch, а также множество сторонних устройств.
Настройка поддержки контроллера в Steam
Платформа Steam предлагает встроенную и весьма продвинутую систему настройки контроллеров, которая решает большинство проблем совместимости без необходимости установки дополнительных программ. Чтобы настроить поддержку геймпада, откройте Steam и перейдите в «Настройки», затем выберите раздел «Контроллер» В открывшемся окне активируйте переключатели, связанные с разными системами ввода. Еще можно включить поддержку геймпадов PlayStation в играх без совместимости, если вы используете DualShock или DualSense.
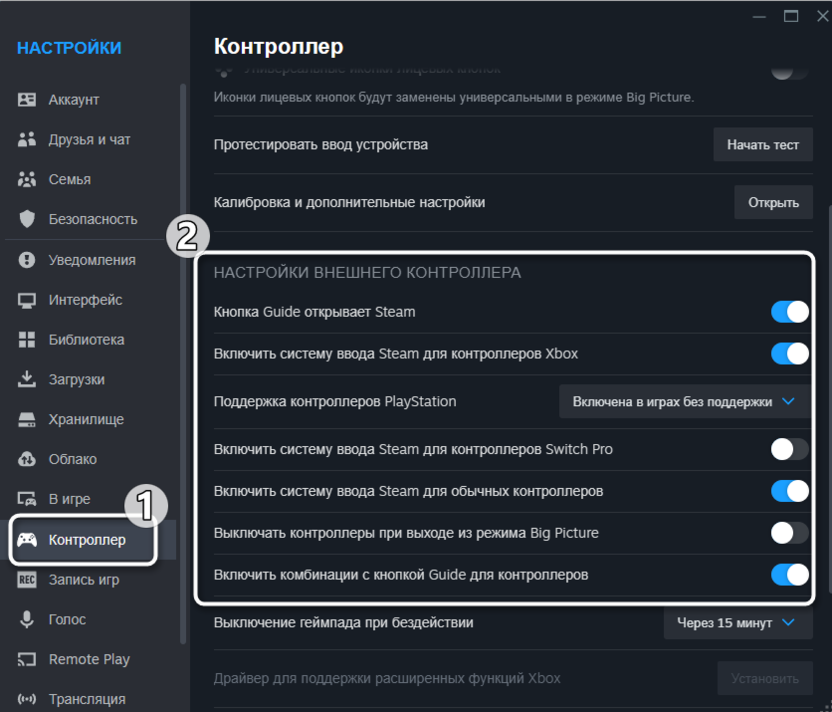
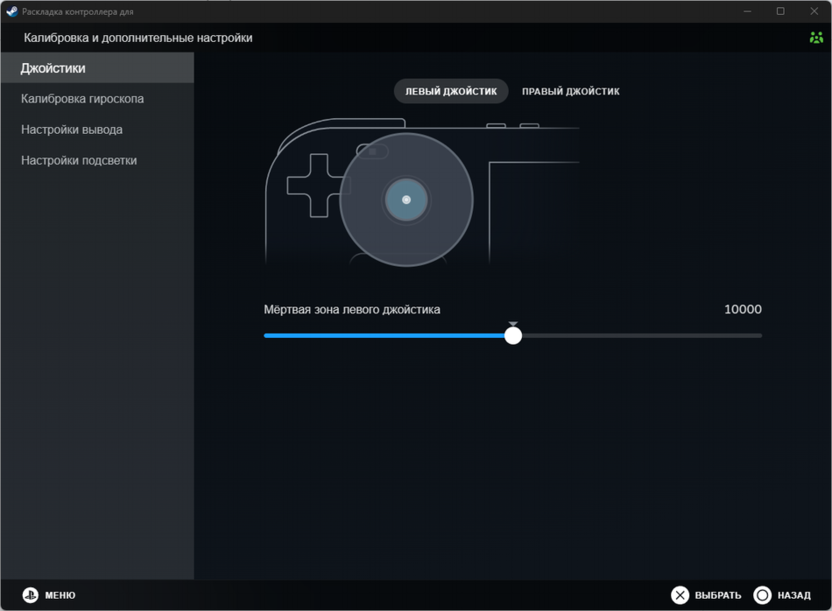
После активации нужных опций подключите ваш геймпад – Steam должен его определить и показать в списке устройств. Нажав кнопки калибровки и теста, вы можете выполнить калибровку и тонкую настройку кнопок. Система настройки контроллеров Steam позволяет создавать различные профили для разных игр, настраивать чувствительность, мертвые зоны, назначать макросы и использовать дополнительные функции. Особенно мощные возможности предлагаются для контроллеров PlayStation и Switch, включая настройку гироскопа, сенсорной панели и адаптивных триггеров в поддерживаемых играх.
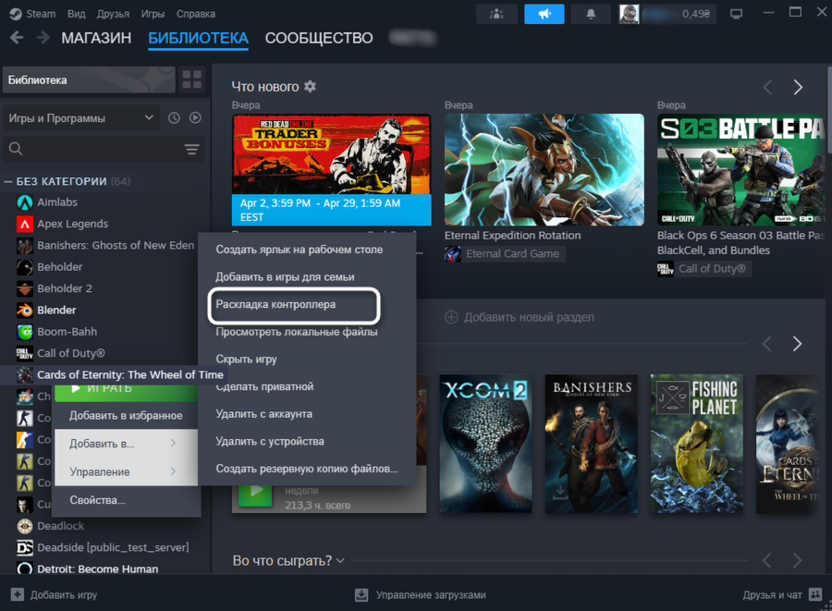
Важное преимущество системы Steam заключается в возможности сохранения и обмена конфигурациями контроллеров с другими пользователями. Это означает, что для популярных игр вы можете найти уже готовые, оптимизированные профили настроек, созданные сообществом. Просто откройте библиотеку Steam, щелкните правой кнопкой мыши по игре, выберите «Управление» и «Раскладка контроллера» для доступа к конфигурациям сообщества.
Запуск сторонних игр через Steam
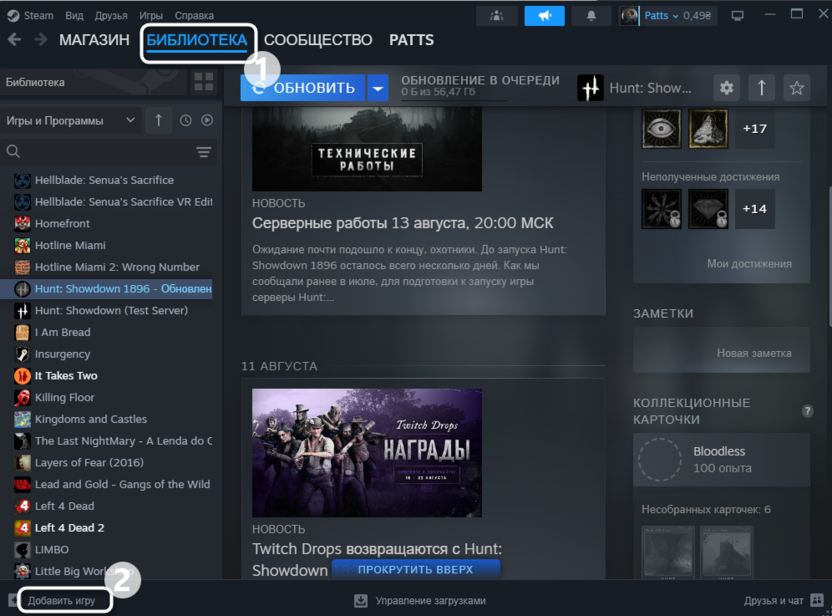
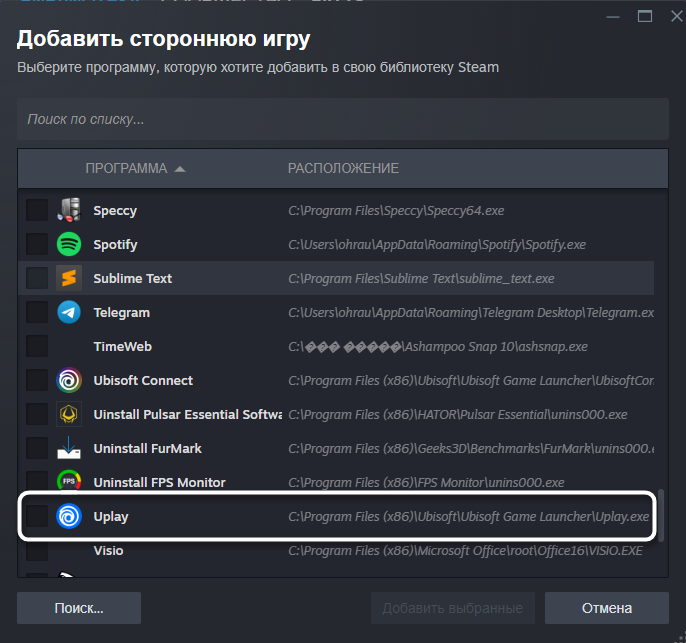
Функция поддержки контроллеров в Steam работает не только с играми из библиотеки Steam, но и с любыми сторонними приложениями, добавленными в библиотеку. Чтобы добавить стороннюю игру, откройте Steam и перейдите в раздел «Библиотека», затем в левом нижнем углу нажмите «+ Добавить игру» и выберите «Добавить стороннюю игру». Найдите исполняемый файл игры или нажмите «Обзор» для ручного поиска, выберите игру и нажмите «Добавить выбранные программы». Игра появится в вашей библиотеке Steam – щелкните правой кнопкой мыши по ней, выберите «Свойства», перейдите в раздел «Контроллер» и выберите «Разрешить настройку контроллера Steam».
После этого вы сможете настроить конфигурацию контроллера, щелкнув правой кнопкой мыши по игре и выбрав «Управление», а затем «Настройки контроллера». Этот метод особенно полезен для старых игр без встроенной поддержки современных геймпадов, а также для игр, распространяемых через сторонние лаунчеры, такие как Epic Games Store, Origin или Ubisoft Connect. Система Steam будет перехватывать и преобразовывать сигналы от вашего контроллера в формат, понятный для игры, даже если сама игра не имеет нативной поддержки вашего геймпада.
Существенным преимуществом этого метода является возможность использования всех продвинутых функций системы настройки контроллеров Steam, включая создание сложных макросов, настройку реакции на наклон стиков, переопределение функций кнопок в зависимости от контекста и многое другое. Фактически, Steam действует как универсальный эмулятор контроллера с широчайшими возможностями настройки, работающий практически с любой игрой.
Решение проблем с конкретными играми
Даже при корректной работе геймпада в системе и других играх, могут возникать проблемы с конкретными приложениями. Рассмотрим наиболее распространенные сценарии и их решения.
Игра не видит геймпад при запуске
Некоторые игры проверяют наличие подключенного контроллера только при запуске и не распознают устройства, подключенные после старта игры.
- Убедитесь, что геймпад подключен и работает до запуска игры.
- Проверьте, включена ли поддержка геймпада в настройках игры – некоторые игры требуют ручного включения этой опции.
- Если игра запускается через лаунчер, попробуйте подключить геймпад до запуска лаунчера.
- Для некоторых игр может потребоваться запуск от имени администратора – щелкните правой кнопкой мыши по исполняемому файлу игры и выберите «Запуск от имени администратора».
Игра распознает геймпад, но кнопки работают некорректно
Бывают ситуации, когда игра видит подключенный геймпад, но назначение кнопок не соответствует ожидаемому или некоторые элементы управления не работают.
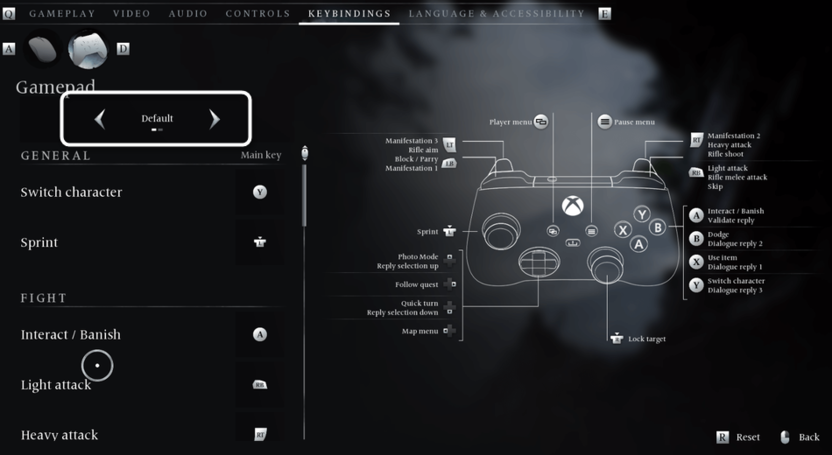
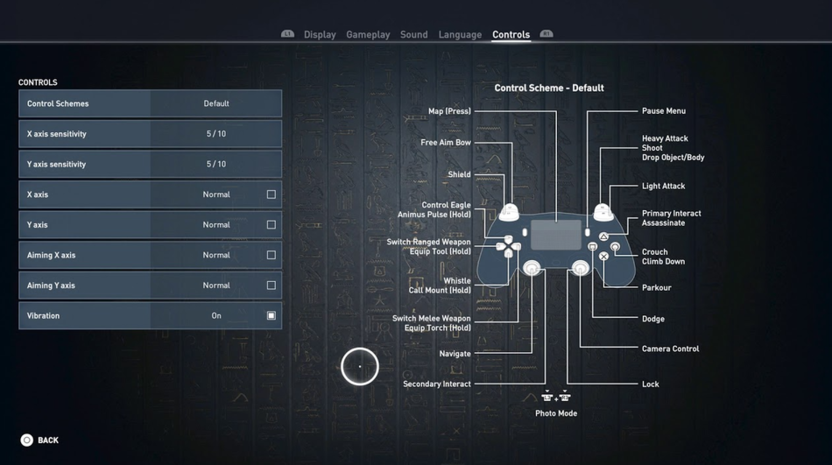
- Проверьте в настройках игры раздел управления – многие игры позволяют переназначить кнопки контроллера или же изменить его тип, переключаясь между раскладками Xbox и PlayStation.
- Если геймпад определяется как «Generic Controller», попробуйте использовать эмуляторы, описанные ранее.
- Для игр с фиксированной раскладкой кнопок используйте программное обеспечение от производителя геймпада для переназначения кнопок на уровне драйвера.
- При использовании Steam настройте конфигурацию контроллера под конкретную игру.
Геймпад работает нестабильно – периодически отключается или «залипают» кнопки
Нестабильная работа геймпада может быть вызвана различными факторами – от проблем с подключением до конфликтов с другими устройствами.
- Проверьте качество подключения – USB-кабель может быть поврежден или иметь плохой контакт.
- Для беспроводных геймпадов убедитесь, что нет источников помех и батарея достаточно заряжена.
- Отключите другие USB-устройства, особенно те, что могут конфликтовать с геймпадом (другие контроллеры, джойстики).
- Проверьте загруженность системы – высокая нагрузка на CPU или недостаток оперативной памяти может вызывать задержки в обработке сигналов от геймпада.
Проблемы с силой вибрации или специальными функциями
Многие современные геймпады имеют расширенные функции (вибрация с регулируемой интенсивностью, адаптивные триггеры, гироскоп), которые могут работать некорректно или не работать вообще в некоторых играх.
- Убедитесь, что игра поддерживает используемые вами функции – многие игры поддерживают только базовые функции контроллеров.
- Проверьте настройки в самой игре – часто интенсивность вибрации и другие параметры можно регулировать.
- Для контроллеров PlayStation используйте специальные программы (DS4Windows, DualSenseX), которые позволяют настроить эти функции даже для неподдерживаемых игр.
- В Steam можно настроить интенсивность вибрации и другие параметры через конфигурацию контроллера.
Общие рекомендации по совместимости геймпадов с играми
Не все геймпады одинаково хорошо работают со всеми играми. Существуют определенные закономерности и рекомендации, которые помогут выбрать наиболее подходящий контроллер и избежать проблем совместимости.
Особенности совместимости различных типов геймпадов
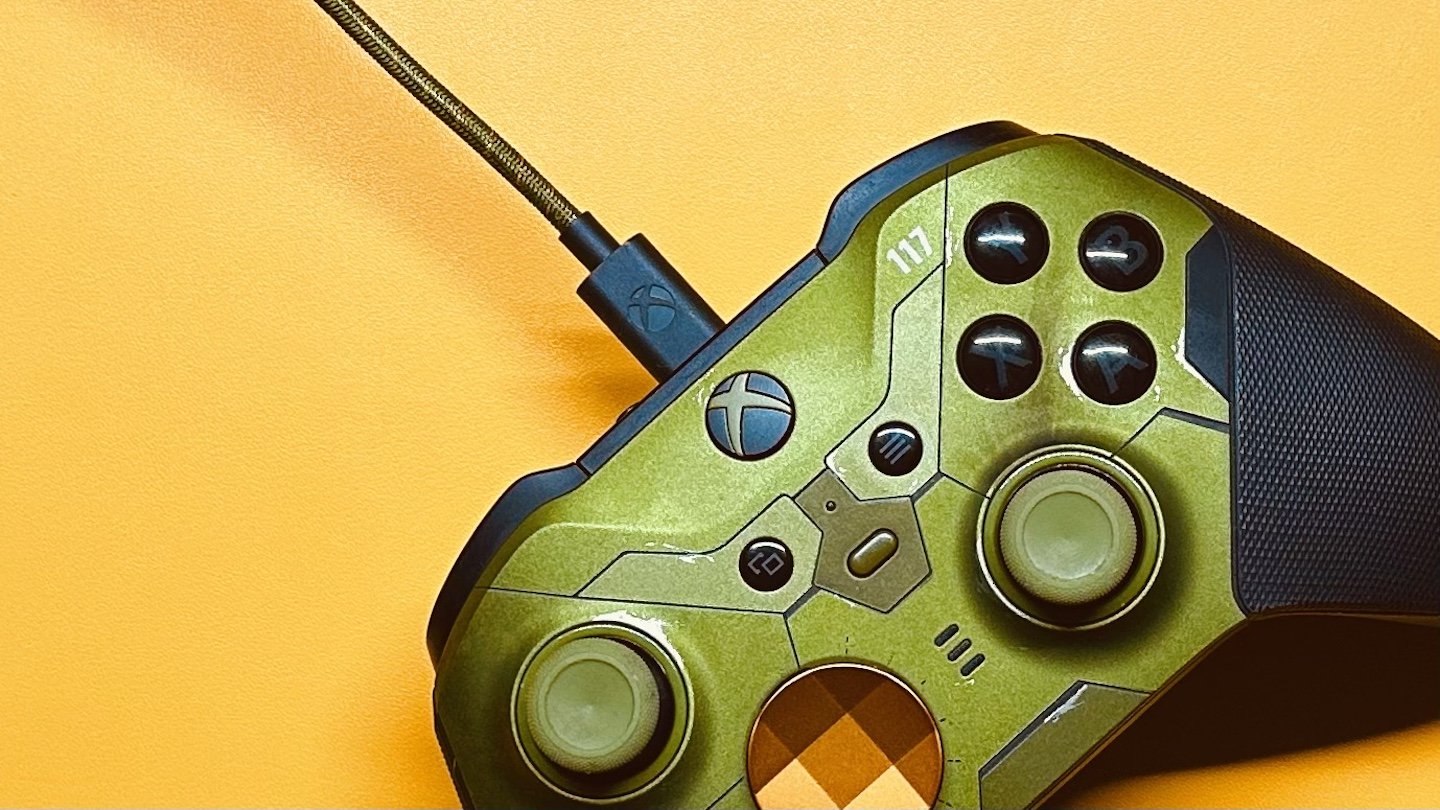
- Контроллеры Xbox имеют наилучшую совместимость с играми для Windows. Это связано с тем, что Microsoft разрабатывает как Windows, так и Xbox, а также с исторической популярностью контроллеров Xbox для PC-гейминга. Большинство современных игр по умолчанию поддерживают геймпады Xbox и отображают соответствующие подсказки с кнопками.
- Контроллеры PlayStation (DualShock 4 и DualSense) имеют хорошую базовую совместимость с Windows, но часто требуют дополнительного программного обеспечения для полноценной работы. Все больше новых игр добавляют нативную поддержку этих контроллеров, но часто игровые подсказки все равно отображаются с кнопками Xbox.
- Контроллеры Nintendo обычно имеют ограниченную совместимость с играми для ПК и почти всегда требуют дополнительного программного обеспечения для корректной работы.
- Сторонние геймпады от производителей, таких как Logitech, Razer, Thrustmaster, обычно предлагают режим совместимости с контроллерами Xbox, что обеспечивает хорошую совместимость с большинством игр. Качество реализации этой эмуляции может различаться.
Определение совместимости игры с различными типами геймпадов
Перед покупкой игры или геймпада стоит проверить их совместимость:
- Проверьте системные требования игры – в них часто указывается поддержка конкретных типов контроллеров.
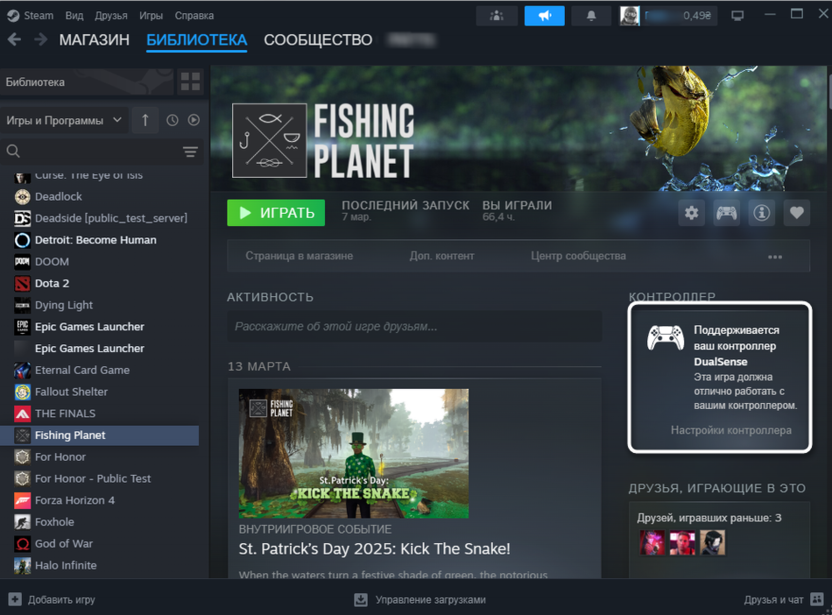
- Посетите страницу игры в Steam – в разделе информации об игре может быть указана поддержка контроллеров.
- Проверьте PCGamingWiki – этот ресурс содержит подробную информацию о совместимости игр с различными контроллерами и возможные проблемы.
- Изучите форумы и сообщества игры – другие игроки могут поделиться своим опытом использования различных геймпадов.
Заключение
Проблемы с работой геймпада в играх на ПК могут быть вызваны множеством факторов: от аппаратных неисправностей и проблем с подключением до несовместимости с конкретными играми или отсутствия необходимых драйверов. В большинстве случаев эти проблемы решаются проверкой базовых настроек, обновлением драйверов, использованием эмуляторов или настройкой через Steam.
Актуальные геймпады предлагают широкие возможности для персонализации игрового опыта, но для их полноценного использования иногда требуется дополнительное программное обеспечение. Важно помнить, что рынок игровых контроллеров постоянно развивается – появляются новые модели, обновляются драйверы и программное обеспечение, поэтому регулярно проверяйте наличие обновлений для вашего геймпада и используемых программ, чтобы обеспечить наилучшую совместимость с новыми играми и избежать возможных проблем в будущем.
В ряде случаев использование геймпада делает игровой процесс куда более комфортным. Но порой случается так, что система не распознает аксессуар. Что может быть причиной, и как заставить геймпад работать? Узнаете из нашего материала.
Возможные причины
- Аппаратные проблемы: поврежденный кабель, разъем или сам геймпад;
- Отсутствие драйверов: если драйверы для устройства не установлены или устарели, то компьютер может не определить его;
- Несовместимость: некоторые геймпады работают только с определенными платформами или требуют дополнительного программного обеспечения;
- Конфликт оборудования или настроек: другие подключенные устройства или неправильные настройки системы могут мешать обнаружению геймпада;
- Программные сбои: ошибки операционной системы или некорректная конфигурация подключений также могут вызывать проблемы;
- Разряженный аккумулятор или севшие батарейки: удостоверьтесь в отсутствии данных проблем, если вы используете беспроводную модель.
Методы решения проблемы
Проводной геймпад
Источник: CQ / Проводной геймпад
Проверка подключения и совместимости:
- Убедитесь, что кабель и USB-разъем исправны. Попробуйте подключить геймпад к другому порту или заменить кабель, есть такая возможность;
- Убедитесь, что ваш геймпад поддерживает работу с Windows или установленной версией ОС.
Обновление драйверов:
- Нажмите «Win + X» и выберите «Диспетчер устройств»;
- Найдите свой геймпад в списке, щелкните по нему правой кнопкой мыши и выберите «Обновить драйвер»;
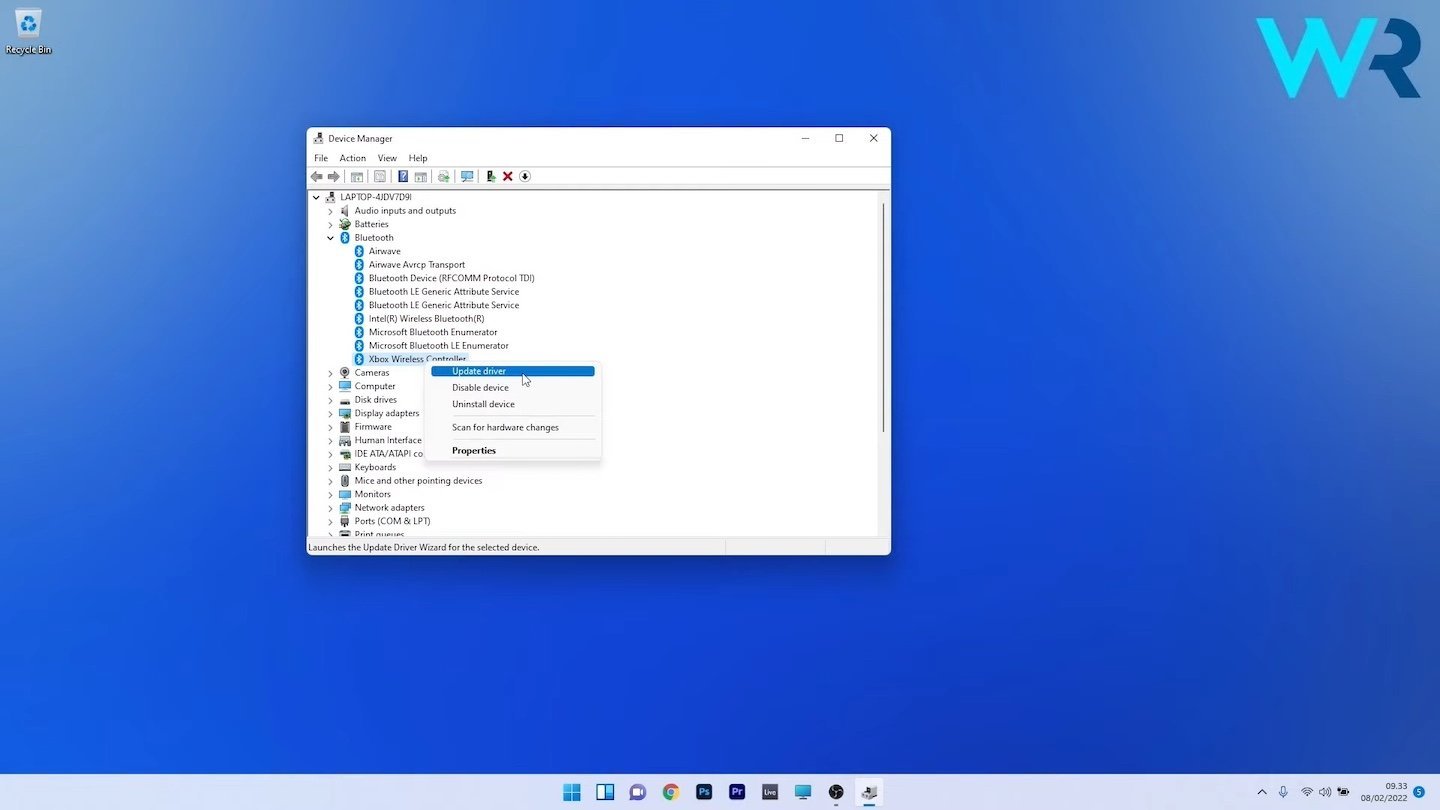
Источник: Windows Report / Обновление драйвера геймпада
- Если устройство не отображается, выберите опцию «Сканировать на предмет изменений оборудования».
Установка ПО производителя:
- Скачайте драйверы и утилиты с официального сайта производителя. Например, для геймпадов Xbox можно использовать приложение Xbox Accessories.
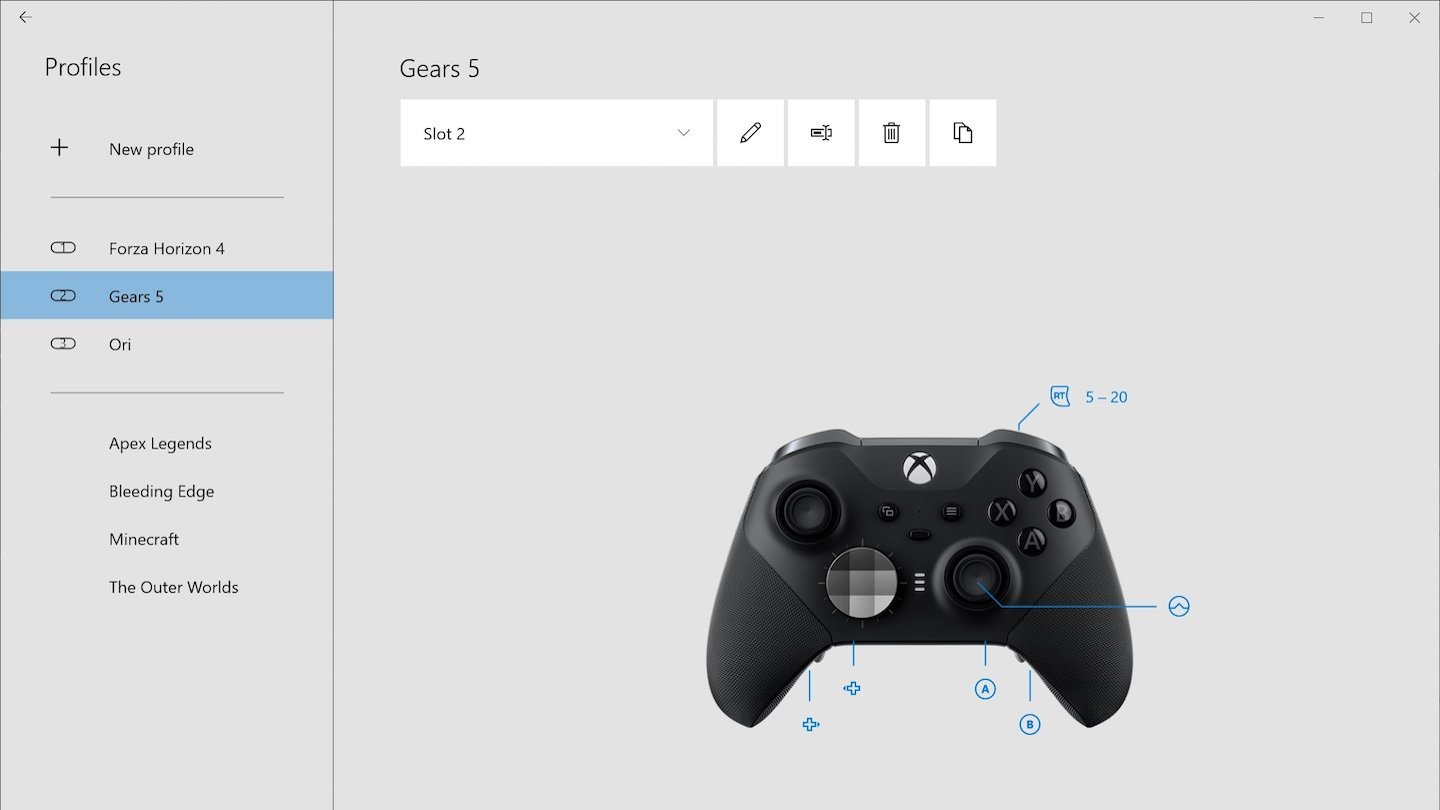
Источник: Microsoft / Приложение Xbox Accessories
Беспроводной геймпад
Источник: CQ / Беспроводной геймпад
Подключение через Bluetooth:
- Включите режим сопряжения на геймпаде (обычно зажимается кнопка с Bluetooth-символом);
- В Windows перейдите в «Параметры» > «Bluetooth и устройства» > «Добавить устройство» > выберите ваш геймпад из списка.
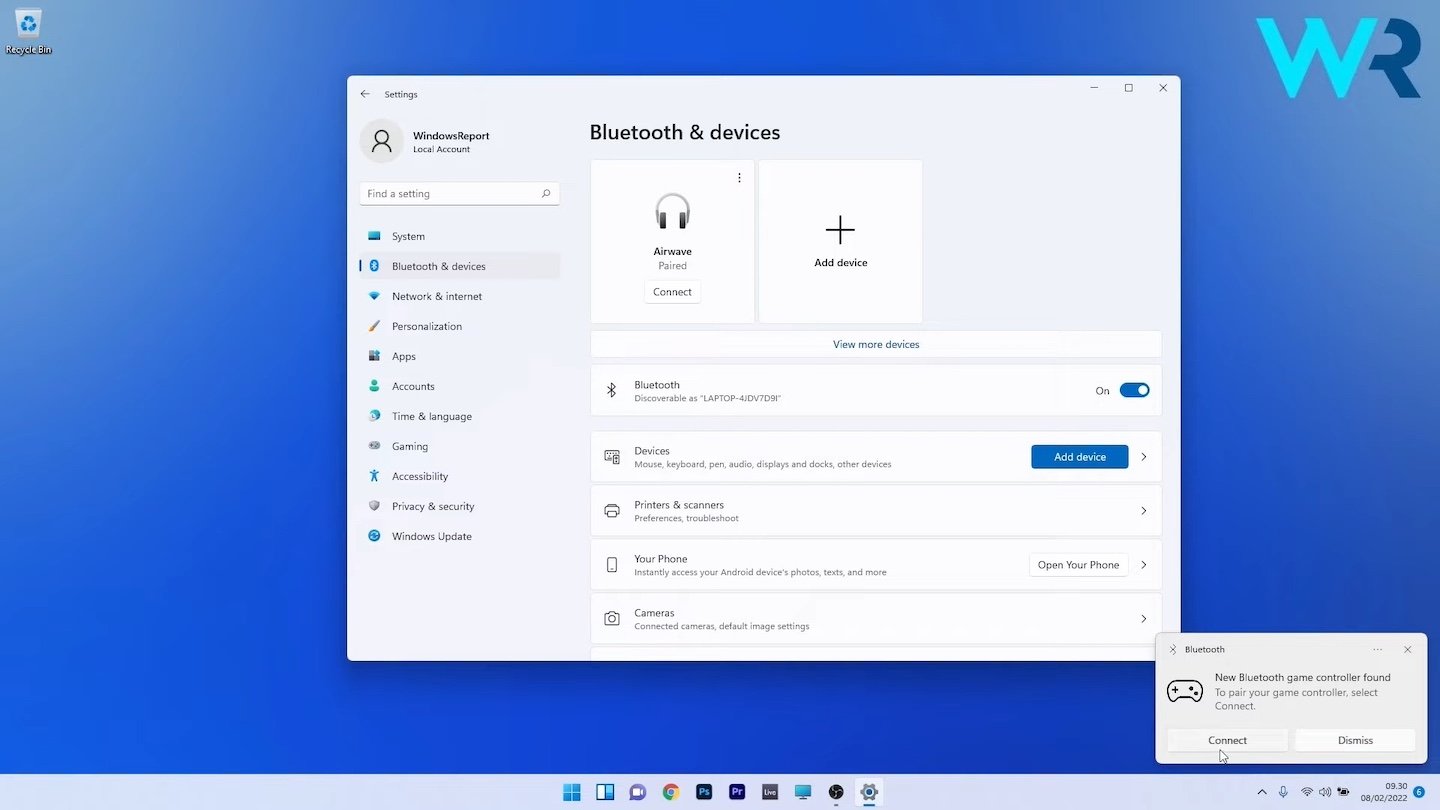
Источник: Windows Report / Подключение геймпада по Bluetooth
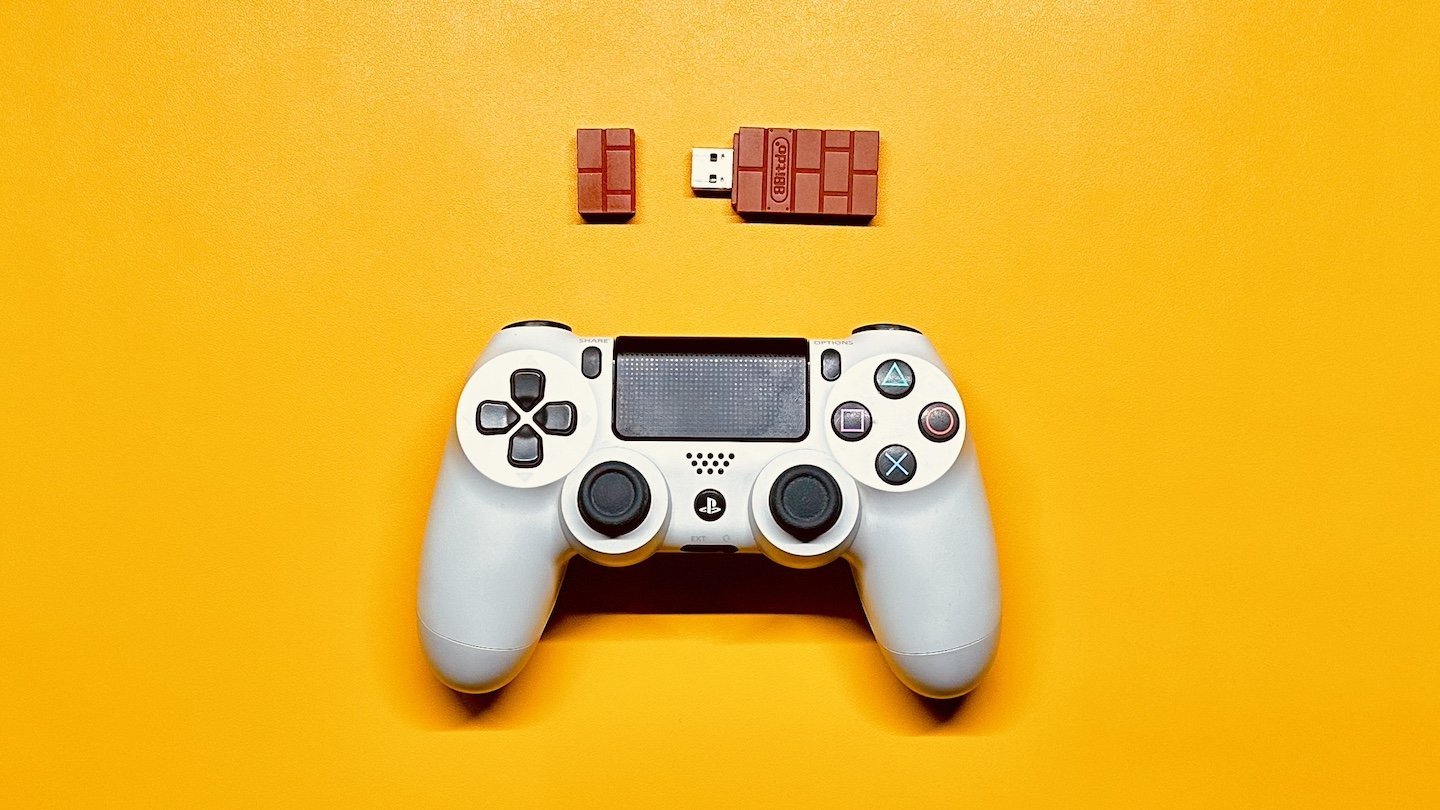
Использование беспроводного адаптера:
- Некоторые геймпады работают только от специальных радиомодулей, которые обычно идут в комплекте. Убедитесь, что адаптер подключен и правильно настроен.
Обновление прошивки:
- Проверьте, не требует ли геймпад обновления встроенного ПО, используя утилиты производителя.
Заглавное фото: CQ
Читайте также:
- Как подключить наушники Logitech G435 к ПК и ноутбуку
- 30 лучших игр с джойстиком и геймпадом на Android
- Как подключить джойстик к ПК
- Как подключить джойстик к телефону
- Как подключить геймпад от PS4 к ПК
Encountering issues and bugs are nothing new but a common scenario after upgrading Windows 10. Many users complain about a nasty problem with the connection between Xbox one controller and computer. As a result, they are not able to use the console to start gameplay.
Microsoft has replaced the original console driver including other drivers on the Windows 10 installation and the issue happens when they are not digitally signed. Tech experts say that USB device not recognized message could have been avoided if the peripheral had been unplugged during the upgrade. Let’s see how to fix PC not detecting Xbox one controller in Windows 10 if you couldn’t do that and now getting the problem. The fixes are valid for both the USB and Wireless consoles.
PC not detecting Xbox one controller
Here is how to fix PC not detecting Xbox one controller in Windows 10 –
1] Reconnect Xbox one controller
Oftentimes, Windows 10 computer is unable to recognize the Xbox One console just because the device is not paired properly in case of the wireless device. If the controller is USB then you will need to reconnect it first rather than trying out advanced workarounds.
For Bluetooth supporting controller
- Click Start and select – Settings.
- Choose – Devices.
- From the next page, click – Add Bluetooth or other device.
- Add a device pop up prompts; select – Bluetooth.
- Now take the controller and press – Guide button.
- Press – Sync button.
- Go back to the “Add a device” popup and the controller name will be available now.
- Select it and this is all.
Once the controller is paired with your Windows 10 PC, essential drivers will themselves get installed.
2] Check USB cable
Problems with USB devices are pretty common and most of the time these get fixed after changing the cable. Since not all USB cables are identical, there is a high possibility that the one you are using is incompatible with your controller.
While buying a new USB cable, do not buy Charge & Play Kit one. Since this is only designed for charging and not data transfer, your PC may deny recognizing the connected Xbox one controller. We highly recommend buying a standard USB to Micro USB cable and use the same to connect your controller to the PC.
3] Keep the battery out of your Controller to fix PC not detecting Xbox one controller
This may sound weird but many users inform that PC not detecting Xbox one controller problem triggers because of rechargeable battery. Hence, pull out the battery and then use a cable to make the PC recognize the console.
4] Run Hardware and Devices troubleshooter
If PC not detecting Xbox one controller due to some minor glitches, built-in Hardware and Devices troubleshooter should fix the issue. To make use of the utility, here are the steps to follow –
- Press – Windows + S.
- In the search bar, type in – cmd.exe.
- Pick the option – Run as administrator.
- To allow User Account Control, click – Yes.
- Insert the following line in elevated Command Prompt and hit Enter –
msdt.exe -id DeviceDiagnostic
- When Hardware and Devices troubleshooter shows up, click – Next.
- If the utility suggests a fix after detecting the issue, apply it.
5] Update USB drivers along with Plug and Play Software Device Enumerator
Faulty USB driver might also be a major factor to cause the difficulty of the Xbox controller not showing up on PC in Windows 10. The same scenario may also occur if Plug and Play Software Device Enumerator driver is corrupted or backdated. To update those, follow the way given bellow –
- Press – Windows + X.
- Select – Device Manager.
- Double-click – Universal Serial Bus controllers.
- Right-click the device that is causing the issue and choose – Update driver.
- Pick – Browse my computer for driver software.
- Opt for – Let me pick from a list of device drivers on my computer.
- Select the USB driver you want to update and then click – Next.
- Comply with on-screen instructions if any.
- Similarly, expand System devices from Device Manager.
- Update the Plug and Play Software Device Enumerator driver.
6] Reinstall Xbox controller drivers if PC not detecting Xbox one controller
When Xbox controller driver becomes incompatible that doesn’t go with your system configuration, your PC may deny detecting the device. The best way to deal with such an issue is to uninstall the culprit driver that exists on the system and then install it afresh. For that –
- Open Device Manager.
- Double-click – Sound, video and game controllers.
- Right-click the controller driver and choose – Uninstall device.
- For final consent, again click – Uninstall.
- Restart the Windows 10.
- Plugin Xbox one controller to the computer.
- The uninstalled driver software should get installed automatically.
Methods list
1] Reconnect Xbox one controller
2] Check USB cable
3] Keep the battery out of your Controller
4] Run Hardware and Devices troubleshooter
5] Update USB drivers along with Plug and Play Software Enumerator
6] Reinstall Xbox controller drivers
That’s all!!
Table of contents
- Why Gamepad is Not Recognized in Windows 10 and 11
- How to Fix Gamepad Not Recognized in Windows 10 and 11
- Fix 1: Restart the gamepad and Windows
- Fix 2: Update your drivers
- Fix 3: Confirm gamepad compatibility
- Fix 4: Assign the gamepad as a gaming device
- Fix 5: Rebuild configuration file data from APPDATA folder
- Fix 6: Change power settings from the device manager page
- Conclusion
- FAQ
Maybe you just downloaded a new game and cannot wait to start playing it. You install it and get your gamepad ready to smash game characters, but then nothing happens.
You plug in the connector to a different port on your Windows PC and find that it does not register, indicating that your gamepad is not recognized on your device.
Gamepad Not Recognized is not a big issue. Once you know the origin of the issue, you can easily resolve it.
So, if you are like other Windows 10/11 users who are typing “How can I fix my gamepad if it’s not recognized on Windows” on their search engines, this article is for you.
Why Gamepad is Not Recognized in Windows 10 and 11
Your Windows 10/11 PC may be unable to recognize the gamepad you plugged into the ports for a number of reasons.
Some of these reasons are:
- Too many Windows processes are already in operation. Excessive Windows processes can interrupt the normal operation of gamepads on Windows. These processes are usually unnecessary, with some of them breaking the startup process of some apps and system components. When such processes are running in the background, they could terminate the default gamepad controller processes that ordinarily enable Windows to recognize gamepads and use them.
- The drivers needed for gamepad operation are outdated. Another common reason your Windows 10/11 PC cannot recognize your gamepad is that the drivers running on your system are outdated. Software drivers, as you probably know, enable you to use computer components efficiently. So, when they are outdated, problems like Gamepad Not Recognized crop up.
- The gamepad is not compatible with the game or the Windows version. Also, the reason you are unable to connect your gamepad to your Windows PC may be that they are incompatible. This incompatibility may result from the fact that you just updated your Windows from 10 to 11, or that you just installed a Windows 10 OS, or that the video game that necessitated your using a gamepad requires a special driver.
- The gamepad is not the assigned controller for games on Windows 10/11. You may also be unable to use your gamepad on Windows 10/11 simply because gamepads are not assigned as the default controllers for games.
- Existing controller data in the game folder prevents Windows from recognizing gamepads. Similar to the problem of excessive Windows processes, it is also possible that your Windows PC does not recognize your gamepad because there is an existing gamepad controller data file/folder that interrupts it. The existence of such files is common, but their interruption of Windows processes is rare. Only by clearing such files from the Windows application data folders can you get Windows to recognize the gamepad you keep plugging in.
How to Fix Gamepad Not Recognized in Windows 10 and 11
Now that you know why Windows is unable to recognize your gamepad, here are ways to fix the problem.
Note that the majority of online articles on how to fix Gamepad Not Recognized in Windows 11 are the same as articles about fixing the problem on Windows 10.
In other words, you can use the following solutions whether you have Windows 10 or Windows 11 installed on your PC.
Fix 1: Restart the gamepad and Windows
When your Windows PC is unable to recognize your gamepad, the first thing you must do is restart the gamepad.
This is the same as turning the gamepad off if it has an on/off button and turning it back on.
If that does not work, you can plug it into a different port. If that is also ineffective, you should restart your Windows computer.
The restart option lets the OS shut down and boot up, terminating and reinitiating every Windows process.
So, if a particular Windows process is responsible for your PC’s inability to recognize your gamepad, the restart procedure will fix it.
Fix 2: Update your drivers
Against the noted problem of outdated drivers, the obvious solution to fixing the Gamepad Not Recognized problem is to update your drivers.
There are three ways you can go about this:
Use the device manager
- Hold down the
Windows key + Xto load the Power User Menu. - Select Device Manager.
- Navigate to the location of the gamepad device. This depends on the specific gamepad you’re using. For example, when an Xbox 360 controller is plugged in, the device will appear as “Xbox 360 Controller for Windows” under “Xbox 360 Peripherals.”
- Right-click the device and select Update Driver.
- On the next window, choose Search automatically for drivers.
Windows will search for the latest official driver on the web and install it. After this, reboot your PC to complete the procedure.
However, this is an inefficient method because you may not know which driver is outdated or responsible for the Gamepad Not Recognized problem.
Use the Windows Update
On Windows 10:
- Open Settings with Windows key + I.
- Navigate to Update & Security > Windows Update.
- Click Search for Updates.
On Windows 11:
- Use Windows key + I to open Settings.
- Select Windows Update from the left navigation pane.
- Click on Check for Updates.
Some Windows updates include official driver updates from Nvidia, Intel, and Realtek. So, this is a quick way to install missing driver updates.
Use Auslogics Driver Updater
The third and most efficient method of updating drivers is to use third-party software.
The Auslogics Driver Updater, for example, helps you update all needed drivers at once.
Whichever way you choose, updating your Windows drivers should fix the Gamepad Not Recognized problem.
Download Auslogics Driver Updater
Prevent hardware errors and ensure problem-free device operation with this advanced tool that detects outdated drivers and safely gets them updated.
Related:Auslogics Driver Updater: Update Your Drivers in One Click!
Fix 3: Confirm gamepad compatibility
If updating your drivers does not work, the Gamepad Not Recognized issue may not be as serious as you imagine. It could be a problem of compatibility, as we earlier pointed out.
So, either the gamepad you are using is incompatible with the video game or with your current version of Windows.
In the rare case where this is true, you can simply do the following:
- Search for set up USB game controllers from the Start screen or use the Run Command (
Windows key + R) and entercpl.Both of these methods take you to the Game Controllers mini page. - If you see your gamepad indicated on the mini page, click on the Properties option.
- Use the Test tab to confirm that your gamepad is functional.
This tells you whether your gamepad is still working and useful.
Fix 4: Assign the gamepad as a gaming device
Beyond the issue of compatibility, it is possible that you are unable to use a gamepad on Windows because you have not assigned gamepads as the default game controller.
Put differently, your Windows PC only recognizes keyboards and mice as the input device for gaming. Therefore, you need to get Windows to recognize gamepads as the preferred device for gaming.
To assign gamepads as Windows default game controller devices:
- Use
Windows + Rto open the Run Command and then entercpl. - On the Game Controllers mini page that pops up, click the option that says Advanced.
- Click on the drop-down option and select your gamepad, and then OK. (Also click OK, not esc, on the Game Controllers mini page to implement your changes.)
You should also check the settings of the game you are playing to effect similar changes.
Note
Although it is very unlikely that Windows does not recognize your gamepad because the keyboard is selected as the controller in the video game settings, it will not hurt to check.
So, start up the game and navigate to the settings. Once you find the tab for the game controller, make sure that the gamepad option is selected.
Fix 5: Rebuild configuration file data from APPDATA folder
As noted earlier, there may be existing game data that is preventing Windows from recognizing your gamepad.
When this is the case, you have to get Windows to rebuild the configuration file (often with the .CFG extension) from your APPDATA folder.
To do this,
- Close the video game and check the Task Manager to ensure that no related process is running in the background.
- Use
Windows + Rto open the Run Command and then enter%appdata%\microsoft. - Select the folder of the game you are trying to play and enter.
- Locate any file with the .CFG extension and delete it.
- Start the game.
Once you ask Windows to start the game again, it will rebuild a new configuration file. So, if this is the root of the problem, your Windows 10/11 should now recognize gamepads and allow you to use them.
Fix 6: Change power settings from the device manager page
One other way to fix the Gamepad Not Recognized problem on Windows 10/11 is to prevent Windows from turning off (or refusing to recognize) gamepad devices to save power.
To do this, you have to change the power settings from the USB driver tab on the Device Manager page in Windows 10/11. So, to change these settings,
- Click the Windows key + X on your keyboard and select Device Manager.
- On the Device Manager page, move your cursor to the Universal Serial Bus controllers option and double-click.
- From the options that emerge, select USB Root Hub and double-click to get to the Properties page.
- On the USB Root Hub Properties page, select the Power Management tab and deselect the Allow the computer to turn off this device to save power
- Click OK and close Device Manager. Then, plug in the gamepad to see if the problem is fixed.
Conclusion
These solutions are effective for fixing the Gamepad Not Recognized problem on Windows 10/11. Using any one of them could save you from buying a new gamepad or reinstalling the video game.
Share this article with your friends, and feel free to comment below with any additional tips or thoughts!
FAQ
Why is my computer not detecting my controller?
Check to see if the controller is correctly paired wirelessly or connected to your computer using a USB connection, depending on the model. If the controller is wireless, ensure the batteries are charged; low battery levels might occasionally result in problems connecting. To rule out any port-related problems, you can also try connecting the controller to a different USB port on your computer. Also, see whether driver updates are available and whether the controller is compatible with your operating system. Reinstalling or updating the drivers may fix the problem if the computer is unable to recognize the controller due to outdated or corrupted drivers.
How do I set up my gamepad on Windows 11?
Connect your gamepad to your PC using a USB cable or wireless connection. If the controller is connected, connect it to a USB port on your computer. To link a wireless controller with your PC using Bluetooth or a wireless receiver, follow the manufacturer’s directions. Once the controller is connected, Windows 11 should recognize it and automatically install any required drivers. In case the controller is not detected, it could be necessary for you to update the drivers manually.
Why is my controller not connecting to my PC on Windows 11?
There are various reasons why your controller might be unable to connect to your Windows 11 computer. First, depending on the controller you’re using, ensure it’s correctly linked to your computer via a USB cable or wirelessly. Verify that the wireless controller is correctly paired with your computer if it is one. Second, see if Windows 11 is compatible with the controller. It’s possible that certain older controllers require compatibility patches or driver updates since the newest operating system doesn’t support them. If the controller is wireless, make sure the batteries are charged as well, as low battery levels occasionally hinder a good connection.

