
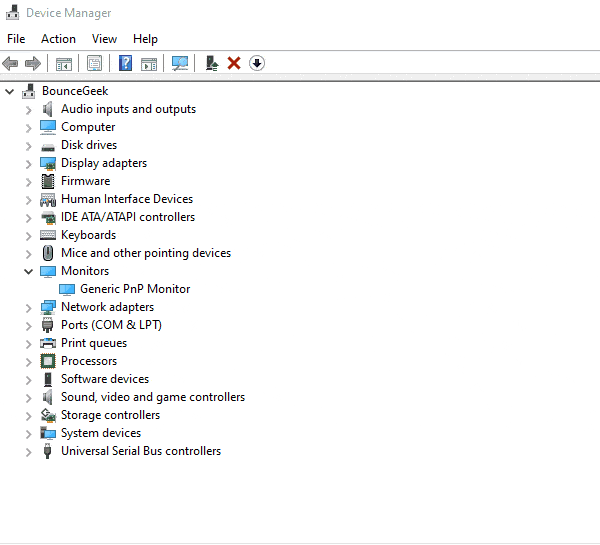
Device Drivers are the most important part of a Computer System. It does control a particular type of device that is attached to a Computer. An operating system also comes with many Generic Device Drivers. This means if you don’t install a required driver for connected hardware. Then, Windows automatically does install a generic driver for it. It helps devices to get work basic functionality. But, recently after Windows 10 update, many users are reporting the Generic PnP Monitor issue. This means, their monitor isn’t being recognized by Windows. Even, many Windows 11 users also experience the same after upgrading to Windows.
Undoubtedly, It is a monitor driver issue. But, we also can’t deny that it could be a hardware or cable-related issue. For some users, the device manager is showing Generic Non-PnP Monitor. Well, no need to worry. This problem can be fixed by trying out certain methods. Simply, do follow each solution mentioned in this article, one by one, until this monitor driver issue gets fixed.
What is a Generic PnP Monitor?
In Windows, PnP stands for Plug and Play. When you plug a PnP monitor into Windows, it starts working without having to install a specific driver. And, when the device manager shows Generic PnP Monitor, that means: Windows has installed a basic monitor driver, in the absence of the required monitor driver. A generic monitor driver provides basic functionality to the monitor.
But, with the generic monitor driver, you cannot customize display settings. You cannot set the best resolution and highest possible refresh rate. For that, you have to install the required monitor driver.
How to Fix Generic PnP Monitor Issue
Note: If you have already tried to install a monitor driver using the device manager. Then, check solution 4. I have mentioned in it how you can generate a monitor driver file and install it.
Solution 1: Reconnect Monitor, and Change Monitor Display Cable
Before moving towards some advanced solutions, let’s try some basic solutions. If you’re a desktop user or using an external display on your laptop, then this method might help you. Also, this solution will work for those, who’re facing this issue after a Windows update.
Step 1. Do completely turn off your computer. Even, remove the power cord.
Step 2. Now, unplug the video cable from the CPU. (HDMI/VGA/DVI Cable.)
Tip: If you’re using VGA Cable connect the Monitor to the CPU. Then, do use a “VGA to HDMI Converter“. And, connect the HDMI cable to the HDMI port. And, if you’re using a dedicated graphics card on your PC. Then, connect the video cable to the graphics card port, not to the motherboard display port.
Step 3. After 10 minutes, plug the video cable back in. And, turn on your PC.
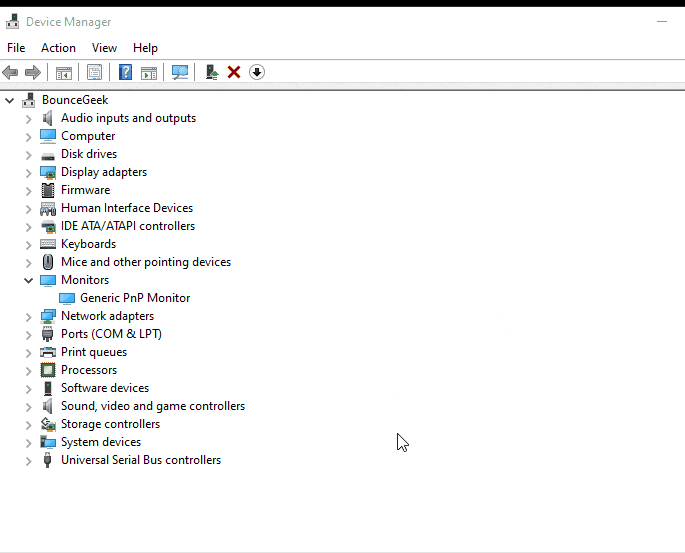
Open Device Manager and find out connected monitor name is appearing in the monitor’s section or not.
Solution 2: Install Monitor Driver from Windows Optional Updates
Install Monitor Driver from Windows Optional Updates.
If you’ve recently built a PC, and using the latest Monitor with it. Then, you can easily get driver updates for it from Windows Updates. Yes, Windows has a hidden section to update monitor and chipset drivers. Windows 10/11 comes with an optional updates section in the settings app. From there, you can find a driver for your monitor. And, this will replace Generic PnP Monitor with your Monitor name.
1. Press Windows + I key in Windows 11 to open the Settings App.
2. Click on Windows Updates from the left pane.
3. Now, click on Advanced Options. Now, in Additional Options, you will see “Optional Updates”.
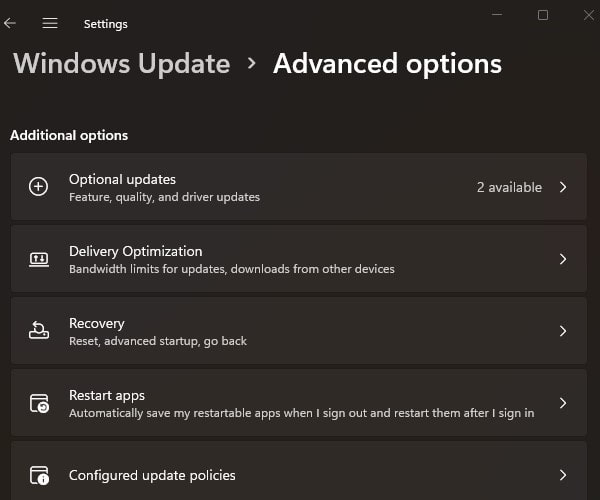
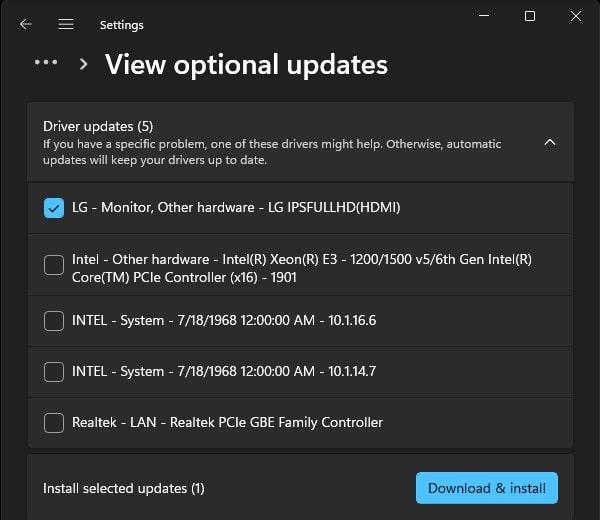
4. Click on Driver Update. Here, you will find your monitor driver. Select the driver from the list, and click on “Download & Install”.
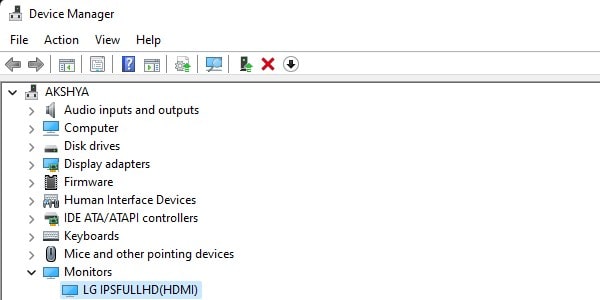
5. Once, the driver gets installed, open the device manager, and you will see your monitor name.
Solution 3: Uninstall Generic Monitor Driver
If after reconnecting the monitor or changing the display cable, if still issue not resolved. Then, you can try uninstalling the Generic Monitor Driver.
Is it safe to uninstall the generic PnP monitor driver?
You must be thinking if I uninstall the generic driver, will I lose the monitor display? The answer is no, your monitor display will not stop working. Windows will revert to either a standard driver or the same default driver that was used during the original installation of the OS. In other words, Windows will recognize it as new connected hardware and it will install the drivers automatically. Do follow the following steps:
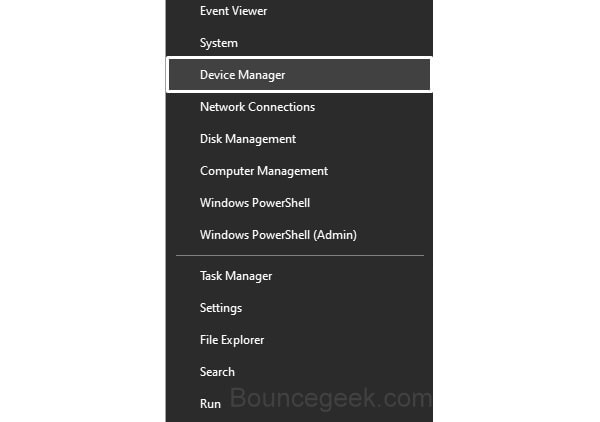
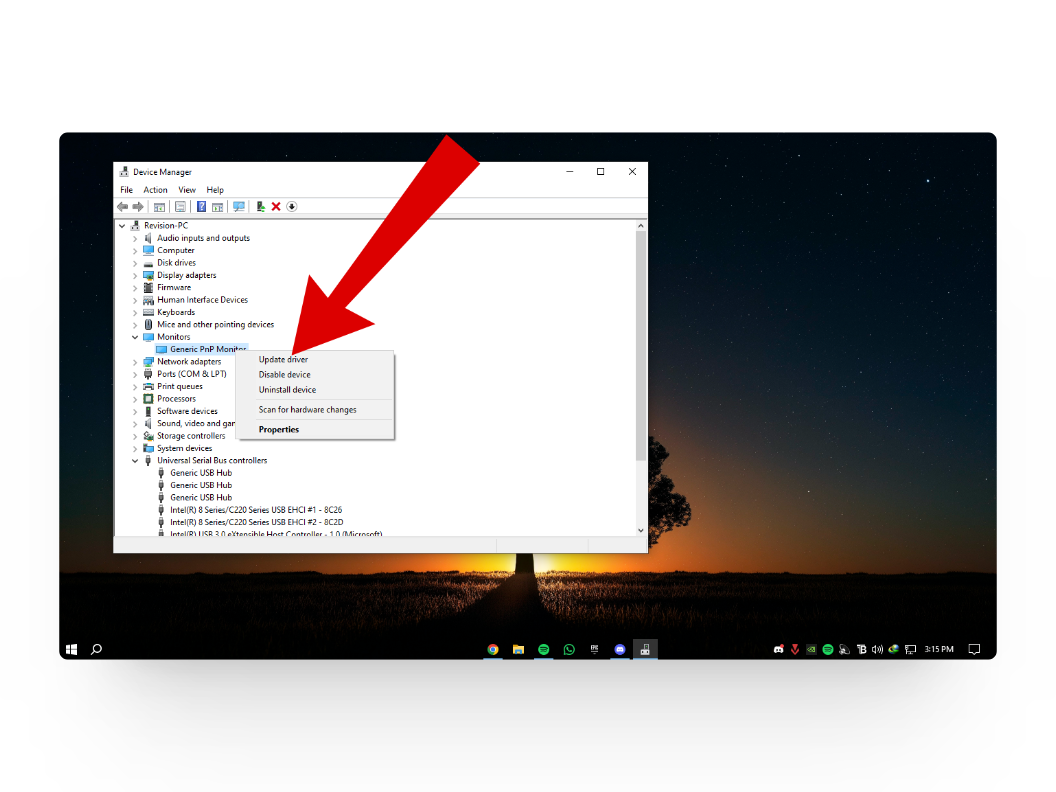
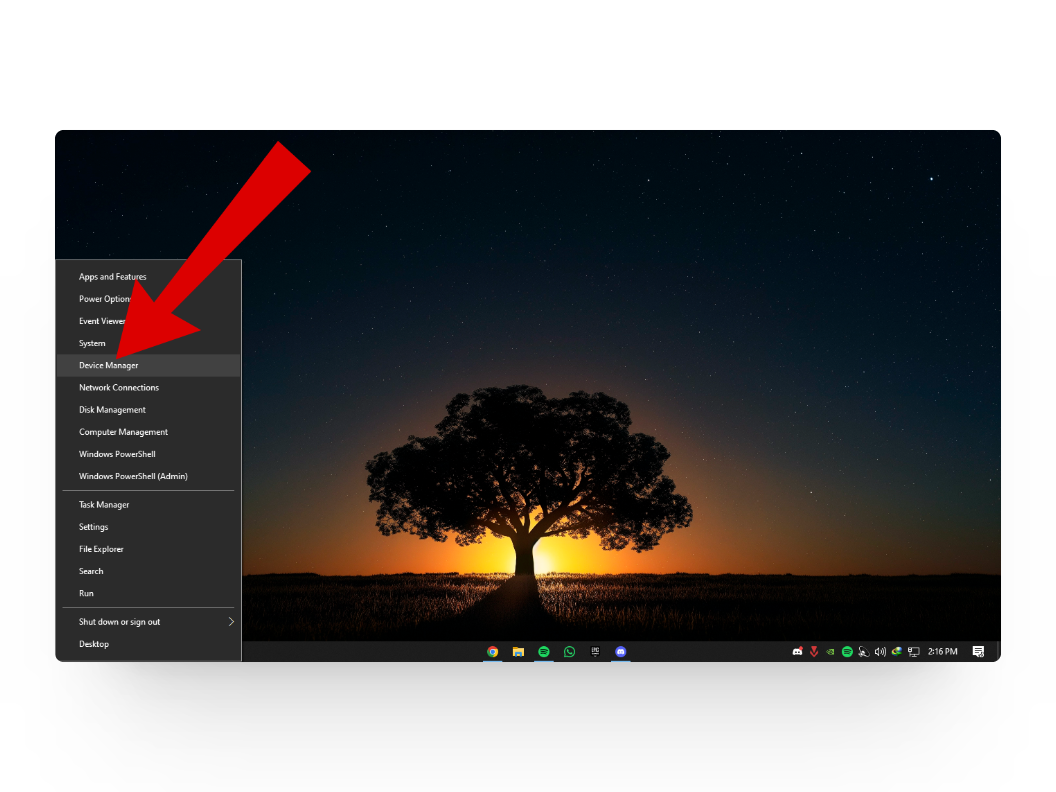
Step 1. Right-Click on the start button, and from the WinX Menu, click on Device Manager to open.
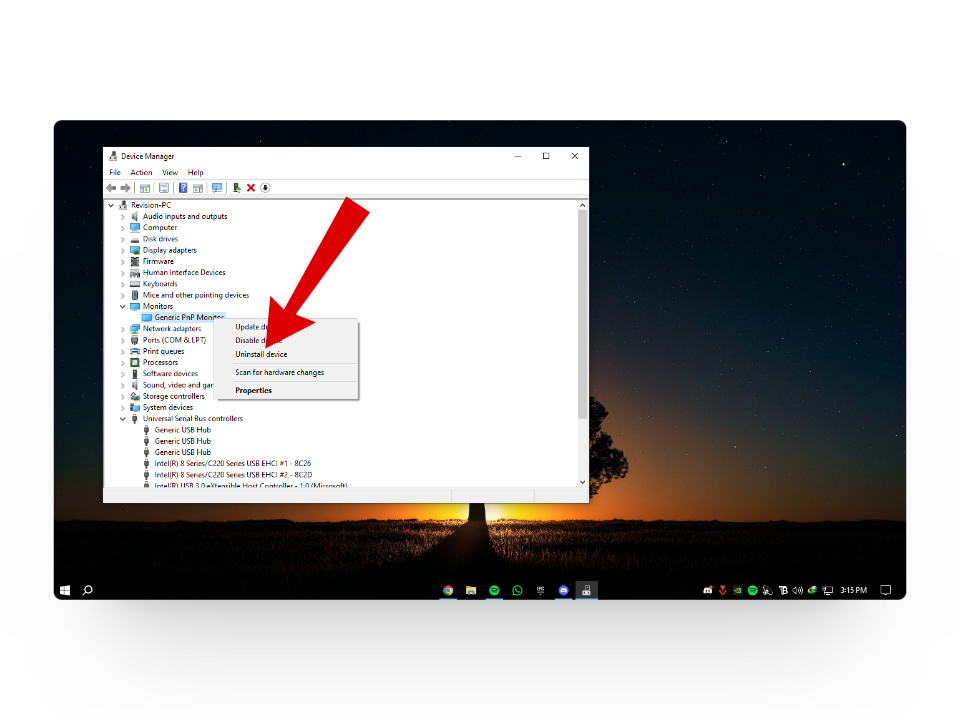
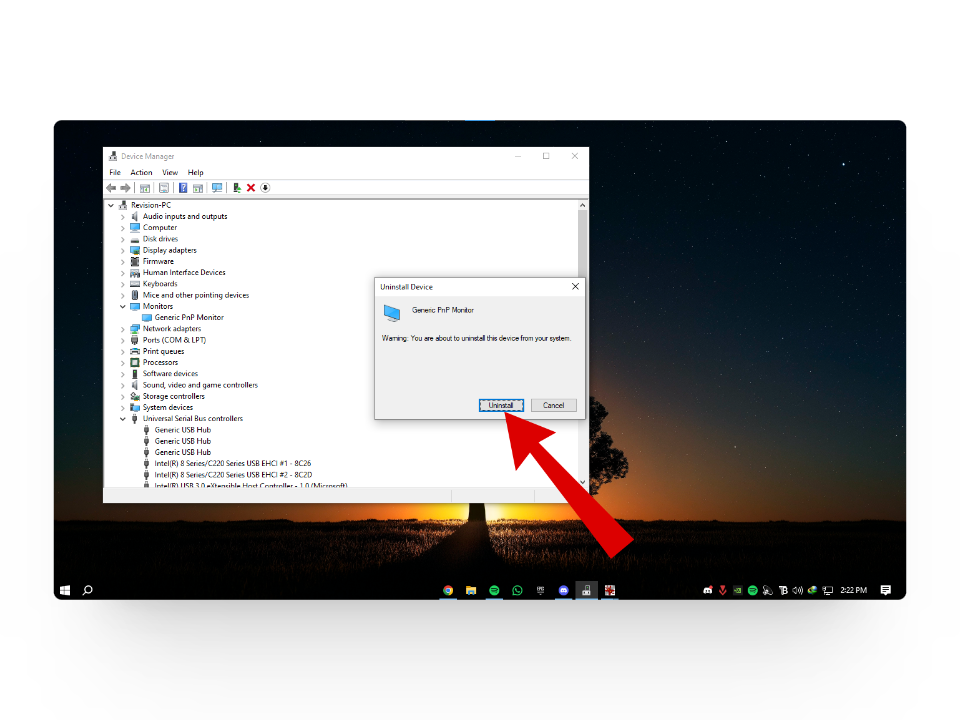
Step 2. Expand Monitors in Device Manager. Now, do right-click on Generic PnP Monitor, and then click on Uninstall device.
A warning now will appear, click on Uninstall.
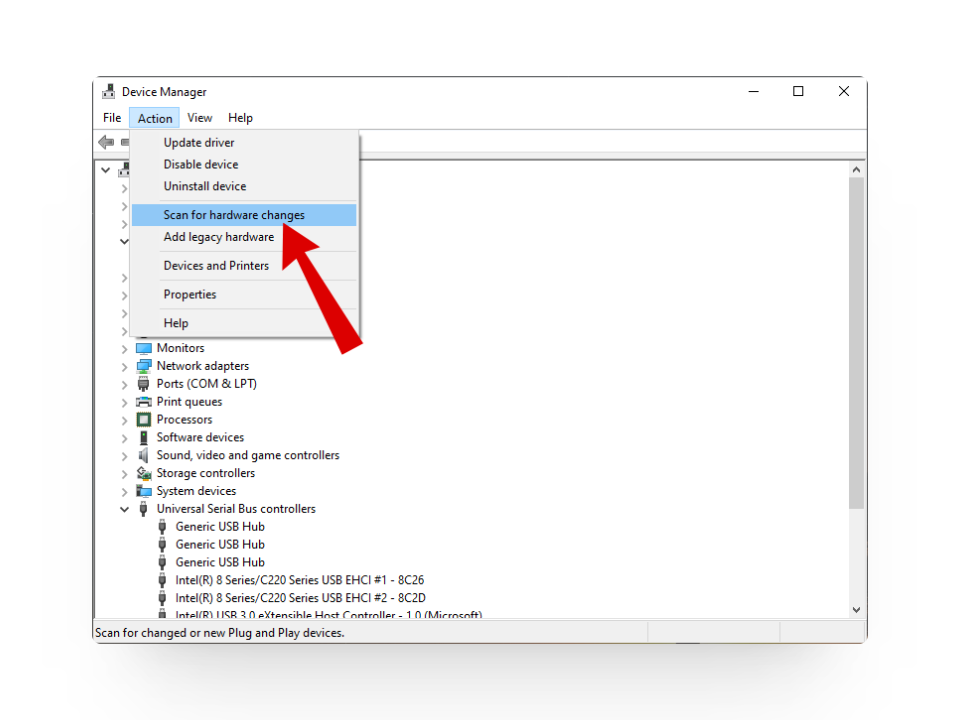
Step 3. Now, click on the “Scan for hardware changes” option.
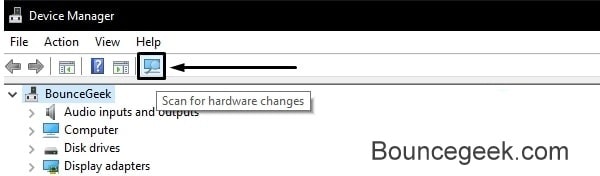
Hopefully, now Windows will now recognize the monitor and will install the real monitor driver, instead of Generic. Though, If it doesn’t work for you, then try the next method.
Solution 4: Update Monitor Driver
If the computer is not able to identify the monitor. And, if it keeps installing Generic PnP Driver, even after uninstalling. Then, the best thing you can do is, install Monitor Driver. There are two ways to update or install Monitor Driver in Windows 10/Windows 11. Either you can update using Device Manager. But, that method does not work in most cases. So, you can download Monitor Driver from the Manufacturer’s site. And, can install it manually.
Though, If you have already installed Monitor Driver manually. But still, the device manager is showing Generic Driver. Then, check our next solution, in which we have used Monitor Asset Manager. Because even I resolved this issue by using that method.
Find and Download Monitor Driver
Most Monitor manufacturer companies provide a driver CD with their product. But, If your monitor is Plug and Play compatible, then there won’t be any driver CD. Even, you don’t need to install any separate driver. You can just install the latest graphics driver.
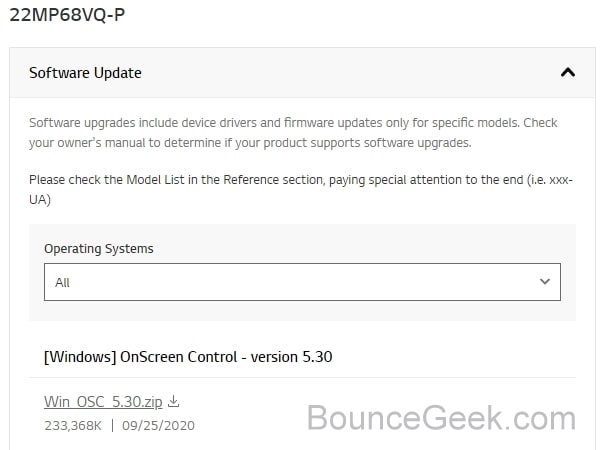
Step 1. To find out if there is a monitor driver available or not. Go to your manufacturer’s website’s software, firmware, or driver download webpage. And, search for your Monitor model number. And, hopefully, you will get the driver download link.
Important: If the problem is with a laptop, then you can go to the laptop manufacturer site and from your laptop support page. You will get all the required driver’s download links. To install all display-related drivers.
In my case, I am using LG 22MP68VQ Monitor. And, LG provides an OnScreen Control software for it. That helps to manage the Monitor refresh rate, brightness, and everything else.
Step 2. If the monitor driver file is in .exe format. Then, you can directly run it and install it on your PC or laptop. But, if it is an INF file, then you can use the device manager to update it.
Update Monitors Driver using Device Manager
Step 1. Open Device Manager.
Press Windows + X keyboard shortcut.
Click on Device Manager.
Step 2. In Device Manager, click on monitors to expand.
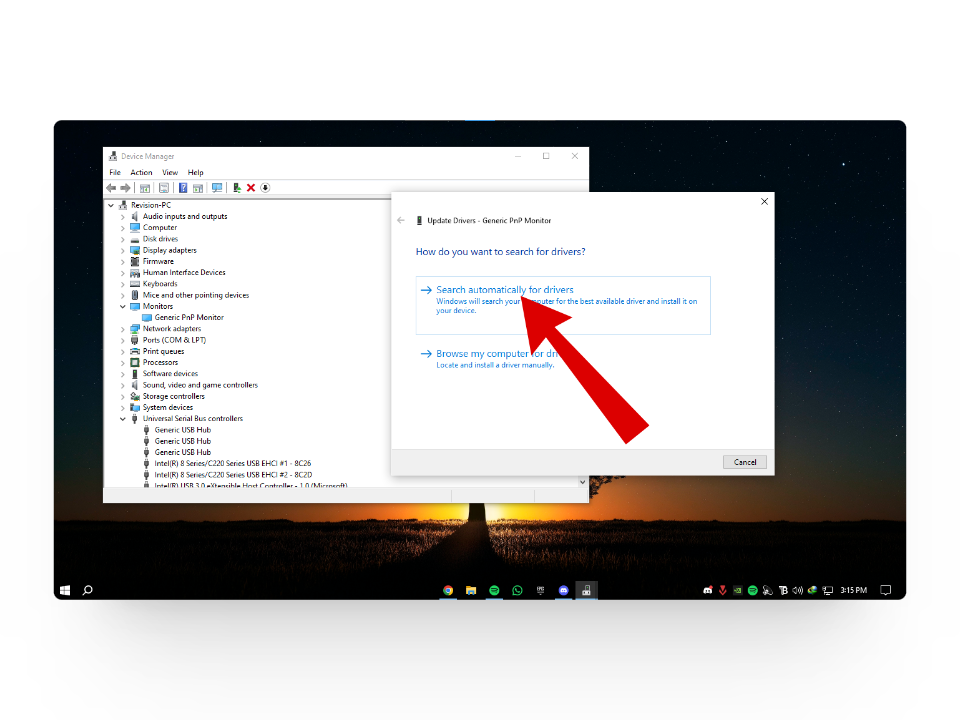
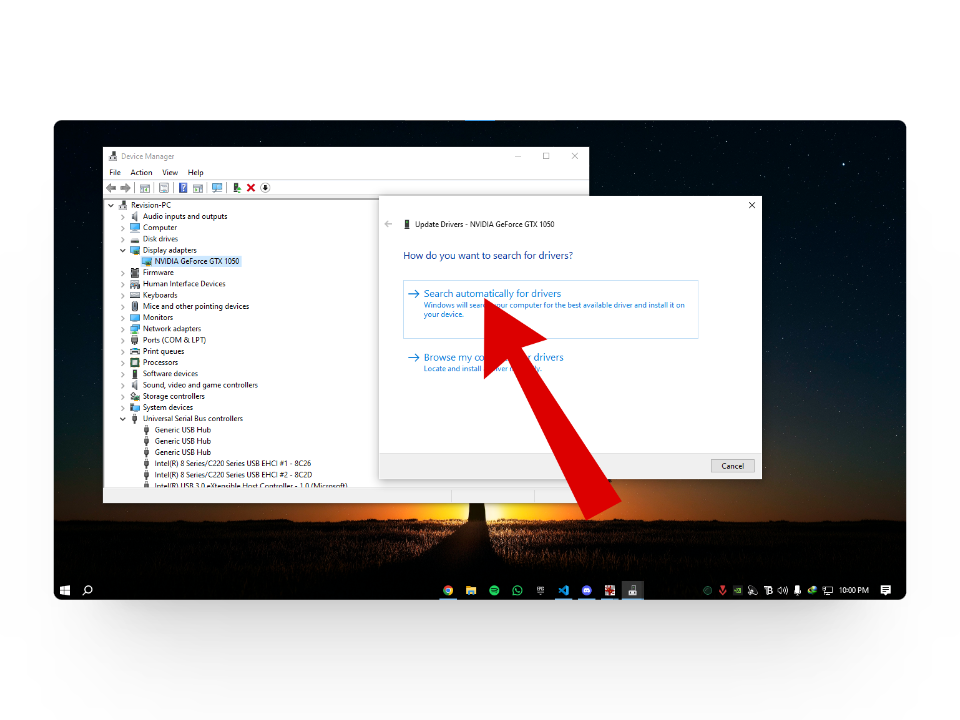
Step 3. Right-click on Generic PnP Monitor driver and then click on Update driver.
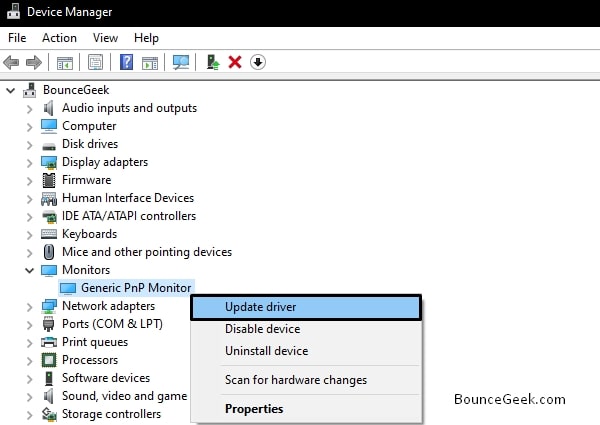
Next, click on “Search automatically for drivers”.
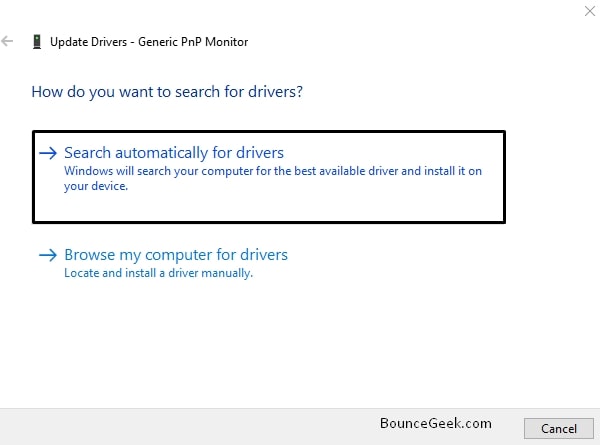
Windows will now find the latest driver for your monitor and install it on your system.
Though, If Windows says “The best drivers for your device are already installed”. In that case, follow this: (Though, this will only work, if your monitor name was appearing before. But, after the Windows update, the Generic driver got installed.)
Step 1. Again open the Driver Update window of the Generic Monitor Driver. And, this time, click on Browse my computer for drivers.
Step 2. Click on Let me pick from a list of device drivers on my computer.
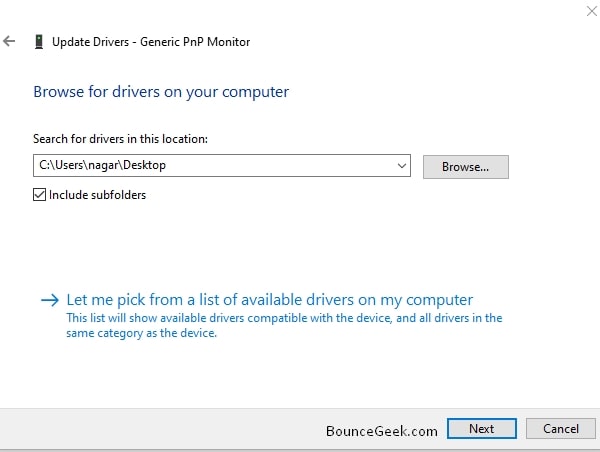
Note: If you have a driver file, then select by clicking on the “Have Disk” option and then click on Next to install.
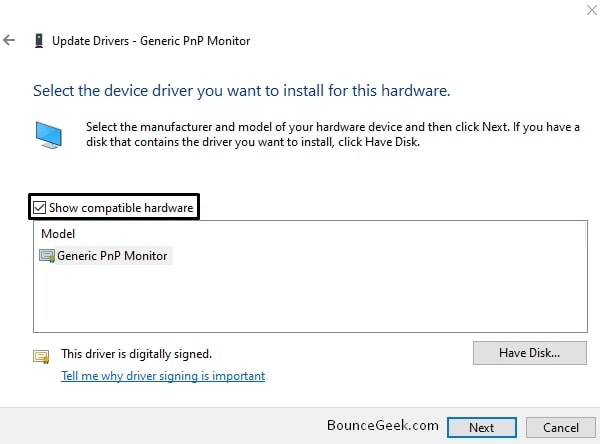
Step 3. Mark the “Show compatible hardware” option. And, If your monitor driver appears in the list, then select it and install it.
Well, If this doesn’t work, then you can try our next method. That will definitely work.
Solution 5: Create a Driver File using Monitor Asset Manager
Change the Startup Settings in Windows
Before installing the monitor driver, first, you need to disable driver signature enforcement from Startup Settings. Else, during installation, you will get an error “Windows encountered a problem installing the drivers for your device. The third-party INF does not contain digital signature information”. Because, we are going to create a driver file for the monitor, which will not digitally be signed.
Disable driver signature enforcement
Step 1. In Windows, Click on the start, then click on the power. Now, press and hold the Shift key and click the Restart button.
Step 2. Wait for a few seconds, a new window will appear to ask you to select an option.
Click on Troubleshoot.
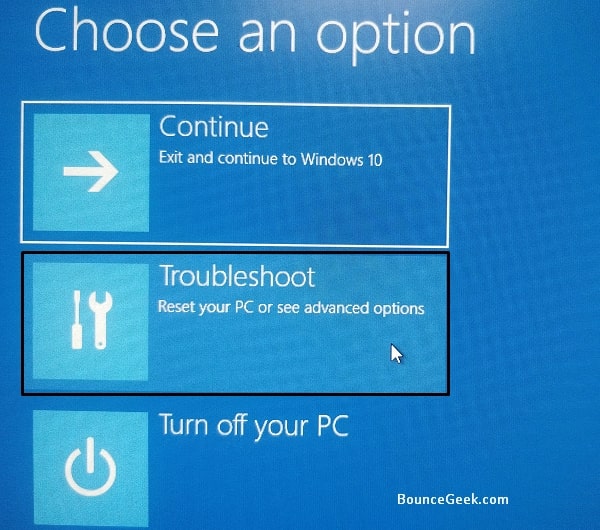
Step 3. Now, click on Advanced options > Startup Settings.
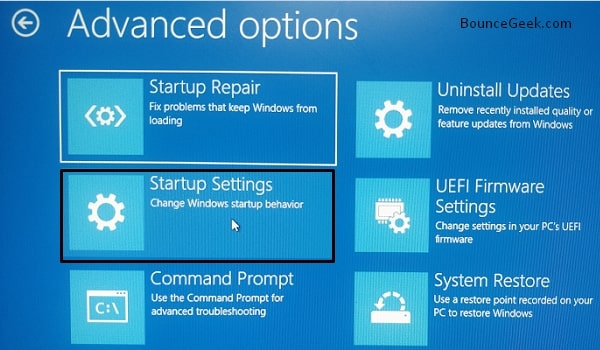
Click on “Restart”.
Step 4. Now, Windows’s Startup Settings will appear, now, to disable driver signature enforcement. Do press the F7 key.
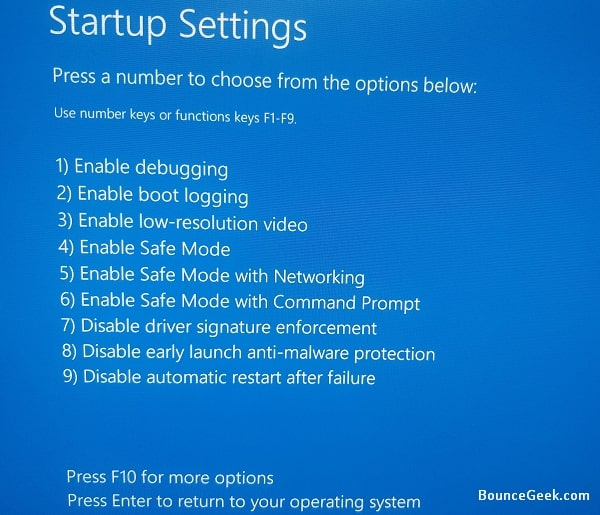
That’s it, Computer will now restart. And, now you can install any unsigned drivers.
Create INF File
INF File or as known as a setup information file is a plain-text file used by Microsoft Windows. It is most commonly used for installing device drivers for hardware components. So, we are going to create a monitor INF file. And, after that, we will install it from the device manager. And, that will fix the Generic PnP monitor problem.
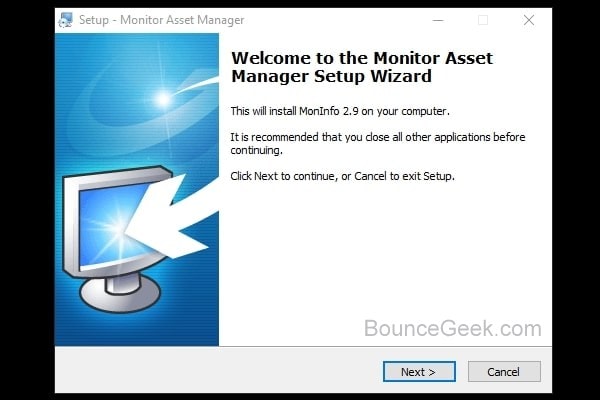
Download: Monitor Asset Manager.
Monitor Asset Manager is a PnP monitor information utility. It shows detailed technical information about the target display device and its capabilities. And, with that, you can create a Monitor Driver (INF) File.
Step 1. First, download and install Monitor Asset Manager on your Windows PC.
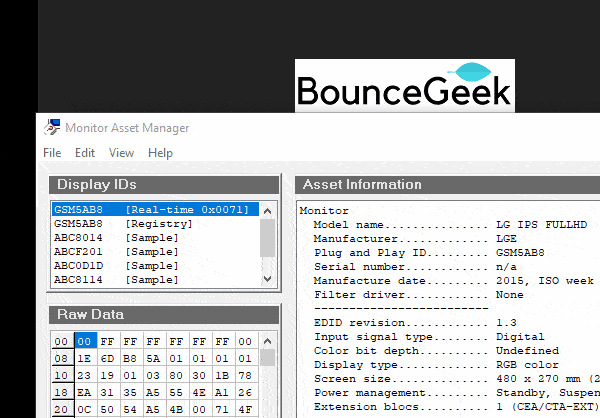
Step 2. Open the MAM utility, and it will show you complete display information.
If it doesn’t click on view > refresh.
As you can see in the screenshot, it is showing the correct information about my monitor, instead of the Generic PnP Monitor. So, I can continue this process.
Step 3. You will notice a Display ID section. Here, you will notice multiple display ID entries. On my PC, it is showing Real-time information about my connected monitor. So, I am selecting it to create an INF file. Though, you can create an INF file from the Registry Active display ID also.
Click on File > Create INF.
Select Desktop and Click on Save.
Install Monitor Driver
Step 1. Right-Click on the Start button and then click on “Device Manager”.
Step 2. Expand Monitors Section, now, right-click on Generic PnP monitor. And, then click on Update driver.
Click on Browse my computers for Drivers.
Step 3. Next, click on Let me pick from available drivers on my computer.
Step 4. Now, Click on Have Disk.
From the “Install from Disk” window, click on Browse. And, do select monitor.inf file from the desktop. Which you have created using Monitor Asset Manager. And, after that, click on ok.
Click on Next.
Step 5. A Windows Security Warning will now appear. Click on “Install the driver software anyway”.
That’s it, you will now get a message, that “Windows has successfully updated your drivers”.
And, now instead of Generic PnP or Non-PnP Monitor, the name of your Monitor will appear. So this was the way to update Monitor Driver.
Solution 6: Update Display Adapter Driver
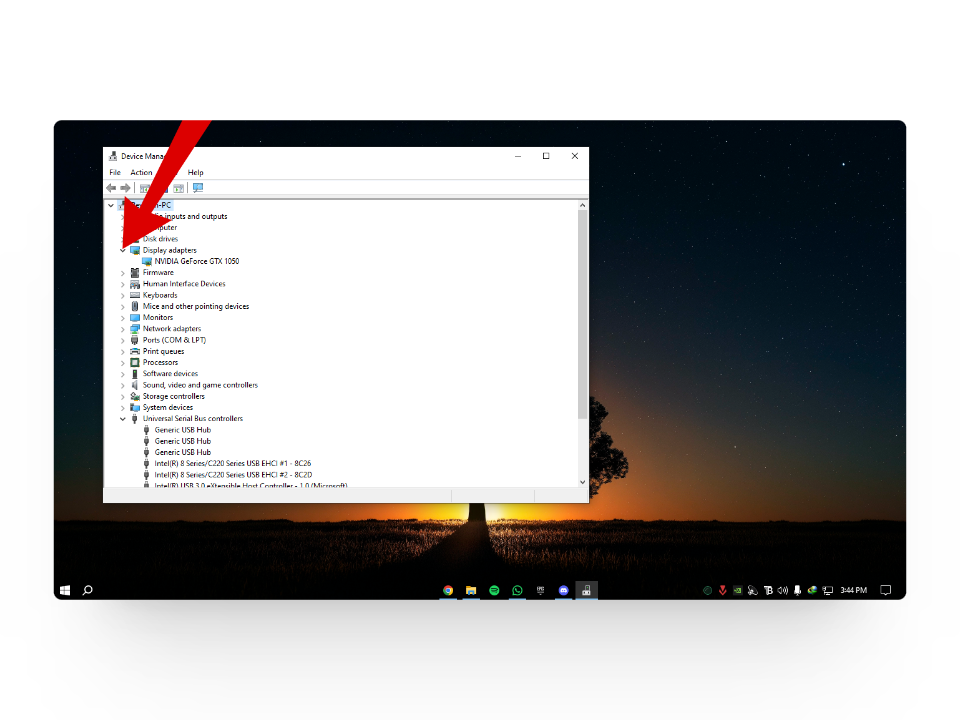
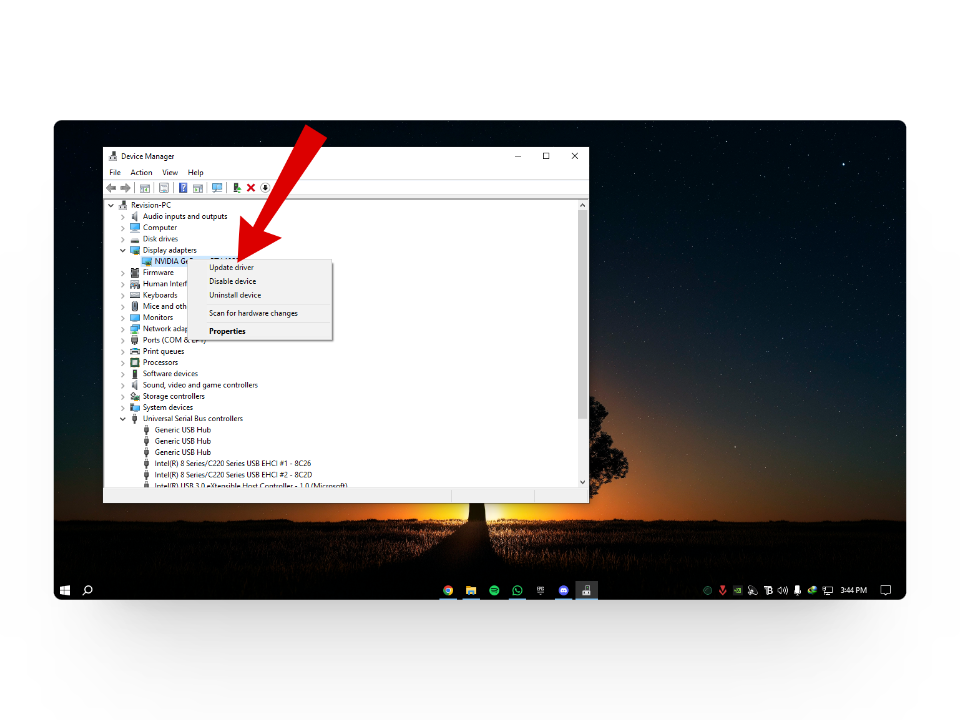
If you’re using a dedicated NVIDIA Graphics Card on your PC. And, your monitor is also connected to it. Then, you can update the Graphics Card Driver instead of the Monitor. Graphics Card software will help you to manage your monitor settings. For instance, I can change resolution, set up multiple displays, and change the refresh rate, all is possible with the NVIDIA Control Panel. So, do the open device manager, and find out your Graphics Card information. And, download and install its driver from the manufacturer’s site. If you’re using a laptop then you might have to update both integrated and dedicated graphics card drivers.
Solution 7: Run SFC Scan
If you think driver files got corrupted due to some reason. Then, you can run the system file checker tool in Windows. It will work as an automatic troubleshooter. SFC Scan is designed to scan for corrupted system files. As you know drivers are also part of the system. System File Checker utility also repairs files automatically. So, if nothing works, you can give it a try.
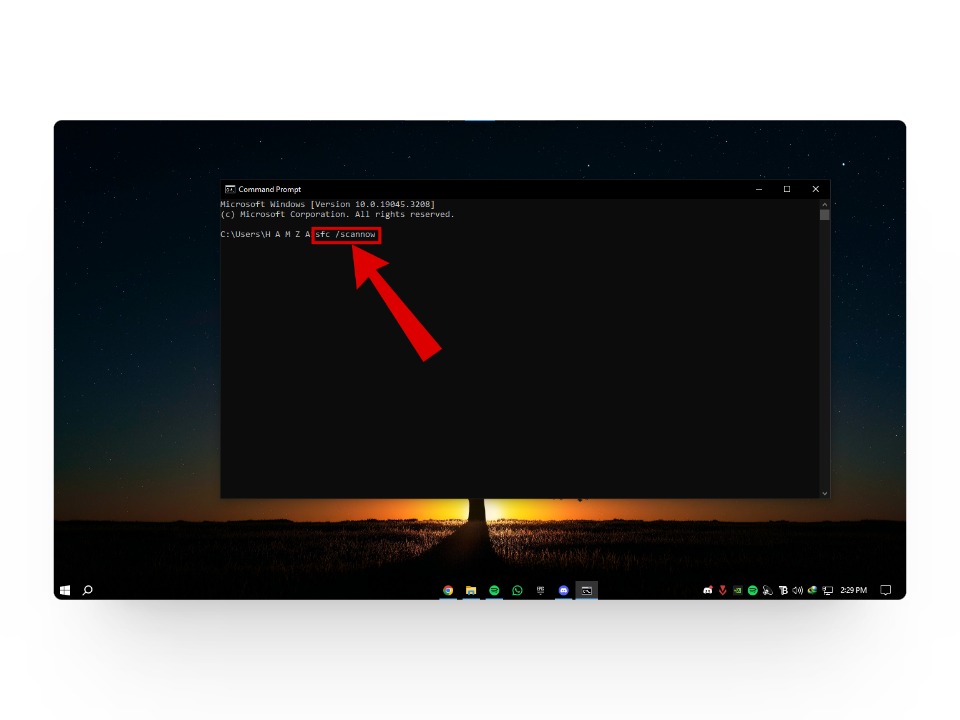
Step 1. Click on the start button, and search for CMD. And, then click on “Run as administrator”. You can also use Windows PowerShell
Step 2. In Command Prompt, type the following command to run SFC Scan.
sfc /scannow
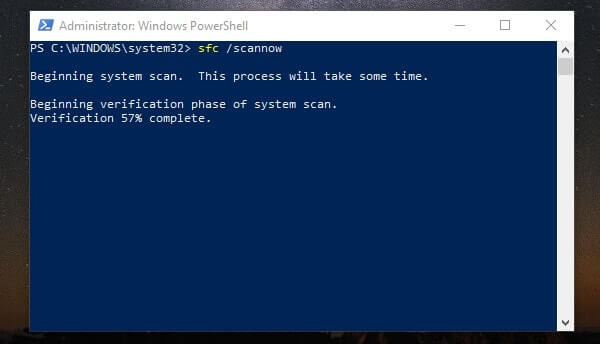
Wait for the SFC scan to get complete, don’t interrupt the process.
I hope you’re able to fix the Generic PnP Monitor issue on your PC or Laptop. If you have any queries related to this Windows 10/Windows 11 problem, you can leave a comment. Moreover, you can also overclock monitor refresh rate.
- The Generic PnP monitor driver in Windows allows external monitors to be used without manually installing specific drivers. It defaults to this when it can’t find a suitable driver for the monitor connected.
- Ensure all connections are secure. Update or reinstall the Generic PnP Monitor driver through Device Manager. Check your display card drivers for updates, and use Windows’ System File Checker or troubleshooter to fix system errors.
- Regularly check for Windows updates to keep your system and drivers up to date. This helps avoid conflicts and ensures better hardware compatibility and performance, reducing issues like the Generic PnP monitor error.
Suppose you are trying to connect an external monitor to your system but are facing issues such as the monitor not being detected. In that case, chances are you might be facing the Generic PnP monitor error. In this article, we’ll look at what the Generic PnP drivers are and 6 ways to help you fix the Generic PnP monitor error. So, let’s dive in!
Table of Contents
- What is the Generic PnP Monitor Driver?
- How to Fix Generic PnP Monitor Issue
- 1. Check The Basics
- 2. Update Generic PnP Monitor Driver
- 3. Uninstall the Generic PnP Monitor Driver
- 4. Update or Roll Back Display Card Driver
- 5. Run the SFC or the Windows Troubleshooter
- 6. Check For Windows Updates
- Conclusion
What is the Generic PnP Monitor Driver?
PnP means Plug and Play and is a part of your computer that allows external hardware to work without manually installing drivers. When you plug an external monitor into your computer, Windows searches for a suitable driver for it. However, if Windows is unable to find a driver for your monitor, it will instead install a generic monitor driver.
While PnP monitor drivers ease the process of using an external monitor, sometimes these generic drivers don’t properly work with the monitor and lead to issues such as a yellow caution sign next to your Generic PnP monitor driver.
READ MORE: Monitor Says “No Signal”? Try These 8 Easy Fixes! [2024] ➜
How to Fix Generic PnP Monitor Issue
Now that you know what PnP means and what the Generic PnP Monitor issue is, let’s look at some of the best and quickest ways to help you fix it.
1. Check The Basics
One of the first things you should do before trying anything advanced is check the connection to your external monitor. This is because your system can not detect if the video cable is connected properly to both the external monitor and the PC. For this, simply shut down your computer, remove the power cables, and reconnect your monitor’s video and power cable.
You can also try checking your monitor with another system to see if it works. If the issue persists, the culprit might be a faulty video cable or the monitor itself. Try using different video cables and if nothing changes, keep on reading for monitor-related fixes.
READ MORE: HDMI 2.1 vs DisplayPort 1.4 – Which is Better in 2024? ➜
2. Update Generic PnP Monitor Driver
After checking the cables and connections, the next thing that has worked for several people is updating the Generic PnP monitor driver as outdated and faulty drivers are a big cause of this issue.
Here’s a step-by-step guide to updating your Generic PnP Monitor drivers:
- Right-click on the Start menu and select Device Manager from the menu.

- From here, expand the Monitor tab and right-click on the Generic PnP Monitor driver.
Expand the Monitor tab
- A drop-down menu will appear. Click on the “Update driver” option.
Click on Update driver - This will open up a dialogue box asking you to either automatically or manually download the drivers. Here, select the first option “Search automatically for updated driver software“.

Click on Search automatically


If there are any updates available, Windows will automatically install them. Once the process is finished, restart your computer to see if anything changes.
READ MORE: [FIXED] Mouse Cursor Won’t Move to Second Monitor in Windows ➜
3. Uninstall the Generic PnP Monitor Driver
When updating your Generic PnP Monitor driver, Windows might fail to find any updates. In that case, you can uninstall the Generic PnP Monitor driver altogether and let Windows automatically install it back into your system.
To uninstall the Generic PnP Monitor driver, follow these steps:
- Open up the Device Manager by right-clicking the start menu.
Click on Device Manager - From here, expand the Monitor section and again right-click on the Generic PnP Monitor driver.
Expand the Monitor tab - Now, select the “Uninstall device” option from the drop-down menu.
Uninstall the driver - If you are asked for confirmation, simply click on the Uninstall button.
Click on Uninstall

Once you have successfully uninstalled the Generic PnP Monitor driver, click on the Action tab and select “Scan for hardware changes“. This time Windows should install the correct drivers for your monitor instead of generic drivers.
READ MORE: How to Troubleshoot and Fix Black Lines on Your Monitor? ➜
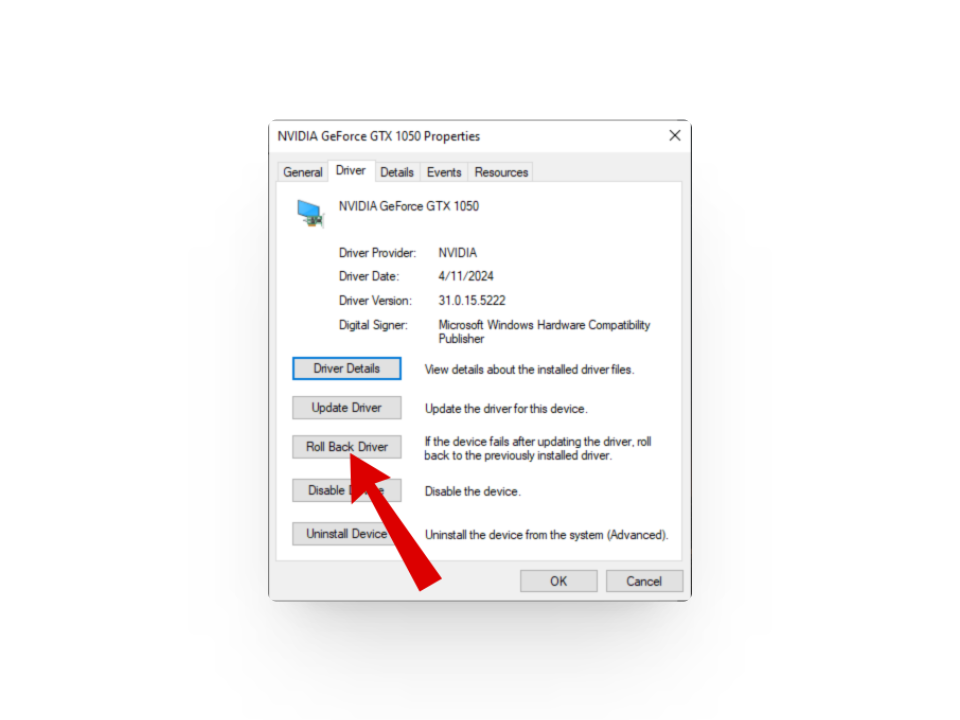
4. Update or Roll Back Display Card Driver
While your display card’s drivers aren’t directly related to the Generic PnP Monitor issue, we still suggest checking for any updates just to be safe.
Here’s how to update the display card driver:
- Open up the Device Manager and expand the Display Adapters tab.
Expand your display tab - From here, right-click on your system’s display card and select the Update driver option.
Click on Update drivers - In the next dialogue box, select “Search automatically for updated driver software” to automatically install updated drivers from the Internet.
Click on Automatically
After the process is finished, restart your computer and see if the issue persists. If it does, you can try rolling back the driver to a previous version. For that, open your display adapter’s properties > switch to the Driver tab and click on the Roll Back driver button. Once everything is complete, restart your computer again.
READ MORE: How to update graphics driver in Windows? (AMD, Nvidia, Intel) ➜
5. Run the SFC or the Windows Troubleshooter
System File Checker in Windows works as an automatic troubleshooter that allows you to scan corrupt files and faulty and missing drivers and then repair them. In that case, you can run SFC to help you find the files you need.
Here’s how to fix the Generic PnP Monitor issue using System File Checker:
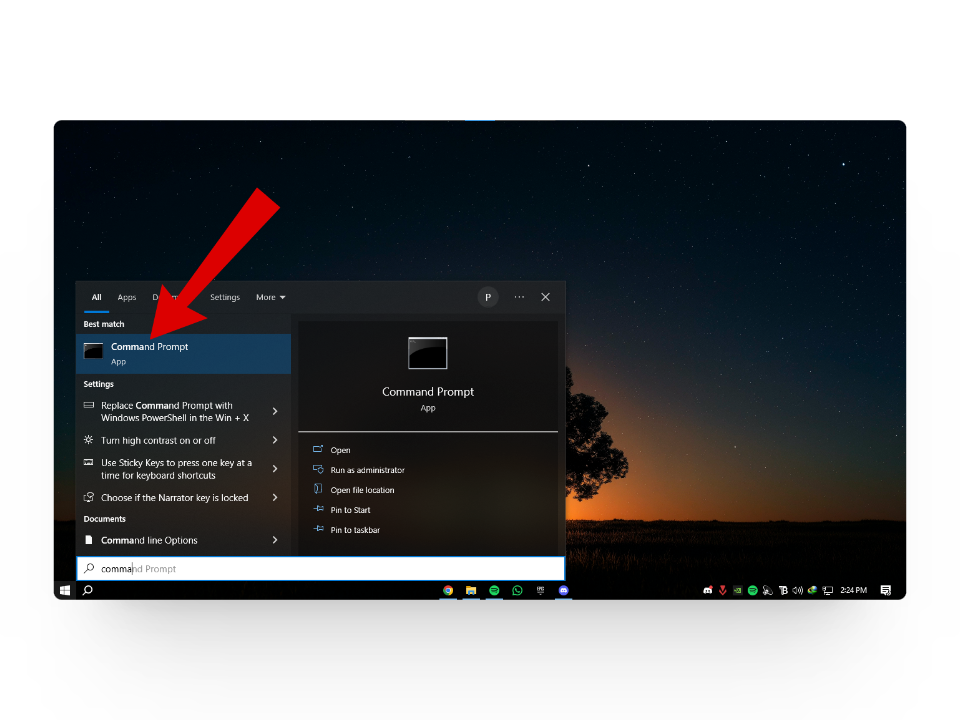
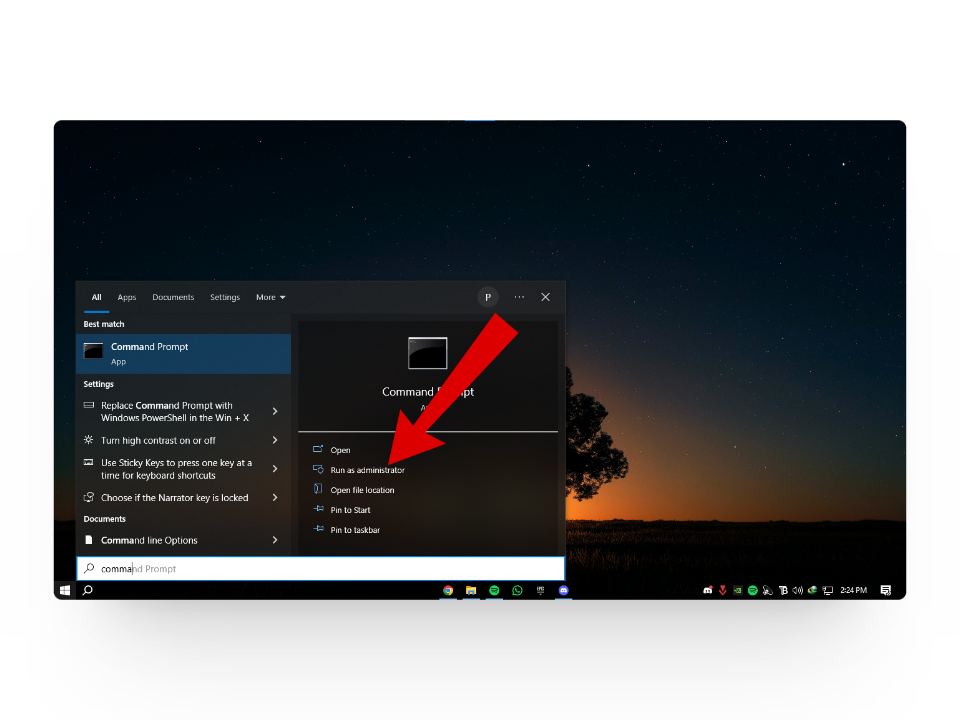
- Open up the Windows Search Bar and type in Command Prompt.
Search for Command Prompt - Right-click on the first result and select the “Run as administrator” option.
Run as administrator - Once the command prompt opens up, type “sfc /scannow” and hit enter.
Type the command - Wait for the SFC to do its magic and be patient as this could take as long as 15 minutes if there are several underlying issues.
When the process is done, check if the issue is still there. Additionally, you can also use Windows Troubleshooter which also scans for system file issues and fixes them automatically. To run the Windows Troubleshooter, open up Settings > Update & Security > Troubleshoot to scan your system files and replace the problematic ones.

READ MORE: How to Use DISM to Repair Windows ➜
6. Check For Windows Updates
If the issue still hasn’t moved an inch, one final course of action to take is to check for any available Windows updates. Updating your Windows to the latest version ensures all the files are up to date. Here’s a quick rundown on updating your Windows to the latest version:
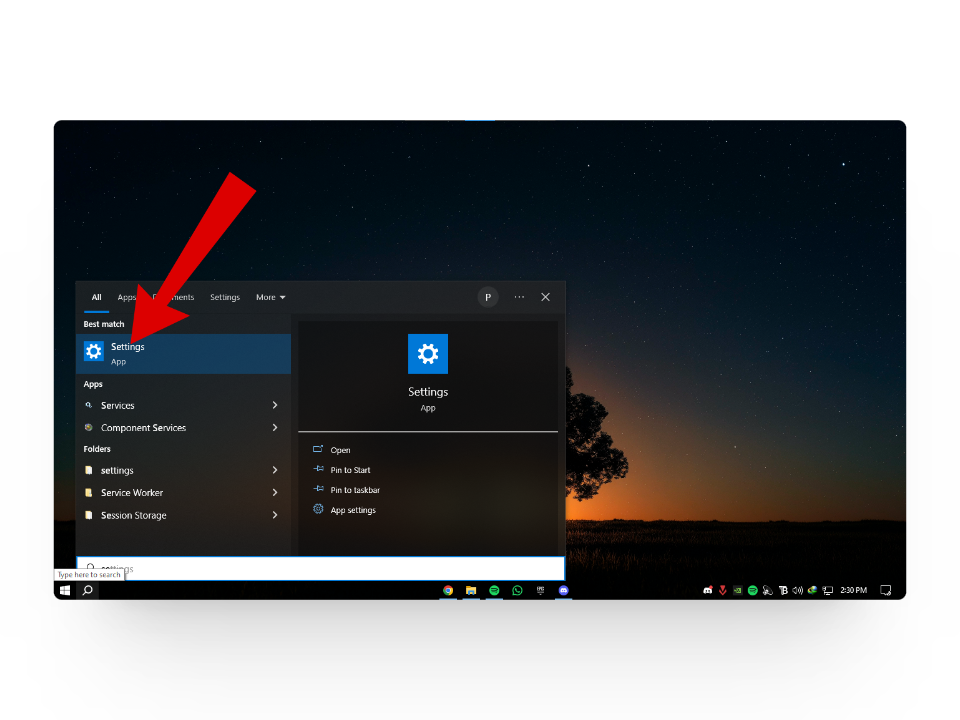
- Search for Settings in the Windows Search bar and open up the best match.
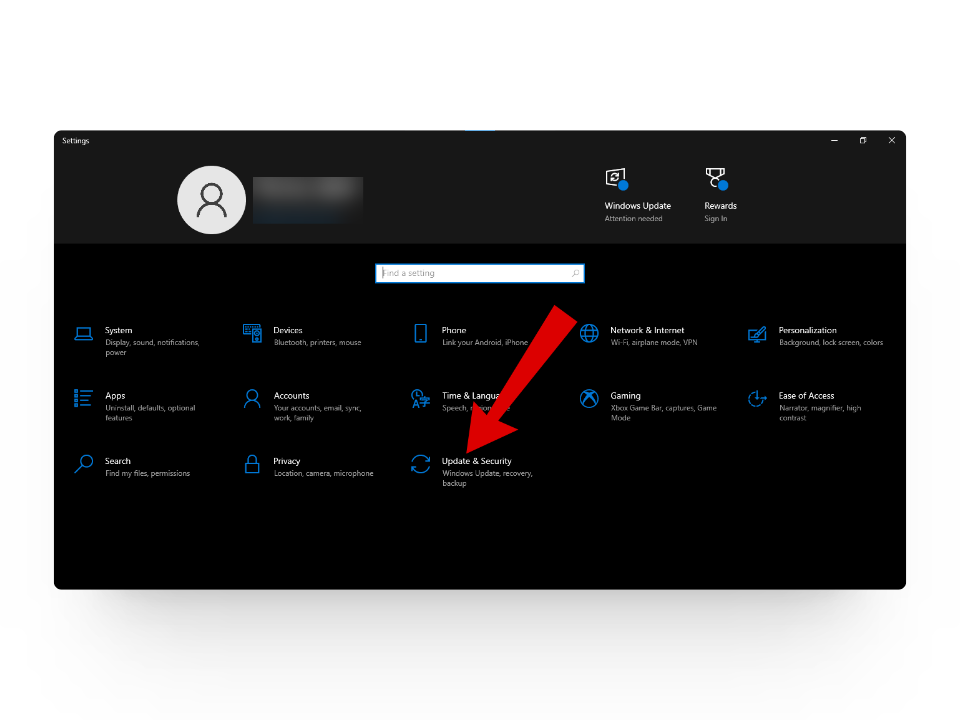
Search for windows - From here, click on the Update & Security tab.
Tap on Windows & Security - Next, select the “Windows Update” option from the side menu and click on Check for updates.

Check for Windows Updates

Conclusion
Whether it’s for gaming, streaming, or work purposes setting up an external monitor can make multitasking a breeze for you. With the above-mentioned fixes, we hope you can resolve the Generic PnP Monitor in no time.
FAQs
What are some common video cable connections?
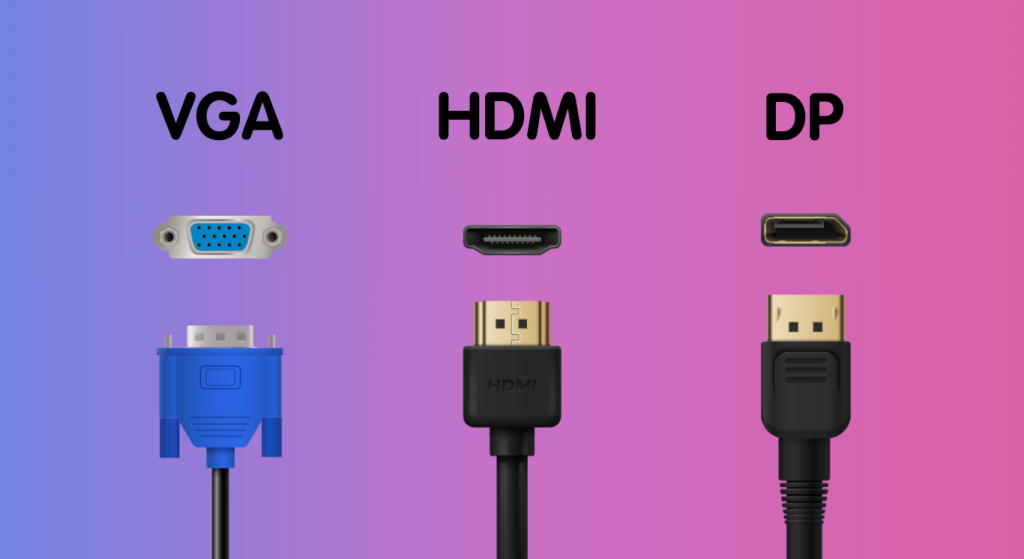
Common video cable connections include HDMI, which is widely used for high-definition audio and video signals, VGA, primarily found in older devices like computers and monitors, and DisplayPort, known for its high bandwidth and compatibility with modern displays.
What is the Command Prompt?
The Command Prompt is a tool in Windows that lets you control your computer using text commands. Instead of clicking icons or buttons, you type commands like “dir” to see files or “ping” to test network connections. It’s handy for tasks like navigating files, troubleshooting, or automating tasks quickly.
Is setting up a second monitor a good idea?
Setting up a second monitor can be a great idea for improving productivity and multitasking. With two screens, you can have multiple applications or documents open simultaneously, making it easier to compare information, work on different projects, or simply have more screen real estate for your tasks.
Windows 10 came with a lot of exciting features, which has given users an amazing experience of utilizing it. However, there are certain issues that can never be overlooked. After updating the existing operating system to Windows 10, some users are facing errors in hardware drivers. And, the Generic PnP Monitor Driver Error on Windows 10 is one of them.
There’s no need to be concerned if you’re having any problem regarding Windows. Using our approaches, we will assist you to resolve any issue related to Windows. However, for Generic PnP monitor error on Windows 10, follow the below-mentioned step-by-step procedure.
The term PnP stands for Plug and Play. As a result, the generic PnP monitor drivers serve as a translator between the Windows operating system and Plug & Play monitors.
This driver is designed to connect external monitors to your device. You should be able to connect external displays without any problems once it’s up and running. Typically, generic PnP monitors come pre-installed in the system and are activated when the computer is turned on for the first time.
Impact of the Generic PnP Monitor Driver Error
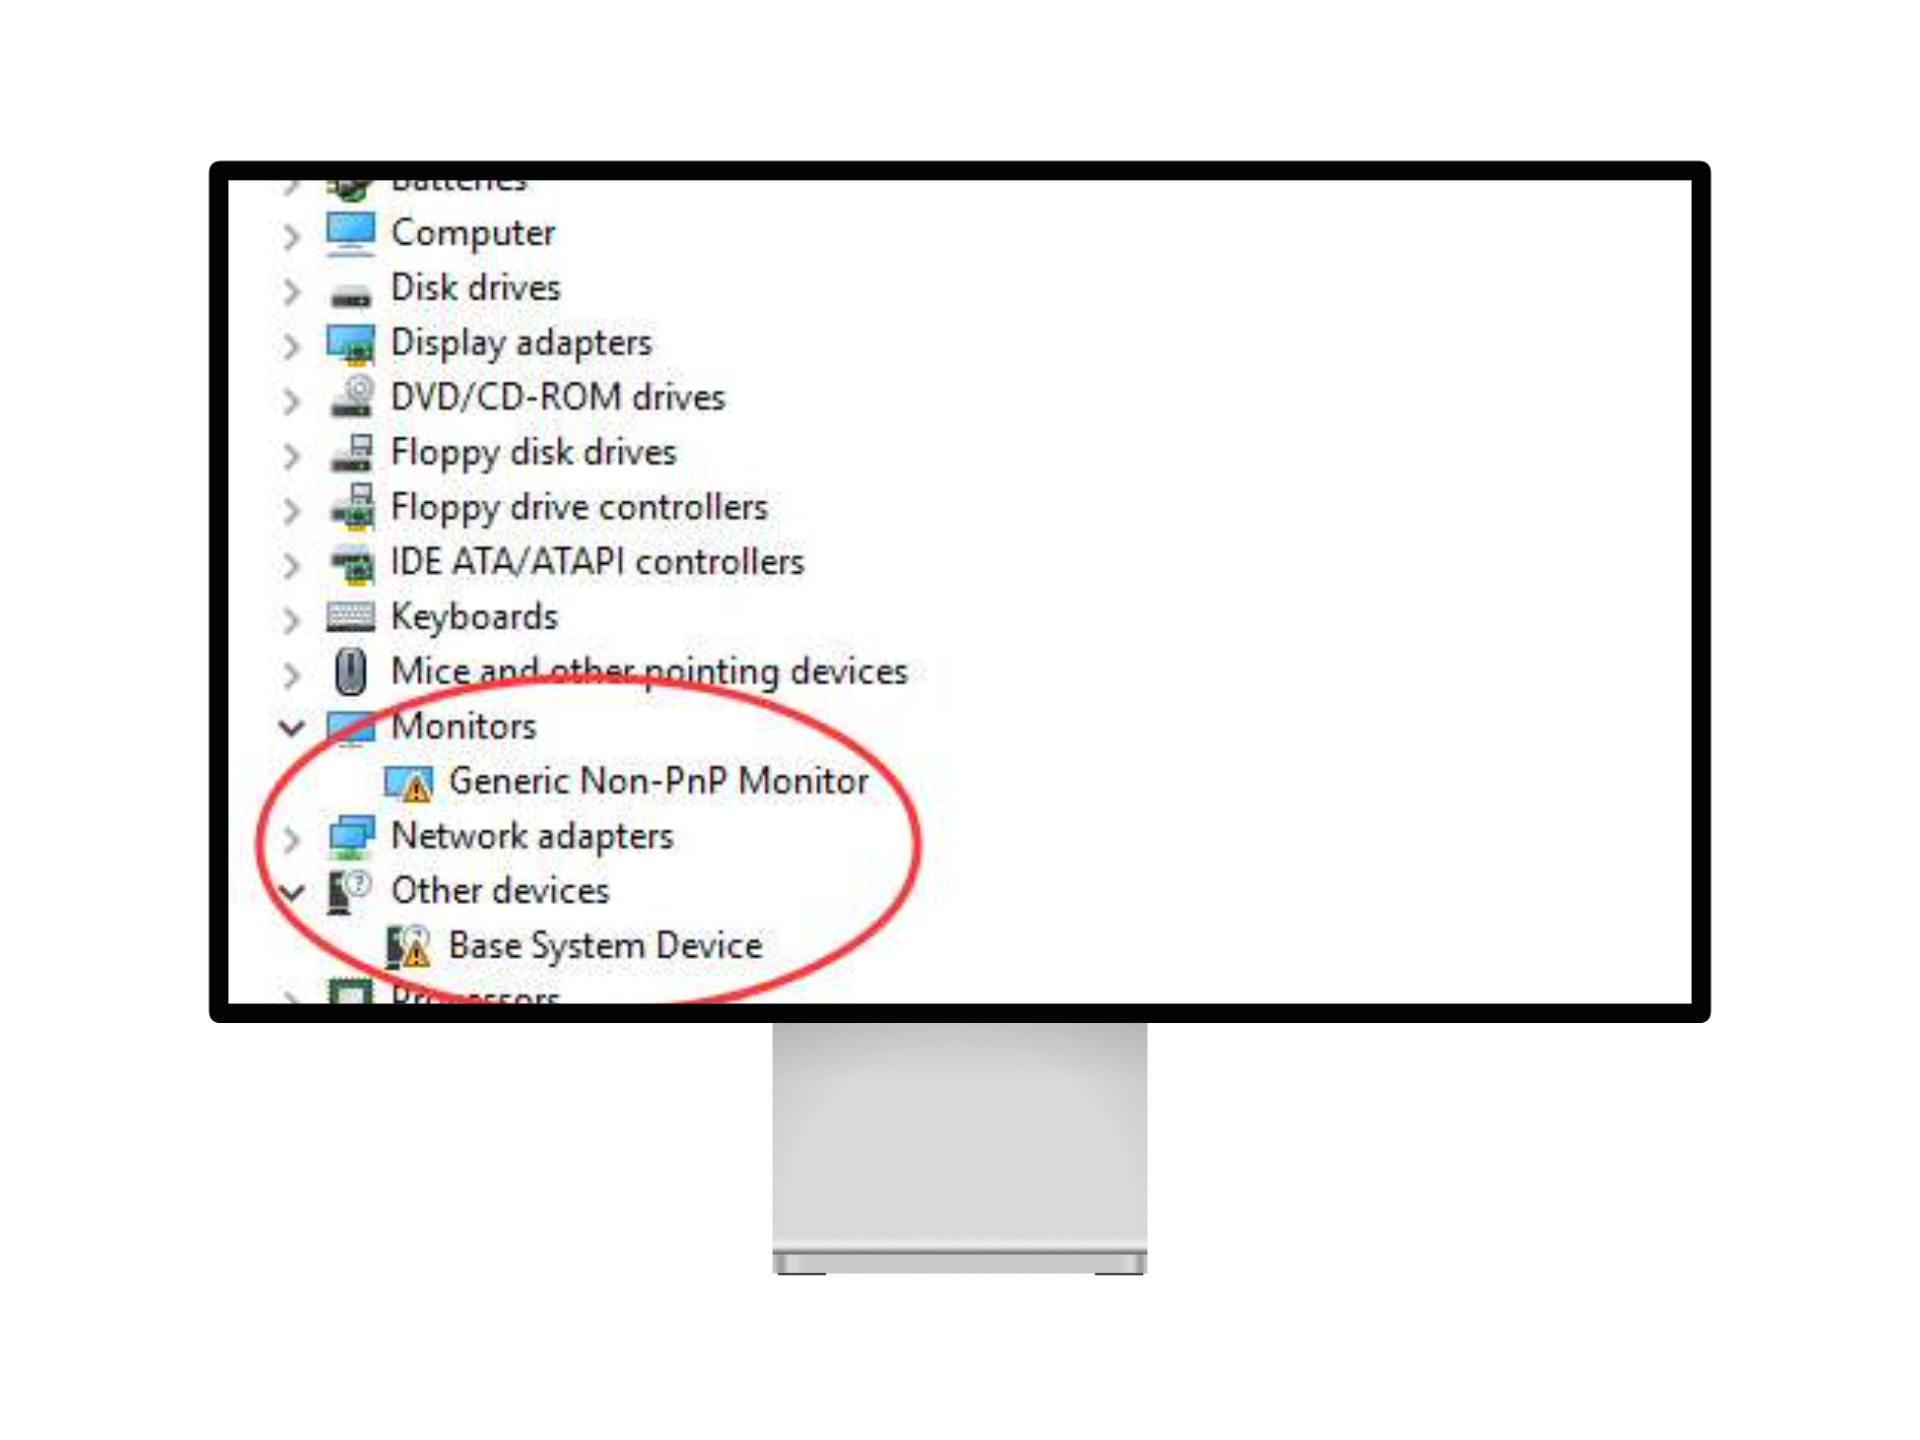
When your PC fails to identify an external monitor, then this driver problem occurs. It’s simple to recognize this issue. It all starts with the error message “Failed to load hardware monitor driver.” In Device Manager, you’ll also see a yellow exclamation mark next to your Generic PnP Monitor driver.
Here are the certain causes for this error:
- Corrupted or outdated Generic PnP Monitor driver
- Faulty VGA/HDMI/DVI cable
- The fault of the external monitor
- Faulty or incorrect connections
How to Fix Generic PNP Monitor Driver Issue on Windows 10
If you want to solve the generic PnP monitor problem quickly, you should use a combination of hardware and software driver techniques. To put it another way, you should double-check your settings while also focusing on this driver updates. Let’s discuss how to fix this:
1. Try to Reconnect Monitor and Computer
If the monitor appears to be a generic PnP monitor, it’s possible that your system doesn’t recognize it. Thus, to resolve this problem, reconnect the monitor and restart the computer.
#1. Turn off the computer and monitor.
#2. Disconnect the monitor cable and power supply.
#3. Reconnect the monitor’s power supply as well as the VGA or HDMI cable.

#4. Restart your computer.
The computer will then detect your monitor model and reinstall the monitor drivers. This will assist you in quickly and simply resolving this problem.
2. Update the Existing Driver
When your monitor driver is missing, the generic PnP monitor will appear. Hence, updating the Generic PnP Monitor driver will assist Windows in restoring the original monitor.
#1. Go to Device Manager and open it.

#2. In the Monitors section, look for the Generic PnP monitor.
#3. Select Update driver from the context menu by right-clicking it.

#4. After that, Windows will search for this for your Windows 10 system automatically, and the real monitor will then appear.
3. Uninstall Generic PnP Monitor Driver
Some users may simply see this without an exclamation, but others have noticed a generic PnP monitor with a yellow triangle or with a yellow exclamation. So, if Generic Monitor has a driver error, you can uninstall it.
#1. Open the Device Manager.
And follow this path Monitors > Generic PNP Monitor > Uninstall.

#2. Select View > Scan for Hardware Changes.
The yellow exclamation mark will vanish away and your generic PNP monitor will transform into a real monitor.
4. Reinstall Graphic Driver
If upgrading the graphic driver does not resolve the issue, you should uninstall and reinstall the video driver to verify if the generic PnP monitor is still present.
You can uninstall the graphic driver via the control panel and device manager, but this will not entirely remove it; instead, use Display Driver Uninstaller to completely uninstall the graphic driver.

Then, go to the manufacturer’s website and download the most recent video driver, I personally prefer to go for NVIDIA, which you should install step by step.
You may now restart your computer and check to see whether the generic monitor is still shown in Device Manager.
5. Run an SFC Scan
The System file checker is a built-in tool that allows users to scan for and restore corrupted driver and system files. Run this program to see whether any files associated with the monitor driver files are corrupted.
#1. Type Command prompts into the search box, and the result will appear. Select Run as administrator by right-clicking it.

#2. Press Enter after typing sfc/scannow.
Well, everyone should learn to run an sfc scanner. As it does not help to solve only this error but you can also resolve other errors such as to fix the 0xC1900101 error code in Windows 10.

The Windows system will then begin scanning your system files in order to resolve the issue.
6. Keep Your Windows 10 Updated
Many difficulties, such as system bugs, driver errors, and hardware issues, can be resolved with the Windows 10 update. If you face this problem, try to update your Windows 10 version. If you are struggling with any errors while updating you can get direct help from Microsoft.
#1. Follow this path: Start > Settings > Update & Security > Windows Update.

#2. Select Check for Updates.

The Windows operating system will assist in the downloading process of updated drivers and system files. You can check this out to know how to get help in Windows 10. After that, check to see if the generic monitor has returned to the device manager.
7. Execute Clean Reboot Process
Windows clean reboot means start your computer within the basic drivers and startup programs. This will assist to reduce software troubles. And you can identify if there is one or more third-party applications or startup items that cause this monitor issue.
To perform clean boot you have to follow mentioned steps.
#1. Input msconfig in the search box and hit Enter to get in the System Configuration window.

#2. In the System Configuration dialog box, under the General tab, choose Selective startup and uncheck the box of Load startup items.

#3. Navigate to the Service tab and Click Hide all Microsoft services, and then choose to Disable all.
#4. In Task Manager, select the Enabled startup item and then click disable.

#5. Close the Task Manager and click OK in the System Configuration window.
#6. Restart your computer to let it take effect.
Final Words
Hope! The aforementioned methods will help you to resolve this annoying trouble of Generic PnP Monitor Driver error in your windows 10. If you face any difficulty or face any other error while operating Windows, stay tuned to our blog or comment down so that we can help you out with the same.

The Generic non-PnP monitor problem appears when you try to connect an external monitor, and the driver is not correctly installed. Fortunately, there’s a fix, and this post explains different ways to resolve the issue.
What is a generic PnP monitor?
It is a driver installed in Windows before the connected monitor’s drivers are installed. The new Plug and Play (PnP) monitors cannot be used without this driver.
What is Plug and Play (PnP)?
PnP is a Windows feature that allows the PC to adapt to hardware changes with minimum human interaction. With its help, without any knowledge of hardware, users can easily add and remove devices.
What is the difference between generic PnP and non-generic PnP drivers?
When Plug and Play devices are connected, the system detects them without needing a driver. However, Windows cannot detect the device if you see a generic PnP monitor or a non-generic PnP monitor in Device Manager.
Windows automatically installed a generic monitor driver to troubleshoot this problem. However, in some cases, Windows fails to install the generic PnP monitor driver. To fix this, we need to install it manually, or you can use a driver updating tool like Advanced Driver Updater.
How To Fix the Generic Non- PnP Driver Error
There are different ways to fix the non-PnP driver issue. Below we explain them. Try them one by one to find the correct fix for you.
Method 1: Detach and Reconnect The Monitor
Before updating the missing, corrupt, or problematic driver, to fix the Generic Non-PnP monitor driver issue, try unplugging and replugging your monitor. When you perform this, Windows will automatically download and install the latest driver for the connected device.
If reconnecting the monitor did not work for you, move to the next troubleshooting way.
Method 2: Use Device Manager to Update The Monitor Driver
Try updating the monitor driver manually through Device Manager to fix the Generic Non-PnP Monitor driver download issue. Go through the following steps to update it:
- Right-click the Windows Start icon > select Device Manager.
- Under the Device Manager window, double click Monitors section and right-click Generic Non-PnP Monitor > select Update driver.

- Select “Search automatically for drivers,” allowing Windows to look for the latest monitor driver update.

If a driver update is available, it will be automatically installed. Suppose this did not work; we will use the second option to update the PnP Monitor driver.
To do so, follow these steps:
- Launch Device Manager by pressing Windows + X > select Device Manager.
- Go to the Monitors section and double-click to expand it.
- Right-click on Generic Non-PnP Monitor > Update driver.
- This time, select “Browse my computer for drivers.”

- Select Let me pick a list of available drivers on my computer.

- Uncheck the option; show compatible hardware.

- Select your monitor’s manufacturer and select the monitor’s model number. If you cannot find the monitor model in the list, skip this method.

Method 3: Automatically Update Monitor Driver Using Advanced Driver Updater
If none of the above fixes work for you, try Advanced Driver Updater. With its help, you can quickly detect and update the monitor driver. Over a million people trust the tool, and without you providing any information, it scans the computer for outdated drivers and adds incompatible drivers to the exclusion list. Setting a schedule for driver scanning enables you to install individual updates simultaneously.
You can update all outdated drives using the registered version of Advanced Driver Updater. You can update all obsolete drives. While with the help of the trial version, you can update a single driver at a time. Here’s how to use Advanced Driver Updater.
- Download and install Advanced Driver Updater on your PC.
- Run the driver updater and click “Start Scan Now” to run the scan and identify outdated and missing drivers.

- Let the scanning process take its time.

- When done, review the scan results and update the drivers.

- To fix PnP Non-Generic issue and to download the monitor driver, click Update driver if using the trial version. However, if you are a paid user, you can use the Update All button to download and install driver updates for all detected outdated drivers.
The paid version of Advanced Driver Updater comes with a 60-day money-back guarantee. Also, to get any technical assistance, you can send an email to support@systweak.com. The trained technical staff will help with all product-related queries.
Method 4: Run the System File Checker
You can face the Generic non-PnP monitor error when the system files are corrupt. To troubleshoot it, we will use Windows built-in functionality. Follow these steps to check system files for errors.
Step 1. Run the Command prompt as an administrator.
Step 2. Type sfc /scannow and press the Enter key in the Command Prompt window.
Step 3. Wait for the system file checker to scan and automatically fix the issues (if any).
Step 4. Restart the PC and see if the problem is resolved or not.
Wrap Up – Generic Non-PnP Monitor Download
Hopefully, using the different methods explained, you can update the monitor driver and fix the Generic Non-PnP Monitor driver issue. If you still face the problem, we suggest updating the display driver.
To do so, you can use Advanced Driver Updater as the tool will help detect and easily update all types of outdated drivers. Also, you can try uninstalling and reinstalling the Generic PnP driver. These additional steps should help. However, if you still face any problems, share them with us in the comments section.
More Related Read :
Intel UHD Graphics 630 Driver Download & Update
How To Fix Realtek Ethernet Drivers That Keep Disappearing
Fixed – Wireless Mouse Isn’t Working On Windows
Исправление «Не удалось загрузить драйвер аппаратного монитора» в Windows 10 способов решить общую проблему с монитором PnP на ПК с Windows с помощью этого простого руководства

Хотя ОС Windows 10 является усовершенствованной операционной системой, в ней все еще есть несколько ошибок и проблем, которые время от времени возникают в ОС. Хотя некоторые проблемы легко решить и исправить, существует множество проблем, таких как «Общая проблема с монитором PnP», которые беспокоили пользователей в недавнем прошлом. Эта проблема не нова, но она время от времени возникала у нескольких пользователей. Очевидно, когда эта проблема возникает на ПК с Windows 10, появляется сообщение: «Не удалось загрузить драйвер аппаратного монитора !»
Если вы столкнулись с той же проблемой на своем компьютере с Windows 10, то вы попали по адресу. Как и в этом посте, мы дадим вам подробное руководство о том, как решить эту проблему. Чтобы дать вам преимущество, наиболее вероятная причина общей ошибки монитора PnP связана с устаревшими драйверами или недостаточным оборудованием. Если пользователи, обновившие свою операционную систему Windows 10, также могут столкнуться с этой проблемой. К счастью, это руководство поможет вам. С учетом вышесказанного перейдем непосредственно к самой статье:
Прежде чем мы продолжим и выполним действия по устранению этой проблемы, лучше понять основную причину этой проблемы с драйвером универсального монитора PnP в Windows 10. Прежде всего, PnP означает «Plug and Play». Это означает, что все устройства, которые вы можете использовать, просто подключив внешнее оборудование к компьютеру, называются устройствами Plug and Play. Кроме того, оборудование PnP не требует от пользователя установки драйвера.
.Когда это происходит, Windows устанавливает универсальный драйвер для внешнего монитора, но это не всегда работает, так как может быть несоответствие. Это приводит к сообщению «Не удалось загрузить драйвер аппаратного монитора!»
Проблема также может возникнуть при обновлении ОС Windows 10. При добавлении второго монитора к основному первый отображается как настоящий, а второй — как универсальный монитор PnP. Причиной этой проблемы также могут быть мониторы или кабели других производителей, не распознаваемые Windows 10.
Как исправить Проблему с драйвером аппаратного монитора в Windows 10?
После того, как вы ознакомились с приведенным выше разделом и поняли, в чем основная причина этой проблемы, давайте рассмотрим потенциальные исправления, которые помогут вам решить проблему с драйвером универсального монитора PnP в Windows 10.
Удалить универсальный драйвер монитора PnP
Иногда откат также помогает решить проблему с PnP Monitor. Для этого вам необходимо удалить драйвер Generic PnP Monitor.
- Нажмите клавиши Win+Rи введите «devmgmt.msc», чтобы открыть диспетчер устройств.
- В окне Диспетчер устройств найдите раздел Мониторы.
- В разделе В разделе Мониторы вы увидите параметр Общий монитор PnP.
- Щелкните по нему правой кнопкой мыши и выберите Удалить устройство.

- Как только это будет сделано, вы сможете проверить наличие изменений в оборудовании. Это заставит Windows 10 установить монитор как настоящий монитор, а не как обычный монитор PnP.

Если это не решит вашу проблему, перейдите к следующему шагу.
Обновить универсальный драйвер монитора PnP
Если удаление не помогло вам, вы можете рискнуть, обновив общий драйвер монитора PnP.
- Щелкните правой кнопкой мыши меню «Пуск» и выберите «Диспетчер устройств». Вы также можете нажать клавиши Win+Rна клавиатуре и ввести «devmgmt.msc», чтобы открыть диспетчер устройств.
- В окнах Диспетчера устройств разверните раздел Мониторы.
- В разделе Мониторы вы увидите Общий монитор PnP. Щелкните его правой кнопкой мыши и выберите параметр Обновить драйвер.
- После того, как вы закончите На последнем шаге появится новое диалоговое окно, в котором вам будет предложено выбрать либо «Автоматический поиск обновленного программного обеспечения драйвера», либо «Просмотреть на моем компьютере программное обеспечение драйвера». li>
- Вам нужно нажать на первый вариант, то есть «Автоматический поиск обновленного программного обеспечения драйвера». Драйвер автоматически загрузится и установится из Интернета.
- После установки драйвера перезагрузите компьютер и посмотрите, произойдет ли это. исправит вашу проблему или нет.


Запустите проверку системных файлов
Возможно, вам придется запустить программу проверки системных файлов — встроенную в Windows 10 служебную программу, которая поможет вам сканировать и исправить поврежденные драйверы на вашем компьютере.
- Нажмите Win+Rи введите «cmd», чтобы открыть командную строку.
- В новом окне командной строки введите «sfc /scannow» и нажмите Enter.
- Проверка системных файлов просканирует ваш компьютер и найдет поврежденные драйверы. Обратите внимание, что процесс сканирования может занять до 15 минут. Так что наберитесь терпения.
- После завершения процесса вы увидите, решит ли это вашу общую проблему с монитором PnP или нет.

Проверить наличие последних обновлений Windows
Мы уже упоминали, что проблемы с Generic PnP Monitor могут возникнуть и из-за старых драйверов. Итак, вам необходимо убедиться, что вы установили на свой компьютер последнюю версию Windows 10, поскольку Microsoft также исправляет несколько ошибок и проблем с каждым обновлением. Всегда убедитесь, что на вашем ПК или ноутбуке установлена последняя версия Windows 10. Вы можете сделать это:
- Нажмите значок Windows и найдите Обновление.
- Откроется Меню Центра обновления Windows.
- Здесь нажмите кнопку Проверить наличие обновлений.
- Начнется проверка наличия последней версии Windows 10. Если обнаружено новое обновление, настоятельно рекомендуется установить его на свой компьютер.
Проверьте подключение кабеля
И последнее, но не менее важное: все, что вы можете сделать, это проверить, есть ли неисправные соединения или нет. Если да, то это может быть причиной того, что ваш монитор не определяется как основной.
- Выключите монитор и компьютер.
- Отсоедините шнур питания монитора и подождите около 10 минут, прежде чем подключать его. обратно.
- Отключите кабель HDMI или видео от процессора и подождите 10 минут.
- Подключите обратно все кабели в соответствующие разъемы и посмотрите, решит ли это проблему или нет.
Заключение
Итак, вот и все с моей стороны в этом посте. Хотя эта ошибка довольно распространена, ее решение зависит от ее основной причины. Итак, лучше просмотрите все решения, упомянутые в этом посте. Чтобы увидеть больше таких потрясающих репортажей, подписывайтесь на DigitBin. До следующего поста… Всего хорошего!