
Quick Tips
- Ensure the sharing protocol and network discovery are enabled on your PC.
- Check if your user account has the permission to access the shared folder.
- Ensure that network and sharing services are running on your PC.
If you can’t open the shared folder in File Explorer, use Command Prompt to access it. Here’s how.
Step 1: Right-click on the Start icon and select Terminal (Admin) from the list.

Step 2: Type the details like PC name, server name, and shared folder name in the following command and hit Enter.
net use <DeviceName>: \\<ServerName>\<ShareName>

Fix 2: Enable File Sharing Support
You should also ensure the sharing protocol is enabled on your Windows PC. Here’s how to check.
Step 1: Click the search icon on the taskbar, type turn windows features on or off, and press Enter.
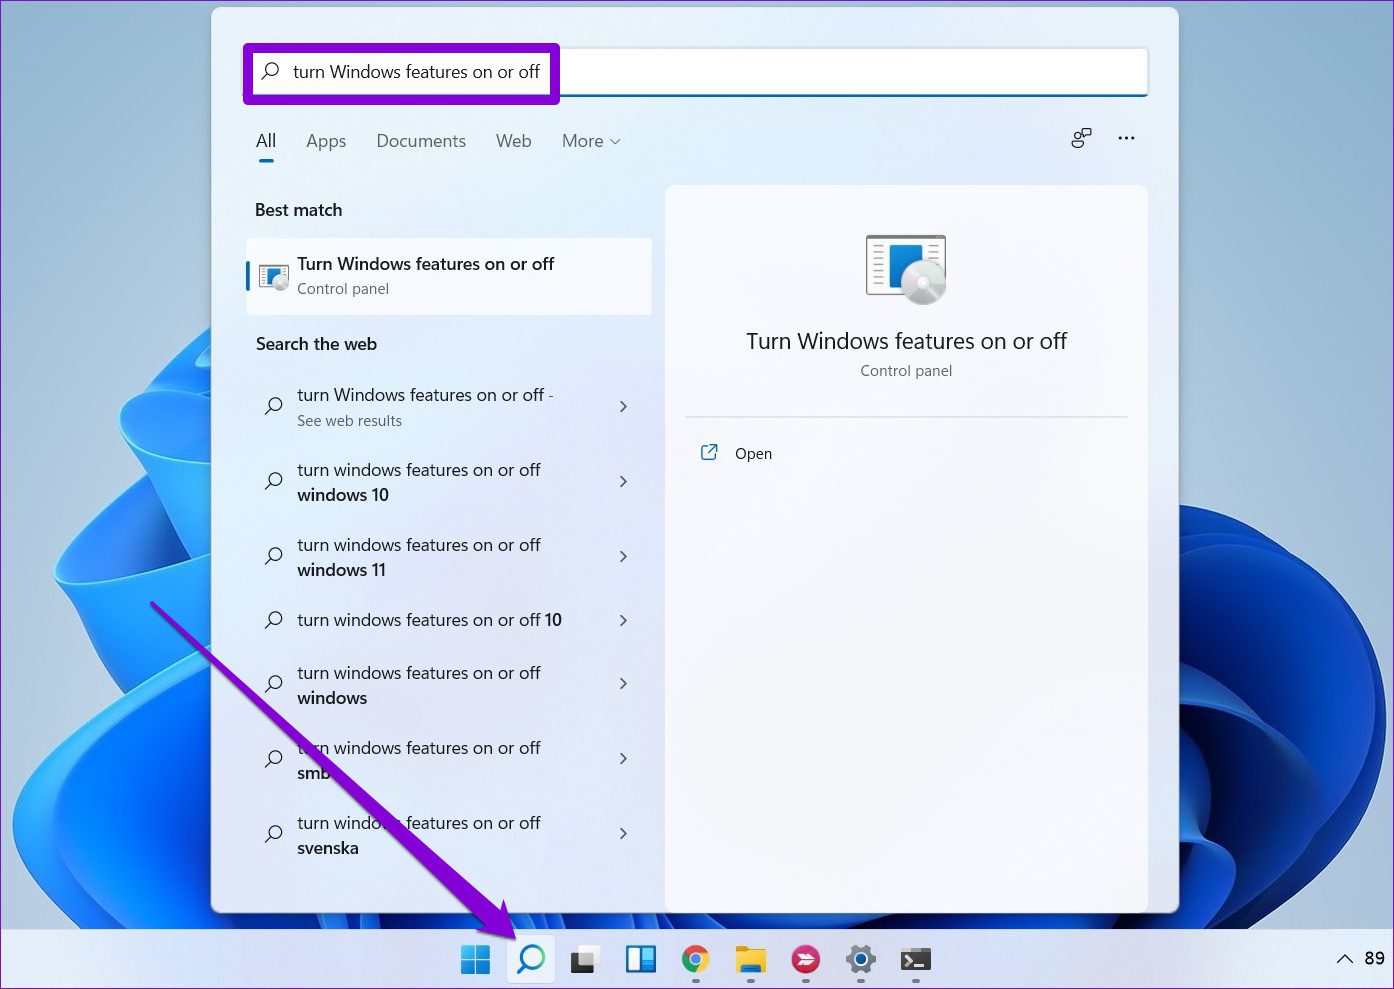
Step 2: Locate and check the box for SMB 1.0/CIFS File Sharing Support. Then, click OK.

Fix 3: Enable Network Discovery
Another reason your PC might fail to access the shared folder is if Network Discovery is disabled. Turning it on will allow your PC to view and access shared folders on the same network.
Step 1: Open the search menu, type control panel, and press Enter.

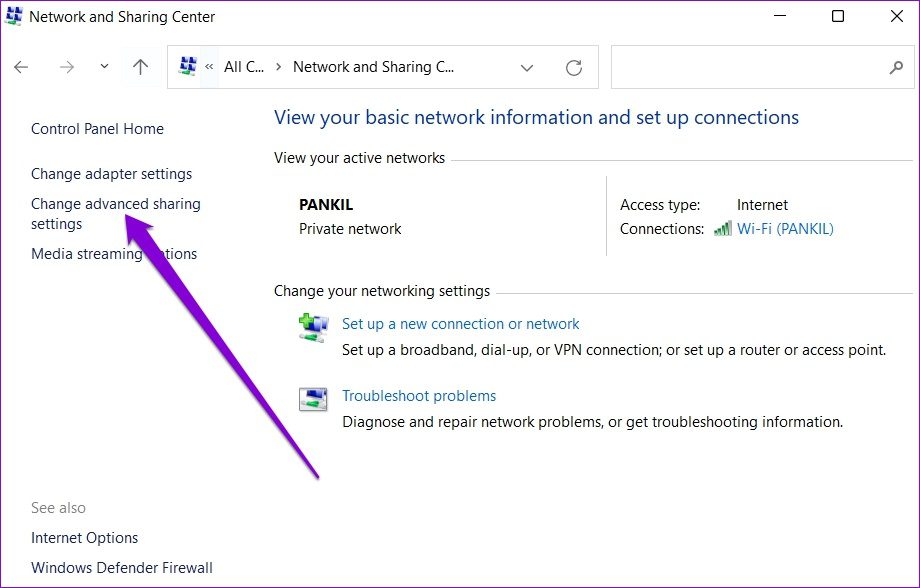
Step 2: Change the view type to Large icons. Then, click on Network and Sharing Center.

Step 3: Click on Change advance sharing settings in the left pane.
Step 4: Under Private, select Turn on network discovery.

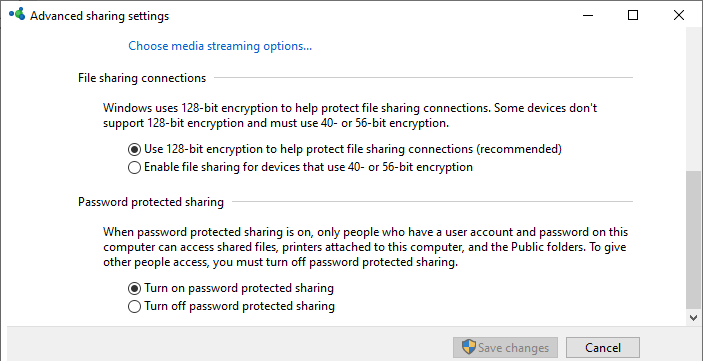
Step 5: Expand All Networks and navigate to the Password protected sharing section. Select Turn on password protected sharing and hit Save changes.

Fix 4: Check Folder Permissions
Improper setup or lack of sharing permissions can prevent you from accessing a shared folder on Windows. To avoid this, ensure that the folder permissions for the shared folder are configured correctly.
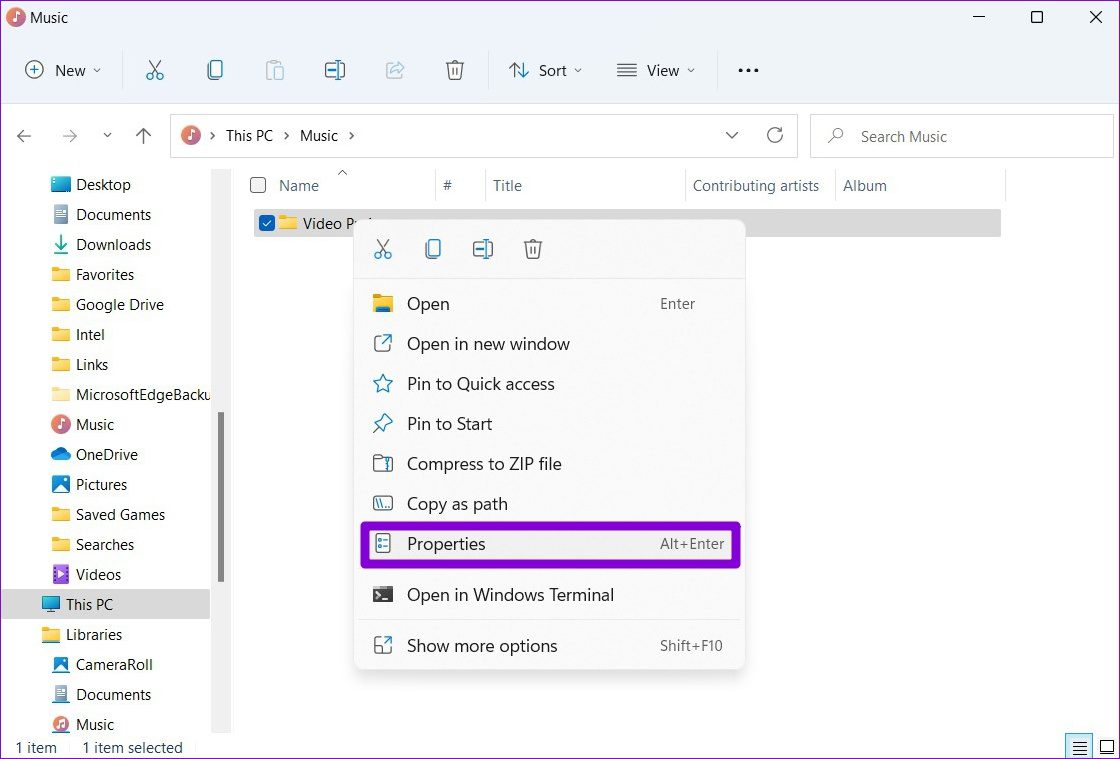
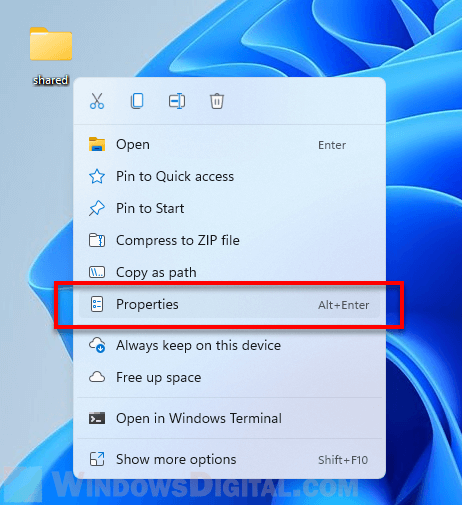
Step 1: Press the Windows key + E to launch the File Explorer. Right-click on the folder you wish to share and select Properties.
Step 2: In the Properties window, switch to the Sharing tab. Then click Advanced Sharing.
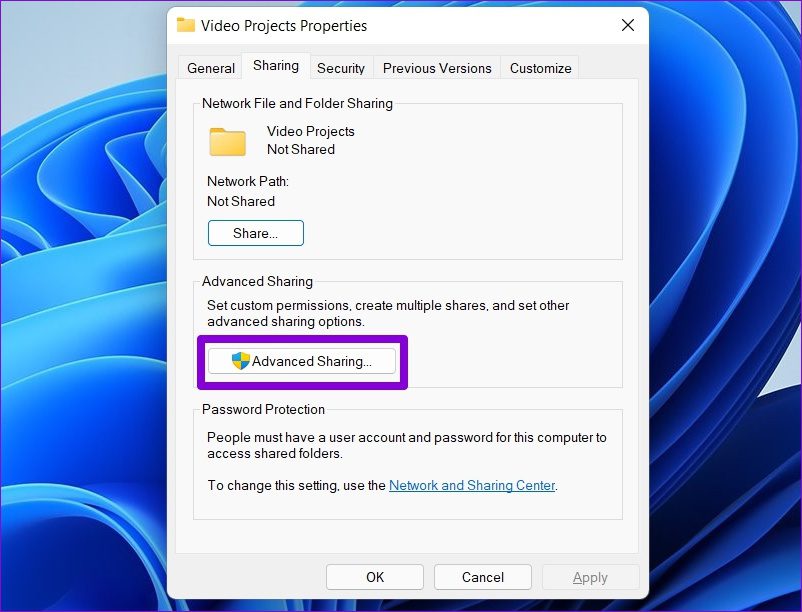
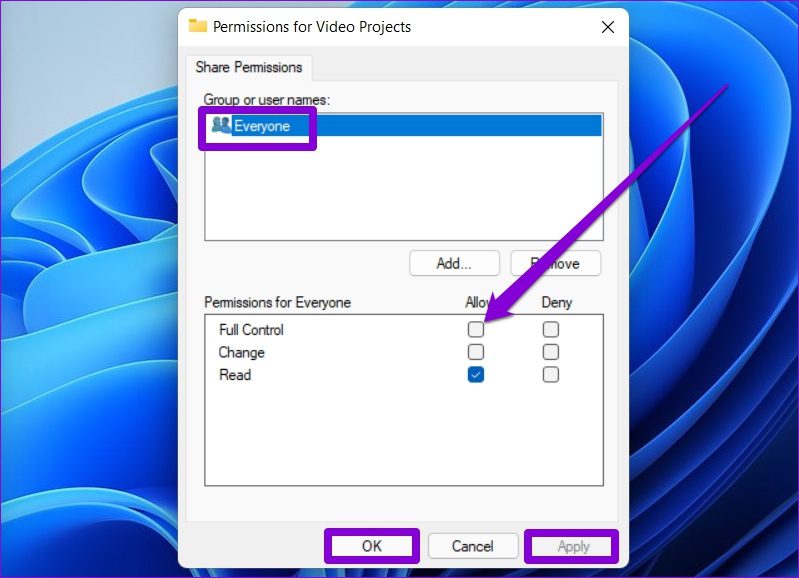
Step 3: Click on Permissions.

Step 4: Under Group or user names, select Everyone and allow Full Control. Then, hit Apply, followed by OK.
Fix 5: Start Sharing Services
If you still can’t access the shared folder on Windows, the network and sharing services on your PC may not be running. Here’s how to fix that.
Step 1: Press the Windows key + R to launch the Run command. Type services.msc and press Enter.
Step 2: In the Services window, you’ll find all the services arranged alphabetically. Right-click on Function Discovery Provider Host and select Start from the menu.

Repeat the above step to start Function Discovery Resource Publication, SSDP Discovery, and UPnP Device Host services as well.
Fix 6: Modify Registry Files
If nothing works, you can modify your PC’s file-sharing policies via the registry editor. Here are the steps:
Step 1: Press the Windows key + R, type regedit, and press Enter.
Step 2: Use the address bar at the top to navigate to the following key.
Computer\HKEY_LOCAL_MACHINE\SOFTWARE\Policies\Microsoft\Windows\LanmanWorkstation
If you can’t find LanmanWorkstation, right-click on the Windows key > go to New > Key. Name it LanmanWorkstation.

Step 3: Select the LanmanWorkstation key, right-click anywhere on the empty space on your right, and select New > DWORD (32-bit) Value. Name it AllowInsecureGuestAuth.

Step 4: Double-click the newly created DWORD and change its value data to 1. Then, click OK.

Restart your PC and access the shared folder again.
Was this helpful?
Thanks for your feedback!
The article above may contain affiliate links which help support Guiding Tech. The content remains unbiased and authentic and will never affect our editorial integrity.
It’s annoying to meet the “Windows 11 cannot access shared folder” issue. There are many reasons for the “cannot access shared folder Windows 11” issue. There may be a misconfigured network, incorrect drive settings, and misspellings of the folder names mentioned above. And in some cases, the user account behind the folder has inappropriate permissions settings.
Then, let’s see how to get rid of the “Windows cannot access shared folder on Windows 11” issue.
Fix 1: Turn on Network Sharing Permission
First, you can try to turn on network sharing permission on Windows 11 to fix the issue. Here is how to do that:
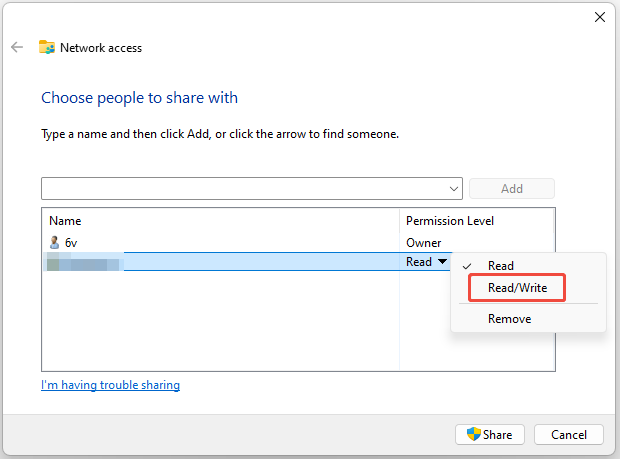
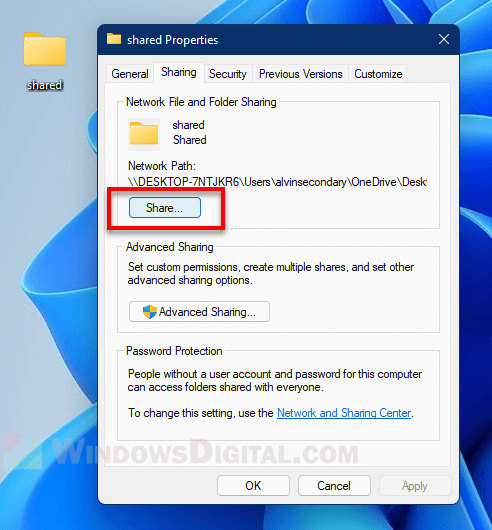
Step 1: Right-click the shared folder to choose Properties. Then, click the Sharing tab and click Share….
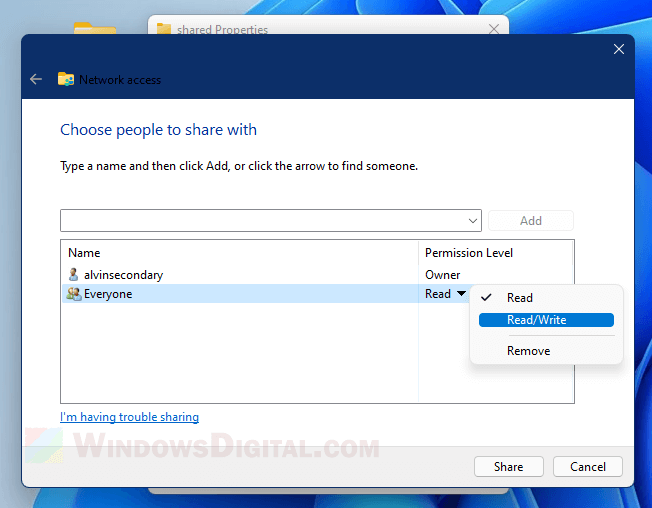
Step 2: Click the arrow to choose the user you want to share files and click Add. Choose Read/Write under Permission Level and click Share.
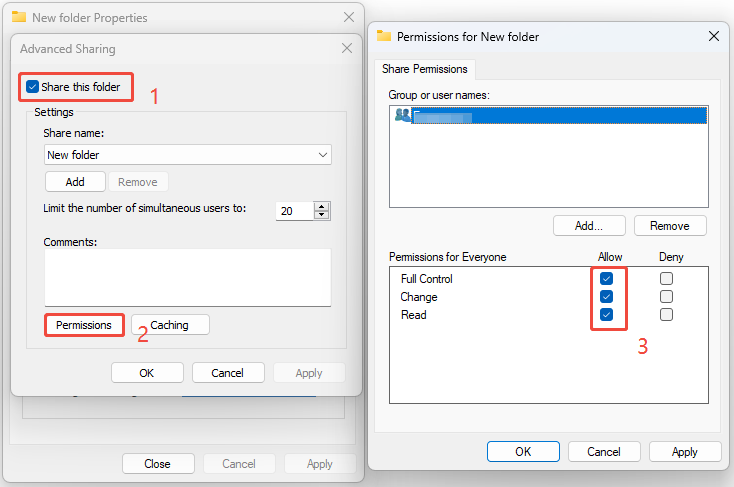
Step 3: Go to the Sharing tab again. Click Advanced Sharing… and check the Share this folder option. In the same window, click the Permissions button and check the Allow box next to the Full Control option.
Fix 2: Enable File and Printer Sharing
Then, you can try to enable file and printer sharing settings. Follow the guide below:
Step 1: Type Control Panel in the Search box to open it.
Step 2: Go to Network and Internet > Network and Sharing Center > Change advanced sharing settings.
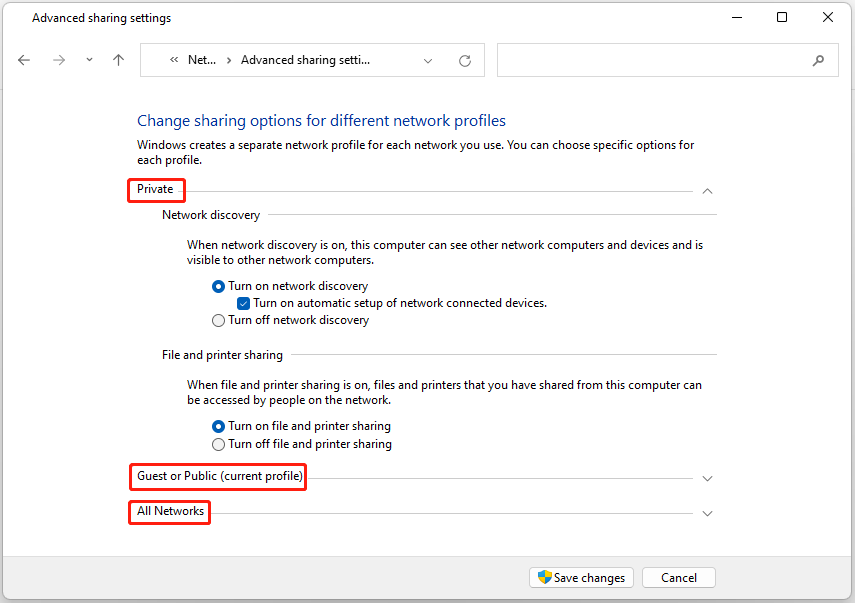
Step 3: You need to turn on file sharing under Private, Public, and All networks.
1. Private
Network discovery: Check Turn on network discovery and also check Turn on automatic setup of network-connected devices.
File and printer sharing: Check Turn on file and printer sharing.
2. Guest or Public (current profile)
Check Turn on file and printer sharing under Network discovery and File and printer sharing.
3. All Networks
Turn on public file sharing and turn on password-protected sharing.
Fix 3: Give Security Permission
If you don’t have the correct security permission, you can also encounter the Windows 11 cannot access shared folder issue.
Step 1: Right-click the shared folder to choose Properties.
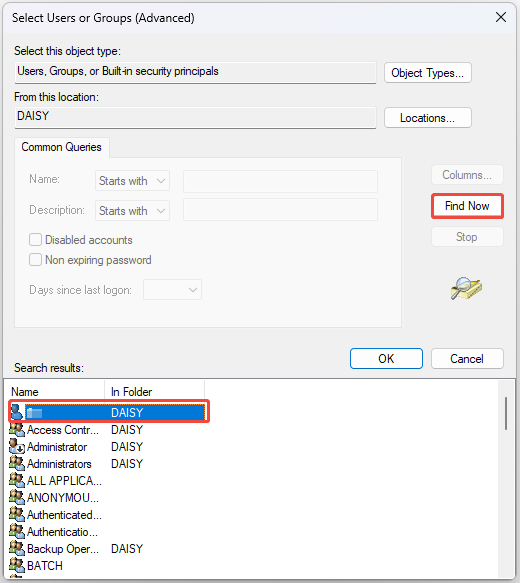
Step 2: Go to the Security tab and click Edit…. Then, click Add… and click Advanced….
Step 3: Click Find Now and select the user you want to share files. Then, click OK.
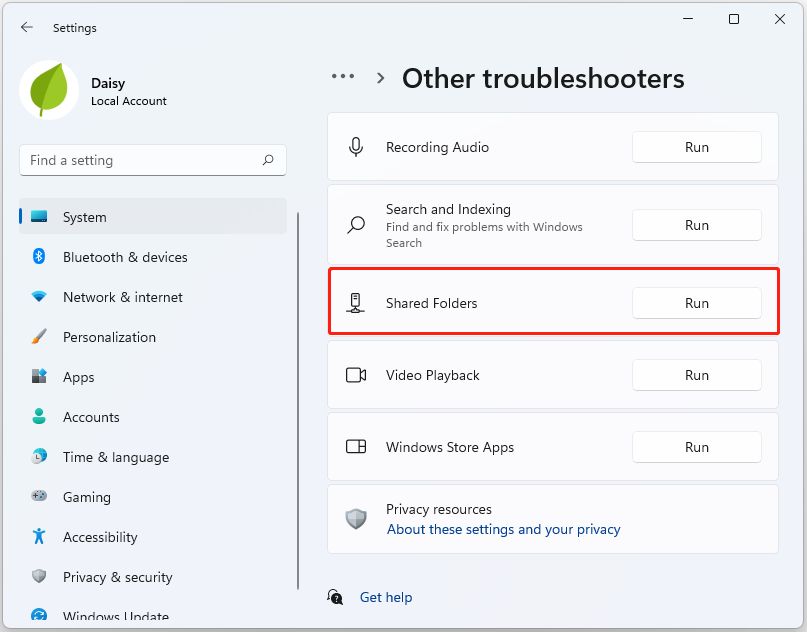
A Shared Folder troubleshooter can be helpful for you to get rid of the sharing issue.
Step 1: Press the Windows + I keys together to open the Settings application.
Step 2: Go to System > Troubleshoot > Other Troubleshooters.
Step 3: Find Shared Folders and click Run. Then, you just need to wait for the process to finish.
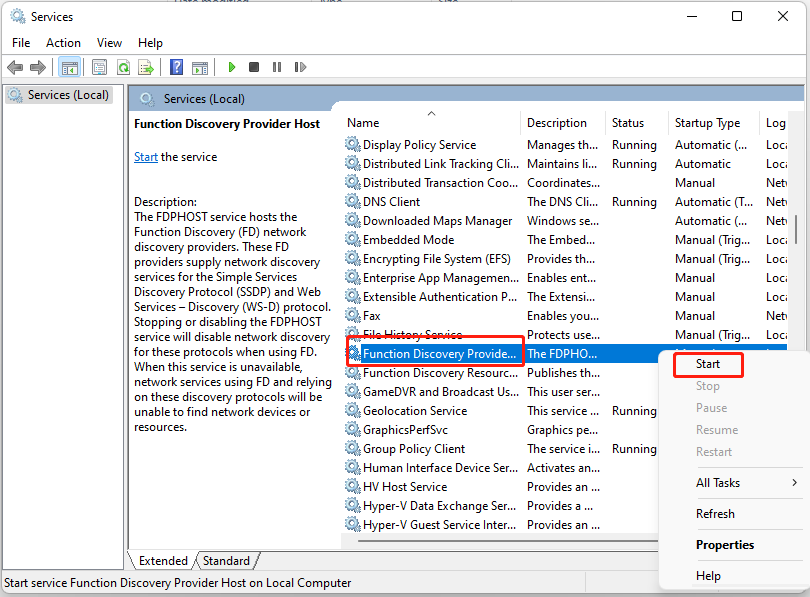
If you still can’t access the shared folder on Windows, you need to verify if the network and sharing services on your PC are running.
Step 1: Press the Windows + R keys to open the Run box. Type services.msc and press Enter.
Step 2: Right-click Function Discovery Provider Host and select Start.
Fix 6: Use Registry Editor
If the above solutions are not working, try to use Registry Editor to fix the issue.
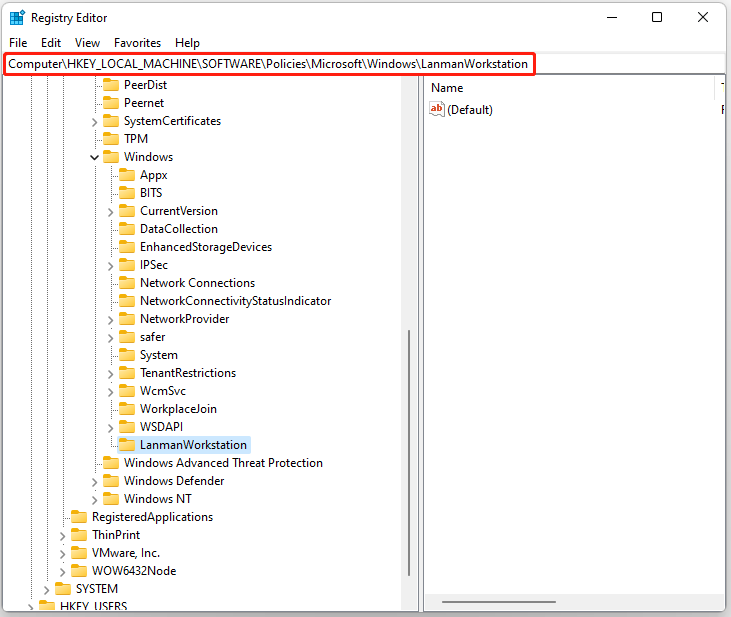
Step 1: Open the Run box, type regedit, and press Enter.
Step 2: Go to the below path:
Computer\HKEY_LOCAL_MACHINE\SOFTWARE\Policies\Microsoft\Windows\LanmanWorkstation
Step 3: If you can’t find the LanmanWorkstation key, right-click the Windows key to select New > Key. Name it LanmanWorkstation.
Step 4: Then right-click the right pane, and select New > DWORD (32-bit) Value. Name it AllowInsecureGuestAuth.
Step 5: Double-click on this key. Then change the Value data to 1.
Final Words
This post provides 6 ways to get rid of the “Windows 11 cannot access shared folder” issue. You can try them to fix the issue.
Если вы из Windows 10 или 11 не можете открыть сетевые папки на других сетевых устройствах (NAS, Samba сервера Linux) или на компьютерах со старыми версиями Windows (Windows 7/ XP /2003), скорее всего проблема связана с тем, что в вашей версии Windows отключена поддержка устаревших и небезопасных версий протокола SMB (используется в Windows для доступа к общим сетевым папкам и файлам). В современных версиях Windows 10 и в Windows 11 по-умолчанию отключен протокол SMBv1 и анонимный (гостевой) доступ к сетевым папкам по протоколу SMBv2 и SMBv3.
Microsoft планомерно отключает старые и небезопасные версии протокола SMB во всех последний версиях Windows. Начиная с Windows 10 1709 и Windows Server 2019 (как в Datacenter так и в Standard редакциях) в операционной системе по умолчанию отключен протокол SMBv1 (помните атаку шифровальщика WannaCry, которая как раз и реализовалась через дыру в SMBv1).
Конкретные действия, которые нужно предпринять зависят от ошибки, которая появляется в Windows при доступе к общей сетевой папке и от настроек удаленного SMB сервера, на котором хранятся общие папки.
Содержание:
- Вы не можете получить гостевой доступ к общей папке без проверки подлинности
- Вашей системе необходимо использовать SMB2 или более позднюю
- Нет доступа к сетевой папке, у вас нет прав доступа
- Дополнительные способы проверки доступа к сетевой папке в Windows
Вы не можете получить гостевой доступ к общей папке без проверки подлинности
Начиная с версии Windows 10 1709 (Fall Creators Update) Enterprise и Education пользователи стали жаловаться, что при попытке открыть сетевую папку на соседнем компьютере стала появляться ошибка:
Вы не можете получить доступ к этой общей папке, так как политики безопасности вашей организации блокируют гостевой доступ без проверки подлинности. Эти политики помогают защитить ваш компьютер от небезопасных или вредоносных устройств в сети.
An error occurred while reconnecting Y: to
\\nas1\share Microsoft Windows Network: You can’t access this shared folder because your organization’s security policies block unauthenticated guest access. These policies help protect your PC from unsafe or malicious devices on the network.
При этом на других компьютерах со старыми версиями Windows 8.1/7 или на Windows 10 с билдом до 1709, эти же сетевые каталоги открываются нормально. Причина в том, что в современных билдах Windows 10 (начиная с 1709) по умолчанию запрещен сетевой доступ к сетевым папкам под гостевой учетной записью по протоколу SMBv2 (и ниже). Гостевой (анонимный) доступ подразумевают доступ к сетевой папке без аутентификации. При доступе под гостевым аккаунтом по протоколу SMBv1/v2 не применяются такие методы защиты трафика, как SMB подписывание и шифрование, что делает вашу сессию уязвимой против MiTM (man-in-the-middle) атак.
При попытке открыть сетевую папку под гостем по протоколу SMB2, в журнале клиента SMB (Microsoft-Windows-SMBClient) фиксируется ошибка:
Log Name: Microsoft-Windows-SmbClient/Security Source: Microsoft-Windows-SMBClient Event ID: 31017

Rejected an insecure guest logon.
Данная ошибка говорит о том, что ваш компьютер (клиент) блокирует не аутентифицированный доступ под аккаунтом guest.
Чаще всего с этой проблемой можно столкнуться при использовании старых версий NAS (обычно для простоты настройки на них включают гостевой доступ) или при доступе к сетевым папкам на старых версиях Windows 7/2008 R2 или Windows XP /2003 с настроенным анонимным (гостевым) доступом (см. таблицу поддерживаемых версий SMB в разных версиях Windows).
Microsoft рекомендует изменить настройки на удаленном компьютере или NAS устройстве, который раздает сетевые папки. Желательно переключить сетевой ресурс в режим SMBv3. А если поддерживается только протокол SMBv2, тогда нужно настроить доступ с аутентификацией. Это самый правильный и безопасный способ исправить проблему.
В зависимости от устройства, на котором хранятся сетевые папки, вы должны отключить на них гостевой доступ.
- NAS устройство – отключите гостевой доступ в настройках вашего NAS устройства (зависит от модели);
- Samba сервер на Linux — если вы раздаете SMB папку с Linux, добавьте в в секции [global] конфигурационного файла smb.conf строку:
map to guest = never
А в секции с описанием сетевой папки запретить анонимный доступ:
guest ok = no - В Windows вы можете включить общий доступ к сетевым папкам и принтерам с парольной защитой в разделе Control Panel\All Control Panel Items\Network and Sharing Center\Advanced sharing settings. Для All Networks (Все сети) в секции “Общий доступ с парольной защитой” (Password Protected Sharing) измените значение на “Включить общий доступ с парольной защитой” (Turn on password protected sharing). В этом случае анонимный (гостевой) доступ к папкам будет отключен и вам придется создать локальных пользователей, предоставить им доступ к сетевым папкам и принтерам и использовать эти аккаунты для сетевого доступа к общим папкам на этом компьютере..

Есть другой способ – изменить настройки вашего SMB клиента и разрешить доступ с него на сетевые папки под гостевой учетной записью.
Этот способ нужно использовать только как временный (!!!), т.к. доступ к папкам без проверки подлинности существенно снижает уровень безопасности ваших данных.
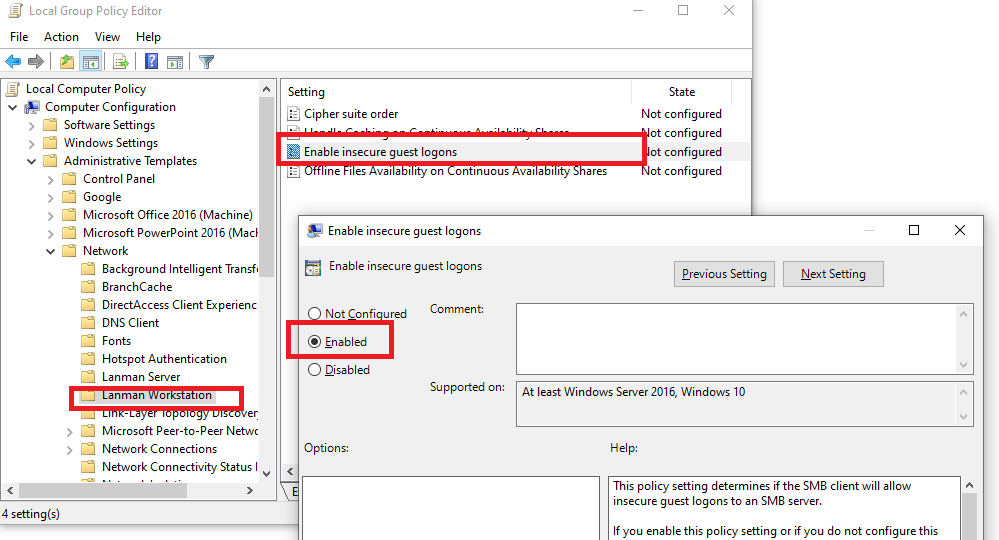
Чтобы разрешить гостевой доступ с вашего компьютера, откройте редактор локальных групповых политик (gpedit.msc) и перейдите в раздел: Конфигурация компьютера -> Административные шаблоны -> Сеть -> Рабочая станция Lanman (Computer Configuration ->Administrative templates -> Network (Сеть) -> Lanman Workstation). Включите политику Enable insecure guest logons (Включить небезопасные гостевые входы).
Обновите настройки групповых политик в Windows с помощью команды:
gpupdate /force
В Windows 10 Home, в которой нет редактора локальной GPO,вы можете внести аналогичное изменение через редактор реестра вручную::
HKLM\SYSTEM\CurrentControlSet\Services\LanmanWorkstation\Parameters “AllowInsecureGuestAuth”=dword:1
Или такими командами:
reg add HKLM\SYSTEM\CurrentControlSet\Services\LanmanWorkstation\Parameters /v AllowInsecureGuestAuth /t reg_dword /d 00000001 /f
reg add HKLM\Software\Policies\Microsoft\Windows\LanmanWorkstation /v AllowInsecureGuestAuth /t reg_dword /d 00000001 /f
Вашей системе необходимо использовать SMB2 или более позднюю
Другая возможная проблема при доступе к сетевой папке из Windows 10 – поддержка на стороне сервера только протокола SMBv1. Т.к. клиент SMBv1 по умолчанию отключен в Windows 10, то при попытке открыть шару или подключить сетевой диск вы можете получить ошибку:
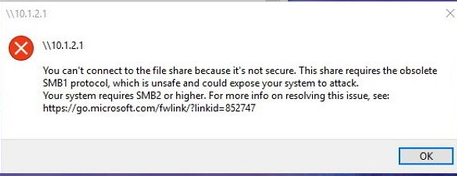
Не удалось выполнить сопоставление сетевого диска из-за следующей ошибки.
Вы не можете подключиться к общей папке, так как она небезопасна. Эта общая папка работает по устаревшему протоколу SMB1, который небезопасен и может подвергнуть вашу систему риску атаки.
Вашей системе необходимо использовать SMB2 или более позднюю версию.
You can’t connect to the file share because it’s not secure. This share requires the obsolete SMB1 protocol, which is unsafe and could expose your system to attack. Your system requires SMB2 or higher.
При этом соседние устройства SMB могут не отображаться в сетевом окружении и при открытии сетевых папок по UNC пути может появляться ошибка 0x80070035.
Сообщение об ошибки явно указывает, что сетевая папка поддерживает только SMBv1 для доступа к файлам. В этом случае нужно попытаться перенастроить удаленное SMB устройство для поддержки как минимум SMBv2 (правильный и безопасный путь).
Если сетевые папки раздает Samba сервер на Linux, вы можете указать минимально поддерживаемую версию SMB в файле smb.conf так:
[global]
server min protocol = SMB2_10
client max protocol = SMB3
client min protocol = SMB2_10
encrypt passwords = true
restrict anonymous = 2
В Windows 7/Windows Server 2008 R2 вы можете отключить SMBv1 и разрешить SMBv2 так через реестр:
Set-ItemProperty -Path "HKLM:\SYSTEM\CurrentControlSet\Services\LanmanServer\Parameters" SMB1 -Type DWORD -Value 0 –Force
Set-ItemProperty -Path "HKLM:\SYSTEM\CurrentControlSet\Services\LanmanServer\Parameters" SMB2 -Type DWORD -Value 1 –Force
В Windows 8.1 отключите SMBv1, разрешите SMBv2 и SMBv3 и проверьте что для вашего сетевого подключения используется частный или доменный профиль:
Disable-WindowsOptionalFeature -Online -FeatureName "SMB1Protocol"
Set-SmbServerConfiguration –EnableSMB2Protocol $true
Если ваше сетевое устройство (NAS, Windows XP, Windows Server 2003), поддерживает только протокол SMB1, в Windows 10 вы можете включить отдельный компонент SMB1Protocol-Client. Но это не рекомендуется!!!
Если удаленное устройство требует использовать SMBv1 для подключения, и этот протокол отключен в вашем устройстве Windows, в Event Viewer появляется ошибка:
Log Name: Microsoft-Windows-SmbClient/Security
Source: Microsoft-Windows-SMBClient
Event ID: 32000
Description:  SMB1 negotiate response received from remote device when SMB1 cannot be negotiated by the local computer.
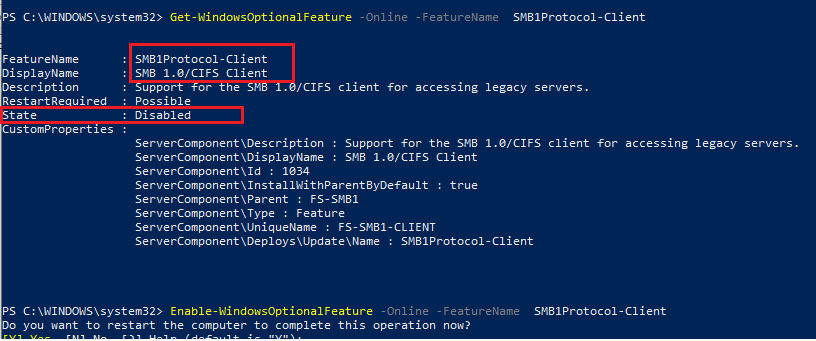
Запустите консоль PowerShell и проверьте, что SMB1Protocol-Client отключен (
State: Disabled
):
Get-WindowsOptionalFeature -Online -FeatureName SMB1Protocol-Client
Включите поддержку протокола SMBv1 (потребуется перезагрузка):
Enable-WindowsOptionalFeature -Online -FeatureName SMB1Protocol-Client
Также вы можете включить/отключить SMBv1 в Windows 10 и 11 из меню
optionalfeatures.exe
-> SMB 1.0/CIFS File Sharing Support –> SMB 1.0/CIFS Client.
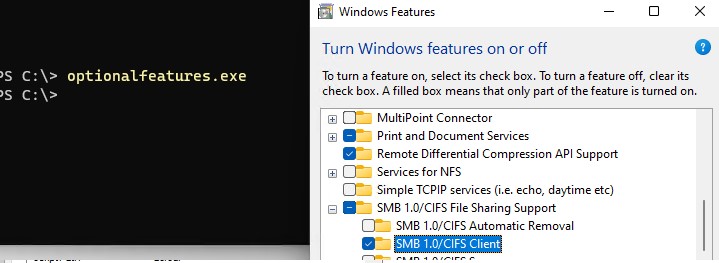
В Windows 10 1709 и выше клиент SMBv1 автоматически удаляется, если он не использовался более 15 дней (за это отвечает компонент SMB 1.0/CIFS Automatic Removal).
В этом примере я включил только SMBv1 клиент. Не включайте компонент SMB1Protocol-Server, если ваш компьютер не используется устаревшими клиентами в качестве сервера для хранения общих папок.
После установке клиента SMBv1, вы должны без проблем подключиться к общей сетевой папке или принтеру. Однако, нужно понимать, что использование данного обходного решения не рекомендовано, т.к. подвергает снижает уровень безопасности.
Нет доступа к сетевой папке, у вас нет прав доступа
При подключении к сетевой папке на другом компьютере может появится ошибка:
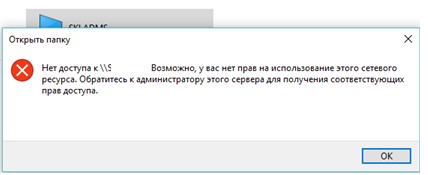
Нет доступа к \\ComputerName\Share. Возможно у вас нет прав на использование этого сетевого ресурса. Обратитесь к системному администратору этого сервера для получения соответствующих прав доступа.
Network Error
Windows cannot access \\PC12\Share
You do not have permissions to access \\PC12\Share. Contact your network administrator to request access.
При появлении это ошибки нужно:
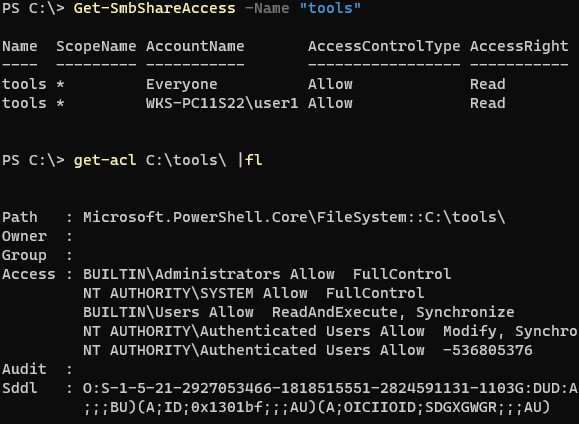
- Убедиться, что пользователю, под которым вы подключаетесь к сетевой папке, предоставлены права доступа на сервере. Откройте свойства общей папке на сервере и убедитесь что у вашего пользователя есть права доступа.
Проверьте разрешения сетевой шары на сервере с помощью PowerShell:
Get-SmbShareAccess -Name "tools"
Затем проверьте NTFS разрешения:
get-acl C:\tools\ |fl

Если нужно, отредактируйте разрешения в свойствах папки.
- Проверьте, что вы используете правильные имя пользователя и пароль для доступа к сетевой папки. Если имя и пароль не запрашиваются, попробуйте удалить сохраненные пароли для доступа к сетевой папке в диспетчере учетных записей Windows. Выполните команду
rundll32.exe keymgr.dll, KRShowKeyMgr
и удалите сохраненные учетные данные для доступа к сетевой папке.
При следующем подключении к сетевой папки появится запрос имени и пароля. Укажите имя пользователя для доступа к папке. Можете сохранить его в Credential Manager или добавить вручную.
Дополнительные способы проверки доступа к сетевой папке в Windows
В этом разделе указаны дополнительные способы диагностики при проблема с открытием сетевые папок в Windows:
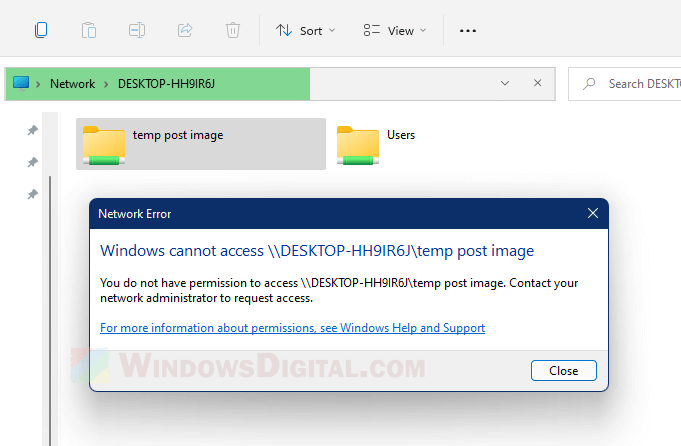
When you open a shared folder in a local network, if you receive the following error: “Windows cannot access \\DESKTOP-XXXXXXX\ shared folder – You do not have permission to access the shared folder. Contact your network administrator to request access” or “Check the spelling of the name. Otherwise, there might be a problem with your network“, try the solutions below.
First, check if you have properly turn on network discovery on the computer you share the folder from and on the computer you want to access the shared folder. Secondly, check if the computer you share the folder from has also turned on file sharing. For a detailed guide on how to enable (or disable) these options in Windows 11 or 10, follow the links below.
- How to Turn On Network Discovery and File Sharing in Windows 11
- How to Turn On Network Discovery and File Sharing in Windows 10
For a detailed guide on how to correctly share a folder from scratch on Windows 11 or 10, read: How to Share a Folder in Windows 11 / 10 Local Network Without Password
If you have done all the above and still getting the error, follow the solutions below. The screenshots in the instruction below were taken on Windows 11, but the steps are similar to that of Windows 10. You can follow the same steps for both Windows 11 and 10.
Fix: “Windows cannot access shared folder – You do not have permission” in Windows 11
In most cases, you get the “You do not have permission” network error message when you open a shared folder if the shared folder does not have the user (you use to access this folder) added to its “share with” list. Follow the steps below to re-configure the Share and Advanced Sharing options for the shared folder to add the user(s) you want to share the folder with and configure their permission levels.
- On the computer you want to share the folder from, right-click on the folder you want to share, then select Properties.

- In the Properties window, click on Sharing tab.
- Under Network File and Folder Sharing section, click on the Share button.

- In the “Choose people to share with” settings window, click on the drop-down menu and select the user (or create a new user) you want to share your folder with. If you are not sure about what user to add, you can select Everyone to share the folder with anyone that has access to the local network (not recommended if the computer is or will be connecting to a public network).

- Once the user is added, optionally, you can configure the permission level of the user. You can set the user to have Read only permission or both Read and Write permissions. The write permission means to allow the user to also edit, move or delete the files in the shared folder.

- Next, click Share to proceed.
- On the next screen, you can copy the shared link and use it in the File Explorer address bar on another computer to access the shared folder. This step is optional if you can access the shared folder via the Network folder. Click Done to proceed.

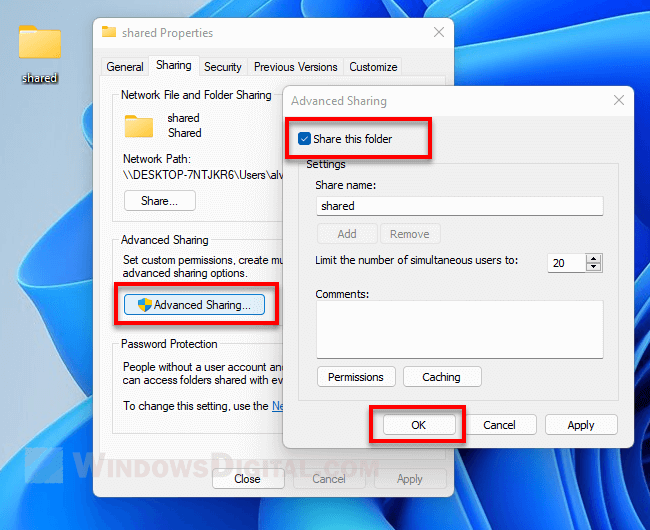
- Next, back to the properties window, click on the Advanced Sharing button.
- Tick the “Share this folder” checkbox.

- Optionally, you can click on the Permissions button. From here, you can set the permissions for each user, whether to allow the users to have full control or read only over the shared folder.
- Click Apply, then OK to save the changes. Close the properties window and retry access to this shared folder again from another computer in the same local network.

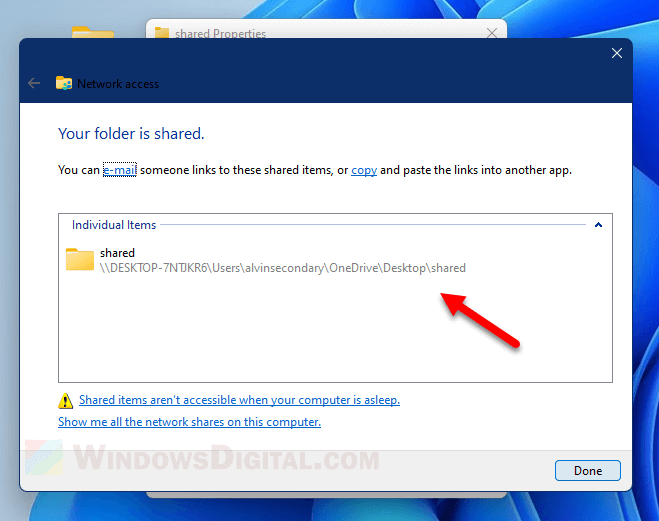
Note that shared folders are not accessible when the computer where the shared folder is located at is in sleep or hibernation mode. Shared folders can only be accessed when Windows is actively running.
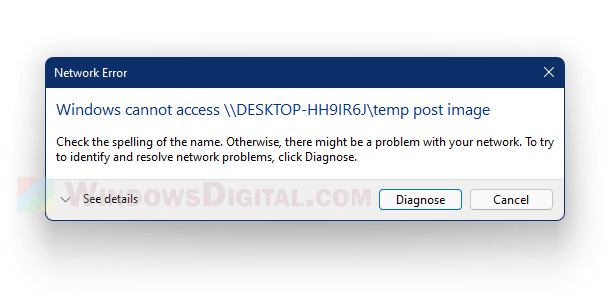
“Windows cannot access shared folder – Check the spelling of the name” Windows 11
Windows would prompt the error – “Check the spelling of the name” when you open a shared folder if the shared folder is not visible or no longer exist, the shared link is already outdated, or the shared folder is no longer being shared. It happens when a shared folder is no longer exist in the location where it was first shared or no longer set as shared.
It could of course also be due to incorrect shared link caused by spelling mistake or change in location of the shared folder commonly due to a recent move of the folder to another location.
Regardless of what causes the issue, the easiest solution to this issue is to re-configure the sharing options of the folder you want to share. If you have access to the computer which you want to share the folder from, follow the same steps in the instruction above (in the first part of this guide) to reconfigure the Share and Advanced Sharing settings for the shared folder to correctly share the folder again.