
Readers help support Windows Report. We may get a commission if you buy through our links.
Read our disclosure page to find out how can you help Windows Report sustain the editorial team. Read more
Many users reported Windows can’t connect to a hidden network. While you should be able to connect by entering the correct SSID and password, that won’t always work.
But don’t worry, in this guide, we’ll explain all you need to know to successfully connect to a hidden network on your Windows PC.
1. Manually connect to the hidden SSID network
- Go to Network and Sharing Center.

- Select the name of your hidden Wi-Fi connection.
- On the Wi-Fi Status box > click on Wireless Properties.
- Check the box Connect even if the network is not broadcasting its name.


Sometimes in order to connect to the hidden wireless network, you need to make a few changes to your network connection. To do that, follow the steps described above.
This quick workaround should fix your Wifi hidden network problem, and your computer should automatically connect to your default network.
2. Turn off your Bluetooth
- Press Windows Key + I to open the Settings app.
- When the Settings app opens, navigate to the Devices section.

- Now, select Bluetooth from the menu on the left and disable Bluetooth from the right pane.


After doing that, the Bluetooth will be disabled and you should be able to connect to a hidden WiFi network without any issues.
If you want to quickly disable Bluetooth, you can do it right from the Action Center. To do that, simply follow these steps:
- Press Windows Key + A to open the Action Center.
- Now locate Bluetooth and click to disable it.
If removing the Bluetooth device failed, you can also try to disable Bluetooth from Device Manager. To do that, just follow these steps:
- Open Win + X menu by pressing Windows Key + X. Now select Device Manager from the list.
- When Device Manager opens, locate your Bluetooth device, right-click it and choose Disable device from the menu.
- A confirmation dialog will now appear. Click on Yes to confirm.
Once the Bluetooth is disabled, try to connect to a hidden wireless network and check if the problem is resolved.
3. Temporarily turn on SSID broadcasting
- Right-click the network icon in your Taskbar and choose Open Network & Internet settings.
- When the new window appears, scroll all the way down and click on Network and Sharing Center.

- Network and Sharing Center window will now appear. Click on Set up a new connection or network.

- Now select Manually connect to a wireless network and click Next.

- Enter the required information such as Network name, Security type, and Security Key. Keep in mind that you need to enter the correct information or else you won’t be able to find and access your network.
- Also, be sure to enable Connect even if the network is not broadcasting and Start this connection automatically options. Once you’re done, click Next to proceed.


After you enter the necessary information, check if the problem still persists. If the problem is still present, you need to log in to your router and temporarily turn on the SSID broadcasting feature.
Then, connect to your wireless network and turn off SSID broadcasting once again.
- Fix: Error saving wireless profile on Windows PC
- Fix: Unable to connect to Wi-Fi after update [Windows 10/11]
- Fix: WiFi Doesn’t Have a Valid IP Configuration [Windows 10]
4. Check your power management options
- Open Device Manager.
- Locate your network adapter on the list and double-click it to open its properties.
- Navigate to the Power Management tab and uncheck Allow the computer to turn off this device to save power option.
- Now click OK to save changes.
After making these changes, your PC should be able to connect to a hidden network without too many issues.
According to users, in order to connect to a hidden network, your network adapter should be prevented from going to sleep. This isn’t hard, and you can change this setting by following the steps described above.
5. Forget the wireless network
- Open the list of available networks.
- There you should see Hidden network on the list.
- Select it and click on Forget.
If you’re having problems connecting to a hidden wireless network, you might be able to fix the problem simply by forgetting the network.
After doing that, manually connect to the hidden network and check if that solves the problem. This is just a workaround, but it works according to users, so we encourage you to try it out.
6. Select the hidden network from the list of networks
- Click the WiFi icon on your Taskbar.
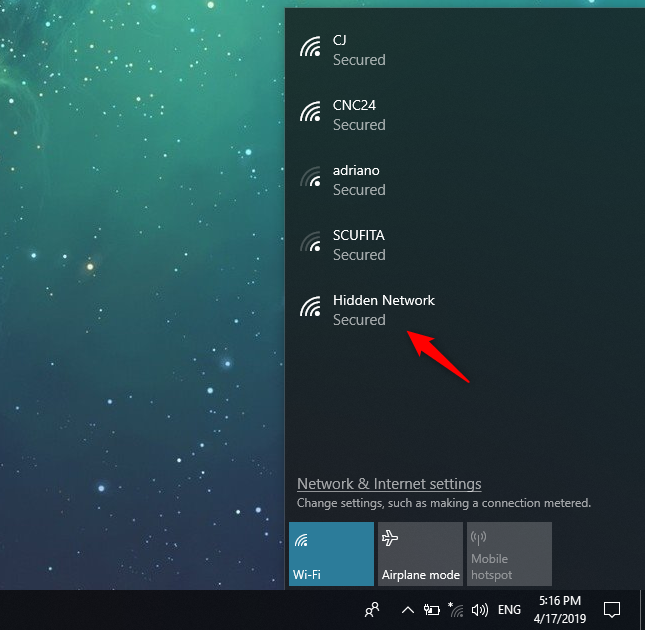
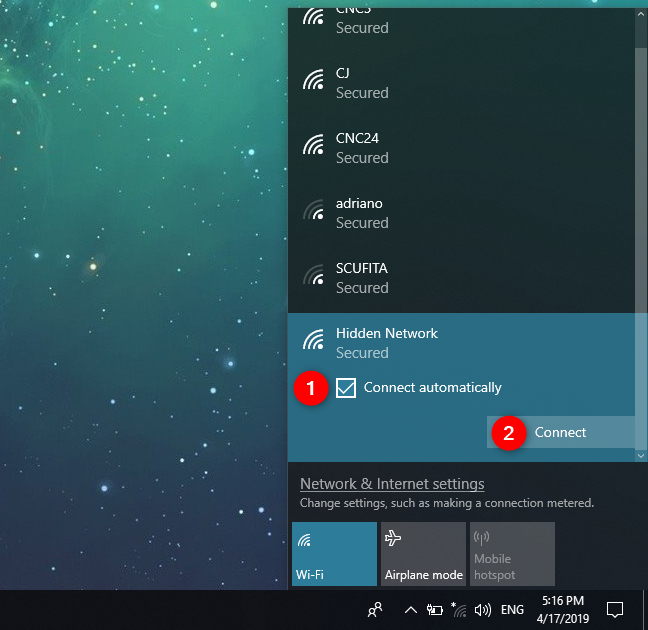
- A list of available networks will now appear. Select Hidden Network and check the Connect automatically option.
- Now click the Connect button.
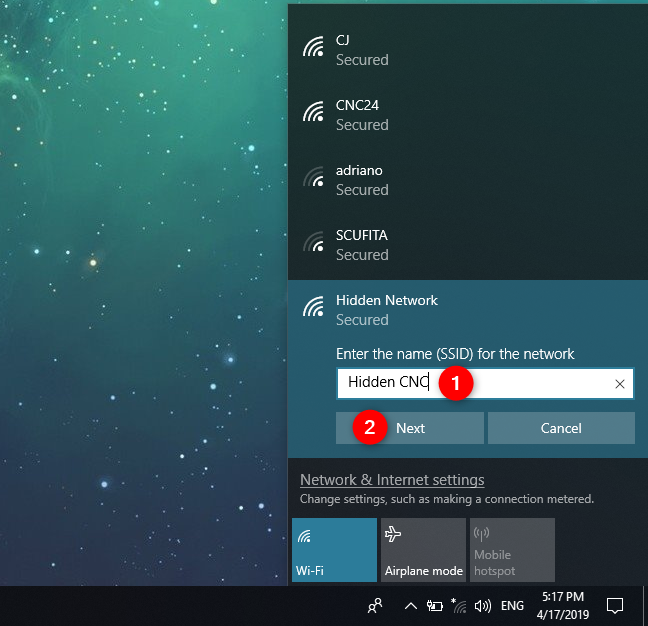
- Enter the name (SSID) of the hidden network. Be sure to enter the correct name or else you won’t be able to connect to the hidden network.
- Now enter the password for that network and click Next.
- When asked whether you want to make your PC discoverable on the network, click Yes.
- Keep in mind to select Yes only if you’re using a home network that you trust.
According to users, you can connect to a hidden WiFi network simply by selecting it from the list of networks. After doing that, you should be able to connect to a hidden network without any issues.
Hidden networks can be useful since they can hide from the public, but any user that has the required information can easily access them.
As you can see, certain issues can occur while trying to connect to a hidden network, but we hope that you managed to solve them using one of our solutions.
Sonia Martin
Sonia is a tech enthusiast that fell in love with Windows after having experienced working on a different OS.
Being above all, a down-to-earth kind of person, she deeply appreciated the ease of learning and usage associated with Windows products and made it her personal mission to guide her peers in discovering the same beauty of simplicity through writing.
When she does not preach about computer-related topics, she enjoys cooking extravagant food with intricate names and peculiar aromas which are usually not appreciated by the crowds.
Hidden WiFi networks do not broadcast their names, so they are not visible in the list of wireless networks that Windows 10 displays. However, that does not mean that you cannot connect to a hidden WiFi: you can, but you have to know its name, password and other security information. Here are three different ways to connect to hidden Wi-Fi networks, on laptops, tablets and hybrid devices with Windows 10:
What you must know about the hidden Wi-Fi network
When you connect to a wireless network that broadcasts its name and is visible in the list of available networks, much of the network configuration is done automatically. All you have to do is enter a password or press the WPS button on the router. However, when you connect to a hidden wireless network, you must know its security information. You have to enter all the details manually:
- The name or SSID (Service Set Identifier) of the hidden wireless network
- The password used by the wireless network
- The type of encryption (or security) used by the Wi-Fi network. If the network uses WEP, note the WEP key. If it is using WPA-PSK or WPA2-PSK, note the Pre-shared key. If it is not using any security, you only need the SSID.
You can find all this information from the owner of the Wi-Fi network, the IT administrator (if you are in a business environment) or from your wireless router if you are at home. You can also follow the recommendations from this guide: How to find hidden wireless networks (SSIDs) in your area, in Windows. Before trying to connect, make sure that you are in the range of the hidden wireless network.
Method 1: Connect to a hidden wireless network using the networks list from the system tray
First of all, open the list of available Wi-Fi networks, by clicking or tapping the Wi-Fi icon from the system tray (the bottom-right corner of the desktop). If you do not see this icon, read this tutorial to bring it back: How to set the icons shown on the Windows 10 taskbar, in the system tray.
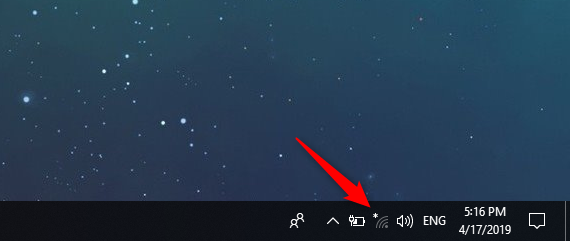
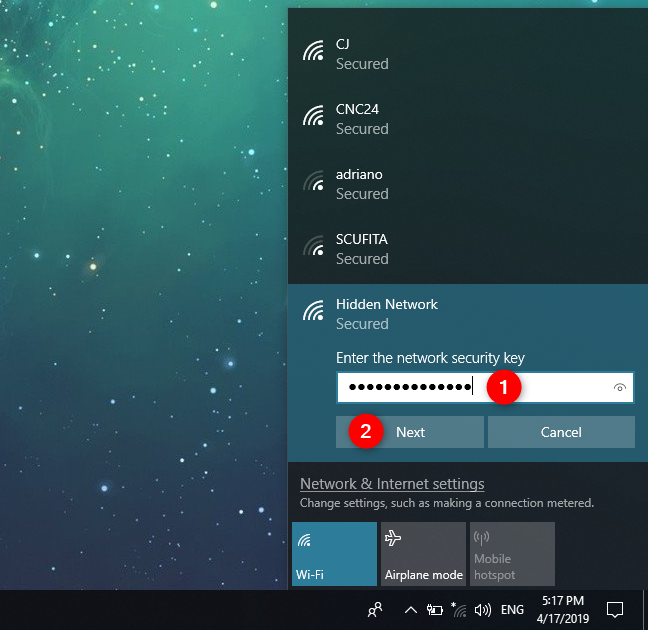
Windows 10 displays all the wireless networks in your area. Scroll through the list until you reach the bottom. That’s where you see a Wi-Fi network called Hidden Network. Click or tap this entry.
Tick the «Connect automatically» option and then press Connect.
You are now asked to enter the name of the hidden wireless network. Type it and press Next.
When you are asked to enter the password (or security key) of the hidden network, type it and press Next.
Windows 10 spends a few seconds and tries to connect to the hidden Wi-Fi network. If everything went well, you are asked whether you want to allow your PC to be discoverable on this network. Choose Yes or No, depending on what you want. This choice sets the network location or profile and your network sharing settings. If you want to know more and understand this choice, read: What are network locations in Windows?.
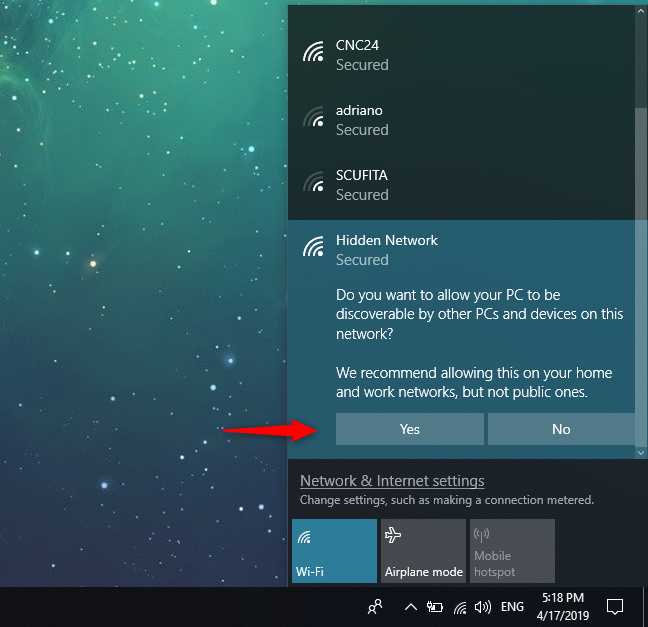
You are now connected to the hidden wireless network.
Method 2: Connect to a hidden wireless network using the Settings app
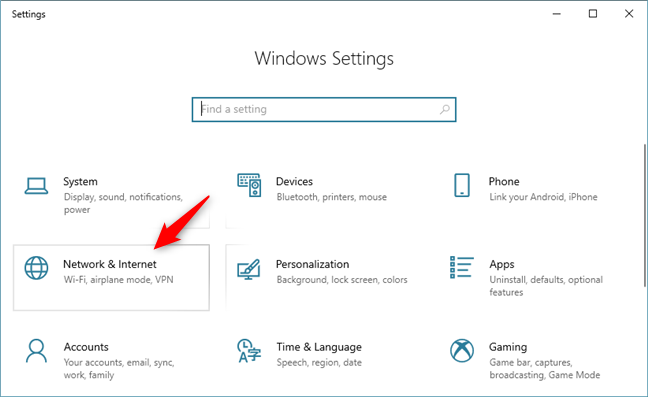
The Settings app offers us another method to connect to hidden wireless networks. The first step is to open the Settings and then the Network & Internet category.
Select Wi-Fi on the left side of the window, and click or tap «Manage known networks» on the right side.
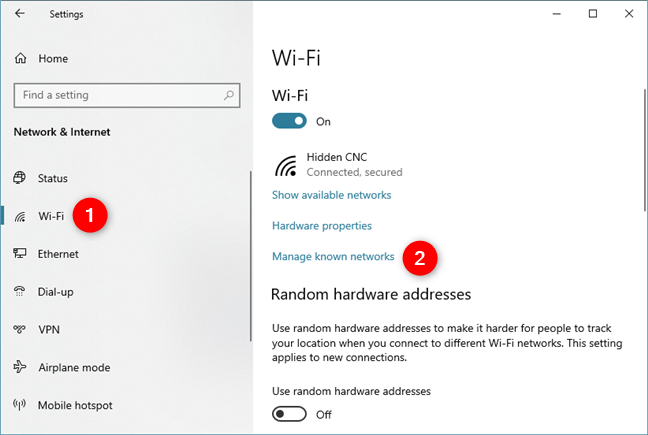
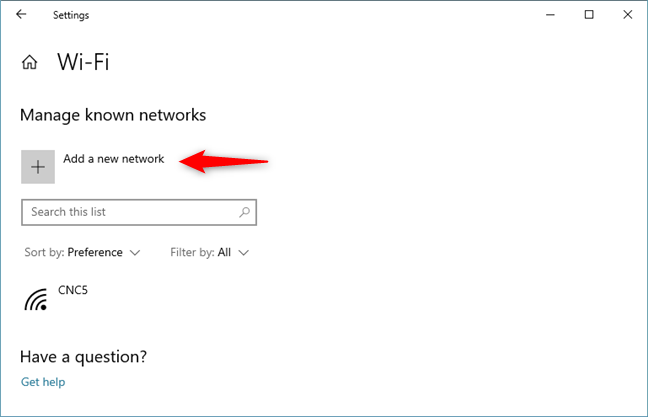
On the «Manage known networks» page, click or tap the «+ Add a network» button.
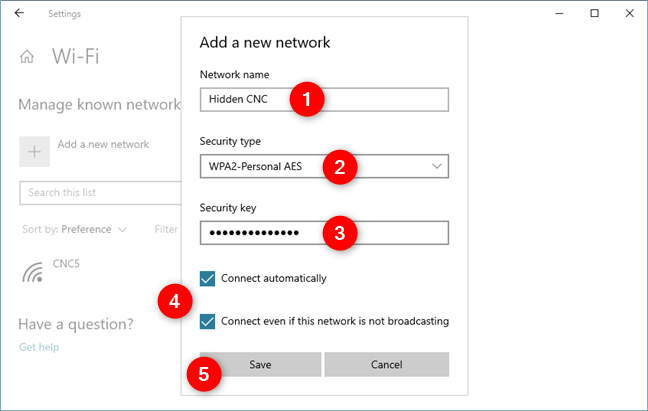
Enter the security information for the hidden wireless network, as follows:
- Enter the SSID or the name of the hidden network, in the Network name field.
- In the Security type field choose the type of security used by the hidden network. Some routers may name this authentication method. Depending on the security type you choose, Windows 10 may or may not ask you also to specify an encryption type.
- In the Security key field, enter the password used by the hidden WiFi.
- To connect to the hidden network automatically, check the box that says «Connect automatically.»
- If you want, you can also check the box that says «Connect even if the network is not broadcasting.» This makes Windows 10 search for the hidden network every time it is not connected to a network, even if the hidden network is not in your area. However, it may put your privacy at risk because skilled professionals can intercept this search for the hidden network. It also uses battery power while the search is on, if your device runs on batteries.
When done completing everything, click or tap Save.
Once you save the new wireless network, Windows 10 tries to connect to it automatically. If you entered its details correctly, you should connect in no time.
Method 3: Connect to a hidden wireless network using the Control Panel and the «Set Up a Connection or Network» wizard
If the options shown in the first two methods are not found on your Windows 10 laptop or tablet, then you might be using an older version of Windows 10. If you do not know which, read What version, edition, and type of Windows 10 do I have installed?
In this case, you need to try this method instead: open the Control Panel and go to «Network and Internet -> Network and Sharing Center.» There, click or tap the link that says: «Set up a new connection or network.»

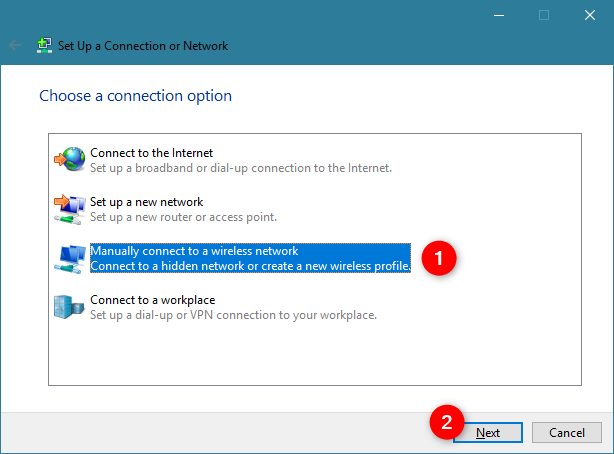
The «Set Up a Connection or Network» wizard is started. Choose «Manually connect to a wireless network» and click or tap Next.
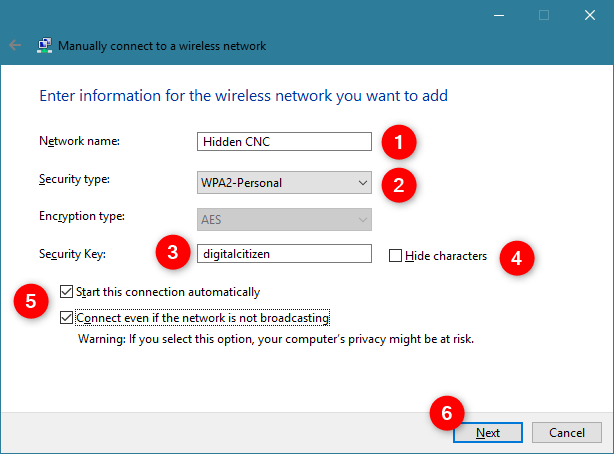
Enter the security information for your WiFi network in the appropriate fields, as follows:
- Enter the SSID or the name of the network, in the Network name field.
- In the Security type field choose the type of security used by the hidden wireless network. Some routers may name this authentication method. Depending on the security type you choose, Windows 10 may or may not ask you to specify an encryption type.
- In the Security key field, enter the password used by the hidden WiFi.
- If you do not want others to see the password you type, check the box that says «Hide characters.»
- To connect to this network automatically, check the box that says «Start this connection automatically.»
- If you want, you can also check the box that says «Connect even if the network is not broadcasting.» This makes Windows 10 search for the hidden network every time it is not connected to a network, even if the hidden network is not in your area. This may put your privacy at risk because skilled professionals can intercept this search for the hidden network.
When done completing everything, click Next.
Windows 10 notifies you that it has successfully added the wireless network. Click Close and you are done.
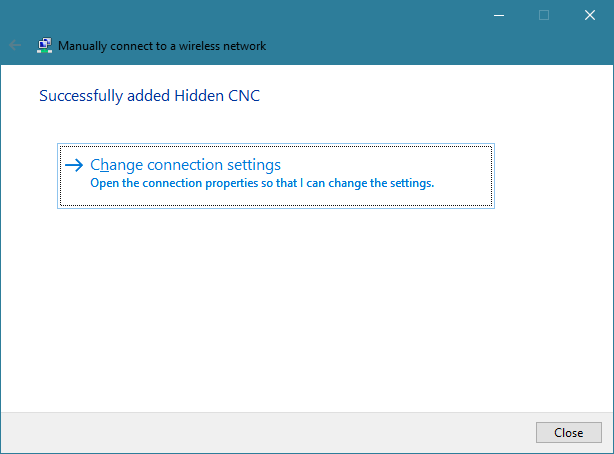
If you are in the range of the hidden wireless network, Windows 10 automatically connects to it.
Why do you use hidden WiFi?
As you have seen from this tutorial, the procedure for connecting to a hidden network is a bit more complex than the simple process of connecting to WiFi networks that broadcast their name. Also, using a hidden wireless network does not make you more secure. Therefore, before closing this article, we would like to know why you use hidden wireless networks, and where. Is it at home or at work? Comment below and let’s discuss.
Трансферное обучение с предобученными моделями в Keras с Python
AI_Generated 06.05.2025
Суть трансферного обучения проста: взять модель, которая уже научилась решать одну задачу, и адаптировать её для решения другой, похожей задачи. Мозг человека работает по схожему принципу. Изучив. . .
Циклические зависимости в C#: методы управления и устранения
stackOverflow 06.05.2025
Если вы хоть раз работали над не самым тривиальным проектом на C#, то наверняка сталкивались с той ситуацией, когда компилятор вдруг начинает сыпать странными ошибками о невозможности разрешить. . .
Как перейти от Waterfall к Agile
EggHead 06.05.2025
Каскадная модель разработки Waterfall — классический пример того, как благие намерения превращаются в организационный кошмар. Изначально созданная для упорядочивания хаоса и внесения предсказуемости. . .
Оптимизация SQL запросов — Продвинутые техники
Codd 06.05.2025
Интересно наблюдать эволюцию подходов к оптимизации. Двадцать лет назад всё сводилось к нескольким простым правилам: «Избегайте SELECT *», «Используйте индексы», «Не джойните слишком много таблиц». . . .
Создание микросервисов с gRPC и Protobuf в C++
bytestream 06.05.2025
Монолитные приложения, которые ещё недавно считались стандартом индустрии, уступают место микросервисной архитектуре — подходу, при котором система разбивается на небольшие автономные сервисы, каждый. . .
Многопоточность и параллелизм в Python: потоки, процессы и гринлеты
py-thonny 06.05.2025
Параллелизм и конкурентность — две стороны многопоточной медали, которые постоянно путают даже бывалые разработчики.
Конкурентность (concurrency) — это когда ваша программа умеет жонглировать. . .
Распределенное обучение с TensorFlow и Python
AI_Generated 05.05.2025
В машинном обучении размер имеет значение. С ростом сложности моделей и объема данных одиночный процессор или даже мощная видеокарта уже не справляются с задачей обучения за разумное время. Когда. . .
CRUD API на C# и GraphQL
stackOverflow 05.05.2025
В бэкенд-разработке постоянно возникают новые технологии, призванные решить актуальные проблемы и упростить жизнь программистам. Одной из таких технологий стал GraphQL — язык запросов для API,. . .
Распознавание голоса и речи на C#
UnmanagedCoder 05.05.2025
Интеграция голосового управления в приложения на C# стала намного доступнее благодаря развитию специализированных библиотек и API. При этом многие разработчики до сих пор считают голосовое управление. . .
Реализация своих итераторов в C++
NullReferenced 05.05.2025
Итераторы в C++ — это абстракция, которая связывает весь экосистему Стандартной Библиотеки Шаблонов (STL) в единое целое, позволяя алгоритмам работать с разнородными структурами данных без знания их. . .
Способ 1
- Нажмите на значок сети в правом нижнем углу панели задач, нажмите на значок рядом со значком беспроводной сети, выберите опцию Скрытая сеть (Hidden Network), а затем нажмите Подключить (Connect).
Опция Скрытая сеть (Hidden Network) отображается только при обнаружении скрытой сети.
- Введите имя и защитный ключ (пароль) скрытой сети и нажмите Далее (Next). Компьютер автоматически подключится к этой сети.


Способ 2
- Нажмите на значок сети в правом нижнем углу панели задач, нажмите на значок рядом со значком беспроводной сети, а затем выберите опцию Дополнительные настройки Wi-Fi (More Wi-Fi Settings).
2. Перейдите в раздел Управление известными сетями (Manage known networks) > Добавить сеть (Add network).

- Введите необходимую сетевую информацию, следуя инструкциям на экране, и нажмите Сохранить (Save) для подключения к сети.
- Имя сети (Network name): имя беспроводной сети (WLAN).
- Тип защиты (Security type): выберите WPA2-Personal AES для домашней сети. Для получения дополнительной информации обратитесь к вашему оператору.
- Тип шифрования (Encryption type): автоматически настраивается после выбора типа защиты (security type).
- Защитный ключ (Security key): пароль беспроводной сети (WLAN).
Если вы хотите, чтобы ваш компьютер автоматически подключался к этой скрытой сети в будущем, выберите опцию Подключаться автоматически (Connect automatically) и нажмите Сохранить (Save).


