
What is a React Native for Windows app?
When you create a React Native for Windows app targeting React Native’s old architecture, you will get a Universal Windows Platform app (aka UWP app).
The Universal Windows Platform allows you to access a set of common functionality on all Windows devices via the Windows Runtime (WinRT). WinRT APIs can be accessed from C++ (via C++/WinRT), or via .NET C#.
WinRT support in .NET
The current publicly supported version of .NET (.NET UWP) has built-in support for WinRT.
Win32 Desktop apps vs. RNW apps
Whether you are new to Windows development, or you are a Win32 desktop app veteran, the following FAQs should answer some common questions.
When you add Windows support to a React Native app via the steps described in Get Started with Windows, you will get a UWP app.
Note: By default the init-windows command creates a C++ app, however it is possible to create a C# app instead. The choice of language can impact your performance and your capacity to consume native modules, so if either of those issues are important to you, it’s highly recommended that you read Choosing C++ or C# for native code.
Regardless of the language of your app RNW apps are UWP apps and therefore have the following characteristics:
API surface
The set of APIs these app can access are a subset of all Windows APIs (i.e. those accessible via WinRT). See:
- Win32 and COM APIs for UWP apps
- CRT functions not supported in Universal Windows Platform apps
- Alternatives to Windows APIs in Universal Windows Platform (UWP) apps
Isolation
The app runs inside of an app container — a type of sandbox. This provides apps with a secure way to install, access system resources like the filesystem, and lets the system manage their lifetime (e.g. suspending the app when it isn’t on the foreground). This means that by default an RNW app cannot access arbitrary filesystem locations, start arbitrary processes, etc. UWP apps that need to access these kinds of capabilities may be able to do so via App capability declarations.
Packaging
React Native Windows apps are signed and packaged. Packaging is a mechanism through which an app and its dependencies acquire an identity, which is used to determine whether API calls that require system capabilities (e.g. filesystem access) should succeed or not.
Distribution
React Native Windows apps can be distributed, installed and updated in the following ways:
- via the Microsoft Store.
- via your private Store if you are a business or educational organization. See also Distribute LOB apps to enterprises.
- using App Installer.
It’s worth noting that you cannot just «copy an EXE» as the app package contains more than just the main executable, including an app manifest, assets, dependent framework libraries, etc.
In addition, the Store submission process has these requirements:
- UWP apps submitted to the store must pass Windows App Certification Kit (WACK) validation.
- UWP apps written in C# or other managed languages submitted to the store must be built using the .NET Native toolchain. This is the default when building C# apps in Release mode, but not in Debug, so apps built in Debug will be rejected by the Store.
Use of non-WinRT libraries
Any libraries you use should be built as WinRT components. In other words, you cannot easily link libraries built for Win32 desktop apps without additional work.
- C++/CX is a dialect of C++ that allows writing UWP apps, however this is not supported for writing a RNW app. The article How to use existing C++ code in a Universal Windows Platform app talks about how to consume non-WinRT libraries in a WinRT context using C++/CX, but most of the content should be applicable to using C++/WinRT which is the supported way to write RNW apps.
- See also the guide for moving from C++/CX to C++/WinRT.
- Libraries built for .NET desktop framework cannot be directly accessed by UWP. You can create a .NET Standard library that calls into the .NET framework one, and call from the UWP app into the .NET Standard middleware.
Local testing and inner loop
For internal development, you can deploy your app for test purposes by side-loading and deploying via loose-file registration. When building in Debug mode (which is the default), the run-windows command performs loose-file registration of your app in order to install it locally. When building with the --release switch, the CLI will install the real package onto your local machine. This requires the app to be signed and for the certificate it uses for signing to be trusted by the machine the app is going to be installed on. See Create a certificate for package signing and Intro to certificates.
Debugging crashes and reporting issues
If your app is «hard crashing» (the native code hits an error condition and your app closes), you will want to investigate the native side of the code. If the issue is in the Microsoft.ReactNative layer, please file a bug in the React Native for Windows repo, and provide a native stack trace, and ideally a crash dump with symbols.
For your convenience, you can use a script to collect a native crash dump and stack traces. Here are the instructions:
- Download the script at https://aka.ms/RNW/analyze-crash.ps1, for example to C:\temp
- Open an admin PowerShell
- If you haven’t enabled running unsigned scripts yet, do that by running:
Set-ExecutionPolicy Unrestricted - Run the script and pass it the name of your app’s exe (usually it will be your app’s name):
C:\temp\analyze-crash.ps1 -ExeName MyApp
The script will set up automatic crash dump collection for your app, download the native debugging tools (including the command line debugger cdb), and ask you to reproduce the crash.
At this point you can launch the app (e.g. from Start menu if you’ve already deployed it to the local device). When the app crashes, it will generate a crash dump. You can then press enter to resume execution of the script, and the script will use cdb to automatically analyze the crash dump, and output the results to a file analyze.log.
The script will then copy the contents of the log to the clipboard, open the log file in notepad, and launch the browser to file an issue in the react-native-windows repo, where you can paste the stack trace into the bug template.
- Windows Native Development Environment Setup Guide for Linux Users
- Introduction
- Installing Visual Studio, Some Packages and Scoop
- WinGet and Scoop notes
- Configure the Terminal
- Terminal Usage
- Scrolling and Searching in the Terminal
- Transparency (Old Method)
- Setting up an Editor
- Setting up Vim
- Neovim Terminal
- Setting up nano
- Setting up Vim
- Setting up PowerShell
- Setting up ssh
- Setting up and Using Git
- Git Setup
- Using Git
- Dealing with Line Endings
- Setting up gpg
- Profile (Home) Directory Structure
- PowerShell Usage Notes
- Introduction
- Finding Documentation
- Commands, Parameters and Environment
- Values, Arrays and Hashes
- Redirection, Streams, $input and Exit Codes
- Command/Expression Sequencing Operators
- Commands and Operations on Filesystems and Filesystem-Like Objects
- Pipelines
- The Measure-Object Cmdlet
- Sub-Expressions and Strings
- Script Blocks and Scopes
- Using and Writing Scripts
- Writing Simple Modules
- Miscellaneous Usage Tips
- Elevated Access (sudo)
- Using PowerShell Gallery
- Available Command-Line Tools and Utilities
- Using BusyBox
- Using MSYS2
- Using GNU Make
- Using tmux with PowerShell
- Creating Scheduled Tasks (cron)
- Working With virt-manager VMs Using virt-viewer
- Using X11 Forwarding Over SSH
- Mounting SMB/SSHFS Folders
- Appendix A: Chocolatey Usage Notes
- Chocolatey Filesystem Structure
- Appendix B: Using tmux with PowerShell from WSL
Windows Native Development Environment Setup Guide for Linux Users
Introduction
This guide is intended for experienced developers familiar with
Linux or other UNIX-like operating systems who want to set up a
native Windows terminal development environment. I will walk you
through setting up and using the package manager, terminal, vim,
gpg, git, ssh, Visual Studio build tools, and PowerShell. I will
explain basic PowerShell usage which will allow you to use it as a
shell and write simple scripts.
This is a work in progress and there are sometimes typos and
grammatical or ordering mistakes as I keep editing it, or bugs in
the $profile or setup code, so make any
necessary adjustments.
I am planning to make many more expansions covering for example
things like using cmake with vcpkg or Conan etc..
Your feedback via issues or pull requests on Github is appreciated.
Installing Visual Studio, Some Packages and Scoop
Make sure developer mode is turned on in Windows settings, this is necessary for
making unprivileged symlinks. Also in developer settings, change powershell
execution policy to RemoteSigned.
- Press Win+X and open PowerShell (Administrator).
Run this script, which is in the repo, like so:
, it installs some WinGet packages, the Visual Studio C++ workload, sets up the
OpenSSH server and sets some QOL improvement settings.
If you want to use the Chocolatey package manager instead of WinGet and Scoop,
see Appendix A: Chocolatey Usage Notes.
[environment]::setenvironmentvariable('POWERSHELL_UPDATECHECK', 'off', 'machine')

set-service beep -startuptype disabled

echo Microsoft.VisualStudio.2022.Community 7zip.7zip gsass1.NTop Git.Git `
    GnuPG.GnuPG SourceFoundry.HackFonts Neovim.Neovim OpenJS.NodeJS `
    Notepad++.Notepad++ Microsoft.Powershell Python.Python.3.13 `
    SSHFS-Win.SSHFS-Win Microsoft.OpenSSH.Beta Microsoft.WindowsTerminal | %{
	winget install $_
}

iwr https://aka.ms/vs/17/release/vs_community.exe -outfile vs_community.exe

./vs_community.exe --passive --add 'Microsoft.VisualStudio.Workload.NativeDesktop;includeRecommended;includeOptional'

start-process powershell '-noprofile', '-windowstyle', 'hidden', `
    '-command', "while (test-path $pwd/vs_community.exe) { sleep 5; ri -fo $pwd/vs_community.exe }"

new-itemproperty -path "HKLM:\SOFTWARE\OpenSSH" -name DefaultShell -value '/Program Files/PowerShell/7/pwsh.exe' -propertytype string -force > $null

$sshd_conf = '/programdata/ssh/sshd_config'
$conf = gc $sshd_conf | %{ $_ -replace '^([^#].*administrators.*)','#$1' }
$conf | set-content $sshd_conf

set-service sshd -startuptype automatic
set-service ssh-agent -startuptype automatic

restart-service -force sshd
restart-service -force ssh-agent
. If winget exits abnormally, update this app from the Windows
Store:
https://apps.microsoft.com/detail/9nblggh4nns1
. If something fails in the script, run it again until everything
succeeds.
- Press Win+X and open PowerShell (NOT Administrator)
Now run the user-mode install script:
, which installs Scoop and some Scoop packages of UNIX ports, and fixes your
~/.ssh files permissions, copy it over first, but you can do this
later as well.
ni -it sym ~/.config -tar ($env:USERPROFILE + '\AppData\Local') -ea ignore

if (-not (test-path ~/scoop)) {
    iwr get.scoop.sh | iex
}

function scoop { & ~/scoop/apps/scoop/current/bin/scoop.ps1 @args }

# BusyBox must be first in the installation order.
scoop install busybox-lean base64 bc bind bzip2 dd diffutils dos2unix file gawk gettext grep gzip ipcalc less make openssl perl ripgrep sed tar zip unzip wget

'arch ash basename cal cksum clear comm cp cpio cut date df dirname dpkg dpkg-deb du echo ed env expand expr factor false find fold fsync ftpget ftpput getopt hd head hexdump httpd ln logname lzcat lzma lzop lzopcat md5sum mktemp mv nc nl od paste pgrep pidof pipe_progress printenv printf ps pwd readlink realpath reset rev rm rmdir rpm rpm2cpio seq sh sha1sum sha256sum sha3sum sha512sum shred shuf sleep sort split ssl_client stat sum tac tail tee test time timeout touch tr true truncate ts ttysize uname uncompress unexpand uniq unlink unlzma unlzop unxz usleep uudecode uuencode vi watch wc which xargs xxd xz xzcat yes zcat'.split(' ') | %{
    scoop shim add $_ busybox $_
}

scoop bucket add extras
scoop install mpv

scoop bucket add nerd-fonts
scoop install DejaVuSansMono-NF

&(resolve-path /prog*s/openssh*/fixuserfilepermissions.ps1)
import-module -force (resolve-path /prog*s/openssh*/opensshutils.psd1)
repair-authorizedkeypermission -file ~/.ssh/authorized_keys
.
WinGet and Scoop notes
To update your WinGet packages, run this in either a user or admin PowerShell:
, to update your Scoop packages, run this in a normal user
PowerShell:
. Never run scoop in an elevated shell, only as the user.
Use winget search and scoop search to look for packages, and install to
install them, and list to see locally installed packages.
To completely uninstall Scoop, run start (gi ~), select the scoop directory
in your profile directory in the Explorer window and press SHIFT+DEL to wipe
it. You may want to do this if you screw up your installation or want to run a
newer version of the user install
script.
Configure the Terminal
Launch the Windows Terminal and choose Settings from the tab
drop-down, this will open the settings json in visual studio.
In the global settings, above the "profiles" section, add:
. In the "profiles" "defaults" section add:
. The settings useAcrylic and opacity make the terminal
transparent, leave those out or set opacity to 100 to turn this
off.
I prefer the ‘SF Mono’ font which you can get here:
https://github.com/supercomputra/SF-Mono-Font
. Other fonts you might like are IBM Plex Mono which you can
install from:
https://github.com/IBM/plex
, and ‘DejaVu Sans Mono’ which was in the list of
packages.
The Terminal also comes with a nice new Microsoft font called
«Cascadia Code», if you leave out the "face": "<name>", line, it
will use it instead.
You can get the newest version of Cascadia Code and the version with
Powerline glyphs called «Cascadia Code PL» from here:
https://github.com/microsoft/cascadia-code/releases?WT.mc_id=-blog-scottha
, you will need it if you decide to use the oh-my-posh prompt
described here.
If you want a font that is very legible at very small sizes for more screen
real estate, try:
https://github.com/koemaeda/gohufont-ttf
, install just the uni-11.ttf file.
This font looks terrible with the default ClearType settings, so you will want
to run the ClearType Tuner and choose the faintest least-sharp variants. Another
option is to use MacType which makes fonts use
greyscale antialiasing.
In the profile list section, in the entry that lists:
, add this:
. You can do the same for the «Windows PowerShell» profile if you
like.
In the "actions" section add these keybindings:
. And REMOVE the CTRL+V binding, if you want to use CTRL+V
in vim (visual line selection.)
This gives you a sort of «tmux» for PowerShell using tabs, and binds
keys to find next/previous match.
Note that CTRL+SHIFT+N is bound by default to opening a new window
and CTRL+SHIFT+P is bound by default to opening the command
palette, if you need these, rebind them or the original actions to
something else.
Restart the terminal.
Terminal Usage
You can toggle full-screen mode with F11.
SHIFT+ALT++ will open a split pane vertically, while
SHIFT+ALT+- will open a split pane horizontally. This works in
full-screen as well.
You can paste with the right mouse button, SHIFT+INSERT and
CTRL+SHIFT+V. To copy text with "copyOnSelect" enabled, simply
select it, or press CTRL+SHIFT+C otherwise.
The documentation for the terminal and a lot of other good information is here:
https://docs.microsoft.com/en-us/windows/terminal/
.
Scrolling and Searching in the Terminal
These are the scrolling keybinds available with this configuration:
| Key | Action |
|---|---|
| CTRL+SHIFT+PGUP | Scroll one page up. |
| CTRL+SHIFT+PGDN | Scroll one page down. |
| CTRL+SHIFT+UP | Scroll X lines up. |
| CTRL+SHIFT+DOWN | Scroll X lines down. |
CTRL+SHIFT+UP/DOWN will scroll by 1 line, you can change this to
any number of lines by adjusting the rowsToScroll parameter. You
can even make additional keybindings for the same action but a
different keybind with a different rowsToScroll value.
You can scroll with your mouse scrollwheel, assuming that there is
no active application controlling the mouse.
For searching scrollback with this configuration, follow the
following process:
- Press
CTRL+SHIFT+Fand type in your search term in the search
box that pops up in the upper right, the term is
case-insensitive. - Press
ESCto close the search box. - Press
CTRL+SHIFT+Nto find the first match going up, the match
will be highlighted. - Press
CTRL+SHIFT+Pto find the first match going down below the
current match. - To change the search term, press
CTRL+SHIFT+Fagain, type in
the new term, and pressESC.
You can scroll the terminal while a search is active and your match
position will be preserved.
Transparency (Old Method)
The transparency configuration in the terminal described
above works correctly with neovim but not
regular vim. For older versions of Terminal or to get transparency
in regular vim, use the autohotkey method described here. You can
install autohotkey from WinGet using the id AutoHotkey.AutoHotkey.
This is the autohotkey script:
#NoEnv
SendMode Input
SetWorkingDir %A_ScriptDir%

; Toggle window transparency.
#^Esc::
WinGet, TransLevel, Transparent, A
If (TransLevel = 255) {
    WinSet, Transparent, 180, A
} Else {
    WinSet, Transparent, 255, A
}
return
. This will toggle transparency in a window when you press
CTRL+WIN+ESC, you have to press it twice the first time.
Thanks to @munael for this tip.
Note that this will not work for the Administrator PowerShell window
unless you run AutoHotkey with Administrator privileges, you can do
that on logon by creating a task in the Task Scheduler.
Setting up an Editor
In this section I will describe how to set up a couple of editors.
You can also edit files in the Visual Studio IDE using the devenv command.
You can use notepad which is in your $env:PATH already or
notepad++.
If you want a very simple terminal editor that is easy to use, you
can use nano, it has nice syntax highlighting
too.
Make sure $env:EDITOR is set to the executable or .bat file that
launches your editor with backslashes replaced with forward slashes
and make sure that it does not contain any spaces. Set it in your
$profile so that git can use it for
commit messages. For example:
$private:nano = resolve-path ~/.local/bin/nano.exe
$env:EDITOR = $nano -replace '\\','/'
. This will also work well with things you use from UNIX-compatible
environments like Cygwin, MSYS2, etc. if you end up doing that.
The profile function shortpath will do this for you.
Another option is to set it in Git config, which will override the
environment variables, for example:
get config --global core.editor (get-command notepad++).source
.
Setting up Vim
I recommend using Neovim on Windows because it has working mouse
support and is almost 100% compatible with vim. It also works
correctly with transparency in Windows Terminal with a black
background unlike the port of regular vim.
If you want to use the regular vim, the WinGet id is vim.vim.
If you are using neovim only, you can copy your ~/.config/nvim
over directly, to ~/AppData/Local/nvim.
You can edit your powershell profile with vim $profile, and reload
it with . $profile.
Look at the included $profile for how to
set up a vim alias and set $env:EDITOR so that it will work with
Git.
Some suggestions for your ~/.vimrc, all of this works in both
vims:
set encoding=utf8
set langmenu=en_US.UTF-8
language en
let g:is_bash=1
set formatlistpat=^\\s*\\%([-*][\ \\t]\\\|\\d+[\\]:.)}\\t\ ]\\)\\s*
set ruler bg=dark nohlsearch bs=2 noea ai fo+=n undofile belloff=all modeline modelines=5
set fileformats=unix,dos
set mouse=a
set clipboard=unnamedplus

" Add vcpkg includes to include search path to get completions for C++.
if isdirectory($HOME . 'source/repos/vcpkg/installed/x64-windows/include')
  let &path .= ',' . $HOME . 'source/repos/vcpkg/installed/x64-windows/include'
endif

if isdirectory($HOME . 'source/repos/vcpkg/installed/x64-windows-static/include')
  let &path .= ',' . $HOME . 'source/repos/vcpkg/installed/x64-windows-static/include'
endif

if !has('gui_running') && match($TERM, "screen") == -1
  set termguicolors
  au ColorScheme * hi Normal ctermbg=0
endif

if has('gui_running')
  au ColorScheme * hi Normal guibg=#000000

  if has('win32')
    set guifont=Cascadia\ Code:h11:cANSI
  endif
endif

if has('win32') || has('gui_win32')
  if executable('pwsh')
    set shell=pwsh
  else
    set shell=powershell
  endif

  set shellquote= shellpipe=\| shellredir=> shellxquote=
  set shellcmdflag=-nologo\ -noprofile\ -executionpolicy\ remotesigned\ -noninteractive\ -command
endif

filetype plugin indent on
syntax enable

au BufRead COMMIT_EDITMSG,*.md setlocal spell
au BufRead *.md setlocal tw=80
au FileType json setlocal ft=jsonc sw=4 et

if has('nvim')
  au TermOpen,TermEnter * startinsert
endif

" Return to last edit position when opening files.
autocmd BufReadPost *
     \ if line("'\"") > 0 && line("'\"") <= line("$") |
     \   exe "normal! g`\"" |
     \ endif

" Fix syntax highlighting on CTRL+L.
noremap  <C-L> <Esc>:syntax sync fromstart<CR>:redraw<CR>
inoremap <C-L> <C-o>:syntax sync fromstart<CR><C-o>:redraw<CR>

" Markdown
let g:markdown_fenced_languages = ['css', 'javascript', 'js=javascript', 'json=javascript', 'jsonc=javascript', 'xml', 'ps1', 'powershell=ps1', 'sh', 'bash=sh', 'autohotkey', 'vim', 'sshconfig', 'dosbatch', 'gitconfig']
. You can use Plug or pathogen or whatever you prefer to install
plugins.
I highly recommend subscribing to GitHub Copilot and using the vim
plugin which you can get here:
https://github.com/github/copilot.vim
. I use this color scheme, which is a fork of Apprentice for black
backgrounds:
https://github.com/rkitover/Apprentice
You’ll probably want the PowerShell support for vim including syntax
highlighting which is here:
https://github.com/PProvost/vim-ps1
. I also use vim-sleuth to detect indent settings and vim-markdown
for better markdown support including syntax highlighting in code
blocks.
Neovim Terminal
Neovim has a built-in terminal that works perfectly on Windows, when running in
tmux too. You can open a terminal window on the bottom with :botright terminal. Enter insert mode to use the terminal and press C-\ C-n to return
to normal mode.
You can make a mapping to make this more convenient, for example:
noremap <leader>t :botright terminal<CR>
, which would make the mapping \t by default or whatever you set mapleader
to. When the terminal process exists, press Enter to close the window. See
:help terminal for more information.
Neovim will refuse to quit if a terminal process is running, in which case, save
your files and use :qa! to force quit.
Setting up nano
Run this script, from this repo using:
, this is the script:
$erroractionpreference = 'stop'

$releases = 'https://files.lhmouse.com/nano-win/'

ri -r -fo ~/nano-installer -ea ignore
mkdir ~/nano-installer | out-null
pushd ~/nano-installer
curl -sLO ($releases + (
    iwr -usebasicparsing $releases | % links |
    ? href -match '\.7z$' | select -last 1 | % href
))
7z x nano*.7z | out-null
mkdir ~/.local/bin -ea ignore | out-null
cpi -fo pkg_x86_64*/bin/nano.exe ~/.local/bin
mkdir ~/.nano -ea ignore | out-null
git clone https://github.com/scopatz/nanorc *> $null
gci -r nanorc -i *.nanorc | cpi -dest ~/.nano
popd
("include `"" + (($env:USERPROFILE -replace '\\','/') `
    -replace '^[^/]+','').tolower() + `
    "/.nano/*.nanorc`"") >> ~/.nanorc

ri -r -fo ~/nano-installer

gi ~/.nanorc,~/.nano,~/.local/bin/nano.exe
. Make sure ~/.local/bin is in your $env:PATH and set
$env:EDITOR in your $profile as follows:
$env:EDITOR = (get-command nano).source -replace '\\','/'
, or configure Git like so:
git config --global core.editor (get-command nano).source
.
Setting up PowerShell
To install the pretty oh-my-posh prompt, run this:
winget install jandedobbeleer.ohmyposh
, the profile below will set it up for you. You will need a font
with Powerline glyphs, like «Cascadia Code PL», see setting up the
terminal.
If you want to use my
posh-git theme, install the
module
posh-git-theme-bluelotus
from PSGallery.
You can also install posh-git
and make your own
customizations.
Here is a profile to get you started, it has a few examples of
functions and aliases which you will invariably write for yourself.
To edit your $profile, you can do:
, or
. If you cloned this repo, you can dot-source mine in yours by
adding this:
. ~/source/repos/windows-dev-guide/profile.ps1
, you can also link or copy this profile to yours and add your own
things in ~/Documents/PowerShell/private-profile.ps1, which will
be automatically read with the path set in $profile_private.
Or just copy the parts you are interested in to yours.
# Windows PowerShell does not have OS automatic variables.
if (-not (test-path variable:global:iswindows)) {
    $global:IsWindows = $false
    $global:IsLinux   = $false
    $global:IsMacOS   = $false

    if (get-command get-cimsession -ea ignore) {
        $global:IsWindows = $true
    }
    elseif (test-path /System/Library/Extensions) {
        $global:IsMacOS   = $true
    }
    else {
        $global:IsLinux   = $true
    }
}

import-module packagemanagement,powershellget

if ($iswindows) {
    [Console]::OutputEncoding = [Console]::InputEncoding `
        = $OutputEncoding = new-object System.Text.UTF8Encoding

    set-executionpolicy -scope currentuser remotesigned

    [System.Globalization.CultureInfo]::CurrentCulture = 'en-US'

    if ($private:chocolatey_profile = resolve-path (
            "$env:chocolateyinstall\helpers\chocolateyprofile.psm1"`
        ) -ea ignore) {

        import-module $chocolatey_profile
    }

    if (get-command -ea ignore update-sessionenvironment) {
        update-sessionenvironment
    }

    # Tell Chocolatey to not add code to $profile.
    $env:ChocolateyNoProfile = 'yes'
}
elseif (-not $env:LANG) {
    $env:LANG = 'en_US.UTF-8'
}

# Make help nicer.
$psdefaultparametervalues["get-help:full"] = $true
$env:PAGER = 'less'

# Turn on these options for less:
#    -Q,--QUIET             # No bells.
#    -r,--raw-control-chars # Show ANSI colors.
#    -X,--no-init           # No term init, does not use alt screen.
#    -F,--quit-if-one-screen
#    -K,--quit-on-intr      # Quit on CTRL-C immediately.
#    --mouse                # Scroll with mouse wheel.
$env:LESS = '-Q$-r$-X$-F$-K$--mouse'

new-module MyProfile -script {

$path_sep = [system.io.path]::pathseparator
$dir_sep  = [system.io.path]::directoryseparatorchar

$global:ps_share_dir = if ($iswindows) {
    '~/AppData/Roaming/Microsoft/Windows/PowerShell'
}
else {
    '~/.local/share/powershell'
}

function split_env_path {
    $env:PATH -split $path_sep | ? length | %{
        resolve-path $_ -ea ignore | % path
    } | ? length
}

function curdrive {
    if ($iswindows) { $pwd.drive.name + ':' }
}

function trim_curdrive($str) {
    if (-not $str) { $str = $input }

    if (-not $iswindows) { return $str }

    $str -replace ('^'+[regex]::escape((curdrive))),''
}

function home_to_tilde($str) {
    if (-not $str) { $str = $input }

    $home_dir_re = [regex]::escape($home)
    $dir_sep_re  = [regex]::escape($dir_sep)

    $str -replace ('^'+$home_dir_re+"($dir_sep_re"+'|$)'),'~$1'
}

function backslashes_to_forward($str) {
    if (-not $str) { $str = $input }

    if (-not $iswindows) { return $str }

    $str -replace '\\','/'
}

function global:remove_path_spaces($path) {
    if (-not $path) { $path = $($input) }

    if (-not $iswindows) { return $path }

    if (-not $path) { return $path }

    $parts = while ($path -notmatch '^\w+:[\\/]$') {
        $leaf = split-path -leaf   $path
        $path = split-path -parent $path

        $fs = new-object -comobject scripting.filesystemobject

        if ($leaf -match ' ') {
            $leaf = if ((gi "${path}/$leaf").psiscontainer) {
                split-path -leaf $fs.getfolder("${path}/$leaf").shortname
            }
            else {
                split-path -leaf $fs.getfile("${path}/$leaf").shortname
            }
        }

        $leaf.tolower()
    }

    if ($parts) { [array]::reverse($parts) }

    $path = $path -replace '[\\/]+', ''

    $path + '/' + ($parts -join '/')
}

function global:shortpath($str) {
    if (-not $str) { $str = $($input) }

    $str | resolve-path -ea ignore | % path `
        | remove_path_spaces | trim_curdrive | backslashes_to_forward
}

function global:realpath($str) {
    if (-not $str) { $str = $($input) }

    $str | resolve-path -ea ignore | % path `
        | remove_path_spaces | backslashes_to_forward
}

function global:syspath($str) {
    if (-not $str) { $str = $($input) }

    $str | resolve-path -ea ignore | % path
}

if ($iswindows) {
    # Replace OneDrive Documents path in $profile with ~/Documents
    # symlink, if you have one.
    if ((gi ~/Documents -ea ignore).target -match 'OneDrive') {
        $global:profile = $profile -replace 'OneDrive\\',''
    }

    # Remove Strawberry Perl MinGW stuff from PATH.
    $env:PATH = (split_env_path |
        ?{ $_ -notmatch '\bStrawberry\\c\\bin$' }
    ) -join $path_sep

    # Add npm module bin wrappers to PATH.
    if (resolve-path ~/AppData/Roaming/npm -ea ignore) {
        $env:PATH += ';' + (gi ~/AppData/Roaming/npm)
    }
}

$global:profile = $profile | shortpath

$global:ps_config_dir = split-path $profile -parent

$global:ps_history = "$ps_share_dir/PSReadLine/ConsoleHost_history.txt"

if ($iswindows) {
    $global:terminal_settings = resolve-path ~/AppData/Local/Packages/Microsoft.WindowsTerminal_*/LocalState/settings.json -ea ignore | shortpath
    $global:terminal_settings_preview = resolve-path ~/AppData/Local/Packages/Microsoft.WindowsTerminalPreview_*/LocalState/settings.json -ea ignore | shortpath

    if (-not $global:terminal_settings -and $global:terminal_settings_preview) {
        $global:terminal_settings = $global:terminal_settings_preview
    }
}

$extra_paths = @{
    prepend = '~/.local/bin'
    append  = '~/AppData/Roaming/Python/Python*/Scripts',
              '/program files/VcXsrv'
}

foreach ($section in $extra_paths.keys) {
    foreach ($path in $extra_paths[$section]) {
        if (-not ($path = resolve-path $path -ea ignore)) {
            continue
        }

        if (-not ((split_env_path) -contains $path)) {
            $env:PATH = $(if ($section -eq 'prepend') {
                $path,$env:PATH
            }
            else {
                $env:PATH,$path
            }) -join $path_sep
        }
    }
}

if (-not $env:TERM) {
    $env:TERM = 'xterm-256color'
}
elseif ($env:TERM -match '^(xterm|screen|tmux)$') {
    $env:TERM = $matches[0] + '-256color'
}

if (-not $env:COLORTERM) {
    $env:COLORTERM = 'truecolor'
}

if (-not $env:ENV) {
    $env:ENV = shortpath ~/.shrc
}

if (-not $env:VCPKG_ROOT) {
    $env:VCPKG_ROOT = resolve-path ~/source/repos/vcpkg -ea ignore
}

if ($iswindows) {
    # Load VS env only once.
    :OUTER foreach ($vs_year in '2022','2019','2017') {
        foreach ($vs_type in 'preview','buildtools','community') {
            foreach ($x86 in '',' (x86)') {
                $vs_path="/program files${x86}/microsoft visual studio/${vs_year}/${vs_type}/Common7/Tools"

                if (test-path $vs_path) {
                    break OUTER
                }
                else {
                    $vs_path=$null
                }
            }
        }
    }

    if ($vs_path) {
        $default_host_arch,$default_arch = if ($env:PROCESSOR_ARCHITECTURE -ieq 'AMD64') {
            'amd64','amd64'
        }
        elseif ($env:PROCESSOR_ARCHITECTURE -ieq 'ARM64') {
            'arm64','arm64'
        }
        elseif ($env:PROCESSOR_ARCHITECTURE -ieq 'X86') {
            'x86','x86'
        }

        function global:vsenv($arch, $hostarch) {
            if (-not $arch)     { $arch     = $default_arch }
            if (-not $hostarch) { $hostarch = $default_host_arch }

            $saved_vcpkg_root = $env:VCPKG_ROOT

            & $vs_path/Launch-VsDevShell.ps1 -hostarch $hostarch -arch $arch -skipautomaticlocation

            if ($saved_vcpkg_root) {
                $env:VCPKG_ROOT = $saved_vcpkg_root
            }
        }

        vsenv $default_arch $default_host_arch
    }
}

if ($env:VCPKG_ROOT -and (test-path $env:VCPKG_ROOT)) {
    $global:vcpkg_toolchain = $env:VCPKG_ROOT + '/scripts/buildsystems/vcpkg.cmake'

    if ($iswindows) {
        $env:VCPKG_DEFAULT_TRIPLET = if (test-path $env:VCPKG_ROOT/installed/${env:Platform}-windows-static) `
            { "${env:Platform}-windows-static" } else { "${env:Platform}-windows" }

        $env:LIB     = $env:LIB     + ';' + $env:VCPKG_ROOT + '/installed/' + $env:VCPKG_DEFAULT_TRIPLET + '/lib'
        $env:INCLUDE = $env:INCLUDE + ';' + $env:VCPKG_ROOT + '/installed/' + $env:VCPKG_DEFAULT_TRIPLET + '/include'
    }
}

if (-not $env:DISPLAY) {
    $env:DISPLAY = '127.0.0.1:0.0'
}

if (-not $env:XAUTHORITY) {
    $env:XAUTHORITY = join-path $home .Xauthority

    if (-not (test-path $env:XAUTHORITY) `
        -and (
          ($xauth = (get-command -commandtype application xauth -ea ignore).source) `
          -or ($xauth = (gi '/program files/VcXsrv/xauth.exe' -ea ignore).fullname) `
        )) {

        $cookie = (1..4 | %{ "{0:x8}" -f (get-random) }) -join ''

        xauth add ':0' . $cookie | out-null
    }
}

function global:megs {
    if (-not $args) { $args = $input }

    gci @args | select mode, lastwritetime, @{ name="MegaBytes"; expression={ [math]::round($_.length / 1MB, 2) }}, name
}

function global:cmconf {
    sls 'CMAKE_BUILD_TYPE|VCPKG_TARGET_TRIPLET|UPSTREAM_RELEASE' CMakeCache.txt
}

function global:cmclean {
    ri -r CMakeCache.txt,CMakeFiles -ea ignore
}

# Windows PowerShell does not have Remove-Alias.
function global:rmalias($alias) {
    # Use a loop to remove aliases from all scopes.
    while (test-path "alias:\$alias") {
        ri -force "alias:\$alias"
    }
}

function is_ext_cmd($cmd) {
    (get-command $cmd -ea ignore).commandtype `
        -cmatch '^(Application|ExternalScript)$'
}

# Check if invocation of external command works correctly.
function ext_cmd_works($exe) {
    $works = $false

    if (-not (is_ext_cmd $exe)) {
        write-error 'not an external command' -ea stop
    }

    $($input | &$exe @args | out-null; $works = $?) 2>&1 `
        | sv err_out

    $works -and -not $err_out
}

function global:%? { $input | %{ $_ } | ?{ $_ } }

function global:which {
    $cmd = try { get-command @args -ea stop | select -first 1 }
           catch { write-error $_ -ea stop }

    if (is_ext_cmd $cmd) {
        $cmd = $cmd.source | shortpath
    }
    elseif ($cmd.commandtype -eq 'Alias' `
            -and (is_ext_cmd $cmd.Definition)) {

        $cmd = $cmd.definition | shortpath
    }

    $cmd
}

rmalias type

function global:type {
    try { which @args } catch { write-error $_ -ea stop }
}

function global:command {
    # Remove -v etc. for now.
    if ($args[0] -match '^-') { $null,$args = $args }

    try {
        which @args -commandtype application,externalscript
    } catch { write-error $_ -ea stop }
}

function ver_windows {
    $osver = [environment]::osversion.version
    $major = $osver.major
    $build = $osver.build

    if ($major -eq 10 -and $build -gt 22000) {
        $major = 11
    }

    try {
        $arch = [System.Runtime.InteropServices.RuntimeInformation,mscorlib]::OSArchitecture
    } catch {}

    'Windows {0} build {1}{2}' `
        -f $major,
           $build,
           $(if ($arch) { " $arch" })
}

function global:ver {
    if ($iswindows) {
        ver_windows
    }
    else {
        $uname_parts = $(if     ($islinux) { 'sri' }
                         elseif ($ismacos) { 'srm' }
                       ).getenumerator() | %{ uname "-$_" }

        # Remove -xxx-xxx suffixes from kernel versions.
        if ($islinux) {
            $uname_parts[1] = $uname_parts[1] -replace '-.*',''
        }

        "{0} kernel {1} {2}" -f $uname_parts
    }
}

function global:mklink {
    $usage = 'args: [link] target'

    $args = $args | %{ $_ } | ? length

    if (-not $args) { $args = @($input) }

    while ($args.count -gt 2 -and $args[0] -match '^/[A-Z]$') {
        $null,$args = $args
    }

    if (-not $args -or $args.count -gt 2) {
        write-error $usage -ea stop
    }

    $link,$target = $args

    if (-not $target) {
        $target = $link

        if (-not (split-path -parent $target)) {
            write-error ($usage + "`n" + 'cannot make link with the same name as target') -ea stop
        }

        $link = split-path -leaf $target
    }

    if (-not ($link_parent = split-path -parent $link)) {
        $link_parent = get-location | % path
    }
    if (-not ($target_parent = split-path -parent $target)) {
        $target_parent = get-location | % path
    }

    $link_parent = try {
        $link_parent | resolve-path -ea stop | % path
    }
    catch { write-error $_ -ea stop }

    if (-not (resolve-path $target -ea ignore)) {
        write-warning "target '${target}' does not yet exist"
    }

    $absolute = @{
        link   = join-path $link_parent   (split-path -leaf $link)
        target = join-path $target_parent (split-path -leaf $target)
    }

    $home_dir_re = [regex]::escape($home)
    $dir_sep_re  = [regex]::escape($dir_sep)

    $in_home = @{}

    $absolute.getenumerator() | %{
      if ($_.value -match ('^'+$home_dir_re+"($dir_sep_re"+'|$)')) {
        $in_home[$_.key] = $true
      }
    }

    # If target is in home, make sure ~ is resolved.
    #
    # Make sure relative links are relative to link parent
    # (::ispathrooted() does not understand ~ paths and considers
    # them relative.)
    #
    # And if both link and target are in home dir, force relative
    # link, this is to make backups/copies/moves and SMB shares of
    # the home/profile dir easier and less error-prone.
    $target = if (-not (
                      $in_home.target `
                      -or [system.io.path]::ispathrooted($target)
                  ) -or $in_home.count -eq 2) {

        pushd $link_parent
        resolve-path -relative $absolute.target
        popd
    }
    else {
        $absolute.target
    }

    if (-not $iswindows -or $psversiontable.psversion.major -ge 6) {
        # PSCore.
        try {
            new-item -itemtype symboliclink $absolute.link `
                -target $target -ea stop
        }
        catch { write-error $_ -ea stop }
    }
    else {
        # WinPS or older.
        $params = @(
            if (test-path -pathtype container $target) { '/D' }
        )
        cmd /c mklink @params $absolute.link $target
        if (-not $?) { write-error "exited: $lastexitcode" -ea stop }
    }
}

function global:rmlink {
    $args = @($input),$args | %{ $_ } | ? length

    if (-not $args) {
        write-error 'args: link1 [link2 ...]' -ea stop
    }

    $args | %{
        try { $_ = gi $_ -ea stop }
        catch { write-error $_ -ea stop }

        if (-not $_.target) {
            write-error "$_ is not a symbolic link" -ea stop
        }

        if ((test-path -pathtype container $_) `
            -and $iswindows `
            -and $psversiontable.psversion.major -lt 7) {

            # In WinPS remove-item does not work for dir links.
            cmd /c rmdir $_
            if (-not $?) { write-error "exited: $lastexitcode" -ea stop }
        }
        else {
            try { ri $_ }
            catch { write-error $_ -ea stop }
        }
    }
}

# Find neovim or vim and set $env:EDITOR, prefer neovim.
if ($iswindows) {
    $vim = ''

    $locs =
        { (get-command nvim.exe @args).source },
        { resolve-path /tools/neovim/nvim*/bin/nvim.exe @args },
        { (get-command vim.exe @args).source },
        { (get-command vim.bat @args).source },
        { resolve-path /tools/vim/vim*/vim.exe @args }

    foreach ($loc in $locs) {
        if ($vim = &$loc -ea ignore) { break }
    }

    if ($vim) {
        set-alias vim -value $vim -scope global

        if ($vim -match 'nvim') {
            set-alias nvim -value $vim -scope global
        }

        $env:EDITOR = realpath $vim
    }
}
else {
    $env:EDITOR = 'vim'
}

# Windows PowerShell does not support the `e special character
# sequence for Escape, so we use a variable $e for this.
$e = [char]27

if ($iswindows) {
    function global:pgrep($pat) {
        if (-not $pat) { $pat = $($input) }

        get-ciminstance win32_process -filter "name like '%${pat}%' OR commandline like '%${pat}%'" | select ProcessId,Name,CommandLine
    }

    function global:pkill($proc) {
        if (-not $proc) { $proc = $($input) }

        if ($pid = $proc.ProcessId) {
            stop-process $pid
        }
        else {
            pgrep $proc | %{ stop-process $_.ProcessId }
        }
    }

    function format-eventlog {
        $input | %{
            ("$e[95m[$e[34m" + ('{0:MM-dd} ' -f $_.timecreated) `
            + "$e[36m" + ('{0:HH:mm:ss}' -f $_.timecreated) `
            + "$e[95m]$e[0m " `
            + $_.message) | out-string
        }
    }

    function global:syslog {
        get-winevent -log system -oldest | format-eventlog | less
    }

    # You have to enable the tasks log first as admin, see:
    # https://stackoverflow.com/q/13965997/262458
    function global:tasklog {
        get-winevent 'Microsoft-Windows-TaskScheduler/Operational' `
            -oldest | format-eventlog | less
    }

    function global:ntop {
        ntop.exe -s 'CPU%' @args
        if (-not $?) { write-error "exited: $lastexitcode" -ea stop }
    }

    function head_tail([scriptblock]$cmd, $arglist) {
        $lines =
            if ($arglist.length -and $arglist[0] -match '^-(.+)') {
                $null,$arglist = $arglist
                $matches[1]
            }
            else { 10 }

        if (!$arglist.length) {
            $input | &$cmd $lines
        }
        else {
            gc $arglist | &$cmd $lines
        }
    }

    function global:head {
        $input | head_tail { $input | select -first @args } $args
    }

    function global:tail {
        $input | head_tail { $input | select -last @args  } $args
    }

    function global:touch {
        if (-not $args) { $args = $input }

        $args | %{ $_ } | %{
            if (test-path $_) {
                (gi $_).lastwritetime = get-date
            }
            else {
                ni $_ | out-null
            }
        }
    }

    function global:sudo {
        $cmd = [management.automation.invocationinfo].getproperty('ScriptPosition',
            [reflection.bindingflags] 'instance, nonpublic').getvalue($myinvocation).text -replace '^\s*sudo\s*',''

        ssh localhost -- "sl '$(get-location)'; $cmd"
    }

    function global:nproc {
        [environment]::processorcount
    }

    # To see what a choco shim is pointing to.
    function global:readshim {
        if (-not $args) { $args = $input }

        $args | %{ $_ } |
            %{ get-command $_ -commandtype application `
                -ea ignore } | %{ $_.source } | `
                # WinGet symlinks
            %{ if ($link_target = (gi $_).target) {
                    $link_target | shortpath
                }
                # Scoop shims
                elseif (test-path ($shim = $_ -replace '\.exe$','.shim')) {
                    gc $shim | %{ $_ -replace '^path = "([^"]+)"$','$1' } | shortpath
                }
                # Chocolatey shims
                elseif (&$_ --shimgen-help) {
                    $_ | ?{ $_ -match "^ Target: '(.*)'$" } `
                       | %{ $matches[1] } | shortpath
                }
            }
    }

    function global:env {
        gci env: | sort name | %{
            "`${{env:{0}}}='{1}'" -f $_.name,$_.value
        }
    }

    # Tries to reset the terminal to a sane state, similar to the Linux reset
    # binary from ncurses-utils.
    function global:reset {
        [char]27 + "[!p"
        clear-host
    }

    if ((test-path ~/.tmux-pwsh.conf) -and (test-path /msys64/usr/bin/tmux.exe)) {
        function global:tmux {
            /msys64/usr/bin/tmux -f ~/.tmux-pwsh.conf @args
        }
    }
    elseif ((gcm -ea ignore wsl) -and (wsl -- ls '~/.tmux-pwsh.conf' 2>$null)) {
        function global:tmux {
            wsl -- tmux -f '~/.tmux-pwsh.conf' @args
        }
    }
}
elseif ($ismacos) {
    function global:ls {
        if (-not $args) { $args = $input }
        &(command ls) -Gh @args
        if (-not $?) { write-error "exited: $lastexitcode" -ea stop }
    }
}
elseif ($islinux) {
    function global:ls {
        if (-not $args) { $args = $input }
        &(command ls) --color=auto -h @args
        if (-not $?) { write-error "exited: $lastexitcode" -ea stop }
    }
}

if (-not (test-path function:global:grep) `
    -and (get-command -commandtype application grep -ea ignore) `
    -and ('foo' | ext_cmd_works (command grep) --color foo)) {

    function global:grep {
        $input | &(command grep) --color @args
        if (-not $?) { write-error "exited: $lastexitcode" -ea stop }
    }
}

rmalias gl
rmalias pwd

function global:gl  { get-location | % path | shortpath }
function global:pwd { get-location | % path | shortpath }

function global:ltr { $input | sort lastwritetime }

function global:count { $input | measure | % count }

# Example utility function to convert CSS hex color codes to rgb(x,x,x) color codes.
function global:hexcolortorgb {
    if (-not ($color = $args[0])) { $color = $($input) }

    'rgb(' + ((($args[0] -replace '^(#|0x)','' -split '(..)(..)(..)')[1,2,3] | %{ [uint32]"0x$_" }) -join ',') + ')'
}

function map_alias {
    $input | %{ $_.getenumerator() | %{
        $path = $_.value

        # Expand any globs in path.
        if ($parent = split-path -parent $path) {
            if ($parent = resolve-path $parent -ea ignore) {
                $path = join-path $parent (split-path -leaf $path)
            }
            else {
                return
            }
        }

        if ($cmd = get-command $path -ea ignore) {
            rmalias $_.key

            $type = $cmd.commandtype

            $cmd = if ($type `
                    -cmatch '^(Application|ExternalScript)$') {

                $cmd.source
            }
            elseif ($type -cmatch '^(Cmdlet|Function)$') {
                $cmd.name
            }
            else {
                throw "Cannot alias command of type '$type'."
            }

            set-alias $_.key -value $cmd -scope global
        }
    }}
}

if ($iswindows) {
    @{
        patch   = '/prog*s/git/usr/bin/patch'
        wordpad = '/prog*s/win*nt/accessories/wordpad'
        ssh     = '/prog*s/OpenSSH-*/ssh.exe'
        '7zfm'  = '/prog*s/7-zip/7zfm.exe'
    } | map_alias
}

# Alias the MSYS2 environments if MSYS2 is installed.
if ($iswindows -and (test-path /msys64)) {
    function global:msys2 {
        $env:MSYSTEM = 'MSYS'
        /msys64/usr/bin/bash -l $(if ($args) { '-c',"$args" })
        ri env:MSYSTEM
    }

    function global:msys {
        $env:MSYSTEM = 'MSYS'
        /msys64/usr/bin/bash -l $(if ($args) { '-c',"$args" })
        ri env:MSYSTEM
    }

    function global:clang64 {
        $env:MSYSTEM = 'CLANG64'
        /msys64/usr/bin/bash -l $(if ($args) { '-c',"$args" })
        ri env:MSYSTEM
    }

    function global:ucrt64 {
        $env:MSYSTEM = 'UCRT64'
        /msys64/usr/bin/bash -l $(if ($args) { '-c',"$args" })
        ri env:MSYSTEM
    }

    function global:mingw64 {
        $env:MSYSTEM = 'MINGW64'
        /msys64/usr/bin/bash -l $(if ($args) { '-c',"$args" })
        ri env:MSYSTEM
    }

    function global:mingw32 {
        $env:MSYSTEM = 'MINGW32'
        /msys64/usr/bin/bash -l $(if ($args) { '-c',"$args" })
        ri env:MSYSTEM
    }
}

$cmds = @{}

foreach ($cmd in 'perl','diff','colordiff','tac') {
    $cmds[$cmd] = try {
        get-command -commandtype application,externalscript $cmd `
            -ea ignore | select -first 1 | % source
    }
    catch { $null }
}

# For diff on Windows install diffutils from choco.
#
# Clone git@github.com:daveewart/colordiff to ~/source/repos
# for colors.
if ($cmds.diff) {
    rmalias diff
    rmalias colordiff

    $cmd = $clone = $null
    $prepend_args = @()

    function global:diff {
        $args = $prepend_args,$args

        $rc = 2

        @( $input | &$cmd @args; $rc = $lastexitcode ) | less -Q -r -X -F -K --mouse

        if ($rc -ge 2) {
            write-error "exited: $rc" -ea stop
        }
    }

    $cmd = if ($cmds.colordiff) {
        $cmds.colordiff
    }
    elseif ($cmds.perl -and ($clone = resolve-path `
                ~/source/repos/colordiff/colordiff.pl `
                -ea ignore)) {
        $prepend_args = @($clone)
        $cmds.perl
    }
    else {
        $cmds.diff
    }

    if ($cmds.colordiff -or $clone) {
        set-alias -scope global colordiff -value diff
    }
}

@{
    vcpkg = '~/source/repos/vcpkg/vcpkg'
} | map_alias

if (-not $cmds.tac) {
    function global:tac {
        $file = if ($args) { gc $args } else { @($input) }

        $file[($file.count - 1) .. 0]
    }
}

# Aliases to pwsh Cmdlets/functions.
set-alias s -value select-object -scope global

# Remove duplicates from $env:PATH.
$env:PATH = (split_env_path | select -unique) -join $path_sep

} | import-module

# This is my posh-git prompt theme:
if (get-module -listavailable posh-git-theme-bluelotus) {
    import-module posh-git-theme-bluelotus

# If you want the posh-git window title, uncomment this:
#
#    $gitpromptsettings.windowtitle =
#        $gitprompt_theme_bluelotus.originalwindowtitle;
}
elseif (get-command oh-my-posh -ea ignore) {
    oh-my-posh --init --shell pwsh `
        --config 'https://raw.githubusercontent.com/JanDeDobbeleer/oh-my-posh/main/themes/paradox.omp.json' | iex
}

if (-not (get-module posh-git) `
    -and (get-module -listavailable posh-git)) {

    import-module posh-git
}

if (-not (get-module psreadline)) {
    import-module psreadline
}

set-psreadlineoption -editmode emacs
set-psreadlineoption -historysearchcursormovestoend
set-psreadlineoption -bellstyle none

set-psreadlinekeyhandler -key tab       -function complete
set-psreadlinekeyhandler -key uparrow   -function historysearchbackward
set-psreadlinekeyhandler -key downarrow -function historysearchforward

set-psreadlinekeyhandler -chord 'ctrl+spacebar' -function menucomplete
set-psreadlinekeyhandler -chord 'alt+enter'     -function addline

if ($private:posh_vcpkg = `
    resolve-path ~/source/repos/vcpkg/scripts/posh-vcpkg `
        -ea ignore) {

    import-module $posh_vcpkg
}

if ($private:src = `
    resolve-path $ps_config_dir/private-profile.ps1 `
        -ea ignore) {

    $global:profile_private = $src | shortpath

    . $profile_private
}

# vim:set sw=4 et:
. This profile works for «Windows PowerShell» as well. But the profile
is in a different file, so you will need to make a symlink there to
your PowerShell $profile.
mkdir ~/Documents/WindowsPowerShell
ni -it sym ~/Documents/WindowsPowerShell/Microsoft.PowerShell_profile.ps1 -tar $profile
. Be aware that if your Documents are in OneDrive, OneDrive will
ignore and not sync symlinks.
This $profile also works for PowerShell for Linux and macOS.
The utility functions it defines are described here.
Setting up ssh
To make sure the permissions are correct on the files in your
~/.ssh directory, run the following:
&(resolve-path /prog*s/openssh*/fixuserfilepermissions.ps1)
import-module -force (resolve-path /prog*s/openssh*/opensshutils.psd1)
repair-authorizedkeypermission -file ~/.ssh/authorized_keys
.
Setting up and Using Git
Git Setup
You can copy over your ~/.gitconfig and/or run the following to
set some settings I recommend:
# SET YOUR NAME AND EMAIL HERE:
git config --global user.name "John Doe"
git config --global user.email johndoe@example.com

git config --global core.autocrlf  false
git config --global push.default   simple
git config --global pull.rebase    true
git config --global commit.gpgsign true
.
Using Git
Git usage from PowerShell is pretty much the same as on Linux, with
a couple of caveats.
Arguments containing special characters like : or . must be
quoted, for example:
git tag -s 'v5.41' -m'v5.41'
git push origin ':refs/heads/some-branch'
. The .git directory is hidden, to see it use:
. NEVER run the command:
. On Linux, the * glob does match dot files like .git, but on
Windows it matches everything.
The command:
, is safe because hidden files like .git are not affected without -Force.
Because .git is a hidden directory, this also means that to delete a cloned repository, you must pass -Force to Remove-Item, e.g.:
.
Dealing with Line Endings
With core.autocrlf set to false, the files in your checkouts
will have UNIX line endings, but occasionally you need a project to
have DOS line endings, for example if you use PowerShell scripts to
edit the files in the project. In this case, it’s best to make a
.gitattributes file in the root of your project and commit it,
containing for example:
. Make sure to add exclusions for all binary file types you need.
This way, anyone cloning the repo will have the correct line
endings.
Setting up gpg
Make this symlink:
sl ~
mkdir .gnupg -ea ignore
cmd /c rmdir (resolve-path ~/AppData/Roaming/gnupg)
ni -it sym ~/AppData/Roaming/gnupg -tar (resolve-path ~/.gnupg)
. Then you can copy your .gnupg over, without the socket files.
To configure git to use it, do the following:
git config --global commit.gpgsign true
git config --global gpg.program 'C:\Program Files (x86)\GnuPG\bin\gpg.exe'
.
Profile (Home) Directory Structure
Your Windows profile directory, analogous to a UNIX home directory,
will usually be something like C:\Users\username, it may be on a
server share if you are using a domain in an organization.
The automatic PowerShell variable $home will contain the path to
your profile directory as well as the environment variable
$env:USERPROFILE. You can use the environment variable in things
such as Explorer using the cmd syntax, e.g. try entering
%USERPFOFILE% in the Explorer address bar.
The ~/AppData directory is analogous to the Linux ~/.config
directory, except it has two parts, Local and Roaming. The
Roaming directory may be synced by various things across your
computers, and the Local directory is generally intended for your
specific computer configurations.
It is up to any particular application whether it uses the Local
or Roaming directory, or both, and for what. When backing up any
particular application configuration, check if it uses one or the
other or both.
The install
script makes a
~/.config symlink pointing to ~/AppData/Local. This is adequate
for some Linux ports such as Neovim.
There is one other important difference you must be aware of. When
you uninstall an application on Windows, it will often DELETE
its configuration directory or directories under ~/AppData. This
is one reason why in this guide I give instructions for making a
directory under your $home and symlinking the AppData directory
to it. Make sure you backup your terminal settings.json for this
reason as well.
PowerShell Usage Notes
Introduction
PowerShell is very different from POSIX shells, in both usage and
programming.
This section won’t teach you PowerShell, but it will give you enough
information to use it as a shell, write basic scripts and be a
springboard for further exploration.
You must be aware that when PowerShell is discussed, there are two
versions that are commonly used, Windows PowerShell or WinPS for
short, and PowerShell Core or PSCore for short.
Windows PowerShell is the standard powershell command in Windows,
and you can rely on it being installed on any Windows system. It is
currently version 5.1 of PowerShell with some extra patches and
backported security fixes by Microsoft.
PowerShell Core is the latest release from the open source
PowerShell project. Currently this is 7.2.1 but will almost
certainly be higher when you are reading this. If installed, it will
be available in $env:PATH as the pwsh command.
You can see your PowerShell version with:
. Everything in this guide is compatible with both versions, except
when I explicitly state that it isn’t.
WinPS is not as nice for interactive use as PSCore, but for writing
scripts and modules you have just about all the facilities of the
language available, except for a few new features like ternaries
which I won’t cover here. I recommend targeting WinPS for any
scripts or modules that you will write.
Finding Documentation
You can get a list of aliases with alias and lookup specific
aliases with e.g. alias ri. It allows globs, e.g. to see aliases
starting with s do alias s*.
You can get help text for any Cmdlet via its long name or alias with
help -full <Cmdlet>. To use less instead of the default pager,
do e.g.: help -full gci | less.
In the $profile, less is set to the
default pager for help via $env:PAGER, and -full is enabled by
default via $PSDefaultParameterValues.
You can use tab completion to find help topics and search for
documentation using globs, for example to see a list of articles
containing the word «where»:
. The conceptual documentation not related to a specific command or
function takes the form about_XXXXX e.g. about_Operators,
modules you install will often also have such a document, to see a
list do:
. Run update-help once in a while to update all your help files.
You can get documentation for external utilities in this way:
. For documentation for cmd builtins, you can do this:
. For the git man pages, use git help <command> to open the man
page in your browser, e.g.:
.
Commands, Parameters and Environment
I suggest using the short forms of PowerShell aliases instead of the
POSIX aliases, this forces your brain into PowerShell mode so you
will mix things up less often, with the exception of a couple of
things that are easier to type like mkdir, ps or kill or some
of the wrappers in the $profile.
Here are a few:
| PowerShell alias | Full Cmdlet + Params | POSIX command |
|---|---|---|
| sl | Set-Location | cd |
| gl | Get-Location | pwd |
| gci -n | Get-ChildItem -Name | ls |
| gci | Get-ChildItem | ls -l |
| gi | Get-Item | ls -ld |
| cpi | Copy-Item | cp -r |
| ri | Remove-Item | rm |
| ri -fo | Remove-Item -Force | rm -f |
| ri -r -fo | Remove-Item -Force -Recurse | rm -rf |
| gc | Get-Content | cat |
| mi | Move-Item | mv |
| mkdir | New-Item -ItemType Directory | mkdir |
| which (custom) | Get-Command | command -v, which |
| gci -r | Get-ChildItem -Recurse | find |
| gci -dir | Get-ChildItem -Directory | find -type d |
| ni | New-Item | touch |
| sls -ca | Select-String -CaseSensitive | grep |
| sls | Select-String | grep -i |
| gci -r | sls -ca | Get-ChildItem -Recurse |
| sort | Sort-Object | sort |
| sort -u | Sort-Object -Unique | sort -u |
| measure -l | Measure-Object -Line | wc -l |
| measure -w | Measure-Object -Word | wc -w |
| measure -c | Measure-Object -Character | wc -m |
| gc file | select -first 10 | Get-Content file | Select-Object -First 10 | head -n 10 file |
| gc file | select -last 10 | Get-Content file | Select-Object -Last 10 | tail -n 10 file |
| gc -wait -tail 20 some.log | Get-Content -Wait -Tail 20 some.log | tail -f -n 20 some.log |
| iex | Invoke-Expression | eval |
. This will get you around and doing stuff, the usage is slightly
different however.
For one thing commands like cpi (Copy-Item) take a list of files
differently from POSIX, they must be a PowerShell list, which means
separated by commas. For example, to copy file1 and file2 to
dest-dir, you would do:
. To remove file1 and file2 you would do:
. You can list multiple globs in these lists as well as files and
directories etc., for example:
. Note that globs in PowerShell are case-insensitive.
Also, unlike Linux, the * glob will match all files including
.dotfiles. Windows uses a different mechanism for hidden files,
see below.
PowerShell relies very heavily on tab completion, and just about
everything can be tab completed. The style I present here uses short
forms and abbreviations instead, when possible.
Tab completing directories and files with spaces in them can be
annoying, for example:
, will show the completion C:\Program. If you want to complete
C:\Program Files type `<SPACE> and it will be completed with
a starting quote. More on the ` escape character later.
For completing /Program Files it’s easier to use DOS short alias
/progra~1 and for /Program Files (x86) the /progra~2 alias.
The $profile defines the variable
$ps_history for the command history file location which is
analogous to ~/.bash_history on Linux, you can view it with e.g.:
. Command-line editing and history search works about the same way
as in bash. I have also defined the PSReadLine options to make up
arrow not only cycle through previous commands, but will also allow
you to type the beginning of a previous command and cycle through
matches.
For examining variables and objects, unlike in POSIX shells, a value
will be formatted for output implicitly and you do not have to
echo it, to write a message you can just use a string, to examine
a variable you can just input it directly, for example:
'Operation was successful!'
"The date today is: {0}" -f (get-date)
$profile
$env:PAGER
. As you can see here, there is a difference between normal
variables and environment variables, which are prefixed with env:,
which is a PSDrive, more on that later.
Many commands you will use in PowerShell will, in fact, yield
objects that will use the format defined for them to present
themselves on the terminal. For example gci or gi. You can
change these formats too.
The Cmdlet Get-Command will tell you the type of a command, like
type on bash. To get the path of an executable use, e.g.:
. The $profile which,type and
command wrappers do this automatically.
Values, Arrays and Hashes
One very nice feature of PowerShell is that it very often allows you
to use single values and arrays interchangeably. Arrays are created
by using the , comma operator to list multiple values, or
assigning the result of a command that returns multiple values.
$val = 'a string'
$val.count # 1
$arr = 'foo',,'bar','baz'
$arr.count # 3

$val | %{ $_.toupper() } # A STRING
($arr | %{ $_.toupper() }) -join ',' # FOO,BAR,BAZ

$repos = gci ~/source/repos
$repos.count # 29
. You usually do not have to do anything to work with an array value
as opposed to a single value, but sometimes it is very useful to
enclose values or commands in @(...) to coerce the result to an
array. This will also exhaust any iterator-like objects such as
$input into an immediate array value. $(...) will have the same
effect, but it will not coerce single values to an array.
Occasionally you may want to write a long pipeline directly to a
variable, you can use set-variable which has the standard alias
sv to do this, for example:
gci /windows/system32/*.dll | % fullname | sv dlls
$dlls.count # 3652
. Hashes can be defined and used like so:
$hash = @{
    foo = 'bar'
    bar = 'baz'
}
$hash.foo # bar
$hash.bar # baz
$hash['foo'] # bar

$hash.keys -join ',' # foo,bar
$hash.values -join ',' # bar,baz

$hash.getenumerator() | %{ "{0} = '{1}'" -f $_.key,$_.value }
# foo = 'bar'
# bar = 'baz'
. To make an ordered hash do:
$ordered_hash = [ordered]@{
    some  = 'val'
    other = 'val2'
}
.
Redirection, Streams, $input and Exit Codes
Redirection for files and commands works like in POSIX shells on a
basic level, that is, you can expect >, >> and | to redirect
files and commands like you would expect, for TEXT data. LF
line ends will also generally get rewritten to CRLF, and sometimes
an extra CRLF will be added to the end of the file/stream. See
here for some ways to deal with this
in git repos. You can also adjust line endings with the dos2unix
and unix2dos commands.
The > redirection operator is a shorthand for the Out-File
command.
DO NOT redirect binary data, instead have the utility you are
using write the file directly.
The < operator is not yet available.
The streams 1 and 2 are SUCCESS and ERROR, they are
analogous to the STDOUT and STDERR file descriptors, and
generally work similarly and support the same redirection syntax.
PowerShell has many other streams, see:
help about_output_streams
. There is no analogue to the STDIN stream. This gets quite
complex because the pipeline paradigm is central in PowerShell.
For example, text data is generally broken up into string objects
for each line. If you pipe to out-string they will be combined
into one string object. Here is an illustration:
get-content try.ps1 | invoke-expression
# Throws various syntax errors.
get-content try.ps1 | out-string | invoke-expression
# Works correctly.
, there are many ways to handle pipeline input, the simplest and
least reliable is the automatic variable $input, I have used it in
the $profile for many things. Here is a
stupid example:
function capitalize_foo {
    $input | %{ $_ -replace 'foo','FOO' }
}
. If you want to test for the presence of pipeline input, you can
use $myinvocation.expectinginput, for example:
function got_pipeline {
    if ($myinvocation.expectinginput} { 'pipe' } else { 'no pipe' }
}
. The equivalent of /dev/null is $null, so a command such as:
, would be:
. While a command such as:
cmd >/dev/null 2>&1
# Or, using a non-POSIX bash feature:
cmd &>/dev/null
, would generally be written as:
, to silence all streams, including extra streams PowerShell has
such as Verbose. If you just want to suppress the output
(SUCCESS) stream, you would generally use:
. The ERROR stream also behaves quite differently from POSIX
shells.
Both external commands and PowerShell functions and cmdlets indicate
success or failure via $?, which is $true or $false. For
external commands the actual exit code is available via
$LastExitCode.
However, PowerShell commands use a different mechanism to indicate
an error status. They throw an exception or write an error to the
ERROR stream, which is essentially the same thing, just resulting
in different types of objects being written to the ERROR stream.
You can examine the error/exception objects in the $error array,
for example:
write-error 'Something bad happened.'
$error[0]
Write-Error: Something bad happened.
PSMessageDetails      :
Exception             : Microsoft.PowerShell.Commands.WriteErrorException: Something bad happened.
...
. As a consequence of both external commands and PowerShell
functions/cmdlets setting $?, when you wrap an external command
with a function, $? from the command execution will be reset by
the function return. The best workaround I found for this so far, is
to throw a short error like this:
function cmd_wrapper {
    cmd @args
    if (-not $?) { write-error "exited: $LastExitCode" -ea stop }
}
. Now I must admit to lying to you previously, that is:
, is not the same thing as suppressing STDERR in sh, for example:
, will still set error status, even though you see no output, and
$error[0] will contain an empty error.
Even worse, this means that if you have:
$erroractionpreference = 'stop'
, your script will terminate.
For native commands, it does in effect suppress STDERR, because
they do not use this mechanism.
For PowerShell commands what you want to do instead is this:
mkdir existing-dir -ea ignore
, this sets ErrorAction to Ignore, and does not trigger an error
condition, and does not write an error object to ERROR.
Command/Expression Sequencing Operators
The operators ;, && and || will generally work how you expect
in sh, but there are some differences you should be aware of.
The ; operator can not only separate commands, but can also be
very useful to output multiple values (commands are also values.)
Both the ‘;’ and the ‘,’ operator will yield values, but sometimes
using the ‘,’ operator will limit the syntax you can use inside an
expression.
The ‘;’ operator will not work in a parenthesized expression, but
will work in value and array expressions $(...) and @(...). For
example:
# This will not work:
(cmd; 'foo', 'bar')
# This will work:
$(cmd1; 'foo'; cmd2)
. The && and || operators are only available in PSCore, and their
semantics are different from what you would expect in sh and other
languages.
The do not work on $true/$false values, but on the $? variable
I described previously.
This variable is $true or $false based on whether the exit code
of an external command is zero or if a PowerShell function or cmdlet
executed successfully.
That is, this will not work:
, but things like this will work fine:
cmake && ninja || write-error 'build failed'
. As I mentioned previously, since this is a PSCore feature, I do
not recommend using it in scripts or modules intended to be
distributed by themselves.
Commands and Operations on Filesystems and Filesystem-Like Objects
The gci aka Get-ChildItem command is analogous to ls -l.
For ls -ltr use:
gci | sort lastwritetime
# Or my alias:
gci | ltr
. The command analogous to ls -1 would be:
, aka -Name, it will list only file/directory/object names as
strings, which can be useful for long names or to pipe name strings
only to another command.
Get-Child-Item (gci) and Get-Item (gi) do not only operate
on filesystem objects, but on many other kinds of objects. For
example, you can operate on registry values like a filesystem, e.g.:
gi  HKLM:/SOFTWARE/Microsoft/Windows/CurrentVersion
gci HKLM:/SOFTWARE/Microsoft/Windows/CurrentVersion | less
, here HKLM stands for the HKEY_LOCAL_MACHINE section of the
registry. HKCU stands for HKEY_CURRENT_USER.
You can go into these objects using sl (Set-Location) and work
with them similar to a filesystem. The properties displayed and
their contents will depend on the types of objects you are working
with.
You can get a list of «drive» type devices including actual drive
letters with:
. These also include variables, environment variables, functions and
aliases, and you can operate on them with Remove-Item, Set-Item,
etc..
For actual Windows filesystems, the first column in directory
listings from gci or gi is the mode or attributes of the object.
The positions of the letters will vary, but here is their meaning:
| Mode Letter | Attribute Set On Object |
|---|---|
| l | Link |
| d | Directory |
| a | Archive |
| r | Read-Only |
| h | Hidden |
| s | System |
. To see hidden files, pass -Force to gci or gi:
gci -fo
gi -fo hidden-file
. The best way to manipulate these attributes is with the attrib
utility, for example, to make a file or directory hidden do:
attrib +h file
gi -fo file
, -Force is required for gci and gi to access hidden
filesystem objects.
To make this file visible again, do:
. To make a symbolic link, do:
ni -it sym name-of-link -tar (resolve-path path-to-source)
. The alias ni is for New-Item. Make sure the path-to-source
is a valid absolute or relative path, you can use tab completion or
(resolve-path file) to ensure this. The source paths CAN NOT
contain the ~ $env:USERPROFILE shortcut because this is specific
to PowerShell and not to the Windows operating system.
You must turn on Developer Mode to be able to make symbolic links
without elevation in PowerShell Core.
In Windows PowerShell, you must be elevated to make symbolic links
whether Developer Mode is enabled or not. But you can use:
cmd /c mklink <link> <targeT>
, without elevation if Developer Mode is enabled.
WARNING: Do not use ri to delete a symbolic link to a
directory in Windows PowerShell, do this instead:
cmd /c rmdir symlink-to-directory
, ri dirlink works fine in PowerShell Core.
My $profile functions mklink and
rmlink handle all of these details for you and work in both
versions of PowerShell and other OSes. The syntax for mklink is
the same as the cmd command, but you do not need to pass /D for
directory links and the link is optional, the leaf of the target
will be used as the link name as a default.
For a find replacement, use the -Recurse flag to gci, e.g.:
.
To search under a specific directory, specify the glob with
-Include, e.g.:
, for example, to find all DLL files in all levels under
C:\Windows.
Another useful parameter for the file operation commands is
-Exclude, which also takes globs, e.g.:
gci ~/source/repos -exclude vcpkg
gci -r /some/dir -exclude .*
.
Pipelines
PowerShell supports an amazing new system called the «object
pipeline», what this means is that you can pass objects around via
pipelines and inspect their properties, call methods on them, etc..
You’ve already seen some examples of this, and this is the central
paradigm in PowerShell for everything.
When you run a command in PowerShell from the terminal, there is an
implicit pipeline from the command to your terminal device, when the
objects from the command reach your terminal, the format objects for
terminal view are applied to them and they are printed.
Here is an example of using the object pipeline to recursively
delete all vim undo files:
. Here remove-item receives file objects from get-childitem and
deletes them.
To do the equivalent of a recursive grep you could do something
like:
sls -r *.[ch] | sls -ca void
. I prefer using ripgrep (rg command) for this purpose. To turn
off the highlighting in Select-String, use the
-noe(-NoEmphasis) flag. Be aware that Select-String will apply
an output format to its results and there will be extra blank lines
at the top and bottom among other things, so if you are going to use
them as text in a pipeline or redirect use the -raw flag.
If the Cmdlet works on files, they can be strings as well, for
example:
gc file-list | cpi -r -dest e:/backup
, copies the files and directories listed in file-list to a
directory on a USB stick.
Most commands can accept pipeline input, even ones you wouldn’t
expect to, for example:
split-path -parent $profile | sl
, will enter your Documents PowerShell directory.
The help documentation for commands will generally state if they
accept pipeline input or not.
You can access the piped-in input in your own functions as the
special $input variable, like in some of the functions in the
$profile. This is the worst way to do
this, it’s better to make an advanced function with a process block,
which I won’t cover here yet, but it is the most simple.
Here is a more typical example of a pipeline:
get-process | ?{ $_.name -notmatch 'svchost' } | %{ $_.name } | sort -u
. Here ?{ ... } is like filter/grep block while %{ ... } is like
an apply/map block.
In PowerShell pipelines you will generally be working with object
streams and their properties rather than lines of text. And, as I
mentioned, lines of text are actually string objects anyway. I will
describe a few tricks for doing this here.
You can use the % property shorthand to select a single property
from an object stream, for example:
, will do the same thing as gci -n. The input does not have to be
a stream of multiple objects, using this on a single object will
work just fine.
This will get the full paths of the files in a directory:
gci ~/source/pwsh/*.ps1 | % fullname
. This also works with ? aka Where-Object, which has parameters
mimicking PowerShell operators, allowing you to do things like this:
, which will show all filesystem objects less than 1000 bytes.
Or, for example:
get-process | ? name -match 'win'
. There are many useful parameters to the select aka
Select-Object command for manipulating object streams, including
-first and -last as you saw for the head/tail equivalents,
as well as -skip, -skiplast, -unique, -index, -skipindex
and -expand. The last one, -expand, will select a property from
the objects selected and further expand it for objects and arrays.
For a contrived example:
gci ~/Downloads/*.zip | sort length | select -skiplast 1 `
    | select -last 1 | % fullname
, will give me the name of the second biggest .zip file in my
~/Downloads folder.
I have aliased Select-Object to s in the
$profile as many people do to save you
some typing.
If you want to inspect the properties available on an object and
their current values, you can use select * e.g.:
.
The Measure-Object Cmdlet
The equivalent of wc -l file to count lines is:
, while -w will count words and -c will count characters. You
can combine any of the three in one command, the output is a table.
To get just the number of lines, you can do this:
gc file | measure -l | % lines
. Note that if you are working with objects and not lines of text,
meaure -l will still do what you expect, but it’s better to do
something like:
gci | measure | % count
# Or with my $profile function:
gci | count
. This is essentially the same thing, because lines of text in
PowerShell pipelines are actually string objects, as I already
mentioned at least 3 times.
Sub-Expressions and Strings
The POSIX command substitution syntax allows inserting the result of
an expression in a string or in some other contexts, for example:
"This file contains $(gc README.md | measure -l | % lines) lines."
. Executing an external command is also an expression, that returns
string objects for the lines outputted, which gives you essentially
the same thing as POSIX command substitution.
The @( ... ) syntax works identically to the $( ... ) syntax to
evaluate expressions, however, it cannot be used in a string by
itself and will always result in an array even for one value.
When not inside a string, you can simply use parenthesis, and when
assigning to variables you need nothing at all, for example:
$date = get-date
vim (gci -r *.ps1)
. For string values, it can be nicer to use formats, e.g.:
"This shade of {0} is the hex code #{1:X6}." -f 'Blue',13883343
"Today is: {0}." -f (get-date)
. See
here
for more about the -f format operator.
. Variables can also be interpolated in strings just like in POSIX
shells, for example:
$greeting = 'Hello'
$name     = 'Fred'
"${greeting}, $name"
. In PowerShell, the backtick ` is the escape character, and you
can use it at the end of a line, escaping the line end as a line
continuation character. In regular expressions, the backslash \ is
the escape character, like everywhere else.
The backtick can also be used to escape nested double quotes, but
not single quotes, for example:
, PowerShell also allows escaping double and single quotes by using
two consecutive quote characters, for example:
"this ""is"" a test"
'this ''is'' a test'
. The backtick is also used for special character sequences, here are
some useful ones:
| Sequence | Character |
|---|---|
| `n | Newline |
| `r | Carriage Return |
| `b | Backspace |
| `t | Tab |
| `u{hex code} | Unicode Character by Hex Code Point |
| `e | Escape (not supported by «Windows PowerShell») |
| `0 | Null |
| `a | Alert (bell) |
.
For example, this will print an emoji between two blank lines,
indented by a tab:
.
Script Blocks and Scopes
A section of PowerShell code is usually represented by a Script
Block, a function is a Script Block, or any code between { ... }
braces, such as for %{ ... } aka ForEach-Object or ?{ ... }
aka Where-Object. Script Blocks have their own dynamic child
scope, that is new variables defined in them are not visible to the
parent scope, and are freed if and when the Script Block is
released.
Script Blocks can be assigned to variables and passed to functions,
like lambdas or function pointers in other languages. Unlike
lambdas, PowerShell does not have lexical closure semantics, it uses
dynamic scope. You can, however, use a module to get an effect
similar to closure semantics, I use this in the
$profile. For example:
new-module SomeName -script {
  ...
  code here
  ...
} | import-module
, the way this works is that the module scope is its own independent
script scope, and any exported or global functions can access
variables and non-exported functions in that scope without them
being visible to anything else. When you see the GetNewClosure()
method being used, this is essentially what it does.
You can use the call operator & to immediately execute a defined
Script Block or one in a variable:
&{ "this is running in a Script Block" }
$script = { "this is another Script Block" }
&$script
, this can be useful for defining a new scope, somewhat but not
really analogous to a ( ...) subshell in POSIX shells.
Using and Writing Scripts
PowerShell script files are any sequence of commands in a .ps1
file, and you can run them directly:
. The equivalent of set -e in POSIX shells is:
$erroractionpreference = 'stop'
. I highly recommend it adding it to the top of your scripts.
The bash commands pushd and popd are also available for use in
your scripts.
Although this guide does not yet discuss programming much, I wanted
to mention one thing that you must be aware of when writing
PowerShell scripts and functions.
PowerShell does not return values the same way as most other
languages. A section of PowerShell code can return values from
anywhere and they will passed down the pipeline or collected into an
array. The command echo does nothing for example, a string value
with no command will do the same thing. The return statement will
yield a value and return control to the caller, but any value will
be yielded implicitly.
In essence, everything in PowerShell runs in a pipeline, a section
of code runs in a pipeline and yields values to it, and if you are
running it from your terminal, the terminal takes the output objects
from the pipeline and formats them using the formatters assigned to
them.
Here is an illustration:
function foo {
    "val1"
    "val: {0}" -f 42
    50
    return 90
    # This won't get returned.
    66
}

$array = foo
$array -join ','
# or
(foo) -join ','
# will yield:
# val1,val: 42,50,90
. Since arrays are in PowerShell are fixed size, it is more
computationally expensive to manipulate them via adding and removing
elements. To build an array it is better to assign the result of a
pipeline or a loop, for example:
$arr1 = gci /windows

$arr2 = foreach ($file in gci /windows) { $file }
, and to remove elements of an array it’s better to assign the
source elements you want to a new array by filtering or index, for
example:
$arr1 = gci /windows

$arr2 = $arr1 | ?{ (split-path -extension $_) -ne '.exe' }

$arr3 = $arr2[20..29]
. Reading a PowerShell script into your current session and scope
works the same way as «dot-source» in POSIX shells, e.g.:
. ~/source/PowerShell/some_functions.ps1
, this will also work to reload your
$profile after making changes to it:
. Function parameter specifications get extremely complex in
PowerShell, but for simple functions this is all you need to know:
function foo($arg1) {
    # $arg1 will be first arg, $args will be the rest
}
function bar([array]$arg1, [string]$arg2) {
    # $arg1 must be an array, $arg2 must be a string, $args is the
    # rest.
}
# For more complex param definitions:
function baz {
    param(
        [Parameter(Mandatory=$true)]
        [ValidateNotNullOrEmpty()]
        [string]$UserName,
        [Parameter(Mandatory=$true)]
        [ValidateNotNullOrEmpty()]
        [string]$Password
        [validatescript({
            if (-not (test-path -pathtype leaf $_)) {
                throw "Certificate file '$_' does not exist."
            }
            $true
        })]
        [system.io.fileinfo]$CertificateFile
    )
}
.
Writing Simple Modules
As I explained here a module has its
own script scope. It can export functions, variables and aliases
into the importing scope.
A very basic module is a file that ends in the .psm1 extension and
looks something like this:
# open-thingy.psm1

function helper { ... }

function OpenMyThingy {
    ... stuff that uses (helper)
    ... which is not visible anywhere else
}

set-alias thingy -value OpenMyThingy

# Here you specify what is actually visible.
export-modulemember -function OpenMyThingy -alias thingy
. You can then load the module with:
import-module ~/source/pwsh/modules/open-thingy.psm1
, it will tell you if the verbs you are using as the first word of
your exported functions are not up to standard, which is why my
example function has such a stupid name.
You unload it with:
remove-module open-thingy
, and while you are debugging the module you will need to load it
many, many, many times, which you can do with:
import-module -force ~/source/pwsh/modules/open-thingy.psm1
. Sometimes this will not be sufficient, and you will need to unload
it, or even start a new PowerShell session.
For more about modules, see the Using PowerShell Gallery
section.
If you want to publish a module to the PowerShell Gallery, you can
follow this excellent
guide.
Just be aware that the publish-module cmdlet is called
publish-psresource -repo psgallery in newer versions of
PackageManagement/PowerShellGet. Also look at the sources of other
people’s Gallery modules for ideas on how to do things.
Miscellaneous Usage Tips
Another couple of extremely useful Cmdlets are get-clipboard and
set-clipboard to access the clipboard, they are alias to gcb and
scb respectively, for example:
gcb > clipboard-contents.txt
gc somefile.txt | scb
gc $profile | scb
. To open the explorer file manager for the current or any folder
you can just run explorer, e.g.:
explorer .
explorer (resolve-path /prog*s)
explorer shell:startup
. To open a file in its associated program, similarly to xdg-open
on Linux, you can use the start command or invoke the file like a
script, e.g.:
start some_text.txt
./some_file.txt
start some_code.cpp
./some_code.cpp
.
Elevated Access (sudo)
Windows now includes a sudo command which can be enabled in
Settings under System -> Developer Settings. However, the method
I describe here is better. In the usual case, the built-in sudo
command has a UAC prompt and only allows running commands in a new
window.
By connecting to localhost with ssh, you gain elevated access (if
you are an admin user, which is the normal case.) This will not
allow you to run GUI apps with elevated access, but most PowerShell
and console commands should work.
If you use the sudo function defined in the
$profile, then your current location
will be preserved.
All of this assumes you installed the ssh server as described
here.
To set this up:
sl ~/.ssh
gc id_rsa.pub >> authorized_keys
, then make sure the permissions are correct by running the commands
here.
Test connecting to localhost with ssh localhost for the first
time, if everything went well, ssh will prompt you to trust the host
key, and on subsequent connections you will connect with no prompts.
You can now run PowerShell and console elevated commands using the
sudo function.
Using PowerShell Gallery
To enable PowerShell Gallery to install third-party modules, run this command:
set-psrepository psgallery -installationpolicy trusted
, for new versions of PowerShellGet/PackageManagement, do this
instead:
set-psresourcerepository psgallery -trusted
, this is not necessary on Windows PowerShell.
You can then install modules using install-module, for example:
install-module PSWriteColor
. On newer versions the command is:
install-psresource PSWriteColor
. You can immediately use the new module, e.g.:
write-color -t 'foo' -c 'magenta'
. To update all your modules, you can do this:
get-installedmodule | update-module
. On newer versions the command is:
get-psresource | update-psresource
. The uninstall-module cmdlet can uninstall modules, usually, the
new cmdlet is uninstall-psresource.
. You may need to unload the module in all your sessions for the
package commands to be able to uninstall or update it, and sometimes
you will need to manually delete module directories, preferably in
an admin cmd prompt not running PowerShell, core or Windows.
In PowerShell Core, your modules are written to the
~/Documents/PowerShell/Modules directory, with each module written
to a <Module>/<Version> tree. You can delete them if they are not
in use. The system-wide directory is
$env:programfiles/PowerShell/7/Modules.
For Windows PowerShell the location of modules is
$env:programfiles/WindowsPowerShell/Modules.
To see where an imported module is installed, you can do, e.g.:
get-module posh-git | select path
. You can use import-module to load your installed modules by name
into your current session and remove-module to remove them.
If you get yourself into some trouble with module installations,
remember that .nupkg files are zip files, and you can extract them
to the appropriate <Module>/<Version> directory and this will
generally work.
Available Command-Line Tools and Utilities
The commands installed in the list of packages installed from
Scoop are
pretty much the same as in Linux.
There are a few very simplistic wrappers for similar functions as
the namesake Linux commands in the
$profile, including: pwd, which,
type, command, pgrep, pkill, head, tail, tac, touch,
sudo, env, and nproc.
The $profile function vsenv will set up the Visual
Studio environment for the specified architecture, for example vsenv x64,
vsenv arm64 or vsenv x86. By default, the profile loads the environment for
the host architecture. This can be run to change the environment as many times
as necessary.
See here about the sudo wrapper.
The ver function will give you some OS details.
The mklink <link> <target> function will make symlinks. With one
parameter, mklink will assume it is the target and make a link
with the name of the leaf in the current directory.
The rmlink function will delete symlinks, it is primarily intended
for compatibility with WinPS which does not support deleting
directory links with remove-item.
The rmalias function will delete aliases from all scopes in a way
that is compatible with WinPS.
I made these because the normal PowerShell approach for these is too
cumbersome, I generally recommend using and getting used to the
native idiom for whatever you are doing.
You will very likely write many of your own functions and aliases to
improve your workflow.
For example, I also define ltr to add sort lastwritetime and
count to add measure | % count to the end of a pipeline, and
alias select-object to s.
The readshim function will give you the installed target of WinGet symlinks,
Scoop shims and Chocolatey shims for executables you have installed.
The shortpath function will convert a raw path to a nicer form with the
current drive removed and path parts with spaces replaced with short DOS paths,
it can take args or pipeline input.
The realpath function is the same as shortpath but does not remove the
current drive, while sysppath will give you the standard Windows path with
backslashes for e.g. passing to cmd /c commands.
The megs function will show you the size of a file in mebibytes,
this is not really the right way to do this, the right way would be
to override the FileInfo and DirectoryInfo formats, I’m still
researching a nice way to do this.
The syslog function will show you a simple view of the System
event log, while the tasklog function will show you a simple view
of the Tasks event log, which you must first enable as described
here.
The patch command comes with Git for Windows, the
$profile adds an alias to it.
The install script in this
guide installs ripgrep, which is a very powerful and fast recursive text search
tool and is extremely useful for exploring codebases you are not familiar with.
The command for it is rg.
You get node and npm from the nodejs package. You can install
any NodeJS utilities you need with npm install -g <utility>, and
it will be available in your $env:PATH. For example, I use
doctoc and markdown-link-check to maintain this and other
markdown documents.
The python and pip tools (version 3) come from the WinGet
python package. To install utilities from pip use the --user
flag, e.g.:
, you will also need to add the user directory in your $env:PATH,
this is done for you in the $profile.
The path depends on the Python version and looks something like
this:
~/AppData/Roaming/Python/Python310/Scripts
, pip will give you a warning with the path if it’s not in your
$env:PATH.
The perl command comes from the perl package from Scoop, which is Strawberry
Perl portable, and is mostly fully functional, but does not allow installing
CPAN modules that require building with a C/C++ compiler.
If you need to install CPAN modules that require building with a compiler,
remove the perl Scoop package and install the WinGet
StrawberryPerl.StrawberryPerl package, which includes a MinGW toolchain. My
$profile removes the MinGW toolchain from
$env:PATH because it breaks other build tools, you can re-add the path when
you need to build CPAN modules or disable the override.
The tools cmake and ninja come with Visual Studio, the
$profile sets up the Visual Studio
environment. You can get dependencies from Conan or VCPKG, I
recommend Conan because it has binary packages. More on all that
later when I expand this guide. Be sure to pass -G Ninja to
cmake.
The Visual Studio C and C++ compiler command is cl. Here are a couple of
examples:
cl /std:clatest hello.c /Fe:hello.exe
cl /std:c++latest hello.cpp /Fe:hello.exe ole32.lib
. To start the Visual Studio IDE you can use the devenv command.
To open a cmake project, go into the directory containing
CMakeLists.txt and run:
. To debug an executable built with -DCMAKE_BUILD_TYPE=Debug, you
can do this:
devenv /debugexe file.exe arg1 arg2 ...
. The tool make is a native port of GNU Make, available in the «make» and
«mingw» packages from Scoop. See the section on setting it
up.
For an ldd replacement, you can do this:
dumpbin /dependents prog.exe
dumpbin /dependents somelib.dll
. To see the functions a .dll exports, you can do:
dumpbin /exports some.dll
, and to see the symbols in a static .lib library, you can do:
. To get the disassembly of any binary you can use:
. If you like, you can install the Scoop «mingw» package for MinGW GCC and Binutils, but be aware that
it will conflict with native build tools. It includes some useful utilities like
strings. See gci (split-path -parent (gcm gcc)) for the full list.
To force cmake to use MSVC when the Scoop «mingw» package is installed, pass
the following to cmake: -DCMAKE_C_COMPILER=cl -DCMAKE_CXX_COMPILER=cl .
The commands curl and tar are now standard Windows commands. The
implementation of tar is not particularly wonderful, it currently does not
handle symbolic links correctly and will not save your ACLs. You can save your
ACLs with icacls.
For an htop replacement, use ntop, installed
here, with the
wrapper function in the $profile.
You can run any cmd.exe commands with cmd /c <command>.
Many more things are available from WinGet, Scoop and Chcolatey and other
sources of course, at varying degrees of functionality.
Using BusyBox
If you have not installed BusyBox using the install
scripts, you can install it
from Scoop from the busybox-lean package. Do NOT install the busybox
package, because it installs a bunch of shims that will overwrite the better
programs for those purposes.
The user install script
creates shims for the useful and correctly working BusyBox utilities, and
installs some of the better versions for others.
The shim to start the BusyBox ash shell is sh. Or you can invoke it with
busybox sh, which is also a way to start any other BusyBox built-ins.
The BusyBox ash shell does not have a default initialization file like a
.bashrc. However, you can set it to something like:
$env:ENV = (convert-path ~/.shrc)
, to point to one, which the profile does for you if
you create one.
Here is a basic .shrc file you can use (it is in this repository):
export LC_ALL=en_DE.UTF-8
export PAGER=less

stty -ixon 2>/dev/null

set -o notify
set -o ignoreeof

alias ls='ls -h --color=auto'

# vim:ft=bash sw=4 et sts=4:
. You may like my Git prompt which works with BusyBox ash, you can find it
here.
To make a Windows Terminal profile for BusyBox, you can use something like this:
{
    "commandline": "cmd /k set ENV=%USERPROFILE%/.shrc && %USERPROFILE%/scoop/shims/busybox.exe sh && exit",
    "guid": "{0e1f141b-f220-488d-a5e8-8e06a1cc1ff5}",
    "icon": "C:/Windows/System32/cmd.exe",
    "hidden": false,
    "name": "BusyBox ash",
    "startingDirectory": "%USERPROFILE%"
}
.
Using MSYS2
MSYS2 is a Cygwin runtime system
for Windows with some patches for basic paths translations, which make it more
convenient than Cygwin to use as a Windows shell.
Run this script from a local admin terminal, which is in this repository as
install-msys2.ps1, to install MSYS2:
$erroractionpreference = 'stop'

if (-not (test-path /msys64)) {
    winget install --force msys2.msys2
}

$nsswitch_conf = '/msys64/etc/nsswitch.conf'
$conf = gc $nsswitch_conf | %{ $_ -replace '^db_home:.*','db_home: windows' }
$conf | set-content $nsswitch_conf

$env:MSYSTEM = 'MSYS'

1..5 | %{ /msys64/usr/bin/bash -l -c 'pacman -Syu --noconfirm' }

/msys64/usr/bin/bash -l -c 'pacman -S --noconfirm --needed man-db vim git openssh tmux tree mingw-w64-clang-x86_64-ripgrep'

if (-not (test-path ~/.bash_profile)) {
    "source ~/.bashrc`n" | set-content ~/.bash_profile
}

if (-not (test-path ~/.bashrc)) {
    # SET BACK TO MASTER ON FINAL COMMIT
    iwr 'https://raw.githubusercontent.com/rkitover/windows-dev-guide/refs/heads/master/.bashrc' -out ~/.bashrc
}
. The script installs a basic .bashrc if you do not have one, this is the
file:
export LC_ALL=en_DE.UTF-8
export PAGER=less

stty -ixon 2>/dev/null

ulimit -c unlimited

set -o notify
set -o ignoreeof

# Remove background colors from `dircolors`.
eval "$(f=$(mktemp); dircolors -p | \
    sed 's/ 4[0-9];/ 01;/; s/;4[0-9];/;01;/g; s/;4[0-9] /;01 /' > "$f"; \
    dircolors "$f"; rm "$f")"

alias ls="ls -h --color=auto --hide='ntuser*' --hide='NTUSER*'"
alias grep="grep --color=auto"
alias egrep="egrep --color=auto"
alias fgrep="fgrep --color=auto"

if [ -n "$MSYSTEM" ]; then
    [ -x /clang64/bin/rg ]  && alias rg=/clang64/bin/rg
    [ -x /clang64/bin/rga ] && alias rga=/clang64/bin/rga
fi

shopt -s histappend
shopt -s globstar
shopt -s checkwinsize

PROMPT_COMMAND="history -a; history -c; history -r; $PROMPT_COMMAND"

COMP_CONFIGURE_HINTS=1
COMP_TAR_INTERNAL_PATHS=1

source /usr/share/bash-completion/bash_completion 2>/dev/null

export HISTSIZE=30000
export HISTCONTROL=$HISTCONTROL${HISTCONTROL+,}ignoredups:erasedups
export HISTIGNORE=$'[ \t]*:&:[fb]g:exit:ls' # Ignore the ls command as well
. The example profile adds some functions for launching
the MSYS2 environments, for example
msys2 will launch an MSYS environment shell, while clang64 will launch a
shell for building with CLANG64 etc..
If you would like to use my prompt with MSYS2, you can find it
here, it allows turning off Git
status when more speed is needed.
If you would like history completions in bash, try
this.
To add MSYS2 environments to your Terminal menu, add this to your
settings.json:
            {
                "commandline": "C:\\msys64\\msys2_shell.cmd -defterm -here -no-start -msys2 -shell bash",
                "guid": "{656f4496-bff3-4876-acc4-8c5cd3c7c91c}",
                "hidden": false,
                "icon": "C:\\msys64\\msys2.ico",
                "name": "MSYS2: MSYS",
                "startingDirectory": "%USERPROFILE%"
            },
            {
                "commandline": "C:\\msys64\\msys2_shell.cmd -defterm -here -no-start -clang64 -shell bash",
                "guid": "{a6af7f5b-1a50-4f7e-828d-26c3977be4ef}",
                "hidden": false,
                "icon": "C:\\msys64\\clang64.ico",
                "name": "MSYS2: CLANG64",
                "startingDirectory": "%USERPROFILE%"
            },
            {
                "commandline": "C:\\msys64\\msys2_shell.cmd -defterm -here -no-start -ucrt64 -shell bash",
                "guid": "{b973b9fa-fa61-4487-bdc1-4716f91aad00}",
                "hidden": false,
                "icon": "C:\\msys64\\ucrt64.ico",
                "name": "MSYS2: UCRT64",
                "startingDirectory": "%USERPROFILE%"
            },
            {
                "commandline": "C:\\msys64\\msys2_shell.cmd -defterm -here -no-start -mingw64 -shell bash",
                "guid": "{ac1f6f05-bc9d-4617-9554-6f783e9afef5}",
                "hidden": false,
                "icon": "C:\\msys64\\mingw64.ico",
                "name": "MSYS2: MINGW64",
                "startingDirectory": "%USERPROFILE%"
            },
            {
                "commandline": "C:\\msys64\\msys2_shell.cmd -defterm -here -no-start -mingw32 -shell bash",
                "guid": "{f2f8f3b2-52b2-42a9-84b2-a3c6826353e2}",
                "hidden": false,
                "icon": "C:\\msys64\\mingw32.ico",
                "name": "MSYS2: MINGW32",
                "startingDirectory": "%USERPROFILE%"
            }
.
To install the basic set of build programs for an MSYS2 environment, use the
script install-msys2-buildenv.ps1 from this repo with the build environment
you want as the argument, the default is CLANG64. This script does not have to
be run as an admin. Here it is:
$erroractionpreference = 'stop'

$orig_path = $env:PATH
$env:PATH  = "C:\msys64\usr\bin;$env:PATH"

if (-not $args) {
    $args = 'clang64'
}

foreach ($env in $args) {
    $env = $env.tolower()

    if ($env -eq 'msys') {
	$arch = ''
    }
    elseif ($env -eq 'clang64') {
	$arch = 'mingw-w64-clang-x86_64'
    }
    elseif ($env -eq 'clangarm64') {
	$arch = 'mingw-w64-clang-aarch64'
    }
    elseif ($env -eq 'mingw32') {
	$arch = 'mingw-w64-i686'
    }
    elseif ($env -eq 'ucrt64') {
	$arch = 'mingw-w64-ucrt-x86_64'
    }
    elseif ($env -eq 'mingw64') {
	$arch = 'mingw-w64-x86_64'
    }
    else {
	write-error -ea stop "Unknown MSYS2 build environment: $env"
    }

    if ($env -eq 'msys') {
	$pkgs = echo isl mpc msys2-runtime-devel msys2-w32api-headers msys2-w32api-runtime
    }
    else {
	$pkgs = echo crt-git headers-git tools-git libmangle-git
    }

    if ($env -match '64$') {
	$pkgs += 'extra-cmake-modules'
    }

    if ($env -eq 'clang64') {
	$pkgs += echo lldb clang
    }
    else {
	$pkgs += echo gcc gcc-libs

	if ($env -ne 'msys') {
	    $pkgs += 'gcc-libgfortran'
	}
    }

    $pkgs += echo binutils cmake make pkgconf `
	windows-default-manifest ninja gdb ccache

    if ($arch) {
	$pkgs = $pkgs | %{ "${arch}-$_" }
    }

    $pkgs += echo git make

    /msys64/usr/bin/pacman -Sy --noconfirm
    /msys64/usr/bin/pacman -S --noconfirm --needed $pkgs
}

$env:PATH = $orig_path
.
Using GNU Make
GNU Make is available from the «make» Scoop package and also comes with the
«mingw» Scoop package, the «make» package is installed by the install
scripts here.
It will however use cmd.exe to execute shell commands by default and will not
run any normal Makefiles for POSIX/Linux.
There are three ways to fix this, one is to use BusyBox ash as
the shell for Make, which will run POSIX shell commands, which should be
sufficient for most Makefiles. If, however, you need to run GNU shell commands
from your Makefiles, you can use MSYS2 or Git Bash as the shell, which will run
GNU shell commands that come with MSYS2 or the Git for Windows distribution
(which is based on MSYS2) and any others in your $env:PATH.
To use BusyBox ash as your Make shell, create the file
~/.local/bin/make.cmd with the following contents:
, and make sure ~/.local/bin is in your $env:PATH, which the
profile does for you if it exists.
To use MSYS2 as your Make shell, create the file ~/.local/bin/make.cmd with the
following contents:
@make.exe PATH="%PATH%;C:\msys64\usr\bin" SHELL=/msys64/usr/bin/bash %*
. To use Git Bash as your Make shell, create the file ~/.local/bin/make.cmd
with the following contents:
@make.exe PATH="%PATH%;C:\progra~1\Git\usr\bin" SHELL=/progra~1/Git/usr/bin/bash %*
.
If you run POSIX/Linux Makefiles, you may run into issues with unquoted
substitutions returning paths, quoting them in single quotes will generally fix
the problem. And of course you may have other issues in this environment, see
the
Makefile
in this repository for a stupid example of how to deal with such an issue.
When writing Makefiles, be aware that you cannot use literal Windows paths with
backslashes as that is an escape character in POSIX shells, you can enclose them
in single quotes or use forward slashes, which work for the vast majority of
Windows programs.
Using tmux with PowerShell
Recent changes in the Cygwin runtime allow for using a Cygwin runtime-based tmux
like the one in MSYS2.
First follow the instructions in the Using MSYS2 section to
install MSYS2, which also install its tmux package.
If you would prefer to use tmux from WSL, see Appendix B: Using tmux with
PowerShell from WSL.
Then, create a ~/.tmux-pwsh.conf with your tmux configuration of choice, with
the following at the very end:
orig_path="$PATH"
set-environment -g PATH "/c/msys64/usr/bin:$PATH"
set -g default-command "PATH='$orig_path' /c/progra~1/PowerShell/7/pwsh -nologo"
. If you want to use a configuration that behaves like screen I have one
here. You can load a
configuration file before the preceding statement with the source statement in
the tmux config.
To run tmux, run:
/msys64/usr/bin/tmux -f '~/.tmux-pwsh.conf'
. The included profile function tmux will do this,
and also run tmux commands for your current session.
Creating Scheduled Tasks (cron)
You can create and update tasks for the Windows Task Scheduler to
run on a certain schedule or on certain conditions with a small
PowerShell script. I will provide an example here.
First, enable the tasks log by running the following in an admin
shell:
$logname = 'Microsoft-Windows-TaskScheduler/Operational'
$log = new-object System.Diagnostics.Eventing.Reader.EventLogConfiguration $logname
$log.isenabled=$true
$log.savechanges()
. This is from:
https://stackoverflow.com/questions/23227964/how-can-i-enable-all-tasks-history-in-powershell/23228436#23228436
. This will allow you to use the tasklog function from the
$profile to view the Task Scheduler log.
This is a script that I use for the nightly builds for a project.
The script must be run in an elevated shell, as this is required to
register a task:
$taskname = 'Nightly Build'
$runat    = '23:00'

$trigger = new-scheduledtasktrigger -at $runat -daily

if (-not (test-path /logs)) { mkdir /logs }

$action  = new-scheduledtaskaction `
    -execute 'pwsh' `
    -argument ("-noprofile -executionpolicy remotesigned " + `
	"-command ""& '$(join-path $psscriptroot build-nightly.ps1)'""" + `
	" *>> /logs/build-nightly.log")

$password = (get-credential $env:username).getnetworkcredential().password

register-scheduledtask -force `
    -taskname $taskname `
    -trigger $trigger -action $action `
    -user $env:username `
    -password $password `
    -ea stop | out-null

"Task '$taskname' successfully registered to run daily at $runat."
. With the -force parameter to register-scheduledtask, you can
update your task settings and re-run the script and the task will be
updated.
With -runlevel set to highest the task runs elevated, omit this
parameter to run with standard permissions.
You can also pass a -settings parameter to
register-scheduledtask taking a task settings object created with
new-scheduledtasksettingsset, which allows you to change many
options for how the task is run, see the help documentation for
it.
You can use:
start-scheduledtask 'Task Name'
, to test running your task.
To delete a task, run:
unregister-scheduledtask -confirm:$false 'Task Name'
. See also the virt-viewer
section for an
example of a task that runs at logon.
Working With virt-manager VMs Using virt-viewer
Unfortunately virt-manager is unavailable as a native utility, if
you like you can run it using WSL or even Cygwin.
However, virt-viewer is available from WinGet using the id RedHat.VirtViewer
and with a bit of setup can allow you to work with your remote virt-manager
VMs conveniently.
The first step is to edit the XML for your VMs and assign
non-conflicting spice ports bound to localhost for each one.
For example, for my Windows build VM I have:
<graphics type='spice' port='5901' autoport='no' listen='127.0.0.1'>
  <listen type='address' address='127.0.0.1'/>
</graphics>
, while my macOS VM uses port 5900.
Edit your sshd config and make sure the following is enabled:
. Then restart sshd.
Forward the spice ports for the VMs you are interested in working
with over ssh. To do that, edit your ~/.ssh/config and set your
server entry to something like the following:
Host your-server
  LocalForward 5900 localhost:5900
  LocalForward 5901 localhost:5901
  LocalForward 5902 localhost:5902
, then if you have a tab open in the terminal with an ssh connection
to your server, the ports will be forwarded.
You can also make a separate entry just for forwarding the ports
with a different alias, for example:
Host your-server-ports
  HostName your-server
  LocalForward 5900 localhost:5900
  LocalForward 5901 localhost:5901
  LocalForward 5902 localhost:5902
, and then create a continuously running
task that starts at logon to keep
the ports open, with a command such as:
ssh -NT your-server-ports
. Here is a script to create this task:
$erroractionpreference = 'stop'

$taskname = 'Forward Server Ports'

$trigger = new-scheduledtasktrigger -atlogon

$action  = new-scheduledtaskaction `
    -execute (get-command ssh).source `
    -argument '-NT server-ports'

$password = (get-credential $env:username).getnetworkcredential().password

register-scheduledtask -force `
    -taskname $taskname `
    -trigger $trigger -action $action `
    -user $env:username `
    -password $password `
    -ea stop | out-null

"Task '$taskname' successfully registered to run at logon."
. As an alternative to creating a task, you can make a startup
folder shortcut, first open the folder:
, create a shortcut to pwsh, then open the properties for
the shortcut and set the target to something like:
"C:\Program Files\PowerShell\7\pwsh.exe" -windowstyle hidden -c "ssh -NT server-ports"
. Make sure Run: is changed from Normal window to Minimized.
Once that is done, the last step is to install virt-viewer from WinGet using
the id RedHat.VirtViewer and add the functions to your
$profile for launching it for your VMs.
I use these:
function winbuilder {
    &(resolve-path 'C:\Program Files\VirtViewer*\bin\remote-viewer.exe') -f spice://localhost:5901 *> $null
}

function macbuilder {
    &(resolve-path 'C:\Program Files\VirtViewer*\bin\remote-viewer.exe') -f spice://localhost:5900 `
        --hotkeys=release-cursor=ctrl+alt *> $null
}
. Launching the function will open a full screen graphics console to
your VM.
Moving your mouse cursor when it’s not grabbed to the top-middle
will pop down the control panel with control and disconnect
functions.
If your VM requires grabbing and ungrabbing input, use the
--hotkeys parameter as in the example above to define a hotkey to
release input.
Using X11 Forwarding Over SSH
Install vcxsrv from WinGet using the id marha.VcXsrv.
It is necessary to disable DPI scaling for this app. First, run this
command in an admin terminal:
[environment]::setenvironmentvariable('__COMPAT_LAYER', 'HighDpiAware /M', 'machine')
. Open the app folder:
explorer (resolve-path /progr*s/vcxsrv)
, open the properties for vcxsrv.exe and go to Compatibility -> Change High DPI settings, at the bottom under High DPI scaling override check the checkbox for Override high DPI scaling behavior and under Scaling performed by: select Application.
Reboot your computer, which by the way, you can do with
restart-computer.
Open your startup shortcuts:
, and create a shortcut to vcxsrv.exe with the target set to:
"C:\Program Files\VcXsrv\vcxsrv.exe" -multiwindow -clipboard -wgl
. Launch the shortcut.
Make sure that C:\Program Files\VcXsrv is in your $env:PATH and
that you generate an ~/.Xauthority file, the sample $profile does this for you. To generate an ~/.Xauthority file do the following:
xauth add ':0' . ((1..4 | %{ "{0:x8}" -f (get-random) }) -join '') | out-null
. On your remote computer, add this function to your ~/.bashrc:
x() {
    (
        scale=1.2
        export GDK_DPI_SCALE=$scale
        export QT_SCALE_FACTOR=$scale
        export QT_FONT_DPI=96
        export ELM_SCALE=$scale
        export XAUTHORITY=$HOME/.Xauthority
        export GTK_THEME=Adwaita:dark
        # Install libqt5-qtstyleplugins and qt5ct and configure your Qt style with the qt5ct GUI.
        export QT_PLATFORM_PLUGIN=qt5ct
        export QT_QPA_PLATFORMTHEME=qt5ct
        ("$@" >/dev/null 2>&1 &) &
    ) >/dev/null 2>&1
}
. Edit your remote computer sshd config and make sure the following
is enabled:
, then restart sshd.
On the local computer, edit ~/.ssh/config and set the
configuration for your remote computer as follows:
Host remote-computer
  ForwardX11 yes
  ForwardX11Trusted yes
. Make sure $env:DISPLAY is set in your
$profile as follows:
if (-not $env:DISPLAY) {
    $env:DISPLAY = '127.0.0.1:0.0'
}
. Open a new ssh session to the remote computer.
You can now open X11 apps with the x function you added to your
~/.bashrc, e.g.:
. Set your desired scale in the ~/.bashrc function and configure
the appearance for your Qt apps with qt5ct.
One huge benefit of this setup is that you can use xclip on your
remote computer to put things into your local clipboard.
Mounting SMB/SSHFS Folders
This is as simple as making a symbolic link to a UNC path.
For example, to mount a share on an SMB file server:
sl ~
ni -it sym work-documents -tar //corporate-server/documents
. To mount my NAS over SSHFS I can do this, assuming the WinGet
sshfs package (id SSHFS-Win.SSHFS-Win) is installed:
sl ~
ni -it sym nas -tar //sshfs.kr/remoteuser@remote.host!2223/mnt/HD/HD_a2/username
. Here 2223 is the port for ssh. Use sshfs.k instead of
sshfs.kr to specify a path relative to your home directory.
Appendix A: Chocolatey Usage Notes
I have switched this guide to WinGet and Scoop because that’s what people want
to use these days, however Chocolatey is still a very useful source of software
that you may want to use, I will describe it here.
To install the Chocolatey package manager, run this from an admin PowerShell:
iwr 'https://chocolatey.org/install.ps1' | % content | iex
, then relaunch your terminal session.
This is the old install script for this guide using Chocolatey if
you would prefer to use it instead of WinGet and Scoop:
[environment]::setenvironmentvariable('POWERSHELL_UPDATECHECK', 'off', 'machine')
set-service beep -startuptype disabled
choco feature enable --name 'useRememberedArgumentsForUpgrades'
choco install -y visualstudio2022community --params '--locale en-US'
choco install -y visualstudio2022-workload-nativedesktop
choco install -y vim --params '/NoDesktopShortcuts'
choco install -y 7zip NTop.Portable StrawberryPerl bzip2 dejavufonts diffutils dos2unix file gawk git gpg4win grep gzip hackfont less make neovim netcat nodejs notepadplusplus powershell-core python ripgrep sed sshfs unzip xxd zip
## Only run this on Windows 10 or older, this package is managed by Windows 11.
#choco install -y microsoft-windows-terminal
## If you had previously installed it and are now using Windows 11, run:
#choco uninstall microsoft-windows-terminal -n --skipautouninstaller
choco install -y openssh --prerelease --force --params '/SSHServerFeature /PathSpecsToProbeForShellEXEString:$env:programfiles\PowerShell\*\pwsh.exe'
refreshenv
sed -i 's/^[^#].*administrators.*/#&/g' /programdata/ssh/sshd_config
restart-service sshd
&(resolve-path /prog*s/openssh*/fixuserfilepermissions.ps1)
import-module -force (resolve-path /prog*s/openssh*/opensshutils.psd1)
repair-authorizedkeypermission -file ~/.ssh/authorized_keys
ni -it sym ~/.config -tar (resolve-path ~/AppData/Local)
, run it in an admin PowerShell terminal.
Here are some commands for using the Chocolatey package manager.
To search for a package:
. To install a package:
. To get the description of a package:
, this will also include possible installation parameters that you
can pass as a single string on install, e.g.:
choco install -y package --params '/NoDesktopShortcuts
/SomeOtherParam'
, if you use install params make sure you enabled the
useRememberedArgumentsForUpgrades choco feature, otherwise your
params will not be applied on upgrades and your package may break,
to do this run:
choco feature enable --name 'useRememberedArgumentsForUpgrades'
. To uninstall a package:
, you might run into packages that can’t uninstall, this can happen
when a package was installed with an installer and there is no
specification for how to uninstall, in which case you would have to
clean it up manually.
If you need to uninstall packages that depend on each other, you
must pass the list in the correct order, or choco will throw a
dependency error. For example, this would be the correct order in
one particular case:
choco uninstall -y transifex-client python python3
, any other order would not work. You can also use the -x option
to remove packages and all of their dependencies, or run the command
repeatedly until all packages are uninstalled.
To list installed packages:
. To update all installed packages:
. Sometimes after you install a package, your terminal session will
not have it in $env:PATH, you can restart your terminal or run
refreshenv to re-read your environment settings. This is also in
the $profile, so starting a new tab will
also work.
Chocolatey Filesystem Structure
The main default directory for choco and packages is
/ProgramData/chocolatey.
You can change this directory BEFORE you install choco itself like so:
[environment]::setenvironmentvariable('ChocolateyInstall', 'C:\Some\Path', 'machine')
. This can only be changed before you install choco and any
packages, it CANNOT be changed after it is already installed and
any packages are installed.
The directory /ProgramData/chocolatey/bin contains the .exe
«shims», which are kind of like symbolic links, that point to the
actual program executables. You can run e.g.:
, to see the target path and more information about shims. The
$profile has a shimread function to
get the target of shims.
The directory /ProgramData/chocolatey/lib contains the package
install directories with various package metadata and sometimes the
executables as well.
The directory /tools is sometimes used by packages as the
installation target as well.
You can change this directory like so:
[environment]::setenvironmentvariable('ChocolateyToolsLocation', 'C:\Some\Path', 'machine')
, this can be changed after installation, in which case make sure to
move any files there to the new location.
Many packages simply run an installer and do not install to any
specific location, however various package metadata will still be
available under /ProgramData/chocolatey/lib/<package>.
Appendix B: Using tmux with PowerShell from WSL
It is possible to use tmux from WSL with PowerShell.
This section is based on the guide by superuser.com
member NotTheDr01ds here.
First set up WSL with your distribution of choice, I won’t cover this here as
there are many excellent guides available. If for some reason you are not able
to use virtual machines with Hyper-V, you can use WSL version 1 which is not a
virtual machine.
Then create a ~/.tmux-pwsh.conf in your WSL home with your tmux
configuration of choice including this statement:
set -g default-command "'/mnt/c/Program Files/PowerShell/7/pwsh.exe' -nologo -noexit -c sl"
. If you want to use a configuration that behaves like screen I have one
here. You can load a
configuration file before the preceding statement with the source statement in
the tmux config.
To run tmux, run:
wsl -- tmux -f '~/.tmux-pwsh.conf'
. The included profile function tmux will do this,
and also run tmux commands for your current session.
As a software developer and architect, I’m always looking at options for my customers whether they’re around technologies, tools, hosting, security and tenancy model (being the last three mandatory in a “cloudy” world) among some other factors and considerations. To me crafting software it’s more than cracking code and ensure it compiles, it’s more about building smart solutions that will help people, as well as enjoying the building process. What really makes it enjoyable are two things (in my humble and personal opinion: First, what the challenge and requirements are; Second, technology to use and lastly, the IDE).
In regards to points 2 & 3, I have to say that C++ is an awesome and powerful language and similarly to C, they both have been standard and platform independent since their very first versions, something that was achieved by Java and subsequently by .NET (and its Linux implementation, Mono for instance). So what’s all this introductory fuss about then? well… This post is about building a very simple native Windows application using non-Microsoft technologies:
- GCC – This article explains “How to install the latest GCC on Windows”
- CygWin
- Jetbrains CLion – Cross-platform IDE
Our source code Today is pretty straightforward, it’s classic Win32 development and if you’re like me and keen on learning how to do this kind of development without any frameworks, I can mention two books that helped me a lot when I was learning (They’re not recent or new though and the OS has changed a lot since the books were originally published – They are a relic, actually)
The code and a screenshot of the application running are shown below
#include <windows.h>

HINSTANCE  hInst;
const char g_szClassName[] = "bonafideideasWindowClass";

int WINAPI WinMain(HINSTANCE hInstance, HINSTANCE hPrevInstance,
                   LPSTR lpCmdLine, int nCmdShow){
    MSG Msg;
    HWND hwnd;
    WNDCLASSEX wc;

    wc.lpszMenuName  = NULL;
    wc.hInstance     = hInstance;
    wc.lpszClassName = g_szClassName;
    wc.cbSize        = sizeof(WNDCLASSEX);
    wc.cbClsExtra      = wc.cbWndExtra  = 0;
    wc.style         = CS_HREDRAW | CS_VREDRAW ;
    wc.hbrBackground = (HBRUSH)(COLOR_WINDOW+1);
    wc.hCursor       = LoadCursor(NULL, IDC_ARROW);
    wc.hIcon         = LoadIcon(NULL, IDI_APPLICATION);
    wc.hIconSm       = LoadIcon(NULL, IDI_APPLICATION);
    wc.lpfnWndProc   = [=](HWND hwnd, UINT msg, WPARAM wParam, LPARAM lParam) -> LRESULT {
        HDC hdc;
        RECT rect;
        TEXTMETRIC tm;
        PAINTSTRUCT ps;

        switch(msg)    {
            case WM_CLOSE:
                if (MessageBox(NULL, "Are you sure you want to quit?",
                               "Confirmation", MB_ICONQUESTION | MB_YESNO) == IDYES)
                    DestroyWindow(hwnd);
                break;

            case WM_DESTROY:
                PostQuitMessage(0);
                break;

            case WM_PAINT:
                hdc = BeginPaint (hwnd, &ps) ;
                GetClientRect (hwnd, &rect) ;
                DrawText (hdc, TEXT ("Native Windows Development with CygWin and CLion."),
                          -1, &rect, DT_SINGLELINE | DT_CENTER | DT_VCENTER) ;
                EndPaint (hwnd, &ps) ;
                return 0 ;

            default:
                return DefWindowProc(hwnd, msg, wParam, lParam);
        }

        return 0;
    };


    if(!RegisterClassEx(&wc))    {
        MessageBox(NULL, "Window Registration Failed", "Error",   MB_ICONEXCLAMATION | MB_OK);
        return 0;
    }

    hwnd = CreateWindowEx(
            WS_EX_CLIENTEDGE,
            g_szClassName,
            "Simplest Windows Native App built with CLion",
            WS_OVERLAPPEDWINDOW,
            CW_USEDEFAULT, CW_USEDEFAULT, 500, 250,
            NULL, NULL, hInstance, NULL);

    if(hwnd == NULL)    {
        MessageBox(NULL, "Window Creation Failed", "Error",   MB_ICONEXCLAMATION | MB_OK);
        return 0;
    }

    ShowWindow(hwnd, nCmdShow);
    UpdateWindow(hwnd);

    while(GetMessage(&Msg, NULL, 0, 0) > 0)    {
        TranslateMessage(&Msg);
        DispatchMessage(&Msg);
    }
    return Msg.wParam;
}

Now, let’s talk a bit of CLion… As previously mentioned it’s a cross-platform IDE (I’m writing a few things on Linux with it, actually). It’s very similar to IntelliJ IDEA (Keep in mind it’s from the same company). The UI is easy to use and functional (It’s not fair to compare to more mature products) and just to give you a glimpse

Besides providing with a good and decent Intellisense support and fast parsing oh header files and libraries, good debugging experience and it also supports most of the new features in C++11 and C++14 Standards (This is because of using GCC as compiler).

Happy coding!,
Angel
Время на прочтение7 мин
Количество просмотров46K
В Windows 10 универсальные Windows-приложения на управляемых языках (C#, VB) проходят в магазине процедуру компиляции в машинный код с использованием .NET Native. В данной статье мы предлагаем вам познакомиться подробнее с тем, как это работает и как это влияет на процесс разработки приложений. Ниже вы найдете видео-интервью с представителем команды разработки .NET Native и перевод соответствующей статьи.
Что такое .NET Native?
.NET Native – это технология предварительной компиляции, используемая при создании универсальных Windows-приложений в Visual Studio 2015. Инструменты .NET Native компилируются ваши IL-библиотеки с управляемым кодом в нативные библиотеки. Каждое управляемое (C# или VB) универсальное Windows-приложение использует данную технологию. Приложения автоматически компилируются в нативный код прежде, чем они попадут на конечное устройство. Если вы хотите погрузиться глубже в то, как это работает, рекомендуем статью “Компиляция приложений с помощью машинного кода .NET”.
Как .NET Native повлияет на меня и мое приложение?
Конкретные показатели могут отличаться, но в большинстве случаев ваше приложение будет запускаться быстрее, работать с большей скоростью и потреблять меньше системных ресурсов.
- До 60% повышения скорости холодного старта
- До 40% повышения скорости горячего старта
- Уменьшенное потребление памяти при компиляции в машинный код
- Нет зависимости от десктопного .NET Runtime при установке
Так как ваше приложение скомпилировано в машинный код, вы получите прирост производительности, связанный со скоростью выполнения нативного кода (близко к производительности C++). При этом вы по-прежнему можете пользоваться преимуществами индустриальных языков программирования C# или VB и связанных инструментов.
Вы также можете продолжать использовать всю мощь программной модели, доступной в .NET с широким набором API для описания бизнес-логики и со встроенными механизмами управления памятью и обработки исключений.
Другими словами, вы получаете лучшее из обоих миров: управляемая разработка с производительностью близкой к С++. Это ли не прекрасно?
Различия настроек компиляции в отладке и релизе
Компиляция в .NET Native – это сложный процесс, обычно более медленный в сравнении с классической компиляцией в .NET. Преимущества, упомянутые выше, имеют цену в виде времени компиляции. Вы можете выбрать компилировать нативно каждый раз, когда вы запускаете приложение, но при этому вы будете тратить больше времени, ожидая окончания сборки. Инструменты Visual Studio могут помочь вам лучше управлять этим, сглаживая, насколько это возможно, опыт разработки.
Когда вы собираете проект и запускаете в режиме отладки, вы используете IL-код поверх CoreCLR, упакованного в ваше приложение. Системные сборки .NET добавляются к коду вашего приложения, и ваше приложение учитывает зависимость от пакета Microsoft.NET.CoreRuntime (CoreCLR).
Это означает, что вы получаете наилучший возможный опыт разработки: быстрые компиляция и развертывание, широкие возможности отладки и диагностики и работоспособность всех других инструментов, к которым вы привыкли при разработке на .NET.
Когда вы переключаетесь в режим релиза, по умолчанию, ваше приложение начинает использовать цепочку сборки .NET Native. Так как пакет компилируется в машинный код, более не требуется, чтобы пакет содержал библиотеки .NET-фреймворка. В дополнение, пакет теперь зависит от свежей версии .NET Native среды – в отличие от пакета CoreCLR. Среда исполнения .NET Native на устройстве будет всегда совместима с пакетом вашего приложения.
Локальная нативная компиляция с релизной конфигурацией позволяет вам протестировать приложение в окружении, близком к тому, что будет у конечного пользователя. Важно регулярно тестировать в таком режиме по мере разработке.
Хорошее правило, которое вы можете взять себе в привычку, — это тестировать ваше приложение таким образом в течение процесса разработки, чтобы убедиться, что вы вовремя находите и исправляете проблемы, которые могут происходить в результате компиляции с .NET Native. В большинстве случаев никаких проблем не должно быть, однако, мы знаем о нескольких вещах, которые работают не очень хорошо с .NET Native. К примеру, массивы с размерностью больше четырех. В конце концов, ваши пользователи получат версию вашего приложения, скомпилированную через .NET Native, так что это хорошо бы проверить, что все работает заранее и до того, как приложение будет доставлено.
В дополнение к тому, что хорошо бы тестировать в режиме нативной компиляции, вы также можете заметить, что конфигурация сборки AnyCPU исчезла. С появлением .NET Native конфигурация AnyCPU больше не имеет смысла, так как нативная компиляция зависит от архитектуры. Дополнительным следствием этого является то, что, когда вы упаковываете ваше приложение, вам нужно выбрать все три конфигурации архитектуры (x86, x64 и ARM), чтобы быть уверенным, что ваше приложение будет запускаться на максимальном количестве устройств. Все-таки это универсальная Windows-платформа! По умолчанию, Visual Studio настроена для сборки именно таким образом, как показано на снимке ниже.
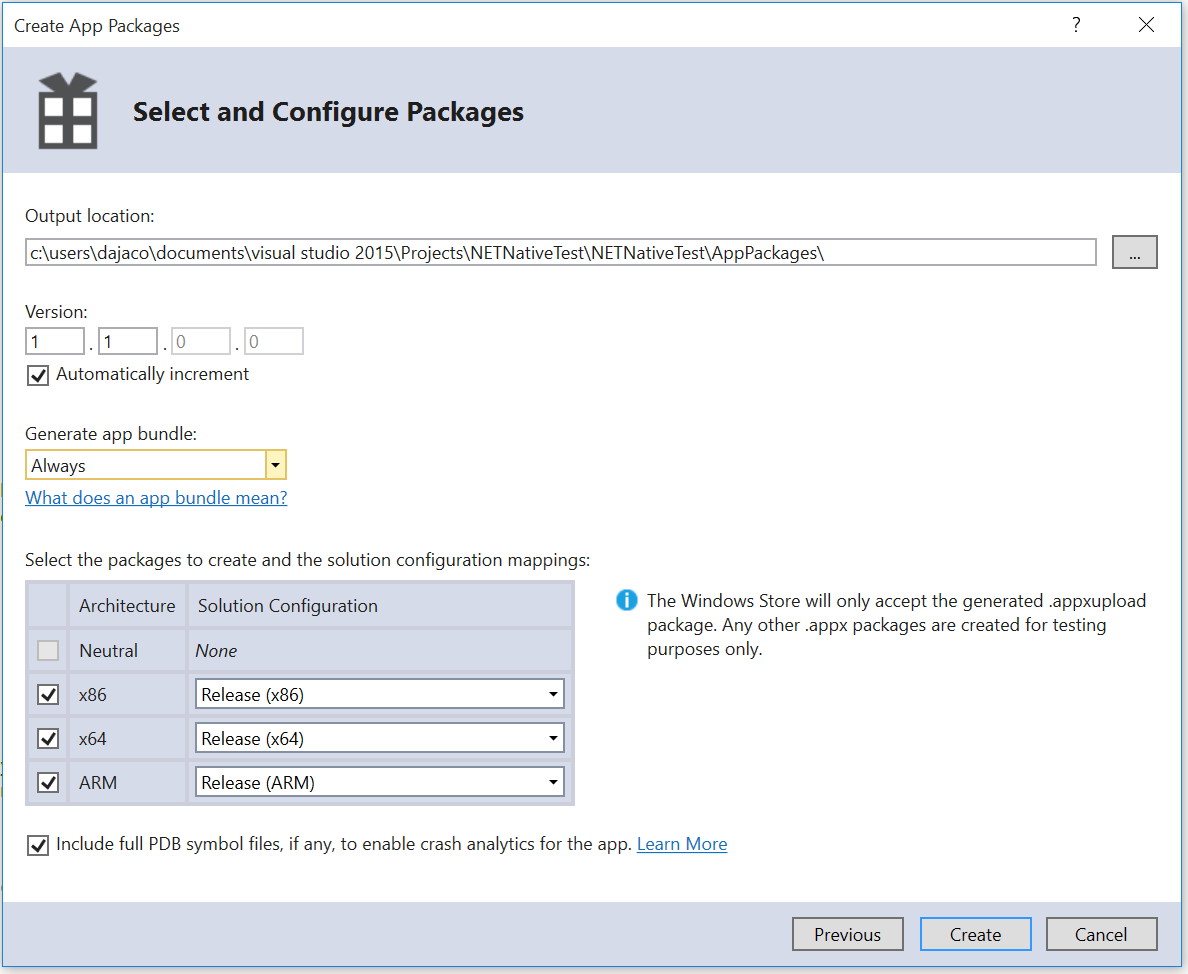
Все три архитектуры выбраны по умолчанию
Важно отметить, что вы по-прежнему можете собирать AnyCPU-библиотеки и использовать соответствующие DLL в вашем UWP-приложении. Эти компоненты будут скомпилированы в бинарные библиотеки под соответствующие архитектуры, указанные в настройках проекта.
Наконец, последнее значительное изменение в привычном подходе в результате перехода на .NET Native – это то, как вы создаете пакеты для магазина. Одна из ключевых возможностей .NET Native заключается в том, что компилятор может работать в облаке. Когда вы создаете пакет для магазина в Visual Studio, создаются два пакета: .appxupload для магазина и “тестовый” .appx для локальной установки. Пакет .appxupload содержит MSIL-сборки, а также явные отсылки на версию .NET Native, используемую вашим приложением (указано в AppxManifest.xml). Далее этот пакет отправляется в магазин и компилируется с использованием той же версии цепочки компиляции .NET Native. Так как компилятор находится в облаке, он может быть использован повторно для исправления багов без необходимости локальной перекомпиляции приложений.
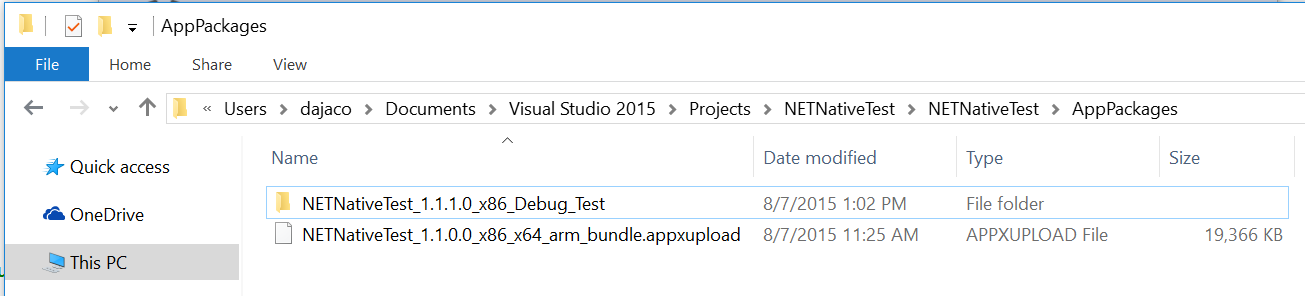
Пакет .appxupload отправляется в магазин; папка Test содержит пакет appx для локальной устровки
Два следствия из этого: первое, вы как разработчик более не имеете доступа к номеру ревизии вашего приложения (четвертое число). Магазин резервирует это число как способ версионирования пакета приложения, если по какой-либо причине потребуется перекомпиляция в облаке. Не беспокойтесь, вы по-прежнему можете управлять тремя другими числами.
Второе, что вам нужно иметь в виду – вам нужно быть осторожным относительно того, какой пакет вы загружаете в магазин. Так как магазин осуществляет компиляцию в машинный код за вас, вы не можете загружать нативные сборки, созданные локальным компилятором .NET Native. Visual Studio поможет вам разобраться с этим, чтобы вы могли выбрать правильный пакет.
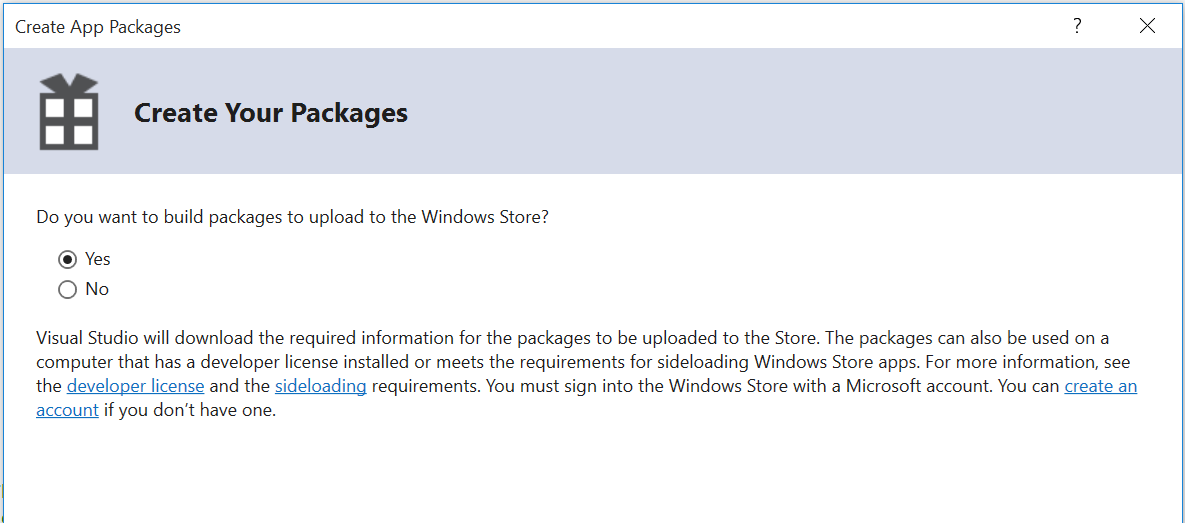
Выберите “Yes” для загрузки в магазин
Когда вы используете помощника для создания пакетов приложения, вам нужно выбрать “Yes” в ответ на вопрос Visual Studio, хотите ли вы создать пакет для загрузки в магазин. Я также рекомендую выбрать “Always” для опции “Generate app bundle”, что приведет к созданию единого файла .appxupload, готового для загрузки. Полная инструкция по созданию пакетов для магазина доступна в статье «Пакетирование универсальных приложений Windows для Windows 10».
Как итоги, основные изменения в том, как вы работаете, от использования .NET Native:
- Регулярно тестируйте ваше приложение в режиме релиза
- Убедитесь, что вы оставляете номер ревизии пакета как 0. Visual Studio не даст вам его изменить, но также не стоит это делать в других редакторах.
- Загружайте в магазин только .appxupload, собранные в процессе создания пакета для магазина, если вы загрузите .appx для UWP-приложения, вы получите ошибку в магазине.
Дополнительные советы по использованию .NET Native
Если вы столкнетесь с проблемой, в причине которой вы подозреваете .NET Native, есть техника, которая поможет вам отладить такую проблему. Релизная конфигурация по умолчанию оптимизирует код так, что он теряет некоторые артефакты, используемые при отладки. В итоге попытка отладки релизной конфигурации будет осложнена. Вместо этого вы можете создать собственную конфигурацию, разрешив в ней использование компиляции .NET Native. Убедитесь, что вы не оптимизируете код. Подробнее об этом описано в статье “Debugging .NET Native Windows Universal Apps”.
Теперь, когда вы знаете, как отлаживать проблемы, не было бы еще лучше научиться избегать их? Для этого через NuGet вы можете поставить в ваше приложение Microsoft.NETNative.Analyzer (из консоли управления пакетами можно использовать команду “Install-Package Microsoft.NETNative.Analyzer”). Во время разработки анализатор будет предупреждать вас, если ваш код не совместим с компилятором .NET Native. Есть небольшое подмножество пространства .NET, которое не совместимо, но большинство приложений никогда не столкнется с такой проблемой.
Если вы хотите самостоятельно оценить улучшения во времени загрузки от перехода на .NET Native, вы можете замерить их самостоятельно.
Известные проблемы и способы решения
Есть несколько вещей, которые нужно иметь в виду при использовании Windows Application Certification Kit (WACK) для тестирования ваших приложений:
- Когда вы запускаете WACK на UWP-приложении, не прошедшем через процедуру компиляции, вы столкнетесь с нетривиальной проблемой. Она выглядит примерно так:
- API ExecuteAssembly in uwphost.dll is not supported for this application type. App.exe calls this API.
- API DllGetActivationFactory in uwphost.dll is not supported for this application type. App.exe has an export that forwards to this API.
- API OpenSemaphore in ap-ms-win-core-synch-11-1-0.dll is not support for this application type. System.Threading.dll calls this API.
- API CreateSemaphore in api-ms-win-core-kernel32-legacy-11-1-0.dll is not supported for this application type. System.Threading.dll calls this API.
Решением является убедиться, что вы создаете пакеты правильно и запускаете WACK на соответствующем пакете. Следуйте рекомендациям сборки, чтобы не сталкиваться с такой проблемой.
- Приложения на .NET Native, использующие рефлекцию, могут провалиться в Windows App Cert Kit (WACK) с отсылкой на Windows.Networking.Vpn для исправления. Для решения проблемы в файле rd.xml добавьте следующую строчку и пересоберите пакет:
< Namespace Name=”Windows.Networking.Vpn” Dynamic=”Excluded” Serialize=”Excluded” Browse=”Excluded” Activate=”Excluded” />
Подводя итоги
Все пользователи Windows должны выиграть от использования .NET Native. Управляемые приложения из магазина будут стартовать и работать быстрее. Разработчики смогут сочетать опыт разработки в .NET в Visual Studio, а пользователи получат прирост производительности от машинного кода. Если вы хотите рассказать нам о вашем опыте или пожеланиях, используйте UserVoice. Если вы хотите сообщить об ошибке, заполните, пожалуйста, информацию на Connect.
The C++ Programming Language is one of the most widely used software development languages in the world. It can be downloaded easily and, combined with a great C++ IDE, allows you to create native applications which really harness the full potential of the operating system and underlaying hardware. The great variety of sources and hosts for C++ compilers often means users can develop smaller applications for different platforms entirely for free. When we say “native development” we mean you can use every part of the device natively and efficiently without layers of interpreters or runtime frameworks slowing things down or forcing the developer to jump through hoops or make compromises. This native access allows you to build faster applications with faster data connections and full speed raw power computation for tough tasks like numerical analysis, image processing, High-DPI video analyzers, Deep Learning, and other AI applications which can take a toll on scripting or interpreted solutions. Thus, for the best application performance, developers should use a native C++ compiler combined with a professional, specialized C++ IDE to ensure they’re working smarter, not harder, to get the very best from their coding. Here, we listed the Top 10 C++ IDE Windows features for native windows development.
1. Support for the latest versions of Windows
One of the main C++ IDE Windows features is of course support for Windows development in 32bits and in 64bits. The compiler should come with the IDE and should be designed for native Windows Development. The latest Windows has some very specific UI design metaphors so the C++ UI elements or framework should support those. In But, in addition to Windows 11 it should also support Windows 10 since a substantial number of Windows users either couldn’t upgrade or chose not to. Windows 8 is beneficial too since, at the time of writing, Microsoft still actively supports it.
Here are the features of the C++ IDE that needs to satisfy these features.
- Provision apps for Windows 11, Windows 10 and before
- Able to compile code for Windows but it’s also desirable to be able to compile for Android and iOS (Multi-Platform, Multi-OS, Multi-Device Support)
- Modern UI elements with skins, or styles, in design time and run time
- New & modernized components
- Design on high-DPI 4K+ displays
- Remote desktop support to collaborate remotely
- Building applications faster with less code.
- Integrated toolchain and professional-level developer tools
- Featuring Clang-enhanced compiler, Dinkumware standard library, MSBuild/CMake/Ninja support, and popular libraries like Boost and Eigen.
- Developing Windows Apps with a single codebase and responsive UI
- Licensed for use until your individual revenue from C++Builder applications or company revenue reaches $5,000 US or your development team expands to more than 5 developers
- Friendly code compilation between older and newer Windows versions

C++ Builder is the easiest and fastest C and C++ IDE for building simple or professional applications on the Windows, iOS & Android operating systems. It is also easy for beginners to learn with its wide range of samples, tutorials, help files and LSP support for code. RAD Studio’s C++ Builder version comes with the award-winning VCL framework for high-performance native Windows apps and the powerful FireMonkey (FMX) framework for cross-platform UIs. There is a free C++ Builder Community Edition for students, beginners and startups. There is a free C++ Builder Community Edition. Embarcadero’s C++ Builder CE, is a combined C++ IDE and compiler for the community of freelance developers, startups, students and non-profits.
2. The CLANG compiler is essential for all forms of professional C and C++ development
In Windows application development, a native C++ compiler and IDE that supports the latest Windows features are very important. Some of the IDEs are not specifically designed for C++ development. Some IDEs are designed only for console application developments. Some support with a limited set of features, generally, you must install a C++ compiler with a lot of options changes, etc. In modern application development, professional developers use much stronger C++ IDE.
If the IDE development company also develops the compiler, this can ensure a smoother and more integrated developer experience. Be sure that your C++ IDE comes with a CLANG based compiler. Be sure that your IDE also supports, other C++ libraries and standards like Dinkumware standard library, MSBuild/CMake/Ninja support, and popular libraries like Boost and Eigen.
CLANG is considered to be a production quality C, Objective-C, C++ and Objective-C++ compiler when targeting X86-32, X86-64, and ARM. It is a new C/C++ compiler standard (C++98, C++11, C++17, C++20, C++23 ..) supported by The LLVM Compiler Infrastructure Project, and has been a default compiler in recent years for most C/C++ compilers. This means that if you code for a CLANG compiler, most other IDEs, Compilers of Platforms will support your code without any changes. The latest C++17 standard is supported by the most C++ compilers. More information about core language features can be found here. C++ 20 is new and needs adaptation time.
We highly recommend you start with or to move to a CLANG Enhanced compiler like the Embarcadero’s C++ Builder, which supports the CLANG (C++11, C++ 17) standard and has its own C++ Compiler, IDE, GUI Designer and more. The C++Builder Standards and Clang Enhanced Compiler features can be found here.
The C++ Builder Community Edition is a free edition and can be used by students, beginners and startups. You can download it here Free C++ Builder Community Edition.
Professional developers can use the Professional, Architect or Enterprise versions of the C++ Builder.
CLANG is supported by many other Development IDEs Like Visual Studio, VS Code, Dev C++. CodeBlocks, CLion etc. For more details, please see our article about the Top 6 C++ IDEs For Building Native Windows Apps.
3. You need to use a modern C++ IDE
It’s very hard to identify which C++ IDE is the best for you, as this is mostly about what you want to achieve with your code. If you want to implement small projects for analysis and calculations without GUIs and many other features, most small compilers will do just fine. If you want to migrate from building simple executable code to complex professional applications, we highly recommend starting with Community Editions which are often free to use so you can benefit from an advanced IDE right from the start and then progress to the full Pro or Enterprise editions.

IDE should support professional code editing with cut, copy, paste, undo, redo operations, syntax highlighting, LSP support for code completion, higher compiler support with tools, easy IDE installation and uninstallation. IDE should have options in general and specific options for the project code.
4. Good debugging features help make sense of your C++ code when something isn’t working
Be sure that your IDE has built-in Debugging tools that allow you to debug on any device. You should be able to build and debug apps with local/embedded capabilities. The Debug Inspector enables you to examine various data types such as arrays, classes, constants, functions, pointers, scalar variables, and interfaces.
These are important parts of debugging,
- Stepping – Step by Step Debugging Through Code
- Evaluate/Modify – Investigate Expressions
- Breakpoints – Pause and Check
- Watches – Tracking Values
- Exceptions – Displaying the stack trace
5. A good quality visual designer ensure you design modern, professional-looking C++ app screens
When you first start coding in C++, console applications might be easy to learn some basics of C and C++ programming language. In modern C++, you must develop your apps with an IDE which has a good quality visual designer. The award-winning C++ Builder Visual Designer using the C++Builder VCL and FireMonkey frameworks ensures you achieve maximum productivity and create applications which look utterly superb on all devices.

C++ Builder supports a treasure-trove of modern visual design components and a low-code/no-code feature called Live Bindings which means you can avoid almost all of the ‘boilerplate’ data handling, storage and retrieval code. C++ Builder has benefitted from agile early design feedback across a range of devices using a live preview powered by real data, both on device and in the IDE. The live preview allows you to design your screens in the C++ IDE with the data shown as you create the various screen elements. This “what you see is what you get” capability is extremely powerful and simplifies the design process so you can prototype faster and reach more platforms more quickly.
6. Modern visual look and feel at design time and run time
Your C++ IDE should support the latest Windows UI visuals. In addition, it should support custom UI designs (skins or styles). Using styles on your new projects should be very easy, they should be easily removed which allows your visuals in standard visuals of windows. You should be able to design your application view in normal ways with buttons, labels, edit boxes, memos, trackbars, panels, switches, etc. You should be able to set one style to all of your components or you can choose different styles on different forms or different components. In addition, users should easily install and uninstall these kinds of styles, skins via IDE tools.
One of the most important parts is seeing visuals in design time and when coding, so developers may design their best UI forms during development. In addition to Windows visuals, users should be able to easily switch to other operating systems to compare different UI visuals in different operating systems. Thus, users may develop their Windows apps well under other OS visuals and standards.

Styles are sets of graphical details that define the look and feel of a application visually and they are one of most beautiful and useful UI feature of RAD Studio, that makes your UI elements skinned with professionally designed with different Styles. Official Styles are designed by Embarcadero’s Designers and other there are other 3rd party Styles, also users may generate their own styles. Styles are similar to themes in Windows or skins of applications. Styles are being modernized with RAD Studio, C++ Builder and Delphi since the first XE versions (2010), currently C++ Builder11 has many improvements on Styles. There are more than 50 different styles. You can see some of officila ones here on GetIt.
7. Modern components, libraries and tools provide ready-made nuggets of functionality for maximum efficiency
Why work too hard? Using components, libraries and tools allows you to produce programs MUCH faster and more reliably by taking ready-made chunks of functionality which have been widely tested and then add them to your own programs. This avoids having to ‘reinvent the wheel’ and means you get to focus on only writing the code you have to. In modern C++, modern programming we mostly refer to a lot of libraries and other tools that help us to modernize our applications. One of the strongest parts of C++ Builder is the availability of a broad wealth of ready-made built-in components and libraries. Plus, it supports 3rd party components and libraries. GetIt also a good place for developers who want to release this kind of libraries and tools.

The GetIt Package Manager, is an official tool (a window form) of RAD Studio IDE that comes with C++ Builder and/or Delphi. GetIt Package Manager lets you search and browse available packages (C++ or Delphi Components, Libraries, Components for IoT, Styles, Sample Projects, Tools, IDE Plugins, Patches, Trails, …). From this window you can install, uninstall, update, or subscribe to these packages. Currently it has about 300 components, all are in up to date, and able to run on the latest RADS version. With these more than 300 of included components, you can easily enhance your apps and you can reduce development cycles and time spend.
8. Use Live Bindings and data binding to let C++ Builder do the hard work for you
Why write more code than you need to? Live Bindings and Data Bindings are based on relational expressions, called binding expressions, that can be either unidirectional or bidirectional. LiveBindings is also about control objects and source objects. By means of binding expressions, any object can be bound to any other object, simply by defining a binding expression involving one or more properties of the objects you want to bind together. For example, you can bind a TEdit control to a TLabel so that, when the text changes in the edit box, the caption of the label is automatically adjusted to the value evaluated by your binding expression. Another example is binding a track bar control to a progress bar so that the progress rises or lowers as you move the track bar.

We can connect to dataset fields, alter one or more properties of different objects, and so on. Because LiveBindings propagate, we can even alter properties of objects that are connected to other objects that are bound to a control object.
In C++ Builder, you can easily use visual components of the VCL Visual Component Library framework for Windows apps or FMX FireMonkey framework for Multidevice applications.
9. Use modern data connections to get your C++ App to talk to the world’s databases
Modern applications use modern databases with modern data connections and data bindings. If you are developing a modern app, your database should be modern too. We highly recommend you make use of online and modern databases as much as possible.
C++ Builder has a great official database component, the FireDAC component pack. FireDAC is one of the great components for database connections that comes with RAD Studio, C++ Builder and Delphi. FireDAC is a Universal Data Access library for developing applications for multiple devices, connected to enterprise databases. With its powerful universal architecture, FireDAC enables native high-speed direct access from Delphi and C++Builder to InterBase, SQLite, MySQL, SQL Server, Oracle, PostgreSQL, DB2, SQL Anywhere, Advantage DB, Firebird, Access, Informix, DataSnap and more, including the NoSQL Database MongoDB.
FireDAC is a Universal Enterprise Data Connectivity

To use FireDAC with C++ Builder, be sure that your RAD Studio, C++ Builder version has support for this component. We highly recommend here C++ Builder 10.x or above because of improvements on database connections. If you don’t have this component in your version there is a Trial version of FireDAC that you can test and then you can purchase if it meets your needs. In a new C++ Builder Project, VCL or FMX) you can drag and use its components on your forms. Most experienced programmers prefer to add a new DataModule to their project.
Some database posts about how to connect your C++ apps to modern databases like Interbase, PosgreSQL, MySQL and others are here: https://learncplusplus.org/category/database/
10. Your C++ IDE should help manage C++ application deployment
All development cycles require a lot of steps. At the end, you need a release version of your application. And your application may require additional files, dlls, images, sounds, databases. At the final stage, all should be packed and they should have Provisioning options and developer should easily deploy his application to the appropriate operating systems or its application store.
Professional application deployment is very important to setup packages safely for the operating system. For example, Windows needs MSIX deployment package for Windows Store of Microsoft, and Android apps needs deployment packages for Google Play and İOS apps needs deployment packages for the App Store of Apple.
MSIX is modern file installation package for Windows applications. Windows apps packaged with MSIX can be uploaded to the Windows Store to make is easier for your users to install your apps whether you decide to charge for them or not. It is a Windows app package format that provides a modern packaging experience to all Windows apps. The MSIX package format preserves the functionality of existing app packages and/or install files in addition to enabling new, modern packaging and deployment features to Win32, WPF, and Windows Forms apps.

RAD Studio directly supports creating MSIX packaging for both your Delphi and C++ Builder apps directly via the RAD Studio IDE It is easy to create a new MSIX package for your own programs so that they are professional, modern packages. If you would like to release your VCL or FMX framework-based Windows C++ applications in MSIX package form, you should know how to create a MSIX package in C++ Builder.
RAD Studio 10.4.2 release and above, including the Latest RAD Studio 11, has support for MSIX packaging of Windows applications, for Microsoft Store and Enterprise deployment.
C++ Builder is the easiest and fastest C and C++ IDE for building simple or professional applications on the Windows, MacOS, iOS & Android operating systems. It is also easy for beginners to learn with its wide range of samples, tutorials, help files, and LSP support for code. RAD Studio’s C++ Builder version comes with the award-winning VCL framework for high-performance native Windows apps and the powerful FireMonkey (FMX) framework for cross-platform UIs.
There is a free C++ Builder Community Edition for students, beginners, and startups; it can be downloaded from here. For professional developers, there are Professional, Architect, or Enterprise versions of C++ Builder and there is a trial version you can download from here.