
Introduction
In this article, we are going to configure Microsoft SQL Server on a Windows machine to listen to a specific TCP port. We will enable TCP/IP and Named Pipe and configure firewall rules so that other network computers can communicate with SQL Server instances.
Pre-requisites
- Microsoft SQL Server installed on the machine (please check my article to install SQL Server here).
Configure Named pipe and TCP/IP protocols
Let us first configure Named Pipe and TCP/IP for SQL Server. I have installed SQL Server 2019 on my local machine.
Step 1
Open SQL Server Configuration Manager from the Start menu.
Step 2
Let’s first enable Named Pipe for the SQL Server Instance (in my case MSSQLSERVER). Go to SQL Server Network Configuration (in Console pane) and click on the Protocols for MSSQLSERVER.
Step 3
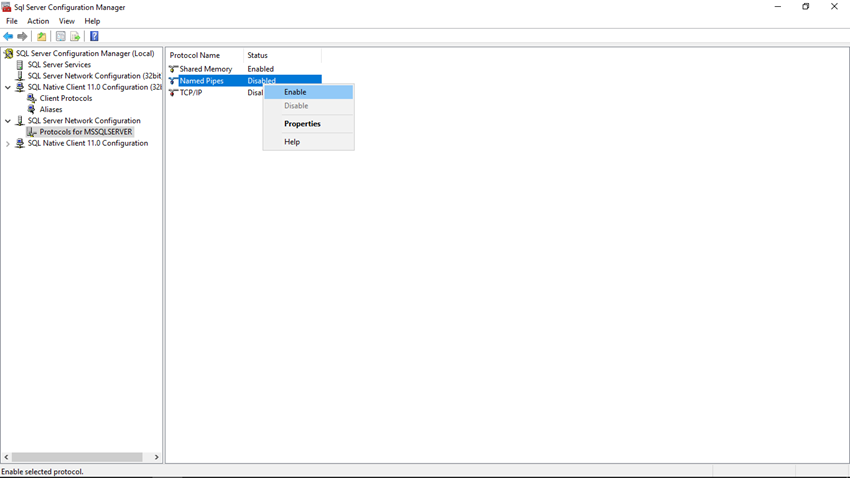
In the details pane (right panel), right-click on the Named Pipes protocol, and then click Enable to enable the named pipe for that particular SQL instance.
Step 4
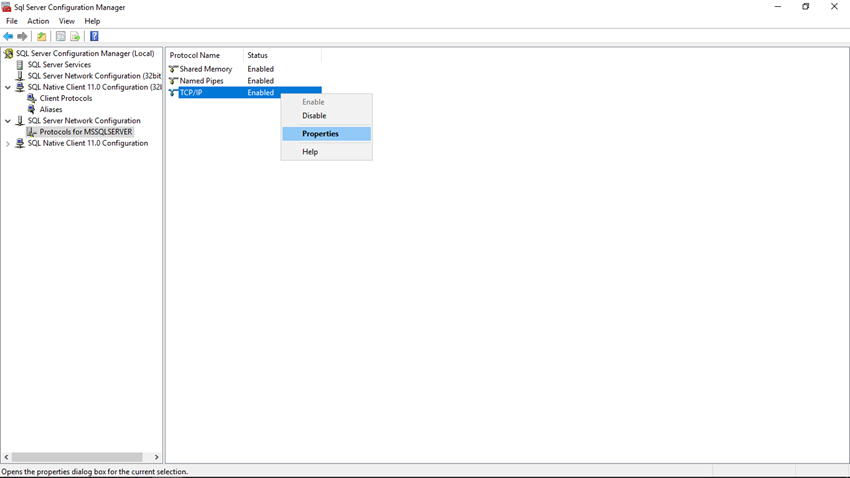
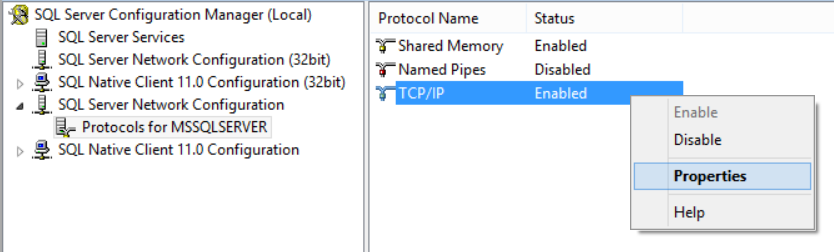
Next, we will enable TCP/IP connection for the SQL Server Instance. So right-click on the TCP/IP protocol and click on the Enable option.
Step 5
Now again right-click on TCP/IP protocol, and then click the Properties option.
Step 6
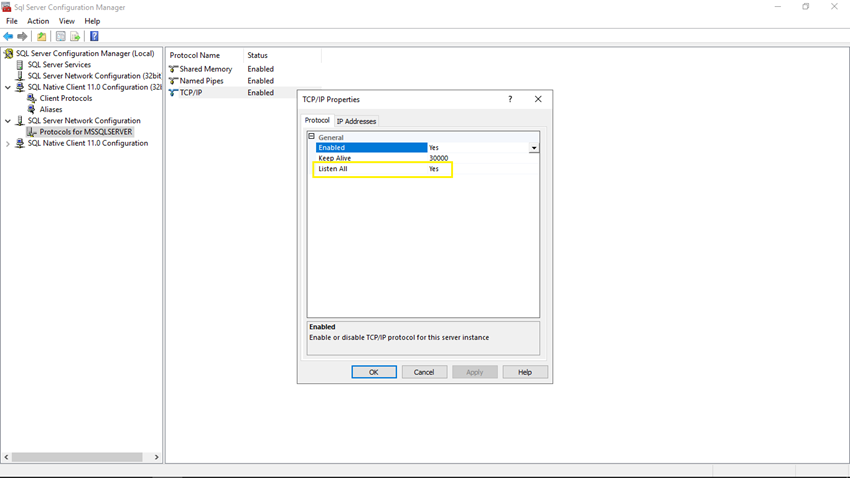
Now you can see the TCP/IP Properties window, click on the Protocol tab, select Yes in Listen All property.
Step 7
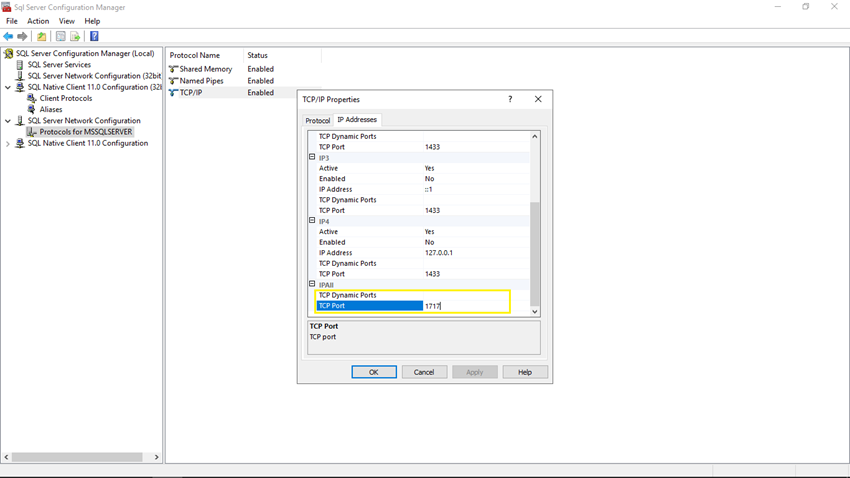
Now click on the IP Addresses tab, scroll down to the IPALL section. Now change the value of the TCP Dynamic Ports property to blank. If its value is zero, the Database Engine will listen on dynamic ports. Next, in the TCP Port property, enter the port number you want this IP address to listen on (in my case 1717), and then click the OK button. You can also specify multiple ports by separating them with a comma.
Note
If you want to use individual IP addresses (IPn sections), please set Listen to All property to No in the Protocol tab. Here, I want to use IPAll section, for that reason, I have set Listen All property to Yes in the Protocol tab.
Step 7
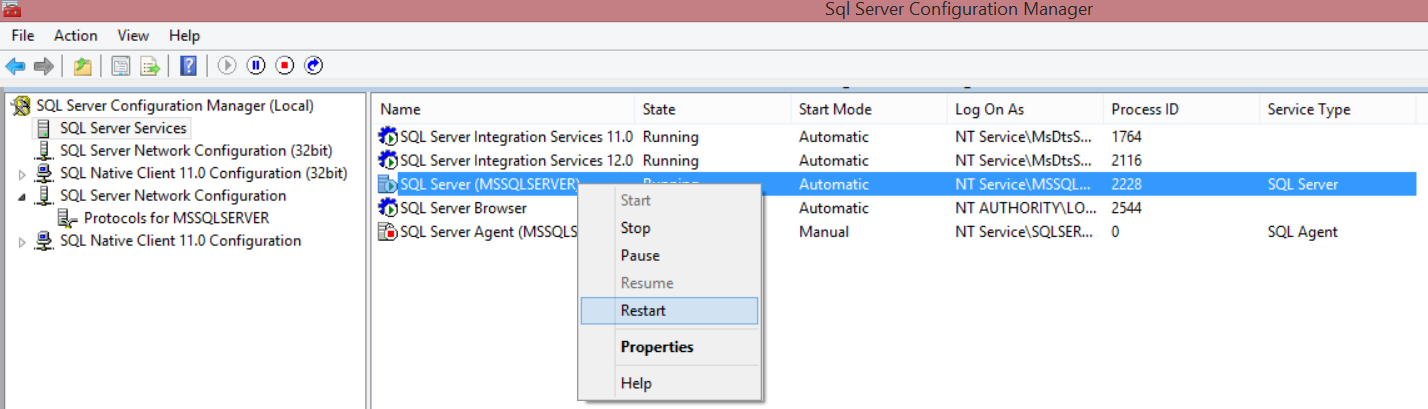
The above configurations will only take effect after we restart SQL Server Instance services. So now select the SQL Server Services option from the Console Pane.
Step 8
Now, right-click on the SQL Server (MSSQLSERVER) from the Details Pane and then click the Restart button to restart the SQL Server service.
We have successfully configured an instance of the SQL Server Database Engine to listen on a specific fixed port by using the SQL Server Configuration Manager. Next, we need to configure a firewall so that our specified port (in my case 1717) can be opened in the firewall.
Firewall configurations to allow SQL port
Now that we have configured SQL Server to listen on a specific port, we need to open that particular port in the firewall. Let us see how to configure the firewall.
Step 1
Open Windows Defender Firewall from the Start menu.
Step 2
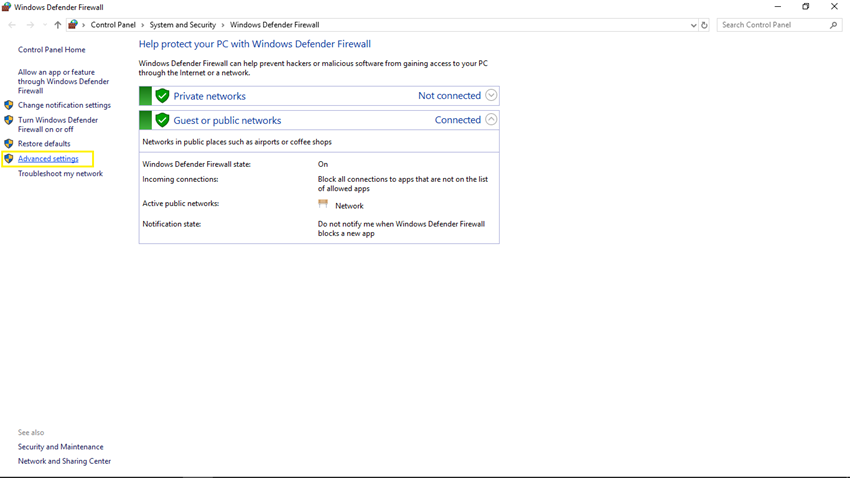
You will see the Windows Defender Firewall window from Control Panel. Click on the Advanced Settings link from the left panel.
Step 3
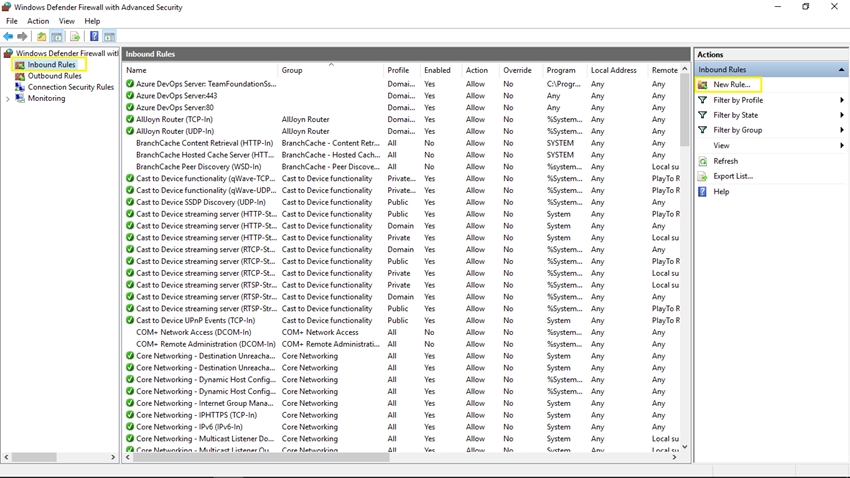
Now you will see Windows Defender Firewall with Advanced Security window. Click on the Inbound Rules from the left panel and then click on the New Rule button from the right panel.
Step 4
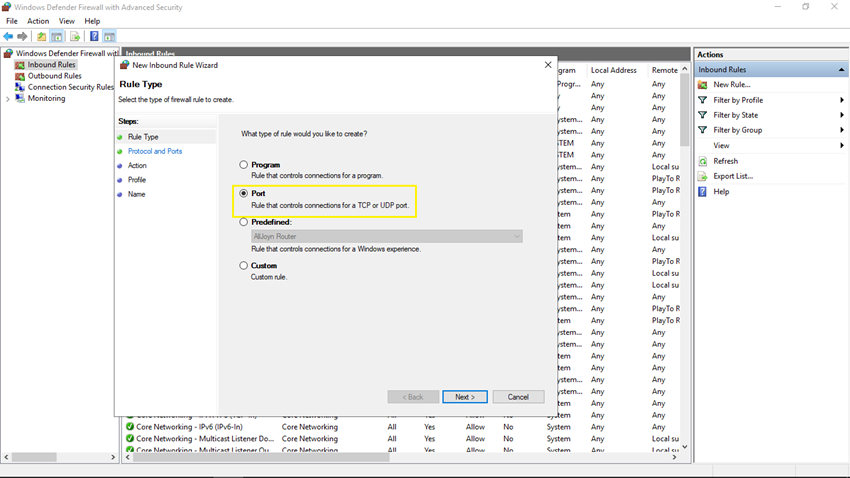
Now you will see the New Inbound Rule Wizard window. In the Rule Type step, select Port because we want to allow SQL port 1717 from the firewall and click on the Next button.
Step 5
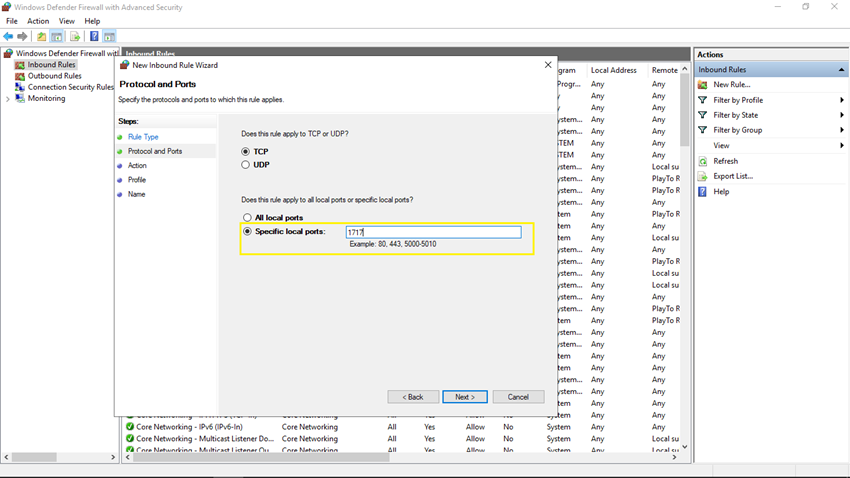
In Protocol and Ports step, select Specific local ports and enter our SQL port 1717 in the textbox and click the Next button.
Step 6
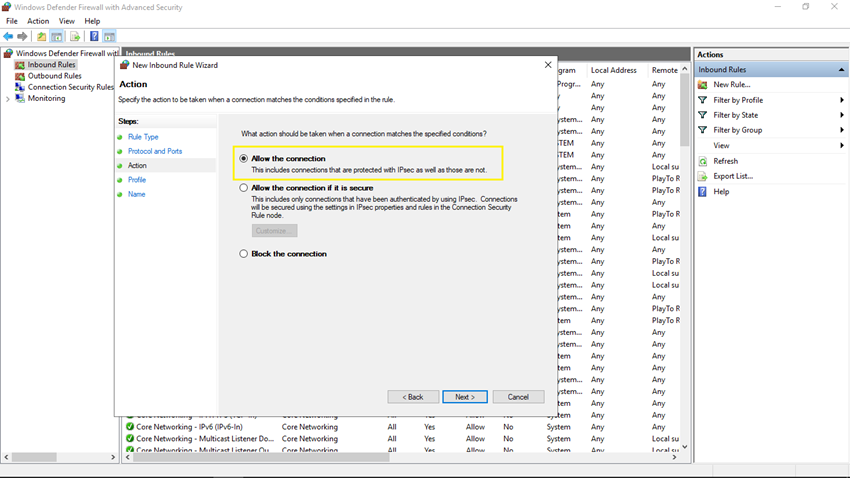
In the Action step, select Allow the connection and click on the Next button.
Step 7
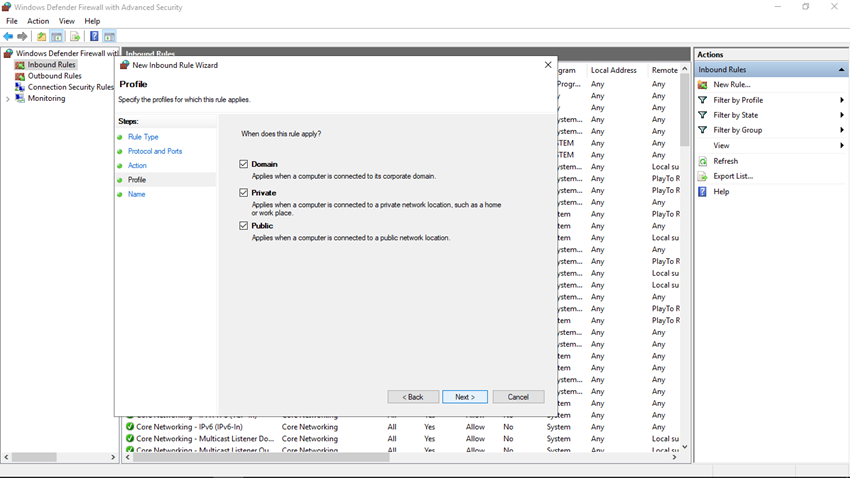
In the Profile step, check all the checkboxes and click on the Next button.
Step 8
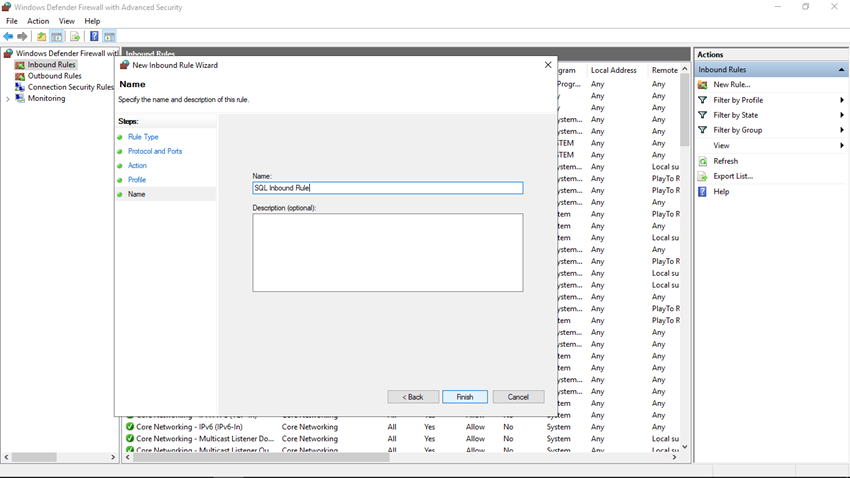
In the Name step, specify a meaningful name for the rule and provide a description and click on the Finish button.
Step 9
Now you can see our new rule is listed in the Inbound Rules list.
Excellent! We have successfully configured a firewall to open the SQL port for the database instance connection from outside.
Expected errors/issues
Sometimes you can face some issues/errors in connectivity with SQL Server instances from outside even after the above configurations. Please make sure:
- In SQL Server Configuration Manager, in the console pane, click on the SQL Server Services, make sure SQL Server Browser service is running.
- If you have assigned an SQL port other than 1433, you have to specify the port number in the server name at the time of the SQL connection. For example, cloude-desire-01, 1717 in my case.
Conclusion
As you can see, it is very easy to configure outside access on a specific port for SQL Server instance if you follow the above steps accurately.

In this article, we are going to configure Microsoft SQL Server on a Windows machine to listen to a specific TCP port. We will enable TCP/IP and Named Pipe and configure firewall rules so that other network computers can communicate with SQL Server instances.
Pre-requisites
- Microsoft SQL Server installed on the machine (please check my article to install SQL Server here).
Configure Named pipe and TCP/IP protocols
Let us first configure Named Pipe and TCP/IP for SQL Server. I have installed SQL Server 2019 on my local machine.
Step 1
Open SQL Server Configuration Manager from the Start menu.
Step 2
Let’s first enable Named Pipe for the SQL Server Instance (in my case MSSQLSERVER). Go to SQL Server Network Configuration (in Console pane) and click on the Protocols for MSSQLSERVER.

Step 3
In the details pane (right panel), right-click on the Named Pipes protocol, and then click Enable to enable the named pipe for that particular SQL instance.
Step 4
Next, we will enable TCP/IP connection for the SQL Server Instance. So right-click on the TCP/IP protocol and click on the Enable option.

Step 5
Now again right-click on TCP/IP protocol, and then click the Properties option.
Step 6
Now you can see the TCP/IP Properties window, click on the Protocol tab, select Yes in Listen All property.
Step 7
Now click on the IP Addresses tab, scroll down to the IPALL section. Now change the value of the TCP Dynamic Ports property to blank. If its value is zero, the Database Engine will listen on dynamic ports. Next, in the TCP Port property, enter the port number you want this IP address to listen on (in my case 1717), and then click the OK button. You can also specify multiple ports by separating them with a comma.
Note
If you want to use individual IP addresses (IPn sections), please set Listen to All property to No in the Protocol tab. Here, I want to use IPAll section, for that reason, I have set Listen All property to Yes in the Protocol tab.
Step 7
The above configurations will only take effect after we restart SQL Server Instance services. So now select the SQL Server Services option from the Console Pane.
Step 8
Now, right-click on the SQL Server (MSSQLSERVER) from the Details Pane and then click the Restart button to restart the SQL Server service.
We have successfully configured an instance of the SQL Server Database Engine to listen on a specific fixed port by using the SQL Server Configuration Manager. Next, we need to configure a firewall so that our specified port (in my case 1717) can be opened in the firewall.
Firewall configurations to allow SQL port
Now that we have configured SQL Server to listen on a specific port, we need to open that particular port in the firewall. Let us see how to configure the firewall.
Step 1
Open Windows Defender Firewall from the Start menu.
Step 2
You will see the Windows Defender Firewall window from Control Panel. Click on the Advanced Settings link from the left panel.
Step 3
Now you will see Windows Defender Firewall with Advanced Security window. Click on the Inbound Rules from the left panel and then click on the New Rule button from the right panel.
Step 4
Now you will see the New Inbound Rule Wizard window. In the Rule Type step, select Port because we want to allow SQL port 1717 from the firewall and click on the Next button.
Step 5
In Protocol and Ports step, select Specific local ports and enter our SQL port 1717 in the textbox and click the Next button.
Step 6
In the Action step, select Allow the connection and click on the Next button.
Step 7
In the Profile step, check all the checkboxes and click on the Next button.
Step 8
In the Name step, specify a meaningful name for the rule and provide a description and click on the Finish button.
Step 9
Now you can see our new rule is listed in the Inbound Rules list.
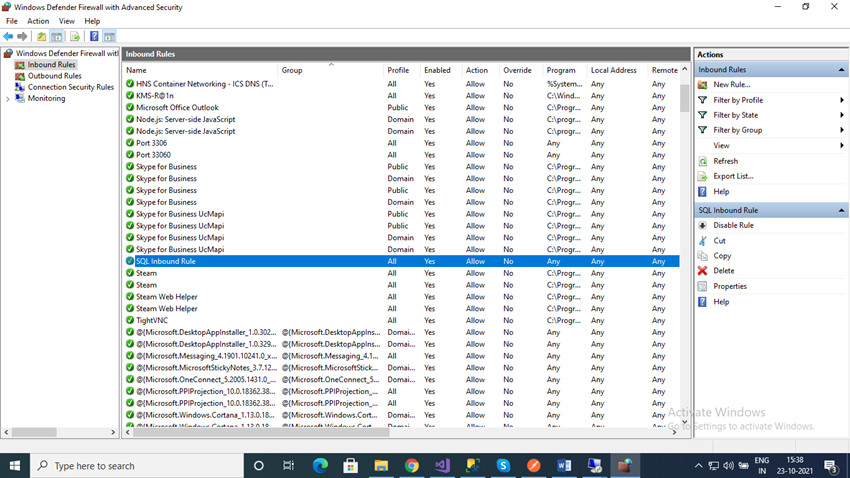
Excellent! We have successfully configured a firewall to open the SQL port for the database instance connection from outside.
Expected errors/issues
Sometimes you can face some issues/errors in connectivity with SQL Server instances from outside even after the above configurations. Please make sure:
- In SQL Server Configuration Manager, in the console pane, click on the SQL Server Services, make sure SQL Server Browser service is running.
- If you have assigned an SQL port other than 1433, you have to specify the port number in the server name at the time of the SQL connection. For example, cloude-desire-01, 1717 in my case.
SQL Server Network Configuration involves enabling the protocols that manage the connection to the SQL Server and configuring the available options for these network protocols. It also provides the means to encrypt the communication between the SQL Server instance and the client applications and hide the SQL Server instance from being browsed. SQL Server Network Configuration can be managed using the SQL Server Configuration Manager tool.
There are three main network protocols that you can configure in SQL Server. All these network protocols are installed by default when installing the SQL Server instance, but you need to enable one or more network protocols that the clients will use to communicate with the SQL Server.
To enable or disable a specific network protocol, open the SQL Server Configuration Manager and expand the SQL Server Network Configuration node to view the Protocols for <instance name>. At the details area in the right, right-click on the protocol you are interested in and click on Enable or Disable as below:

Enabling or disabling the SQL Server network protocols requires restarting the SQL Server service to take effect, which can be done from the same console. From the SQL Server Configuration Manager, click on the SQL Server Services. From the details area in the right, right-click on the SQL Server (<instance name>) service for the configured SQL Server instance and choose Restart.
Shared Memory Protocol
SQL Server Shared Memory protocol is used by clients to connect to the SQL Server instance that is running on the same machine. SQL Server Shared Memory protocol is the simplest protocol, as it has no configurable settings to be tuned in order to use it. Shared Memory protocol can be used to troubleshoot other network protocols if these protocols are not configured correctly.
TCP/IP Protocol
The most commonly used network protocol in SQL Server is the TCP/IP protocol. This protocol connects computers with different hardware and operating systems specs and allows it to communicate together, as it includes network traffic routing standards with advanced security protection.
By default, the SQL Server instance listens on TCP port 1433, where the named instances located in the same server will be configured for dynamic TCP ports, selecting an available TCP port each time the SQL Server service restarted. SQL Server Bowser Service helps the client identifying that used TCP port when he tries to connect. It is better to configure the SQL Server named instance to listen on a specific static port rather than using dynamic ports, in order to configure the firewall to allow communication to the SQL Server on that specific TCP port.
To configure the SQL Server instance with a specific TCP port, open the SQL Server Configuration Manager and expand the SQL Server Network Configuration node to view the Protocols for <instance Name>. At the details area in the right, right-click on the TCP/IP protocol and choose Properties:
From the TCP/IP Properties window, choose the IP Addresses tab, where you can see a node for each IP address on that server, in addition to the IP 127.0.0.1 loopback adaptor. First, you need to make sure that the TCP Dynamic Ports box is empty, preventing the SQL Server instance from using different TCP port on each server restart. In the TCP Port box under each IPn node, type the TCP port number that you want this IP address to listen on. Once you finish with all IP addresses, click OK.

Changing the TCP protocol that the SQL Server Instance is listening on requires restarting the SQL Server service to take effect, which can be done from the SQL Server Services node of the SQL Server Configuration Manager console as described previously.
Changing the default TCP port of the SQL Server instance will prevent clients from connecting to the SQL Server instance without specifying that new port. In order to allow clients to connect to the SQL Server instance with the new TCP port, you need to enable and start the SQL Server Browser Service, which helps the clients in getting the TCP port for that SQL Server instance. You can also customize the connection string that the client uses by specifying the ServerName,TCP_Port_Number rather than using the server name only. Another option is to create an alias on the client’s machine that specifies the port number for that SQL Server instance.
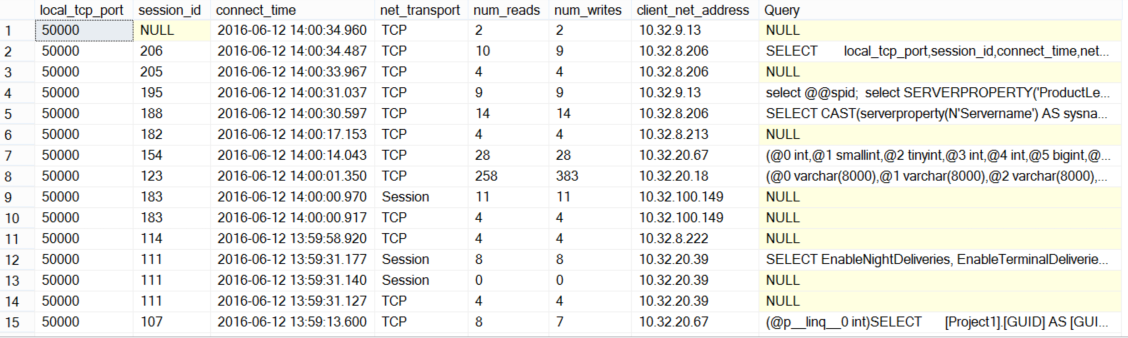
If the SQL Server instance is configured to listen on multiple TCP ports, you can identify the TCP port used by each SQL Session using the sys.dm_exec_connections DMV. This DMV returns all connected sessions with the TCP port, source IP and other useful information.
We can optimize the use of this DMV, as it returns only the SQL handle for that session and not the actual query text. To get the query text, the sys.dm_exec_sql_text DMV can be used with the complete script below:
|
SELECT local_tcp_port,session_id,connect_time,net_transport ,num_reads ,num_writes,client_net_address , (select text from sys.dm_exec_sql_text(most_recent_sql_handle)) as Query FROM sys.dm_exec_connections order by connect_time desc |
The result will be like the following:
Named Pipes Protocol
The last network protocol we will discuss here is Named Pipes. This protocol is designed for local area networks, to provide a way for inter-process communication among the processes running on the same machine or on a remote computer in the same LAN, where the output of one process is the input of the second one, without having the penalty of involving the network stack.
The Named Pipes protocol default value for the default SQL Server instance is \\.\pipe\sql\query, and \\.\pipe\MSSQL$<instancename>\sql\query for the named SQL instance. You can configure the SQL Server instance to listen to one pipe only.
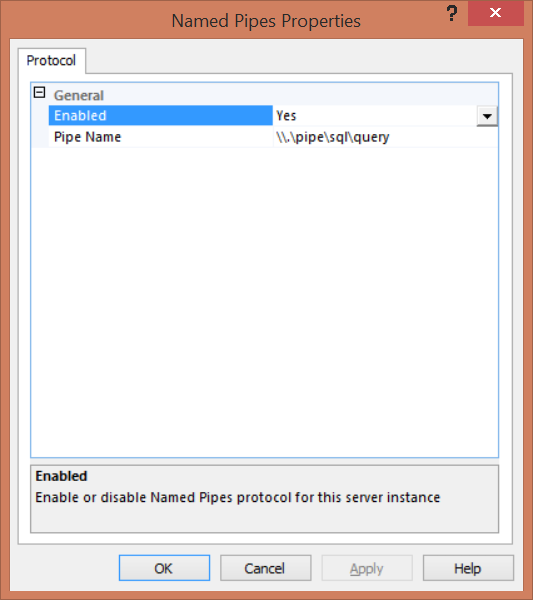
To configure the SQL Server instance with a specific pipe value, open the SQL Server Configuration Manager and expand the SQL Server Network Configuration node to view the Protocols for <instance Name>. At the details area in the right, make sure that the Named Pipe protocol is enabled then right-click on that protocol and choose Properties:
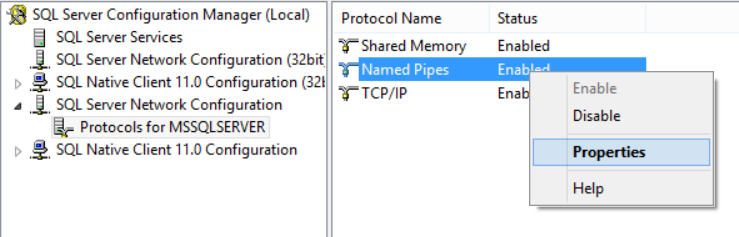
On the Protocol tab of the Named Pipes Properties window, type in the Pipe Name the new pipe value you want your SQL Server instance to listen to and click OK.
You will be asked to restart the SQL Server Service to make sure that the Named Pipe protocol new value will take effects. You can restart it from the SQL Server Services node of the SQL Server Configuration Manager console as described before.
Again, the clients will not be able to connect to the SQL Server instance with the default settings if the Named Pipe protocol default value changed. The SQL Server Browser Service should be enabled and started to help the clients in getting the new pipe for that SQL instance. You can also customize the connection string that the client uses to include this pipe value. Another option is to create an alias on the client’s machine that specifies the pipe value for that SQL Server instance.
If you have fast LAN connection, both the TCP/IP Sockets and Named Pipes clients will have good performance. With slower networks, such as WANs or dial-up networks, Named Pipes protocol can be very costly and cause excessive network traffic, as the Named Pipes network communications are more interactive. Using TCP/IP, data transmissions are more streamlined with less overhead, which makes the TCP/IP very helpful in slow network connections.
In General, TCP/IP protocol is better in a slow LAN, WAN, or dial-up network. The Named Pipes protocol can be a better choice when the network speed is high, as it offers more functionality, easier to use, and have more configuration options.
Force Encryption
Another SQL Server Network Configuration option that can be configured to encrypt the communication between the applications and the SQL Server instance is Force Encryption. If the communication encryption is forced, the server should have a certificate installed on it and imported to the Windows, and the client machine should be configured to trust the root authority for that certificate.
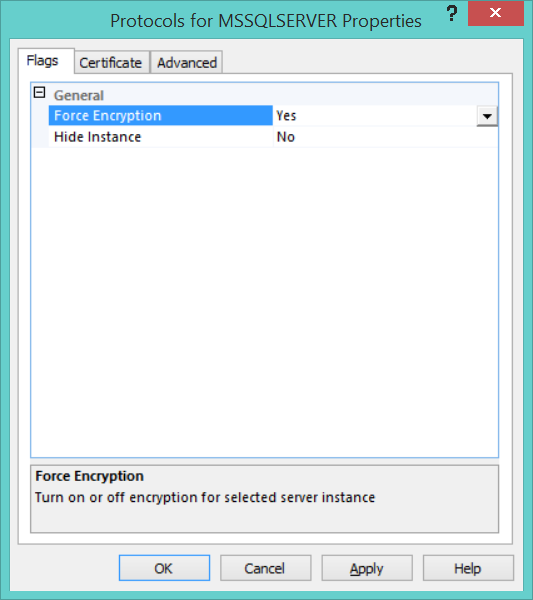
To encrypt the communication between the SQL Server instance and the application, install the certificate in the Windows certificate store of the server and open the SQL Server Configuration Manager. Expand the SQL Server Network Configuration node then right-click on Protocols for <instance Name> and choose Properties. On the Certificate tab, configure the SQL Server instance to use the installed certificate. On the Flag tab, make sure that the Force Encryption option is enabled. If not, set it to Yes and then restart the SQL Server Service to take effect.
If the Force Encryption is enabled but no certificate installed, SQL Server will generate a self-signed certificate when the SQL Server instance started. This certificate will encrypt the data transmitted across the network between the SQL Server instance and the application connected to that instance, but it will not protect against identity spoofing by the server or man-in-the-middle attack.
Hide Instance
SQL Server provides the ability to hide the SQL Server instance. In normal cases, the SQL Server Browser provides the connected users with the instance name, version, and the connection information. When you set the Hide Instance flag to YES, the SQL Server Browser will not respond to the connecting queries with the instance information. In this case, the client application should know the connection information in order to connect to the SQL instance successfully. Hiding the SQL instance will prevent the SQL Server Browser from exposing the instance to the users who try to locate that instance using the Browse button too.
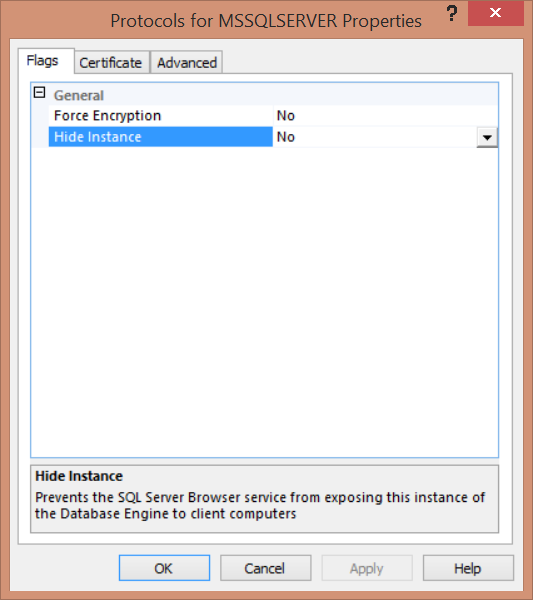
To hide a SQL Server instance, open the SQL Server Configuration Manager and expand the SQL Server Network Configuration node then right-click on Protocols for <instance Name> and choose Properties.
From the Flag tab, set the Hide Instance box value to YES, the click OK. Restart the SQL Server Service so that the change will take effect.
You should take into consideration that, when hiding an instance, the TCP port used for that instance should be provided by the client application in the connection string. Also, if this instance is involved in Failover Cluster or Always On Availability Group, you need to create an alias for that server with the static TCP port in all nodes and replicas, so that the replicas can connect to each other.
Problem
Windows Firewall is an OS level software firewall. It can be a crucial part of OS level security if you are not using other firewall hardware or software. Since I do not have another firewall I have a need to enable Windows Firewall for my SQL Server database server. In this article I go through the process of configuring Windows Firewall for different scenarios along with the associated considerations.
Solution
Windows Firewall was previously known as ICF (Internet Connection Firewall). It falls into the category of software firewalls and is used to block/filter specific traffic towards your machine. Windows Firewall may be accessed from the Control Panel of your Windows machine or by executing “firewall.cpl” inside the run command box (as shown below). It requires theWindows service “Windows Firewall/Internet Connection Sharing (ICS)” to be in a running state.
By executing the firewall.cpl command, you get the Windows Firewall configuration frame. Here you can turn on/off the firewall along with adding exceptions and other settings. Check the status of the firewall on the General tab and if the firewall is off turn it on to enable it.

If you just turned this on, at this stage your firewall would block any SQL Server connection request to your machine. To allow access to a SQL Server database engine behind the firewall, you would have to configure the firewall by providing certain exceptions. When working with firewall configurations for SQL Server we need to know about the ports used for SQL Server and the SQL Server Browser service. Both are involved when configuring the firewall for SQL Server. So it would be appropriate to go through both concepts separately.
SQL Server ports
A SQL Server port can be related to an instance level and is specific for that instance. Ports are used by SQL Server when an instance is configured to use the TCP/IP protocol. When network data/connection request arrives at your server machine through the IP address and instance name, at this point SQL Server receives data on its specific port.
Port allotment to SQL Server may be dynamic or static. While working with firewalls and adding a port exception, you would have to configure a static port for SQL Server. It is important to note that SQL Server Express, SQL Server Compact 3.5 SP1, and named instances always use a dynamic port by default. You may allot static ports to these instances as mentioned in this tip.
SQL Server default instances use port 1433 by default. After that, any instance on that machine would have to use another port. Default instance can also be configured to listen on a custom port rather than the default 1433. You may view/edit SQL Server port configurations by going into properties of TCP/IP protocol in SQL Server Configuration Manager for a specific instance of SQL Server as shown below.

By clicking on Properties, you will get the TCP/IP properties. Go to the IP Addresses tab and here you may edit/view port configurations for a specific instance of SQL Server.
SQL Server Browser Service
SQL Server Browser service is responsible to serve incoming requests for SQL Server connection by providing them information about installed instances of SQL Server. If this service is stopped and the port assigned to any instance is other than the default port (1433), then you will need socket information (IP + Instance + Port) to access the instance . If the SQL Server Browser service is on then you do not need to provide a port number with the IP and instance. To make use of the SQL Server Browser service while the firewall is on, you have to include UDP port 1434 in the exception list of the firewall, else SQL Server Browser service would not be able to serve the incoming connection requests You can check the status or change the status of the SQL Server Browser service by using Windows MMC or by using SQL Server Configuration Manager/Surface Area Configuration. To access Windows services execute ‘services.msc’ in the Run command box as we did above for the firewall.
One thing to note is that I mention it uses the IP Address. The reason for this is that when you connect to machines your DNS will direct you to the correct IP based on the machine name you give it, so you are still accessing your SQL Servers by using the machine name + Instance + Port.
Protocols for SQL Server network connections
SQL Server may be configured to accept network data through TCP/IP or named pipes protocol. In coming sections we will discuss each while configuring the firewall connections.
Different scenarios with TCP/IP
TCP/IP protocol has different scenarios when working with firewalls. Ports are involved for accessing the SQL Server engine through TCP/IP. You may have one instance running on a default/custom/dynamic port. On the other hand there may be more than one instance on the same machine with a combination of different ports and the SQL Server Browser service may be stopped or running.
For working with TCP/IP protocol access configurations, I have selected some scenarios to start with. Based on these you would be able to configure firewall access for any number of instances on your machine.
| Scenario | SQL Server Browser | Port |
|---|---|---|
| Scenario 1 | Running | Default (1433) |
| Scenario 2 | Running | Custom port |
| Scenario 3 | Not Running | Default (1433) |
| Scenario 4 | Not Running | Custom port |
Scenario 1
SQL Server instance is running on default port 1433 TCP/IP. So you need to add TCP/IP 1433 in exception list of Windows Firewall.
Access Windows Firewall exception frame, go to exceptions tab and click Add Port… button. A frame will appear as shown below, provide parameters with any descriptive name as shown in below figure and click OK.

Now you can access your SQL server instance on the default port without any customization in connection parameters. Although it would have no effect on your connection parameters since you are using the default port, you could also add SQL Server Browser in the exception list. For this, go to exceptions tab and click Add Port… button and add 1434 port number for UDP and click OK.
Scenario 2
In this scenario you are using a port other than the default 1433 and SQL Server Browser Service is running.
Suppose you have configured SQL Server to run on port 55120. So you would add the custom port in the exception list as shown below.

To make use of the SQL Server Browser service, you would also add port 1434 UDP in exception list as shown below.

If you do not include port 1434 UDP in the exception list then there would be no use for the SQL Server Browser service even if it was started. Now to access the instance just enter IP of machine with instance name without any port number. SQL Server Browser service would do the rest for you and it will connect you to the instance even if a custom port is being used.
Scenario 3
In cases where the instance to be accessed is using the default port TCP 1433 and SQL Server Browser Service is not running, you can connect to an instance without specifying the port. You may note that in the case where instance to be accessed is on default TCP/IP port, SQL Server Browser Service status would not effect the way you are connecting to the instance.
Scenario 4
If instance is on any custom defined port and SQL Server Browser service is not running, then just add SQL Server instance custom port in exception list.
Now you have to provide IP + InstanceName + Port# for connection. If you provide just IP along with instance name, there is no mechanism to get the port number. As a result the connection would fail.
Rules for working with firewall and TCP/IP
Above mentioned scenarios may be used to build more complex configurations where more than one instances is installed on the same machine with different port configurations. Following are rules that may be deducted from above four scenarios
- Make sure that your instance is configured to use a static port either default or custom while configuring firewall access through adding ports in exception list.
- If you need to use SQL Server Browser service, include UDP 1434 in exception list
- Include 1433 in exception list, if your instance is running on default port
- Include custom port in exception list, if instance is running on custom port
- If you are not using SQL Server Browser service then provide IP + InstanceName + Port for connection to custom port other than default (1433).
Configuring access for Named Pipes
If you have configured named pipes as a network protocol, then to allow access through Windows Firewall, go to configuration frame and enable File and Printer Sharing through the firewall as shown below.

This will allow you to access the SQL Server engine on named pipes behind the firewall.
Using firewall with SQL Server on dynamic ports
If you have configured SQL Server to listen on dynamic ports, even then you can use the firewall for your SQL Server instance. To do this you include the “sqlservr.exe” program in your firewall exception list. Just go to exceptions tab and click on ‘Add Program’ button.

Browse to “sqlservr.exe”, it is in the bin directory of your SQL Server instance installation. Click OK and now you can access this instance of SQL Server without adding specific ports in the exception list.
This configuration would work for only one instance for which you have browsed to sqlservr.exe.
To configure multiple instances along with dynamic ports, add “sqlservr.exe” from each instance in the exception list.
Adding sqlsrvr.exe works for static ports also.
Configuring more complex scenarios
Once you have worked with the above mentioned simple scenarios, you may join these pieces to build more complex configurations of instances, ports and SQL Server Browser services.
Follow these rules to build complex configurations
- Pick each instance one by one for configuration
- After configuration of each instance, perform cumulative testing for instances that have been configured for access behind the firewall
- Do not exclude any previously added exception from exception list
Next Steps
- It is among best practices to turn on Windows Firewall on server machine. But make sure to test properly in simulated environment.
- For enhanced security change your server port to a port other than the default port and also turn off SQL Server Browser service. With this configuration, you would have to provide IP+InstanceName+ port for connection.
- If you have a firewall other than Windows Firewall, then thoroughly consult its documentation according to your specific environment.
- Click here to read more about Windows Firewall
- Click here to read more about classification and assignment of port numbers
~8 min read
In this post I describe Windows named pipes, what they are, the scenarios where they’re useful, how to use them with ASP.NET Core, and how to call a named pipe ASP.NET Core app using HttpClient.
What are Windows named pipes?
Windows named pipes provide a named, one-way or duplex pipe for communication between a client and a server. They provide a way to communicate between different processes, typically on the same machine.
Named pipes support calling remote servers by network name too, though that seems less common from what I understand.
You can think of a duplex named pipe as being similar to a TCP/IP connection, in that you can send data to the server and can receive a response. Named pipes are a Windows kernel feature, so they’re not specific to .NET, although they have been accessible from .NET since .NET Framework 3.5 (to a greater or lesser extent).
Named pipes each have a unique name that looks something like this:
\\<ServerName>\pipe\<PipeName>
where <PipeName> is the name of the pipe, which is up-to 256 characters long, can contain any character except \, and is not case-sensitive. If you’re using a named pipe on the same server (the typical usage), then you must use . for the server name. For example:
\\.\pipe\my-pipe-name
Note that ASP.NET Core only support local named-pipes, so the server name will always be
..
Named pipes have various modes, and types, so you can create named pipes that are write-only for example (think UDP equivalent). But duplex is probably more common, in which clients can both send requests and receive responses.
There’s a whole load of additional modes and configuration for named pipes but I’m going to gloss over those in this post, mostly because I don’t fully understand them 😅 But one final option to be aware of is that you need to explicitly opt-in to asynchronous operations for named pipes, otherwise the pipe will be synchronous only.
Why use named pipes?
Named pipes allow for inter-process communication, and are primarily geared towards communication on a single machine. So why would you choose them over TCP/IP for example, where you could use the loopback address (localhost) for single-server communication?
There are a few reasons you might choose named pipes:
- Named pipes integrate well with Windows security, which can control which clients can access the pipe
- Named pipes support impersonation, in which the server can execute code with the privileges of the client user. Obviously here be security dragons 😉
- In some environments access to TCP ports may be limited across process tree boundaries
- Re-using TCP ports can be problematic
The first two points are very Windows-specific. If that’s something you need, then it may be easier to use named pipes to get these features, though I suspect there’s not a massive need for that these days.
Impersonation in particular is a feature which sounds great on the surface, but which also kind of sounds like a privilege escalation issue waiting to happen. Luckily, the server has to explicitly choose to impersonate a client, and the client can prevent this by setting a flag when it connects.
If you need the security behaviour of named pipes, then that’s a clear reason for choosing them. But we actually use named pipes in the Datadog .NET Azure App Service (AAS) Extension, and it has nothing to do with the security features.
In the AAS extension, we instrument your app using the .NET profiling APIs using the Datadog client library, enabling automatic instrumentation that generate traces. In addition, we also run:
- trace-agent.exe which is responsible for receiving the traces, processing them, and forwarding them to Datadog’s backend.
- dogstats.exe which receives metrics generated by your application, aggregates them, and forwards them to Datadog’s backend.
Due to limitations in the AAS extension API, we create those processes as children of your app’s process. But an AAS host may have multiple apps we want to trace, yet we only want to run a single instance of trace-agent.exe. Unfortunately, in the AAS extension environment, processes cannot communicate with TCP ports owned by another process tree, so this design doesn’t work 🙁
Take my assertions about how AAS works above with a pinch of salt—this design was mostly implemented before I joined Datadog, so I’m regurgitating second hand information and it’s very possible I’ve misunderstood some of the details😅
Additionally, running the trace-agent.exe as a child-process is a little…hacky…in AAS, so occasionally AAS kills it entirely. At that point, we would need to re-negotiate a new port between the app client library and the trace-agent which is a headache.
I assume that we have to re-negotiate a new port because of the classic
TIME_WAITissue which used to be a problem for causing socket exhaustion withHttpClient.
By using named pipes we can skirt around all these issues. All the processes can talk to each other using a single named pipe, regardless of their process tree. And if the trace-agent.exe process is killed by AAS, we don’t need to change the pipe. When the process restarts, it can start listening on the same named pipe. No port renegotiation or anything required, so no more headaches!
Creating a named pipe server with ASP.NET Core and Kestrel
Until .NET 8, if you wanted to implement a named pipe server you certainly could, but it’s not exactly simple or easy. For a start, you would need to implement your own HTTP server on top of it if that’s the protocol you want to use for communication.
Luckily, in .NET 8, ASP.NET Core added direct support for Windows named pipes to Kestrel, so you can use all the same features and programming model of ASP.NET Core as you’re used to using with TCP 🎉
Changing your application to listen using named pipes is as simple as doing one of the following:
- Configuring Kestrel in code using
ListenNamedPipe() - Setting the URLs for your application to
http://pipe:/<pipename>
The example below shows a very simple .NET 8 test app (adapted from the empty template: dotnet new web). The only change here is that I specifically configured the app to listen using named pipes:
var builder = WebApplication.CreateBuilder(args);

//    Configure Kestrel to listen on \\.\pipe\my-test-pipe
// 👇 Note that you only provide the final part of the pipe name
builder.WebHost.ConfigureKestrel(
    opts => opts.ListenNamedPipe("my-test-pipe"));

var app = builder.Build();

app.MapGet("/test", () =>  "Hello world!");

app.Run();
If you start the app with dotnet run, you’ll see that the logs show the listen address as:
info: Microsoft.Hosting.Lifetime[14]
      Now listening on: http://pipe:/my-pipe-name
The http://pipe: looks a little odd, but it kind of makes sense. After all, we’re still sending HTTP requests, we’re just sending them over a named pipe instead of a TCP socket.
As I described in my previous post, you can also configure Kestrel entirely using IConfiguration, so instead of adding the ConfigureKestrel() call above, you could instead define the listen URL in your appsettings.json file like this:
{
  "Kestrel": {
    "Endpoints": {
      "NamedPipeEndpoint": {
        "Url": "http://pipe:/my-pipe-name"
      }
    }
  }
}
You can also use all the other approaches I described in my previous post to opt-in to binding named pipes using the same binding address pattern as the above configuration does. For example:
export ASPNETCORE_URLS="http://pipe:/my-pipe-name"
And in case you were wondering, yes, you can also specify https in your URLs and kestrel will use HTTPS for the requests!
ASP.NET Core exposes various settings for customizing the named pipe, such as buffer sizes and pipe security options. You can configure these using IConfiguration or by passing a configuration lambda to builder.WebHost.UseNamedPipes():
var builder = WebApplication.CreateBuilder(args);

// Customize the named pipe configuration
builder.WebHost.UseNamedPipes(opts =>
{
    // Bump the buffer sizes to 4MB (defaults to 1MB)
    opts.MaxWriteBufferSize = 4 * 1024 * 1024;
    opts.MaxReadBufferSize = 4 * 1024 * 1024;
});

// ...
The call to UseNamedPipes() is actually a prerequisite for using named pipes, as it adds the required services. You don’t need to call it explicitly as it’s added to the DI container automatically by default.
Calling the named pipe server with HttpClient
So in .NET 8, creating an HTTP server (or gRPC server, or anything else supported by ASP.NET Core!) that listens over named pipes is surprisingly easy. But you will likely also want to be able to send requests to the server, so we need a client.
For this, we need our trusty HttpClient and SocketsHttpHandler. SocketsHttpHandler was introduced in .NET Core 2.1, but we need to use the ConnectCallback property specifically, which was only added in .NET 5.
Technically, the
NamedPipeClientStreamthat underlies the code below is available as far back as .NET Framework 3.5. But using this directly requires you build your own HTTP client to use it. Much like building your own HTTP server, I don’t recommend it if you can avoid it!
To configure an HttpClient to use named pipes you need to specify a custom ConnectCallback() which will create a NamedPipeClientStream instance and connect to the server. After configuring the client, you just use it like you would to call any other ASP.NET Core app.
using System.IO.Pipes;

var httpHandler = new SocketsHttpHandler
{
    // Called to open a new connection
    ConnectCallback = async (ctx, ct) =>
    {
        // Configure the named pipe stream
        var pipeClientStream = new NamedPipeClientStream(
            serverName: ".", // 👈 this machine
            pipeName: "my-test-pipe", // 👈
            PipeDirection.InOut, // We want a duplex stream
            PipeOptions.Asynchronous); // Always go async

        // Connect to the server!
        await pipeClientStream.ConnectAsync(ct);

        return pipeClientStream;
    }
};

// Create an HttpClient using the named pipe handler
var httpClient = new HttpClient(httpHandler)
{
    BaseAddress = new Uri("http://localhost"); // 👈 Use localhost as the base address
};

var result = await httpClient.GetStringAsync("/test");
Console.WriteLine(result);
The only «oddity» here is that you need to give use a valid hostname in the BaseAddress of the HttpClient, or alternatively in the GetStringAsync() if you don’t specify a BaseAddress. I’ve used localhost for simplicity, but it doesn’t really matter what we use here. If you run the app, it should print "Hello World!" 🎉
Remember to use
https:in theBaseAddressif you have configured ASP.NET Core to listen for HTTPS over named pipes!
And that’s all there is to it. Using named pipes is so much easier in .NET 8 than it was in earlier versions, it should Just Work™. That said, the named pipe support is obviously relatively new, so it’s worth keeping an eye out for any issues and reporting them to the .NET team!
Summary
In this post I described Windows named pipes. I discussed what they are, how they work, and some of the scenarios where they may be useful. They’re particularly useful when you want to use specific Windows security features or where you’re running in scenarios in which cross-process TCP communication is problematic. Next I described the named pipe support added to ASP.NET Core in .NET 8 and how to configure your app to listen on a named pipe. Finally, I showed how you can use HttpClient with a custom SocketsHttpHandler.ConnectCallback to make requests to a named pipe HTTP server.
Andrew Lock | .Net Escapades
Want an email when
there’s new posts?