
Все способы:
- Поиск файлов по содержимому в Виндовс 10
- Способ 1: Сторонние программы
- Способ 2: Поиск через «Пуск»
- Вопросы и ответы: 18
Для многих пользователей основным местом хранения практически любой электронной информации является жесткий диск в компьютере или флешка. Со временем данных может накапливаться большое количество и даже качественная сортировка и структуризация могут не помочь — без дополнительной помощи отыскивать нужное станет сложно, особенно когда помнишь содержимое, но не помнишь имя файла. В Windows 10 есть сразу два варианта того, как искать файлы по их отрывку.
Поиск файлов по содержимому в Виндовс 10
В первую очередь с данной задачей ассоциируются обычные текстовые файлы: мы сохраняем на компьютере различные заметки, интересные сведения из интернета, рабочие/учебные данные, таблицы, презентации, книги, письма из почтового клиента и многое другое, что можно выразить текстом. Помимо этого по содержимому можно искать и узконаправленные файлы — сохраненные страницы сайтов, код, хранящийся к примеру, в расширении JS и др.
Способ 1: Сторонние программы
Обычно функциональности встроенного поисковика Windows достаточно (о нем мы рассказали в Способе 2), но сторонние программы в ряде случаев будут приоритетнее. К примеру, настройка параметров расширенного поиска в Виндовс устроена таким образом, что вы делаете ее один раз и надолго. Вы также можете выставить поиск по всему накопителю, но при большом количестве файлов и объемном жестком диске процесс иногда замедляется. То есть гибкости системой не предусмотрено, сторонние же программы позволяют каждый раз искать по новому адресу, сужая критерии и используя дополнительные фильтры. К тому же такие программы часто выступают небольшими файловыми помощниками и имеют расширенные возможности.
В этот раз мы рассмотрим работу простой программы Everything, поддерживающей поиск на русском языке локально, на внешних девайсах (HDD, флешка, карта памяти) и на серверах FTP.
Скачать Everything
- Скачайте, установите и запустите программу обычным способом.
- Для обычного поиска по названию файла достаточно воспользоваться соответствующим полем. При параллельной работе с другим ПО результаты будут обновляться в режиме реального времени, то есть если вы сохранили какой-то файл, соответствующий введенному имени, он тут же добавится в выдачу.
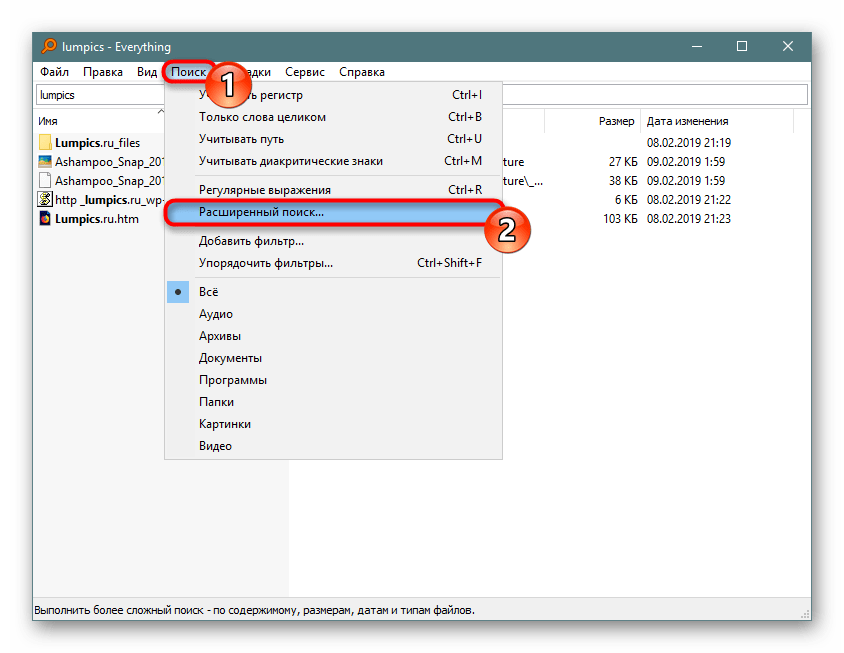
- Для поиска по содержимому переходим в «Поиск» > «Расширенный поиск».
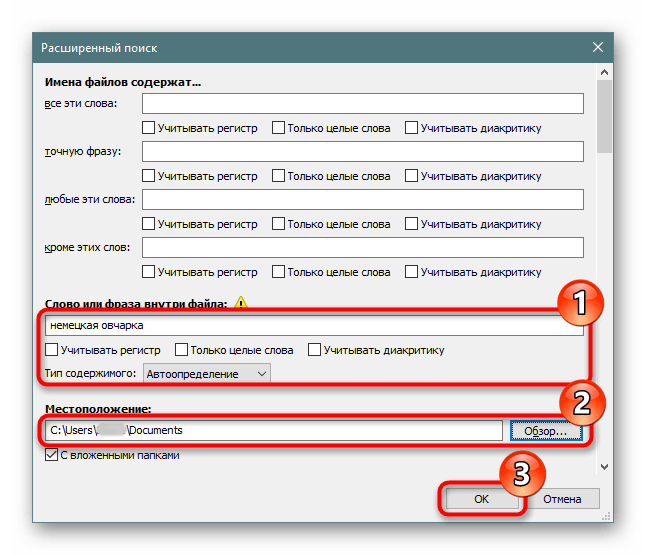
- В поле «Слово или фраза внутри файла» вписываем искомое выражение, при необходимости настроив дополнительные параметры типа фильтра по регистру. Чтобы ускорить процесс поиска, можете также сузить область проверок, выбрав конкретную папку или приблизительную область. Этот пункт желателен, но необязателен.
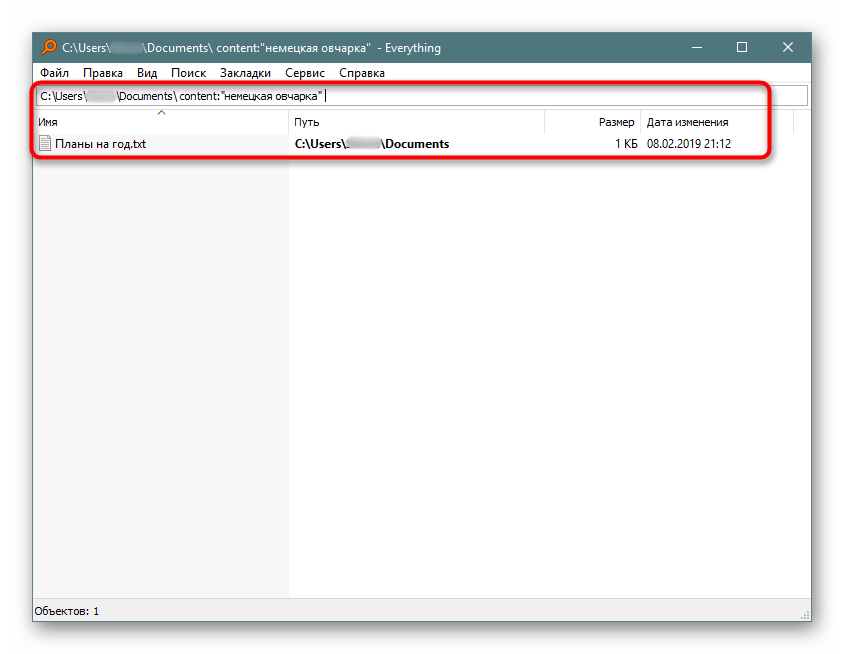
- Появится результат, соответствующий заданному вопросу. Вы можете открыть каждый найденный файл двойным кликом ЛКМ или вызвать его стандартное контекстное меню Windows, нажав ПКМ.
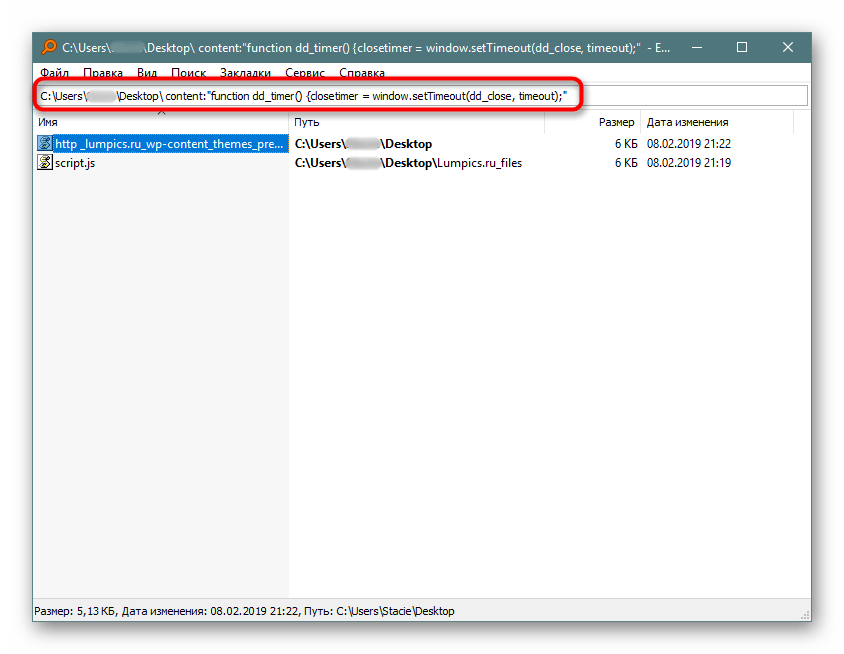
- Кроме того, Everything справляет с поиском специфического контента, как, например, скрипта по строчке его кода.

Остальные возможности программы вы можете узнать из нашего обзора программы по ссылке выше или самостоятельно. В целом это очень удобный инструмент, когда требуется быстро искать файлы по их содержимому, будь то встроенный накопитель, внешний диск/флешка или FTP-сервер.
Если работа с Everything не подходит, ознакомьтесь со списком других похожих программ по ссылке ниже.
Читайте также: Программы для поиска файлов на компьютере
Способ 2: Поиск через «Пуск»
Меню «Пуск» в десятке было улучшено, и сейчас оно не такое ограниченное, как было в прошлых версиях этой операционной системы. Используя его, можно отыскать нужный файл в компьютере по его содержимому.
Для того чтобы этот способ был рабочим, необходима включенная расширенная индексация на компьютере. Поэтому первым делом разберем, как ее активировать.
Включение службы
У вас должна быть запущена служба, отвечающая за поиск в Виндовс.
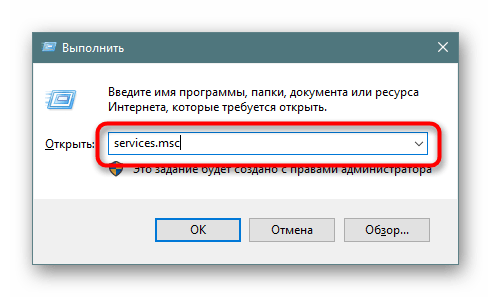
- Чтобы это проверить и при необходимости изменить ее статус, нажмите Win + R и в поисковое поле впишите
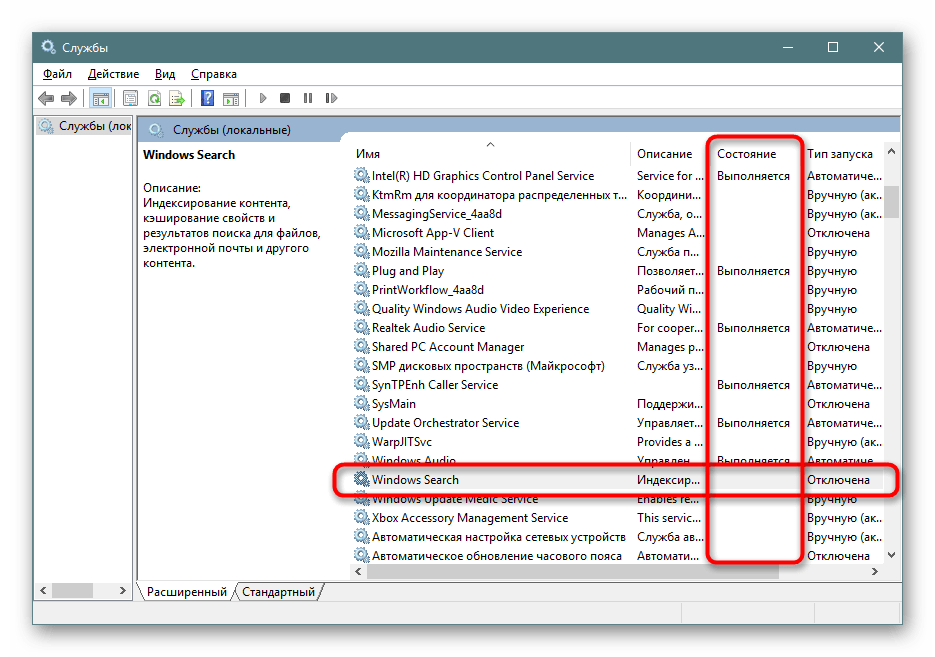
services.msc, затем нажмите Enter. - В списке служб отыщите «Windows Search». Если в колонке «Состояние» статус «Выполняется», значит она включена и дальнейшие действия не требуются, окно можно закрыть и переходить к следующему этапу. Тем, у кого она отключена, нужно ее запустить вручную. Для этого нажмите два раза по службе левой кнопкой мыши.
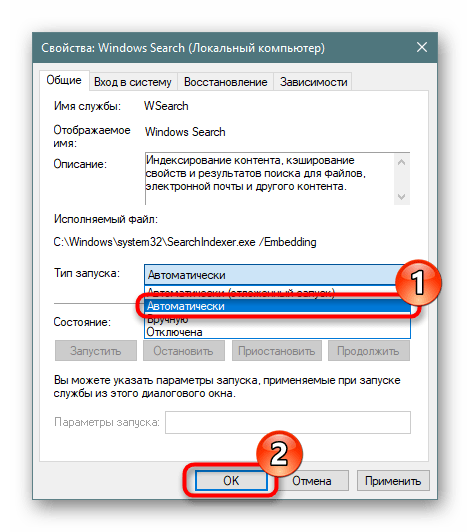
- Вы попадете в ее свойства, где «Тип запуска» смените на «Автоматически» и нажмите «ОК».
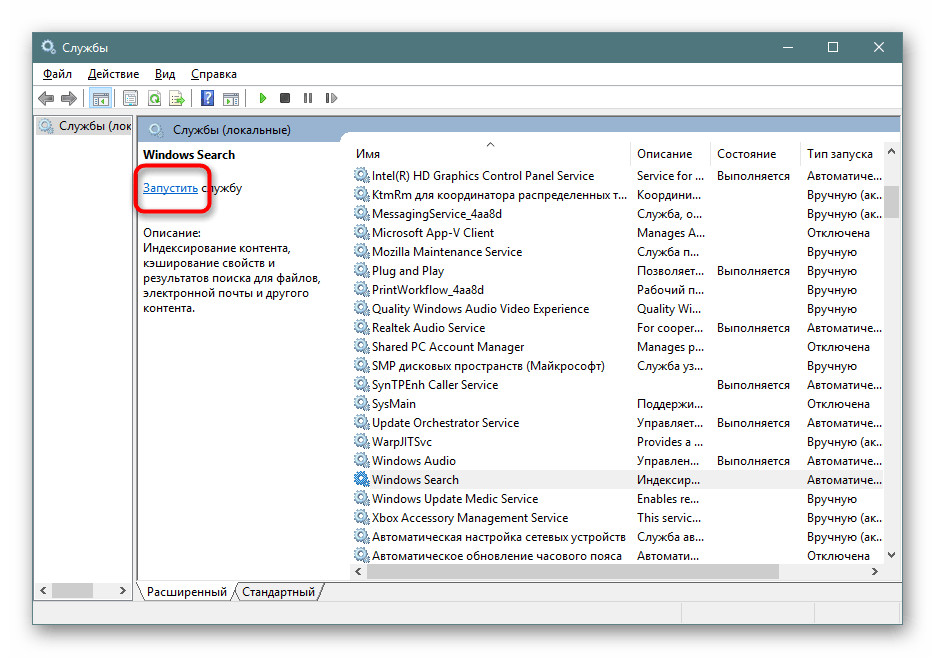
- Вы можете «Запустить» службу. Статус в столбце «Состояние» не сменится, однако если вместо слова «Запустить» вы увидите ссылки «Остановить» и «Перезапустить», значит включение произошло успешно.
Включение разрешения индексации на жестком диске
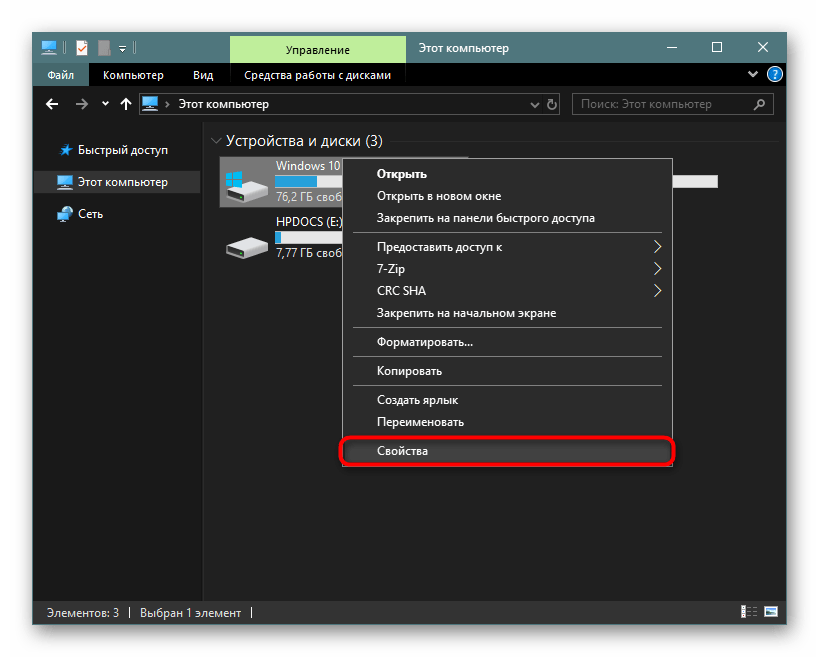
Жесткий диск должен иметь разрешение на индексацию файлов. Для этого открываем «Проводник» и переходим в «Этот компьютер». Выбираем тот раздел диска, на котором планируется совершать поиск сейчас и в будущем. Если таких разделов несколько, выполните дальнейшую настройку поочередно со всеми ними. При отсутствии дополнительных разделов работать будем с одним — «Локальный диск (С:)». Жмем правой кнопкой мыши по иконке и выбираем «Свойства».
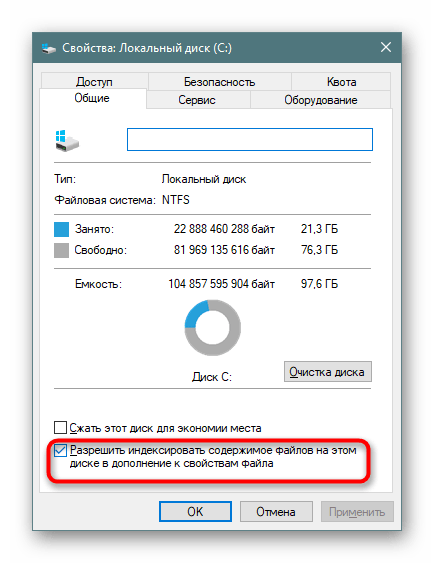
Убедитесь, что галочка рядом с пунктом «Разрешить индексирование…» установлена или поставьте ее самостоятельно, сохранив изменения.
Настройка индексации
Теперь остается включить расширенную индексацию.
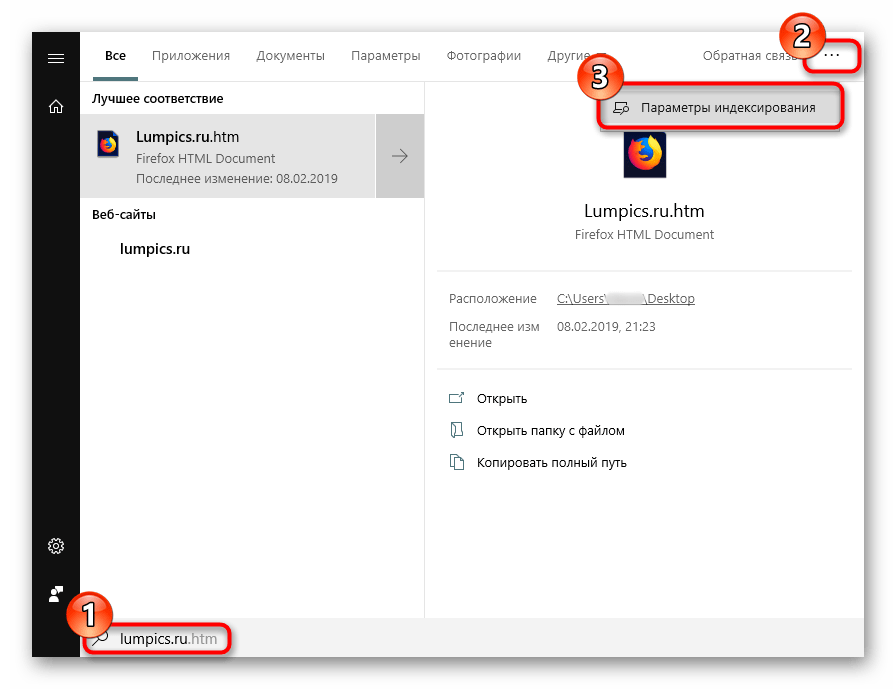
- Открываем «Пуск», в поисковом поле пишем что угодно, чтобы запустить меню поиска. В правом верхнем углу жмем по троеточию и из выпавшего меню кликаем на единственный доступный вариант «Параметры индексирования».
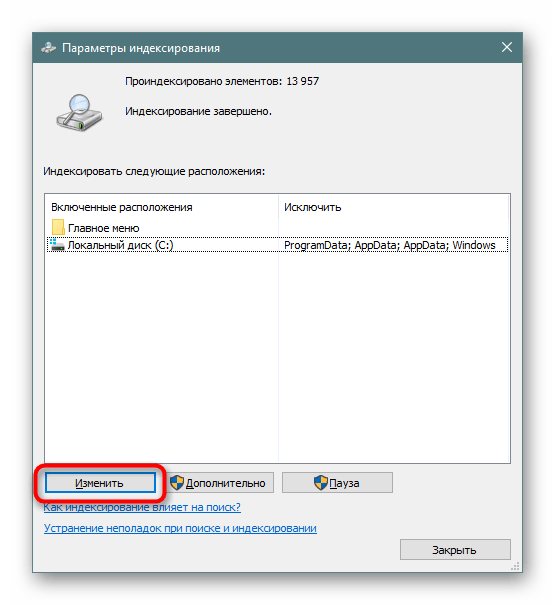
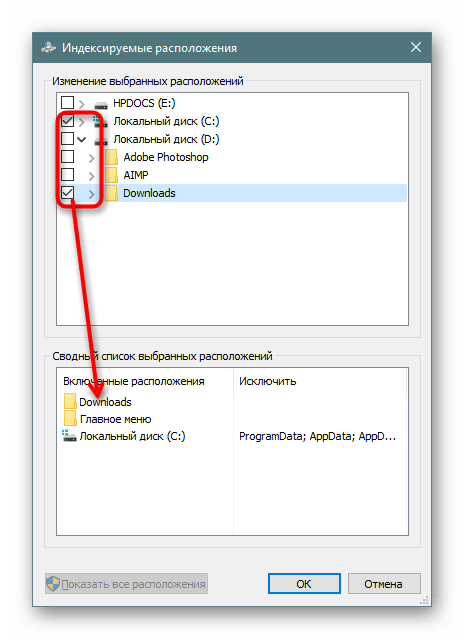
- В окне с параметрами первым делом добавим место, которое будем индексировать. Их может быть несколько (например, если вы хотите индексировать папки выборочно или несколько разделов жесткого диска).
- На скриншоте ниже видно, что для индексирования добавлена одна лишь папка «Downloads», которая находится на разделе (D:). Все те папки, что не были отмечены галочками, индексироваться не будут. По аналогии с этим вы можете настроить раздел (C:) и другие, если таковые имеются.
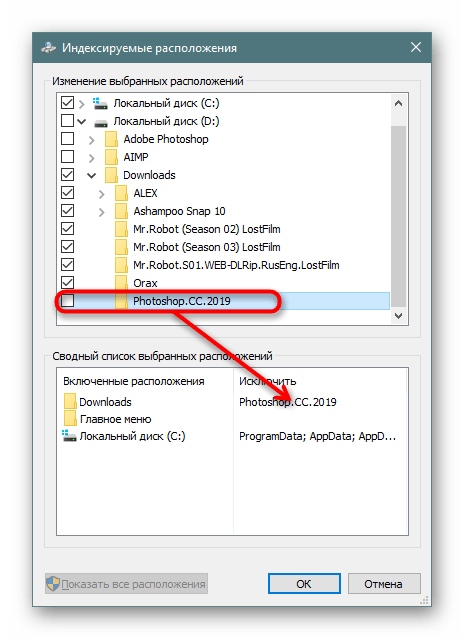
- В колонку «Исключения» попадают папки внутри папок. Например, в папке «Downloads» снятая галочка с подпапки «Photoshop» добавила ее в список исключений.
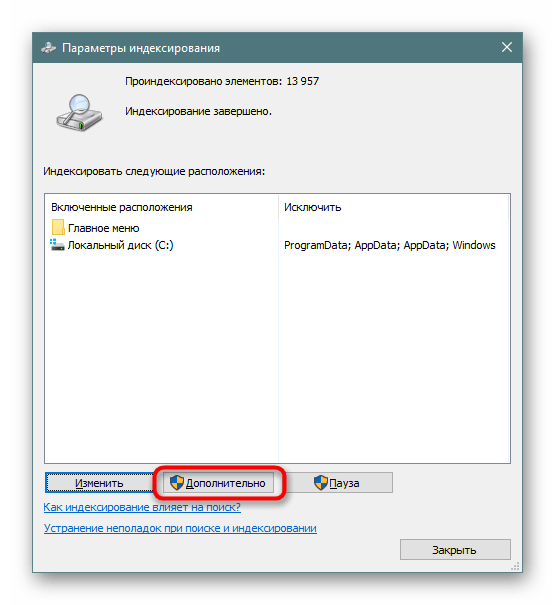
- Когда вы детально настроили все места индексирования и сохранили результаты, в прежнем окне нажмите кнопку «Дополнительно».
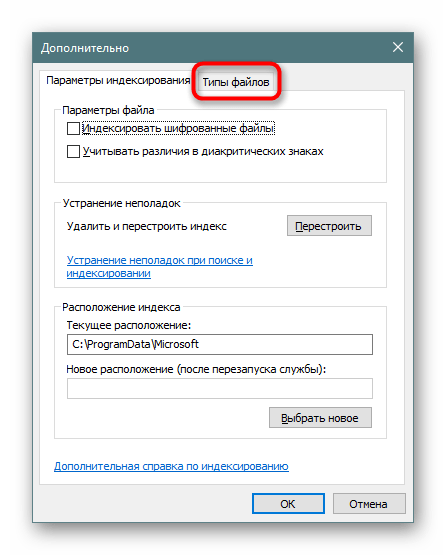
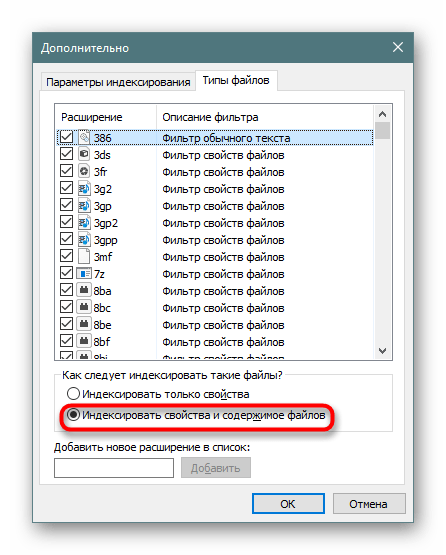
- Переходим на вкладку «Типы файлов».
- В блоке «Как следует индексировать такие файлы?» переставляем маркер на пункт «Индексировать свойства и содержимое файлов», жмем «ОК».
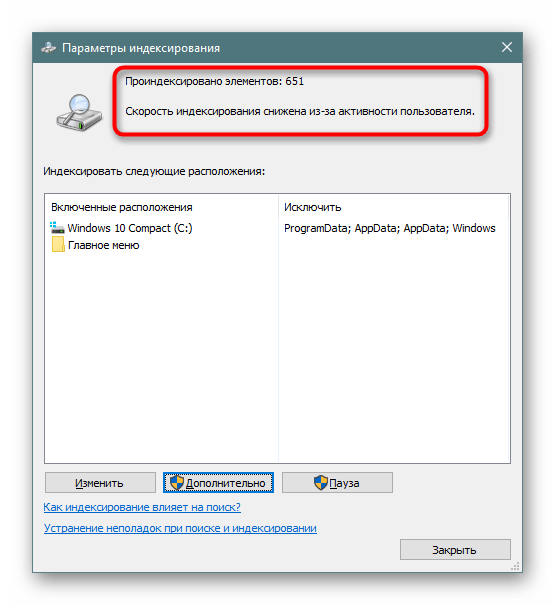
- Будет начато индексирование. Цифра обработанных файлов обновляется где-то раз в 1-3 секунды, а общая продолжительность зависит лишь от того, какой объем информации предстоит проиндексировать.
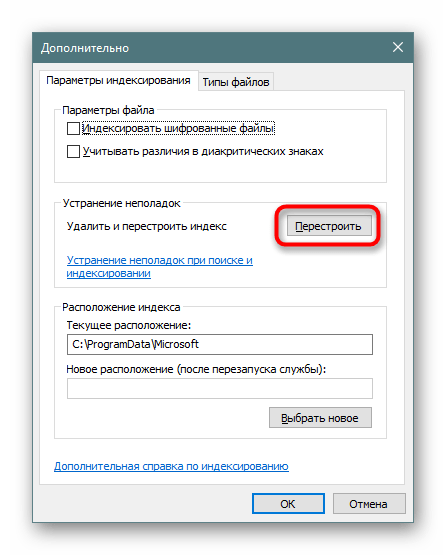
- Если по какой-то причине процесс не запускается, снова зайдите в «Дополнительно» и в блоке «Устранение неполадок» щелкните на «Перестроить».
- Согласитесь с предупреждением и дождитесь, когда в окне будет написано «Индексирование завершено».
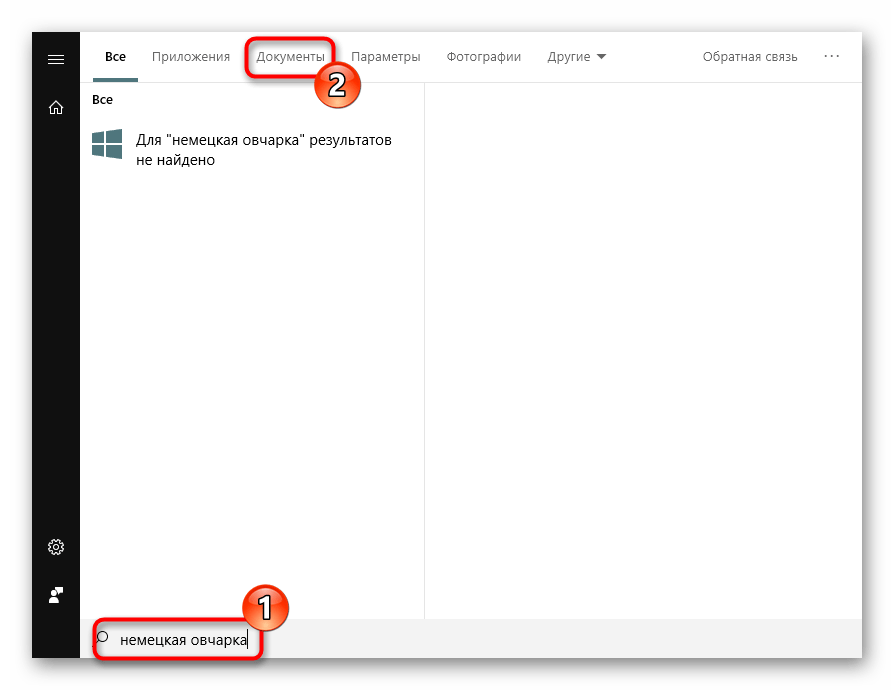
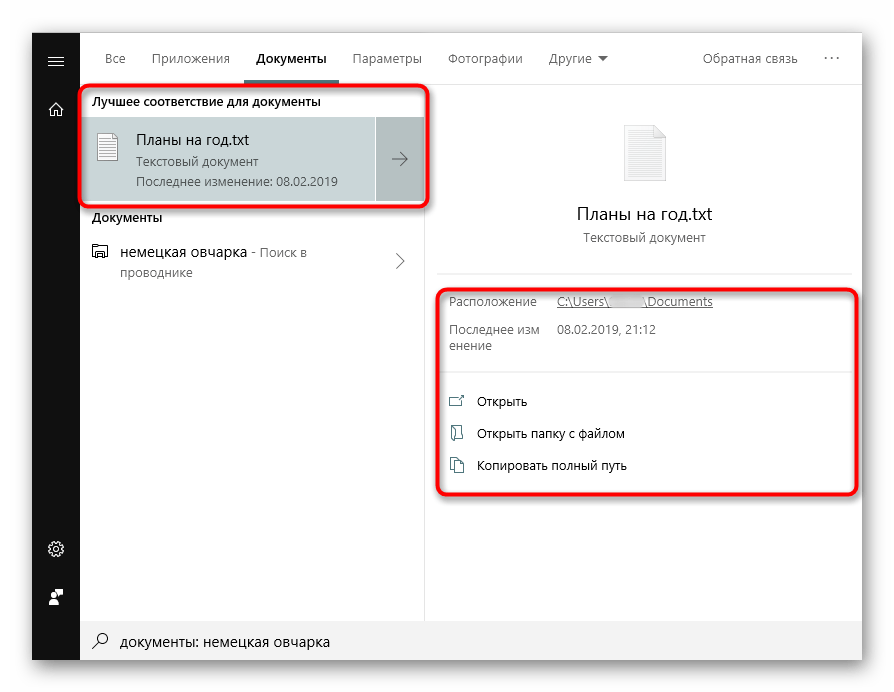
- Все лишнее можно закрыть и попробовать работу поиска в деле. Открываем «Пуск» и пишем фразу из какого-нибудь документа. После этого на верхней панели переключаем тип поиска с «Все» на подходящий, в нашем примере на «Документы».
- Результат на скриншоте ниже. Поисковик отыскал вырванную из текстового документа фразу и нашел ее, предоставив возможность открыть файл, отобразив его расположение, дату изменения и другие функции.
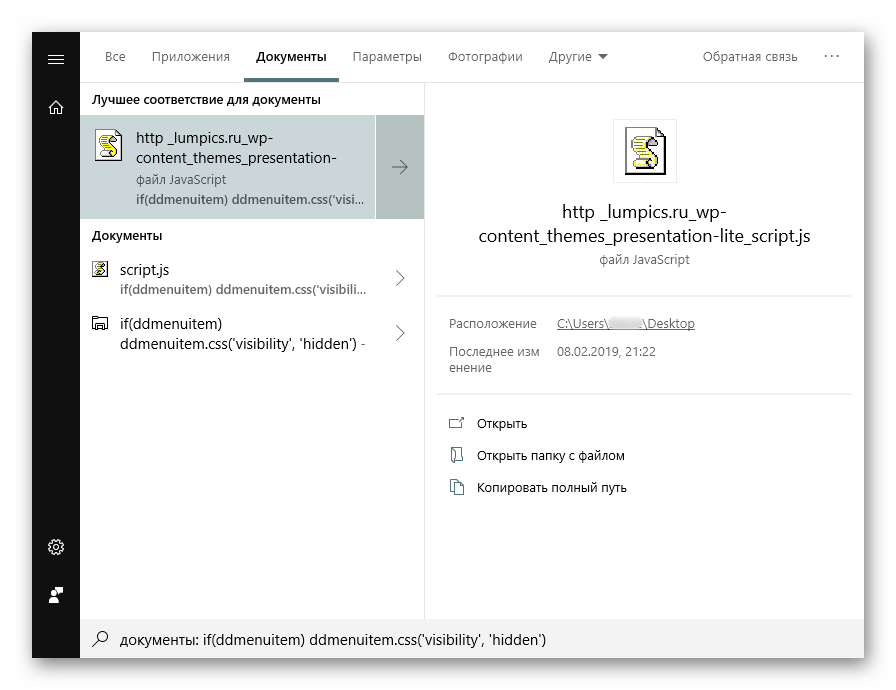
- Помимо стандартных офисных документов Windows умеет искать и по более специфическим файлам, например, в JS-скрипте по строчке кода.

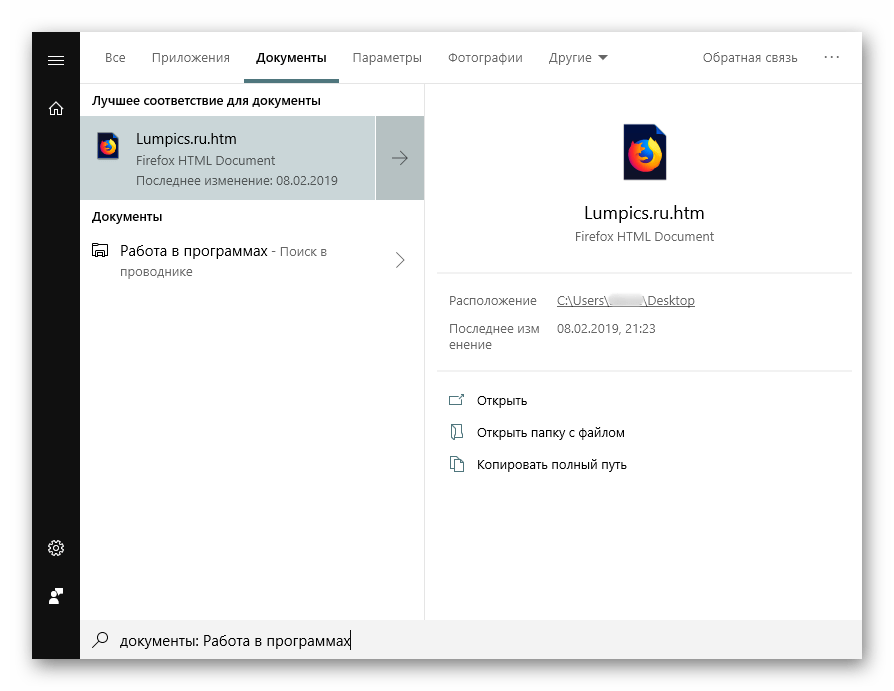
Или в HTM-файлах (обычно это сохраненные страницы сайтов).
Напоминаем, что здесь надо выбирать те места, в которых вы планируете совершать поиск в дальнейшем. Если выбирать сразу весь раздел, в случае с системным будут исключены самые важные его папки. Это сделано и в целях безопасности, и для сокращения времени ожидания поиска. Все остальные настройки касательно индексируемых мест и исключений при желании настройте самостоятельно.

Конечно, полный список файлов, которые поддерживает поисковик десятки, куда больше, и показывать все примеры не имеет смысла.
Теперь вы знаете, как оптимизировать поиск по содержимому в Windows 10. Это позволит сохранять больше полезной информации и не теряться в ней, как прежде.
Наша группа в TelegramПолезные советы и помощь
Description: Learn how to search the content of files in Windows 11. Windows 11 includes a built-in search feature that helps you find files, documents, and apps quickly. You can search a file by content and by its name on your computer and use keywords to search on the web using the search feature in Windows 11. In addition, you can manage search options to control what a search feature can find and how a search works in Windows 11.

There are not any noticeable changes to the overall working of Windows search in Windows 11 compared to Windows 10. However, it comes with many improvements to the search feature, such as dedicated file type search, search a file by content, support for cloud search in conjunction with cloud storage services, indexing options, faster and efficient results.
Continue reading to learn about different ways to search files in Windows 11. Additionally, you will learn how to find files by their type and content/text.
Following are some ways that you can use different options to search a file in Windows 11.
Keyboard shortcut
Press Windows+S on your keyboard to quickly search for files, apps, or on the web in Windows 11. A window will pop up, then start typing, and you will get the results listed below. You can even narrow down your results by category by clicking on the headings below the search bar, such as apps, documents, web, or more.
Search button on the Taskbar.
Click on the Search Icon (which looks like a magnifying glass) on the taskbar to open the Search Menu in Windows 11. It is the same menu as you get when you press Windows+S. But if you do not have a Search Icon on your Taskbar, you can add it. For this, open Settings and go to Personalization. Click on the Taskbar, then Taskbar Items, and turn ON the switch beside Search.
Click Start and type your search.
Click the Start button on the Taskbar, the Start Menu will appear. Then start typing, and the menu will turn into the Windows Search Menu, and you can search the same as the last two methods.
Search in File Explorer.
Another way to search files is within File Explorer. Open File Explorer by clicking on the folder icon on your desktop/taskbar or pressing Windows+E. Navigate to the folder you want to search. Then in the upper right corner of the window, click on the Search Bar and type your search query. You will get every matching result for files.

How to add file extensions to Windows Search Index?
You can find files using the search feature in Windows 11. However, you can search for text in a file for limited file types by default. But you can include other text-based files to expand your searching options in Windows 11.
- Press on the Search Icon in the Taskbar to open a Windows Search window.
- Type index and open the Indexing Options from results.
- Once the Indexing Options window opens, press the Advanced button.
- In the Advanced Options, press on the File Types tab. Mark the extensions for the file type that you want to include in your content searches. Then select the Option Index Properties and File Contents under the list to see the filter in the filter description that will be used to open a specific file type. For example, when you choose the bat extension, the plain text filter will be the filter type.
- However, if you do not have your required file type in the list, it means that the file type does not have an app as the default handler. You can add your new file type by typing the extension in the box under Add New Extension to list and then press Add. Because Windows Search does not have another app associated with those types of files, it will use a plain text filter to search their contents by default.
To search for a specific file extension/type.
Follow the given steps to search for a file type in file explorer.
- Open File Explorer by clicking on the folder icon on your desktop/taskbar or pressing Windows+E.
- Navigate to the folder you want to search. Then in the upper right corner of the window, click on the Search Bar and type the extension of the file you intend to search.
- You will get files matching your extension.

How to enable searching a file by content/text using Windows Search in Windows 11?
Use the following steps to enable searching a file by content/text using Windows Search in Windows 11.
- Click on Start, and open the Control Panel from the Start Menu.
- Once the Control Panel window opens, click on Folder Options.
- In the Folder Options window, click on the Search tab.
- Then under the What to Search option, select the Always Search File Names and Contents and press OK. It will enable searching a file by its name and content in Windows 11.
How to search a file by content/text using Windows Search in Windows 11?
Using Windows Search in Windows 11, you can search a file by content/text by following the steps below.
- Open File Explorer by clicking on the folder icon on your desktop/taskbar or pressing Windows+E.
- Navigate to the folder you want to search. Then in the upper right corner of the window, click on the Search Bar and type the string: content: “your phrase/text/content”. Window 11 will recognize this as a specific instruction, and the text color will change to light blue.
- You will get files matching your text. For example, if you type .pdf in the search box to find all the files with the pdf extension.
Bonus: Search Text in Files with AnyTxt
AnyTxt is a powerful tool that allows you to search text in files on your computer. You can use AnyTxt to find any document, email, ebook, or archive that contains the keywords you are looking for.

It supports multiple file formats, such as PDF, DOCX, EPUB, ZIP, and more. You can also customize the search options, such as case sensitivity, file size, and date range. AnyTxt is fast, accurate, and easy to use. It can help you search files by content in Windows 11/10/7.
Conclusion
To conclude, one can say that the search feature in Windows 11 makes the process of searching files and documents convenient and quick. You can find a file by its name, type, date, size, and even by its content using Windows Search in Windows 11.
Manage Indexing Options and Settings for Windows 11 – A Tutorial
Search through file contents in Windows 10: Laptops or PCs are the storage devices where you keep all your data like files, images, videos, documents, etc. You store all kind of data and data from other devices such as phones, USB, from the Internet, etc is also saved on your PC. All the data is saved in different folders depending on the location where that data is saved.
So, if you want to look for a particular file or app, then what will you do?? If you are planning to open each and every folder and then look for that particular file or app in it, then it will consume a lot of your time. Now to solve the above problem Windows 10 comes with a feature which enables you to search whatever file or app you are looking for, by just typing it in the search box.

Also, it not only provides you an opportunity to search for a particular file but also lets you search among the contents of the files by simply typing what you looking for. Although most of the people are not aware that this feature exists in Windows 10, so to use this feature first you need to enable it. So, in this guide, you will see how to enable the feature that will allow you to search among the contents of the file and other various searching options available in Windows 10.
Table of Contents
Make sure to create a restore point just in case something goes wrong.
Method 1: Search using the Search box or Cortana
The basic search option that is available in all the versions of Windows is a search bar available at the Start Menu. Windows 10 Search bar is more advanced than any of the previous search bar’s. And with the integration of Cortana (the virtual assistant of Windows 10) you can not only search for files under your local PC but you can also discover files available on Bing and other online sources.
To search any file using the search bar or Cortana follow the below steps:
1.Click on the Start Menu and a search bar will appear.
2.Type the name of the file you want to search.
3.All the possible results will appear, then you will have to click on the file that you were looking for.
Method 2: Search using the File Explorer
If you’re looking for a file and if you know in which folder or drive it is under then you can search for the file directly using the File Explorer. It will take less time for the file to be found and this method is quite easy to follow.
To do so, follow the below-given steps:
1.Press Windows Key + E to open File Explorer.
2.From the left side choose the folder under which your file is present. If you don’t know the folder then click on This PC.
3.A search box will appear on the top-right corner.

4.Type the file name you want to search and the required result will appear on the same screen. Click on the file you want to open and your file will open up.
Method 3: Using the “Everything” tool
You can also use a third-party tool called “Everything” to search for any file on your PC. It is very fast as compared to inbuilt search features and is very simple to use. It creates a search index of PCs within a few minutes and when you use the same, it starts working immediately. It is very lightweight and handy application.
If you want to quickly search any file on your computer then Everything tool is the best solution as compared to other integrated searching tools.
All the three methods above will give only file names and folders available on your PC. They will not give you the content of the file. If you want to search the content of the requisite file, then go for the below method.
Method 4: Search for Text or Contents of Any File
Searching through the file content is possible in Windows 10 by using the Start Menu Search. If you are unable to do so, then it is because that feature is turned off by default. So, in order to use this feature, you need to enable this feature.
To enable searching among file content feature, follow the below steps:
1.Open the Cortana or search bar and type Indexing options in it.
2.Click on the Indexing Options that will appear as a result on top or simply hit the enter button on the keyboard. Below a dialog box will appear.

3.Click on the Advanced button available at the bottom.

4.Under Advanced Options, click on File types tab.
5.Below a box will appear in which by default all the extensions are selected.
Note: As all the file extensions are selected, this will allow you to search through the contents of all types of files available under your PC.
6.Check the radio button next to Indexed Properties and File contents option.
7.Click on OK.
8.A Rebuilding Index warning box will appear which gives you a warning regarding some content may not be available under search until the rebuilding is finished. Click OK to close the warning message.
Note: Rebuilding the index might take a long time to complete depending upon the number & size of the files on your PC.
9.Your indexing is in process.
10.Click close on the Advanced options dialog box.

After the indexing is completely finished, now you can search for any text or word in any file using the File Explorer. To do so, follow the below-given steps:
1.Press Windows Key + E to open File Explorer.
2.From the left side, choose “This PC“.
3.Now from the right top corner, a search box is available.
4.Type the text in the search box you want to search among the content of the available files. All the possible result will appear on the same screen.

Note: If you do not get any result, then it is possible that indexing has not been completed yet.
This will give you all the results which include both the content of files as well as the file names which contain that particular text which you searched.
Recommended:
- 9 Best Free Email Service Providers of 2019: Review & Comparison
- 7 Best Pirate Bay Alternatives That Work In 2019 (TBP Down)
- Creating a Full System Image Backup in Windows 10
- 5 Best Music Player for Windows 10 With Equalizer
So, there you have it! Now you can easily Search for Text or Contents of any File on Windows 10. But if you still have any queries regarding this guide then feel free to ask them in the comment’s section.
In Windows 11, you can search for files that contain certain texts or contents using the default search in File Explorer or Start. However, if the files and folders are not indexed by Windows, the search may take a very long time to complete depending on the number of files it has to search.
To speed up the search, you can configure Windows 11 to index the files and folders for faster searches, or you can use a software instead to perform much more powerful searches and replaces.
This guide will show you how to use a powerful tool called grepWin to search for text and contents in files on Windows 11 with much faster search speed.
Search for Text or Contents in Files on Windows 11
GrepWin is a powerful tool that allows you to search for files containing certain text in any folder or directory on Windows 11. You can even search an entire drive for files that containing a certain text you want to search for.
It has all the tools you need to filter your search results such as file size filter, types of files, etc. It also supports regular expressions that some users may find useful when performing advanced searches.
GrepWin also allows you to do search and replace. You can search for certain texts in files and let grepWin to automatically replace them with other texts.
You can download grepWin from https://github.com/stefankueng/grepWin/releases/.
If this is your first time downloading an app or tool from GitHub, here’s what you should look for. On the download page, look for the post marked with “Latest“, which usually appear as the top most post. Then, click on an installer under Assets of that release. For example, if you are using 64-bit Windows 11, select grep-Win-x64.msi.
Optionally, you can also download the grepWin portable version if you don’t want to install the software. Portable means that you can use the software by directly running its executable file without the need to install the software first. However, installing grepWin can add a “search with grepWin” to the Windows context menu which allows you to quickly search with grepWin by just right-clicking a folder or a drive.
How to search for files containing text in Windows 11 using grepWin
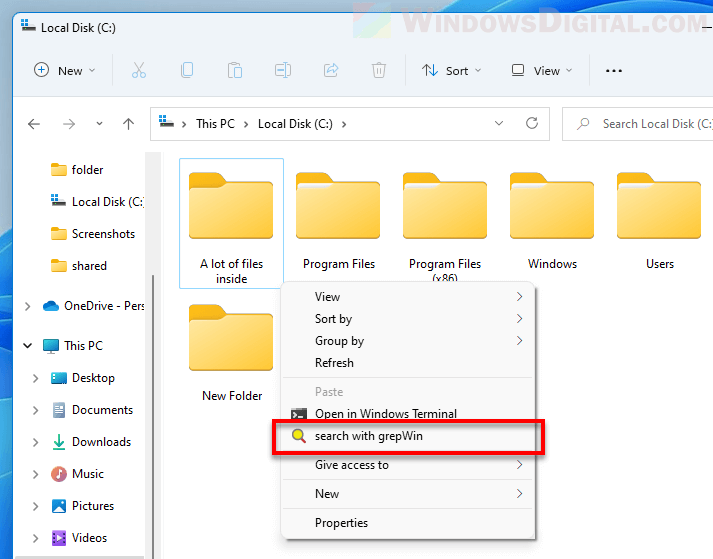
After installing grepWin, to search for files containing certain text in a folder or drive, right-click on the folder or drive, select Show more options > Search with grepWin.
Alternatively (especially if you run grepWin portable version), you can directly run grepWin and manually enter the path to the folder you want to search in the “Search in” field.
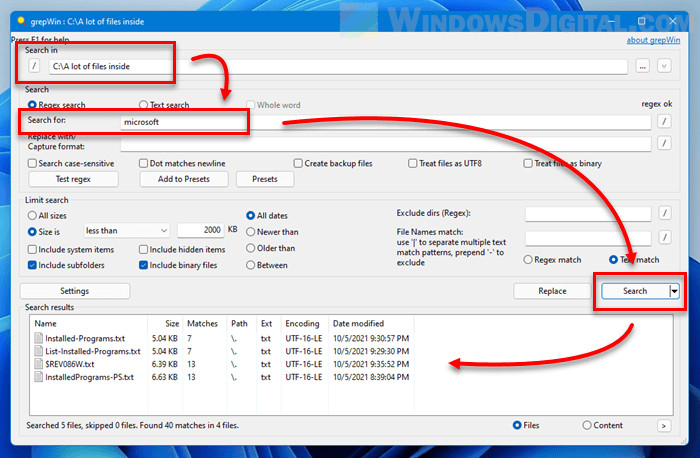
To search for text in files in the selected folder, enter the text you want to search for in the “Search for” field. Then, click on the Search button. The search results will then return all the files that contain the string you’ve entered. Make sure the All sizes under Limit search is selected if you want to search all the files regardless of their file sizes.
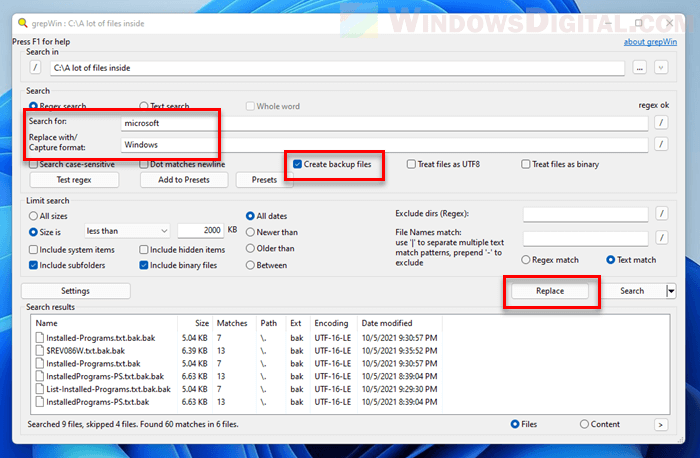
To search and replace using grepWin, in the grepWin window, enter a text you want to search for in the “Search for” field, and enter a text you want to replace with in the “Replace with” field. Then, click on Replace. GrepWin will then search the folder for matching texts and automatically replaces them whenever the stated text is found. It is recommended that you select the “Create backup files” before replacing to allow the tool to automatically create a backup whenever it has to replace texts on a file.
Tip: You can also use the advanced filters in the tool to further narrow down your search results. For example, you can limit your search by file size. Simply select “Size is” under Limit search, and select either “less than“, “equal to” or “greater than” option, and finally enter a file size you want to filter.
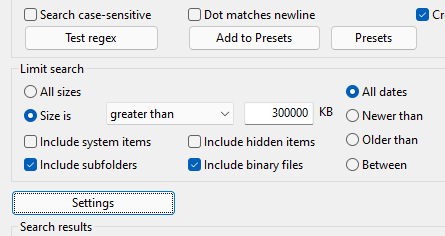
There are other filters such as “search case-sensitive”, include or exclude system items, subfolders, hidden items or binary files, date created of files, file names match, and regular expressions.
Windows 10 has a search feature that can find files; you can search for files by name, by date, and by type. The search on the taskbar works just as well as the search feature in File Explorer.
While you can search for files, you must know what a file was called, what date or approximate date it was created on, and what type of file it is. Barring the availability of this information, finding a file is rather difficult.
One other parameter that can be used to search for a file is its content. If you remember part of what was in a file, you can use it as a search parameter. This only works if the file is text-based or it can store text in it.
On Windows 10, you can search text inside certain documents or file types. Generally speaking, the supported file types are;
- TXT files
- DOCX files
- LOG files
- XLSX files
There may be other files that are supported but many text-based files such as a PS1 script cannot be searched.
Search text in files from File Explorer
To search text in files using File Explorer, follow these steps.
- Open File Explorer.
- Navigate to the drive or folder you think the file might be in.
- Click inside the search bar next to the location bar.
- Enter a term that you know is unique to the file and tap Enter.
- File Explorer will show you the files it has found.
Search text in files with AnyTXT
As mentioned, text search in files isn’t supported for all file types so if you’re looking to search inside a file that isn’t supported, you need a third-party app like AnyTXT.
- Download and install AnyTXT.
- Run the app.
- Open the drive dropdown and select the drive you want to search.
- Open the drive dropdown and select the file format you want to search.
- Enter the term you want to search for.
- Click Go.
Supported file formats
AnyTXT does not add complete and comprehensive support for all files that can store text. It can search for text in files in the following formats.
- DOC
- PPT
- XLS
- DOCX
- PPTX
- XLSX
- CHM
- MOBI
- EPUB
- FB2
- TCR
- TXT
AnyTXT has an option to add additional formats but it didn’t work well when tested. To add additional formats;
- Open the formats dropdown.
- Scroll to the end, and click Add New.
- Select a file that is the type of file you want to search for.
Conclusion
There are lots of third-party search tools available for Windows 10, and some specialize in text search in files. If these tools aren’t what you need, look for one that supports the file type you need to search for. Searching for a file by the text in it makes it easier to find a file without having to open it.

Fatima Wahab
Fatima has been writing for AddictiveTips for six years. She began as a junior writer and has been working as the Editor in Chief since 2014.
Fatima gets an adrenaline rush from figuring out how technology works, and how to manipulate it. A well-designed app, something that solves a common everyday problem and looks