
This post explains how to change Mouse Keys speed or acceleration in Windows 11. Both speed and acceleration play an important role in controlling how the pointer moves on screen while using the Mouse Keys feature to perform basic mouse functions. Speed determines how quickly the pointer moves across the screen, and acceleration determines how quickly it reaches its maximum speed once a key is pressed.

In Windows 11, the speed and acceleration settings for Mouse Keys can be customized to suit user preferences. This post will show you how to use these settings to tailor the behavior of the pointer when using the numeric keypad on your keyboard instead of the mouse.
To change Mouse Keys speed or acceleration in Windows 11, you may follow one of these methods:
- Use Windows Settings
- Use Control Panel
- Use Registry Editor
Let us see this in detail.
1] Use Windows Settings to change Mouse Keys speed or acceleration

Press Win+I to open the Settings window. Navigate to Accessibility > Mouse. Click the down arrow next to the Mouse keys option to expand the section. You will see two options at the bottom:
- Mouse keys speed
- Mouse keys acceleration
(To access these settings, make sure the Mouse keys feature is enabled on your Windows 11 PC. If the feature is disabled, the settings will be grayed out.)
Use the slider next to the ‘Mouse keys speed’ option to adjust the speed of the mouse pointer. Move it towards the right to increase the speed and towards the left to decrease the speed of the pointer.
Use the slider next to the ‘Mouse keys acceleration’ option to increase or decrease the acceleration of the mouse pointer. Higher values accelerate the pointer faster, while lower values result in smoother movement of the pointer.
Close the Settings app when you’re done with the changes.
2] Use Control Panel to change Mouse Keys speed or acceleration

Type ‘control’ in the Windows Search bar and click Open next to the Control Panel app. Select Category under ‘View by’ dropdown and then navigate to Ease of Access > Ease of Access Center.
Click Make the mouse easier to use link. Next, click the Set up Mouse Keys link under ‘Control the mouse with the keyboard’ section. You will see two sliders under the Pointer speed section.
Use the Top speed slider to increase or decrease the speed of the mouse pointer (low or high). Use the Acceleration slider to increase or decrease the acceleration of the mouse pointer (slow or fast).
Click Apply and then OK to save changes to the system.
3] Use Registry Editor to change Mouse Keys speed or acceleration

Advanced users can adjust the Mouse Keys’ speed or acceleration on their Windows 11 PC by modifying specific registry keys.
We recommend backing up the Windows registry before making any changes to it to avoid system instability and other potential issues.
Press Win+R, type ‘regedit‘ in the Run dialogue, and press the Enter key. A User Account Control prompt will appear. Click Yes to open the Registry Editor.
Navigate to the following key in the Registry Editor window:
HKEY_CURRENT_USER\Control Panel\Accessibility\MouseKeys
Double-click the TimeToMaximumSpeed string value in the right pane. Edit String dialogue will appear. In the Value data field, enter a value between 100 and 5000 to modify the Mouse Keys acceleration. The value determines the time it takes (in milliseconds) to reach the pointer’s maximum speed.
Next, double-click the MaximumSpeed string value. In the Edit String dialogue, enter a value between 1 and 359 in the ‘Value data’ field to modify the Mouse Keys speed. This value controls the maximum speed of the mouse pointer when Mouse Keys is enabled.
Close the Registry Editor and reboot your PC to apply changes.
That’s all! I hope you find this useful.
Read: Enable or Disable Use Mouse Keys when Num Lock is On in Windows.
How do I access my mouse settings on Windows 11?
Click the Start button and select Settings to open the Settings app. Click the Bluetooth & devices tab in the left panel. Scroll down and click the Mouse option in the right panel. On the ‘Mouse’ screen, you can select the primary mouse button, change cursor speed, modify scrolling options, and adjust other mouse-related settings. You can also type ‘mouse’ in the Windows Search bar to directly open this screen. Alternatively, you can go to the Mouse section in the Control Panel to adjust mouse properties.
How do I control mouse click speed?
Open the Settings app and navigate to Bluetooth & devices > Mouse. Scroll down and click Additional mouse settings under ‘Related settings’. Mouse Properties dialogue will appear. Switch to the Buttons tab and use the slider under the Double-click speed section to adjust the double-click speed of the mouse. Click Apply followed by OK to save changes to the system.
Read Next: Windows 11 Accessibility Settings and Features.
How To Customize Mouse Acceleration in Windows 11, 10, SmoothMouseXCurve and SmoothMouseYCurve
by Yaron Elharar (@YaronElharar)
This is a powerful mouse customization tool. Back up your Registry keys. As with extreme customization, use at your own risk.
Comments? Questions? Go to this X post
* The graph starts zoomed in to the first four points. These are the most relevant for fine-tuning.
* When you start customizing your curve, you’ll see a gray line, which is a reference of the default mouse acceleration curve built into Windows 10 and 11.
Or check out SpeedCursor Pro, a software I created for accurate mouse control using shortcuts.
Please click the generate button to generate your new mouse curve.
Have you ever wanted to have extreme and accurate control over your mouse? Have you wondered how pro gamers and professionals are so accurate with their mouse movements? One of the less known secrets to this extreme mouse accuracy lies within two little-known registry keys: SmoothMouseXCurve and SmoothMouseYCurve. With the help of the tool on this page and a thorough explanation we will go through how to customize your own mouse acceleration curve and fine-tune it to your exact preferences. This is going to be a level of mouse precision that goes far beyond any standard mouse settings. Let’s get into it.
What are the SmoothMouseXCurve and SmoothMouseYCurve, and what do they do?
SmoothMouseXCurve and SmoothMouseYCurve are Windows Registry keys that contain crucial data for your mouse acceleration. This data is used by Windows to determine how far your pointer should move on the screen based on how fast you’re moving your physical mouse. In essence, these keys define the mouse acceleration curve.
These registry keys allow Windows to translate the speed of your physical mouse movement into the distance the on-screen pointer travels. By modifying the data in these keys, you can customize this relationship, giving you fine-grained control over your mouse’s speed while the mouse accelerates.
What is the mouse acceleration curve?
The mouse acceleration curve is fundamental to understanding how your computer translates physical mouse movement into on-screen cursor motion. Simply put, it’s a mathematical formula that determines how fast the mouse cursor should move on the screen in reaction to the speed at which you physically move your mouse. This curve is not just about position or velocity at a single moment, but primarily concerned with the translation of the physical movement to on-screen cursor movement.
So, in simple terms, you can think about SmoothMouseXCurve as the X-axis representing the physical speed you are moving the mouse on the desk or mousepad, while the SmoothMouseYCurve (Y-axis) values indicate how fast the cursor should move in response to the physical mouse movement.
By customizing the SmoothMouseXCurve and SmoothMouseYCurve registry keys, you’re reshaping the relationship between physical movement of the mouse and screen movement of the mouse. This allows for fine-tuned control over how your mouse behaves at different movement speeds.
Where can you find these registry keys?
To access these keys, you’ll need to dive into the Windows Registry. Here’s how you can find them:
Method 1: Direct navigation
- Click on the Start menu and type “Registry Editor” (without quotes).
- Click on the “Registry Editor” app in the search results to open it.
- In the Registry Editor, navigate to the following path by expanding the folders in the left pane:
HKEY_CURRENT_USER\Control Panel\Mouse - Look for the keys named “SmoothMouseXCurve” and “SmoothMouseYCurve” in the right pane.
Method 2: Search from root
- Open the Registry Editor as described in steps 1-2 above.
- Click on “Computer” at the very top of the left pane to ensure you’re at the root.
- Press Ctrl+F or click Edit > Find from the menu.
- Type “SmoothMouseXCurve” or “SmoothMouseYCurve” (without quotes) in the search box and click “Find Next”.
- Once found, you can see the full path to the key in the address bar at the top of the Registry Editor window.
What are the SmoothMouseXCurve, SmoothMouseYCurve Registry keys?
Each key contains five pairs of values, and each pair is made up of two 32-bit values stored in little-endian format. This means the bytes are arranged in reverse order, which can look confusing at first glance. Here’s what each pair represents:
- SmoothMouseXCurve – mouse movement speed (input).
- SmoothMouseYCurve – the corresponding pointer movement speed (output).
The default registry keys for Windows 10, 11 mouse acceleration are
"SmoothMouseXCurve"=hex:00,00,00,00,00,00,00,00,15,6e,00,00,00,00,00,00,00,40,01,00,00,00,00,00,29,dc,03,00,00,00,00,00,00,00,28,00,00,00,00,00

"SmoothMouseYCurve"=hex:00,00,00,00,00,00,00,00,fd,11,01,00,00,00,00,00,00,24,04,00,00,00,00,00,00,fc,12,00,00,00,00,00,00,c0,bb,01,00,00,00,00
Let’s break down the SmoothMouseXCurve registry, and put each point on its own line.
00,00,00,00,00,00,00,00

15,6e,00,00,00,00,00,00

00,40,01,00,00,00,00,00

29,dc,03,00,00,00,00,00

00,00,28,00,00,00,00,00
As you can see, same as in the tool above we have five points on the x-axis of the acceleration curve graph. remember, the x-axis corresponds to the physical movement of the mouse. The first 4 bits represent the decimal portion of the number, and the second 4 bits represent the integer.
| Hex of Decimal | Hex of Integer | Decimal | Integer | Point Value |
|---|---|---|---|---|
| 00,00,00,00 | 00,00,00,00 | 0 | 0 | 0.0 |
| 15,6e,00,00 | 00,00,00,00 | 43 | 0 | 0.43 |
| 00,40,01,00 | 00,00,00,00 | 25 | 1 | 1.25 |
| 29,dc,03,00 | 00,00,00,00 | 86 | 3 | 3.86 |
| 00,00,28,00 | 00,00,00,00 | 0 | 40 | 40.0 |
Now, to get the point value, we will need to transform the hexadecimal value into a decimal value and combine it into a curve point. The tool above starts from the default Windows 10 values and lets you set your own custom values for the mouse acceleration curve and test them out on your own machine. Note that this registry key is exactly the same for Windows 11 as well.
Let’s start preparing to assign a custom mouse acceleration curve to our mouse.
Backing Up the Registry Keys
Before making any changes to your registry, it’s crucial to back up the original SmoothMouseXCurve and SmoothMouseYCurve registry values. This allows you to restore the original settings if something goes wrong. Here’s how to do it:
- Open the Registry Editor as described in the “Where can you find them?” section,
and get to the SmoothMouseXCurve and SmoothMouseYCurve registry keys as described there. - To back up the entire “Mouse” key, which includes both SmoothMouseXCurve and SmoothMouseYCurve:
- Right-click on the “Mouse” folder in the left pane.
- Select “Export”.
- Choose a location on your computer to save the file.
- Name it something like “Mouse_Settings_Backup.reg” and click “Save”.
Now, if something goes wrong, restoring the original keys is easy, all you need to do is double-click this file and approve it to restore your original settings.
Applying Your Custom Mouse Acceleration Curve
Now that you’ve created a custom mouse acceleration curve using the tool, it’s time to apply it to your system. The tool will output two registry keys that represent your custom curve. They will look something like this:
"SmoothMouseXCurve"=hex:00,00,00,00,00,00,00,00,15,6e,00,00,00,00,00,00,00,40,01,00,00,00,00,00,29,dc,03,00,00,00,00,00,00,00,28,00,00,00,00,00

"SmoothMouseYCurve"=hex:00,00,00,00,00,00,00,00,fd,11,01,00,00,00,00,00,00,24,04,00,00,00,00,00,00,fc,12,00,00,00,00,00,00,c0,bb,01,00,00,00,00
Follow these steps to apply your new custom curve:
- Create a duplicate of your backup file: Copy the “Mouse_Settings_Backup.reg” file you created earlier and rename the copy to “my_new_mouse_curve.reg”.
- Edit the new file:
- Right-click on “my_new_mouse_curve.reg” and select “Edit”.
- Remove all unnecessary keys from the file, leaving only the SmoothMouseXCurve and SmoothMouseYCurve entries.
- Replace these entries with the ones generated by the tool.
- Save the file.
- After performing these edits, your “my_new_mouse_curve.reg” file should look something like this:
Windows Registry Editor Version 5.00[HKEY_CURRENT_USER\Control Panel\Mouse]

"SmoothMouseXCurve"=hex:00,00,00,00,00,00,00,00,00,80,00,00,00,00,00,00,cc,cc,\

00,00,00,00,00,00,99,19,01,00,00,00,00,00,00,80,01,00,00,00,00,00

"SmoothMouseYCurve"=hex:00,00,00,00,00,00,00,00,33,33,01,00,00,00,00,00,66,e6,\

01,00,00,00,00,00,00,00,04,00,00,00,00,00,00,80,09,00,00,00,00,00
Apply the new curve:
-
- Double-click the “my_new_mouse_curve.reg” file.
- Confirm any security prompts that appear.
- Click “Yes” to add the information to the registry.
Important Note: The changes will only take effect after you log out and log back into your user account. You may need to restart your computer for the changes to be fully applied.
By following these steps, you’ve successfully applied your custom mouse acceleration curve. Enjoy your newly customized mouse movement!
If you buy a new mouse, you might be surprised by how quick it is. A higher DPI (dots per inch) rating for your mouse means greater accuracy in picking up the smallest of movements. This isn’t always ideal, and you may prefer to lower the sensitivity on your mouse by reducing the mouse speed.
Thankfully, it’s easy to change your mouse speed in Windows 10. You can use the built-in Windows settings for your mouse to do this, or you can use a third-party solution. Your mouse may even include an easy-access sensitivity button to switch between settings. To change your mouse speed, here’s what you’ll need to do.

If you want to tweak your mouse speed and overall mouse sensitivity, the best place to start is in your Windows 10 settings area. Windows allows you to change various settings that can impact on how you use your mouse or trackpad, including the ability to change button actions, line scrolling speeds, and cursor speeds.
- To change any of the built-in Windows 10 mouse settings, you’ll need to access your Windows 10 settings area. To do this, right-click the Windows Start menu and click Settings.
- In the Windows Settings menu, click the Devices option to enter that menu.

- Click Mouse in the left-hand menu to access some of the more basic mouse settings. From here, you can change your mouse scroll speeds and line length, as well as change some basic mouse button actions.

- For more advanced mouse settings, click the Additional Mouse Options option under the Related settings section on the right (or at the bottom if the window is too small).
- Under the Buttons tab of the Mouse Properties window, you can change the double-click speed. This is the speed you’ll need to be able to perform a double clicking action for Windows to register it. To change this, move the slider towards the left to slow the speed down, or right to speed it up.

- You can change the action speed of your mouse cursor under the Pointer Options tab. Move the slider under the Select a pointer speed section to do this, moving it left to slow it down, or right to speed your cursor up. If you find that your pointer isn’t as precise, click to enable the Enhance pointer precision checkbox.

- Once you’re happy with the changes you’ve made, click OK to save and close the window. Any changes you’ve made will be applied automatically and can be quickly tweaked or reversed, if needed.

Using The Windows Registry Editor To Change Mouse Sensitivity
If you’re comfortable tweaking with the Windows Registry, then you can use the Windows Registry Editor to change some of your mouse sensitivity settings instead. This could allow you to make more precise changes to your mouse speed compared to using the Windows 10 settings menu.
- To do this, press Ctrl+R on your keyboard to open the Run dialog box. Type regedit into the box, then click OK to open it.
- Using the registry navigation menu on the left, head to KEY_CURRENT_USERControl PanelMouse to view the registry entries for your mouse settings.
- You’ll see various registry entries for your mouse settings, but one of the most important is the MouseSensitivity entry. Double-click the entry to change the value to any figure up to 20.

- You can also tweak how precise your cursor movements are using the MouseSpeed, MouseThreshold1 and MouseThreshold2 entries. Your mouse movements will double when the value for MouseSpeed equals or is greater than the value for MouseThreshold1, and quadruples for MouseThreshold2. The values reflect distance travelled by pixels.

- These entries have a default value of 0, but you can see their default values by enabling the Enhance pointer precision checkbox first (Windows Settings > Devices > Mouse > Additional Mouse Options). If you want to set it to maximum, set MouseSpeed to 2, and set the value of MouseThreshold1 and MouseThreshold2 to 0.

- Once you’re done, close the Windows Registry Editor. Any changes you make should be applied automatically, but you may need to restart to see some of the changes take effect.
Using a Third-Party Mouse Settings App
While cheaper mice and keyboard combos are typically supplied without software, more advanced gaming mice will often come with manufacturer settings apps that allow you to tweak and change how they operate. They can also help to unlock additional features, supported by your mouse but not by Windows directly.
If your mouse comes with a DPI settings button (as many gaming mice do), you’ll need to install the settings software from the manufacturer to allow you to set up the different sensitivity profiles that the button supports. Popular gaming manufacturers, including Logitech and Razer, offer this feature.

One example of software that you can use to control your mouse settings is Logitech Gaming Software, designed to support Logitech-branded gaming equipment, including mice and keyboard. Installing this software will allow you to control various settings for your mouse, including the speeds.
In the first instance, check the website for your mouse manufacturer to see if this is something that is offered for your mouse model. If it isn’t, you may find that software that isn’t specifically designed for your mouse will work for some features, but this isn’t guaranteed.
Making Changes In Windows 10
Once you know how to change your mouse speed in Windows 10, you can start to look at other tweaks you can make to your settings. You may wish to change your keyboard language to help your language skills improve, or tweak your display settings to improve your Windows 10 display quality.
If you make too many changes, don’t worry, as you can reset and restore Windows to default settings pretty quickly. Be sure to back up your important files before you do this to make sure you don’t lose anything essential, however. If you’re tired of slowdowns, you could always start building a new custom PC to start afresh.
Related Posts
- How to Fix a “This file does not have an app associated with it” Error on Windows
- How to Fix an Update Error 0x800705b4 on Windows
- How to Resolve “A JavaScript error occured in the main process” Error on Windows
- How to Fix the Network Discovery Is Turned Off Error on Windows
- How to Change Folder Icons in Windows
Last Updated :
15 Apr, 2025
Are you struggling with your mouse sensitivity on Windows 11? Don’t worry, you’re not alone. Many users find adjusting mouse sensitivity a bit tricky. But fear not, as we’re here to guide you through the process step by step. Changing mouse sensitivity can greatly enhance your user experience, whether you’re gaming, browsing, or working on your PC. If the cursor’s too quick or slow, it can affect how you use your computer. In this article, we’ll provide you with simple and easy-to-follow instructions on how to adjust mouse sensitivity, scroll speed, and pointer size on Windows 11. Windows 11 offers straightforward ways to change this.
You can change it via the Settings app or Control Panel.
How to Change Mouse Sensitivity
- Method 1: Change Mouse Speed via Settings
- Method 2: Change Mouse Speed via Control Panel
- Method 3: Change Mouse Speed via Registry
- How to Change the Scroll Speed in Windows 11?
- Personalize the Mouse Pointer using the Settings App
Let’s go through each method step by step to change mouse sensitivity in Microsoft Windows 11.
Method 1: Change Mouse Speed via Settings
Changing your mouse speed through the settings menu in Windows 11 is a straightforward process. This method allows you to customize your mouse sensitivity according to your preferences. By following these simple steps, you can quickly adjust your mouse speed and improve your overall user experience on Windows 11.
Step 1: Use Win + I shortcut key to open settings or click the start button with gear symbol for opening settings.
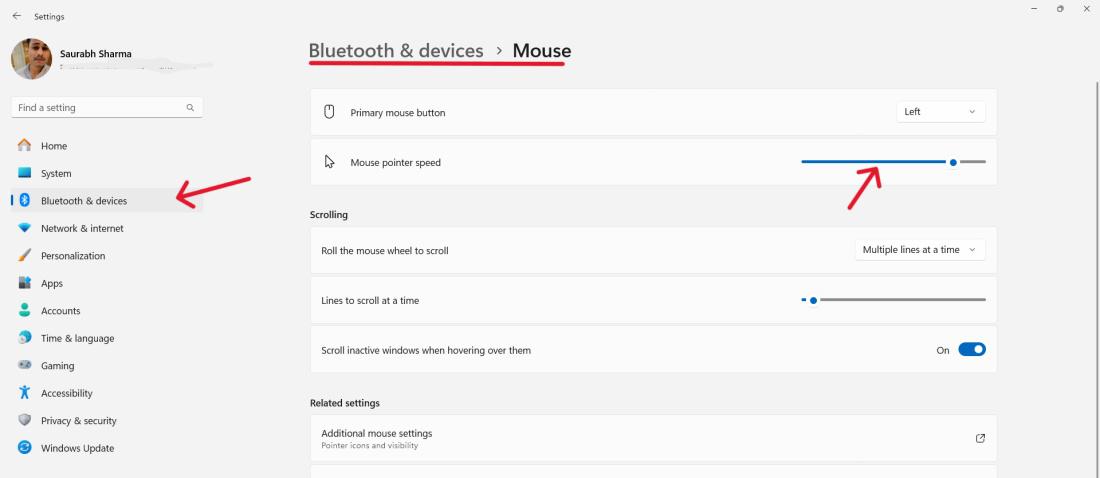
Step 2: Select “Bluetooth & devices” and click on “mouse” on your left sidebar.
Step 3: Go to “Mouse pointer speed” section and move slider to change the sensitivity level. By shifting it to the left the cursor slows down, and to the right makes it faster.
Method 2: Change Mouse Speed via Control Panel
If you prefer a more traditional approach to changing the sensitivity of your mouse, you can use the Control Panel in Windows 11. This method offers a straightforward way to adjust your mouse settings to suit your preferences. Here’s how you can do it:
Step 1: Go to start, find control panel. The shortcut is Win+R and type “control” enter.
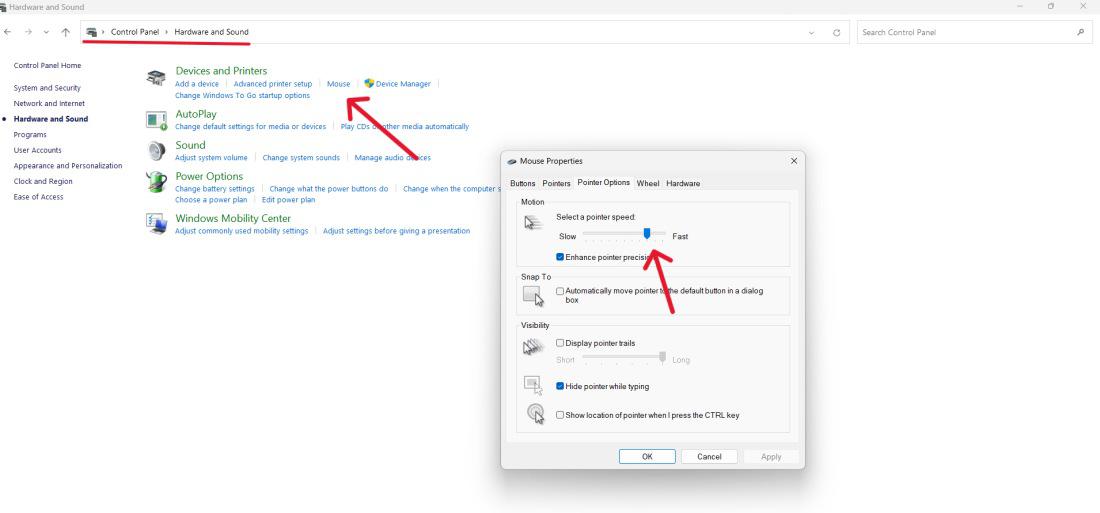
Step 2: Under “Devices and Printers,” select “Hardware and Sound” followed by “Mouse.”
Step 3: Navigate to «Mouse Properties» > «Pointer Options«.
Step 4: Adjust the «Motion» slider to change the mouse sensitivity.
Step 5: Click «Apply» and then «OK» to confirm your changes.
Method 3: Change Mouse Speed via Registry
If you’re looking to change the sensitivity of your mouse with more precision, you can change settings via the Registry. This method offers advanced customization options beyond what’s available in the standard settings. However, it’s important to proceed with caution as altering registry settings can affect your system if done incorrectly. Follow these steps carefully to adjust the mouse sensitivity through the Registry:
Step 1: Open the Run dialog by Pressing Win + R.
Step 2: Now, Type regedit and press Enter, Registry Editor will be opened.
Step 3: If prompted by User Account Control (UAC), click «Yes» to grant administrative privileges.
Step 4: Navigate to
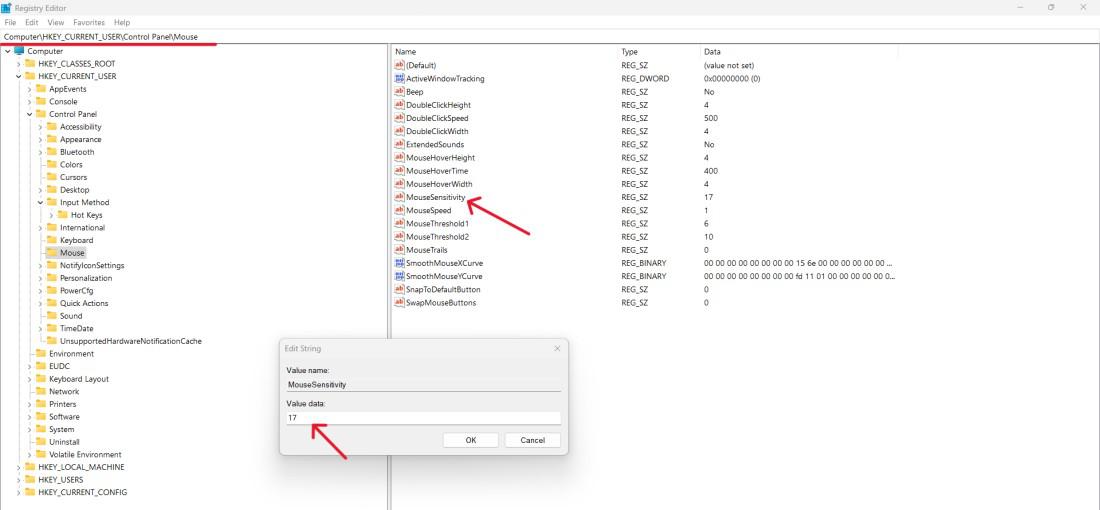
HKEY_CURRENT_USER\Control Panel\Mouse.
Step 5: Double-click the MouseSensitivity then on input change the value from 1 to 20.
Step 6: Click on OK button
If you’re finding your mouse scrolling too fast or too slow on Windows 11, adjusting the scroll speed can make a big difference. Here’s a quick guide on how to change the scroll speed to match your preferences:
Step 1: Open the Settings app and navigate to «Bluetooth & Devices» > «Mouse.»
Step 2: Under “Scrolling” select the number of lines which is under “Roll the mouse wheel to scroll”.
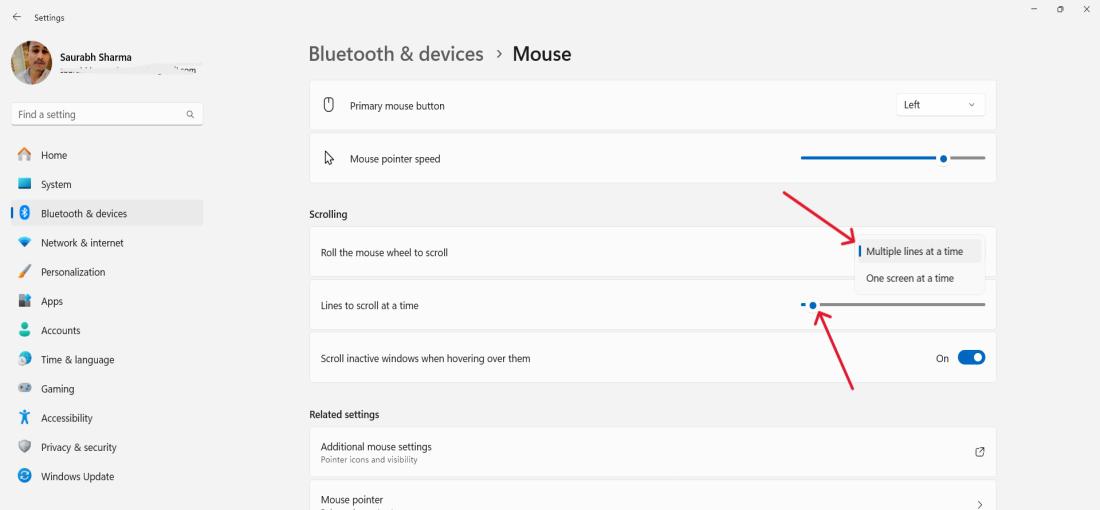
Step 3: Click «Apply» to save your scroll speed changes
Personalize the Mouse Pointer using the Settings App
Customize your mouse pointer to suit your preferences using the Settings app on Windows 11. This feature allows you to personalize the appearance and behavior of your mouse pointer, enhancing your overall user experience. Follow these simple steps to adjust settings such as pointer size to make your pointer feel just right for you.
Step 1: On Settings, select “Devices” then “Mouse”.
Step 2: Open the Mouse Properties by clicking “Additional mouse options”.
Step 3: Click on the “pointers” tab to select other pointer schemes or adjust specific pointers.
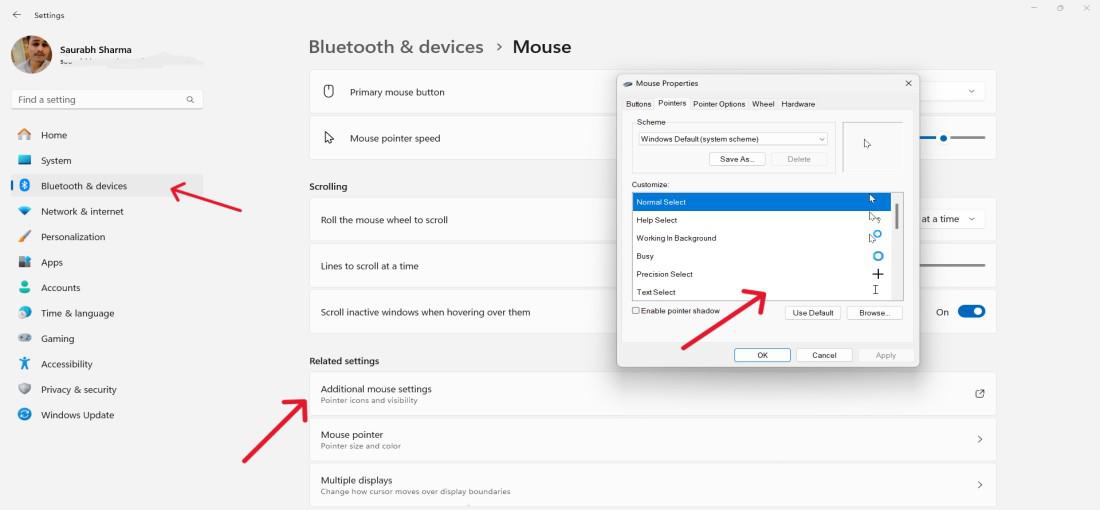
Step 4: Click «Apply» and then «OK» to apply your changes.
Conclusion
In conclusion, adjusting mouse sensitivity on Windows 11 is a simple yet crucial step in optimizing your computing experience. By fine-tuning your mouse settings, you can achieve precise control, whether you’re gaming, working, or simply browsing the web. With the easy-to-follow steps outlined in this guide, you can effortlessly customize your mouse sensitivity to suit your preferences. In the Settings app or Control panel, check various options to modify your mouse settings; and do not forget about scroll speed and your pointer customization. So, take control of your cursor and enjoy a smoother, more responsive user experience on Windows 11.

Overview – Change
Mouse Speed in Windows
It looks that the speed of your mouse pointer is either too slow or too fast for you and you’re want to increase your productivity and comparatively faster workflow by adjusting the cursor speed as per your preference.
By default, the mouse pointer speed is set to slow from the manufacturing end. However, it’s possible to adjust the cursor speed based on your needs.
By the end of this article, you’ll be able to adjust the mouse pointer speed in Windows:
Using Windows Settings
Using Control Panel
Using PowerShell
1. Using Windows
Settings
Step 1: Open the Windows Settings from the Start menu or press the “Windows key + I” key combination on the keyboard.

Windows Settings App
Step 2: Select the “Bluetooth & Devices” option from the left sidebar and click the “Mouse” option.

“Mouse” option
Step 3: Drag the slider to right to increase the mouse speed and left to decrease the mouse speed.

Drag slider to adjust Mouse Pointer Speed
2. Using Control
Panel
Step 1: Open the Control Panel from the Start menu.
Control Panel Icon
Step 2: Select the “Hardware and Sound” option.

‘Hardware and Sound’ option
Step 3: In the Devices and Printers section, click the “Mouse” option.

“Mouse” option
Step 4: Select the “Pointer Options” from the top menu. Now, under the “Motion” section, drag the slider to right to increase the mouse speed and left to decrease the mouse speed.

Adjust Cursor speed by Dragging Slider
Note: If you feel that increasing the cursor’s speed makes it unstable and you’re unable to position the cursor on the component, simply click the “Enhance Pointer Precision” option, and the cursor’s precision will be much improved.
3. Using Registry
Editor
Step 1: Open the “Registry Editor” from the Start menu or press the “Windows logo key + R” key combination to open Windows Run, type “regedit” (without quotation marks) and hit the enter key.
Registry Editor Icon
Step 2: Navigate to the following path: HKEY_CURRENT_USER\Control Panel\Mouse and double-click the “Mouse Sensitivity” option.

‘Mouse Sensitivity’ option
Step 3: The default value data is set to 10. To increase the mouse sensitivity, increase the value greater than 10, and, to decrease the mouse sensitivity, decrease the value lesser than 10.
The more the mouse sensitivity, the more the cursor speed.

Adjust Mouse Sensitivity in Registry
Step 4: Restart the computer to make changes take effect and you’ll notice that the mouse cursor is quicker or slower than usual, depending on your settings.

Restart the Device
Conclusion
In this article, we’ve covered how to change mouse speed in Windows 11.
Adjusting the cursor’s speed as per your preference can help to improve your efficiency, workflow, and overall productivity. Also, it can assist you during gaming and help to improve it.
Related Articles