
Skip to content
Open elevated Command Prompt by hitting Win+R > cmd > Ctrl+Shift+Enter > Yes.
Using DiskPart
Type in diskpart and hit Enter.
Next, enter list vol. It will list all drives and partitions.
Note the volume number of the desired partition and enter sel vol <volume number>.
Mount
Assign it a drive letter currently not in use. It can be done by entering assign letter = <letter>If you receive DiskPart successfully assigned the drive letter or mount point. then the partition mounted successfully..

Leave diskpart by typing exit. Now you can use it as normal from File Explorer. Enter start <letter>: to open the partition in File Explorer. Do not forget the colon ( : ).
Unmount
Enter remove letter = <letter> If you get DiskPart successfully removed the drive letter or mount point. then it unmounted successfully..
Using mountvol
Mount
Enter mountvol. It will list all connected volumes with their UUID. Copy the UUID and mount it to a mount point by entering mountvol <mount point> <UUID>. Now you should be able to open it as normal from File Explorer. To do it, enter start <mount point>.

Unmount
Enter mountvol <mount point> /P. It should unmount the partition.
Next Step
Take care.
A certain student (I guess).
View all posts by SIGSEGV
Efficient hard drive management is essential for maintaining an organized and optimized computer system. Windows operating systems offer various tools to help users manage their data, and Diskpart is one such powerful utility. Diskpart allows users to manipulate hard drive partitions directly from the command line, providing granular control over disk space allocation.
Whether you want to create, extend, delete, or format partitions, Diskpart offers a command-line-driven approach that’s particularly useful for system administrators and advanced users. This guide delves into the details of using Diskpart to manage hard drive partitions effectively in Windows 11/10.
What is Diskpart?
Diskpart, short for “Disk Partition,” is a command-line utility included in Windows 11/10 that empowers users to manage disks, partitions, and volumes. Unlike graphical interfaces, Diskpart operates solely through text-based commands, offering a powerful way to interact with storage devices. It’s especially valuable for managing partitions in scenarios where the graphical interface might not be accessible, such as during system recovery or maintenance.
Diskpart provides a comprehensive set of commands that enable users to create new partitions, extend existing ones, format partitions with different file systems, and even remove partitions entirely. Its versatility and direct control over disk structures make it a preferred tool for those who require a more hands-on approach to disk management.
Precautions to take while using Diskpart commands
While Diskpart can be a highly effective tool, it’s essential to take precautions before using its commands to avoid unintended data loss or system disruptions.
Here are some precautions to consider:
- Backup Your Data: Before performing any disk management operations using Diskpart, create backups of your critical data. Diskpart commands can lead to irreversible changes, and having a backup ensures that you can restore your data if something goes wrong.
- Double-Check Disk Selection: Make sure you’re selecting the correct disk and partition when applying Diskpart commands. A wrong selection can result in unintended changes to your system.
- Understand Commands: Familiarize yourself with the specific commands you’re going to use and their implications. Misinterpreting commands can lead to data loss or system instability.
- Use “List” Commands: Utilize commands like list disk, list partition, and list volume to get a clear view of your disk configuration before making any changes. This helps you verify your selections.
- Avoid Direct “Clean” Command: Be cautious with the clean command, as it removes all partitions from a selected disk without confirmation. This command can lead to complete data loss if not used carefully.
List of common Diskpart commands
Diskpart commands are the building blocks of disk management. Here’s a list of common commands along with their purposes:
| Command | Use |
list disk |
Displays a list of available disks. |
select disk <number> |
Selects a specific disk for further actions. |
detail disk |
Provides detailed information about the selected disk. |
attributes disk clear |
Clears read-only or hidden attributes on a disk. |
online disk |
Brings a disk online if it’s marked as offline. |
offline disk |
Takes a disk offline to prevent it from being accessed. |
clean |
Removes all partitions and volumes from a disk. |
convert gpt |
Converts the selected disk to the GPT partition style. |
convert mbr |
Converts the selected disk to the MBR partition style. |
create partition primary size=<size> |
Creates a primary partition with a specified size. |
create partition extended |
Creates an extended partition. |
format fs=<filesystem> quick |
Formats a partition with the specified file system. |
assign letter=<letter> |
Assigns a drive letter to a partition or volume. |
remove letter=<letter> |
Removes a previously assigned drive letter. |
active |
Marks the selected partition as active (bootable). |
delete partition override |
Deletes the selected partition. |
extend |
Extends a partition into adjacent unallocated space. |
shrink desired=<size> |
Shrinks a partition by the specified size (MB). |
create volume simple size=<size> |
Creates a simple volume with the specified size. |
create volume stripe disk=<disk>... |
Creates a striped volume across specified disks. |
create volume mirror disk=<disk>... |
Creates a mirrored volume across specified disks. |
create volume raid5 disk=<disk>... |
Creates a RAID-5 volume across specified disks. |
format quick |
Formats the selected volume quickly. |
format fs=<filesystem> |
Formats the selected volume with the specified file system. |
delete volume |
Deletes the selected volume. |
list partition |
Shows all partitions on a selected disk. |
list volume |
Lists all volumes on the system. |
list volume verbose |
Provides detailed information about all volumes. |
list partition verbose |
Provides detailed information about all partitions. |
offline volume |
Takes the selected volume offline. |
online volume |
Brings the selected volume online. |
How to launch Diskpart on Windows 11/10
Launching Diskpart is a straightforward process. Here’s how you can do it:
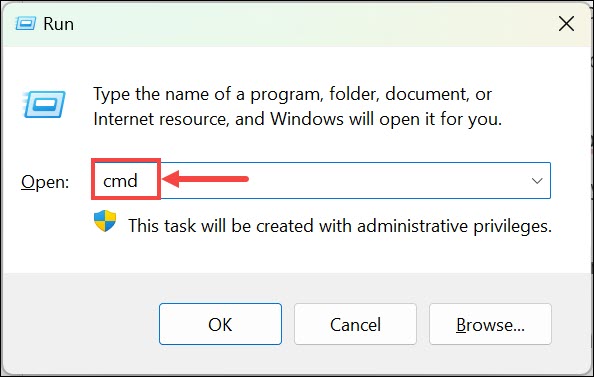
- Press Windows + R to launch the Run Command box.
- Type “cmd” and press Shift+Enter to open the Command Prompt with admin rights.

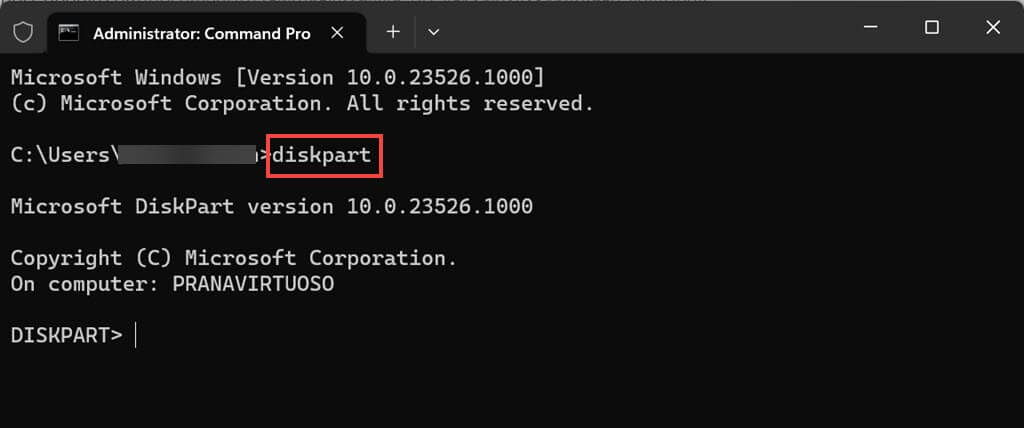
- In the Command Prompt, type diskpart and press Enter. This initiates the Diskpart utility.

- If prompted by User Account Control, click “Yes” to grant administrative privileges to Diskpart. You’ll now be within the Diskpart environment, ready to execute disk management commands.
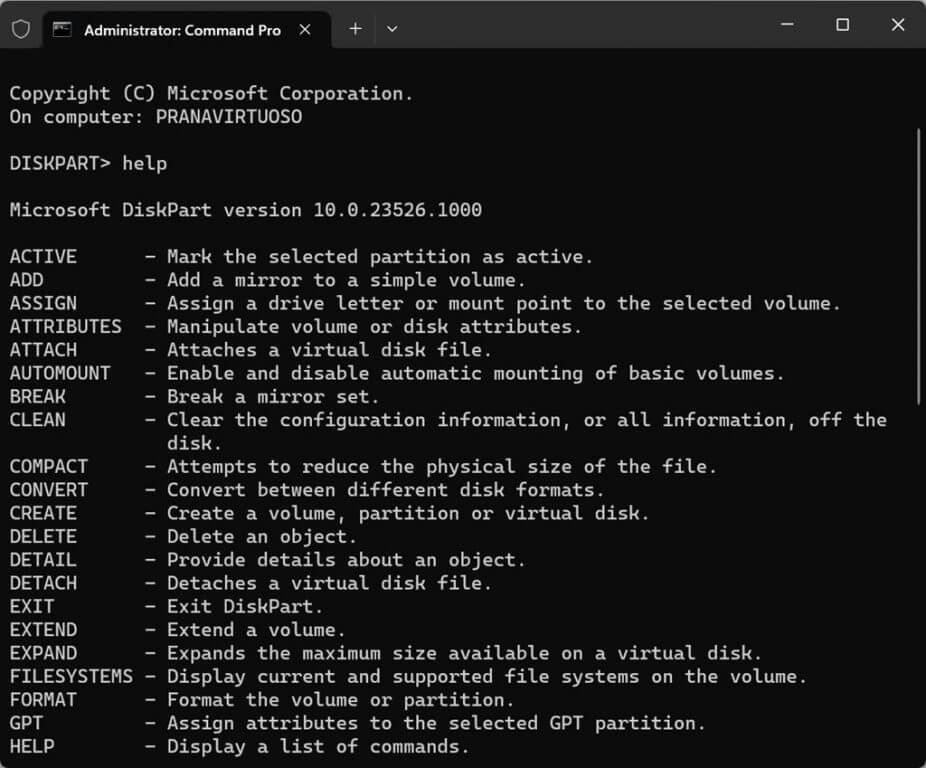
- To view the complete list of available commands for DiskPart, simply type help in the command window and hit the enter key.

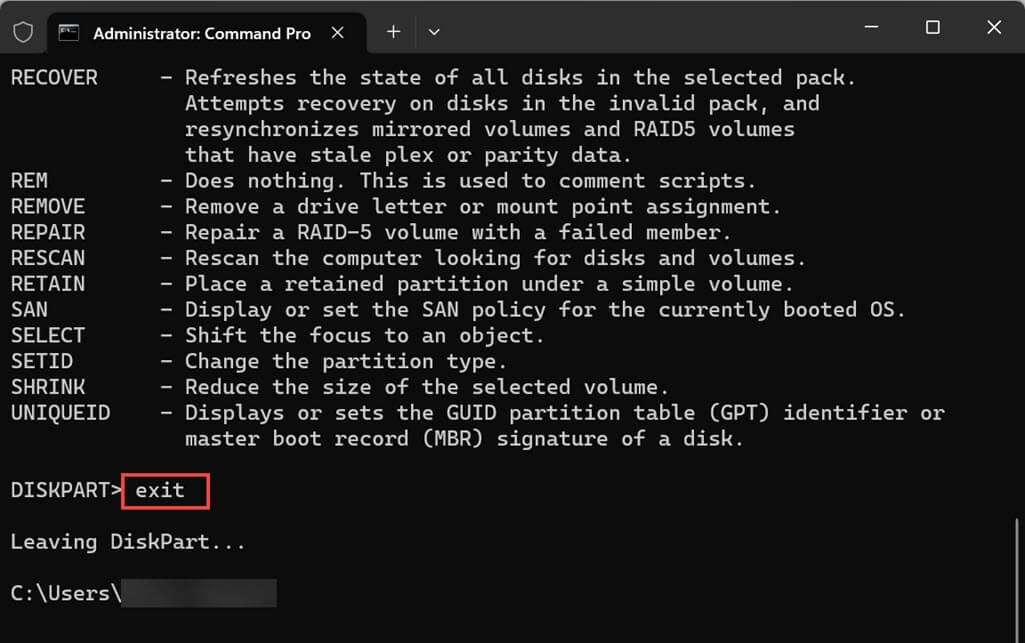
- After utilizing the Diskart, you can simply use the Exit command to come out of it.

How to check existing hard drives, volumes, & partitions using DiskPart
Before making any changes, it’s crucial to understand your disk’s current configuration. Diskpart can help you get this information:
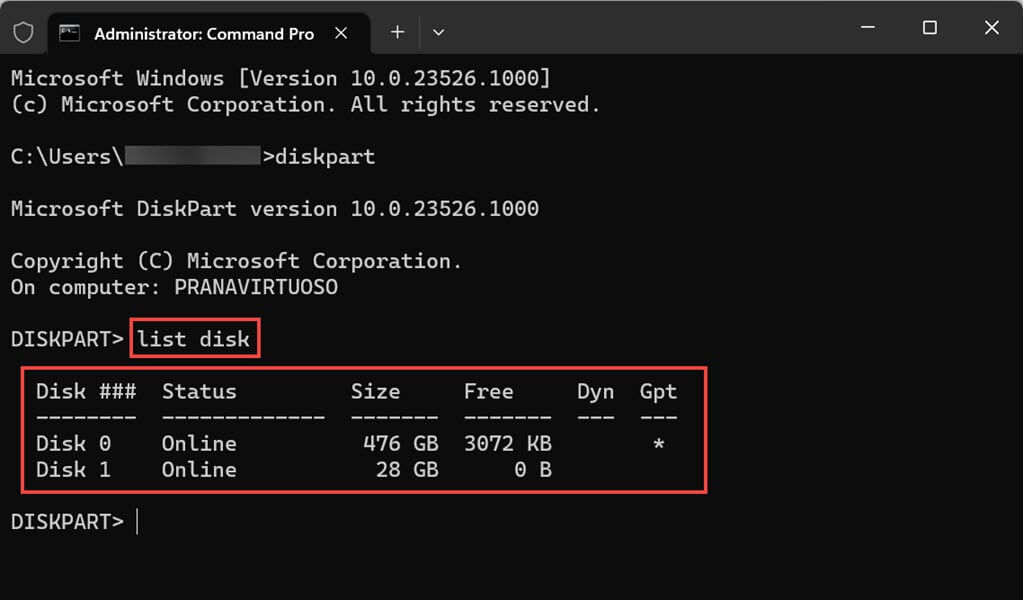
- Open the Command Prompt and enter diskpart.
- Enter list disk to see a list of available disks on your system. Note or remember the disk number you want to work with.

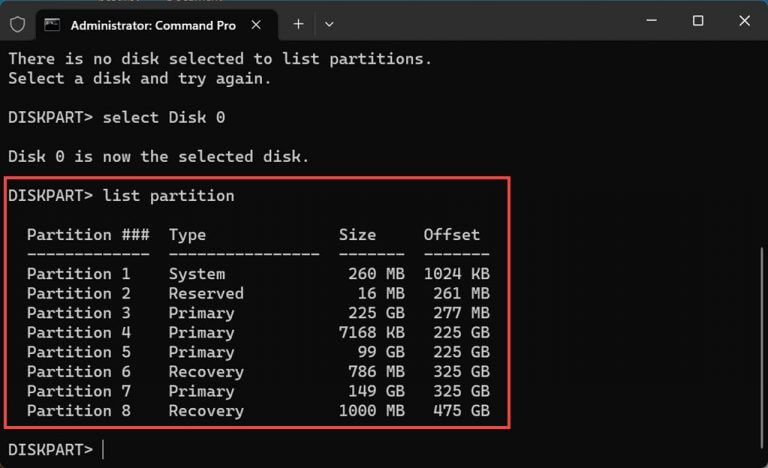
- Type select disk <number> to choose the disk you want to inspect.
- Similarly, use the list partition and list volume commands to see the partitions and volumes on the selected disk.
How to create a partition using Diskpart
Creating a partition using Diskpart provides you with control over its size, file system, and drive letter assignment.
Creating a partition using Diskpart involves a few steps. Let’s go through the process:
- Launch Diskpart as described earlier.
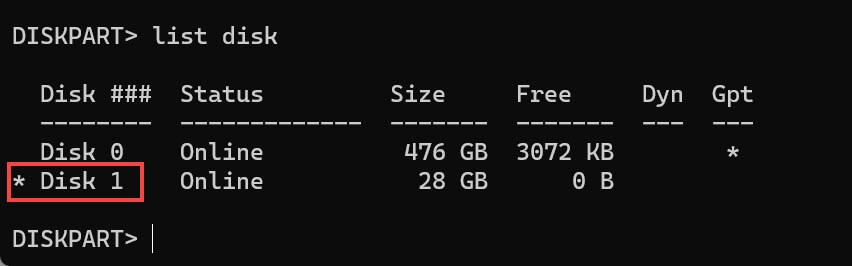
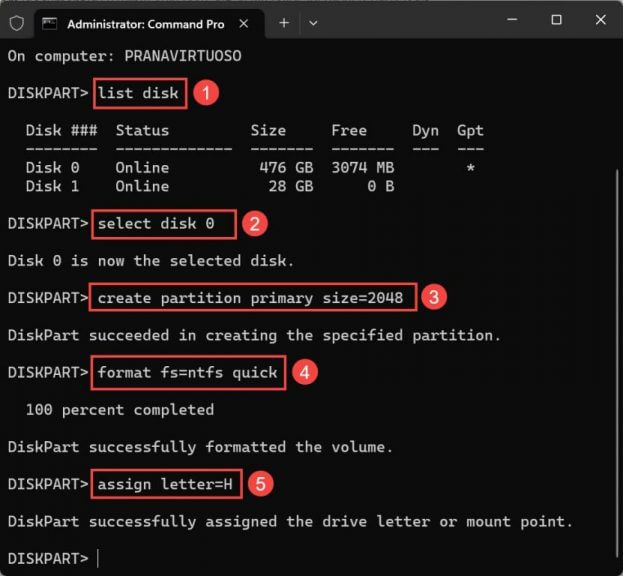
- To access the disk list, use the list disk command, and then choose the desired disk by entering its corresponding number with the select disk # command, where “#” is the disk number.
- Before beginning to create a partition, you need to clean the disk so there are no partitions already. So, be very careful while selecting the disk for parting it. To ensure that you have selected the right disk for partitioning, again use the list disk command and look for the asterisk mark against your selected disk. The asterisk mark indicates that further commands will be taken under the selected disk.

- After selecting the disk, use the clean all command to wipe out the disk. (optional step)
- Once the disk is wiped out, use the create partition primary command to create a partition using the entire space on that drive.
- If you want to create multiple partitions, you can assign how much space a partition could take. For that, use the create partition primary size=X command, where “X” is the size that you wish to set to the partition in megabytes.
- After creating the partition, format it with a file system using the format fs=<filesystem> quick command. For instance, use the format fs=ntfs quick for NTFS or format fs=fat32 quick for FAT32.
- Once the formatting process is complete, Diskpart will automatically assign a letter to the partition. In the event that it does not, you can manually set it by using the command assign letter=<letter>. Replace “<letter>” with the desired drive letter.
You can also create an additional partition in an already partitioned disk. Just skip step 4, i.e., using the Clean command to sweep the disk. Use the create partition primary size=X command to create a partition of X MB. Ensure that enough space is available to create a partition on an already divided hard disk.
How to extend a partition using Diskpart
Extending a partition allows you to combine unallocated space with an existing partition. It’s an excellent way to make efficient use of available space.
Here’s how you can do it:
- Launch Diskpart using the earlier method.
- Make sure that there is enough free space adjacent to the partition you plan to extend on the same drive without any partitions in between. Verify the contiguous availability of the free space.
- Use the list disk command to list all the attached disks on your system. Choose the disk containing the partition you want to extend using the select disk <number>.
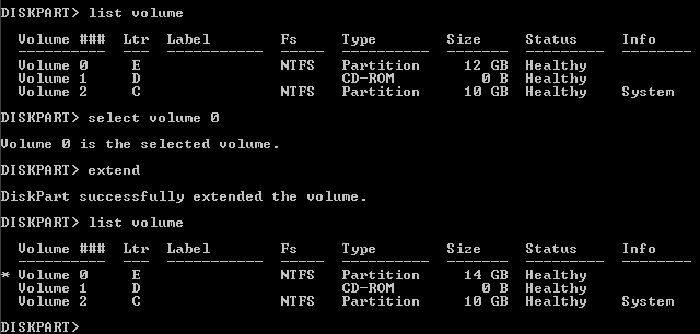
- Next, use the list volume command to get the list of all the volumes under the selected disk.
- Now, choose the volume that you want to extend using the select volume # command. Insert the volume number in place of “#”.
- Next, use the extend command to add the entire free space to the selected volume. However, if you don’t want to include the entire unallocated space to the selected volume, use the extend size=#, and replace “#” with the amount of space you want to extend in megabytes.

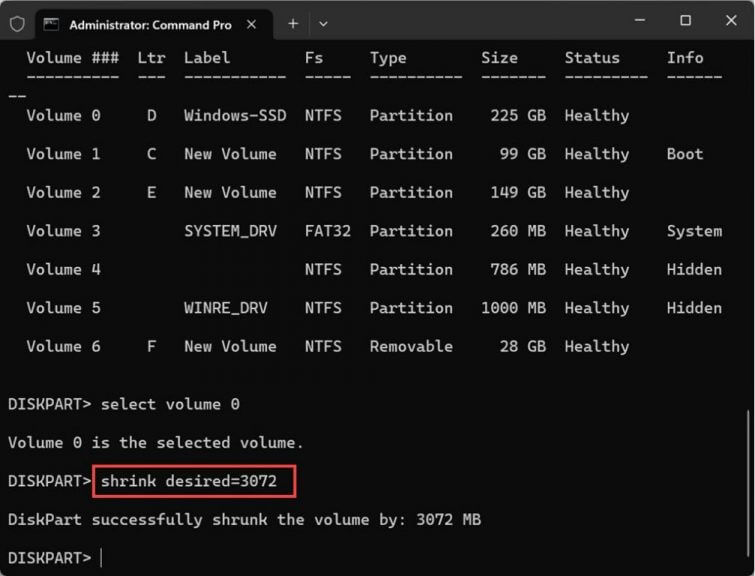
How to shrink a volume using Diskpart
Shrinking a volume allows you to reclaim unused space, which can then be used to create new partitions or extend existing ones. Here’s how you can shrink a volume using Diskpart:
- Launch Diskpart using the previously outlined steps.
- Type list volume to see a list of all volumes on your system. Note the volume number of the one you want to shrink.
- Enter select volume <number> to choose the volume you wish to shrink.
- To initiate the shrinking process, type shrink desired=<size> and press Enter. Replace “<size>” with the amount of space you want to shrink the volume by in megabytes.
- Diskpart will calculate the available space that can be shrunk based on the specified size.
- Once the process is complete, you can exit Diskpart by typing exit and pressing Enter.
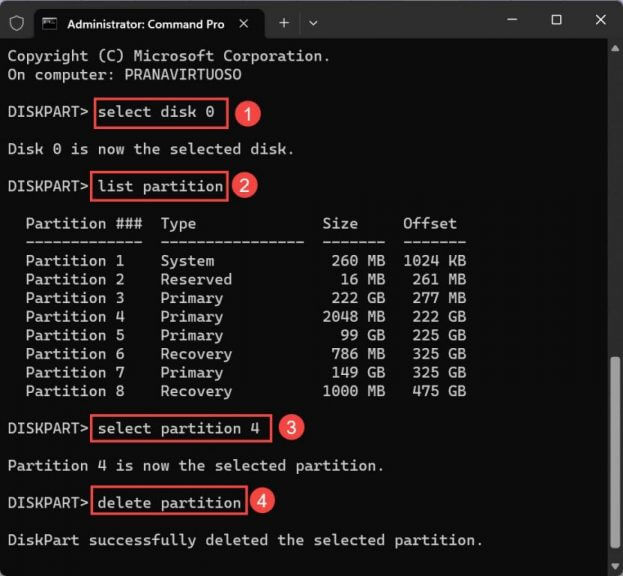
How to delete a partition using Diskpart
You can easily delete a partition, too, using Diskpart. Removing a partition should be done with caution, as it leads to data loss. Follow these steps:
- Open the Command Prompt and launch Diskpart.
- Select the disk containing the partition you want to delete using select disk <number>. If you don’t know the disk number, use the list disk command.
- Now, use the select partition <number> command to select the partition that you want to delete. Use the list partition command if you don’t know the partition number.
- After selecting the partition, use the delete partition command to delete it.
Similarly, you can use the delete volume command to delete a partition.
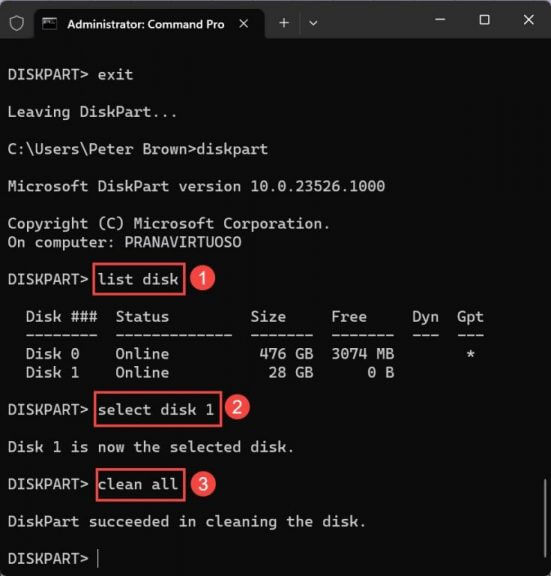
How to completely wipe out the hard disk using DiskPart
If you encounter issues when formatting your system’s hard disk, an external hard drive, or a USB pen drive, you can use DiskPart to wipe them clean. However, please note that you cannot clean the disk on which your operating system is installed.
If you need to wipe out an entire hard disk using Diskpart, follow these steps with caution:
- Open the Command Prompt and enter diskpart.
- Type list disk and note the disk number you want to wipe.
- Select the disk by typing select disk <number>.
- Now type the clean all command and press Enter. This command will erase all data on the selected disk. Be patient; depending on the size of your hard disk, it could take even hours to complete this command.
Alternatives to Diskpart
While Diskpart is a powerful tool for managing hard drive partitions in Windows 11/10, there are alternative methods and third-party tools available for users who prefer different approaches. Here are a couple of alternatives to consider,
Windows Disk Management

Windows provides a built-in graphical tool called “Disk Management.” To access it, right-click on the “Start” button and select “Disk Management.” This tool offers an intuitive interface where you can perform tasks like creating hard drive partitions, formatting, deleting, and resizing them. While it might not offer the same level of command-driven control as Diskpart, it’s user-friendly and suitable for most basic partition management needs.
Third-Party Partitioning Tools
Several third-party partitioning tools are available that provide advanced features and user-friendly interfaces. Tools like EaseUS Partition Master, MiniTool Partition Wizard, and AOMEI Partition Assistant offer capabilities beyond what Diskpart provides, including visual representations of your disk layout, more flexible partition resizing, and better data protection during operations. These tools can be especially useful for users who prefer not to work with command-line utilities.
FAQ
Can Diskpart commands be undone?
Unfortunately, Diskpart commands are irreversible and can lead to data loss if executed incorrectly. It’s crucial to double-check your commands and backup your data before making any changes using Diskpart.
Can I use Diskpart on external drives and USB devices?
Yes, Diskpart can be used on internal and external drives, including USB devices. However, exercise caution and make sure you select the correct disk to avoid accidental data loss.
Is it possible to resize volumes using Diskpart?
Yes, resizing the volume is possible using the Diskpart shrink and extend commands.
Manage your system hard drive easily
Effective hard drive management is essential for maintaining a well-organized and optimized computer system. Diskpart provides a versatile and powerful solution for managing hard drive partitions in Windows 11/10. By understanding its commands and following the steps outlined in this guide, you can confidently create, extend, delete, and manage partitions according to your needs. Remember to exercise caution, back up your data, and double-check your actions before executing Diskpart commands. With this knowledge, you’ll be well-equipped to make the most of your disk space while ensuring the safety of your data.
Looking for more? Check out these OnMSFT.com posts on Diskpart. We also have a guide that explains what is fdisk, so don’t hesitate to check it out.
(Image credit: Windows Central)
Although Windows 10 can automatically mount a drive, the ability to mount and unmount a drive manually can come in handy in many scenarios. For example, when the system does not automatically assign a drive letter upon connecting a new storage device. You formatted a drive using commands, and you did not specify a mount point. Or you need to unmount a device’s storage to make it permanently inaccessible to users.
Whatever the reason it might be, Windows 10 allows you to quickly mount or unmount a drive using a graphical interface with Disk Management or with command-line using the mountvol and DiskPart tools in Command Prompt.
In this Windows 10 guide, we will walk through the steps to mount and unmount a drive (or volume) using the Disk Management graphical console and mountvol and DiskPart command-line tools available with Command Prompt.
- How to mount drive on Windows 10
- How to unmount drive on Windows 10
How to mount drive on Windows 10
On Windows 10, when you mount a drive manually, you will create a mount point with a drive letter that will make the storage available to users and allow the system to automatically mount the drive with the same drive letter.
You can complete this process in at least three ways with the Disk Management console and the mountvol and DiskPart command-line tools.
Mount drive with Disk Management
To use Disk Management to mount a drive on Windows 10, use these steps:
- Open Start.
- Search for Create and format hard disks partitions and click the top result to open Disk Management.
- Right-click the drive and select the Change Drive Letter and Path option.
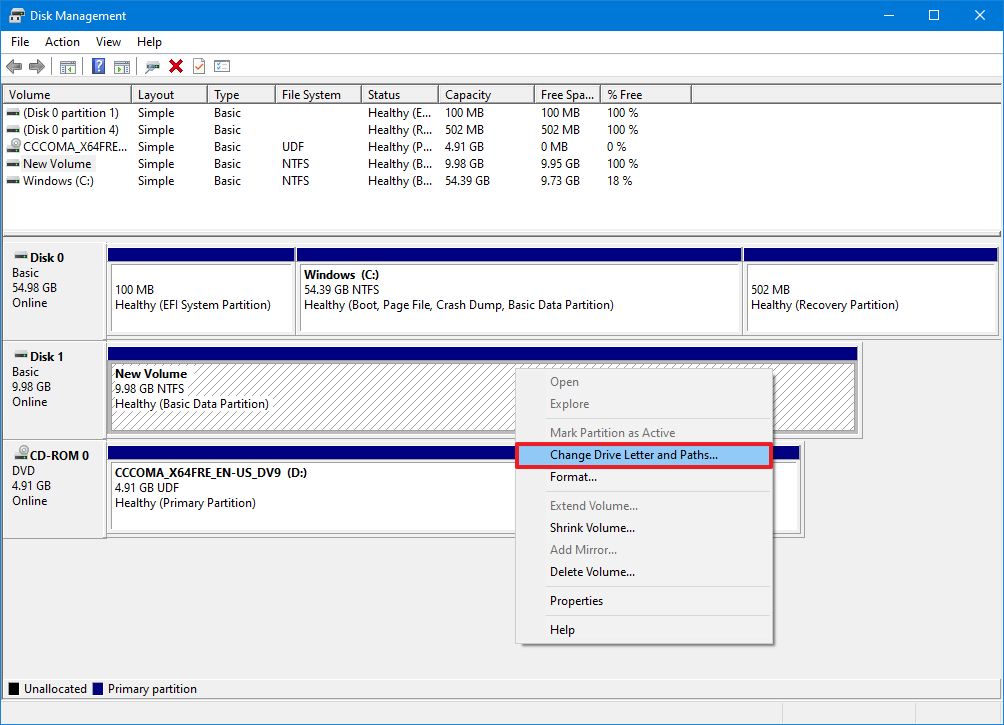
- Click the Add button.
- Select the Assign the following drive letter option.
- Use the drop-down menu and select one of the available letters.Quick tip: When assigning a letter manually, it’s best to start with the last available letter to have a point of reference to determine if the volume was mounted manually or automatically.
Once you complete the steps, the drive will mount and appear in the system to store data.
All the latest news, reviews, and guides for Windows and Xbox diehards.
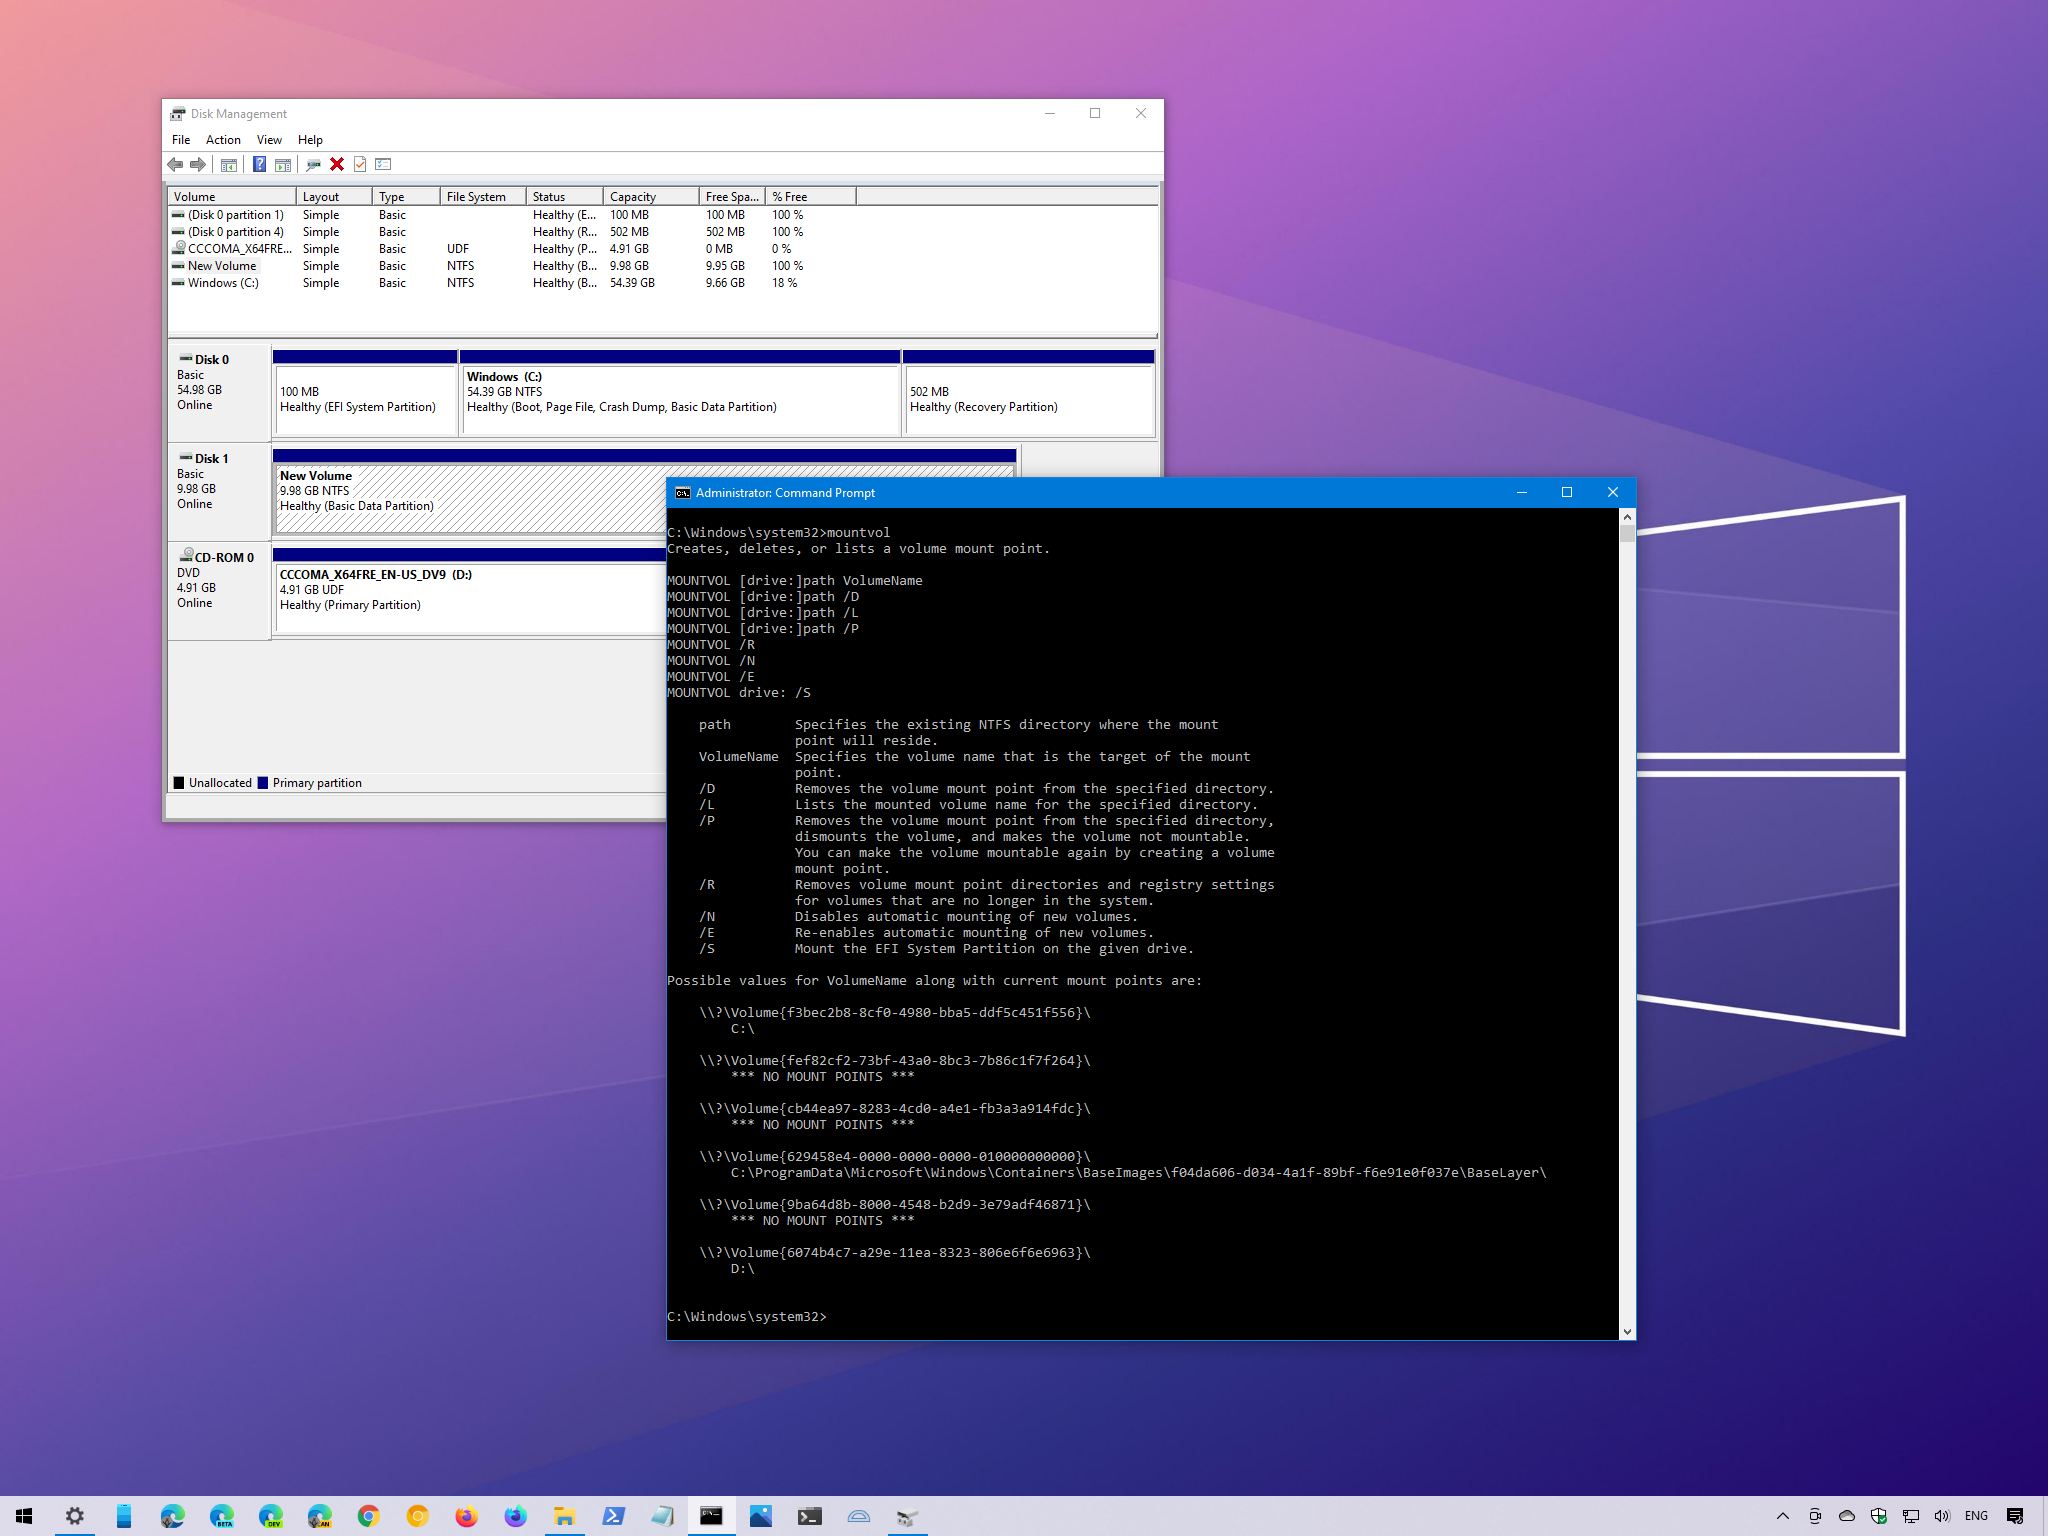
Mount drive with mountvol
To use mountvol to mount a drive, use these steps:
- Open Start.
- Search for Command Prompt, right-click the top result, and select the Run as administrator option.
- Type the following command to list all the available mount points and press Enter:
mountvol
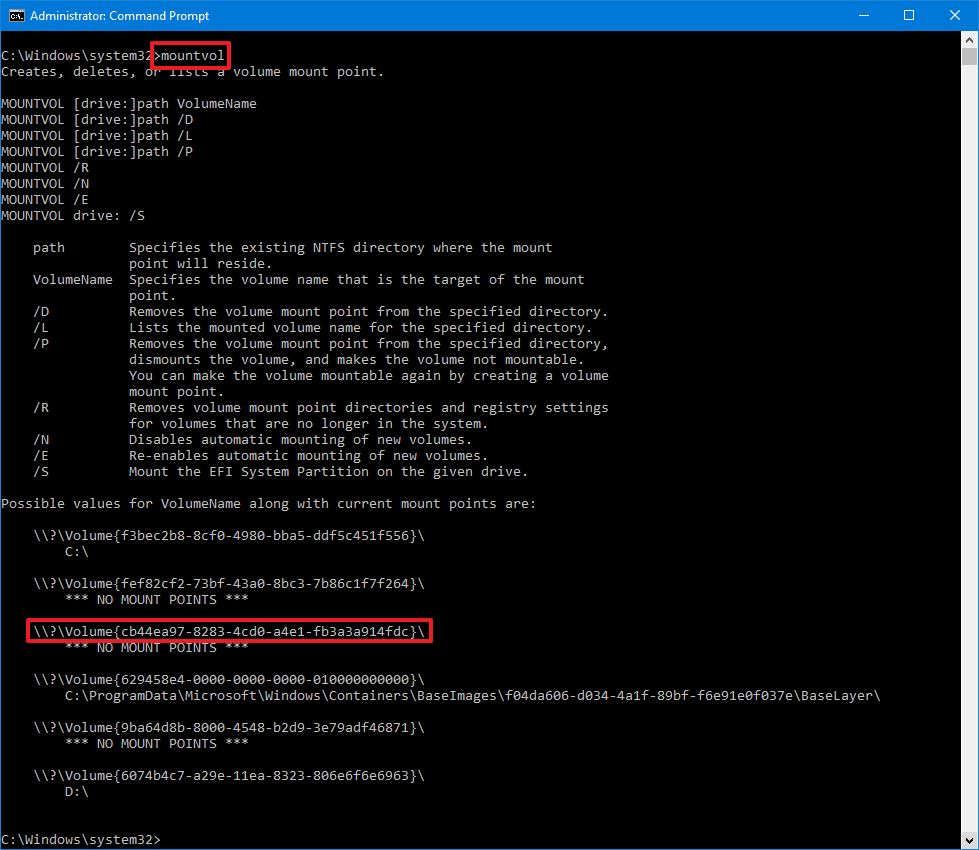
- Select the mount point path to copy the information to the clipboard.Quick note: Usually, the volume may or may not be listed with the «Not mountable until a volume mount point is created» label. If you cannot identify the volume, then use the Disk Management console instead.
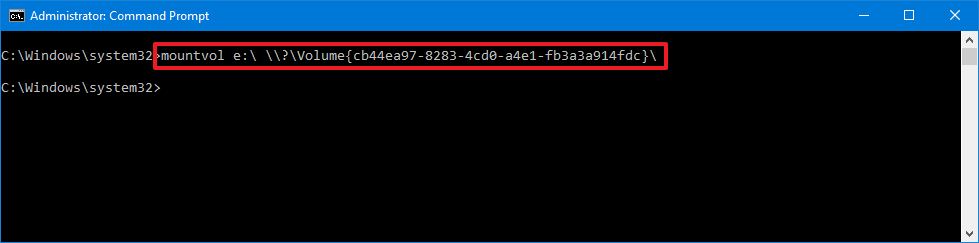
- Type the following command to mount the volume and press Enter:
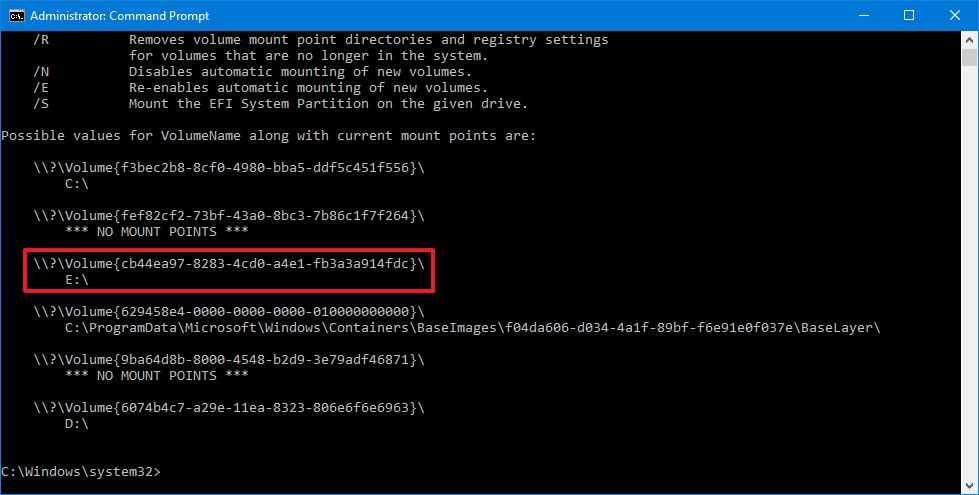
mountvol DRIVE-LETTER:\ VOLUME-NAMEIn the command, make sure to replace DRIVE-LETTER and VOLUME-NAME with the appropriate information.For example, this command mounts the\\?\Volume{cb44ea97-8283-4cd0-a4e1-fb3a3a914fdc}\with theedrive letter:mountvol e:\ \\?\Volume{cb44ea97-8283-4cd0-a4e1-fb3a3a914fdc}\
After you complete the steps, the volume will be accessible through File Explorer and across the experience.
Mount drive with DiskPart
Alternatively, you can also accomplish the task using DiskPart with these steps:
- Open Start.
- Search for Command Prompt, right-click the top result, and select the** Run as administrator** option.
- Type the following command to start the tool and press Enter:
diskpart - Type the following command to list all the available volumes and press Enter:
list volume - Confirm the volume you want to mount.
- Type the following command to select the drive and press Enter:
select volume VOLUME-NUMBERIn the command, replace VOLUME-NUMBER with the number of the drive (volume) you want to mount.For example, this command selects volume number four:select volume 4

- Type the following command to mount the drive on Windows 10 and press Enter:
assign letter DRIVE-LETTERIn the command, replace DRIVE-LETTER with the letter you want to mount and access the storage.For example, this command mounts the drive and assigns theedrive letter:assign letter e
How to unmount drive on Windows 10
When you unmount a drive manually, you will remove the mount point making the storage inaccessible. Also, the system will no longer try to mount it automatically. If you want to make the drive mountable again, you will need to revert the changes (see above steps).
If you want to unmount a drive, you can also use the same Disk Management, mountvol, and DiskPart tools.
Unmount drive with Disk Management
To unmount a drive with Disk Management, use these steps:
- Open Start.
- Search for Create and format hard disks partitions and click the top result to open Disk Management.
- Right-click the drive and select the Change Drive Letter and Path option.
- Click the Remove button.
- Click the Yes button.
Once you complete the steps, the drive will no longer be accessible on Windows 10.
Unmount drive with mountvol
To dismount a drive (or volume) with mountvol, use these steps:
- Open Start.
- Search for Command Prompt, right-click the top result, and select the Run as administrator option.
- Type the following command to list all the available mount points and press Enter:
mountvol
- Type the following command to dismount a drive and press Enter:
mountvol DRIVE-LETTER:\ /pIn the command, make sure to change DRIVE-LETTER with the correct drive letter of the mount point you are trying to dismount.For example, this command unmounts thee:\mount point:mountvol e:\ /pQuick note: The/poption will unmount the drive and remove the drive letter. The tool also offers the/doption, but it is only meant to remove mount points individually.

After you complete the steps, the mount points will be removed, making the storage inaccessible to users.
Unmount drive with DiskPart
You can also dismount a drive with DiskPart using these steps:
- Open Start.
- Search for Command Prompt, right-click the top result, and select the** Run as administrator** option.
- Type the following command to start the tool and press Enter:
diskpart - Type the following command to list all the available volumes and press Enter:
list volume - Confirm the volume you want to unmount.
- Type the following command to select the drive and press Enter:
select volume VOLUME-NUMBERIn the command, replace VOLUME-NUMBER with the number of the drive (volume) you want to mount.For example, this command selects volume number four:select volume 4
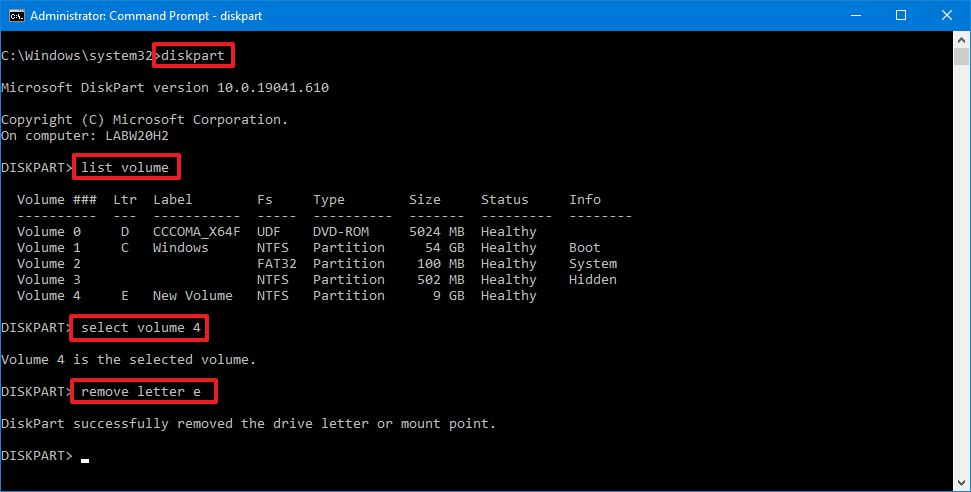
- Type the following command to unmount the drive on Windows 10 and press Enter:
remove letter DRIVE-LETTERIn the command, replace DRIVE-LETTER with the letter of the storage you want to unmount.For example, this command dismounts theedrive:remove letter e
Also, do not confuse mounting a drive with mounting a drive as a folder, which is something different. You can use these instructions to mount a drive as a folder.
Mauro Huculak has been a Windows How-To Expert contributor for WindowsCentral.com for nearly a decade and has over 15 years of experience writing comprehensive guides. He also has an IT background and has achieved different professional certifications from Microsoft, Cisco, VMware, and CompTIA. He has been recognized as a Microsoft MVP for many years.
Updated on Apr 28, 2025
| Workable Solutions | Step-by-step Troubleshooting |
|---|---|
| Disk Partition CMD | Step 1: You can use the two methods mentioned above to open the command prompt or Run window…Full steps |
| EaseUS Partition Master |
1. Disk migration and cloning…Full steps 2. Partition Recovery…Full steps |
«Unable to select a drive, as it is showing 0 MB while installing Windows 10, I tried to check-in cmd, but I don’t know its instructions. Can I get the cmd guide or other software?»
Are you confused about how to use disk partition cmd? Don’t worry. We know what you want to know. In the following, this page lists many practical tips about cmd. And we recommend a third party software — EaseUS Partition Master Professional that can replace the cmd function.
Overview of disk partition cmd
Cmd, the abbreviation for command, is a Microsoft Windows command that opens the Windows command line window.
Notes: Windows 95 & 98 users can only enter the command line by entering command; other Windows users can enter command or cmd to use.
How to open Windows cmd
Method 1: You can input cmd in the Start Menu search bar to open the Windows Command Prompt.
Method 2: You can press Win+R to open the Run box, type cmd, and press Enter.
What is Diskpart
After open cmd, you need to type ‘diskpart’ for disk partitioning. Diskpart is a command-line utility in Windows 10, which enables you to operate disk partition by using Diskpart command prompt, including create, merge, extend, shrink, format, delete, wipe disk partition, and other features.
Next, we will provide more information about how to use disk partition cmd in Windows 11/10. If you like this page, don’t hesitate to click the buttons below to share it with more people!
Steps to create a partition in Windows 11/10 using command prompt.
Warning: Do not use the Diskpart until a full backup.
Step 1: You can use the two methods mentioned above to open the command prompt or Run window.
Step 2: Enter Diskpart
Steps about essential partition functions are as follows:
- Create a partition using Diskpart
1. At the Diskpart prompt, type: List Disk
2. Input: Select Disk * (* represents the disk number)
3. Type: Create partition primary size=*(* means the partition size.)
4. Input: Assign letter=* (* represents Choose a drive letter not already being used.)
5. Type: Exit (Exit is the Esc on the top left of the keyboard.)
- Extending a partition using Diskpart
Note: If you try it or any other method, make sure you have a full backup.
1. Verify that contiguous free space is available on the same drive and that free space is next to the partition you intend on extending, with no partitions in between.
2. Type: Select Disk * (Selects the disk.)
3. Type: Select Volume *(Selects the volume.)
4. Type: Extend Size=*
5. Type: Exit
- Deleting a partition using Diskpart
Note: You cannot delete an active system or boot partition or a partition with a dynamic page file.
1. Input: Diskpart.exe
2. Select disk *
3. Select Partition *
4. Delete partition
5. Exit
- Wiping a disk using Diskpart
This operation deletes all data on the disk.
1. Type: Select disk *
2. Type: Clean all(The CLEAN ALL command removes all partition and volume information from the hard drive being focused on.)
3. Exit
The diskpart also has other features, such as assign drive letters, shrink partition, mark partition as active, convert MBR/GPT. If you want to learn these parts, FAQ, at the end of the article, will bring you the right answer.
After reading the above guide, I believe you have a specific understanding of how to use cmd via Diskpart in Windows 11/10. Cmd is a powerful tool, but it is not suitable for a beginner. Misoperations can easily cause partition problems. There is a better software — EaseUS Partition Master.
How to manage partitions with EaseUS Partition Master
EaseUS Partition Master is an all-in-one partition manager, which helps you create, resize, clone, move, merge, and format partitions. The following video tutorial shows you how to create, deleted, shrink, and resize a partition with this powerful disk management program.
Favored by millions of users. It contains all features Diskpart has and many other superior functions like the two demonstrated below.
1. Disk migration and cloning
Nowadays, for better performance of computer disk, you may want to migrate the operating system and clone disk to the target one. It saves the user’s time to download programs. It only takes a few steps to get remarkable results. For example, there is a guide about transfer Windows 10 to another drive.
Steps to migrate OS to HDD/SSD:
- Run EaseUS Partition Master, and select «Clone» from the left menu.
- Check «Migrate OS» and click «Next».
- Select the SSD or HDD as the destination disk and click «Next».
- Check Warning: the data and partitions on the target disk will be deleted. Make sure that you’ve backed up important data in advance. If not, do it now.
- Then click «Yes».
- Preview the layout of your target disk. Then click «Start» to start migrating your OS to a new disk.
- After this, click «Reboot Now» or «Done» to determine if you want to reboot the computer from the new disk immediately.
«Reboot Now» means to keep the changes instantly, while «Done» means you need to restart the computer later manually.

Note: The operation of migrating OS to SSD or HDD will delete and remove existing partitions and data on your target disk when there is not enough unallocated space on the target disk. If you saved important data there, back up them to an external hard drive in advance.
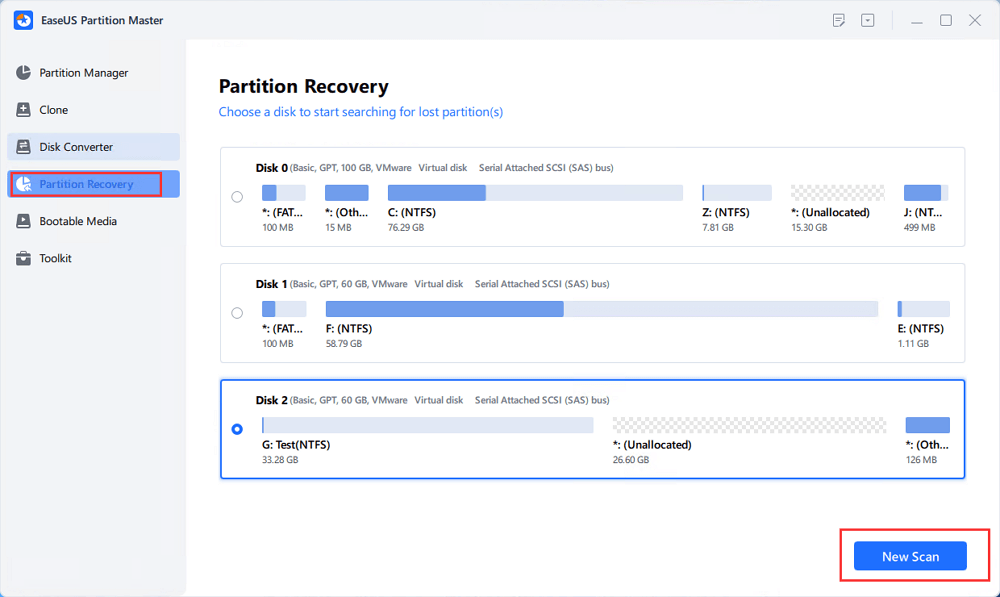
2. Partition Recovery
Partition Recovery is a practical feature targeting your lost partitions.
It is worth trying to scan your selected disk. The spending time of a deep scan may in line with your disk volume.
You can check the related article about «recover unallocated space in Windows 10» to get further learning.
Step 1. Open EaseUS Partition Master and click «Partition Recovery». Select the target disk with your lost partition and click «New Scan».
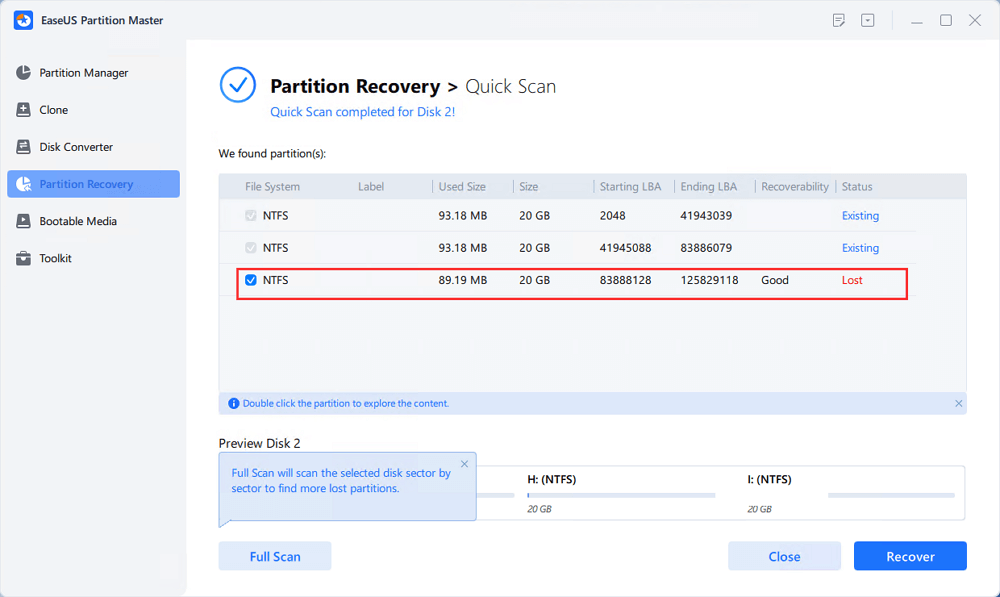
Step 2. Wait patiently to let the software execute «Quick Scan» and «Full Scan» operation. It will mark your deleted partition as «lost» as the Status section. Select the lost partition, and click «Recover».
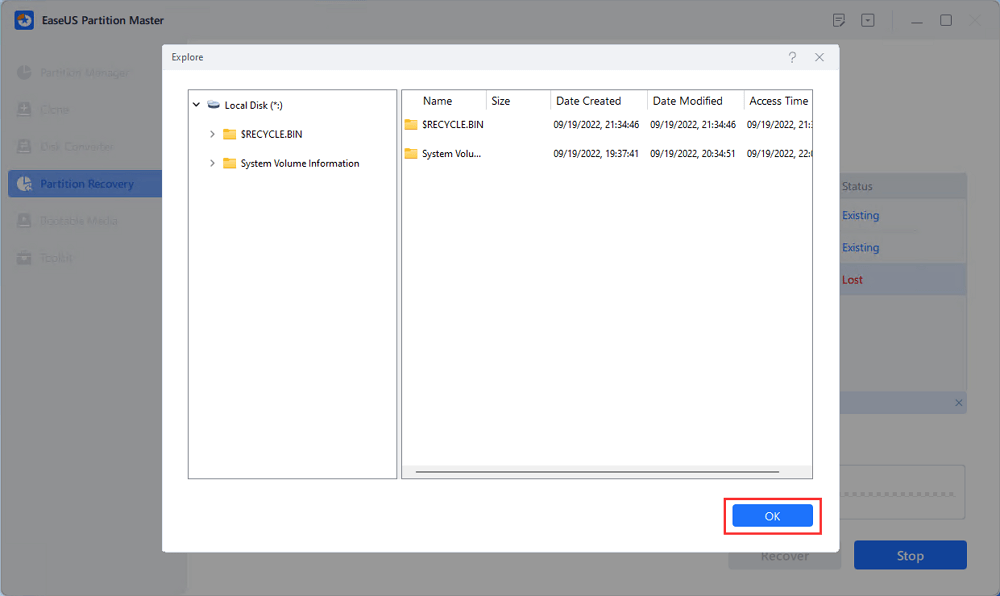
You can also double click on the partition you’re looking for to preview its content and click «OK» to confirm.
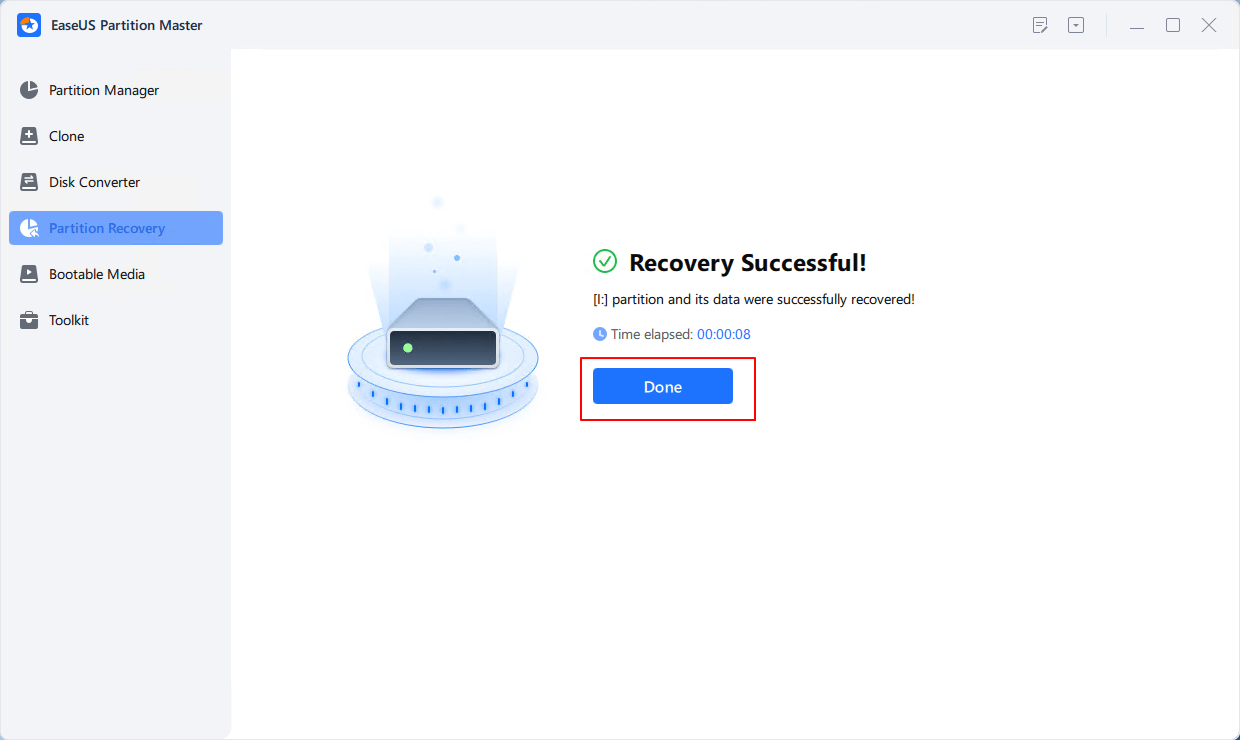
Step 3. Wait patiently and click «Done» when the partition recovery process completes.
FAQ
1. How do I use diskpart command in Windows 11/10?
-Boot into Windows 10
-Press the Windows key and C to open the charm bar.
-Type cmd
-Click Command Prompt
-When Command Prompt opens, type diskpart
-Press Enter
2. How to assign drive letter via Diskpart?
—Type «assign letter=F» (F can be replaced with another letter that has not been used yet).
—And then, you will receive a message that says: DiskPart successfully assigned the drive letter or mount point.
3. How to shrink partition via Diskpart
Type shrink directly will automatically shrink the partition by Windows, and you can also type shrink desired=*** to define your partition size.
(Such as: Type «shrink desired=10240». And then, you will receive a message that says: DiskPart successfully shrunk the volume by 10GB.)
Note: You can reduce the size of a volume only if it is formatted using the NTFS file system.
4. How to mark a partition as active via Diskpart?
—Type active.
—And then, you will receive a message that says: DiskPart marked the current separation as active.
5. How to clean Disk/convert a disk to GPT/ convert a disk to MBR?
-Type: list disk.
-Type: select disk 1.
-Type: clean.
-Type: convert gpt or convert mbr.
- To mount a drive as a folder on Windows 11, open Settings > System > Storage > Disks & volumes, click “Properties” for the drive, click “Add,” and choose the folder mount point.
- You can perform this configuration for a drive that is already formatted or through the partition wizard.
- Alternatively, you can mount a drive to a folder from Disk Management or Command Prompt (the same steps will work on PowerShell).
On Windows 11 (and 10, including older versions), it’s possible to mount a drive as a folder, and in this guide, I will explain how to complete this configuration.
If you have a computer with multiple drives or partitions, instead of assigning a drive letter to each storage, you can mount it as a folder within another location on your system. This approach can be useful for organizing your storage or accessing data in a specific way without using a lot of letter assignments.
Regardless of the reason, Windows offers different ways to mount a drive as a folder through the Disk Management tool and Command Prompt. On Windows 11, you can also use the “Disks & volumes” settings to perform this configuration.
In this guide, I will explain the different ways to mount a drive as a folder on Windows 11 as well as on Windows 10. You can also refer to these instructions on older versions of the operating system, including Windows 8.1, Windows 7, and older.
- How to mount a drive as a folder from Settings app
- How to mount a drive as a folder from Disk Management
- How to mount a drive as a folder from Command Prompt
How to mount a drive as a folder from Settings app
On Windows 11 (and higher releases), you can mount a drive as a folder in at least two ways from the “Disks & volumes” experience from the Settings app.
From formatted drive with data
To mount a hard drive as a folder on Windows 11 from the Settings app, use these steps:
-
Open Settings.
-
Click on System.
-
Click the Storage page.
-
Click “Advanced storage settings” under the “Storage management” section.
-
Click the “Disks & volumes” setting.

-
Click on the hard drive with the partition to mount.
-
Click the Properties button.

-
Click the Add button for the “Paths” settings.
-
Click the Browse button.
-
Open the empty folder to mount the drive.
Quick tip: Windows 11 offers multiple ways to create a new folder through File Explorer, Command Prompt, and PowerShell.
-
Click the Select Folder button.
-
Click the OK button.


From new drive without data
To mount a new partition as a folder from the Settings app, use these steps:
-
Open Settings.
-
Click on System.
-
Click the Storage page.
-
Click “Advanced storage settings” under the “Storage management” section.
-
Click the “Disks & volumes” setting.
-
Click on the hard drive with the partition to mount.
-
Choose the “Create Simple Volume” option for unallocated space.
-
(Optional) Choose the “None” option for the “Drive Letter” setting.
-
Select the appropriate settings for the new volume (as applicable).
-
Open the Advanced settings.
-
Click the Browse button.

-
Open the empty folder to mount the drive.
-
Click the Select Folder button.
-
Click the Format button.


Once you complete the steps, the storage will appear as another folder in File Explorer. Using this approach, you can still assign a drive letter to a partition, but it’s not required since you can access the storage from the mount point.
If you want to remove the folder mount point, open Settings > System > Storage > Disks & volumes, click “Properties” for the drive, click on the mount point, and click the “Remove” button.
How to mount a drive as a folder from Disk Management
The Disk Management tool is available for both Windows 11 and 10 (and even for older versions), and it allows you to mount a hard drive as a folder similar to the “Disks & volumes” settings.
From formatted drive with data
To mount a drive as a folder from the Disk Management tool, use these steps:
-
Open Start.
-
Search for Create and format hard disk and click on the top result to open the Disk Management tool.
-
Right-click the volume to mount as a folder and choose the “Change Drive Letter and Paths” option.

-
Select the current drive letter.
Quick note: The Disk Management tool doesn’t allow the mounting of a drive as a folder when a drive letter has already been assigned. As a result, you will have to remove the drive letter before mounting the storage as a folder.
-
Click the Remove button.
-
Click the Yes button.
-
Right-click the volume to mount as a folder and choose the “Change Drive Letter and Paths” option.
-
Click the Add button.
-
Choose the “Mount in the following empty NTFS folder” option.
-
Click the Browse button.
-
Select the empty folder to mount the drive.
-
Click the OK button.
-
Click the OK button again.


From new drive without data
To mount a new partition as a folder from the Disk Management app, use these steps:
-
Open Start.
-
Search for Create and format hard disk and click on the top result to open the Disk Management tool.
-
Right-click the Unallocated space for the drive to mount as a folder and choose the “New Simple Volume” option.
-
Click the Next button.
-
Choose the volume size in megabytes.

-
Click the Next button.
-
Choose the “Mount in the following empty NTFS folder” option.
-
Click the Browse button.
-
Select the empty folder to mount the drive.
-
Click the OK button.
-
Click the Next button.
-
Select the appropriate settings for the new volume (as applicable).
-
Click the Next button.
-
Click the Finish button.


After you complete the steps, the storage should now be accessible from the folder location you specified in the wizard.
If you want to remove the folder mount point, open Disk Management, right-click the volume to mount as a folder, choose the “Change Drive Letter and Paths” option, select the current folder mount point, and click the “Remove” button.
How to mount a drive as a folder from Command Prompt
On Windows 11, 10, and older versions, you can also use Command Prompt to mount a hard drive as a folder.
From formatted drive with data
To mount a drive as a folder from Command Prompt, use these steps:
-
Open Start.
-
Search for Command Prompt, right-click the top result, and select the Run as administrator option.
-
Type the following command to start diskpart and press Enter:
diskpart
-
Type the following command to view the available volumes and press Enter:
list volume
-
Type the following command to select the volume to mount as a folder and press Enter:
select volume 1
In the command, change “1” for the number of volumes to mount.
-
Type the following command to mount a hard drive as a folder and press Enter:
assign mount=C:\MyDriveFolder
In the command, change
C:\MyDriveFolderfor the path to the folder mount point.

If you want to remove the mount point to a folder, you can use the same instructions, but in step 6, run the remove mount=C:\MyDriveFolder command. You can also assign a new drive letter to the partition on Windows 11 if you want to access the storage.
From new drive without data
To mount a new partition as a folder from Command Prompt, use these steps:
-
Open Start.
-
Search for Command Prompt, right-click the top result, and select the Run as administrator option.
-
Type the following command to start diskpart and press Enter:
diskpart
-
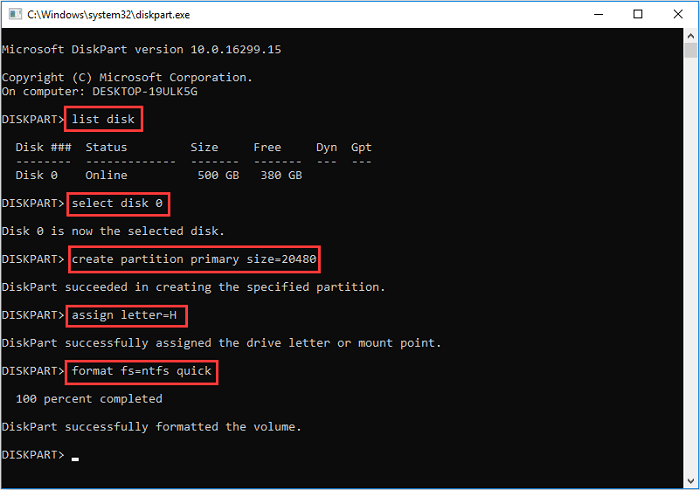
Type the following command to view the available drives and press Enter:
list disk
-
Type the following command to select a disk and press Enter:
select disk 0
In the command, change “0” to the disk number you want to partition.
-
Type the following command to create a primary partition and press Enter:
create partition primary

-
(Optional) Type the following command to view the available volumes and press Enter:
list volume
-
Type the following command to format the partition with the NTFS file system and press Enter:
format fs=ntfs quick
-
Type the following command to mount a hard drive as a folder and press Enter:
assign mount=C:\MyDriveFolder
In the command, change
C:\MyDriveFolderfor the path to the folder mount point.


Once you complete the steps, the hard drive will be accessible from the folder mount point you assigned in Command Prompt.
If you want to remove the mount point to a folder, follow the “From formatted drive” instructions, but in step 6, run the remove mount=C:\MyDriveFolder command.
This process won’t delete the data already on the partition when assigning a mount point or changing the drive letter. However, it’ll break the connection to any app installation hosted in that particular storage, but usually, this is not the case as apps are typically installed on the main system hard drive.