

This tutorial will show you how to add (assign) or remove (unassign) mount point folder paths for a drive or volume in Windows 10 and Windows 11.
You can mount (make a drive accessible) in a folder rather than a drive letter if you want. This makes the drive appear as just another folder.
When you mount an internal or external drive in an empty folder, you will be able to access the contents of the drive from the path of the folder. The contents of the drive will still physically be located on the drive. Anything you save into this folder will actually be saved to the drive.
You can mount a drive or volume with or without a drive letter as an empty folder.
You can use this folder’s path to save, copy, move, etc… to the drive.
Reference:
You can mount drives only in empty folders on basic or dynamic NTFS volumes.
If you mount an external or removable drive in a folder and disconnect the drive, the folder will not open until the drive is connected again.
Contents
- Option One: Mount or Unmount Drive to a Folder in Settings
- Option Two: Mount Drive to a Folder in Windows Terminal
- Option Three: Mount Unallocated Drive without Drive Letter to a Folder in Disk Management
- Option Four: Mount Drive with or without Drive Letter to a Folder in Disk Management
- Option Five: Unmount Drive from Folder in Disk Management
- Option Six: Unmount Drive from Folder by Deleting Folder
Option One
Mount or Unmount Drive to a Folder in Settings
This option is only available in Windows 11.
1 Open Settings (Win+I).
2 Click/tap on System on the left side, and click/tap on Storage on the right side. (see screenshot below)

3 Click/tap on Advanced storage settings to expand it open, and click/tap on Disks & volumes. (see screenshot below)

4 Click/tap on Properties for the drive (partition or volume) you want to add or remove mount point folder paths for. (see screenshot below)

5 Do step 6 (add) or step 7 (remove) below for what you want.
6 Add Mount Point Folder Path to Drive
A) Click/tap on the Add button under Paths. (see screenshot below)

B) Perform the following steps: (see screenshots below)
- Click/tap on Browse.
- Navigate to and select or create an empty folder you want.
- Click/tap on Select Folder.
- Click/tap on OK.


C) Go to step 8.
7 Remove Mount Point Folder Path from Drive
A) Click/tap on the path you want to remove to expand it open. (see screenshot below)
B) Click/tap on Remove, and go to step 8.

8 When finished, you can close Settings if you like.
Option Two
Mount Drive to a Folder in Windows Terminal
You must be signed in as an administrator to use this option.
1 Open Windows Terminal (Admin), and select either Windows PowerShell or Command Prompt.
2 Copy and paste diskpart into Windows Terminal (Admin), and press Enter. (see screenshot below)
3 Copy and paste list volume into Windows Terminal (Admin), and press Enter.
4 Make note of the volume number (ex: «2») of the drive you want to mount to a folder.
5 Type the command below into Windows Terminal (Admin), and press Enter.
select volume ###
Substitute ### in the command above with the actual volume number (ex: «2») of the drive you want to mount to an empty folder from step 4.
For example: select volume 2
6 Type the command below into Windows Terminal (Admin), and press Enter.
assign mount="Full path of empty folder"
Substitute Full path of empty folder in the command above with the actual full path (ex: «C:\Users\Brink\Desktop\My mounted drive») of the empty folder you want to mount the drive to.
For example: assign mount="C:\Users\Brink\Desktop\My mounted drive"
7 You can now close Windows Terminal (Admin) if you like.

Option Three
Mount Unallocated Drive without Drive Letter to a Folder in Disk Management
1 Open Disk Management (diskmgmt.msc).
2 Right click or press and hold on the unallocated drive you want to mount to a folder, and click/tap on the New Simple Volume. (see screenshot below)

3 Click/tap on Next. (see screenshot below)

4 Click/tap on Next. (see screenshot below)
5 Perform the following steps: (see screenshots below)
- Select (dot) Mount in the following empty NTFS folder.
- Click/tap on the Browse button.
- Navigate to and select the empty folder you want to mount the drive to.
- Click/tap on OK.
- Click/tap on Next.

6 Type a name (volume label) you want for the drive, and click/tap on Next. (see screenshot below)
7 Click/tap on Finish. (see screenshot below)
9 You can now close Disk Management if you like.
Option Four
Mount Drive with or without Drive Letter to a Folder in Disk Management
1 Open Disk Management (diskmgmt.msc).
2 Right click or press and hold on the unallocated drive you want to mount to a folder, and click/tap on the Change Drive Letter and Paths. (see screenshot below)

3 Click/tap on Add. (see screenshot below)

4 Perform the following steps: (see screenshots below)
- Select (dot) Mount in the following empty NTFS folder.
- Click/tap on the Browse button.
- Navigate to and select the empty folder you want to mount the drive to.
- Click/tap on OK.
- Click/tap on Ok.

5 You can now close Disk Management if you like.
Option Five
Unmount Drive from Folder in Disk Management
This will not delete the contents on the drive.
1 Open Disk Management (diskmgmt.msc).
2 Right click or press and hold on the unallocated drive you want to unmount from a folder, and click/tap on the Change Drive Letter and Paths. (see screenshot below)

3 Select the mount point folder path you want to remove, and click/tap on Remove. (see screenshot below)
4 Click/tap on Yes to confirm. (see screenshot below)

5 You can now close Disk Management if you like.
Option Six
Unmount Drive from Folder by Deleting Folder
This will not delete the contents on the drive.
1 Delete the folder mounted by a drive.
2 Empty the Recycle Bin to permanently delete this mount point folder path.
That’s it,
Shawn Brink
В Windows 11 и 10 существует возможность подключения диска в виде пути на другом диске. То есть вместо назначения букв каждому диску или разделу диска вы при желании можете сделать так, чтобы все они отображались в рамках одного диска.
В этой инструкции — о том, как подключить диск в виде папки в другом расположении в Параметрах, Управлении дисками или с помощью командной строки.
Параметры
Описываемая возможность доступна в приложении «Параметры». Для подключения диска в виде папки с их помощью достаточно выполнить следующие шаги:
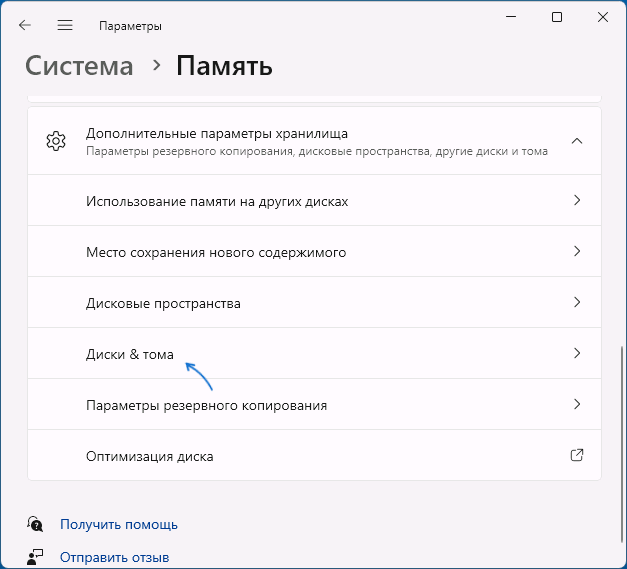
- Откройте Параметры — Система — Память — Дополнительные параметры хранилища — Диски и тома.

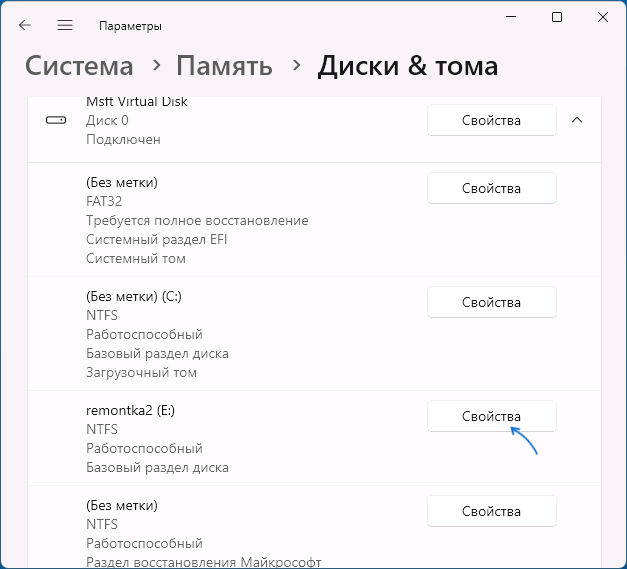
- Нажмите «Свойства» справа от диска, который нужно подключить.
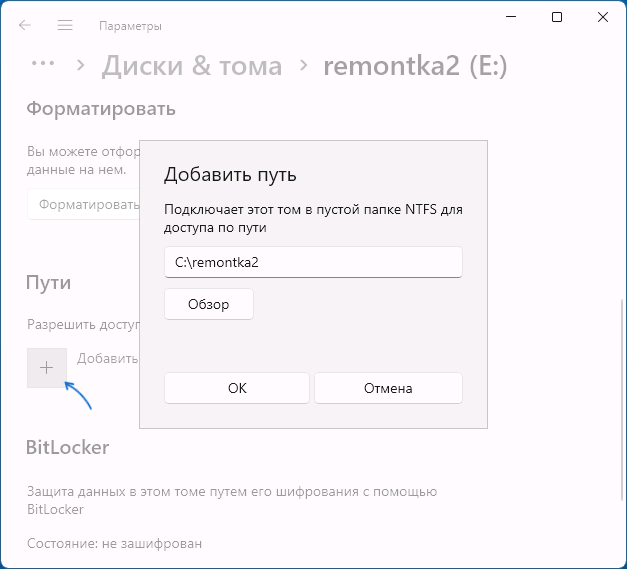
- В разделе «Пути» нажмите «Добавить».
- Укажите путь к любой (обязательно пустой) папке на диске, в рамках которого нужно отображать содержимое выбранного диска и нажмите «Ок».
Готово, теперь при открытии соответствующей папки или при обращении к ней каким-либо образом вы будете получать доступ к содержимому выбранного диска.
При необходимости вы можете удалить букву диска, который вы подключили в виде папки: прямо в этом же окне «Параметров», нажав по кнопке «Сменить букву диска» и выбрав «Нет», либо другими способами: в командной строке или утилите «Управление дисками».
Управление дисками
То же самое можно выполнить в «Управление дисками»:
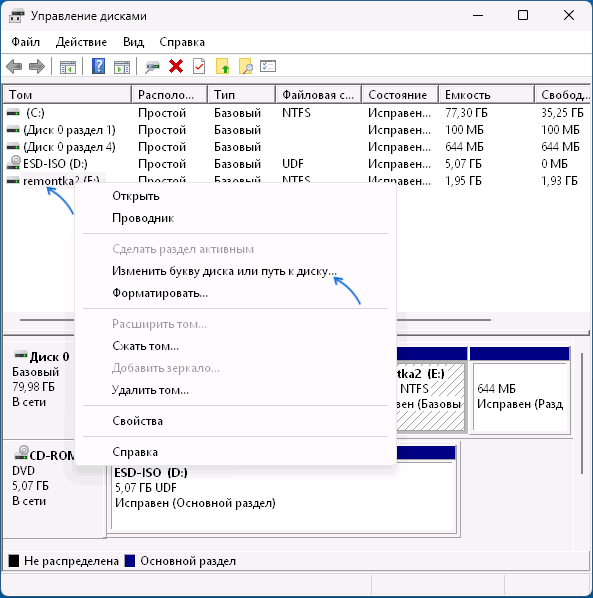
- Откройте «Управление дисками» через контекстное меню кнопки «Пуск», нажав по ней правой кнопкой мыши и выбрав нужный пункт меню, либо с помощью команды Win+R — diskmgmt.msc
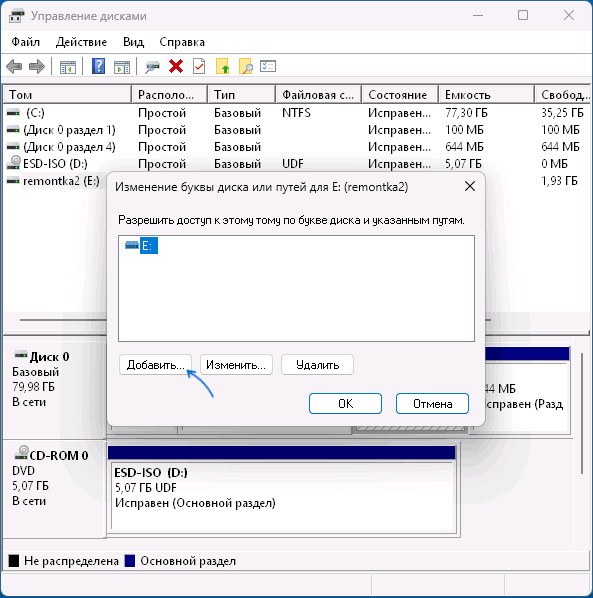
- Нажмите правой кнопкой мыши по диску, который нужно подключить как папку на другом диске и выберите пункт «Изменить букву диска или путь к диску».

- Нажмите кнопку «Добавить».
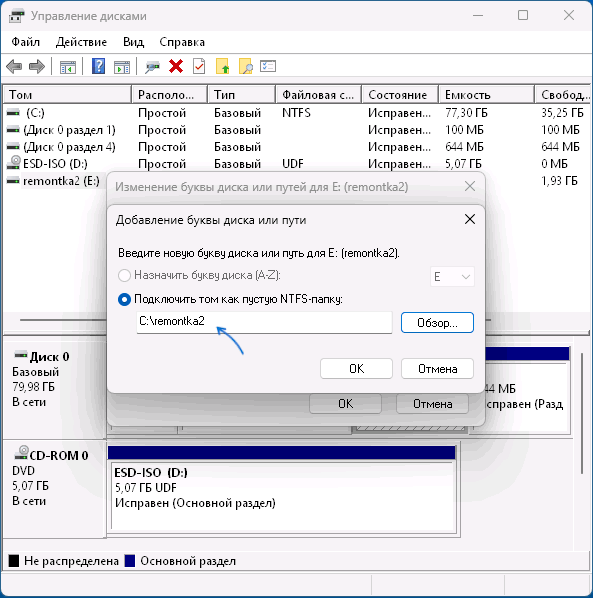
- Выберите пункт «Подключить том как пустую NTFS-папку», нажмите «Обзор» и укажите путь к пустой папке на нужном диске, нажмите «Ок».
Готов, диск будет подключен как папка на другом диске. Как и в предыдущем случае вы можете удалить букву с диска, если не хотите, чтобы он отображался в виде отдельного диска в «Проводнике».
Командная строка
И ещё один метод — командная строка и утилита DISKPART. Порядок действий:
- Запустите командную строку от имени администратора.
- По порядку введите следующие команды, заменив N на номер нужного раздела (который мы подключаем), а C:\Folder на путь к нужной папке:
diskpart
list volume
select volume N
assign mount=C:\Folder
exit
Готово, диск будет подключен как папка.
Если в будущем вам потребуется отключить диск, подключенный в виде папки, используйте те же команды, но предпоследнюю замените на remove mount=C:\Folder
Удаление подключения в виде папки ни в командной строке ни другими способами: в «Параметрах» или «Управлении дисками» не приведёт к удалению данных с диска: если нужно, вы сможете назначить ему букву или подключить к другой папке и пользоваться как обычно.
- To mount a drive as a folder on Windows 11, open Settings > System > Storage > Disks & volumes, click “Properties” for the drive, click “Add,” and choose the folder mount point.
- You can perform this configuration for a drive that is already formatted or through the partition wizard.
- Alternatively, you can mount a drive to a folder from Disk Management or Command Prompt (the same steps will work on PowerShell).
On Windows 11 (and 10, including older versions), it’s possible to mount a drive as a folder, and in this guide, I will explain how to complete this configuration.
If you have a computer with multiple drives or partitions, instead of assigning a drive letter to each storage, you can mount it as a folder within another location on your system. This approach can be useful for organizing your storage or accessing data in a specific way without using a lot of letter assignments.
Regardless of the reason, Windows offers different ways to mount a drive as a folder through the Disk Management tool and Command Prompt. On Windows 11, you can also use the “Disks & volumes” settings to perform this configuration.
In this guide, I will explain the different ways to mount a drive as a folder on Windows 11 as well as on Windows 10. You can also refer to these instructions on older versions of the operating system, including Windows 8.1, Windows 7, and older.
- How to mount a drive as a folder from Settings app
- How to mount a drive as a folder from Disk Management
- How to mount a drive as a folder from Command Prompt
How to mount a drive as a folder from Settings app
On Windows 11 (and higher releases), you can mount a drive as a folder in at least two ways from the “Disks & volumes” experience from the Settings app.
From formatted drive with data
To mount a hard drive as a folder on Windows 11 from the Settings app, use these steps:
-
Open Settings.
-
Click on System.
-
Click the Storage page.
-
Click “Advanced storage settings” under the “Storage management” section.
-
Click the “Disks & volumes” setting.

-
Click on the hard drive with the partition to mount.
-
Click the Properties button.

-
Click the Add button for the “Paths” settings.
-
Click the Browse button.
-
Open the empty folder to mount the drive.
Quick tip: Windows 11 offers multiple ways to create a new folder through File Explorer, Command Prompt, and PowerShell.
-
Click the Select Folder button.
-
Click the OK button.


From new drive without data
To mount a new partition as a folder from the Settings app, use these steps:
-
Open Settings.
-
Click on System.
-
Click the Storage page.
-
Click “Advanced storage settings” under the “Storage management” section.
-
Click the “Disks & volumes” setting.
-
Click on the hard drive with the partition to mount.
-
Choose the “Create Simple Volume” option for unallocated space.
-
(Optional) Choose the “None” option for the “Drive Letter” setting.
-
Select the appropriate settings for the new volume (as applicable).
-
Open the Advanced settings.
-
Click the Browse button.

-
Open the empty folder to mount the drive.
-
Click the Select Folder button.
-
Click the Format button.


Once you complete the steps, the storage will appear as another folder in File Explorer. Using this approach, you can still assign a drive letter to a partition, but it’s not required since you can access the storage from the mount point.
If you want to remove the folder mount point, open Settings > System > Storage > Disks & volumes, click “Properties” for the drive, click on the mount point, and click the “Remove” button.
How to mount a drive as a folder from Disk Management
The Disk Management tool is available for both Windows 11 and 10 (and even for older versions), and it allows you to mount a hard drive as a folder similar to the “Disks & volumes” settings.
From formatted drive with data
To mount a drive as a folder from the Disk Management tool, use these steps:
-
Open Start.
-
Search for Create and format hard disk and click on the top result to open the Disk Management tool.
-
Right-click the volume to mount as a folder and choose the “Change Drive Letter and Paths” option.

-
Select the current drive letter.
Quick note: The Disk Management tool doesn’t allow the mounting of a drive as a folder when a drive letter has already been assigned. As a result, you will have to remove the drive letter before mounting the storage as a folder.
-
Click the Remove button.
-
Click the Yes button.
-
Right-click the volume to mount as a folder and choose the “Change Drive Letter and Paths” option.
-
Click the Add button.
-
Choose the “Mount in the following empty NTFS folder” option.
-
Click the Browse button.
-
Select the empty folder to mount the drive.
-
Click the OK button.
-
Click the OK button again.


From new drive without data
To mount a new partition as a folder from the Disk Management app, use these steps:
-
Open Start.
-
Search for Create and format hard disk and click on the top result to open the Disk Management tool.
-
Right-click the Unallocated space for the drive to mount as a folder and choose the “New Simple Volume” option.
-
Click the Next button.
-
Choose the volume size in megabytes.

-
Click the Next button.
-
Choose the “Mount in the following empty NTFS folder” option.
-
Click the Browse button.
-
Select the empty folder to mount the drive.
-
Click the OK button.
-
Click the Next button.
-
Select the appropriate settings for the new volume (as applicable).
-
Click the Next button.
-
Click the Finish button.


After you complete the steps, the storage should now be accessible from the folder location you specified in the wizard.
If you want to remove the folder mount point, open Disk Management, right-click the volume to mount as a folder, choose the “Change Drive Letter and Paths” option, select the current folder mount point, and click the “Remove” button.
How to mount a drive as a folder from Command Prompt
On Windows 11, 10, and older versions, you can also use Command Prompt to mount a hard drive as a folder.
From formatted drive with data
To mount a drive as a folder from Command Prompt, use these steps:
-
Open Start.
-
Search for Command Prompt, right-click the top result, and select the Run as administrator option.
-
Type the following command to start diskpart and press Enter:
diskpart
-
Type the following command to view the available volumes and press Enter:
list volume
-
Type the following command to select the volume to mount as a folder and press Enter:
select volume 1
In the command, change “1” for the number of volumes to mount.
-
Type the following command to mount a hard drive as a folder and press Enter:
assign mount=C:\MyDriveFolder
In the command, change
C:\MyDriveFolderfor the path to the folder mount point.

If you want to remove the mount point to a folder, you can use the same instructions, but in step 6, run the remove mount=C:\MyDriveFolder command. You can also assign a new drive letter to the partition on Windows 11 if you want to access the storage.
From new drive without data
To mount a new partition as a folder from Command Prompt, use these steps:
-
Open Start.
-
Search for Command Prompt, right-click the top result, and select the Run as administrator option.
-
Type the following command to start diskpart and press Enter:
diskpart
-
Type the following command to view the available drives and press Enter:
list disk
-
Type the following command to select a disk and press Enter:
select disk 0
In the command, change “0” to the disk number you want to partition.
-
Type the following command to create a primary partition and press Enter:
create partition primary

-
(Optional) Type the following command to view the available volumes and press Enter:
list volume
-
Type the following command to format the partition with the NTFS file system and press Enter:
format fs=ntfs quick
-
Type the following command to mount a hard drive as a folder and press Enter:
assign mount=C:\MyDriveFolder
In the command, change
C:\MyDriveFolderfor the path to the folder mount point.


Once you complete the steps, the hard drive will be accessible from the folder mount point you assigned in Command Prompt.
If you want to remove the mount point to a folder, follow the “From formatted drive” instructions, but in step 6, run the remove mount=C:\MyDriveFolder command.
This process won’t delete the data already on the partition when assigning a mount point or changing the drive letter. However, it’ll break the connection to any app installation hosted in that particular storage, but usually, this is not the case as apps are typically installed on the main system hard drive.
Содержание
- 1 Монтирование вручную
- 2 Автоматическое монтирование CIFS при загрузке системы
- 3 Автоматическое монтирование PAM_MOUNT при загрузке системы
- 4 Удаляются файлы при совместном доступе
Монтирование вручную
Для работы будет необходима утилита cifs-utils
Установим её командой
# sudo yum install cifs*
Далее потребуется создать директорию, куда мы хотим примонтировать windows шару.
И выполняем команду монтирования.
# mkdir /mnt/share
# mount -t cifs //server-name/share-name /mnt/share -o username=winuser,password=winpassword
Если используются русские буквы или пробел в имени сетевой папки, надо весь путь заключить в кавычки «//192.168.0.1/Документы»
Так же сразу можно задать права доступа и кодировку, тогда надо вписать следующие параметры
# mount -t cifs //server-name/share-name /mnt/share -o username=winuser,password=winpassword,iocharset=utf8,file_mode=0777,dir_mode=0777
- mount -t cifs — тип устройство/директория
- //ip или доменное имя
- /mnt/share — в эту директорию будет примонтирована сетевая папка
- -o -задаем дополнительные опции монтирования
- username=winuser — это windows-пользователь на удаленном хосте
- password=winpassword — это пароль windows пользователя
- iocharset=utf8 указываем кодировку (cp1251, koi8-r)
- file_mode=0777 — права доступа к файлам
- dir_mode=0777 — права доступа к директориям
Чтобы не беспокоила ошибка несовместимости прав доступа разных систем добавим параметр noperm.
# mount -t cifs //server-name/share-name /mnt/share -o username=winuser,password=winpassword,iocharset=utf8,file_mode=0777,dir_mode=0777,noperm
Автоматическое монтирование CIFS при загрузке системы
Для этого создадим файл, куда мы сможем вписать информацию о пользователе(логин, пароль, домен/рабочая группа)
# nano /root/.smbuser
username=winuser
password=winpassword
domain=salf-net
Для безопасности ограничим доступ к файлу с нашими данными:
# chmod 400 /root/.smbuser
Редактируем файл /etc/fstab
# nano /etc/fstab
//server-name/share-name /mnt/share cifs file_mode=0777,dir_mode=0777,noperm,credentials=/root/.smbuser 0 0
Проверяем, работоспособность
# mount -a
Если не было ошибок, проверяем
# df -h
Видим примонтированую папку, при следующей загрузке системы, будет автоматически примонтирована сетевая папка.
Автоматическое монтирование PAM_MOUNT при загрузке системы
1. Установка PAM Mount:
# yum install pam_mount
2. Настройка PAM Mount:
* Отредактировать файл конфигурации PAM Mount:
    vi /etc/security/pam_mount.conf.xml

  * Файл конфигурации содержит множество примеров настроек, отредактируйте их соответствующим образом в соответствии с вашими потребностями.
3. Настройка автоматического примонтирования:
  * Файлы системы файлов, которые должны быть автоматически примонтированы при входе пользователя, могут быть указаны в файле /etc/security/pam_mount.conf.xml.
  * Например, если вы хотите автоматически примонтировать файловую систему CIFS при входе пользователя, установите следующую конфигурацию в /etc/security/pam_mount.conf.xml:
    <volume user="*" fstype="cifs" server="server" path="share" mountpoint="/mnt/share" options="username=example,password=example" />

  * Замените server на IP-адрес сервера и share на имя замонтированной файловой системы, а username и password на учетные данные пользователя, имеющего доступ к файловой системе.
4. Обновление файла /etc/pam.d/system-auth:
  * Добавьте следующую строку в файл /etc/pam.d/system-auth в блок auth:

   auth       required     pam_mount.so
5. Перезапуск службы автомонтирования:
  * После настройки PAM Mount, перезапустите службу автоматического монтирования:

 systemctl restart autofs.service
6. Протестируйте PAM Mount:
  * Войдите в систему как пользователь и проверьте, автоматически ли монтируется файловая система.
  * Если монтирование выполняется успешно, вы увидите директорию точки монтирования в соответствующем месте (в данном случае в /mnt/share).
Удаляются файлы при совместном доступе
В случае возникновения проблемы с удалением файлов при совместном доступе или в режиме чтения заблокированного другим пользователем документа, необходимо запросить у пользователя параметры монтирования сетевого ресурса. Если среди параметров присутствует nobrl, именно он является причиной проблемы, его необходимо удалить.
How To Mount and Access New Partition / Volume / Drive As Folder Path In Windows
When adding a new hard disk or create a new partition in Microsoft Windows operating system, typically users will normally assign a drive letter such as Local Disk (E:) to the new partition or volume. Beside normal way of allocating a drive letter, it’s also possible to assign a folder or directory (on partitions formatted as NTFS) to represent the hard disk drive, partition or volume too, eliminating eliminating the use of drive letter and enabling browsing the volume and partition contents as in folder, or path.
Mounting a partition or drive as a folder also provides a workaround way or trick to allow a partition to appear as part of C:\ root system drive. This hack is particular useful to expand the hard disk space size of C:\ or other system drive without having to use a new disk drive letter or switching drive to accommodate older program or application that must store and save data on installed drive, typically at system drive.
To mount partition or volume as a folder, users must first have or create a empty folder on a NTFS formatted file system that users want to assign or associate with the partition or volume. And it’s also possible to mount a partition, a volume or a hard disk drive which already assigned with a disk drive letter as folder too, allowing two ways to access the volume or partition via different drive or different folder. And it’s not necessary that only a hard disk (which whole hard disk been allocated as single partition) can be mounted as an empty NTFS folder, unused partition or empty space on existing disk can be mounted as NTFS folder too as long as users can create a new partition on it.
How to Mount a New Volume/Partition as Folder
- Click on Start Menu, then select Run. Alternatively, press Win+R key to open Run command, and type DiskMgmt.msc to open Disk Management.
In Windows 8 / Windows 8.1 / Windows 10, you can also open Win+X Power Users menu, and select Disk Management.
- Right click on the new hard disk or remaining unallocated space, and then select New Partition or New Simple Volume (in Windows Vista or later).
For the partition has been created, but not yet assigned any drive letter and paths, or partition that has been allocated with drive letter and path, right click on the partition and select Change Drive Letter and Paths.
- In the “New Simple Volume Wizard” or “New Partition Wizard”, follow the instructions on screen such as selecting the size of the new partition, until the the Assign Drive Letter or Path screen.
For existing volume/partition, click on Add button to add a new path instead.
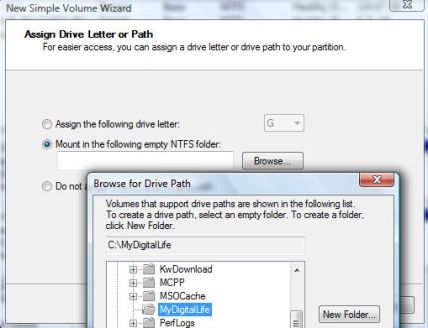
- Select Mount in the following empty NTFS folder radio button, and then select Browse… button.
For existing volume/partition, the “Mount in the following empty NTFS folder” is automatically selected. Users cannot assign more than one drive letter to a partition, but can assign many paths (folders) to a partition.
- Select an empty folder that you want to mount this new partition. Click on New Folder to create a new directory if needed. Once selected the mounting folder, click OK button.

- For existing partition already with drive letter, process is completed and users can now open Windows Explorer to browse the partition content in the mounted folder.
Else, back in the wizard, continue to follow instructions on screen to complete the wizard by selecting file system, allocation unit size, volume label, decide whether to perform quick format or whether to enable file and folder compression. Wait for the disk formatting to complete too. After process completed, a folder is linked to the partition/volume.
As mentioned, users can assign many folder path to a single volume or partition. Users can also remove the relationship of folder mount point with volume at any time, or change back to a drive letter. Even already mounted on a folder path, a drive letter can still be assigned to the partition too. All these administrative operations can be done on the Disk Management. Best of all, changing drive letter or folder paths of a volume will not delete the data on the drive.
About the Author: LK
Page load link