
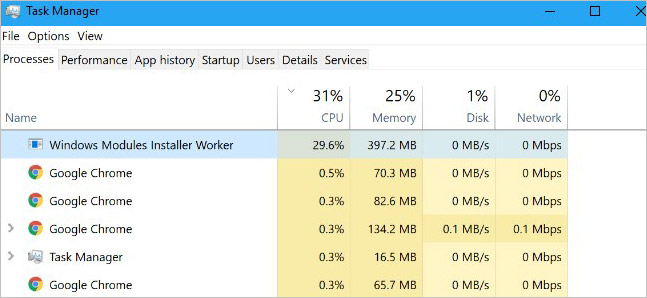
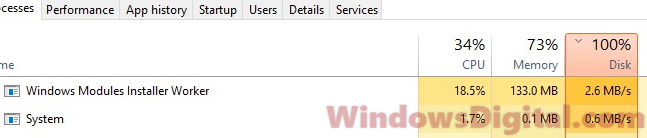
While carrying out a resource-intensive task, a sudden spike in CPU or memory usage is common. This spike usually goes down after some time or when the task is finished. However, there are times when certain processes, like the Windows Modules Installer Worker, shows 100% disk usage in the task manager. This sudden issue leads to a stuttering and sluggish computer without any resources to handle additional tasks.
The Windows Modules Installer Worker’s CPU or memory usage skyrocketing to 100% leaves users wondering about its causes. Regardless of this spike affecting the performance, this issue is not worrisome and can be fixed easily using the methods explained below.
What is Windows Modules Installer Worker (WMIW)?
Windows Modules Installer Worker, WMIW, or TiWorker.exe, is a critical Windows core system process whose function is to check and install Windows updates automatically. This process has administrator-level permissions and works in the background to install all the necessary updates without needing any user interference.
Like any other Windows process or application, the Windows Modules Installer Worker requires some power to work efficiently. Apart from installing updates, the TiWorker.exe also ties up various important system resources like .NET to keep essential processes working smoothly.
While installing updates, it can run into problems, leading to Windows Modules Installer Worker 100% disk usage issue.
Why does the Windows Modules Installer Worker reflect High CPU Usage?
Upon checking the task manager and finding the Windows Modules Installer Worker high CPU usage issue, we assume that the process, in itself, is corrupt or causing problems.
However, there are many other reasons that can cause the Windows Modules Installer Worker high CPU usage. The reasons could be – a malware infection, broken update installer, insufficient power supply, faulty memory or disk, and more.
Windows Modules Installer Worker 100% disk usage can also be due to dust build-up and improper airflow inside the CPU cabinet, resulting in computer overheating and subsequent effects like stuttering, unexpected frame drops, and system crashing.
Methods to Fix the Windows Modules Installer Worker 100% Disk Usage
There is no single cause behind the Windows Modules Installer Worker high disk usage. Nevertheless, we have explained several fixes below that might help fix potential triggers causing this issue.
Method 1: Perform a Clean Boot
A clean boot boots the computer with a minimum set of essential processes and applications. Doing this will help you figure out if the Windows Modules Installer Worker high CPU usage is due to a background program interfering with the TiWorker.exe process. The steps to do this are simple –
- Press WINDOWS + R and type msconfig. Press Enter.
- You’ll see the System Configuration screen.
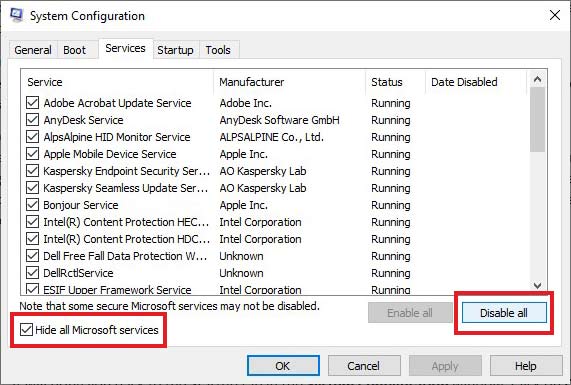
- Navigate to the Services tab and check the Hide all Microsoft services option.
- Then, click on Disable all to disable all third-party services.
- Then, go to the Startup tab and click on Open Task Manager.
- In the startup tab, disable all the applications. Close the Task Manager.
- It will bring you back to the Startup tab in the System Configuration window. Click on OK.
- Restart your computer. Your computer will boot in a clean boot environment.
Method 2: Run Memory Diagnostics
Faulty RAM module/s might be causing the Windows Modules Installer Worker high CPU usage issue on your system. You can test the memory modules via Windows’ built-in memory diagnostics tool. Here’s what to do –
- Press WINDOWS + R and type mdsched.exe. Press Enter.
- Click on Restart now and check for the problems option.
- Wait for the tool to finish the scan and restart the computer.

Note – Make sure to save everything and close all applications before using it.
Method 3: Do a Comprehensive Malware Check
A malware inside your system might have already replaced the real Windows Modules Installer Worker process and mimicking it for suspicious activities. If you see something suspicious or you are facing the Windows Modules Installer Worker 100% CPU usage error after visiting a random webpage or connecting an unknown device to your system, perform a virus scan on your Windows PC. Use a reliable and well-renowned antivirus for this purpose.
Method 4: Set PC performance to the Best
Unwanted features like visual effects can hog up the system resources, leading to other processes like TiWorker.exe to stall or show 100% disk usage. You can fix this by opting for the best performance. To do this –
- Open My PC.
- Right-click on the blank space and click on Properties.
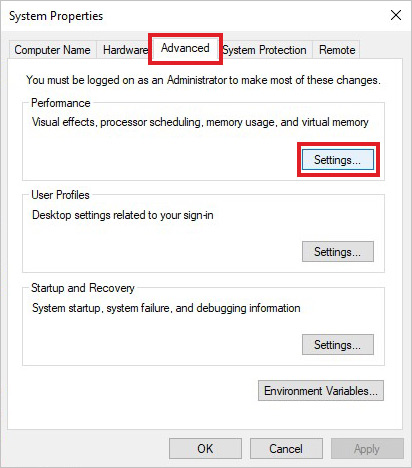
- Click on Advanced system settings to open the System Properties window.

- Under the Advanced tab, go to the Performance section and click on Settings.
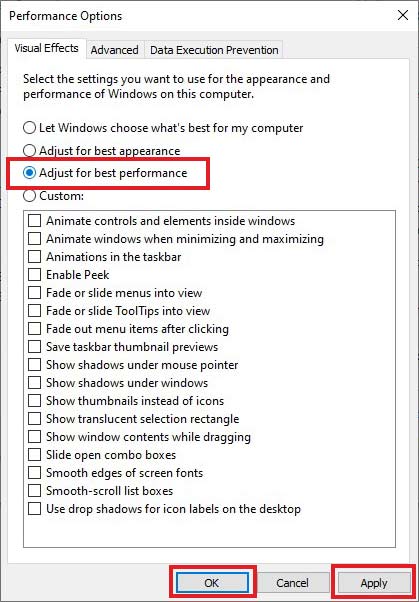
- In the Performance Options window, under the Visual Effects tab, click on Adjust for best performance.
- Click OK.
Method 5: Set Windows Modules Installer Worker to Manual
Automatic update installation in Windows is a great way to prioritize other important tasks. However, in some scenarios, it has issues that lead to Windows Modules Installer Worker 100% CPU usage. You can fix this by toggling the service to ‘manual’ mode. To do this –
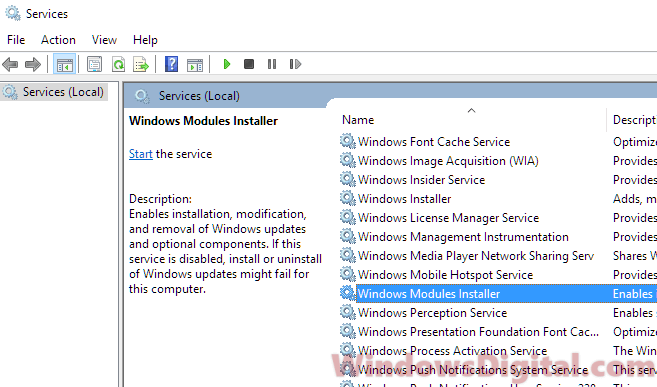
- Press WINDOWS + R and type services.msc. Press Enter.
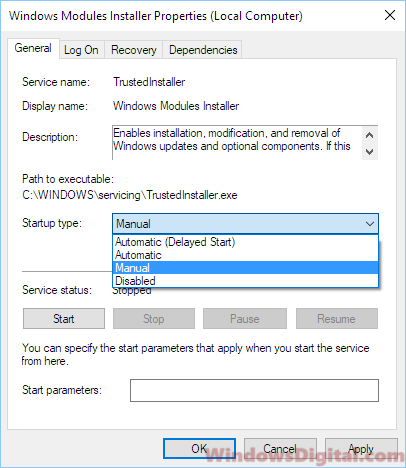
- Locate the Windows Module Installer and right-click on it. Click on properties.
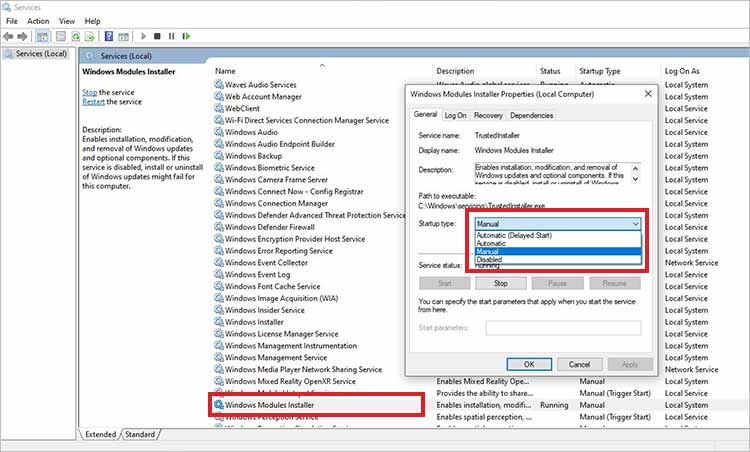
- Change the Startup type to manual.
- Click on Apply and OK.
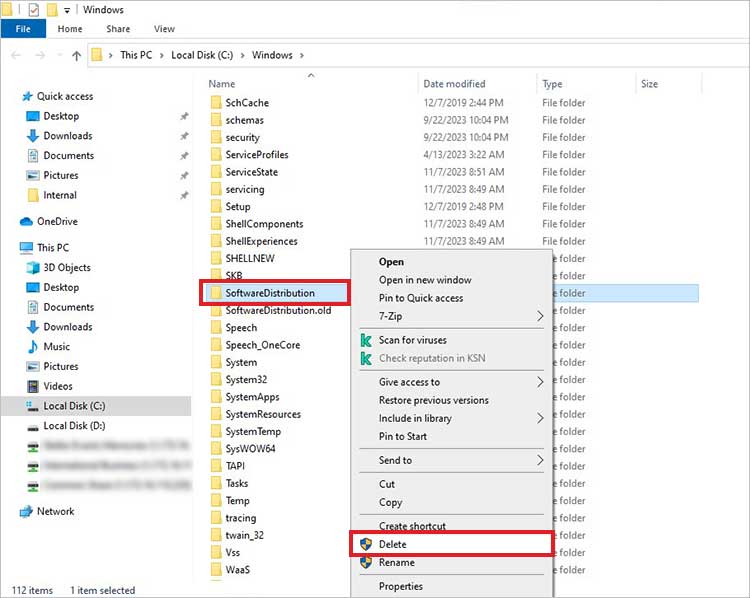
Method 6: Delete the SoftwareDistribution Folder
SoftwareDistribution is a folder that Windows uses to temporarily store files required for installing Windows updates. These files can sometimes conflict with the Windows Modules Installer Worker process, resulting in high CPU usage errors. You can fix the TiWorker high CPU usage by deleting the SoftwareDistribution folder. Here are the steps for doing this –
- Press WINDOWS + R and type services.msc. Press Enter.
- Locate the Windows Update service and stop it.

- Close the Services Window and again press WINDOWS + R.
- Type C:\Windows\ and press Enter.
- Navigate to the SoftwareDistribution folder and delete it.
You can also clean other temporary files from your computer to clear all unwanted files on your computer.
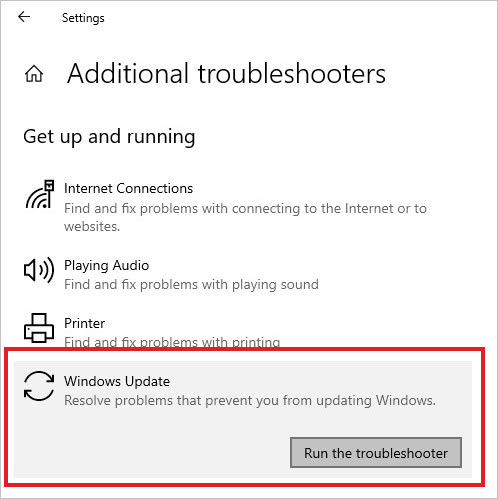
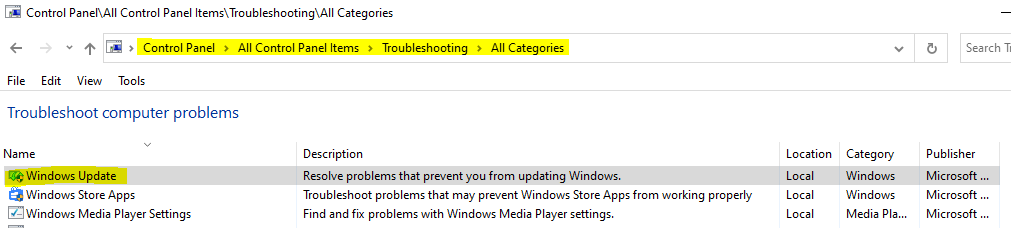
Method 7: Run Windows Update Troubleshooter
If there is a problem with the Windows updater itself, it can cause the Windows Modules Installer Worker 100% usage on your Windows computer. You can resolve the underlying problem by running the Windows update troubleshooter. For this –
- Press WINDOWS + I to open Settings.
- Click on Update & Security.
- Click on Troubleshoot in the left pane.

- Click on Additional troubleshooters.
- Locate the Windows Update troubleshooter and click on it.
- Click on Run the troubleshooter. Follow the on-screen instructions afterward.
Reduce Unnecessary CPU Usage
The Windows Modules Installer Worker (WMIW) 100% disk usage is an unusual behavior indicating high CPU/disk image that can slow down the computer.
Using the methods explained above, you can fix the Windows Modules Installer Worker high disk usage issue in no time. And, if your computer is constantly stuttering and crashing due to high CPU usage, try using System Restore to restore the PC to a previous error-free state.
If you accidentally deleted some files on your sluggish computer, worry not and use a powerful Windows data recovery software to recover them.
[FIXED] — Svchost.exe High CPU usage
How to fix modern setup host high CPU usage issue?
Methods to fix WUDFHost.exe high CPU usage on Windows PCs
[FIXED] – Antimalware service executable high CPU usage issue
Is the Windows Modules Installer Worker process essential?
Yes, WMIW or Windows Modules Installer Worker is a core system process that automatically installs various OS and security updates. It also ensures that essential processes are working smoothly.
What causes 100% Disk usage?
Multiple instances of an application running simultaneously, too many applications running parallel, malware or cryptominer working in the background are some of the reasons behind high disk usage.
Will upgrading RAM or SSD solve 100% usage issue?
In some cases, if the 100% usage is due to insufficient RAM or old HDD, upgrading RAM and switching to SSD can help you resolve high CPU/memory issue.
Was this article helpful?
YES7
NO
If you’ve checked your computer’s Task Manager, you might have seen a process called “Windows Modules Installer Worker” using a lot of CPU or disk space in Windows 10 or Windows 11. Usually, this process is fine and does nothing bad unless it keeps using a lot of resources for a long time. In this guide, we’ll talk about what this process is all about and how you can reduce its workload.
Also see: High CPU Usage After Windows 11/10 Update (Fix)
What is Windows Modules Installer Worker?
Windows Modules Installer Worker, also known as TiWorker.exe, is a service that helps Windows Update find and install new updates from Microsoft. This process runs automatically in the background when you check for updates on your PC or when Windows Update schedules it.
How to fix high CPU usage caused by Windows Modules Installer Worker
If this is your first time seeing this process, it’s best to just wait it out since it might be installing important updates for your Windows 10 or 11. But if it keeps using a lot of CPU or disk space after waiting, you can switch the Windows Modules Installer Worker service to manual. This change makes sure the process only runs when you want it to.
Just be aware that if you end this process using “End Task” in Task Manager, it will restart soon after. Setting the service to manual is the only full-proof way to stop it from running without your permission. However, doing this means Windows Update won’t run on its own anymore. You’ll have to check for updates yourself through the Windows Update interface. Before you decide to stop the service completely, you might want to try the Windows Update Troubleshooter to see if the problem comes from the Windows Update service itself.
Another big reason to manage this process is its impact on battery life, especially if your laptop uses power even when it’s plugged in. Setting Windows Update to manual might help with this issue.
Pro tip: How to Limit CPU Usage of a Process in Windows 11
How to set Windows Update to manual
To set the Windows Modules Installer Worker service to manual and only run on demand, follow the steps below.
- Go to the start menu in Windows.
- Search for “services.msc” and open it.
- Find “Windows Modules Installer” in the list of services and double-click on it.

- Change the Startup type to Manual.
- Click Apply, then OK.

- If you want it to stop right now, you can click the Stop button.
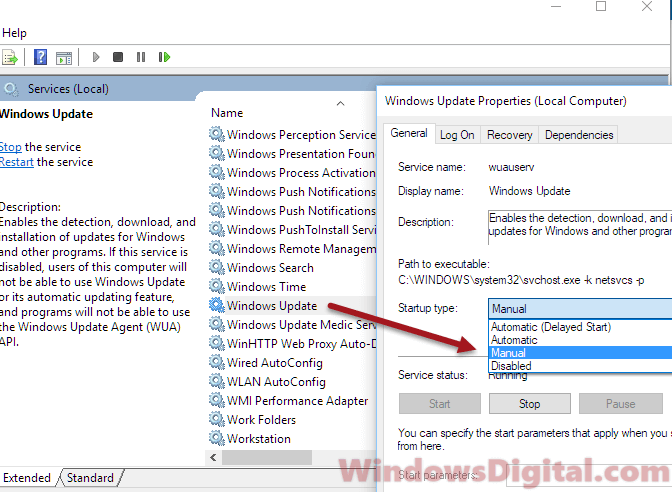
- Then, look for “Windows Update” and double-click on it.
- Change the Startup type to Manual.
- Click Apply, then OK.

- Close the Services window and restart your PC.
After you restart, open Task Manager to see if Windows Modules Installer Worker is still causing high CPU, disk, or memory usage in your Windows 10 or 11.
This method will stop automatic Windows Update, so also remember to check for updates on your own regularly, as your computer won’t do it for you anymore.
Delete corrupted update files
If Windows Modules Installer Worker is still using a lot of CPU or disk space because of corrupted update files, you can delete the Software Distribution folder in Windows. This folder holds temporary files that Windows Update uses and clearing it often fixes issues with corrupted files.
- Open Command Prompt as an administrator. Right-click on the Start menu and choose “Command Prompt (Admin)”.
- Type these commands one at a time, hitting Enter after each:
net stop wuauserv
net stop cryptSvc
net stop bits
net stop msiserver
These commands stop the services related to Windows Update.
- Rename the Software Distribution folder with this command:
ren C:\Windows\SoftwareDistribution SoftwareDistribution.old
This changes the folder’s name to SoftwareDistribution.old, which removes it so Windows can create a new one.
- Restart the services you stopped with these commands:
net start wuauserv
net start cryptSvc
net start bits
net start msiserver
This restarts the Windows Update services.
After doing these steps, check if the issue with high CPU or disk usage by Windows Modules Installer Worker is fixed.
Consider upgrading your hardware
When you frequently run into issues with high CPU or disk usage and software solutions haven’t always fixed the problem, you might want to consider hardware upgrades. Adding more RAM or getting a solid-state drive (SSD) can really help your computer run faster. If changing the CPU is possible, it would give you an even bigger boost. This is especially the case if you have a rather old computer with more than 7-8 years old hardware parts and you have to use some of the latest and big software.
The more Microsoft is trying to make their Windows secure, as much as users are facing issues. I am saying this because, recently, many users started facing high CPU usage issue after update. Maybe, you also facing the same issue, that’s why you’re reading this useful article. In Windows 10, Microsoft removed “turn off automatic update” option. Now, Windows automatically run few services in the background like “Windows Modules Installer Worker”. These services and process were made to check and update Windows. But, now these services are messing up with the system.
What is “Windows Module Installer Worker”?.
According to given description by Microsoft in Windows services. This service enables installation, modification, and removal of Windows updates and the optional component such as driver update. In simple words, this is the service which initiates, when, Windows check for updates. Or, does install updates.
Why “Windows Module Installer” is using high CPU and disk?.
Normally a Windows service required 10% of CPU Power. But, if service is taking more than 50 – 60% then, something wrong with it. CPU usage reaches 90% when we play high-end games. But, TiWorker.exe (Windows Modules Installer Worker) is using 99% CPU and disk. That’s why, Our computer does freeze, because of it. And, other necessary Microsoft services will not able to use CPU power. And, there could be multiple causes, behind this high CPU usage.
Maybe due to some malware attack, this service is using much power. Or maybe some system files got corrupted. Whatever is the reason, you need to try out all solutions mentioned in this article.
Fix Windows Modules Installer Worker high CPU Usage.
Note: If you’re in hurry, then check Solution number 5, for the quick solution.
Solution: 1 Check Windows Update Section.
As I have mentioned, this service is related to Windows updates. So, this service run only when Windows download or install new updates. If the problem is with disk usage, then maybe this service is checking for an update. Or, maybe downloading required updates. In that case, I suggest you wait for updates to get complete. Because stopping this service between update leads to other problems.
To check Windows is downloading or installing new updates or not, follow these instructions.
1. In Windows 10, Press Windows + I key simultaneously to open Settings App.
2. Click on “updates & security”.
Now, here you can see, that Windows is installing an update or not. As you can see in below screenshot, there was a “Cumulative update” available. And, Windows is preparing to download this update. That’s why high disk usage problem was occurring.
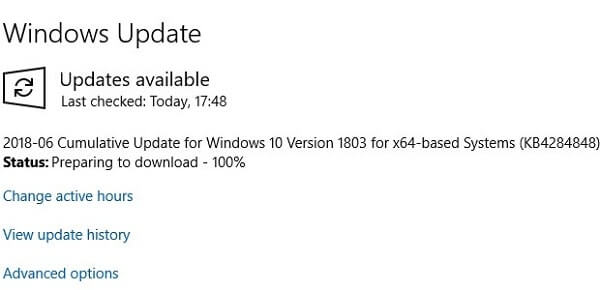
And, After waiting a half hour, updates got completed. And, high disk usage problem gets auto-resolved. But, If it’s showing “You’re up to date” message. And, still, “windows modules installer worker” service is using high CPU power. Then, you need to try out next solutions.
Solution: 2 Change Security and Maintenance Settings.
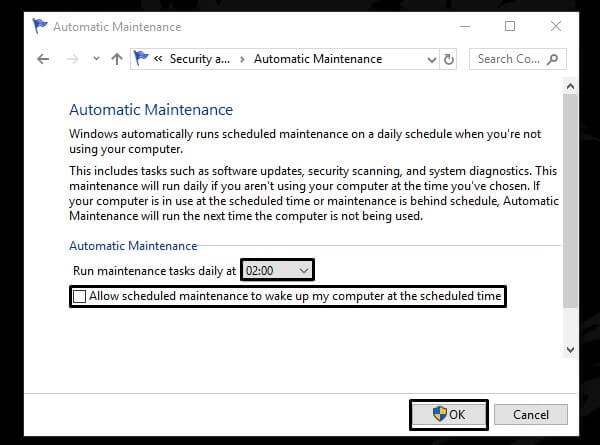
Windows don’t check for updates all time. Windows comes with maintenance settings. Which allows setting time for the update. Means, you can schedule updates. For Example: If maintenance timer is set to 2:00 PM and you work at that time. Then, you can set the timer for the night, to get rid of high CPU usage or disk usage.
1. Go to Control Panel\System and Security\Security and Maintenance.
2. Click on “Maintenance” option to see more options.
3. After that, Click on “Change Maintenance Settings”.
4. Now, here you can change timer. Also, you can turn off automatic maintenance feature. Unmark “Allow Scheduled maintenance to wake up…” option. And, then click on “OK” button.
Solution: 3 Run an Antivirus Scan.
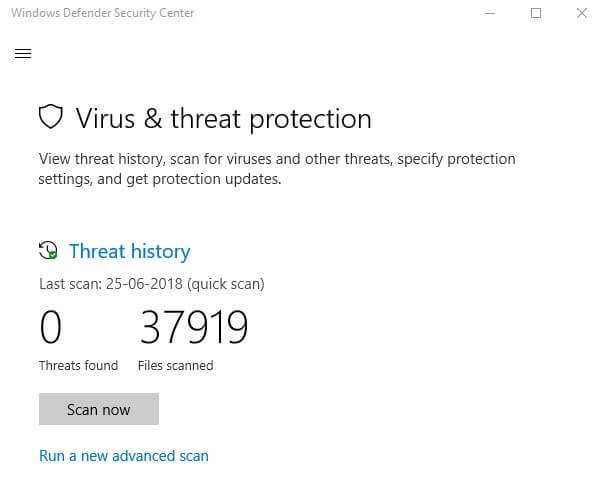
If “windows installer module worker” is using high CPU power. And, In Windows update section is showing “System is up-to-date”. Then, It could possible that due to some malware attack, this problem is occurring. Windows 10 comes with “Windows Defender Security Center”. That can fight against malware and virus. But, if you had turned off “Real-time protection” then malware can attack your system. Because we all visit tons of sites daily. Some sites contain malicious codes, that harm our Computer. So, first turn on “Real-time protection”, if it’s off. After that, run a full system scan.
1. Open Settings App in Windows 10. (Press Windows + I)
2. Go to updates & security > Windows Security > Virus and Threat Protection.
3. Now, Windows Defender Security Center Will get open.
You can click on “Scan now” button to run a virus scan. And, to find out that “Real-time protection” is on or off. Click on “Virus and Threat Protection Settings”.
Solution: 4 Run Windows Update Troubleshooter.
Windows 10 comes with many inbuilt features, which makes it best OS. And, the new troubleshooter is the best feature of Windows. Because you can run troubleshooter according to the problem you’re facing. Even, you can run troubleshooter for “BSOD” Errors. But, here the problem is with “Windows Modules Installer Worker”. And, this service is linked to Windows updates. So, we are here going to run “Windows update” troubleshooter. Though, this troubleshooter is made to fix problems, that prevent Windows Updates. But, still many users solved their problems with it.
1. First, Open Settings App in Windows 10. Then, go to “Updates and Security”
2. Click on “Troubleshoot” from the left pane.
3. Now, Click on Windows Update, then click on “Run the troubleshooter” button.
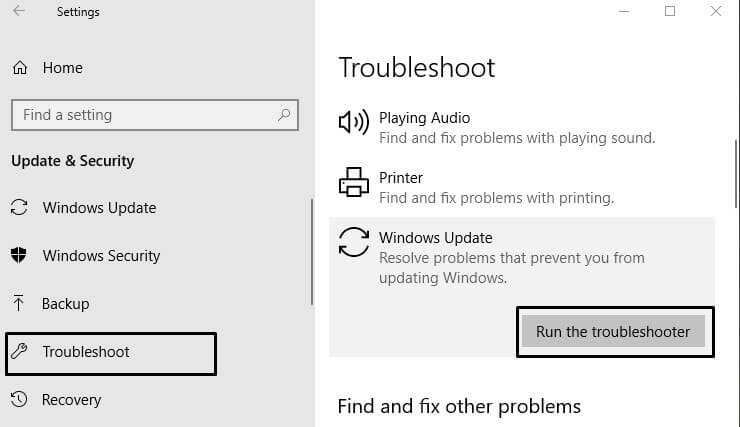
That’s it. Now Windows will automatically find out and, fix the problem.
Solution: 5 Set Manual Mode for Windows Update.
If above solutions don’t work. Then, you need to set Windows update to manual mode. After setting Windows update to manual mode. “Windows Modules Installer worker” Service will not run automatically. It will only start running when you will click on “check for updates”. Only, then you will face high CPU usage problem.
1. Press Windows + R key simultaneously to open run Windows.
2. Type “Services.msc” and then press enter.
3. Here you can find out all services, you need to look for “Windows Module Installer”. Click on it, and on the right side of that Window, you can find out “Stop” button. Click on that button, to stop this service.
4. To set this service in manual mode. Right Click on it, and then go to properties.
Set the Startup type to “Manual”, and click on OK.
Close the services Window, now you will never face high CPU usage problem again.
Fix High Disk Usage Problem.
IMPORTANT – High Disk Usage Problem occurs, when Windows download and install updates. Normally, users who use HDD, face this problem. If you want to get rid of this problem permanently. Then, I suggest you replace your hard drive with SSD (Solid state drive).
Solution: 6 Set Metered Connection.
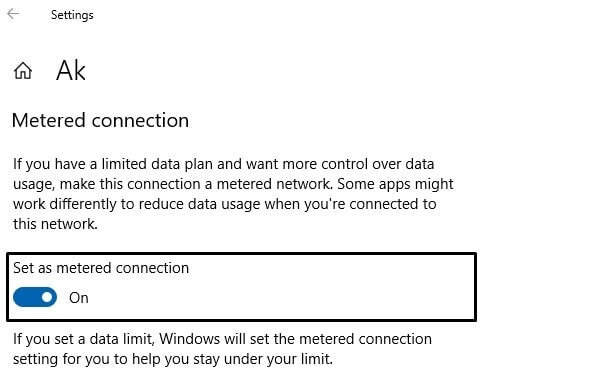
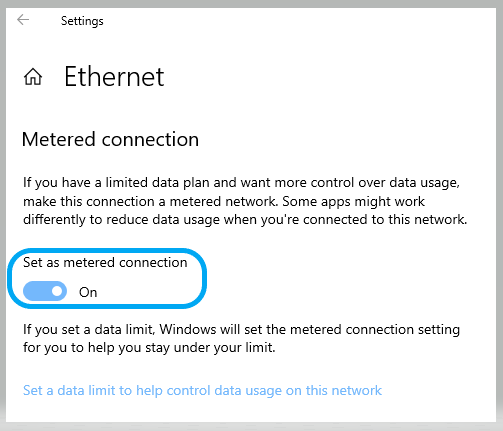
Metered Connection prevents Windows to download updates on the specific network. And, if “Windows Modules Installer Worker” is on automatic mode. Then also, service will not run on your private network. If Metered Connection is on.
For WiFi users. – Click on WiFi Icon > Properties. Scroll down a little and turn on “Set as Metered Connection” Option.
If you’re using the ethernet connection, then you might have the unlimited internet plan. So, I suggest you to just use SSD to get rid of high disk usage option. If you’re turning off Windows updates using 5,6 solutions. Then, you need to check for updates manually. Else, Malware can easily attack older version of Windows.
If you’re reading this article then you must be facing a system slowness issue cause of Windows Modules Installer Worker High CPU & Disk Usage.
We’ll talk about in detail and will perform multiple possible solutions from basic to advance. You’ll learn and get confident after resolving this type of issues.
Table of Contents
Symptom: System Slowness Issue
Your system could slow down due to many reasons. Slowness issues can be caused by hardware, operating systems, third-party apps, viruses, and other factors.
It’s usually due to excessive system resource usage. When a process uses more CPU, Memory, Hard disk, or network resources, your system may respond slowly or hang.
You can also confirm by going to the Task Manager and checking the Process & Performance tab.
- Steps: Start –> Search –> Task Manager
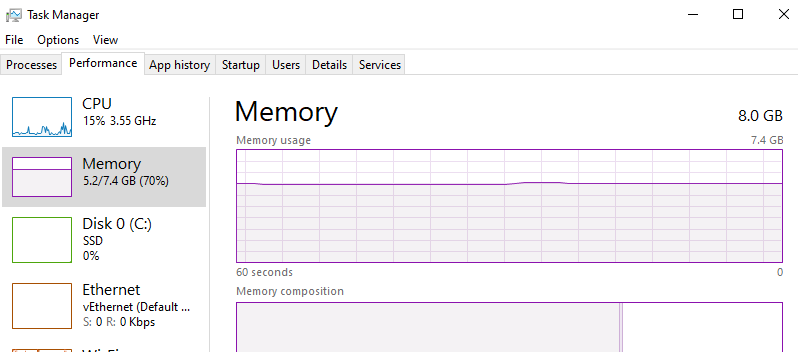
You can get the process name that consuming high CPU and Disk resources.
There are many processes that cause this but, in this article, we’ll talk about the Windows modules installer worker process.
Is Windows Modules Installer Worker a Malware or a Virus?
After examining the high utilization, your first question will be: Is Windows modules installer worker any malware or virus?
The clear answer to this question is NO. You don’t have to be afraid of like any viruses or malware. It is a Windows service-related component that is used to search and install the latest updates.
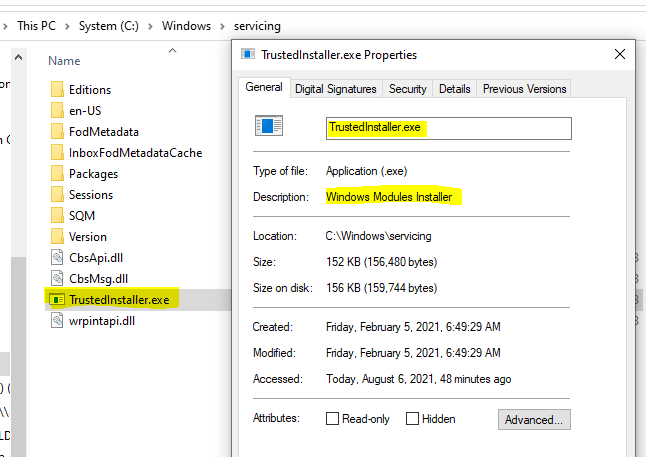
It could happen that its files get infected by a virus. So, you can also scan its executable file with any installed anti-virus to make sure it’s clean, file location is C:\Windows\servicing.
Firstly, let’s understand what is Windows modules installer worker?
Windows modules installer worker is a system service and plays an essential role in system management. It’s used by Windows to automatically check and install the latest updates. Windows modules installer worker is also used to modify and remove the updates.
You may check its details in the Services.msc console.
- Steps: Start –> Search –> Services

In other words, when you manually or the system automatically checks for the updates then this process runs in the background.
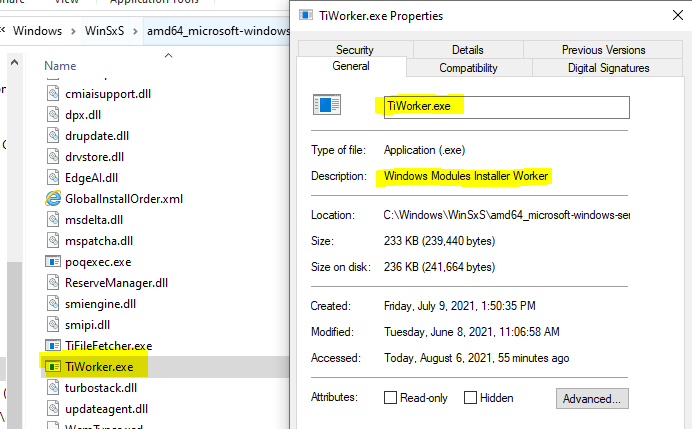
What is Tiworker.Exe and Trustedinstaller.Exe process?
You may see any single or both Tiworker.Exe and Trustedinstaller.Exe processes in the Task manager high usage process list.
Tiworker.Exe is an executable file that display name is Windows modules installer worker.
Trustedinstaller.Exe name will show as process name and its display name will show as Windows Modules Installer.
It is the parent process of Tiworker.Exe and both are part of Windows Modules Installer and run in the background to complete the update task. You should understand that Trustedinstaller.Exe is used to install the updates and enable the windows features.
Why Windows Modules Installer Worker Utilize high CPU & Disk Usage?
You may be now wondering why Windows modules installer worker utilize high CPU & Disk Usage on Windows 10 systems?
It has happened many times that a Windows update installation is in progress or there is a bug in any received update file. Then it starts using available CPU and Disk resources.
This can also happen when its components are corrupted and causing unexpected system behavior.
As per my experience sometimes it’s normal because if an update installation is in progress, then the time taken is expected. Once the installation gets finished automatically it’ll release the used CPU resource.
You can calculate the update installation time, on the basis of size and number of updates files.
How To Identify Windows Modules Installer Problems?
It’s normal when it’s installing the Windows updates and utilization get high.
But it’s not common when an update keeps getting failed on the system like Windows 10 and utilization keep showing high in Task Manager.
It could be an issue if you receive an error message such as ‘please update windows module installer’ or the service is not running while updating.
Follow Troubleshooting Approach Like an IT Professionals:
Now you’ve understood that how to check when your Windows 10 system starts responding slow.
You should follow the right troubleshooting approach to resolve any system-related issue. It’ll save time and effort for you & your users.
Basic Troubleshooting to Fix Windows Modules Installer Worker High CPU & Disk Usage
Firstly, let’s start with basic troubleshooting solutions. If the issue remains then you can perform the below-advanced troubleshooting section steps.
Kill Windows Modules Installer Worker Process
My recommendation is first to let the Windows update get finished.
If high utilization takes a more extended period, you need to work urgently on your windows 10 system. Then try the following steps to kill its process to free the CPU and Disk space.
- Start –> Search –> Open Task Manager
- Click on the Process Tab
- Select Windows Modules Installer and click on End Task button.
After ending the process CPU and Disk utilization will immediately get lower. It’s a temporary solution because it’s required to keep the system up to date.
So you need to let it run later once your system is idle. If still facing any issue then try next steps.
Check Scheduled Automatic Maintenance Running Status
Let’s check if any automatic maintenance job is running and previous run results that could be give a clue of high utilization.
- Open the Automatic Maintenance setting (Control Panel\All Control Panel Items\Security and Maintenance),
- You can check last run date and previous run result to identify if there any error,
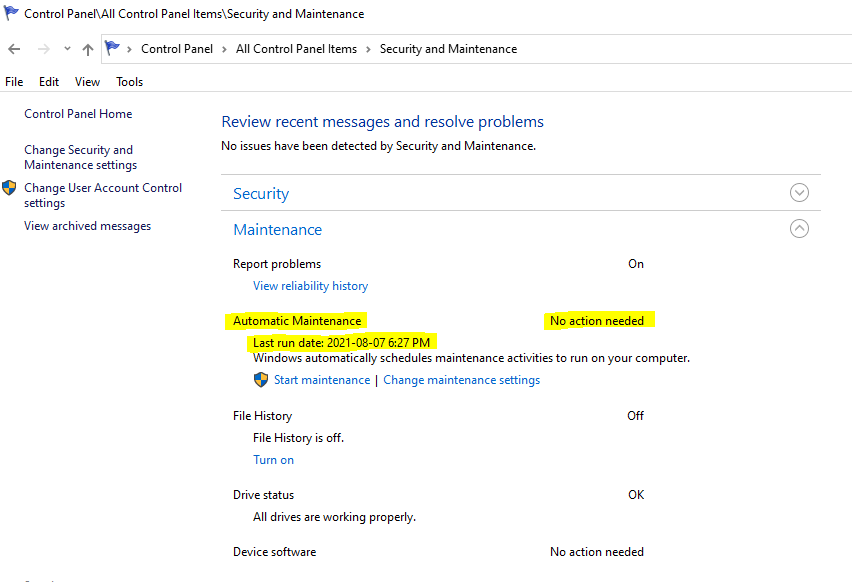
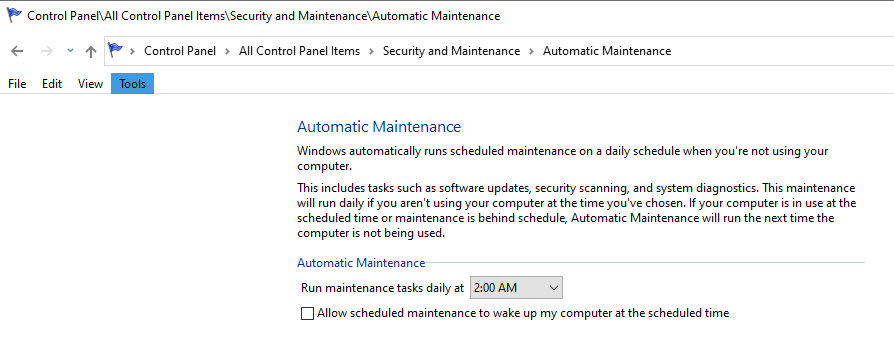
- You can also check its schedule time and change as per your preference,
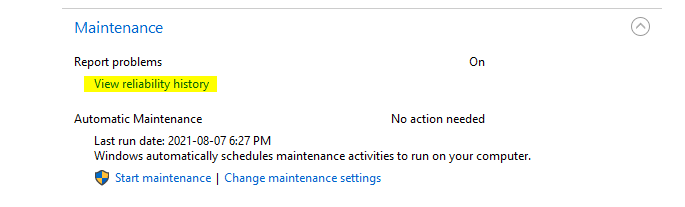
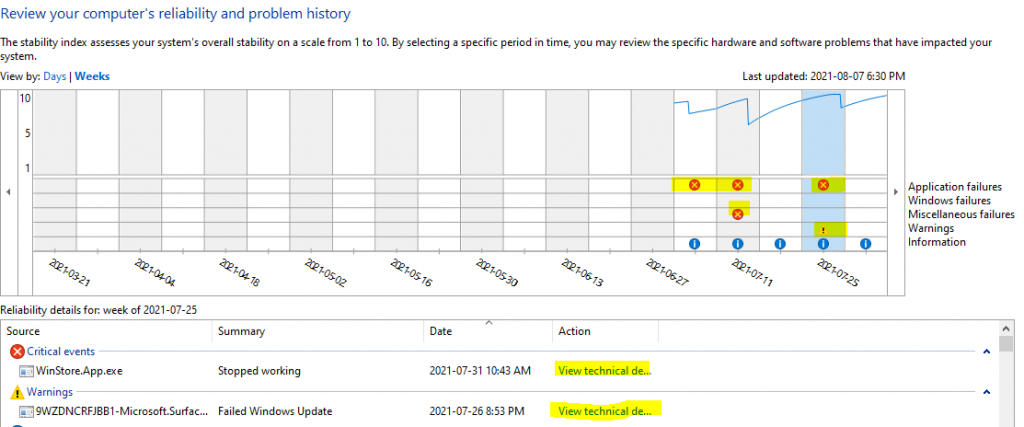
- You should also check the reliability history to find if there is any critical or warning errors are coming.
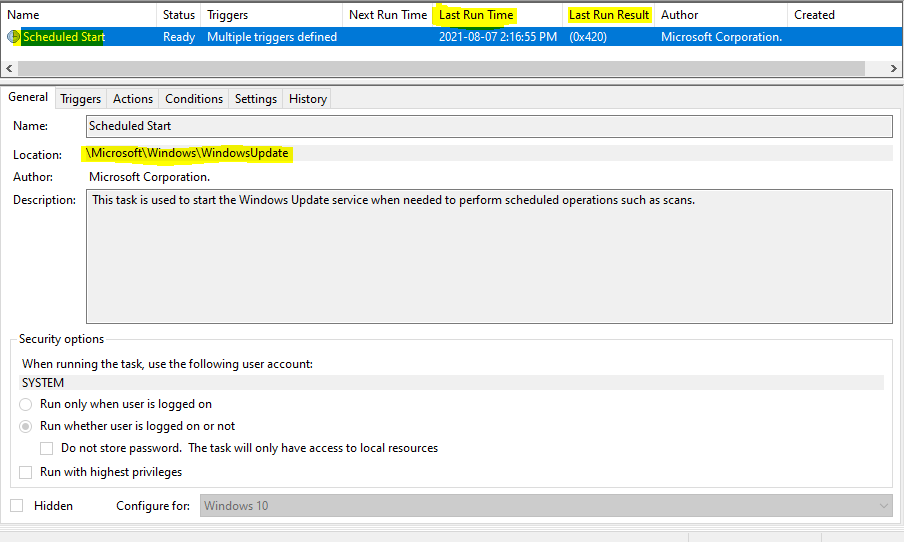
Check Task Schedular Windows Update Task Status
You can confirm the running staus of Windows update through Task scheduler.
There are multiple pre-build schedules yasks are created by Microsoft to manage like Windows 10 OS.
You can check the Windows update task current and for any error in the history status (Path: \Microsoft\Windows\WindowsUpdate) like below screenshot.
Check and Update the System
You should complete the update process once the system is idle if it’s unable to complete in your workig time.
You can also start the update job manually with following steps:
- Click on Start button –> Windows Settings –> Update & Security
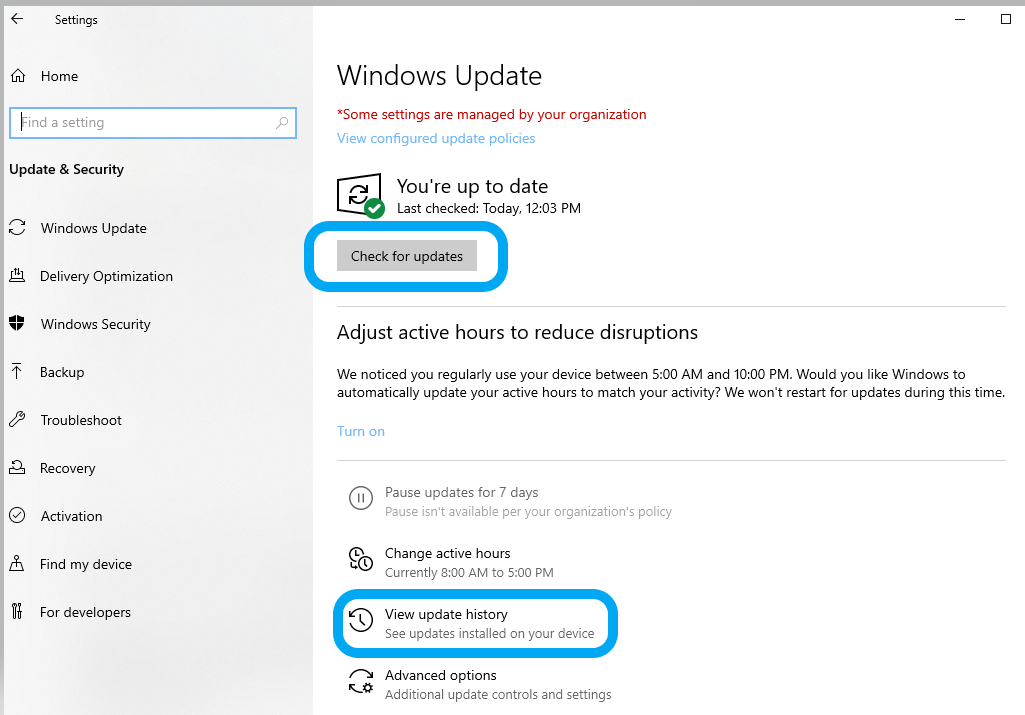
Once the Windows updates are completly installed, this should not take more time in checking new updates.
Restart the Windows Update service
You may also check by restart the Windows update service if it’s not running properly.
- Start –> Search –> Open Services.msc
- Right click on the Windows Update service and restart,
You may also restart the Windows Update service through single line PowerShell comand:
#Restart the Windows Update service
Restart-Service -DisplayName 'Windows Update' -Force
Run the Windows Update Troubleshooter
The Windows Update Troubleshooter can help when you get an error while downloading & installing the Windows updates.
- Start > Search > Troubleshoot Settings
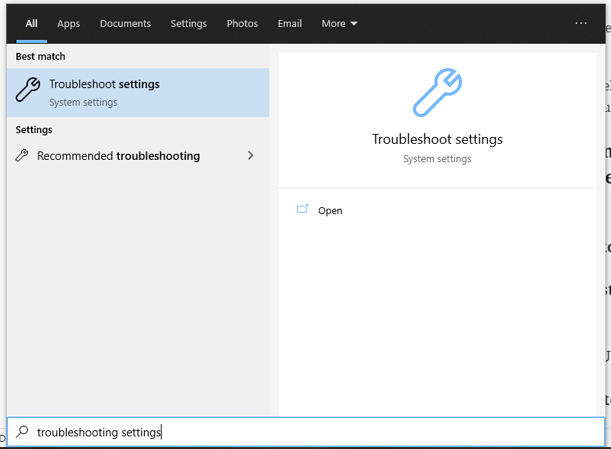
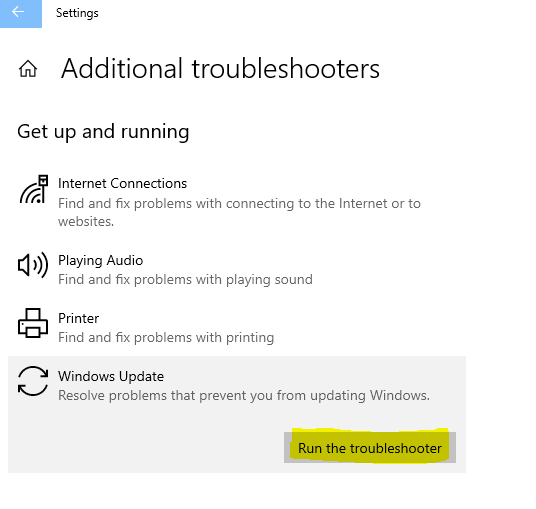
- Then Click on Additional troubleshooters
- and Run the troubleshooter for Windows Update
- After its completion please reboot the system before installing for updates.
- You may also start the Windows update troubleshooter like following old way:
You may also check this page for more info.
Advance Troubleshooting to Fix Windows Modules Installer Worker High CPU & Disk Usage
If you’re still facing issue of Windows modules installer worker high CPU & Disk utilization, after performing the above basic troubleshooting steps.
Then get redy for below advance troubleshooting steps.
Set Windows Update Service to Manual Mode
Microsoft releases the updates every 2nd Tuesday of each month at 10:00 AM PST.
If you’re facing this issue frequently then it would be better to set the Windows Update service from Automatic to Manual mode. Then you can start the update progress accordingly once in a month.
Once you found the root casue and solution then set back to automatic mode.
#PowerShell Command to set Windows Update service type to Manual
Set-Service -DisplayName 'Windows Update' -StartupType Manual
Disable Windows Modules Installer worker on Windows 10?
You may still face the issue even performing above steps.
In that case you can disable the Windows modules installer worker service on Windows 10 system, until it didn’t get fixed completly.
#PowerShell Command to Disabled Windows Modules Installer service type to Manual
Set-Service -DisplayName 'Windows Modules Installer' -StartupType Disabled
Pause Automatic Windows Updates
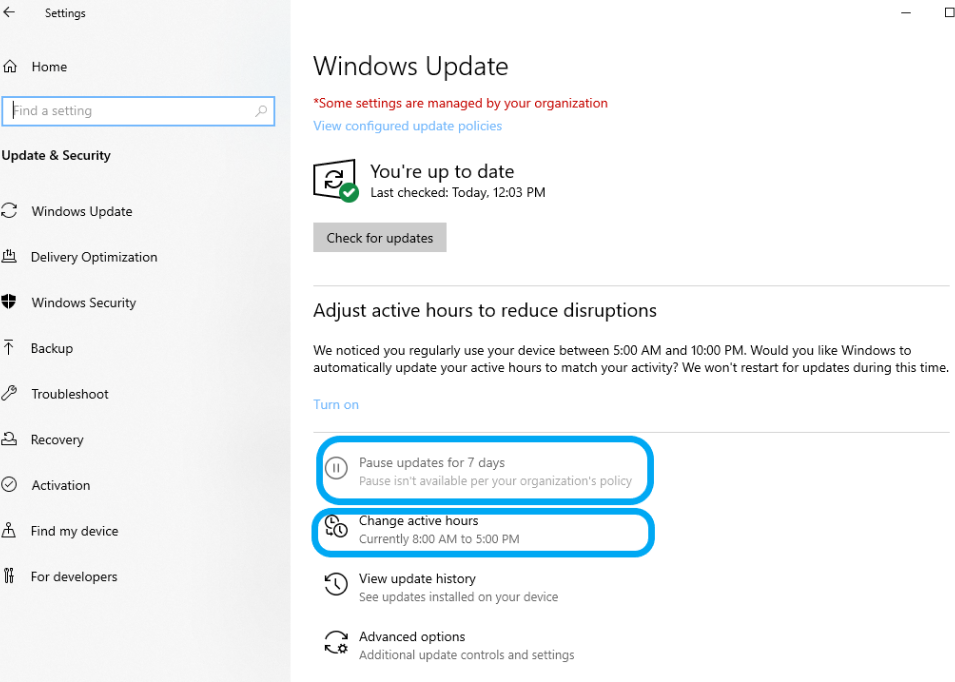
You can also pause the automatic Windows updates installation and set the active hours so that update doesn’t bother you while you’re working.
Enabled metered connection to Limit Bandwidth on Windows 10
You can also control the high utilization of network by set throttling on network bandwidth.
This setting will help you if you’ve limited data plan on network and Windows update is consuming more data bandwidth.
For Wi-Fi Connection:
- Settings –> Network & Internet –> Wi-Fi section > select the Wi-Fi network you’re connected to like below screenshot:
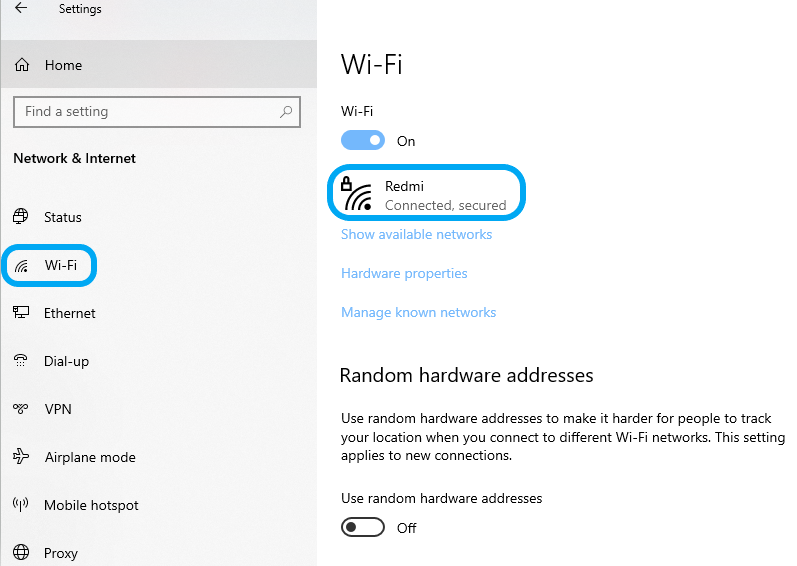
- Move the ‘Set as metered connection’ slider to On
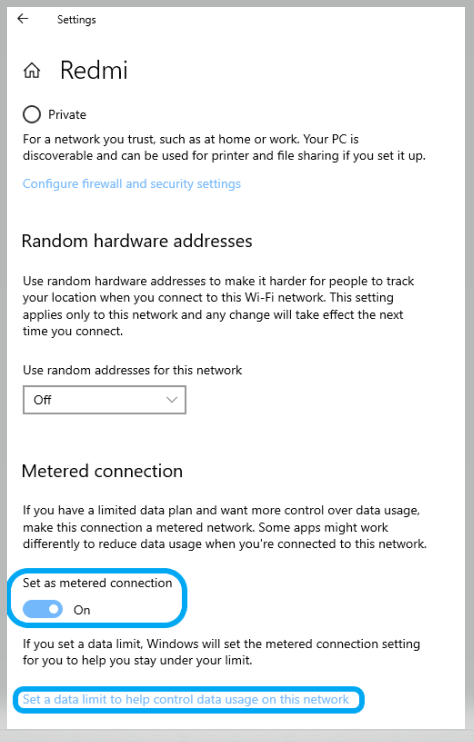
For Ethernet LAN Connection:
- Settings –> Network & Internet –> Click on Ethernet from sidebar –> select the Ethernet network you’re connected to:
- Move the ‘Set as metered connection’ slider to On
Remove Software Distribution Update Folder
Software distribution folder is system directory which used by Windows update service to downloads the updates on local system. It’s directory path is C:\Windows\SoftwareDistribution
It could be a reason for Windows modules Installer worker for high usage, if updates are getting fail or any bug in downloaded update file.
So you should try by rename or delete Software distribution folder on the affected system.
You can try below PowerShell commands to do this job to save time:
#Stop depended services and rename the existing 'Software distribution' folder

Stop-Service -Name wuauserv -Force
Stop-Service -Name bits -Force

Rename-Item -Path 'C:\Windows\SoftwareDistribution' -NewName 'C:\Windows\SoftwareDistribution.bak'

Start-Service -Name wuauserv -Force
Start-Service -Name bits -Force
Set Windows Modules Installer Worker Process to Low Priority
When you don’t want to disable or kill it’s service then you can change its priority low to prevent high usage.
- Set TrustedInstaller.exe process priority to Low or Below normal in the Task Manager.
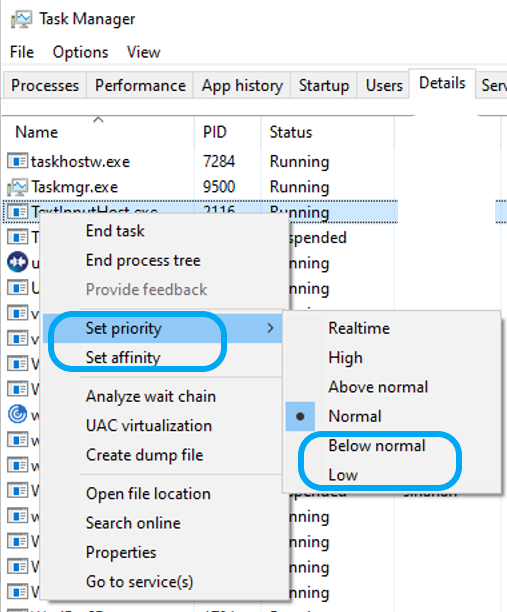
- You can also set affinity for TrustedInstaller.exe process to use selected CPU only not all by default.
Execute System File Checker
When a Windows components and services aren’t working or Windows crashes, you should check it by run System File Checker to scan and restore windows files.
Run sfc /scannow command in command prompt to scan all protected system files, & replace corrupted files.
If it finds any corrupted files will replace to solve the issue.
Restore Corrupt System Files through DISM
You need to run following DISM command, When sfc /scannow command unable to repair corrupted system files.
DISM.exe /Online /Cleanup-image /Restorehealth
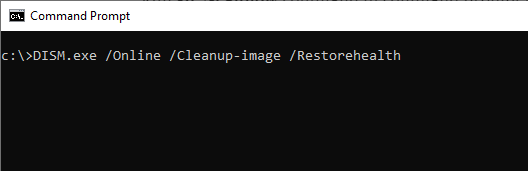
Wait for its completion and then reboot the system before try again.
Please also take following course for more learning….


Summary
We talked about Windows Modules Installer Worker High CPU & Disk Usage cause and it’s components. You also learned multiple troubleshooting steps in detail to resolved this issue with right approach from basic to advance to save time and effort.
Please check this page for more learning resources…..
Learn what is windows modules installer worker (TiWorker.exe) and how to fix Windows Modules Installer Worker high disk usage Windows 10 issue?
Is your Windows 10 computer lagging down because of Windows Modules Installer Worker high CPU usage and you don’t have any idea about it?
If yes then you might be thinking – why is my computer so slow all of a sudden?
As we all know, there are plenty of Windows services run in the background of our Windows 10 computer which we are not aware of and Windows modules installer worker (TiWorker.exe) is one of these important services. Basically, Windows modules installer worker is a Windows update service which works to update Windows. But sometimes the process of Windows modules installer worker creates high CPU usage problems and consumes almost 100% of disk space.

Before knowing the methods to fix Windows modules installer worker Windows 10 high Disk usage issue, let’s know a little more about what is Windows modules installer worker (TiWorker.exe) and what does it do?
What Does Windows Modules Installer Worker Do?
As we have already mentioned above, Windows modules installer worker is a Windows update service which is specifically designed to search for new updates and installs it to your computer. This is not a virus or any malware, so you don’t need to worry about your data. This service is responsible for the installation of Windows updates on your computer which means that it performs a pretty important function.
So frankly, it is not advised to uninstall Windows modules installer worker Windows 10 as it will also stop the functionality of Windows update but high disk usage by Windows modules installer worker problem needs to be fixed as quick as possible because it makes your computer slower.
In case, if you want to check whether your CPU usage has gone out of control because of some issue in the Windows modules installer worker process or not then you can do so by right-clicking on the Windows 10 Taskbar > selecting Task Manager > and then going to Performance tab. And by switching to the Processes tab, you will be able to know which service is causing the high CPU problem.
Once you find out that Windows modules installer worker using high CPU then follow the below explained solutions to fix Windows modules installer worker high CPU usage and high disk usage in Windows 10 system. Here’s how:
Method 1: Fix High Disk Usage using Windows Services
To fix Tiworker.exe Windows modules installer worker high CPU usage issue, we are going to use Windows Service in this method. Here’s how to fix Windows 10 high Disk usage using Windows Services:
Step (1): First of all, open Run dialog box by pressing Windows + R keys together and enter services.msc then press Enter to open Windows Services.
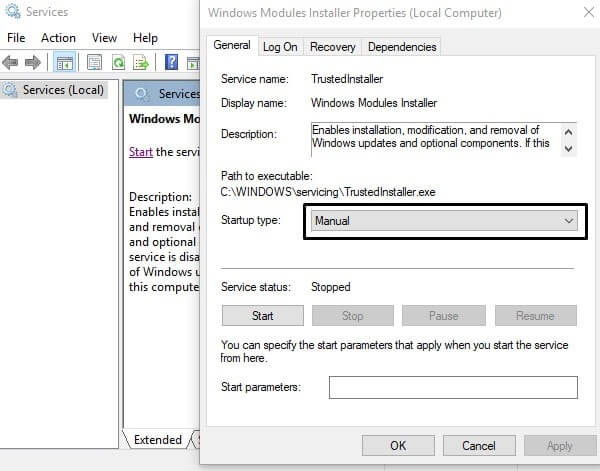
Step (2): On the Services window, you have to search “Windows Module Installer” service.

Step (3): Once you have located this service, double-click on it to open Windows Module Installer Properties and under Start Type select Manual option and then click on OK button.

You have to repeat the exact same steps for Windows Update service. Search for “Windows Update” service.

Double-click on it to open Windows Update Properties and under Start Type select Manual option and then click on OK button.

Step (4): Once you have done all above steps, now you need to disable automatic Windows update in Windows 10. Here’s how to do so:
Case 1 – For WiFi Network Users
Go to Start Menu > Settings > Network & Internet > Wi-FI > click on the Advanced Options.

And then check the “Set as metered connection” option.

Once you set the connection as “metered,” Windows 10 won’t automatically download updates on it.
Case 2 – For Ethernet Network Users
Open Run dialog box by pressing Windows + R keys and then enter regedit to open Windows Registry Editor.
On the Registry Editor window, navigate to the following registry key:
HKEY_LOCAL_MACHINE > SOFTWARE > Microsoft > Windows NT > CurrentVersion > NetworkList > DefaultMediaCost.
Now, right-click on the DefaultMediaCost registry key and then select Permissions option.

Click on Add… button located under Group or user names section.
Next, type your username into Enter the object names to select section and then click on Check Names button.
And then click OK to close Select Users or Groups window.
Now from the Permissions for DefaultMediaCost window, select the user you just add and check on Allow box of Full Control then click OK.
On the right pane of registry editor window, double-click on Ethernet and then set its Value data to be 2.

Click OK and then close the Registry Editor.
Step (6): Finally, Reboot your computer. That’s it!
Now your Windows 10 computer will be able to use Windows Update service properly and you won’t experience Windows modules installer worker high CPU usage and high disk usage issue again.
Method 2: Use Windows Update Troubleshooter to Fix High Disk Usage
It is possible that first method is little difficult for some users as it involves few complex steps. If you also think same then you can use Windows Update Troubleshooter to fix the Windows modules installer worker high CPU usage issue. Windows Update Troubleshooter is a built-in troubleshooter by the Microsoft which helps in resolving the Windows Update errors.
First of all, download Windows Update Troubleshooter and install it on your Windows 10 computer.

Once you have installed the Windows Update Troubleshooter, it will scan your computer and will look for issues and errors which you are experiencing.

Once troubleshooter has scanned your computer, it will also show you the reasons of getting high disk usage by Windows modules installer worker and will also provide you an absolute fix. Once the troubleshooter has fixed the issue, it will show “Troubleshooting has completed”.
Now, you can reboot your computer. Windows modules installer worker high CPU usage Windows 10 issue should be resolved. You can also run Windows update service and update your computer with latest updates.
Conclusion
Troubleshooting Windows modules installer worker high CPU usage issue is a super easy task if you follow all the steps correctly. We hope that our guide “How to fix Windows modules installer worker high disk usage in Windows 10″ has helped you perfectly in fixing the 100% CPU usage issue.
If you have followed any other Windows modules installer worker high disk usage Windows 10 fixes then tell us which one is it and we will add it to this tutorial.
Do you know? How to Fix Firefox Using Too Much Memory and CPU Resources