
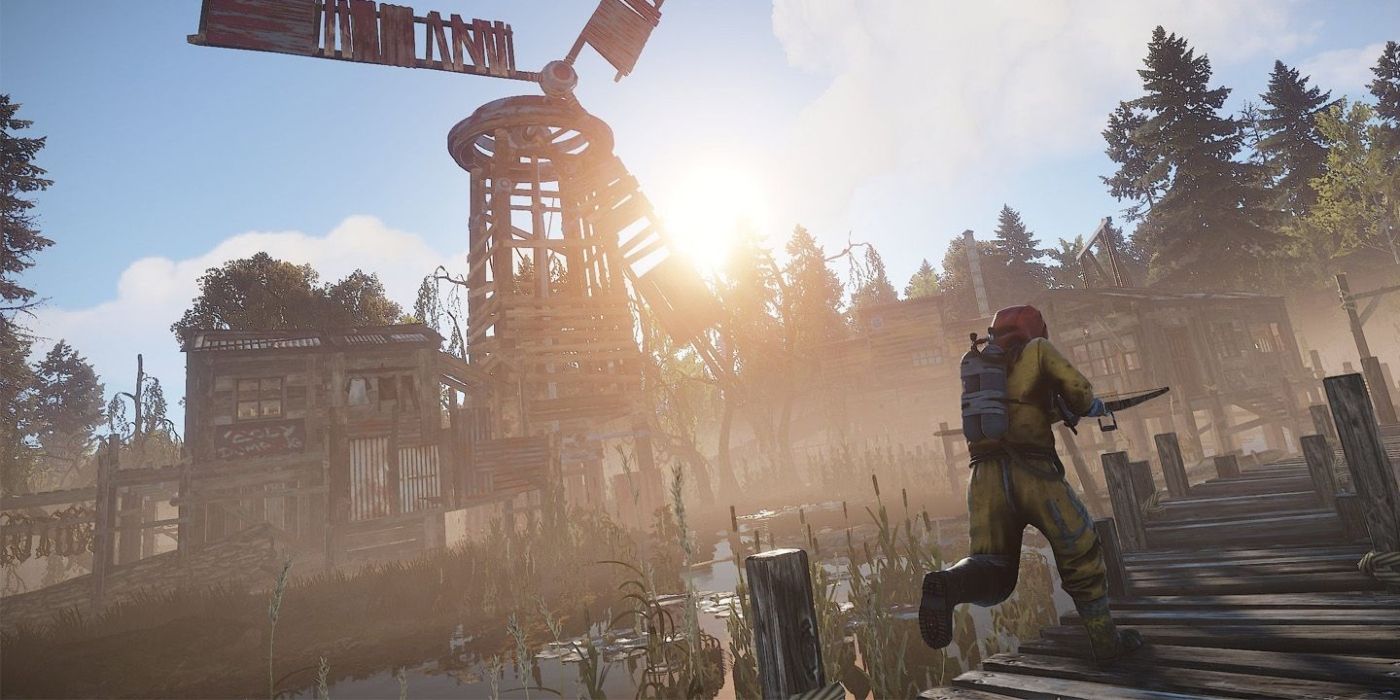
Get Ready to Boost Your Rust Performance
Ever felt like your gaming rig just isn’t cutting it in Rust? You’re not alone. Rust is notoriously CPU-intensive, which means your processor needs to be on point. But even with a top-tier setup, tweaking those Steam launch options can make a world of difference. So, let’s dive right in and see how you can get the most out of your Rust experience in 2025.
First things first, let’s clear up a common misconception. A lot of folks think that upgrading their GPU is the key to better performance in Rust. While a good graphics card helps, it’s actually your CPU that does the heavy lifting. Rust relies on CPU power for physics, AI, and open-world loading. So, optimizing your launch options can give you that extra edge you need.
In this guide, we’ll walk you through the best launch options for Rust, explain why they work, and show you how to set them up. By the end, you’ll have a smoother, faster, and more enjoyable gaming experience. Sounds good, right?
And don’t worry, we’ll keep it simple. No tech jargon, just straightforward tips that anyone can follow. Let’s get started!
The Basics of Rust Launch Options
Before we get into the nitty-gritty, let’s cover the basics. Launch options are essentially commands you can add to your game’s settings in Steam. These commands can help optimize performance, reduce lag, and improve overall gameplay. It’s like giving your game a little boost to run more efficiently.
To access these options, you’ll need to:
- Open Steam and go to your Library.
- Right-click on Rust and select ‘Properties’.
- In the ‘General’ tab, find the ‘Launch Options’ field.
- Enter the desired launch options and you’re good to go!
Easy enough, right? Now, let’s talk about which options to use.
Essential Launch Options for Rust
Memory Management
One of the most important launch options is -maxMem. This command allocates a specific amount of RAM to the game. The idea is to give Rust enough memory to run smoothly without overloading your system.
Here’s how to set it up:
- Find out how much RAM your system has. For example, if you have 16 GB of RAM, you would enter -maxMem=16384.
- Make sure you don’t allocate all your RAM to the game. Leave some for your operating system and other background processes.
A common mistake is using rounded values like 16000. That won’t work. You need to use the exact values, like 16384 for 16 GB. This ensures the game can use the memory efficiently.
Graphics and Performance
Next up, we have -force-d3d11-no-singlethreaded. This command forces the game to use DirectX 11 and disables single-threaded mode. This can significantly improve performance by utilizing multiple cores of your CPU.
To set this up, simply add the command to your launch options. It’s a straightforward way to boost your FPS and reduce lag.
Reducing Input Lag
Input lag can be a real pain, especially in a fast-paced game like Rust. The command -window-mode exclusive can help with this. It sets the game to run in exclusive fullscreen mode, which can reduce input lag and improve overall responsiveness.
Just add this command to your launch options, and you should notice a difference in how quickly your inputs register in the game.
Optimizing Physics and Effects
Rust has a lot of moving parts, literally. The physics engine can be quite demanding. The command -physics.steps 60 can help optimize this. It sets the physics update rate to 60 steps per second, which can make the game feel smoother and more responsive.
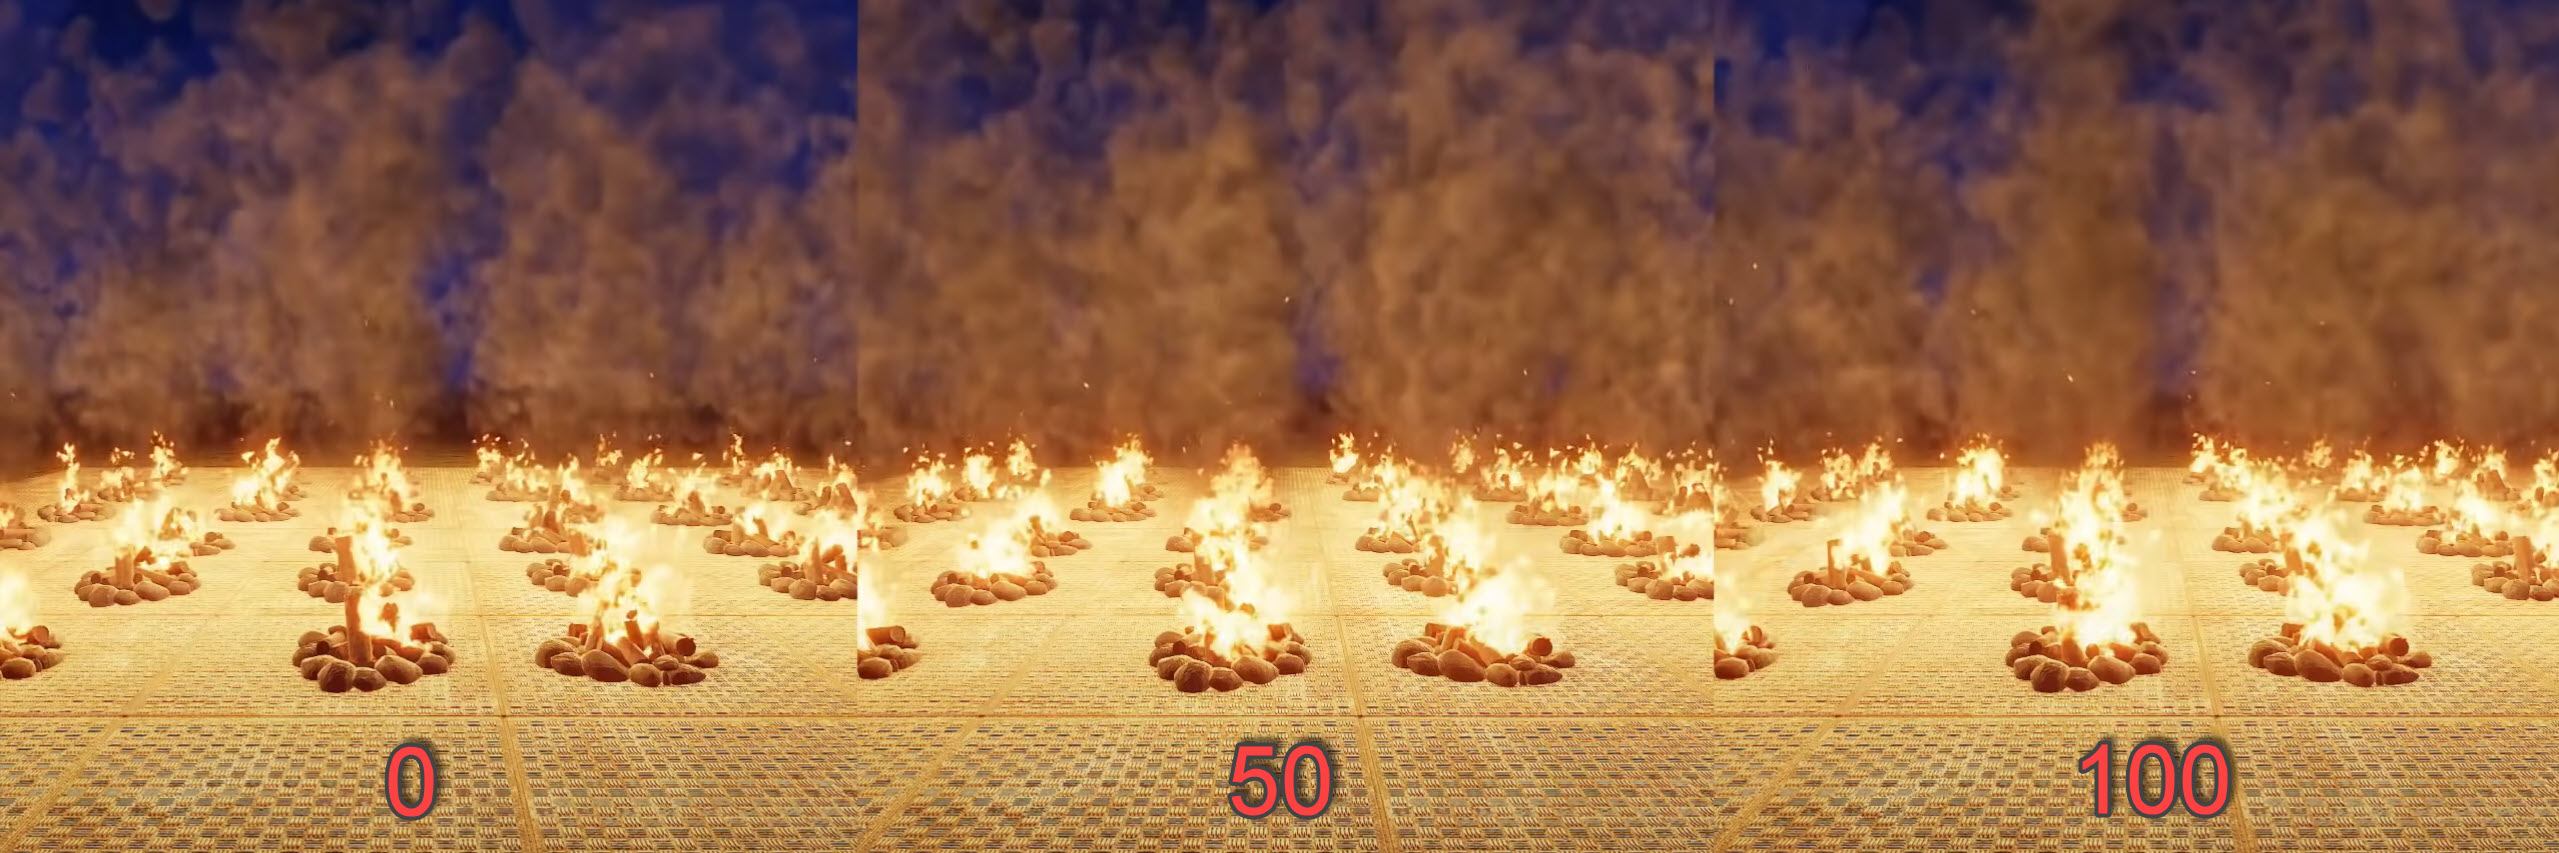
Another useful command is -effects.maxgibs -1. This reduces the number of debris particles when objects are destroyed. It might not seem like much, but it can free up resources and improve performance.
So, that’s the basics covered. But there’s more to it than just these commands. Let’s dive deeper into some advanced tips and tricks.
Advanced Tips for Better Performance
Alright, so you’ve got the basics down. Now let’s talk about some advanced tips that can really take your performance to the next level.
Custom Resolutions
If you’re playing on a high-end monitor, you might want to consider using a custom resolution. This can help maximize your FPS and improve visibility. Here’s how to do it:
- Right-click on your desktop and open the NVIDIA Control Panel (or AMD Catalyst Control Center if you’re using AMD).
- Navigate to the resolution settings and create a custom resolution that matches your monitor’s capabilities.
- Make sure the resolution in Rust matches the custom resolution you set.
For example, you might set a resolution of 1440×1080 for a more stretched look. This can give you a wider field of view and improve your aim.
NVIDIA Control Panel Settings
If you’re using an NVIDIA graphics card, there are a few settings in the NVIDIA Control Panel that can help boost your performance. Here are some recommendations:
- Set Threaded Optimization to Auto.
- Enable Triple Buffering to reduce input lag.
- Set Power Management Mode to Prefer Maximum Performance.
These settings can help ensure that your GPU is running at peak performance, which can translate to better in-game performance.
Windows Settings
Your operating system can also play a role in your gaming performance. Here are a few Windows settings you might want to tweak:
- Set your power plan to High Performance. You can do this through the Command Prompt by entering the command: powercfg -duplicatescheme e9a42b02-d5df-448d-aa00-03f14749eb61.
- Disable mouse acceleration to improve aiming. Go to Mouse Settings, then Additional mouse options, and uncheck ‘Enhance pointer precision’.
These settings can help ensure that your system is running as efficiently as possible, which can improve your gaming performance.
In-Game Shortcuts and Commands
Beyond launch options, there are also some in-game commands and shortcuts that can enhance your experience. Here are a few of my favorites:
Zoom Effect
This command allows you to toggle between different fields of view, creating a zoom effect. It’s great for sniping or just getting a better look at distant objects.
bind c +graphics.fov 90;graphics.fov 70Small Gun
This command makes your weapon model smaller, which can improve visibility and make aiming easier.
graphics.vm_fov_scale falseChange Weapon Side
If you prefer to have your gun on the left side, this command will flip it for you.
graphics.vm_horizontal_flip trueCombat Log and Ping
This command automatically shows the combat log and ping when you press F1. It’s a handy way to keep track of your performance and see who’s been hitting you.
input.bind F1 client.consoletoggle; combatlog; client.pingLook Radius
This command sets the interaction radius for your eyes, allowing you to interact with objects from further away. It’s great for upgrading walls or accessing distant chests.
input.bind L ~meta.exec "client.lookatradius 0" "chat.add 0 0 MIN"; meta.exec "client.lookatradius 0.2" "chat.add 0 0 DEFAULT"; meta.exec "client.lookatradius 10" "chat.add 0 0 MAX"Craft Bandages
This command automatically crafts a bandage with each click and displays a message in the chat. It’s a quick way to heal up during intense fights.
input.bind H craft.add -2072273936 1; chat.add 0 0 "+bandage"No Particle
This command removes all debris particles when objects are destroyed. It can help improve performance and reduce visual clutter.
effects.maxgibs -1Auto Sprint
This command allows you to start running without needing to press W. It’s a handy way to move around quickly without wearing out your fingers.
bind Y "forward;sprint"No Legs
This command removes your own legs from the view, which can improve visibility and make it easier to see what’s going on around you.
legs.enablelegs 0No Text During Aiming
This command hides interaction text when you’re aiming a weapon. It can help reduce visual clutter and improve your focus.
global.hideinteracttextwhileads TrueAnd that’s not all. There are plenty of other commands and shortcuts out there. Feel free to experiment and find what works best for you. Everyone’s setup is different, so don’t be afraid to tweak things to your liking.
Troubleshooting Common Issues
Even with the best settings, things can go wrong. Here are some common issues and how to fix them.
Long Load Times
If Rust is taking forever to load, it might be an issue with your SSD. Make sure Rust is installed on an SSD, not a traditional hard drive. SSDs are much faster and can significantly reduce load times.
If you’re already using an SSD and still having issues, it might be faulty. Check your SSD’s health and consider replacing it if necessary.
Sudden FPS Drops
Sudden FPS drops can be frustrating. Often, this is due to overheating components. If your CPU or GPU is running too hot, it can throttle performance to prevent damage.
Make sure your cooling system is working properly. Check your fans, thermal paste, and consider upgrading to a better cooling solution if necessary.
Input Lag
Input lag can make the game feel unresponsive. As mentioned earlier, setting the game to exclusive fullscreen mode can help. Also, make sure your monitor is set to the correct refresh rate and that any game mode settings are enabled.
If you’re still having issues, it might be worth looking into a new monitor with lower input lag.
Hardware Recommendations
While software settings can make a big difference, having the right hardware is also crucial. Here are some recommendations for the best CPUs and GPUs for Rust.
Best CPUs for Rust
Since Rust is so CPU-intensive, having a powerful processor is key. Here are some of the best CPUs for Rust:
- AMD Ryzen 7 9800X3D: Top performance with 3D V-Cache technology.
- Intel Core i5-13600KF: Excellent frequency and many cores for smooth gameplay.
- AMD Ryzen 5 7600x: Great price/performance ratio with 3D V-Cache.
CPUs with high frequency and a good L3 cache are key to avoiding FPS drops. So, if you’re in the market for a new processor, consider one of these options.
Best GPUs for Rust
While the CPU is more important for Rust, having a good GPU can still make a difference. Here are some of the best GPUs for Rust:
- AMD Radeon RX 7900 XTX: Best for 1440p or 4K with stable performance.
- NVIDIA GeForce RTX 4070: Perfect for DLSS and NVIDIA performance.
- AMD Radeon RX 7700 xt: A powerful and more affordable option for 1440p.
For smooth gameplay, prioritize a strong CPU and a suitable GPU for your resolution. And remember, it’s all about balance. You don’t need the most expensive hardware to have a great experience.
Final Thoughts
Well, that’s a wrap! I hope this guide has given you some useful tips and tricks to optimize your Rust experience. Remember, everyone’s setup is different, so don’t be afraid to experiment and find what works best for you.
And hey, if you’ve got any other tips or questions, feel free to share them in the comments. I’m always looking to learn more and help out where I can. Happy gaming!
FAQ
- What are the best launch options for Rust?
- The best launch options for Rust include -maxMem, -force-d3d11-no-singlethreaded, and -window-mode exclusive. These can help optimize performance and reduce lag.
- How do I set custom resolutions in Rust?
- To set custom resolutions in Rust, you need to adjust your settings in the NVIDIA Control Panel (or AMD Catalyst Control Center) and match them in the game. This can help maximize FPS and improve visibility.
- What should I do if Rust is taking a long time to load?
- Make sure Rust is installed on an SSD, not a traditional hard drive. SSDs are much faster and can significantly reduce load times. If you’re already using an SSD and still having issues, it might be faulty. Check your SSD’s health and consider replacing it if necessary.
- Why is my FPS dropping suddenly in Rust?
- Sudden FPS drops can be due to overheating components. Make sure your cooling system is working properly. Check your fans, thermal paste, and consider upgrading to a better cooling solution if necessary. Also, ensure your system isn’t running too many background processes.
References
Steam Community, PCGamesN
Задача каждого игрока в Rust – собрать хорошую экипировку, нафармить много ресурсов, отстроить крепкую, надежную базу и, конечно же, защитить ее от врагов. Выживете вы в суровых условиях или нет, в первую очередь зависит от вашей быстроты реакции на происходящие в окружающем мире изменения. Упустив какую-либо мелкую, но важную деталь из-за лагов, фризов, низкого FPS и т. д., можно погибнуть и потерять все. Чтобы этого не случилось, нужно запускать Раст на ПК, который соответствует рекомендуемым системным требованиям игры. Но что делать, если ваш компьютер давно не обновлялся, а поиграть хочется? В этом гайде мы расскажем, как повысить ФПС в Rust и избавиться от лагов в игре на слабом ПК.
Содержание:
- 1. Как узнать FPS в Раст?
- 2. Оптимизация Windows 10 для комфортной игры в Rust
- 3. Выбор настроек в Раст для игры на слабых компьютерах
- 4. Параметры запуска Rust для увеличения FPS
- 5. Дополнительные рекомендации
Причин, по которым геймеры сталкиваются с низким ФПС в Rust, много, но основная из них – устаревший в техническом плане ПК. Установка нового ЦП, увеличение объема оперативной памяти или покупка современной видеокарты – все это гарантирует стабилизацию частоты кадров и избавит от лагов, подвисаний и прочих проблем.
Минимальные системные требования Rust:
- Операционная система – Windows 8.1+ (х64);
- Оперативная память (ОЗУ) – 10 Гб;
- Видеокарта – GTX 670 или AMD R9 280 (2 ГБ видеопамяти и выше) с поддержкой DirectX 11;
- Свободное место на жестком диске – 20 ГБ;
- ЦП – Intel Core i7-3770, AMD FX-9590 или лучше.
Рекомендуемые системные требования Раст:
- Операционная система – Windows 10 (х64);
- Оперативная память (ОЗУ) – 16 Гб;
- Видеокарта – GTX 980 или AMD R9 Fury с поддержкой DirectX 12;
- Свободное место на жестком диске – 20 ГБ;
- ЦП – Intel Core i7-4790K или AMD Ryzen 5 1600.
Примечание: настоятельно рекомендуется устанавливать Rust на SSD. Если вы поставите игру на HDD диск, то она будет работать гораздо медленнее.
Если у вас есть возможность приобрести лучшие комплектующие для вашего компьютера, сделайте это как можно быстрее. В противном случае мы попытаемся вам помочь справиться с низким FPS другими способами, но для начала стоит узнать, как посмотреть свой ФПС в Раст:
- Запустите игру;
- Откройте консоль, нажав F1 клавиатуре;
- Введите в поле команду perf 1 и нажмите Enter.
Далее присоединитесь к любому серверу и в левом нижнем углу экрана вы увидите индикатор, отображающий текущее количество кадров/сек. в игре.
2. Оптимизация Windows 10 для комфортной игры в Rust
Оптимизация операционной системы – один из простых способов увеличить ФПС не только в Раст, но и в других играх. Прежде чем перейти к настройке Windows, обязательно сделайте точку восстановления системы, чтобы в случае чего вы всегда могли выполнить откат.
Изменение параметров электропитания
Зачастую Windows 10 автоматически устанавливает сбалансированный план электропитания, который ограничивает мощность процессора и других комплектующих компьютера с помощью различных пороговых значений, что приводит к низкой частоте кадров в играх и медленной работы требовательных приложений. В этом случае мы рекомендуем воспользоваться режимом «Ultimate Performance», задачей которого является значительное увеличение производительности операционной системы. Если вы играете на ноутбуке, а не на настольном ПК, то использование этого инструмента в вашем случае будет особенно полезно.
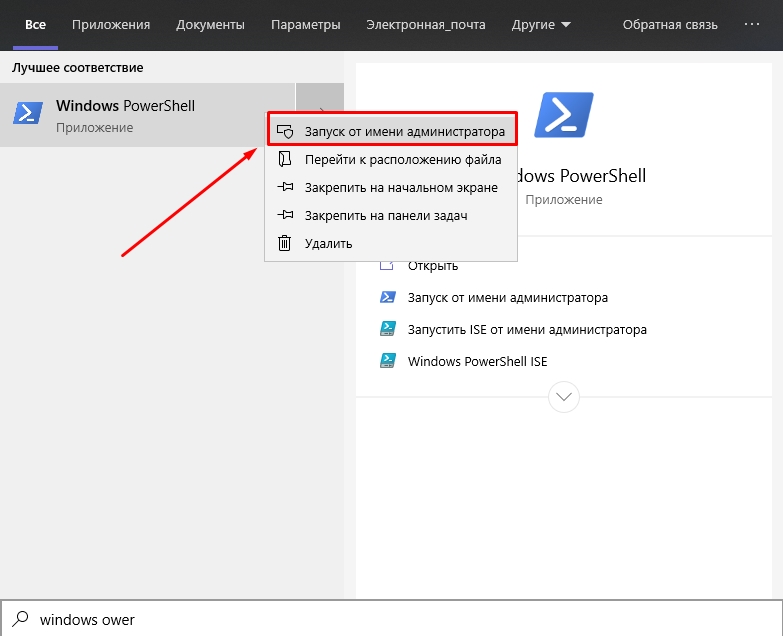
Как активировать режим «Ultimate Performance» (Максимальная производительность) на Windows 10:
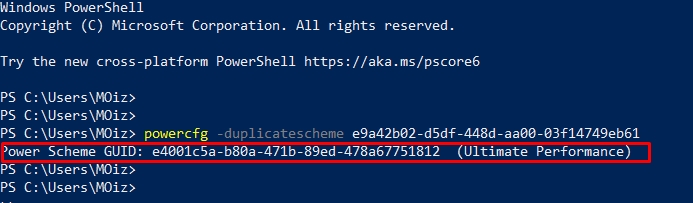
- Найдите на своем компьютере Windows Power Shell и запустите его от имени администратора;

- Введите в командную строку «powercfg -duplicatescheme e9a42b02 -d5df -448d -aa00 -03f14749eb61» без кавычек и нажмите Enter. Если вы сделали все правильно, в консоли появится уведомление об успешной активации Ultimate Performance.

- Далее перейдите в параметры электропитания (Панель управления -> Мелкие значки -> Электропитание) и выберите в качестве активной схему управления питанием «Максимальная производительность».

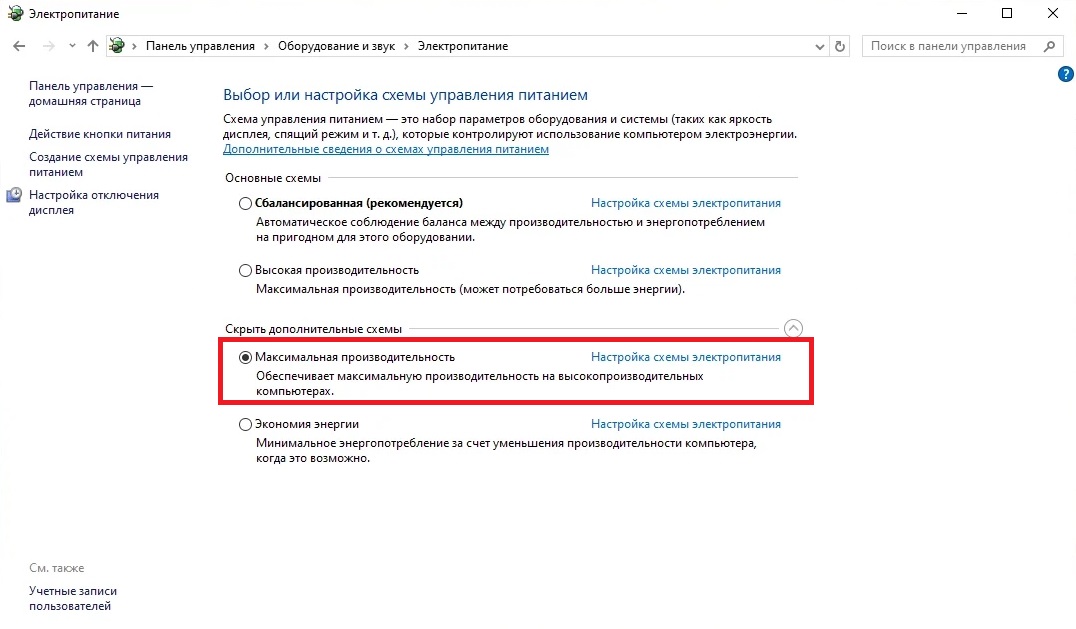
С этого момента ваш процессор начнет работать на полную мощь, что обязательно увеличит ФПС в Раст.
Отключение аппаратного ускорения
Вам может показаться, что аппаратное ускорение – это то, что ускоряет работу вашего компьютера. На самом деле это не так. Оно будет полезно только для таких приложений как Steam, Discord, Google Chrome и т. д. Аппаратное ускорение занимает часть ресурсов компьютера и использует их для улучшения работы перечисленных программ. Из-за этого в Rust и других играх начинает просаживаться FPS. Чтобы повысить частоту кадров в Раст, вам лучше выключить аппаратное ускорение. Ниже мы расскажем, как это сделать.
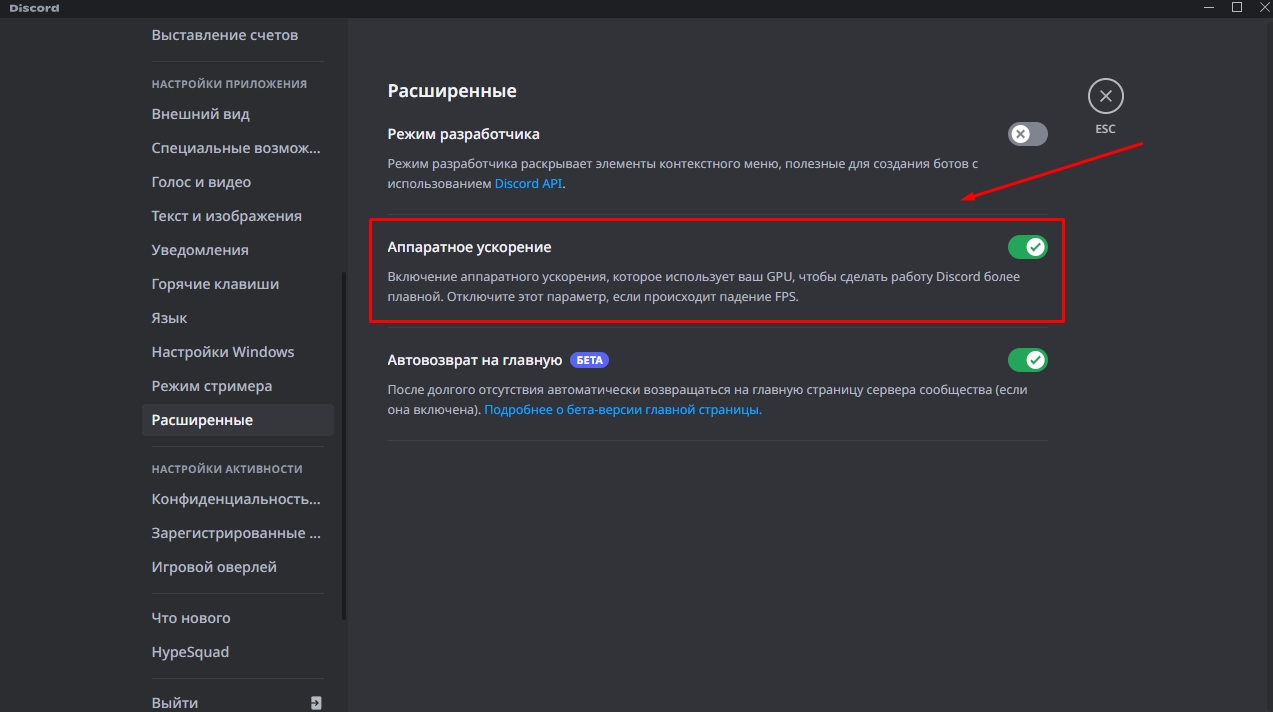
Как выключить аппаратное ускорение в Discord?
- Откройте Дискорд и перейдите в настройки приложения;
- Найдите раздел «Расширенные»;
- Переместите кнопку рядом с пунктом «Аппаратное ускорение» в положение выкл.

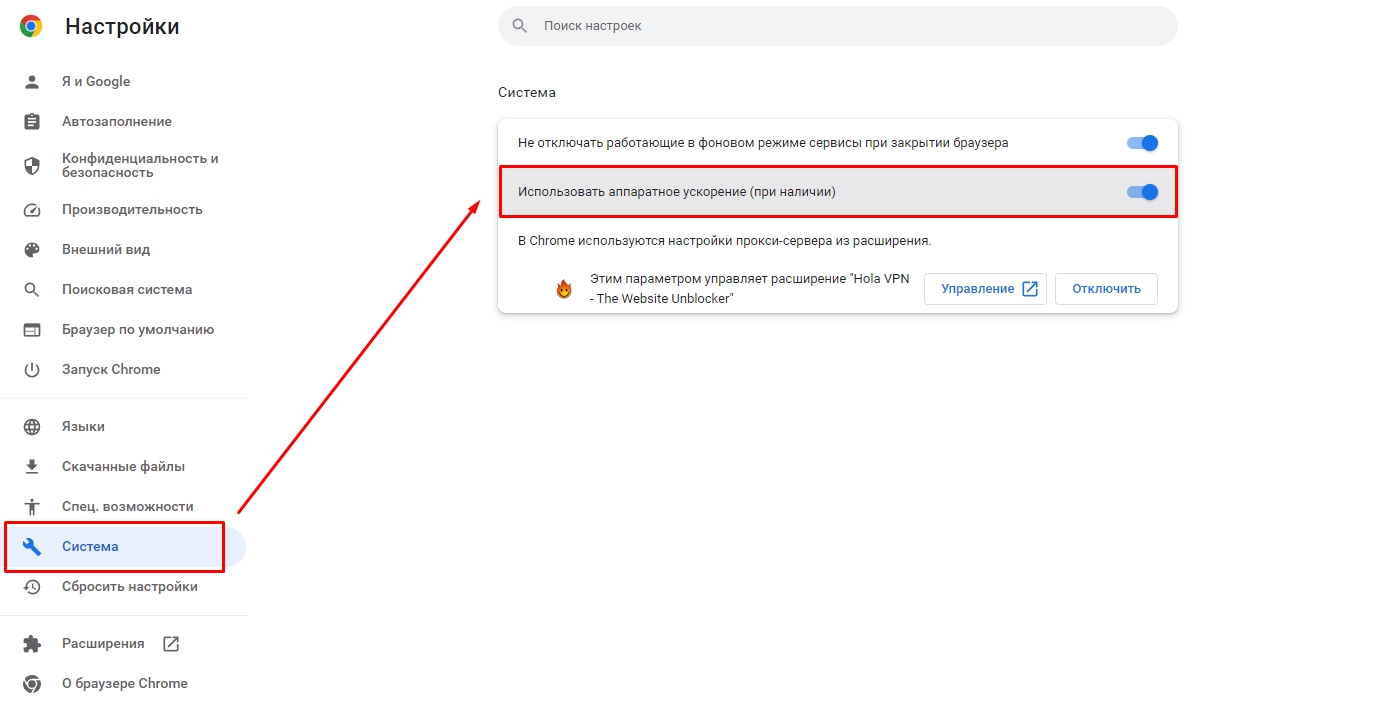
Как отключить аппаратное ускорение в Google Chrome?
- Запустите Гугл Хром и откройте настройки браузера;
- Найдите раздел «Система»;
- Переместите кнопку рядом с пунктом «Использовать аппаратное ускорение (при наличии)» в положение выкл.

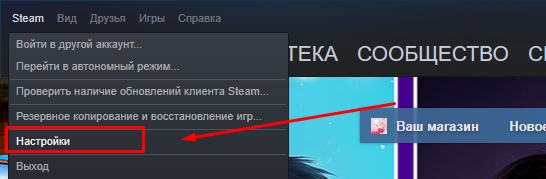
Как выключить аппаратное ускорение в Steam?
- Откройте приложение Стим;
- В левом верхнем углу нажмите «Steam» и в выпадающем меню кликните по «Настройки»;

- В разделе «Интерфейс» снимите флажки с пунктов:
- «Плавная прокрутка на веб-страницах»;
- «Рендеринг веб-страниц с помощью видеокарты»;
- «Аппаратное декодирование видео, если возможно»;
- «Включить DirectWrite для улучшенного отображения шрифта».

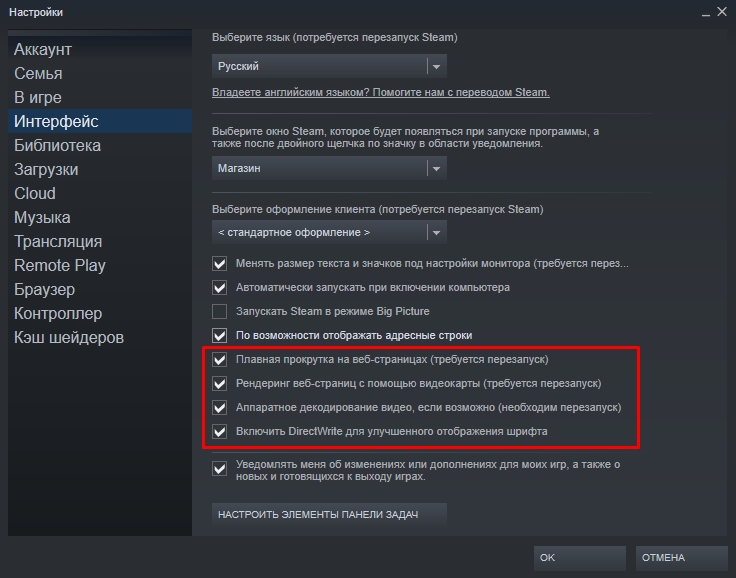
Все эти параметры значительно нагружают слабый компьютер и приводят к сильным лагам в Раст и других играх.
Закройте приложения, работающие в фоновом режиме
Если у вас слабый ПК, то во время игры в Раст на вашем компьютере должны быть выключены все фоновые приложения, кроме Anti-Cheat. Если вы раньше не задумывались о том, сколько различных программ запущено без вашего ведома, настало время подумать об этом, поскольку все они нагружают систему, приводя к просадкам ФПС. Открыв диспетчер задач, можно обнаружить безумное количество запущенных ненужных приложений и служб, которые примерно на 30-40% нагружают ЦП и оперативную память.
Выполните действия, описанные ниже, и вы сразу увидите, как Rust станет меньше лагать, а частота кадров значительно увеличится.
Как закрыть ненужные фоновые приложения:
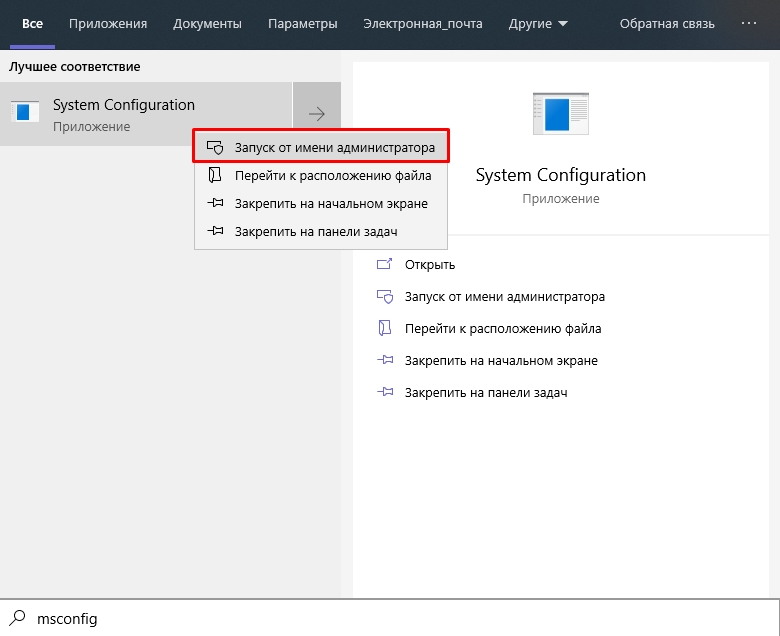
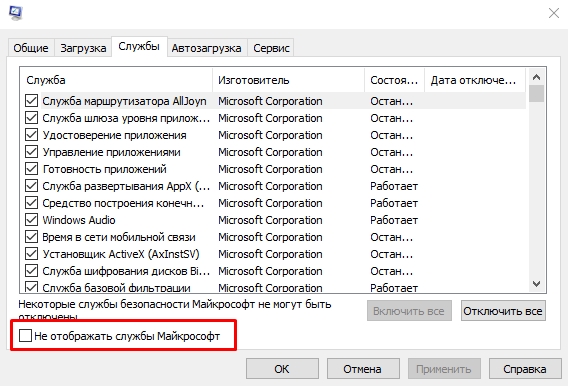
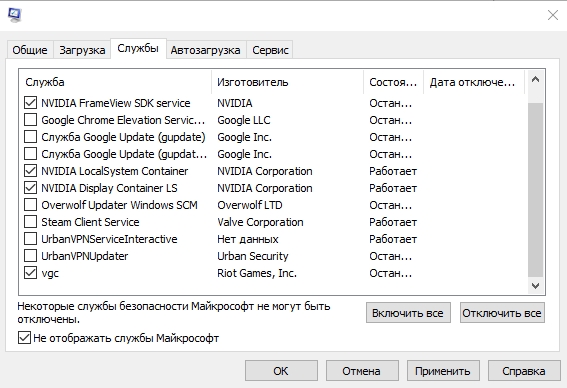
- Введите в поиске на компьютере msconfig и запустите программу от имени администратора;

- Перейдите на вкладку «Службы» и поставьте флажок рядом со строкой «Не отображать службы Microsoft». Так вы скроете все службы, которые обязательно должны быть запущены для корректной работы операционной системы, и не отключите их случайно;

- После обновления списка активных служб отключите все, что вам не нужно, сняв рядом с их названием галочку;

- Нажмите «Применить».
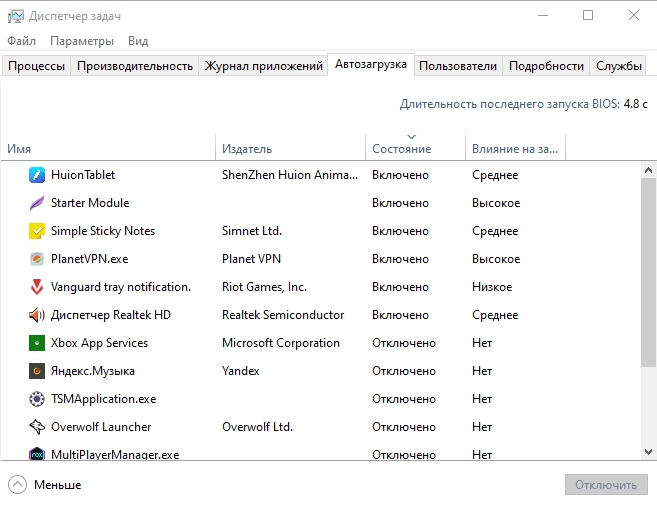
Далее откройте диспетчер задач и на вкладке «Автозагрузка» выключите все приложения, которые начинают работать сразу после запуска компьютера.
Это позволит не только немного повысить FPS в Раст, но и значительно ускорит запуск ПК.
Выключите ненужные анимации и настройте файл подкачки
При использовании Windows 10 вы не могли не заметить, что при нажатии на что-либо срабатывает анимация. Анимированные эффекты – это, несомненно, красиво, но они негативно влияют на производительность. К счастью, в операционной системе есть инструменты, с помощью которых удастся отключить все анимации. Тем самым вы снизите нагрузку на оперативную память/ЦП, что обязательно благоприятно отразится на ФПС в игре.
Как выключить все лишние эффекты и анимации в Windows 10:
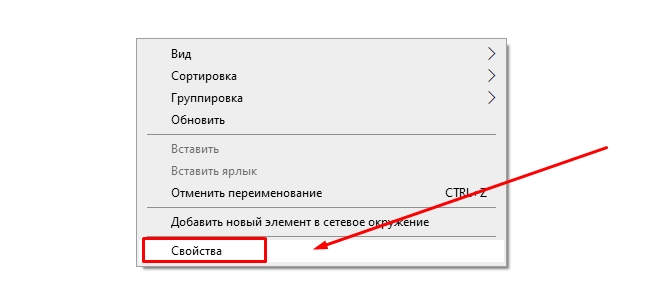
- Зайдите в «Мой компьютер» и кликните правой кнопкой мышки по свободному пространству;
- Выберите в выпадающем меню «Свойства»;

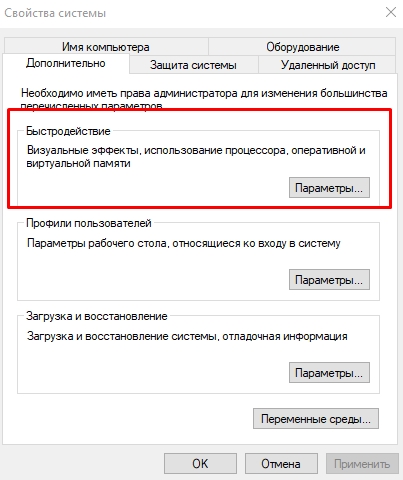
- Слева в списке кликните по «Дополнительные параметры системы»;
- В новом окне на вкладке «Дополнительно» перейдите на параметры быстродействия;

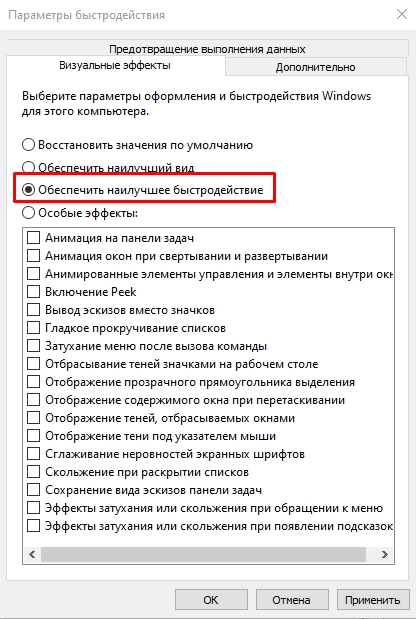
- Далее на вкладке «Визуальные эффекты» снимите все флажки с эффектов и анимаций, либо выберите «Обеспечить наилучшее быстродействие», после чего сохраните изменения.

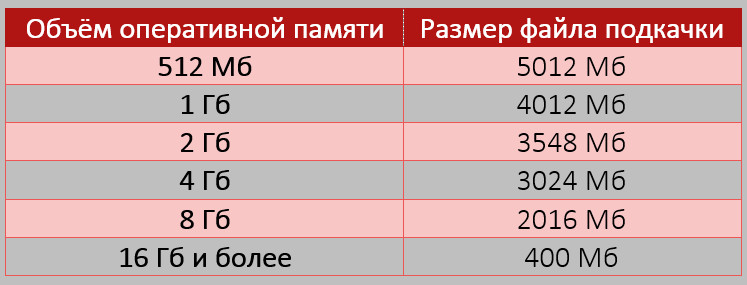
Пока вы находитесь в этом разделе, не забудьте проверить, выбран ли у вас файл подкачки. Файл подкачки – это дополнение к вашей оперативной памяти. Он используется как временное хранилище для различных данных, в том числе и тех, которые нужны для нормальной работы игрового клиента Rust. Если у вас на компьютере мало ОЗУ, обязательно настройте файл подкачки:
- Кликните по вкладке «Дополнительно» (справа от «Визуальные эффекты»);
- Нажмите «Изменить»;

- В следующем окне выберите «Указать размер» и выберите желаемый объем файла подкачки (одинаковый в обоих окошках);
- Сохраните изменения и перезагрузите ПК.

Как выбрать файл подкачки?
Обычно объем файла подкачки выбирается «на глаз». В целом, каких-либо особых форм расчета, каким должен быть файл подкачки, нет. Поэтому вы можете ориентироваться по этой таблице:
3. Выбор настроек в Раст для игры на слабых компьютерах
Если вы выполнили оптимизацию Windows, а FPS в Rust хоть и изменился, но не существенно, настало время покопаться в настройках самой игры. Уменьшив или отключив вовсе некоторые параметры, вы сможете добиться значительного увеличения частоты кадров в секунду для более плавного игрового процесса. Однако примите во внимание, что снижение настроек приведет к плохому качеству картинки.
Лучшие настройки Rust для максимального ФПС на слабом ПК
Раздел «Options» (Опции)
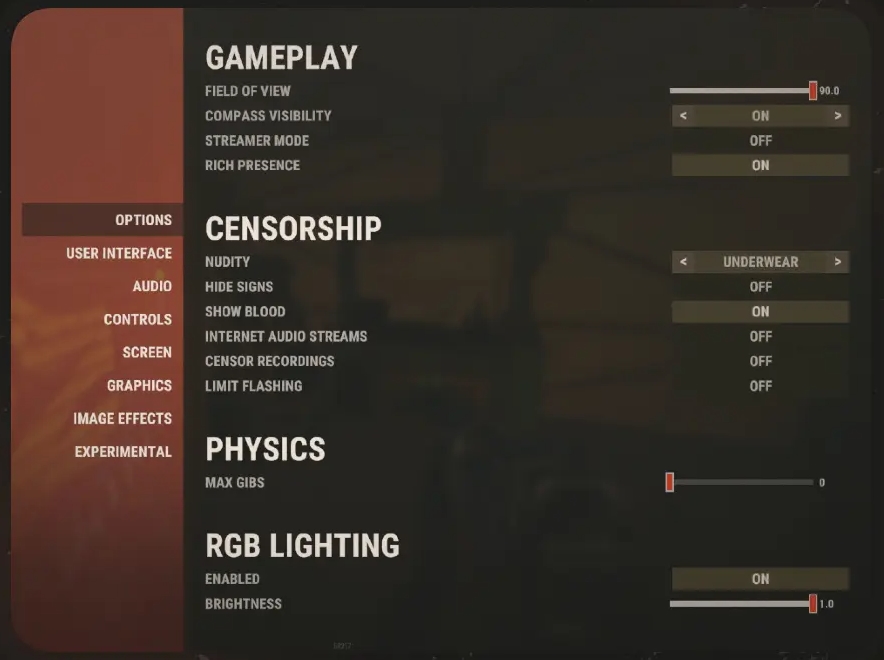
Gameplay:
- Field of view – ползунок на максимум;
- Compass visibility – ON (вкл.);
- Streamer mode – OFF (выкл.);
- Rich presence – ON (вкл.).
Censorship:
- Nudity – UNDERWEAR (отобразить нижнее белье);
- Hide signs – OFF (выкл.);
- Show blood – ON (вкл.);
- Internet audio streams – OFF (выкл.);
- Sensor recordings – OFF (выкл.);
- Limit flashing – OFF (выкл.).
Physics:
- Max gibs – ползунок на минимум.
Rgb lighting:
- Enabled – ON (вкл.);
- Brightness – ползунок на максимум.
Раздел «Screen» (Экран)
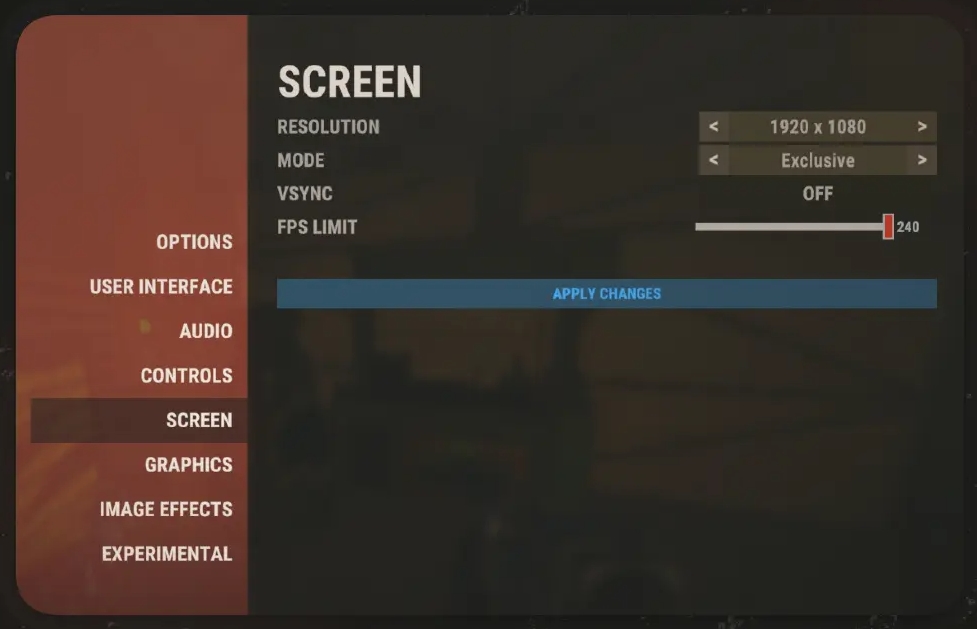
- Resolution – выбирайте на свое усмотрение;
- Mode – EXCLUSIVE (эксклюзив);
- Vsync – OFF (выкл.);
- FPS limit – ползунок на максимум.
Раздел «Graphics» (Графика)
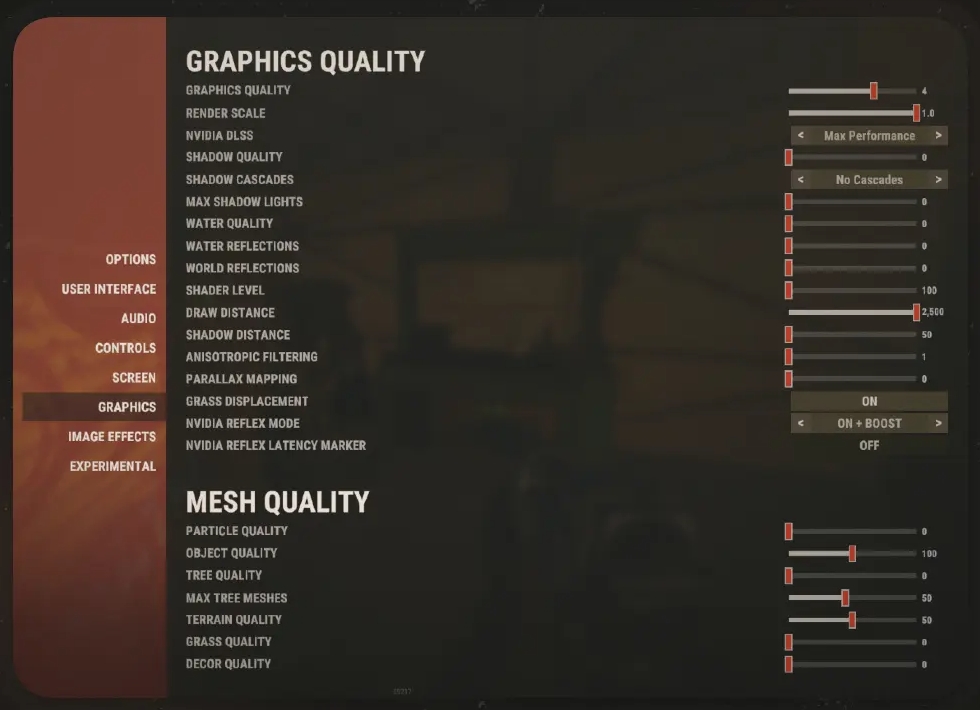
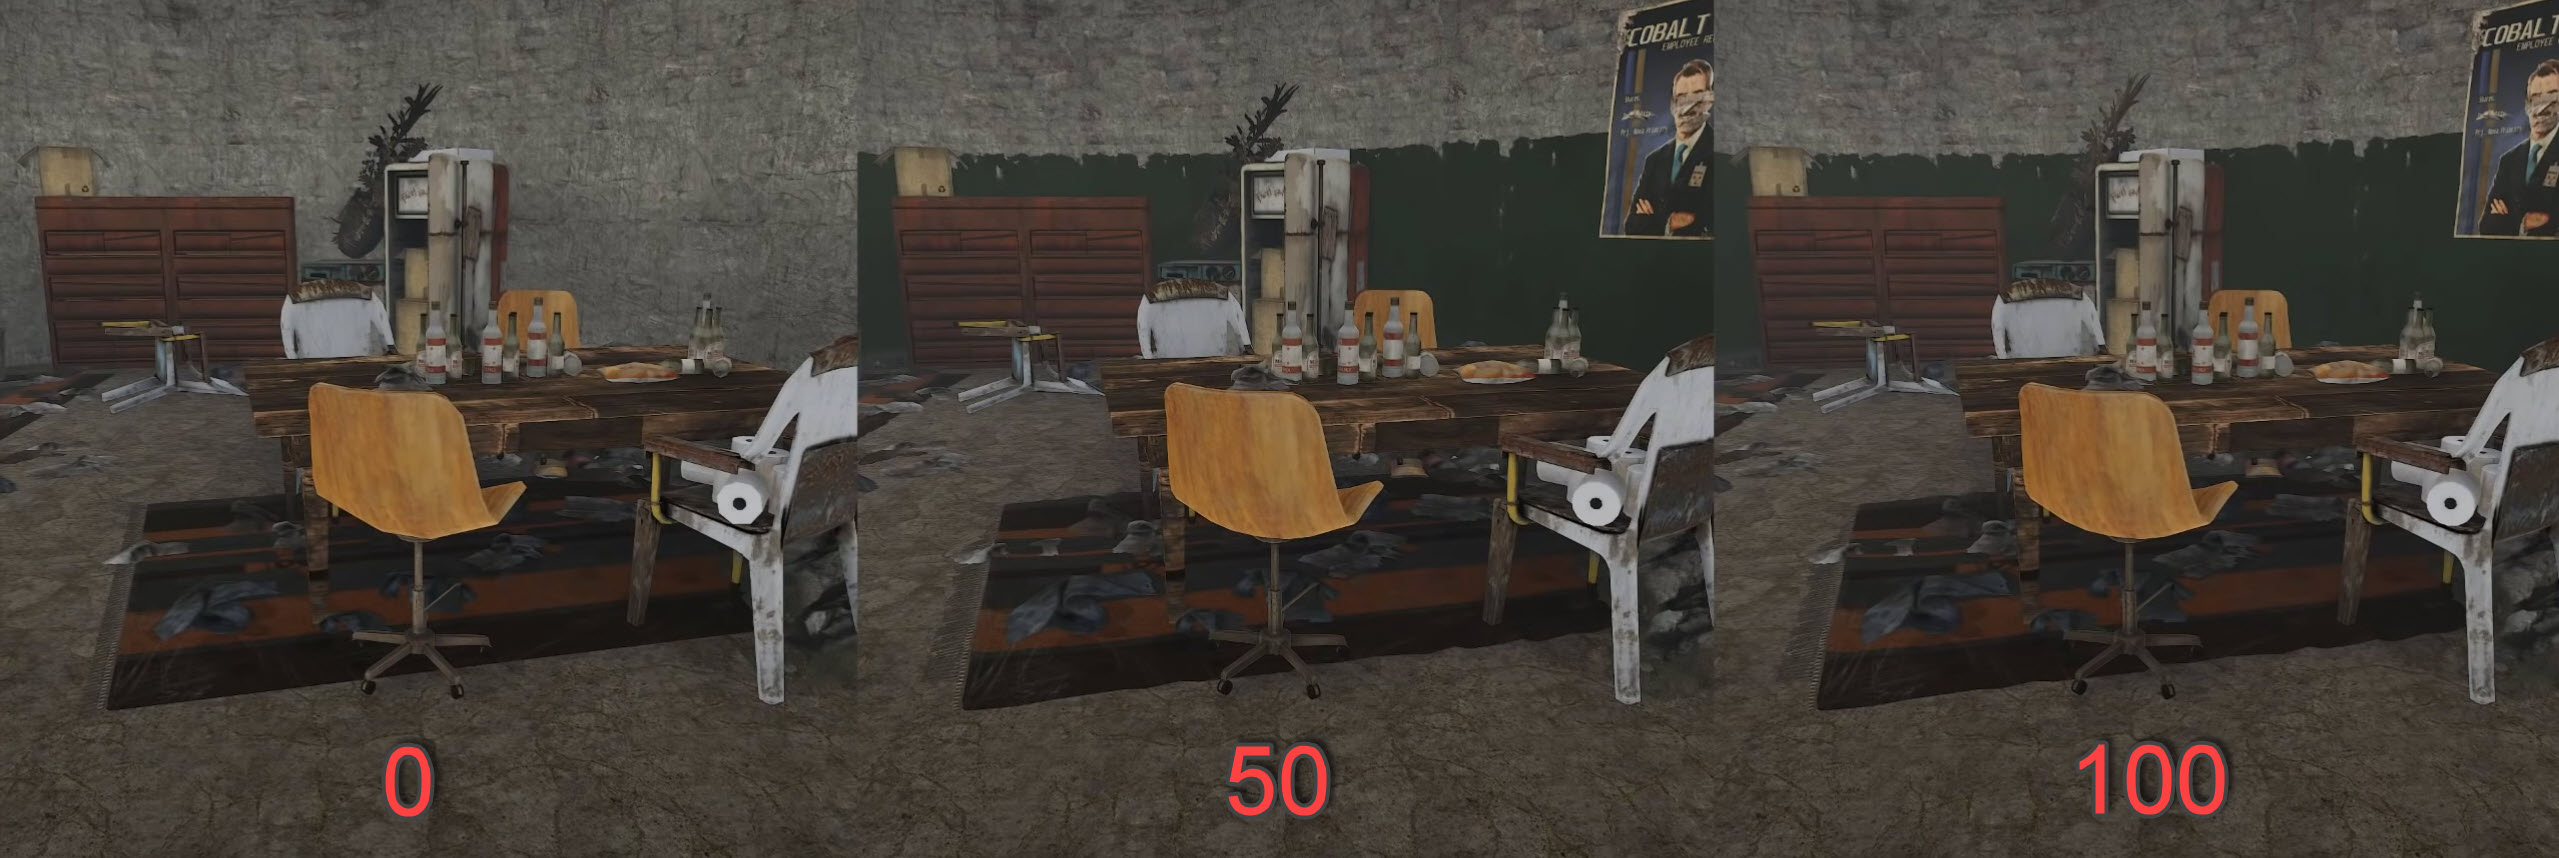
Graphics quality:
- Graphics quality – ползунок выставьте на 4. Если у вас слишком слабый ПК, то выставьте его на минимум;
- Render scale – ползунок на максимум;
- Nvidia DLSS – MAX PERFOMANSE (максимальная производительность);
- Shadow quality – ползунок на минимум;
- Shadow cascades – No Cascades (без каскада теней);
- Max shadow lights – ползунок на минимум;
- Water quality – ползунок на минимум;
- Water reflections – ползунок на минимум;
- World reflections – ползунок на минимум;
- Shader level – ползунок на минимум;
- Draw distance – ползунок на максимум;
- Shadow distance – ползунок на минимум;
- Anisotropic filtering – ползунок на минимум;
- Parallax mapping – ползунок на минимум;
- Grass displacement – ON (вкл.);
- Nvidia reflex mode – ON + BOOST;
- Nvidia reflex latency marker – OFF (выкл.).
Mesh quality:
- Particle quality – ползунок на минимум;
- Object quality – ползунок выставьте на 100. Если у вас слишком слабый ПК, то выставьте его на минимум;
- Tree quality – ползунок на минимум;
- Max tree meshes – ползунок выставьте на 50. Если у вас слишком слабый ПК, то выставьте его на минимум;
- Terrain quality – ползунок выставьте на 50. Если у вас слишком слабый ПК, то выставьте его на минимум;
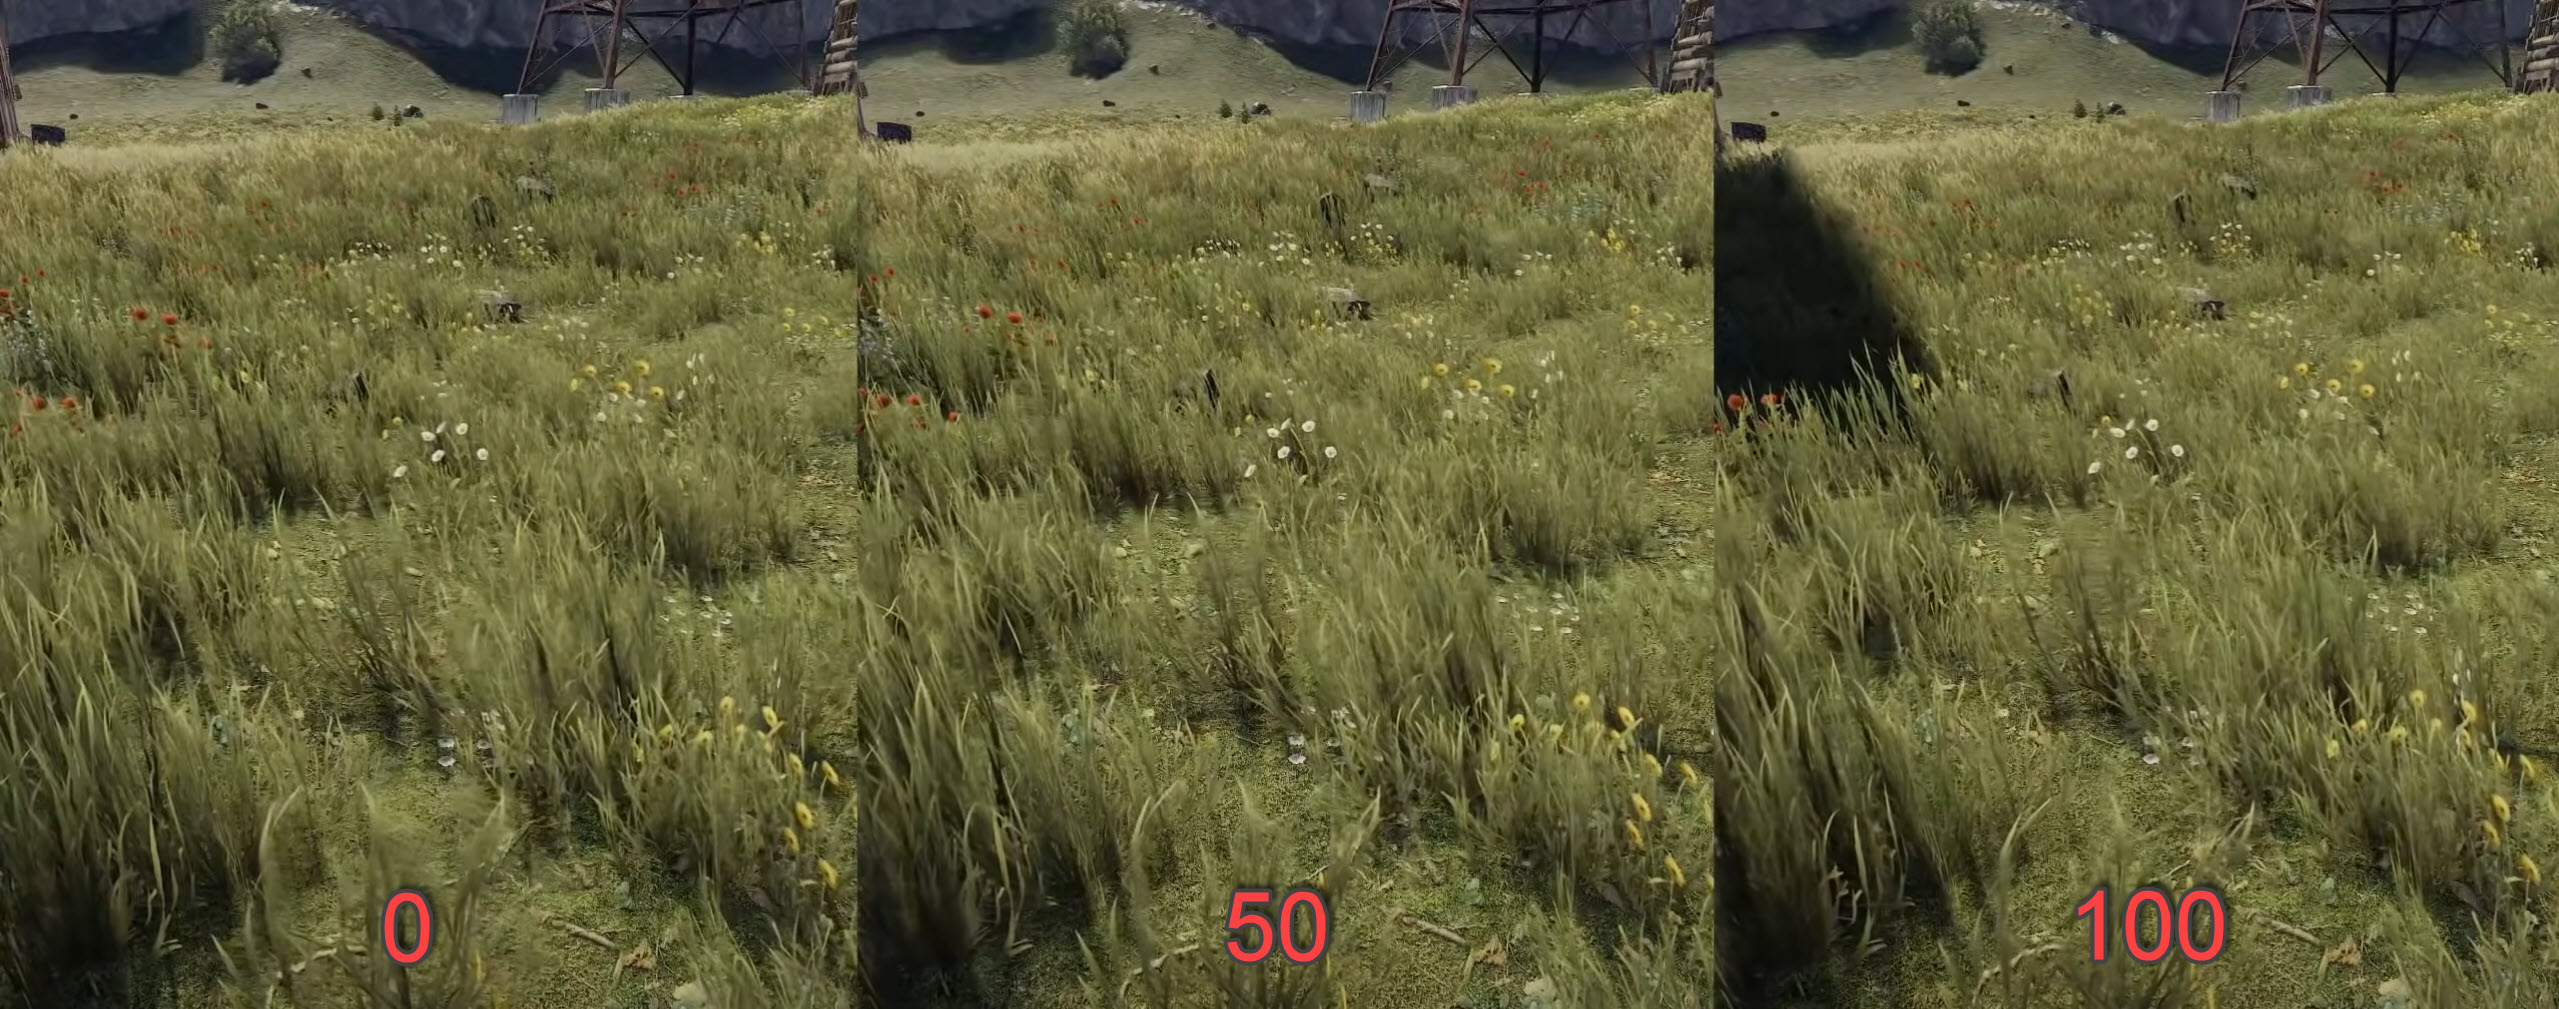
- Grass quality – ползунок на минимум;
- Decor quality – ползунок на минимум.
Радел «Image Effects» (Эффекты изображения)
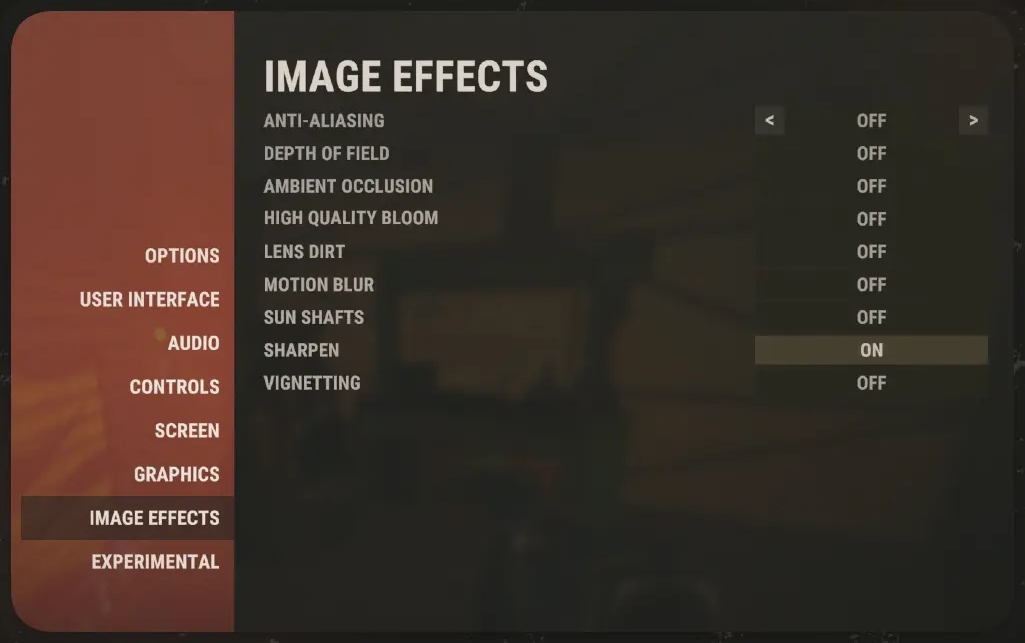
- Anti-aliasing – OFF (выкл.);
- Depth of field – OFF (выкл.);
- Ambient occlusion – OFF (выкл.);
- High quality bloom – OFF (выкл.);
- Lends dirt – OFF (выкл.);
- Motion blur – OFF (выкл.);
- Sun shafts – OFF (выкл.);
- Sharpen – ON (вкл.);
- Vignetting – OFF (выкл.).
Раздел «Experimental» (Экспериментальный)
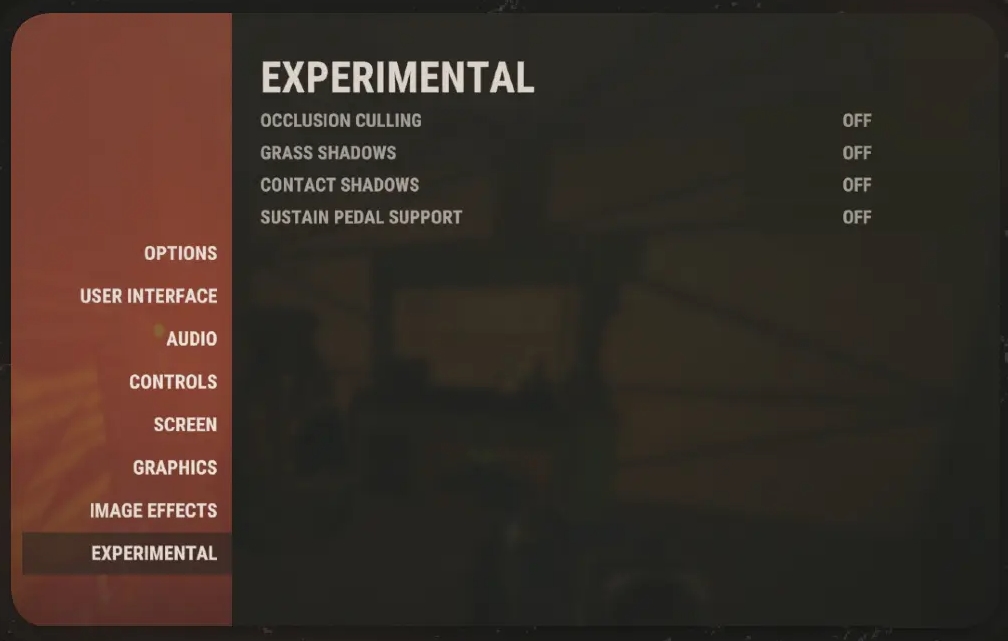
- Occlusion culling – OFF (выкл.);
- Grass shadows – OFF (выкл.);
- Contact shadows – OFF (выкл.);
- Sustain pedal support – OFF (выкл.).
4. Параметры запуска Rust для увеличения FPS
Некоторые параметры запуска Раст могут значительно повысить частоту кадров и избавить от различных проблем, таких как зависания игры, фризы и т. д. Мы потратили много времени на тестирование различных параметров запуска и выбрали для вас наилучшие варианты:
- -window-mode exclusive;
- -high;
- -malloc=system;
- -cpuCount=6;
- -forcee-feature-level-11-0;
- -maxMem=14000;
- -exThreads=12.
Как применить параметры запуска к Раст?
Чтобы применить параметры запуска к игре, откройте Steam, найдите Rust в своей библиотеке и кликните по нему правой кнопкой мышки. В выпадающем меню нажмите «Свойства». На вкладке «Общие» найдите строку для ввода параметров запуска и вставьте в него следующий текст:
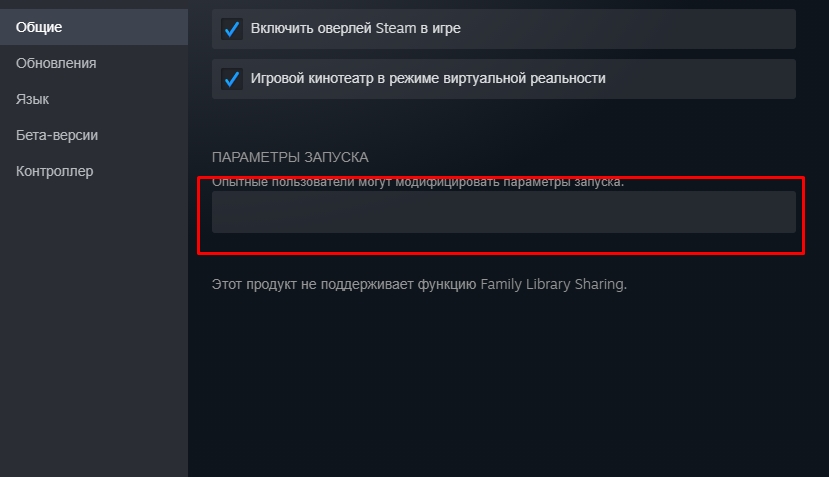
-MaxMem=14000 -high -malloc=system -force-feature-level-11-0 -cpuCount=6 -exThreads=12 -window-mode exclusive
5. Дополнительные рекомендации
Ниже перечислены дополнительные рекомендации, которые помогут повысить ФПС в Rust на слабых ПК:
- Освободите компьютер от мусора. Если ваш ПК начал долго запускаться, а в играх снизилась частота кадров, вам необходимо удалить ненужные файлы с помощью специальных приложений. Например, вы можете воспользоваться популярной утилитой CCleaner.
- Обновите драйвера видеокарты. Если вы давненько не заглядывали на сайт производителя своей видеокарты и не проверяли актуальность установленных на ПК драйверов, настало время сделать это. Установка свежих драйверов в большинстве случаев незначительно увеличивает частоту кадров не только в Раст, но и в других играх.
- Отключите антивирусное ПО на время, пока играете. Антивирусные программы работают в фоне и периодически «перебирают» файлы, выискивая зараженные вирусами объекты. В эти моменты они сильно нагружают жесткий диск, что приводит к просадке FPS в игре.
- Почистите свой компьютер. Очистка системного блока от пыли и обновление термопасты на ЦП и видеокарте избавит от перегрева и тем самым позволит вашему ПК работать быстрее. Подобную процедуру рекомендовано проводить один раз в год. Если в вашем доме есть домашние животные, чистите компьютер каждые полгода.
- Оптимизируйте игровые настройки с помощью GeForce Experience. Этот способ подходит для владельцев видеокарт Nvidia. Скачайте с официального сайта приложение GeForce Experience, установите и запустите его. Далее кликните по кнопке «Начать знакомство», после чего все игры, установленные на вашем ПК, будут автоматически оптимизированы. Если GeForce Experience у вас был установлен ранее, а Раст вы скачали недавно, то для его оптимизации нужно открыть приложение, выбрать игру из списка и кликнуть по «Оптимизировать».
- Включите режим производительности видеокарты (только для Nvidia). Данная настройка находится в панели управления Nvidia. Откройте приложение и найдите раздел «Регулировка настроек изображения с просмотром». Выберите в поле «Пользовательские настройки с упором на:» -> «Производительность». Переключение данного параметра немного повысит частоту кадров в Раст.
- Выполните настройку параметров видеокарты (только для AMD Radeon). Если у вас видеокарта от AMD Radeon, то незначительно повысить ФПС в Rust можно следующим способом:
- Кликните по рабочему столу ПКМ и нажмите «Свойства графики»;
- В новом окне выберите раздел «Игры» -> «Настройки 3D-приложений»;
- Кликните по «Тесселяция» -> «Оптимизировано AMD»;
- Найдите раздел «Питание» и кликните по «Параметры приложения переключаемой графики»;
- Выберите в списке игру Раст и рядом с ее названием укажите «Высокая производительность»;
- Сохраните изменения, нажав «Применить».
Надеемся, что наши рекомендации помогли вам избавиться от низкого FPS в Rust!
We’ll focus on an in-depth analysis of how to increase FPS In Rust, what are the Best Rust Settings, and how to get the most out of your System. The methods shared in this performance guide are perfectly safe and guaranteed to show results.
My settings, as always, are focused on High FPS and Sharp Visuals, so the goal is to find the right balance. In addition, we benchmarked the game several times and avoided focusing on settings that had a huge performance impact while showing little to no improvement in the Graphical Sector.
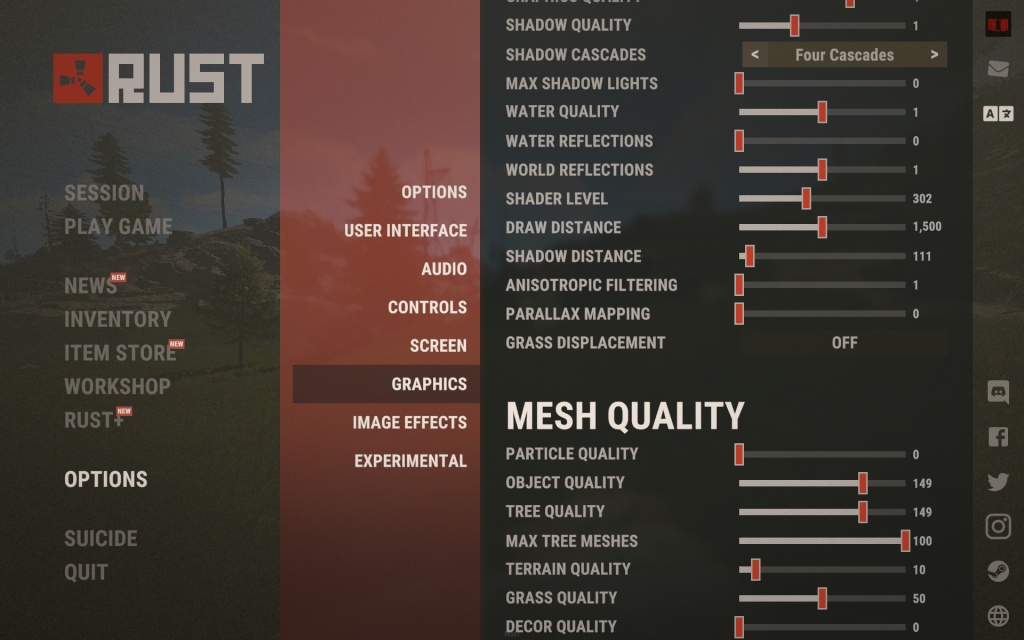
Summary Of Rust’s Best In-Game Settings
| Setting | What to Set it to |
|---|---|
| Screen Resolution | Native |
| Mode | Exclusive (Fullscreen) |
| VSync | Off |
| Graphical Quality | 4 |
| Shadow Quality | 1 |
| Shadow Cascades | Four Cascades |
| Max Shadow Lights | 0 |
| Water Quality | 1 |
| Water Reflections | 0 |
| World Reflections | 1 |
| Anisotropic Filtering | 1 |
| Parallax Mapping | 0 |
| Grass Displacement | Off |
| Particle Quality | 0 |
| Object Quality | 150 |
| Tree Quality | 145 |
| Max Tree Meshes | 100 |
| Terrain Quality | 10 |
| Grass Quality | 50 |
| Decor Quality | 0 |
| Anti-Aliasing | TSSAA (or SMAA) |
| Depth of Field | Off |
| Ambient Occlusion | Off |
| High-Quality Bloom | Off |
| Lens Dirt | Enable (Subjective) |
| Motion Blur | Off |
| Sun Shafts | Off |
| Sharpen | Off |
| Vignetting | Off |
| Occlusion Culling | Enabled |
| Field of View (FOV) | 90 (Subjective) |
| Compass Visibility | On |
| Streamer Mode | Off |
| Nudity | Uncensored |
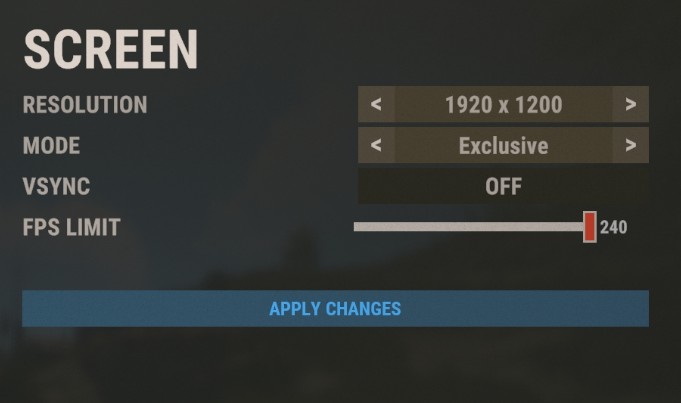
Screen Resolution: Select Native
Selecting your display’s native resolution will result in the best visual clarity.
Mode: Exclusive
This is another word used for full-screen, which is necessary for maximum refresh rate and high performance. Some people also prefer Borderless due to the quick Alt Tabbing. However, we noticed several crashes with that.
VSync: Off
Enabling Vsync would introduce input lag in your game as well as cap your framerates. You best leave it disabled.
Graphical Quality: 4
I’ve noticed heavy lag on anything above 4 during benchmarks while testing it on 1,2 and 3. Hence, 4 seems to be the best preset for it.
Shadow Quality: 1
No Major difference in all other presets. One seems to be the most optimized setting.
Shadow Cascades: Four Cascades
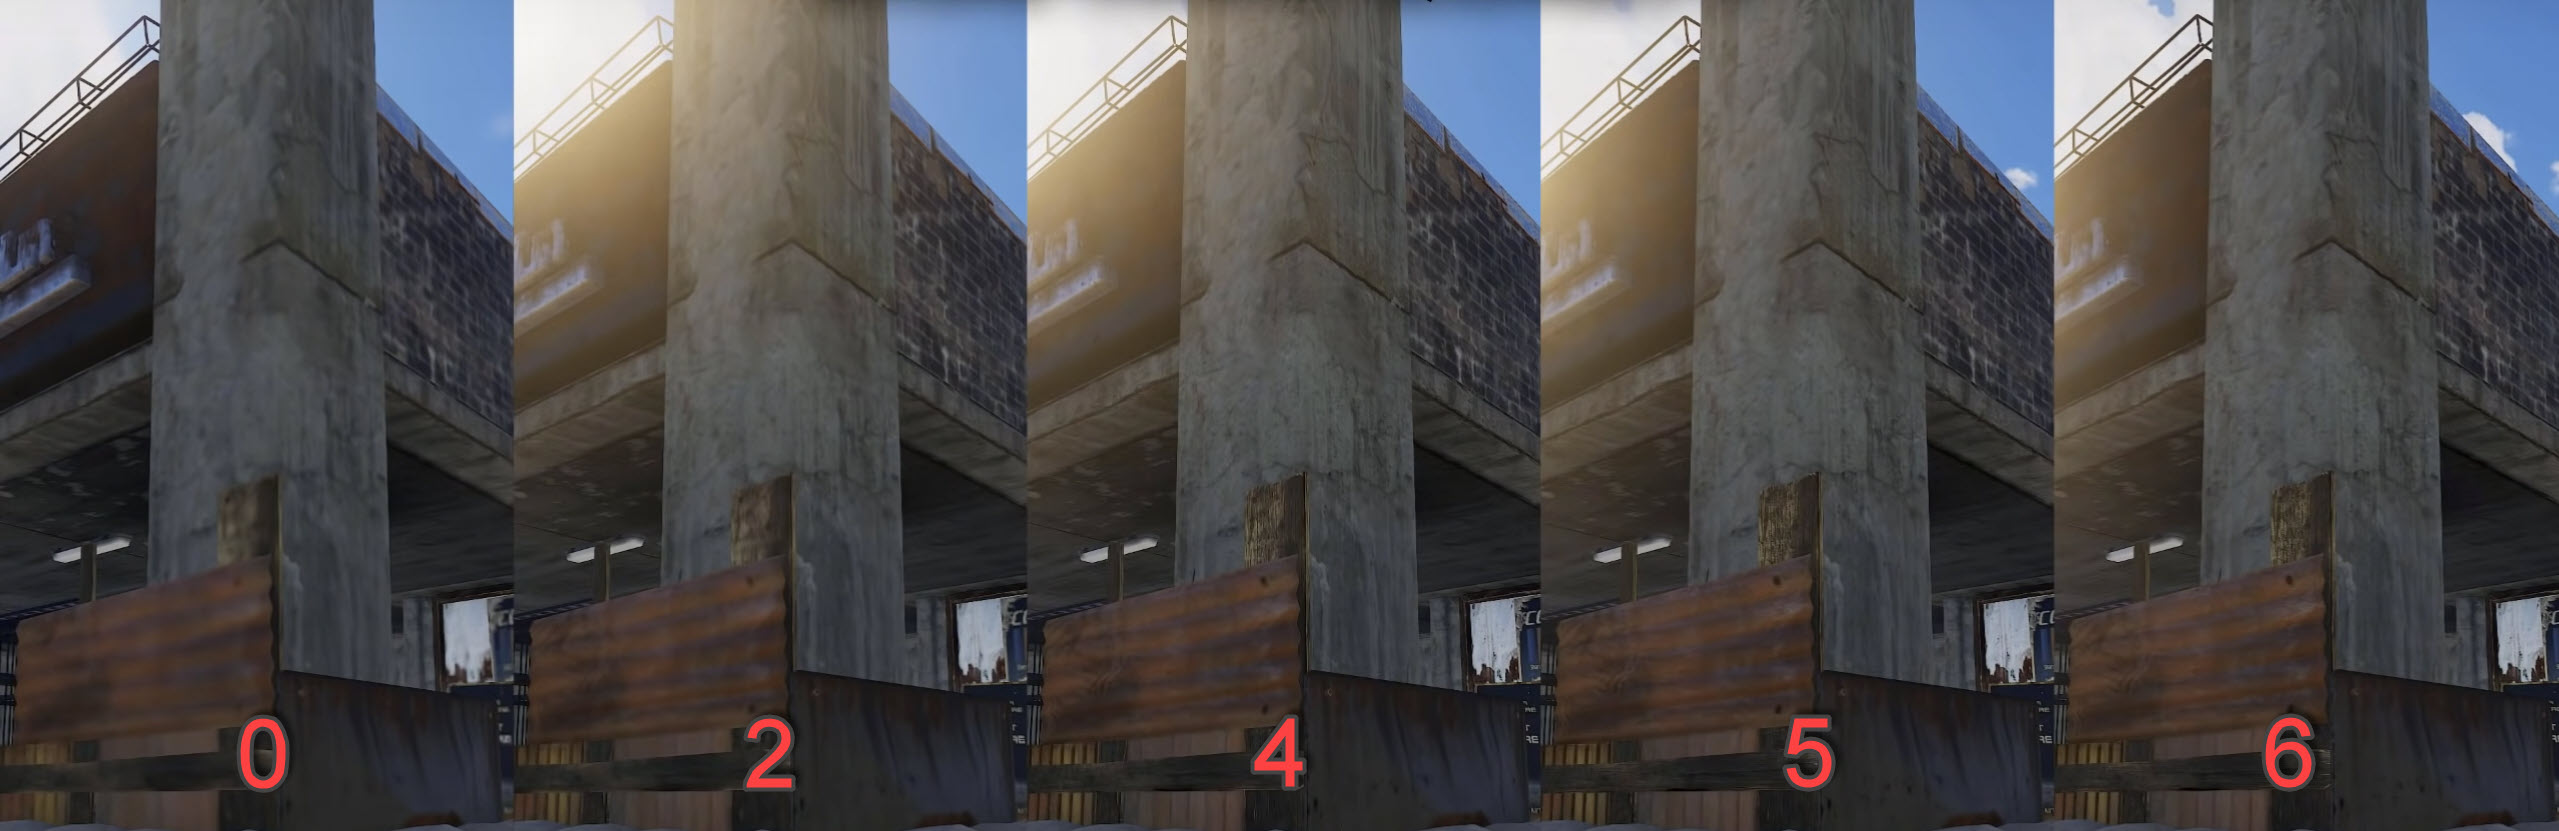
There is a slight change in the dimensions of the shadow, which does signify the overall quality. If you go with lower Shadow Cascades quality, make note that the Shadow Distance quality will also be limited.
Max Shadow Lights: 0
The Max Shadow Lights only seem to have a purpose when there is a reflection from objects. Subsequently, If you look at the performance, this setting does seem to be a problem to sum it up. It is not worth it.
Water Quality: 1
The essential difference between Water Quality 1-3 boils down to the texture, blurriness, and reflections. It isn’t noticeable across all places and therefore, we must keep it at one.
Water Reflections: 0
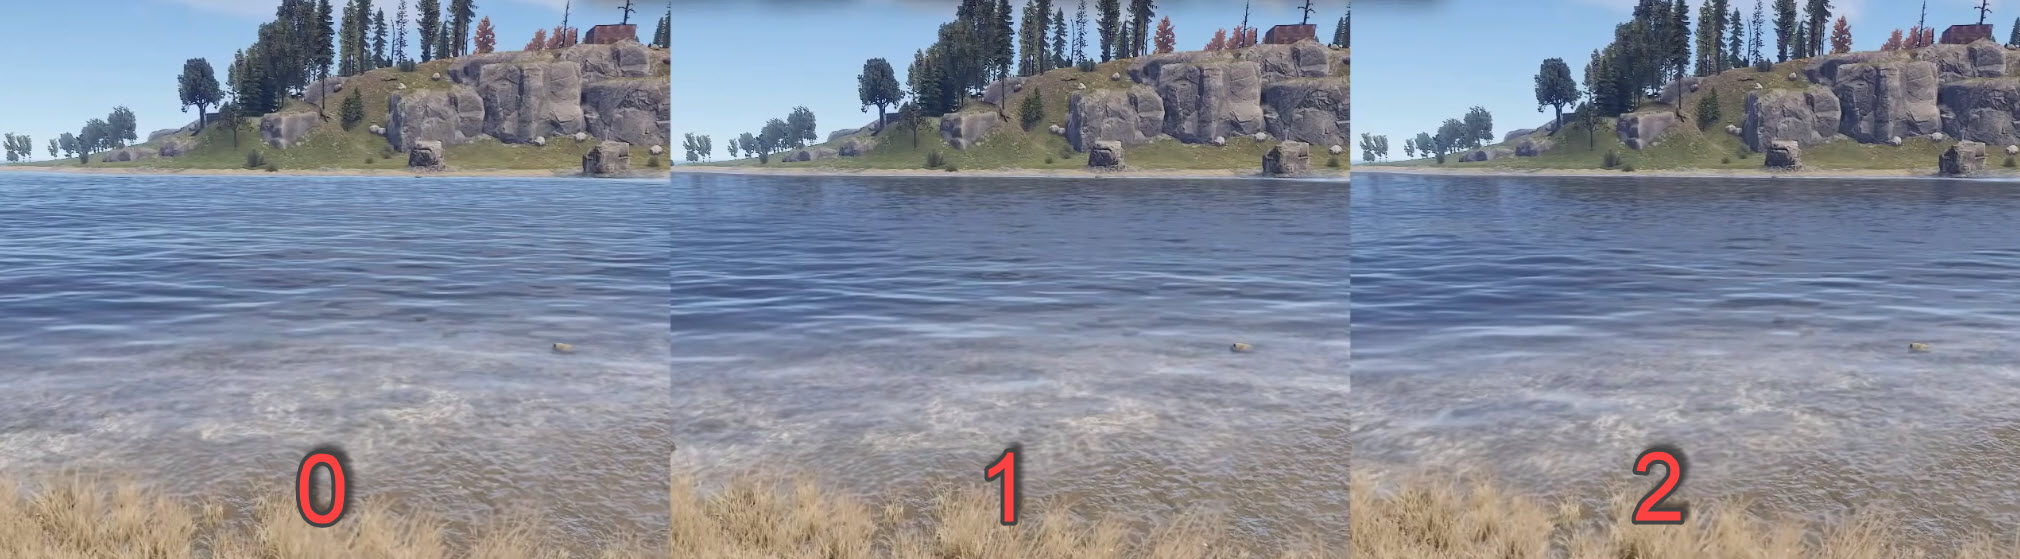
It is imperative to keep water reflections at 0 due to two reasons. The first is that we have already kept Water Quality at one, which will play a significant role in setting the overall meta. And the second is due to a performance problem, which is huge in water reflections.
World Reflections: 1
The Water Reflection setting maintains an astounding clarity and adds exceptional fidelity to the overall world of rust. Likewise, it also has its drawbacks, but luckily, at one, we were only able to find a roughly 2% performance loss, which isn’t a big deal, considering the massive improvements.
Anisotropic Filtering: 1

After finishing our test bench, we were heavily bugged with Anisotropic Filtering because it provided very grainy graphics.
If you still feel like the textures aren’t sharp enough. We still don’t recommend tuning up Anisotropic Filtering, and instead take the benefit of Nvidia Ansel and AMD’s FreeStyle, which is explained in the last section of this guide.
Parallax Mapping: 0
Keeping Parallax Mapping at Zero is the best thing you can do in Rust. That is to say, the impact on performance was roughly 30%, and on the dark side, it has zero to no benefits except showing slight illusions that are merely rare, depending on the weather.
Grass Displacement: Off
The Grass Displacement feature seems to be another unnecessary setting that impacts performance with no meaningful purpose.
Particle Quality: 0
While showing little to no improvement across the Graphical Sector. It’s reasonable to presume that Particle Quality Should be kept at 0.
Object Quality: 150
Have you ever encountered numerous objects that aren’t rendered, and you can see through walls? Well, that is definitely due to Object Quality, which pre-renders all graphical elements to an extent depending on the quality. I recommend keeping it at 150 for the best FPS and realistic fidelity.
More From Settings Guide: Black Ops Cold War PC Settings
Tree Quality: 145
Like Object Quality, the Tree Quality preset also focuses on rendering the bushes, trees, and more. This gets further expanded through the Tree Quality and enhancing the overall object. If you keep it at 50-100, the Trees Look something out of a 2D Game, and performance isn’t very noticeable. The best results come in at 150 with accurate greenery elements and detailed graphics.
Max Tree Meshes: 100
Trees are a vital part of survival in Rust, and you’ll want to view as many and as detailed trees as possible.
Terrain Quality: 10
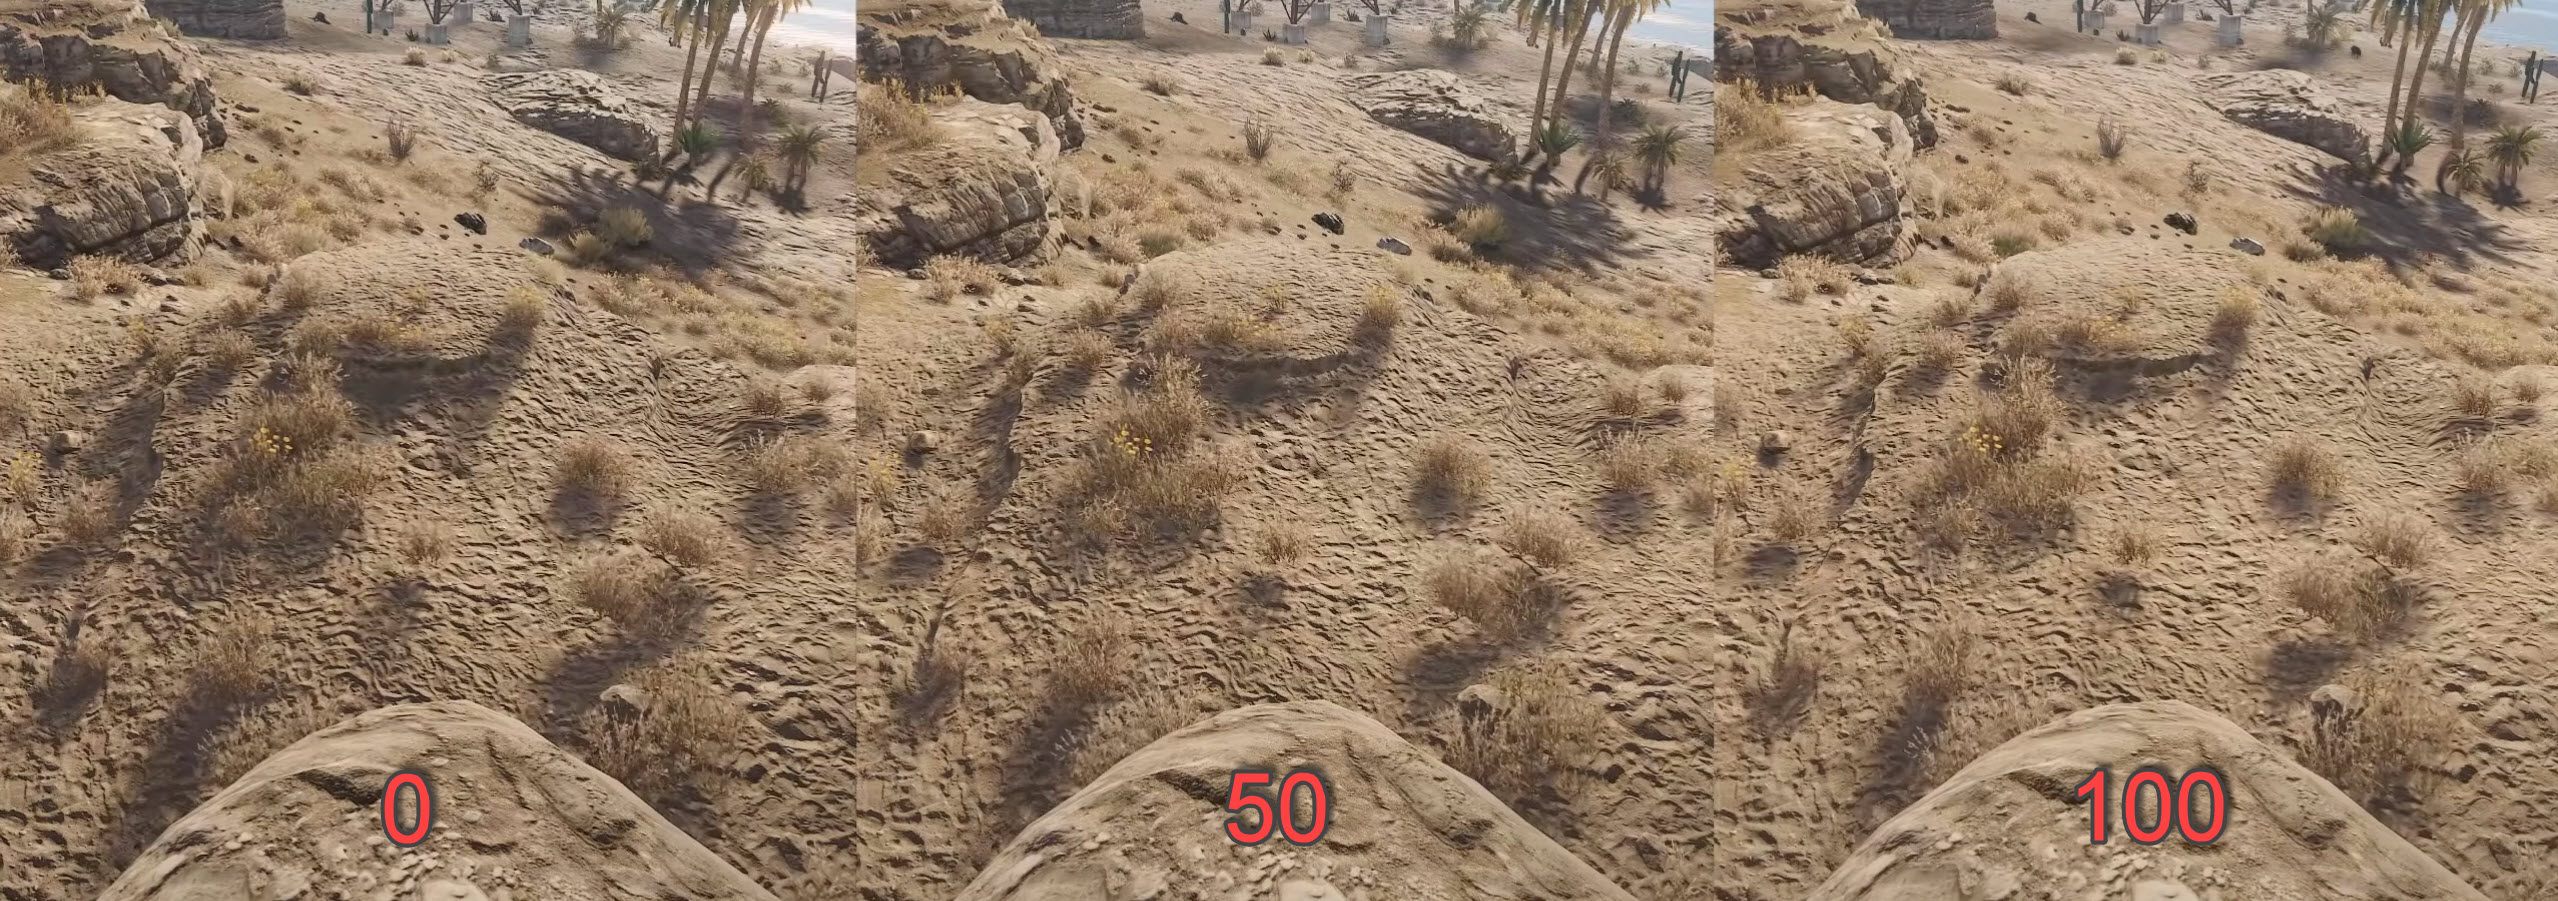
Although many Rust Players Across Steam, YouTube, and Forums conclude that apart from the quality itself, the Terrain Quality feature also improves the rendering distance, which isn’t actually true.
The most optimized and best setting seems to be at 10, which gets further compensated by Anti-Aliasing.
Grass Quality: 50
The Grass Quality setting doesn’t really require an explanation. All it does is change the textures and quantity of all grass across Rust. I found 50 to be optimized, resulting in a 4% FPS Drop, which is perfectly fine.
Decor Quality: 0
Experienced Rust players would know that Decor Quality needs to be turned off because once enabled, the Grass Density increases significantly, making it harder to find items. I tested Decor Quality across numerous green belts and couldn’t find any performance differences.
Anti-Aliasing: TSSAA
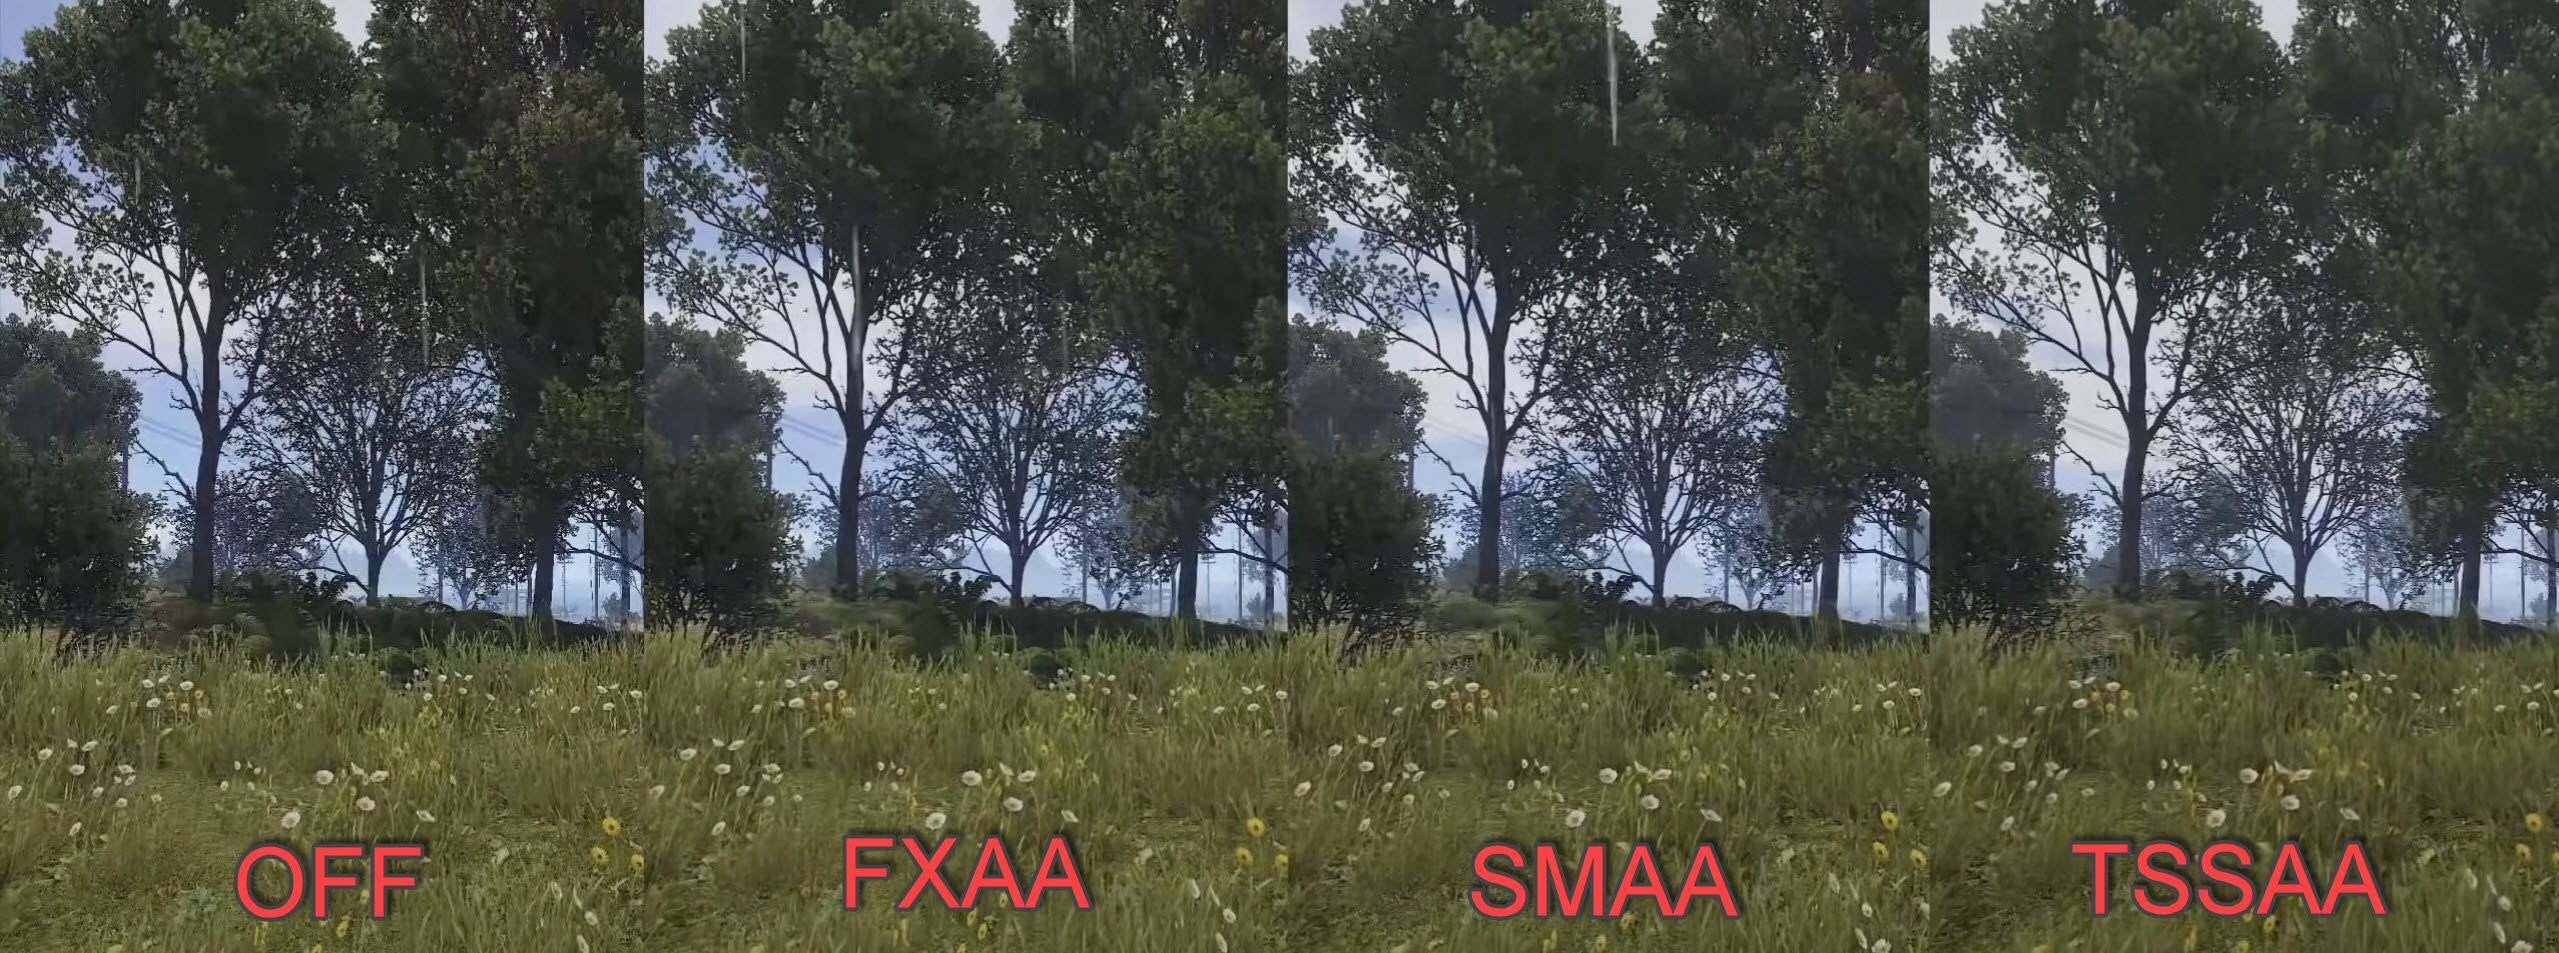
Under the Forest Portion of the Image Effects Settings Tab, you will find numerous entries, including the Anti-Aliasing, which is considered the core feature of all graphics.
You can certainly go with SMAA, which is also a decent choice, but remember that sharpness can also be figured through Nvidia Ansel, which doesn’t come with the consequence of performance.
Depth of Field: Off
Keep Depth of Field disabled because it has added layers that increase the blurriness in long-distance objects. The game does look fabulous, but it’s more of a cinematic feature and not good for gameplay.
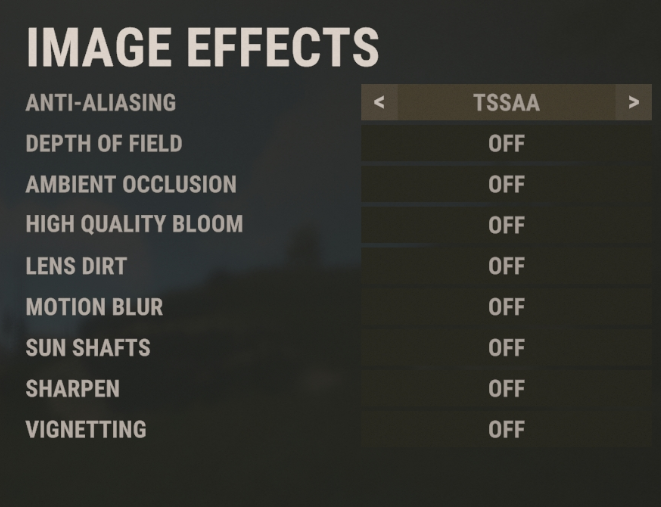
Ambient Occlusion: Off
Many Rust players complain about the graphics being too washed out. The Ambient Occlusion feature could be a decent fix because not only does it provide added shadows, but it also improves their depth. The setting is handy in situations like these, but since we have already enabled Four Cascaded Shadows, you can turn it off to save performance.
High-Quality Bloom: Off
Enabling this would improve the brightness and lighting across rare places, and apart from that, this setting doesn’t seem to have lots of value. We recommend keeping it disabled, and you will find more about this in the Nvidia Ansel section.
Lens Dirt: Enable
The Lens Dirt feature is subjective and can be both enabled or disabled, depending on the performance. We couldn’t find a noticeable difference in performance, and that goes the same for fidelity. According to Rust, this adds dirt effect in extremely bright places, which ultimately means a new layer that is similar to a glass pane.
Motion Blur: Off
We have always recommended turning off Motion Blur because it’s an unnecessary feature that has a huge impact on performance.
Sun Shafts: Off
We tested Sun Shafts for a few hours and weren’t able to find any noticeable difference. The only place where we found any noticeable difference was also in bright sunlight, and rays seemed to have an extra layer of features. Moreover, the impact on performance is also barely noticeable.
Sharpen: Off
Initially, we enabled Sharpen for better texture quality. However, in the later phases of our tests, it was disabled due to two reasons. If Anti-Aliasing is disabled, there is no point in adding an extra depth of sharpness. Secondly, Sharpen seemed to have a notable impact on performance, and we achieved the exact same results with Nvidia Ansel without compromising on performance.
Vignetting: Off
No noticeable difference in fidelity and performance
Occlusion Culling: Enabled
Under the Experimental Settings, Only Enable Occlusion Culling and disable the rest.
Field of View: 90
The Field of View usually accounts for 30% of performance in numerous games. However, that was not the case in Rust. With a roughly 8% FPS Loss on Max FOV, the difference in gameplay was very meaningful. Other than this, FOV also depends on your monitor size and your distance to the desk, so I’d say this setting is subjective.
Compass Visibility: On
It’s literally impossible to play Rust without Compass Visibility.
Streamer Mode: Off
Are you a streamer? If so, Enable this in Rust. Likewise, keep it disabled if you aren’t.
Nudity: Uncensored
With Censored, there is roughly a 4% reduction in performance. Therefore, see If you would like to trade that for the change.
Performance Tips And Tricks For Rust
It is important to have some of the best rest settings so that you can perform well in combat and the PvP mode. Here are some tips and tricks that will help you get the maximum FPS for Rust.
- First, make sure to update your drivers as well as Windows.
- Furthermore, your GPU in usage must be your dedicated GPU. Many players make the mistake of using an integrated GPU for rust, which makes their FPS performance quite low.
- Before playing Rust or any other game, always check your temperature. Thermal throttling may occur if a high temperature is kept for a long time.
- Use the best settings in your Nvidia Control Panel or your AMD Radeon Center.
- Make sure that the background apps that you are not using are always closed.
- The window power settings should always be set to high performance, even if you’re using a desktop.
- Instead of the dropdown menu, change your graphics settings in the game. Doing so will give you many more options, and this is the best way to get Max FPS settings in Rust.
- In case you are stuck or the items on your character are glitched out, ask an admin or your friend to kill your sleeper to fix the problem.
- For a network lag issue. Always check that you are not populating any server list in the background.
Check out our Windows Optimization guide for more tips on increasing performance for Rust.
Best Launch Options For Rust
Launch Options play a vital role in improving our Best Rust Settings. Usually, lots of players debate over the use of launch options in Rust, as most suggest they do not work anymore, and compatibility is a serious problem. We acknowledged this but still went above and beyond to test the game.
As per our benchmarks, only some launch options worked, and these are listed below.
- -window-mode exclusive – Rust has serious full-screen problems that are further expanded by the weird hybrid mode in which the game mostly runs in borderless mode. This can be fixed through two options: the first is -window-mode exclusive, which will guarantee the full-screen option, and the second is -high, which runs the application on priority.
- -high – This expands on window mode exclusive and also provides an additional benefit by running Rust in high priority mode. This ultimately results in more FPS, as the PC focuses on deriving all resources for the game.
- -forcee-feature-level-11-0 – Many argue this isn’t needed as, by default, the Force feature level works fine. Nonetheless, it’s better than anything, and insurance is always worth it.
- -malloc=system – The malloc system command line varies and would not benefit in all cases. In case you don’t know about this class code, it simply enhances or configures what memory allocator is being used by the game.
- -maxMem=14000 – The MaxMem command has proven to be the most beneficial of all. We noticed that Rust wasn’t utilizing all the RAM available. Therefore, Assets wouldn’t load faster, and there were terrible frame drops. This was later fixed through the maxMem command that utilizes a certain value associated. You can check your Memory through the Task Manager and utilize 20% for Windows while the remaining for the game. In this picture, 14000 refers to 14 GB.
- -cpuCount=6 – Similar to maxMem, you can also change the cpuCount for the game. Once again, this can be checked through the Task Manager. In my case, I’m using the Ryzen 3600x, so the core count would be 6.
- -exThreads=12 – The last enhancement would be through the exThreads amount. You can make sure that Rust is utilizing all the cores through this command line. We have 12 threads in our Ryzen 3600x, so the value would be 12.
All in all, these command lines sum up to this. You can enter them in the Steam Launch Options.
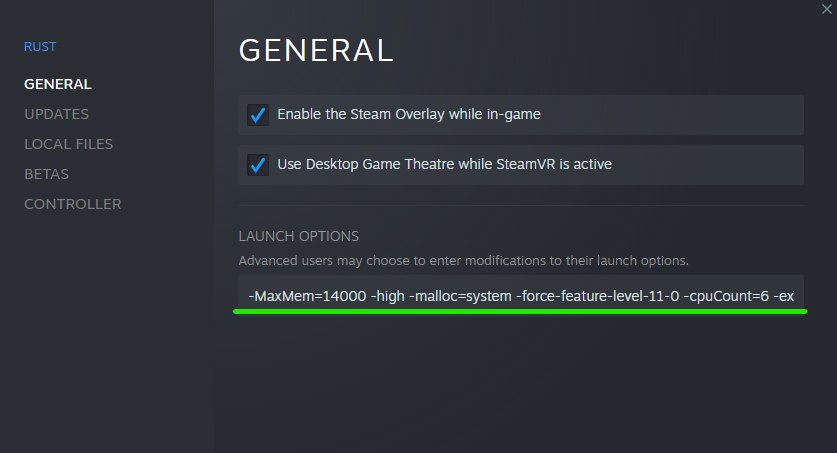
-MaxMem=14000 -high -malloc=system -force-feature-level-11-0 -cpuCount=6 -exThreads=12 -window-mode exclusive
Rust Optimization Takeaways
Rust graphics sliders are one of the most confusing UI that I’ve come across. Measuring performance across different incremental presets was a nightmare. The worst thing that plagued my testing was the need to restart the game sometimes after changing one graphics setting. If I didn’t do it, the setting didn’t apply.
I wasn’t really impressed with the performance of Rust on my PC either. The average FPS hung around 70 to 80 FPS mark at 1600p resolution. I did encounter random FPS drops in more wooded areas and near water bodies. Thermals is where the game really tested my system as my CPU was getting quite hot at 96 C.
Besides my experience with the game, there have been several reports of performance issues within the game on forums. Almost all the reports indicate random FPS drops which is a major issue considering a small lapse in combat can result in you losing your supplies and gear. Hopefully, these settings will be useful to you.
Let us know in the comments below If you have any suggestions or complaints.
More Best Settings Guide: Best Cyberpunk 2077 PC Settings
Rust players have been facing Low FPS drops when playing the game; this can be caused by many factors, including incorrect GPU drivers, unsupported Hardware, misconfigured config file, incorrect GPU settings, etc. This article will show you how to properly adjust these settings and ensure your game is running smoothly.
1. Check Rust’s Recommended System Requirements
If you’re experiencing performance issues in Rust, the first step to finding its solution is to check the game’s system requirements.
If you want the game to run smoothly on your system with decent graphics settings, your system’s hardware must be comparable to Rust’s recommended system requirements.
According to Steam, the system requirements of the game are:
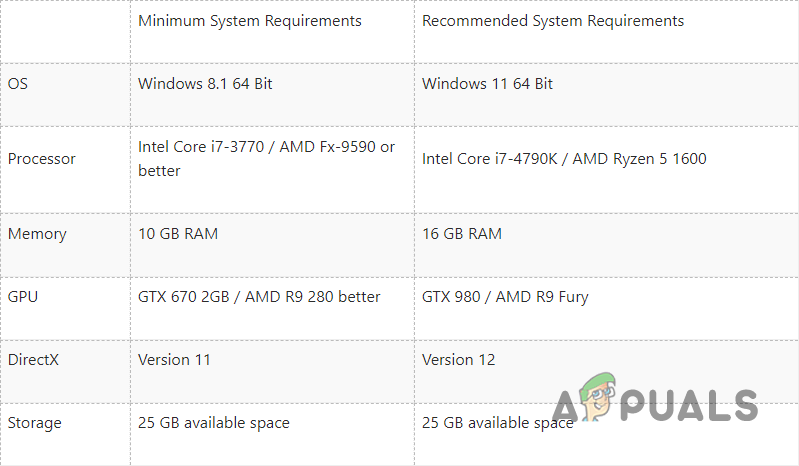
If your system fails to meet the game’s recommended system requirements, your weak hardware is likely the main cause of the performance issues.
However, you can still significantly improve the game’s performance by following the fixes we’ve listed below.
2. Optimal Game Settings
If your Graphics Settings are set too high for your system to handle, it can significantly impact your FPS. Therefore, you must optimize Rust’s in-game settings according to your PC’s specifications.
The image below shows the most optimal Graphics Settings for Rust.
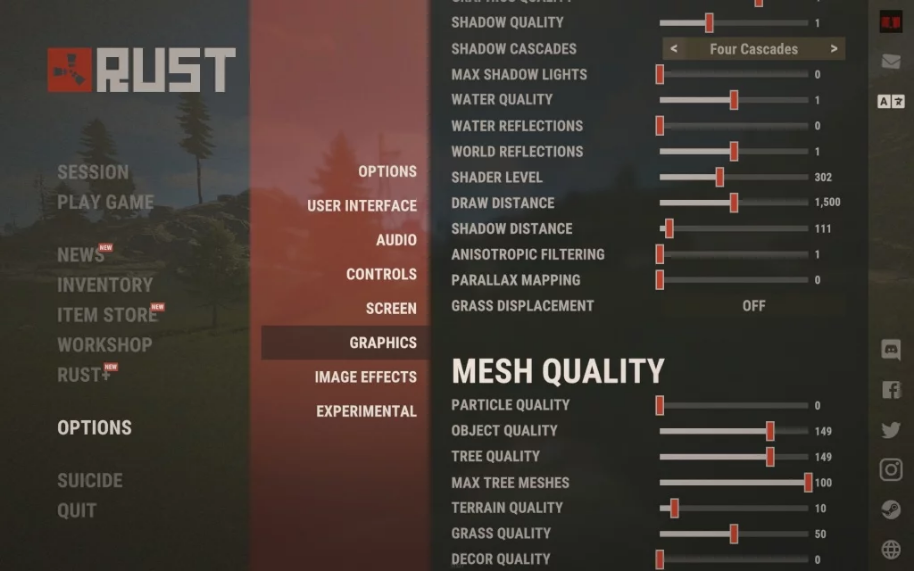
You should also ensure your game is running on your monitor’s native resolution and that Vsync is turned off. You’ll find these two options in the “Screen” tab in the Settings menu.
After optimizing the in-game settings, we need to use some launch options with the game. In certain games like Fortnite, launch options hurt the game’s performance, but for Rust, they have a positive impact on the game’s performance.
Below, we have listed the best launch options for Rust to boost performance and where you need to enter them:
- Open the steam app
- Locate the Steam Library
- Right-click Rust and go into Properties
- In the general tab, you will now see the launch options
- Here are the following best-tested launch options for Rust:
-window-mode exclusive (Sets the windowed mode to fullscreen exclusive, which boosts performance)

-high (Sets the game to high priority)

-force-feature-level-11-0 (Forces the game on DirectX 11)

-malloc=system (This command depends, it may or may not help you, but it configures the memory allocator for the game)

-maxMem=14000 ( ** The number in the red you need to change depending on your RAM, 14000 represents 14 GB of ram, for example. This command helps utilize your RAM on Rust)

-cpuCount=6 (** The number in the red you need to change depending on the number of cores you have, to check go into task manager by right-clicking the taskbar and selecting performance and CPU)

-exThreads=12 (** The number in the red you need to change to the logical processors you have it is located in the same place your cores were.)

Check your CPUs Cores
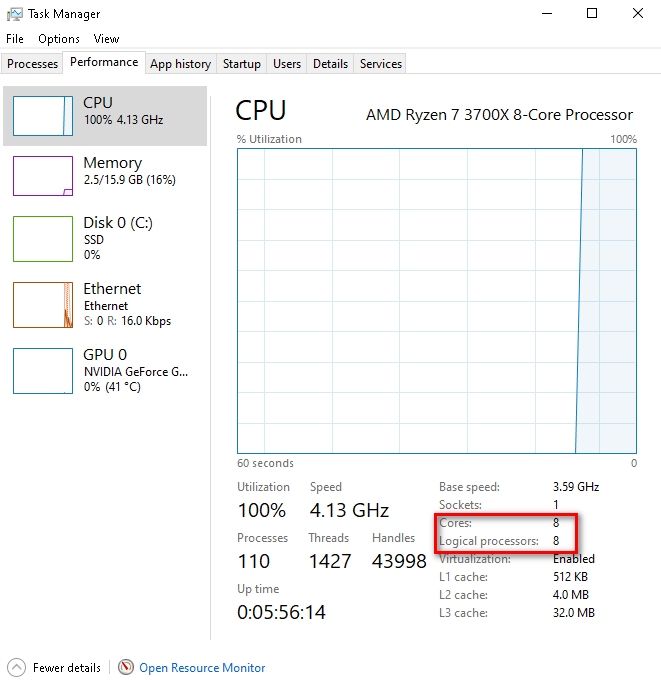
Note: Always restart the game after entering launch options so that they can be applied!
3. Use Correct GPU Configurations
Unity, which is Rust’s game engine, has an issue where it sometimes selects your integrated Graphics Card (GPU) instead of your dedicated GPU.
Your dedicated GPU is much faster than your integrated GPU. So, make sure it’s set as your dedicated GPU.
AMD GPU Users:
- Press the Windows key + I on your keyboard at the same time to open up the Windows Settings app
- Select the “Gaming” tab
- On the top-right, select “Graphics Settings.”
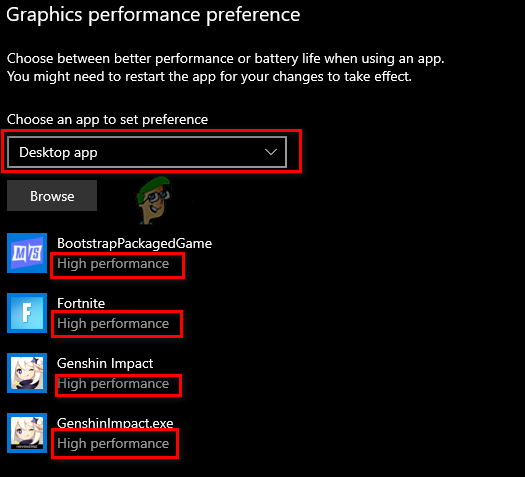
- In the “Graphics Performance Preference” tab, select the dropdown and “Desktop App.”
- Now press Browse and navigate to the following directory:
C:\Program Files (x86)\Steam\steamapps\common\Rust
- Now select Rust in that directory and select “Add” on the bottom right
- The game will now be added to the page; click on Rust, select options, and select “High Performance.”
- It should now look something like this:

Changing Dedicated GPU for Games
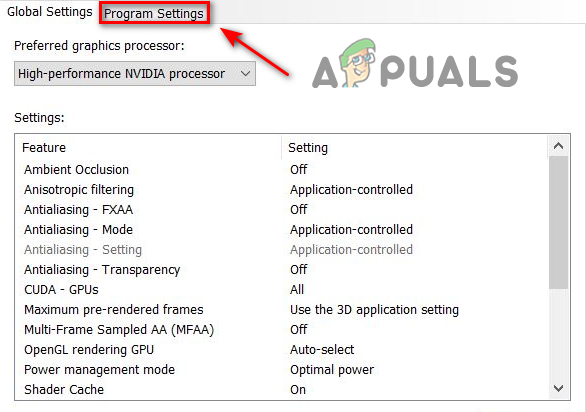
NVIDIA Users:
- Click on Start Menu from Taskbar and Search for “Nvidia Control Panel”
- Open the NVIDIA Control Panel
- Head to “3D Settings” and click “Manage 3D Settings.”
- Open the “Program Settings” tab and select Rust from the dropdown
- On the other dropdown menu, select “Preferred graphics processor for this program.”
- Save your changes.

Changing GPU Settings for Rust in Nvidia
4. Disable Windows Fullscreen Optimizations
If you have the Windows Fullscreen Optimizations feature enabled on Rust, it can be one of the major causes of this performance problem.
The Windows Fullscreen Optimizations feature is usually turned on for games by default, but it should always be disabled.
This feature runs the game on a mixture of fullscreen and windowed mode, instead of running it in actual fullscreen. This leads to many types of performance issues with the game, such as input delay, stuttering, and low FPS etc.
To disable Windows Fullscreen Optimizations for Rust, first find the .exe file of the game by following the steps listed below:
- Open the Steam application.
- Locate the Steam Library.
- Right-click Rust and hover your cursor over Manage.
- Select “Browse Local Files.”
Opening Location of Rust’s Game Files through Steam
This will open the install location of Rust, where you’ll find the.exe file of the game. After locating this file, right-click on it and select Properties.
In the Properties window, remove the checkmark next to the “Disable Fullscreen Optimizations” option. Before clicking apply, also check whether there’s a checkmark next to the “Run as administrator” option.
If there is not, you should enable this option as well, as it grants Rust complete read and write privileges, which usually leads to an improvement in FPS.
5. Update your GPU drivers
Regularly updating your GPU drivers helps solve game performance issues, as your GPU’s manufacturer further optimizes your GPU’s performance with each driver update.
If you’re using a very outdated GPU driver, or if there’s some corruption in your current driver, it can be the leading cause of the low FPS problem you’re experiencing.
To update your GPU drivers, you need to know the brand and model of the GPU installed on your PC. If you don’t know that, follow these steps to find out:
- Press the Windows Key to open the Start menu, type Device Manager, and enter.
- Click on the small arrow next to “Display Adapters.”
- Make a note of the name of the device that appears.
If you have an NVIDIA GPU, click on this link to find its latest drivers.
If you have an AMD GPU, click on this link to find its latest drivers.
After clicking on the link, use the dropdown lists to find the right drivers for your GPU. Once the driver installer has been downloaded, run it, and it will guide you through the installation process. Your GPU drivers will be updated within a few minutes.
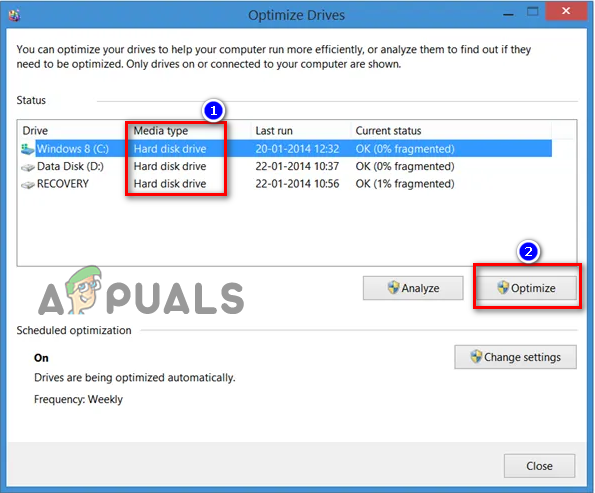
6. Defrag your Hard Drive (HDD Only)
Defragging your HDD is a MUST when it comes to Rust. This is because Rust is a very heavy textured-based game. And if the textures don’t load, it will cause you to have lag spikes or even crash.
- Click on the start menu and type “Defrag,” and click “Defragment and optimize drives”
- From here, in the “Media Type” section, you will be able to see if you have a Hard Disk Drive or a Solid State Drive. You don’t wanna defrag your SSD because it does not increase performance; only do this on your HDD.
- Now click your HDD Drive, select “Optimize,” and wait for it to run.

Defragging your HDD
7. Disable Background Apps
If you have random apps running in the background while playing Rust, they will consume system resources and decrease the game’s performance. The resources they use are RAM, CPU cycles, etc.
- Press your Windows Key + I at the same time to open the Windows Settings app
- In the search bar, type “Background apps” and select the panel
- Turn the toggle off for “Let apps run in the background.”
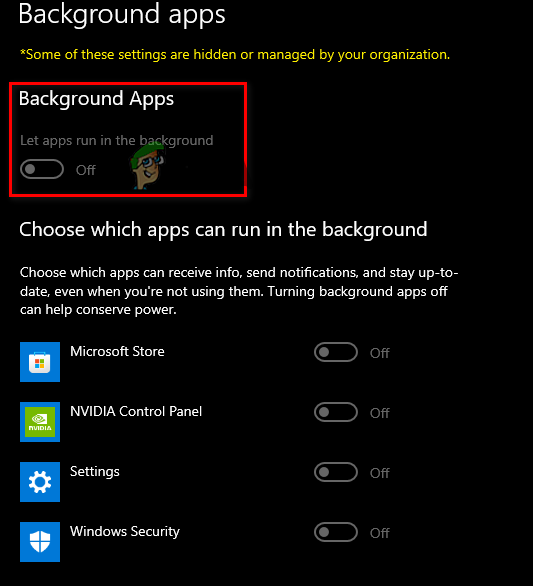
After turning this option off, press Windows Key + X at the same time and open Task Manager. In the Processes tab, see which programs currently consume the most system resources.
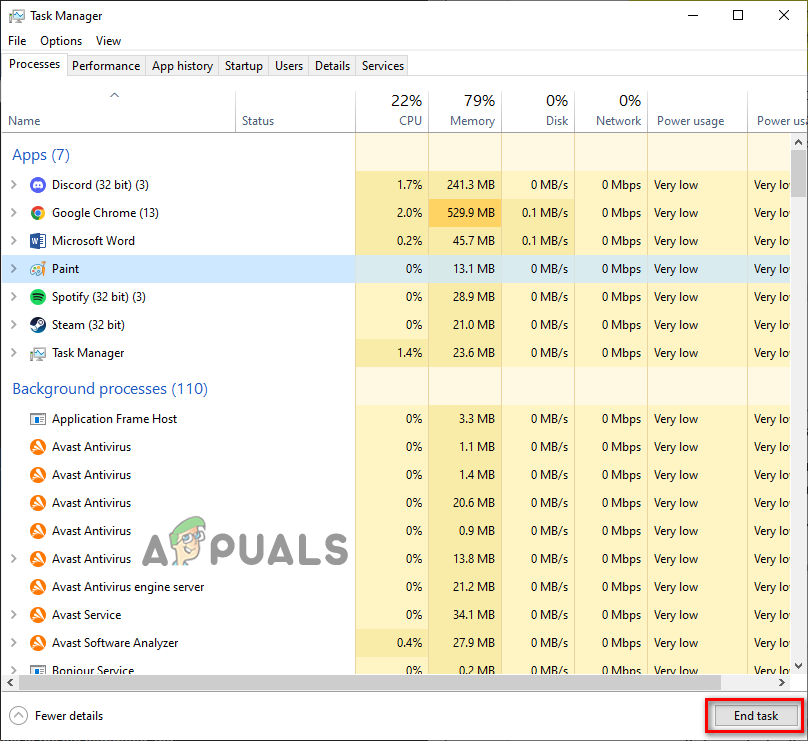
Left-click on all the unneeded programs and click the End Task button at the bottom to close them. This will free up even more system resources for Rust to use, which will further decrease the frame drops.
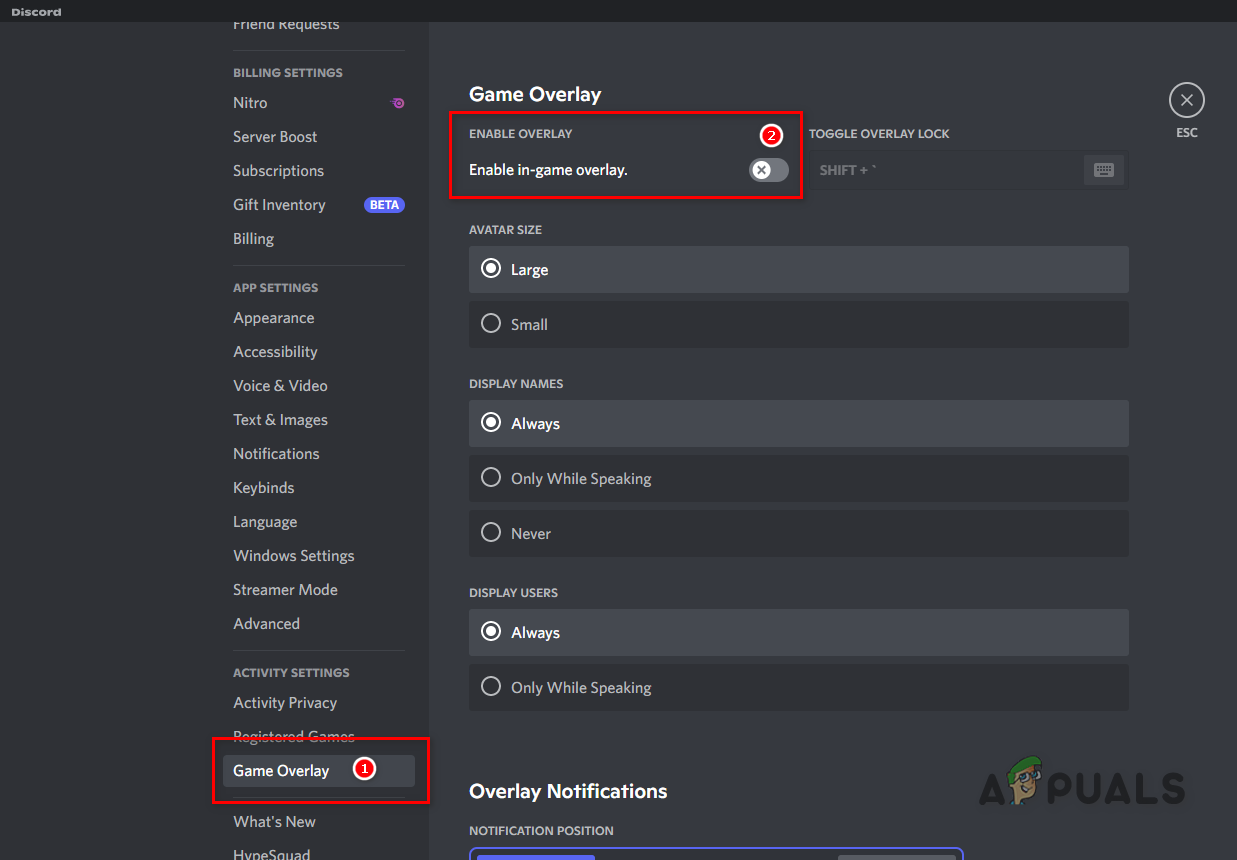
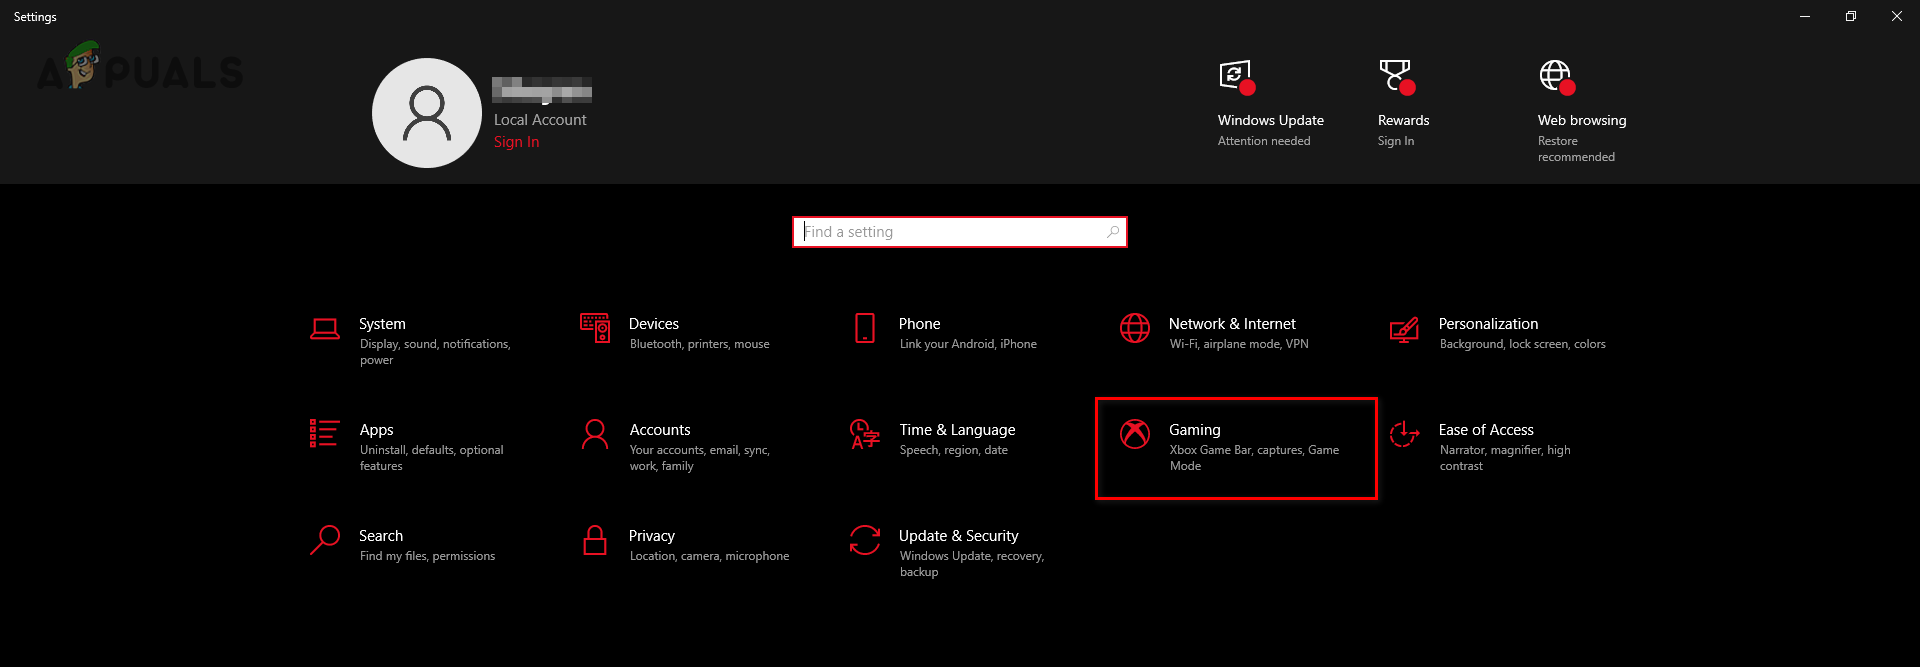
8. Disable Overlays
If you have overlays of different applications, disabling them will give you an instant boost in FPS. The most commonly used overlays are of Steam, NVIDIA GeForce Experience, Discord, and Xbox Game Bar.
These overlays allow for easy access, but they usually consume too many system resources and can even be incompatible with certain games.
This leads to performance problems, so it’s a good idea to disable them if the game is running poorly on your system.
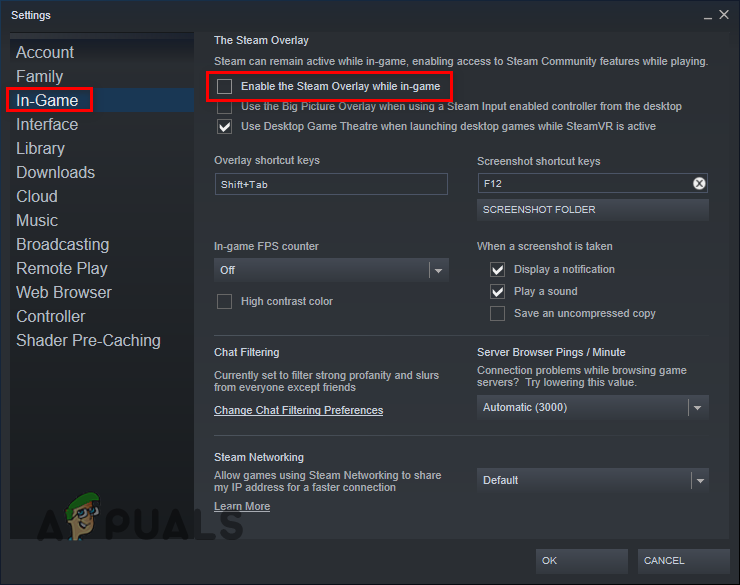
If you use the Steam Overlay, you can disable it by following these steps:
- Open the Steam application.
- Click on the “Steam” option in the top-left corner and click on “Settings.”

Opening Steam Settings - Navigate to the In-game section
- Disable the “Enable the Steam Overlay while in-game” option.

Disabling the Steam Overlay - Click the OK button.

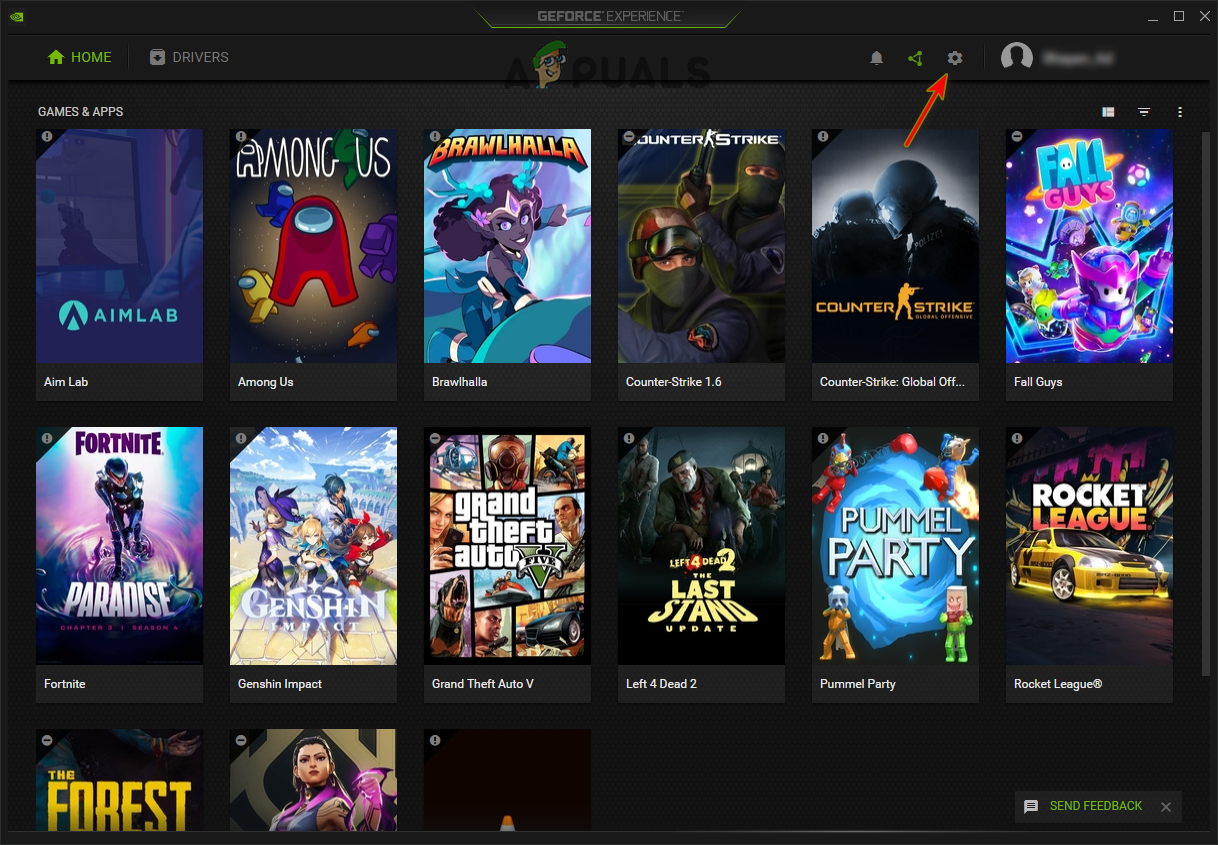
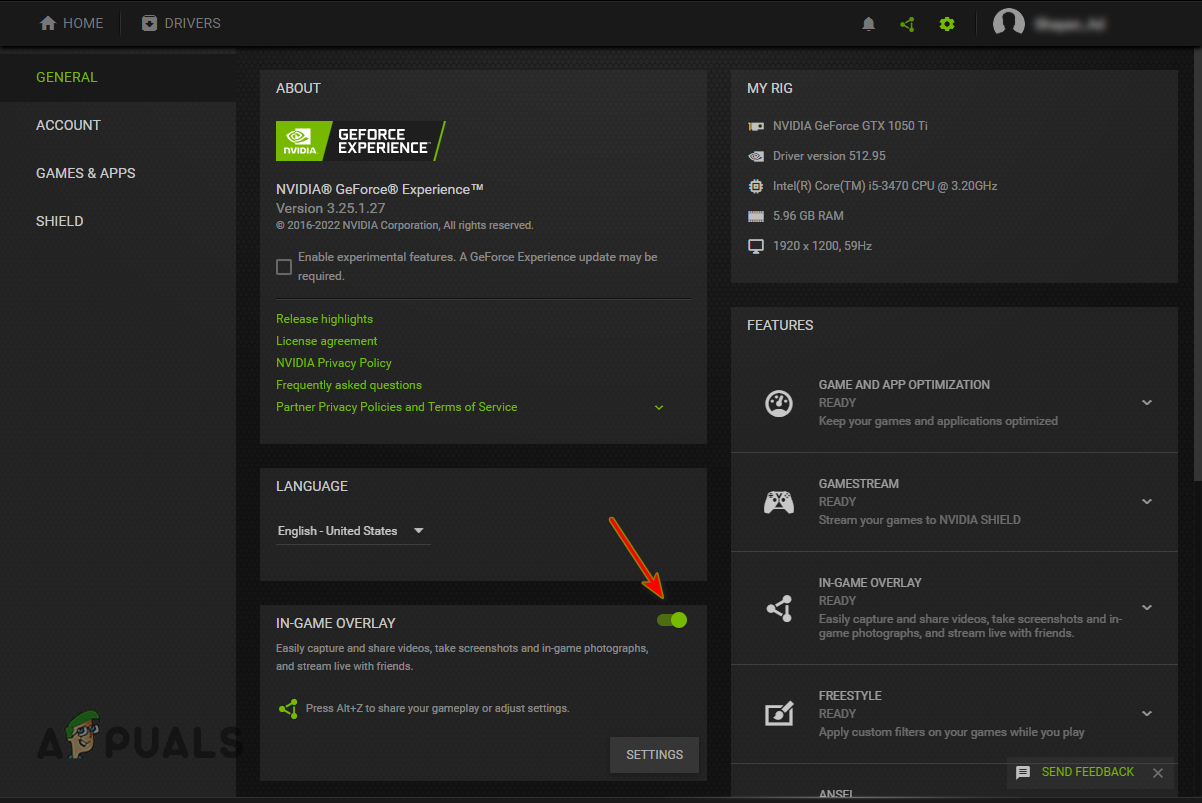
If you use the NVIDIA GeForce Experience Overlay, you can disable it by following these steps:
- Press Windows Key, type GeForce Experience, and press enter.
- Press the gear icon in the top-right corner.

Opening NVIDIA GeForce Experience Settings - Disable the In-Game Overlay option.

Disabling GeForce Experience In-Game Overlay
If you use the Discord Overlay, you can disable it by following these steps:
- Open the Discord application.
- Press the gear icon next to your name (at the bottom-left corner).
Opening Discord Settings - Navigate to the “Activity Settings” category.
- Disable the in-game overlay option.

Disabling the Discord Overlay
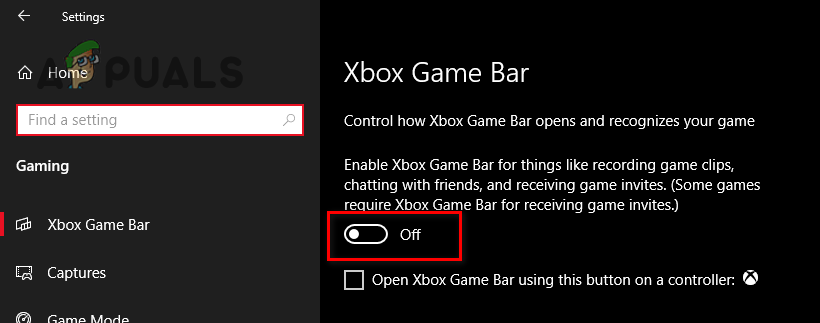
If you use the Xbox Game Bar Overlay, you can disable it by following these steps:
- Press the Windows Key + I on the keyboard at the same time to open Windows Settings
- Select the Gaming tab.

Opening the Gaming Settings menu - Disable the Xbox Game Bar.

Disabling the Xbox Game Bar
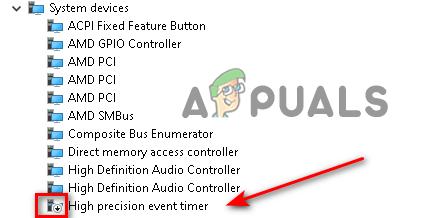
9. Disable High Precision Event Timer (AMD ONLY)
High Precision Event Timer or HPET is a big problem for AMD users in gaming. This one setting has caused significant crashes and lag problems.
- Press Windows Key + X on the keyboard simultaneously, and at the bottom left on the pane that pops up, click “Device Manager.”
- Expand the “System Devices” tab by clicking the arrow on the left of the name
- Scroll until you find “High Precision Event Timer.”
- Right-click the name and click “Disable device.”
- A pop-up will appear; click Yes as it’s nothing to worry about
- It should now have a down arrow near the name like this if you disabled it correctly:

Disabling HPET Driver
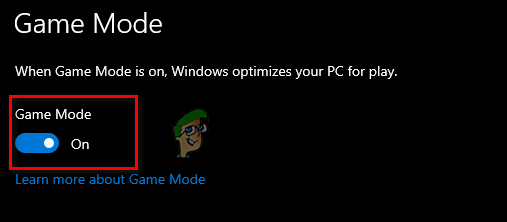
10. Enable Windows Game Mode
After rigorous testing in different types of games, it has been shown that Windows Game Mode is good in some games, and for others, it leads to a loss in performance.
But for Rust, it’s perfectly fine to use as it gives you a slight boost in performance.
- Press the Windows Key + I on the keyboard at the same time to open Windows Settings
- Select the Gaming tab
- On the left-hand pane, select “Game Mode.”
- Turn the toggle On to enable game mode.

Enabling Game Mode
-
rudalkyzhic
-
85 -
2 -
34
Контакты для связи отсутствуют.
-
-
Ответы: 15
-
Привет! В этой теме хочу рассказать о том как повысить FPS в игре Rust.
Системные требования раста.

Если у вас компьютер по характеристикам ниже минимальных, то даже не надо надеяться на хорошую графику в игре
Мои характеристики PC:
Процессор: Intel(R) Core(TM) i3-3220 CPU @ 3.30GHz 3.30 GHz
ОЗУ: 6,00 ГБ
Видеокарта: Geforce GTX 650 1G
Игра выдаёт 30-50 fps при самых минимальных настроек графики(мыло)
1. Программа Mem Reduct
Программа занимается очисткой вашей оперативной памяти!
VT: VirusTotal
Очень сильно помогает в увеличение fps!
2. Параметры запуска
Параметры запуска — это команды которые могут, что-нибудь изменить. В нашем случае повышение FPS.
Для начала заходим в Steam — выбираем игру Rust — правая кнопка мыши — свойства — установить параметры запуска.
Параметры запуска:
-window-mode exclusive -high -maxMem=4096 -malloc=system -force-feature-level-11-0 -winxp -nolog -force-d3d11
| Команда | Функция |
| -window-mode | Запуск в оконном режиме |
| -exclusive -high | Приоритет игры Высокий |
| -malloc=system -force-feature-level-11-0 -winxp -nolog | Позволяет игре использовать все ядра вашего процессора |
| -force-d3d11 | Позволяет игре использовать DirectX вашего компьютера |
В команде maxMex=???? вы ставите цифру сколько у вас оперативной памяти (в мегабайтах):
4 GB = 4096
6 GB = 6144
8 GB = 8192
12 GB = 12288
16 GB = 16384
24 GB = 24576
32 GB = 32768
64 GB = 65536
В команде -force-d3d?? последние цифры вы ставите взависимости какая у вас версия DirectX.
Команда Функция:
effects.aa false
Команда включает или выключает сглаживание(сильно влияет на FPS)
effects.ao false
Команда включает или выключает Ambient Occlusion(сильно влияет на FPS)
effects.color false
Команда включает или выключает цветокоррекцию(слабо влияет на FPS)
effects.gibs false
Команда включает или выключает фрагментацию при разрушении строений
effects.lensdirt false
Команда включает или выключает эффект линзы
effects.motionblur false
Команда включает или выключает эффект размытия
effects.shafts false
Команда включает или выключает объёмный свет
effects.vignet false
Команда включает или выключает виньетирование
graphics.af false
Команда включает или выключает анизотропную фильтрацию
graphics.dof false
Команда включает или выключает размытие переднего, либо заднего плана
skins 0
Команда отключает скины (Полезная команда)
graphics.shadowlights 0
Команда влияет на отрисовку теней
4. GFN (GeForce Now)
Сервис облочного гейминга
(no ad)
Если у вас настолько слабый компьютер, что раст даже не заходит то с помощью GFN вы можете играть на высоких настройках графики!
Есть большие минусы этой программы:
Очередь (на Россию стоит один сервер gfn) Вечером очередь доходит до 500 человек!
Можно играть только в игры которые у вам куплены в steam или epic games
Можно играть только 1 час потом приходится перезаходить и ждать очередь
Также есть платная подписка при которой можно играть в RTX режиме и 6 часов после очереди
также повышенный статус в очереди
Официальный сайт:
КОНЕЦ
Вложения
-
MemReduct.rar
MemReduct.rar
303.2 KB
· Просмотры: 240
Последнее редактирование модератором:
-
Weather
-
OWNER
-
362 -
62
-
-
-
#2
Обратите внимание, пользователь заблокирован на форуме. Не рекомендуется проводить сделки.
Ну gfn если у тебя хуёвый интернет, то лучше не заходи, ну если не хочешь в пиздец каком мыле играть.
-
rudalkyzhic
-
85 -
2 -
34
Контакты для связи отсутствуют.
-
-
-
#3
Ну gfn если у тебя хуёвый интернет, то лучше не заходи, ну если не хочешь в пиздец каком мыле играть.
Я играю через gfn только утром когда очереди нету. А на мыло а игре мне всë равно могу играть и с мылом 
-
Weather
-
OWNER
-
362 -
62
-
-
-
#4
Обратите внимание, пользователь заблокирован на форуме. Не рекомендуется проводить сделки.
Я играю через gfn только утром когда очереди нету. А на мыло а игре мне всë равно могу играть и с мылом

Я в принципе написал, людям минус gfn.
-
kitchenmetaphorical
-
42 -
8
Контакты для связи отсутствуют.
-
-
-
#5
Кто нибудь знает почему когда я ставлю файл подкачки 8192 мегабайта(оперативы 8гб) то крашиться игра? Так же когда ставлю в параметры запуска maxMex=8192 тоже краши.
-
-
-
#6
Кто нибудь знает почему когда я ставлю файл подкачки 8192 мегабайта(оперативы 8гб) то крашиться игра? Так же когда ставлю в параметры запуска maxMex=8192 тоже краши.
Значит не ставь
-
whiteㅤ
-
772 -
2 -
282
Контакты для связи отсутствуют.
-
-
-
#7
что бы повысить фпс в расте, купи новое железо
-
rudalkyzhic
-
85 -
2 -
34
Контакты для связи отсутствуют.
-
-
-
#8
что бы повысить фпс в расте, купи новое железо
Ну, это тема для тех у кого нету денег