
This tutorial will walk you every step of the way through installing, setting up and using SyncMate to sync your Windows Mobile device with your Mac.
2021 Update: the software utilized in this guide no longer supports Windows Mobile. SyncMate 4 was the last version that supported Windows Mobile, and is no longer available for download from the Eltima site (I couldn’t find it…)
Though SyncMate isn’t new, they’ve just released a version with a long awaited feature – the ability to sync using a locked Windows Mobile/Pocket PC device. The free version of SyncMate is limited to only syncing your Contacts and iCal calendar (and Google Contacts and/or Google Calendar) – but that’s more than enough for me. It’s also worth mentioning that you can also use SyncMate to mount your Windows Mobile device as a drive in OS X – and browse/transfer files to and from your Mac/device. Keep reading for the full walk-through.
- Head over to the SyncMate download page NOTE: site no longer appears to include ability to download SyncMate 4, which is the last version that worked with Windows Mobile.
- Open the SyncMate .dmg file and double-click Eltima SyncMate.pkg to begin the installation.
- You’ll be prompted to confirm that it’s OK to include software that determines if it’s possible to install software. Yep. Click Continue.
- There isn’t much to see on the Introduction screen, so click Continue.
- Review the info in the Important Information screen, and click Continue.
- Review the info in the Software License Agreement (yawn) and yet again, click Continue.
- Since it wasn’t enough to get you to click Continue on the previous screen, now click Agree.
- Unless you want to change the installation location (probably not a great idea), click the Install button.
- When prompted to enter your password, do so, and click OK.
- Once the installation has completed, you’ll need to restart. Save any open work, exit out of any open programs, and click the Restart button. Your Mac will reboot now.
- Once your Mac starts again, navigate to the Applications folder and double-click SyncMate to launch it.
- Place a check in the Don’t show this warning again box, and then click OK.
- Plug your Windows Mobile device into the USB cable, and plug the cable into your Mac. A semi-transparent CONNECTING… window will appear.
- In SyncMate, click the Connect button. A message will appear on your mobile device saying that USB drivers are being installed, and once the installation is complete, click Done (on your device). If the Connect button doesn’t trigger the software to install on your mobile device, click it again. For me, it didn’t work until after the 3rd time I clicked Connect.
- Once your mobile device is connected to SyncMate, select Contacts from the Plugins menu on the left side of the window. From here you’ll set how you want to synchronize your contacts. The choices are Mac <-> Mobile device (two-way syncing), Mac -> Mobile device (contacts will be updated on your mobile device from your Mac, but contacts on your mobile device will not update on your Mac) and Mobile device -> Mac (contacts will be updated on your Mac from your mobile device, but contacts on your Mac will not update on your mobile device).
If a conflict occurs, you’ll probably want to leave the default (Ask Me) – but you can also set SyncMate to always use your Mac as the “source of truth”, or always use your mobile device as the source.
If you have multiple groups of contacts, you can opt to only sync one group. To do so, place a check in the box labeled Synchronize only this group of contacts. Select that group by clicking the … button.
- Choose the group you want to sync, and then click OK.
- If you’d like to sync your Google contacts, place a check in the box labeled Sync with Google contacts. Click the Google login info button. Enter your Google user name and password in the spaces provided, and place a check in the box labeled Save password (unless you want to enter your password each time you sync your Google contacts). Click OK.
- Now that you’ve setup your contacts syncing preferences, select iCal from the Plugins menu on the left side of the the SyncMate window. Similar to how the contacts sync works, select how you want your Synchronization direction to work (two-way, update from Mac only or update from mobile device only). Again decide how you want to resolve conflicts (Ask me is probably ideal).
If you have more than one calendar, click the … button.
- Select the calendar you want to sync with your mobile device, and click OK.
- If you’d like to sync your Google calendar, place a check in the box labeled Sync with Google calendar. Click the Google login info button. Enter your Google user name and password in the spaces provided, and place a check in the box labeled Save password (unless you want to enter your password each time you sync your Google calendar). Click OK.
- You’re finally ready to perform your first sync. Click the Sync now button in the upper-right corner of SyncMate.
- The first sync can take a while, depending on how many contacts and calendar events you have on your mobile device and/or Mac. You’ll know it’s actually working by the “spinning circles” next to Contacts and iCal.
- If more than 5% of the info on your computer or mobile device is changing, SyncMate will “warn” you. If you’d like to see the details of the changes, click the Show Details button. Otherwise, just click Sync.
- Your contacts and calendars on your Mac and mobile device will now be in sync. One other feature of SyncMate is Mount disk. This allows you to browse, upload and download files on your mobile device from your Mac. To do so, click the Mount disk button.
- You’ll get a warning message saying that this feature is in beta and may have glitches/bugs. Place a check in the Don’t show me this warning again box and then click OK.
- You can now view and transfer files on your mobile device, from Finder.
- Once you’re done, click the Unmount button and the Disconnect button before you unplug your mobile device.

click to enlarge


click to enlarge

click to enlarge

click to enlarge

click to enlarge

click to enlarge

click to enlarge

click to enlarge

click to enlarge


click to enlarge

click to enlarge


click to enlarge


click to enlarge

click to enlarge

click to enlarge

click to enlarge

click to enlarge

click to enlarge

click to enlarge
If this article helped you, I’d be grateful if you could share it on your preferred social network — it helps me a lot. If you’re feeling particularly generous, you could buy me a coffee and I’d be super grateful 
Время на прочтение3 мин
Количество просмотров41K
Переход на Windows Phone совершенно не означает, что вы должны забыть о синхронизации с OS X. Под катом мы постараемся объяснить, почему «Nokia Lumia + MacOS X = Дружба и взаимопонимание».
Синхронизируем Lumia с Mac
На самом деле, все — от iTunes и iPhoto до Mail — можно синхронизировать с любым смартфоном Nokia Lumia. Первое, что вам обязательно понадобится, — это установить небольшое приложение Windows Phone для Mac. Оно представляет собой удобный инструмент, который позволяет настроить синхронизацию и просмотреть любые файлы, хранящиеся на вашей Lumia.
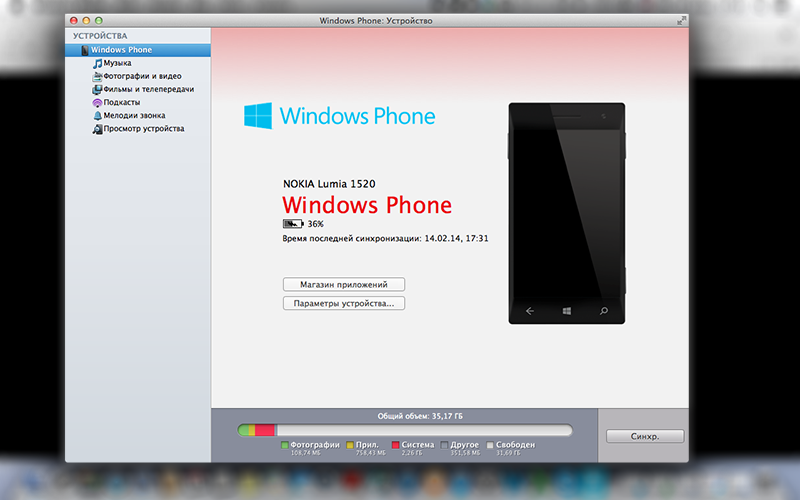
Как вы можете видеть на скриншоте, навигация в приложении очень проста и привычна для пользователей MacOS. Подобно тому, как iTunes взаимодействует с фирменными гаджетами Apple, приложение Windows Phone может сихронизировать с Lumia любую музыку (вместе с плейлистами) и фотографии, хранящиеся на вашем Mac. Однако стоит иметь в виду, что контент с защитой DRM не будет синхронизирован со смартфоном.
Nokia Photo Transfer
Для синхронизации фотографий с Lumia (начиная с Nokia Lumia 520 и заканчивая Nokia Lumia 1520) есть более мощное приложение с дополнительными возможностями импорта и экспорта видео- и фотоконтента. Оно называется Nokia Photo Transfer, и загрузить его можно по этой ссылке.

Простое и минималистичное приложение Nokia Photo Transfer позволит вам самому выбрать, откуда и куда переместить снимки (вне зависимости от того, импортируете вы их или экспортируете). Но, что самое главное, при помощи этого «аппа» вы также сможете переместить на ваш Mac «Ожившие фото» и любые другие снимки, сделанные при помощи Nokia Camera. Дополнительным бонусом для владельцев Nokia Lumia 1020 и Lumia 1520 станет возможность скопировать с устройства снимки в высоком разрешении и цифровые негативы (DNG).
Подключаем ваш iCloud-аккаунт к Nokia Lumia
Если вы являетесь пользователем компьютера Apple, то, возможно, ваш основной ящик электронной почты расположен в iCloud.
В отличие от Gmail и Hotmail, аккаунт iCloud пока не находится в списке предустановленных поставщиков услуг электронной почты для Nokia Lumia. Тем не менее, мы сделали все необходимое, чтобы вы смогли подключить ваш аккаунт в считаные секунды. Откройте в настройках вашего смартфона меню «Почта + Учетные записи», нажмите на раздел «Добавить службу», а затем пролистайте до раздела «Дополнительно».
Теперь вам остается только ввести ваш адрес и пароль, после чего ваш аккаунт автоматически будет добавлен в Lumia, а на стартовом экране появится дополнительная плитка для входа в почтовый ящик iCloud. Все просто!
Есть большая вероятность того, что в ближайшие несколько месяцев в экосистеме Windows Phone появится полноценная поддержка iCloud. Однако, если вам не терпится синхронизировать календари и контакты из «облака» уже сейчас, вы можете воспользоваться способом, рекомендованным пользователем Lumia на конференциях XDA Developers. Еще один способ — экспортировать контакты через vCard на сторонний сервис (Gmail или Microsoft Exchange) и настроить параллельную синхронизацию на Mac и Lumia.
Заменяем iCloud Documents и «Фотопоток» облаком SkyDrive
Все Nokia Lumia отличаются поддержкой Office и SkyDrive по умолчанию. В настройках вашей Lumia вы сможете установить параметры синхронизации так, чтобы отснятые кадры при наличии Wi-Fi или мобильного интернет-соединения автоматически дублировались на ваш SkyDrive-аккаунт. Вы также сможете с легкостью сохранять любые документы в облачном хранилище. Поэтому можно просто сместить акценты «облачного» доступа с iCloud на Skydrive. Благо для этого есть специальное приложение для Mac (https://itunes.apple.com/ru/app/skydrive/id522548761). А параметры автоматической синхронизации контента с других сервисов вы с легкостью настроите при помощи замечательного IFTTT.
Управляем удаленно вашим Mac
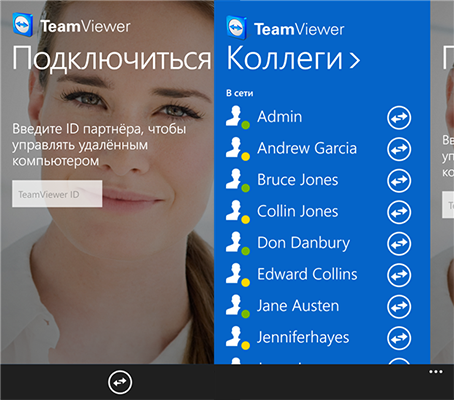
В «Магазине приложений» есть ряд приложений для удаленного управления Mac. К ним, например, можно отнести TeamViewer, благодаря которому вы сможете управлять не только своим Mac, но и другими компьютерами на Windows или Linux.
VLC Mobile Remote Pro станет вашим пультом управления медиаконтентом на Mac. Вы сможете останавливать просмотр фильмов или переключать треки, не вставая с дивана.

В добавок к VLC Mobile Remote Pro вы можете установить приложение с нехитрым названием Remote, которое позволит управлять вашим iTunes с расстояния. При этом приложение не только позволяет переключать треки, но и открывает полный доступ к медиатеке.

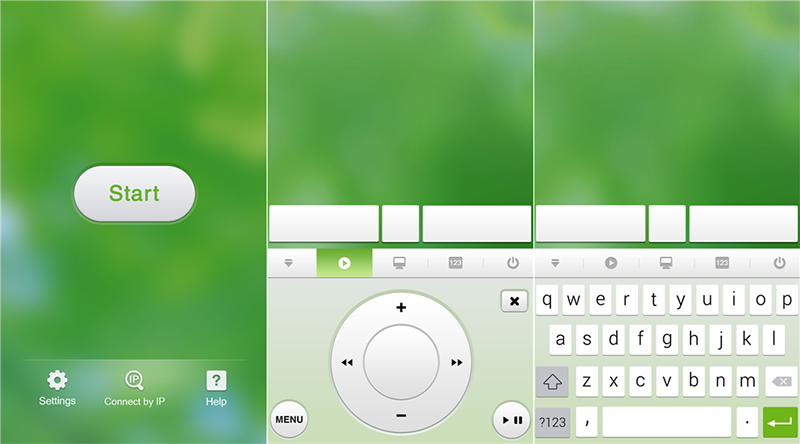
Приложение Remote Mouse позволит превратить Lumia в полноценный беспроводной трекпад / клавиатуру для управления компьютером Apple на небольшом расстоянии. Удобное приложение сможет помочь, например, при переключении слайдов во время презентации или для управления Safari, если Mac подключен к большому дисплею или телевизору.
А какие советы для владельцев Lumia и Mac знаете вы? Пишите в комментариях к этому посту.
You want to connect your Windows Phone to a Mac and synchronize data, you need a special Software. We will show you what you need and how you will proceed.
Windows Phone with Mac connect — how it works
- Download the program «Windows Phone» on your Mac, install it and open it then the App.
- In the next step, you connect your Windows Phone via USB or Micro USB on the Mac. It takes a few moments, until the Windows Phone is detected.
- The Mac downloads iPhoto automatically as soon as it has detected the Windows Phone, and imported all the photos and Videos in iPhoto.
- Now you can assign your phone a new name and specify whether the Phone will automatically sync and photos and Videos to be imported on the Mac. Confirm your selection with click on «Next».
- Your Windows Phone is displayed with all content. You can now store music, pictures, or what you choose otherwise, for data on the Phone.
- Via the menu item «device options» in the settings for device name, auto-Sync, photos and Videos on Mac to import, resize pictures, sync errors and much, much more.
- You have getraoffen your selection and all settings adjusted to your Liking, click «Synchronize».

Windows Phone with Mac connect
If you’ve invested in a Windows Mobile device and you want to sync it to your Mac (and aren’t planning to get an iPhone soon), I would recommend syncing your device using SyncMate.
The alternatives gave me trouble:
* Missing Sync stopped syncing. And it asks you to pay $40 up front with no trial. Their refund policy is that there are no refunds («All Sales are Final» policy).
* PocketMac gave me an error on installation. I couldn’t even get the PocketMac window to appear after installation. At least it has a refund policy.
I had the best luck with SyncMate. Go with SyncMate. There’s a free edition and an expert edition.
One issue though with SyncMate is that it does not sync task categories — you lose any categories that you’ve assigned to your tasks. I use task categories quite a bit (for GTD), so my workaround is to put the category name at the start of each task (e.g. WaitingFor — …).
Sync music, photos, videos and podcasts from your existing iTunes and iPhoto libraries to your Windows Phone 7
Important! Selecting a language below will dynamically change the complete page content to that language.
-
File Name:
WP7C_0.6_Beta.dmg
The Windows Phone 7 Connector for Mac 1.0 is now available via the Mac App Store. For more details go here.
Windows Phone 7 Connector for Mac is a new software application that enables you to synchronize your favorite music*, videos*, photos* and podcasts* from iTunes and iPhoto.
This software is not part of the Zune experience. In order to enjoy the Zune experience on Mac, you will need to install a Windows OS (XP or higher). Zune delivers music and video entertainment across Windows Phone 7, Xbox Live and Windows PC’s.
*DRM Protected content will not be able to be synchronized with Windows Phone 7
-
Supported Operating Systems
Apple Mac OS X, Apple Mac OS X v. 10.5 Leopard
Apple OSX 10.5 and above
-
Double-click on the installer and follow the simple instructions to complete the install.