
Item Preview

me_01.jpeg
me_02.jpeg
me_03.jpeg
me_04.jpeg
me_05.jpeg
me_06.jpeg
me_07.jpeg
me_08.jpeg
me_09.jpeg
me_10.jpeg
me_11.jpeg
me_12.jpeg
me_13.jpeg
me_14.jpeg
me_15.jpeg
me_16.jpeg
me_17.jpeg
me_18.jpeg
me_19.jpeg
me_20.jpeg
me_21.jpeg
me_22.jpeg
me_23.jpeg
me_24.jpeg
me_25.jpeg
me_26.jpeg
me_27.jpeg
me_28.jpeg
me_29.jpeg
me_30.jpeg
me_31.jpeg
me_32.jpeg
me_33.jpeg
me_34.jpeg
me_35.jpeg
me_36.jpeg
me_37.jpeg
me_38.jpeg
me_39.jpeg
me_40.jpeg
me_41.jpeg
me_42.jpeg
me_43.jpeg
31,479
Views
5
Favorites
DOWNLOAD OPTIONS
Uploaded by
Unknown
on
SIMILAR ITEMS (based on metadata)
Are you curious about the installation and use of Windows Millennium Edition (ME) in a new virtual machine? If so, in this guide, I will cover Oracle VM VirtualBox 7.0, which is compatible with both Windows 11 and Windows 10 operating systems.
Then, I will guide you through the installation of Windows ME on the virtual machine. As a result, you will start using ME in a virtual environment. So let’s get started!
How to Set Up Windows ME (Millennium) on Windows 11 / 10 using Oracle VM VirtualBox 7
Microsoft released the Windows ME (Millennium Edition) operating system, which has both 16-bit and 32-bit versions, on September 14, 2000, for users.
Windows ME has the same code structure as Windows 98 and is the last version of the 9x systems. The minimum conditions to run this system on a physical PC are a 150 MHz Pentium processor, 320 MB of available disk space, and 32 MB of RAM.
Windows ME, which physically supports a maximum of 1.5 GB of RAM, can be increased to more capacity by editing some configuration files.
Windows ME also includes Internet Explorer 5.5, Windows Media Player, and Windows Movie Maker, which are mainly developed for home users.
This system, which took the title of Microsoft’s most unsuccessful operating system, was quickly replaced by Windows XP due to system instability and crashing problems.
Significant support for the Windows Millennium Edition (ME) system officially ended on December 31, 2003, and extended support ended on July 11, 2006.
Nowadays, it may make little sense to install Microsoft’s legacy Me system on a physical computer. Even in some cases, it may be necessary because the updated software of older devices supports older systems.
It can be challenging to locate and install the necessary hardware drivers when using an older computer. Therefore, installing older Windows operating systems on virtual machines may be more accessible.
How to Create a New Virtual Machine for Windows ME
You can install all old and new Windows, Linux, and macOS systems on virtual machines using Oracle VM VirtualBox on your host computer, which supports virtualization.
Creating a new virtual computer for Windows Millennium is simple, but you must configure its settings correctly. If not, there is a possibility of encountering numerous errors while installing the operating system.
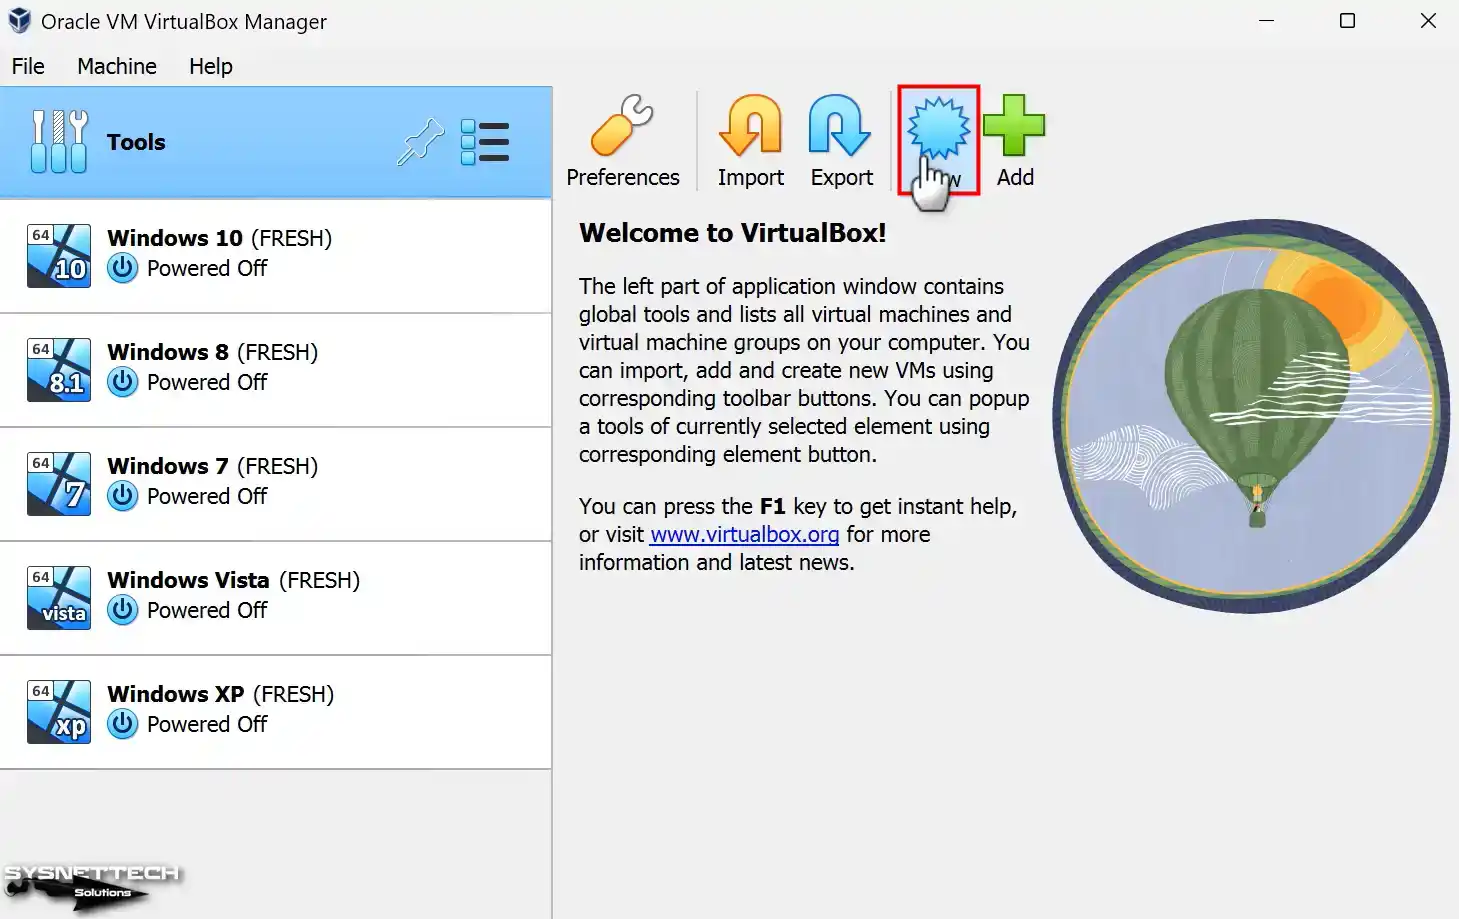
Step 1
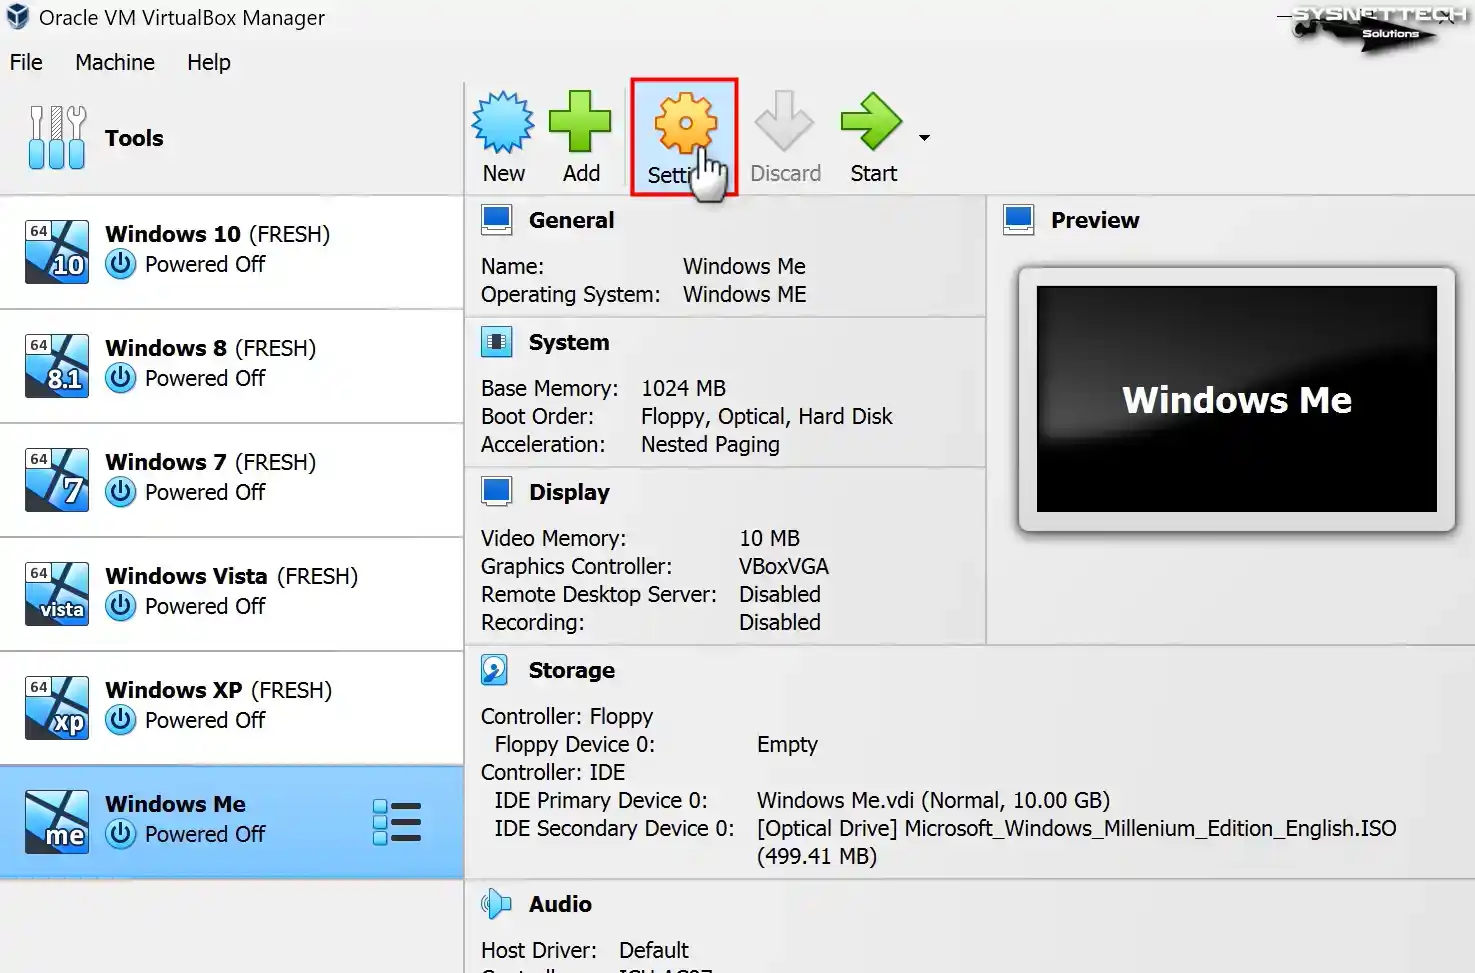
After installing VirtualBox, run the program, click the Machine / New button from the tool menu or the New button from the shortcuts on the right, and start the virtual machine setup wizard.
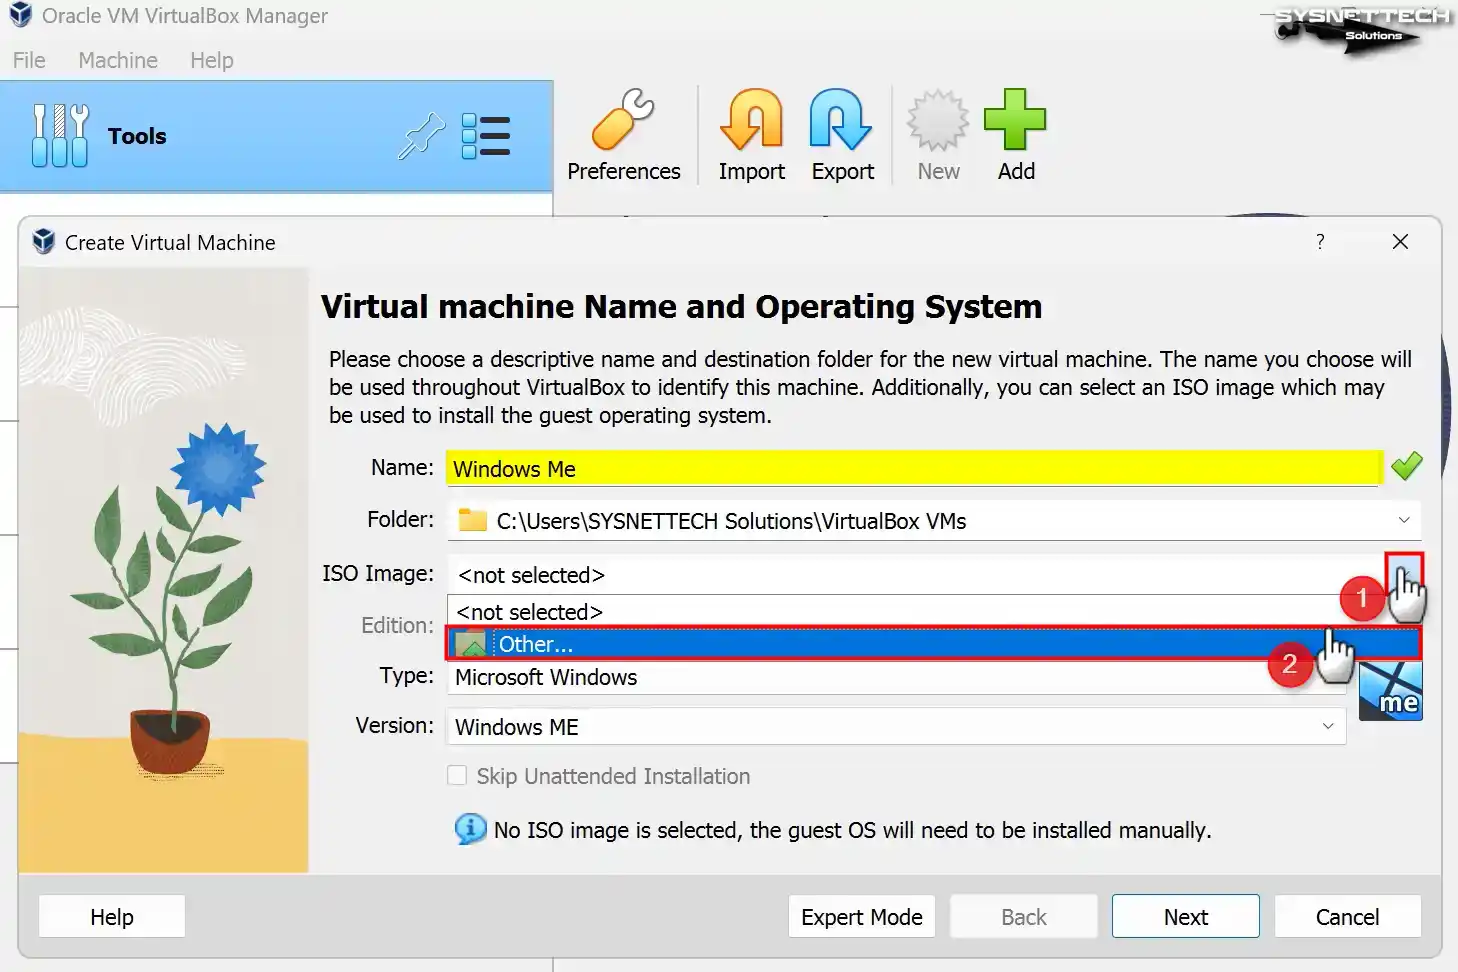
Step 2
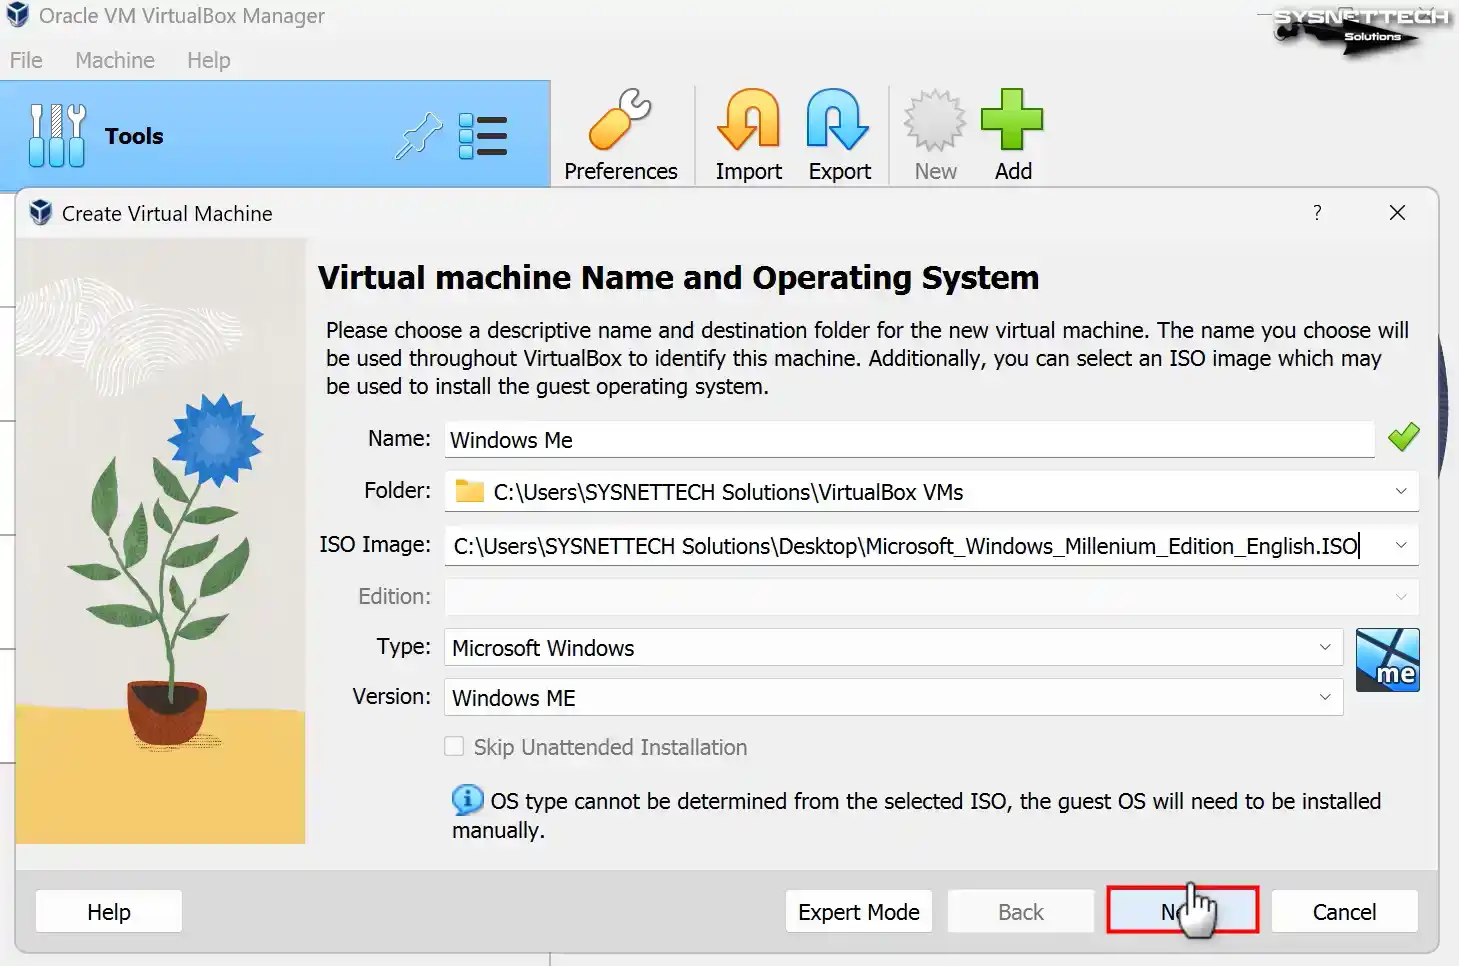
When you type the operating system’s name, you will install it in the Name field of the Virtual PC wizard. The values in the Type and Version fields will be determined automatically by VirtualBox.
If you do not want to form it on your host disk, configure the Folder to a location on your external disk. Also, expand the drop-down menu from the ISO Image section and click Other to add a Windows ME ISO file to the virtual machine.
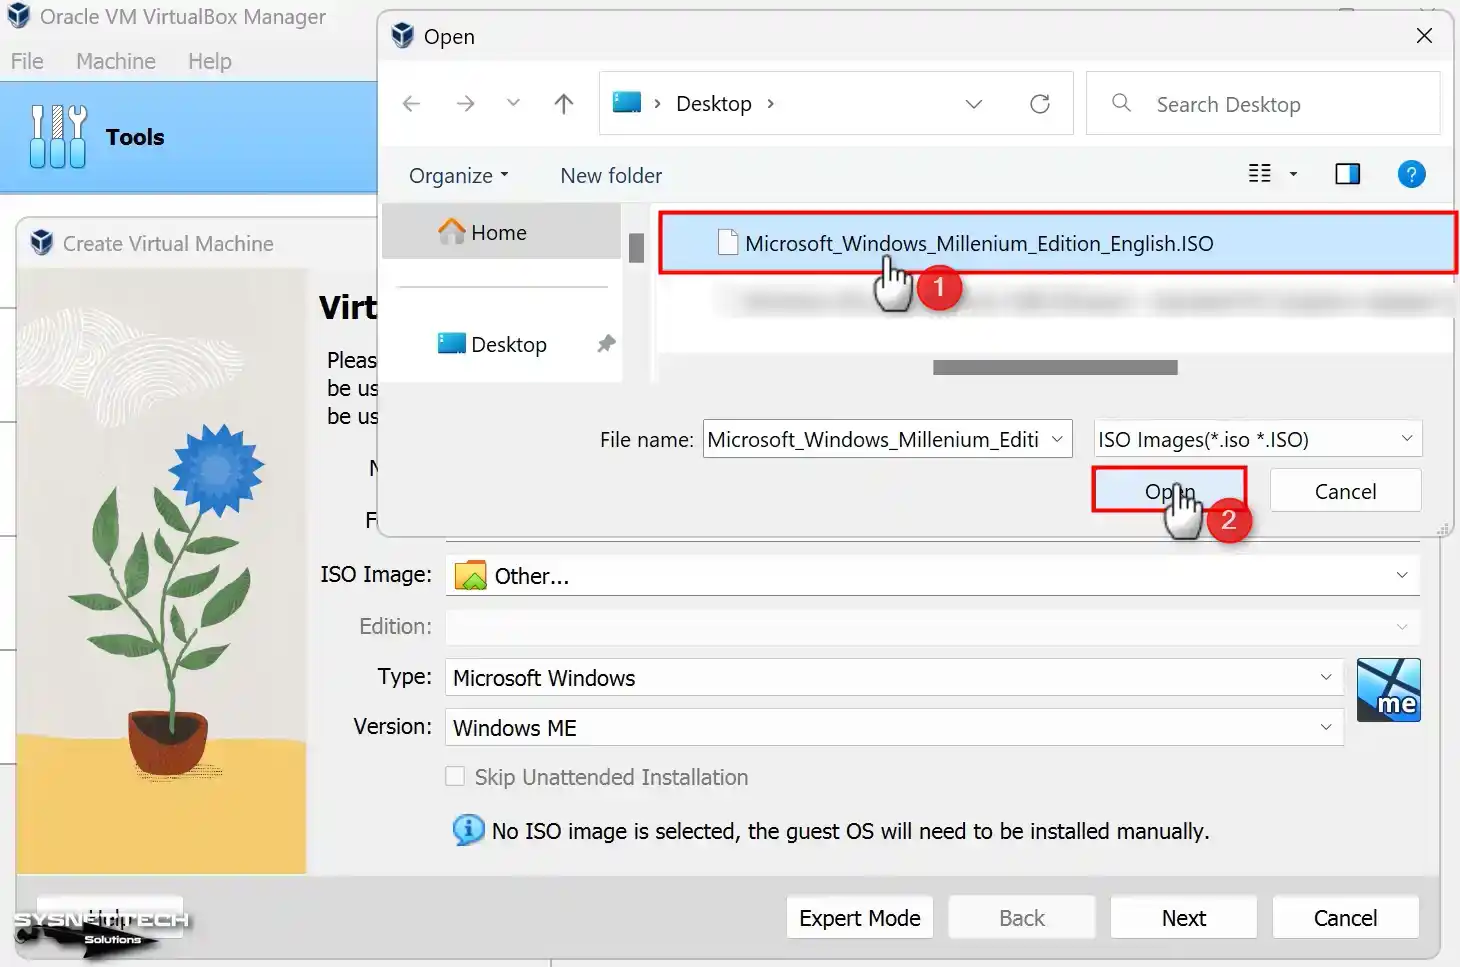
Step 3
Select the Microsoft Windows ME (Millennium) ISO file you downloaded to your computer from the table below the article and open it.
Step 4
You can see the unattended system configuration in this window, as the UI has been changed in the 7.x versions of VirtualBox. On older Windows systems, this feature may not work, so you have to continue with the manual system setup.
Step 5
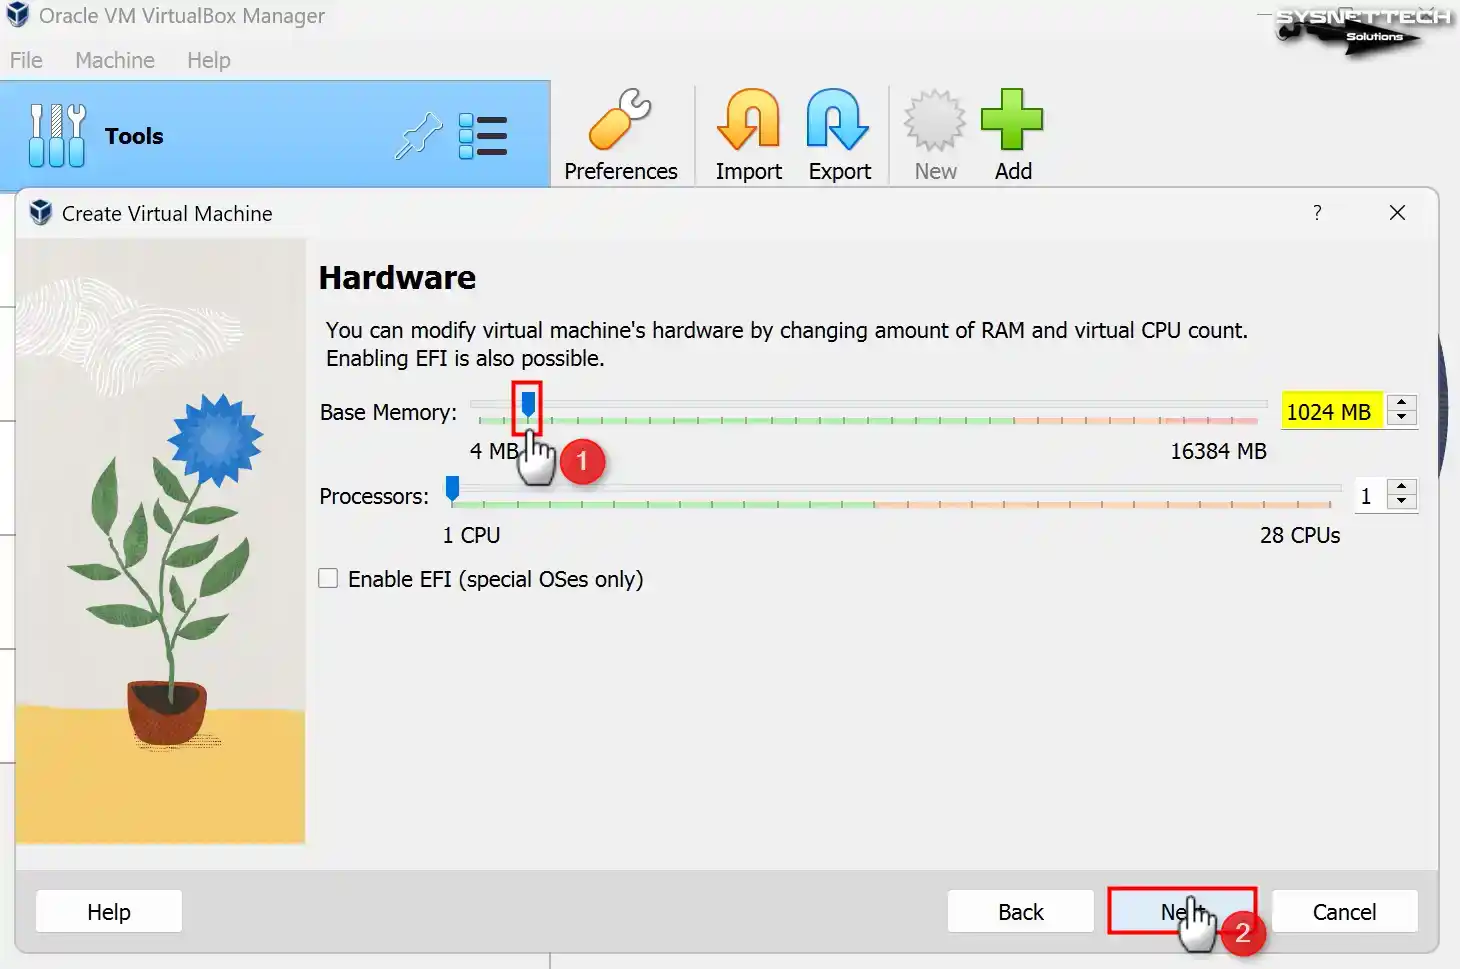
The recommended memory size for the Windows Me VM is 128 MB, but the RAM value should be set to 1024 MB (1 GB), and click Next.
Step 6
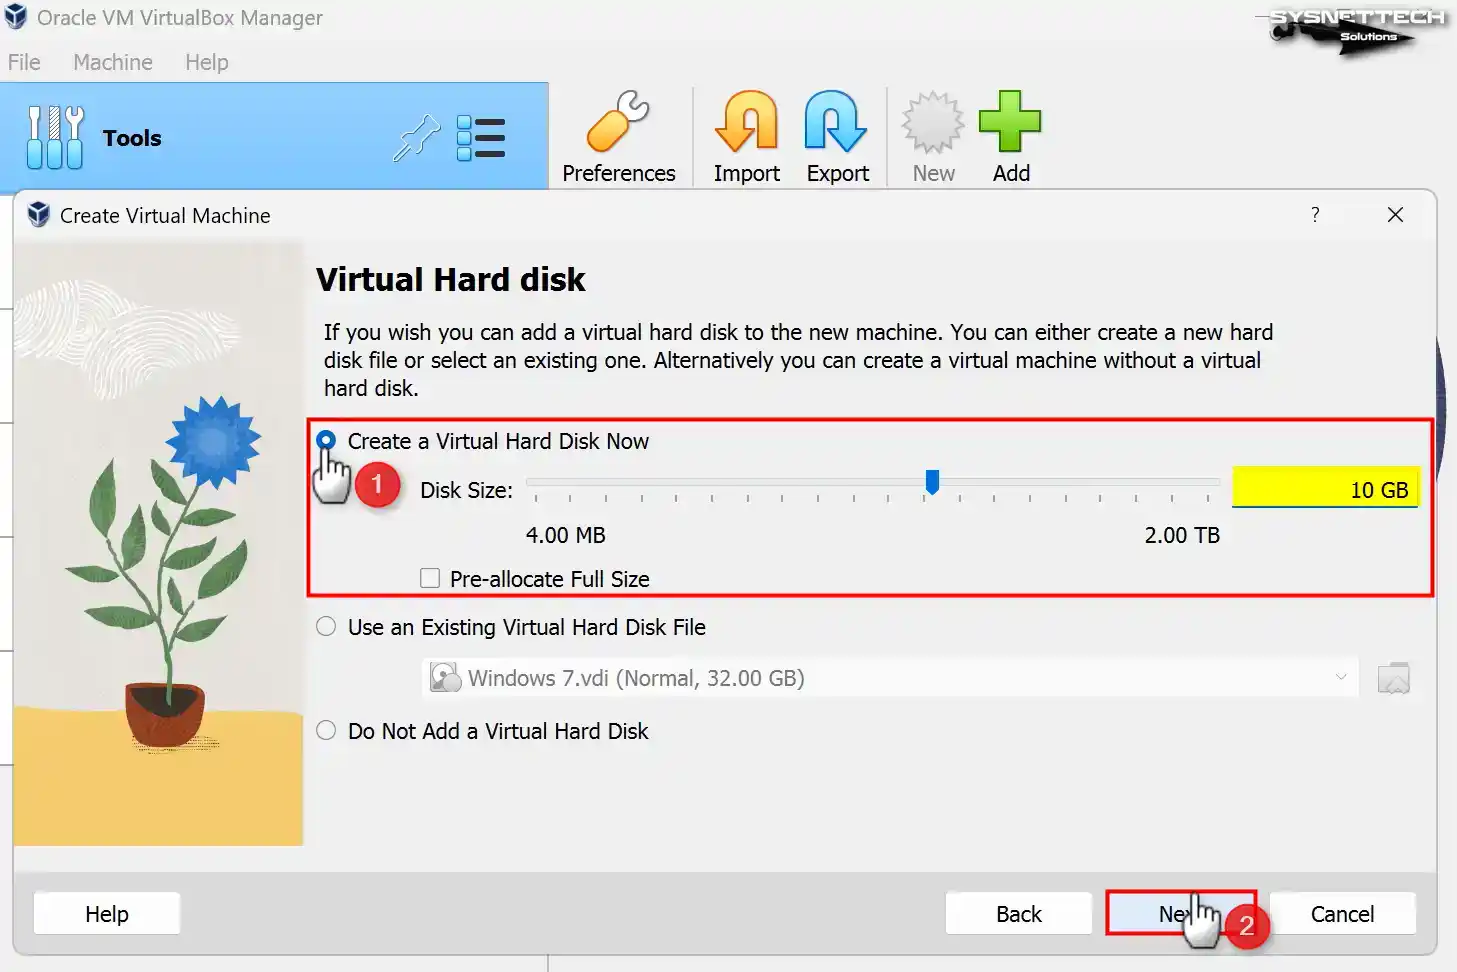
Since you will install a clean Windows system, tick the “Create a Virtual Hard Disk Now” option in the Hard Disk configuration window and configure the disk size to 10 GB or according to your needs.
NOTE: At this stage, if you are using one of the old VBox versions and installing it on an old host computer, you can configure the virtual disk size to Fixed Size for virtual machine performance. Thus, the virtual HDD’s capacity will be allocated from the host disk. If your host computer has a fast SSD disk, installing it with the Dynamically Allocated option is recommended. In this case, the necessary disk space will automatically be allocated from the host disk when using a VM.
Step 7
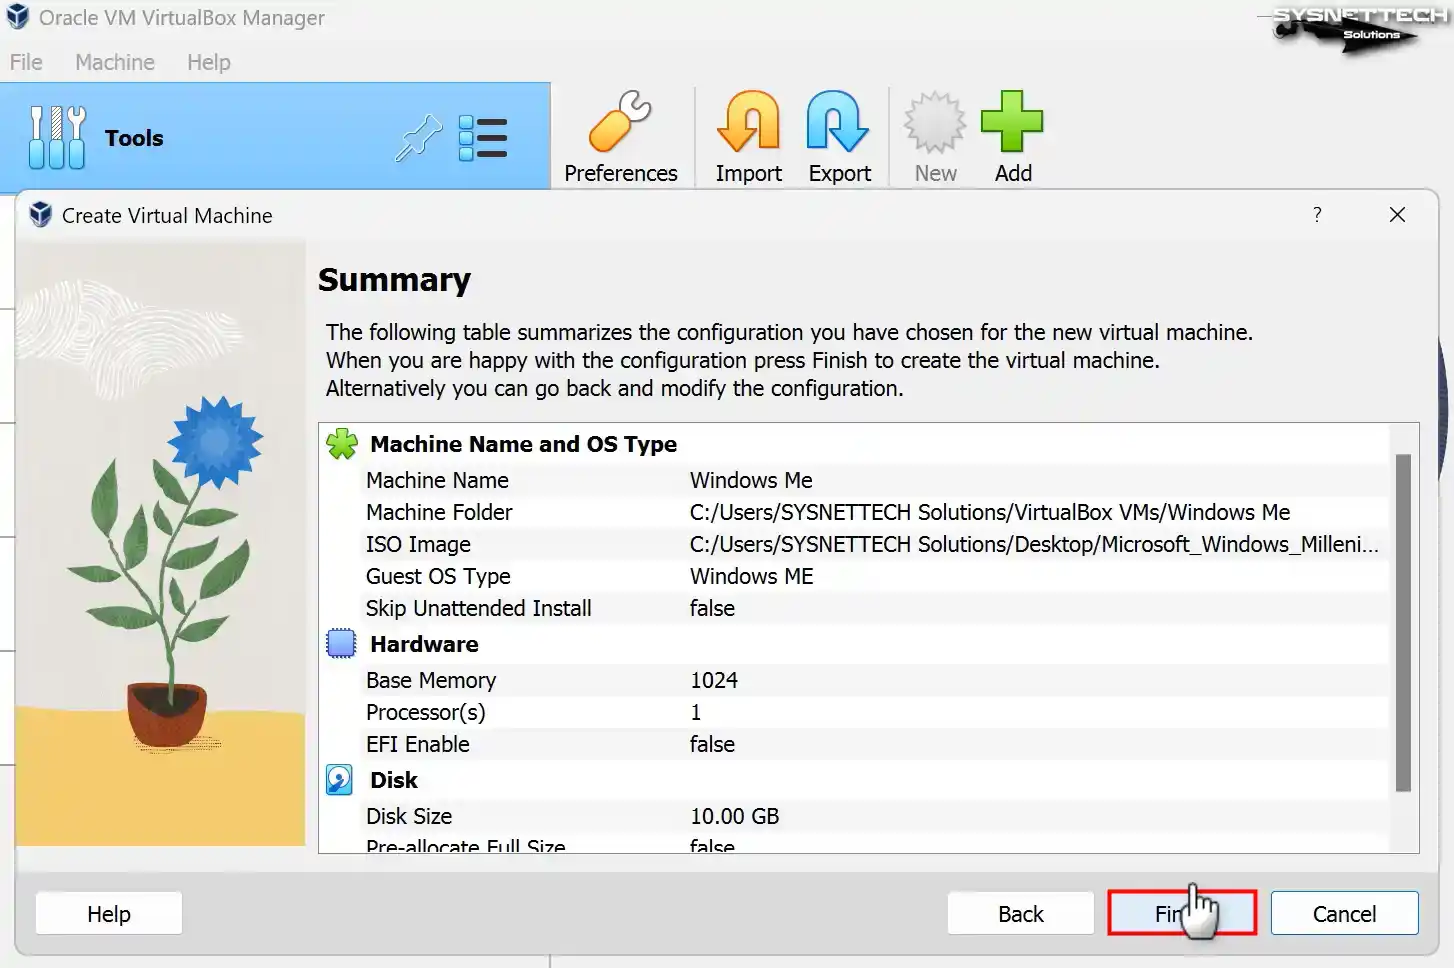
Check the hardware information of the Windows ME guest machine and close the wizard.
Step 8
Open Settings to better organize the virtual PC’s settings.
Step 9
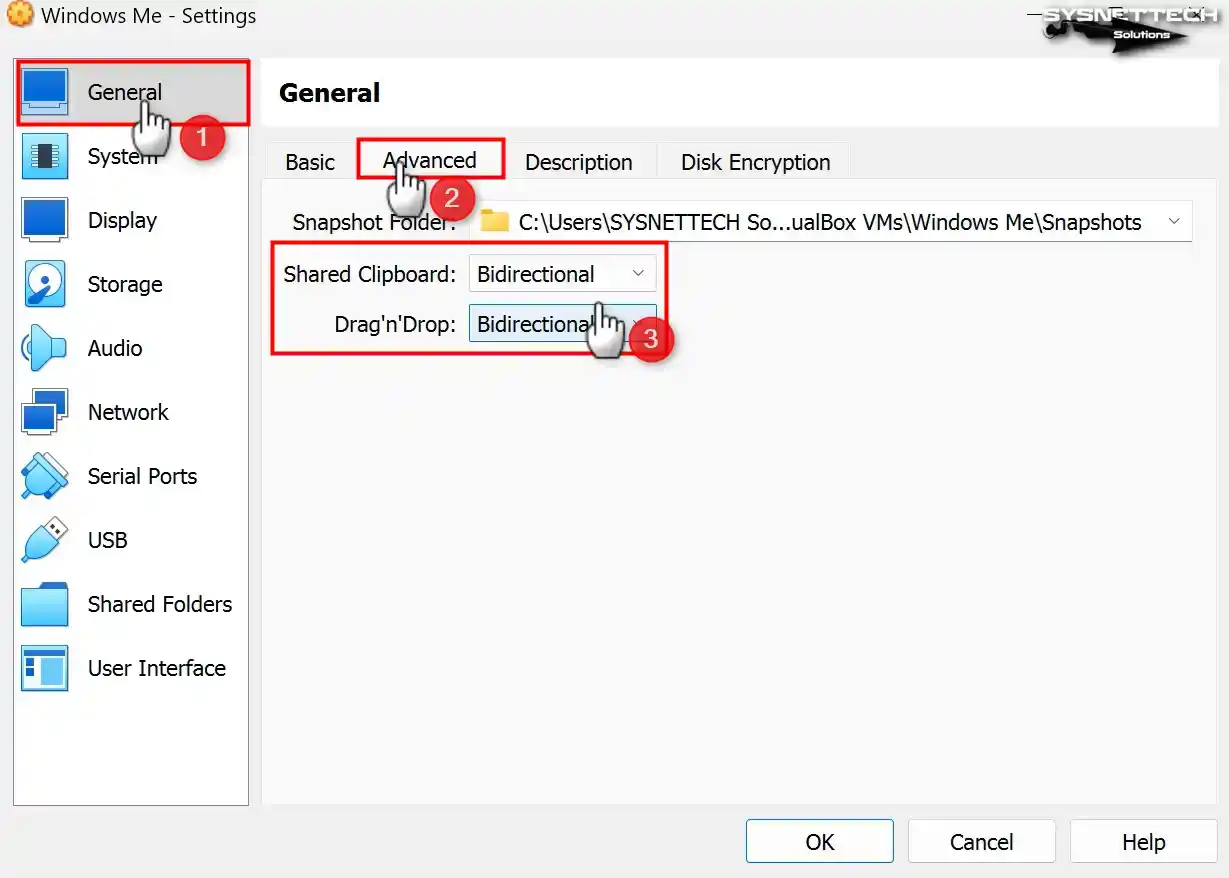
You cannot use drag-and-drop or copy-and-paste features in VirtualBox 7.x versions, as Guest Additions are unsupported for older Windows systems. However, if you are trying to install with a 5.x or 6.x version of VirtualBox and it supports these features, change the Shared Clipboard and Drag’n’Drop properties to Bidirectional.
Step 10
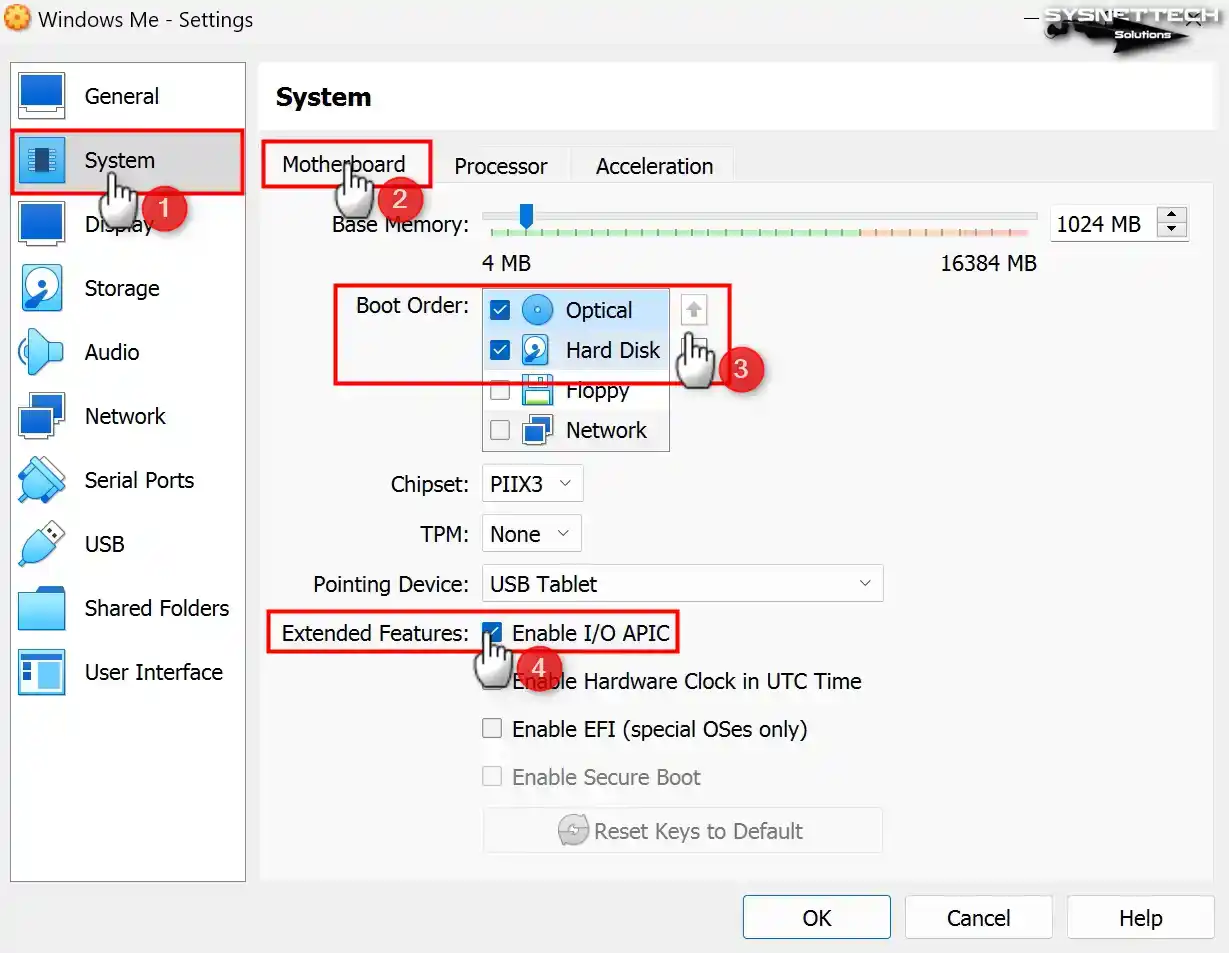
In the System / Motherboard tab, select the Optical device in the first row of the Boot Order setting and enable the I/O APIC feature.
Step 11
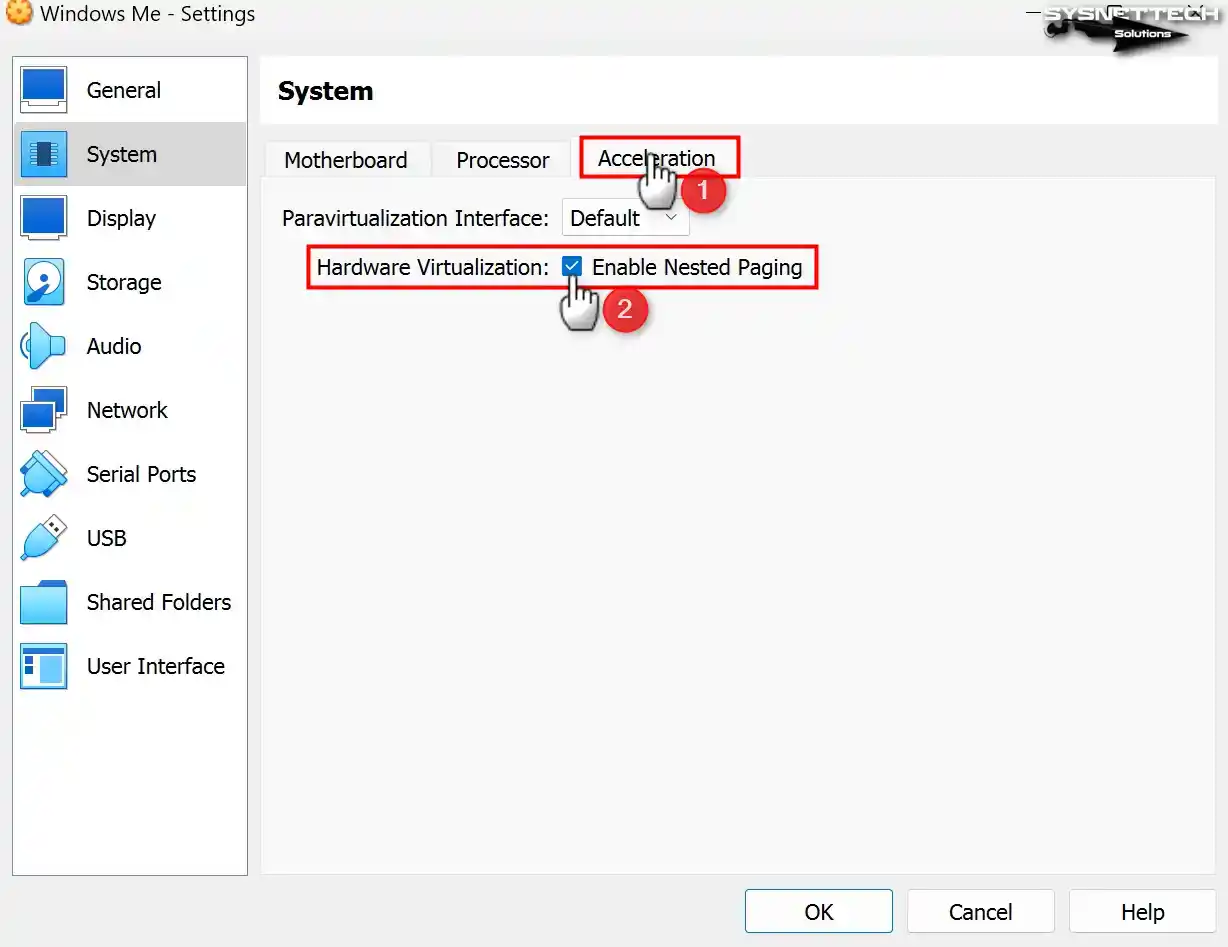
In the Acceleration tab, enable Nested Paging and leave the Paravirtualization Interface at the default for better memory management between the host and VM.
Step 12
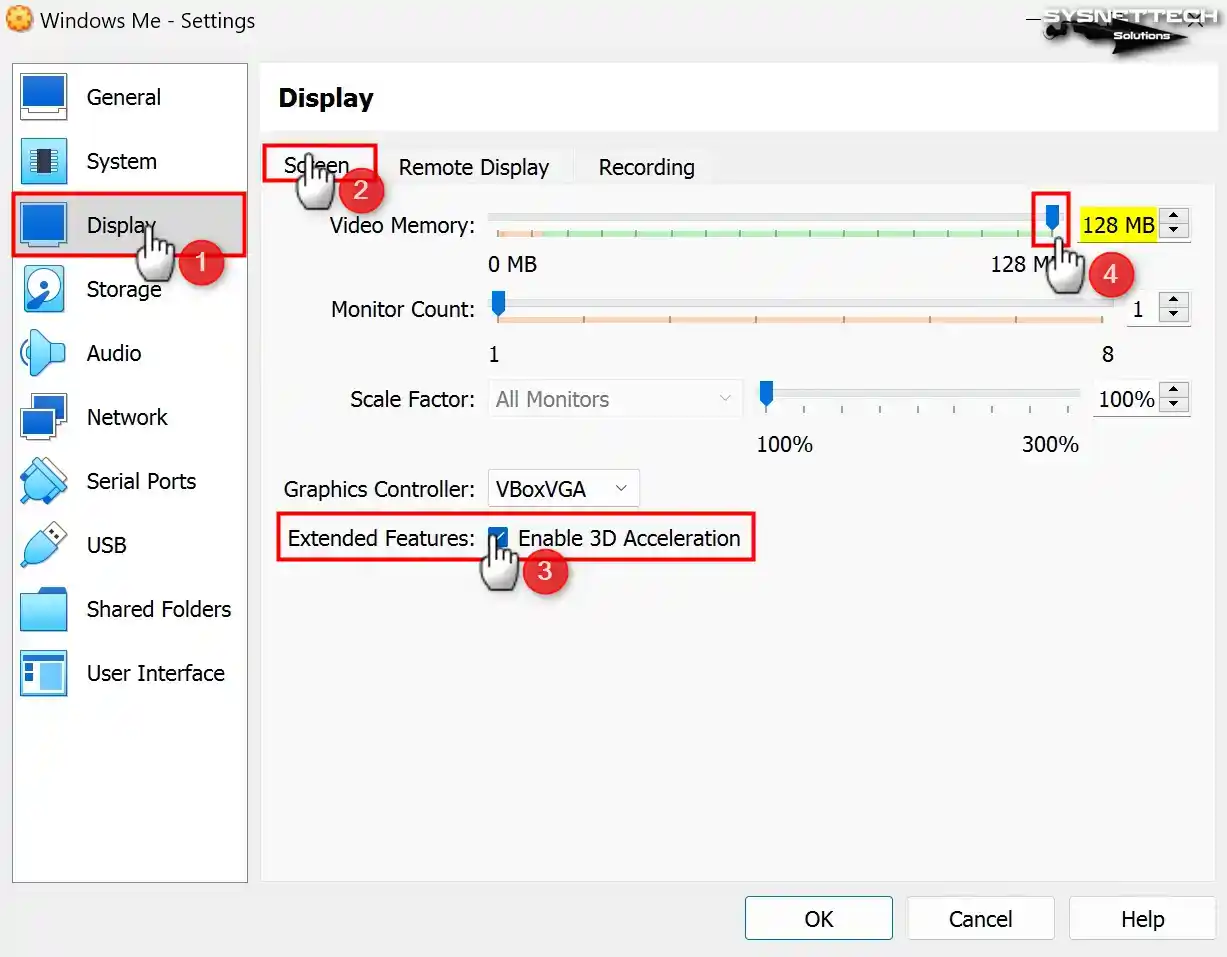
As we said, you cannot use the 3D feature in new versions of VBox. But if you are utilizing the old version of VBox, enable 3D Acceleration for the Display device and configure the Video Memory value to 128.
Suppose you cannot install the Guest Additions for 9x versions in VirtualBox because it is not officially supported. In that case, we will install the driver for the display adapter, which helps increase the video memory.
Step 13
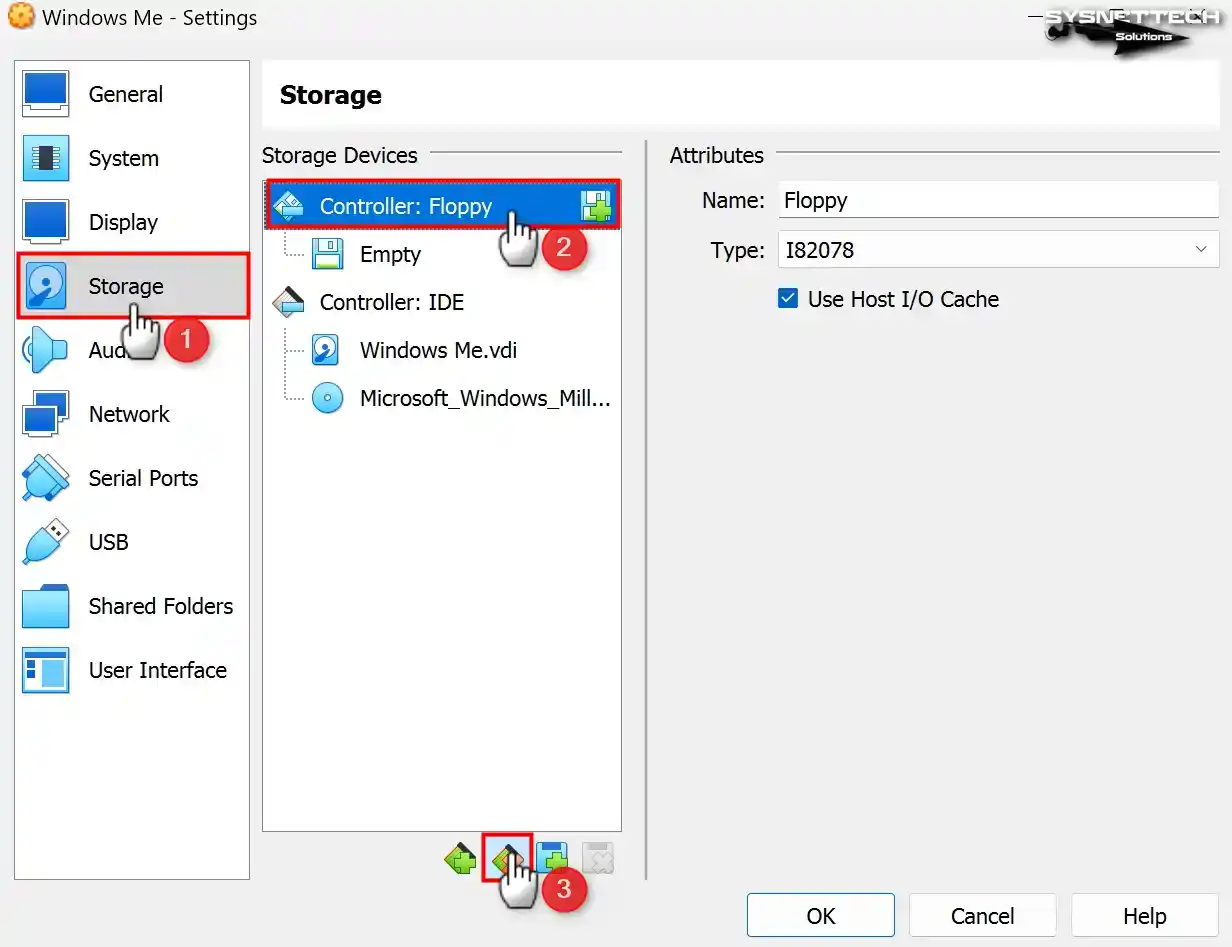
Remove the Floppy controller from the Storage devices.
Step 14
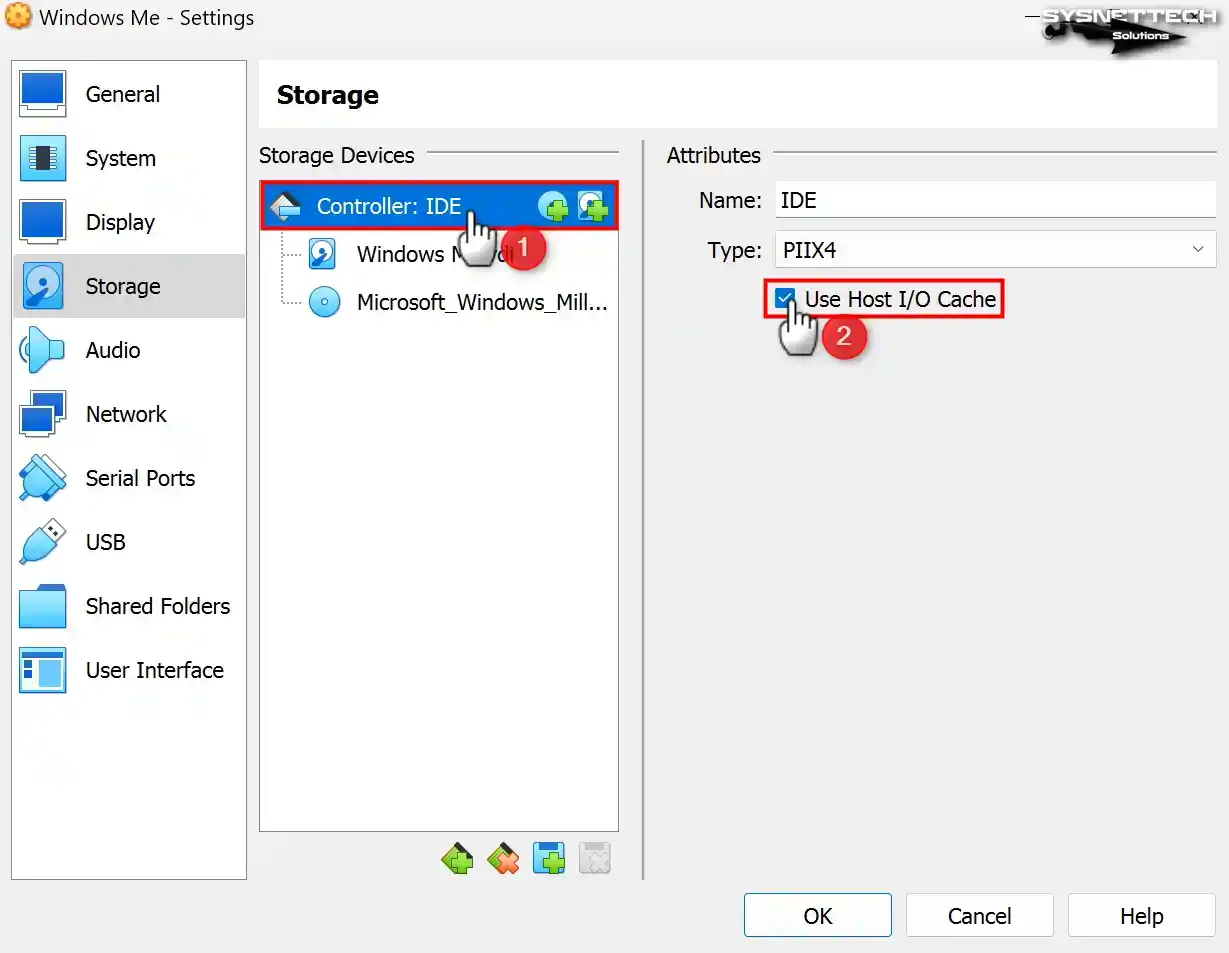
Check that the Host I/O Cache feature of the IDE controller is enabled.
Step 15
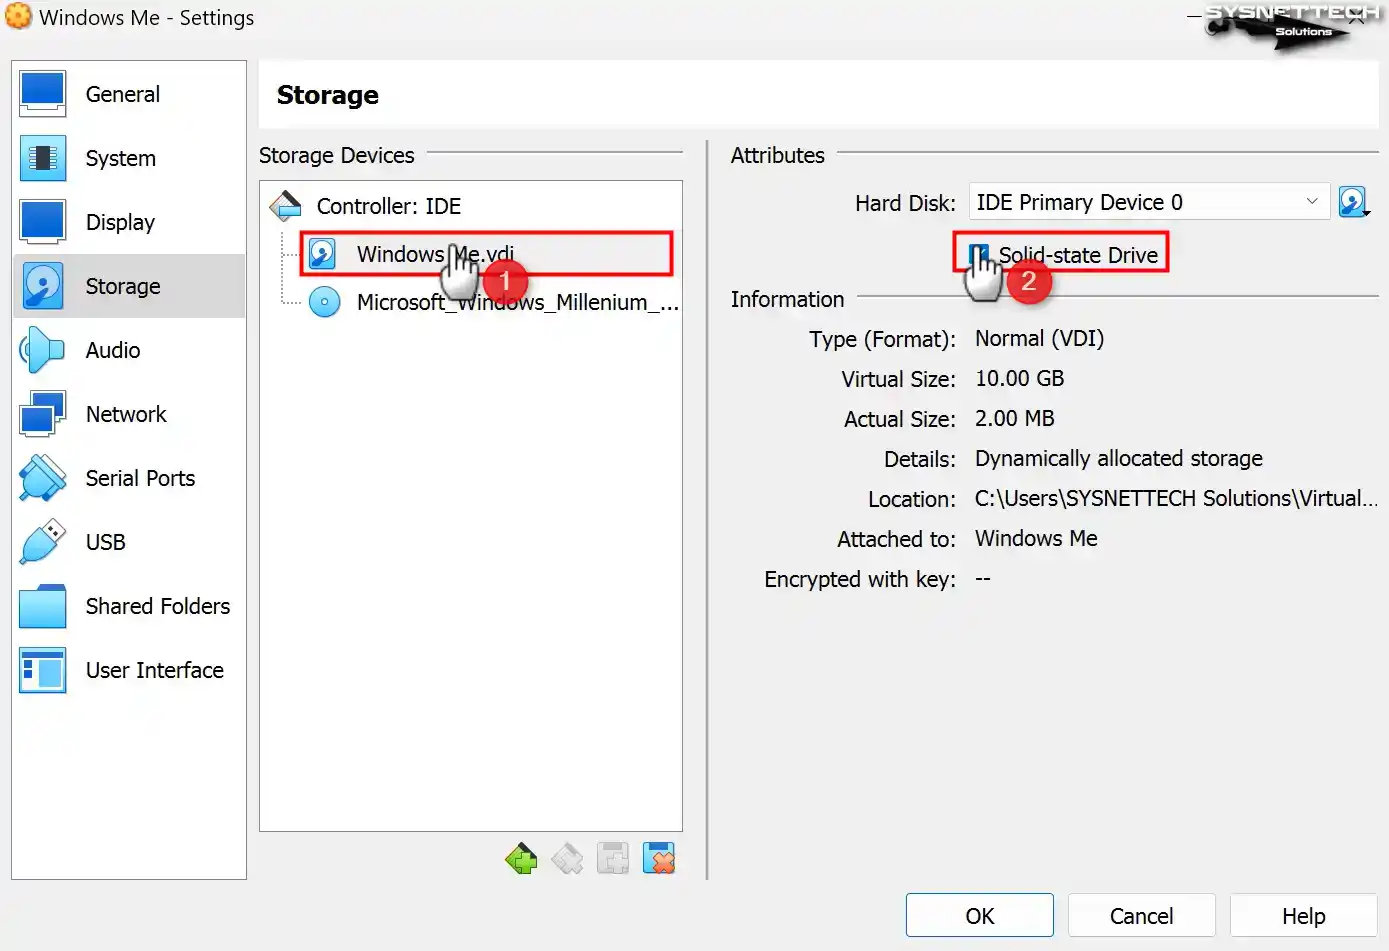
Configure WindowsMe.vdi disk file as SSD (Solid State Drive) to improve read and write speeds.
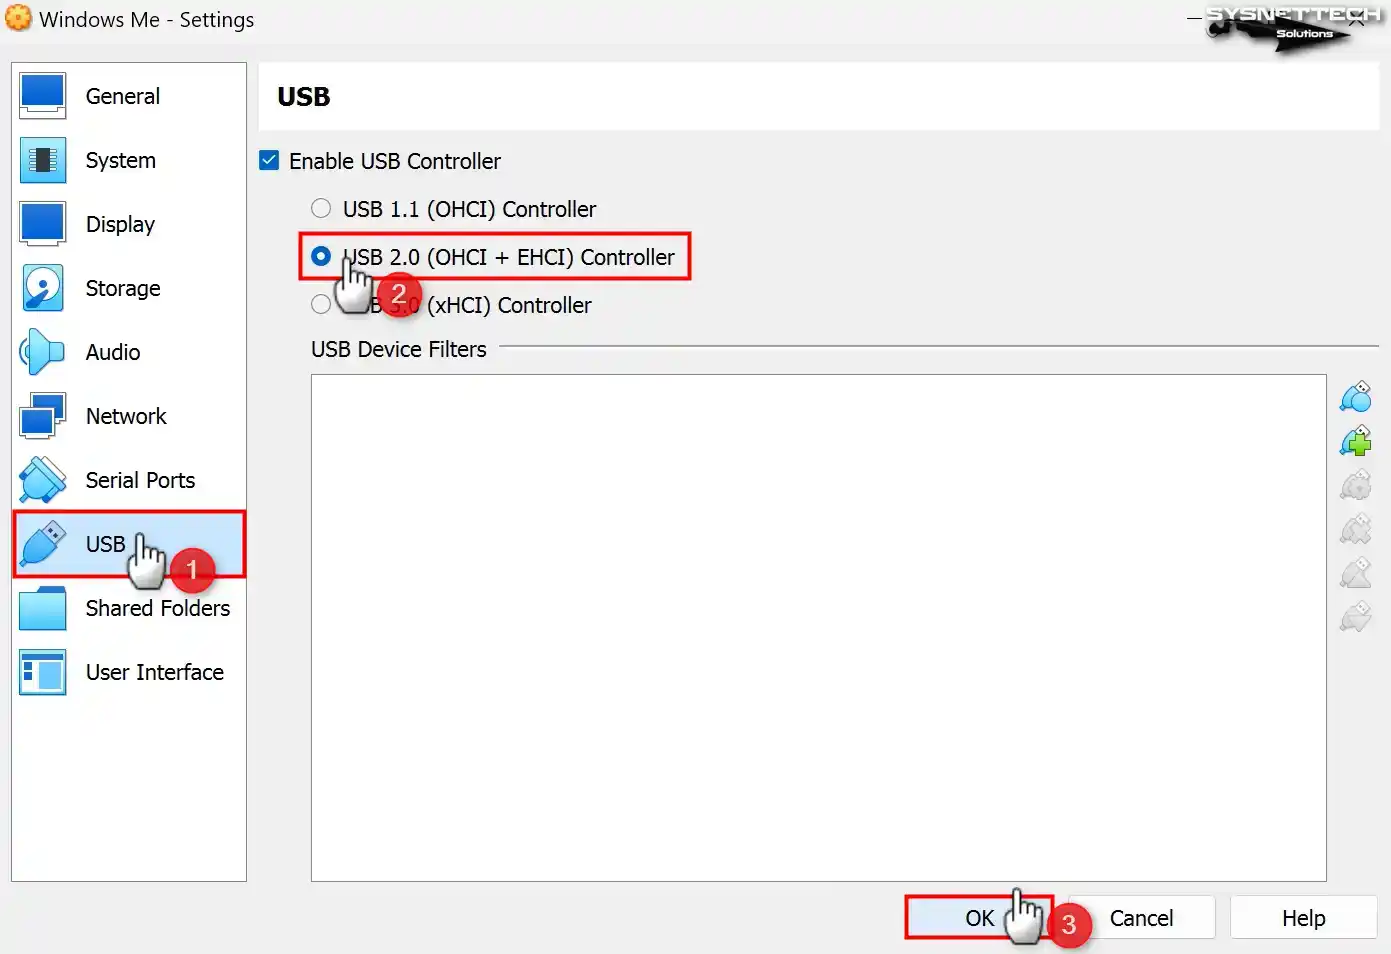
Step 16
If you want to use USB flash memory or storage devices in your Windows Millennium virtual system, enable the USB 2.0 (OHCI + EHCI) Controller.
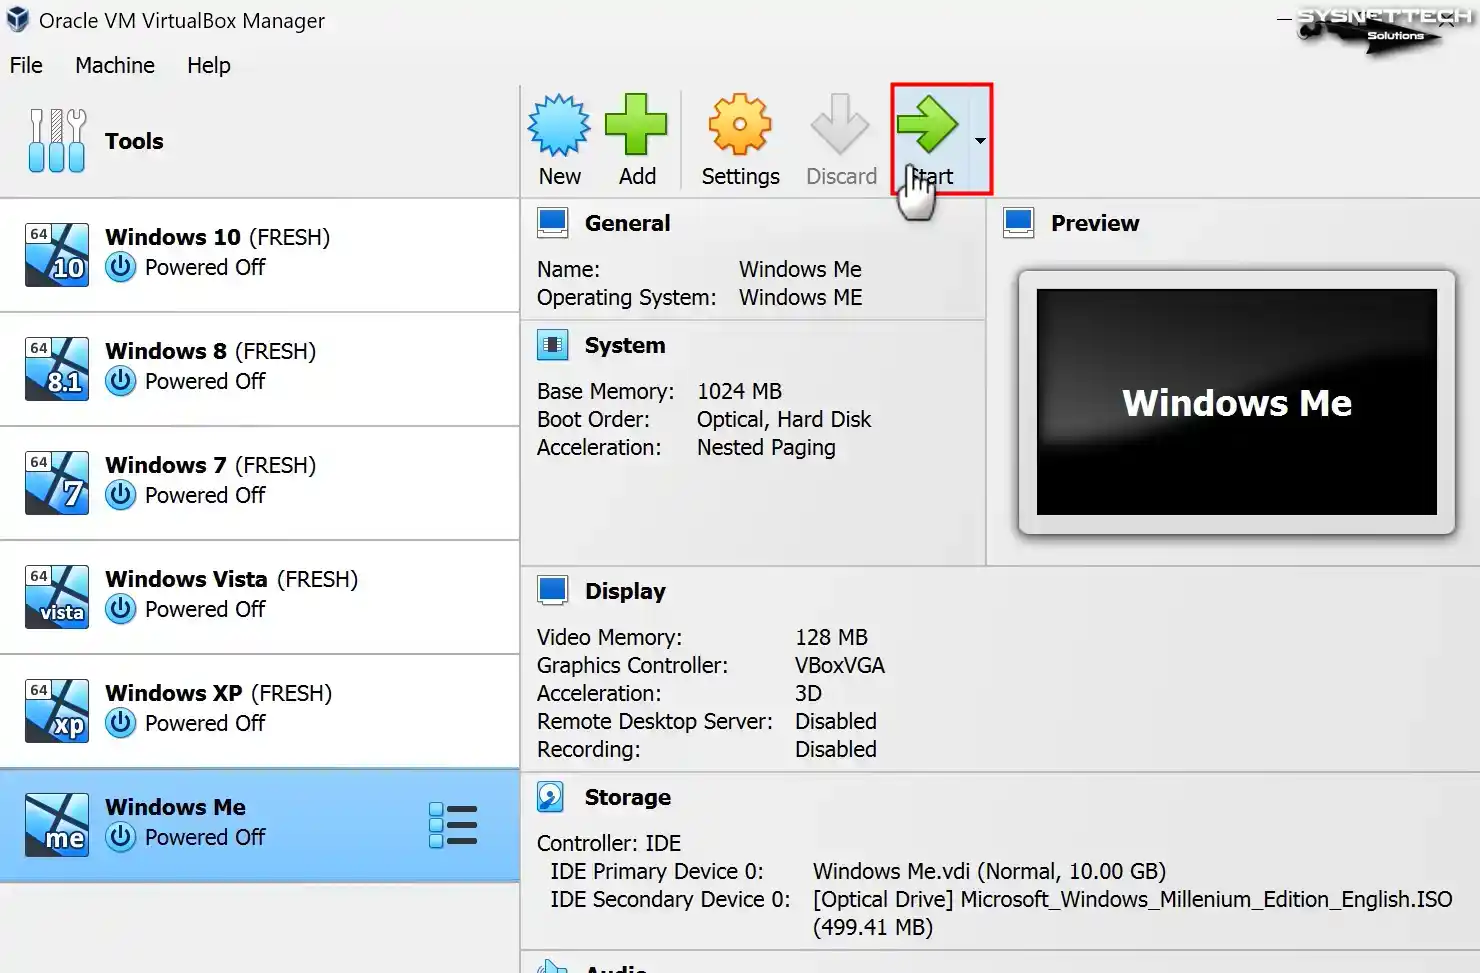
Step 17
Run the VM for system setup after editing all the guest operating system settings.
How to Install Windows ME (Millennium) using VirtualBox
After running the Windows Millennium virtual machine, you can continue as if you were installing it on a physical computer by following the steps below.
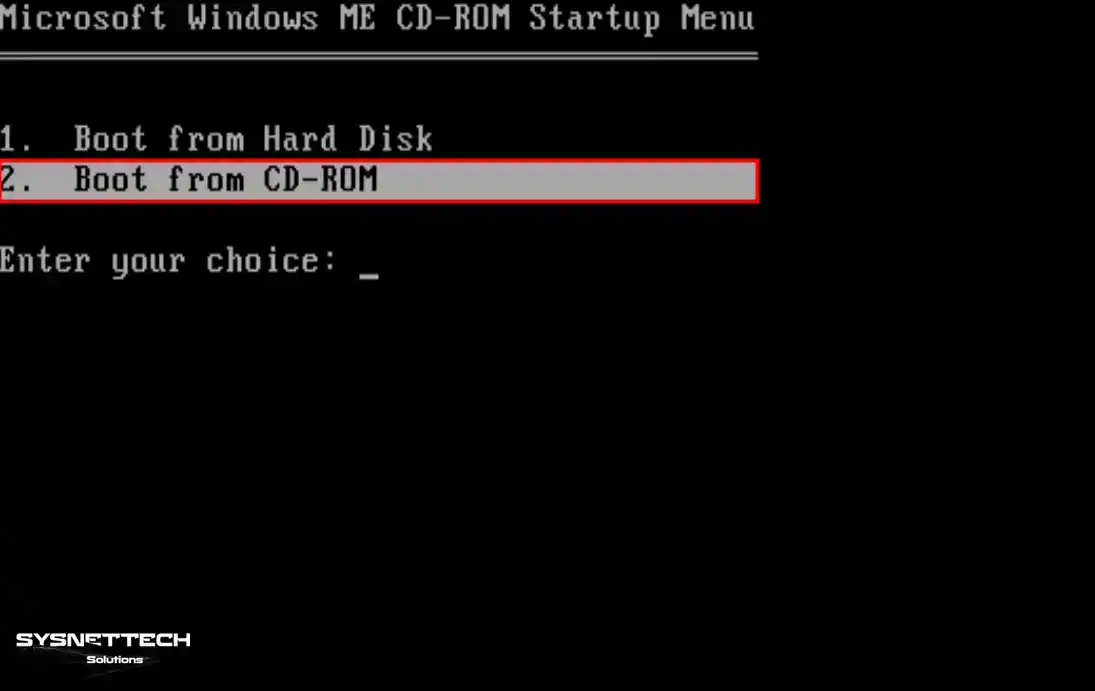
Step 1
You can boot from a Hard Disk and CD-ROM in the Microsoft Windows ME CD-ROM Startup Menu screen. Since you will install the system on the virtual PC, press Enter on the Boot from CD-ROM option.
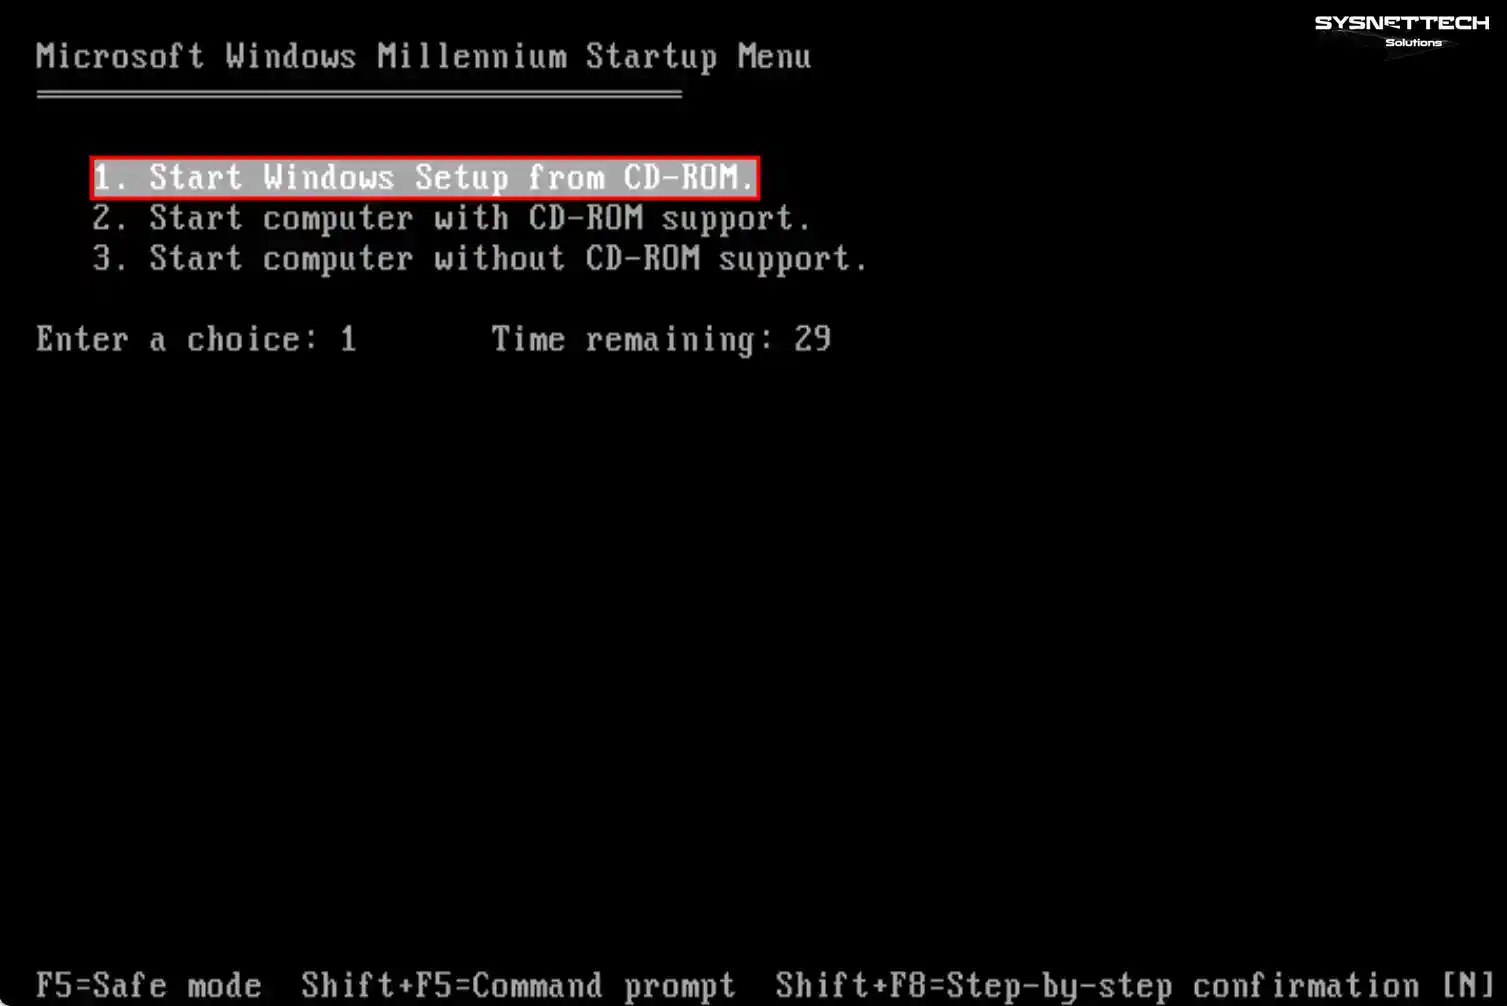
Step 2
Since you have added the ISO file to the optical drive, press Enter on the Start Windows Setup from the CD-ROM option.
Step 3
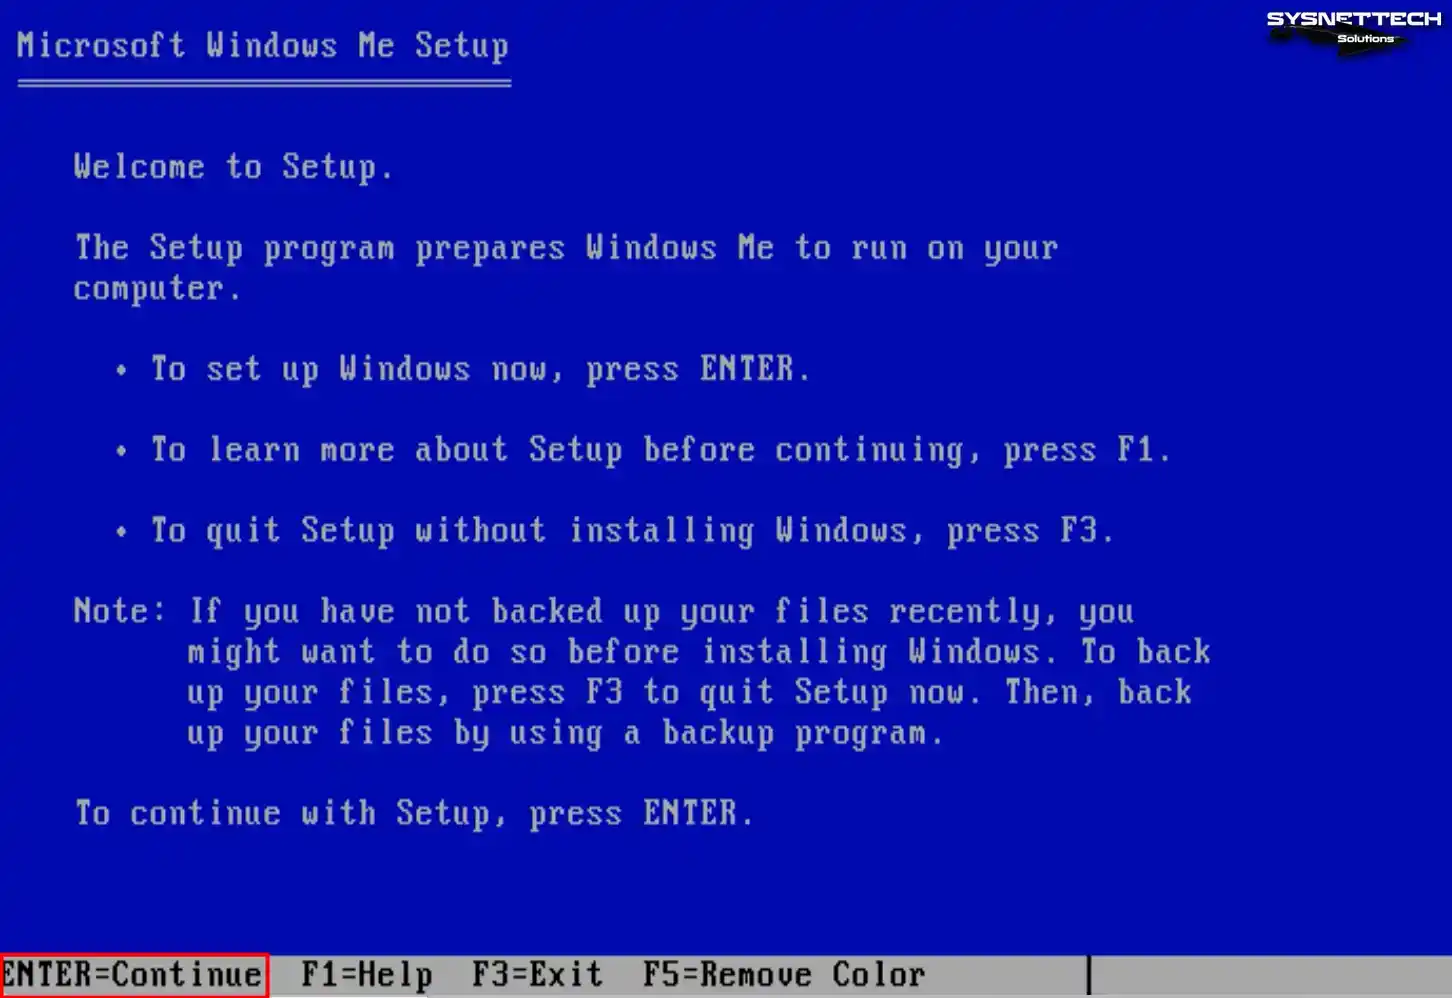
When the Setup wizard shows up, hit Enter to get started with the Microsoft WinME installation. If you require more details, hit F1. And if you need to cancel the installation, confidently press F3.
Step 4
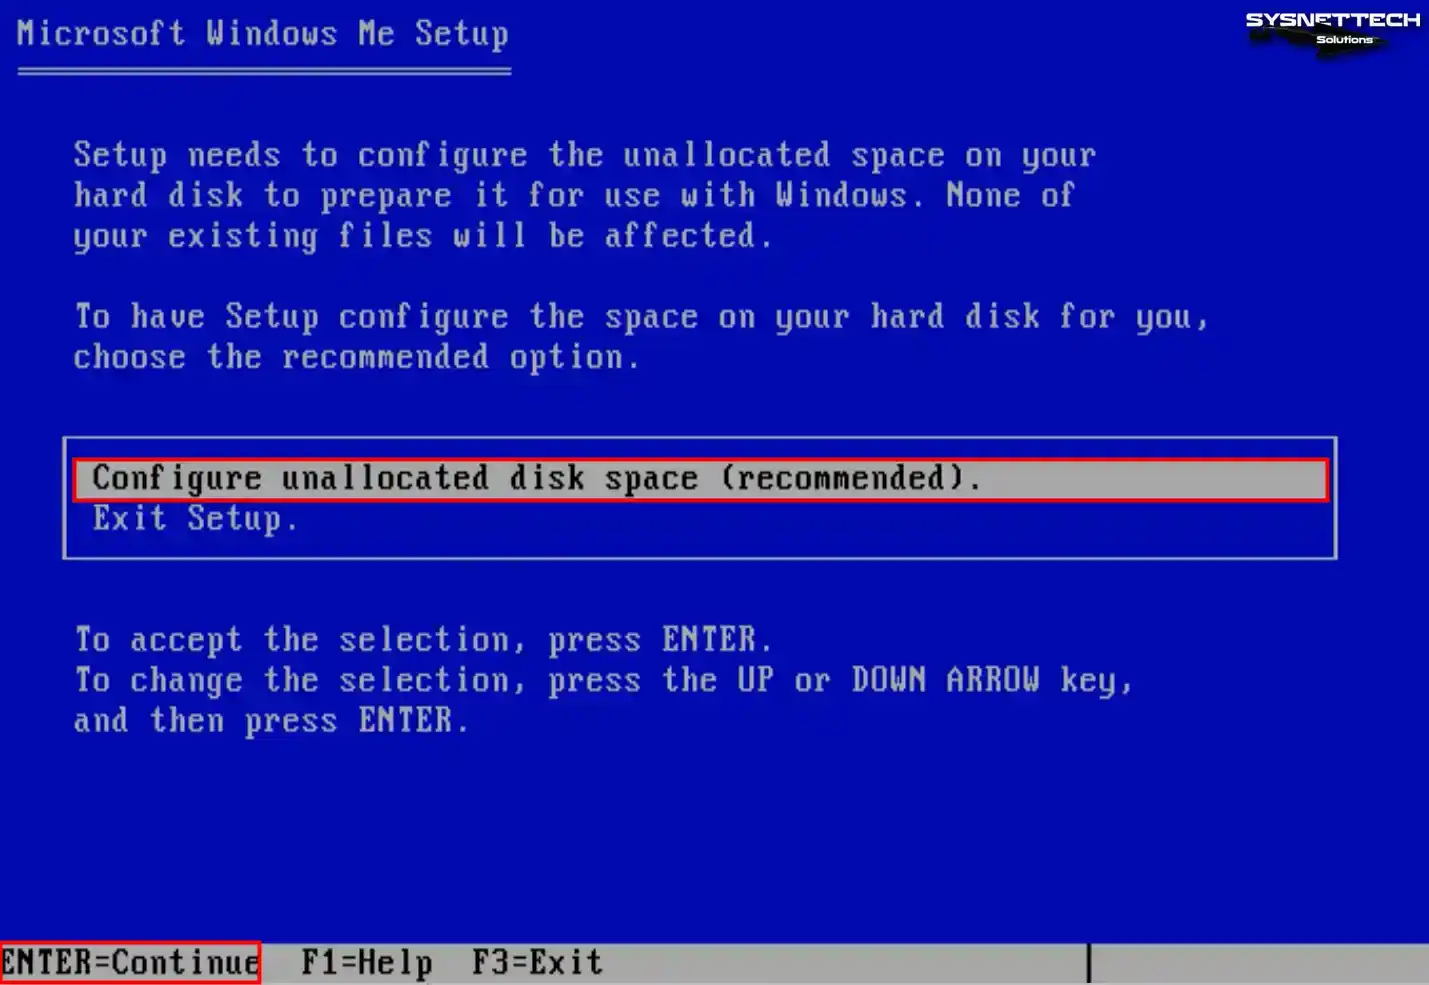
Press Enter on the Configure unallocated disk space option to edit the unallocated disk space.
Step 5
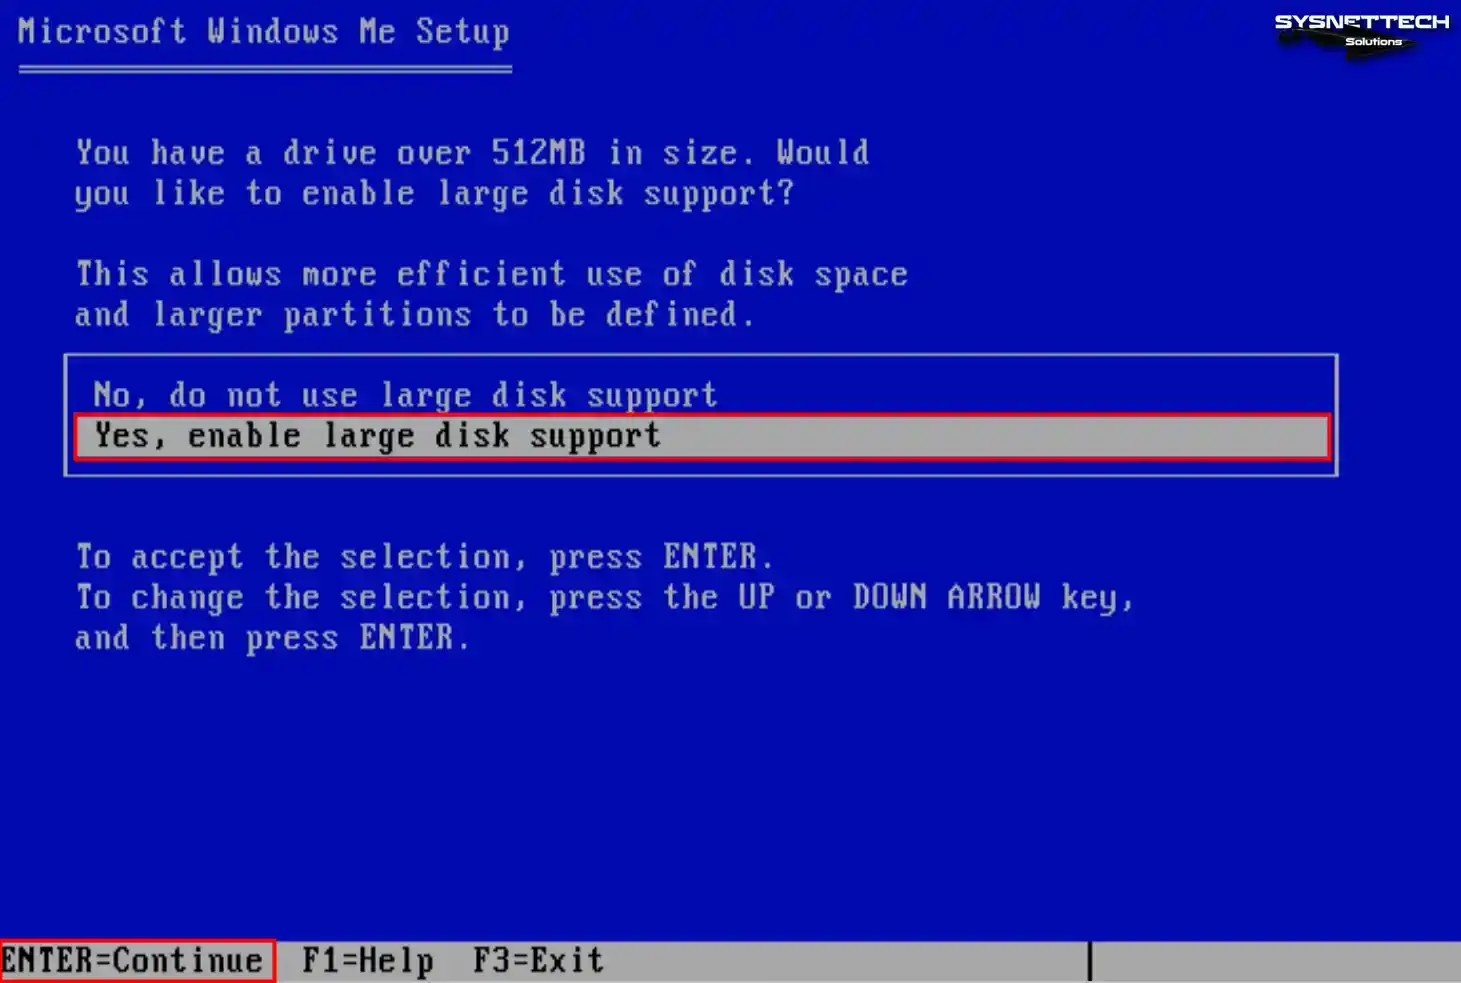
If you have a disk capacity of more than 512MB disk capacity, you need to enable extensive disk space usage. Click the down arrow, select “Yes, enable large disk support,” and press Enter.
Step 6
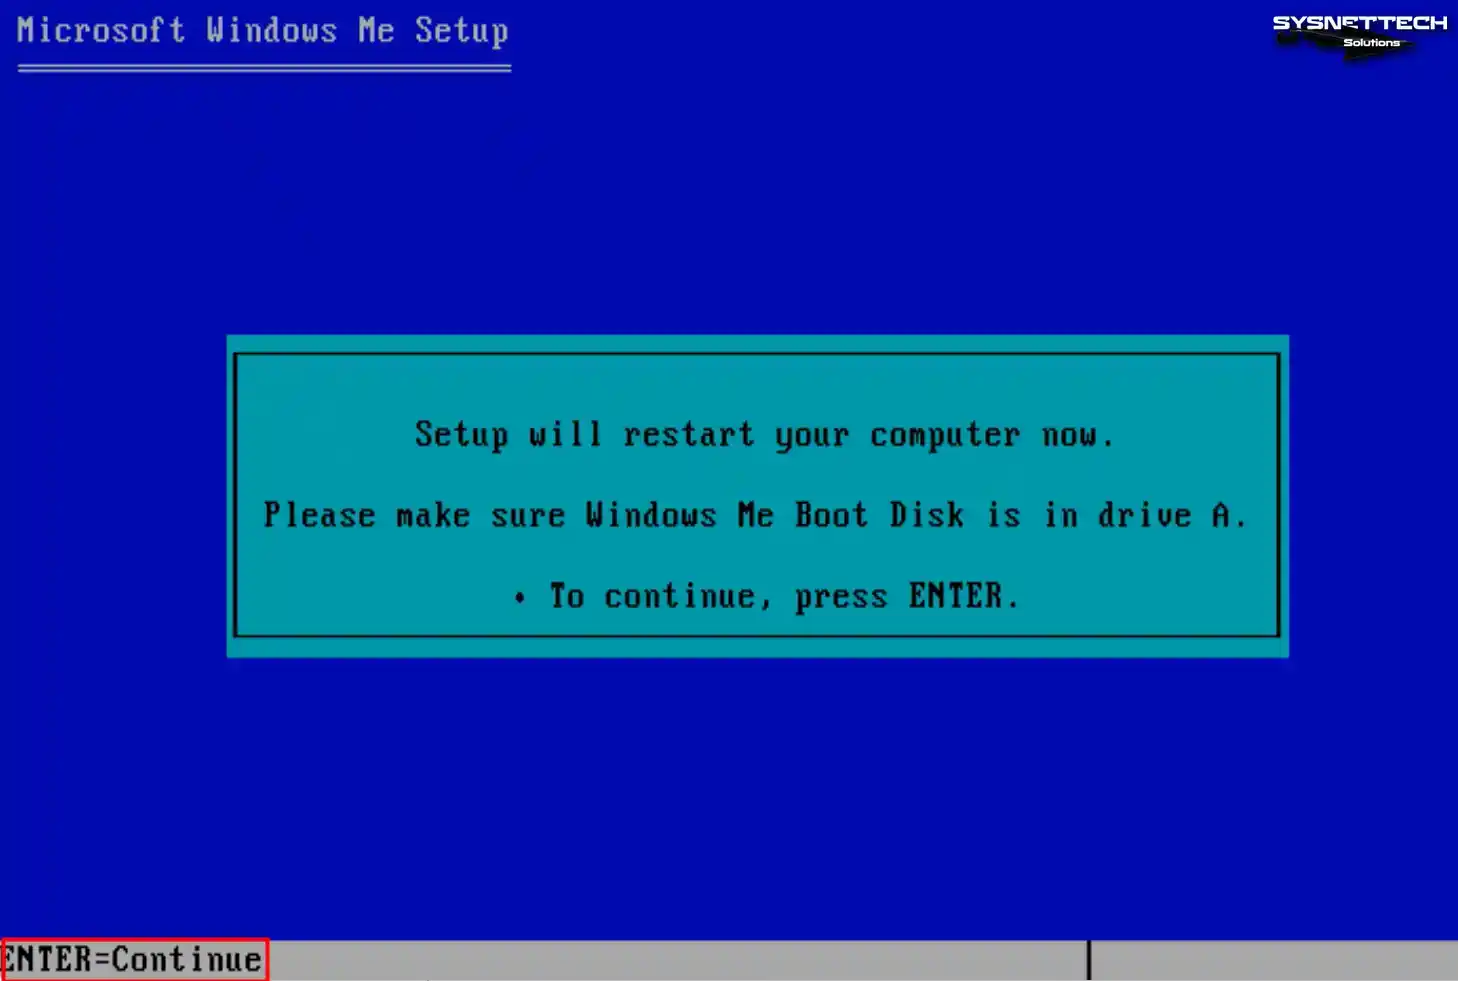
When the setup wizard restarts your virtual machine, boot your system again from the CD-ROM.
Step 7
When your guest machine restarts, this time, the setup wizard will format your virtual disk.
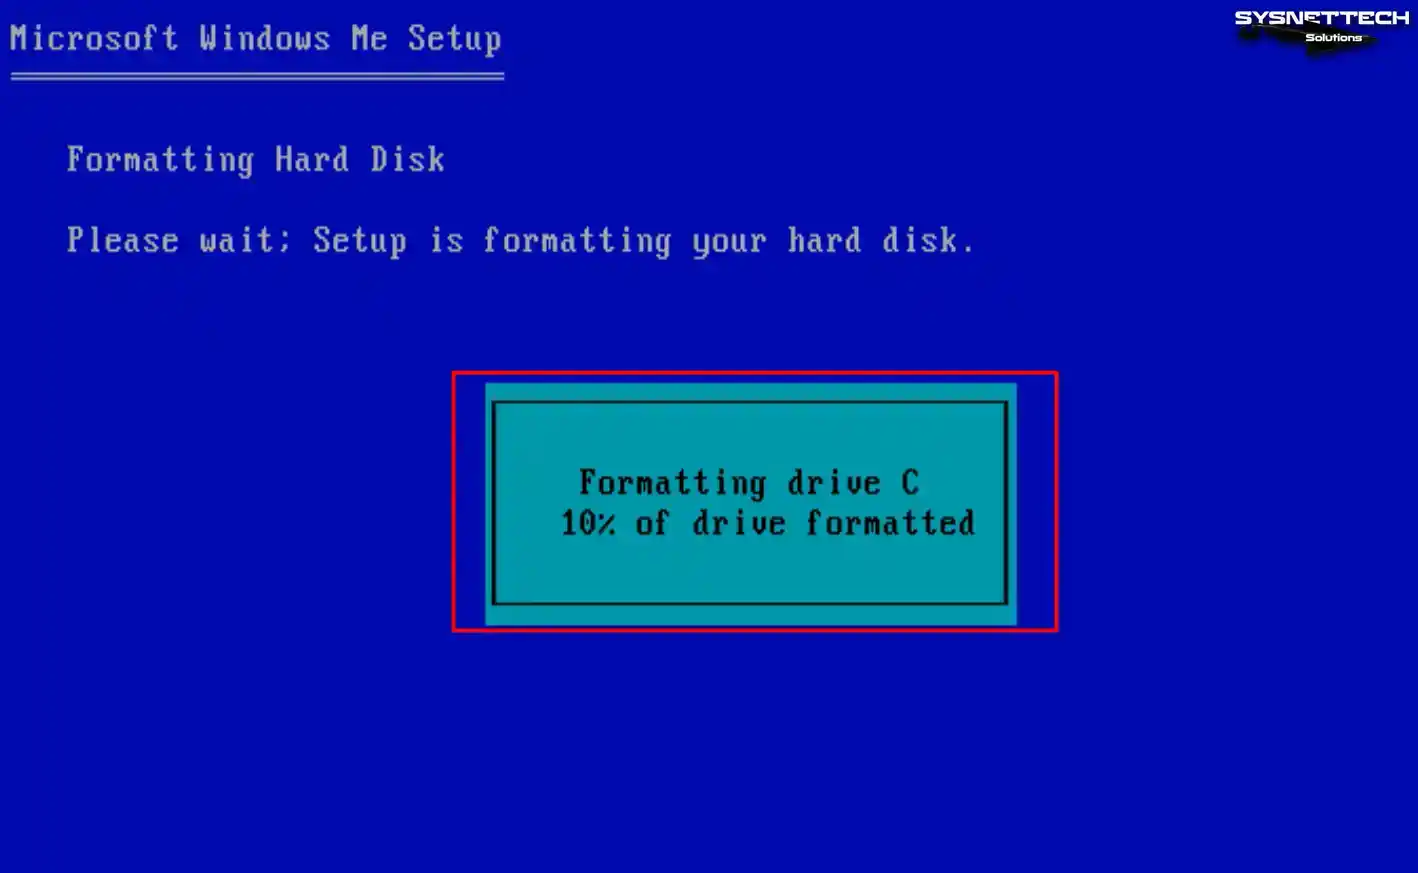
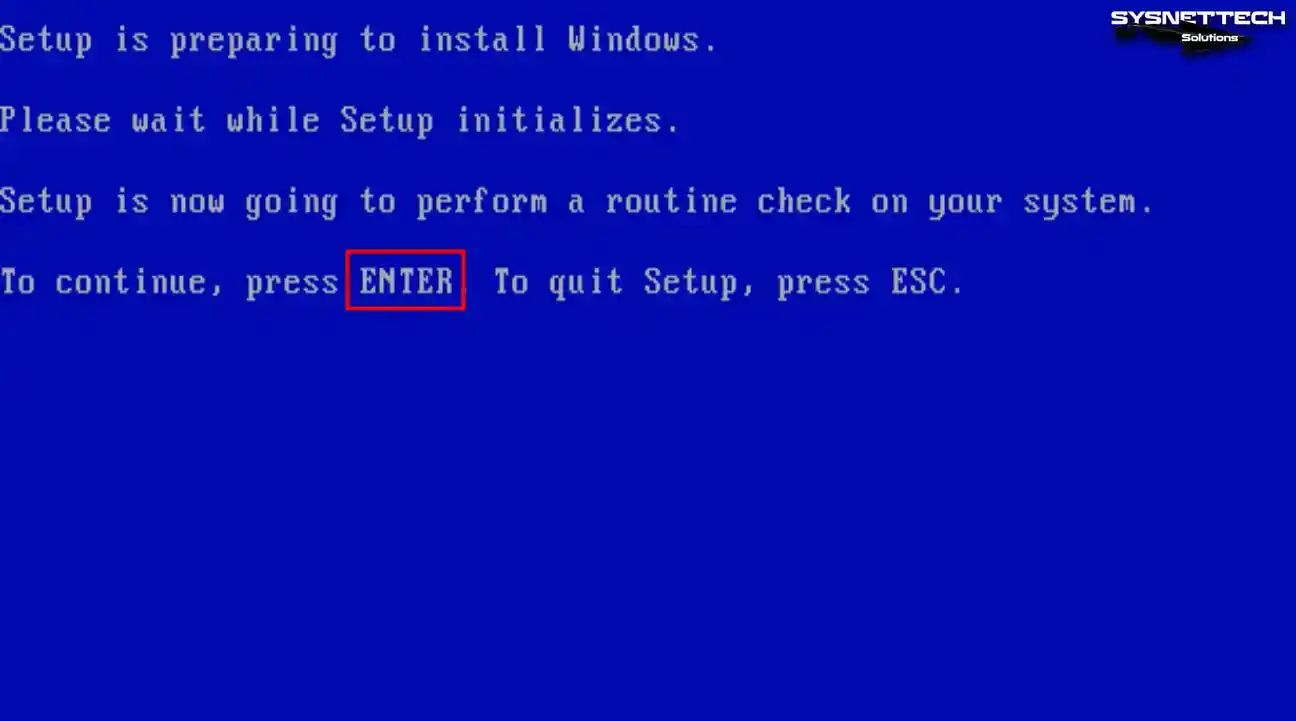
Step 8
After the virtual disk is formatted, the setup wizard will check your system, so press Enter and continue.
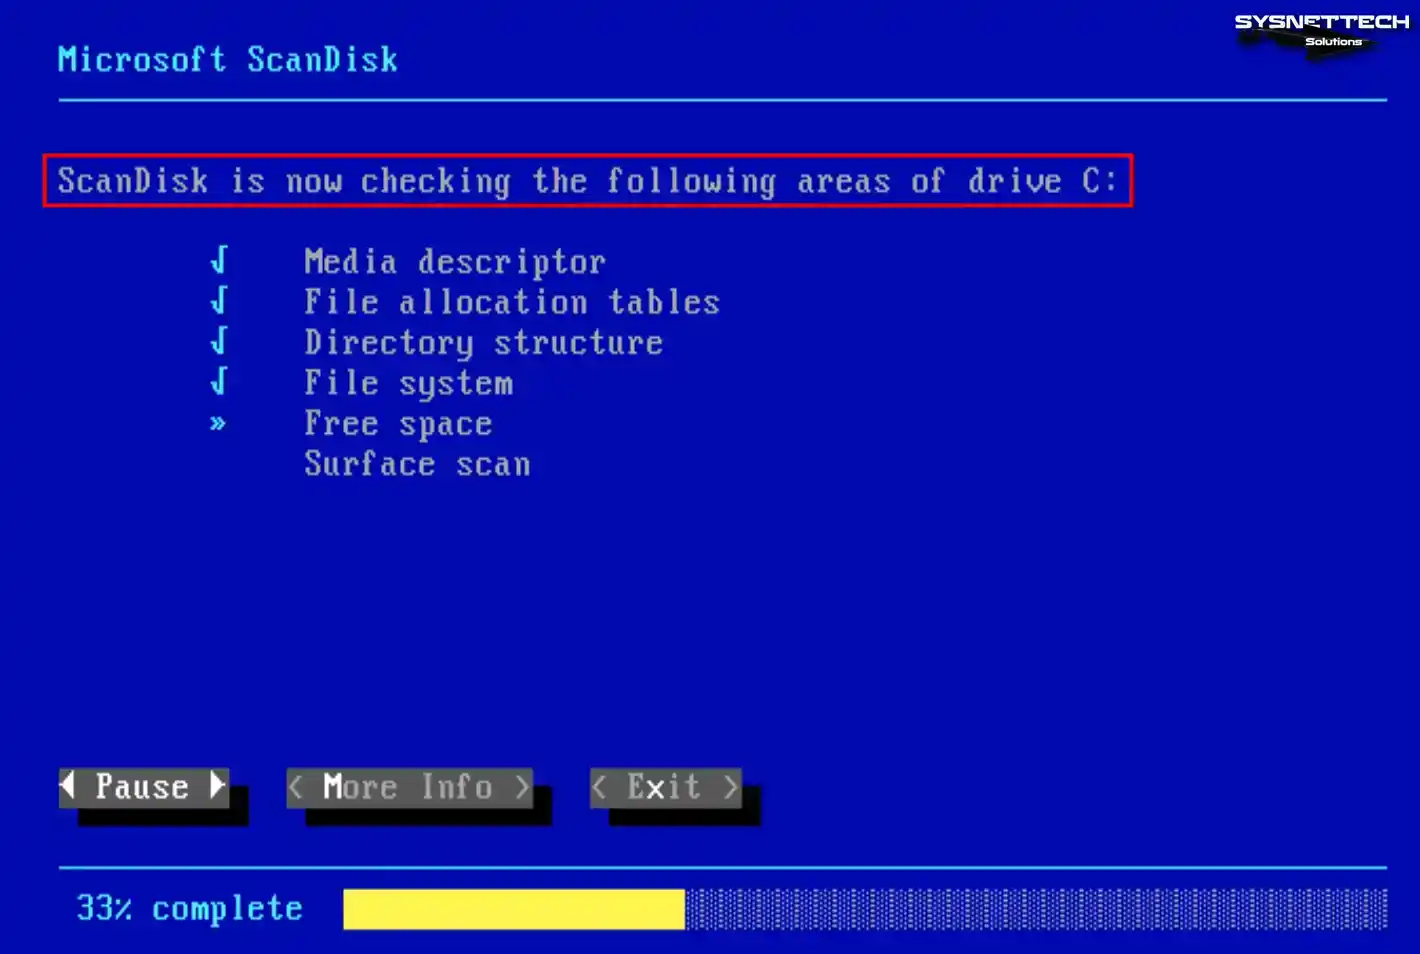
Step 9
When Microsoft ScanDisk is opened, media, file, and directory structures will be checked on the C drive, and disk space will be checked.
Step 10
Once your virtual machine has restarted, Setup will prepare the Windows setup wizard.
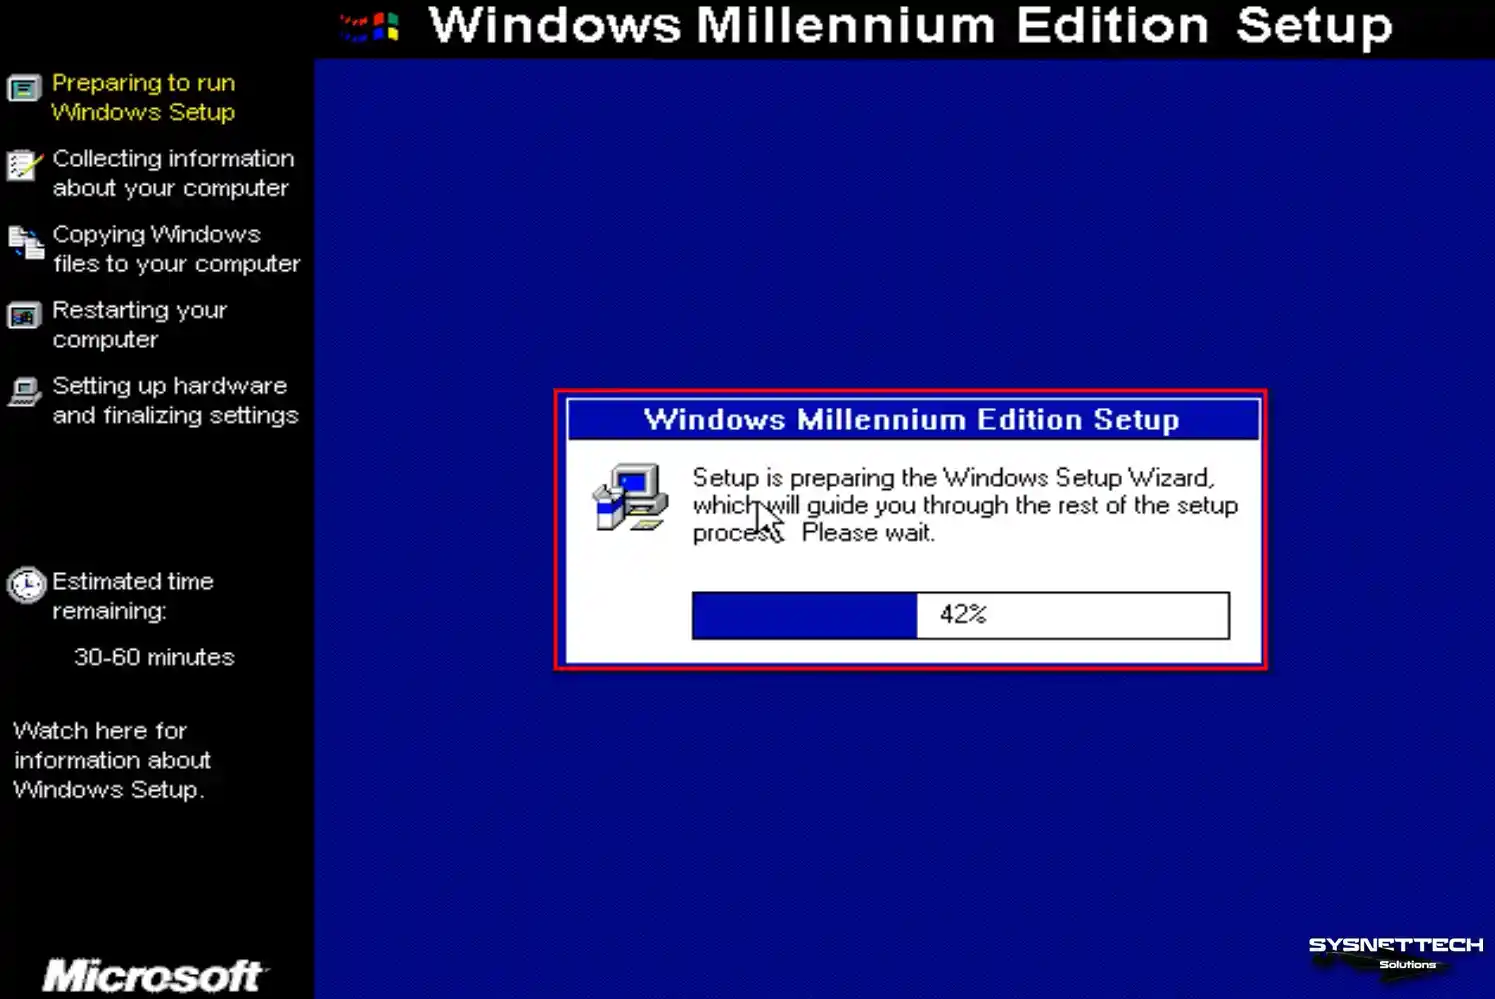
Step 11
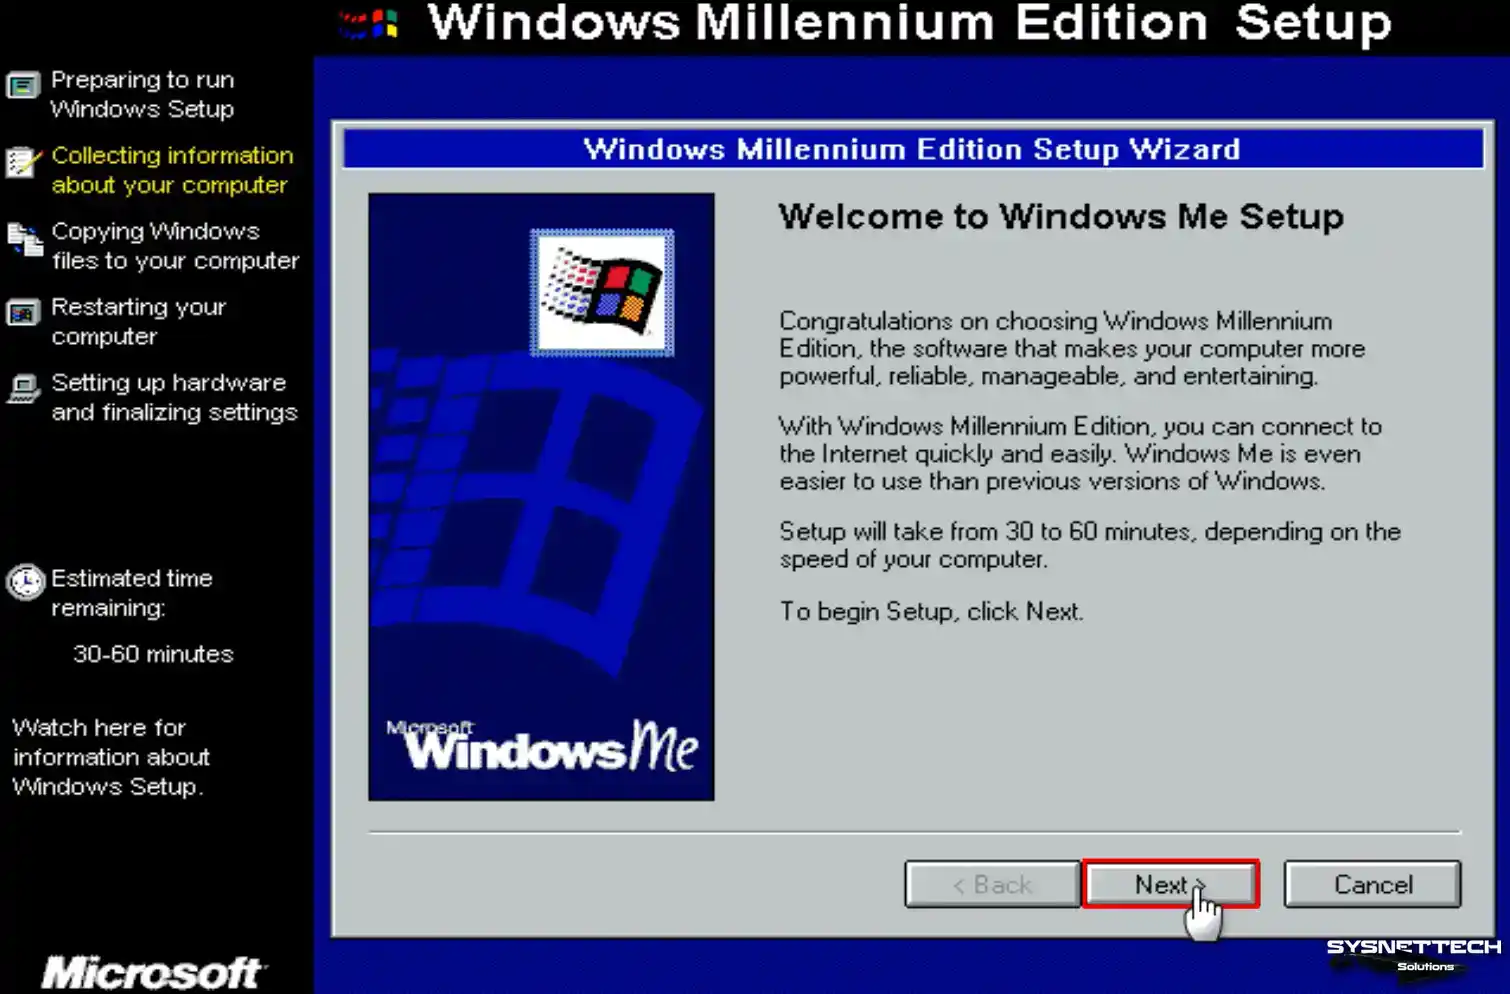
The Windows Millennium Edition setup wizard reports that the installation will be completed in 30 to 60 minutes. Continue by clicking Next to start the installation process.
Step 12
Installing Windows from the default directory can cause system problems. Therefore, choose C:\WINDOWS as the installation directory and click Next.

Step 13
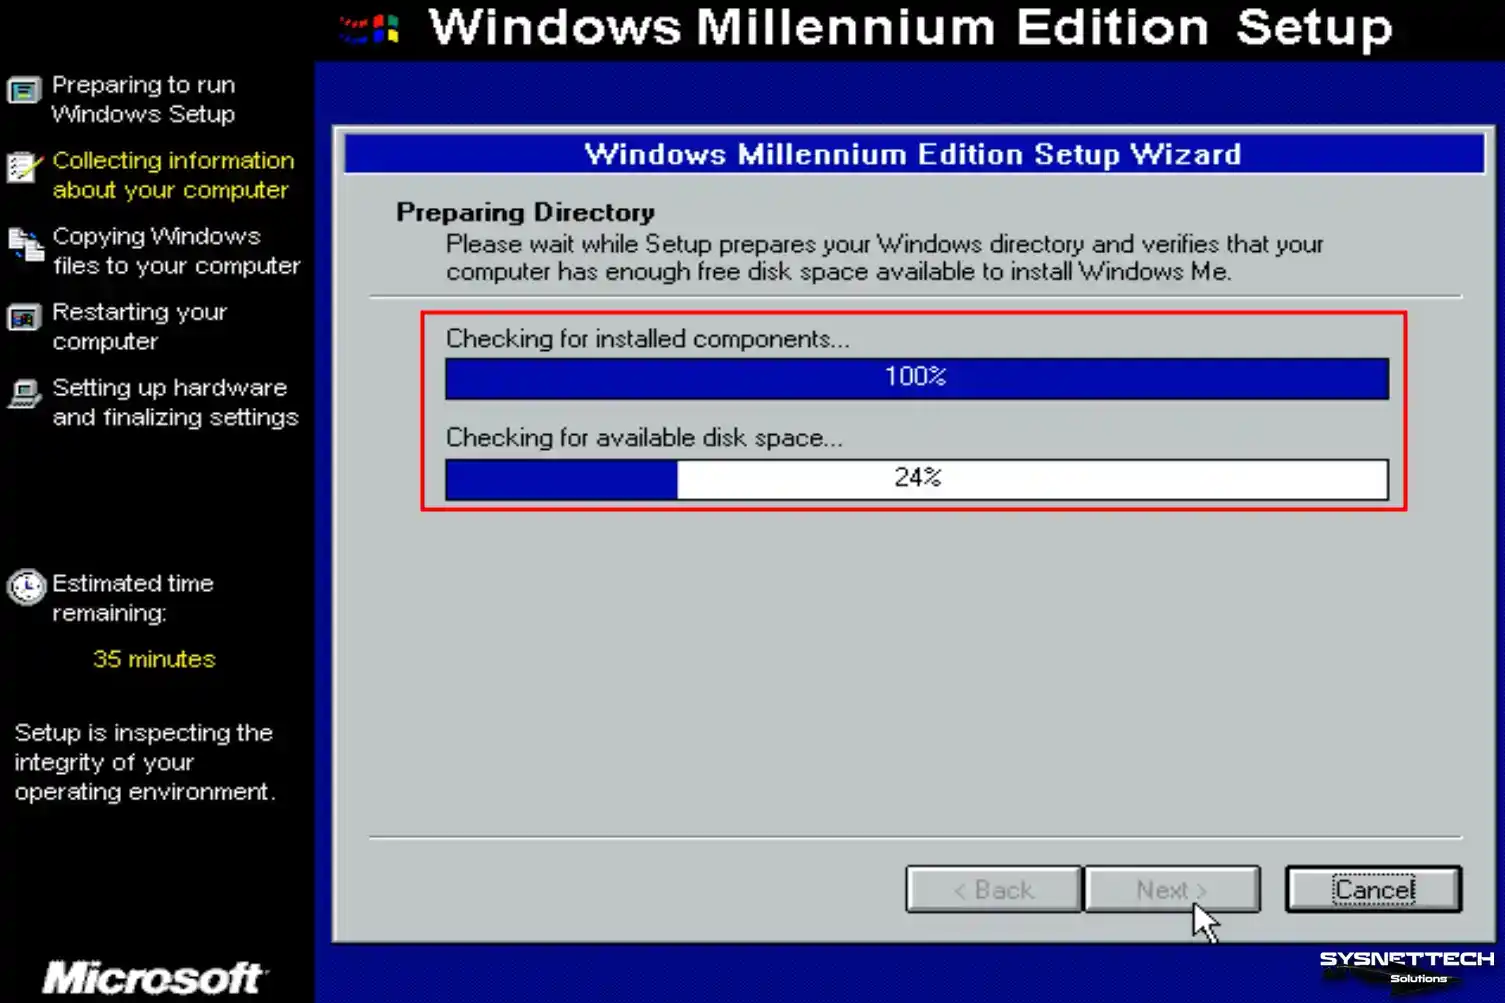
Wait while the setup wizard prepares the Windows directory and checks the disk space.
Step 14
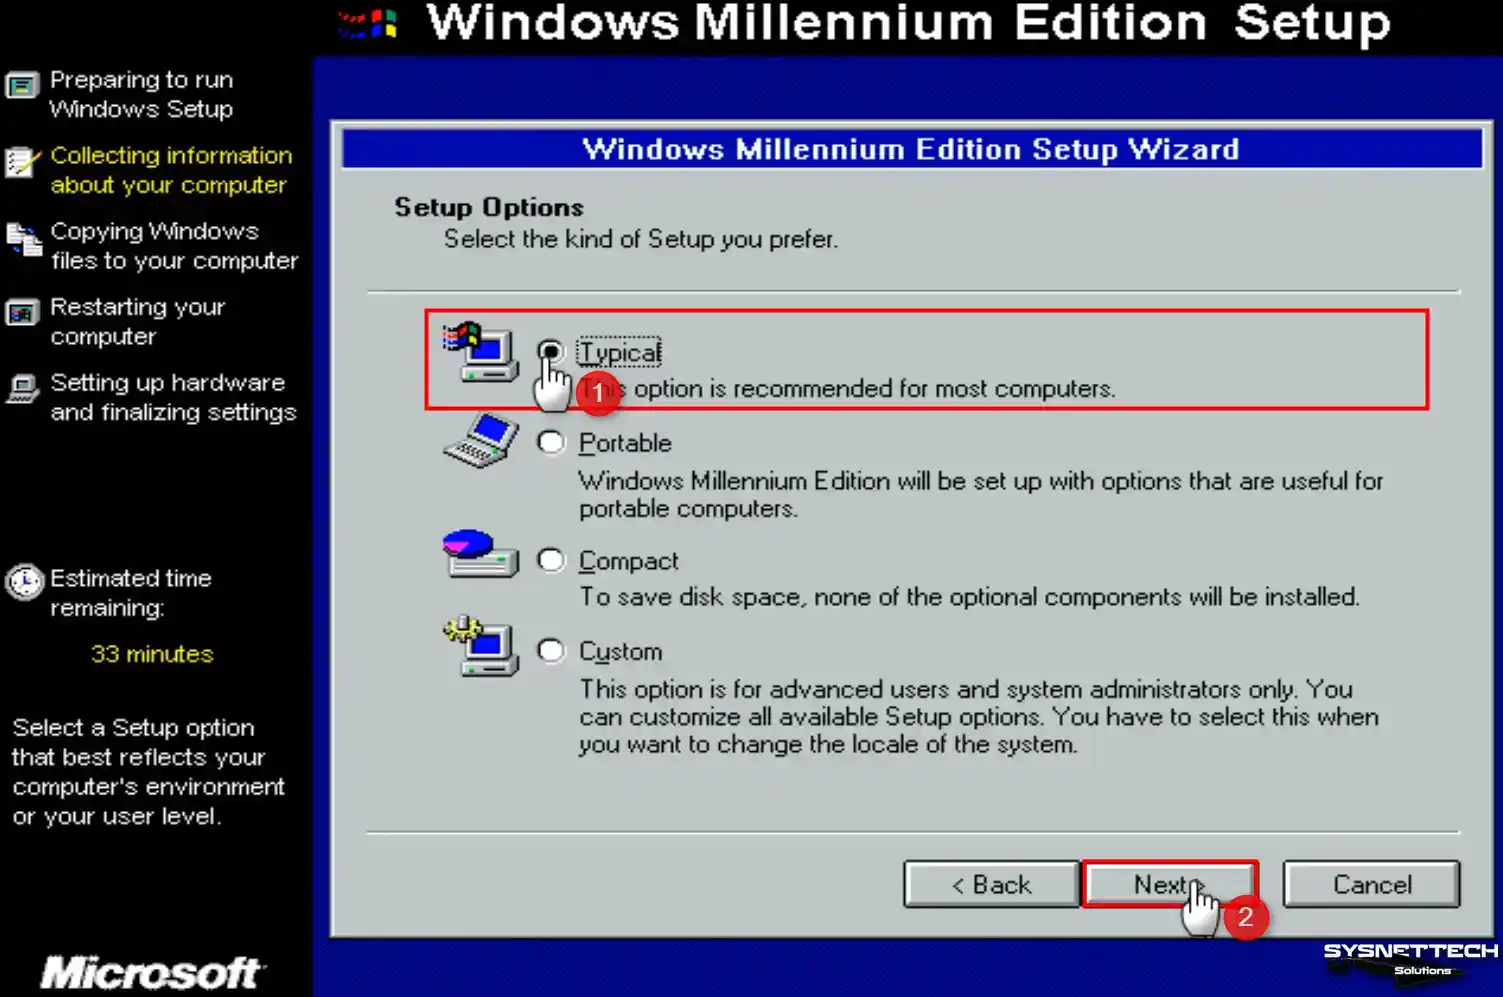
It would be helpful if you selected the default option, “Typical,” when choosing your installation type in this step.
Step 15
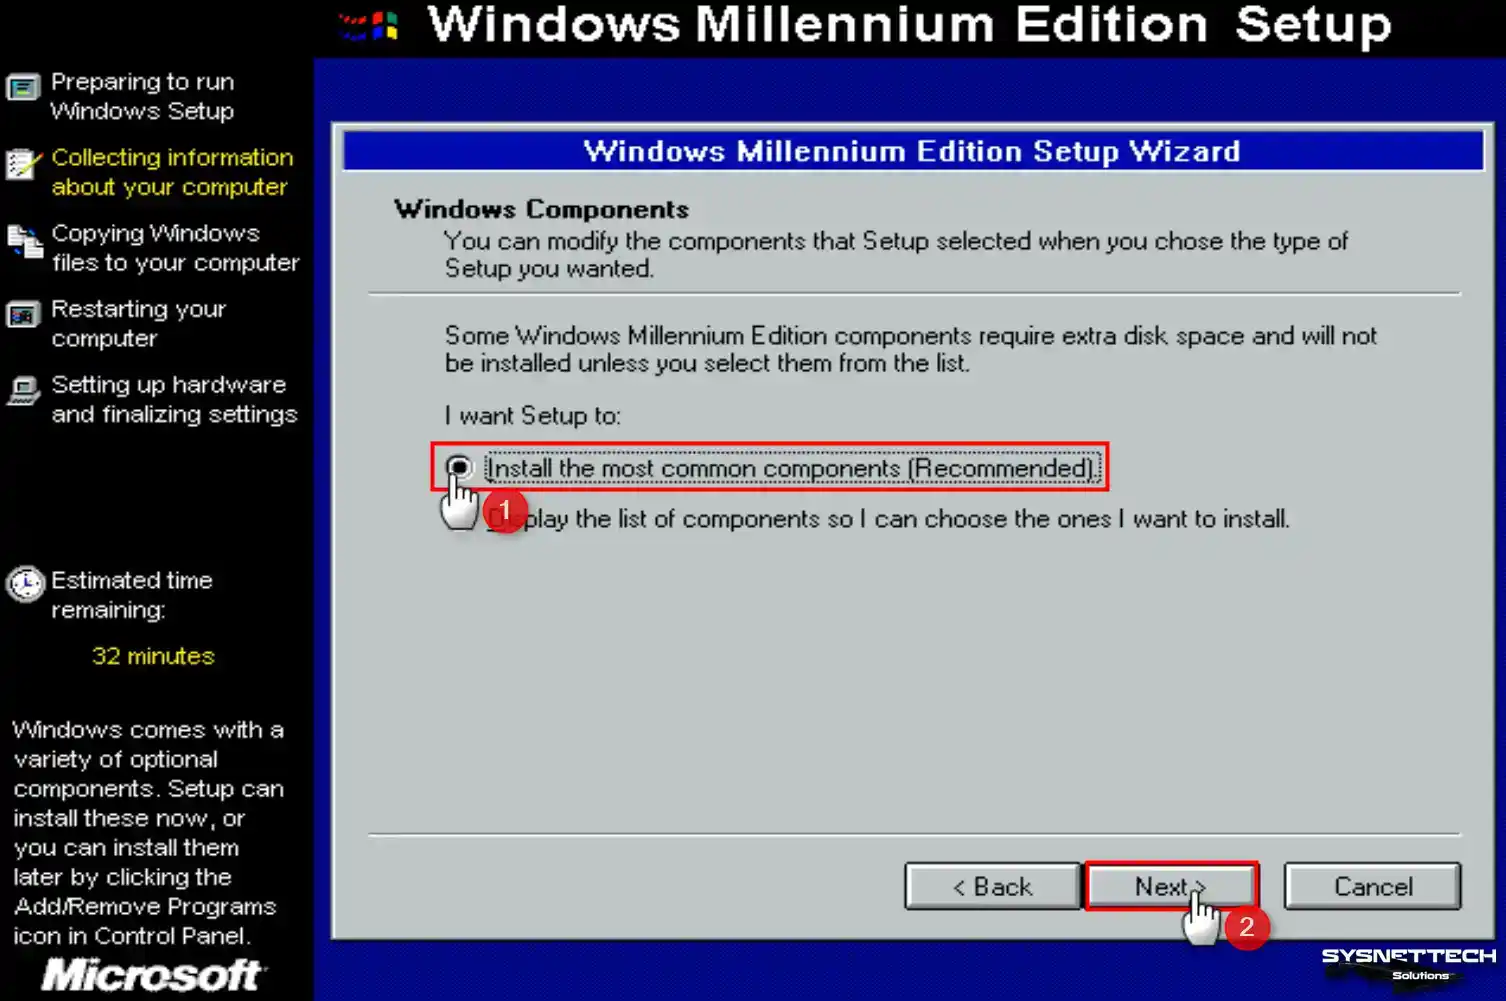
In the Windows Components window, choose to install the most commonly used components and continue.
Step 16
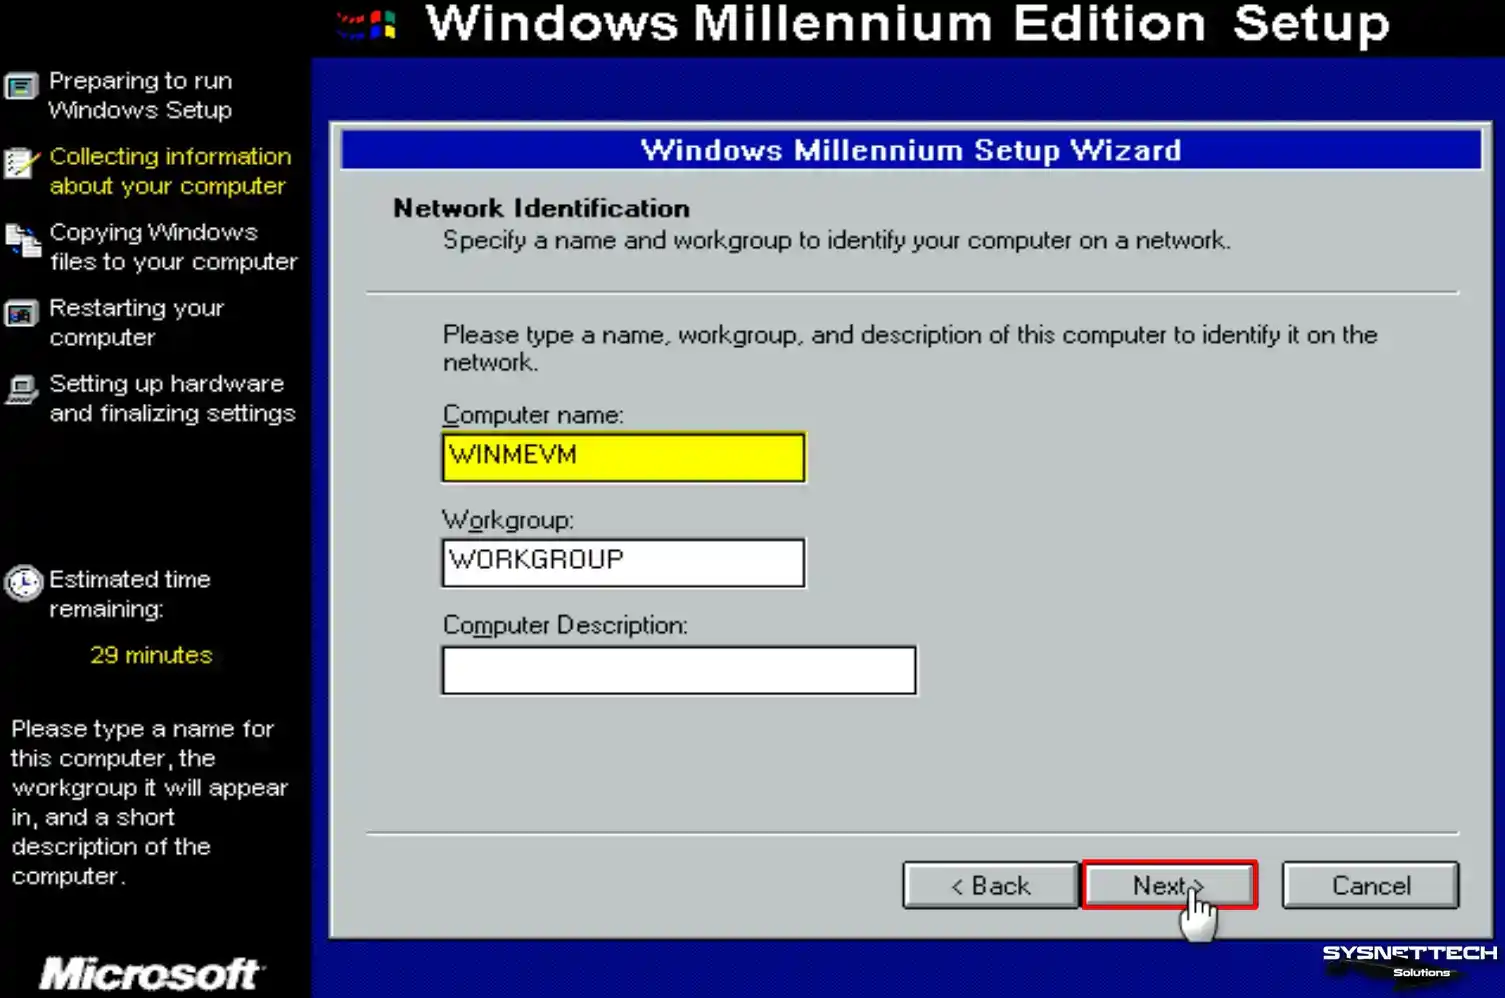
To identify your computer on a network, type a different computer name from your other existing computers and click Next.
Step 17
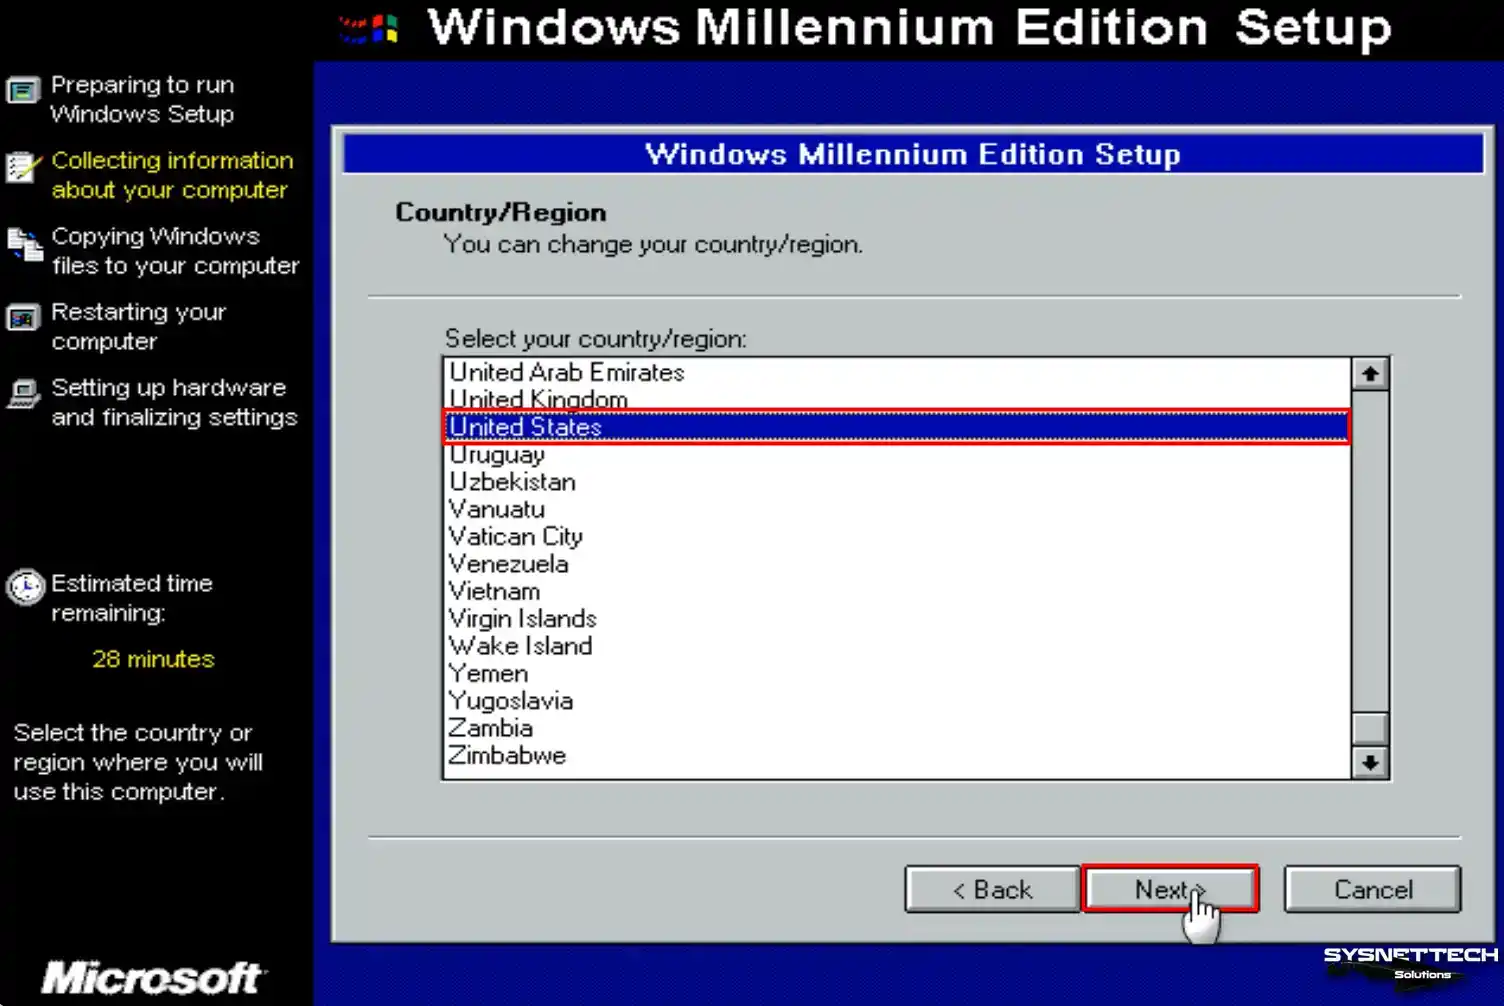
In the Country/Region window, select your country and click Next.
Step 18
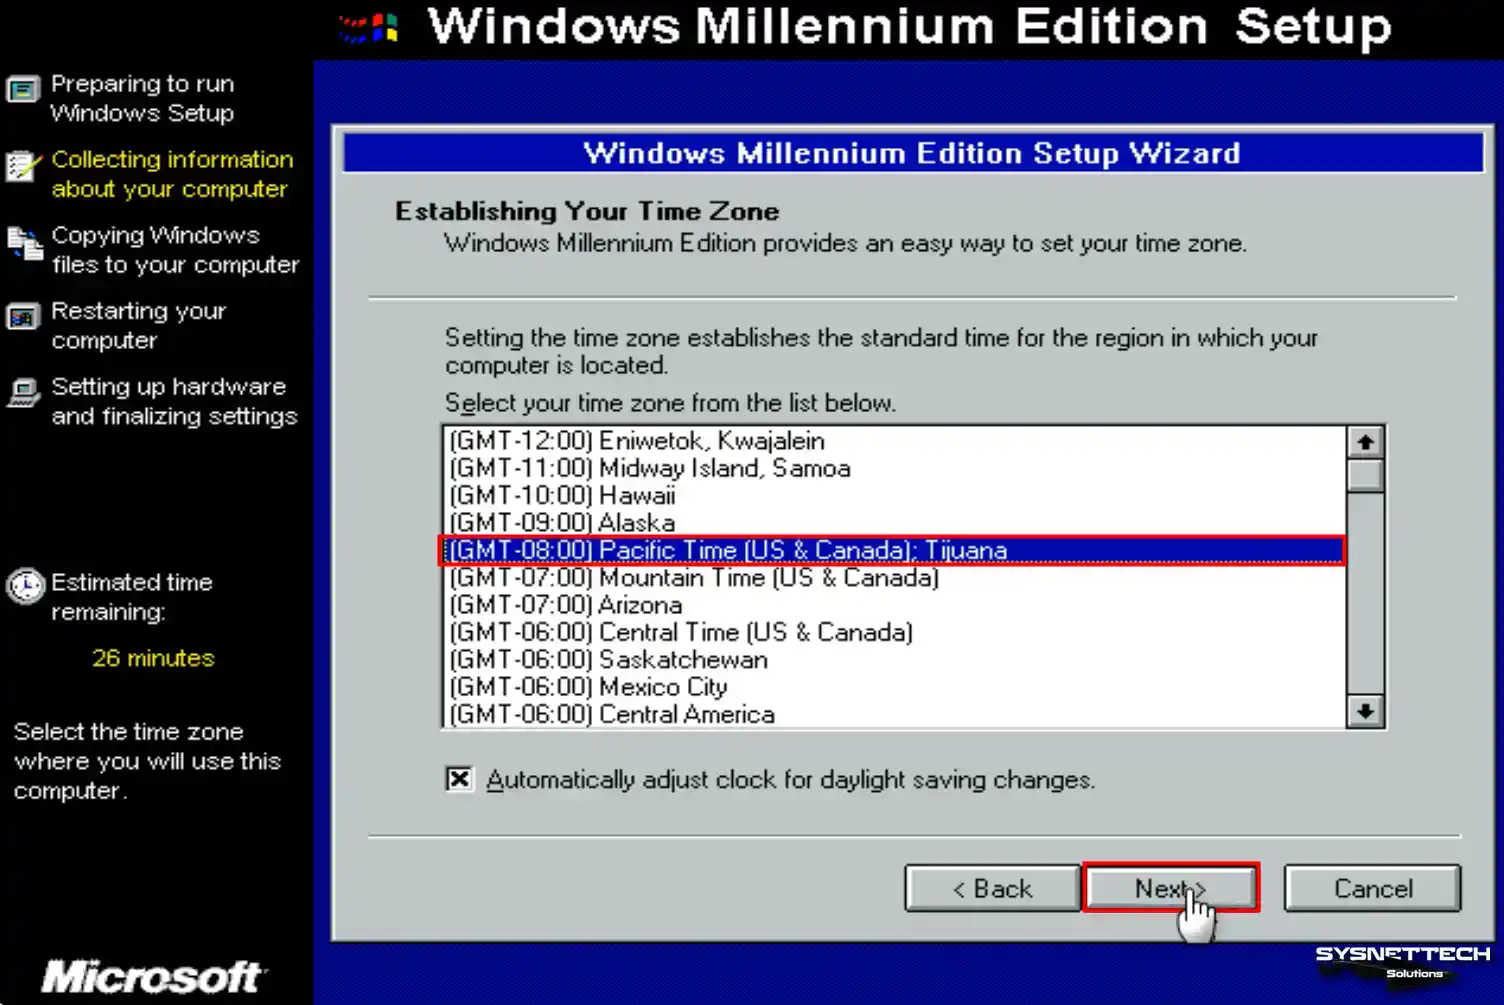
Configure the time zone of your virtual system according to the homeland you live in and click Next.
Step 19
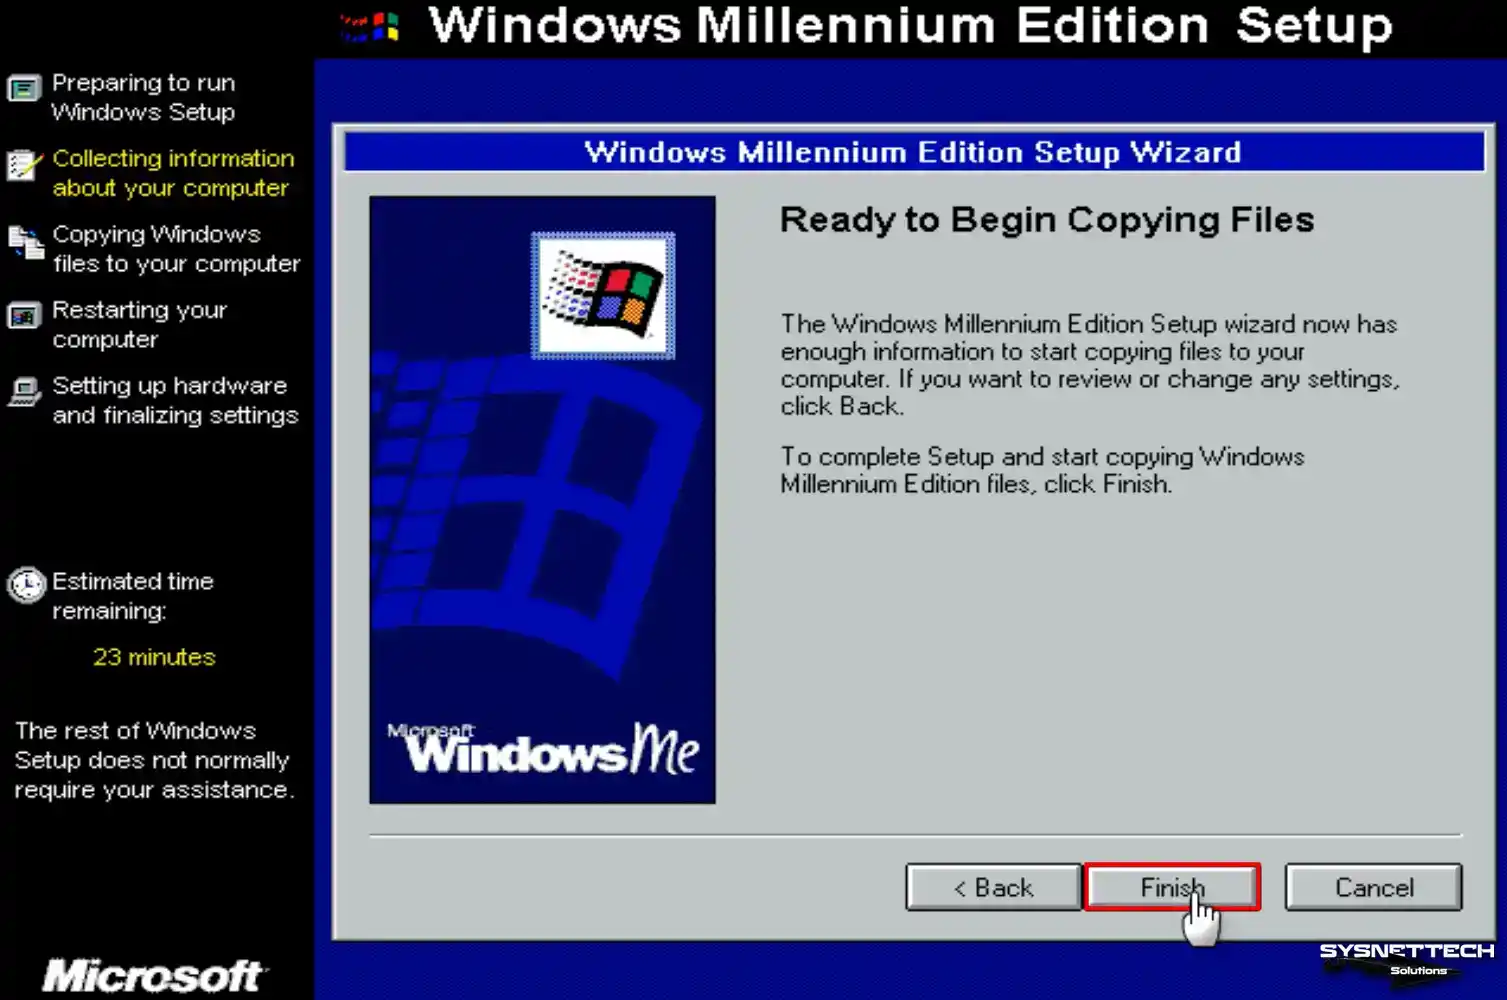
If you need to modify a setting, click the Back button and revisit the appropriate stage to make the necessary changes. When the setup wizard is ready to copy the Windows files, click Finish and continue.
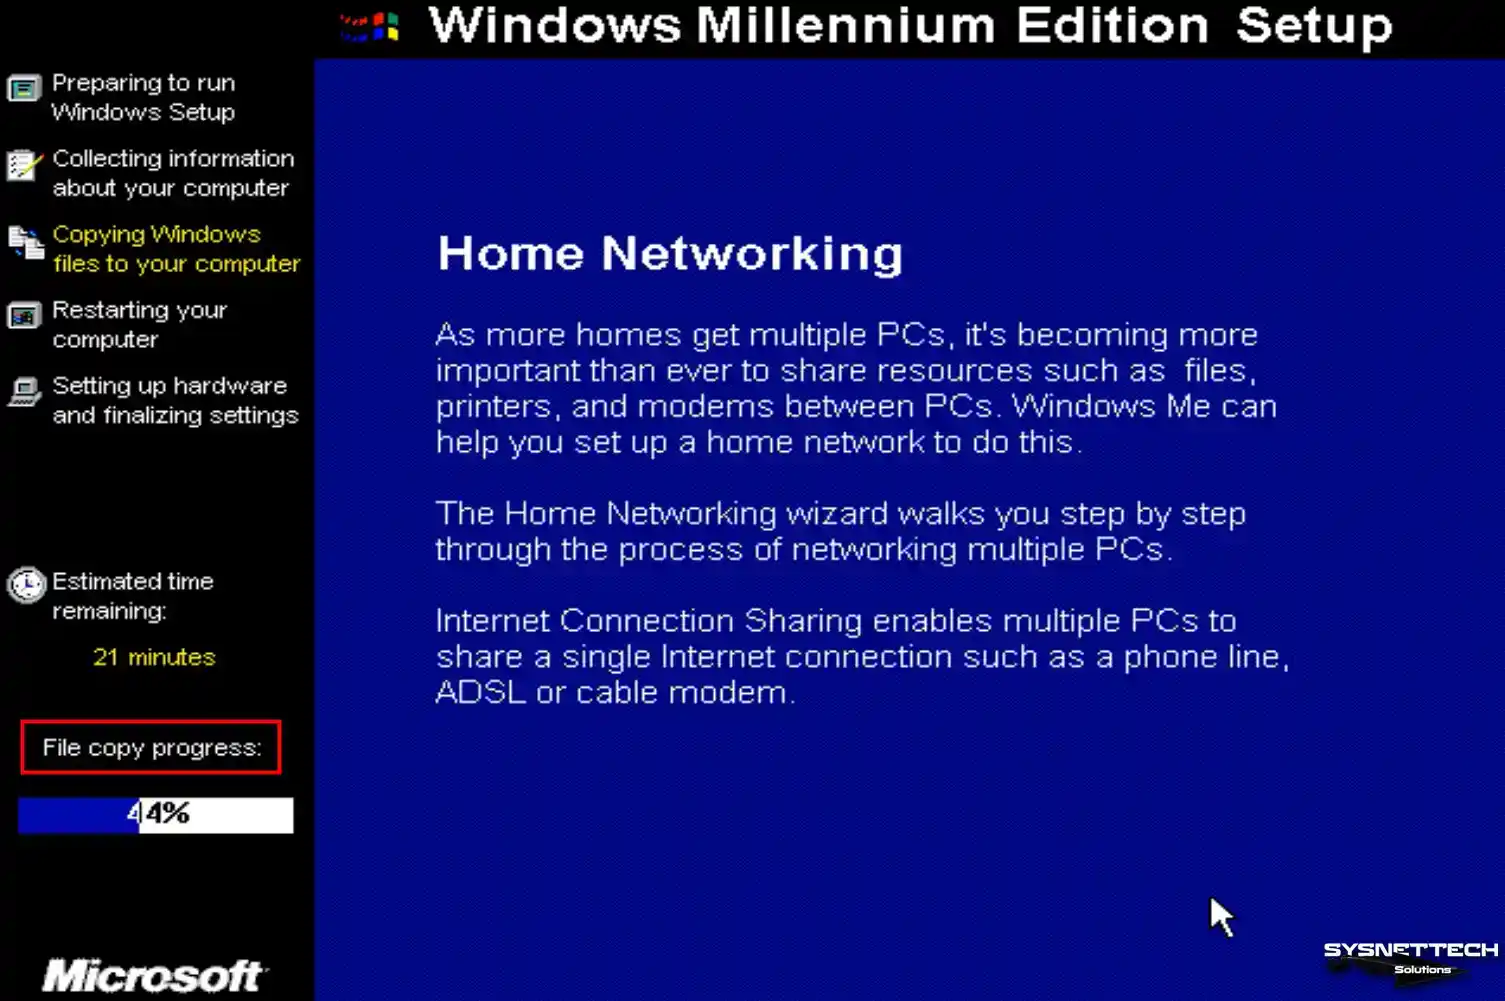
Step 20
Wait while the system files are copied to your virtual disk.
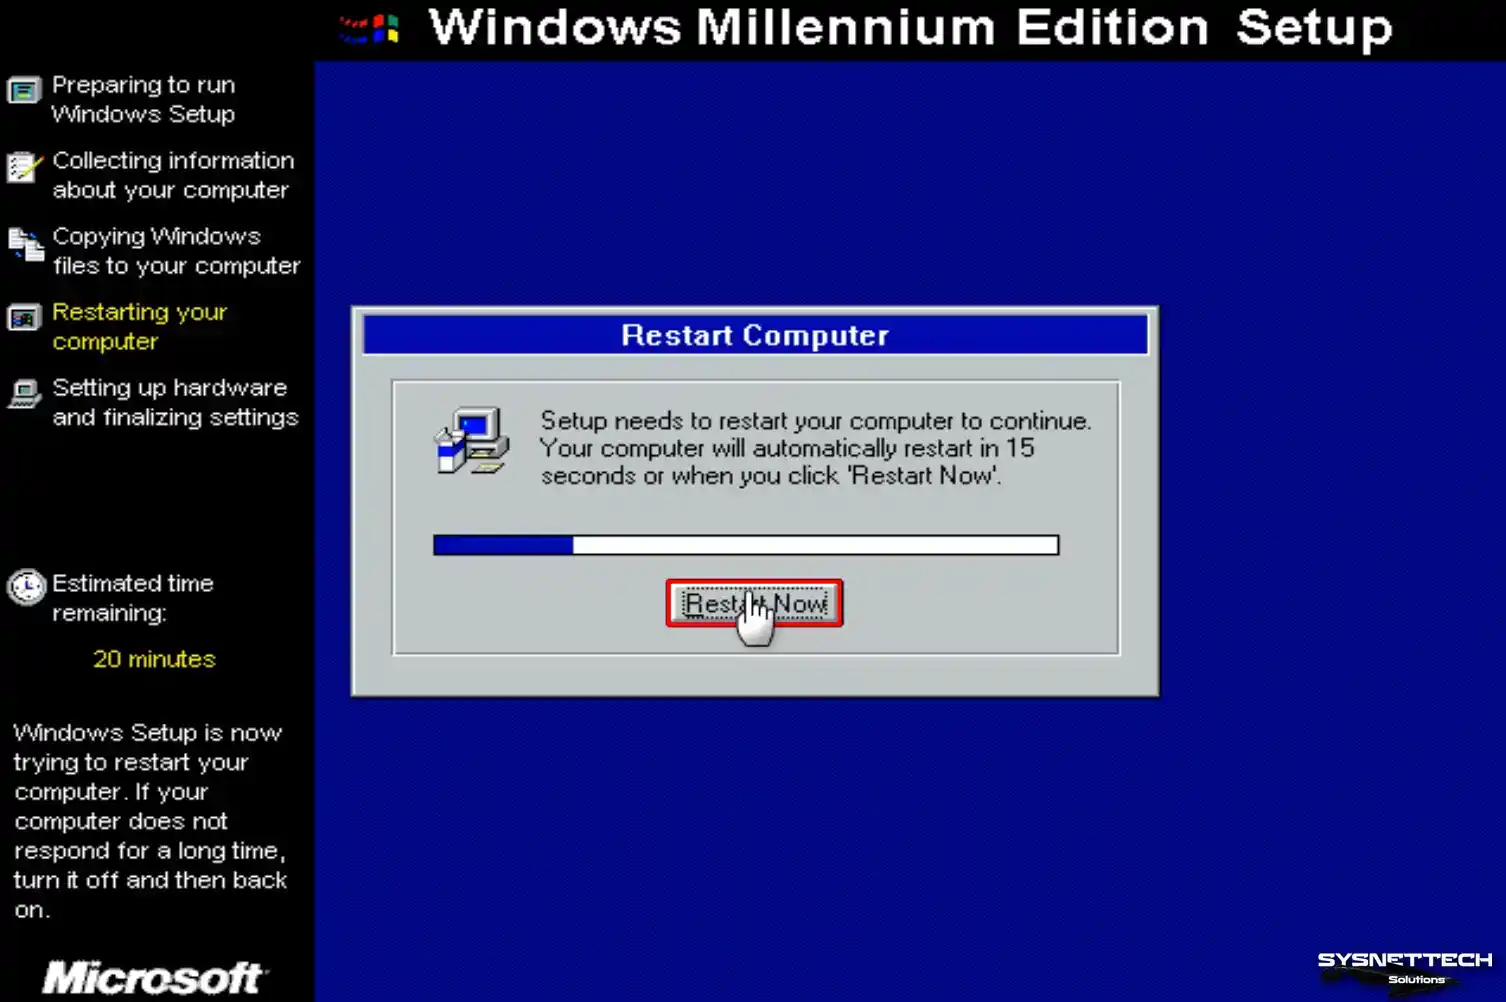
Step 21
Your virtual system will automatically reboot in 15 seconds.
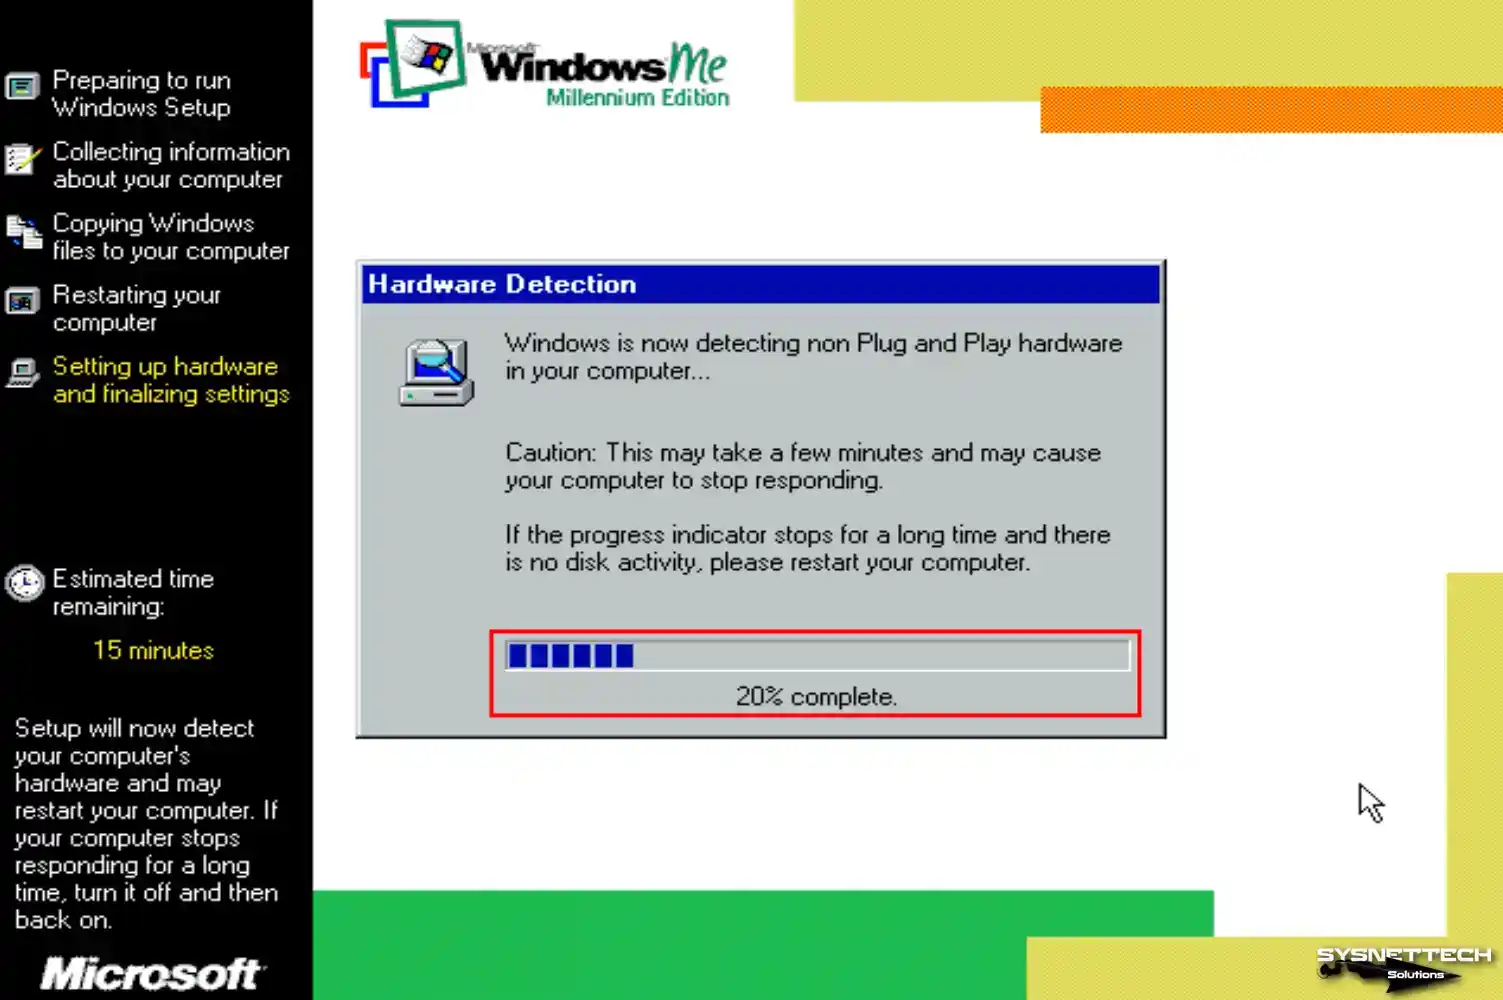
Step 22
Windows will identify plug-and-play devices on your guest machine. If the hardware scan takes longer than anticipated, we suggest restarting your virtual machine and giving the scan another try.
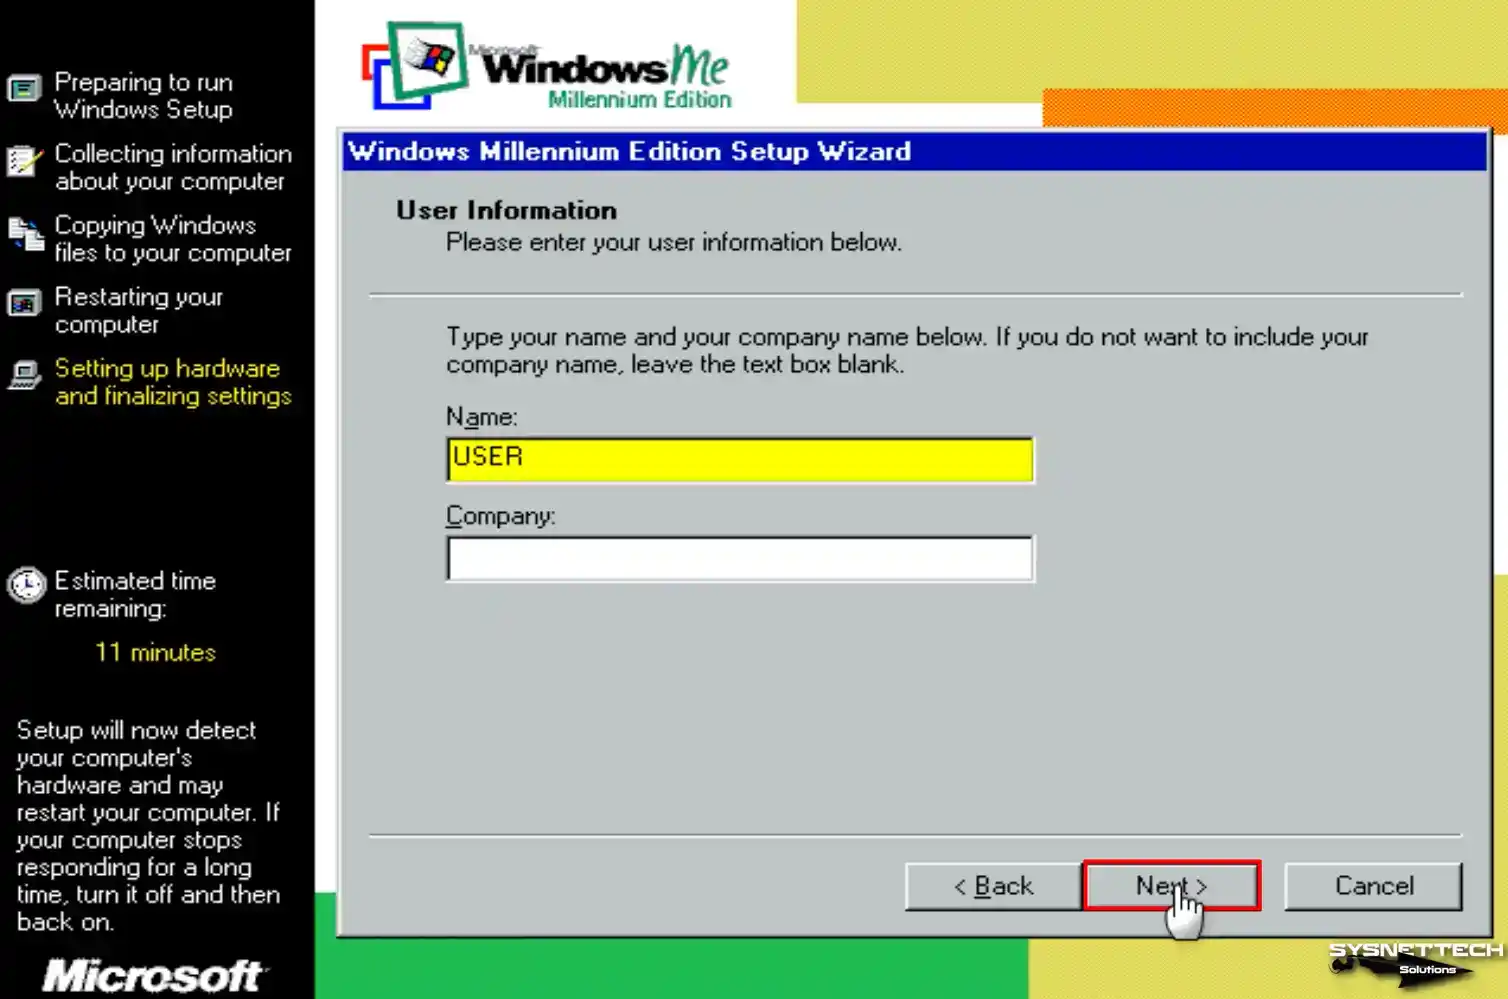
Step 23
Type the username of the user account for your Windows Millennium system and click Next.
Step 24
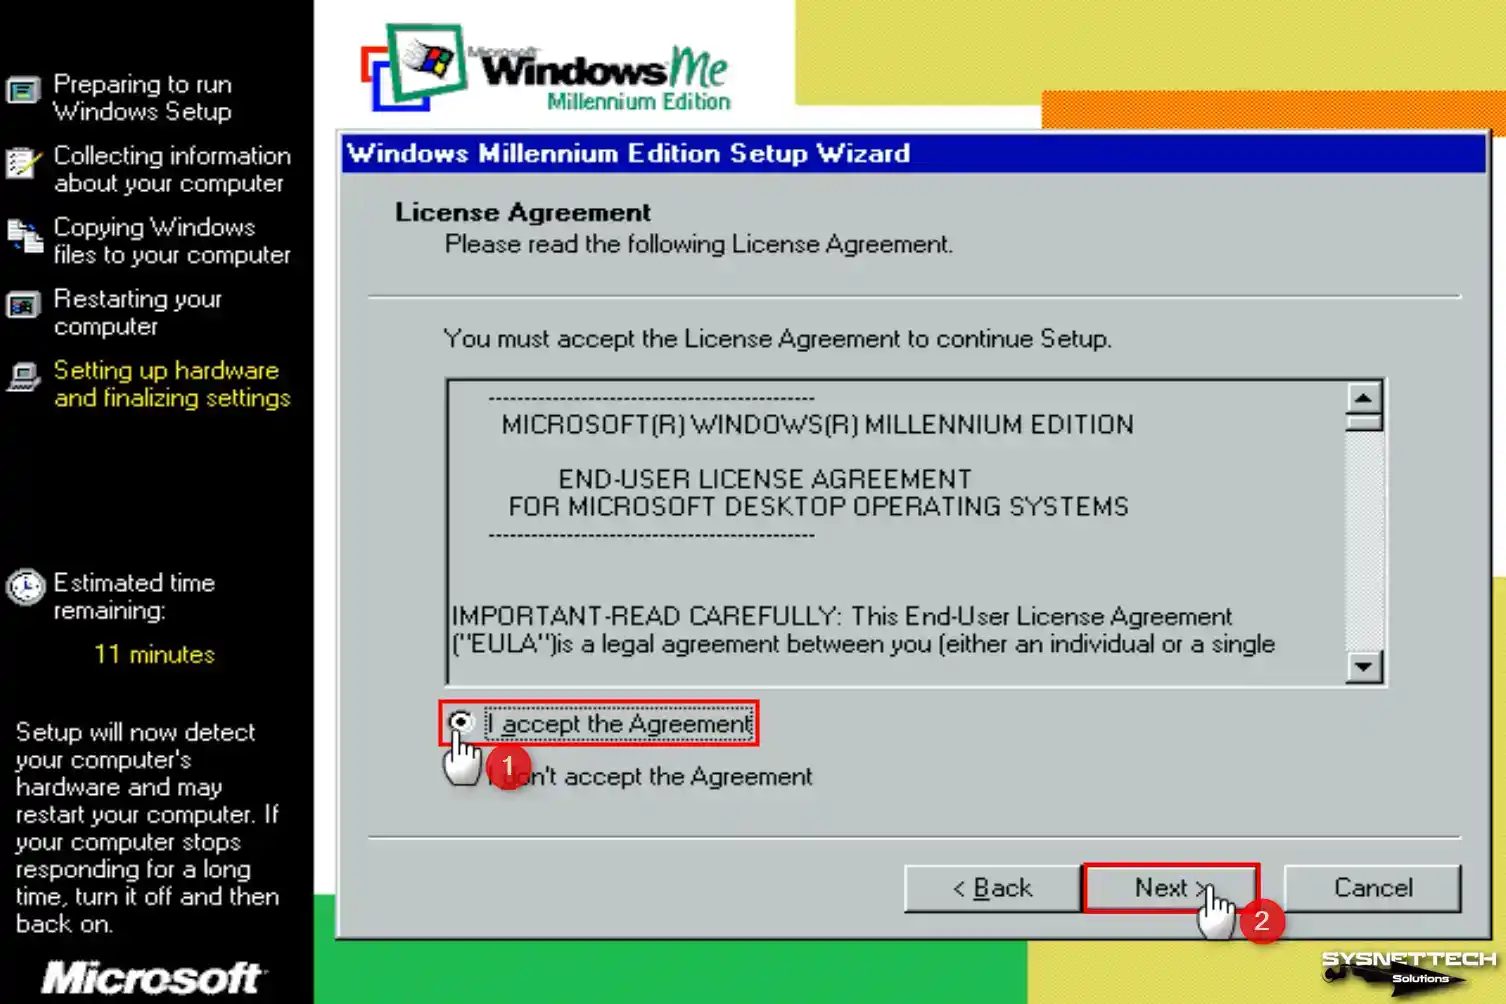
Accept the license agreement of the Windows ME operating system and click Next.
Step 25
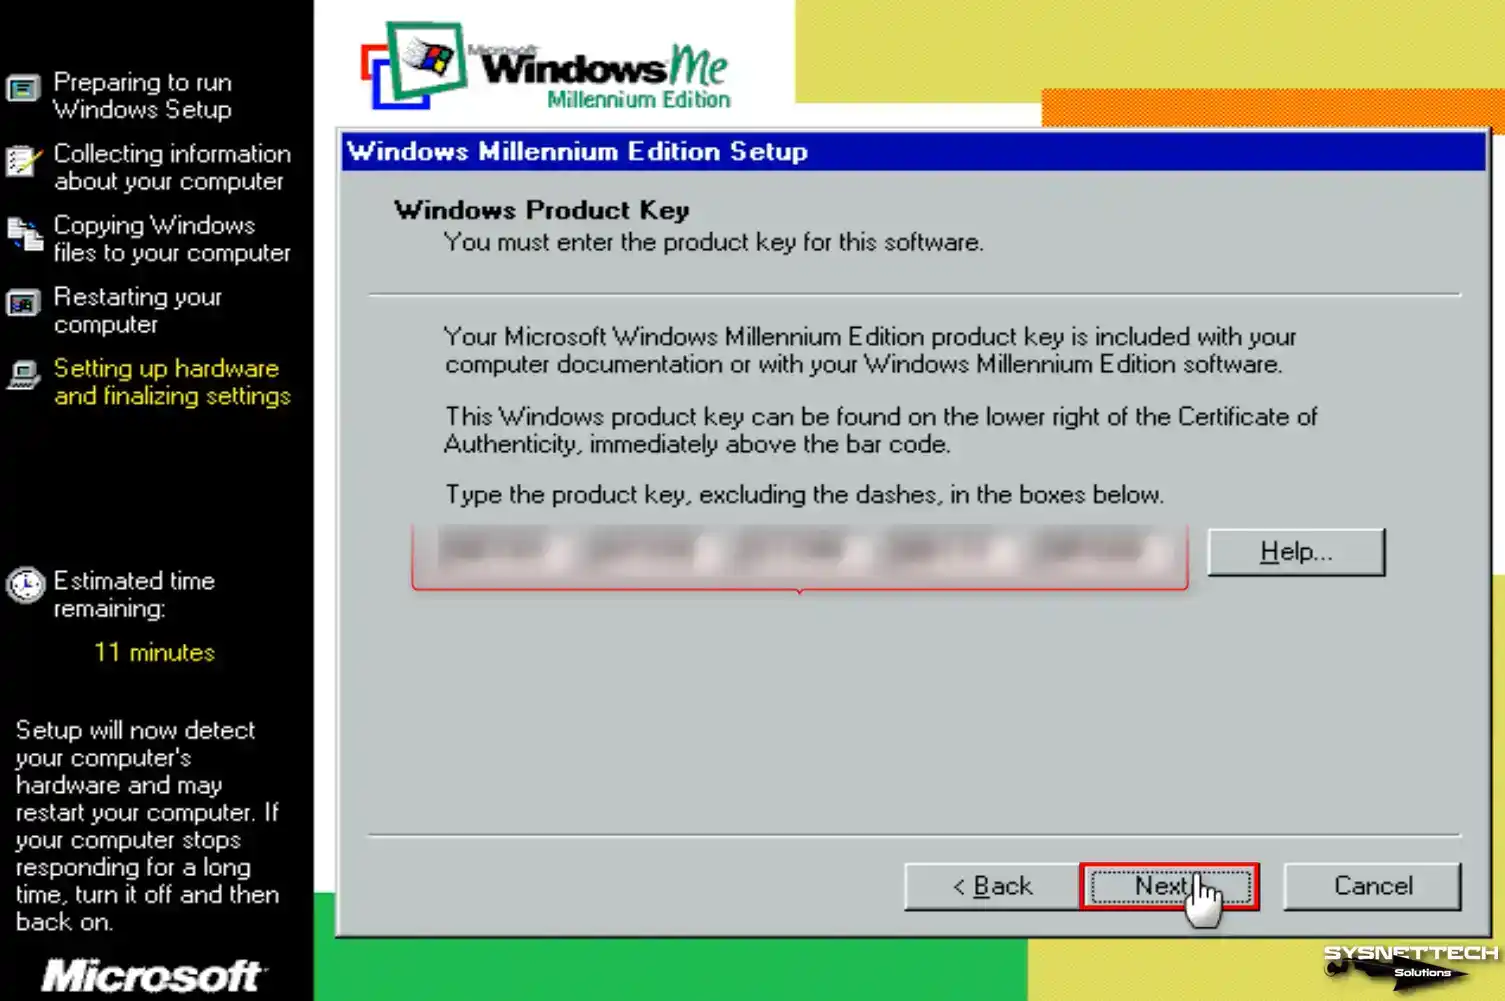
Type your Windows ME product key and continue.
Step 26
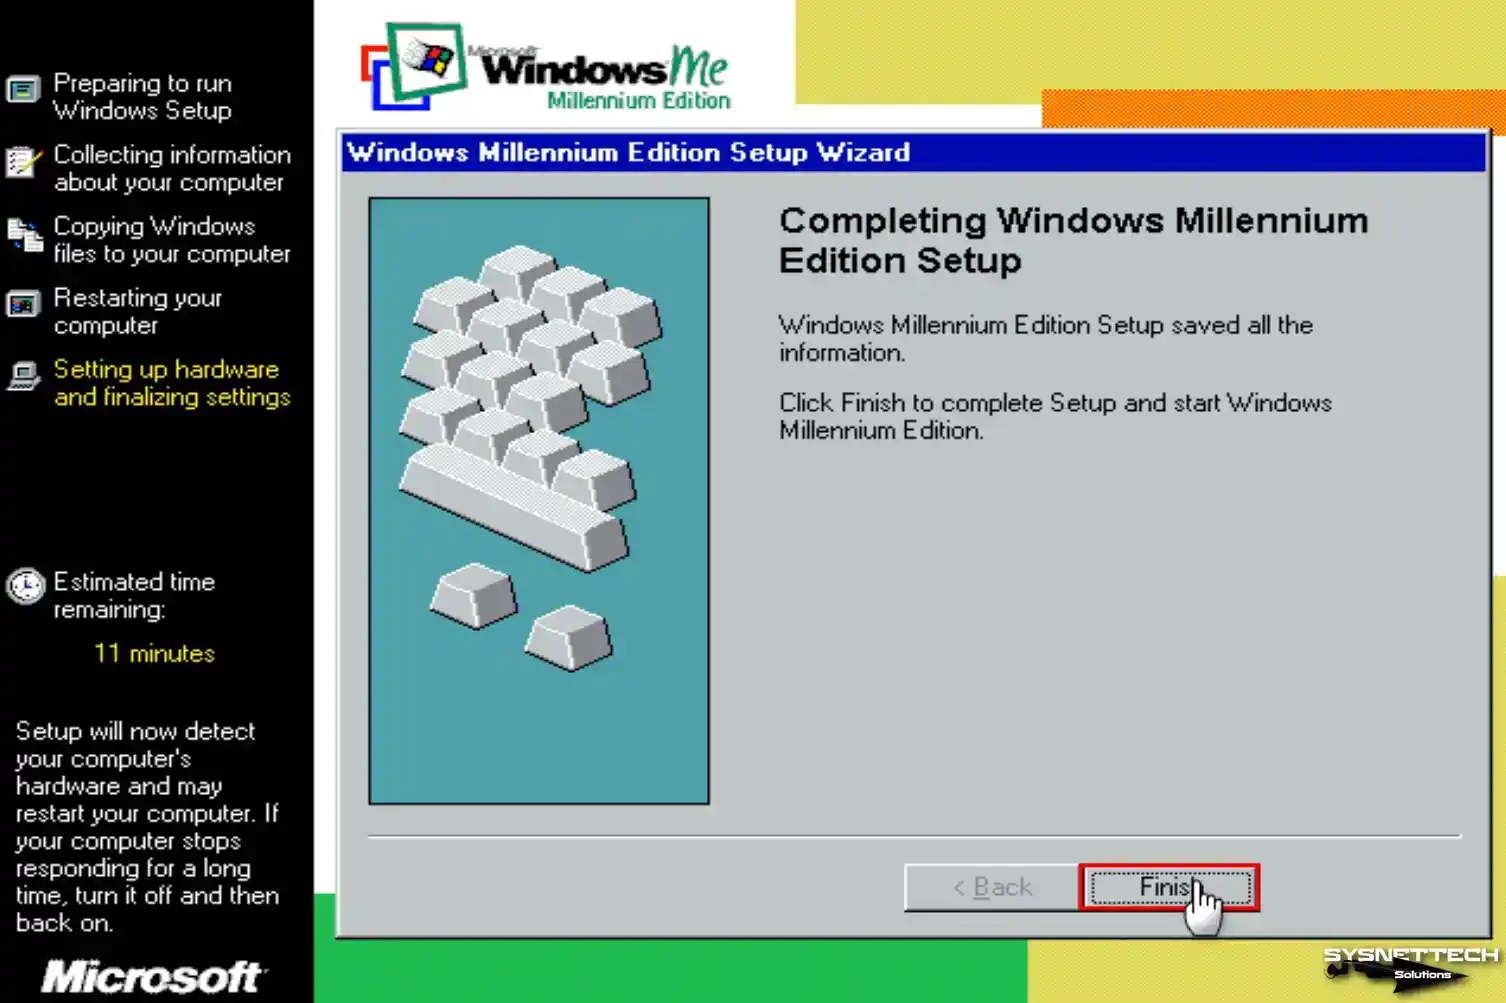
After typing the product key of your virtual system, click Finish to start Windows ME.
Step 27
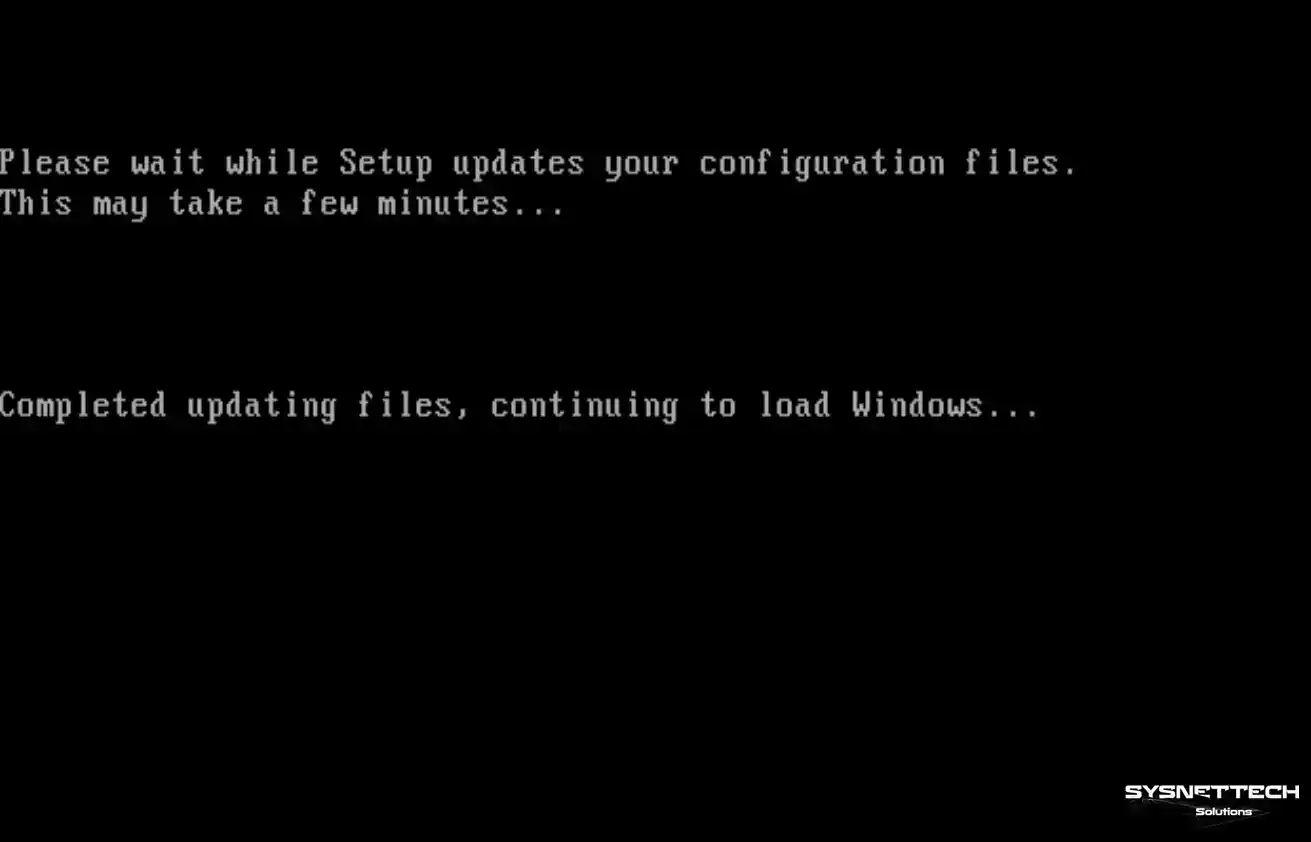
When your guest machine restarts, wait while your configuration files are updated.
Step 28
When your virtual machine restarts, system settings such as the control panel, shortcuts in the start menu, and Windows help will be updated.
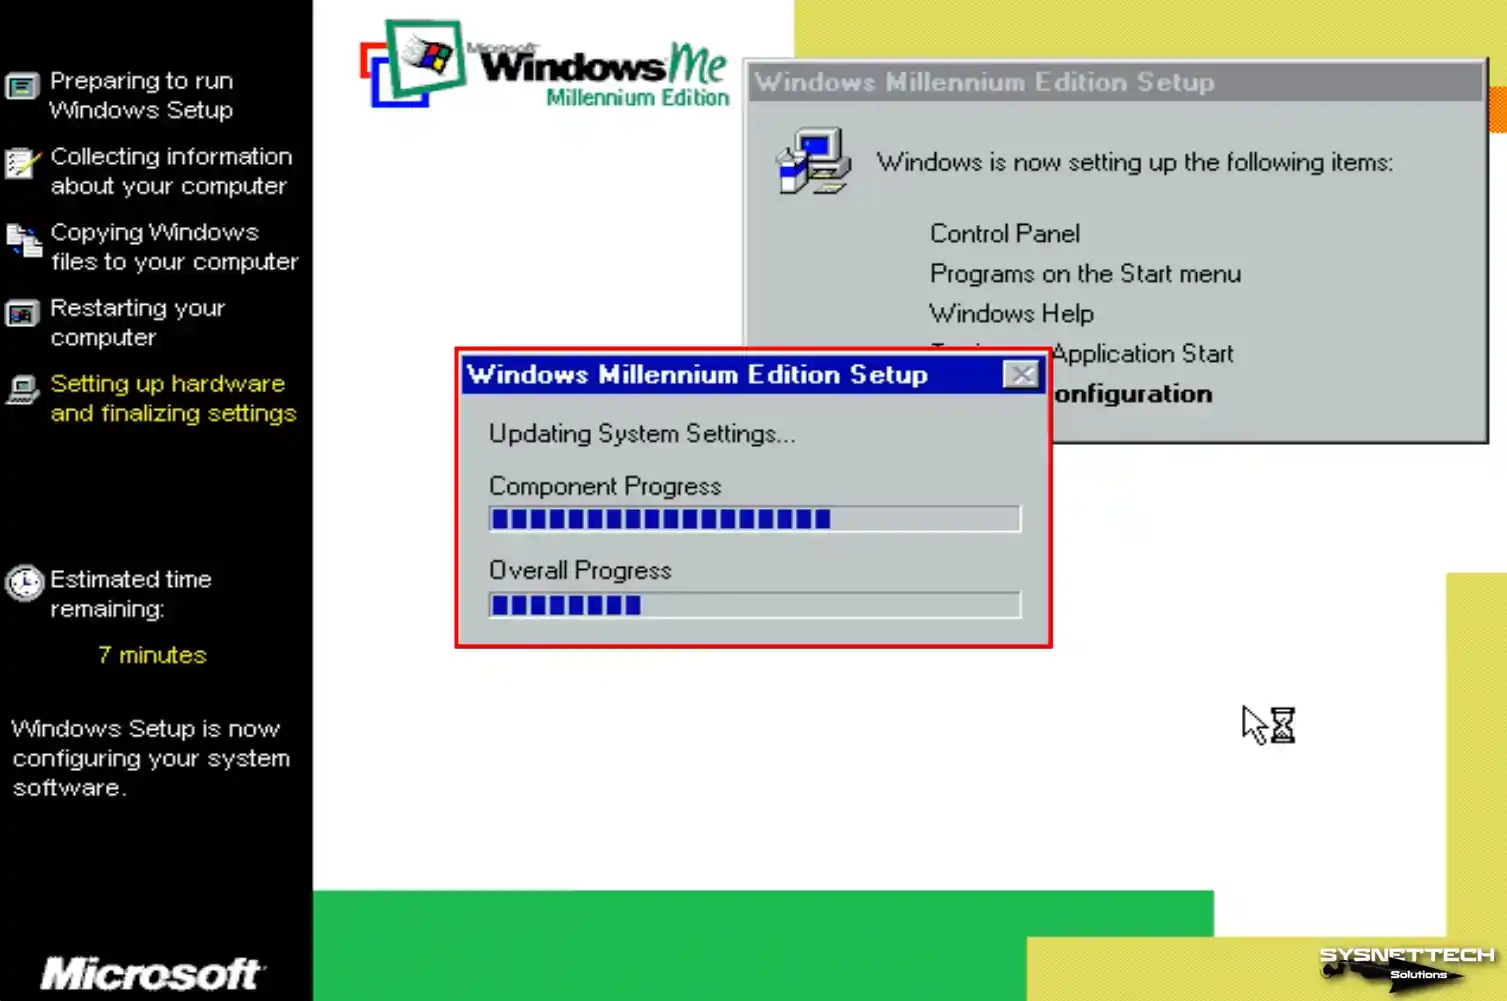
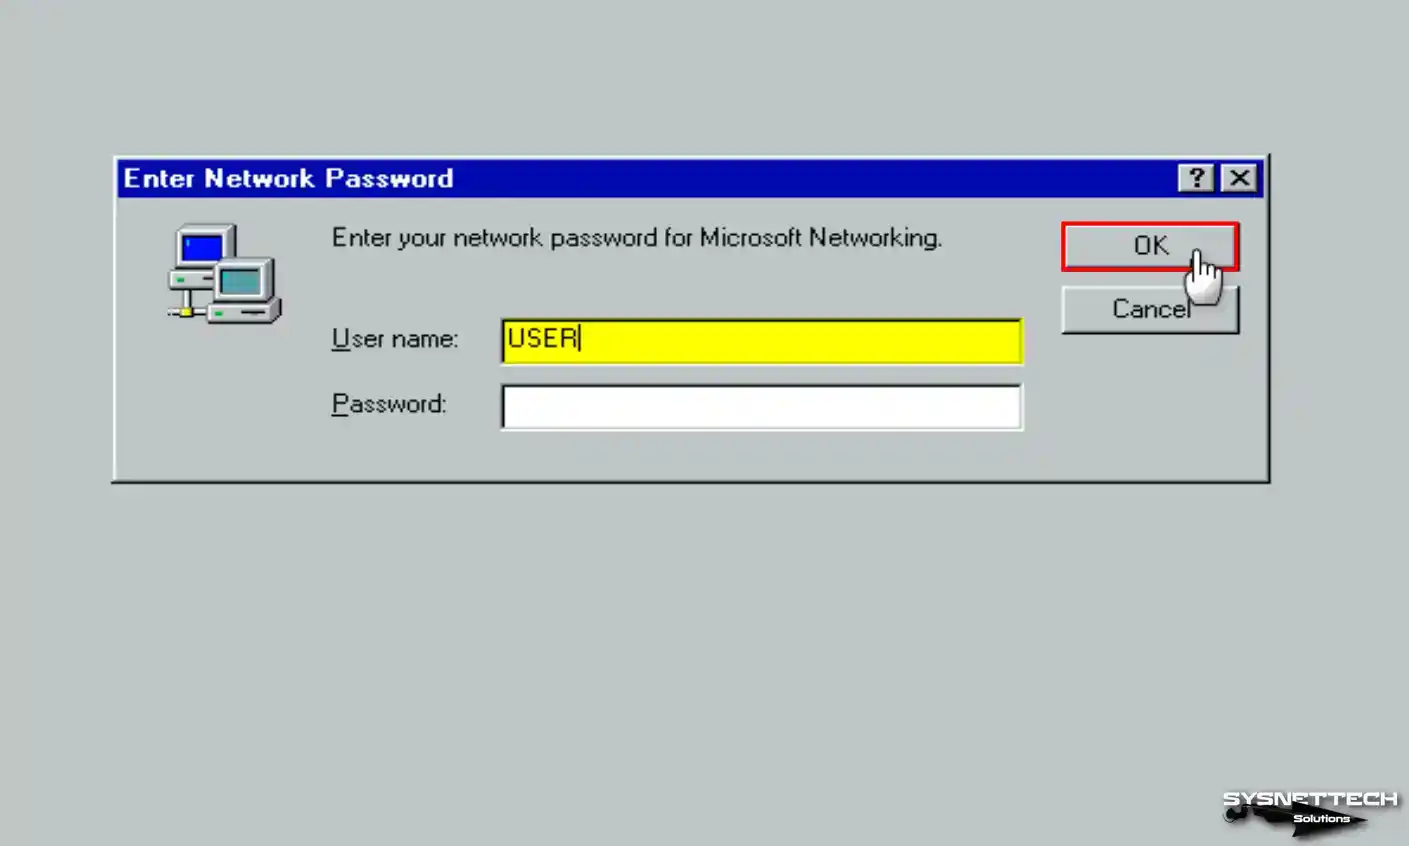
Step 29
After configuring the system settings, type your username and click OK to continue.
Step 30
Wait while your system settings are updated for the last time.

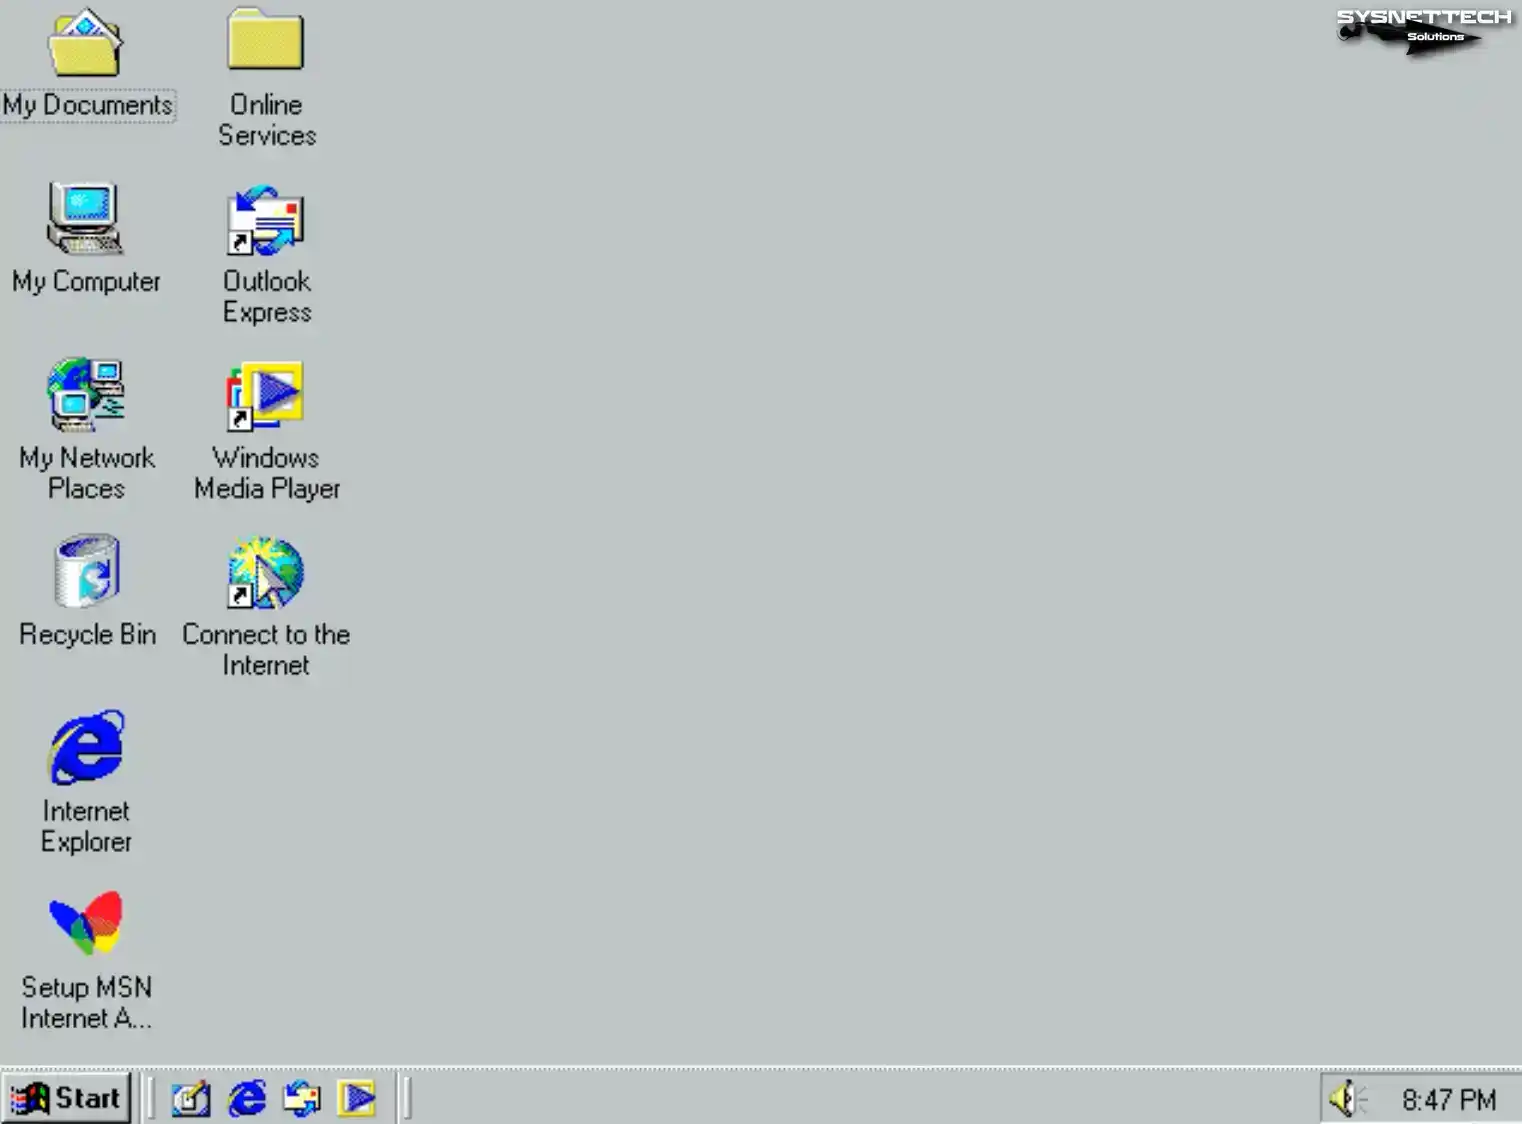
Step 31
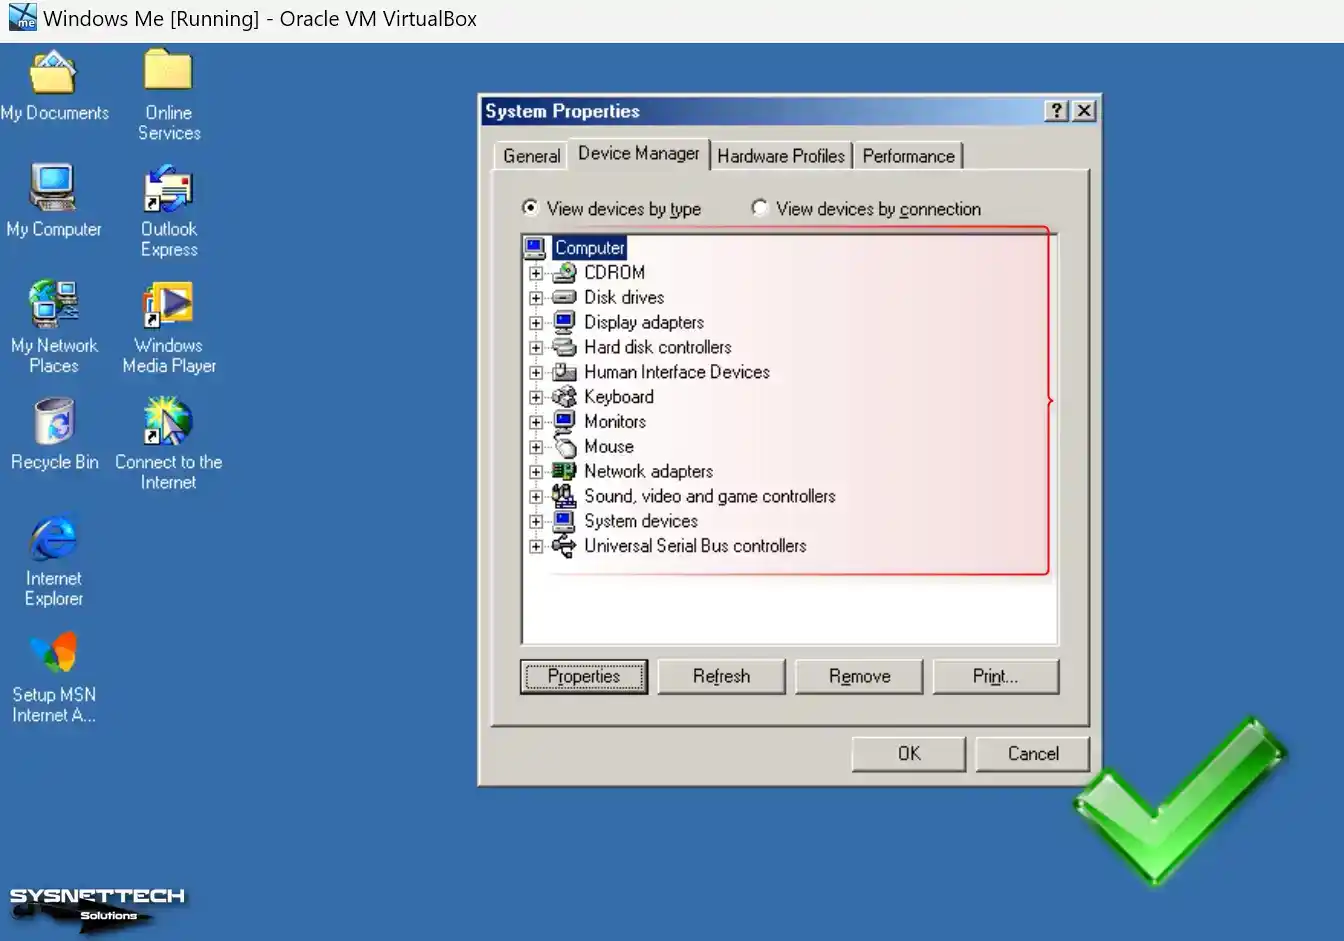
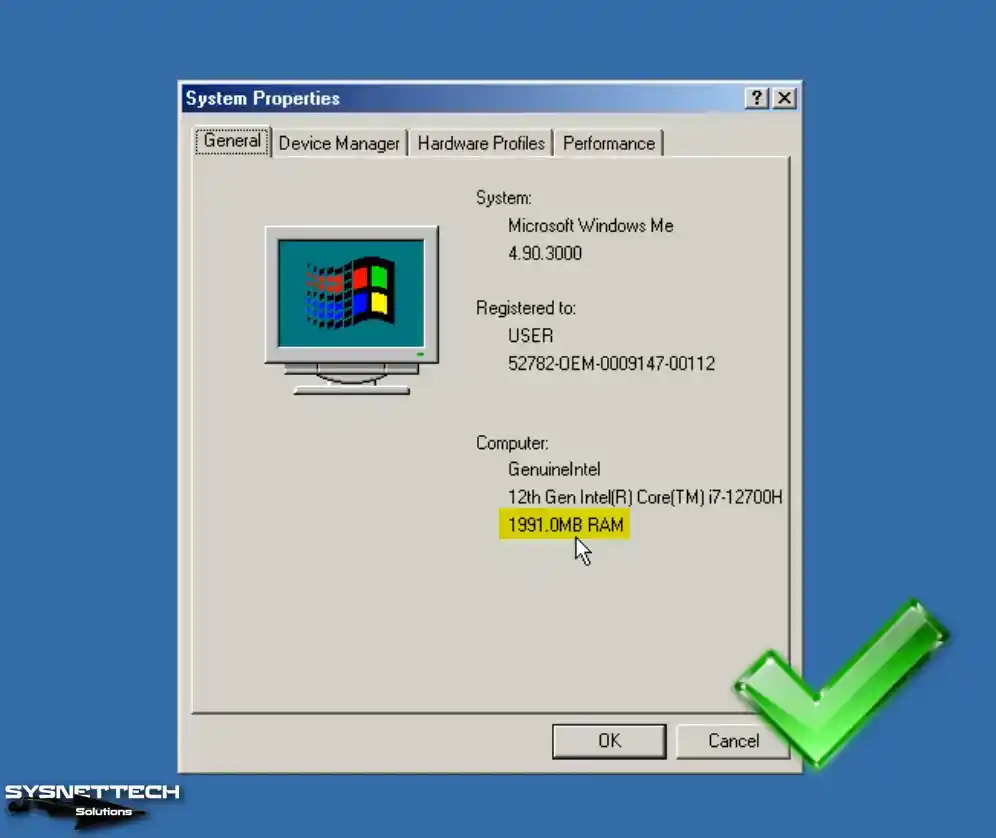
After installing Windows ME with VirtualBox, the desktop view will be as in the image below. Furthermore, to obtain system information, you can right-click on My Computer and proceed to click on Properties.
How to Install Graphics Drivers and Change Screen Resolution
The Oracle VM VirtualBox virtualization program does not support Guest Additions for 9x versions of Windows. Therefore, you may get less efficiency from virtual machines. Moreover, you can adjust the screen resolution and color mode by utilizing third-party software.
Step 1
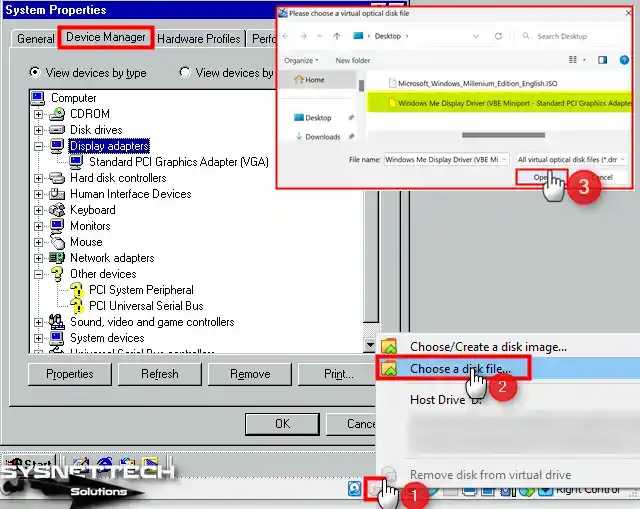
First, open Device Manager after clicking My Computer / System Properties, and check the drivers that are not installed. If Guest Additions could be installed, drivers for all devices in the device manager would be installed automatically.
You can use SciTech Display Doctor software or install the Display Adapter driver to change the screen resolution in Windows 95, 98, and ME versions.
Download the VBE Miniport display adapter driver from the area at the bottom of the article to your host computer, right-click on the CD/DVD icon to add the ISO file to the guest machine, and click Choose a disk file.
Step 2
Double-click the Standard PCI Graphics Adapter in Device Manager and click the Update Driver button.
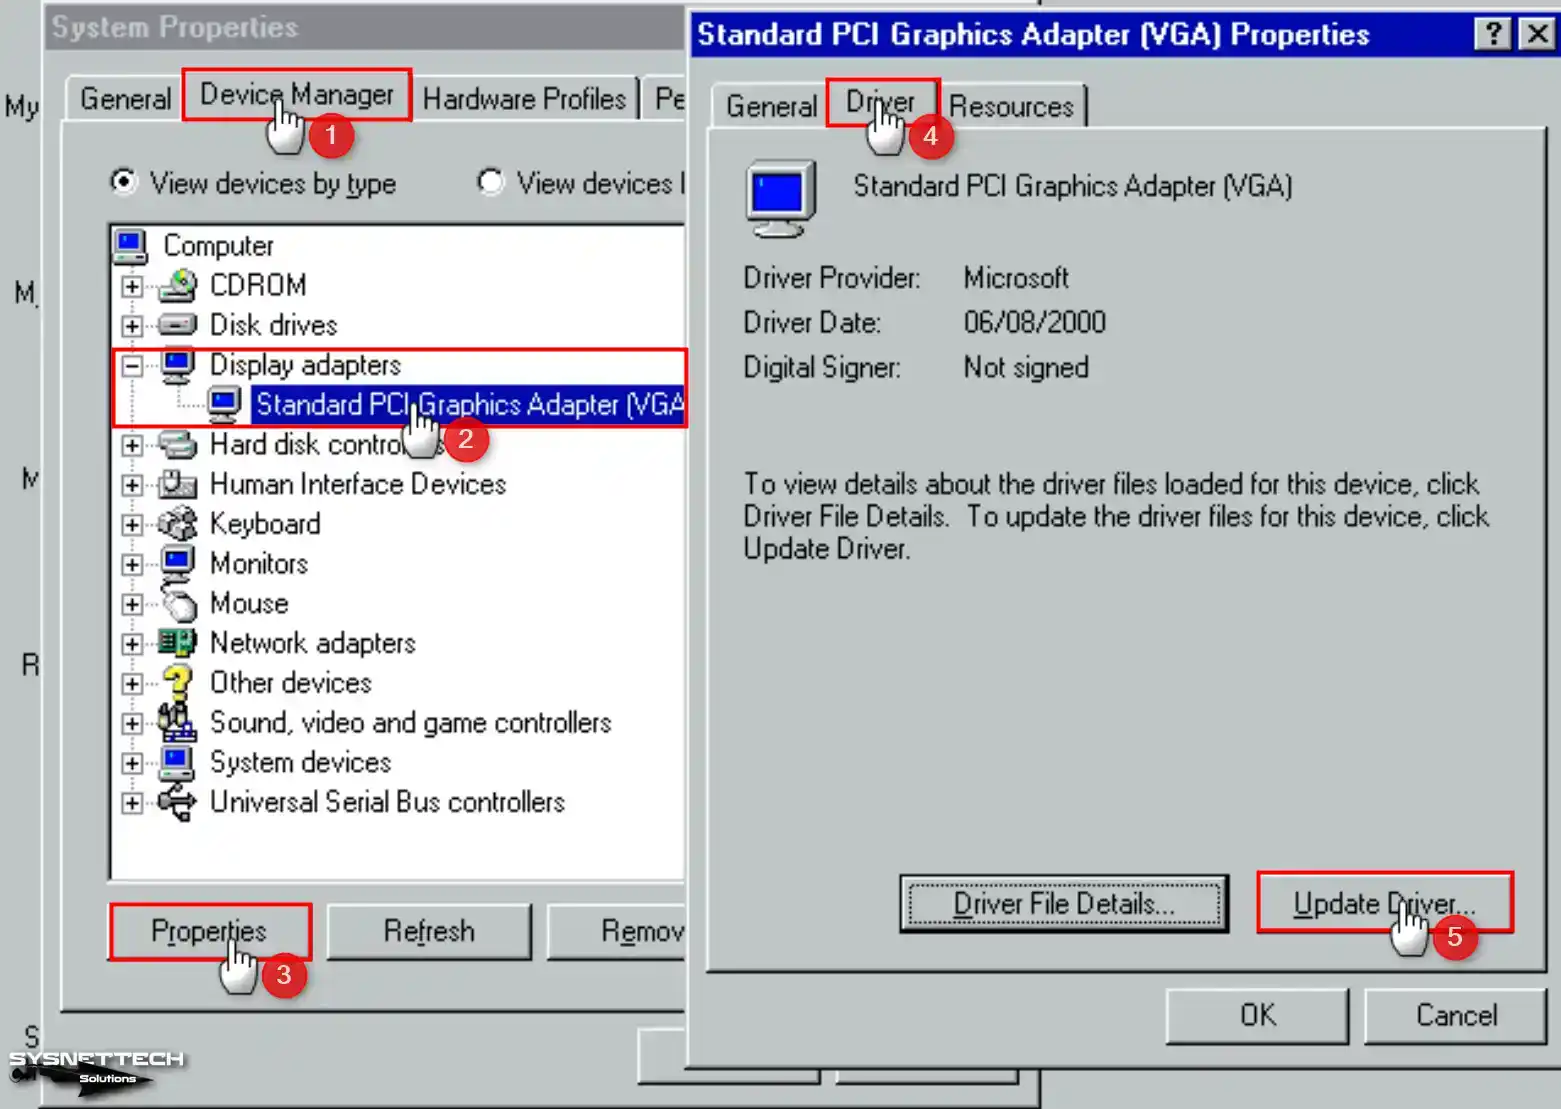
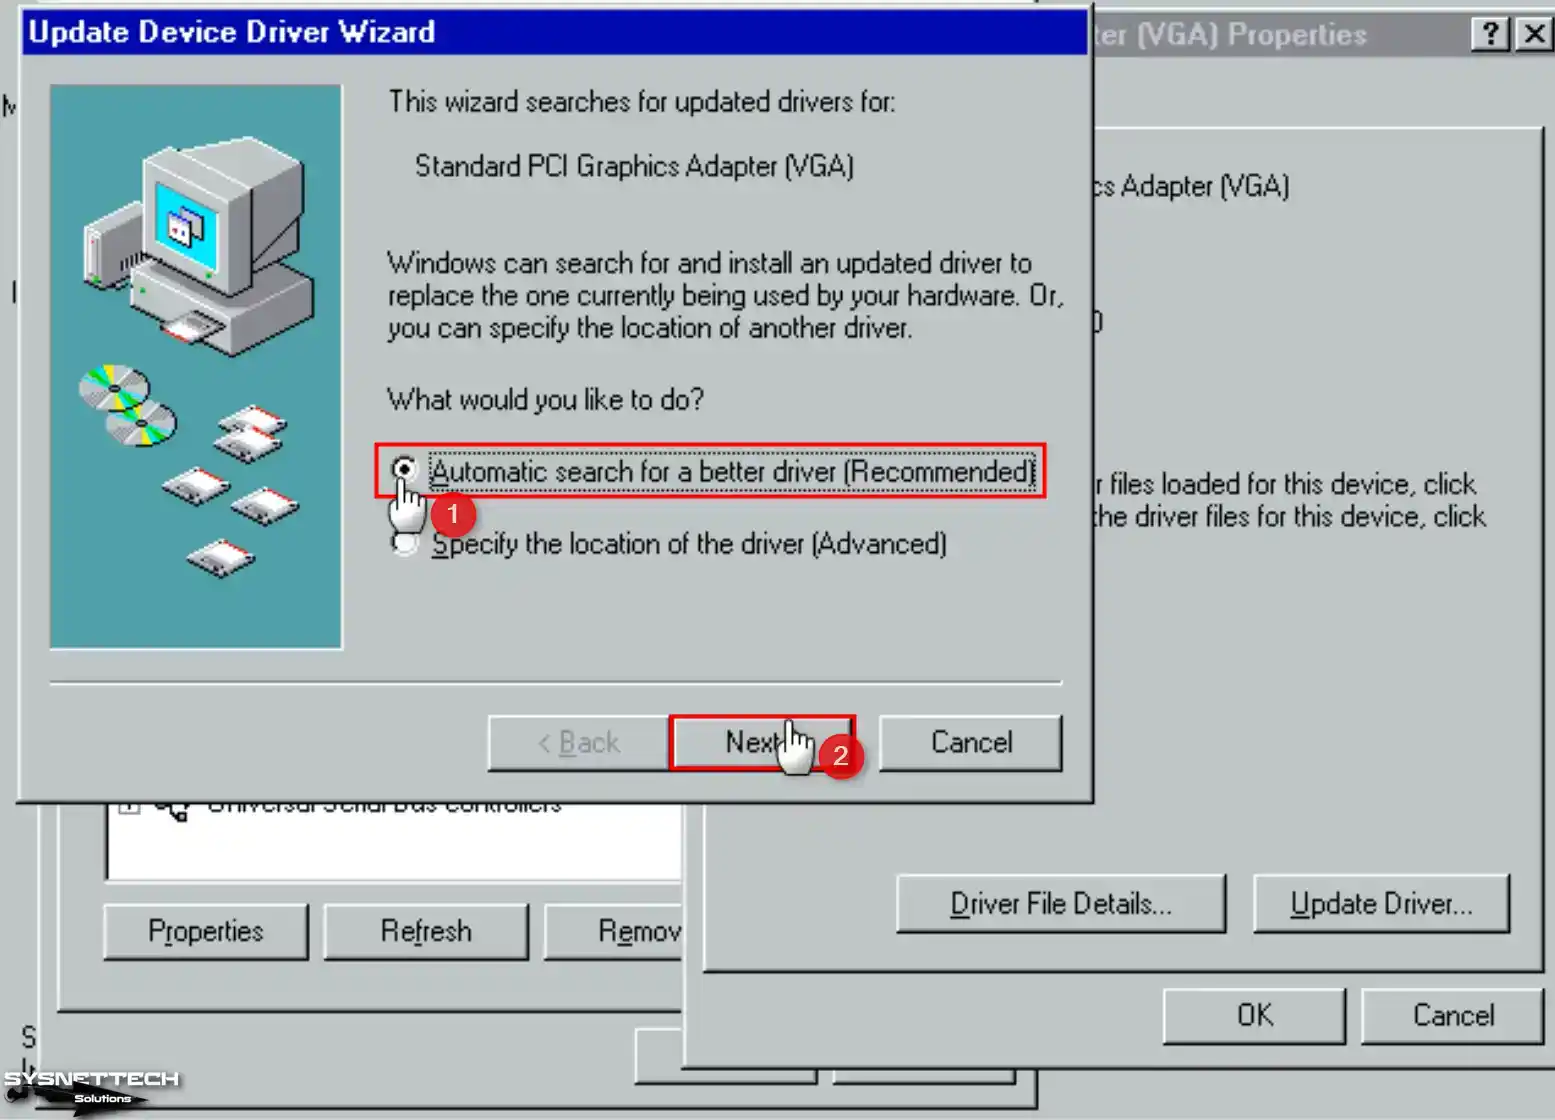
Step 3
To install the relevant driver from the ISO file content that you added to the optical drive, click Next. In contrast, the auto-install driver option is selected.
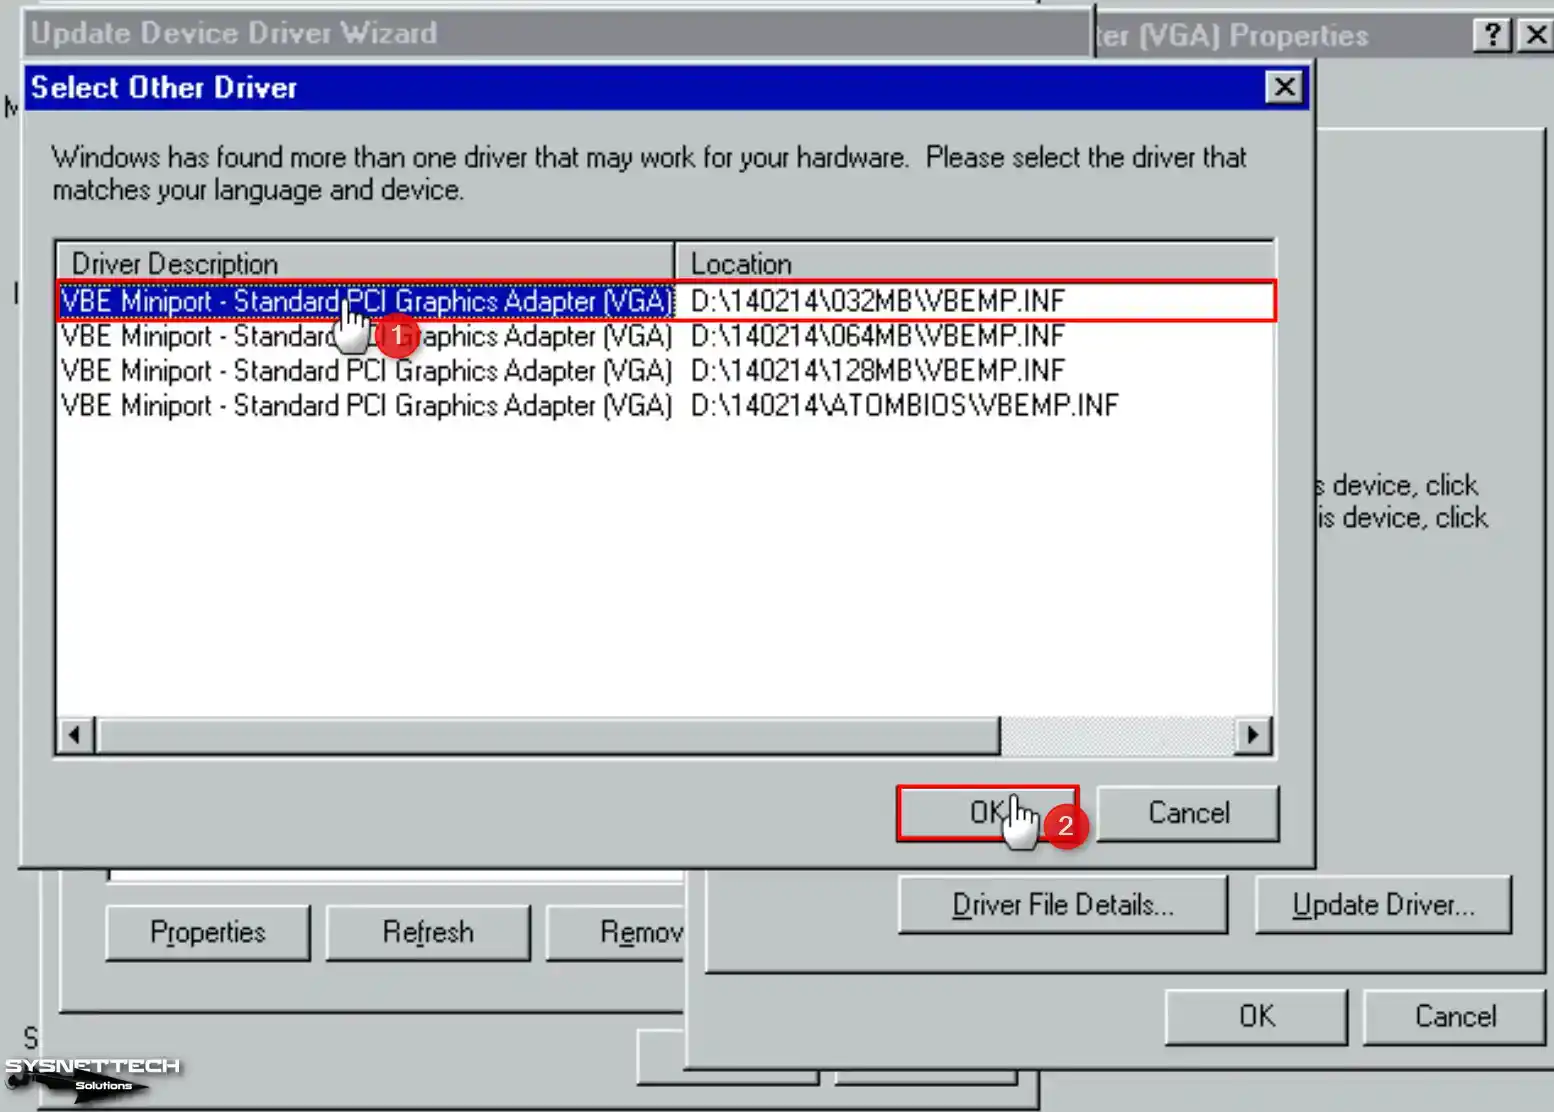
Step 4
When Driver options are listed, select the “VBE Miniport – Standard PCI Graphics Adapter (VGA) / 032MB\VBEMP.INF” and click OK.
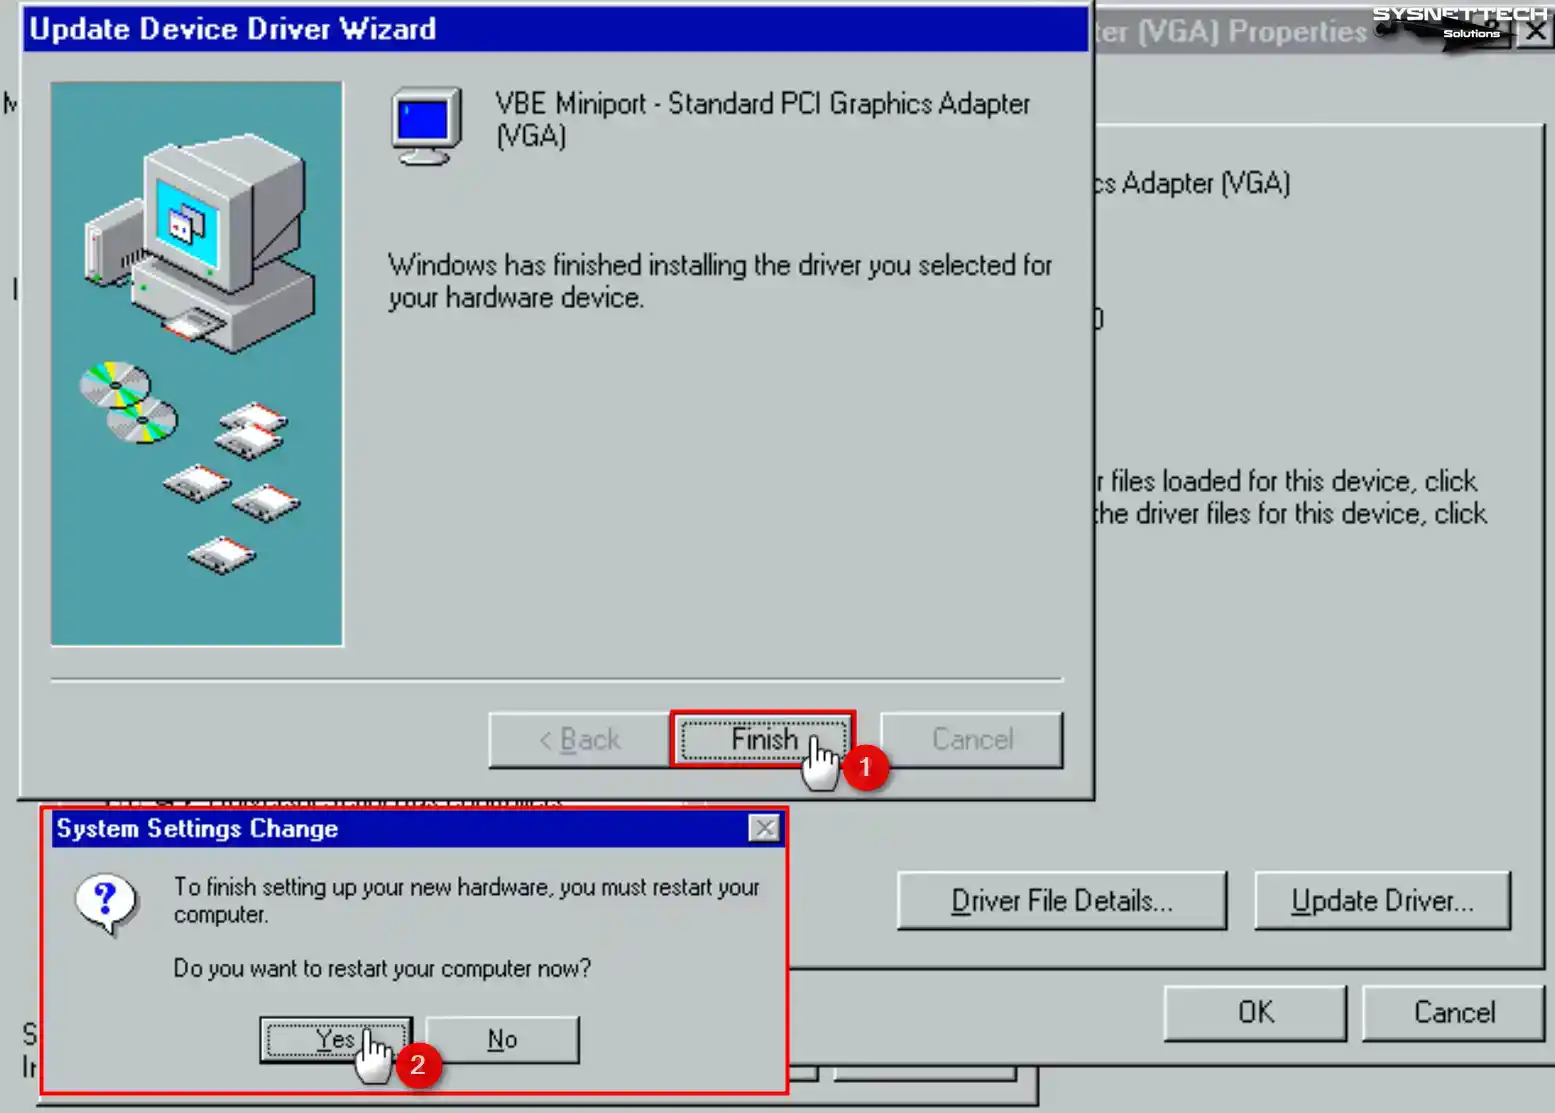
Step 5
After installing the driver for the graphics adapter of the monitor device, restart your virtual computer.
Step 6
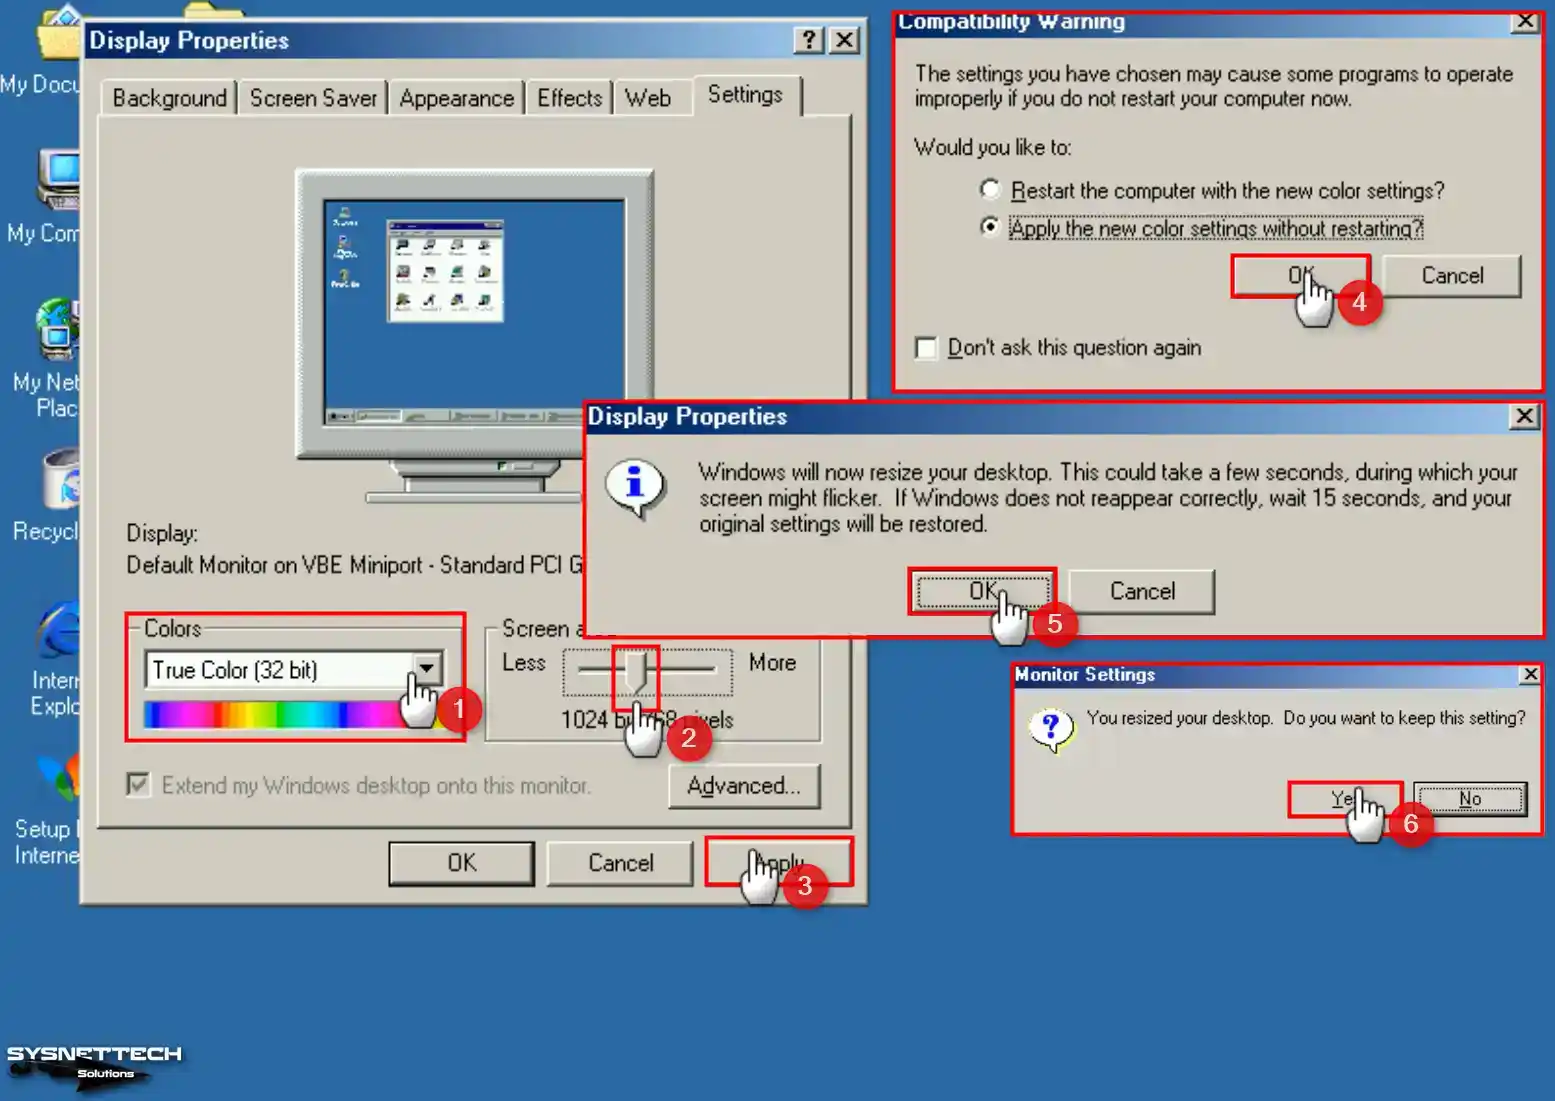
Open Display Properties, choose True Color (32 Bit) from the options under Colors, and apply the changes without restarting your virtual PC.
How to Install USB 2.0 Driver in Windows ME
Under normal circumstances, installing a USB 2.0 driver on a Windows ME/Millennium virtual PC is troublesome. All the drivers you download from the internet are both incompatible and problematic. Therefore, you can download the USB 2.0 driver we have prepared for you, which works without any problems, from the table below the article to your computer.
NOTE: If you install the driver for the graphics device of the virtual machine with SciTech Display Doctor, the USB 2.0 driver will not work when you restart your VM. This is because the display driver is not fully compatible with Windows Me. Therefore, configure the graphics adapter using the VBE Miniport.
Step 1
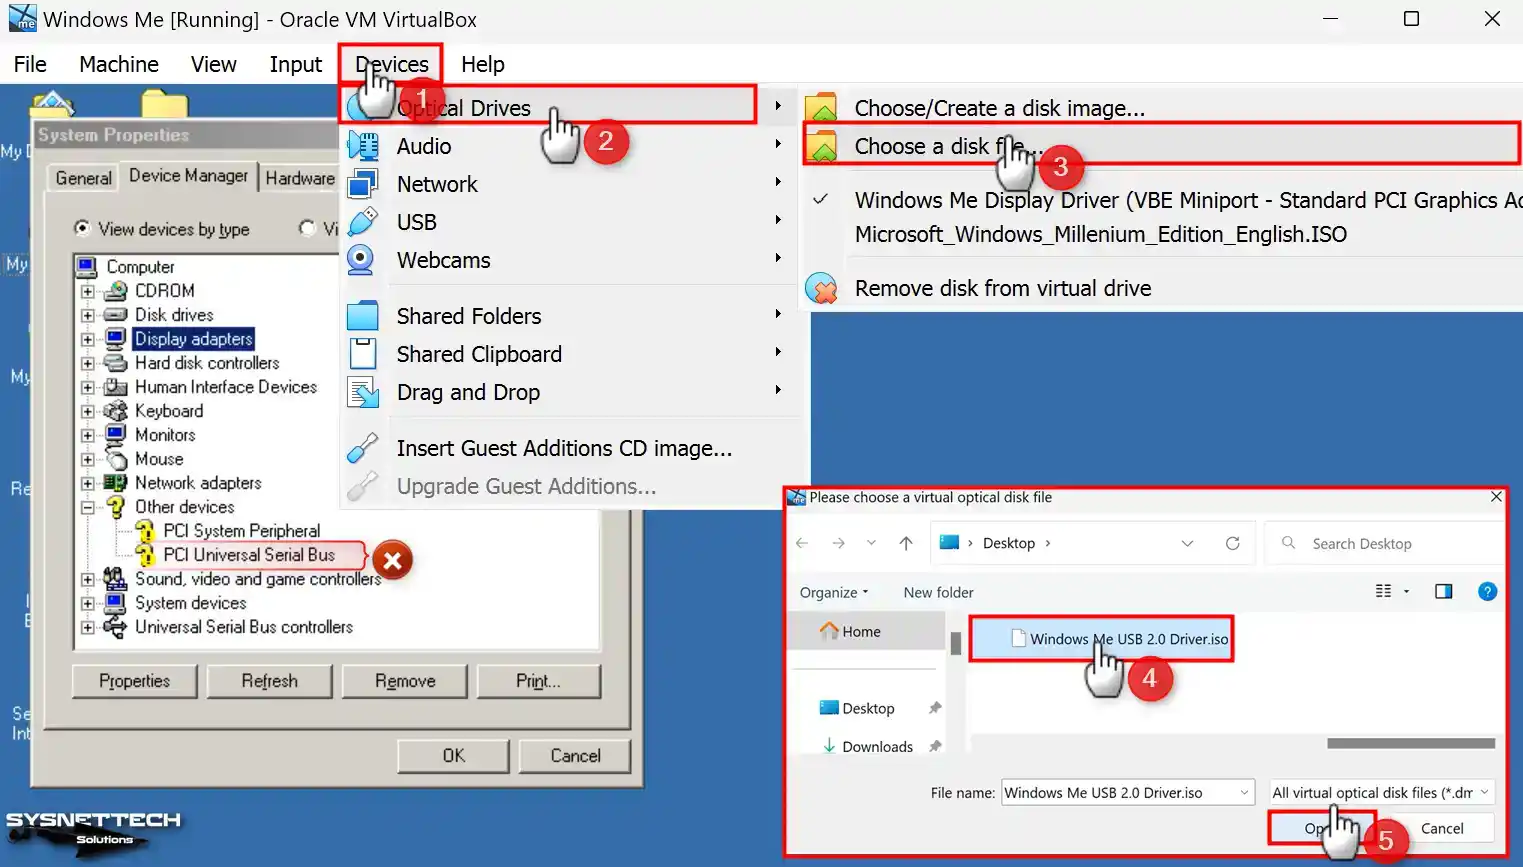
Open Device Manager again and check that USB 2.0 is not enabled under Universal Serial Bus Controllers. Then, right-click the CD/DVD icon and click Choose a disk file to add the USB 2.0 Driver ISO file to the virtual machine.
Select the USB 2.0 Driver ISO file downloaded to your computer from the table below the article and click the Open button.
Step 2
Double-click PCI Universal Serial Bus on Device Manager and click the Reinstall Driver button. Select the Automatic Search for a Better Driver option in the open window and click Next again.
After scanning the USB 2.0 drivers from the ISO file you added, restart your system after installing the Intel (R) 82801FB/FBM (ICH6 Family) USB2 Enhanced Host Controller – 265C.

Step 3
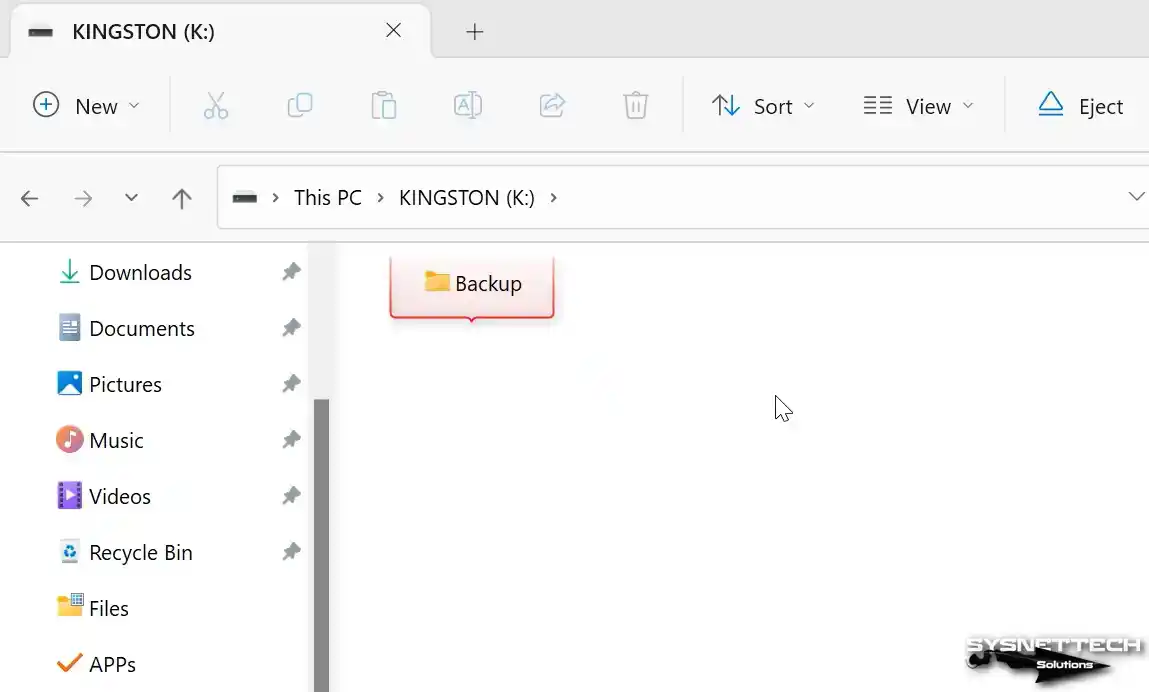
Begin by inserting a flash stick that supports USB 2.0/3.0 into your computer’s 2.0 slot. Afterward, please create a new folder within it as an example.
Step 4
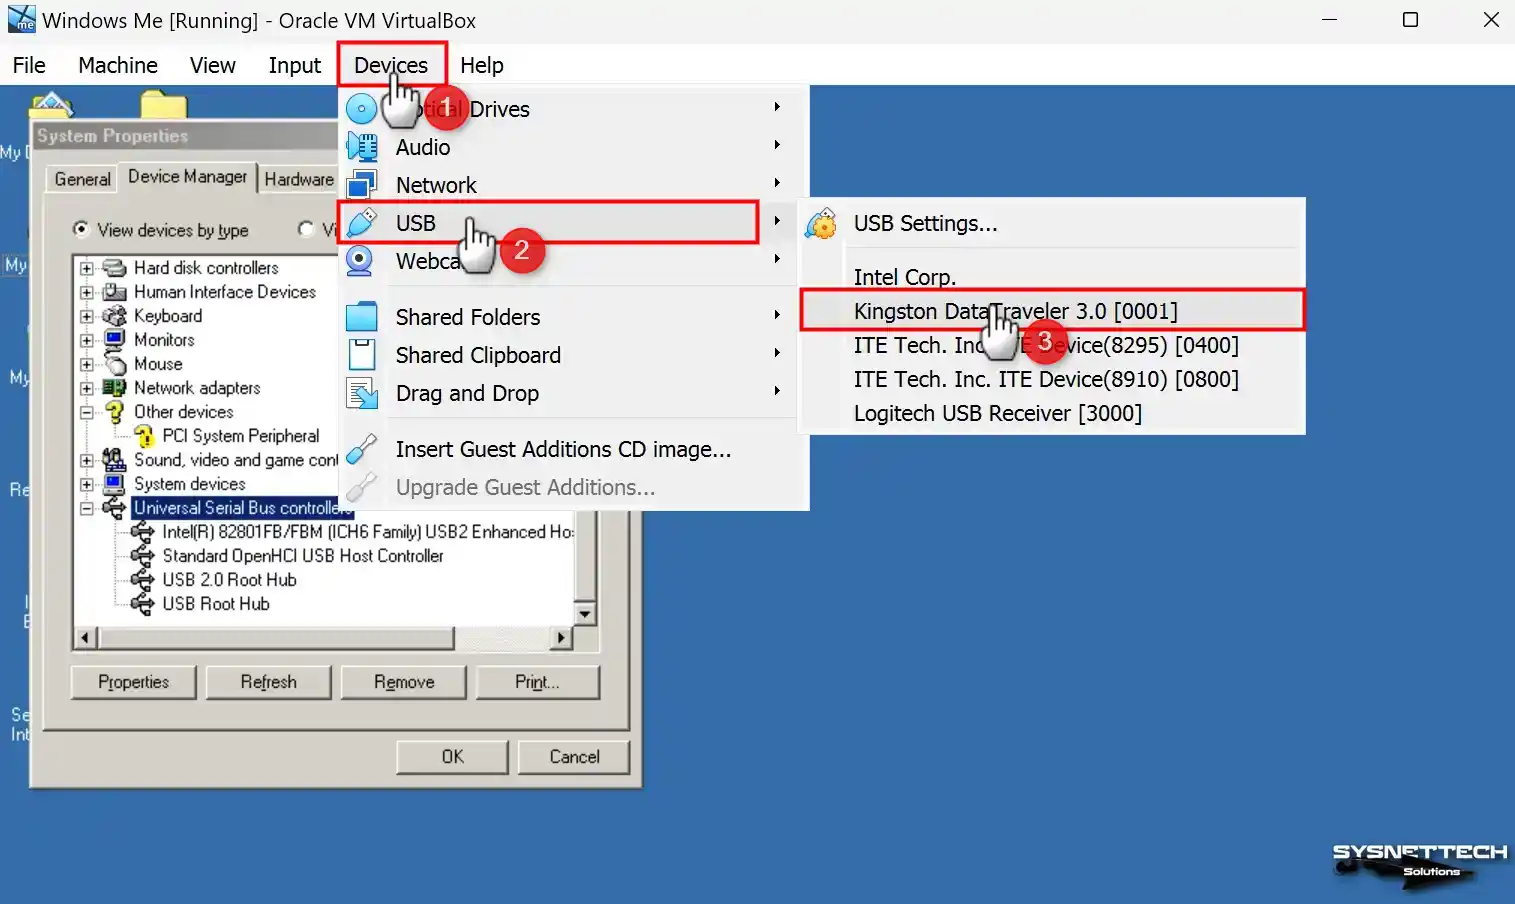
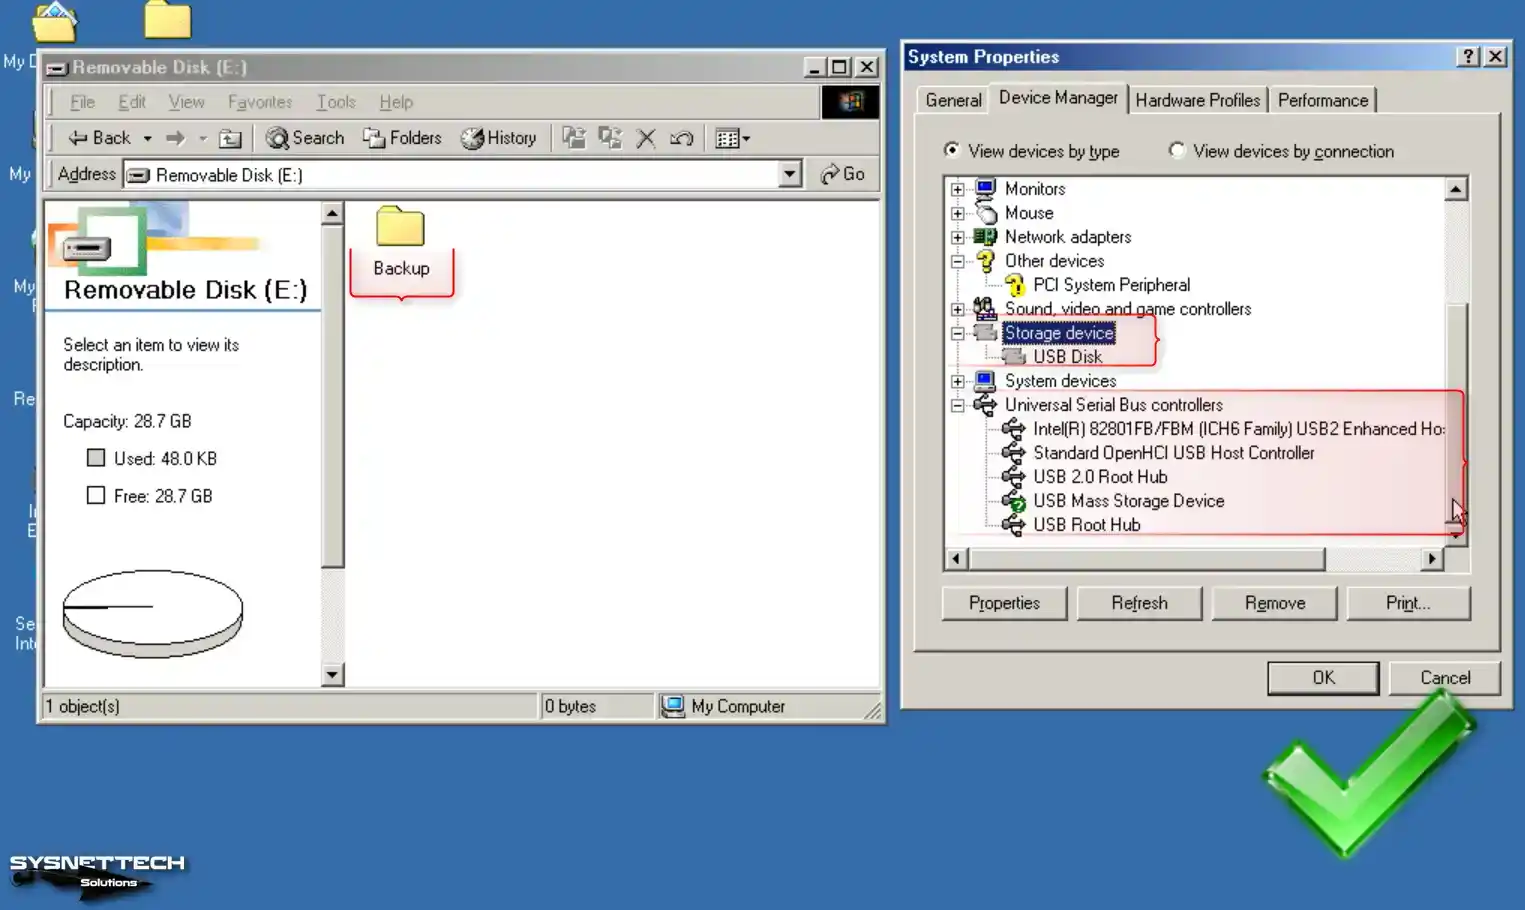
Click Devices / USB / KINGSTON DataTraveler in the tool menu of your guest machine. Then, after clicking the Refresh button in the device manager of the virtual machine, the USB storage device inserted in your virtual PC will be detected, and its drivers will be installed.
Step 5
To locate your USB device, navigate to the device manager and check under Storage Devices. Additionally, you can confirm whether the USB flash memory you inserted into your virtual machine is recognized by opening the My Computer window.
How to Install a PCI System Peripheral
Since Windows ME is not fully supported by Oracle virtualization software, you may see in Device Manager that drivers for some devices, such as PCI System Peripheral, cannot be installed. In such cases, you can try to establish an alternative driver to remove the device warning, but this is only sometimes a permanent solution.
Step 1
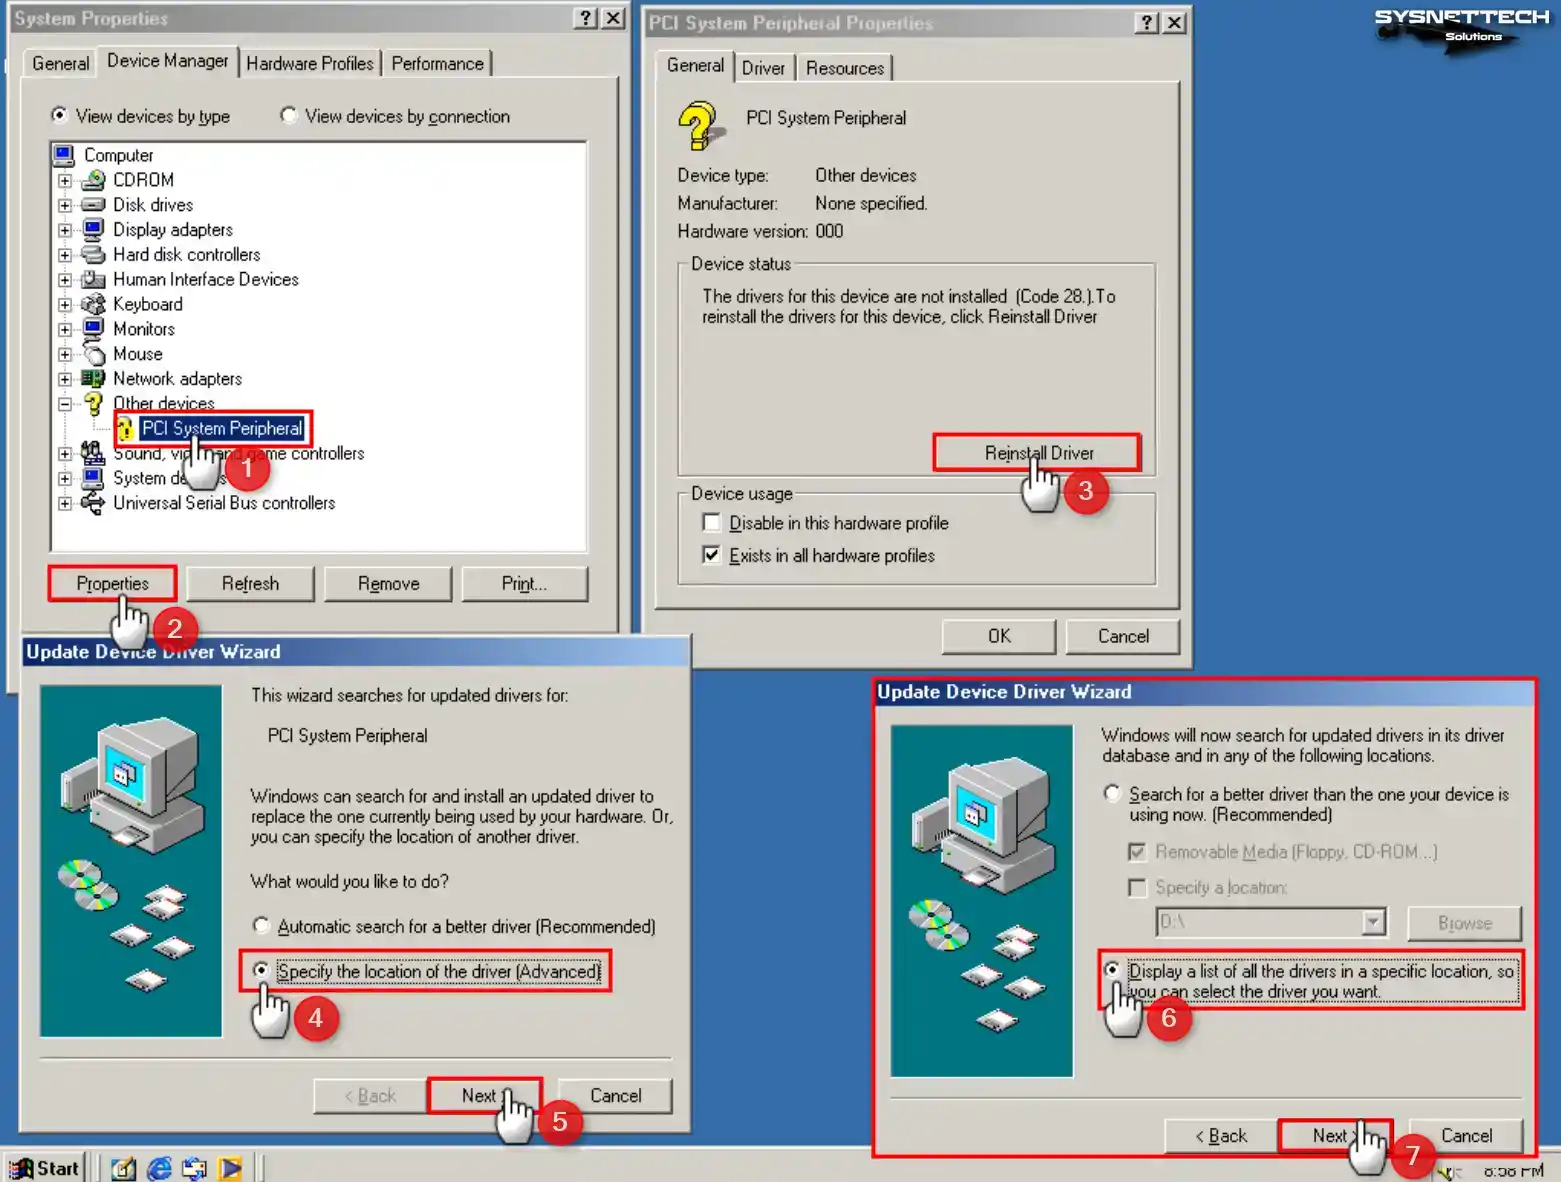
After opening System Properties, click on the Device Manager tab. In the hardware window that opens, double-click on PCI System Peripheral in the Other Devices section. In the window that opens, click on the Reinstall Driver button. In the next window, check the Specify the location of the driver (Advanced) and continue.
In the driver update wizard, choose to install the driver you want and continue.
Step 2
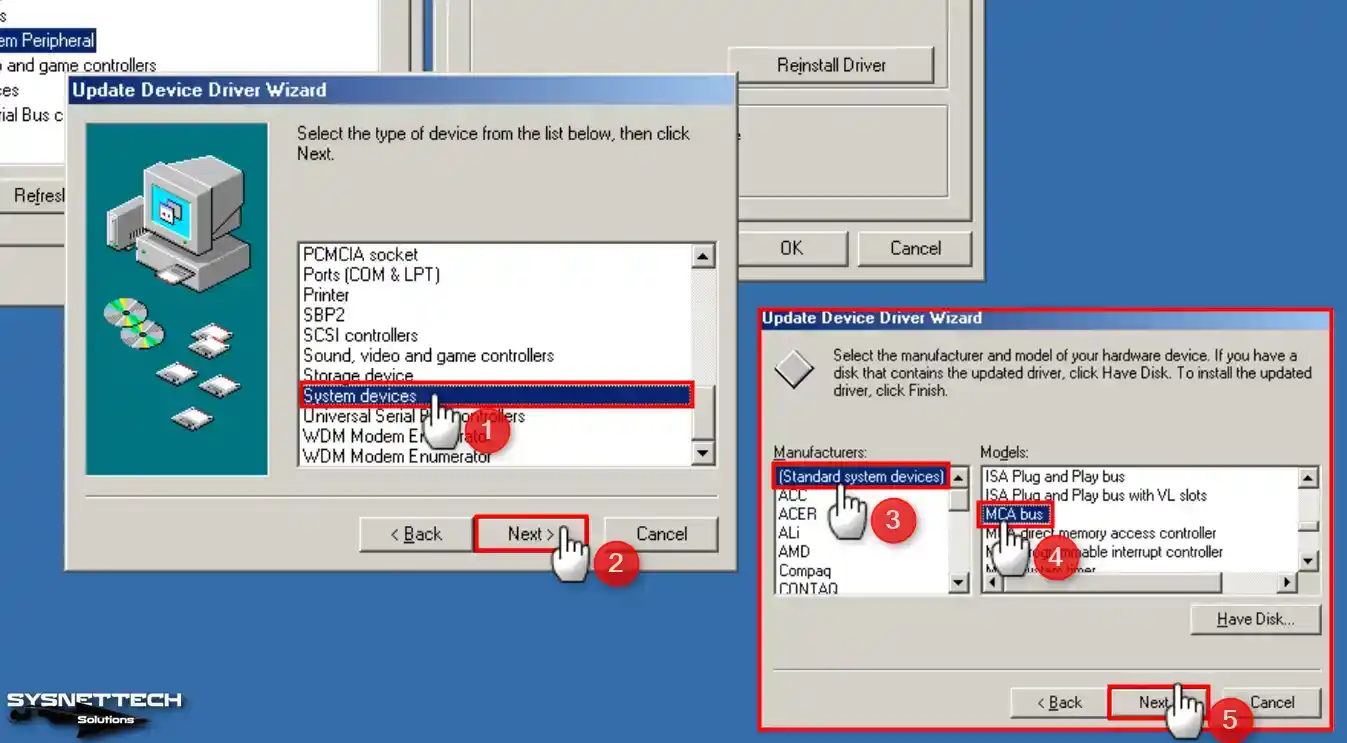
Select System Devices from the hardware types in the device list and click Next. Then, after selecting Standard System Devices from the Manufacturers section, select MCA Bus from the device types listed on the right and continue.
Step 3
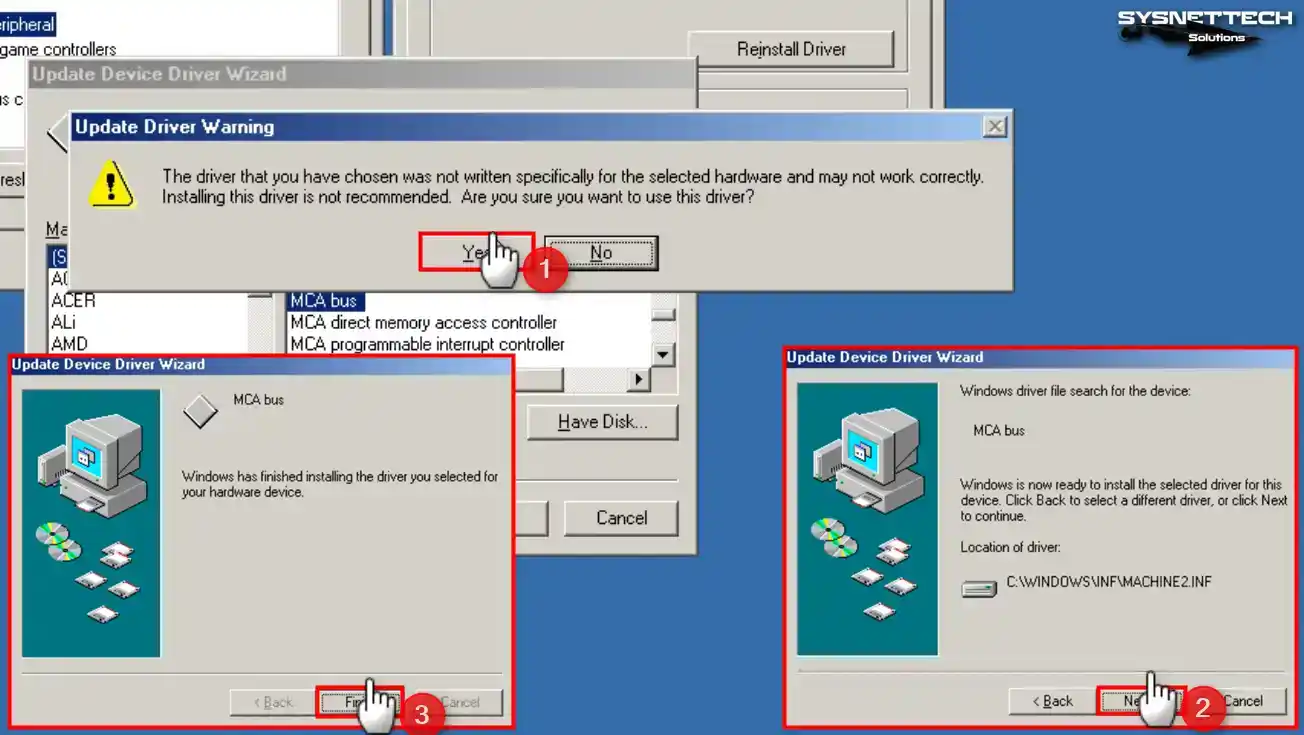
After installing the MCA Bus driver, confirm using the non-recommended driver and restart your virtual system.
Step 4
After your system is turned on, you can see all hardware running smoothly in Device Manager.
How to Configure Internet Connection in Windows Millennium
Of course, one of the things you should test on your Windows Millennium guest machine is the Internet connection. Network adapters are automatically installed by Oracle software when the system is installed.
Step 1
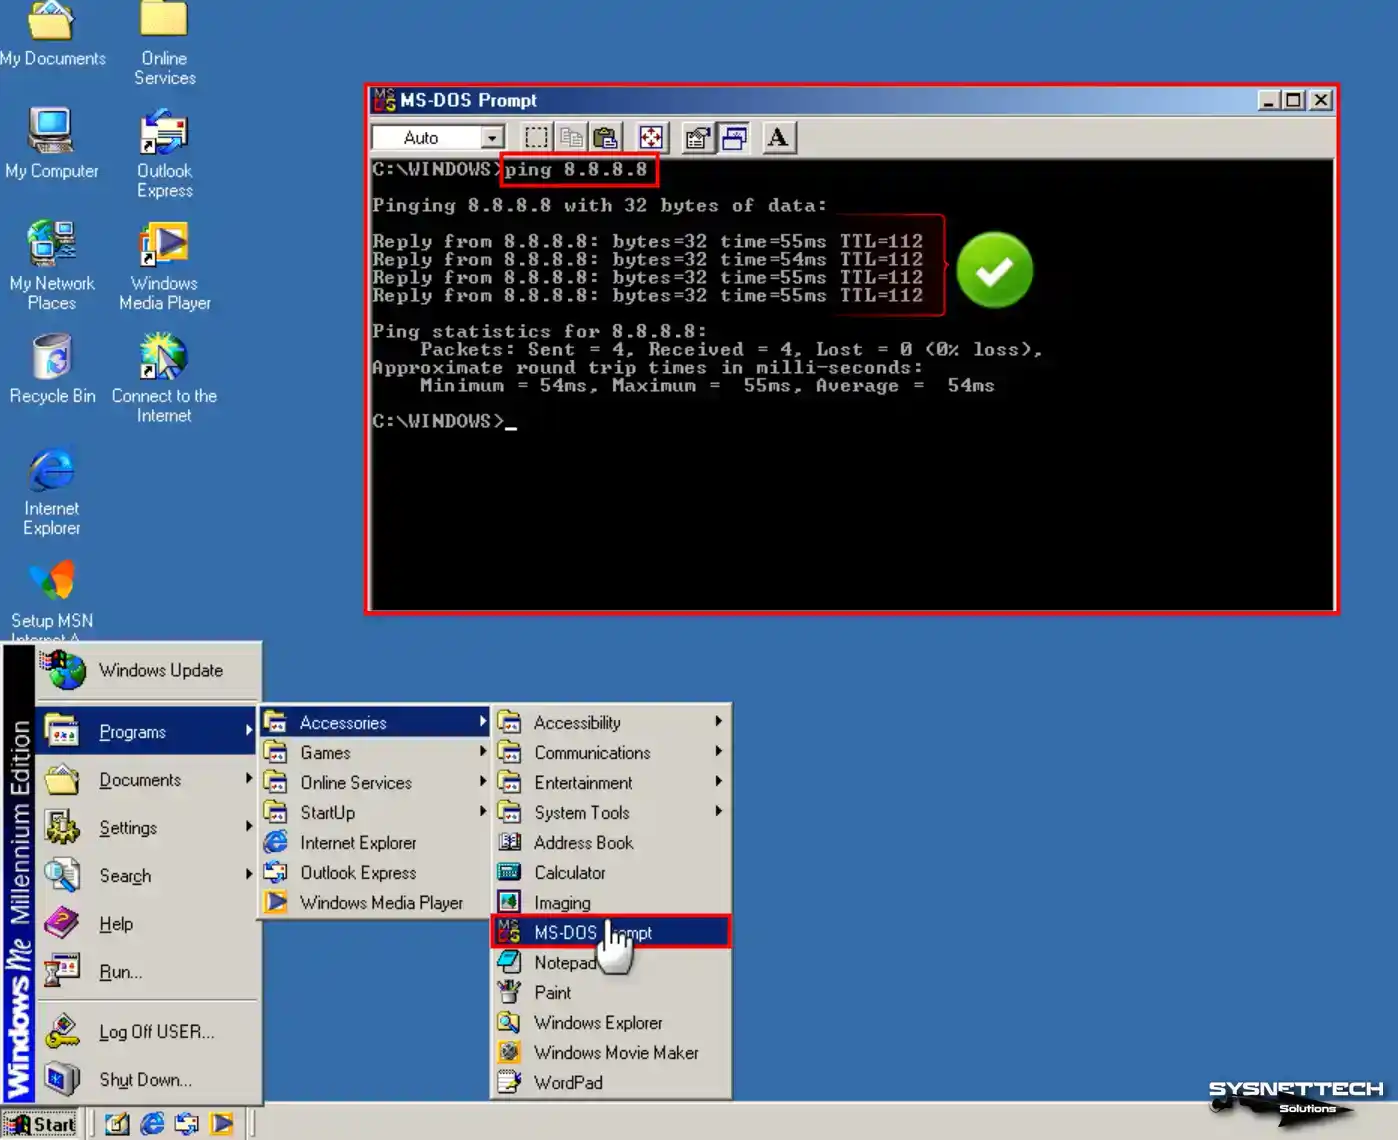
To check the Internet connection, open MS-DOS Prompt from Start / Programs / Accessories, execute the “ping 8.8.8.8” command, and test the connection.
Step 2
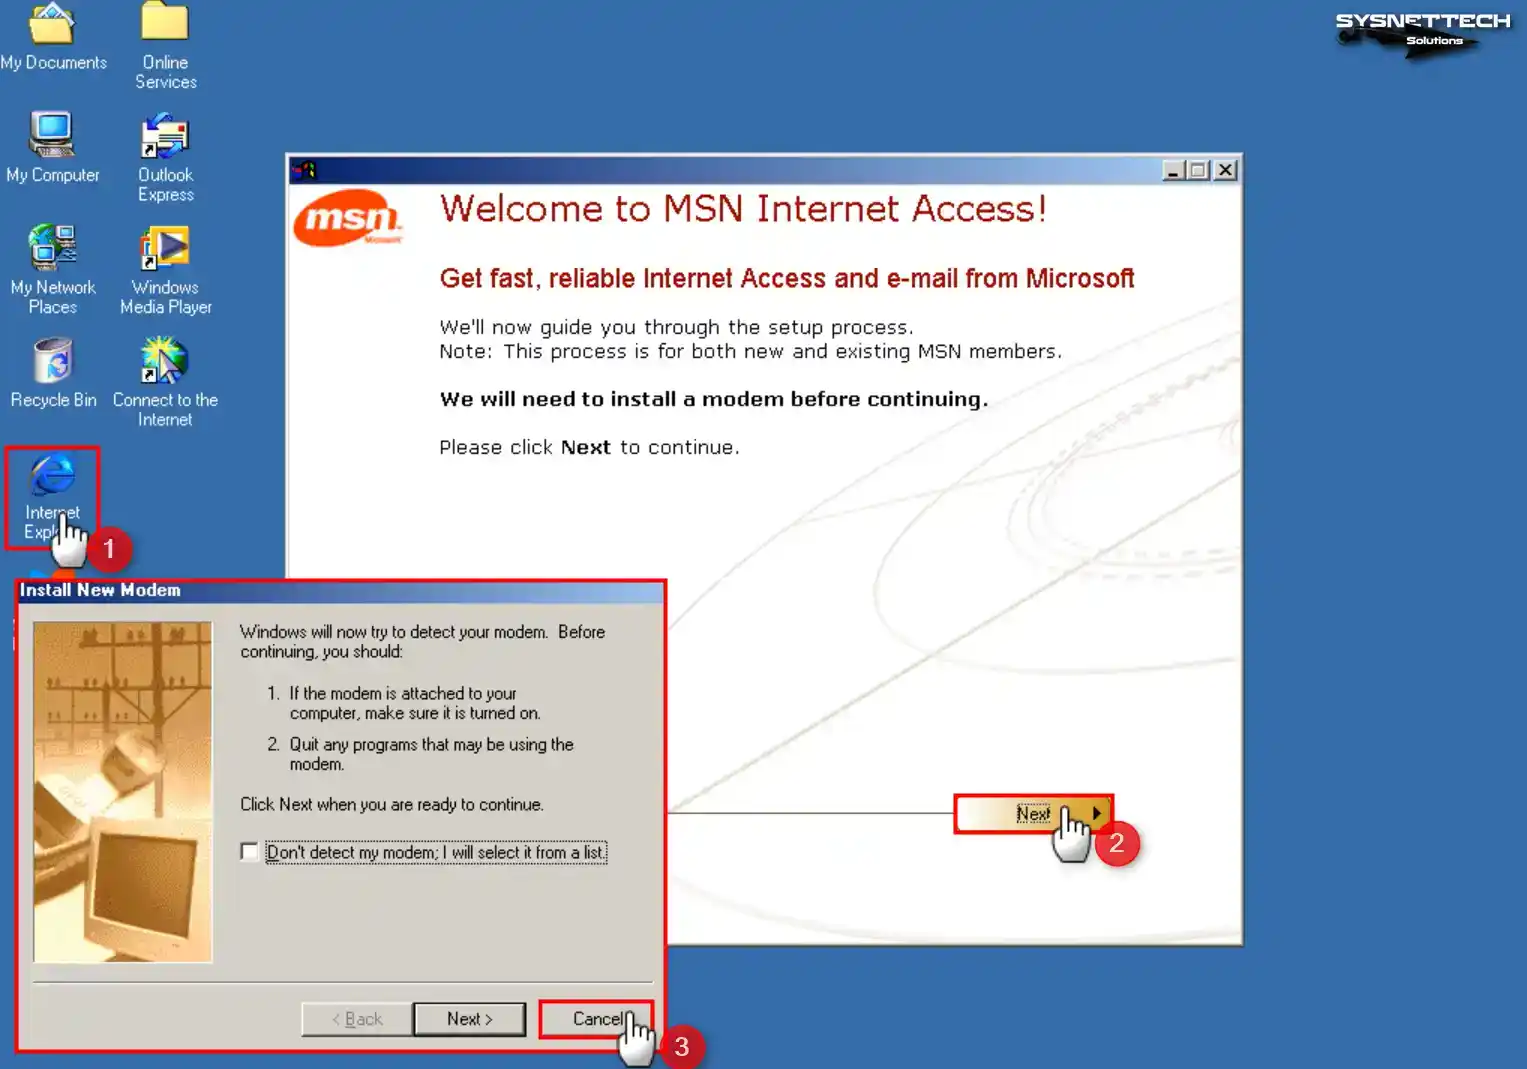
If the internet connection is healthy, open Internet Explorer from the desktop location, click Next in the “Welcome to MSN Internet Access” window, and click Cancel in the modem add wizard that opens.
Step 3
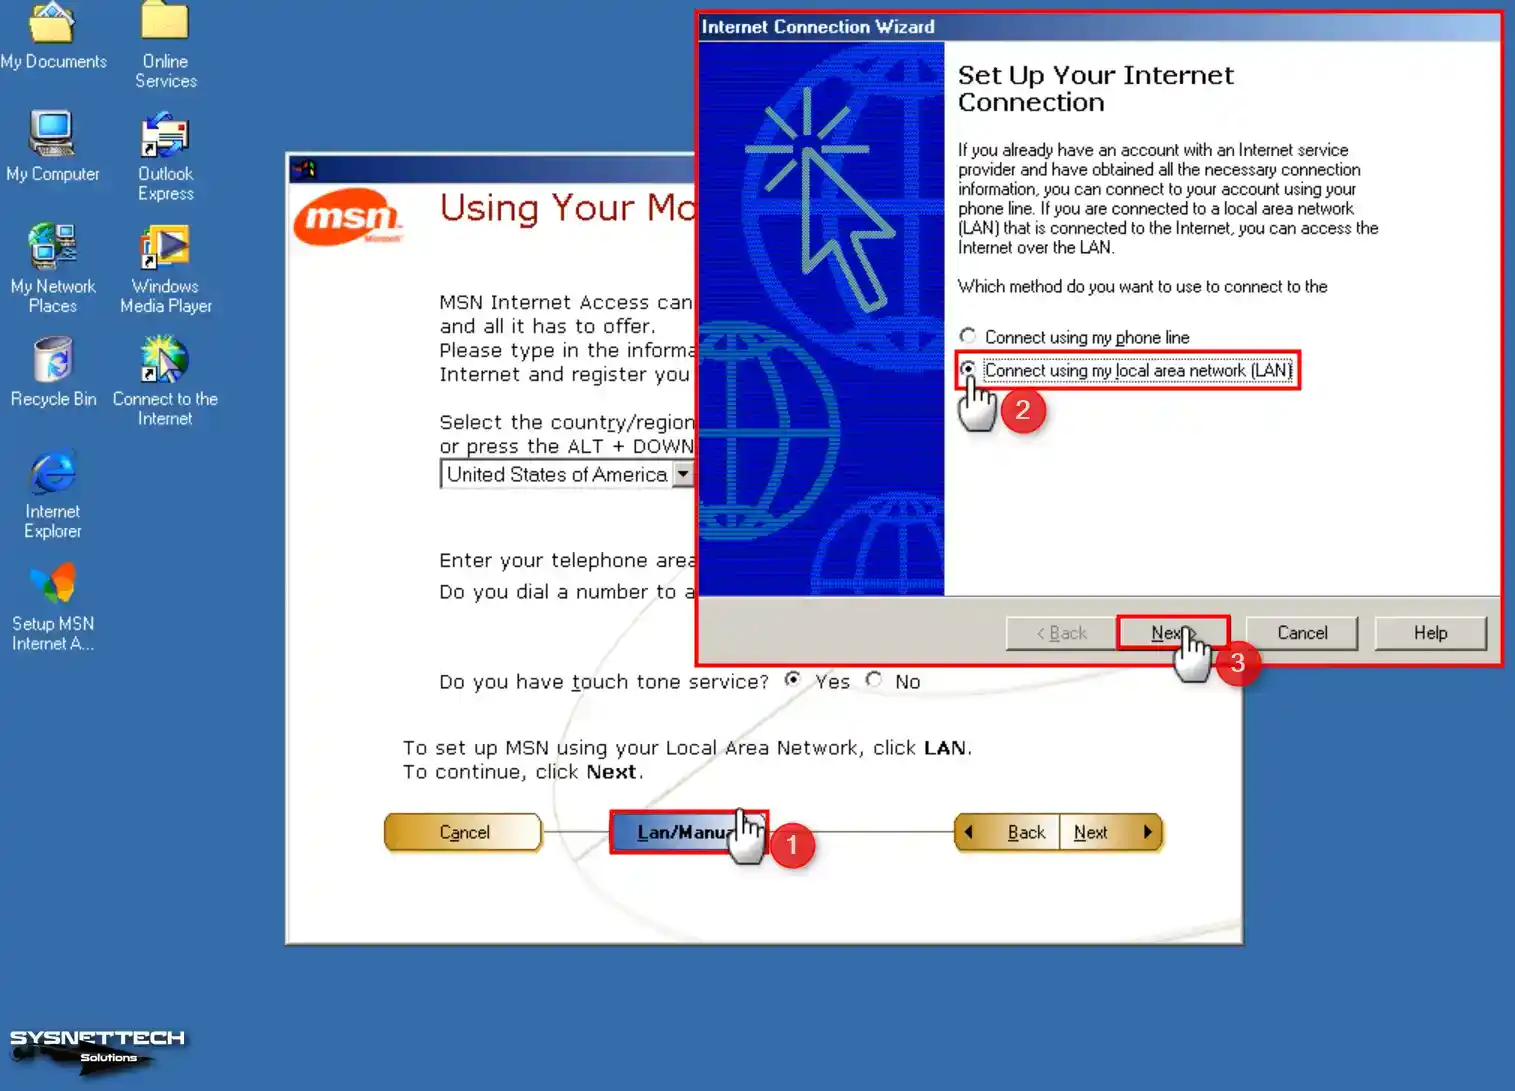
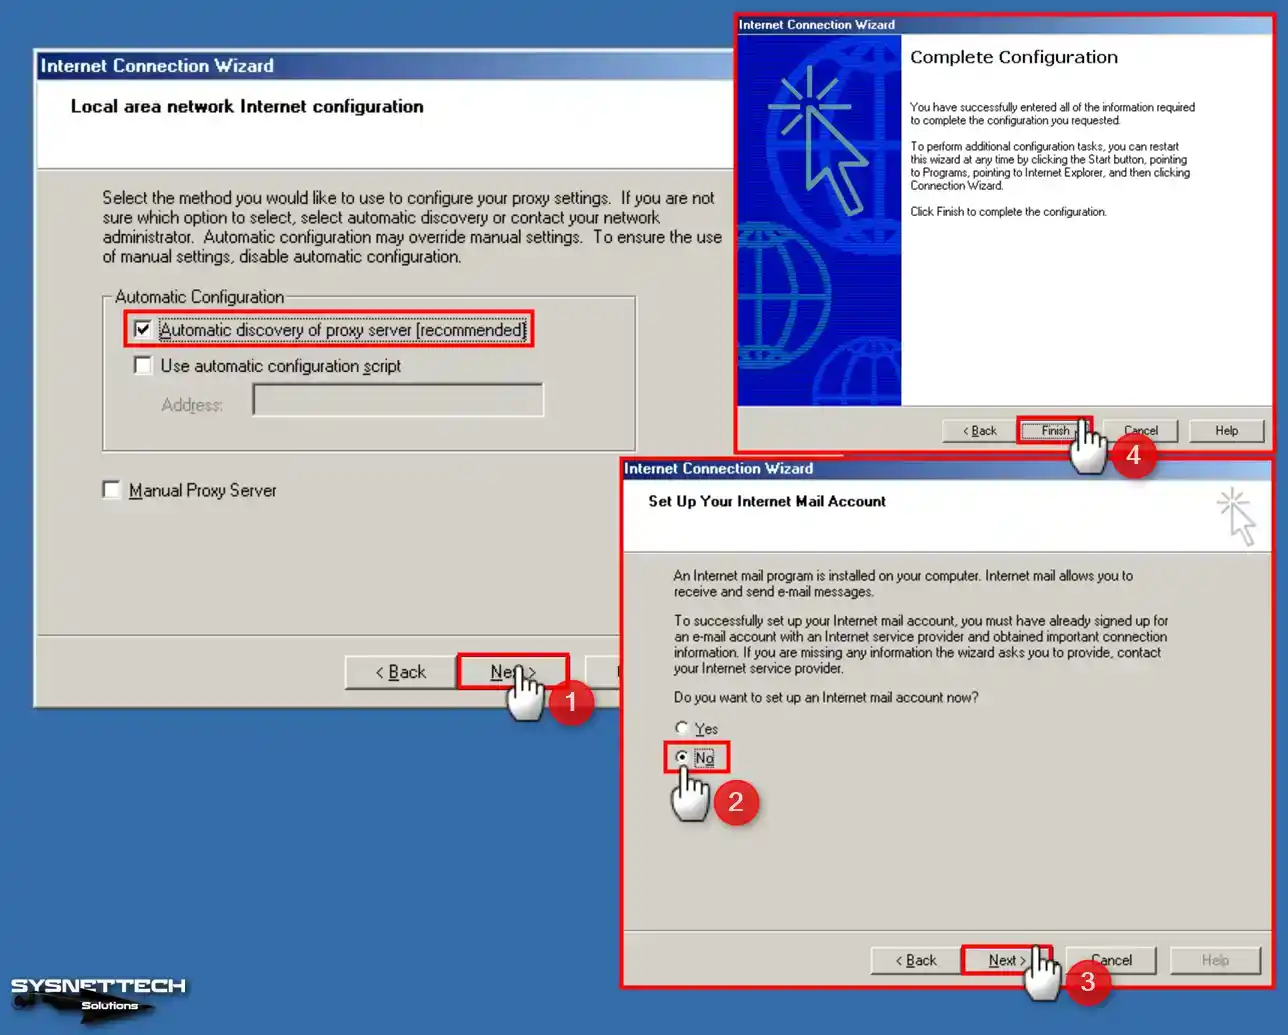
Click LAN/MANUAL to configure using MSN using a local area connection. Check LAN in the Internet connection wizard and click Next.
Step 4
Check the proxy discovery, skip the mail account creation, and close the wizard.
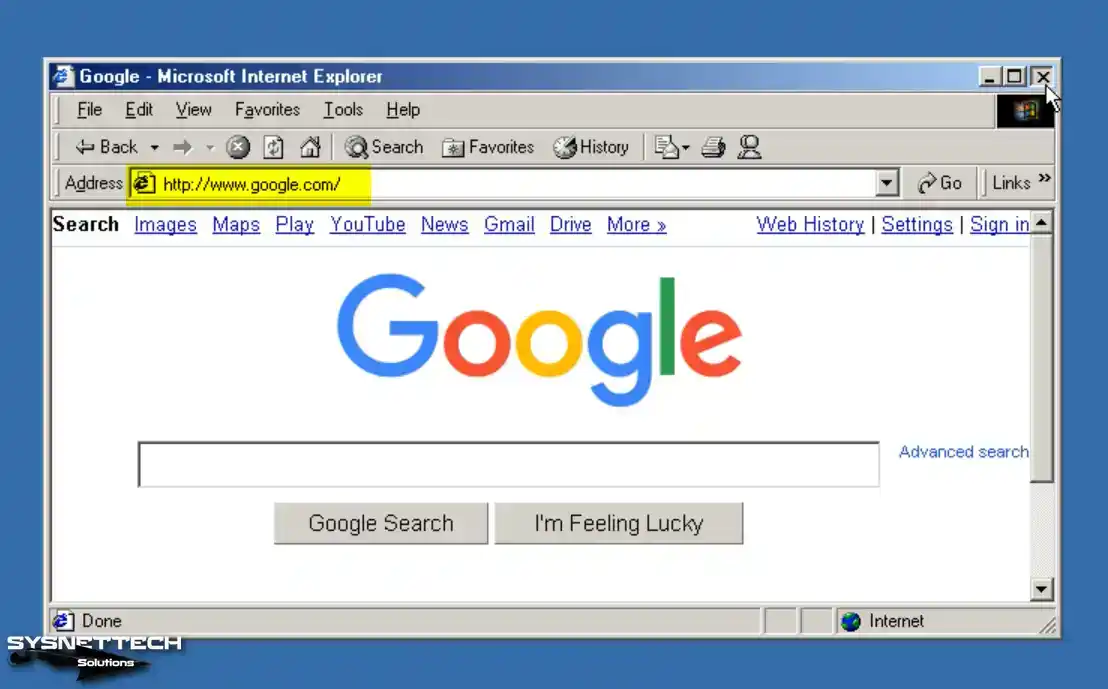
Step 5
After closing the Internet connection wizard, you can view the Google search engine.
How to Increase the System RAM Size of Windows ME
The officially stated Windows ME maximum RAM is 512 MB, but on physical computers, the maximum RAM is 1.5 GB.
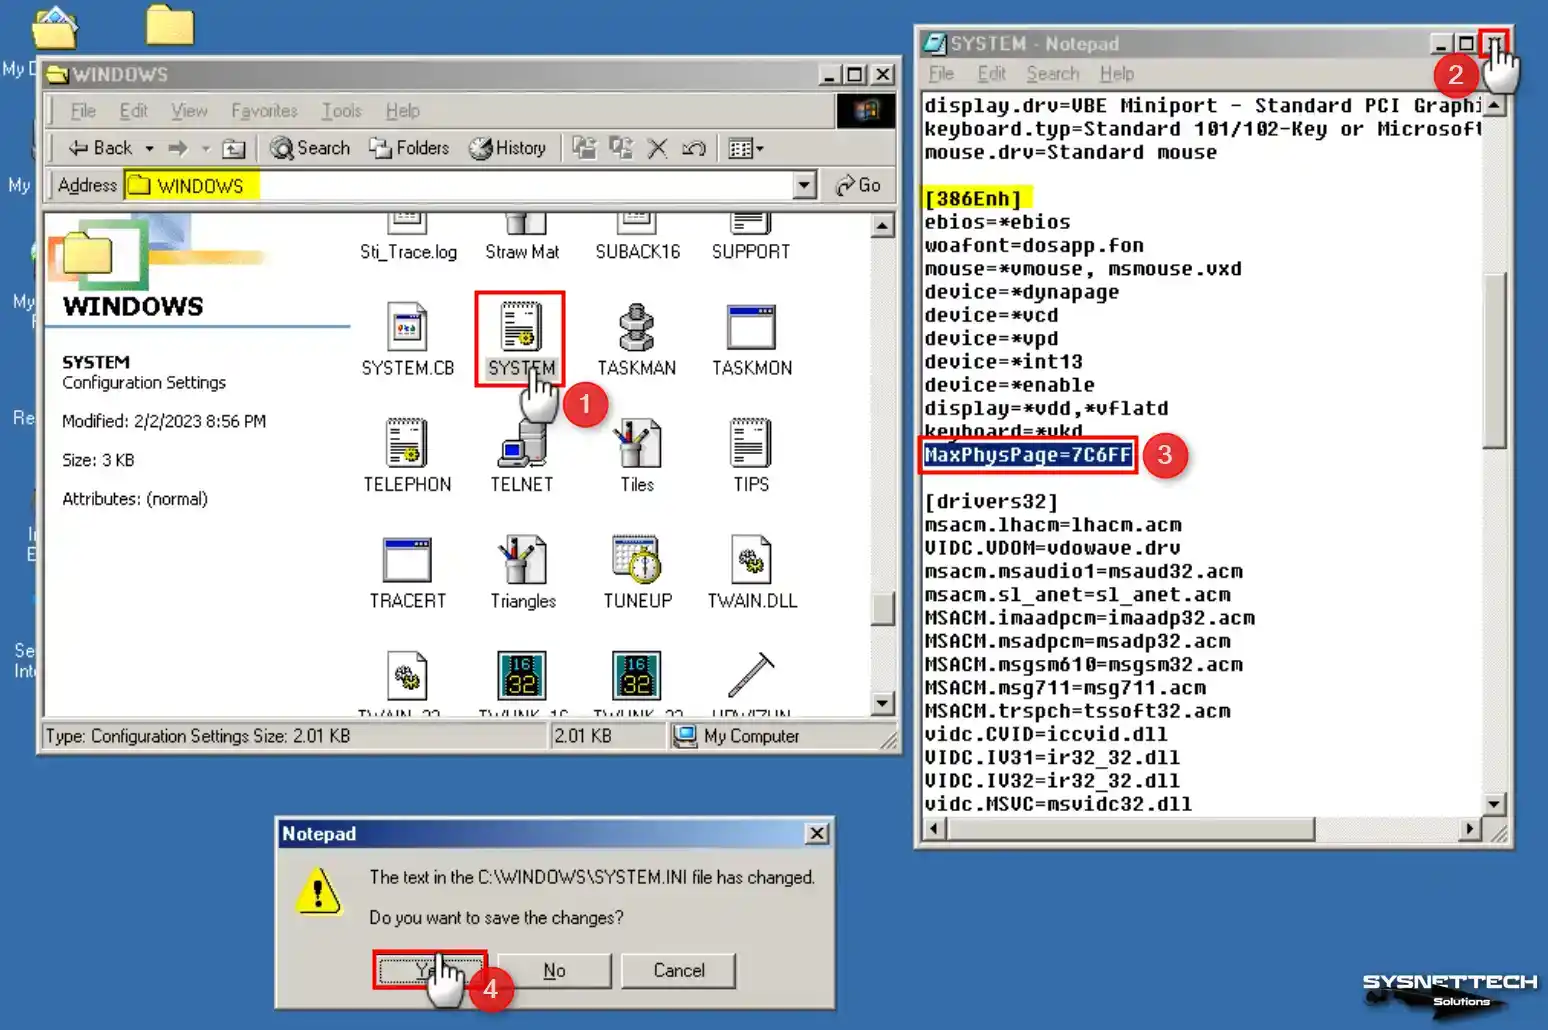
You can increase the RAM value of your WinMe system running on a virtual machine by 2 GB by editing the SYSTEM.INI file.
Step 1
With your Windows guest machine running, open the SYSTEM.INI file in C:\WINDOWS. Add MaxPhysPage=7C6FF under [386Enh] in SYSTEM.INI and save the file.
Step 2
Turn off your virtual computer and change the Base Memory value to 2048 MB (2 GB) from the system settings.
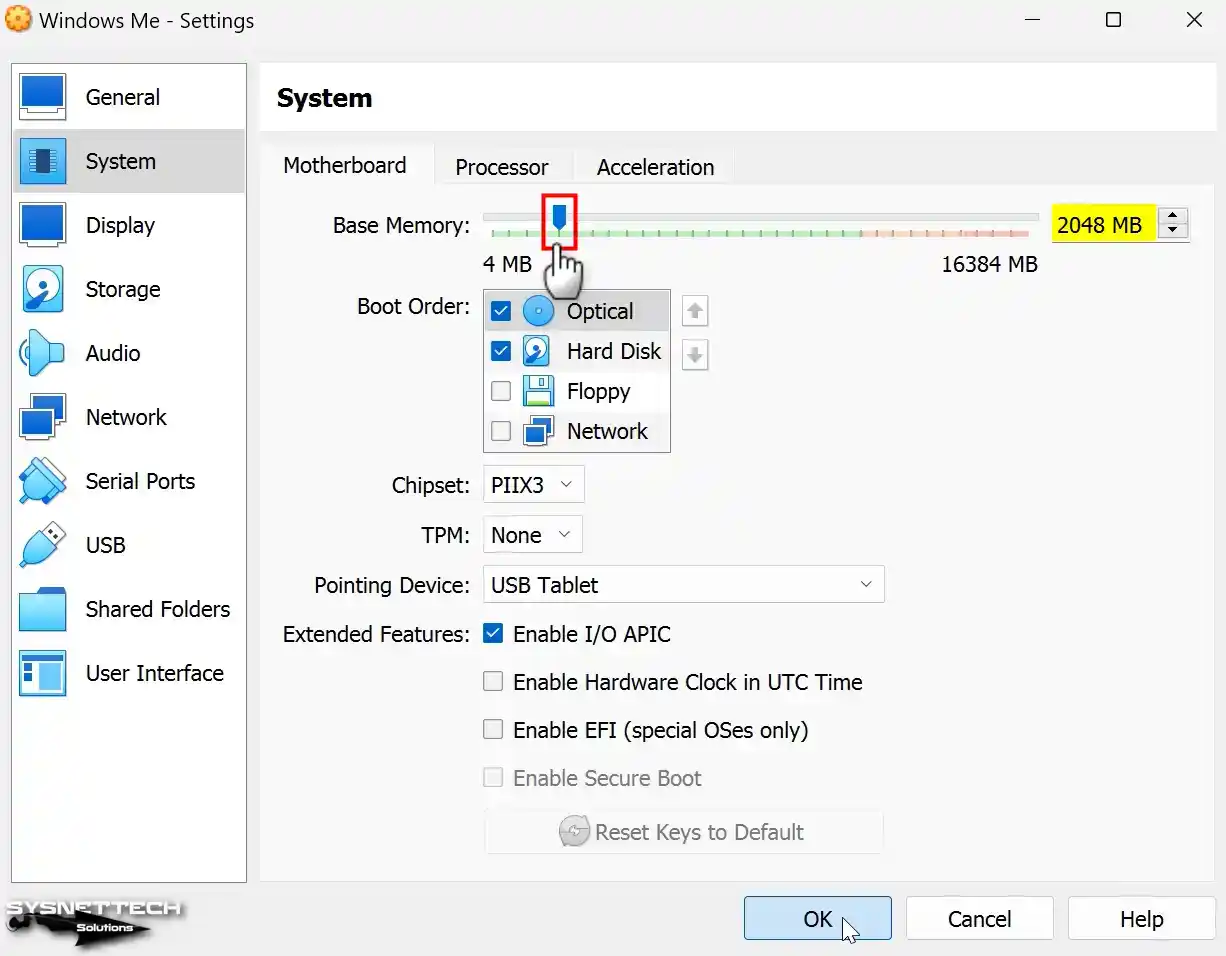
Step 3
Run your virtual computer and verify that the system memory is 2 GB in the system properties.
Video
Installing Old Versions
Windows ME ISO ve Driver Download
| Kaynak | Link |
|---|---|
| Windows ME/Millennium ISO | Download |
| Windows ME Display Driver (VBE Miniport) | Download |
| Windows ME USB 2.0 Driver | Download |
Conclusion
In conclusion, Windows Millennium Edition is not a practical choice for modern computing. But I recommend you install this system on a virtual machine and test it. Whether you want to do historical research or explore the evolution of this OS, Oracle VM VirtualBox will help you with this.
In short, this experience gives you a perspective on the history of computing technology. In short, you can install old software like Windows Me by following all the detailed steps I have prepared in this guide.
This informative article will walk you through setting up Windows ME, or Millennium Edition, on a newly created virtual machine utilizing the highly efficient Oracle VirtualBox virtualization program.
Windows ME (Millennium Edition) was one of Microsoft’s operating system versions that connected Windows 98 and XP.
After the successful release of Windows 2000, the new version of the operating system for the commercial space, Microsoft decided to release the Millennium version to allow home users to update their platform. Windows ME caused a lot of design and hardware errors for users using this operating system until the release of Windows XP.
Unfortunately, when you want to install and try Windows ME on your physical computer, you cannot use up-to-date technologies or find hardware drivers. So, using virtualization software such as VirtualBox, you can install and experience Windows ME on the virtual machine by following this video or the steps below.
Step 1: First, download the ISO file of the Windows ME/Millennium operating system from the or a source on the Internet.
Step 2: After running the Oracle software, click the New button on its menu or shortcut tools to start a new virtual PC creation wizard.
Step 3: In the Name and Operating System window, after typing WindowsME in the Name field, check the values in the Type and Version sections. If you want to store the VM, you will create a different location and set the location of your external HDD or SSD storage device in the Machine Folder.
Step 4: In the Memory Size window, set a suitable RAM value for the Windows ME virtual machine according to the RAM capacity of your physical computer. By default, WinMe’s maximum RAM value is 512 MB, but you can choose a 1 GB size.
Step 5: In the Hard Disk window, you must create a new virtual disk for the Windows Millennium virtual machine. Since the Create a virtual hard disk option is enabled by default, click Next directly. In this window, if you have a guest machine you have previously installed, you can add your virtual disk file with the option to add an existing virtual HDD.
Step 6: In the Hard Disk File Type window, select the VDI (VirtualBox Disk Image) disk type and click Next. Other virtualization programs use different disk types in this window, so it is helpful to select it as the VDI disk type is the most suitable option for Oracle VM VirtualBox software.
Step 7: If you want to select a location other than the installation location in the File Location and Size window, click on the folder icon and select the location you created on your physical computer. Finally, configure the capacity of the Windows Millennium virtual disk to 4 GB.
Step 8: After creating the Windows ME virtual computer, click Settings to add the Windows ISO installation media to the guest machine and to make other virtual hardware settings.
Step 9: Since VirtualBox does not support the Guest Additions software for Windows 9x versions, you will not be able to use the hardware of your physical computer in the virtual machine, and you will not be able to enable features such as Shared Clipboard and Drag and Drop.
Step 10: In the System / Motherboard window, configure the primary boot device as Optical and turn off the Floppy device.
Step 11: If you want to configure more than one number of virtual processors for the WinME virtual computer, first enable I/O APIC on the Motherboard hardware and then specify the virtual CPU number.
Step 12: As Guest Additions cannot be installed, you usually do not need to enable 3D graphics acceleration in the Display / Screen settings. However, allow that option anyway since you will install the display adapter driver manually.
Step 13: After checking that you have configured the I/O Cache feature of the IDE controller and the WindowsVista.vdi virtual disk file as SSD (Solid-State Drive) in the storage settings, click on Empty and then the DVD icon to add the Windows ISO file to the VM and add the image file.
Step 14: After preparing the Windows Millennium virtual PC, click the Start button and start the installation. Watch the video tutorial to install the Display and USB 2.0 driver drivers.
-
Peter Swinkels
- Posts: 1
- Joined: 8. Nov 2018, 16:16
- Primary OS: MS Windows 7
- VBox Version: OSE other
- Guest OSses: Windows ME
Using Windows Millennium in VirtualBox->
Hi,
I am trying to run Microsoft Windows Millennium (downloaded from virtualdiskimages weebly com) in Oracle VM VirtualBox 5.2.20 r125813 (Qt5.6.2) using Microsoft Windows 7 Home Premium as a host. Everything works pretty much except for the following issues:
1. The «Shared Clipboard» and «Drag ‘n Drop» options are checked in the virtual machine’s settings but do not appear to be working as I can nor drag or drop files nor copy/paste text between the guest and host OS’s.
2. I am trying to get an ancient Disney Interactive game called Nightmare Ned to run properly and suspect I need to update the DirectX software running in the Virtual Machine. However given the fact that I am unable to drag/drop files or to copy/paste data I can’t move any software I may have to the Virtual Machine.
3. Because of the issue mentioned above I am stuck using Internet Explorer 5.0 from inside the Virtual Machine but this browser is so hopelessly outdated as to be unusable.
4. Does anyone know where I find suitable software for Windows ME and how to get it into the Virtual Machine?
There is a lot more information I could post here but because I don’t know which data would be relevant to the above questions I would appreciate it if anyone willing to help would ask. I will post the requested information in further posts.
Thanks in advance.
-
mpack
- Site Moderator
- Posts: 39134
- Joined: 4. Sep 2008, 17:09
- Primary OS: MS Windows 10
- VBox Version: VirtualBox+Oracle ExtPack
- Guest OSses: Mostly XP
Re: Using Windows Millennium in VirtualBox->
Post
by mpack »
«Shared Clipboard», «Drag and drop», accelerated graphics etc are features of the Guest Additions, which do not exist for the old DOS based Windows editions.
To get files into the VM, put them in an ISO and mount the ISO in the virtual CD drive: in fact the same way you would have got files onto the physical PC back in the day. You can also try getting a network share working, but network security configurations have changed quite a bit since the beginning of this century.
See the «Howto» area for further tips.
-
socratis
- Site Moderator
- Posts: 27329
- Joined: 22. Oct 2010, 11:03
- Primary OS: Mac OS X other
- VBox Version: VirtualBox+Oracle ExtPack
- Guest OSses: Win(*>98), Linux*, OSX>10.5
- Location: Greece
Re: Using Windows Millennium in VirtualBox->
Post
by socratis »
Peter Swinkels wrote:3. I am stuck using Internet Explorer 5.0 … so hopelessly outdated as to be unusable.
As opposed to what? Windows ME? From 2000? According to the Wikipedia article (ME is too old to remember the details by heart):
Windows ME article on Wikipedia wrote:Windows ME could be upgraded to Internet Explorer 6 SP1 (but not to SP2 (SV1) or Internet Explorer 7)
so, at the most you’re looking at IE6 SP1. Which is… so hopelessly outdated as to be unusable.
Peter Swinkels wrote:4. Does anyone know where I find suitable software for Windows ME and how to get it into the Virtual Machine?
Google? Or any old-software library that has Win9* software still available?
Do NOT send me Personal Messages (PMs) for troubleshooting, they are simply deleted.
Do NOT reply with the «QUOTE» button, please use the «POST REPLY«, at the bottom of the form.
If you obfuscate any information requested, I will obfuscate my response. These are virtual UUIDs, not real ones.
-
BillG
- Volunteer
- Posts: 5106
- Joined: 19. Sep 2009, 04:44
- Primary OS: MS Windows 10
- VBox Version: VirtualBox+Oracle ExtPack
- Guest OSses: Windows 10,7 and earlier
- Location: Sydney, Australia
Re: Using Windows Millennium in VirtualBox->
Post
by BillG »
If the software is on CD (or if downloaded, an ISO file) you can install it by assigning the install media to the optical drive of the vm, as you would for a physical machine.
Bill
How To, How To Install Windows ME In VirtualBox, Hypervisor, i12bretro, Install Guide, Microsoft, Microsoft Windows, Microsoft Windows ME, Tutorial, Vintage Microsoft, Virtual Machine, VirtualBox, VM, Windows ME, Windows Millennium Edition, Windows Version 4
2 Minutes
View interactive steps on GitHub
- Download Microsoft Windows ME Download
- Download MS-DOS 6.22 Download
- Download MS-DOS CD driver Download
- Extract the Windows ME and MS-DOS files
- Launch Virtualbox
- Create a New VM by selecting Machine > New
Name: Windows ME
Machine Folder: C:\VMs
Type: Microsoft Windows
Version: Windows ME
Memory Size: 1024 MB
Hard disk: Create a virtual hard disk now - Click Create
- On the Create Virtual Hard Disk dialog
Name the virtual disk image Windows ME.vdi
File size: 4.00 GB
Hard disk file type: VDI
Storage on physical hard disk: Dynamically Allocated - Click Create
- Select the VM and Click Settings
- Select Storage
- Click on the Floppy disk drive
- Select the disk dropdown to the right > Choose virtual floppy disk file…
- Browse to the extracted MS-DOS 6.22 files and select Disk1.img
- Click OK
- Click on the CD-ROM drive
- Select the disc dropdown to the right > Choose a virtual optical disc file…
- Browse to the extracted Windows ME files and select the .iso file
- Click OK
- Make sure the Windows ME VM is selected and click Start > Normal
- Press Enter to start the MS-DOS installation and press Enter multiple times to accept the default values
- When prompted by the installer, go to the VM settings and swap out the MS-DOS disk images and press Enter to continue
- Once MS-DOS has been successfully installed, select Devices > Floppy Drives > Remove disk from virtual drive
- Press Enter in the VM to reboot
- Once MS-DOS has booted, select Devices > Floppy Drives > Choose disk image…
- Navigate to and select cd-driver-1.25.img
- Type the following commands
A:
install - The CD-ROM driver installation process will start
- Click OK to complete the installation
- Select Devices > Floppy Drives > Remove disk from virtual drive
- Select Machine > Reset > Reset to restart the VM
- Upon booting into MS-DOS the Virtualbox CD drive should be assigned a drive letter
- Type the following commands:
D:
setup - Press Enter for the routine maintenance
- The Windows ME setup will launch
- Click Next at the Welcome screen
- Select I accept the Agreement > Click Next
- Enter a valid Windows ME product key (GY9FQ-2J9MR-PM78B-J9JCT-X8RDG), click Next
- Click Next
- Wait for Windows to install components
- Click Next > Enter a name and company > Click Next
- Click Next > Give the computer a name > Click Next
- Click Next > Select a timezone > Click Next
- Click Cancel when prompted to create a startup disk
- Click OK
- Click Finish
- Go grab some coffee, it’s going to be a while
- When prompted, select Devices > Optical Drives > Remove disk from virtual drive
- Click OK, the VM will reboot
- Wait for Windows to install devices and drivers
- Time for some more coffee, maybe write your first novella
- The VM will reboot
- Press Enter at the network password dialog
- Welcome back to Windows ME
- Revel in the nostalgia
Published