
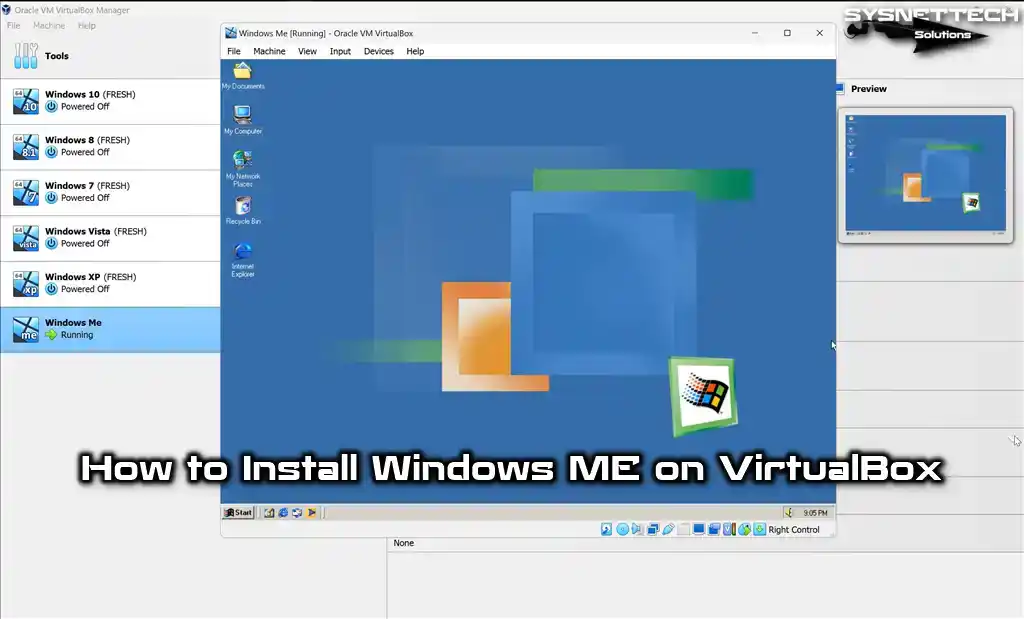
If you have a Windows ME installation CD and valid product code, you can install it on your PC for a true blast from the past. Read on to learn how to get this vintage Windows operating system running on your computer.
The installation, depending on your computer specs, will take about 30 minutes.
The following steps should be identical regardless of whether the installation is performed on actual hardware or a virtual machine.
-
1
Check if your PC meets the recommended specifications to run the OS. These are:
- CPU: 300MHz
- Memory: 64MB (RAM size over 512MB may cause instabilities with the Operating System)
- Free Space: 2GB
- CD ROM and a 3.5″ floppy drove
- You will also need a Windows ME Installation Disk (a CD ROM), Windows ME Boot Disk (a 3.5″ Floppy Disk), along with its 25-digit product key.
- Windows ME may run on lower specifications, but the setup process will take longer.
-
2
Ensure the PC boot order in the BIOS is configured correctly. For this installation, it will need to boot from the CD first. This is normally enabled by default, but you can check first. To do this:
- Restart your computer. As soon as it begins to restart, press the key that allows you to enter the BIOS/UEFI settings. This varies by make and model, but common options are F2, F10, Del, Esc and F12.
- Find the Boot menu, which may be labelled as Boot Options, Boot Order, Boot, or similar. Usually, you can move through different tabs using the arrow keys.
- Look at the list. The order the devices are listed in is the order in which your computer will look for operating system information. Follow the onscreen instructions (which will usually involve the arrow keys or the + and - keys) to move the CD/DVD drive or Optical Drive to the top of the list.
- Find the Exit menu and select Exit Saving Changes or similar. If a confirmation prompt appears, click Yes to confirm the changes.
- Your computer will now restart automatically and attempt to boot from the CD first as specified.
-
1
Insert the Windows ME boot disk floppy and the Windows ME Installation Disk. Then, boot or reset the computer.
For the first few steps, navigation is only possible with the keyboard.
-

1
Choose to Boot from CD-ROM using the arrow keys. Then, press ↵ Enter.
-

Start Windows Setup from CD-ROM» is highlighted. Then, press ↵ Enter.
-

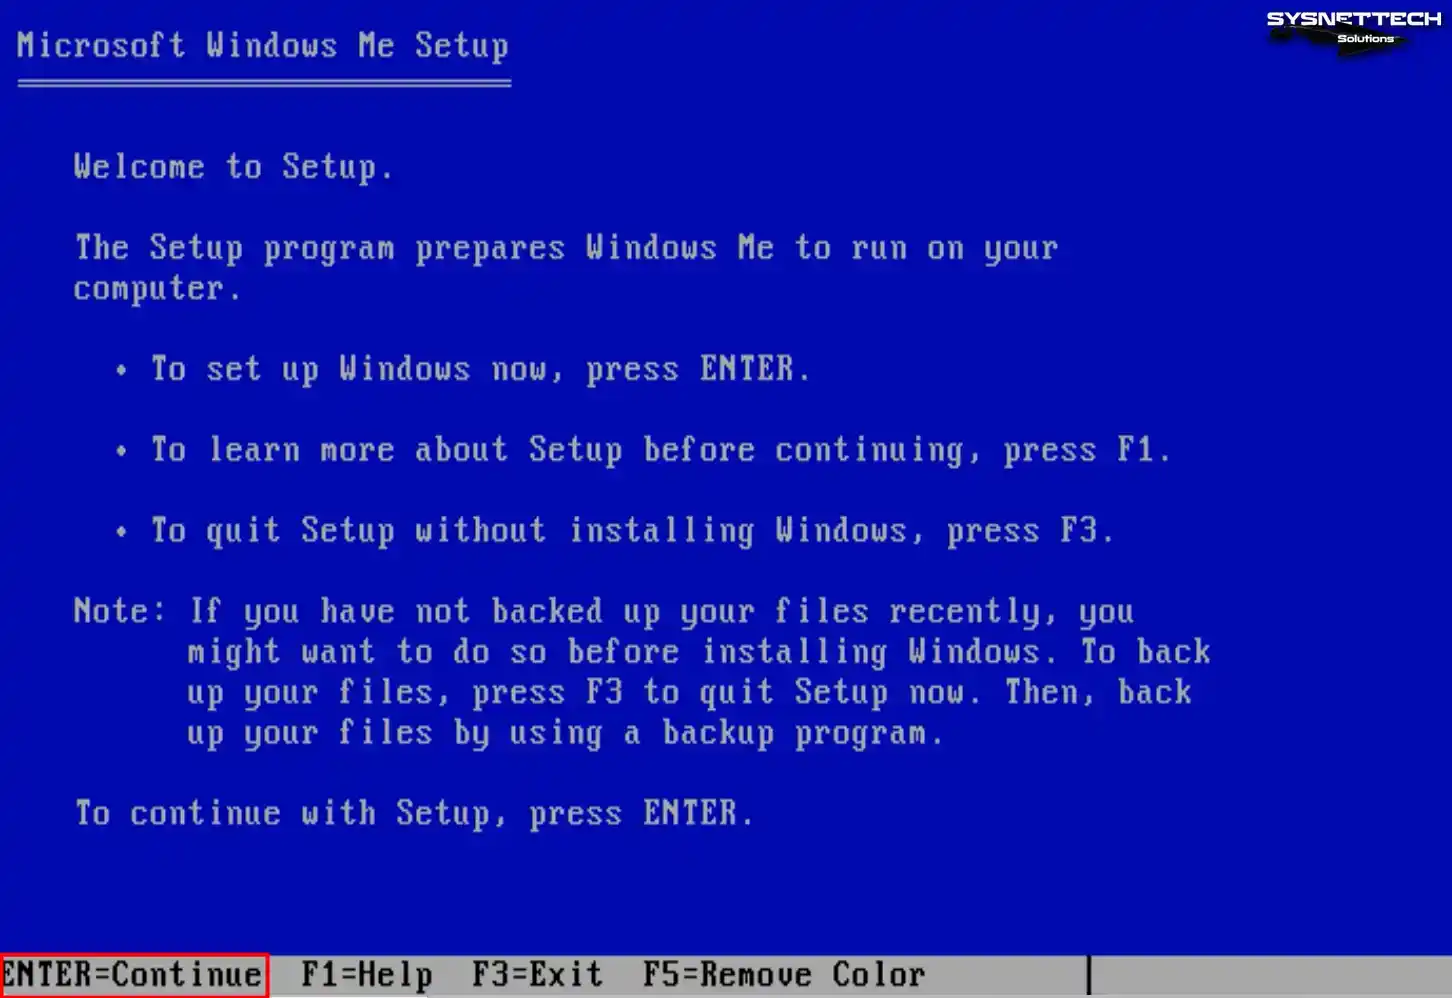
3
To begin setting up Windows ME, press ↵ Enter.
-

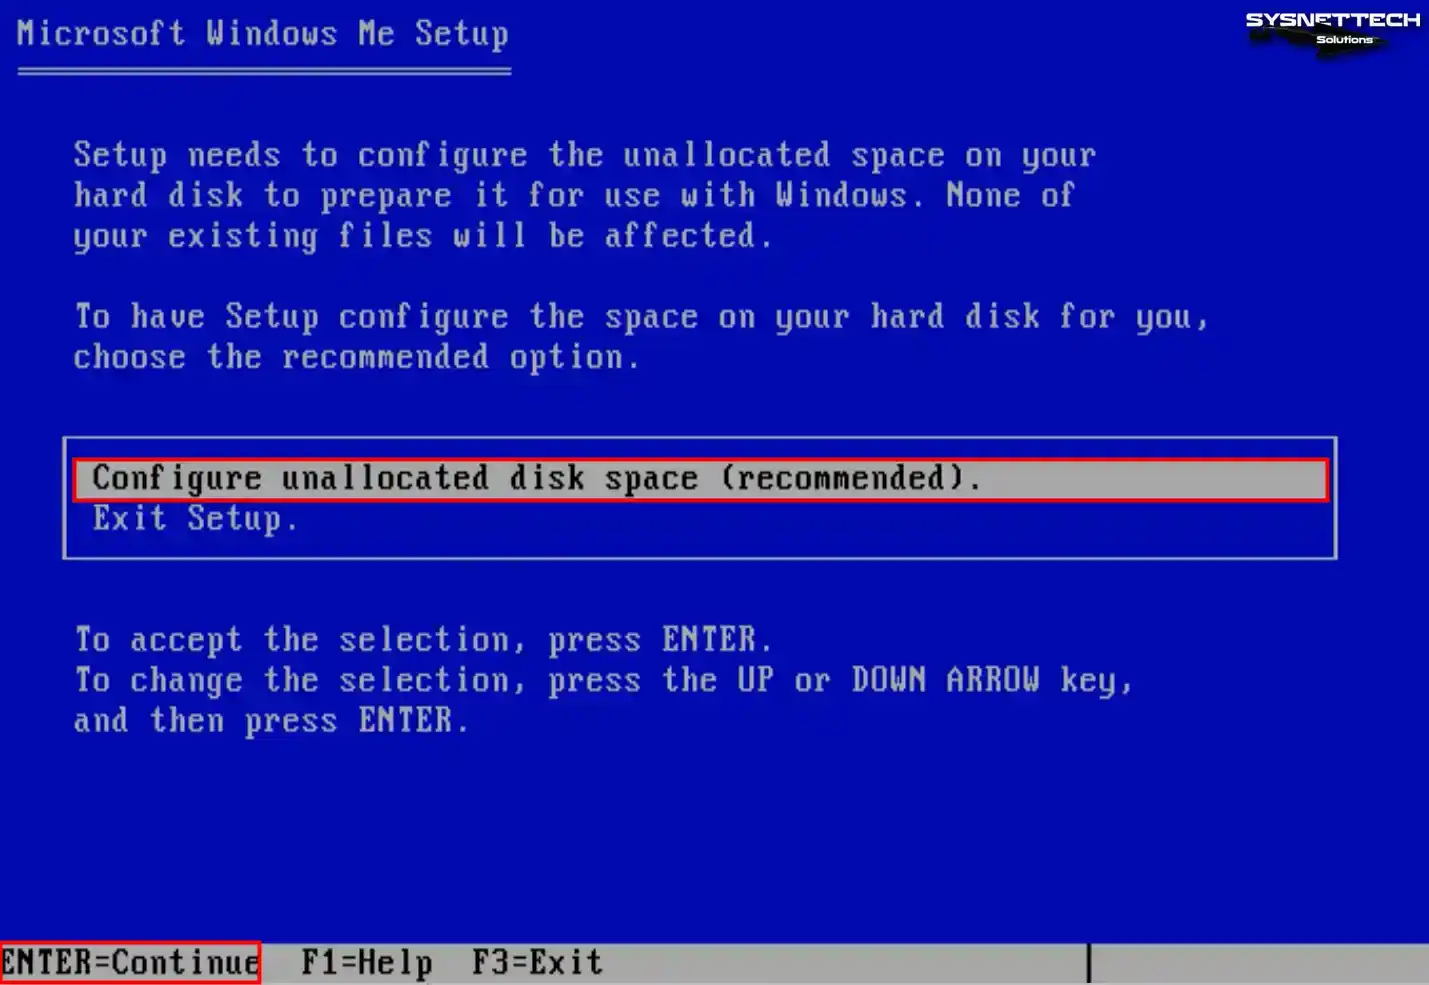
4
Ensure Configure unallocated disk space (recommended) is highlighted. Then, press ↵ Enter.
-
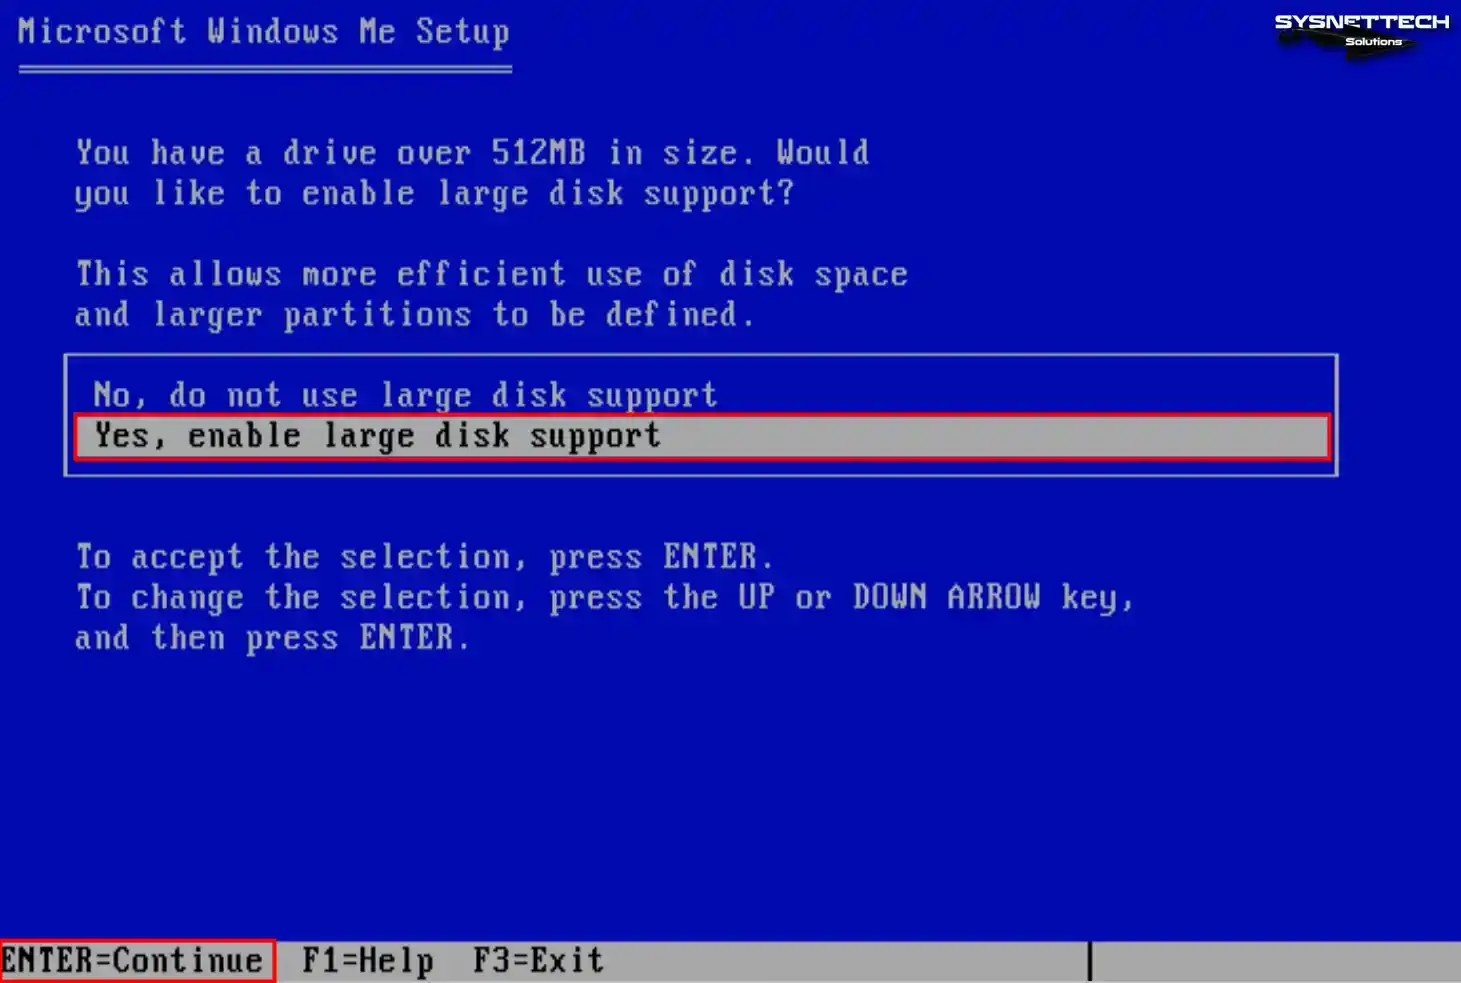
5
EnsureYes, enable large disk support is highlighted. Then, click Next.
-
6
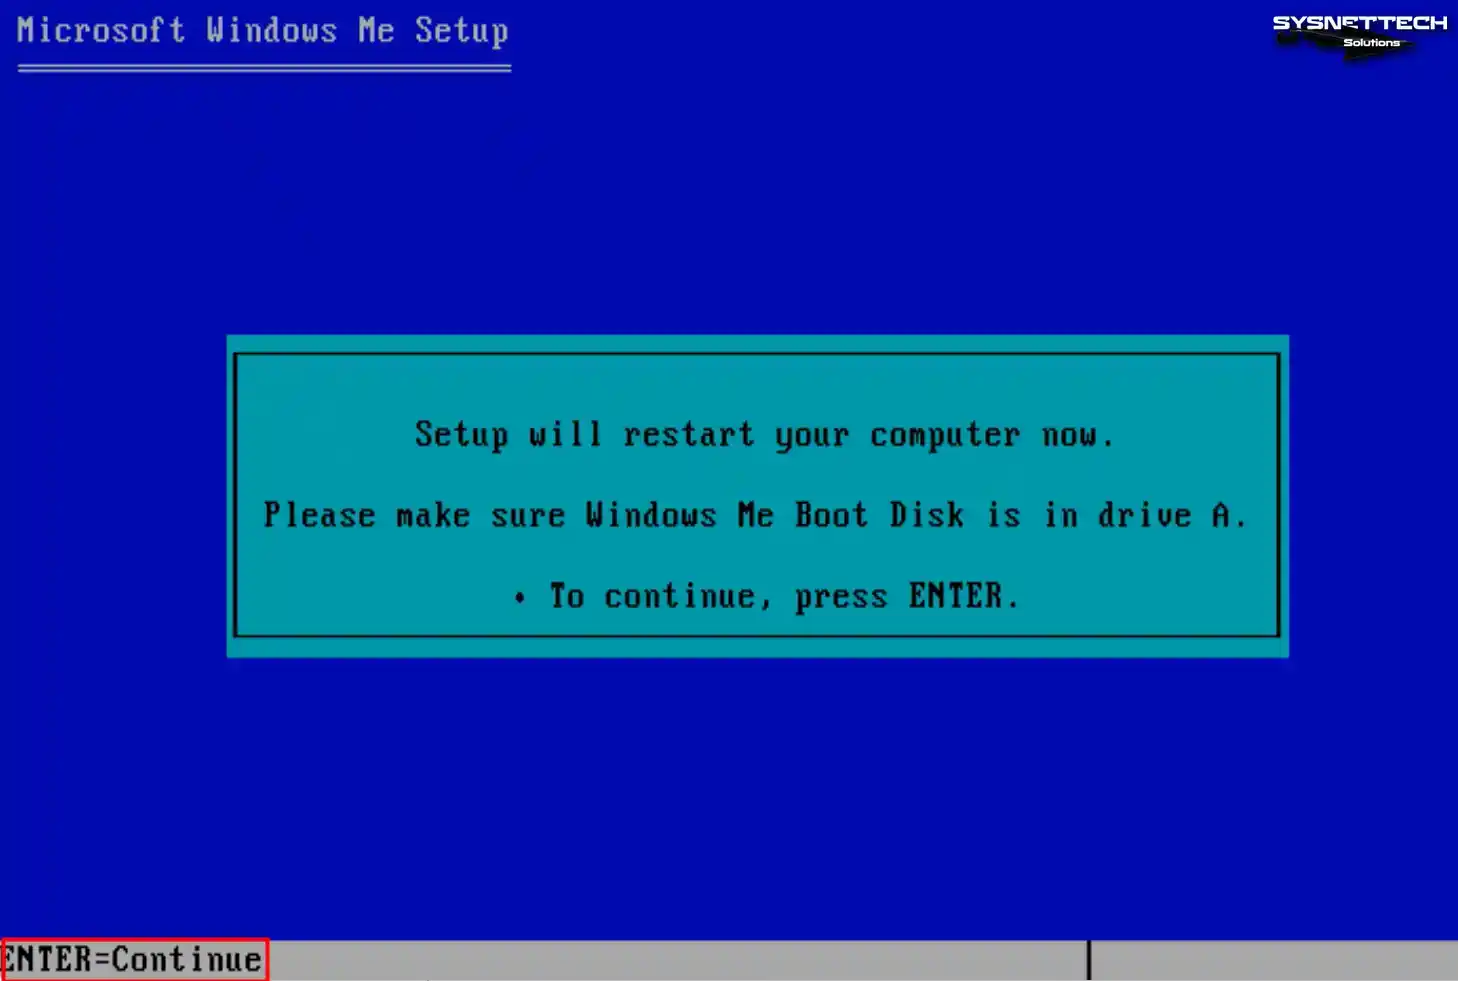
Leave the disks in the computer. Press ↵ Enter to restart the computer.
-
7
Press ↵ Enter to allow Windows to perform its check.


You may use your mouse at this point.
-
1
Click Next to begin setup.
-
2
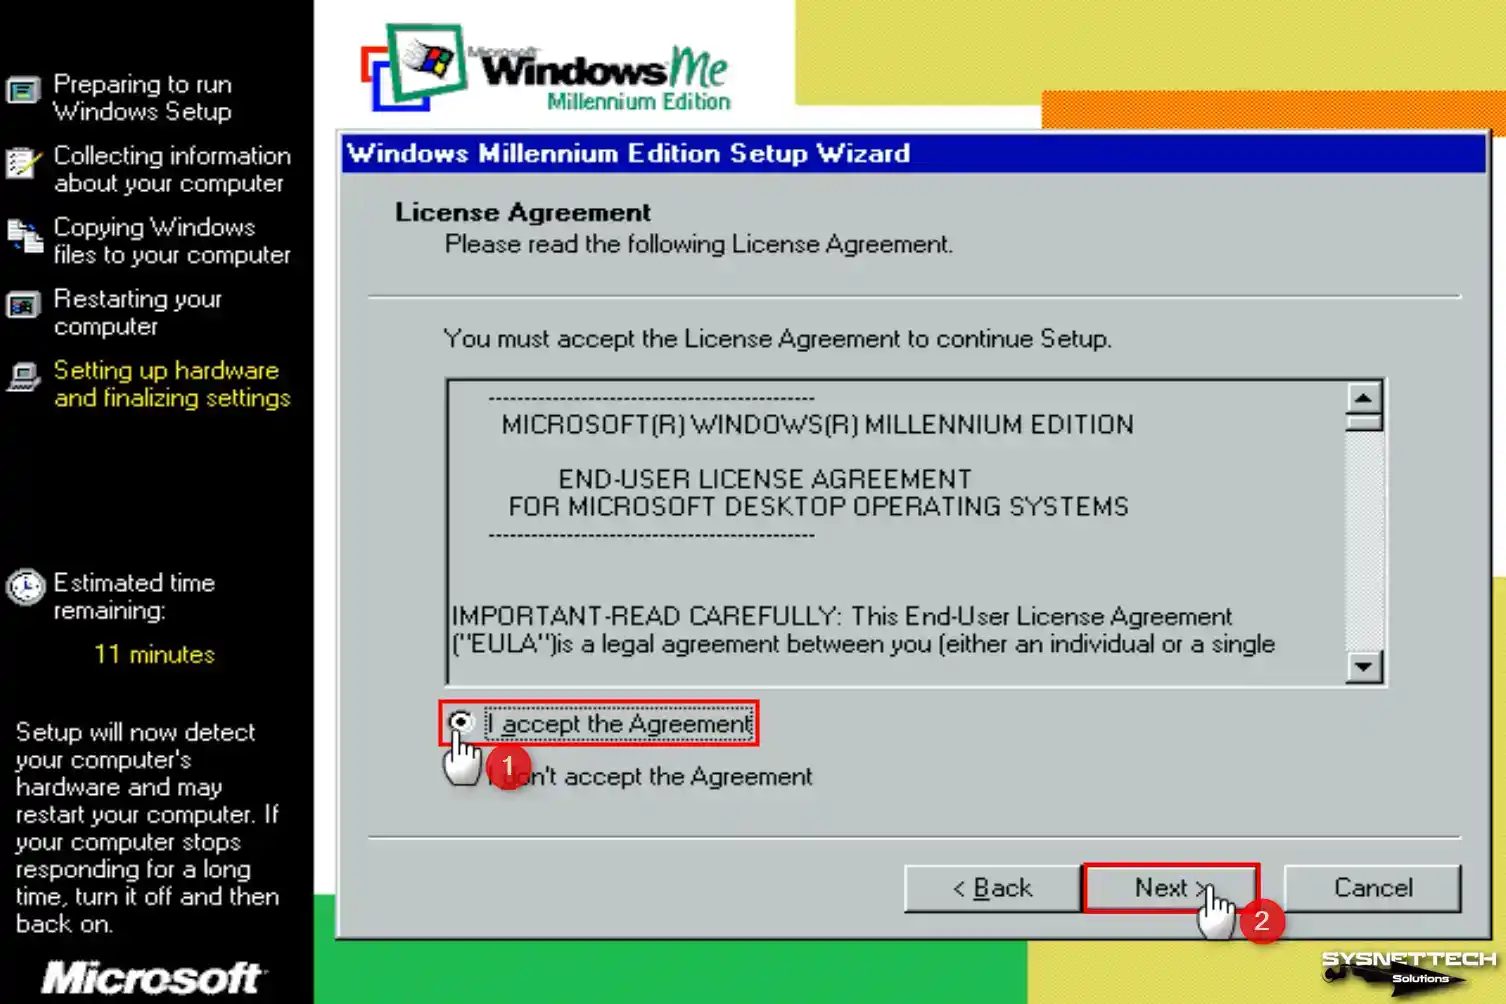
Read the License Agreement. If you agree with the License Agreement, checkI accept the Agreement and click Next.
-
3
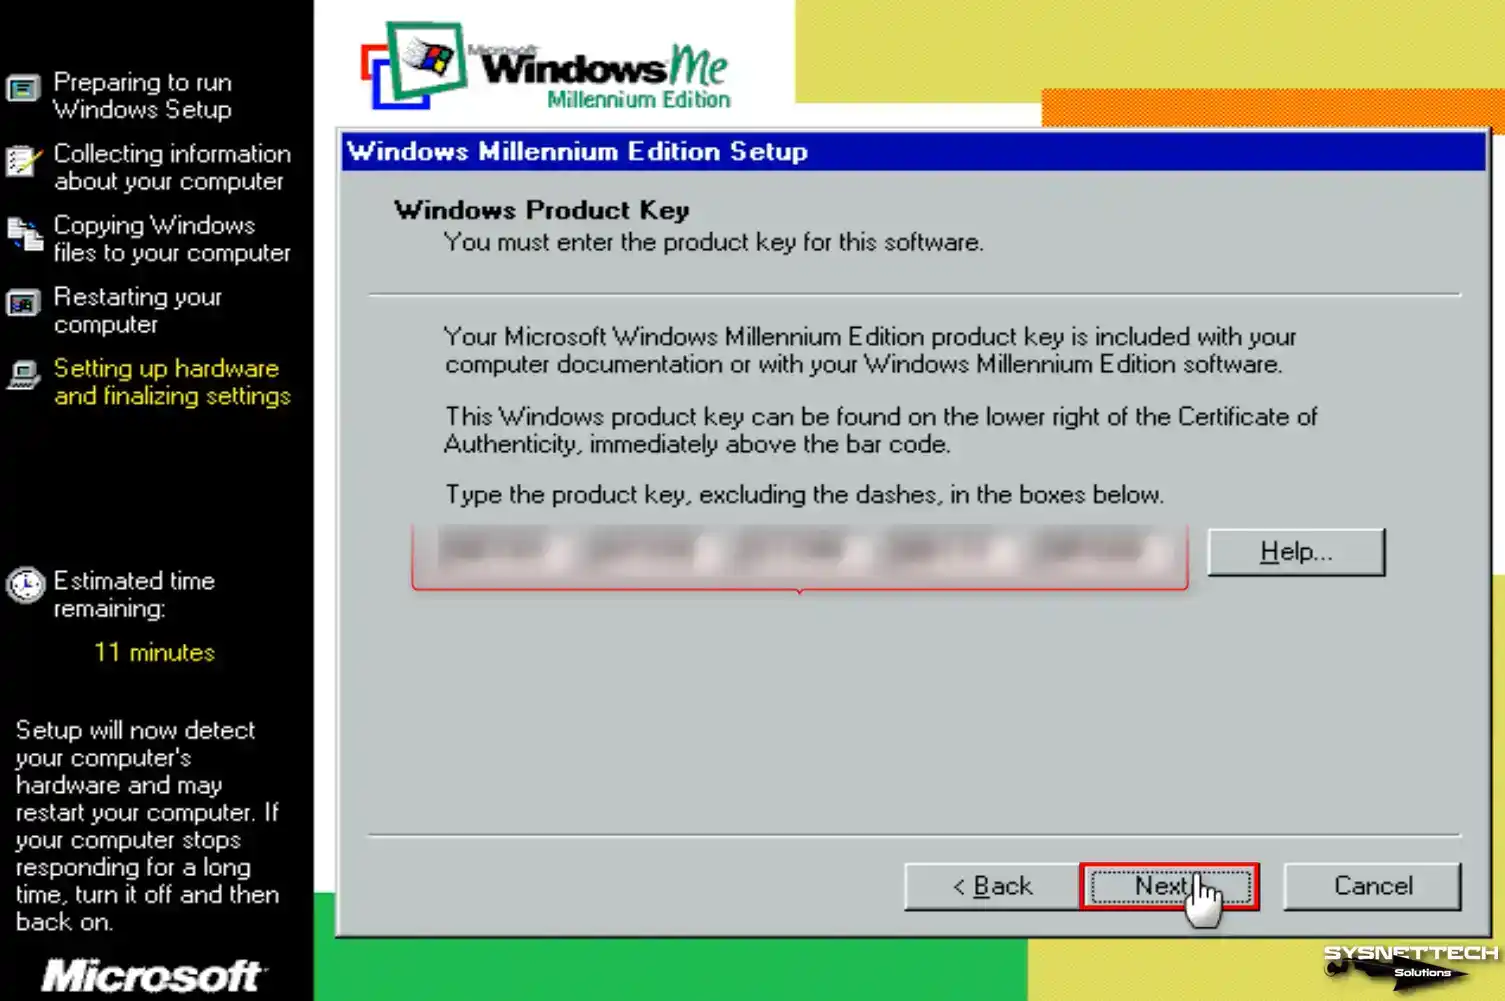
Type in your 25-digit product key and click Next.
- It will be a mixture of letters and numbers.
- Type the product key in one fluid motion. Windows will automatically capitalise any letters and jump to the next box.
-
4
Ensure Typical is checked. Then, click Next.
-
5
Type in the following credentials then click Next.
-
6
Check Install the most common components (Recommended). Then, click next.
-
7
Leave these as suggested by the computer and click Next.
-

8
Select your Country/Region then click Next.
-
9
Select your time zone and click Next.
-
10
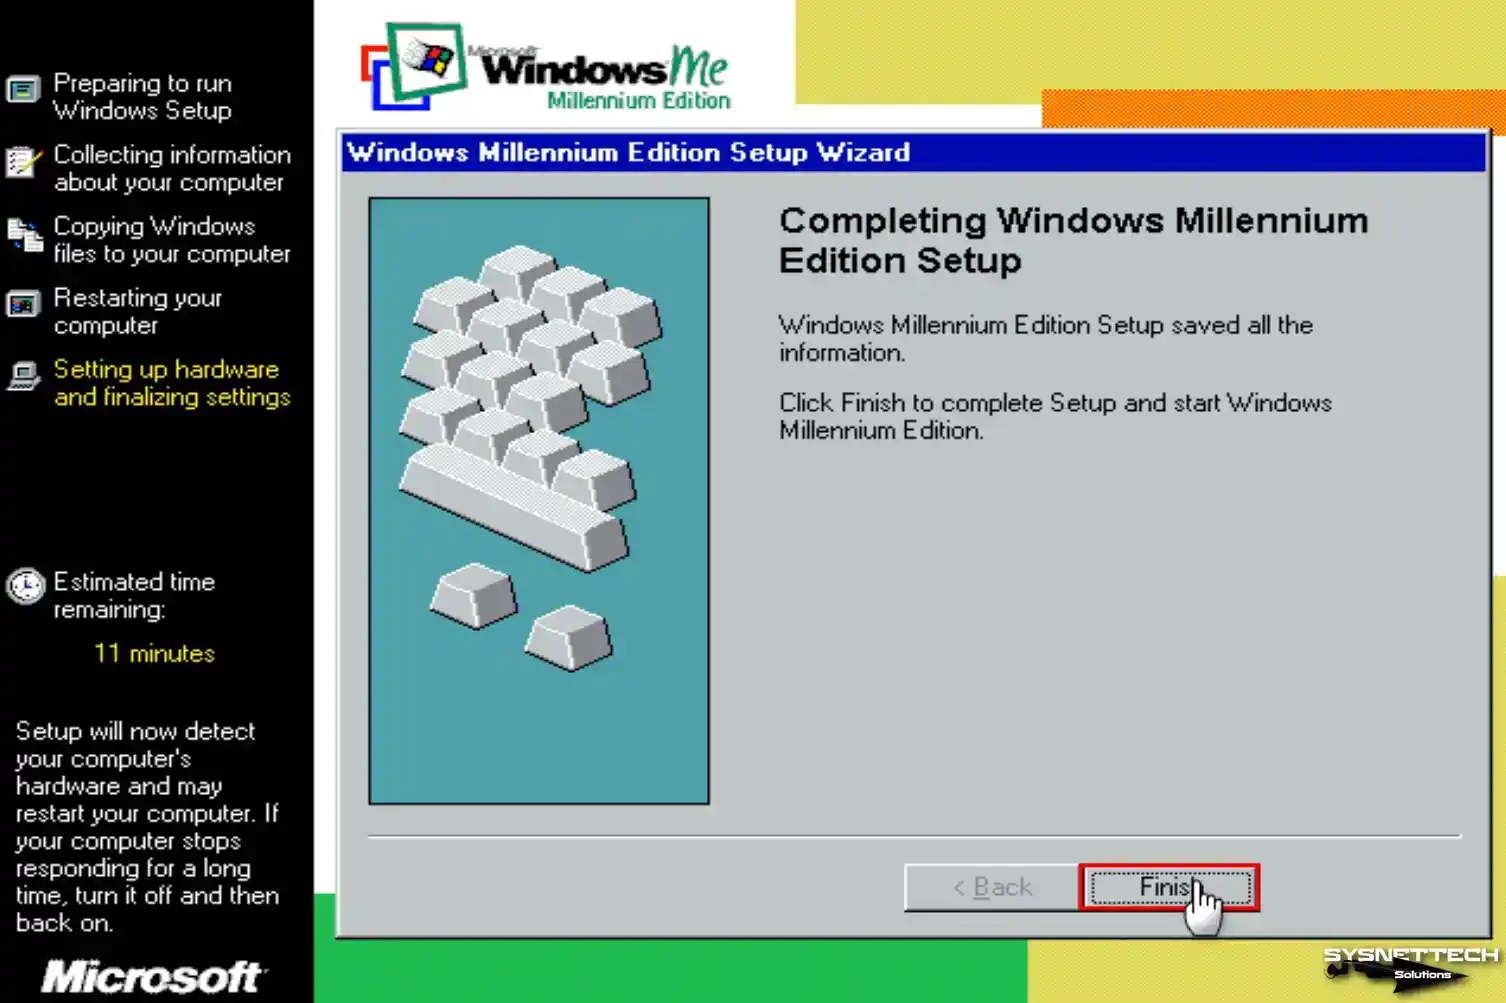
Click Finish.
-
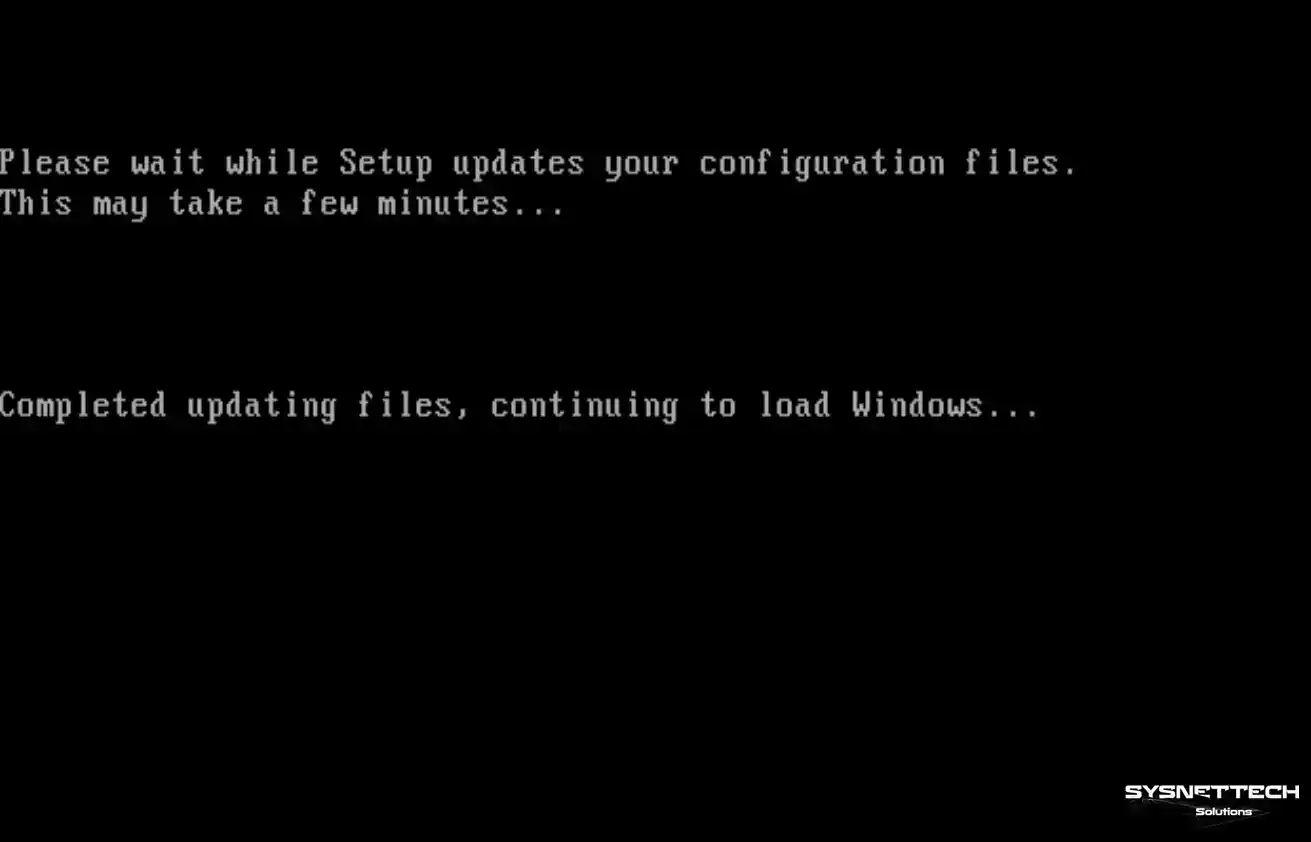
11
Note that the next stage of the process is automated. You will need to wait until it completes, in which time no use input is required.
-

12
Wait for the computer to restart a few times. Each time it restarts, it will give you this screen. It should automatically default to «Boot from Hard Disk» each time and continue from there without input. However, it’s worth watching the setup to ensure this option is auto-selected.
-

13
Explore the operating system. Windows ME has now finished installation.


When you’re finished playing with Windows ME, to shut it down:
-

-
-
Then, click OK.


Add New Question
-
Question
How can I install Windows ME without a product key?
You need to have a Windows ME product key in order to install the operating system. You can do a Google search to find a product key.
Ask a Question
200 characters left
Include your email address to get a message when this question is answered.
Submit
Video
-
The installation process may be different if you have cleanly installed a computer with Windows ME, rather than upgraded from an older system.
-
You can upgrade to Windows ME from Windows 95 or 98 by inserting the Windows ME installation disk and booting from it.
- Alternatively, whilst running either 95 or 98, insert the installation disk. Then, go to My Computer and right click on your CD Drive. Click Autorun.
-
Windows ME may not be compatible with newer programs, due to its age.
Warning
- Windows ME is no longer supported which means that is vulnerable to security threats such as viruses. It is not recommended for use on the internet. If you are going to connect it to the internet, try not to use the internet very often. Also, disconnect from the internet as soon as you are finished with your internet search!
- ME is designed for RAM up to 512MB. Anything above that may cause system issues (though workarounds have been created).
References
About this article
Thanks to all authors for creating a page that has been read 21,731 times.
Is this article up to date?
Are you curious about the installation and use of Windows Millennium Edition (ME) in a new virtual machine? If so, in this guide, I will cover Oracle VM VirtualBox 7.0, which is compatible with both Windows 11 and Windows 10 operating systems.
Then, I will guide you through the installation of Windows ME on the virtual machine. As a result, you will start using ME in a virtual environment. So let’s get started!
How to Set Up Windows ME (Millennium) on Windows 11 / 10 using Oracle VM VirtualBox 7
Microsoft released the Windows ME (Millennium Edition) operating system, which has both 16-bit and 32-bit versions, on September 14, 2000, for users.
Windows ME has the same code structure as Windows 98 and is the last version of the 9x systems. The minimum conditions to run this system on a physical PC are a 150 MHz Pentium processor, 320 MB of available disk space, and 32 MB of RAM.
Windows ME, which physically supports a maximum of 1.5 GB of RAM, can be increased to more capacity by editing some configuration files.
Windows ME also includes Internet Explorer 5.5, Windows Media Player, and Windows Movie Maker, which are mainly developed for home users.
This system, which took the title of Microsoft’s most unsuccessful operating system, was quickly replaced by Windows XP due to system instability and crashing problems.
Significant support for the Windows Millennium Edition (ME) system officially ended on December 31, 2003, and extended support ended on July 11, 2006.
Nowadays, it may make little sense to install Microsoft’s legacy Me system on a physical computer. Even in some cases, it may be necessary because the updated software of older devices supports older systems.
It can be challenging to locate and install the necessary hardware drivers when using an older computer. Therefore, installing older Windows operating systems on virtual machines may be more accessible.
How to Create a New Virtual Machine for Windows ME
You can install all old and new Windows, Linux, and macOS systems on virtual machines using Oracle VM VirtualBox on your host computer, which supports virtualization.
Creating a new virtual computer for Windows Millennium is simple, but you must configure its settings correctly. If not, there is a possibility of encountering numerous errors while installing the operating system.
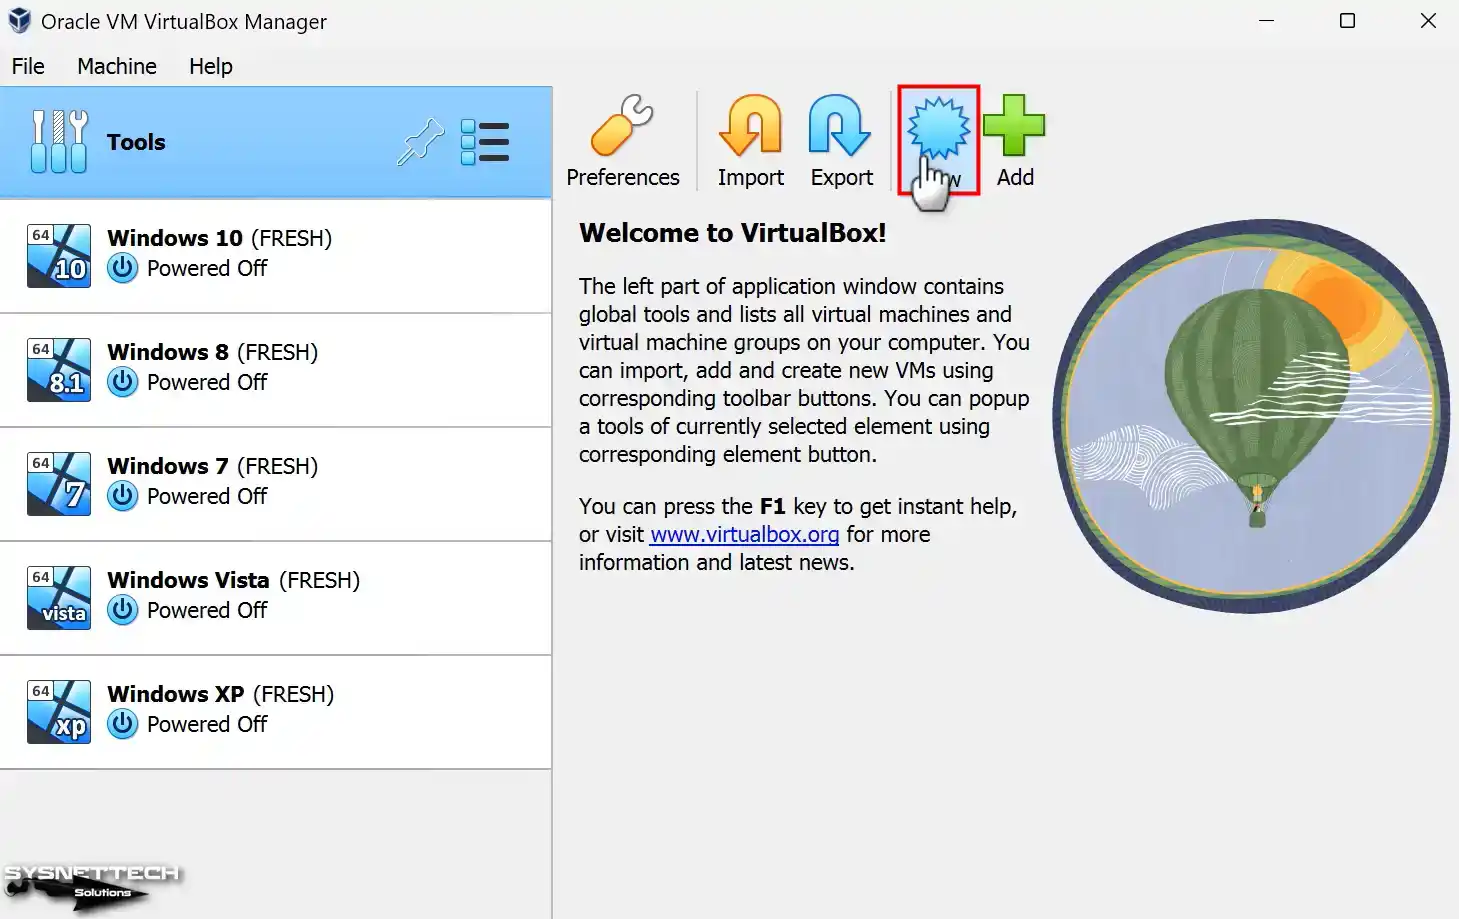
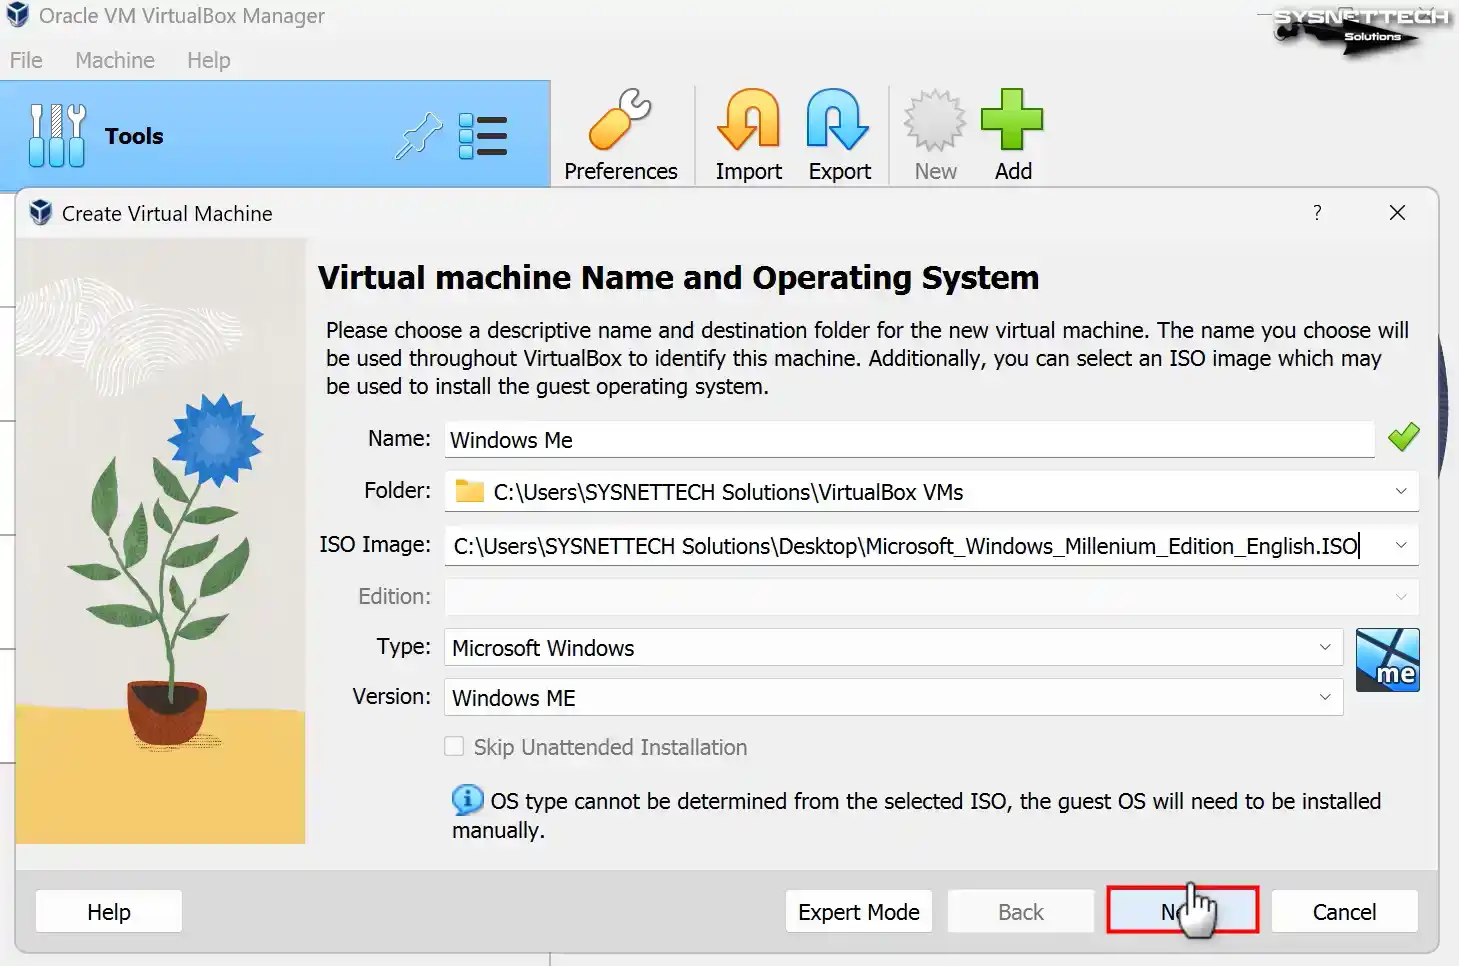
Step 1
After installing VirtualBox, run the program, click the Machine / New button from the tool menu or the New button from the shortcuts on the right, and start the virtual machine setup wizard.
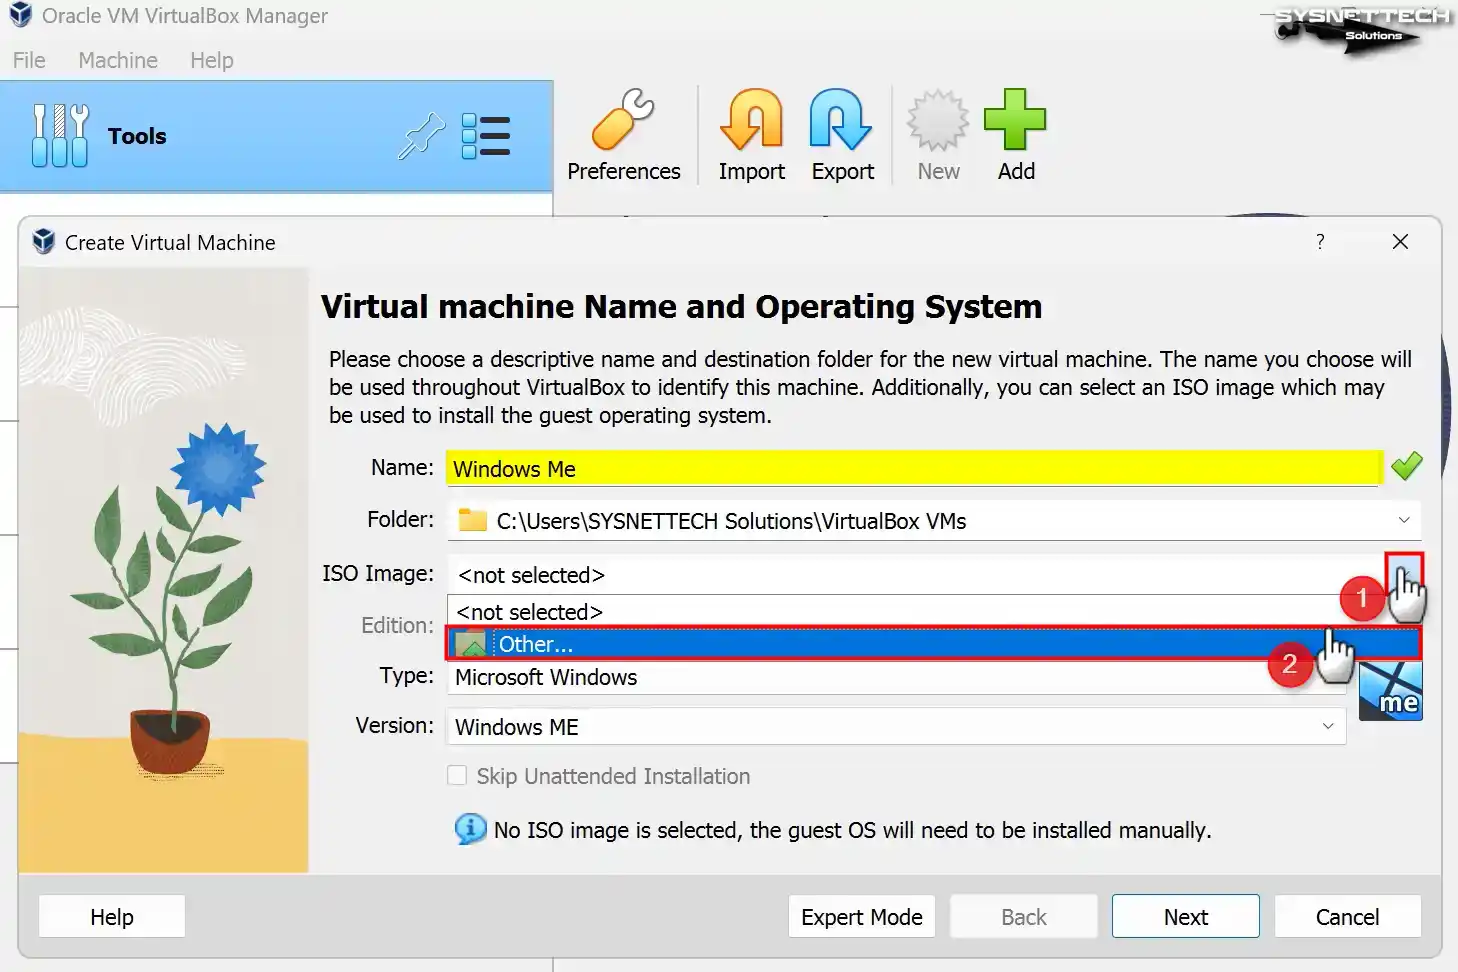
Step 2
When you type the operating system’s name, you will install it in the Name field of the Virtual PC wizard. The values in the Type and Version fields will be determined automatically by VirtualBox.
If you do not want to form it on your host disk, configure the Folder to a location on your external disk. Also, expand the drop-down menu from the ISO Image section and click Other to add a Windows ME ISO file to the virtual machine.
Step 3
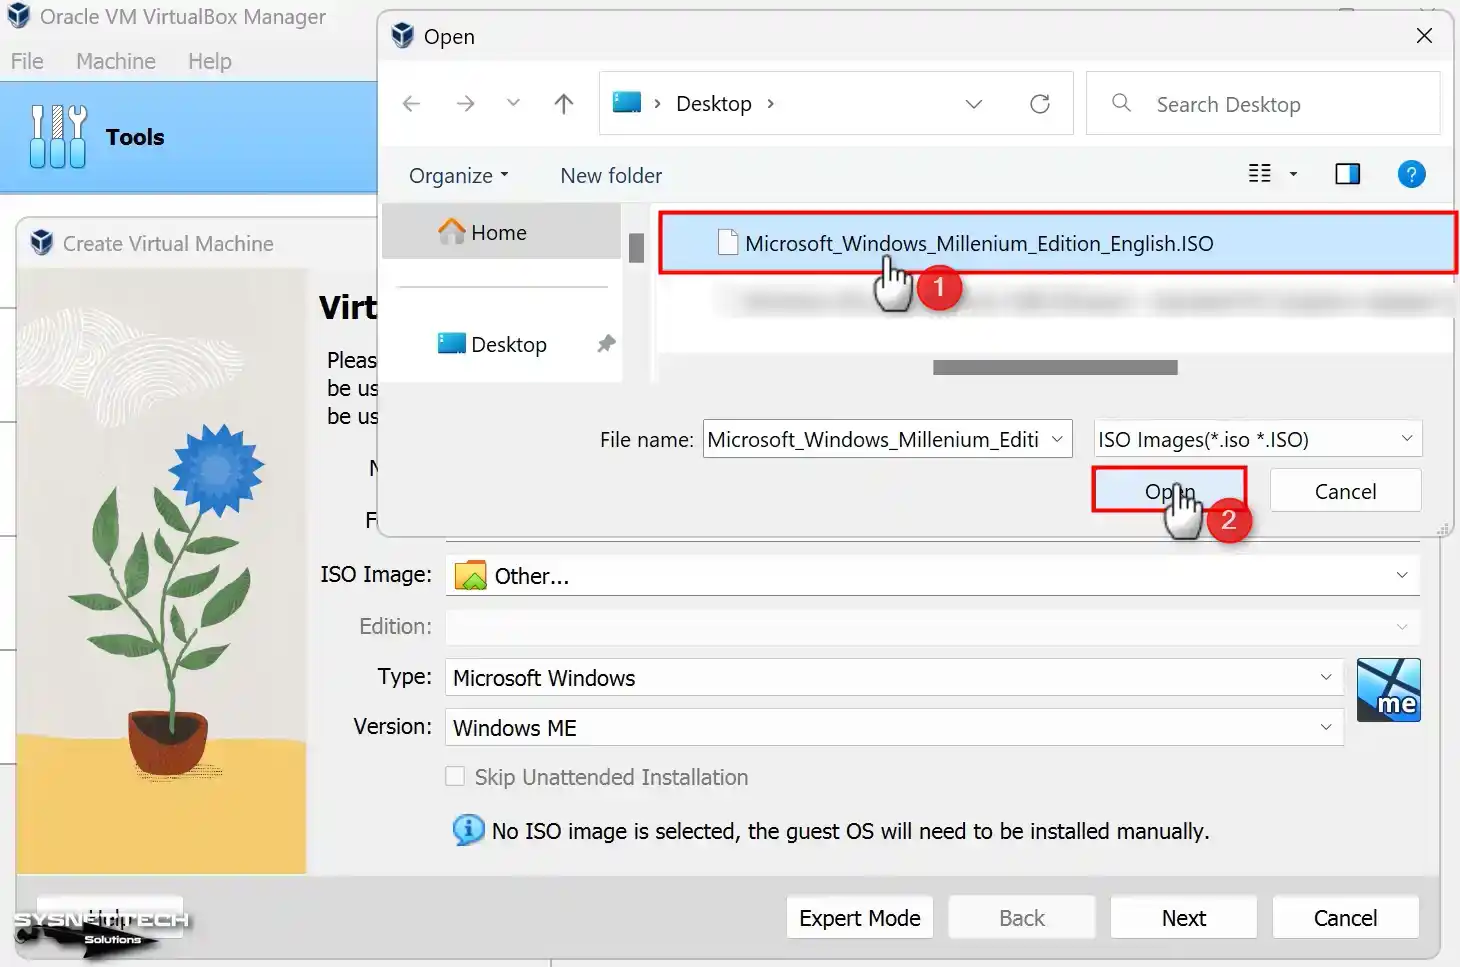
Select the Microsoft Windows ME (Millennium) ISO file you downloaded to your computer from the table below the article and open it.
Step 4
You can see the unattended system configuration in this window, as the UI has been changed in the 7.x versions of VirtualBox. On older Windows systems, this feature may not work, so you have to continue with the manual system setup.
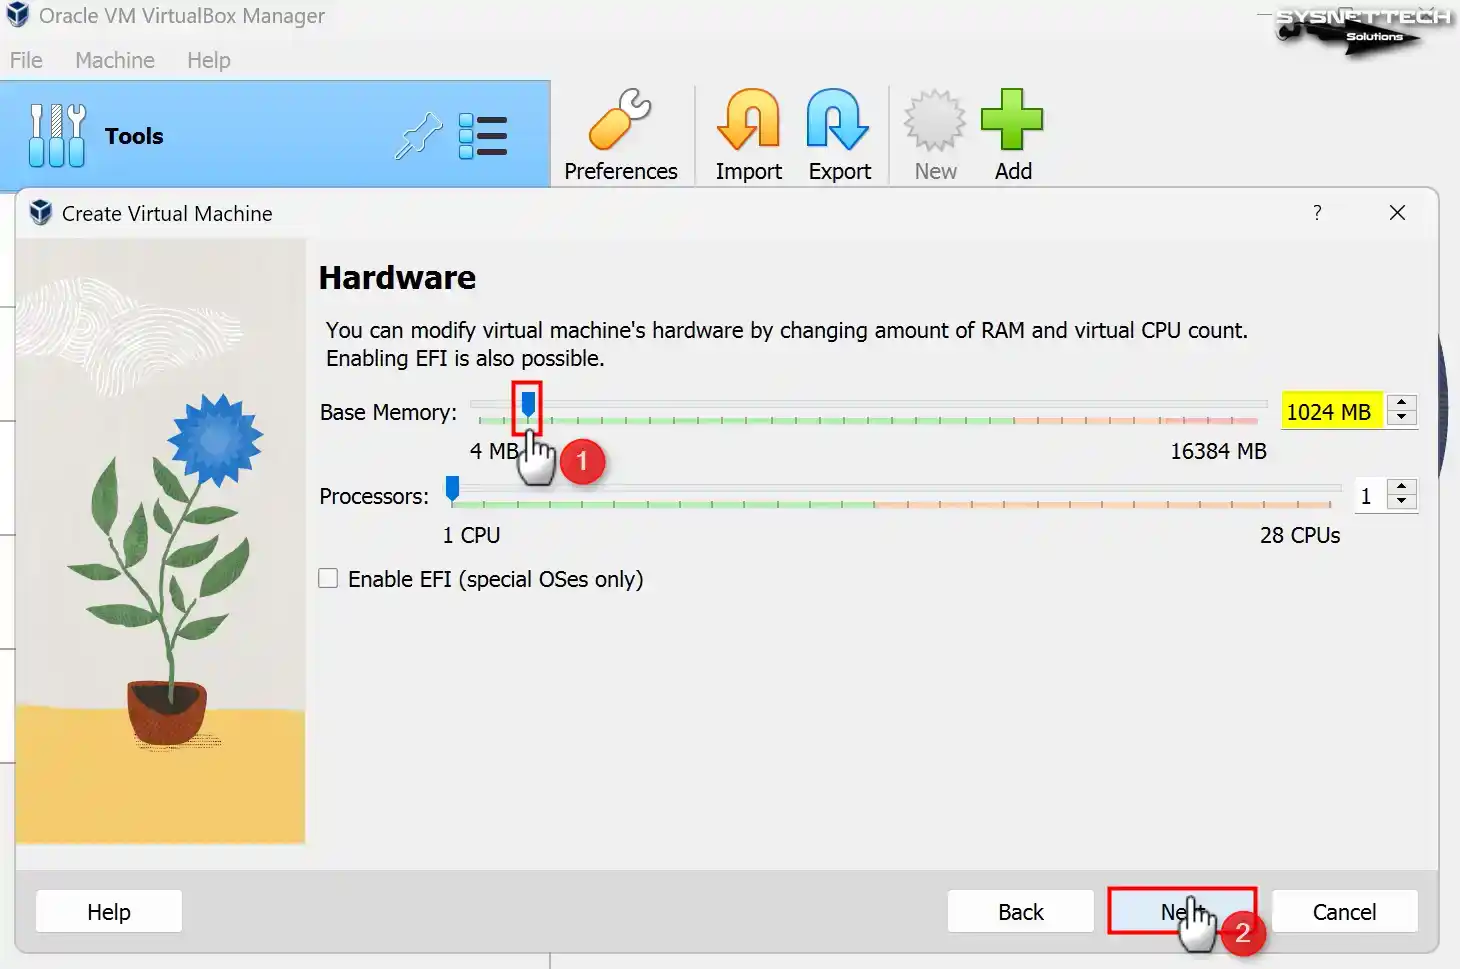
Step 5
The recommended memory size for the Windows Me VM is 128 MB, but the RAM value should be set to 1024 MB (1 GB), and click Next.
Step 6
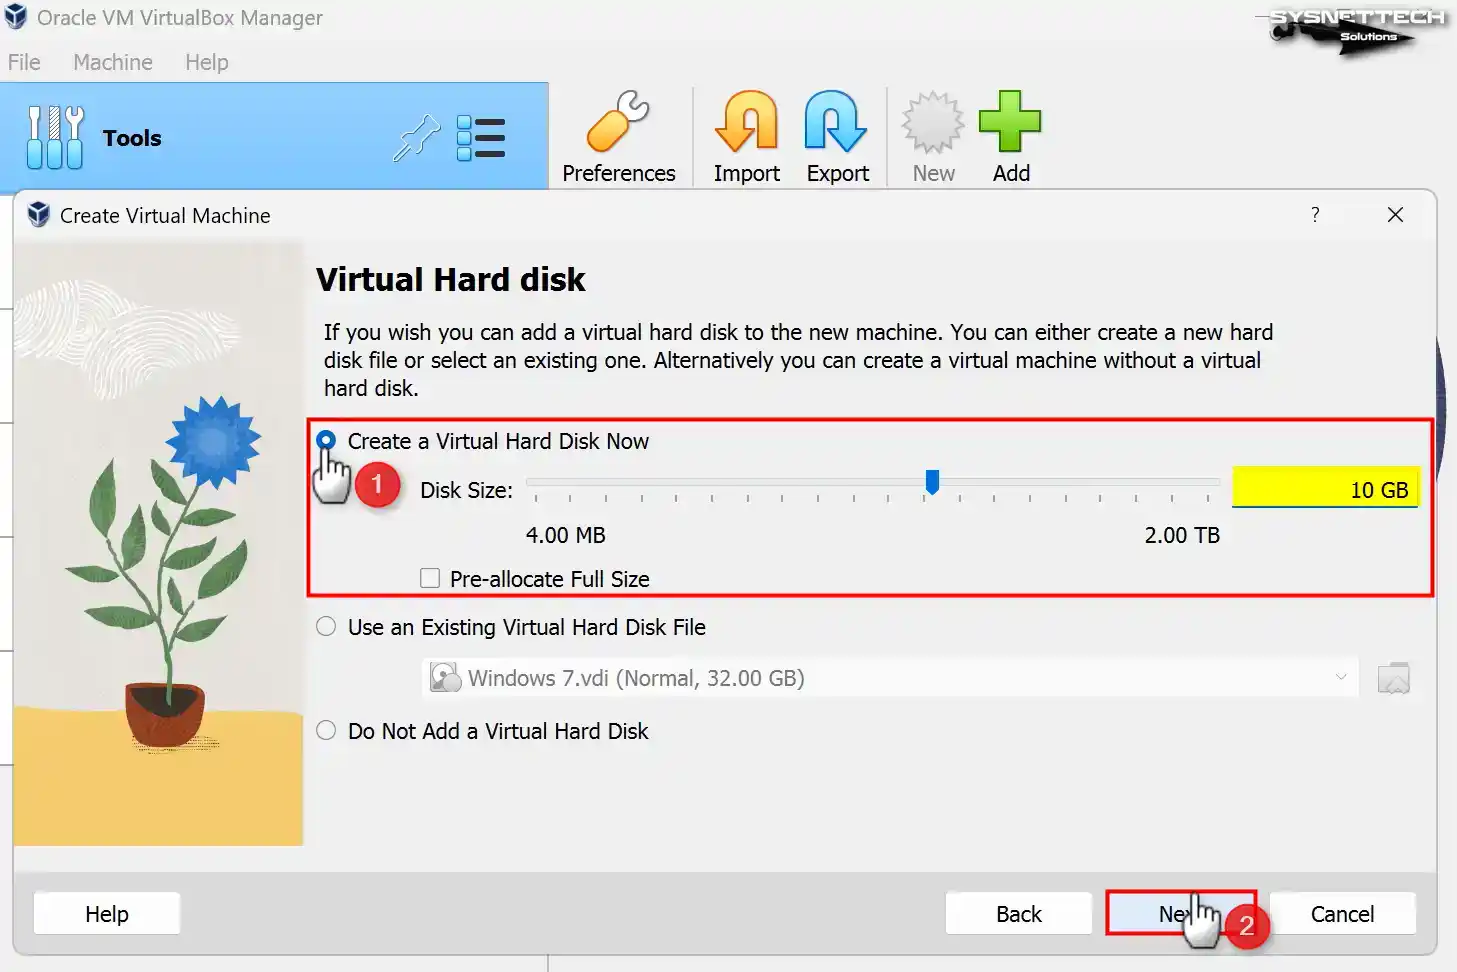
Since you will install a clean Windows system, tick the “Create a Virtual Hard Disk Now” option in the Hard Disk configuration window and configure the disk size to 10 GB or according to your needs.
NOTE: At this stage, if you are using one of the old VBox versions and installing it on an old host computer, you can configure the virtual disk size to Fixed Size for virtual machine performance. Thus, the virtual HDD’s capacity will be allocated from the host disk. If your host computer has a fast SSD disk, installing it with the Dynamically Allocated option is recommended. In this case, the necessary disk space will automatically be allocated from the host disk when using a VM.
Step 7
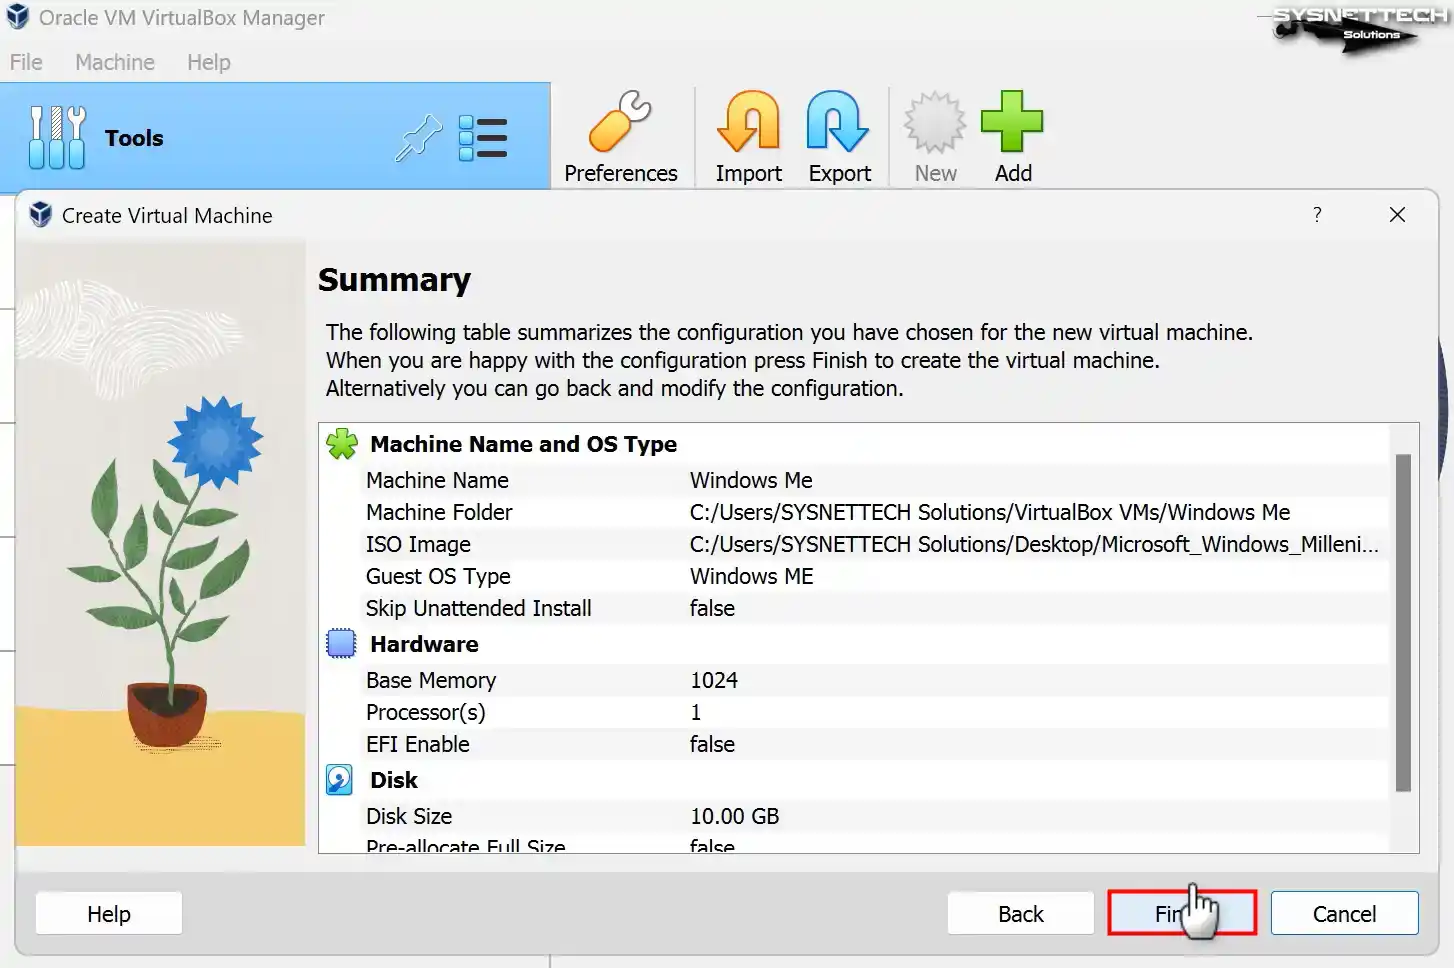
Check the hardware information of the Windows ME guest machine and close the wizard.
Step 8
Open Settings to better organize the virtual PC’s settings.
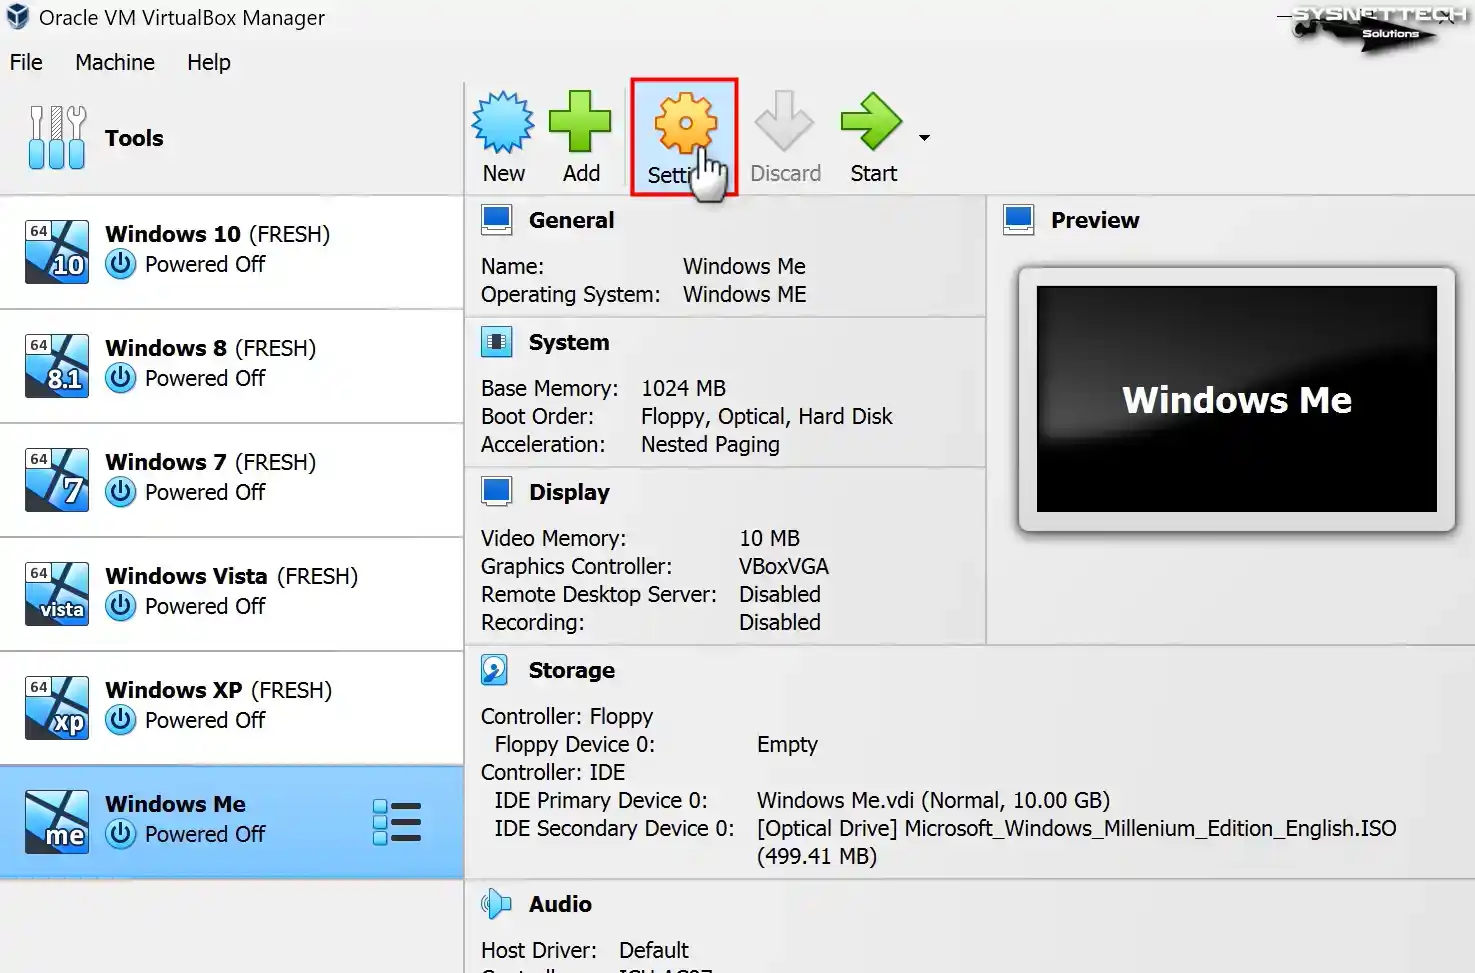
Step 9
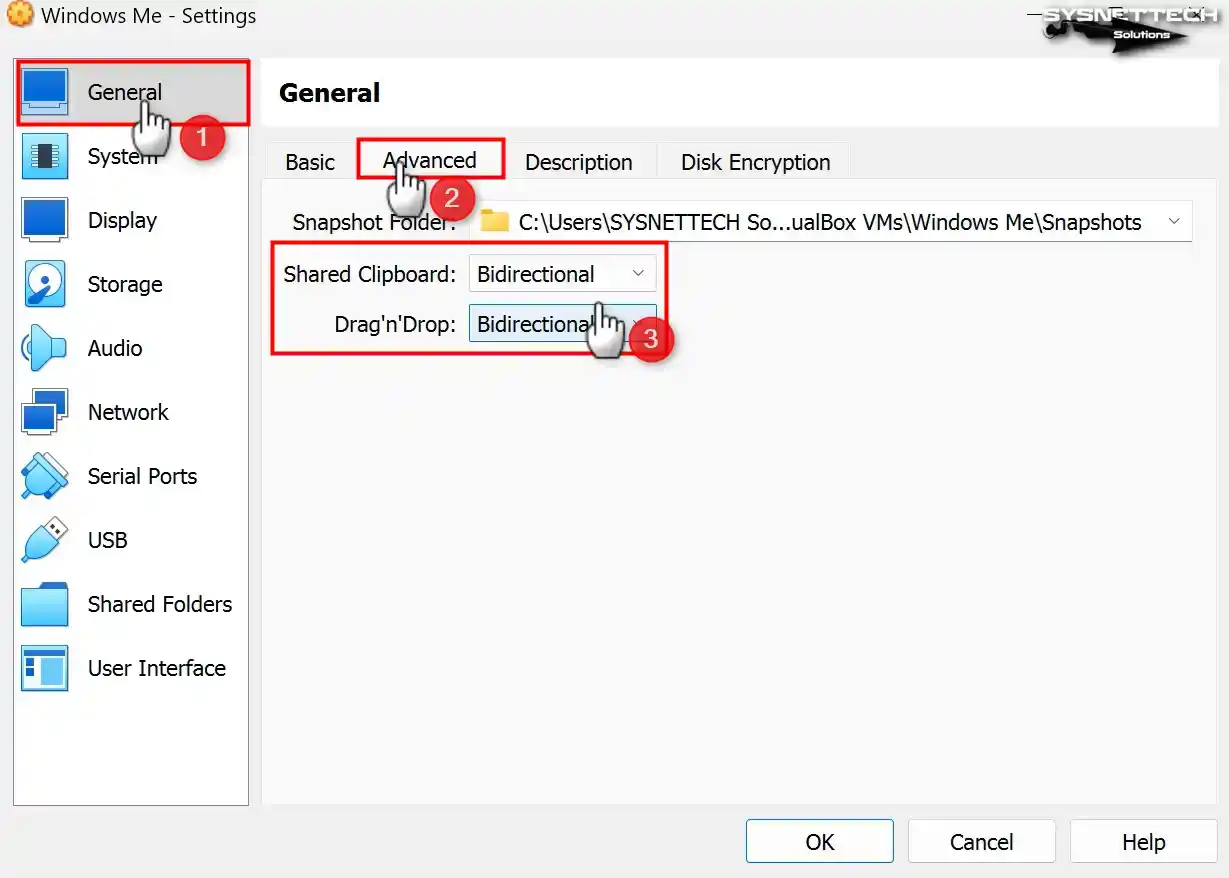
You cannot use drag-and-drop or copy-and-paste features in VirtualBox 7.x versions, as Guest Additions are unsupported for older Windows systems. However, if you are trying to install with a 5.x or 6.x version of VirtualBox and it supports these features, change the Shared Clipboard and Drag’n’Drop properties to Bidirectional.
Step 10
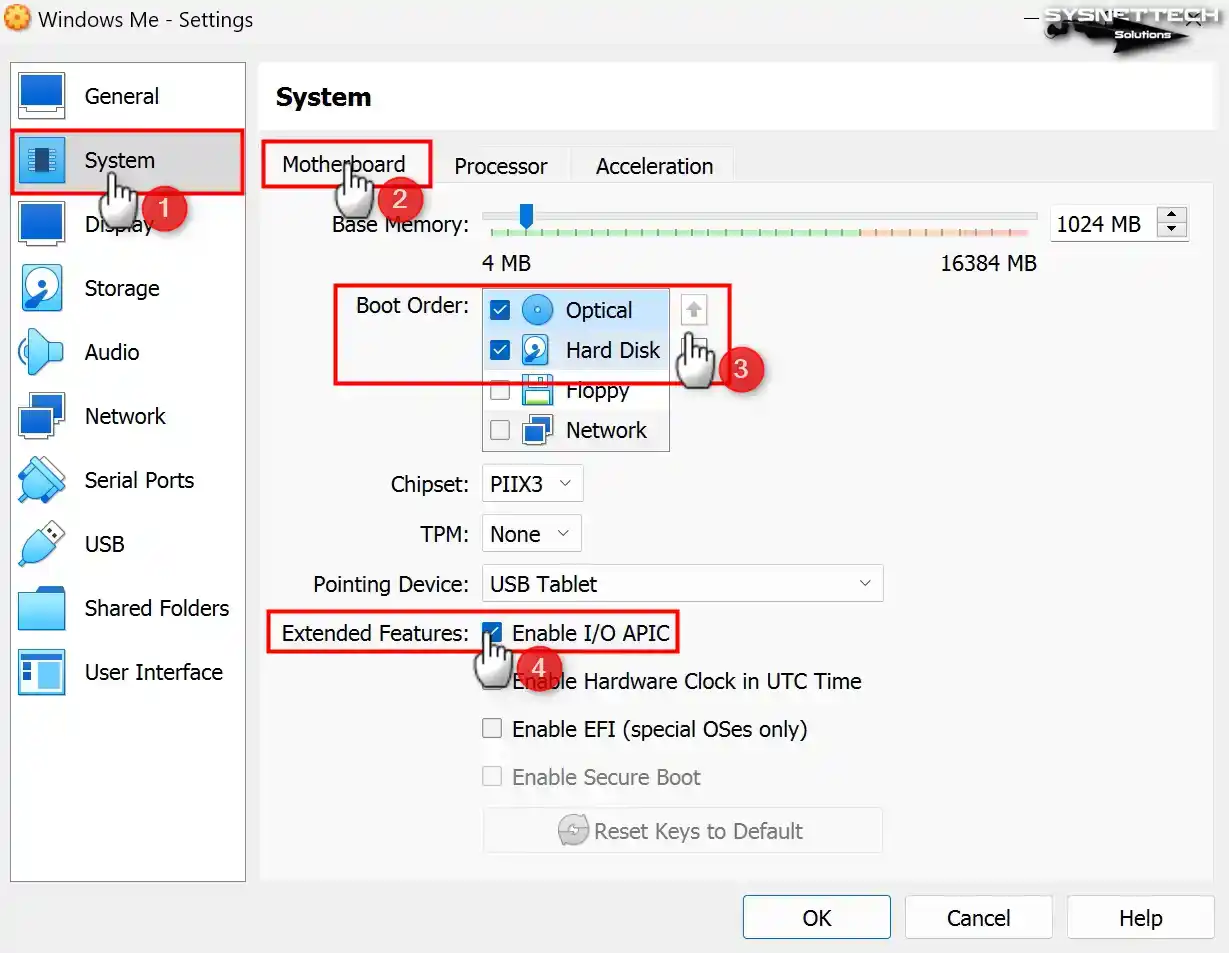
In the System / Motherboard tab, select the Optical device in the first row of the Boot Order setting and enable the I/O APIC feature.
Step 11
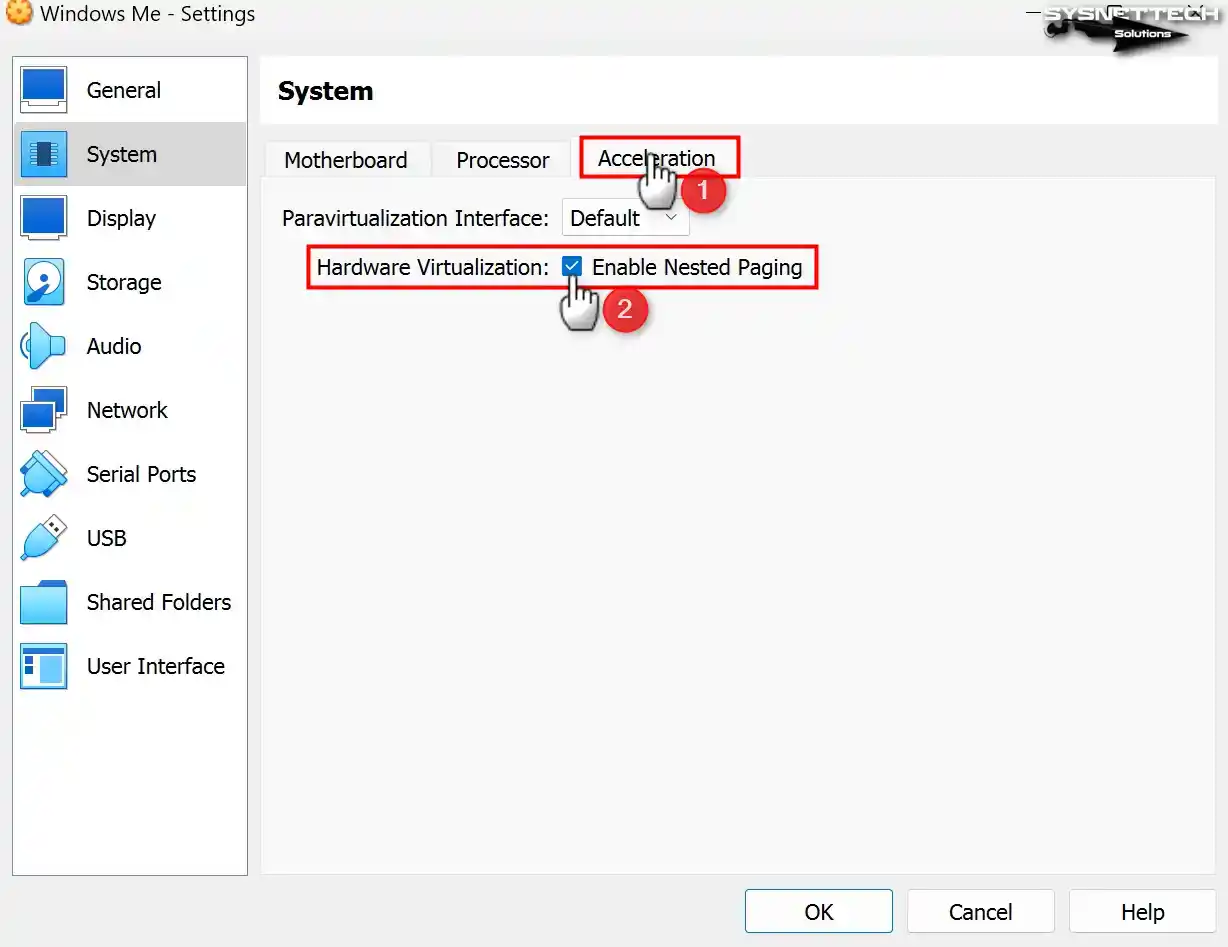
In the Acceleration tab, enable Nested Paging and leave the Paravirtualization Interface at the default for better memory management between the host and VM.
Step 12
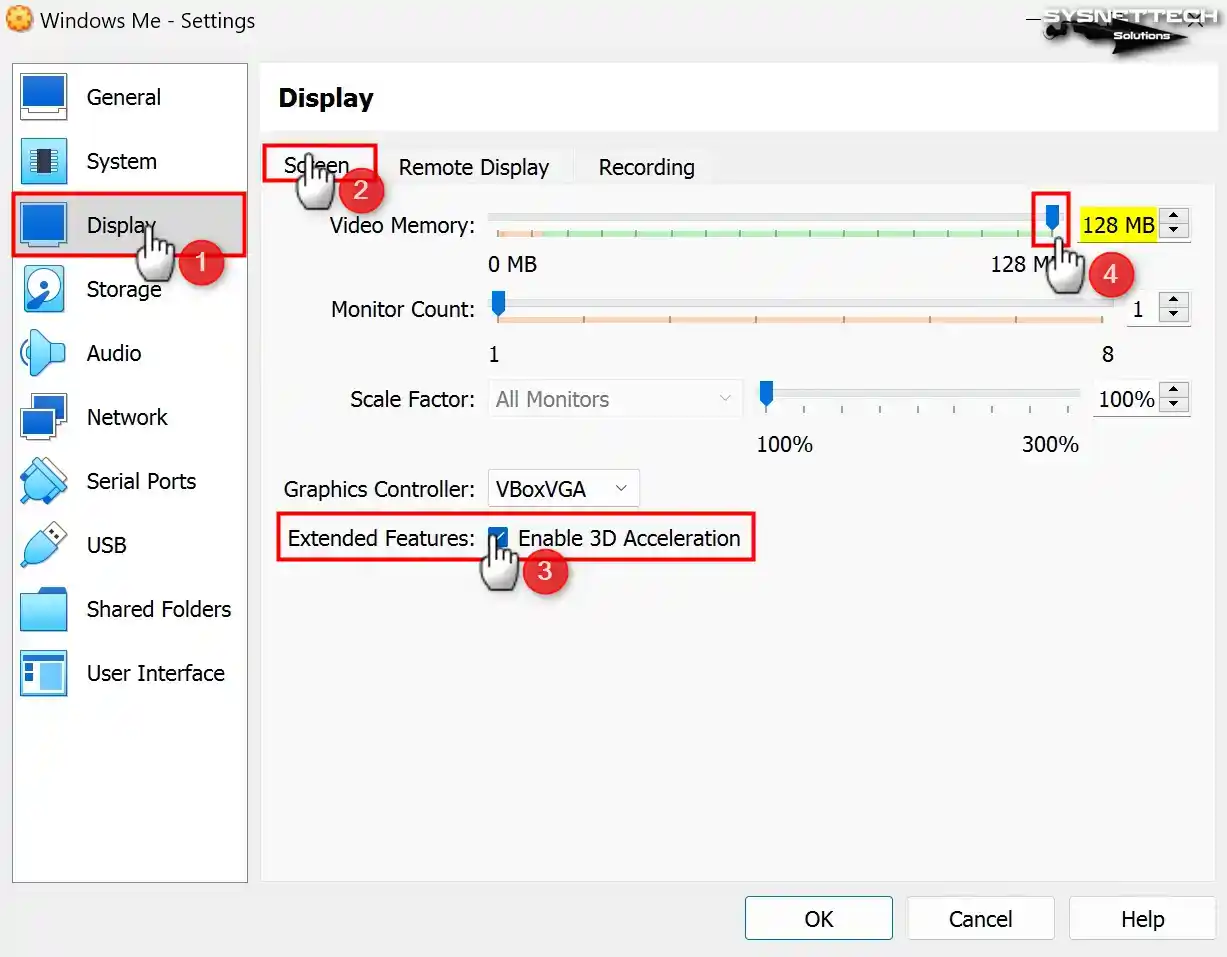
As we said, you cannot use the 3D feature in new versions of VBox. But if you are utilizing the old version of VBox, enable 3D Acceleration for the Display device and configure the Video Memory value to 128.
Suppose you cannot install the Guest Additions for 9x versions in VirtualBox because it is not officially supported. In that case, we will install the driver for the display adapter, which helps increase the video memory.
Step 13
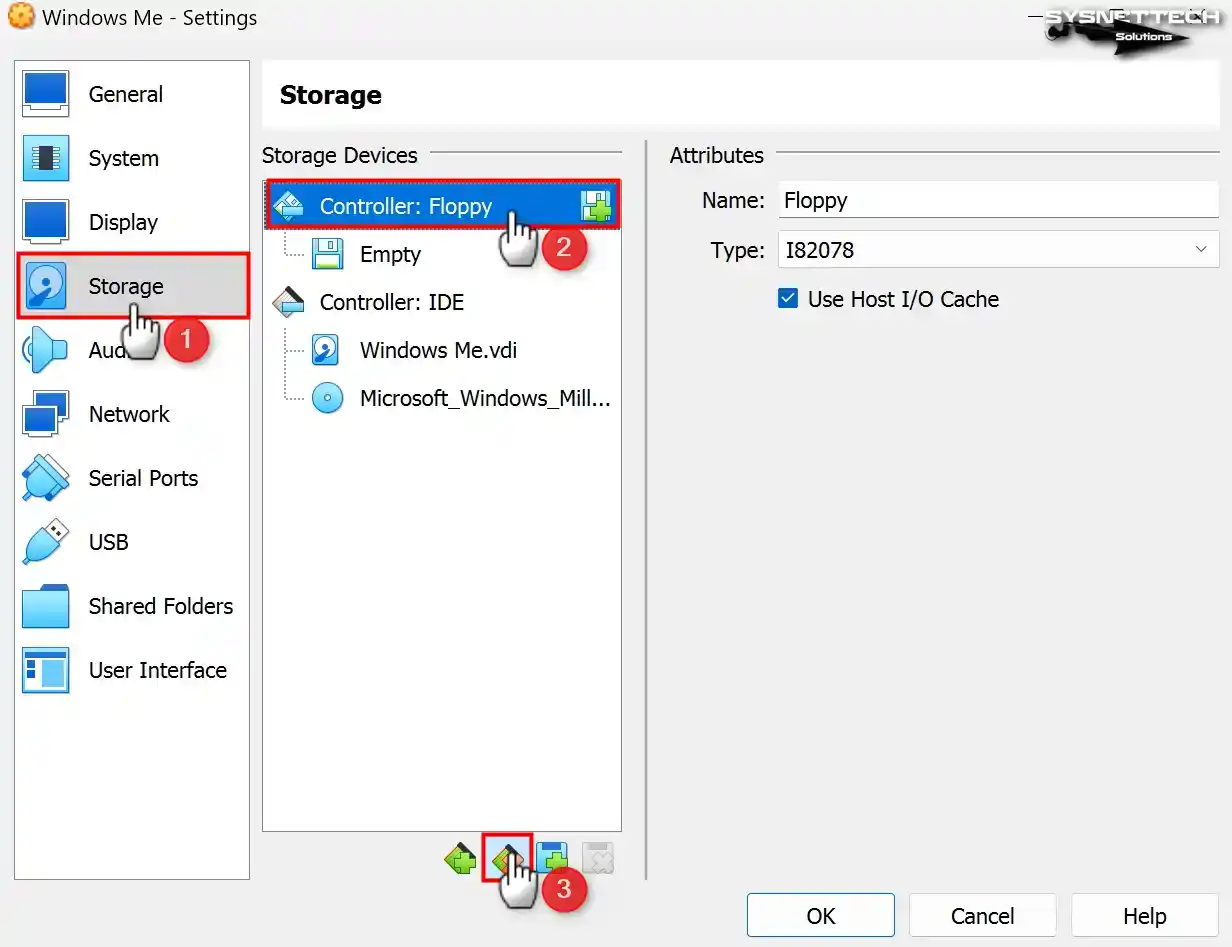
Remove the Floppy controller from the Storage devices.
Step 14
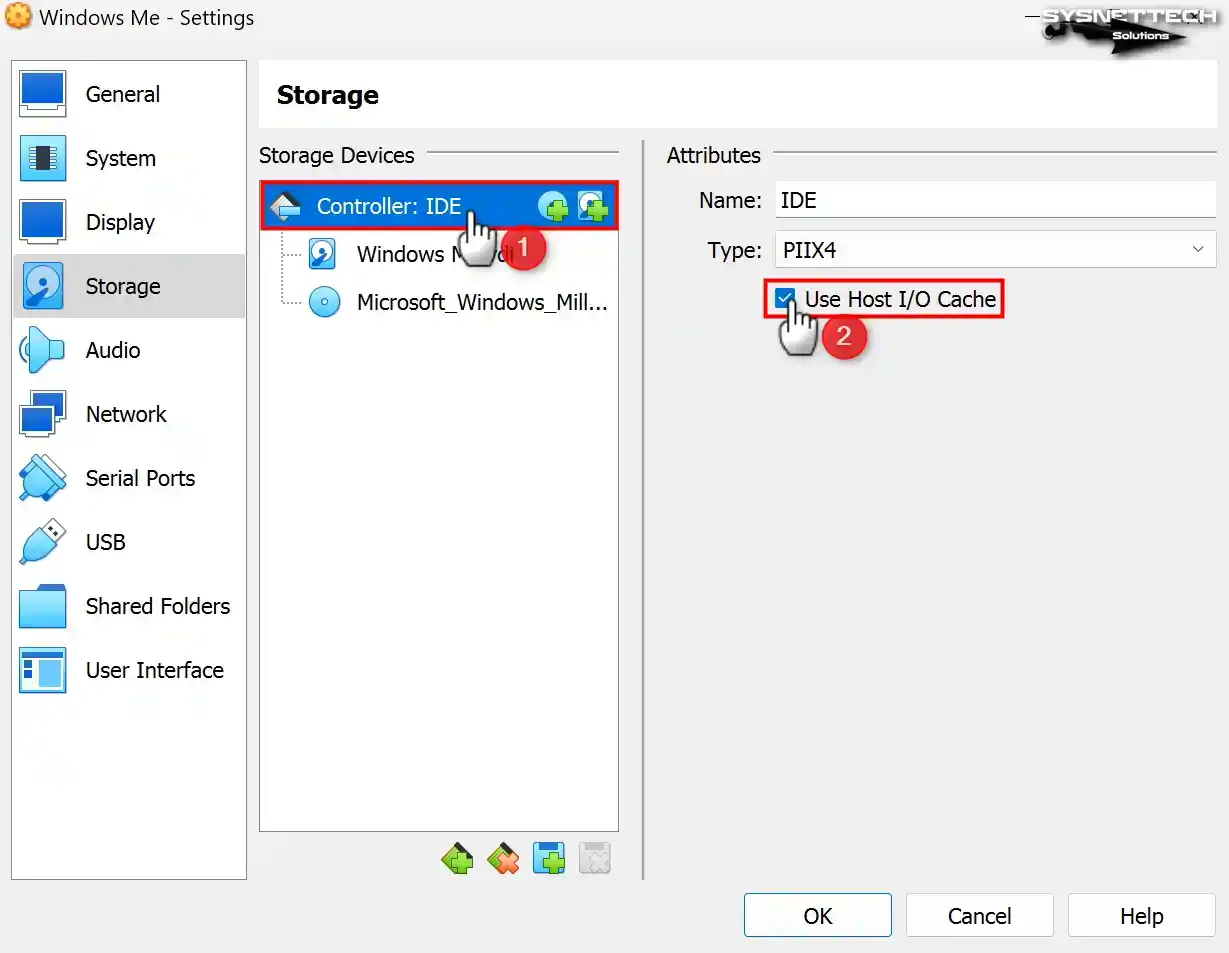
Check that the Host I/O Cache feature of the IDE controller is enabled.
Step 15
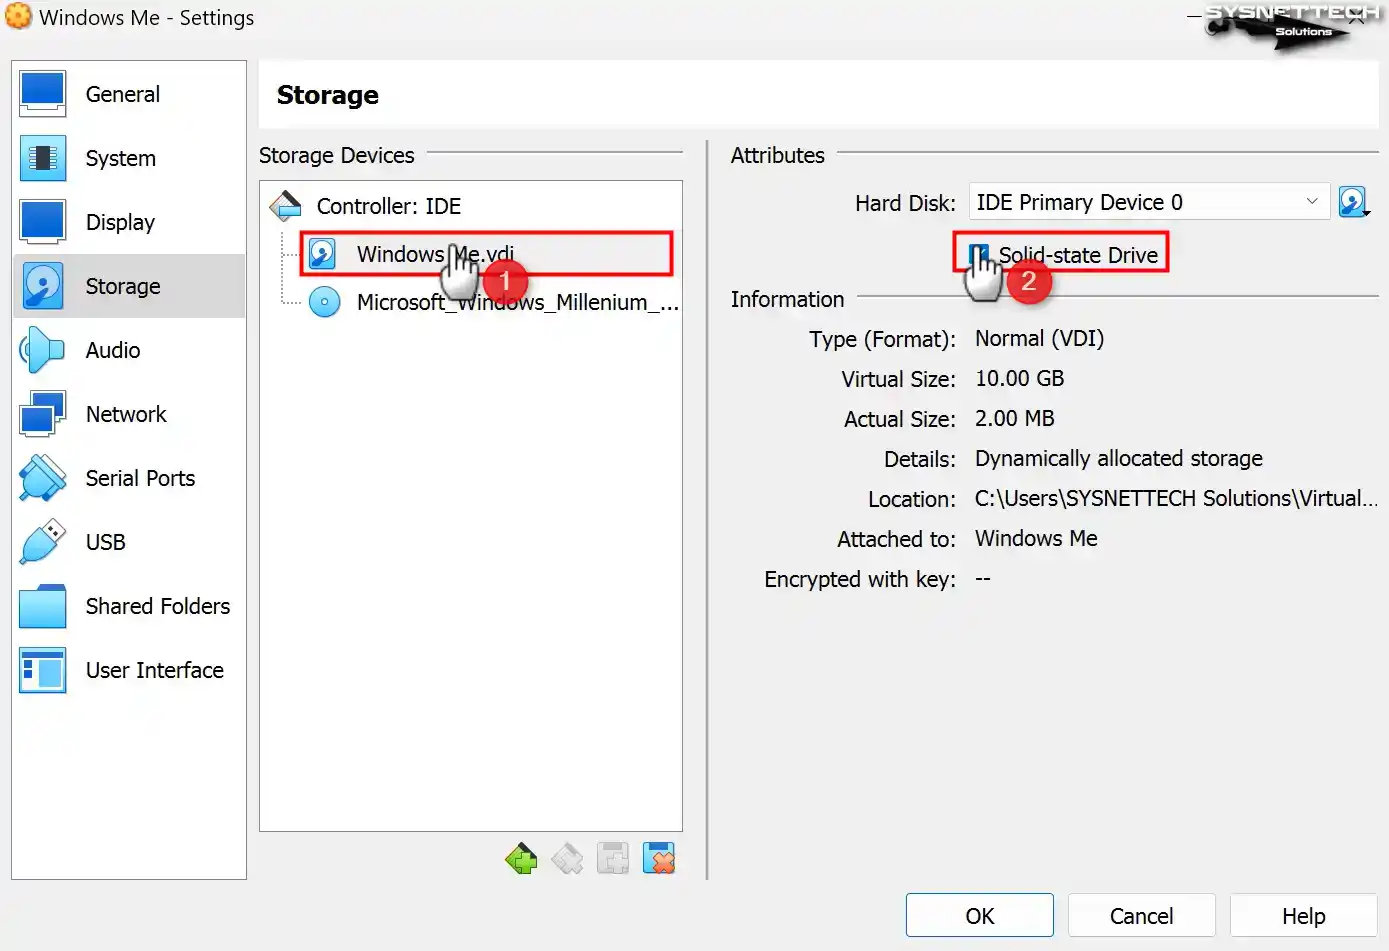
Configure WindowsMe.vdi disk file as SSD (Solid State Drive) to improve read and write speeds.
Step 16
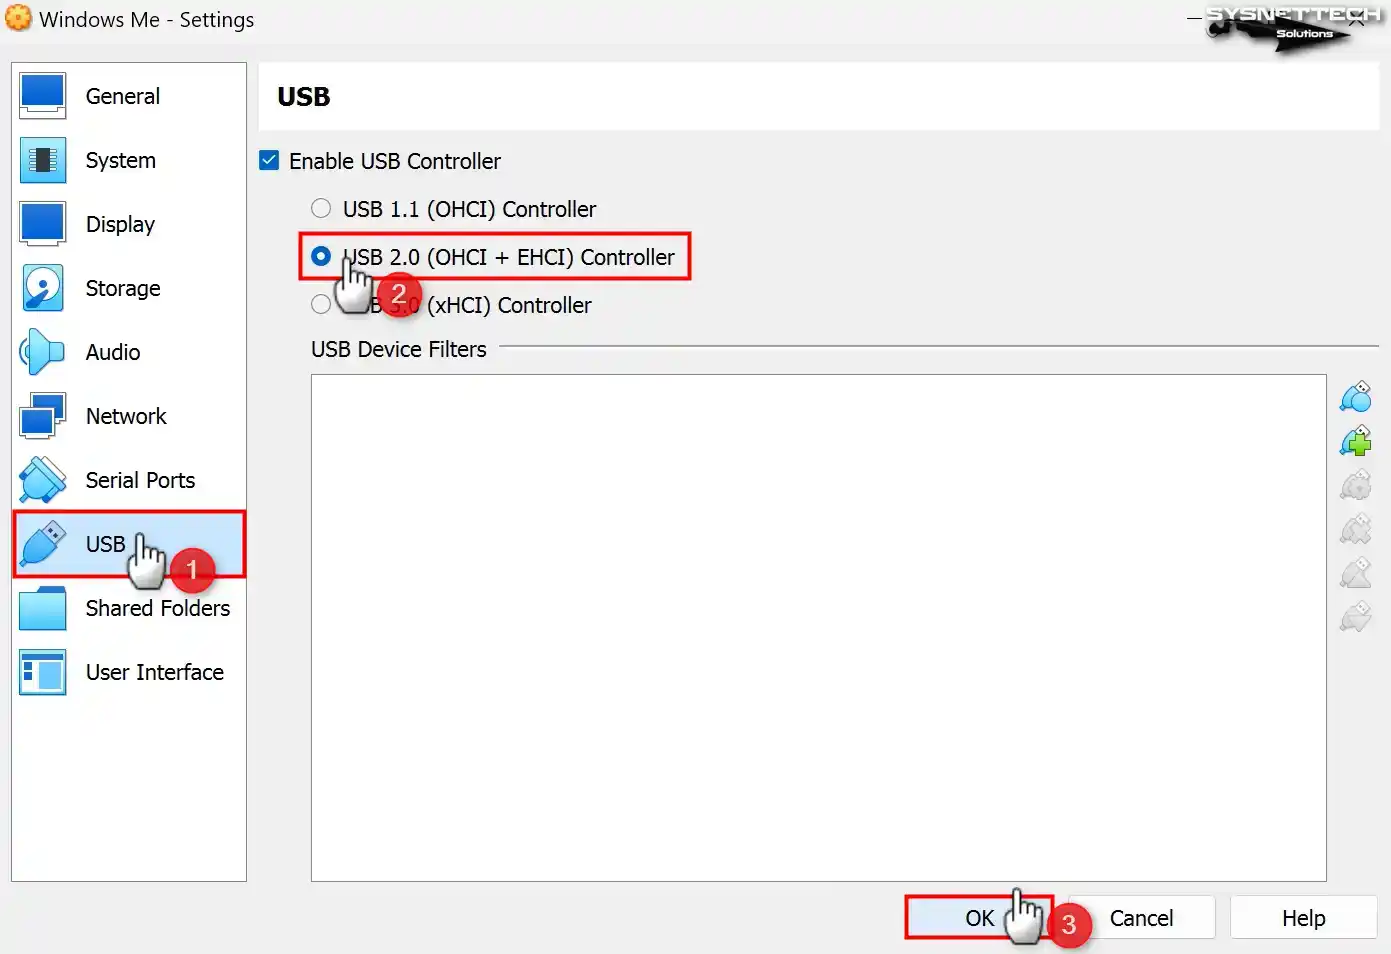
If you want to use USB flash memory or storage devices in your Windows Millennium virtual system, enable the USB 2.0 (OHCI + EHCI) Controller.
Step 17
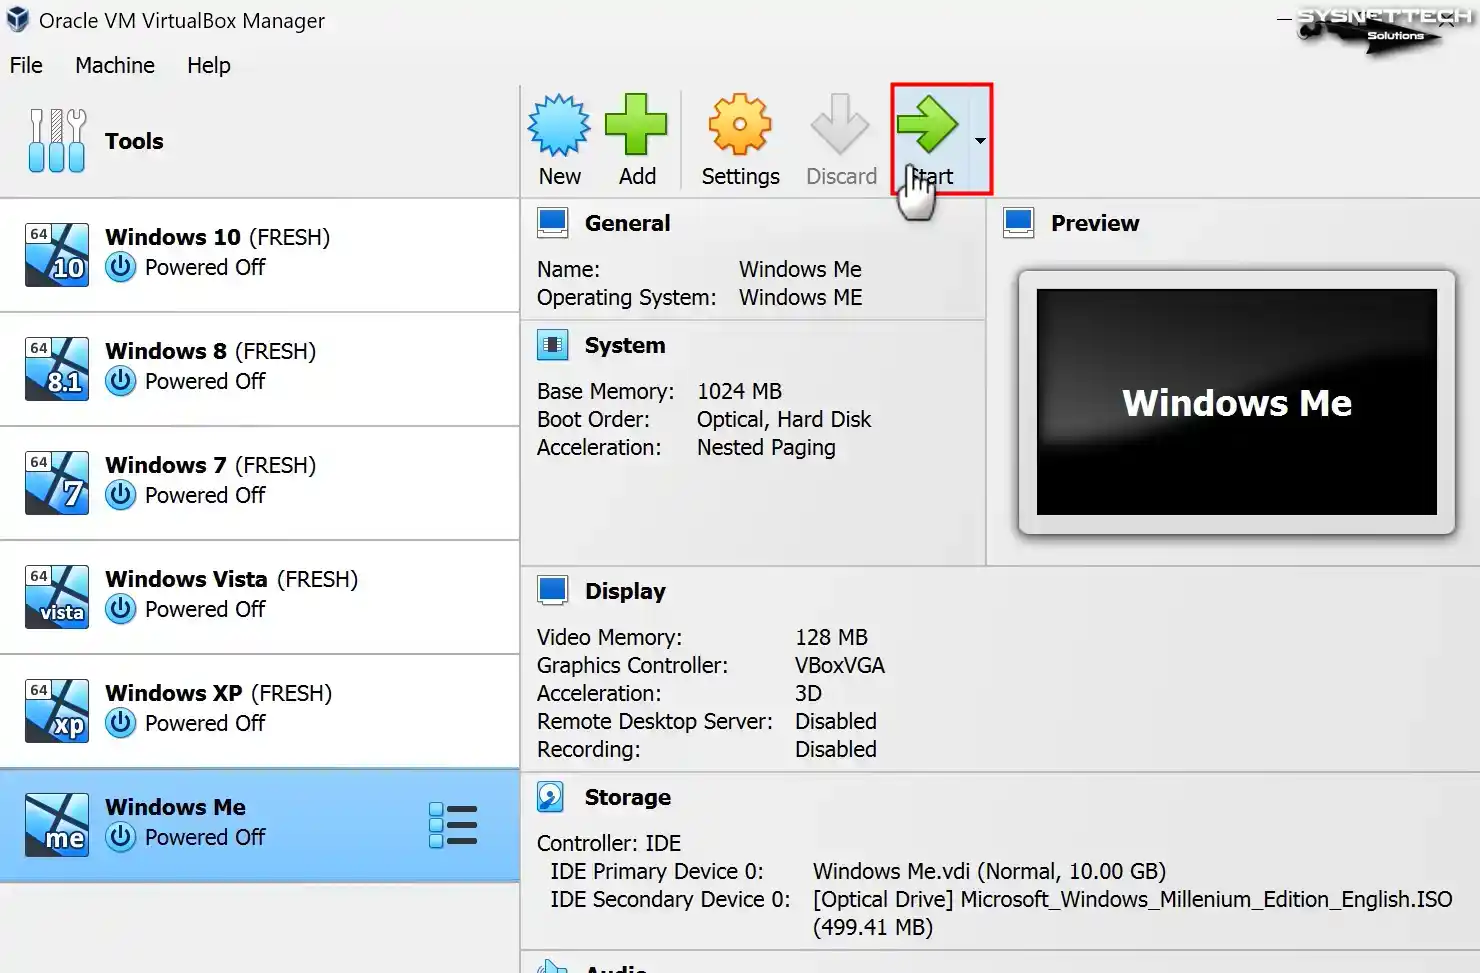
Run the VM for system setup after editing all the guest operating system settings.
How to Install Windows ME (Millennium) using VirtualBox
After running the Windows Millennium virtual machine, you can continue as if you were installing it on a physical computer by following the steps below.
Step 1
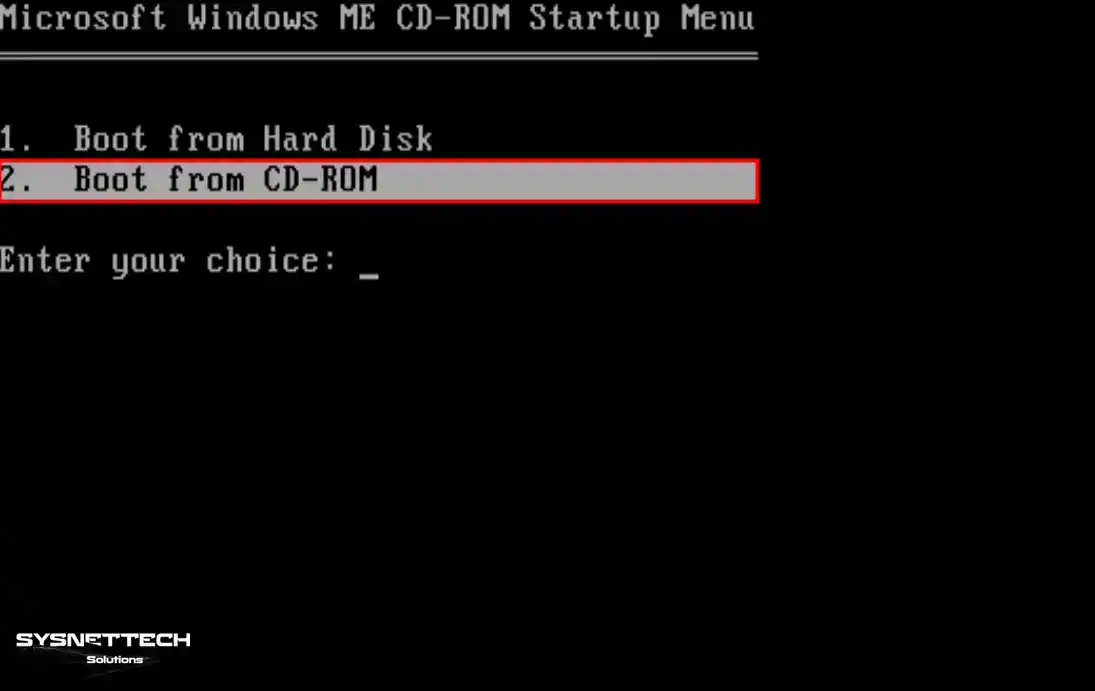
You can boot from a Hard Disk and CD-ROM in the Microsoft Windows ME CD-ROM Startup Menu screen. Since you will install the system on the virtual PC, press Enter on the Boot from CD-ROM option.
Step 2
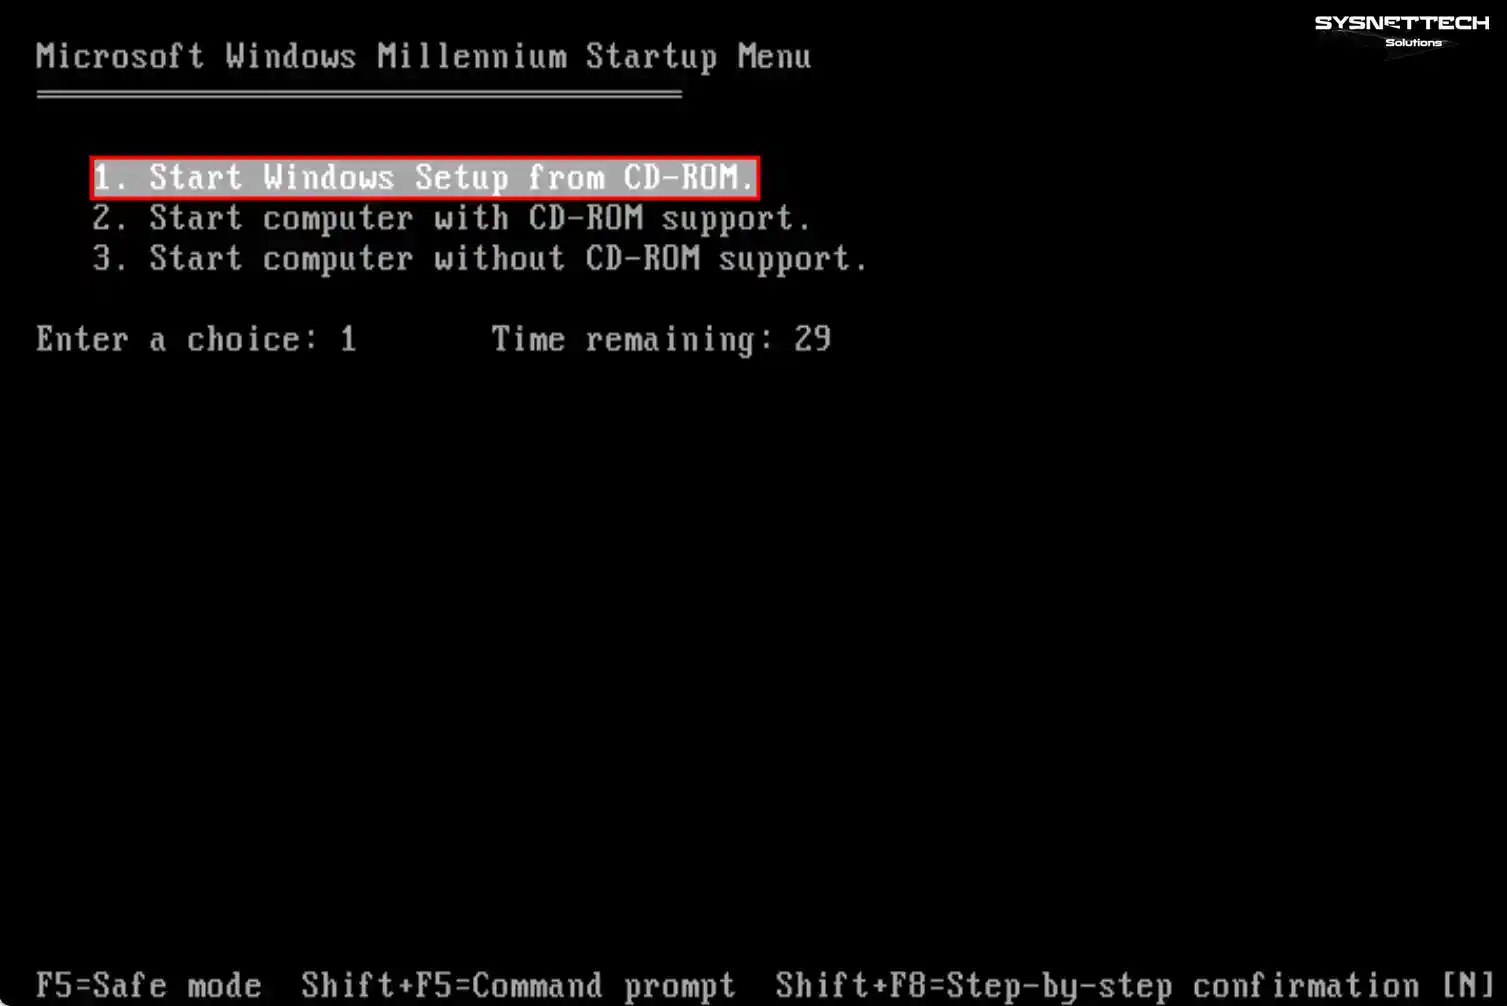
Since you have added the ISO file to the optical drive, press Enter on the Start Windows Setup from the CD-ROM option.
Step 3
When the Setup wizard shows up, hit Enter to get started with the Microsoft WinME installation. If you require more details, hit F1. And if you need to cancel the installation, confidently press F3.
Step 4
Press Enter on the Configure unallocated disk space option to edit the unallocated disk space.
Step 5
If you have a disk capacity of more than 512MB disk capacity, you need to enable extensive disk space usage. Click the down arrow, select “Yes, enable large disk support,” and press Enter.
Step 6
When the setup wizard restarts your virtual machine, boot your system again from the CD-ROM.
Step 7
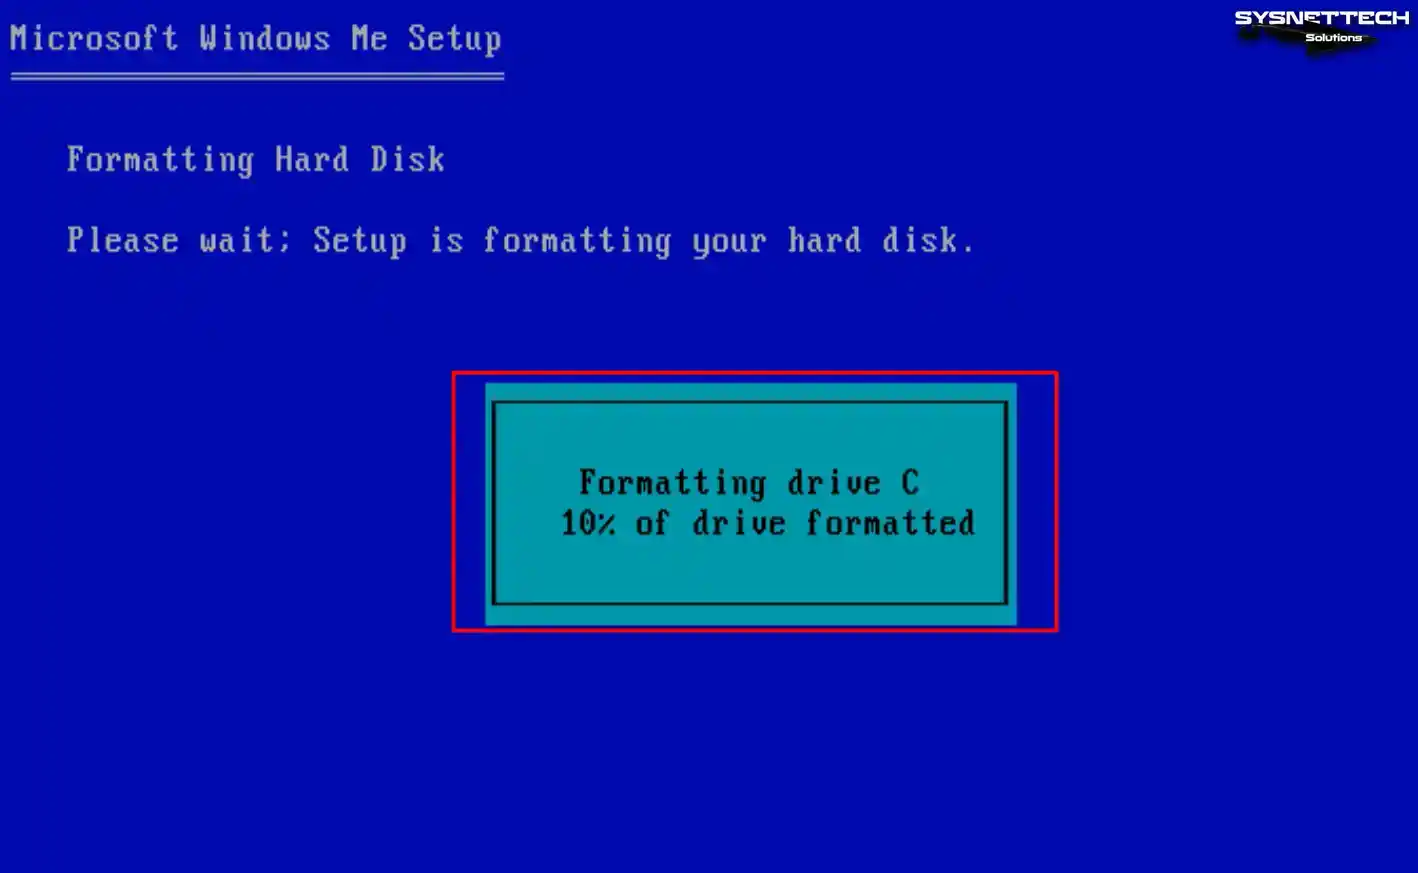
When your guest machine restarts, this time, the setup wizard will format your virtual disk.
Step 8
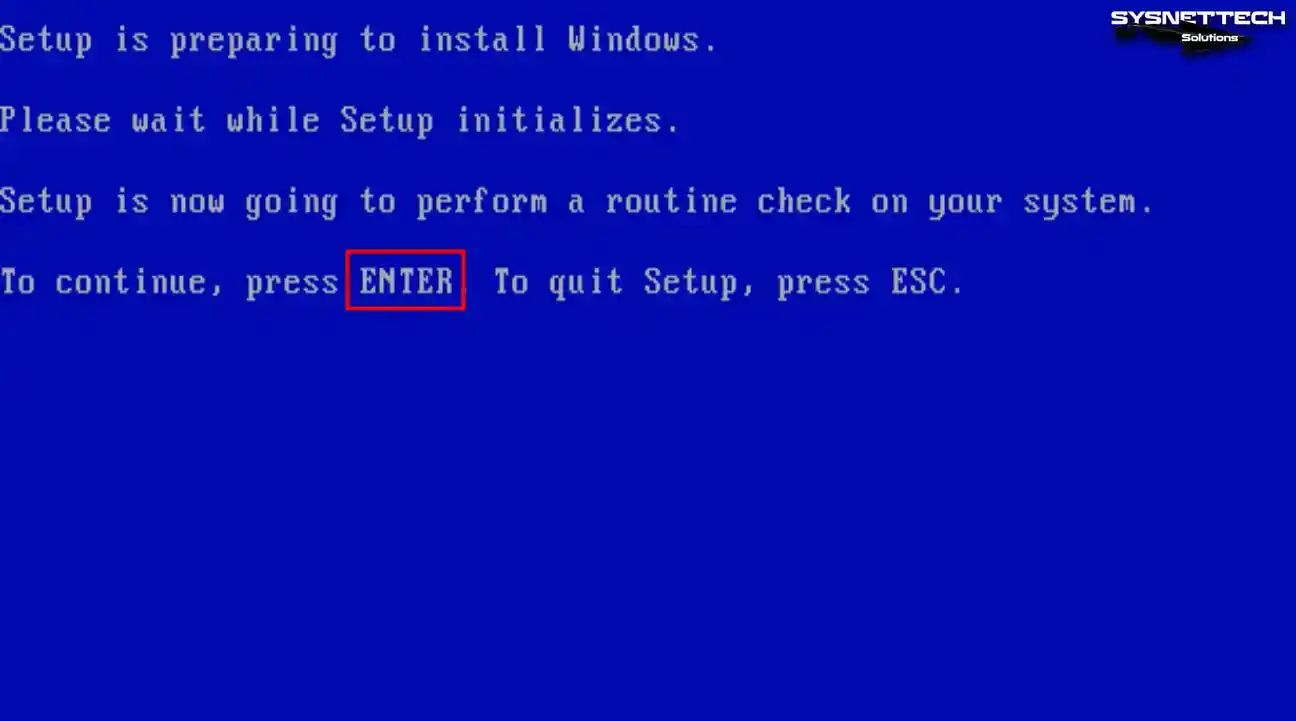
After the virtual disk is formatted, the setup wizard will check your system, so press Enter and continue.
Step 9
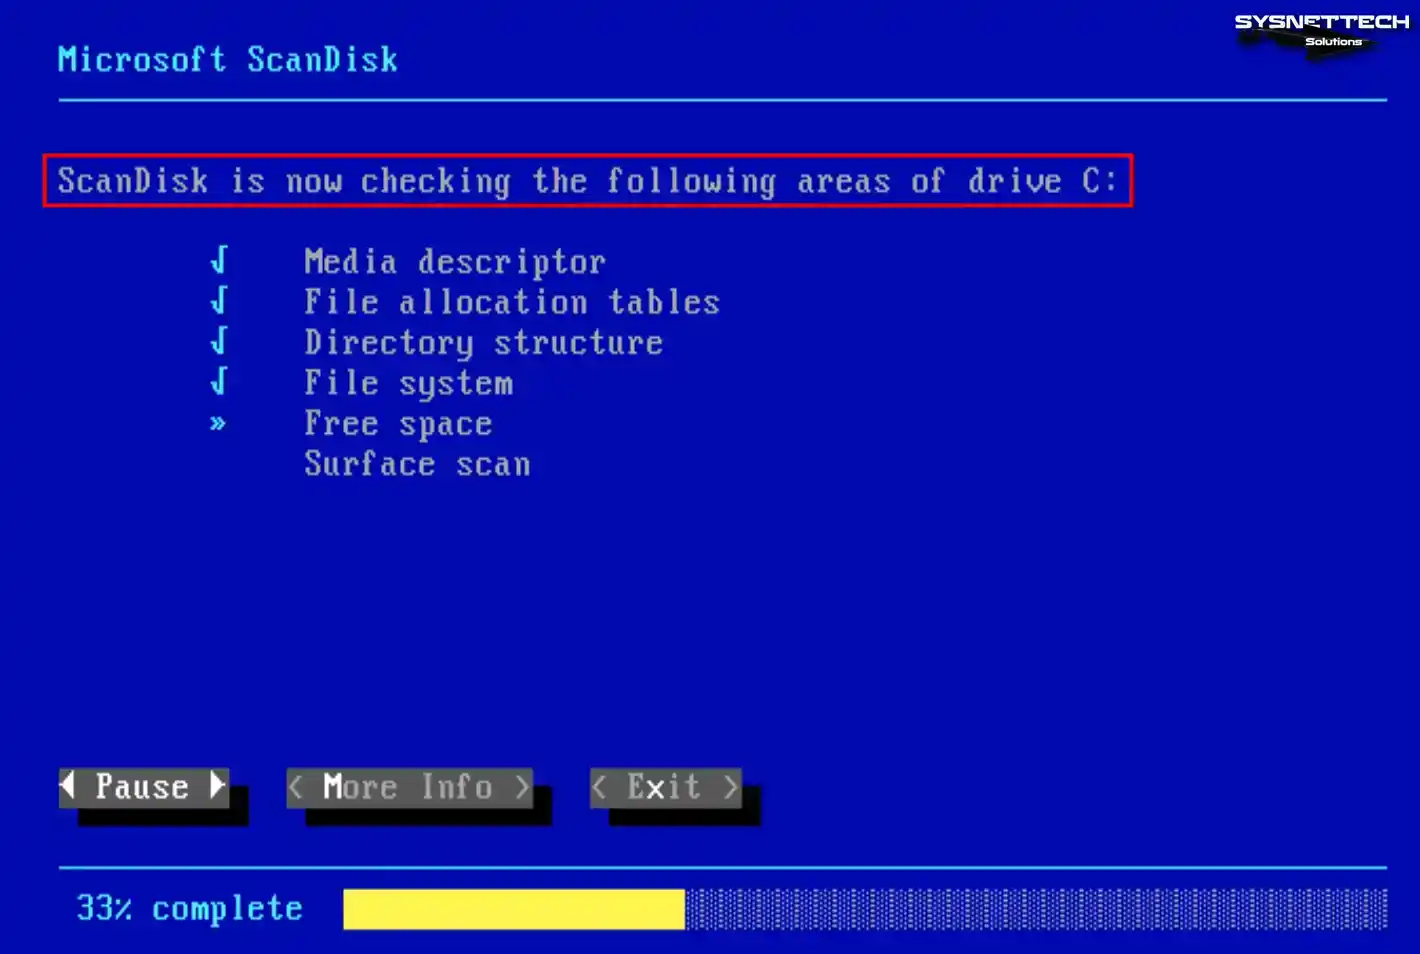
When Microsoft ScanDisk is opened, media, file, and directory structures will be checked on the C drive, and disk space will be checked.
Step 10
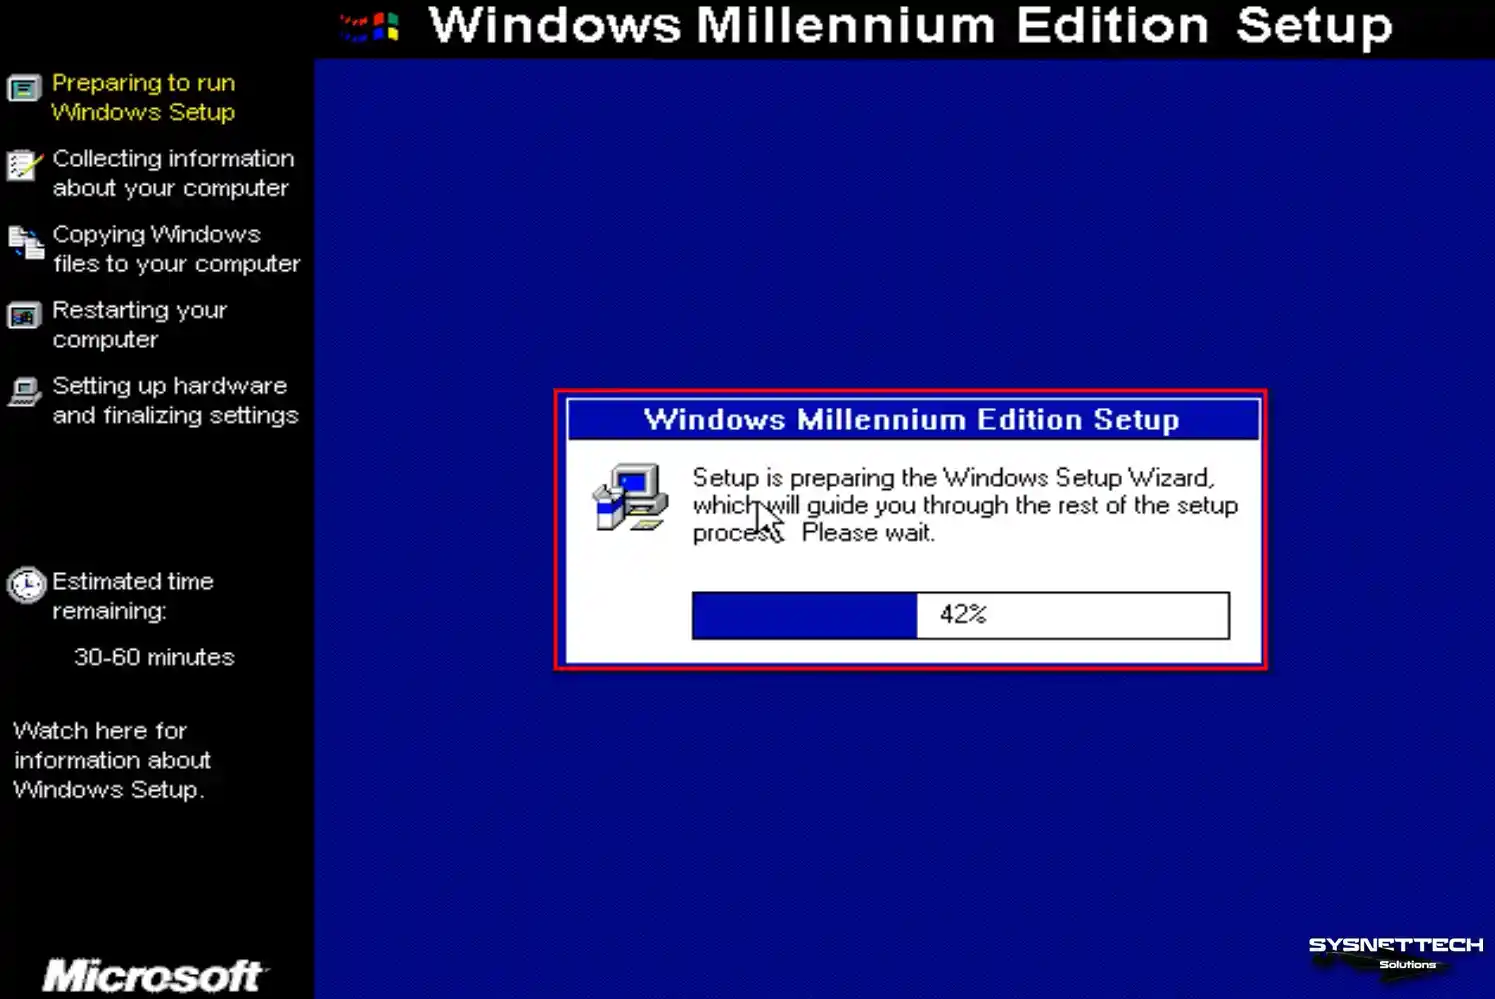
Once your virtual machine has restarted, Setup will prepare the Windows setup wizard.
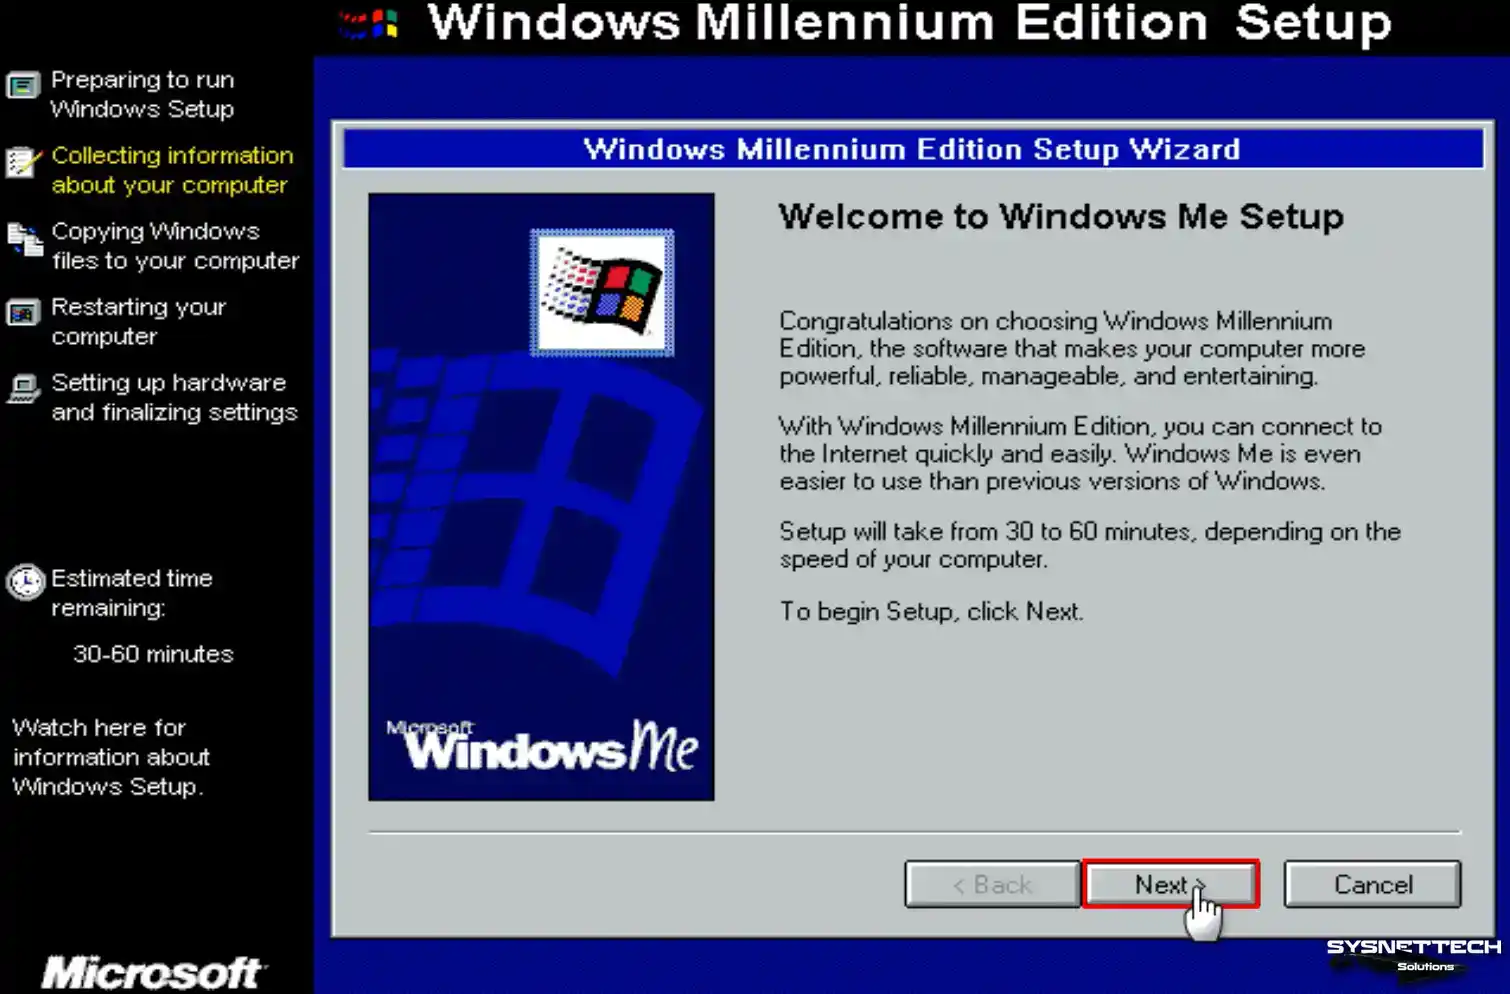
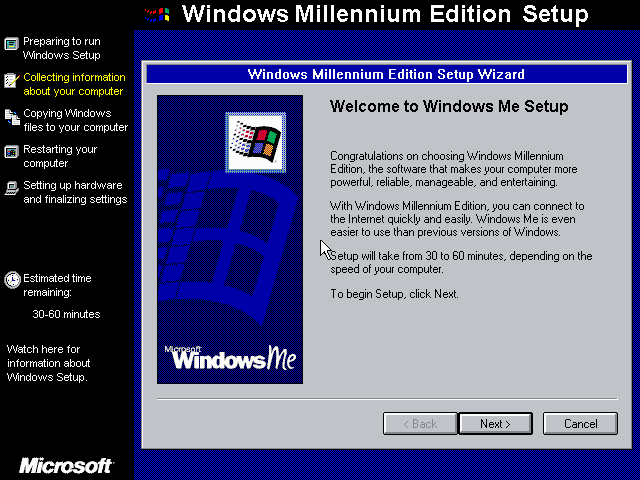
Step 11
The Windows Millennium Edition setup wizard reports that the installation will be completed in 30 to 60 minutes. Continue by clicking Next to start the installation process.
Step 12
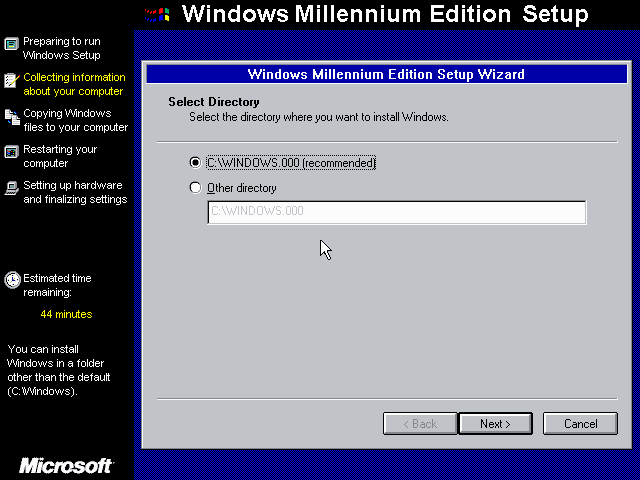
Installing Windows from the default directory can cause system problems. Therefore, choose C:\WINDOWS as the installation directory and click Next.

Step 13
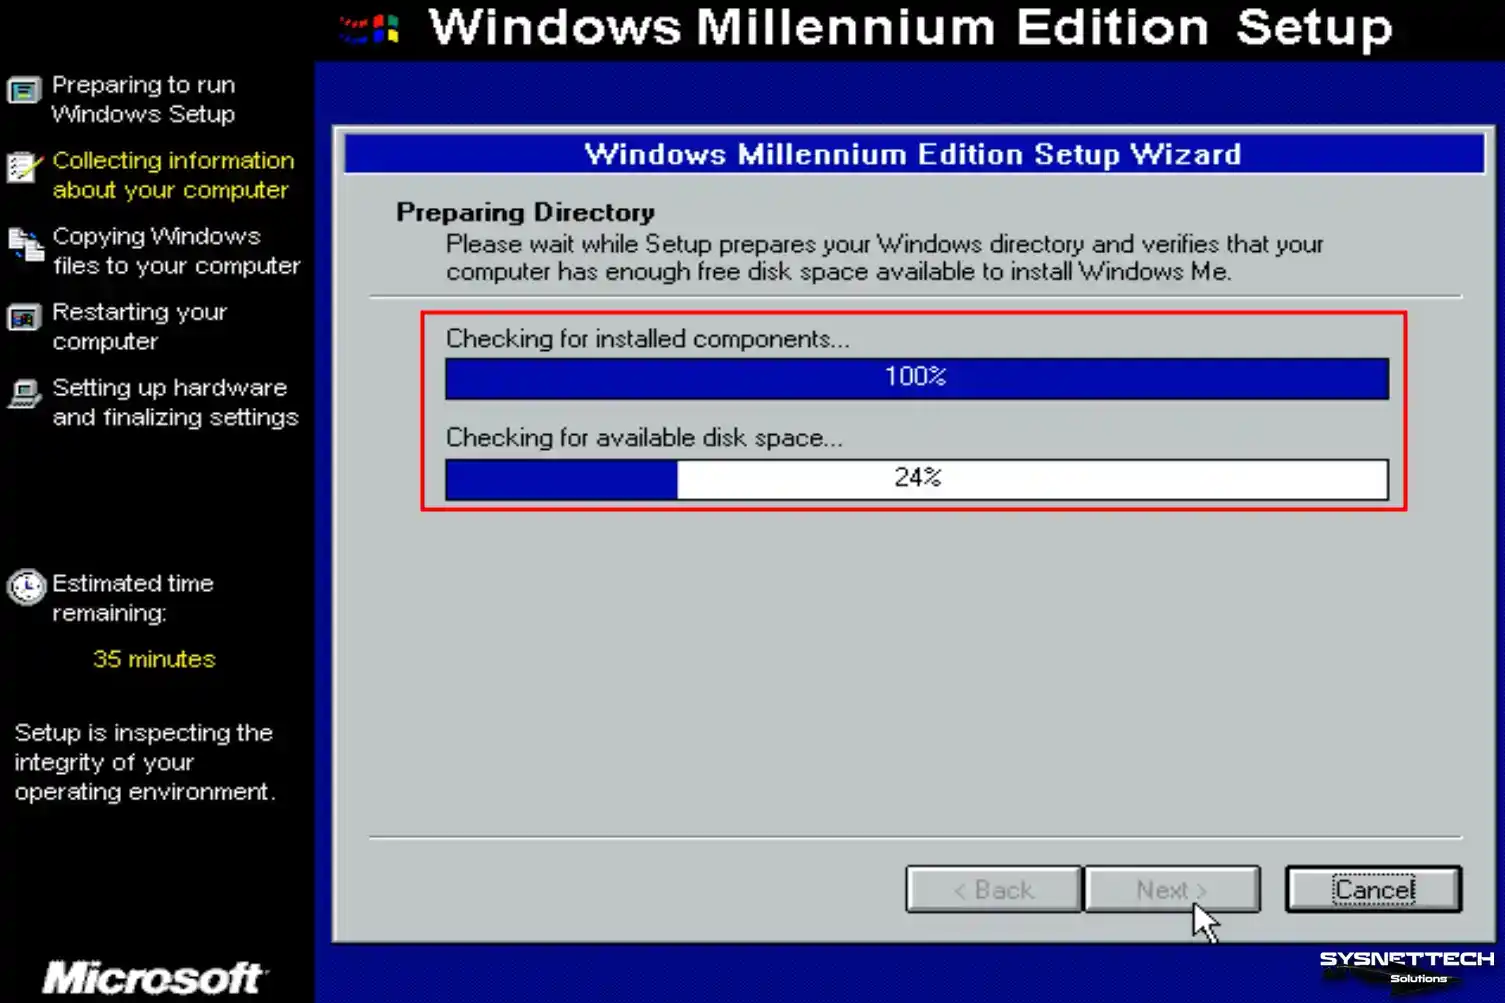
Wait while the setup wizard prepares the Windows directory and checks the disk space.
Step 14
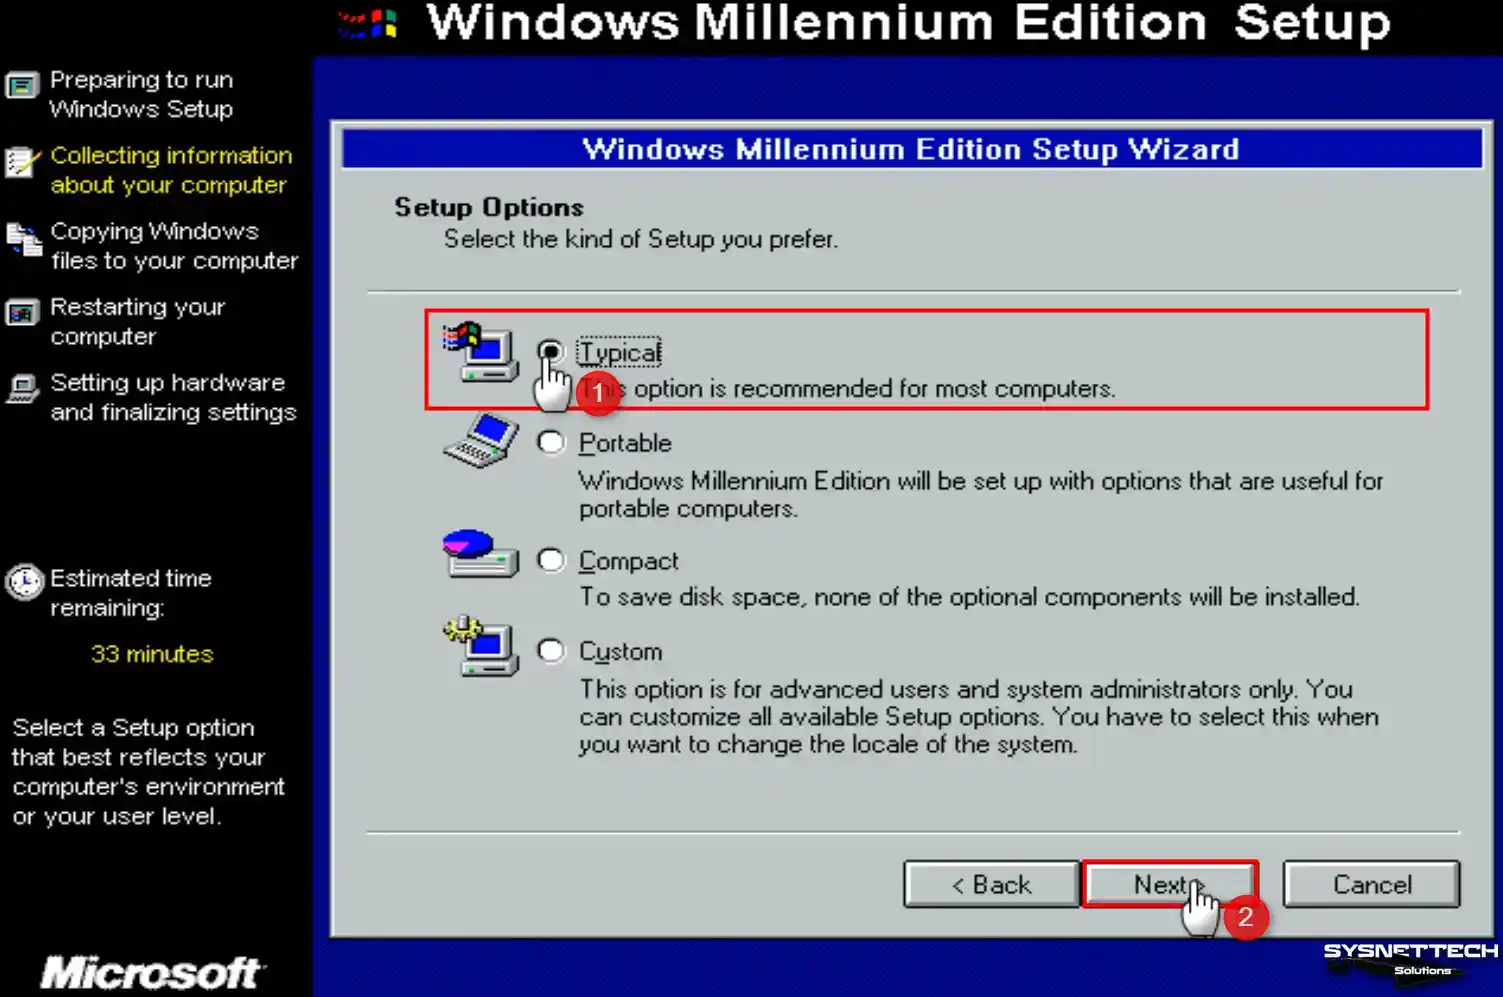
It would be helpful if you selected the default option, “Typical,” when choosing your installation type in this step.
Step 15
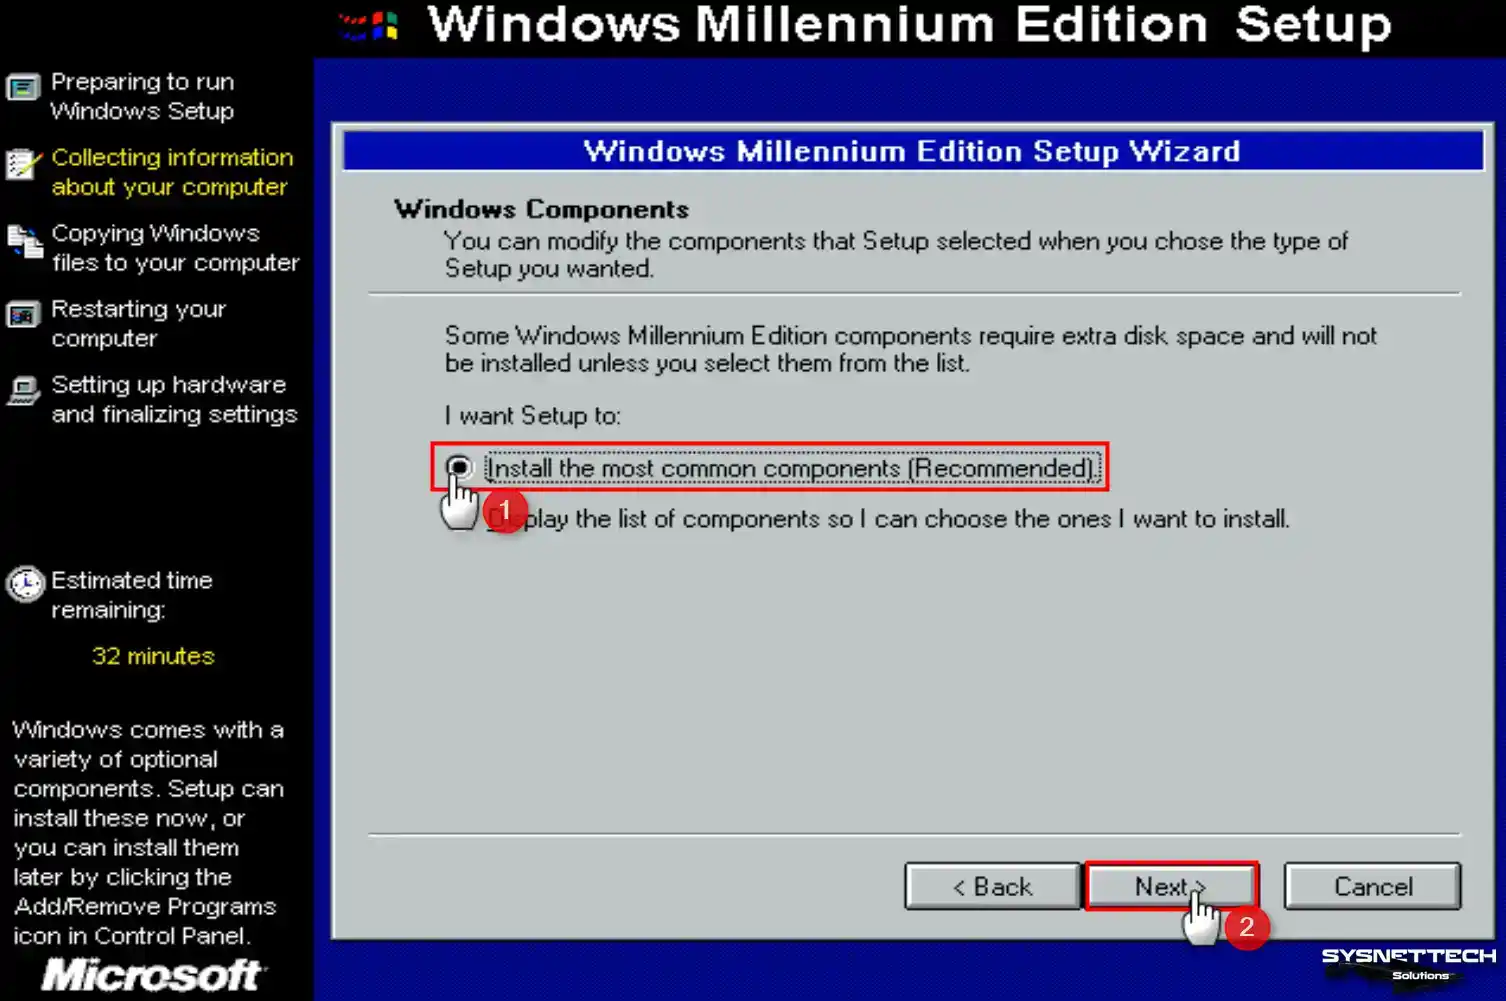
In the Windows Components window, choose to install the most commonly used components and continue.
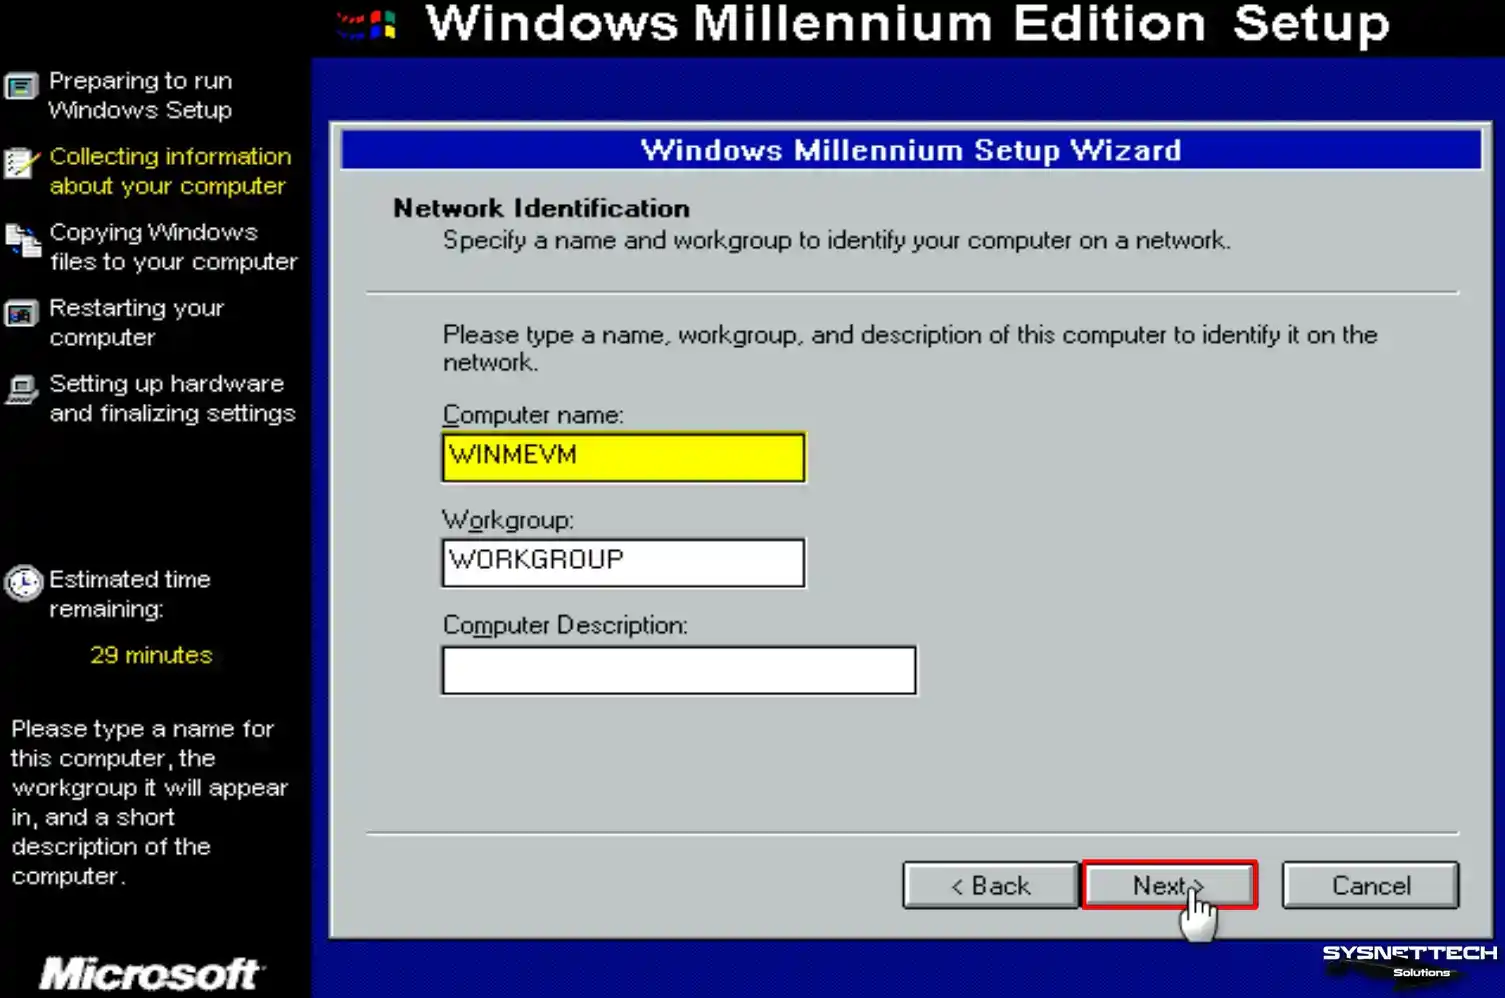
Step 16
To identify your computer on a network, type a different computer name from your other existing computers and click Next.
Step 17
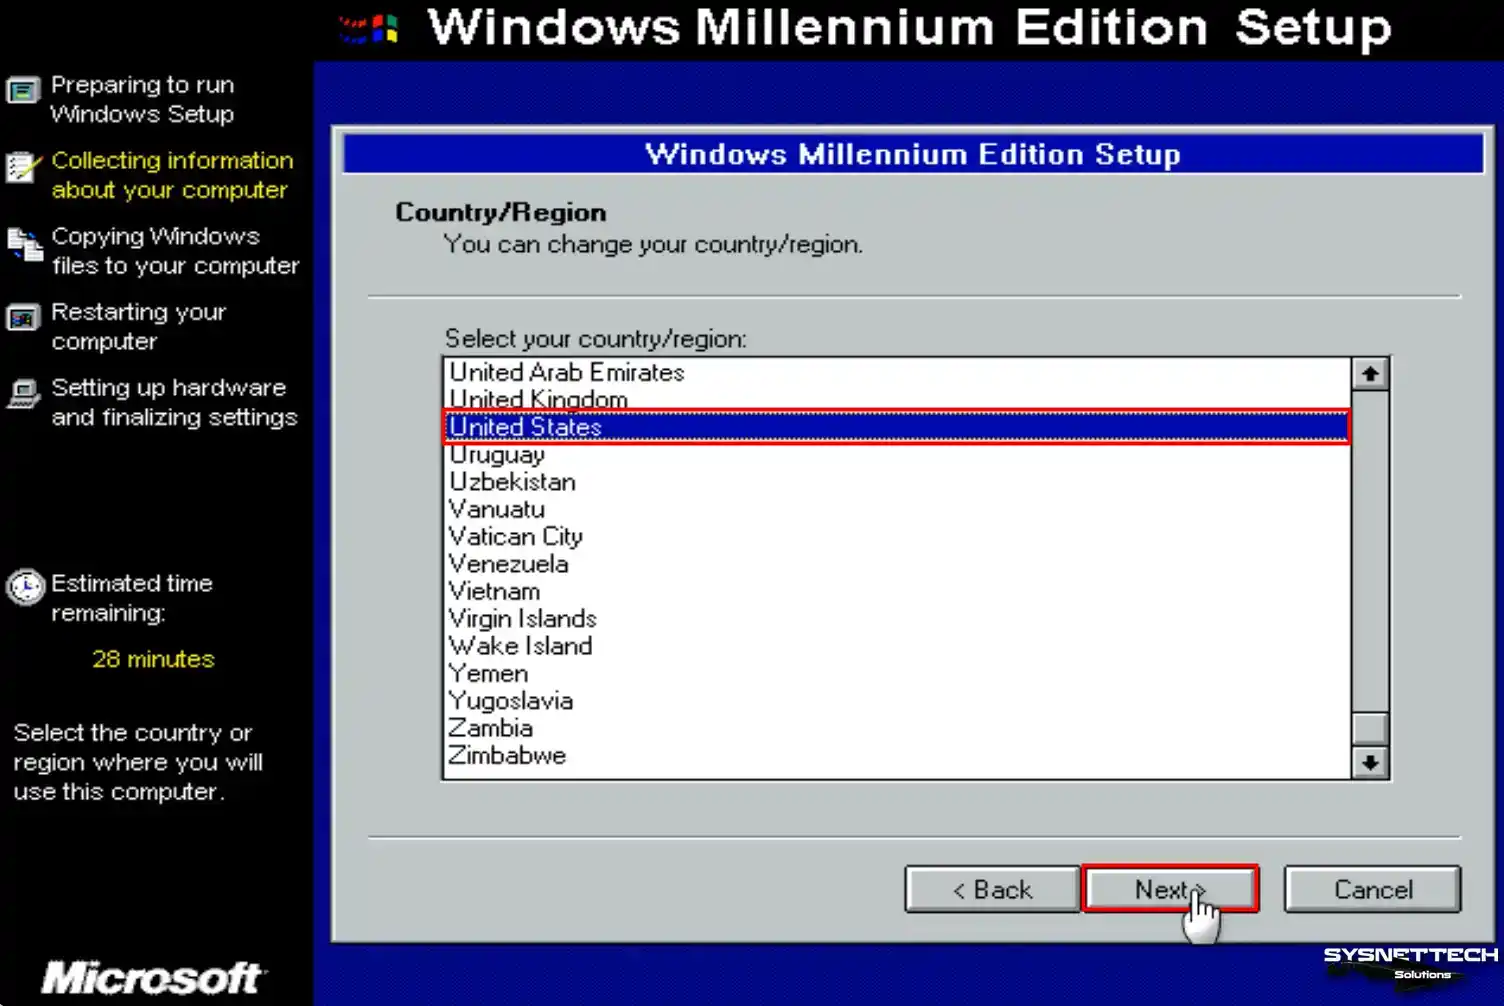
In the Country/Region window, select your country and click Next.
Step 18
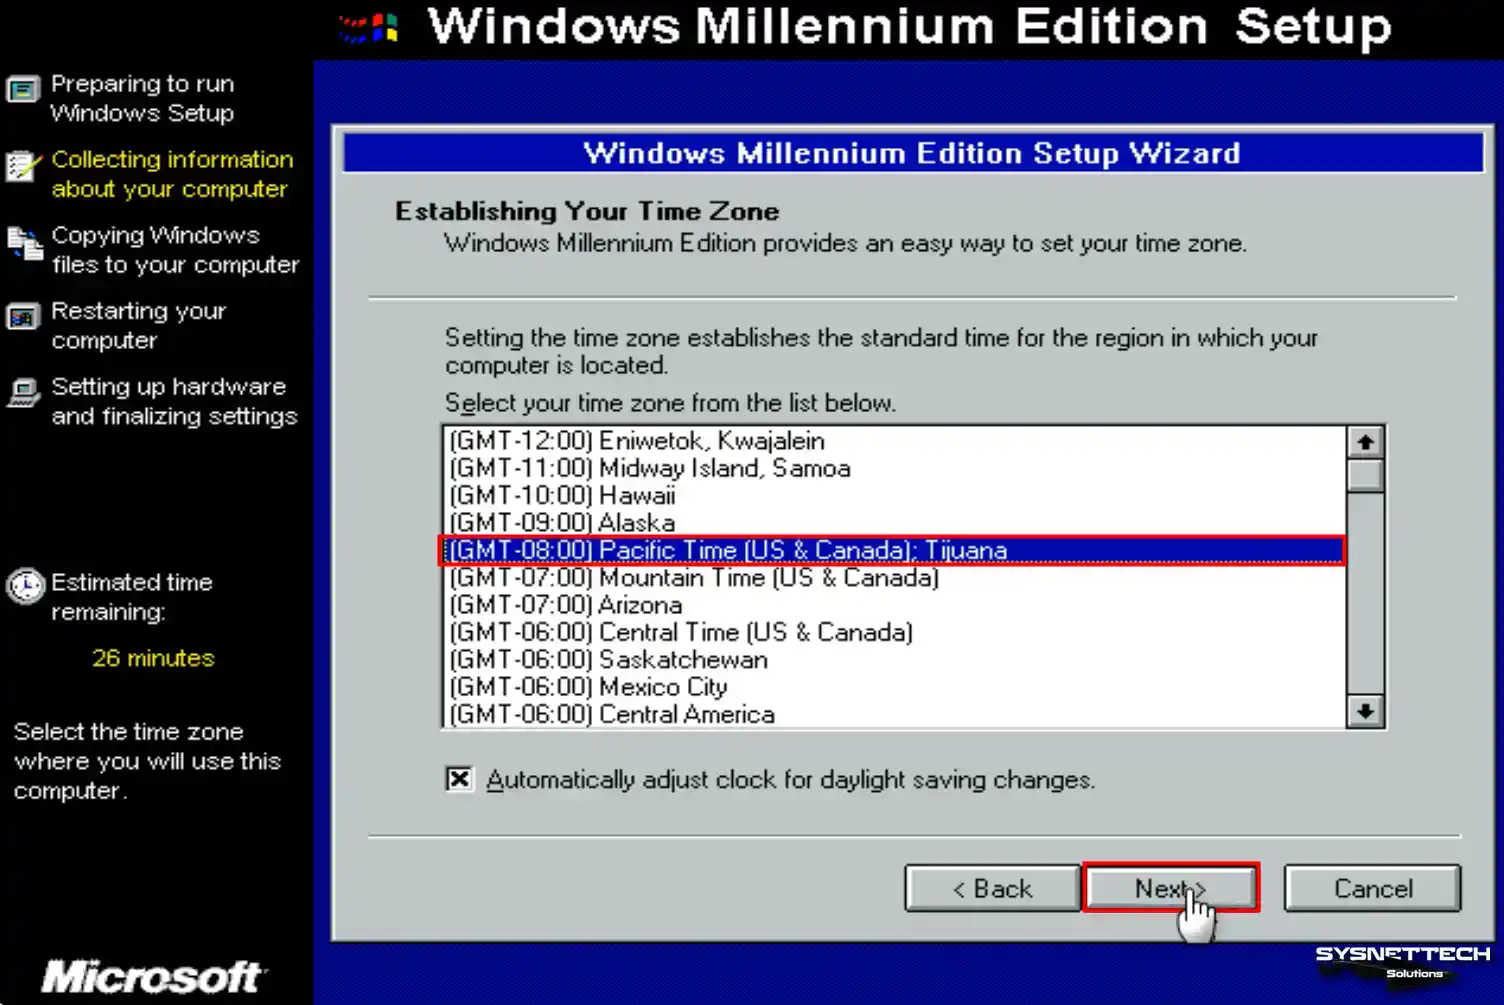
Configure the time zone of your virtual system according to the homeland you live in and click Next.
Step 19
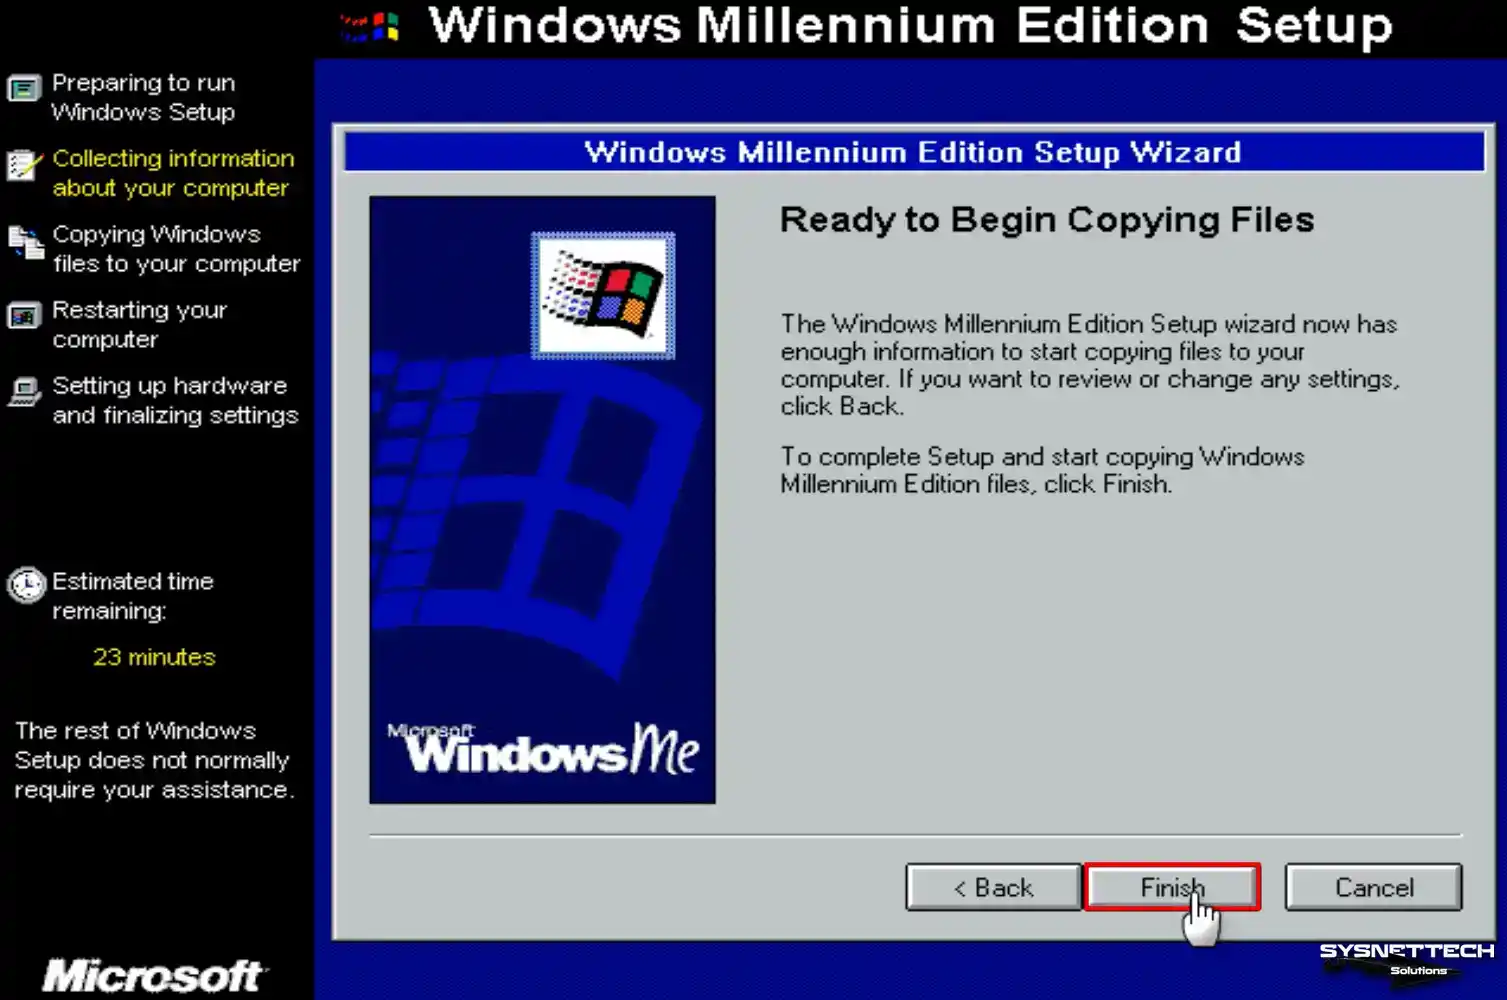
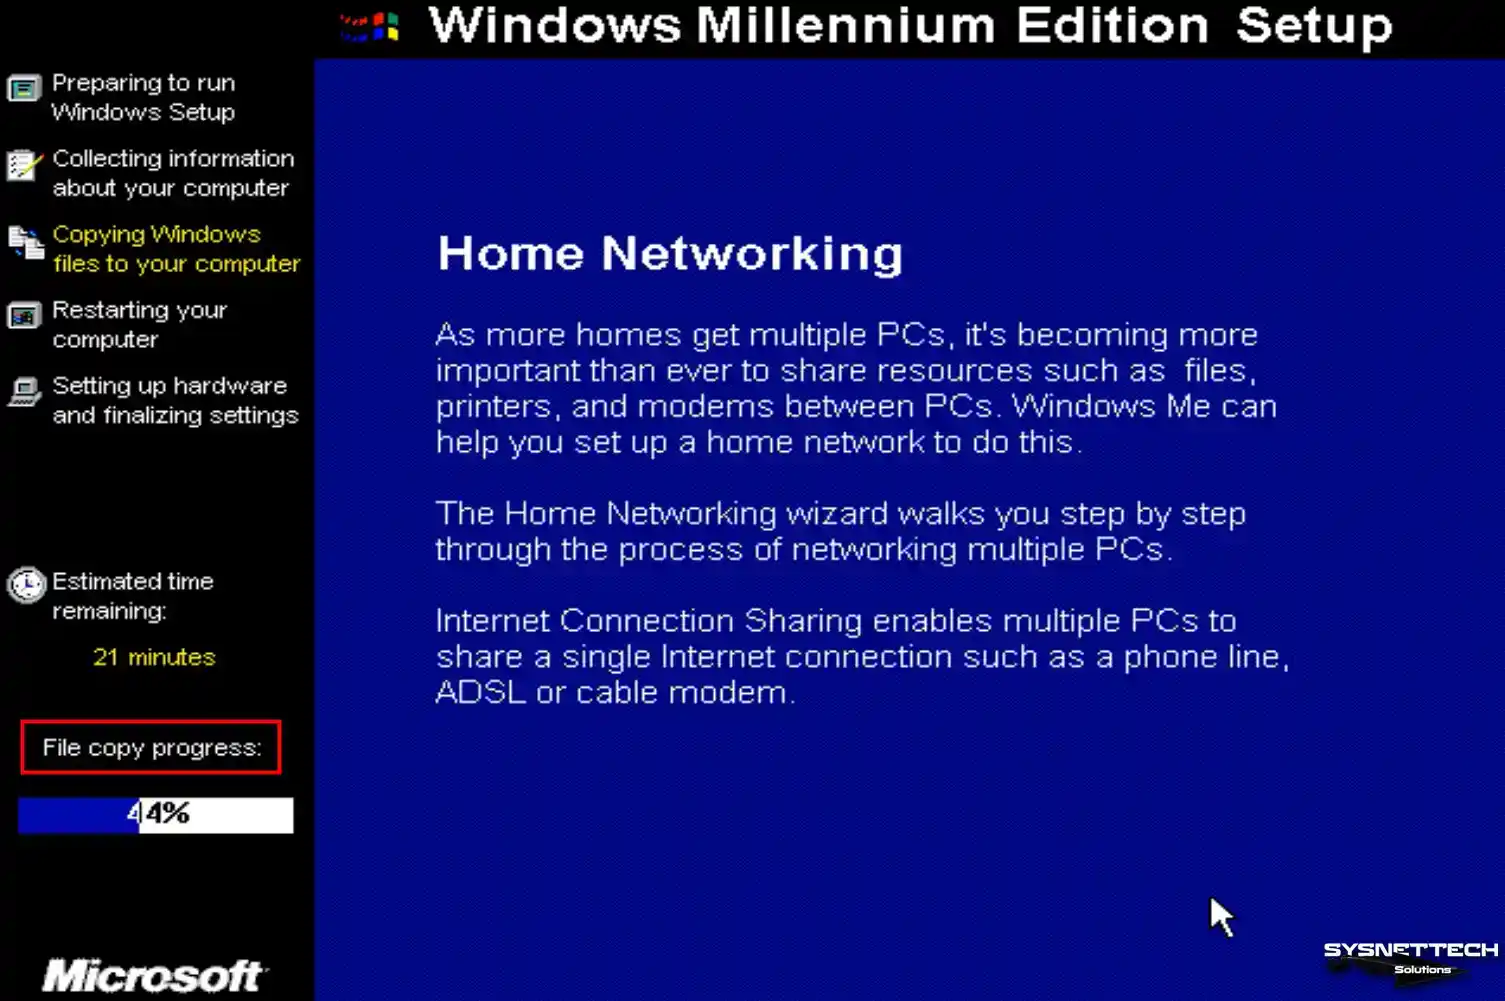
If you need to modify a setting, click the Back button and revisit the appropriate stage to make the necessary changes. When the setup wizard is ready to copy the Windows files, click Finish and continue.
Step 20
Wait while the system files are copied to your virtual disk.
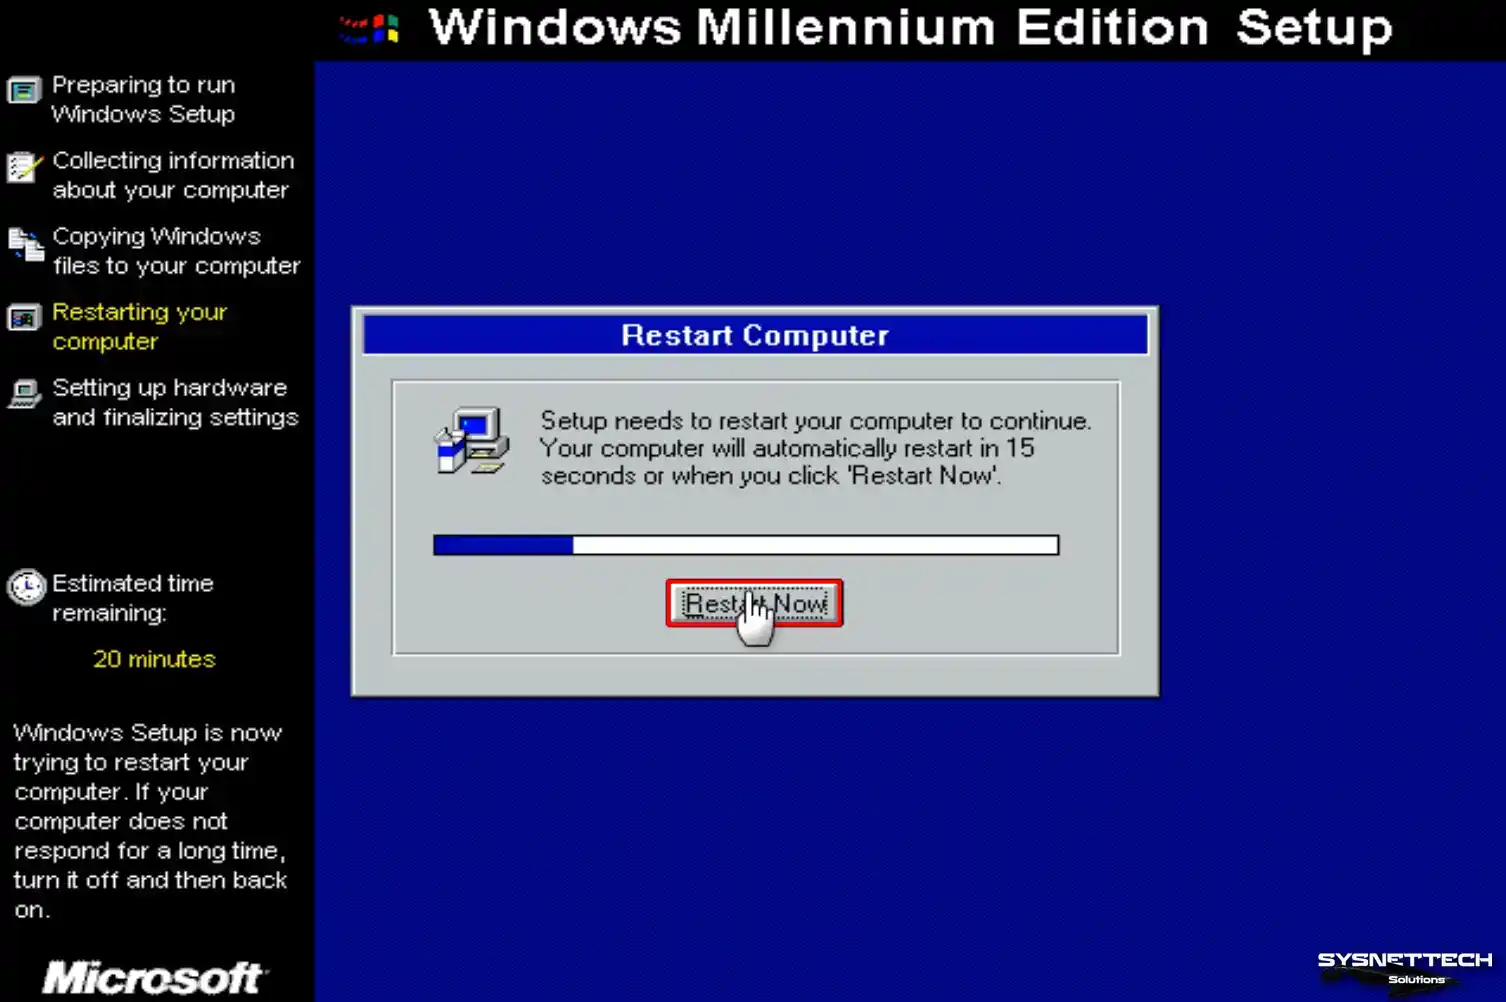
Step 21
Your virtual system will automatically reboot in 15 seconds.
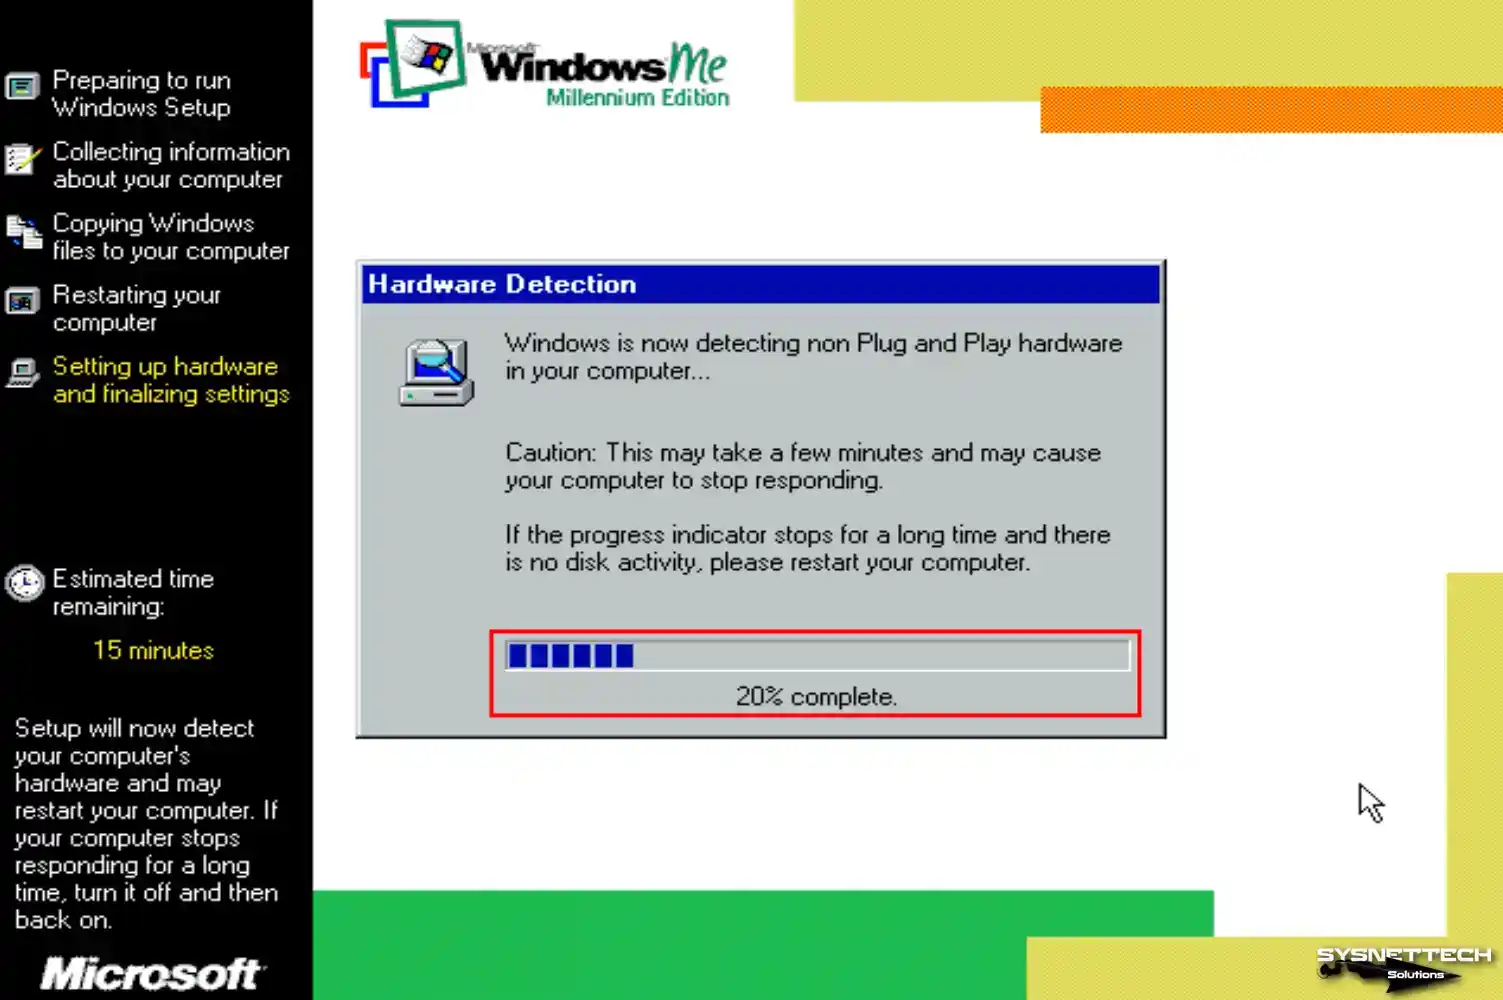
Step 22
Windows will identify plug-and-play devices on your guest machine. If the hardware scan takes longer than anticipated, we suggest restarting your virtual machine and giving the scan another try.
Step 23
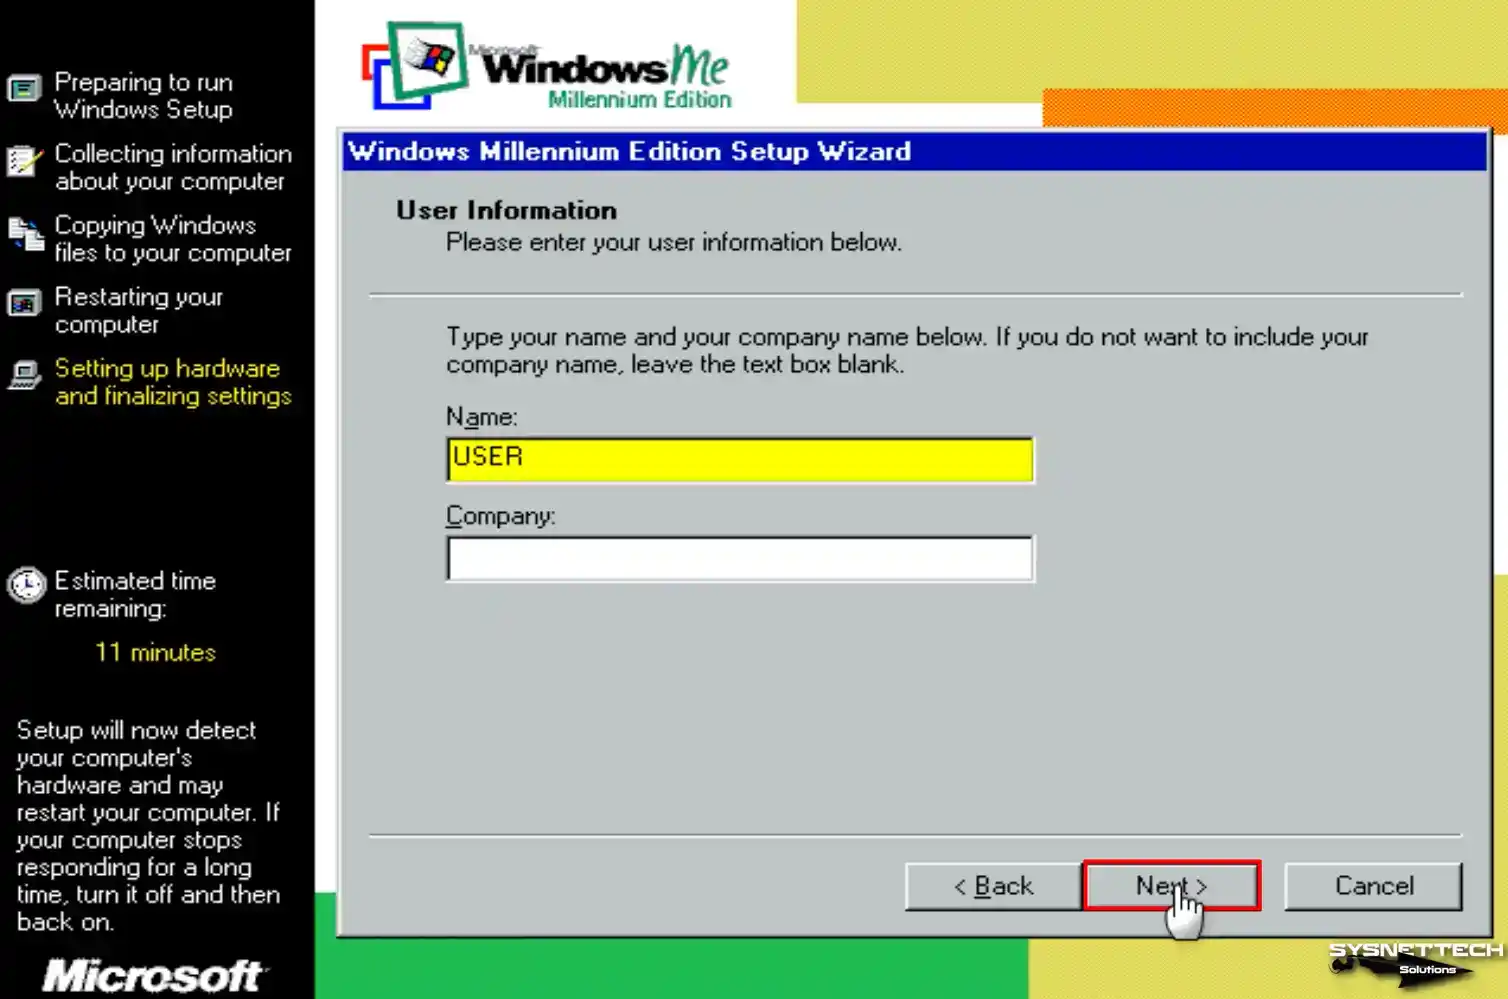
Type the username of the user account for your Windows Millennium system and click Next.
Step 24
Accept the license agreement of the Windows ME operating system and click Next.
Step 25
Type your Windows ME product key and continue.
Step 26
After typing the product key of your virtual system, click Finish to start Windows ME.
Step 27
When your guest machine restarts, wait while your configuration files are updated.
Step 28
When your virtual machine restarts, system settings such as the control panel, shortcuts in the start menu, and Windows help will be updated.
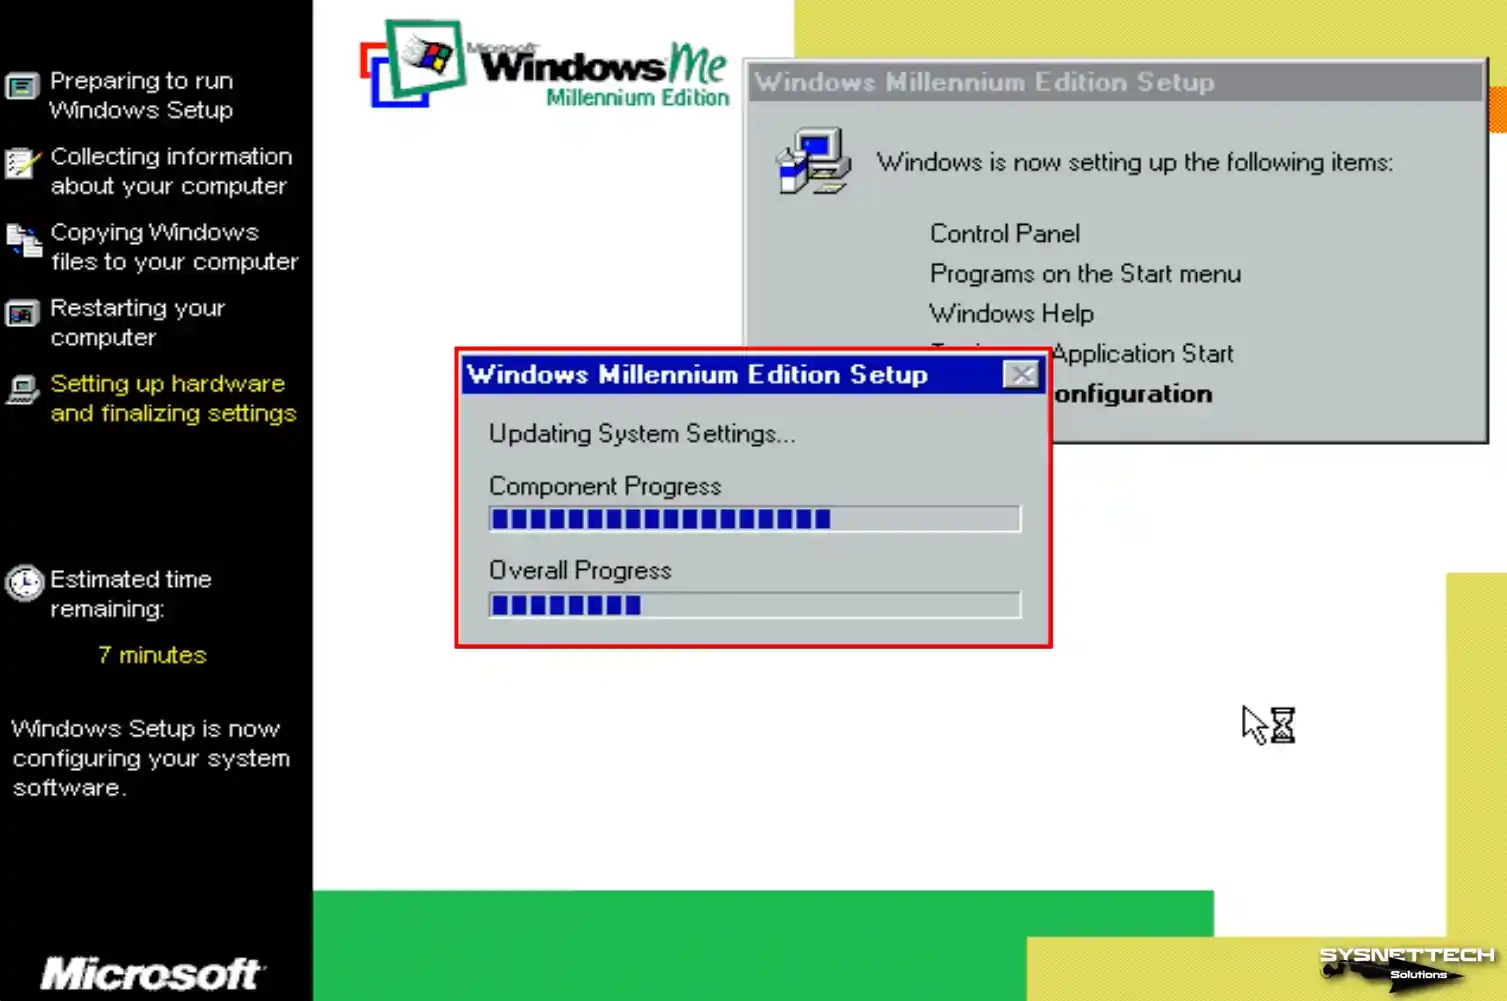
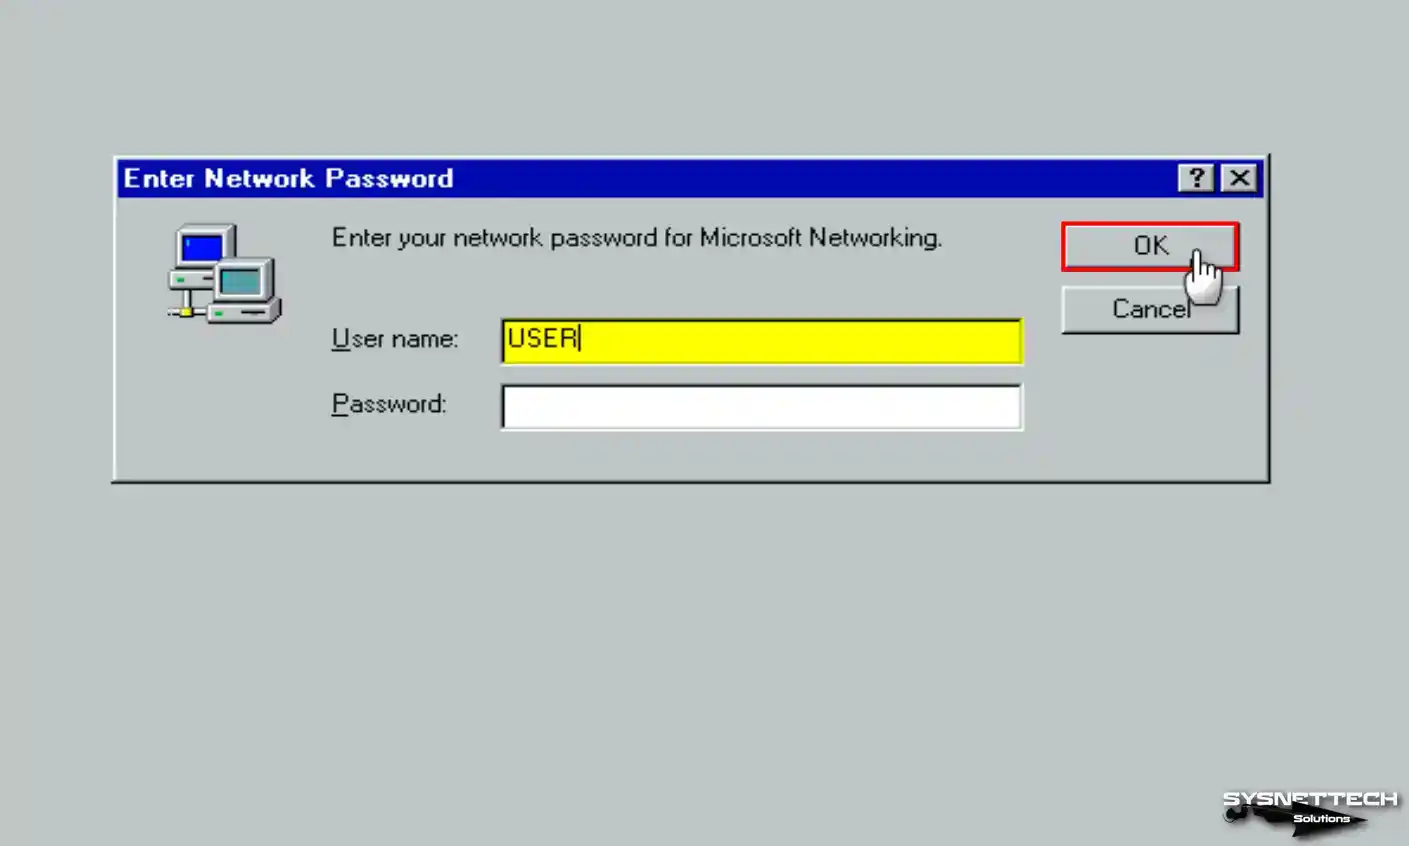
Step 29
After configuring the system settings, type your username and click OK to continue.
Step 30
Wait while your system settings are updated for the last time.

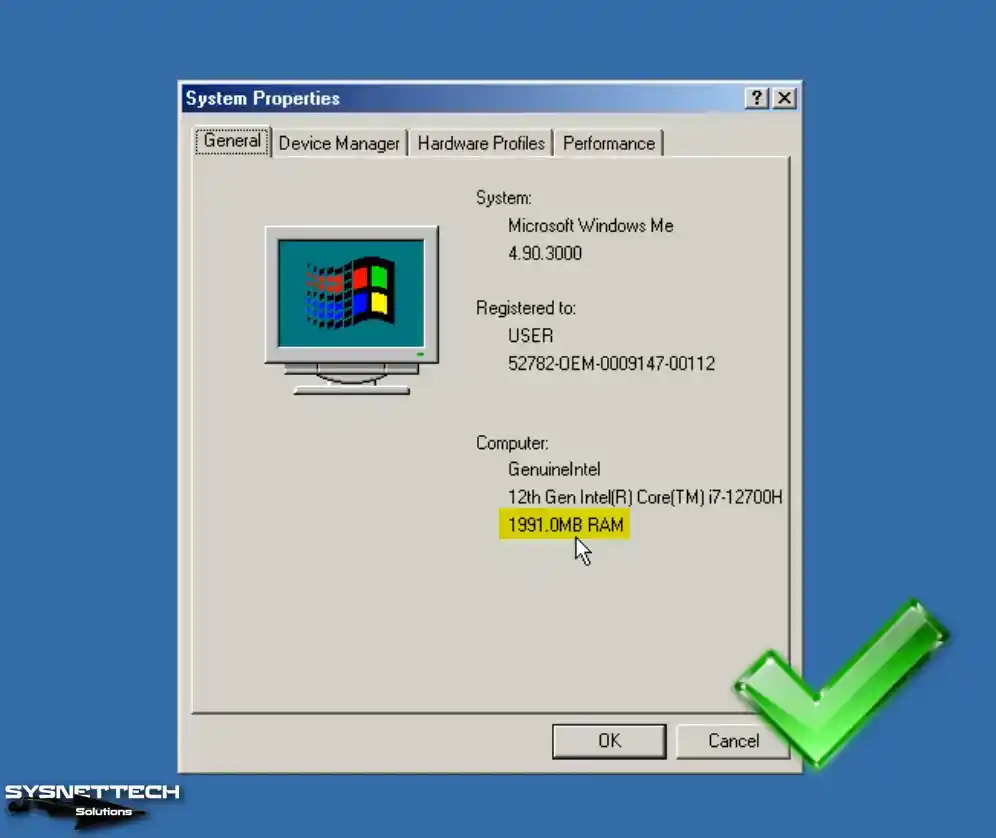
Step 31
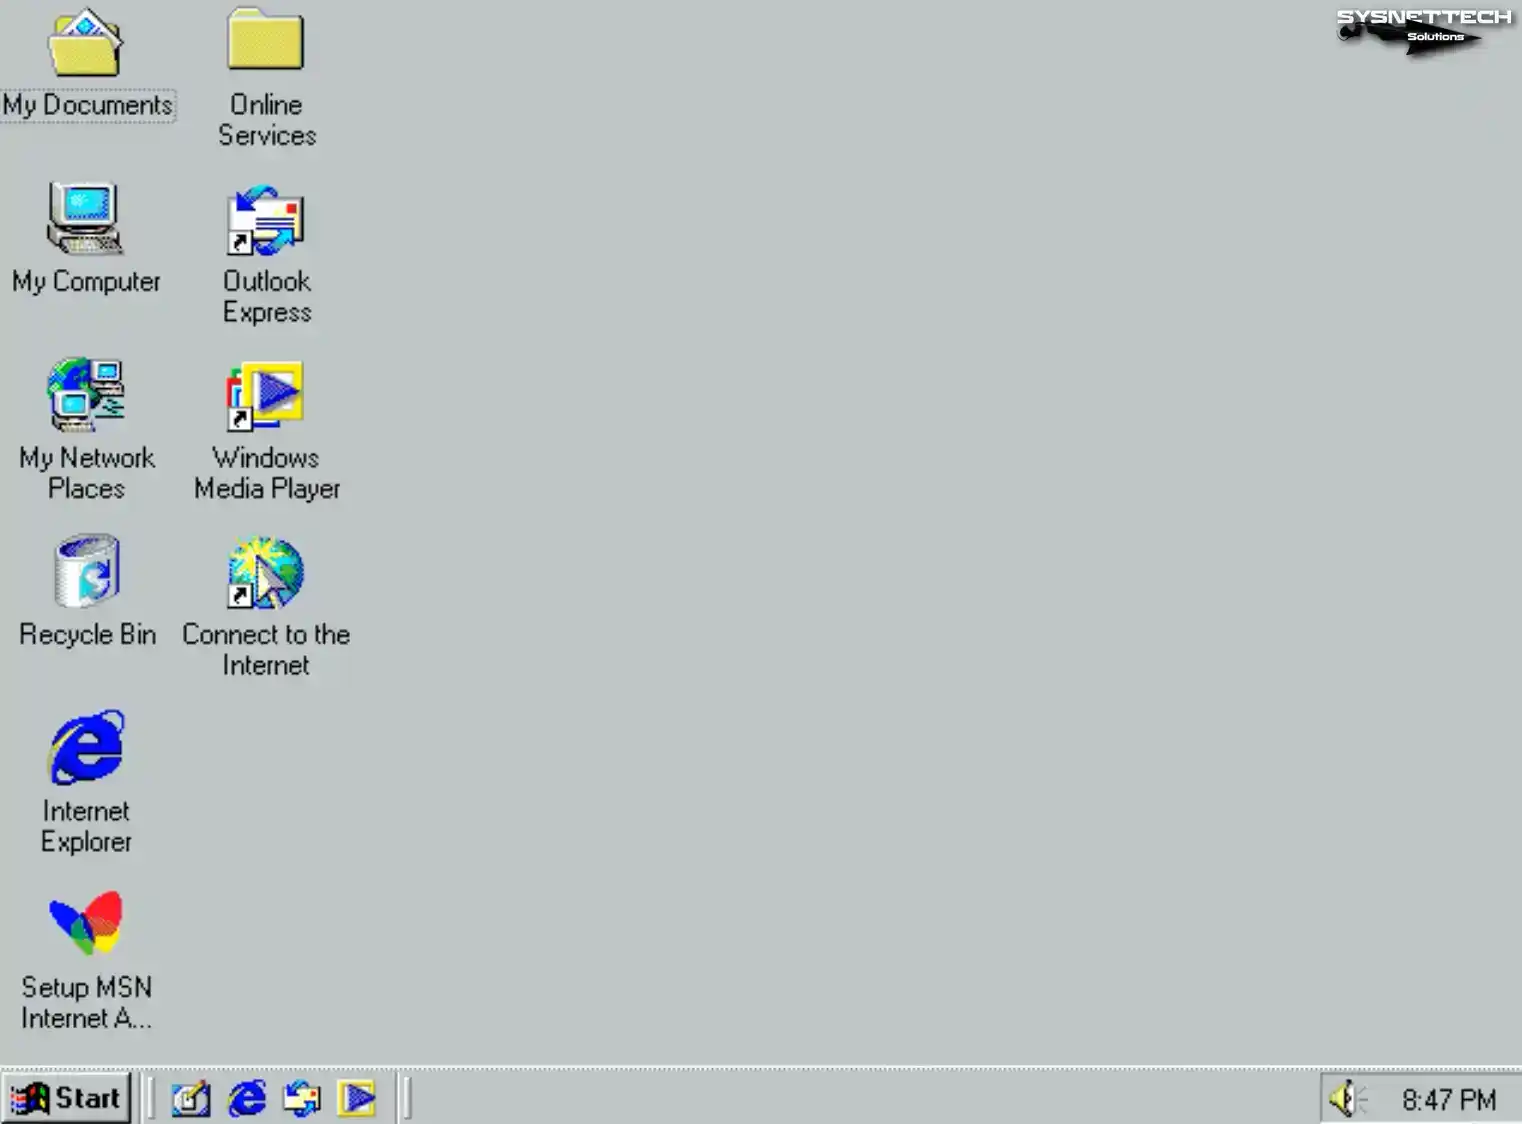
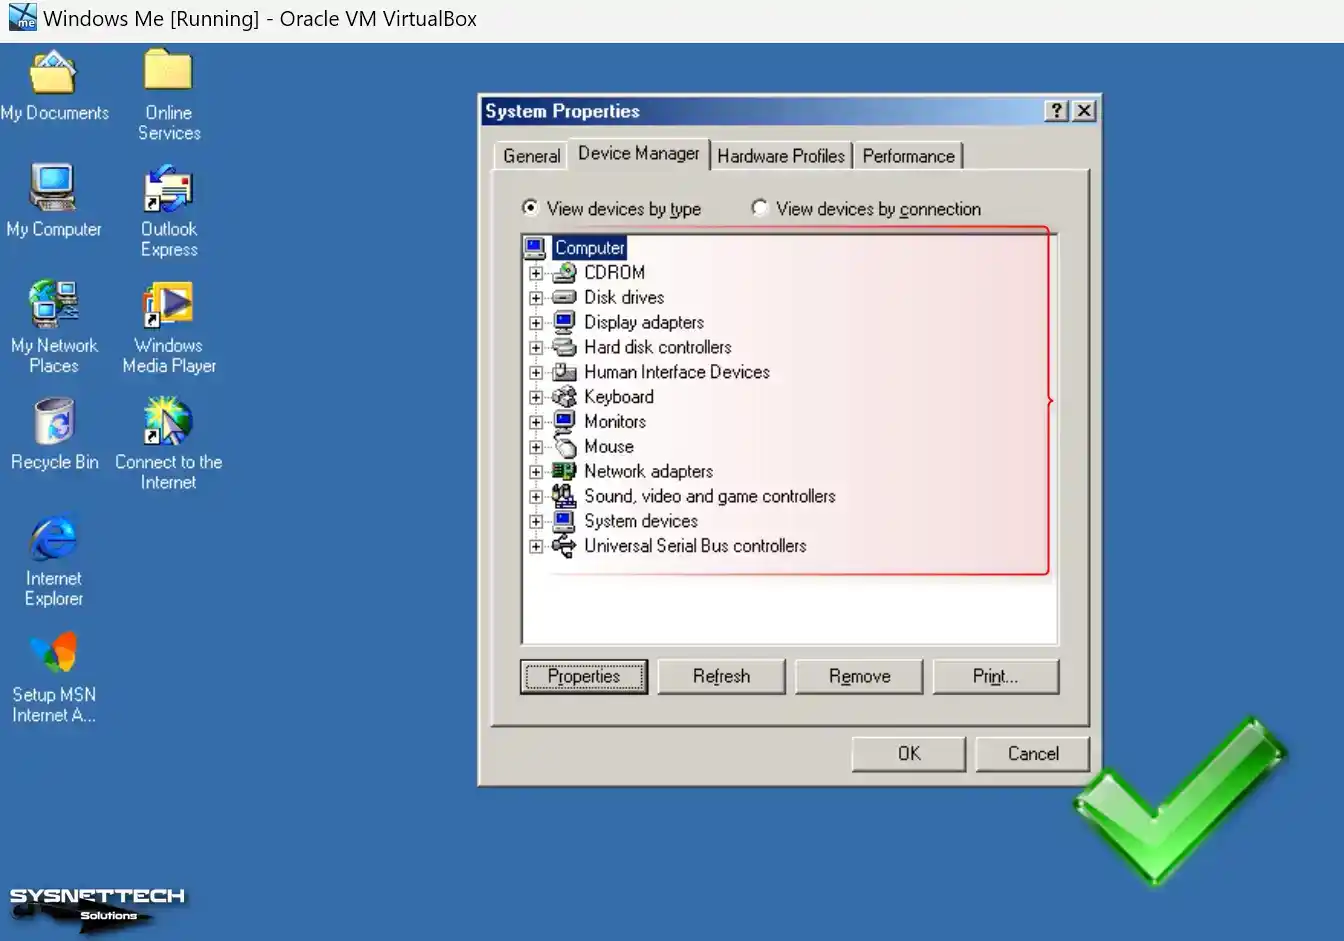
After installing Windows ME with VirtualBox, the desktop view will be as in the image below. Furthermore, to obtain system information, you can right-click on My Computer and proceed to click on Properties.
How to Install Graphics Drivers and Change Screen Resolution
The Oracle VM VirtualBox virtualization program does not support Guest Additions for 9x versions of Windows. Therefore, you may get less efficiency from virtual machines. Moreover, you can adjust the screen resolution and color mode by utilizing third-party software.
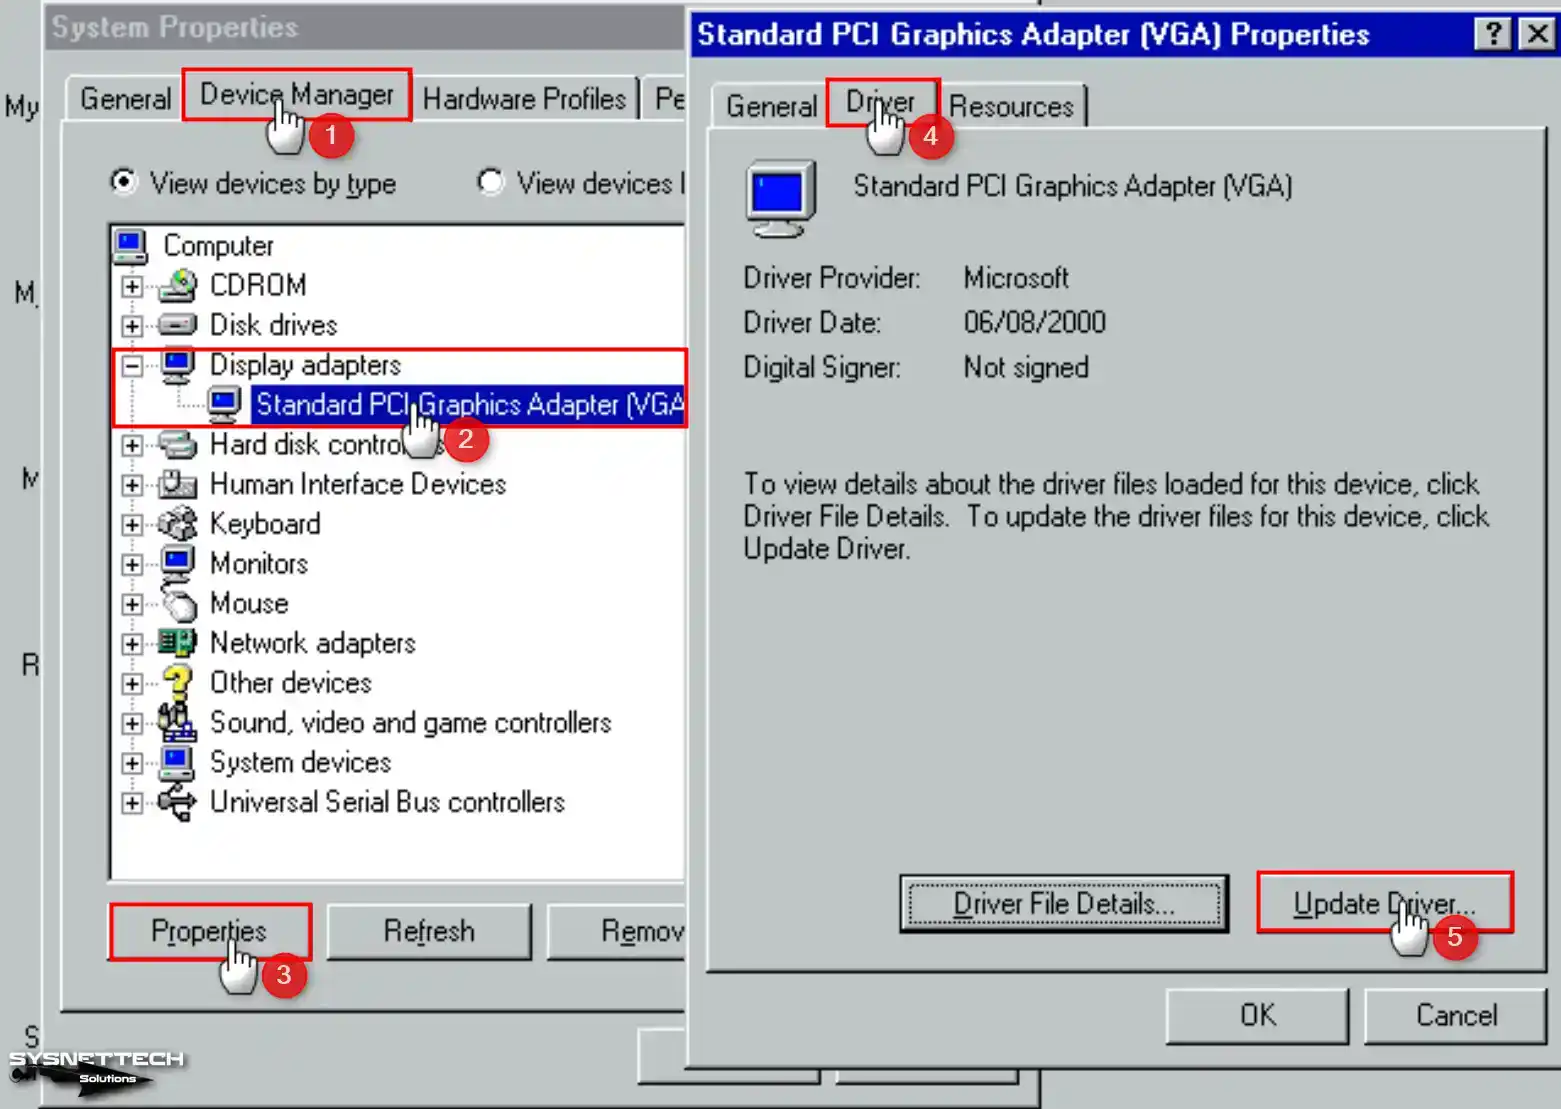
Step 1
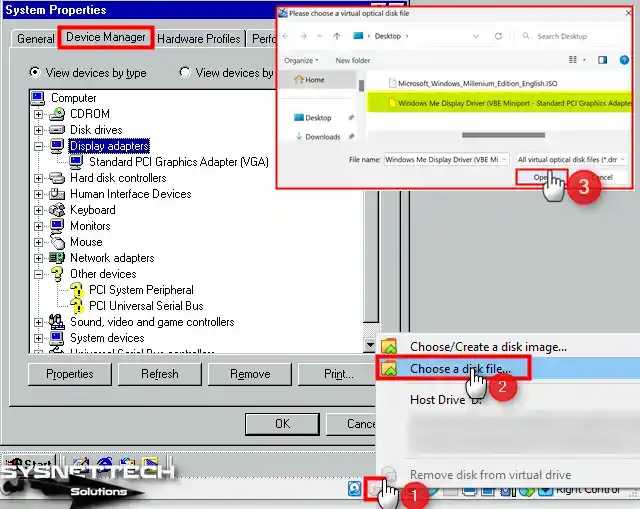
First, open Device Manager after clicking My Computer / System Properties, and check the drivers that are not installed. If Guest Additions could be installed, drivers for all devices in the device manager would be installed automatically.
You can use SciTech Display Doctor software or install the Display Adapter driver to change the screen resolution in Windows 95, 98, and ME versions.
Download the VBE Miniport display adapter driver from the area at the bottom of the article to your host computer, right-click on the CD/DVD icon to add the ISO file to the guest machine, and click Choose a disk file.
Step 2
Double-click the Standard PCI Graphics Adapter in Device Manager and click the Update Driver button.
Step 3
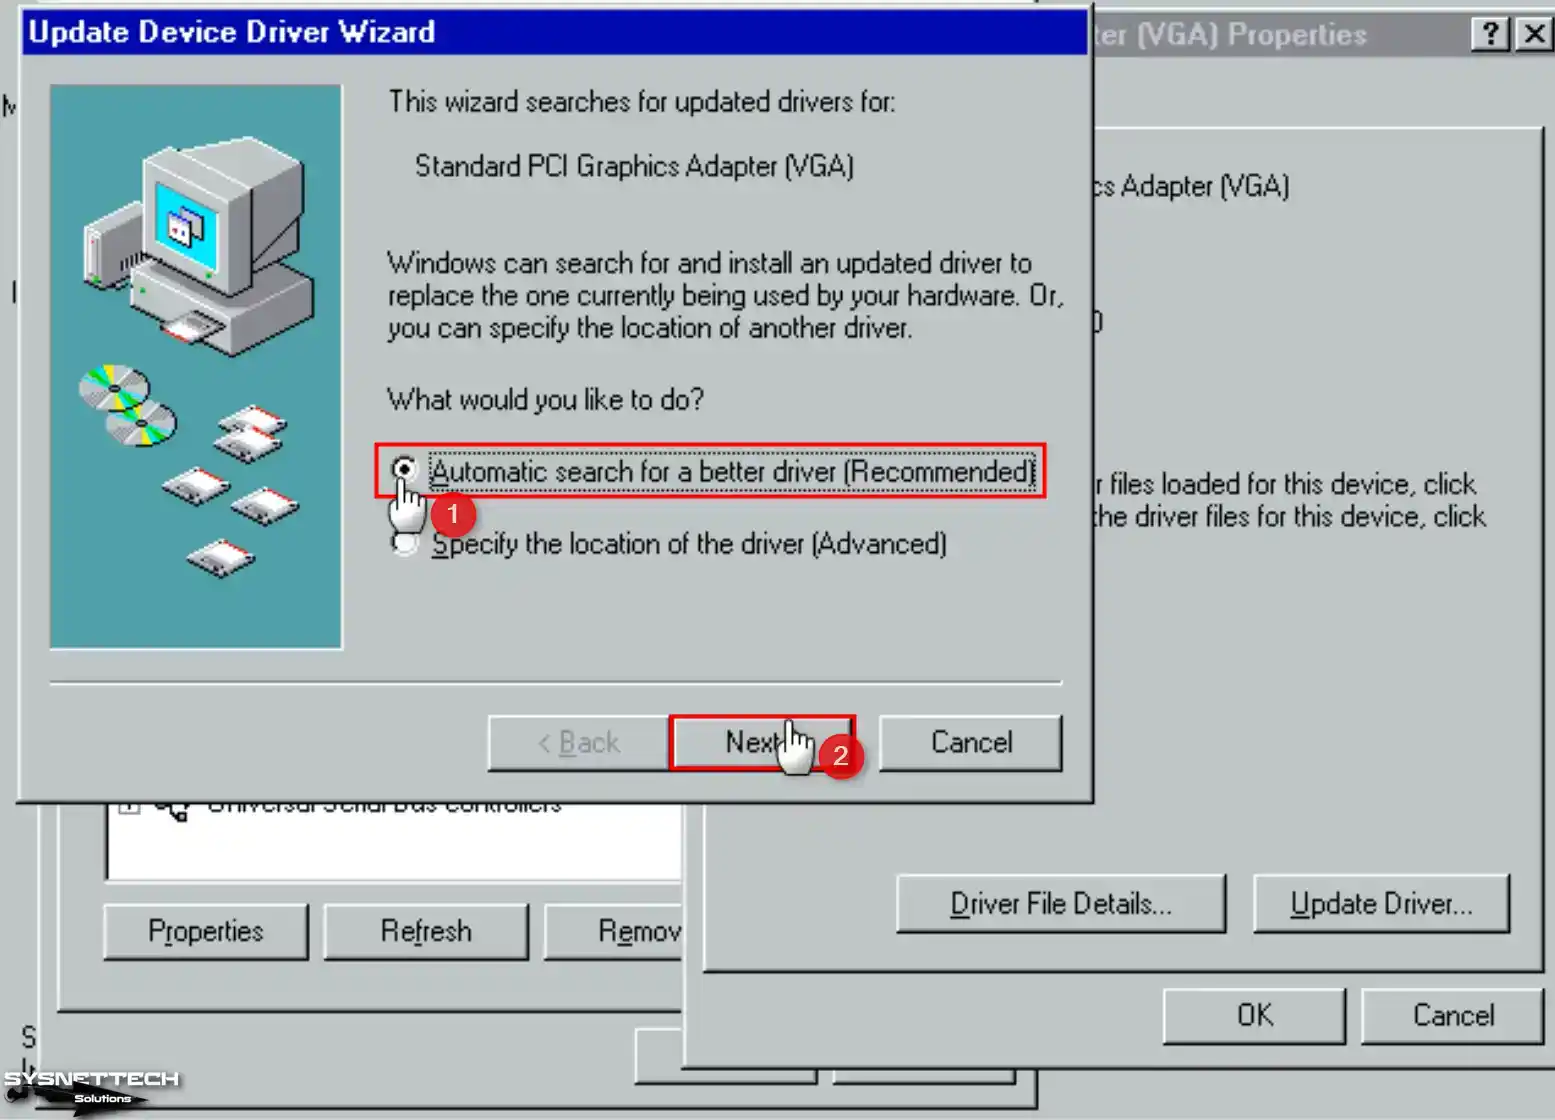
To install the relevant driver from the ISO file content that you added to the optical drive, click Next. In contrast, the auto-install driver option is selected.
Step 4
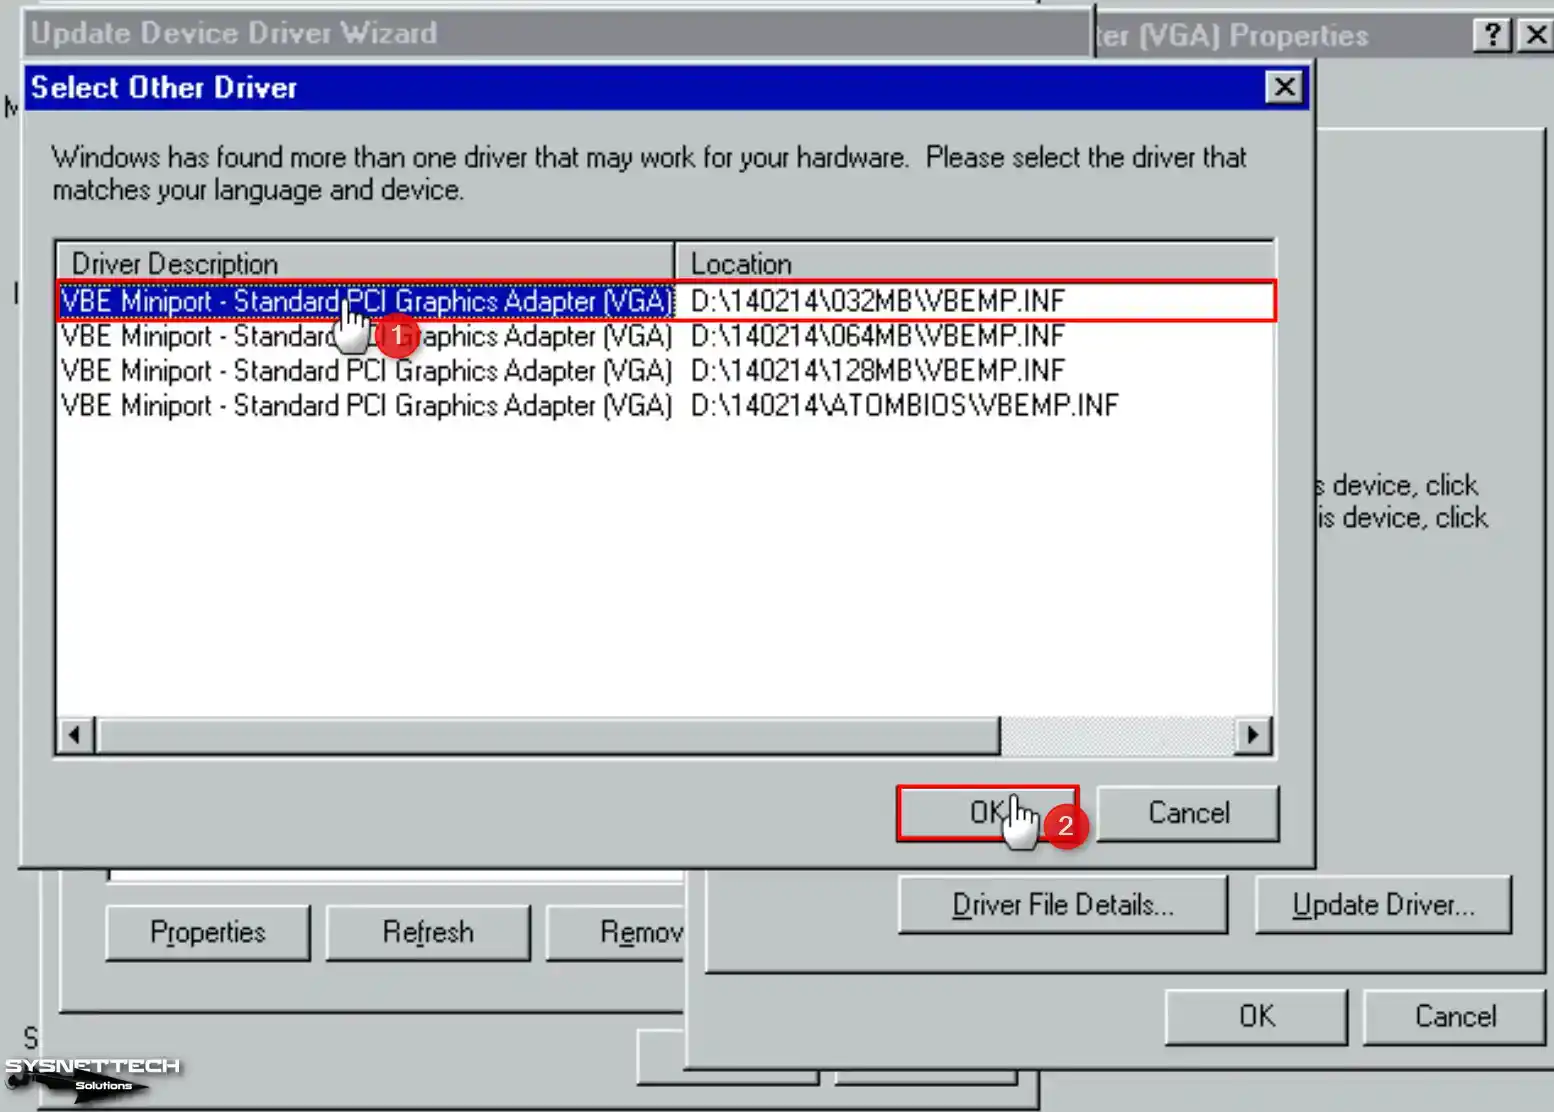
When Driver options are listed, select the “VBE Miniport – Standard PCI Graphics Adapter (VGA) / 032MB\VBEMP.INF” and click OK.
Step 5
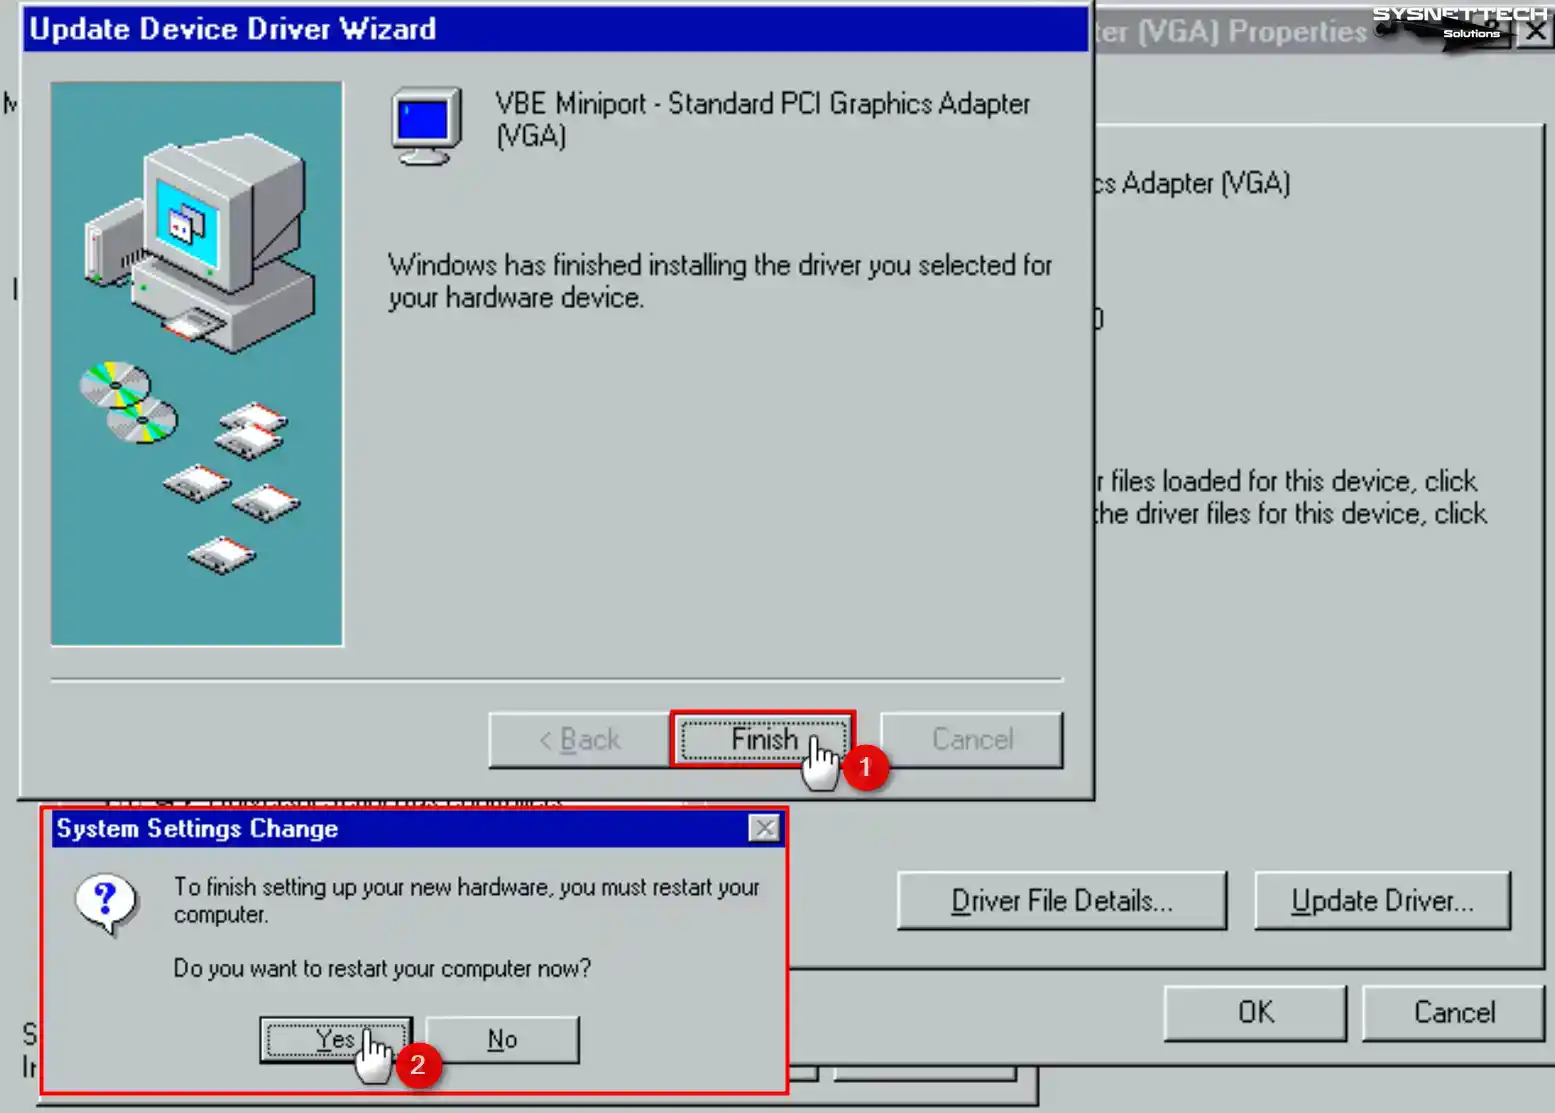
After installing the driver for the graphics adapter of the monitor device, restart your virtual computer.
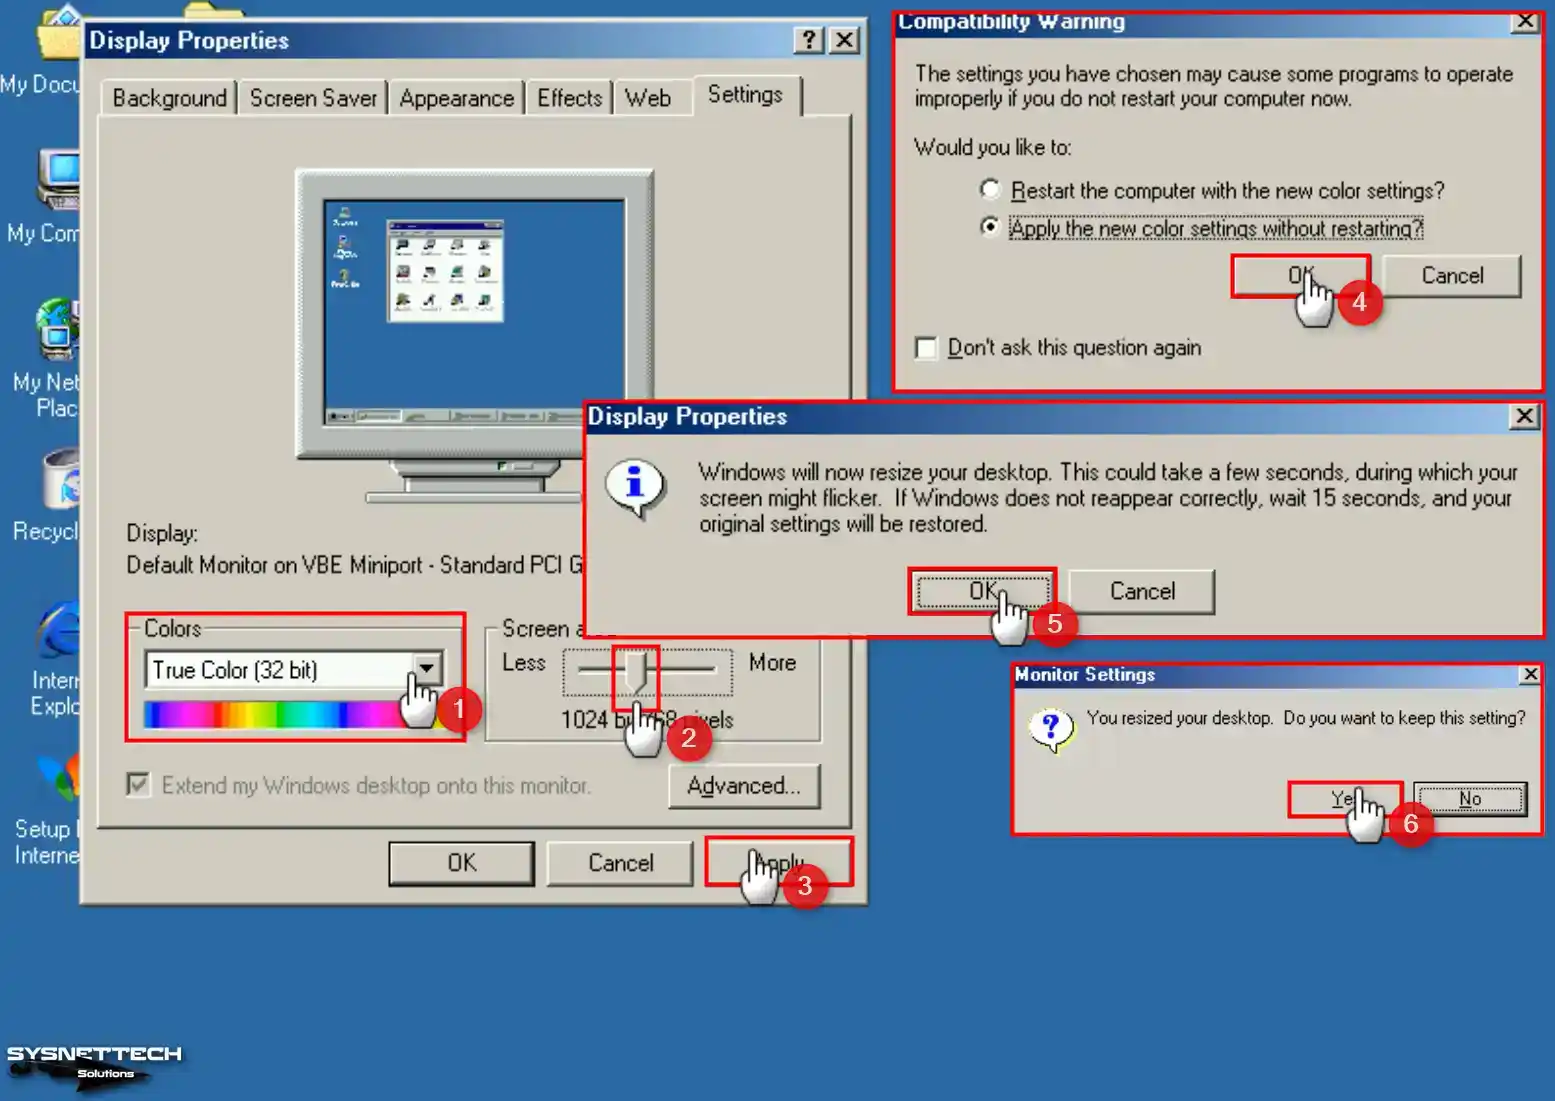
Step 6
Open Display Properties, choose True Color (32 Bit) from the options under Colors, and apply the changes without restarting your virtual PC.
How to Install USB 2.0 Driver in Windows ME
Under normal circumstances, installing a USB 2.0 driver on a Windows ME/Millennium virtual PC is troublesome. All the drivers you download from the internet are both incompatible and problematic. Therefore, you can download the USB 2.0 driver we have prepared for you, which works without any problems, from the table below the article to your computer.
NOTE: If you install the driver for the graphics device of the virtual machine with SciTech Display Doctor, the USB 2.0 driver will not work when you restart your VM. This is because the display driver is not fully compatible with Windows Me. Therefore, configure the graphics adapter using the VBE Miniport.
Step 1
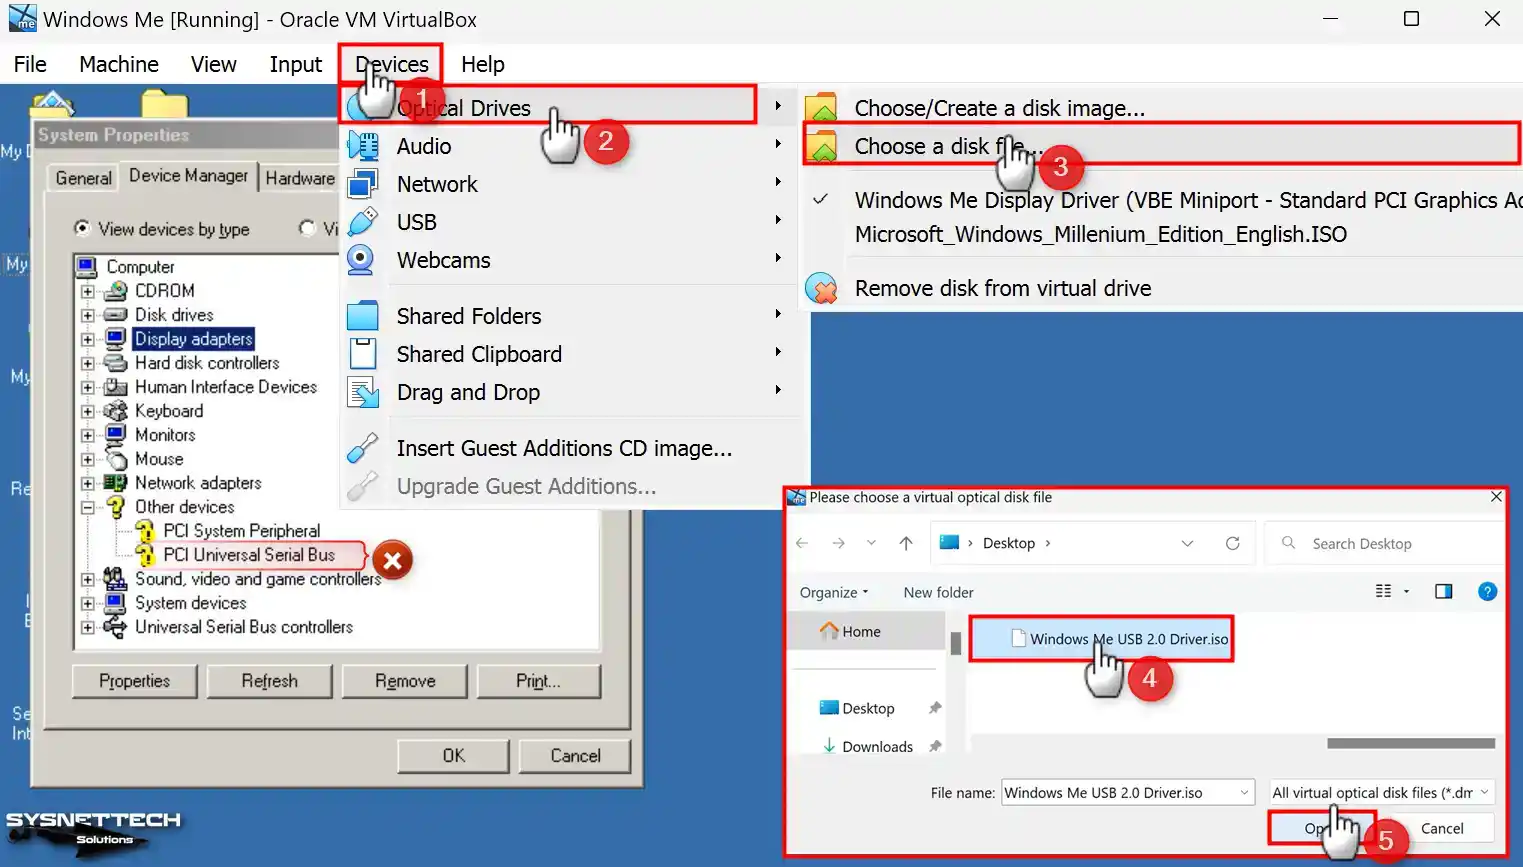
Open Device Manager again and check that USB 2.0 is not enabled under Universal Serial Bus Controllers. Then, right-click the CD/DVD icon and click Choose a disk file to add the USB 2.0 Driver ISO file to the virtual machine.
Select the USB 2.0 Driver ISO file downloaded to your computer from the table below the article and click the Open button.
Step 2
Double-click PCI Universal Serial Bus on Device Manager and click the Reinstall Driver button. Select the Automatic Search for a Better Driver option in the open window and click Next again.
After scanning the USB 2.0 drivers from the ISO file you added, restart your system after installing the Intel (R) 82801FB/FBM (ICH6 Family) USB2 Enhanced Host Controller – 265C.

Step 3
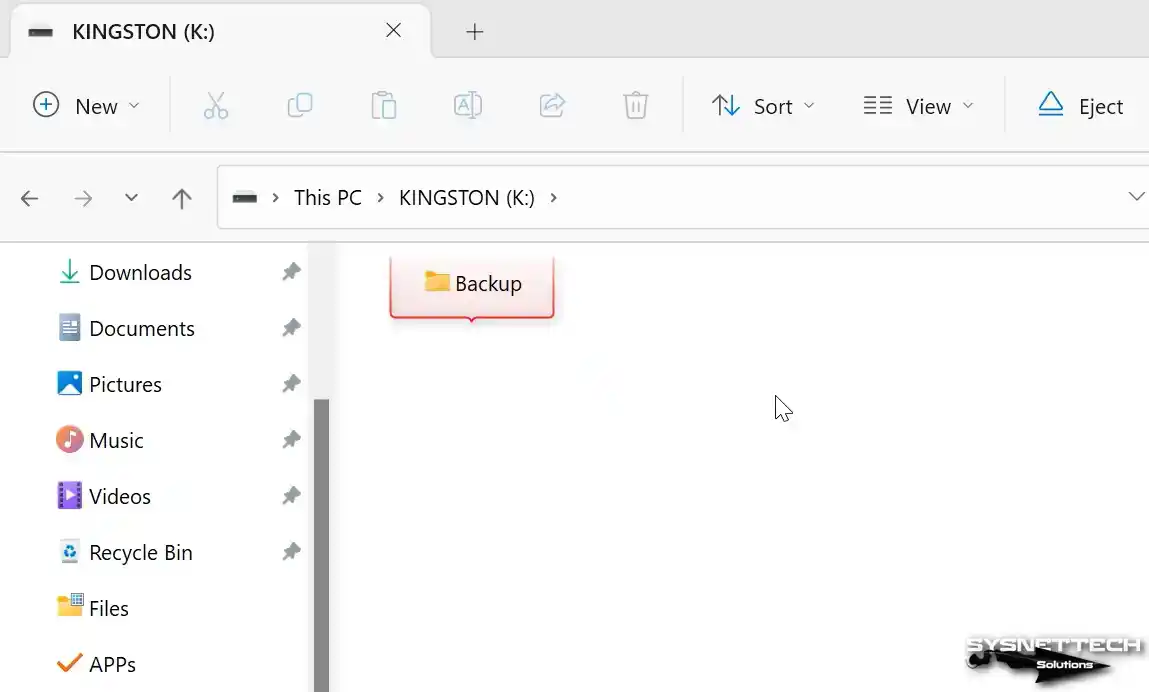
Begin by inserting a flash stick that supports USB 2.0/3.0 into your computer’s 2.0 slot. Afterward, please create a new folder within it as an example.
Step 4
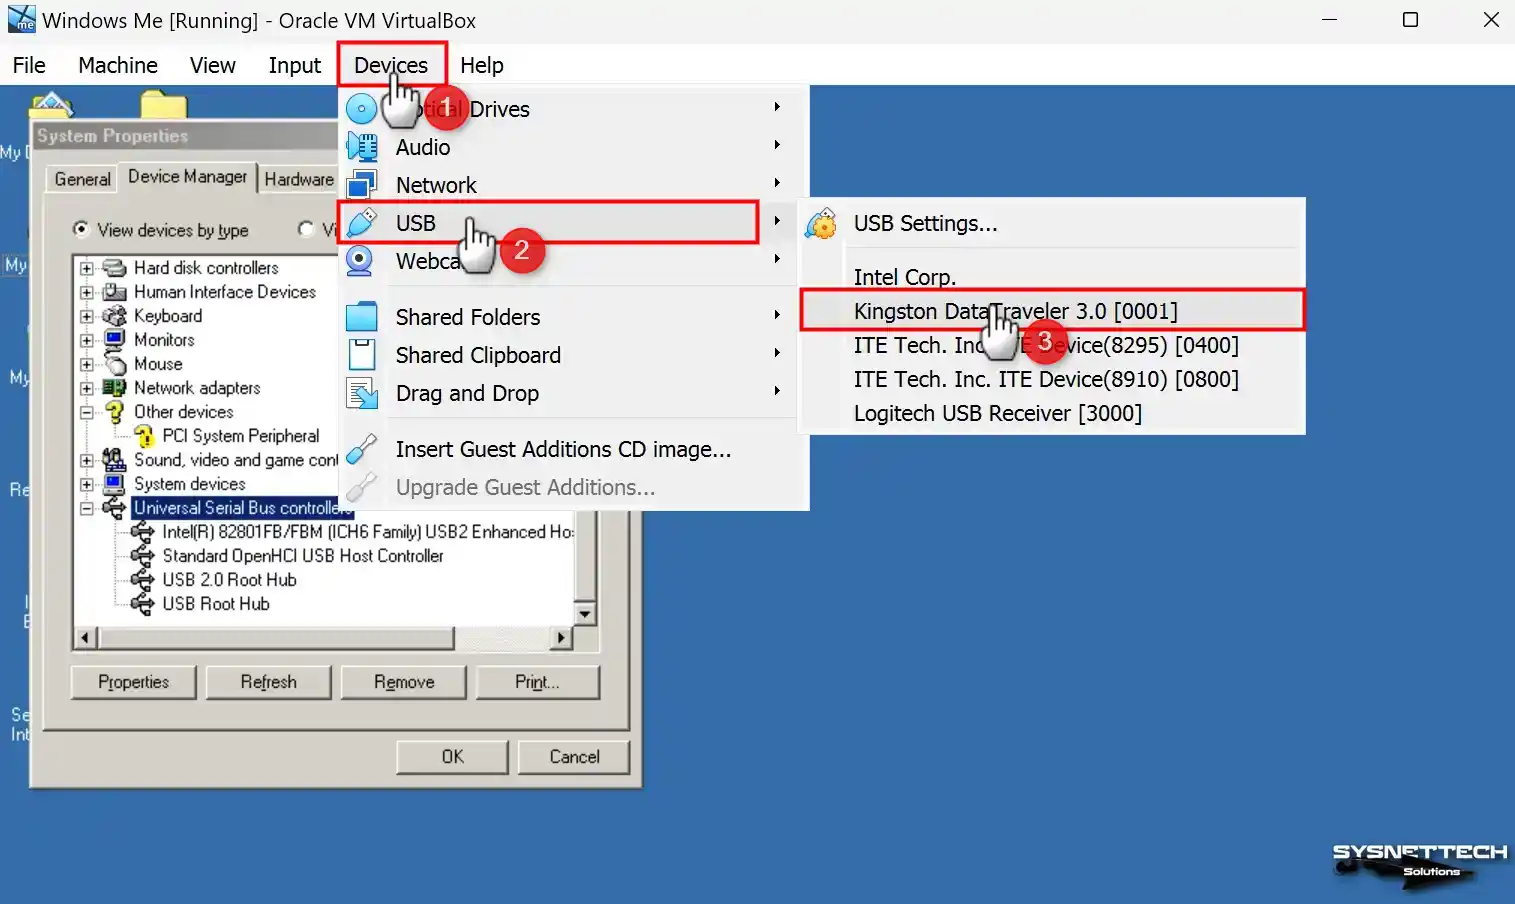
Click Devices / USB / KINGSTON DataTraveler in the tool menu of your guest machine. Then, after clicking the Refresh button in the device manager of the virtual machine, the USB storage device inserted in your virtual PC will be detected, and its drivers will be installed.
Step 5
To locate your USB device, navigate to the device manager and check under Storage Devices. Additionally, you can confirm whether the USB flash memory you inserted into your virtual machine is recognized by opening the My Computer window.
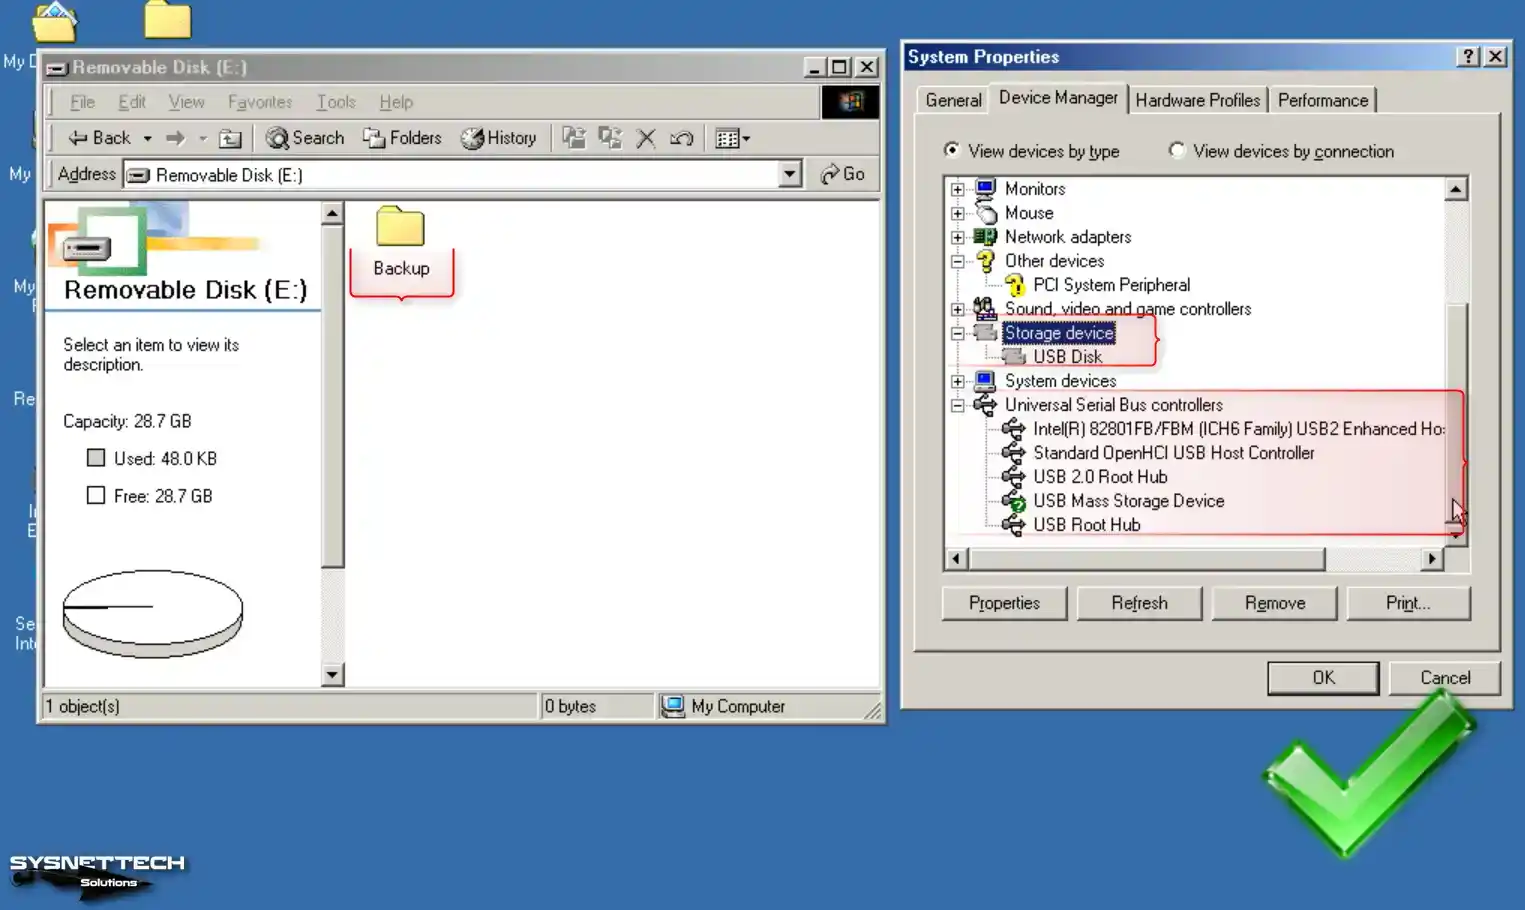
How to Install a PCI System Peripheral
Since Windows ME is not fully supported by Oracle virtualization software, you may see in Device Manager that drivers for some devices, such as PCI System Peripheral, cannot be installed. In such cases, you can try to establish an alternative driver to remove the device warning, but this is only sometimes a permanent solution.
Step 1
After opening System Properties, click on the Device Manager tab. In the hardware window that opens, double-click on PCI System Peripheral in the Other Devices section. In the window that opens, click on the Reinstall Driver button. In the next window, check the Specify the location of the driver (Advanced) and continue.
In the driver update wizard, choose to install the driver you want and continue.
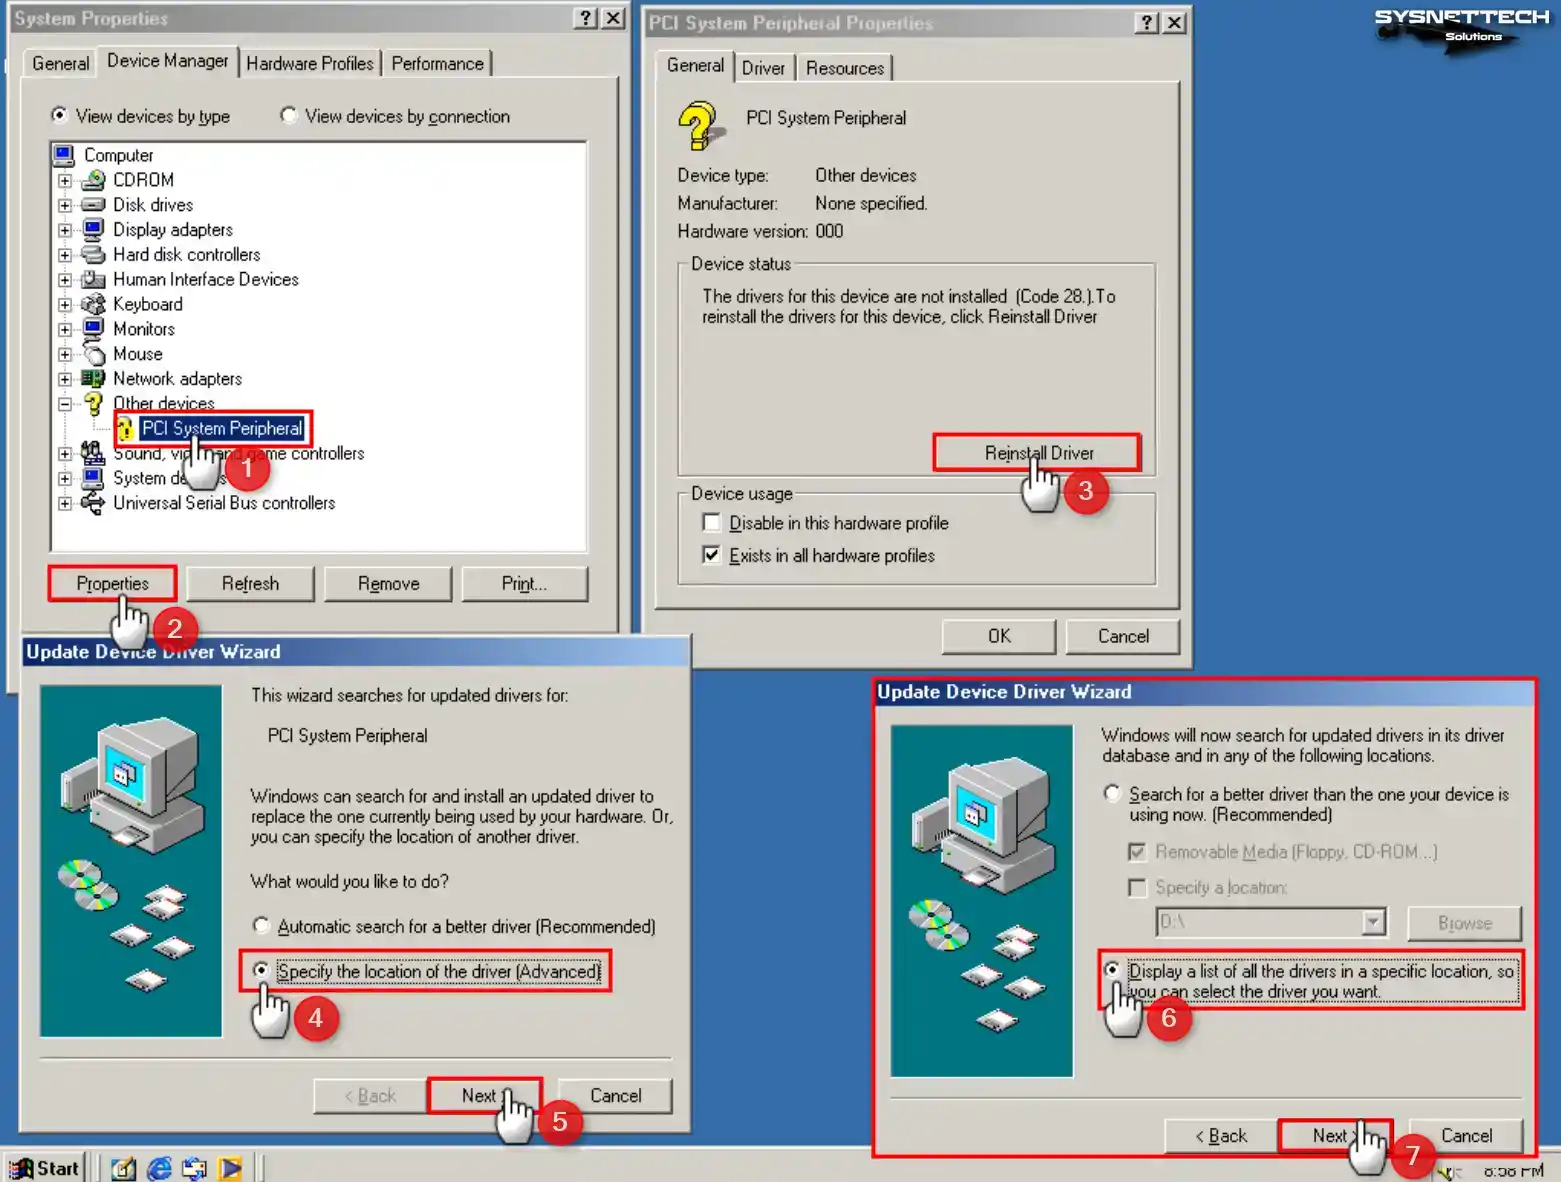
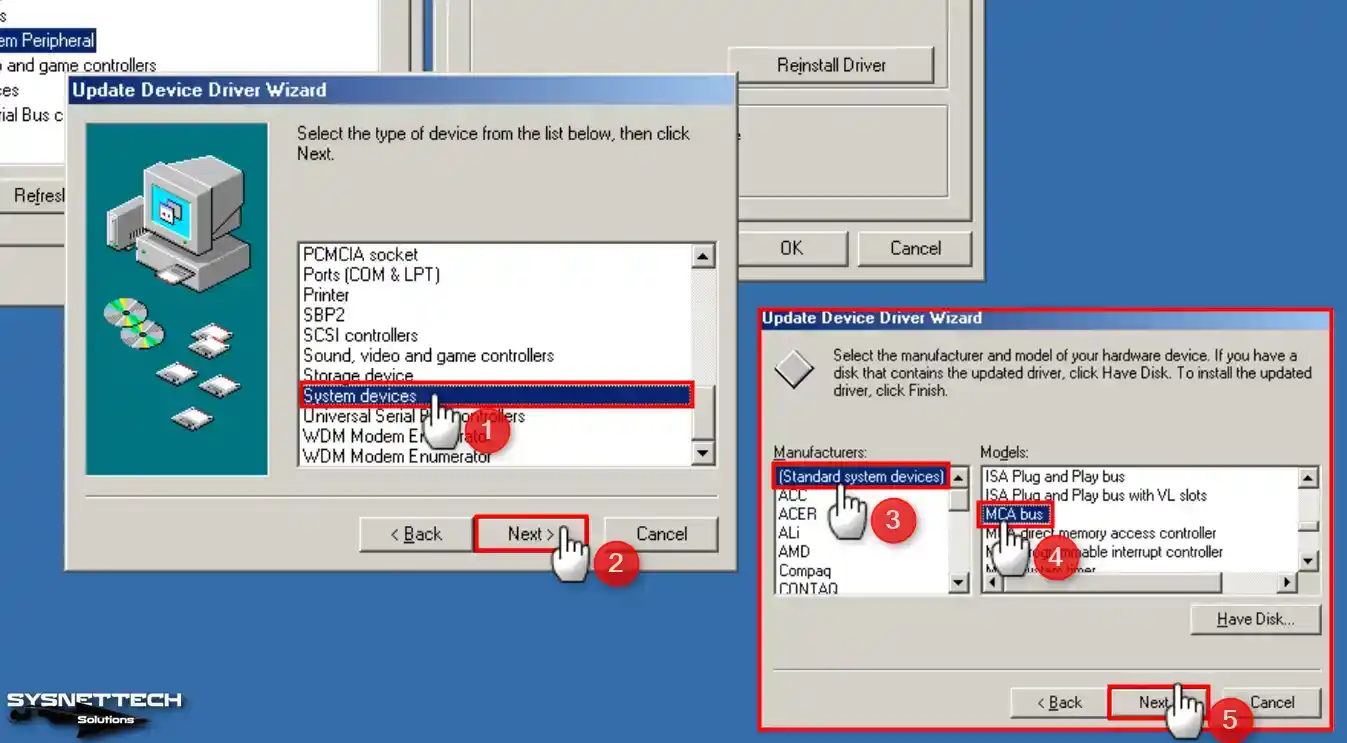
Step 2
Select System Devices from the hardware types in the device list and click Next. Then, after selecting Standard System Devices from the Manufacturers section, select MCA Bus from the device types listed on the right and continue.
Step 3
After installing the MCA Bus driver, confirm using the non-recommended driver and restart your virtual system.
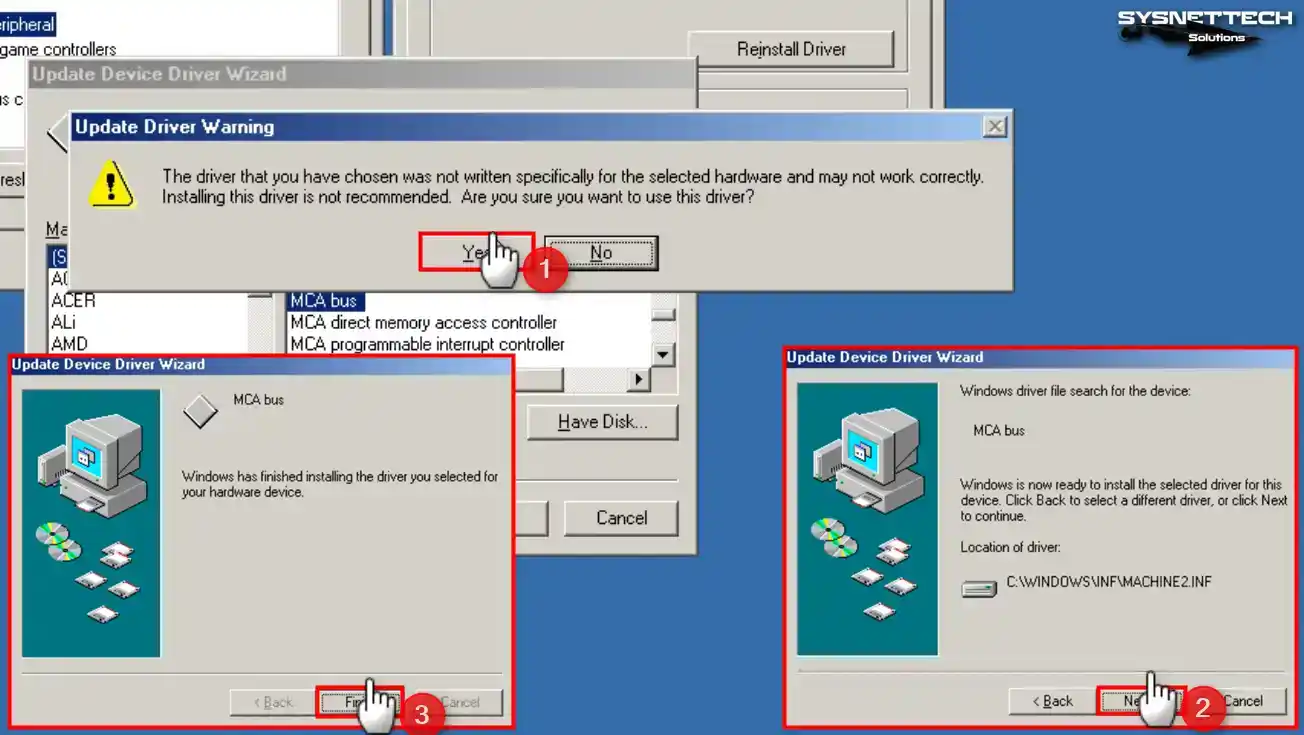
Step 4
After your system is turned on, you can see all hardware running smoothly in Device Manager.
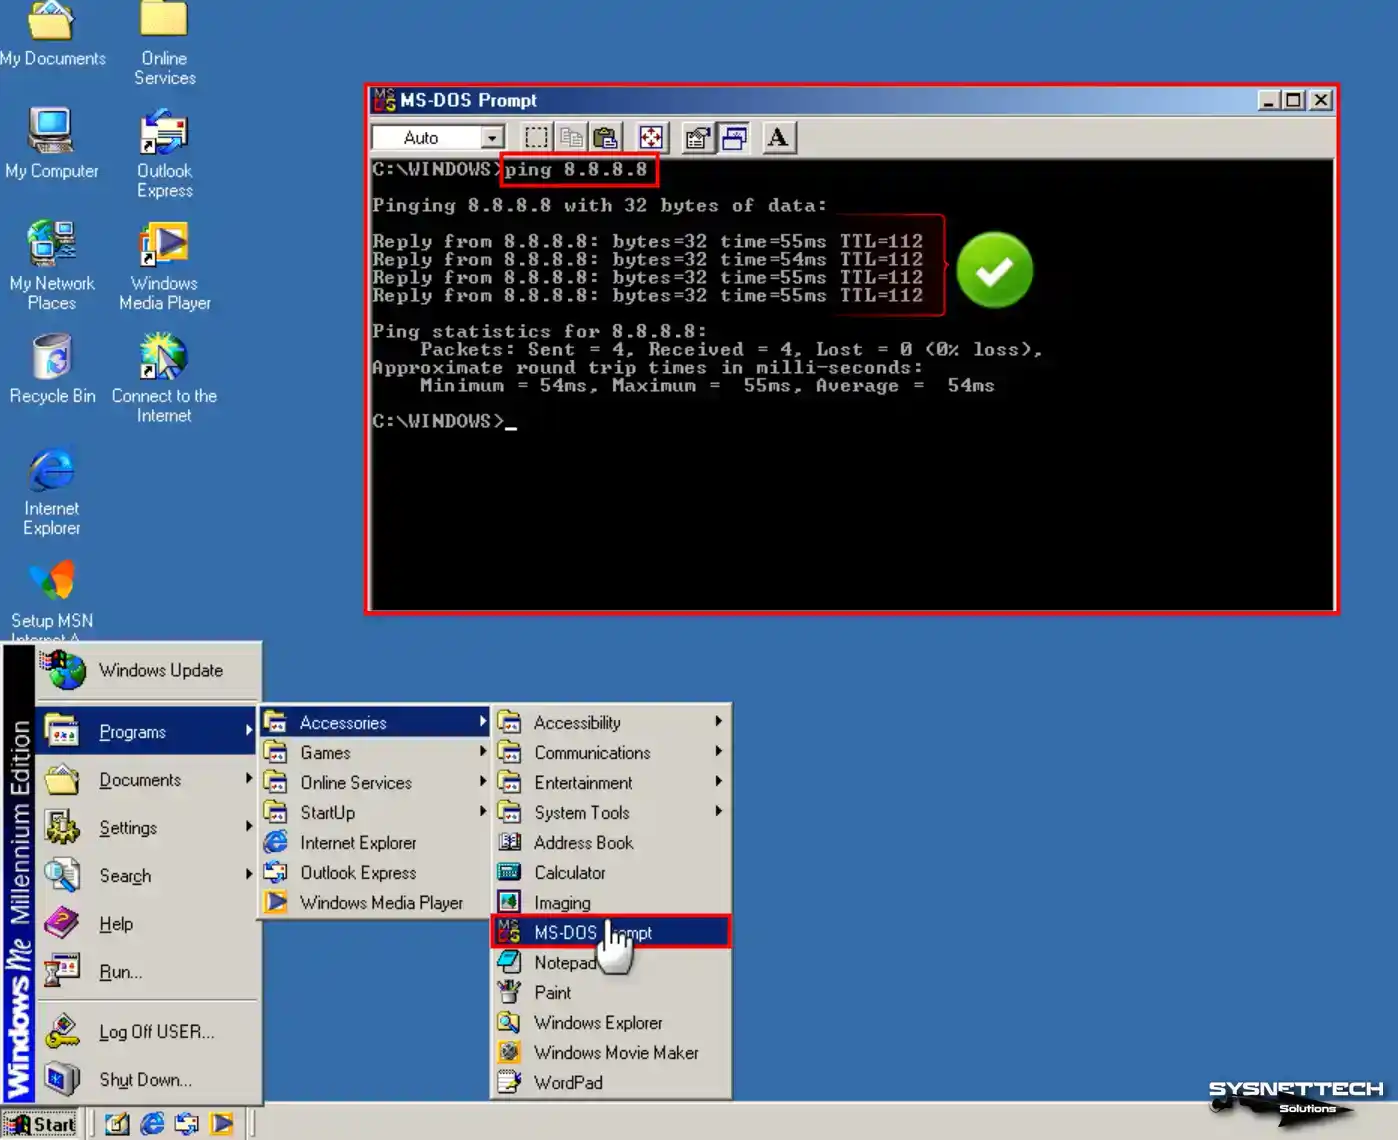
How to Configure Internet Connection in Windows Millennium
Of course, one of the things you should test on your Windows Millennium guest machine is the Internet connection. Network adapters are automatically installed by Oracle software when the system is installed.
Step 1
To check the Internet connection, open MS-DOS Prompt from Start / Programs / Accessories, execute the “ping 8.8.8.8” command, and test the connection.
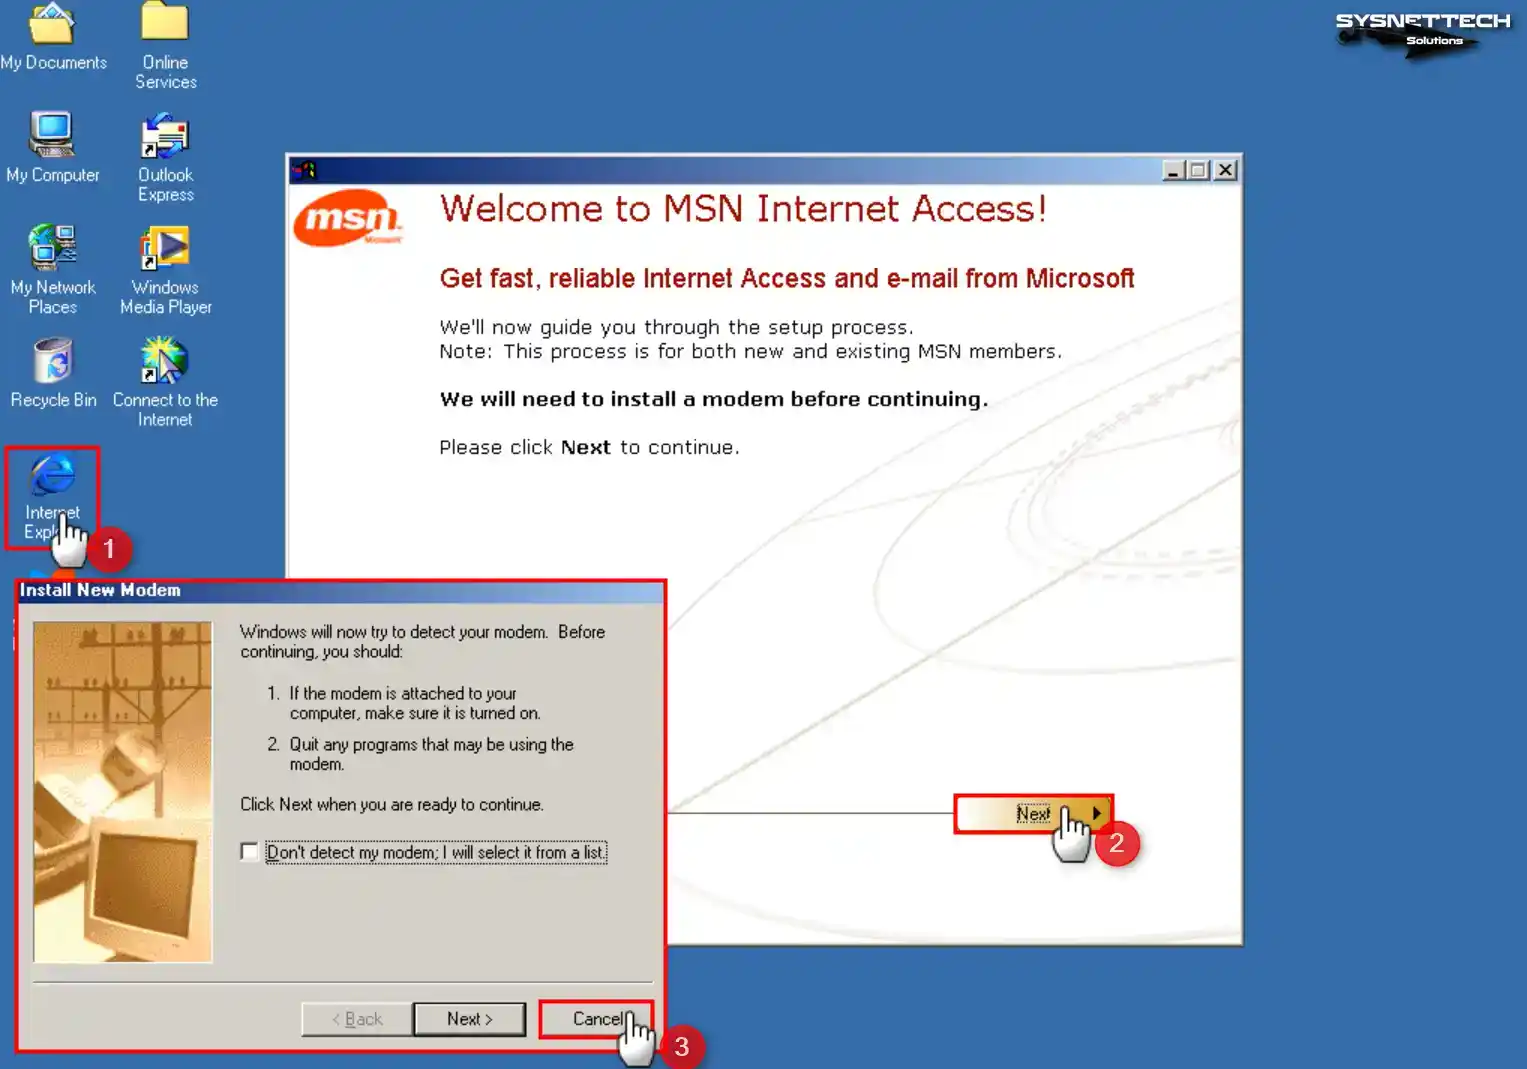
Step 2
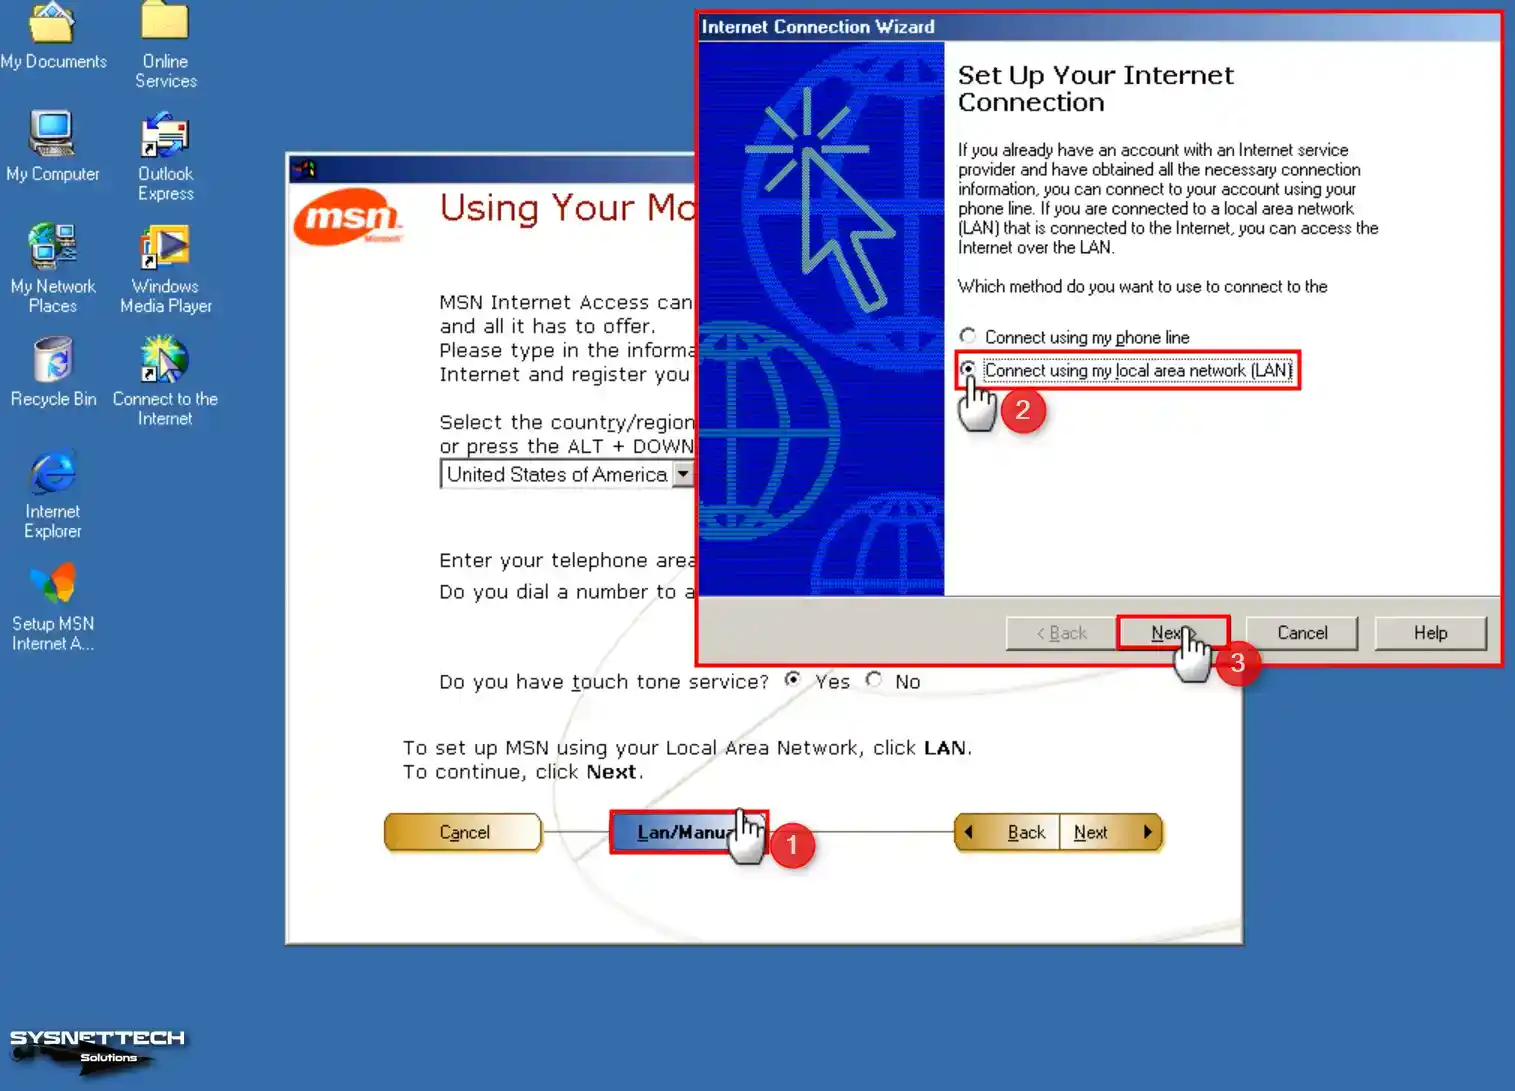
If the internet connection is healthy, open Internet Explorer from the desktop location, click Next in the “Welcome to MSN Internet Access” window, and click Cancel in the modem add wizard that opens.
Step 3
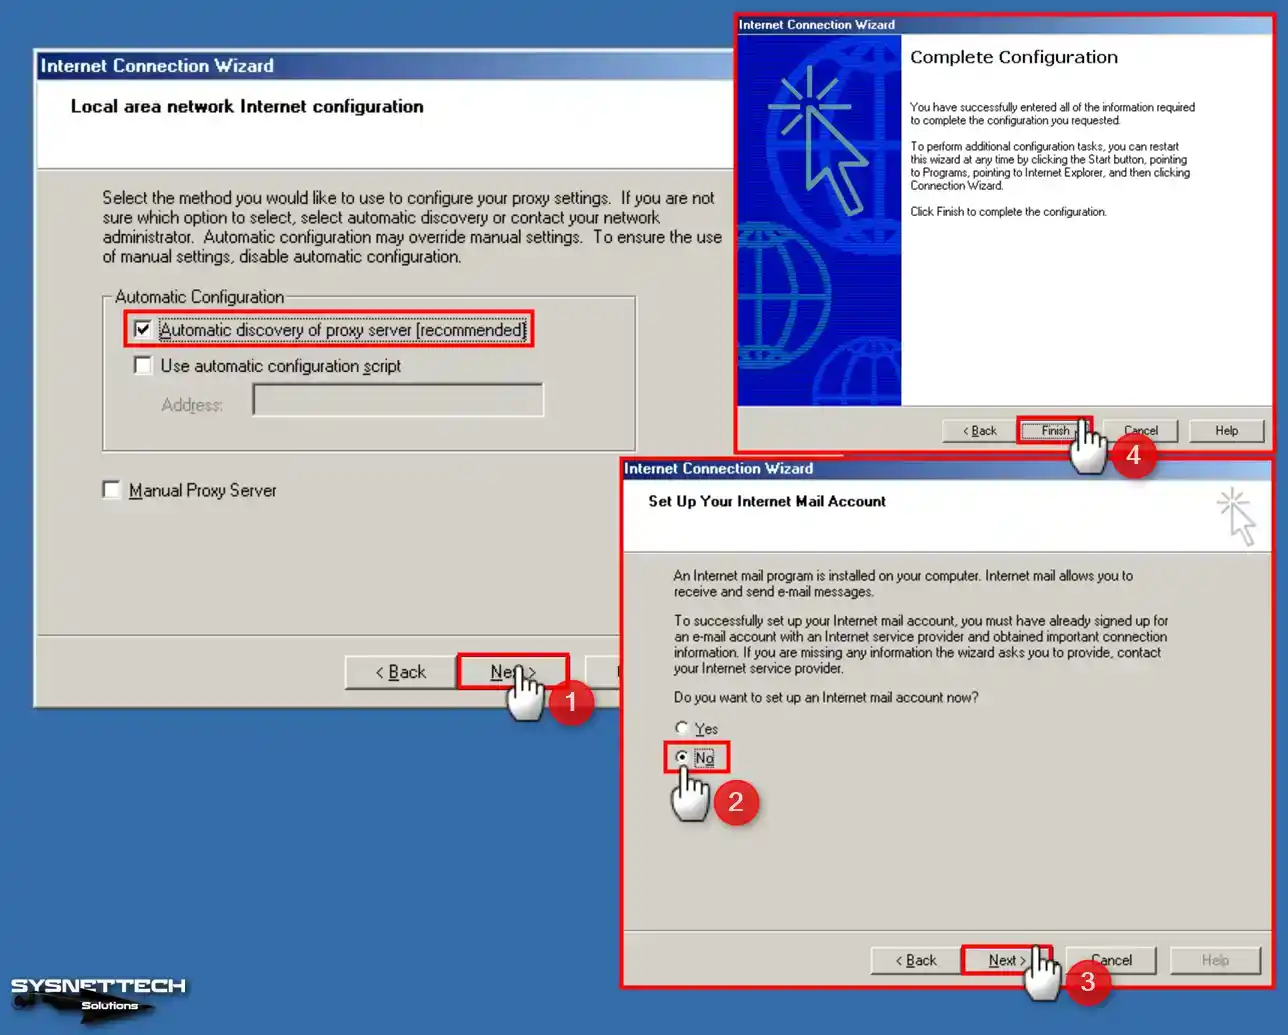
Click LAN/MANUAL to configure using MSN using a local area connection. Check LAN in the Internet connection wizard and click Next.
Step 4
Check the proxy discovery, skip the mail account creation, and close the wizard.
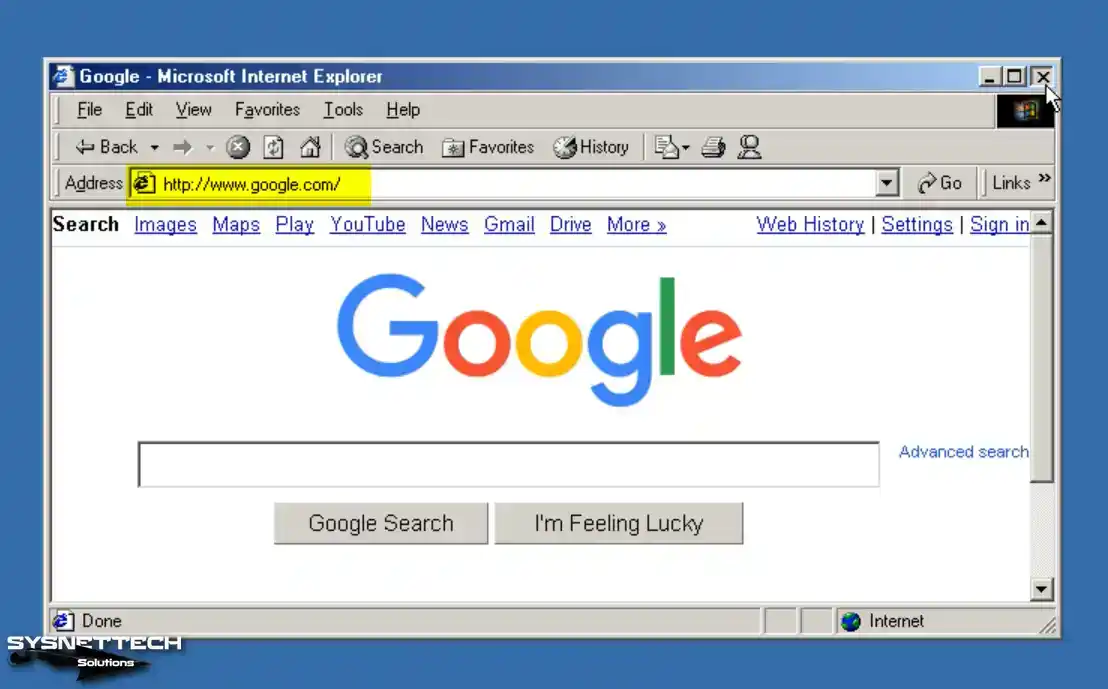
Step 5
After closing the Internet connection wizard, you can view the Google search engine.
How to Increase the System RAM Size of Windows ME
The officially stated Windows ME maximum RAM is 512 MB, but on physical computers, the maximum RAM is 1.5 GB.
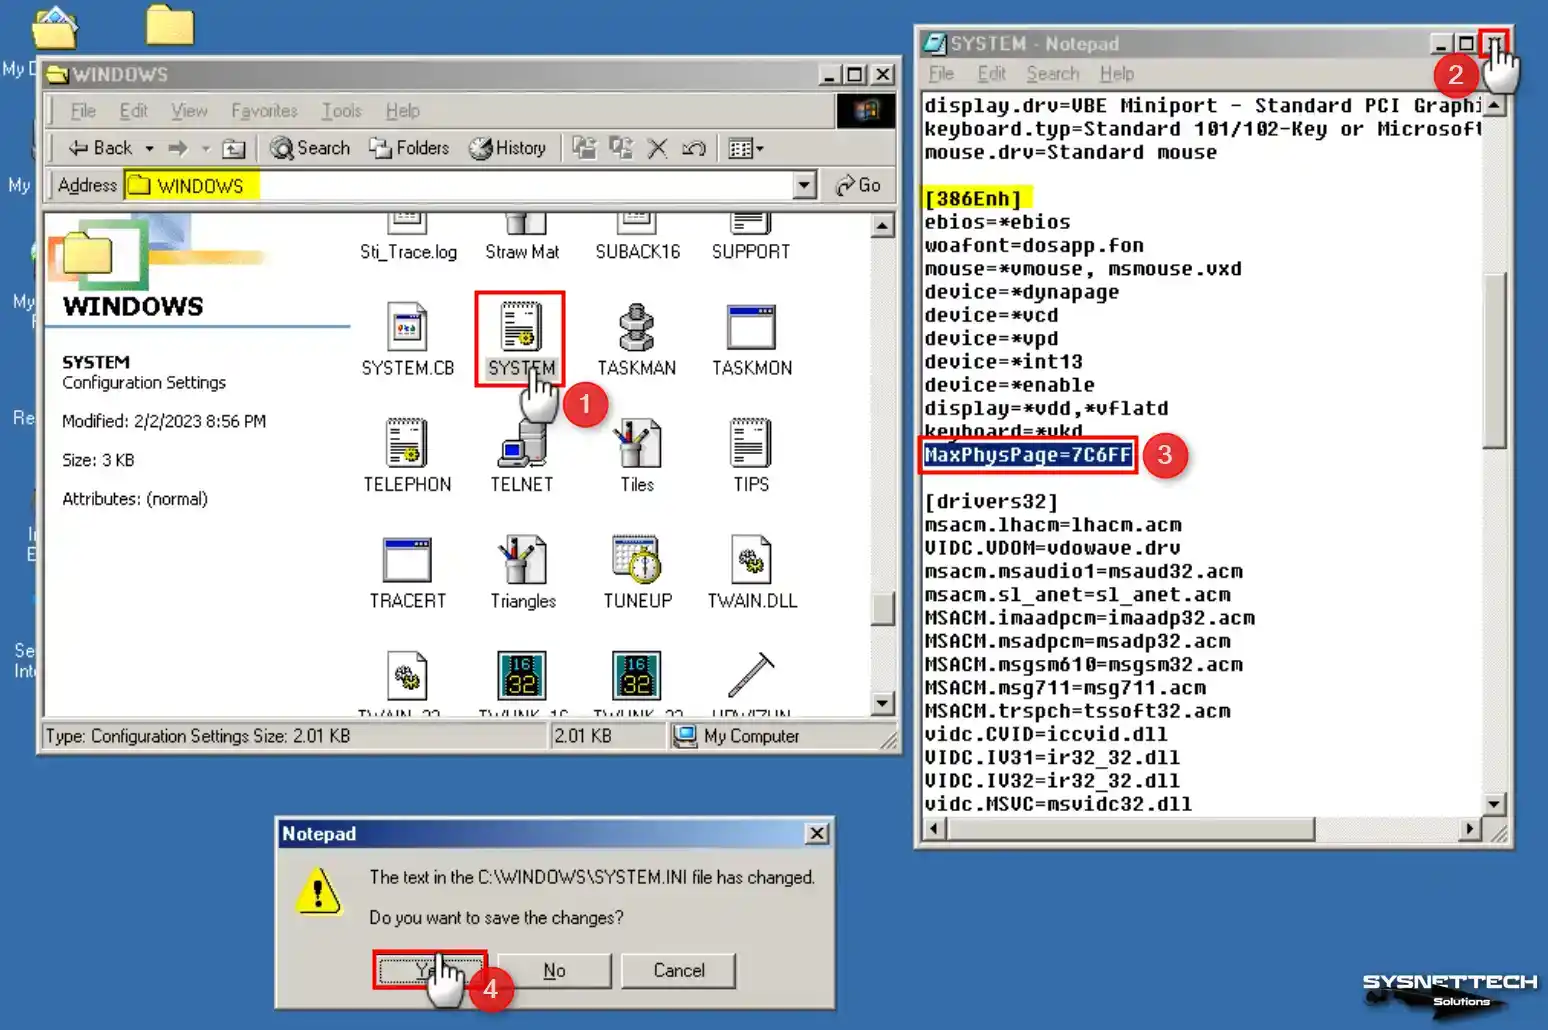
You can increase the RAM value of your WinMe system running on a virtual machine by 2 GB by editing the SYSTEM.INI file.
Step 1
With your Windows guest machine running, open the SYSTEM.INI file in C:\WINDOWS. Add MaxPhysPage=7C6FF under [386Enh] in SYSTEM.INI and save the file.
Step 2
Turn off your virtual computer and change the Base Memory value to 2048 MB (2 GB) from the system settings.
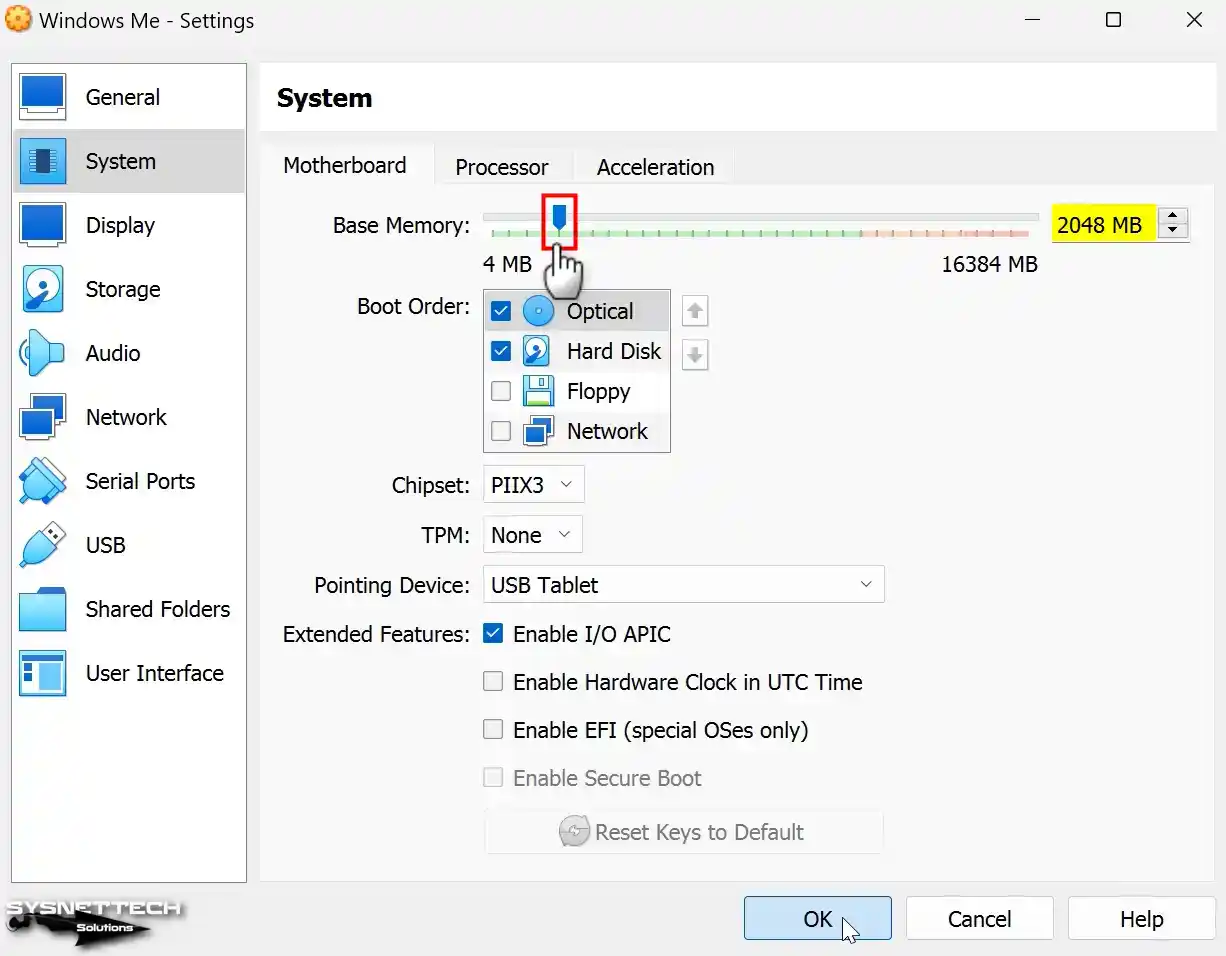
Step 3
Run your virtual computer and verify that the system memory is 2 GB in the system properties.
Video
Installing Old Versions
Windows ME ISO ve Driver Download
| Kaynak | Link |
|---|---|
| Windows ME/Millennium ISO | Download |
| Windows ME Display Driver (VBE Miniport) | Download |
| Windows ME USB 2.0 Driver | Download |
Conclusion
In conclusion, Windows Millennium Edition is not a practical choice for modern computing. But I recommend you install this system on a virtual machine and test it. Whether you want to do historical research or explore the evolution of this OS, Oracle VM VirtualBox will help you with this.
In short, this experience gives you a perspective on the history of computing technology. In short, you can install old software like Windows Me by following all the detailed steps I have prepared in this guide.
Table of Contents
- Installing Microsoft Windows Millennium Edition in DOSBox-X
- Overview
- Windows editions this guide applies to
- External links
- DOSBox-X config file
- Dynamic vs Normal core
- Turbo mode
- Creating a Harddisk image
- Installation Method 1: Boot from CD-ROM image
- Requirements
- Starting the installation
- Transfer Windows ME install files to your HDD image
- Installation Method 2
- Requirements
- Starting the installation
- Copying the contents of the CD-ROM
- Running SETUP.EXE
- Booting Windows ME after installation
- Steps to take after Installation
- Mounting CD or Diskette images
- Enabling networking
- Enabling NE2000 in your DOSBox-X config file
- Setting up NE2000 networking in Windows ME
- Emulated video adapter and video mode
- VESA driver
- Emulated sound card
- Enabling General MIDI
- Enabling printing
- Print to PostScript
- Epson emulation
- 3dfx Voodoo
- Glide pass-through
- Hard Disk Read-ahead optimization
- Host Folder mounts
- Known limitations
- Outstanding issues
Overview
This guide will give a general description of installing Windows Millennium Edition (aka Windows ME) in DOSBox-X, in addition to addressing some common issues.
Windows editions this guide applies to
-
Windows ME — Retail Full
-
Windows ME — OEM Full
|
Note |
Windows ME Upgrade editions have additional requirements and are not covered by this guide. |
|
Warning |
In general Windows ME has received less testing with DOSBox-X, and also has more compatibility issues with programs designed for Windows 95 and 98. As such, unless you have a specific requirement for Windows ME, the DOSBox-X team recommends to use Windows 98SE instead. |
DOSBox-X config file
You first need to create a DOSBox-X config file.
[sdl]
autolock=true

[dosbox]
title=Windows ME
memsize=128


vmemsize=8
vesa modelist width limit=0
vesa modelist height limit=0

[dos]
ver=8.0
lfn=false
hard drive data rate limit=0
floppy drive data rate limit=0

[cpu]
cputype=pentium_mmx
core=normal

[sblaster]
sbtype=sb16vibra

[fdc, primary]
int13fakev86io=false

[ide, primary]
int13fakeio=true
int13fakev86io=false

[ide, secondary]
int13fakeio=true
int13fakev86io=false
cd-rom insertion delay=4000

[render]
scaler=none

[autoexec]
Copy the above config and save it as winme.conf
|
Note |
It is recommended by DOSBox-X developers that at this time, you do not enable int13fakev86io in your config file when using Windows ME. |
|
Note |
You can increase the allocated RAM up to the Windows ME maximum of 512MB by setting memsize=512.Larger values may be possible with tweaks but are not covered here. |
Dynamic vs Normal core
The dynamic_x86 core, which should perform much better, has been sufficiently enhanced that it can now be used for most use-cases with Windows ME.
However, for now we still recommend that you do the installation of Windows ME using core=normal until issue #2215 is resolved.
But after the installation is finished you should be able to change to core=dynamic_x86.
Should you run into problems such as application crashes or a Windows ME blue-screen that cannot be reproduced with core=normal, please report the problem on the DOSBox-X Git issues page.
Turbo mode
Some parts of the installation, but also starting Windows ME can take a considerable amount of time.
You may be able to speed this up considerably (depending on the host CPU) by using the DOSBox-X Turbo mode, which can be enabled from the drop-down menu bar by selecting «CPU» followed by «Turbo (Fast Forward)».
This turbo mode is not like the old Turbo button on retro PCs, but functions more like a fast-forward, and therefore should not be used when interacting with the guest OS.
By default, the moment you press a key on the keyboard, turbo mode will disengage.
|
Warning |
Using the mouse not disengage turbo mode, and double-clicks will be almost impossible to achieve as long as turbo mode is active. |
You may also want to enable turbo mode by default to allow Windows ME to startup quicker by merging the following settings into your DOSBox-X config file.
|
Note |
This will cause some audio distortion on Windows ME startup, if you have the Windows startup sound enabled. |
Creating a Harddisk image
|
Note |
In addition to the below DOSBox-X command line utility, it is possible to create harddisk images from the DOSBox-X menu. Go to the «DOS» menu and select «Create blank disk image…». This option allows for various common harddisk types to be created, for less common types you need to use the command line utility. |
|
Note |
When creating your HDD image with IMGMAKE, instead of specifying a custom size, you can choose a pre-defined template. The pre-defined HDD templates can be seen by running IMGMAKE without arguments.
|
-
Diskette (floppy) images are always created as FAT12.
-
If your reported DOS version is 7.1 or higher, then harddisk images up to 512MB will use FAT16 by default.
-
Larger size harddisk images will use FAT32 by default (larger than 2GB can only be created as FAT32).
Alternatively, you can use the -fat option to instruct IMGMAKE to create a certain FAT type (assuming that is possible for the harddisk size).
First you need to start DOSBox-X from the command-line, using your newly created winme.conf.
This assumes that dosbox-x is in your path and winme.conf is in your current directory.
dosbox-x -conf winme.confThen in DOSBox-X you need to create a new harddisk image file with IMGMAKE.
This example uses an 8GB hard disk image with a single FAT32 formatted partition.
The maximum FAT32 partition size for Windows ME should be 2TB, but this has not yet been tested in DOSBox-X.
In later Windows versions, starting with Windows 2000, Microsoft won’t let you format a volume bigger than 32GB with FAT32 using its built-in formatting tool, this was presumably to push migrations to NTFS and later exFAT.
IMGMAKE hdd.img -t hd_8gigOr if you want to create a larger disk, you can create a custom type.
This is an example of a 16GB (16*1024=16384 MB) disk, which due to its size, will be formatted as FAT32.
IMGMAKE hdd.img -t hd -size 16384Installation Method 1: Boot from CD-ROM image
It is possible to boot directly from the Windows ME CD-ROM, as long as you have the «OEM Full» edition, in which case no separate bootdisk is needed.
Requirements
A Windows ME OEM Full edition CD-ROM image (named «WinME.iso» in the example below).
Getting this image file is outside the scope of this guide.
Starting the installation
This assumes you have already started DOSBox-X with the winme.conf config file and created your harddisk image.
First mount the harddisk image you created earlier:
Now let’s boot from the CD-ROM and start the installation.
IMGMOUNT D WinME.iso
IMGMOUNT A -bootcd D
BOOT A:|
Note |
If the second IMGMOUNT command gives an error «El Torito CD-ROM boot record not found«, your CD-ROM image is not bootable, and you will have to use either a different installation method or a different Windows ME CD-ROM image.
|
You will first get a Startup menu, where you need to select «Boot from CD-ROM».
After which you will get the «Microsoft Windows Millennium Startup Menu» where you need to select «Start computer with CD-ROM support.»
After it finished loading the CD-ROM support, you will be at the DOS A:\> prompt.
Now type the following commands:
At this point it should format the harddisk and the installation process should start.
When the Windows installer reboots, and you’re back at the DOSBox-X Z:\> prompt.
Close DOSBox-X and edit your winme.conf config file, and add the following lines in the [autoexec] section at the end of the file:
IMGMOUNT C hdd.img
IMGMOUNT D WinME.iso
BOOT C:
Now start DOSBox-X as follows to continue the installation process:
dosbox-x -conf winme.confTransfer Windows ME install files to your HDD image
This is an optional step. It is to prevent Windows from asking for the CD-ROM whenever it needs additional files.
Boot Windows ME with the CD-ROM image mounted. In Windows ME, copy the \WIN9X directory and its contents from the CD-ROM to your C: drive.
You can copy it to any directory you want, but we assume here that you copied it to C:\WIN9X
Once the files are copied, start REGEDIT and navigate to HKEY_LOCAL_MACHINE\Software\Microsoft\Windows\CurrentVersion\Setup and change SourcePath= to the location where you copied the files. e.g., SourcePath=C:\WIN9X
In the case of Windows ME, copying the entire directory will require roughly 195MB of diskspace.
The \WIN9X\OLS sub-directory can however be skipped which will save roughly 42MB, bringing the total to roughly 153MB.
Installation Method 2
This method will start the installation from DOSBox-X and does not require a bootable CD-ROM image.
Requirements
A Windows ME CD-ROM image (named «WinME.iso» in the example below).
Getting this image file is outside the scope of this guide.
Starting the installation
This assumes you have already started DOSBox-X with the winme.conf config file and created your harddisk image.
First mount the harddisk image you created earlier:
You will also need to mount the Windows ME CD-ROM. There are a few ways of doing so, but this guide assumes you have a ISO image.
If you have a copy of the Windows ME CD-ROM as an ISO (or a cue/bin pair), you can mount it as follows:
Copying the contents of the CD-ROM
While not strictly necessary, as it is possible to run SETUP.EXE directly from the CD-ROM (if you have the CD-ROM automatically mounted in your [autoexec] section of the config file).
It is recommended to copy the installation files (contents of the WIN9X directory on the CD-ROM) to your HDD image, as it will prevent Windows ME from asking for the CD-ROM when it needs additional files later.
XCOPY D:\WIN9X C:\WIN9X /I /EThe files in the above example are copied to the C:\WIN9X directory.
You may want to use C:\WINDOWS\OPTIONS\CABS instead, as that is the directory that OEM installs normally use.
But if you do, be aware that the installer will attempt to install into C:\WINDOWS.000 as C:\WINDOWS already exists.
If you get the above screen during SETUP, select «Other directory» to change it back to C:\WINDOWS
Running SETUP.EXE
You can now run SETUP.EXE.
|
Note |
It is necessary to use the /NM option when running SETUP.EXE, as otherwise Windows ME will not install in DOSBox-X as it will claim that it needs at least a 150MHz CPU.Alternatively, you may overcome this issue by selecting «CPU» ⇒ «Emulate CPU speed» ⇒ «Pentium 166MHz MMX (~97240 cycles)» from the drop-down menu. |
Now run through the installation process.
The actual steps will not be covered in this guide, but are pretty self-explanatory and detailed guides on the Windows ME install process can be found online such as YouTube.
When the installer reboots DOSBox-X, and you’re back at the DOSBox-X Z:\ prompt, type EXIT.
Now edit your winme.conf config file.
At the end of the file, in the [autoexec] section, add the following lines:
IMGMOUNT 0 empty -fs none -t floppy
IMGMOUNT 1 empty -fs none -t floppy -size 512,15,2,80
IMGMOUNT C hdd.img -ide 1m
IMGMOUNT D empty -t iso -ide 2m
BOOT C:|
Note |
The current DOSBox-X release seems to have a bug where WinME will only see the first floppy drive. |
Save the config file, and at the command-prompt of your host PC you can type the below command to continue with the next phase of the installation process.
This is also the command you use, after the installation is finished, to start Windows ME in DOSBox-X.
dosbox-x -conf winme.confBooting Windows ME after installation
After the installation is finished, you can start Windows ME from the command-prompt of your host PC, with the following command:
dosbox-x -conf winme.confYou can optionally create a shortcut on your desktop to start Windows ME directly.
Steps to take after Installation
Once Windows ME is installed, here is some additional software you may want to install or update:
-
Install Microsoft .NET framework version 1.0, 1.1 and 2.0
-
Install Microsoft Visual C++ 2005 runtime
-
Update to Microsoft Internet Explorer 6.0 (rarely needed)
-
Update to Microsoft DirectX 9.0c
-
Install Microsoft Windows Installer 2.0
-
Install Microsoft WinG API 1.0 (needed by just a few games, and those games typically include it)
-
Install Microsoft GDI+ re-distributable
-
Install Adobe Acrobat Reader 6.0
-
Install/Update to Adobe Flash Player 9.0.47.0
-
Install Adobe PostScript driver 4.2.6
-
Install Apple QuickTime 6.5.2
Mounting CD or Diskette images
DOSBox-X supports mounting CD and diskette (floppy) images, and making those available to an OS booted in DOSBox-X.
To do so, an empty diskette or CD drive needs to be attached before booting a guest OS such as Windows ME, or diskette or CD images need to be attached (which will automatically cause an appropriate drive type to be emulated).
-
Disks can be changed after booting a guest OS from the drop-down menus under «DOS» → «Change current floppy image…»
-
CDs can be changed after booting a guest OS from the drop-down menus under «DOS» → «Change current CD image…»
For example, to specifying multiple image files with the IMGMOUNT command:
IMGMOUNT A disk1.img disk2.img disk3.img
IMGMOUNT D cd1.iso cd2.iso cd3.iso
You can then swap between disk images with the «DOS» → «Swap floppy drive» or «Swap CD drive» option from the drop-down menus, or using the hot-key.
Enabling networking
To enable networking, you first need to enable NE2000 adapter emulation in your winme.conf config file and select an appropriate back-end for the NE2000 emulation.
Enabling NE2000 in your DOSBox-X config file
There are two different back-ends to the NE2000 adapter emulation.
The default is backend=auto, which implies backend=slirp if SLIRP support is available, otherwise backend=pcap is implied if PCAP support is available.
backend=pcap
The PCAP back-end uses something called «Promiscuous mode».
This has the advantage that DOSBox-X can support various legacy network protocols, such as IPX and NetBIOS Frames (aka NetBEUI) in addition to TCP/IP.
This mode not only allows communication between DOSBox-X instances on the same network, but also with legacy PCs on the same network.
However, for this to work DOSBox-X needs to have very low-level access to your real network adapter.
In some cases, this is not possible, such as:
-
Network Adapter or Driver not supporting Promiscuous mode (most wireless adapters fall into this category).
-
Your Ethernet switch not allowing multiple MAC addresses on a single port or doing any kind of MAC address whitelisting.
-
Sandboxed versions of DOSBox-X (e.g., Flatpak) not allowing the required low-level access.
To enable NE2000 emulation with the pcap back-end, add the following to your winme.conf config file:
[ne2000]
ne2000=true
nicirq=10
backend=pcap

[ethernet, pcap]
realnic=list
The list value for realnic= will need to be replaced by a value representing your actual network adapter.
See Guide: Setting up networking in DOSBox-X for more information.
backend=slirp
Unlike the PCAP back-end, the SLIRP back-end does not require Promiscuous mode.
As such it will work with wireless adapters, and it will work in most sandboxed environments.
But obviously, it has its own limitations.
-
It is not supported in all platforms, such as Windows Visual Studio builds.
-
It only supports the TCP/IP protocol (other protocols must be TCP/IP encapsulated).
-
It is effectively behind a NAT (Network Address Translation) gateway, meaning that you can communicate outbound, but no systems on the LAN can instantiate a new connection to it. Which means that two DOSBox-X instances on the same LAN using
backend=slirpcannot communicate with each other.
To enable NE2000 emulation with the slirp back-end, add the following to your winme.conf config file:
[ne2000]
ne2000=true
nicirq=10
backend=slirp
Setting up NE2000 networking in Windows ME
Windows ME does not detect the emulated NE2000 adapter during installation as it is not a ISA PnP or PCI adapter.
As such you need to set it up manually afterwards, which is quite a bit more involved than in older Windows versions.
On the Windows ME desktop, click the «Start» button followed by «Settings» and «Control Panel».
In the «Control Panel» window, click on the «view all Control Panel options.» link on the left side.
You should now see more options displayed. Double-click on the «Add New Hardware» icon.
Now let the Hardware Wizard detect new hardware.
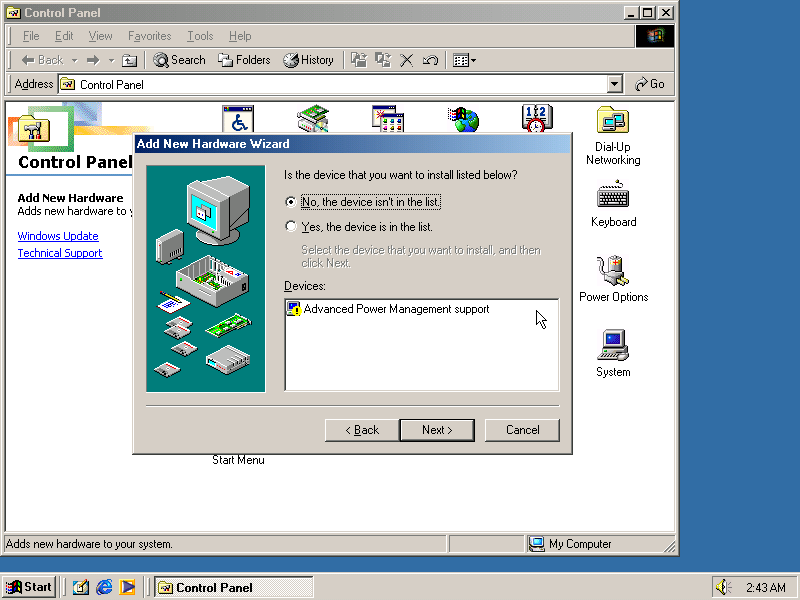
If it presents a question if the «Advanced Power Management support» listed is what you want to configure, select «No, the device isn’t in the list», and click the «Next >» button.
Now Windows ME will offer to search for the hardware.
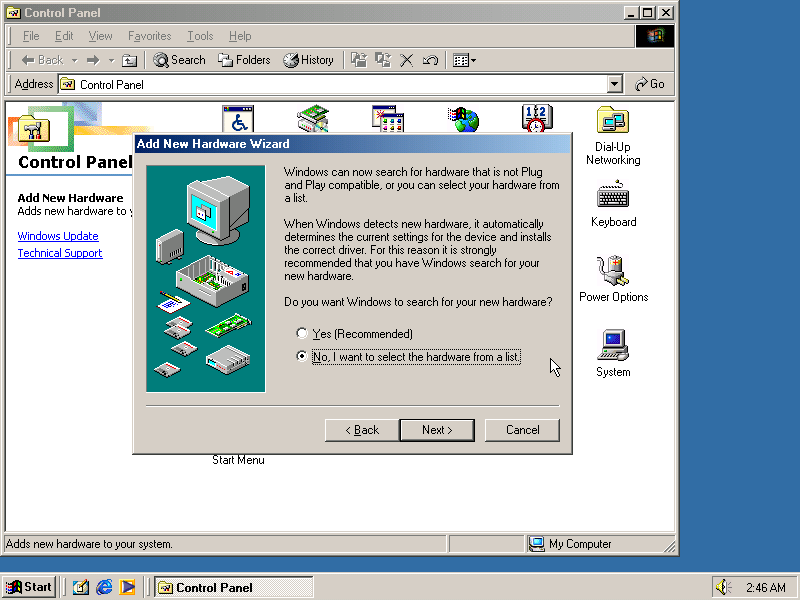
This search will not work, so select the option «No, I want to select the hardware from a list.», and click the «Next >» button.
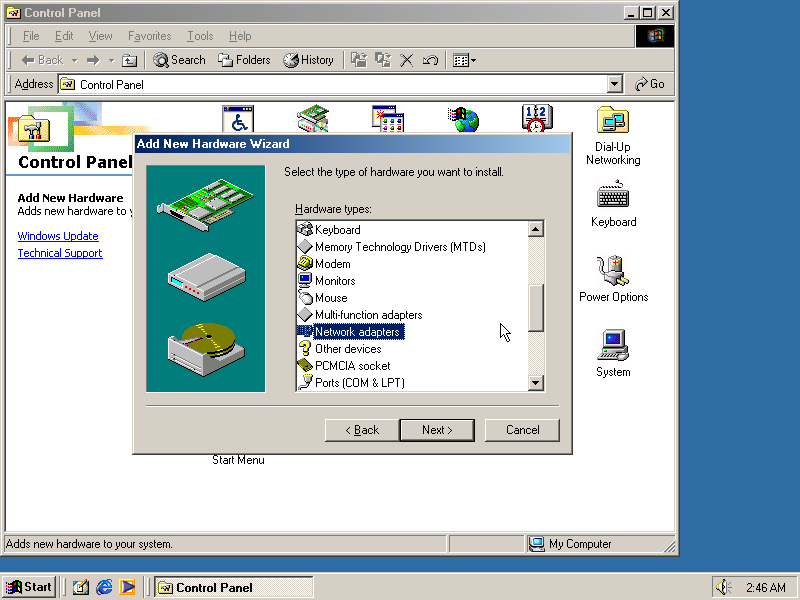
You will now be asked for the hardware type to install, highlight «Network adapters», and click the «Next >» button.
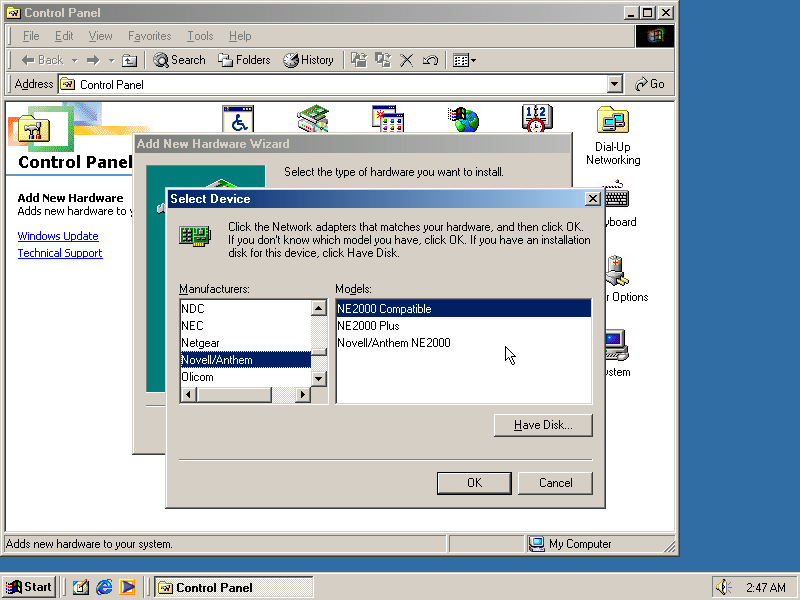
You will be presented with a «Select Device» dialogue where you need to select «Novell/Anthem» for the manufacturer and «NE2000 Compatible» for the Model, and click the «OK» button.
Windows ME will now present you with a resource dialogue with completely invalid resources and no way to directly edit them. Click the «Next >» button to continue.
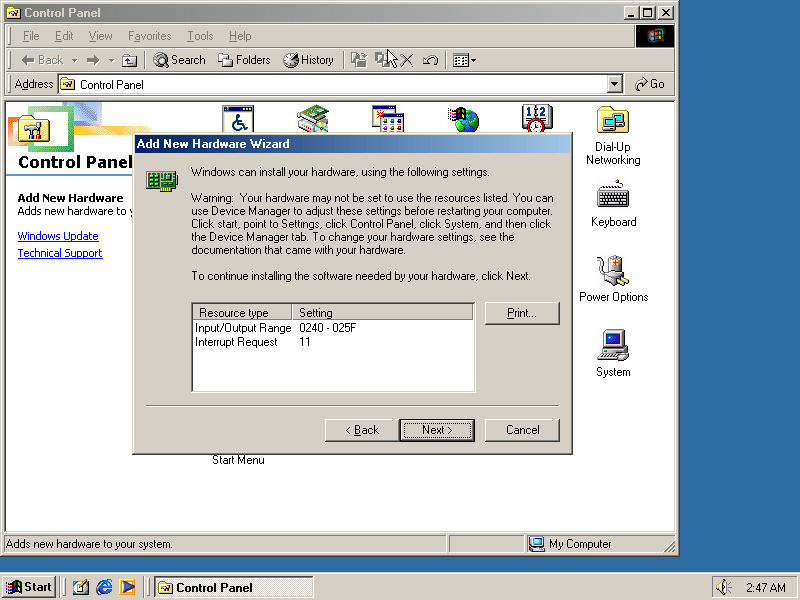
Now click the «Finish button» to complete the process.

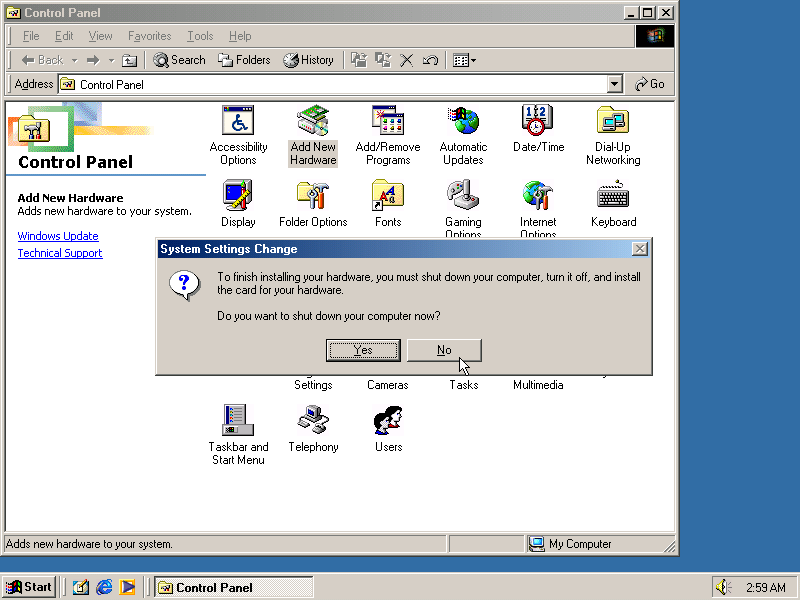
Windows ME will now want to shut down for the changes to take effect.
However since the resources that it set for the emulated NE2000 adapter are invalid, we should fix that first.
As such click the «No» button.
Now double-click on the «System» icon, and you will now get the «System Properties» window.
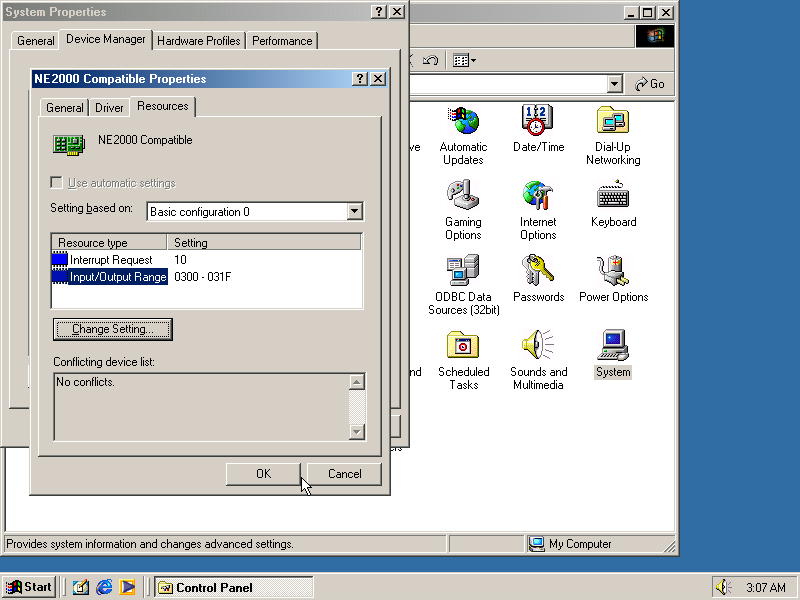
Select the «Device Manager» tab and highlight the «NE2000 Compatible» option and click on the «Properties» button.

You will now get a «NE2000 Compatible Properties» window where you need to select the «Resources» tab.
Now highlight «Interrupt Request» and click on the «Change Settings» button.
Change the value to 10 as set with nicirq= in your winme.conf file and click the «OK» button.
Now highlight «Input/Output Range» and click on the «Change Settings button»
Change the value to «0300-031F» and click the «OK» button.
Now close the «NE2000 Compatible Properties» window by clicking the «OK» button.
Windows ME will now ask you to shut down to apply the settings, click the «Yes» button to let it perform a shutdown.
After the shutdown you will have to restart DOSBox-X.
|
Note |
By default, TCP/IP will try to get its network configuration over DHCP, if you need to manually specify the settings you can do so, in «Control Panel», double-click «Network». Once it opens, highlight «TCP/IP», and click the «Properties» button to modify the TCP/IP settings. |
|
Note |
In the Network settings, there will also be a «Dial-Up Adapter» listed, which you can safely remove. |
|
Note |
If you don’t want the Windows logon dialog on startup, and don’t care for file and printer sharing, you can remove the «Client for Microsoft Networks» component from the Network configuration settings (although, it will complain that «Your network is not complete», which you can ignore). |
|
Note |
If you want to share files between Windows ME and Windows 10 on the network, have a look at this blog: SMB File Sharing between Win10 and Win98, but apparently this fails with the latest Win10 builds 2004 and 20H2. |
Emulated video adapter and video mode
The default video adapter that DOSBox-X emulates is the S3 Trio64, which is the best emulated video adapter that DOSBox-X offers, with the widest range of resolutions and colour depths.
In addition, this video adapter is supported out-of-the-box in Windows ME, simplifying the installation process.
The available video modes with the S3 Trio64 driver are:
-
4-bit colour (16): 640×480
-
8-bit colour (256): 640×480, 800×600, 1024×768, 1152×864, 1280×1024 and 1600×1200
-
16-bit colour (65536): 640×480, 800×600 and 1024×768
-
32-bit colour (16.7M): 640×480 and 800×600
A few enhancements have been made to the emulated S3 Trio64, compared to a real S3 Trio64:
-
No real S3 Trio64 was ever produced with more than 4MB video memory, under DOSBox-X you can optionally configure 8MB.
-
The real cards never supported wide-screen resolutions, wide-screen VESA modes can optionally be enabled in DOSBox-X.
However, these enhancements cannot be used in Windows ME with the S3 video driver due to driver limitations.
An updated S3 Trio64 video driver is not available for Windows ME.
As such you will be limited to the above video modes with this driver.
VESA driver
First add the following lines to your DOSBox-X config file in the section:
allow high definition vesa modes=true
allow unusual vesa modes=true
allow low resolution vesa modes=false
Download and extract the latest VBEMP driver package and install the driver from the 032MB directory.
With these settings modes up to 1920×1080 in 32bit colour, or 1920×1440 in 16bit colour are possible.
|
Note |
Using the VBEMP driver does have a negative graphics performance impact, which when measured in WinBench96 Graphics WinMark, can be a reduction of up to 59%. |
Emulated sound card
The emulated sound card used in this guide is the SB16 Vibra, instead of the default SB16.
This is simply because the SB16 Vibra is an ISA PnP card, and therefore automatically detected by Windows.
There is no other real advantage of using the emulated SB16 Vibra over the SB16.
Windows ME includes WDM driver version 4.90.2471.1. No newer driver appears to exist.
|
Note |
One often heard complaint of the real SB16 Vibra is its CQM synthesis, which was used as a low-cost replacement of the OPL3 chip found on earlier cards. However, DOSBox-X does not really emulate the CQM, instead it uses the same OPL3 emulation as for the regular SB16 model. Therefore, the CQM sound quality issues with the real SB16 Vibra do not apply to DOSBox-X. |
Enabling General MIDI
If you have a working DOSBox-X General MIDI setup, either emulated or real, you can use that in Windows ME.
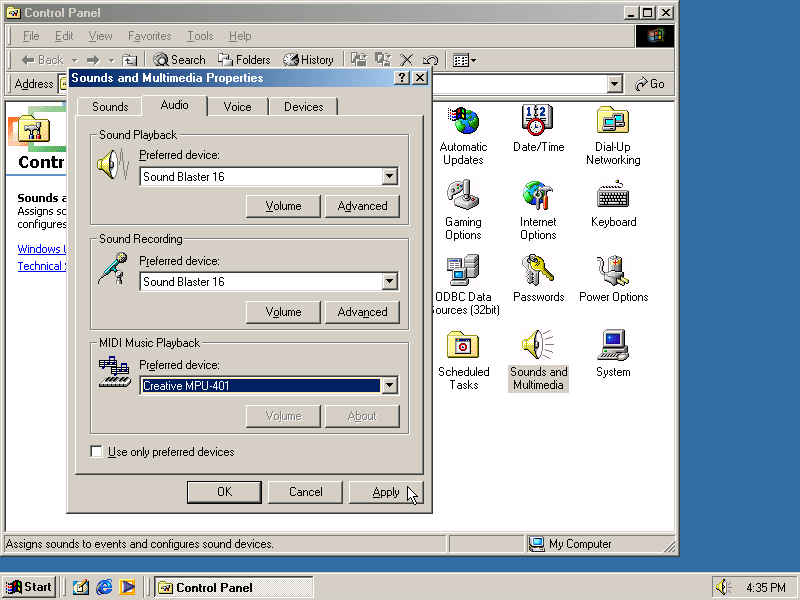
Go to «Start», «Settings» and open «Control Panel», and then double-click on «Sounds and Multimedia».
If you don’t see this option listed, click on the «view all Control Panel options» link on the left side.
Now on the «Audio» tab, change the «MIDI Music Playback» option to «Creative MPU-401», and click OK to close the window.
Enabling printing
Print to PostScript
For the best print quality, you will want to print to a PostScript printer in Windows ME.
First, set up your DOSBox-X config to print to a file as such:
[dosbox]
captures=capture

[parallel]
parallel1=file timeout=2000
You can either use the PostScript driver bundled with Windows ME, or alternatively install the newer Adobe PostScript 4.2.6 driver.
If using the bundled driver, select any PostScript printer such as the «QMS ColorScript 100 Model 30», during printer setup connected to LPT1.
When you print, a .prt file in your captures= directory will be created, which despite the extension, is actually a PostScript file.
On Linux and macOS, PostScript files are natively supported and can be viewed and printed.
On a Windows host, it is necessary to install a separate PostScript viewer such as GSview.
Epson emulation
As an alternative, you can use the integrated Epson printer emulation, but the output quality will be significantly less compared to PostScript.
First, set up your DOSBox-X config to emulate an Epson printer as such:
[parallel]
parallel1=printer

[printer]
printer=true
printoutput=ps
multipage=true
timeout=2000
Next in Windows ME, select any Epson dot-matrix printer, such as the «Epson LQ-860+» option during printer setup connected to LPT1
|
Warning |
Make sure that you do not configure the Epson printer driver for a graphics resolution other than 180×180, or the output will be corrupted. |
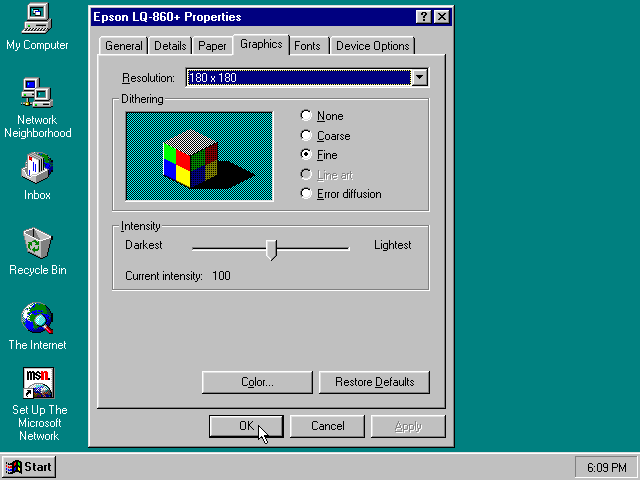
When you print, a PostScript file with the .ps extension will be created in your current working directory.
The emulated Epson printer settings can be adjusted as documented on the above linked wiki printing guide.
3dfx Voodoo
The emulated 3dfx Voodoo PCI device is enabled by default in DOSBox-X, and Windows ME includes a driver and will automatically detect it.
Windows ME includes a driver dated 4-23-1999. There is a 3.01.00 update available.
After the update it will show a date of 4-29-1999.
If for some reason you do not want 3dfx Voodoo emulation, it can be disabled by adding the following lines to your DOSBox-X config:
[voodoo]
voodoo_card=false
Glide pass-through
Glide pass-through is an optional DOSBox-X feature, and not required to use a 3dfx Voodoo game with Windows ME.
It can provide better performance, but can also be rather tricky to get working properly. As such it is not recommended for most users.
If you decide to try this method, first ensure the game works without glide pass-through using the standard 3dfx Voodoo emulation.
There are a few points you need to be aware of.
-
The DOSBox-X and glide-wrapper installed on the host need to be the same architecture.
So, if you’re using a 64bit DOSBox-X, you need to use a matching 64-bit glide-wrapper. -
The Linux SDL2 DOSBox-X does not work with OpenGlide, this is a limitation of OpenGlide (see OpenGlide issue #20).
The work-around is to use the SDL1 DOSBox-X instead.
You need to set the following DOSBox-X config option:
You will also need a specially patched GLIDE2X.DLL file which you can place in either the C:\Windows\System directory of Windows ME, or in the game directory.
But be aware that some games come with their own GLIDE2X.DLL, which typically gets installed in the game directory.
If so, you will have to remove this DLL file for glide pass-through to work.
Hard Disk Read-ahead optimization
In «System Properties», select the «Performance» tab, and click the «File System…» button.
A separate «File System Properties» window will open.
On the «Hard Disk» tab you can specify the Read-ahead optimization.
Based on benchmark results (WinBench 96), it seems that setting this to «None» gives the best performance in combination with DOSBox-X, although the difference is marginal.
This is no doubt because the host system is better at caching then the Windows ME cache function.
Host Folder mounts
Starting with DOSBox-X 2022.08.0, there is optional support to dynamically convert a host folder mount to an emulated FAT harddisk for use when you need to boot a guest OS, such as Windows ME.
This can be accomplished in one of two ways. Either when you issue the boot command, you add the option -convertfat. e.g. boot c: -convertfat.
Or by setting the following option in your DOSBox-X config file:
[sdl]
convertdrivefat = true
When you now boot from a real image file, it will attempt to convert ALL folder mounts at the time of booting to emulated FAT Harddisks.
|
Note |
You cannot boot from such an emulated FAT harddisk. You will still need some other bootable image file to actually boot a guest OS. |
|
Note |
This conversion is dynamic, effectively creating an emulated FAT harddisk out of a folder mount. This converted FAT harddisk is not automatically stored permanently. You can however, store it as a permanent image file that you can later mount with IMGMOUNT, using the «Drive» > «drive letter» > «Save to disk image» option from the menus.Please see the «Creating harddisk images from folder mounts» section in the Guide: Managing image files in DOSBox-X for more information. |
|
Note |
There is currently no support for creating emulated CD-ROM or Floppy drives out of folder mounts with this method. Any CD-ROM or Floppy folder mounts will also be converted to harddisk folder mounts, and may not actually work for the intended purpose. |
One thing to note, is that there is no way to specify the FAT type to use for the conversion.
The FAT type will be automatically selected based on the aggregate size of files in the folder, plus 250MiB (this can be adjusted with the convert fat free space option in the DOSBox-X config file).
If the total space of files + 250MiB does not exceed 2GiB, it will convert it into a FAT16 disk. Otherwise, it will become a FAT32, which in turn will require a guest OS with FAT32 support.
Alternatively, you can also make the emulated FAT drive read-only by using the -convertfatro option with the boot command. Or by setting convert fat free space=0 option in the DOSBox-X config file.
Known limitations
-
If you intend at any point to use a Floppy or CD during your usage of Windows ME, you must attach either a floppy and/or CD image before starting Windows ME, or an empty floppy or CD-ROM drive.
If a floppy or CD drive is not present when starting Windows ME the drive is simply missing, and you cannot add it without rebooting the guest OS. -
When mounting a CD-ROM image using
imgmount, before booting Windows ME, you may have to specify the IDE device to attach it to for it to work properly in Windows ME. e.g.imgmount d game_cd.iso -ide 2mto make the CD-ROM drive appear as the master device on the secondary IDE controller. -
If animated mouse cursors don’t work, the most likely cause is that for some reason it does not work if the HDD is in «compatibility mode». https://kb.iu.edu/d/adkl
Outstanding issues
-
«System Properties» → «Performance» complains about
-
Compatibility-mode paging reduces overall system performance.
-
Drive A is using MS-DOS compatibility mode file system.
-
Drive C is using MS-DOS compatibility mode file system.
-
-
In device manager, a problem with APM support: «The VPOWER.XVD device driver(s) for this device could not load the device driver (Code 2)».
-
NE2000 adapter is not automatically detected, and even if you manually add it, it takes the wrong resources (which needs to be adjusted in device manager).
-
core=dynamic_x86is not compatible at this time with Windows ME
Купить USB Портативный дисковод гибких дисков http://ali.pub/386jze
Второй канал Esset Nod https://www.youtube.com/channel/UC_Go…
Третий канал Заработок Новичку https://www.youtube.com/channel/UCyU5…
Караоке канал ESSET SMART 2 https://www.youtube.com/channel/UCwEY…
Игровой канал Esset Gamer https://www.youtube.com/channel/UCA5c…
Группа в VK покупка из Китая https://vk.com/technokitaiali
Группа в VK https://vk.com/essetsmart
Instagram https://www.instagram.com/esset_smart
Telegram https://t.me/esset_smart
Настает конец эпохи: по заявлению Microsoft, новая версия Windows — Millennium Edition, а сокращенно Me — последняя система семейства, заявившего о себе пять лет назад выходом Windows 95 и покорившего настольные компьютеры всего мира.Последняя представительница семейства Windows 9x предназначена в первую очередь счастливым обладателям современной аппаратуры, любящим мультимедийные инструменты и душой стремящимся к ПК, более устойчивому против сбоев. Конечно, для фирм, использующих Windows 95 или 98, в новой ОС тоже кое-что найдется, ее возможности восстановления покажутся весьма привлекательными системным администраторам, которых осаждают пользователи, загубившие свои машины установкой нелегального ПО. И все же для руководителей, ценящих стабильность, надежность защиты и мощные средства работы в сети, гораздо более удачным выбором будет Windows 2000 Professional.
Главное для Me — это дом. Усовершенствованные аудио- и видеоплейер, новый интерфейс для цифрового фотоаппарата и сканера плюс элементарный редактор видео делают Me самой мультимедийной из существующих Windows-систем. Кроме того, в состав ОС включены новый Мастер домашних сетей, Internet-игры и долгожданная окончательная версия Internet Explorer 5.5.
Letyshops регистрируйся и экономь на покупке https://letyshops.com/soc/sh-1?r=5567261
ePN регистрируйся и экономь на покупке http://ali.pub/2qgrob
Зарабатывай деньги, установив Kryptex на компьютер https://www.kryptex.org/?ref=fc03de5b
BestChange выгодный обменник https://www.bestchange.ru/?p=812389
Создай персональный PAYEER кошелек https://payeer.com/?partner=7069789
Зарабатывайте вместе с партнеркой AIR https://join.air.io/essetsmart
__________________________________________________________________
Очень интересные видео не пропустите:
Установка Windows Millennium на современный компьютер Часть 2 https://www.youtube.com/watch?v=tw64F…
Установка WINDOWS Millennium Edition на виртуальную машину VMware Workstation https://www.youtube.com/watch?v=t5PLb…
Установка Windows NT на современный компьютер https://www.youtube.com/watch?v=_gh0T…
Установка WINDOWS NT 4.0 на виртуальную машину VMware Workstation https://www.youtube.com/watch?v=SBDEV…
Как установить Windows XP на современный компьютер https://www.youtube.com/watch?v=2BTQ1…
Установка Windows 95 на современный компьютер https://www.youtube.com/watch?v=0k7ko…
Установка Windows 2000 на современный компьютер https://www.youtube.com/watch?v=Lt2Pp…
Установка Windows XP на RAID массив https://www.youtube.com/watch?v=Gpi21…
Установка Windows XP 64-bit Edition https://www.youtube.com/watch?v=UCl-h…
Установка Windows 10 на старый компьютер https://www.youtube.com/watch?v=f-gRJ…
Пляски с бубном при установки Windows 7 на новый ноутбук https://www.youtube.com/watch?v=19V9I…
Установка лучшей сборки Windows XP ZVER https://www.youtube.com/watch?v=k63Ip…
Установка сборки Windows XP Game Edition https://www.youtube.com/watch?v=Pxgz_…
Установка сборки Windows XP Black Edition https://www.youtube.com/watch?v=Jb6OX…
Установка сборки Windows XP MiniXP https://www.youtube.com/watch?v=OZkwo…
Загрузочный Windows с SATA жесткого диска https://www.youtube.com/watch?v=OtDl_…
Загрузочный Windows с SATA SSD диска https://www.youtube.com/watch?v=OT4Do…
Установка Windows 7 на USB носитель https://www.youtube.com/edit?o=U&vide…
Установка Windows с MICRO CD карты памяти https://www.youtube.com/watch?v=Llll4…
Прошивка BIOS для активации OEM ключом SLIC 2.1 https://www.youtube.com/watch?v=fMwGo…
Горячие клавиши BIOS на все модели ноутбуков и компьютеров https://www.youtube.com/edit?o=U&vide…
Подробная установка Windows 95 на старый компьютер https://www.youtube.com/watch?v=z_0Zf…
Подробная установка Windows 98 на старый компьютер https://www.youtube.com/watch?v=s6dHK…
………………………………………………………………………………………………………
Спасибо что просмотрели видео! Поблагодарите автора за труды!!!
Собираю деньги на видеокамеру и штатив
QIWI +77021053833
Webmoney R459676452636
Яндекс.Деньги 410014818639534
PAYEER P98276503
Донат http://www.donationalerts.ru/r/esset
BTC 16d3ofgXy2kcNoE6xmHBUHLKDF8eWR2S2h
ETH 0x43e2698ba784a660853e5034f1807b50b06682a2
This informative article will walk you through setting up Windows ME, or Millennium Edition, on a newly created virtual machine utilizing the highly efficient Oracle VirtualBox virtualization program.
Windows ME (Millennium Edition) was one of Microsoft’s operating system versions that connected Windows 98 and XP.
After the successful release of Windows 2000, the new version of the operating system for the commercial space, Microsoft decided to release the Millennium version to allow home users to update their platform. Windows ME caused a lot of design and hardware errors for users using this operating system until the release of Windows XP.
Unfortunately, when you want to install and try Windows ME on your physical computer, you cannot use up-to-date technologies or find hardware drivers. So, using virtualization software such as VirtualBox, you can install and experience Windows ME on the virtual machine by following this video or the steps below.
Step 1: First, download the ISO file of the Windows ME/Millennium operating system from the or a source on the Internet.
Step 2: After running the Oracle software, click the New button on its menu or shortcut tools to start a new virtual PC creation wizard.
Step 3: In the Name and Operating System window, after typing WindowsME in the Name field, check the values in the Type and Version sections. If you want to store the VM, you will create a different location and set the location of your external HDD or SSD storage device in the Machine Folder.
Step 4: In the Memory Size window, set a suitable RAM value for the Windows ME virtual machine according to the RAM capacity of your physical computer. By default, WinMe’s maximum RAM value is 512 MB, but you can choose a 1 GB size.
Step 5: In the Hard Disk window, you must create a new virtual disk for the Windows Millennium virtual machine. Since the Create a virtual hard disk option is enabled by default, click Next directly. In this window, if you have a guest machine you have previously installed, you can add your virtual disk file with the option to add an existing virtual HDD.
Step 6: In the Hard Disk File Type window, select the VDI (VirtualBox Disk Image) disk type and click Next. Other virtualization programs use different disk types in this window, so it is helpful to select it as the VDI disk type is the most suitable option for Oracle VM VirtualBox software.
Step 7: If you want to select a location other than the installation location in the File Location and Size window, click on the folder icon and select the location you created on your physical computer. Finally, configure the capacity of the Windows Millennium virtual disk to 4 GB.
Step 8: After creating the Windows ME virtual computer, click Settings to add the Windows ISO installation media to the guest machine and to make other virtual hardware settings.
Step 9: Since VirtualBox does not support the Guest Additions software for Windows 9x versions, you will not be able to use the hardware of your physical computer in the virtual machine, and you will not be able to enable features such as Shared Clipboard and Drag and Drop.
Step 10: In the System / Motherboard window, configure the primary boot device as Optical and turn off the Floppy device.
Step 11: If you want to configure more than one number of virtual processors for the WinME virtual computer, first enable I/O APIC on the Motherboard hardware and then specify the virtual CPU number.
Step 12: As Guest Additions cannot be installed, you usually do not need to enable 3D graphics acceleration in the Display / Screen settings. However, allow that option anyway since you will install the display adapter driver manually.
Step 13: After checking that you have configured the I/O Cache feature of the IDE controller and the WindowsVista.vdi virtual disk file as SSD (Solid-State Drive) in the storage settings, click on Empty and then the DVD icon to add the Windows ISO file to the VM and add the image file.
Step 14: After preparing the Windows Millennium virtual PC, click the Start button and start the installation. Watch the video tutorial to install the Display and USB 2.0 driver drivers.