
Диспетчер учетных данных Windows (Credential Manager) позволяет безопасно хранить учетные записи и пароля для доступа к сетевым ресурсам, веб сайтам и приложениям. Благодаря сохраненным в Credential Manager паролям вы можете подключаться без ввода пароля к сетевым ресурсам, которые поддерживаются проверку подлинности Windows (NTLM или Kerbersos), аутентификацию по сертификату, или базовую проверку подлинности.
Содержание:
- Используем диспетчер учетных данных Windows для хранения паролей
- Управление сохраненными учетными данными Windows из командной строки
- Доступ к менеджеру учетных данных Windows из PowerShell
Используем диспетчер учетных данных Windows для хранения паролей
Диспетчер учетных данных встроен в Windows и позволяет безопасно хранить три типа учетных данных:
- Учетные данные Windows (Windows Credentials) — учетные данные доступа к ресурсам, которые поддерживаются Windows аутентификацию (NTLM или Kerbersos). Это могут быть данные для подключения сетевых дисков или общим SMB папкам, NAS устройствам, сохраненные пароли для RDP подключений, пароли к сайтам, поддерживающих проверку подлинности Windows и т.д;
- Учетные данные сертификатов (Certificate-Based Credentials) – используются для доступа к ресурсам с помощью сертификатов (из секции Personal в Certificate Manager);
- Общие учетные данные (Generic Credentials) – хранит учетные данные для доступа к сторонним приложениям, совместимым с Credential Manager и поддерживающим Basic аутентификацию;
- Учетные данные для интернета (Web Credentials) – сохранённые пароли в браузерах Edge и Internet Explorer, приложениях Microsoft (MS Office, Teams, Outlook, Skype и т.д).
Например, если при доступе к сетевой папке вы включите опцию “Сохранить пароль”, то введенный вами пароли будет сохранен в Credential Manager.

Аналогично пароль для подключения к удаленному RDP/RDS серверу сохраняется в клиенте Remote Desktop Connection (mstsc.exe).
Открыть диспетчер учетных данных в Windows можно:
- из классической панели управления (Control Panel\User Accounts\Credential Manager, Панель управления -> Учетные записи пользователей -> Диспетчер учетных данных);
- изкоманднойстроки:
control /name Microsoft.CredentialManager
На скриншоте видно, что в Credential Manager хранятся два пароля, которые мы сохранили ранее.
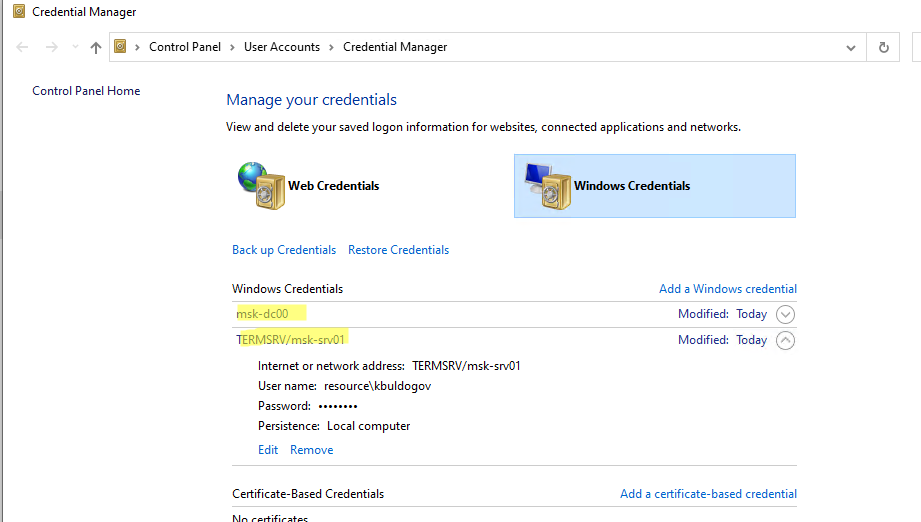
Сохраненный пароль для RDP подключения сохраняется в формате
TERMSRV\hostname
.
Здесь вы можете добавить сохранённый пароль, отредактировать (просмотреть сохраненный пароль в открытом виде из графического интерфейса нельзя) или удалить любую из записей.
Для управления сохраненными паролями можно использовать классический диалоговый интерфейс Stored User Names and Password. Для его запуска выполните команду:
rundll32.exe keymgr.dll,KRShowKeyMgr
Здесь вы также можете управлять сохраненными учетными данными, а также выполнить резервное копирование и восстановление записей в Credential Manager (можно использовать для переноса базы Credential Manager на другой компьютер).
Управление сохраненными учетными данными Windows из командной строки
Вы можете добавить удалить и вывести сохраненные учетные данных в Credentil Manager из командной строки с помощью утилиты cmdkey.
Добавить в диспетчер учетные данные для доступа к серверу FS01:
cmdkey /add:FS01 /user:kbuldogov /pass:Passw0rdd1
Если нужно сохранить доменную учетную запись:
cmdkey /add:fs01.winitpro.local /user:[email protected] /pass:Passw0rdd1
Сохранить учетные данные для доступа к RDP/RDS серверу:
cmdkey /generic:termsrv/MSKRDS1 /user:kbuldogov /pass:Passw0rdd1
Вывести список сохраненных учетных данных:
cmdkey /list
Вывести список хранимых учетных данных для указанного компьютера:
cmdkey /list:fs01.winitpro.local
Удалить ранее сохраненные учетные данные:
cmdkey /delete:FS01
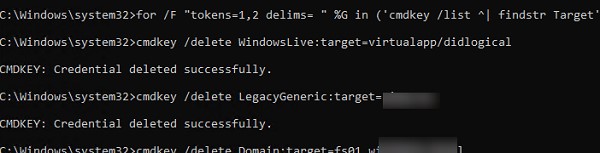
Удалить из Credential Manager все сохраненные пароли для RDP доступа:
For /F "tokens=1,2 delims= " %G in ('cmdkey /list ^| findstr "target=TERMSRV"') do cmdkey /delete %H
Полностью очистить пароли в Credential Manager:
for /F "tokens=1,2 delims= " %G in ('cmdkey /list ^| findstr Target') do cmdkey /delete %H
Также для управления сохраненными учетными данными можно использовать утилиту vaultcmd.Вывести список сохраненных учетных данных типа Windows Credentials:
vaultcmd /listcreds:"Windows Credentials"

Все сохраненные пароли хранятся в защищенном хранилище Windows Vault. Путь к хранилищу можно получить с помощью команды:
vaultcmd /list

По умолчанию это
%userprofile%\AppData\Local\Microsoft\Vault
. Ключ шифрования хранится в файле Policy.vpol. Клю шифровани используется для рашировки паролей в файлах .vcrd.
Для работы Credential Manager должна быть запущена служба VaultSvc:
Get-Service VaultSvc
Если служба отключена, при попытке получить доступ к Credential Manager появится ошибка:
Credential Manager Error
The Credential Manager Service is not running. You can start the service manually using the Services snap-in or restart your computer to start the service.
Error code: 0x800706B5
Error Message: The interface is unknown.
Если вы хотите заблокировать пользователям возможность сохранения сетевых паролей в Credential Manager, нужно включить параметр Network access: Do not allow storage of passwords and credentials for network authentication в разделе GPO Computer Configuration -> Windows Settings -> Security Settings -> Local Policies -> Security Options.
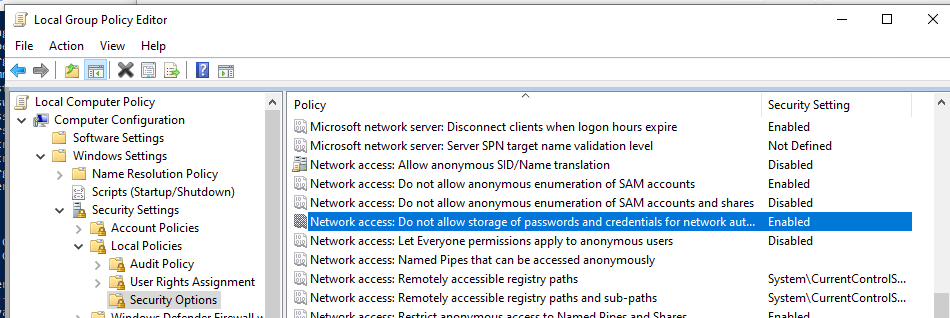
Теперь, если пользователь попытается сохранить пароль в хранилище, появится ошибка:
Credential Manager Error
Unable to save credentials. To save credentials in this vault, check your computer configuration.
Error code: 0x80070520
Error Message: A specified logon session does not exist. It may already have been terminated.
Доступ к менеджеру учетных данных Windows из PowerShell
В Windows нет встроенных командлетов для обращения к хранилищу PasswordVault из PowerShell. Но вы можете использовать модуль CredentialManager из галереи PowerShell.
Установите модуль:
Install-Module CredentialManager

В модуле всего 4 командлета:
- Get-StoredCredential – получить учетные данные из хранилища Windows Vault;
- Get-StrongPassword – сгенерировать случайный пароль;
- New-StoredCredential – добавить учетные данные в хранилище;
- Remove-StoredCredential – удалить учетные данные.
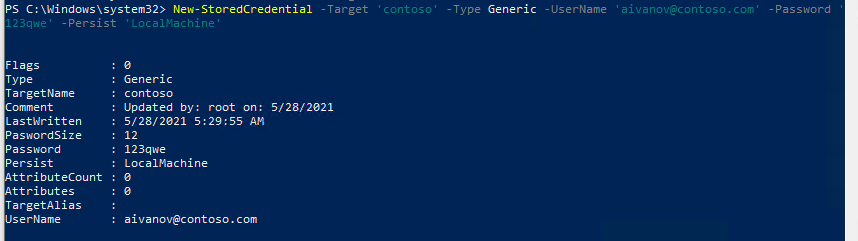
Чтобы добавить новые учетные данные в хранилище CredentialManager, выполните команду:
New-StoredCredential -Target 'contoso' -Type Generic -UserName '[email protected]' -Password '123qwe' -Persist 'LocalMachine'
Проверить, есть в хранилище сохраненные данные:
Get-StoredCredential -Target contoso
С помощью командлета Get-StoredCredential вы можете вывести сохраненный пароль, хранящийся в диспетчере учетных данных в отрытом виде.
Выведите список сохраненных учетных данных:
cmdkey.exe /list
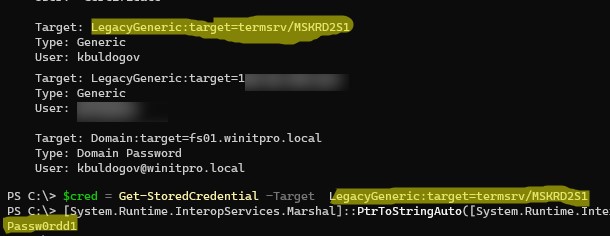
Скопируйте значение Target для объекта, пароль которого вы хотите извлечь и вставьте его в следующую команду:
$cred = Get-StoredCredential -Target  LegacyGeneric:target=termsrv/MSKRD2S1
[System.Runtime.InteropServices.Marshal]::PtrToStringAuto([System.Runtime.InteropServices.Marshal]::SecureStringToBSTR($cred.Password))
Команда выведет сохраненный пароль в открытом виде.
Также для получения сохраненных паролей из credman в открытом виде можно использовать утилиты типа Mimikatz (смотри пример).
Сохраненные пароли из Credential Manager можно использовать в ваших скриптах PowerShell. Например, в следующем примере я получаю сохраненные имя и пароль в виде объекта PSCredential и подключаюсь с ними к Exchange Online из PowerShell:
$psCred = Get-StoredCredential -Target "Contoso"
Connect-MSolService -Credential $psCred
Также вы можете использовать Get-StoredCredential для безопасного получения сохранённых учетных данных в заданиях планировщика.
Также обратите внимание на модуль PowerShell Secret Management, который можно использовать для безопасного хранения паролей в Windows (поддерживает различные хранилища паролей: KeePass, LastPass, HashiCorp Vault, Azure Key Vault, Bitwarden.
Чтобы удалить сохраненные учетные данные из Windows Vault, выполните:
Remove-StoredCredential -Target Contoso
Практически каждый владелец компьютера Apple рано или поздно сталкивается с процедурой переноса данных с одного Mac на другой. Купертиновцы разработали несколько простых и доступных способов передать данные для быстрого переезда.
Сейчас расскажем о каждом способе подробнее. Вы сможете перенести файлы, приложения и настройки как при наличии двух компьютеров рядом, так и в случае когда одно устройство продается перед покупкой другого.
Как подготовиться к переносу данных
▣ Подключить оба компьютера Mac к источнику питания, перенос может занять много времени, а батарея ноутбука – разрядиться.
▣ Подключить оба устройства к одной локальной сети при помощи Wi-Fi или проводного соединения. Вместо сетевого подключения можно использовать прямое соединение при помощи кабеля Type-C или Thunderbolt.
▣ Обновите операционную систему на каждом из устройств до последней доступной. Желательно, чтобы оба компьютера имели одинаковую версию macOS.
В противном случае часть данных может не перенестись из-за отсутствия поддержки определенных системных фишек. Так, например, если переносить заметки или напоминания с тегами, их получится передать только на актуальные версии системы, начиная с macOS Monterey.
▣ Используйте разные имена для каждого компьютера, чтобы их было проще отличить друг от друга и не запутаться при переносе. В дальнейшем вы сможете назвать новый Mac так же как и старый. Смена имени компьютера осуществляется по пути Системные настройки – Общий доступ – Имя компьютера.
▣ Если нужно отдавать старый Mac перед покупкой нового, сделайте резервную копию данных через Time Machine на подходящем по объему внешнем накопителе.
Когда все готово к переносу данных, можете приступать к следующему шагу.
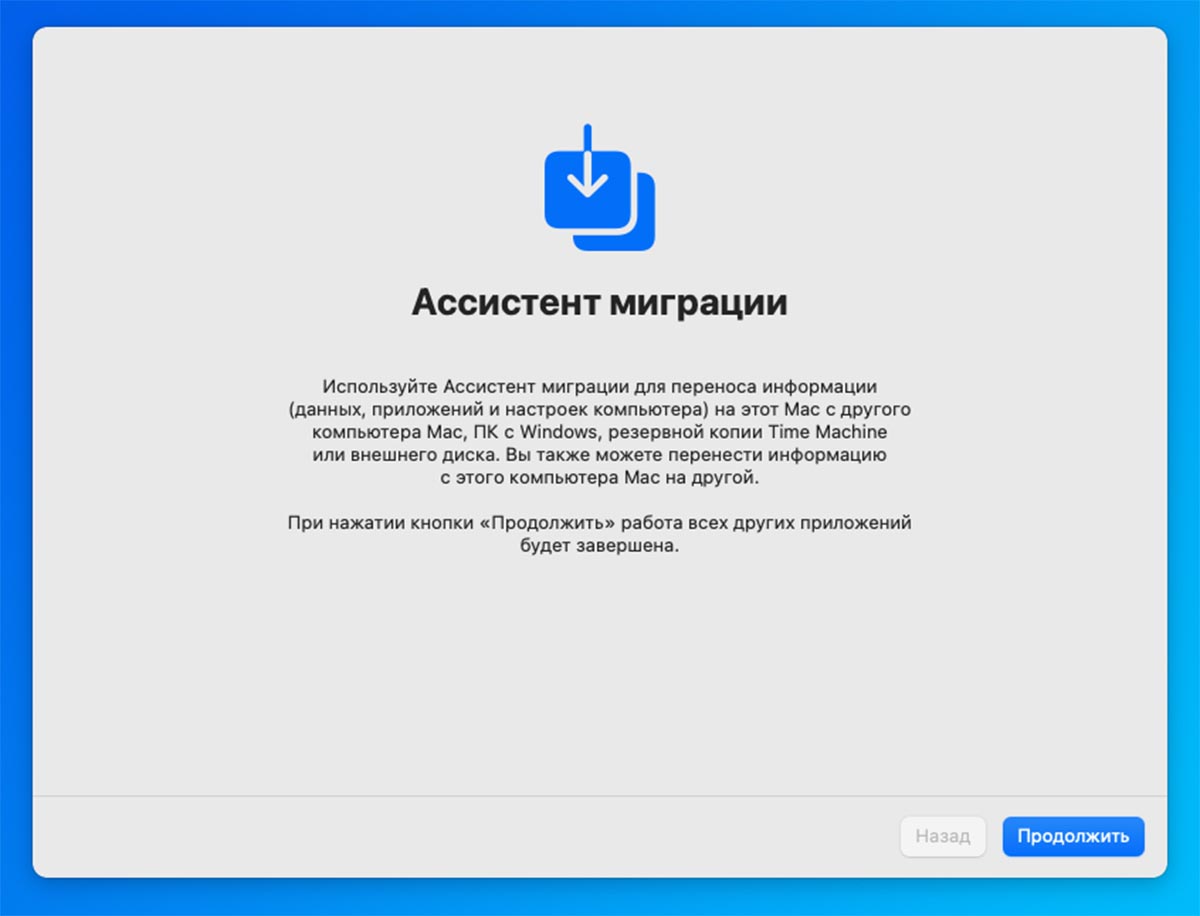
Как перенести данные при помощи Ассистента миграции
Купертиновцы добавили в macOS специальное приложение для простого и быстрого переноса данных. С его помощью можно передавать файлы, настройки системы и приложения с одного компьютера Apple на другой. Поддерживается как прямой перенос данных, так и миграция через резервную копию.
Кроме этого при помощи Ассистента миграции можно перенести данные при переходе с Windows-ПК на Mac. Разумеется, в этом случае будут перенесены только пользовательские файлы и документы. Кроссплатформенный перенос приложений или системных параметров невозможен.
▶ Запустите утилиту Ассистент миграции через поиск Spotlight или Launchpad.
▶ Нажмите Продолжить и введите пароль администратора Mac. Обратите внимание, что после этого другие приложения будут автоматически завершены.
▶ Выберите одно из подходящих действий:
◉ Перенос на этот Mac данных с другого компьютера, загрузочного диска или копии Time Machine.
◉ Перенос на этот Mac данных с Windows ПК (только контент без настроек системы и приложений).
◉ Перенос данных с этого Mac на другой Mac.
Далее действуйте по подходящей инструкции.
Как перенести данные на этот Mac
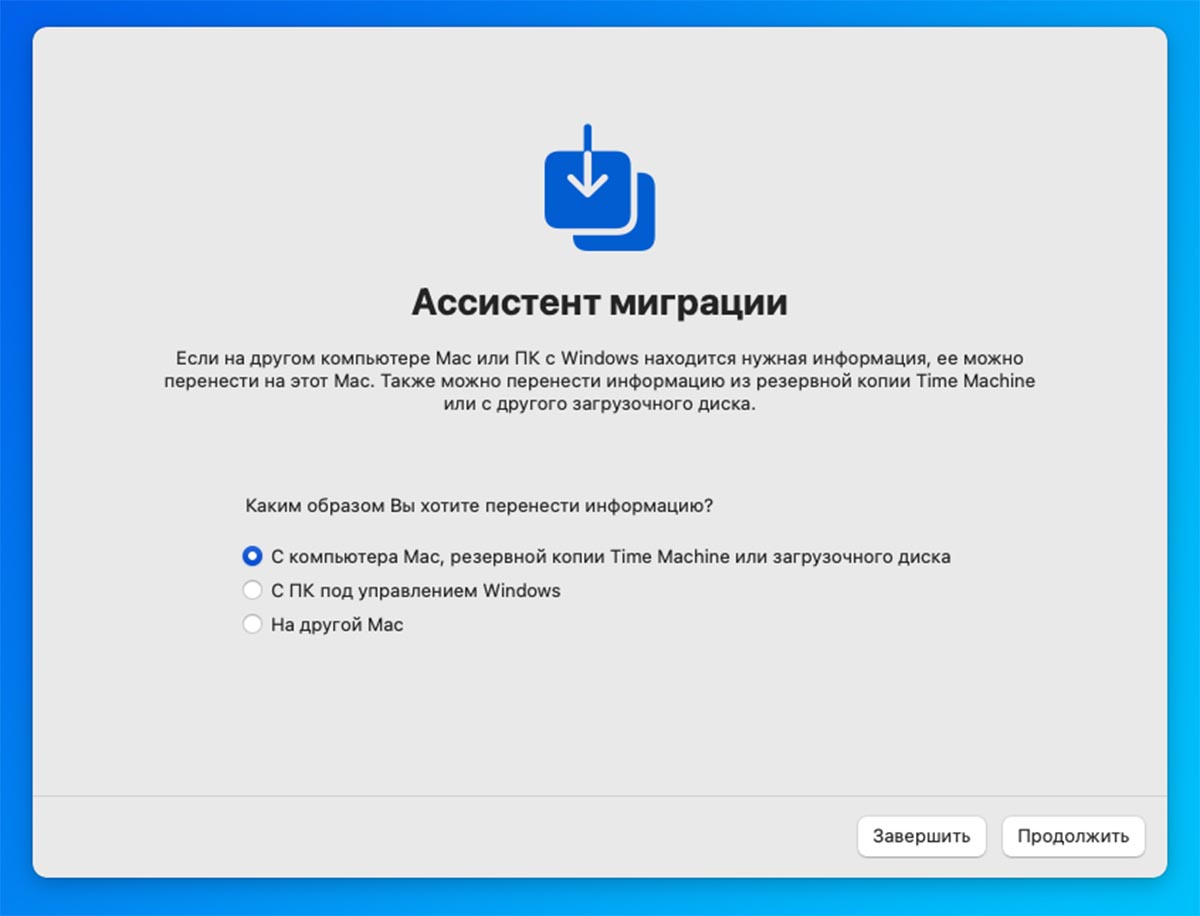
Если хотите настроить перенос данных на текущий компьютер, дойдите до последнего шага Ассистента миграции и на нем укажите первый пункт: С компьютера Mac, резервной копии Time Machine или загрузочного диска.
После этого укажите источник переноса данных. Это может быть другой Mac с запущенной утилитой Ассистент миграции, подключенный накопитель или сетевое хранилище с бекапом Time Machine или загрузочный диск с образом операционной системы.
В зависимости от выбранного источника следуйте дальнейшим указаниям Ассистента миграции и дождитесь окончания переноса.
Как перенести данные с этого Mac

Для переноса данных с текущего устройства дойдите до соответствующего пункта меню в утилите Ассистент миграции и укажите пункт: На другой Mac.
Далее потребуется оставить этот компьютер включенными и не занимать его другими процессами.
Все дальнейшие действия до окончания переноса нужно будет осуществлять на другом Mac, куда будут переноситься данные.
Как перенести данные через iCloud
Кроме стандартного способа с использованием ассистента миграции можно перенести данные через облако Apple. Этот способ позволяет передавать контент, но не дает возможность передавать установленные приложения и системные опции.
После переноса данных придется вручную устанавливать и настраивать приложения на новом компьютере. Однако, этот способ не требует наличия двух компьютеров одновременно. Так вы сможете перенести данные из облака на новый Mac уже после продажи или передачи другому пользователю старого Mac.
Для подобного переноса потребуется большой объем облачного хранилища, чтобы уместить все необходимые данные.
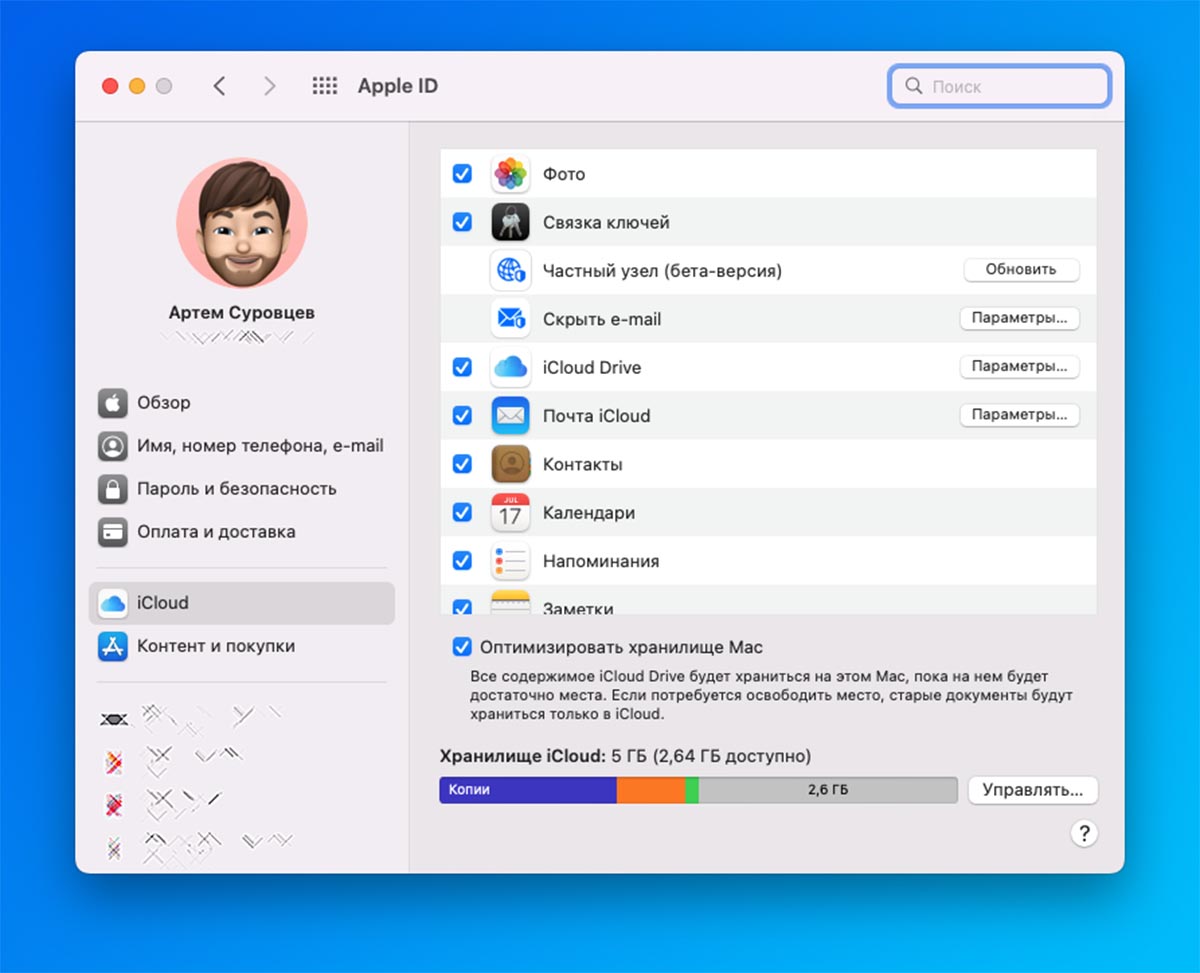
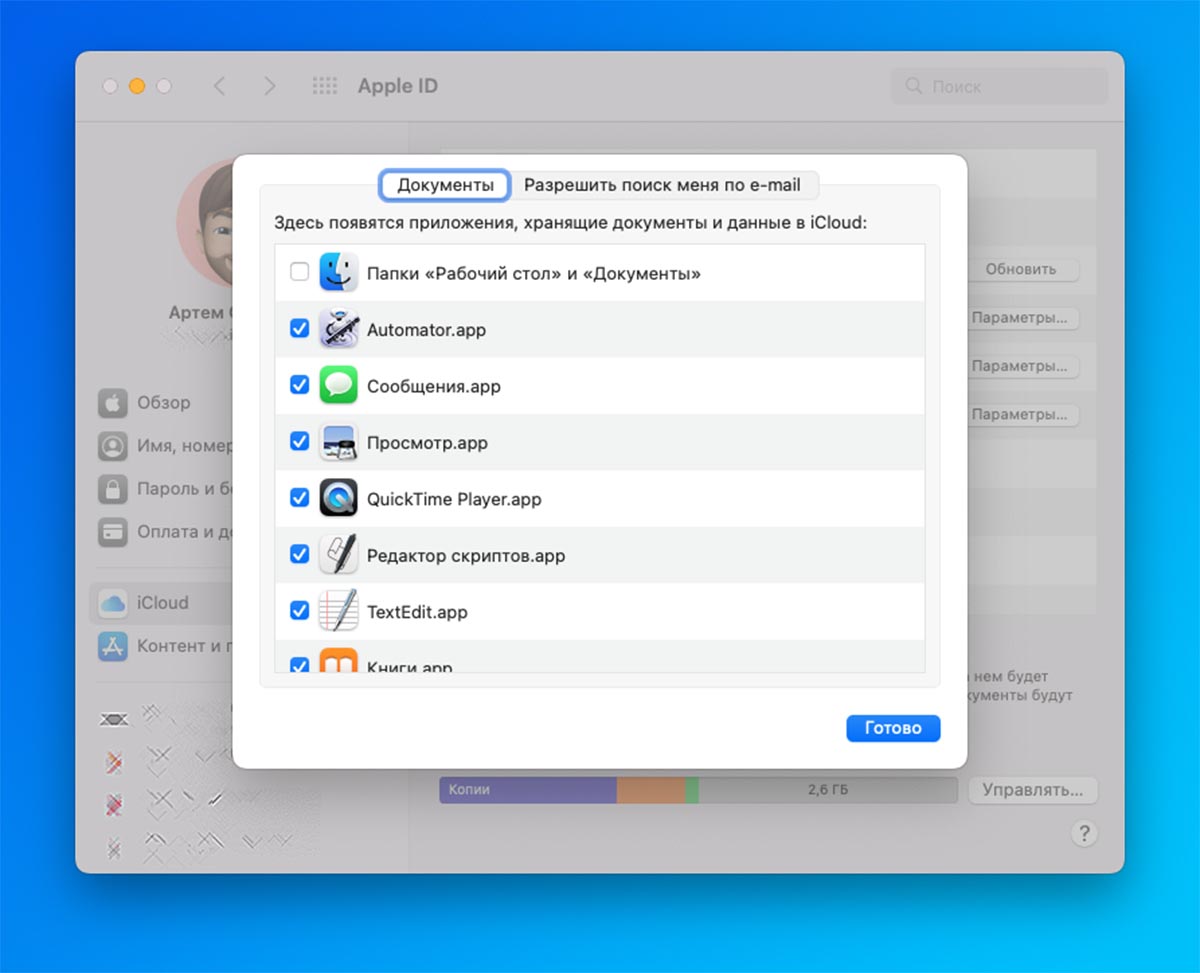
◈ На компьютере-источнике перейдите в Системные настройки – Apple ID – iCloud и выберите необходимые для переноса данные.
◈ В разделе параметров iCloud можете включить синхронизацию с облаком папок Рабочий стол и Документы. После этого туда нужно поместить все необходимые для переноса файлы.
◈ Дождитесь, пока все данные с компьютера-источника не будут перенесены в облако. Во время переноса будете видеть активный индикатор синхронизации возле папки iCloud в Finder.
◈ На компьютере-приемнике авторизуйтесь в своей учетной записи Apple ID (Системные настройки – Apple ID) и включите синхронизацию тех же приложений и папок, что и на компьютере-источнике.
Через некоторое время все данные будут перенесены из облака на новый Mac.
Как перенести данные через общий доступ к файлам
Если места в облачном хранилище не хватает для переноса всех необходимых данных или вы не хотите нарушать привычную структуру хранения файлов, можете перенести все нужные для переноса папки по сети.
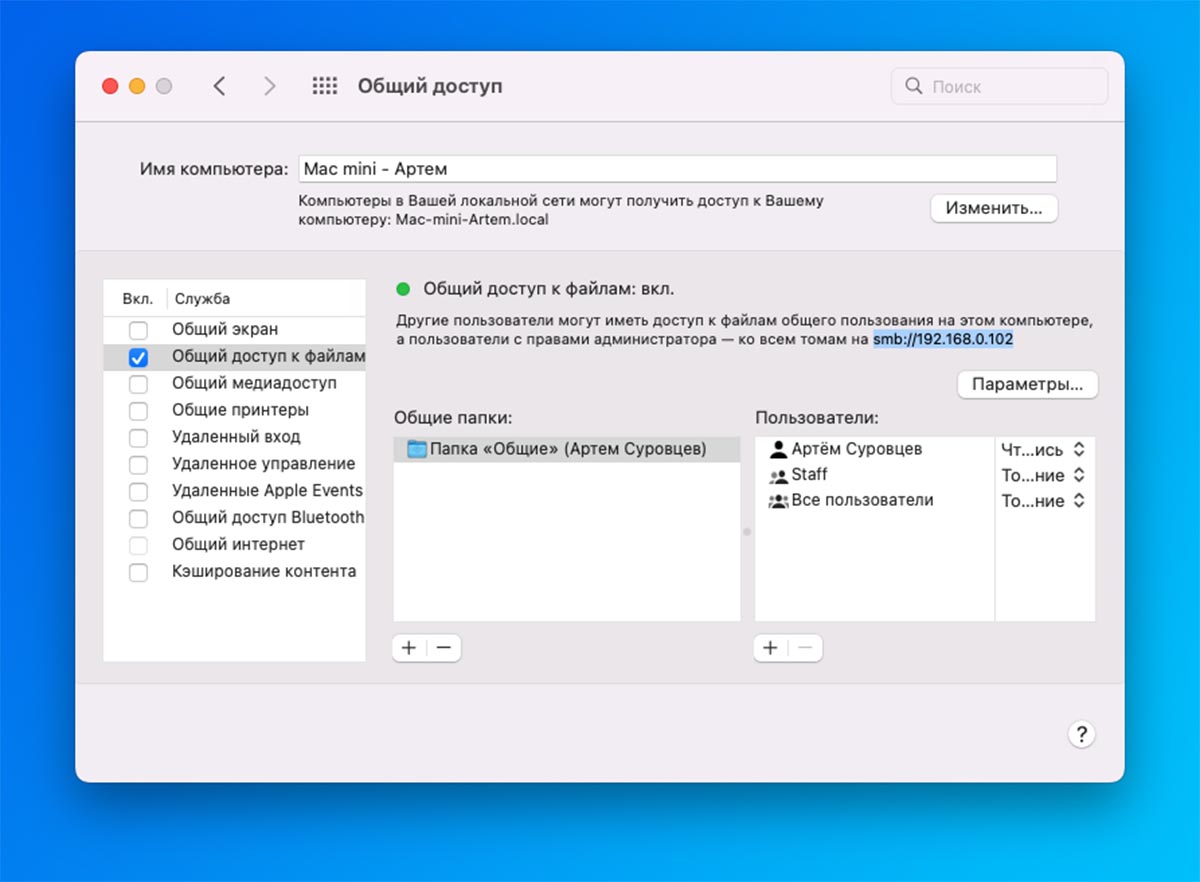
◎ На компьютере-источнике перейдите в Системные настройки – Общий доступ.
◎ В боковом меню выберите раздел Общий доступ к файлам и установите возле него флаг.
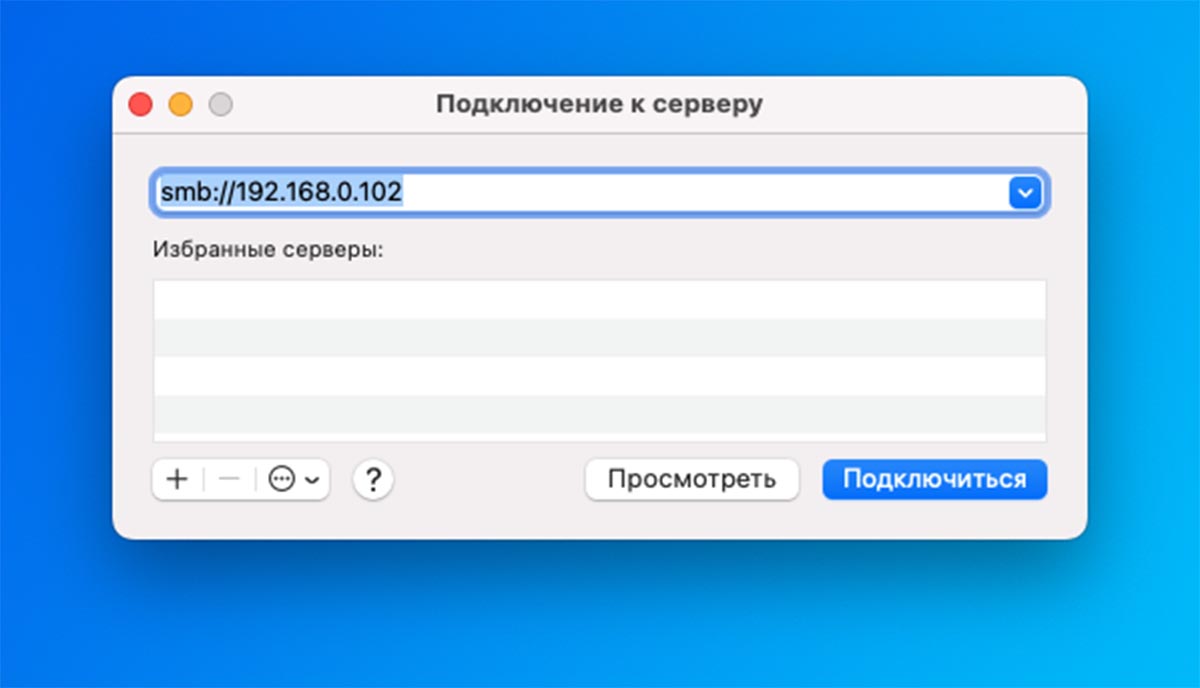
◎ На компьютере-приемнике откройте Finder и выберите пункт Переход – Подключение к серверу…
◎ Введите IP-адрес компьютера-источника (он будет виден в параметрах при включении общего доступа) и подключитесь к нему.
◎ Авторизуйтесь при помощи логина и пароля администратора и сможете перенести данные с одного Mac на другой.
Как перенести данные через AirDrop
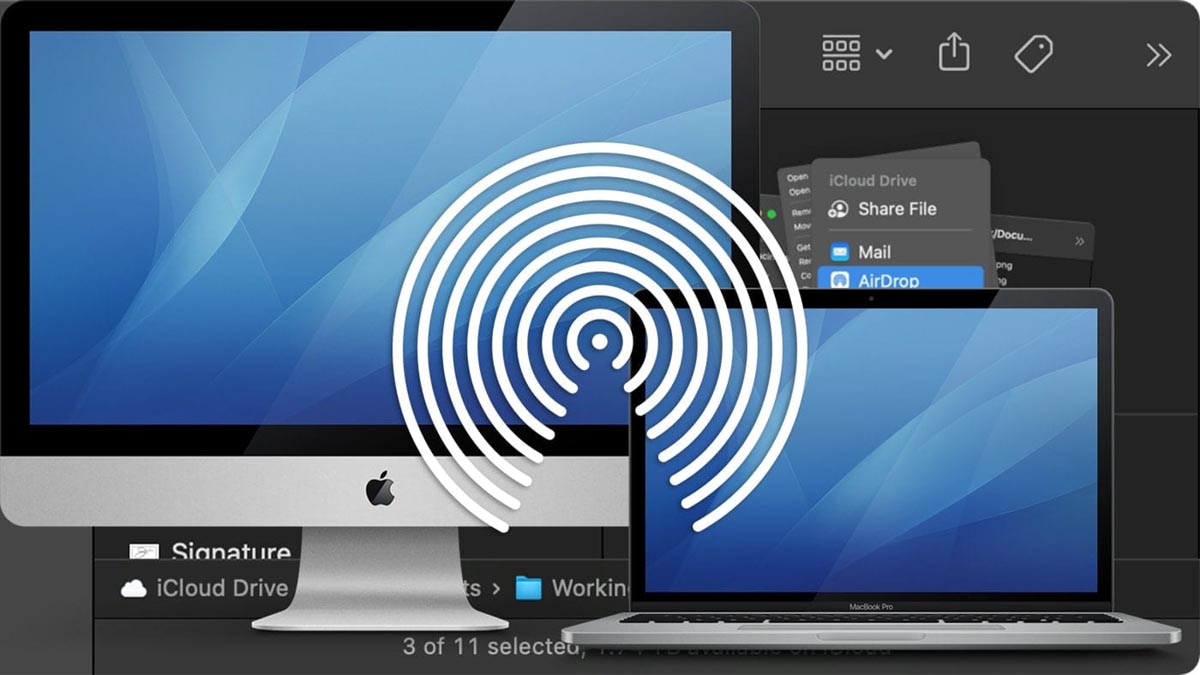
Самым простым способом переноса данных является банальная передача файлов через AirDrop. Она позволит перенести любые файлы между компьютерами без соответствующего кабеля, внешнего диска или доступного сетевого подключения.
Нужно лишь включить Bluetooth и Wi-Fi на каждом Mac, выделить необходимые данные и переслать их по беспроводному подключению через меню Поделиться.
Рекомендуем разбить передаваемые данные на несколько частей, чтобы в случае сбоя не начинать весь процесс с начала.
Вот так можно быстро переносить файлы, приложения и нужные данные для развертывания привычного рабочего пространства с одного Mac на другой.
(22 голосов, общий рейтинг: 4.32 из 5)
iPhones.ru
Есть способы на все случаи жизни.
Артём Суровцев
@artyomsurovtsev
Люблю технологии и все, что с ними связано. Верю, что величайшие открытия человечества еще впереди!
Некоторые пользователи Windows 10 сообщили о проблемах в работе функции запоминания паролей. Microsoft уже успела признать наличие бага, а мы расскажем о действиях, которые можно предпринять, если вы столкнулись с неприятной проблемой.
Основные жалобы пользователей касаются таких приложений, как Outlook, OneDrive, Chrome и Microsoft Edge. Дескать, все эти программы забывают введённые и зафиксированные ранее пароли от аккаунтов.
Самое примечательное, что о баге начали говорить сразу после майского обновления операционной системы — Windows 10 2004. Другими словами, Microsoft почему-то уже полгода не может устранить проблему.
К счастью, странное поведение не затрагивает пароль от самой учтённой записи Windows 10. Более того, отдельным пользователям вообще повезло обойти стороной этот баг. Однако многих всё же коснулся недочёт апдейта.
«После установки Windows 10 версии 2004 (номер сборки — 19041.173) вы могли обнаружить проблему с запоминанием паролей в приложениях. Судя по всему, причина кроется в задачах «Планировщика Windows», сконфигурированных определённым образом», — пишет сама Microsoft.
Так что же делать рядовому пользователю, если он обнаружил досадный баг? Достаточно просто отключить конкретные задачи в «Планировщике». Рассказываем алгоритм:
1. Запускаем Windows Powershell с правами администратора (это можно сделать из меню «Пуск»).
2. Копируем и вставляем следующее в Powershell:
Get-ScheduledTask | foreach { If (([xml](Export-ScheduledTask -TaskName $_.TaskName -TaskPath $_.TaskPath)).GetElementsByTagName("LogonType").'#text' -eq "S4U") { $_.TaskName } }
3. Нажимаем Enter и запоминаем все задачи, которые вывела команда.
4. Открываем «Планировщик Windows» и отключаем эти задачи (правой кнопкой мыши и соответствующий пункт).
5. Перезагружаем Windows 10.
После этого проблема должна уйти.
Подписывайтесь на канал «AM Live» в Telegram, чтобы первыми узнавать о главных событиях и предстоящих мероприятиях по информационной безопасности.
Читайте также
/news/2025-05-14-111332/46025

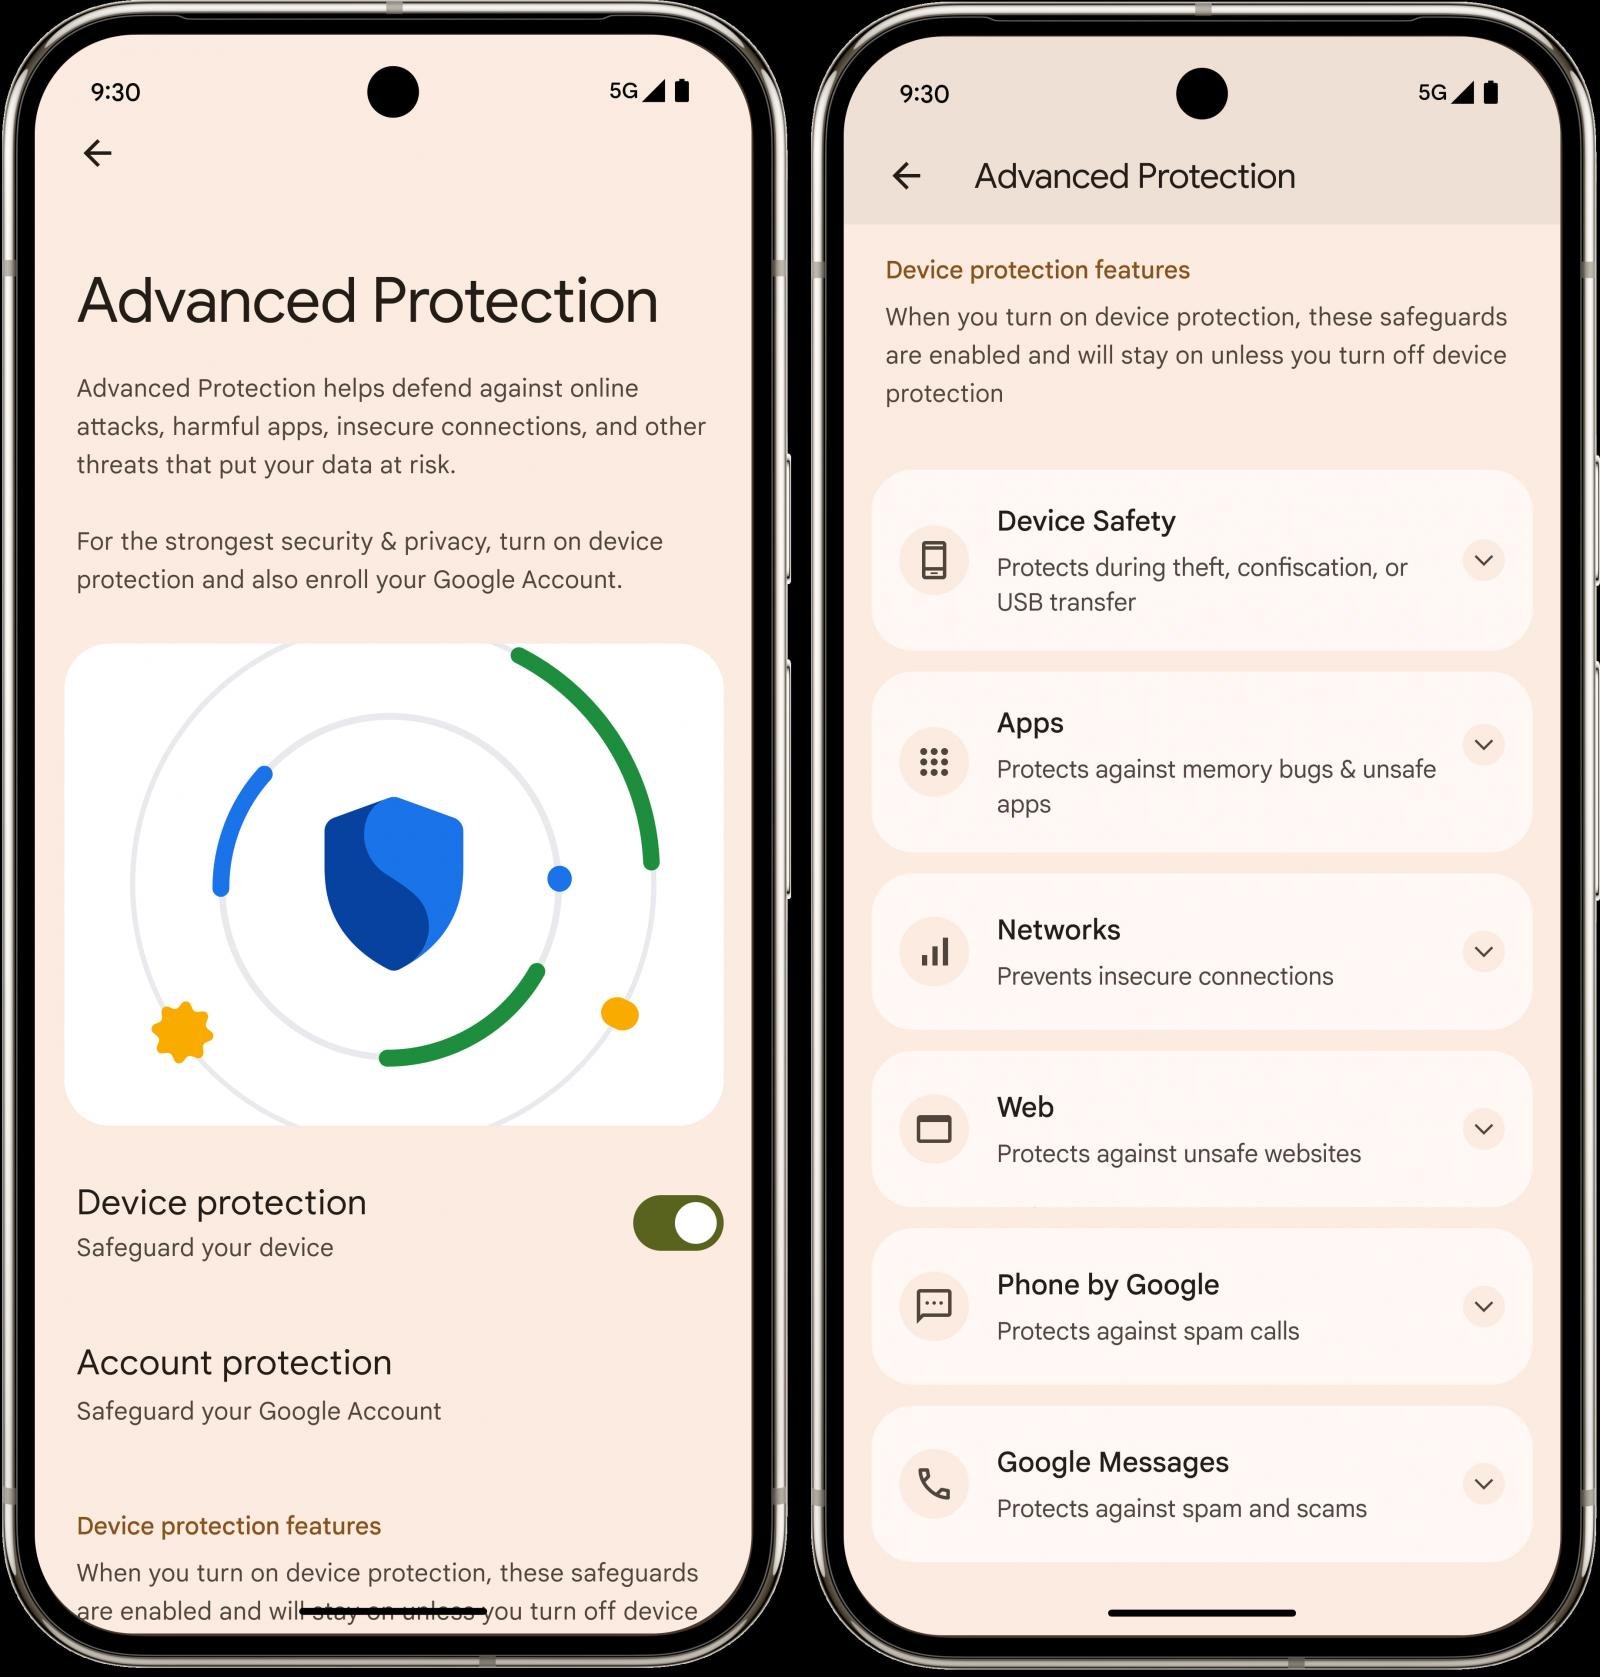
Google представила Android 16 на «The Android Show: I/O Edition» — и одной из главных тем стали серьёзные усиления безопасности. Особенно для тех, кто может стать мишенью сложных кибератак: журналистов, политиков, активистов и просто параноиков (в хорошем смысле).
Теперь в Android появится Advanced Protection — режим безопасности, который делает смартфон практически непробиваемым для большинства видов шпионского софта.
Раньше такая защита была только для Google-аккаунтов, теперь же речь идёт о защите самого устройства — на уровне системы, а не просто настроек отдельных приложений.
Что входит в Advanced Protection:
- Проверка целостности загрузки и системы.
- Блокировка USB-порта.
- Полная изоляция приложений.
- Перезагрузка устройства, если оно бездействует более 72 часов.
- Усиленный Google Play Protect.
- Блокировка отключения или ослабления защиты (ни случайно, ни намеренно).
А ещё — новинки:
- Intrusion logging — журнал подозрительных событий, защищённый и хранящийся в облаке (но доступен только владельцу устройства).
- Блокировка автоподключения к слабым Wi-Fi-сетям, которые могут использоваться для атак.
Всё это напоминает Lockdown Mode от Apple, но в версии для Android.
Не все функции будут доступны сразу — многое зависит от производителя и модели смартфона.
Android 16 добавляет ещё одну важную функцию — in-call scam protection. Если вам звонит незнакомый номер, система не даст выполнить рискованные действия: установить APK, выдать опасные разрешения или отключить защиту.
Также улучшения получили:
- Приложения «Сообщения» и «Телефон» — теперь они используют ИИ для распознавания скамов (платные дороги, крипта, «техподдержка Google» и вся эта классика).
- Key Verifier — новый механизм в «Сообщениях» для проверки, кто на самом деле с вами переписывается. Работает через QR-коды или сравнение номеров — помогает защититься даже от атак с подменой сим-карты.
- Find Hub — обновлённый «Найти устройство», который теперь работает и с потерянными вещами (метки Bluetooth, чемоданы в аэропортах и т.д.). А скоро он будет работать даже через спутники!
Когда всё это будет? Некоторые функции уже есть в Android 16 Developer Preview, остальные появятся ближе к релизу финальной версии, а кое-что — к концу года.
Подписывайтесь на канал «AM Live» в Telegram, чтобы первыми узнавать о главных событиях и предстоящих мероприятиях по информационной безопасности.
Свидетельство о регистрации СМИ ЭЛ № ФС 77 — 68398, выдано федеральной службой по надзору в сфере связи, информационных технологий и массовых коммуникаций (Роскомнадзор) 27.01.2017
Разрешается частичное использование материалов на других сайтах при наличии ссылки на источник. Использование материалов сайта с полной копией оригинала допускается только с письменного разрешения администрации.
© ООО «АМ Медиа», 2005-2025. Все права защищены.
Passwords are excellent security tools preventing unauthorized persons from accessing various information. But keeping up with all of your passwords is not that easy. This is because the average computer user utilizes 20 to 40 passwords and managing them is not an easy task.
Learning all these passwords by heart is a bit difficult — that’s why many prefer to use the same password on all of their accounts. Luckily, browsers can now save your username and password so you don’t need to learn all your passwords by heart or always keep a password notebook at hand.
Well, this password-saving feature may sometimes not work and Microsoft Edge may not remember your passwords. But there are some troubleshooting steps you can pursue to fix the problem.
Contents
- 1 Microsoft Edge Won’t Remember Passwords
- 1.1 1. Re-enable Show most used apps
- 1.2 2. Allow cookies in Edge
- 1.3 3. Enable Microsoft Credential Manager
- 1.4 4. Clear your browser history and cookies
- 1.5 5. Disable extensions
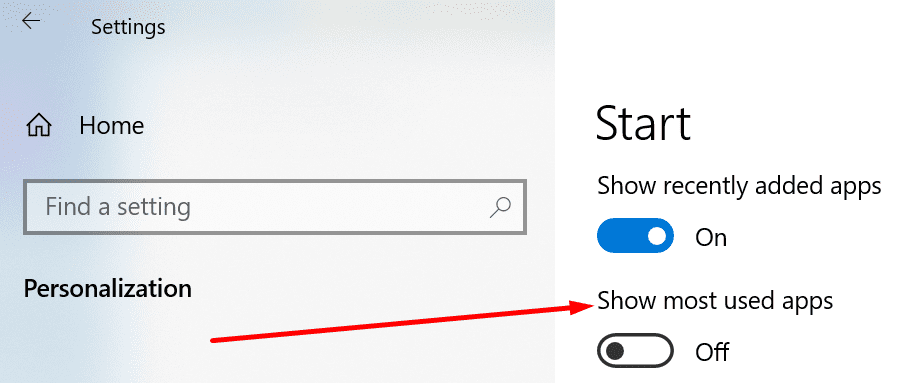
1. Re-enable Show most used apps
- Open the Settings app and go to Personalization
- Select Start and locate the option Show most used apps

- Turn this feature on — if it’s already enabled, disable it and then re-enable it.
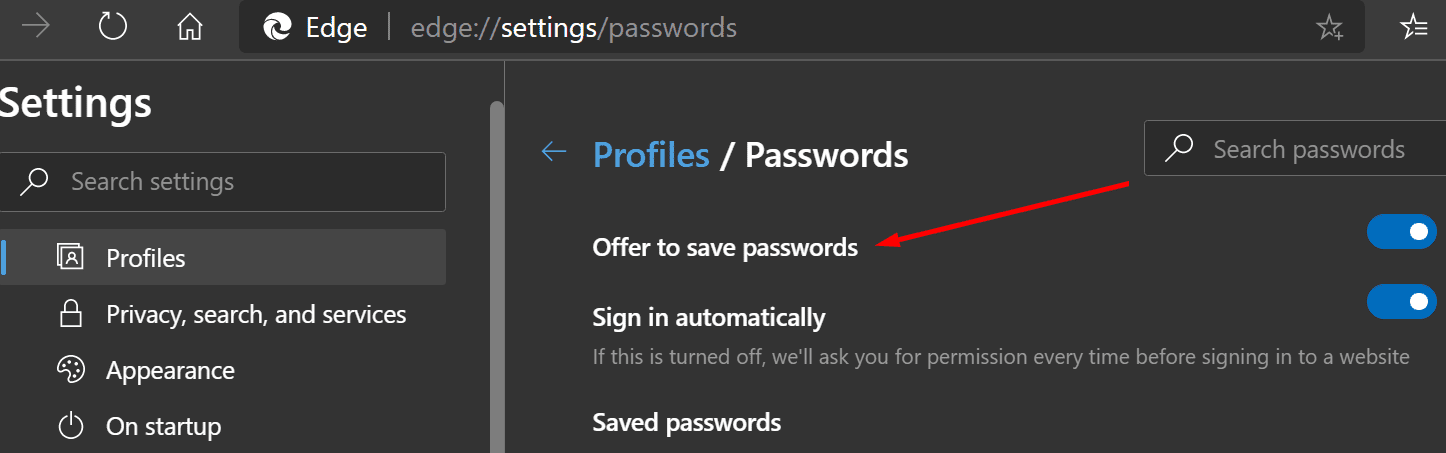
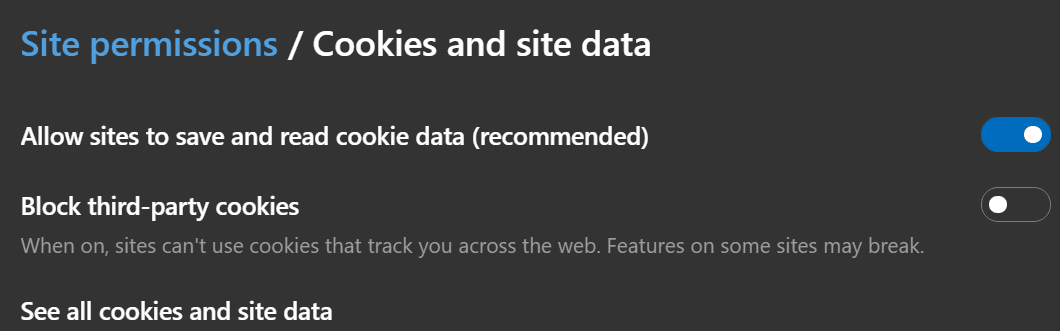
2. Allow cookies in Edge
If you blocked cookies in Edge, this could also affect the browser’s ability to save and remember your passwords.
- Launch the browser and click the menu
- Select Settings → go to your Profile
- Enable Offer to save password and Save from entries

- Go to Site Permissions and allow cookies

- Restart your browser and check if the password problem is gone.
3. Enable Microsoft Credential Manager
If the Microsoft Credential Manager is disabled, Windows 10 and Edge won’t be able to access the passwords you previously saved.
To fix the problem, you need to make sure the Credential Manager is running.
- Go to Windows Search and type services
- Open the Services app and locate the Credential Manager
- Select it and make sure the service is active

- If it’s already running, double click on it, disable it and then re-enable it.

4. Clear your browser history and cookies
Previously saved data such as cookies, your browsing history and other temporary files may prevent Edge from remembering your passwords. Clearing that data should help.
- Launch Edge, click on the menu and select History
- Click on Clear browsing data and select your history, cookies and cache
- Hit the Clear now button and restart your browser.
5. Disable extensions
Make sure your extensions or add-ons are not interfering with Edge’s password saving feature. Start by disabling all of your extensions and check if the problem is gone.
If Edge can save and remember passwords without any problem with the extensions disabled, identify the culprit and uninstall the problematic extension.
If nothing worked, consider using a password manager.
Chrome is not just a place where you can find a solution to your problems, but it also provides additional features. This browsing platform is a great place to access different applications and generally use Google. Chrome provides an in-built password saving feature that facilitates sign-in with a single click. Many users have reported their struggles with Google Chrome not saving passwords. If you are also dealing with the same problem, you are at the right place. We bring you a perfect guide to help you fix the Chrome saved passwords disappeared issue.

Table of Contents
If you face the Chrome saved passwords not working issue, there might be a few reasons behind it. The reasons are listed below:
- Corrupt file on the Chrome app.
- Corrupt browser cache.
- Disabled save password option.
- Disabled storing data option in Chrome.
- Outdated Chrome browser.
- Corrupt Chrome extensions.
- Corrupt user profile.
If you are facing issues with your Chrome and its password-saving ability, then it is time to resolve those issues using some uncomplicated methods.
Method 1: Update Google Chrome
The simplest way to come over this issue is by updating the app with the newest software version available. To do that, follow the steps mentioned below:
1. Double-click on Google Chrome on your desktop to launch the app.

2. Click on the three-dot icon at the top right corner of the screen.
3. Click on Help in the drop-down menu.
4. Select About Google Chrome in it.

5A. If Google Chrome is updated to its latest version, it will show Chrome is up to date.

5B. If a new update is available, the browser will automatically update the browser to the latest version. Click on Relaunch to complete the update process.

Method 2: Sign in to Google Account Again
There are times when just simply logging out of your Google account could help you resolve the Chrome saved passwords not working issue. To do so, you can follow the steps below:
1. Open Chrome web browser.
2. Click on the three-dot icon on the browser page.
3. Click on Settings.
4. Click on Manage your Google Account.

5. Click on the profile picture at the top right corner of the page.

6. Click on Sign out.
7. Now, enter your Email or phone to sign in to your Google account again in the browser.

Also Read: 14 Ways to Fix Chrome Profile Error
Method 3: Modify Password Settings
Chrome saved passwords disappeared can be a problem due to password settings. If you have disabled auto-login, it may cause Chrome not to save the password in the future. Hence, follow the steps given below to enable it again:
1. Launch Chrome browser as done earlier.
2. Click on the three-dot icon at the top right corner.
3. Click on Settings.
4. Click on Autofill.
5. Click on Passwords.

6. Turn on the toggle for Offer to save passwords and Auto Sign-in options.

7. Scroll down to the Never Saved section and click on the cross icon next to the sites for which you want to save the passwords.

Method 4: Clear Browser Cache and Cookies
If your Chrome browser is overloaded due to cache and cookies, it might be affecting your browser’s functioning, including its capability to save passwords. Therefore, cleaning the cache and cookies in Chrome is suggested to get rid of Chrome saved passwords not working issue. Read our guide, How to Clear Cache & Cookies in Google Chrome, to do the same.

Also Read: How to Fix Chrome Ran Out of Memory
Method 5: Update Extensions (If Applicable)
If the problem of Chrome not being able to save passwords still exists, then another reason behind it could be conflicts with the extension. To get rid of it, follow the steps given below:
1. Launch the Chrome browser as done earlier.
2. Type chrome://extensions in the Chrome web address bar and hit Enter key.

3. Turn on the toggle for the Developer mode option at the top right corner.

4. Now, click on the Update button.

Method 6: Disable Browser Extensions (If Applicable)
The web extensions you have installed on your Google Chrome browser may have prevented the browser from saving passwords. To disable the web extensions, execute the steps mentioned below on your PC:
1. Open Google Chrome and click on the three vertical dots as done in the previous method.

2. Click on More tools and then select Extensions.

3. Turn off the toggle for unused extensions. Here, Google Meet Grid View is taken as an example.
Note: If the web extension is not essential, you can delete them by clicking on the Remove button.

Also Read: Fix Chrome Blocking Download Issue
Method 7: Save Local Data
In almost all devices, Chrome saves the local data allowing it to save passwords. Unfortunately, due to changes in settings, this option in Chrome might be disabled. So, by following the steps mentioned below, enable Chrome to save the local data.
1. Launch Chrome browser as done earlier.
2. Click on the three-dot icon at the top right corner.
3. Select Settings.
4. Click on Privacy and security.
5. Click on Cookies and other site data.

6. Turn on the toggle for the option Clear cookies and site data when you close all windows.

7. Finally, restart the Chrome browser.
Method 8: Create New Chrome Profile
Sometimes, problems with Chrome itself can be the reason why it is not able to save passwords. Hence, it is suggested to use a new user profile on the browser. You can follow the steps mentioned below:
Option I: Rename Default Folder
1. Press Windows + R keys together to launch the Run dialog box.
2. Type %localappdata%\Google\Chrome\User Data\ address and click on the OK button to open the AppData folder.

3. Right-click on the file Default and select the option Rename in the menu.

4. Rename the file as Default-Bak and press the Enter key to create a new user profile for Google Chrome.

5. Launch Google Chrome.
Option II: Create New Chrome Profile
To create a new Chrome profile, follow the steps mentioned below.
1. Open the Google Chrome browser as done earlier.
2. Click on the profile picture as shown.

3. Then, select the Add option.

4. Click on Continue without an account.
Note: Click on Sign in to log in using your Gmail account.

5. Here, customize your profile by adding your desired name, profile picture, and theme color.
6. Now, click on Done, as shown below.
Note: If you do not want a desktop shortcut for this user, uncheck the Create a desktop shortcut for this user option.

7. Now, launch Google Chrome with the new chrome profile.
Also Read: What is Google Chrome Elevation Service
Method 9: Reset Chrome
If your Chrome is facing the issue of not saving passwords, it can be due to tampering with Chrome settings. If the browser’s default settings are changed, it can easily be the reason behind Chrome not saving passwords anymore. Hence, to overcome the issue, it is important to set the browser to its default settings:
1. Launch the Chrome browser as done earlier.
2. Click on the three-dot icon and then Settings.
3. Click on Advanced.
4. Select Reset and clean up from the options in the menu.
5. Click on Restore settings to their original formats.

6. Click on the Reset settings button to confirm.

Method 10: Reinstall Chrome
If nothing works out for you and your Chrome is still not saving passwords, it is advised to reinstall the program again. This will clear the app from all the errors and help it restore its original settings.
1. Press the Windows + I keys simultaneously to open Settings.
2. Click on Apps.

3. Scroll down and select Google Chrome.

4. Now, click on Uninstall.

5. Then, click on Uninstall in the pop-up.

6. Now, confirm the prompt by clicking Yes.
7. Click on Uninstall in the pop-up to confirm.

8. Again, hit the Windows key. Type %localappdata% and click on Open to open AppData Local folder.

9. Now, double-click on the Google folder.

10. Right-click on the Chrome folder and select the Delete option.

11. Then, hit the Windows key and type %appdata%. Then, click on Open to navigate to the AppData Roaming folder.

12. Now, repeat Steps 10 & 11 and delete the Chrome folder if there are any.
13. Finally, restart the PC.
14. Visit the official Chrome website to download the latest version of Chrome.
15. Click on the Download Chrome button.

16. Go to My downloads and run the setup file. Then, follow the on-screen instructions to install Chrome.

Also Read: How to Export Saved Passwords from Google Chrome
Pro Tip: Use Password Manager Tool
If you are in no mood to change the Chrome browser settings and want an easy solution to password saving on your system, then using a password manager comes in handy. It not only rescues you from the trouble of filling in the log-in details but is also a safe & secure method. One of the safest and most efficient password managers is Dashlane. It does the job of securing passwords and the personal details of the user. Follow these steps to use password manager tool to fix Chrome saved passwords not working issue.
1. Open Dashlane on your browser.
2. Click on Get Dashlane.

3. Now, click on the Add to Chrome button.

4. Click on Add extension in the pop-up.

5. Click on Log in.

6. Now, click on Create an account.

7. Enter your Email address and click on Next.

8. Enter Password in the respective fields and click on Create My Account.

9. Once your account is ready, you can save passwords and personal information.

What are the Benefits of Saving Passwords in Chrome?
Saving passwords in Chrome is not just an easy way to access accounts, but it comes with a few benefits. Let us go through them below:
- Password saving on Chrome is convenient for users who need to log in to their accounts quite often.
- Also, it is a suitable method for ones who have multiple accounts. Remembering passwords for each account can be a task. Hence, Chrome helps to ease this hassle by saving passwords.
- Auto log-in is also possible with saving passwords on Chrome.
- It is one of the fastest ways to access accounts on Chrome, with no need to log in time, and again, it saves a lot of hassle.
- Also, saving passwords on Google Chrome is a free platform without paying a fee.
Recommended:
- Fix Nexus Mod Manager a Problem Occurred During Install
- How to Force Cortana to Use Chrome on Windows 10
- Fix Shockwave Flash Crashes in Chrome
- Fix Google Chrome Frequently Visited Sites Missing
We hope that this guide was helpful and you were able to fix Chrome not saving passwords in Windows 10. Let us know which method worked for you the best. If you have any queries or suggestions, please drop them in the comments section below. Also, let us know what you want to learn next.