
Если сбои системы, синие экраны BSoD или иные проблемы при работе Windows 10, 8.1 или Windows 7 наводят вас на мысли о том, что имеются какие-либо проблемы с оперативной памятью компьютера, может иметь смысл выполнить её проверку, а начать можно со встроенного средства диагностики проверки памяти Windows.
В этой инструкции подробно о способах запустить средство проверки памяти средствами Windows, причём даже в тех случаях, когда вход в систему невозможен, а также о возможных вариантах действий в случае, если в результате теста средство диагностики памяти сообщает о том, что были обнаружены проблемы оборудования. На схожую тему: Устранение неполадок Windows 10.
- Способы запуска средства проверки памяти
- Использование средства и просмотр результатов
- Обнаружены проблемы оборудования в средстве диагностики памяти
- Видео инструкция
Как запустить средство проверки памяти в Windows 10 и предыдущих версиях системы
В случае, если операционная система запускается, вход в неё и работа возможны, вы можете использовать один из следующих вариантов запуска средства проверки памяти:
- Найти нужный пункт в разделе «Средства администрирования Windows» меню «Пуск».
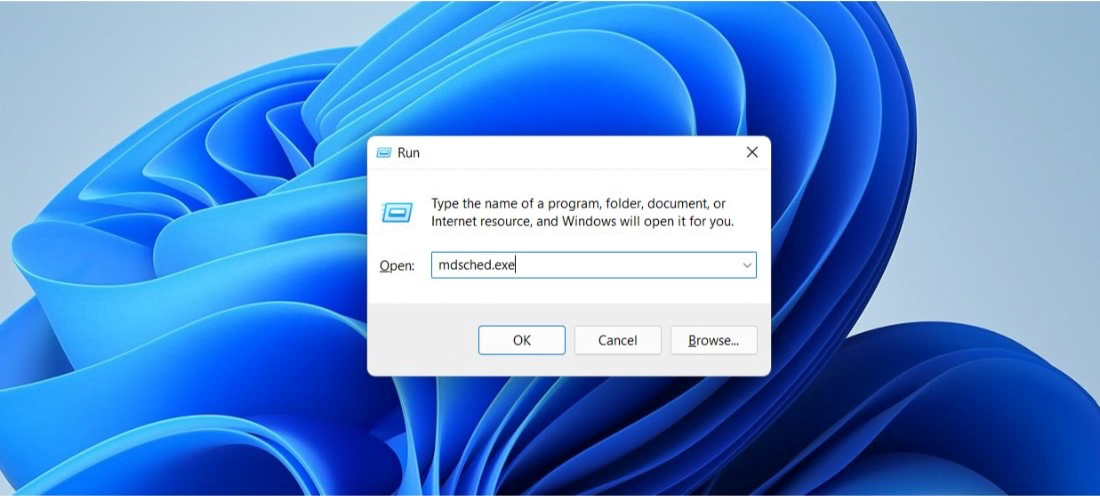
- Нажать клавиши Win+R на клавиатуре, ввести mdsched.exe и нажать Enter.

- Открыть панель управления, выбрать пункт «Администрирование» и запустить «Средство проверки памяти Windows».
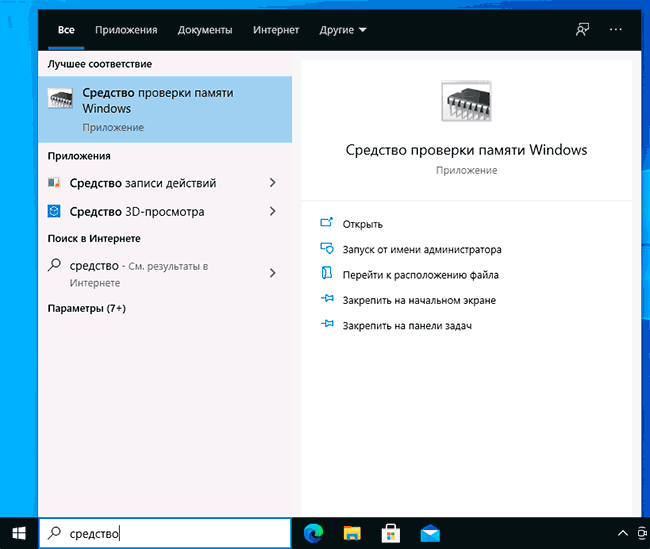
- Использовать поиск в панели задач Windows 10, начав вводить «Средство проверки памяти». Или встроенные средства поиска в предыдущих версиях ОС.

- Вручную запустить файл C:\Windows\System32\MdSched.exe

Если же ситуация осложняется тем, что Windows не запускается, вход в неё невозможен, либо сразу после него происходят сбои, можно использовать следующие способы запуска средства диагностики оперативной памяти:
- Загрузить компьютер или ноутбук с загрузочной флешки с Windows 10 или другой версией Windows, можно и с загрузочного диска. На экране программы установки нажать клавиши Shift+F10 (Shift+Fn+F10 на некоторых ноутбуках), ввести mdsexe в открывшейся командной строке и нажать Enter. После выбора в утилите проверки пункта «Выполнить перезагрузку и проверку», загружайте компьютер не с флешки, а с обычного загрузочного HDD или SSD.

- Средство проверки памяти можно запустить из среды восстановления Windows 10 — нажав кнопку «Дополнительные параметры» на синем экране с ошибкой или, находясь на экране блокировки Windows 10 (с выбором имени пользователя) нажать по изображенной справа внизу кнопке «Питания», а затем, удерживая Shift, нажать «Перезагрузка». В среде восстановления выбираем «Поиск и устранение неисправностей» — «Дополнительные параметры» — «Командная строка». А в ней, как и в предыдущем случае используем команду mdsched.exe.

- Если у вас есть подготовленный диск восстановления Windows, запуск можно осуществить, загрузившись с него.


Использование средства проверки памяти Windows и просмотр результатов

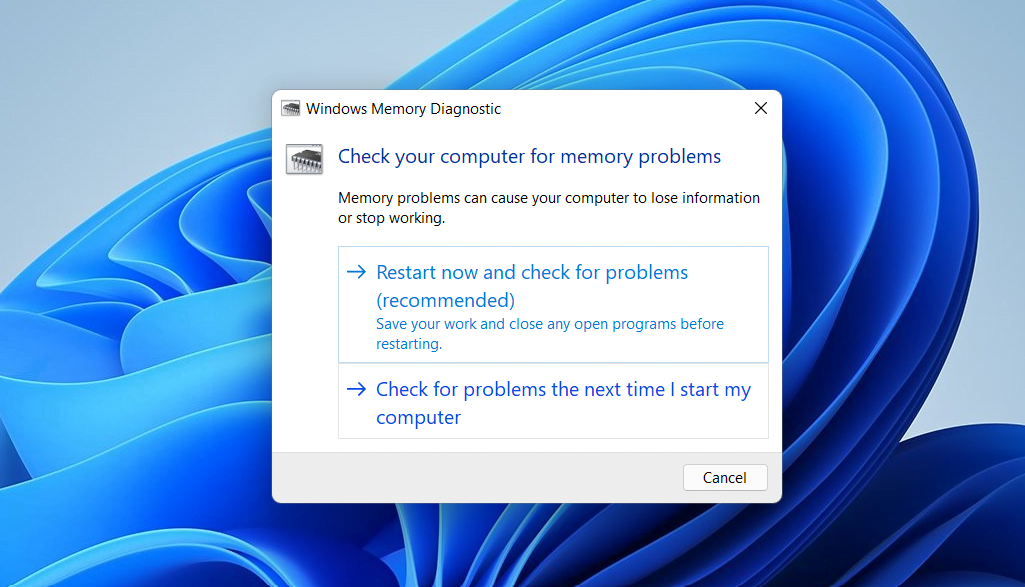
После запуска средства проверки памяти вам будет предложено перезагрузить компьютер, после согласия, процесс будет выглядеть следующим образом:
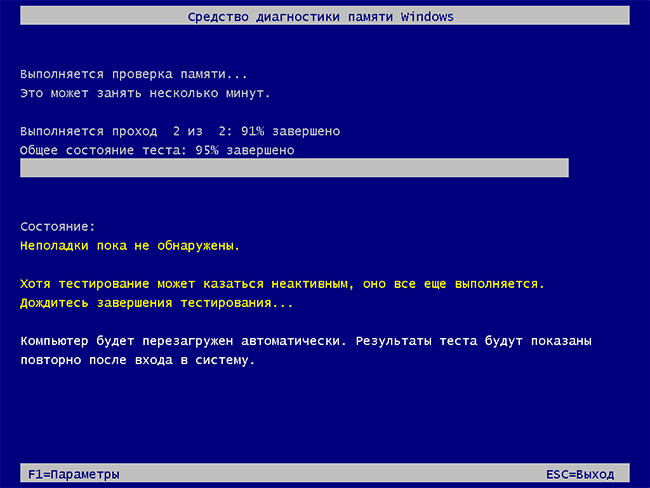
- Начнётся проверка оперативной памяти, которая может занять продолжительное время. Может показаться, что средство диагностики зависло: на всякий случай подождите в такой ситуации 5-10 минут. Если же действительно произошло зависание, не исключено что есть проблемы с оборудованием, вероятно — с оперативной памятью, но не обязательно.

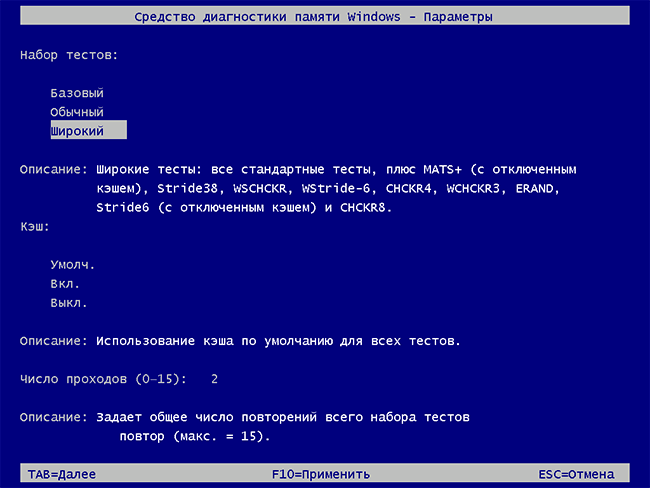
- Если в ходе проверки нажать клавишу F1 (или Fn+F1, если F1 не срабатывает), вы попадёте в настройки средства диагностики памяти Windows. Здесь можно выбрать набор тестов (по умолчанию — обычный), использование кэша, и число проходов. Переключение между разделами настроек выполняется клавишей Tab, изменение параметров — стрелками и вводом цифр (для числа проходов), применение параметров — клавишей F10. После изменения настроек тест перезапускается.
- В ходе проверки вы будете видеть информацию вида «Неполадки пока не обнаружены» или «Были обнаружены проблемы оборудования».
После завершения проверки компьютер будет автоматически перезагружен. Дальнейшие шаги — просмотр результатов.
- После перезагрузки в случае Windows 10 вы можете увидеть уведомление в области уведомлений, сообщающее о результате проверки памяти. Но оно отображается не всегда.
- Можно зайти в просмотр событий, для этого нажимаем Win+R, вводим eventvwr.msc и нажимаем Enter. Там открываем раздел «Журналы Windows» — «Система», находим пункты, где в столбце «Источник» указано MemoryDiagnostics-Results и просматриваем результаты.


Учитывайте, что ошибки, «вылеты», синие экраны и зависания не всегда связаны с проблемами оперативной памяти: если средство диагностики показывает, что всё в порядке, есть и иные возможные причины: отключенный файл подкачки, проблемы с HDD или SSD (или с их подключением, например — неисправный кабель), сторонние антивирусы или, наоборот, вредоносные программы, неправильная работа драйверов оборудования.
Что делать, если были обнаружены проблемы оборудования в средстве диагностики памяти
К сожалению, средство диагностики не сообщает о том, какие именно проблемы были обнаружены в ходе проверки, а лишь рекомендует обратиться к производителю оборудования. Что можно сделать:
- Отключить любые опции ускорения памяти (изменение частоты, таймингов и другие) при наличии соответствующих опций в БИОС или ПО производителя материнской платы или ноутбука.
- Попробовать проверить планки памяти по одной, в других слотах на материнской плате для того, чтобы выяснить, появляются ли проблемы только с одним конкретным модулем памяти или в одном конкретном разъеме.
- Использовать другие утилиты для проверки оперативной памяти при необходимости.
- Прочитать документацию к материнской плате ПК — возможно, это какая-то несовместимость с памятью с конкретными характеристиками (если вы недавно добавили новые модули памяти или только что самостоятельно собрали компьютер).
- Иногда может помочь обновление БИОС.
Видео инструкция
Если вы разобрались, чем была вызвана именно ваша проблема, буду благодарен комментарию к статье: возможно, для кого-то он окажется полезным.
Table of contents
- What is Windows Memory Diagnostic?
- 1. Memory Testing
- 2. Identifying Memory Issues
- 3. Diagnostic Reports
- 4. Options for Advanced Testing
- When Should You Use Windows Memory Diagnostic?
- 1. Frequent PC Crashes and Freezes
- 2. Application Errors
- 3. Blue Screen of Death (BSOD)
- 4. Slow Performance
- 5. After Hardware Upgrades
- 6. Routine Maintenance
- Running Windows Memory Diagnostic
- Method 1: Using the Windows Interface
- Method 2: Running from the Command Prompt
- Where to Find Windows Memory Diagnostic Results
- How to Check Windows Memory Diagnostic Results: Interpreting the Results
- No Errors Detected
- Hardware Errors Detected
- Conclusion
- FAQ
When your computer is booting randomly, freezing, or crashing, it might indicate a memory issue. However, you can use the Windows Memory Diagnostic tool to see if the problem is with the memory rather than changing your computer or memory. If the memory passes the test, you can rule out this being the issue’s root. If it fails, you may need to replace one of your RAM modules. This guide will show you how to run Windows Memory Diagnostic and check its results. Let’s begin.
What is Windows Memory Diagnostic?
The memory diagnostic tool is a program that comes pre-installed with the Windows operating system from Microsoft. Its main objective is to help you find and diagnose problems with your computer’s Random Access Memory (RAM). RAM is a crucial part of a computer that stores data that the Central Processing Unit (CPU) needs to carry out various operations. So, what does Windows Memory Diagnostic do ? Let’s find out:
1. Memory Testing
The tool runs several checks on the RAM in your computer to look for any potential issues or mistakes to get the Windows Memory Diagnostic results. These tests involve reading from and writing to various RAM locations to ensure the RAM operates correctly.
2. Identifying Memory Issues
You’ll get the Windows Memory Diagnostic results after the test if any problems are discovered. These issues could involve faulty memory sectors, data corruption, or other issues with memory.
3. Diagnostic Reports
It gives you a report that includes a summary of the tests’ findings, any memory-related issues, or if Windows Memory Diagnostic detected hardware errors.
4. Options for Advanced Testing
A basic test and an extended test are also available. The shorter basic test usually meets the needs of most users, whereas the extended test conducts a more thorough analysis of your RAM.
When Should You Use Windows Memory Diagnostic?
There are several indications to know when you should perform a memory diagnostic. Let’s go through them:
1. Frequent PC Crashes and Freezes
Frequent system freezes, or crashes are one of the most obvious indicators to use memory diagnostic. These sudden breaks in activity can be a sign of RAM problems.
Your computer may crash, become unresponsive, or even restart without warning when your RAM doesn’t function as it should. Using the diagnostic tool, you can determine whether the problem is with the RAM.
Related:How to Clear RAM and Reduce RAM Usage in Windows 10
2. Application Errors
Applications on your computer that frequently crash or shut down unexpectedly could indicate that you have memory issues. Applications can behave unpredictably, and data corruption can result from faulty RAM.
If your RAM is causing these issues, memory diagnostic can help identify the problem.
3. Blue Screen of Death (BSOD)
The feared Blue Screen of Death (BSOD) clearly indicates that your computer is malfunctioning. Memory problems can occasionally be the root of BSOD faults. You can use the Windows Memory Diagnostic results to check whether your RAM is the cause.
Related: Windows Stop Code: How to Check Causes of Windows BSOD?
4. Slow Performance
Memory issues may also cause a slowdown in your computer’s general performance, such as prolonged application loading times or slow response. RAM issues can cause ineffective data handling, which slows down your computer.
The diagnostic program can show you if your RAM isn’t operating at peak efficiency.
Related: Why Is My Computer So Slow? – Improve Computer Performance
5. After Hardware Upgrades
It’s a good idea to run a memory diagnostic if you just updated or installed new RAM modules on your computer. Memory-related issues can result from incompatible RAM modules or improper installation.
After a hardware upgrade, you can run the utility to help you ensure your new RAM operates properly.
Also Read: Why Is My Computer Glitching?
6. Routine Maintenance
The long-term health of your computer depends on routine maintenance. Even if you haven’t noticed any problems, you may run Windows Memory Diagnostic as part of this routine.
This approach might help you spot and address any memory issues before they become more serious problems.
Running Windows Memory Diagnostic
Here’s how to run a memory diagnostic:
Method 1: Using the Windows Interface
- Press the
Windows log + Rto open the Run dialog box - Enter
mdsched.exein the search field to launch the Windows Memory Diagnostic tool.
You now have two options for running the utility when your PC boots up. The first option is to restart your computer right away. The diagnostic will automatically run when the PC starts again. Alternatively, you can schedule the utility to launch when your PC restarts.
When your computer restarts, the tool checks your memory immediately for any potential problems. The memory diagnostic tool launches by default in Standard mode, which includes eight consecutive memory tests.
Each of these tests uses a unique algorithm to look for different faults. The Standard tests can run until finished when Windows restarts.

You also have the option to use the F1 key at any time while the test is running. By doing this, you’ll be redirected to a different screen where you can choose the precise type of scan you want. The utility offers the Basic, Standard, and Extended scan options.
You can configure the Pass Count, which indicates how many times each test will be run. Two is the default value, which is usually sufficient for seeing any possible problems. Simply hit the F10 key to apply your options and begin the test after choosing your preferred option.
Method 2: Running from the Command Prompt
Running the memory diagnostic from the command prompt is easy. Here’s how to run Windows Memory Diagnostic from command prompt :
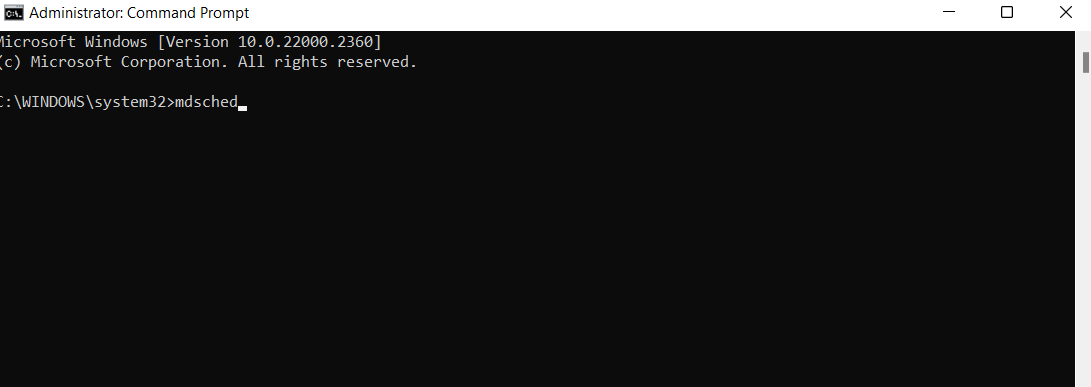
- Type
command promptin the search bar, right-click, and select Run as administrator.
- Type
mdschedand pressEnter.
- Click the Restart now and check for problems(recommended) option from the pop-up window.

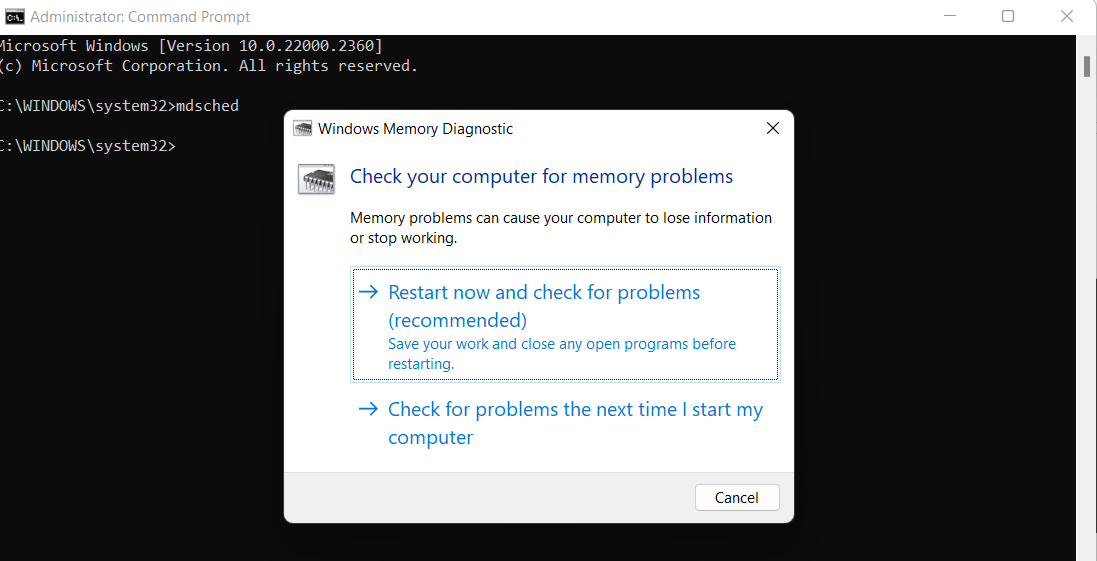
Your computer will launch the memory diagnostic tool after restarting. This utility will start scanning the memory of your computer right away, and it’ll let you know if it finds any issues. After the test, your computer will immediately reboot and return to the Windows desktop.
Related: Windows Command Prompt: Most Useful Commands
Where to Find Windows Memory Diagnostic Results
Here’s how to see results of Windows Memory Diagnostic :
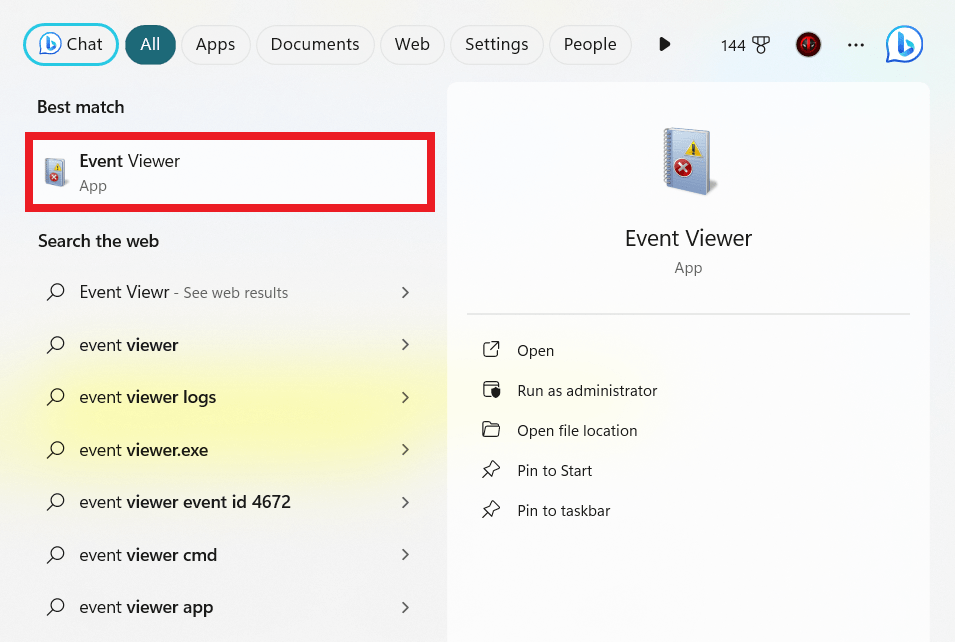
- Type
Event Viewerin the search bar and click to open.
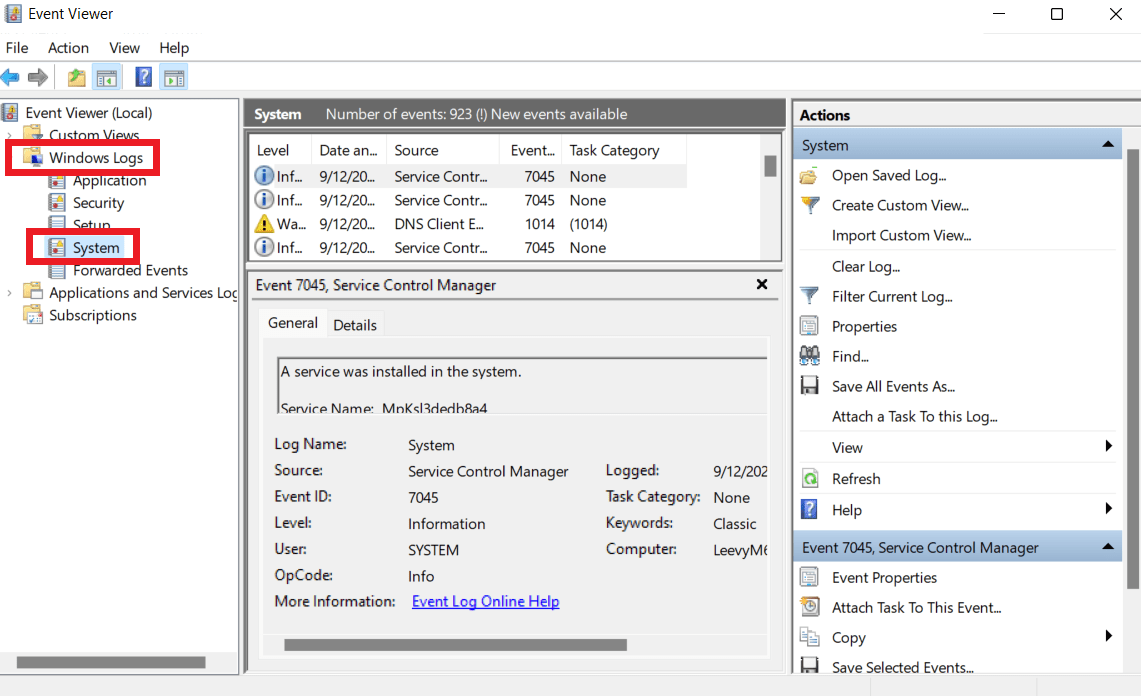
- Expand Windows Logs and select System in the left panel.
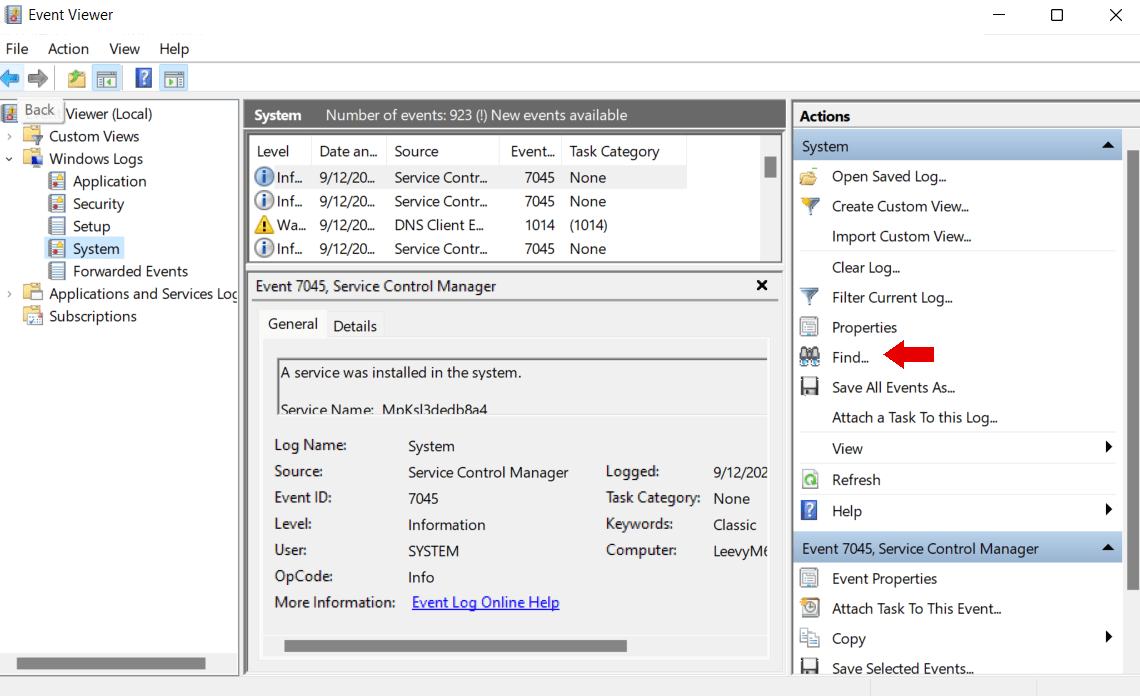
- Click the Find button on the right-side panel. Alternatively, press
Ctrl + Fto open the Find tool.
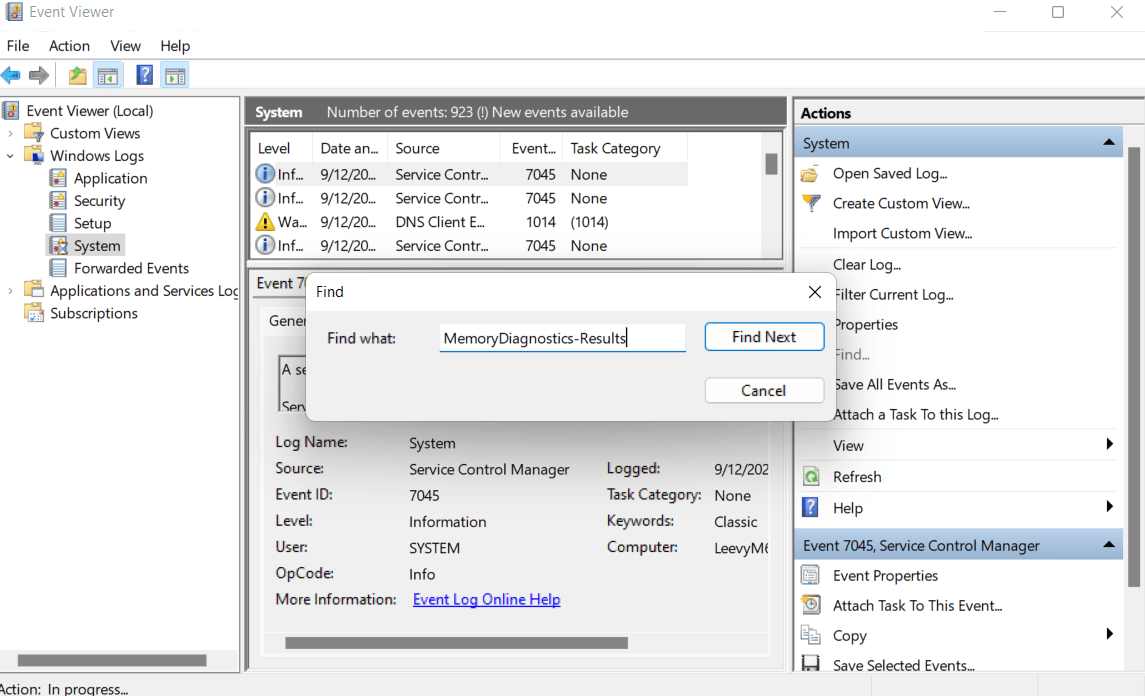
- Type
MemoryDiagnostics-Resultsin the Find what field, and click Find Next.
- Close the Find window. You’ll see the first highlighted entry in the middle column. Double-click on it.
You can learn more about the tests from the scan results. You can rule out memory as the problem’s source if you receive a message, ”
The Windows Memory Diagnostic tested the computer’s memory and detected no errors.”
How to Check Windows Memory Diagnostic Results: Interpreting the Results
After the Windows Memory Diagnostic results , you’ll receive one of two messages: no errors detected or hardware errors detected. Let’s go through each of them:
No Errors Detected
A clean report from memory diagnostic shows that the issues you’ve been having are not most likely caused by your RAM. So you can focus on other areas causing the problem. Here’s what you should do:
1. Update Your Software
Even though memory problems might not be the main cause, updating your software is crucial. Check to see if the most recent versions of your operating system, drivers, and apps are installed.
Also, check for Windows updates. Outdated software can cause incompatibility issues and instability. You can use Auslogics Driver Updater to automatically check and install updates with just one click.
Download Auslogics Driver Updater
Prevent hardware errors and ensure problem-free device operation with this advanced tool that detects outdated drivers and safely gets them updated.
This software installs the manufacturer-recommended drivers, ensuring it’s always compatible with your devices.
Learn more here: Auslogics Driver Updater: New Drivers in One Click!
2. Check the HardwareIt’s a good idea to check other hardware parts if your computer still has problems. For example, system instability can result from overheating. Verify that the cooling system on your computer is operating correctly and that there isn’t excessive dust accumulation.
Related: Enjoy a Dust-Free PC: Expert Tips on How to Clean a Computer
3. Scan for MalwareMalicious software occasionally imitates the signs of memory issues. Run a complete malware scan with reliable anti-malware software like Auslogics Anti-Malware to ensure your system is malware-free.
Download Auslogics Anti-Malware
Detects malware, spyware and viruses, then safely removes them from your PC to help keep it as secure as possible. The program is made to complement your main antivirus.
Related: How to Remove Virus and Other Malware from Windows
Hardware Errors Detected
If there’s a problem after the memory diagnostic test, you’ll get one of two error messages: “Hardware problems were found” or “Physical Address Limit Exceeded.”
These error messages warn that one or more memory modules in your computer may be defective. Here are some troubleshooting methods you can use if you run into these error messages to fix the problem:
1. Don’t Overclock the System
The error message could appear if you overclocked your Graphics Processing Unit (GPU), CPU, or RAM to the limit. Think about turning off overclocking and returning your BIOS/UEFI settings to the default settings.
2. Re-insert Memory Modules
Memory modules may not be inserted correctly in their slots. Open the computer’s case, turn off the power, and unplug it. Ensure all memory sticks are completely seated by carefully removing and replacing the RAM modules in their slots.
3. Test Each Module Separately
If you have more than one memory module, check each one separately. Run the diagnostic tool, remove all but one, and record the outcomes.
For every RAM module, repeat this process. This method can help identify which RAM module is responsible for the faults experienced.
Conclusion
Memory issues can be annoying, but the Windows Memory Diagnostic tool provides a helpful solution. You can go through this guide and use the methods discussed to run the tool properly.
You can troubleshoot and fix memory-related issues by being aware of its capabilities and how to interpret its findings. This can help your computer to run more smoothly.
You’ll be well-equipped to handle any memory difficulties you run across, ultimately improving your PC performance.
FAQ
The hardware and installed RAM on your computer can affect how long a Windows Memory Diagnostic test takes. A basic test typically takes 10 to 15 minutes to finish. However, selecting the “Extended” test option can take a lot longer, possibly an hour or more, depending on how much memory your PC has.
One trustworthy tool for identifying memory-related problems is the memory diagnostic tool. It carries out several straightforward and in-depth tests to find memory issues. Although it’s not perfect, it’s a helpful starting step in identifying potential memory issues with your computer.
Here are some things to consider. Ensure your computer is connected to a power source without using its battery life. Start your computer again, then repeat the diagnostic test.
If the issue still exists, use an alternative memory diagnostic program or contact a professional because it can point to more severe hardware problems.
The memory diagnostic tool’s default pass count is one. This shows that it’ll only run a single pass of memory testing by default. When you begin the test, you can set this option if you want to run the test several times. Multiple attempts can help you discover random memory issues.
The frequency with which you should perform the RAM diagnostic is mainly determined by how often you use your computer and whether or not you’ve recently had any problems. If you frequently have system freezes, crashes, or strange errors, run the memory diagnostic, as these could be symptoms of memory issues.
Consider regularly running the diagnostic on your computer as part of routine maintenance, possibly once every few months, if used for necessary tasks or work.
When your computer experiences unexpected crashes, blue screens, or performance issues, memory problems are often the culprit.
Windows 10 includes a built-in Memory Diagnostics Tool that can help identify RAM-related issues, but finding and interpreting the results can be challenging for many users.
This guide will walk you through the process of locating memory test results in Event Viewer and help you read Memory Diagnostics Tool results, helping you determine if your RAM is functioning properly or needs replacement.
Introduction to the Windows Memory Diagnostic Tool
The Windows Memory Diagnostic Tool is a built-in utility designed to test your computer’s Random Access Memory (RAM) for errors. This diagnostic tool performs a comprehensive examination of your system’s memory hardware by writing and reading various test patterns to and from all locations in the installed memory modules. It can detect a wide range of memory problems, from persistent hardware failures to intermittent errors that might only appear under specific conditions.
Operating at a low level before Windows fully loads, the Memory Diagnostic Tool can identify issues that might not be apparent during normal system operation. It uses multiple test patterns and algorithms to stress the memory in different ways, helping to reveal potential problems that could lead to system instability.
When and why to run a memory diagnostic
You should consider running this helpful tool when:
- Your system experiences random crashes, freezes, or blue screens of death (BSODs)
- Applications terminate unexpectedly or report memory-related errors
- You notice system instability after installing new RAM modules
- Windows becomes increasingly slower over time without explanation
- You’re experiencing file corruption issues
- You suspect hardware problems but can’t pinpoint the source
Running a memory diagnostic is a non-invasive way to rule out or confirm RAM issues before exploring other potential causes of system instability. Since memory problems can manifest in various and seemingly unrelated ways, checking your RAM should be one of the first troubleshooting steps when experiencing persistent system issues.
Common memory-related issues in Windows 10
Memory problems in Windows 10 can manifest in various ways:
- Blue Screen errors: Many blue screen crashes, especially those with error codes like MEMORY_MANAGEMENT, PAGE_FAULT_IN_NONPAGED_AREA, or IRQL_NOT_LESS_OR_EQUAL, are often related to memory issues.
- Application crashes: Programs may close unexpectedly or report that they couldn’t allocate enough memory, even when system resources appear adequate.
- System slowdowns: Degraded performance and unexplained lag, especially when multitasking, can indicate memory that’s failing or operating below its rated speed.
- File corruption: Damaged files that were recently accessed or modified might point to memory errors occurring during read/write operations.
- Boot failures: In severe cases, memory issues can prevent Windows from starting properly or cause the system to restart during the boot process.
- Memory leak symptoms: While actual memory leaks are software issues, their symptoms (such as steadily decreasing available memory) can sometimes be confused with hardware memory problems.
Running the Windows Memory Diagnostic Tool
There are several ways to start the Windows Memory Diagnostic Tool, depending on your situation and preferences:
Method 1: Using Windows Settings
- Press Windows key + I to open Settings
- Navigate to Update & Security → Troubleshoot → Additional troubleshooters
- Scroll down to find Windows Memory Diagnostic and select it
- Click Run the troubleshooter
Method 2: Using the Run Command
- Press Windows key + R to open the Run dialog
- Type mdsched.exe and press Enter
- Choose whether to restart now and check for problems or check the next time you start your computer
Method 3: Using Event Viewer
- Press Windows key + X and select Event Viewer
- In the left pane, navigate to Windows Logs → System
- In the right pane, click on Find
- Search for MemoryDiagnostics to see if you’ve previously run the tool
- From here, you can also initiate a new scan by right-clicking on System and selecting All Tasks → Windows Memory Diagnostic
Method 4: Through Command Prompt or PowerShell (Admin)
- Right-click on the Start button and select Command Prompt (Admin) or Windows PowerShell (Admin)
- Type mdsched.exe and press Enter
- Select your preferred option for running the diagnostic
How the tool scans for memory issues
Once initiated, the Windows Memory Diagnostic Tool performs a series of tests on your system’s RAM:
- Basic Test Suite (Default): Includes a mix of test patterns that check for common memory issues. These include MATS+ (Modified Addressing Test), INVC (Inversion test), and SCHCKR (Sequential Complementary pattern checker).
- Standard Test Suite: Adds more comprehensive tests including LRAND (Random pattern test), Stride6 (Moving inversions), CHCKR3 (Checker pattern), WMATS+ (Extended MATS+), and WINVC (Extended inversion test).
- Extended Test Suite: The most thorough option, including all the above plus MATS+ (Extended algorithm), MARCH_X (March test with extended pattern), and several other intensive memory tests.
Each test writes specific patterns of data to memory and then reads them back to verify they weren’t corrupted during storage. The tool tests every memory address multiple times with different patterns to detect various types of failures:
- Stuck bits: Memory cells that can’t change state (always 0 or always 1)
- Coupling faults: When writing to one memory cell affects another cell
- Addressing problems: When the memory controller accesses the wrong location
- Data retention issues: When memory cells can’t hold their value for the required period
- Pattern sensitivity: Failures that only occur with specific data patterns
Understanding the reboot and scan process
When you initiate the Memory Diagnostic Tool, the process follows these steps:
- System notification: You’ll be prompted to choose between restarting immediately or scheduling the test for the next reboot. If you have unsaved work, choose the latter option and save your documents before manually restarting.
- System reboot: Your computer will restart, but instead of loading Windows normally, it will boot into the Memory Diagnostic environment. This is a special pre-boot environment that allows the tool to test RAM directly without interference from the operating system.
- Testing phase: During this phase, you’ll see a blue screen with the Windows Memory Diagnostic interface. The screen displays:
- Current test pass and overall progress
- Status information about the tests being performed
- Any detected errors
- Options you can access by pressing F1 (changing test settings)
- Test completion: After completing all test passes (default is one pass), the system automatically reboots back into Windows. No explicit results are shown at this point.
- Results storage: The results are logged to the Windows Event Viewer, where you can access them later. Windows doesn’t typically show a notification about the results unless significant errors are found.
The entire process usually takes between 10-30 minutes for the basic test suite on a typical system with 8-16GB of RAM. The standard and extended tests can take considerably longer, especially on systems with large amounts of RAM. You won’t be able to use your computer while the test is running, so plan accordingly.
Accessing Memory Diagnostic results in Event Viewer
After the Windows Memory Diagnostic Tool completes its tests and your system reboots, the results aren’t displayed automatically. Instead, Windows stores these diagnostic results in the Event Viewer, which acts as a centralized logging system for all significant system events.
Here’s how to access and locate your memory test results:
Opening Event Viewer in Windows 10
There are several methods to open Event Viewer in Windows 10:
Method 1: Using Run Dialog
- Press Windows key + R to open the Run dialog
- Type eventvwr.msc and press Enter
Method 2: Using search
- Click on the search box in the taskbar
- Type Event Viewer
- Click on the Event Viewer app in the search results
Method 3: Using Administrative Tools
- Right-click on the Start button (or press Windows key + X)
- Select Computer Management
- In the left pane, expand System Tools and click on Event Viewer
Method 4: Using Control Panel
- Open Control Panel (you can search for it in the Start menu)
- Navigate to System and Security → Administrative Tools
- Double-click on Event Viewer
Where to find memory diagnostic logs in Windows 10 Event Viewer
Once Event Viewer is open, you’ll need to navigate to the specific location where memory diagnostic results are stored:
- In the left navigation pane, expand Windows Logs
- Click on System
This System log contains records of various system events, including the results from the Windows Memory Diagnostic Tool. The log may contain thousands of entries, so you’ll need to filter it to find the specific memory diagnostic results.
Using Event ID filters to locate Memory Diagnostics results
Memory Diagnostic results are recorded with specific Event IDs that make them easier to find:
- With the System log selected, look for the Filter Current Log option in the right-hand Actions pane
- Click on Filter Current Log
- In the filter dialog, enter the following information:
- In the Event sources dropdown, select MemoryDiagnostics-Results
- In the Event IDs field, enter 1201
- Click OK to apply the filter
What does Event ID 1201 mean in Windows Memory Diagnostic logs?
- Event ID 1201: This is the primary event ID for successful memory diagnostic results. It will contain a summary of whether any hardware memory errors were detected.
- Event ID 1202: Sometimes appears with additional details about specific memory errors if any were found.
- Event ID 1101: Related to the Memory Diagnostic Scheduler rather than results. It indicates that the memory diagnostic was scheduled to run.
If you don’t find any events with ID 1201, you can try broadening your search:
- Clear the Event ID filter but keep the MemoryDiagnostics-Results source filter
- Look for any events from this source
- Alternatively, search for keywords like “memory diagnostic” in the entire System log by using the Find feature (Ctrl+F)
When you locate the relevant event, double-click on it to open the Event Properties dialog, which will display detailed information about the memory diagnostic results. The information will include whether the diagnostic completed successfully and if any hardware memory errors were detected during the test.
If the diagnostic detected no memory errors, the event description will typically contain a message like “The Windows Memory Diagnostic tested the computer’s memory and did not find any errors.” If errors were found, the event will provide some information about the nature of the errors and possibly the memory module location.
How to interpret Memory Diagnostic results
The Memory Diagnostic Tool presents its findings through several standard message types in the Event Viewer. When you open a memory diagnostic event (Event ID 1201), you’ll typically see one of several result patterns in the general description field. These messages follow a standard format but may contain variations depending on the specific findings.
The most important part of the message is the summary statement, which indicates whether memory errors were detected or not. This is usually found at the beginning of the description and provides a high-level overview of the test results.
What “no errors detected” means
When you see a message similar to:
“The Windows Memory Diagnostic tested the computer’s memory and did not find any errors.”
This indicates that the diagnostic tool completed its tests without detecting any hardware-level problems with your RAM. This is generally good news and suggests that:
- Your memory modules are functioning properly at the hardware level
- The RAM is likely not the cause of any system instability you might be experiencing
- No immediate action is needed regarding your memory hardware
However, it’s important to understand the limitations of this result:
- The Memory Diagnostic Tool might not detect intermittent or temperature-related issues
- Some memory problems only appear under specific load conditions that the test might not replicate
- The “No errors” result doesn’t rule out software-related memory issues, such as memory leaks or driver conflicts
- If you’re still experiencing symptoms that suggest memory problems, consider running more comprehensive third-party memory testing tools
What “hardware problems were detected” means
If you see a message similar to:
“The Windows Memory Diagnostic tested the computer’s memory and detected hardware problems.”
This indicates that the tool found one or more errors during its testing cycles. This result strongly suggests that:
- One or more of your memory modules may be failing or defective
- Your system instability is likely related to these memory hardware issues
- You should take action to address the memory problems
When hardware problems are detected, the event log may provide additional details about:
- The number of errors detected
- The test pass during which errors occurred
- Memory addresses or regions where problems were found
- The type of error patterns detected
Common error messages and what they indicate
Beyond the primary “pass/fail” results, you might encounter more specific error messages that provide clues about the nature of the memory problems:
-
Test coverage messages:
“X% of your memory was tested.”
If less than 100% of your memory was tested, this could indicate that some memory regions were reserved by the system or couldn’t be tested. This doesn’t necessarily indicate a problem but might mean the test was not completely comprehensive.
-
Specific error location messages:
“Hardware errors were detected on module X at address Y.”
This type of message is particularly useful as it identifies which specific memory module is experiencing problems. The module number can help you identify which physical RAM stick needs to be replaced.
-
Test interruption messages:
“The Windows Memory Diagnostic was canceled.”
This indicates that the test didn’t complete, possibly due to user intervention or a system crash during testing. In such cases, the results are inconclusive, and you should run the diagnostic again.
-
Error count messages:
“X errors were found during the test.”
The number of errors can indicate the severity of the problem. A small number of errors might suggest a minor issue or a false positive, while a large number of errors strongly indicates failing hardware.
-
Test type messages:
“Errors were detected while running the XYZ test.”
Different test patterns stress memory in different ways. Errors in specific tests can sometimes help diagnose particular types of memory failures, though interpreting these requires more technical knowledge.
How to proceed based on your results
Based on the diagnostic results, here are the recommended next steps:
If no errors were detected:
- If you’re still experiencing system instability, investigate other potential causes (drivers, software conflicts, overheating)
- Consider running a more comprehensive third-party memory testing tool like MemTest86
- Monitor your system for continued symptoms
If hardware problems were detected:
- Back up important data immediately to prevent potential data loss
- If multiple memory modules are installed, try removing them one by one to identify the faulty module
- Replace the problematic memory module(s)
- After replacement, run the Memory Diagnostic Tool again to confirm the issue is resolved
- If errors persist after replacement, check for issues with the memory slots on your motherboard
Frequently Asked Questions (FAQs)
Q: Can Windows Memory Diagnostic detect all RAM issues?
A: No, Windows Memory Diagnostic cannot detect all RAM issues:
- It may miss intermittent or temperature-sensitive errors
- Some failures only appear under heavy workloads
- Certain timing-related issues might be overlooked
For comprehensive testing, use it as an initial screen before trying third-party tools if problems persist.
Q: What if Windows 10 Event Viewer does not show memory test results?
A: If memory diagnostic results are missing from Event Viewer:
Expand your search:
- Search for “MemoryDiagnostics” without specifying Event ID
- Look for Event IDs 1101-1202
Verify test completion:
- The test might have been interrupted
- Event ID 1101 indicates a scheduled test
- Run the test again with administrator privileges
If results still don’t appear, the Event logging service itself might need repair.
Q: How accurate are Windows memory tests compared to third-party tools?
A: Windows Memory Diagnostic provides adequate basic testing but has limitations:
Windows Memory Diagnostic:
- Convenient and integrated
- Good for identifying obvious failures
- Suitable for initial diagnostics
Third-party tools (like MemTest86):
- More comprehensive test patterns
- Better at finding subtle and intermittent issues
- More detailed error reporting
- Test outside Windows environment
- Customizable parameters
For home users with obvious stability issues, Windows Memory Diagnostic is often sufficient. For critical systems or subtle problems, third-party tools are more reliable.
In summary
As you’ve seen, diagnosing memory issues in Windows 10 doesn’t have to be intimidating. Using the built-in Memory Diagnostics Tool and applying the know-how to interpret Event Viewer results, nearly anyone can identify and resolve RAM problems on their system.
While not every memory issue will be detected by Windows’ native tools, understanding how to run tests, locate results, and take appropriate action based on those findings will solve most common memory-related problems.
By methodically following these steps, you can maintain your computer’s health and extend its usable life without unnecessary hardware replacements or expensive repairs.
Windows 11 includes a handy tool to check your computer’s memory for problems. To access the Memory Diagnostic results, first run a memory test using the built-in Windows Memory Diagnostic tool. After your PC restarts and completes the test, you can view the results in the Event Viewer. This process helps you identify any issues with your RAM, which may be causing your computer to run slowly or crash.
Checking the memory diagnostic results in Windows 11 involves first running the diagnostic tool and then accessing the results through the Event Viewer. Here’s how you do it:
Step 1: Open Windows Memory Diagnostic
Type “Windows Memory Diagnostic” into the Windows search bar and press Enter.
This tool is designed to run a memory test on your computer to check for any RAM issues. It will offer two options: restart now to check for problems or check for problems the next time you start your computer. Choose the option that best fits your schedule.
Step 2: Run the Memory Test
Select the option to restart your computer and run the memory test.
Your computer will restart and the Windows Memory Diagnostic tool will automatically begin checking your RAM. This process can take some time, so make sure you save your work before starting the test.
Step 3: Log Back In
Once the test is complete, your computer will restart, and you’ll need to log back into Windows 11.
The memory diagnostic test results are not immediately displayed upon login. Instead, you’ll need to manually check the results using the Event Viewer.
Step 4: Open Event Viewer
Type “Event Viewer” into the Windows search bar and press Enter to open it.
Event Viewer is a utility in Windows that logs various events and system messages, including the results of your memory diagnostic test.
Step 5: Navigate to Memory Diagnostic Results
In the Event Viewer window, navigate to Windows Logs > System and look for events labeled “MemoryDiagnostics-Results.”
The Event Viewer logs multiple events, so use the sidebar to find the “System” log. Once you’re there, look for the latest “MemoryDiagnostics-Results” entry to view the outcome of the RAM test.
After completing these steps, you’ll be able to see whether the Windows Memory Diagnostic tool found any memory issues. If there are no errors, your RAM should be working fine. However, if errors are reported, you may need to consider further troubleshooting or consulting with a professional technician to resolve hardware issues.
Tips for How to Check Memory Diagnostic Results in Windows 11
- Make sure to save all your work before running the memory test, as your computer will restart.
- If you see error messages in the results, check Windows support or consult a professional for assistance.
- Regularly checking memory diagnostics can help prevent unexpected crashes.
- Use Event Viewer to track other important events on your computer as well.
- If you’re not comfortable interpreting the diagnostic results, seek expert help.
Frequently Asked Questions
What is the Windows Memory Diagnostic tool?
The Windows Memory Diagnostic tool is a built-in utility that allows users to test their computer’s RAM for any potential errors.
How long does the memory diagnostic test take?
The duration of the test can vary depending on the amount of RAM in your system, but it generally takes a few minutes to an hour.
Can I use my computer during the memory test?
No, the test requires a restart and runs before Windows fully loads, so your computer is not usable during the test.
What should I do if errors are found?
If errors are found, consider reseating your RAM modules or consulting a technician for further troubleshooting.
Is it safe to run the Windows Memory Diagnostic tool?
Yes, it is completely safe and recommended to run the tool to ensure your RAM is functioning properly.
Summary
- Open Windows Memory Diagnostic.
- Run the memory test.
- Log back into Windows 11.
- Open Event Viewer.
- Navigate to Memory Diagnostic Results.
Conclusion
Understanding how to check memory diagnostic results in Windows 11 is an essential skill for maintaining your computer’s health. Memory issues can lead to unexpected crashes, sluggish performance, and even data loss. By following the steps outlined, you can easily diagnose potential problems with your RAM and take corrective action.
The Windows Memory Diagnostic tool is a powerful utility, but remember, it’s just one part of your computer’s maintenance toolkit. Regularly checking your system for updates, malware, and errors can keep it running smoothly. If you find any issues with your RAM, knowing how to interpret and act upon the diagnostic results will empower you to address the problem effectively.
For those still uncertain or uncomfortable with technical diagnostics, reaching out to a professional is a wise choice. Keeping your computer in peak condition will ensure you can work, game, or browse without interruptions.
So, take the time to familiarize yourself with tools like the Windows Memory Diagnostic tool. It’s not just about fixing problems when they happen; it’s about preventing them in the first place. Happy computing!
Matthew Burleigh has been writing tech tutorials since 2008. His writing has appeared on dozens of different websites and been read over 50 million times.
After receiving his Bachelor’s and Master’s degrees in Computer Science he spent several years working in IT management for small businesses. However, he now works full time writing content online and creating websites.
His main writing topics include iPhones, Microsoft Office, Google Apps, Android, and Photoshop, but he has also written about many other tech topics as well.
Read his full bio here.
Quick Tips
- Hardware faults in RAM sticks are usually identified by one long beep and two or three short beeps.
- MemTest86, Memtest86+, and DocMemory Memory Diagnostic are popular tools for testing memory.
- Memory tests are incapable of detecting all errors, particularly those caused by mismatched memory.
You can open the diagnostic tool from the search, Command Prompt, Control Panel, and Recovery.
Step 1: Press the Windows + R keys together to access the Run utility.
Step 2: When a Run dialog appears on your screen, type mdsched.exe and press Enter.
Step 3: You should see a Windows Memory Diagnostic Tool window pop up on your screen with two options:
- Restart now and check for problems (Recommended): Select this if you want to reboot your PC immediately to troubleshoot memory-related issues.
- Check for problems the next time I start my computer: Select this if you want to schedule the Windows Memory Diagnostic Tool to run the next time your PC starts.

Step 4: Whichever option you choose, once your PC restarts, the Windows Memory Diagnostic Tool will automatically start scanning your system for memory-related issues in Standard mode.

Step 5: If you want to change the scan options to Basic or Extended and change the number of scan passes, press the F1 key on your keyboard to access more options.

Note: You will have to press the Tab key on your keyboard to cycle through the different scan options, F10 to Apply the new changes, or Esc to go back and cancel the changes.
How to Check the Memory Diagnostic Results
After the scan completes, your PC will restart, and a pop-up notification showing the results should appear at the bottom-right corner of the desktop view. However, it’s a hit or miss and doesn’t give you a detailed look at the scan results. In such cases, check the Event Viewer.
Step 1: Press the Windows + S keys to launch Windows Search and type Event Viewer. Then, from the result that appears, click on Open.
Step 2: When an Event Viewer window opens, click on Windows Logs, followed by System. Then click on Find in the right-most pane.

Step 3: When a Find dialog appears on the screen, type MemoryDiagnostics-Results. Then click on Find Next. This will help you find the most recent Memory Diagnostic report.
Step 4: When you find the relevant report, click Cancel. You’ll see the Windows Memory Diagnostic Tool scan result on your screen.
Step 5: Click on the Details tab to find more in-depth results for the scan.

If the memory installed on your system has no issues, you will get a message saying, “The Windows Memory Diagnostic tested the computer’s memory and detected no errors.” But if errors are detected, you’ll find details about the problem with the RAM installed on your system.
You may clean and reseat the RAM sticks and rerun the Windows Memory Diagnostic scan to check if the problems are fixed. If that doesn’t help, it might be time to replace the RAM on your system.
To replace or upgrade the RAM on your PC, check our guide to find available RAM slots alongside the best ways to check the RAM size on Windows 11.
FAQs
How Do You Exit the Windows Memory Diagnostic?
To interrupt the ongoing memory diagnostics test, press F1 or Fn + F1. Then, press Esc to restart your computer and boot back into Windows.
How to Stop Memory Diagnostic From Running on Every Restart?
If your PC is stuck in the memory test loop, you can prevent future memory diagnostic tests by opening the Task Scheduler and deleting the Memory Diagnostics task.
Was this helpful?
Thanks for your feedback!
The article above may contain affiliate links which help support Guiding Tech. The content remains unbiased and authentic and will never affect our editorial integrity.