
Внизу меню Пуск в Windows 11 отображается раздел «Рекомендуем», где появляются значки недавно добавленных и часто используемых приложений, а также ссылки на последние открытые документы.
Если вы хотите убрать содержимое раздела «Рекомендуем», сделать это сравнительно легко и далее в инструкции будет показано, как именно. К сожалению, если использовать средства системы, сам раздел, даже пустой, продолжит показываться. Но при необходимости можно использовать сторонние утилиты, что также будет продемонстрировано в статье.
Очистка содержимого раздела «Рекомендуем» в Windows 11
Для того, чтобы убрать отдельные или все программы и документы из раздела «Рекомендуем» в меню Пуск Windows 11, используйте следующие шаги:
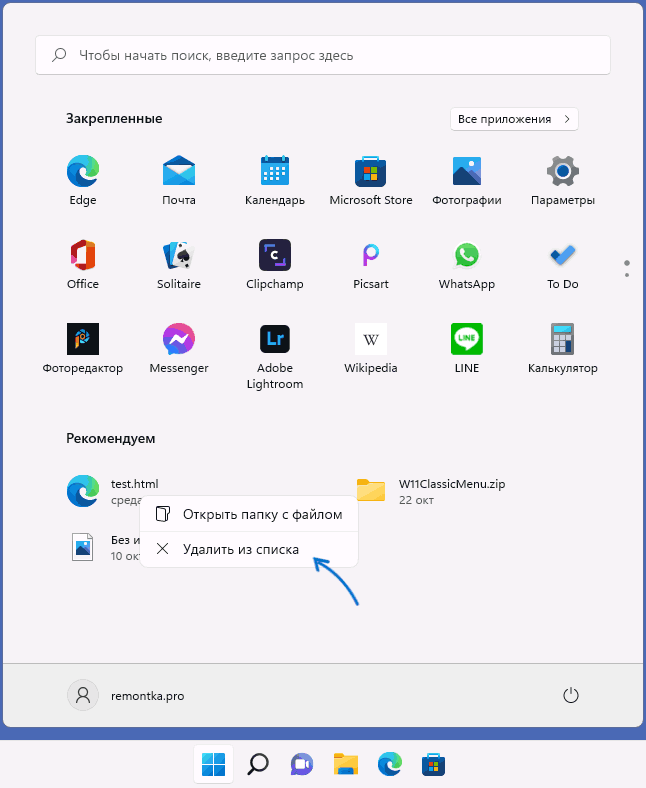
- Если вам требуется удалить только отдельные элементы в разделе «Рекомендуем», просто нажмите по таким элементам правой кнопкой мыши и выберите пункт «Удалить из списка» в контекстном меню.

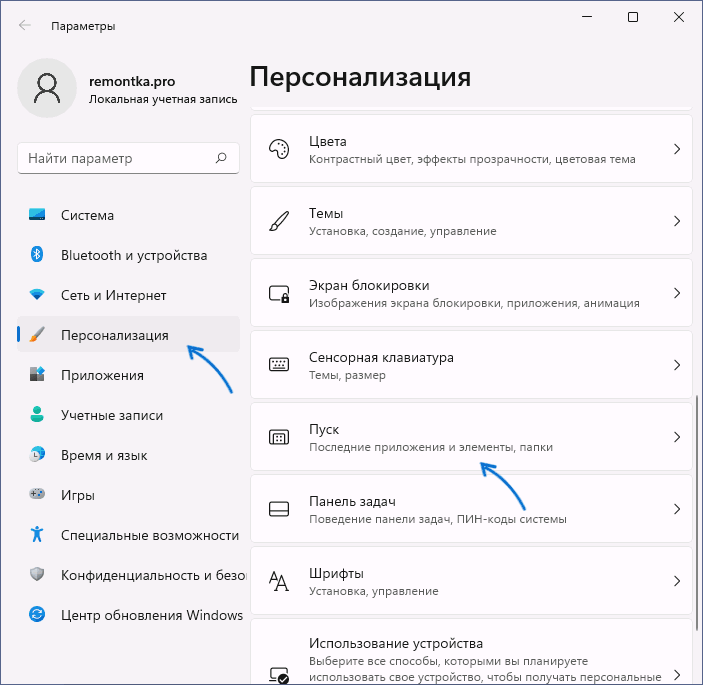
- При необходимости сделать так, чтобы в списке «Рекомендуем» всегда был пустым, зайдите в Параметры — Персонализация и откройте раздел «Пуск».

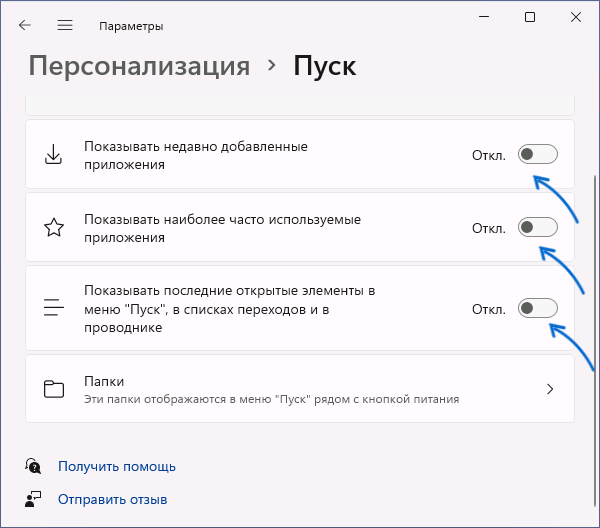
- Отключите пункты «Показывать недавно добавленные приложения», «Показывать наиболее частые приложения», «Показывать последние открытые элементы в меню Пуск, в списках переходов и в проводнике».

- Сразу после этого раздел «Рекомендуем» станет пустым и что-то новое в нём не появится.


Однако, сам раздел продолжит отображаться и всё так же будет занимать почти половину меню «Пуск» Windows 11.
Отключение раздела с рекомендациями в реестре
Следующий вариант, позволяющий убрать соответствующий раздел в меню Пуск — создание файла реестра со следующим кодом:
Windows Registry Editor Version 5.00

[HKEY_LOCAL_MACHINE\SOFTWARE\Microsoft\PolicyManager\current\device\Start]
"HideRecommendedSection"=dword:00000001

[HKEY_LOCAL_MACHINE\SOFTWARE\Microsoft\PolicyManager\current\device\Education]
"IsEducationEnvironment"=dword:00000001

[HKEY_LOCAL_MACHINE\SOFTWARE\Policies\Microsoft\Windows\Explorer]
"HideRecommendedSection"=dword:00000001
Создав указанный файл, «запустите» его, согласитесь с добавлением данных в реестр и перезагрузите компьютер — раздел «Рекомендуем» должен исчезнуть из меню Пуск.
Как полностью убрать раздел Рекомендуем в меню Пуск Windows 11 с помощью ExplorerPatcher
Средства системы позволяют убрать содержимое, но не раздел «Рекомендуем» в меню Пуск как таковой. Если же требуется полностью избавиться от раздела, можно использовать стороннее приложение ExplorerPatcher (обновление: в последних версиях Windows 11 лучше не использовать, может работать неправильно):
- Скачайте последнюю версию ExplorerPatcher с официальной страницы https://github.com/valinet/ExplorerPatcher/releases/latest и запустите приложение.
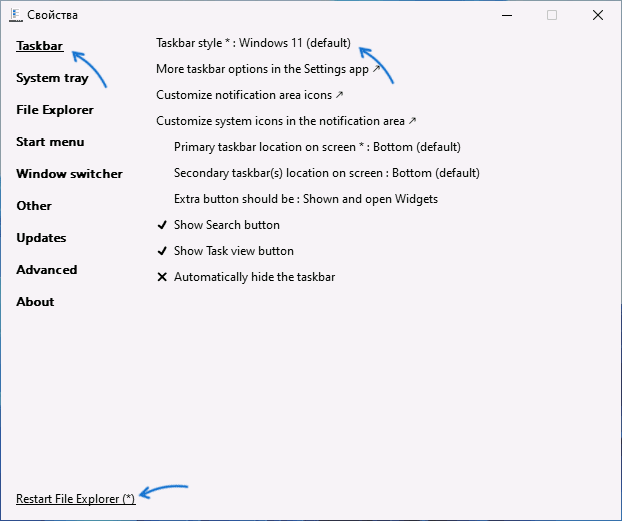
- Внешний вид панели задач изменится, но вы можете вернуть обычный: нажмите правой кнопкой мыши по пустому месту панели задач и выберите пункт «Свойства», в разделе «Taskbar» в пункте «Taskbar Style» выберите «Windows 11» и нажмите «Restart File Explorer» для перезапуска проводника.

- Перейдите в раздел «Start Menu» и включите опцию «Disable the Recommended section», перезапустите проводник.
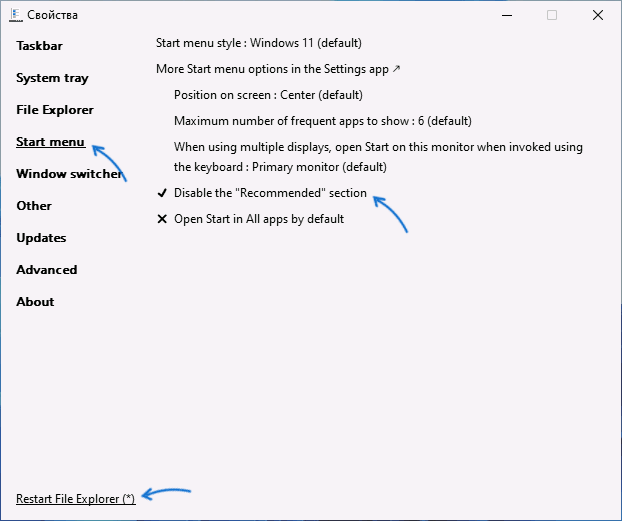
В результате раздел «Рекомендуем» полностью исчезнет из меню Пуск Windows 11, как показано на изображении ниже.
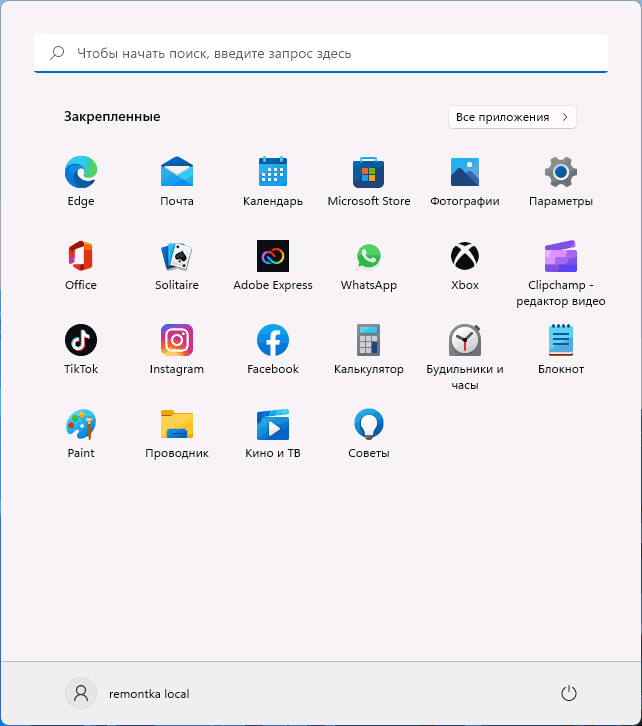
При желании вы можете сделать так, чтобы меню Пуск всегда открывалось в разделе «Все приложения», где рассматриваемый раздел отсутствует.
ОС Microsoft Windows 11 рекомендует пользователю софт. Блок «Рекомендуем» располагается в меню «Пуск». Данные рекомендации содержат недавно установленные и наиболее часто применяемые вами программы. Кроме того там же размещены линки на файлы, которые вы недавно открывали.
Рассмотрим как оставить в «Рекомендуем» только необходимые вам элементы или полностью «опустошить» данный раздел главного меню Windows 11.
Содержание
- Зачем нужен список «Рекомендуем» в меню «Пуск» Windows 11
- Как кастомизировать раздел «Рекомендуем» Windows 11
- Запретите ОС помещать файлы и приложения в раздел рекомендованных
Операционная система изучает сценарий использования вами Windows 11. На основании собранных и проанализированных данных предлагает быстрый доступ к элементам, которые могут вам понадобится по мнению умного алгоритма.
Чем дольше вы используете ОС, тем более точны ее рекомендации. И тем больше значков в соответствуещем разделе главного меню Windows 11 В числе рекомендуемого — не только софт и файлы, но и быстрый доступ к настройке параметров системы.

Многие опытные пользователи предпочитают «статический» интерфейс «динамическому». Не любят, когда элементы GUI «появляются» и «исчезают» сами по себе. Точнее по воле слишком умного системного софта. Удобнее, когда пользователь точно знает как в следующий момент будет выглядеть его ОС.
Очистка списка «Рекомендуем» может понадобиться из соображений конфиденциальности. Данный раздел позволяет составить представление о сценарии использования вами ПК и ваших предпочтениях. Актуально на компьютерах общего использования в офисах и учебных заведениях.
Данный блок может оказаться полезен. Поэтому перед очисткой попробуем «подружиться» с ним и настроить список рекомендуемых элементов под себя.
Как кастомизировать раздел «Рекомендуем» Windows 11
Щелкните правой кнопкой мыши на кнопке «Пуск», чтобы перейти в текстовое меню опытного пользователя Windows 11. Найдите пункт «Параметры» и щелкните по нему для перехода в утилиту настроек операционной системы.

Вы можете также открыть Параметры Windows 11 и через классическое графическое меню. Щелкните левой кнопкой мыши по «Пуску», затем по значку «Параметры» с характерной визуализацией в виде шестеренки.
На левой панели окна системных параметров выберите раздел «Персонализация». Кликните по плитке «Пуск» на правой панели.

Выберите один из трех сценариев поведения раздела рекомендуемых элементов. В окне настроек «Персонализация > Пуск» находятся три настраиваемых параметра:
- Показывать недавно добавленные приложения.
- Показывать наиболее часто используемые приложения.
- Показывать недавно открытые элементы в меню «Пуск», в списках переходов и проводнике.
Предусмотрены два состояния каждого параметра — включенное и отключенное. Чтобы отключить опцию, сместите ползунок влево. Чтобы включить — вправо.

Оставьте включенными только лишь опции, которые вам необходимы. Ведь избыток лишних графических элементов на экране монитора ПК или дисплее ноутбука затрудняет поиск необходимых.
Без ненужных вам элементов «Пусковое» меню станет лаконичнее, что особенно актуально для компактного экрана ноутбука. Читайте также в «Блоге системного администратора» как вернуть «Пуск» на в левый нижний угол экрана:
Запретите ОС помещать файлы и приложения в раздел рекомендованных
Полное удаление или отключение блока «Рекомендуем» в Windows 11 не предусмотрено. Данный раздел в любом случае будет отображаться в главном меню ОС. Является постоянным элементом GUI одиннадцатой Windows.
Чтобы список рекомендаций был пустым, отключите все три параметра. В дальнейшем туда не станут помещаться ни программы, ни файлы, ни ссылки.

Чтобы удалить программу или файл из списка «Рекомендуем» Windows 11, щелкните по кнопке «Пуск» Windows 11.
Чтобы удалить определенную программу или файл из данного списка, откройте контекстное меню элемента. Сначала щелкните по нему правой кнопкой мыши. Из меню выберите пункт «Удалить из списка».

При переходе на новую ОС нередко происходят ошибки и сбои. Читайте как сбросить Windows 11 к заводским настройкам:
Данное действие более мягкий и простой для начинающих пользователей аналог чистой установки системы без потери фотографий, видеозаписей, текстов и других файлов.
Какая ОС у вас на ПК или ноутбуке — Windows 11, 10, 8.1, XP, macOS или Linux? Напишите в комментариях.
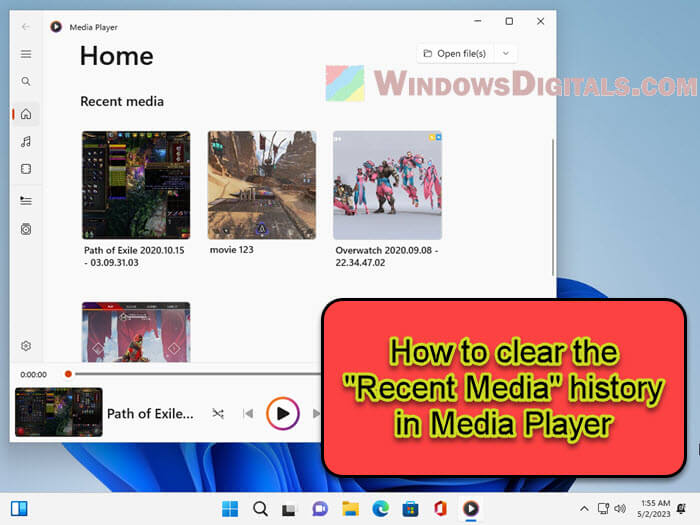
Microsoft upgraded the old Groove Music to something called the new Media Player in Windows 11. It can do a pretty good job in playing songs and videos of most formats, but it also remembers what you watched or listened to and has a list of history shown right on the Home of the player. Well, some people might not like this because of different reasons. If you’re bothered about this, in this guide, we’ll show you how to clear the “Recent Media” history using four different methods.
Also see: How to Disable Recent Files and Frequent Folders in Windows 11
Method 1: Deleting the MediaPlayer.db-wal file and setting it to read-only
This first trick is like saying “no more” to the Media Player for keeping tabs on your watchlist. You’ll delete a file named MediaPlayer.db-wal and then make it so the player can’t write to it anymore. This means your secret watching habits will stay secret.
- Open File Explorer and paste this in the top:
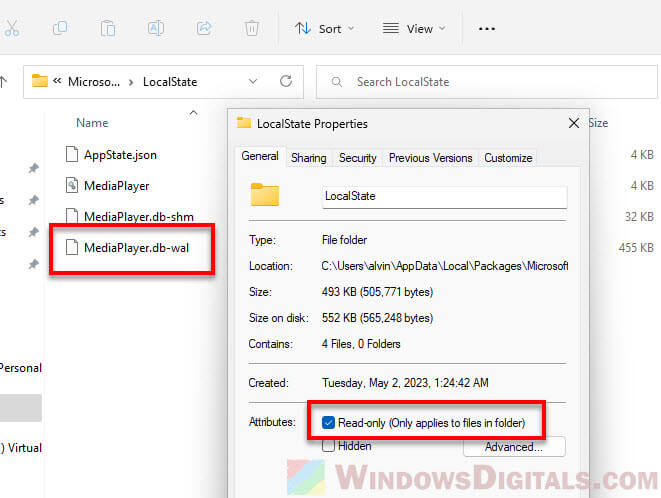
%localappdata%\Packages\Microsoft.ZuneMusic_8wekyb3d8bbwe\LocalState - Find and delete the
MediaPlayer.db-walfile.
- Play any video or song in Media Player. It makes a new
MediaPlayer.db-walfile. - In Media Player, go to recent media and remove the file you just played.

- Back to the
MediaPlayer.db-walfile, right-click it, hit Properties. - Tick the Read-only box, then hit Apply and OK.

Now, the Media Player can’t remember any new stuff you watch or listen to. Your privacy is safe.
Related resource: How to Clear Timeline Activity History in Windows 10 or 11
Method 2: Deleting files from the “Transcoded Files Cache” folder
If you don’t mind to do it manually, this next way lets you clean out the Media Player’s memory by yourself. You’ll go into a folder and delete some files.
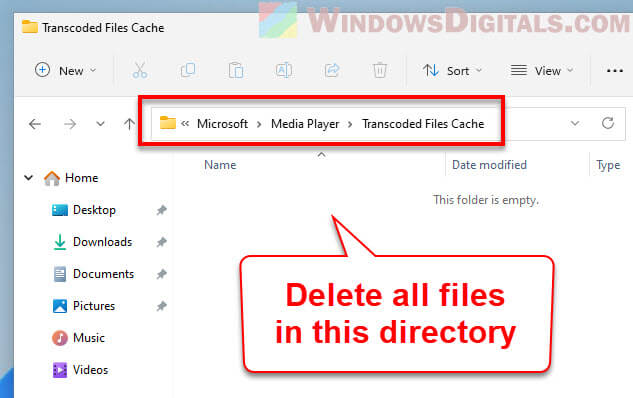
- Head to this place in File Explorer:
C:\Users\username\AppData\Local\Microsoft\Media Player\Transcoded Files Cache. Swap “username” with your own. - Delete all files there to forget the recent stuff.

Tip: Make a shortcut to this folder on your desktop so you can clear things out fast next time.
Useful tip: How to Add Subtitles to Video in Windows 11
Method 3: Removing videos from the Media Player’s Home tab
If you just want to pick and choose what to forget, this way’s for you. You can delete certain things right from Media Player.
- Open the Windows 11 Media Player.
- Click on Home on the right.
- Hover over a video thumbnail. You’ll see a checkbox.
- Tick the box for any video you want to forget, or hit Ctrl + A to select all.
- At the top, hit Remove to clear them out.

This is great when you want to keep some stuff but ditch the rest.
Related issue: Windows 11 Media Player Closes Immediately After Opening
Method 4: Resetting the Media Player app
Resetting the Media Player is like hitting the big red button. It wipes everything clean – your history and any changes you made to the app. Use this when you really want to start fresh.
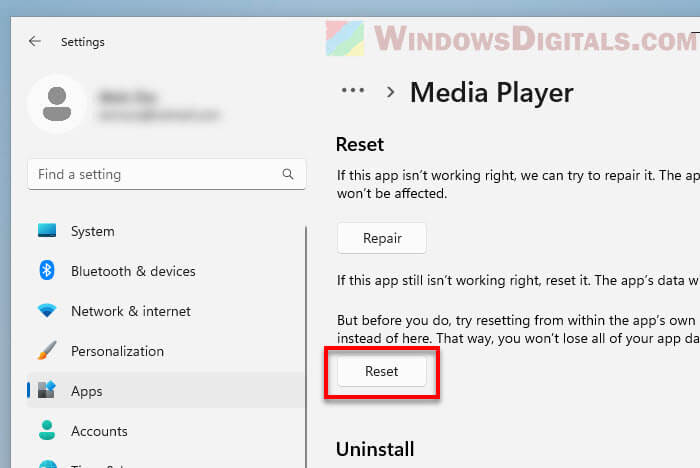
- Hit Search in the taskbar, type Media Player, and right-click the app from the results.
- Choose App Settings.
- Scroll to Reset and press the button. You’ll see a warning about deleting app data and going back to square one.

- Hit Reset again if you’re sure.
After this, your Media Player will be like new, with no memory of past plays.
Here’s what I think
The new Windows 11 Media Player is cool, but it’s a bit too nosy with your watch history. It might keep things you really don’t want it to store. If ever in doubt, the steps above can help you clear the video watched history and keep things private. And if this player isn’t quite your cup of tea, there are always other better options out there like VLC or KMPlayer.

This tutorial will show you how to remove one or all items from recent media history in the Media Play app for your account in Windows 11.
The built-in Media Player app in Windows 11 is designed to make listening to and watching your multimedia content more enjoyable. At the heart of Media Player is a full-featured music library that allows you to quickly browse and play music, as well as create and manage playlists. All your content in the music and video folders on your PC will appear automatically in your library.
By default, Media Player will show all recently played media on the Home page under Recent media to make it easier to access or play again.
You can manually clear your recent media history in Media Player whenever you like.
Removing media from recent media history in Media Player does not delete the actual media file(s) from their source locations.
Contents
- Option One: Clear Recent Media History in Media Player using Context Menu
- Option Two: Clear Recent Media History in Media Player using Check Box
- Option Three: Clear All Recent Media History in Media Player from File Explorer
EXAMPLE: «Recent media» history in Media Player app


Option One
Clear Recent Media History in Media Player using Context Menu
1 Open the Media Player app.
2 Click/tap on Home in the left pane. (see screenshot below)
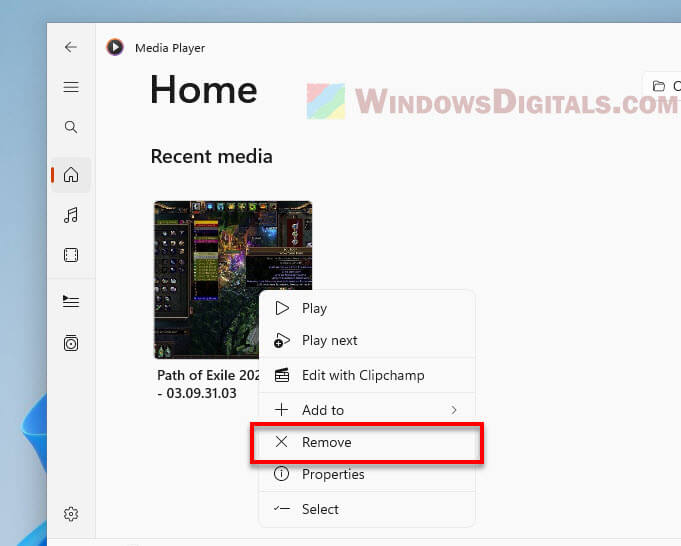
3 Right click on media you want to remove from recent media history.
4 Click/tap on Remove.

Option Two
Clear Recent Media History in Media Player using Check Box
1 Open the Media Player app.
2 Click/tap on Home in the left pane, and hover on the media you want to remove from recent media history. (see screenshot below)
3 Check the box for media you want to remove from recent media history. (see screenshots below)
4 Perform one of the available steps below.
- Click/tap on the Remove button on the toolbar.
- Click/tap on the See more (3 dots) button on the toolbar, and click/tap on Remove.


Option Three
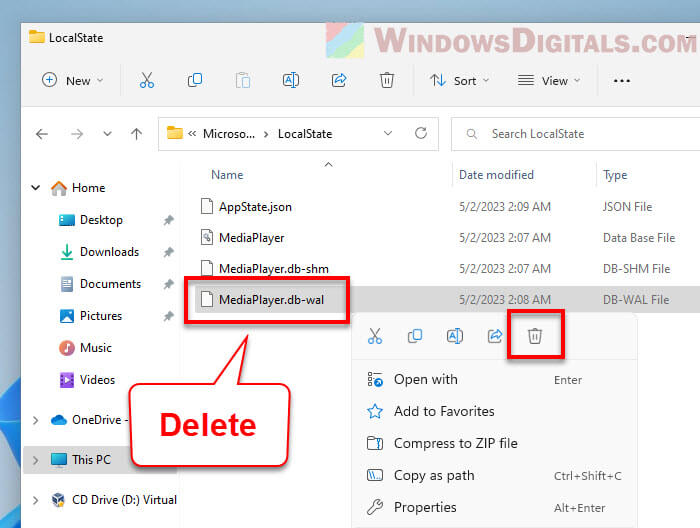
Clear All Recent Media History in Media Player from File Explorer
1 Close the Media Player app if currently open.
2 Open File Explorer (Win+E).
3 Copy and paste the path below into the address bar of File Explorer, and press Enter. (see screenshot below)
%localappdata%\Packages\Microsoft.ZuneMusic_8wekyb3d8bbwe\LocalState
4 Delete the MediaPlayer.db-wal file.
5 You can now close File Explorer if you like.

That’s it,
Shawn Brink
Windows Media Player builds various types of caches to smoothly play your media files and improve your streaming experience. If you’re experiencing slow and sluggishness while playing music and videos, clearing the corrupted cache contents might help.
-

-
-

-
Click on the Devices tab.
-
-


-

-
-
-
-
C:\Users\Your_User_Name\AppData\Local\Microsoft\Media Player
-


-
-
-
-
Click on the Privacy tab.
-
-
-
Click on OK.


-
-
-
-
Click on the Privacy tab.
-
-
Click on OK.


Ask a Question
200 characters left
Include your email address to get a message when this question is answered.
Submit
About this article
Thanks to all authors for creating a page that has been read 1,606 times.