Windows: Unleash Your Computer’s Full Potential by Disabling Media Sharing
In today’s digital age, our computers have become integral to our daily lives. They store important documents, manage our finances, and allow us to connect with others around the globe. However, many users don’t realize that some built-in features, like Windows Media Sharing, can slow down system performance or pose security risks. This article will guide you through the process of disabling Windows Media Sharing, helping you to unlock your computer’s full potential.
Understanding Windows Media Sharing
Windows Media Sharing is a feature that allows users to share media files such as music, videos, and pictures across different devices within a network. While this can be beneficial in some scenarios, it can also lead to unnecessary resource usage and security vulnerabilities. Disabling this feature can significantly improve your system’s performance, especially if you are not actively using it.
Benefits of Disabling Windows Media Sharing
- Improved Performance: Disabling unnecessary services frees up system resources, allowing your computer to run more efficiently.
- Enhanced Security: Reducing the number of shared services minimizes the potential attack surface for hackers and malware.
- Less Network Congestion: If you share media files over a network, disabling this feature can decrease network traffic, leading to a smoother experience for all users.
Step-by-Step Guide to Disable Windows Media Sharing
Follow these simple steps to disable Windows Media Sharing on your Windows computer:
Step 1: Open Control Panel
To begin, access the Control Panel:
- Click on the Start menu.
- Type Control Panel in the search bar and press Enter.
Step 2: Navigate to Network and Internet
In the Control Panel, locate and click on Network and Internet.
Step 3: Access Network and Sharing Center
Under the Network and Internet section, click on Network and Sharing Center.
Step 4: Change Advanced Sharing Settings
In the Network and Sharing Center, look for Change advanced sharing settings on the left sidebar.
Step 5: Disable Media Streaming
Scroll down to find the Media streaming section. Click on Choose media streaming options:
- Click on Turn off media streaming.
- Click OK to confirm the changes.
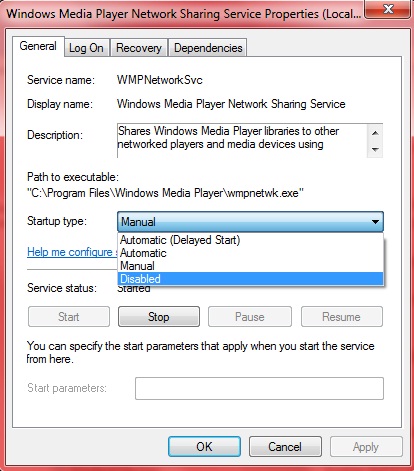
Step 6: Turn Off Windows Media Player Network Sharing Service
Next, you’ll want to disable the Windows Media Player Network Sharing Service:
- Press Windows + R keys together to open the Run dialog.
- Type services.msc and press Enter.
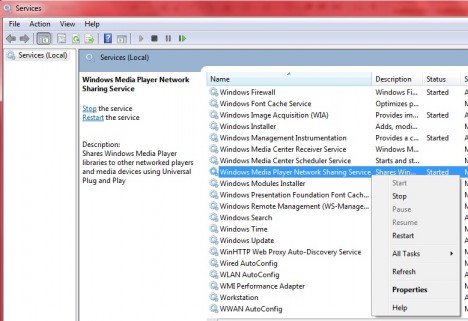
- In the Services window, scroll down to find Windows Media Player Network Sharing Service.
- Right-click on it and select Properties.
- Under the Startup type dropdown menu, select Disabled.
- Click Stop if the service is currently running, then click OK.
Step 7: Restart Your Computer
For the changes to take effect, restart your computer. Once rebooted, Windows Media Sharing will be disabled.
Troubleshooting Tips
In some cases, you may encounter issues while disabling Windows Media Sharing. Here are some troubleshooting tips:
Check for Updates
Ensure your Windows operating system is up to date. Outdated software can lead to performance issues. To check for updates:
- Open Settings from the Start menu.
- Navigate to Update & Security.
- Click Check for updates.
Restart the Service
If you notice that Windows Media Sharing is still active after following the steps, try restarting the service:
- Open the Run dialog by pressing Windows + R.
- Type services.msc and press Enter.
- Find Windows Media Player Network Sharing Service.
- Right-click and select Restart.
Consult Online Resources
If problems persist, consider visiting Microsoft Support for more specialized assistance. They offer comprehensive guides and troubleshooting resources that can help you resolve any issues.
Conclusion
Disabling Windows Media Sharing is a straightforward process that can significantly enhance your computer’s performance and security. By following the steps outlined above, you can effectively manage your system resources and reduce unnecessary network traffic. Regularly reviewing and managing your system settings is essential for maintaining optimal performance. If you want to delve deeper into optimizing your Windows experience, explore additional tips and tricks on our site here.
Taking control of your Windows settings will help you unleash your computer’s full potential, ensuring a smoother and more efficient user experience. Don’t hesitate—start optimizing your system today!
This article is in the category Guides & Tutorials and created by Windows Portal Team
As you probably know, Microsoft has made it easy for anyone to be able to access your computer’s media files through their software. They call this feature Media Streaming or Shared Media. It is typically accessible via every device that uses the internet (phone, tablet, laptop), as well as some devices that are connected directly to your computer.
This can cause issues if you do not want others to have access to all of your movies and music. Many people now use these services daily so being able to access them easily is very valuable. If you would like to protect your privacy more, you may want to consider disabling shared media features on your computer.
There are several ways to disable this in Windows 10, so this article will go into detail about each one! So get ready to share less than you normally would… 😉
Removing Your Account From The Service
You will first need to find out what account users have been using to connect to Windows Media Services. To do this, head over to Settings > Accounts and syncing > Sign-in options. Here, under Add accounts from links you will see “Windows Media service” listed.
If there are any saved passwords here, you can simply delete them all at once to prevent someone else with access to this information from accessing Windows Media Services.
Once that is done, click the link next to “For developers” to remove your user account completely.
Open the Windows Media Player preferences

In the Preferences section of Windows Media Player, you can choose to allow or disable sharing with other users. To do this, click on the Settings button in the top right corner. Then, under General, look for Share settings. You can either enable Shared Playback or disable it completely here as well.
You can also opt to only share one media type (for example, videos or music) instead of all types! This is helpful if you want to use Windows Media Player to manage your songs but not your films. Or if you don’t like the way some video editing software integrates into Windows Media Player, you can prevent them from doing so by limiting their access here as well.
Look for the media player sharing section

There are several ways to disable this feature in Microsoft Windows. Here we will talk about two of them, one is easy and another one may require you to do some more advanced computer settings.
The first way to turn off windows movie playback sharing is by changing the setting under Tools -> Options -> Devices -> Manage Audio Output Plug-Ins.
Here you can choose whether or not to share your movies with other people. By default, it is set to “Allow” which means that anyone can access your movies through windows movie player. You can change this to either “Not Shared” or “Shared Only With Me.”
Note: If you want to keep your music private, you should uncheck the box next to Share my Music library so only you can listen to it.
To disable media player sharing, click the button that says “Never share”

First, you will need to make sure that your computer is in sync with the internet. If it is not, then go onto the next step!
Second, open up windows explorer by clicking File -> Explorer -> Explore all folders as shown here.
Now, navigate to where you saved the music or movie file and right-click on it. Then, choose Properties from the context menu.
In this window, look under the Shared With section for Settings. You can now enable or disable the option to Allow other people to access his/her files using their account.
Restart Windows Media Player

The next step in limiting media sharing is to restart your computer or device, then launch Windows Media Player. You will need to make sure that you have it fully configured so it does not share any content automatically, nor can people add content using it.
Once this has been done, close out of Windows Media Player completely and reopen it. Your restrictions should now be active!
If for some reason they are not, try closing and reopening Microsoft Edge (Windows 10’s default browser) or another app and see if this fixes it.
Tell all your friends about how to disable media player sharing

If you are trying to figure out why your computer is constantly being accessed by an unknown device, it could be that someone has shared their Microsoft Windows or Apple Music account with this device.
A music streaming app such as Spotify, Amazon Prime Music, Google Play Music, or Tidal will automatically connect to other apps when connected to Wi-Fi using its login credentials.
These other apps then have access to not only stream songs, but also any files on your phone, computer, or both. This can easily waste unlimited data plans!
It is very important to know how to prevent these media player sharing settings in Windows and iOS.
Tell all your friends about how to disable media player sharing

If you are trying to figure out why your computer is constantly being accessed by someone else’s software, then this article will help you!
It’s time to tell everyone close to you how to disable windows media player sharing. This will prevent other people from using your computer to access Microsoft Music, YouTube, or any of their own music libraries that they may have installed.
If you’re reading this article online, no one can use your computer to access these services!
There is an easy way to do it. You just need to go into Settings > System settings > Privacy, where you can find more details for each app. Here, look under Online Services and Click Through Modes to make sure «Allow apps through this service» is unchecked.
That should be all you need to do! Now, if you would like some quick tips as to what apps might be causing this issue, we recommend giving yourself a few minutes before running away. Try going through Google, Facebook, and Twitter first to see if anyone reported issues with those apps recently.
Tell all your friends about how to disable media player sharing
If you are trying to figure out why people keep telling you that your computer is always on, there can be some frustrating experiences due to one annoying feature of Windows 10: the ability to share your Microsoft Music or other music libraries with anyone through the built-in media player.
A lot of users seem to have left this option enabled by accident, so it has become quite common for someone to come across their friend’s shared library and see all sorts of things in it!
It is very easy to tell if this setting is turned on though — simply go into Settings > Privacy and make sure «Share my files and apps using Microsoft Services» is checked.
Windows Media Player is the world’s most popular media playing program. It lets users participate in network sharing among other things. However, if it is not required, you can disable the Windows Media Player Network Sharing feature. We will show you how to do so in this article.
- Click on Start > type «services.msc» in the search field and press Enter.
- In the «Services» window, look for the following entry:
- Windows Media Player Network Sharing Services
- Double click and set the «Startup type» as «Disabled«

- Click on OK to validate.
This service is only required for Homegroup sharing and can be safely disabled!
Note: If you don’t have Windows Media Player, you can easily download it here for Windows computers, and here for Mac computers.
Do you need more help with Windows Media Player? Check out our forum!
By default, Microsoft has configured Windows 7 to enable and turn on background services when needed. However, some of these background processes are not always in use or required. When they are constantly running, they will consume a large amount of resources and slow down the system’s performance. One of these background processes that many users have highlighted is the wmpnetwk.exe file. The “wmpnetwk.exe” is the key executable for the Windows Media Player Network Sharing Service and it is used to share Windows Media Player libraries (Windows 7 is using Windows Media Player Version 12). Windows Media Player may not be your preferred player and you may not want to have wmpnetwk.exe running to free up some memory, reduce RAM usage and CPU resources. In that case, Windows 7 offers you an alternative to disable and turn it off.
To disable and turn off wmpnetwk.exe, users just need to type “services.msc” in the Windows search box to open Windows 7 Services Microsoft Management Console (MMC) snap-in. MMC allows users to manage and configure Windows services that are running on the computer.
Select “Windows Media Player Network Sharing Service”, right click, and click “Stop” to disable it.
Users can go to the Resource Monitor to check and confirm that wmpnetwk.exe is no longer running. Even though users have successfully disabled wmpnetwk.exe and turned off Windows Media Player Network Sharing Service, this process will be restored every time users restart the computer.
To permanently disable this process, users can go to MMC again, select and right click “Windows Media Player Network Sharing Service”, in the shortcut menu, click “Properties”. Look for “Startup type” item, select “Disabled” so that this process will be permanently disabled even when users restart the computer.