
Wouldn’t it be nice to have a personal soundtrack for every occasion, ready to play at the click of a button? With Windows Media Player in Windows 11, you can create playlists for any mood or moment. Whether you’re adding background music to your workday or making a soundtrack for the ultimate road trip, playlists offer a seamless and personalized listening experience. See how easy it is to craft and share your own musical collections.
Create a playlist
Let’s get started on creating your very own playlist in Windows Media Player:
- Fire up Windows Media Player: Just click on it in your Start menu, and you’re ready to roll.
- Head to the Library: This is where all your music and videos live.
- Hit ‘Create playlist’: You’ll find this option in the left-hand pane under the ‘Playlists’ section.
- Name your Playlist: Give it a name that speaks to you—something like “Workout Jams” or “Chill Vibes.”
- Add your media: Now for the fun part! Drag and drop your favorite songs or videos into the playlist area.
And just like that, you’ve created a playlist.
AI art created via Copilot
Let Microsoft Copilot curate a playlist
Need some inspiration for your playlist? Copilot, your AI assistant has got you covered. Copilot can suggest songs that match your taste, help you discover new artists, and even create themed playlists for any occasion.
To access Copilot, simply click on the Copilot icon in your taskbar or press Windows + C on your keyboard. From there, you can start a conversation and ask for help with creating playlists, making recommendations, and more.
Try asking Copilot:
- “Can you help me create the playlist: Classic Road Trip Tunes?”
- “What songs should I add to my workout playlist?”
- “I need some chill music for relaxing at home.”
- “What’s a good mix for a party playlist?”
Here’s what Copilot created with the prompt: “Can you help me create the playlist: Classic Road Trip Tunes?”
- «Born to Run» — Bruce Springsteen
- «Sweet Home Alabama» — Lynyrd Skynyrd
- «Hotel California» — Eagles
- «Life is a Highway» — Tom Cochrane
- «Take It Easy» — Eagles
- «On the Road Again» — Willie Nelson
- «Don’t Stop Believin'» — Journey
- «Free Fallin'» — Tom Petty
- «American Pie» — Don McLean
- «Go Your Own Way» — Fleetwood Mac
Play it forward with friends
Pass on your playlists to friends and family. With Windows Media Player, sharing your playlist is easy. Here’s how you do it:
- Save your Playlist: Playlists are automatically saved with a .wpl extension in the ‘Playlists’ folder.
- Locate the Playlist file: Navigate to the ‘Playlists’ folder in your Music library.
- Share the file: You can share the .wpl file via email or any other file-sharing method.
Ready to rock?
Whether you’re organizing your favorite tracks into playlists, discovering new music with Copilot, or enjoying seamless playback, Media Player has got you covered. Try Windows Media Player in Windows 11 today.
Help me choose a Windows 11 PC
Manage your music library with playlists
Updated on December 27, 2022
What to Know
- Select Library tab > under Playlists, select Create Playlist > choose a name for the playlist.
- Next, drag and drop songs from your library to the newly created playlist displayed in the left pane.
This article explains how to make a playlist in Windows Media Player 11, which was included with Windows Vista and Windows Server 2008. It is available for Windows XP and XP x64 Edition. It was superseded by Windows Media Player 12, which is available for Windows versions 7, 8, and 10.
Creating a New Playlist
To create a new playlist in Windows Media Player 11 (The process is very similar in WMP 12 or newer):
-
Select Library tab at the top of the screen (if it is not already selected) to bring up the Library menu screen.
-
Select Create Playlist in the left pane. You may need to select plus (+) icon to open this menu if it isn’t visible.
-
Type in a name for the new playlist and press the Return key.
You will see a new playlist with the name you just typed in.
Populating a Playlist
To populate your new playlist with tracks from your music library, drag and drop tracks from your library to the newly created playlist displayed in the left pane. Again, you may need to select the plus (+) icon icon next to the Library menu item to see the suboptions. For example, select the Artist submenu to simplify creating a playlist that contains all the music from a particular band or artist.
Using Your Playlist
Once you have a populated playlist, you can use it to play back the music tracks from your music library, burn a CD, or sync the music to a media or MP3 player.
Use the top menu tabs (Burn, Sync, and others) and drag your playlist over to the right pane to burn or sync the playlist.
Thanks for letting us know!
Get the Latest Tech News Delivered Every Day
Subscribe
In this guide, we are going to talk about how to create an M3U playlist in Windows 11/10. M3U is an acronym for MP3 URL and is a multimedia playlist file. It was originally designed to create playlist files with MP3 audio files. However, it may contain audio files in other audio formats too. Additionally, you can also add video files to M3U playlists.
How to open M3U Playlist in Windows
A lot of music players let you open and listen to M3U playlists on Window 11/10. You can import, view, and play M3U playlists in Windows Media Player. Other than that, some other third-party media players also support M3U playlists to import and play. Some of these media players include VLC media player, GOM Player, Winamp, AIMP, and PotPlayer.
Do note that the M3U playlists don’t contain the actual media content. These playlists are stored in text-based format and contain only the path to media files to play them in the added order. Let us now check out different methods to create M3U playlists on Windows 11/10.
How do I make an M3U playlist in Windows Media Player?
You can use the native media player application of Windows 10 i.e., Windows Media Player. You can create a new M3U playlist as well as play existing M3U files using WMP. Here are the steps to generate playlists in M3U file format in Windows Media Player:
- Open Windows Media Player.
- Browse and import source media files.
- Drag the media files to Playlist.
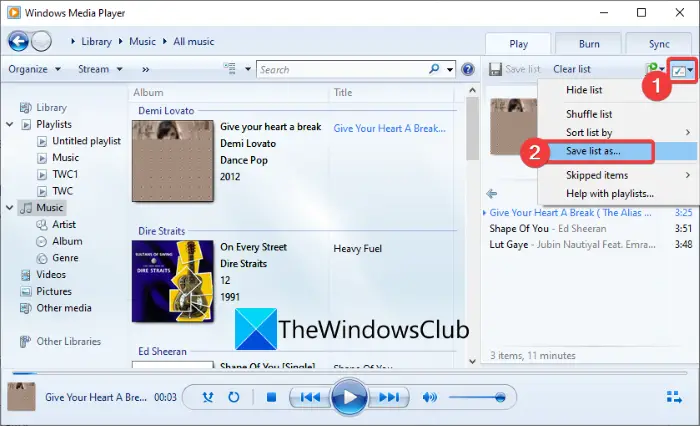
- Click on List options > Save list as.
- Select M3U as playlist format.
- Press the Save button to generate an M3U playlist.
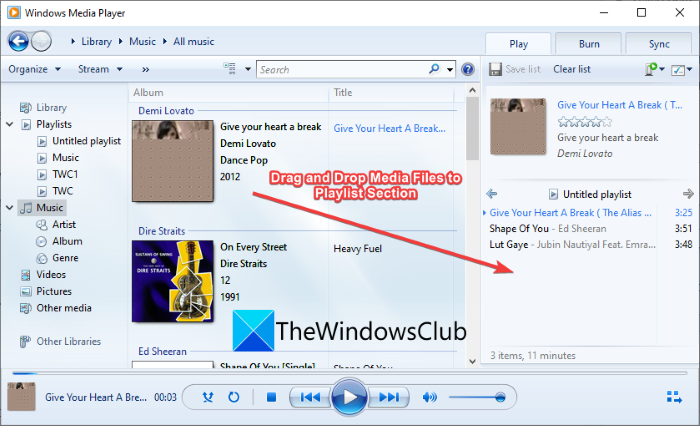
Firstly, launch the Windows Media Player application. Next, browse the media files and folder with which you want to create an M3U playlist file. Now, drag the media files onto the Playlist section.
Then, click on the List options drop-down option. After that, tap on the Save list as option from various options.
Finally, select the output playlist format as M3U and click the Save button to create an M3U playlist.
If you want more options to create M3U playlists, we are going to list them in this post. Let us checkout!
Here are some other methods to create an M3U playlist on your Windows 11/10 PC:
- Use a dedicated playlist creator to create an M3U playlist.
- Create M3U playlists in the VLC media player.
- Generate M3U playlists in Winamp.
- Create an M3U playlist in AIMP.
- Use Audacious to create M3U playlists.
- Create an M3U playlist in Notepad.
Let us discuss the above methods in detail now!
1] Use a dedicated playlist creator to create an M3U playlist
There are some dedicated programs that allow you to create M3U playlists on Windows 11/10. Here, we are going to list down two free playlist creators. Let us checkout!
1) Playlist Creator For Mp3 Players
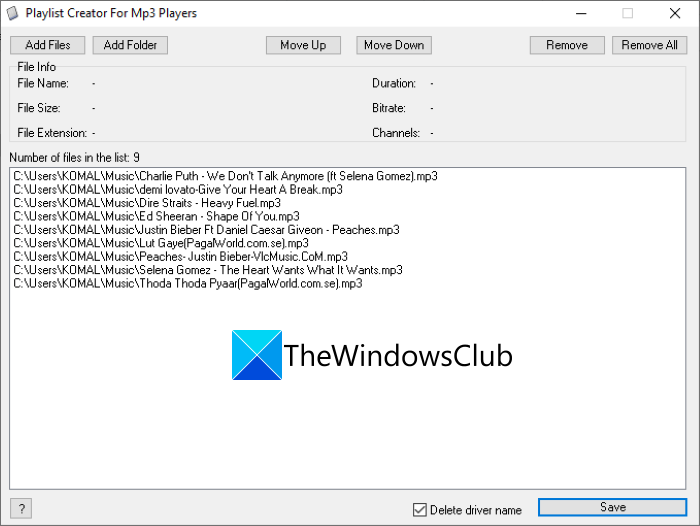
As the name gives away, Playlist Creator For Mp3 Players is a free software to generate M3U playlists. It is portable and lightweight playlist maker software. Here are the main steps to use this software in order to generate M3U playlists:
- Download this software from sourceforge.net.
- Unzip the downloaded RAR file using unzipper freeware.
- Launch the Playlist Creator application.
- Click on the Add Files or Add Folder button to import multiple source media files.
- You can now change the order of files using Move Up or Move Down button.
- Press the Save button to save the M3U playlist.
It is an easy-to-use and simple M3U playlist maker that you can try.
2) sPlaylistMaker
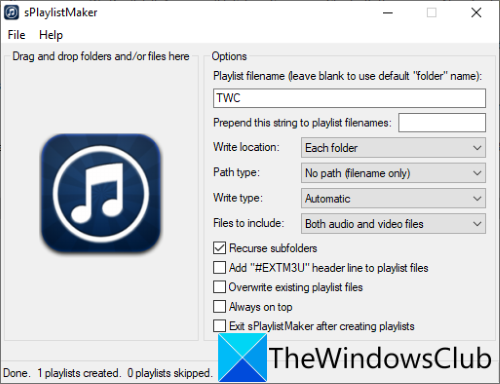
Another dedicated software to create M3U playlists on Windows 11/10 is sPlaylistMaker. It is a portable software that allows you to create M3U and M3U8 playlists. Here are the steps to create an M3U playlist using sPlaylistMaker:
- Download sPlaylistMaker.
- Unzip the downloaded folder.
- Run the sPlaylistMaker application file.
- Set up Playlist options including playlist name, write location, files to include (audio/ video or both), write type (M3U or M3U8), etc.
- Drag and drop audio files or a whole folder to its interface.
The M3U playlist will be created as soon as you drop audio files onto its interface.
To use this software, you can download it from here.
See: How to merge multiple Playlists on Spotify and YouTube Music.
2] Create M3U playlists in the VLC media player
If you are an ardent user of the famous VLC media player, you can use it to create M3U playlists. It lets you generate M3U and other playlist files including M3U8, XSPF, and HTML playlists. Here are the main steps to create M3U playlists in the VLC media player:
- Download and install the VLC media player.
- Launch the application.
- Toggle view mode to Playlist.
- Add media files to the playlist.
- Go to the File > Save Playlist to File option.
- Select M3U as the output file format and save the playlist.
Firstly, download and install the VLC media player if you don’t already have it on your PC. Then, open the GUI of this software.
Now, go to the View menu and click on the Playlist option to open up its Playlist Manager.
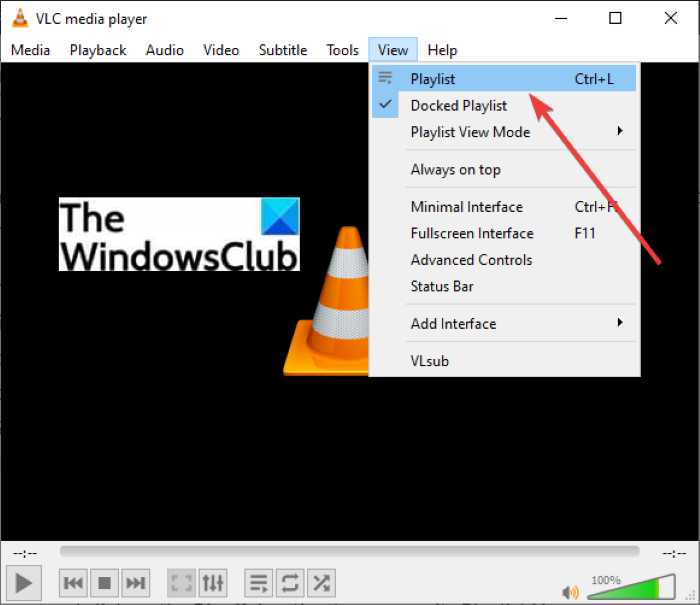
Next, right-click on the white blank area, and from the context menu, use Add File or Add Folder option to import the input media files to it.
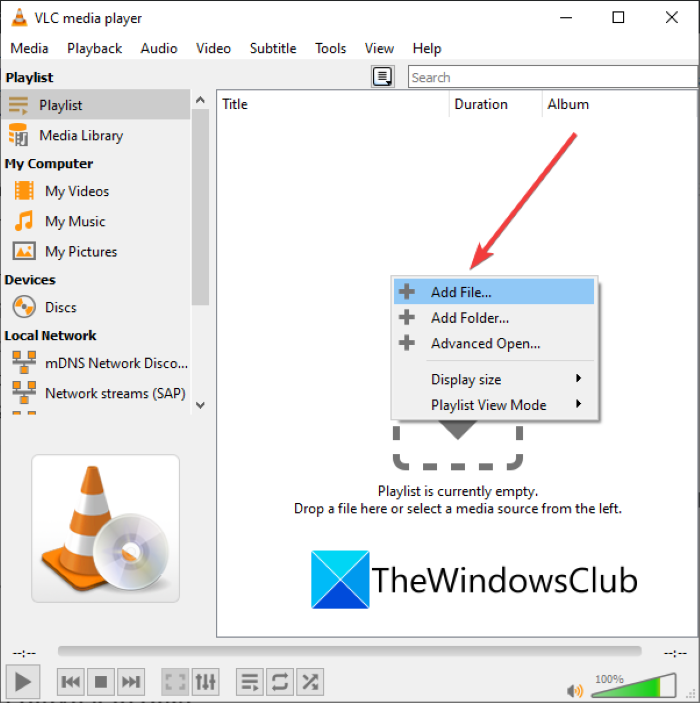
After that, go to the File menu and tap on the Save Playlist to File option.
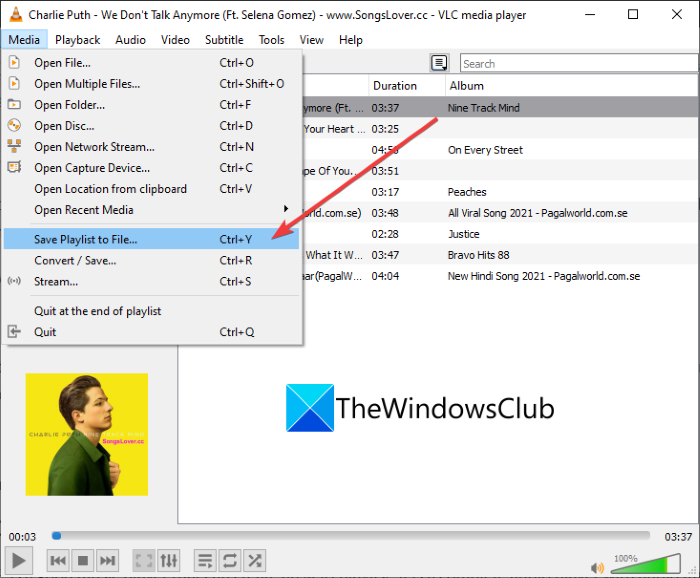
Finally, set the target format to M3U, enter the playlist filename, and then press the Save button. This will create an M3U playlist file that you can use in a supported application.
Read: How to edit Audio or Video Metadata Tags in VLC media player.
3] Generate M3U playlists in Winamp
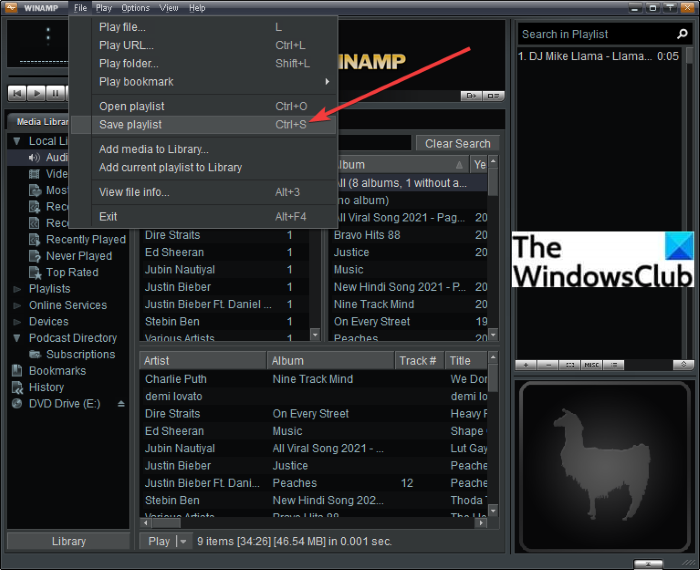
Winamp is one of the first audio players that supported M3U playlists. You can use it to play and create M3U, M3U8, and PLS playlists in Windows 11/10. To do so, here are the steps:
- Download and install Winamp.
- Launch Winamp.
- Add media files to it.
- Click on the File > Save Playlist option.
- Select M3U as output playlist format.
- Enter a filename and press the Save button.
This way you can create M3U8 and PLS playlists too.
Read: How to use Mini Lyrics Plugin for Windows Media Player.
4] Create an M3U playlist in AIMP
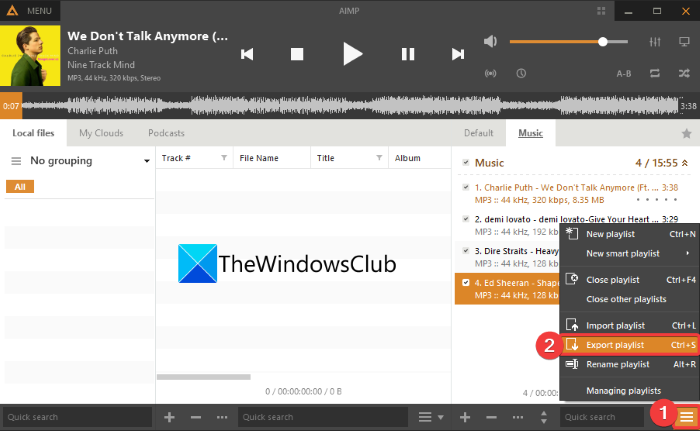
AIMP is a good music player that can create an M3U playlist. It is a complete audio player with audio tagging and conversion functionalities. You can create M3U, M3U, (Unicode), and Winamp playlist files using this audio player software. Let us check out the steps to do so:
- Firstly, download and install AIMP on your PC.
- Now, launch the AIMP software.
- Next, go to the Menu and click on the Open Files option to import multiple audio files.
- After that, click on the three-bar menu present at the bottom-right corner.
- Then, press the Export Playlist option and save the M3U playlist file.
It is quite easy and smooth to create M3U playlists with AIMP.
5] Use Audacious to create M3U playlists
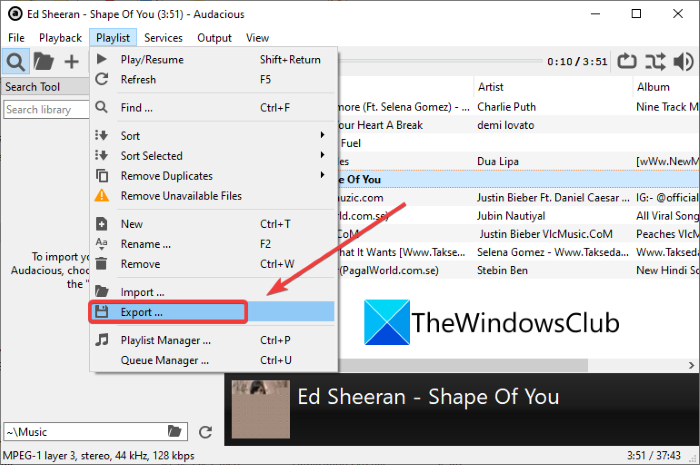
Another software that you can use to generate M3U playlists is Audacious. It is a dedicated music player that can create M3U playlists. Follow the below steps to do so:
- Download Audacious and install it.
- Launch the application.
- Import the source audio files by going to the File menu.
- Go to the Playlist menu and click on the Export button.
- Enter the playlist name with the .m3u extension.
- Press the Save button to generate an M3U playlist.
Read: How to download YouTube playlist videos at once.
6] Create an M3U playlist in Notepad
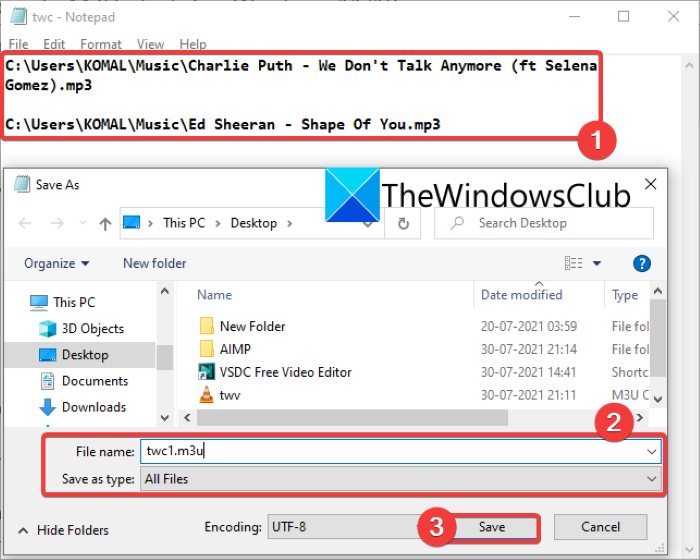
Yes, you read that right! You can also create an M3U playlist in Notepad on Windows 11/10 PC. As an M3U playlist basically contains the location of media files and is a text-based file format, you can enter the path of media files in new lines and create an M3U playlist. Here are the exact steps to create an M3U playlist in Notepad:
- First, open the Notepad application on Windows 11/10.
- Now, copy and paste the exact path to all the media files with which you want to create a playlist.
- After entering the path to all the source media files, go to the File menu and click the Save as option.
- Next, select Save as type to All Files.
- Then, enter the playlist filename and manually add the .m3u file extension.
- Lastly, press the Save button to create an M3U playlist.
Using Notepad is the easiest way to create an M3U playlist on Windows 11/10 PC.
How do I make an m3u playlist in notepad?
You can create M3U playlists in Notepad by using the steps mentioned in method (6). Just enter the path of media files and save the file in M3U format.
How do I turn a folder into a playlist?
The above-listed methods can be used to turn a folder into a playlist. You can import a folder of media files VLC, AIMP, or any other software mentioned here and convert it to an M3U or some other supported playlist.
That’s it!
Now read: Cannot load M3U8, Cross Domain Access Denied, 404 not found, or No levels to play
Загрузить PDF
Загрузить PDF
С распространением музыки и видео в интернете возникла необходимость отслеживать и хранить именно тот контент, который нам нравится. Для этого и были созданы плейлисты. Любая популярная медиа-программа позволит вам создавать списки ваших любимых песен или видео. Вы можете сортировать их по жанрам, исполнителям или по любым другим критериям. Прочтите это руководство, чтобы узнать, как это делается.
-

Плейлистом является список песен из вашей библиотеки, отобранных вами по определенному критерию. Например, вы можете создать плейлист Вечеринка или плейлист За рулем. Плейлисты могут насчитывать неограниченное количество песен.
- Нажмите Файл и выберите Новый — Плейлист.
- Введите название плейлиста.
- Добавьте песни в плейлист, перетянув их из вашей библиотеки на название вашего плейлиста в левом меню или нажав правой кнопкой на песнях и выбрав Добавить в плейлист. После этого вам нужно будет выбрать соответствующий плейлист.
- Создавая плейлист для свадьбы или вечеринки, добавляйте песни, под которые будет весело танцевать!
-
Смарт-плейлист автоматически создает плейлисты по заданным пользователем параметрам. Например, вы можете создать смарт-плейлист, в котором будут только джаз-песни с высоким рейтингом, написанные не ранее 1955 года, или плейлист с песнями, темп которых составляет 100 BPM и выше, которые были добавлены в вашу библиотеку в прошлом году.
- Совмещайте все возможные параметры, чтобы создавать уникальные плейлисты.
- Вы также можете создавать параметры для исключения определенных песен из плейлиста. Например, вы можете создать параметр, по которому песни определенного жанра не будут добавлены.
- Количество песен в смарт-плейлистах может быть ограниченным или неограниченным — в зависимости от настроек пользователя.
- Смарт-плейлисты могут обновляться каждый раз, когда вы добавляете в iTunes файлы, соответствующие заданным параметрам. Чтобы активировать эту функцию, отметьте поле Оперативное обновление.
-
Плейлист Genius анализирует вашу медиатеку, на основе чего автоматически создает плейлист с похожими песнями, которые могут вам понравиться. Наведите курсор на песню в медиатеке и нажмите стрелку. Выберите Создать плейлист Genius. Новый плейлист появится в левой панели рядом с иконкой Genius.
- Вы можете добавлять песни в текущий плейлист Genius, нажав Обновить.
- Вы можете настраивать количество песен в плейлисте, нажав стрелку вниз рядом с количеством песен и установив новое значение.
Реклама


-
Новый плейлист появится в категории Плейлисты в левом меню.
-
При создании плейлиста вам будет предложено ввести его название — вы увидите соответствующее поле, в котором сможете ввести любое название.
-
Придумав название, самое время добавить песни! Просмотрите свою библиотеку и перетяните любые песни, альбомы или исполнителей на иконку плейлиста. Новые песни появятся внизу списка.
-
Нажмите на плейлист, чтобы увидеть список песен, из которых он состоит. Вы можете перетягивать песни по плейлисту, и располагать их так, как вам нравится.
Реклама


-

Новый плейлист появится в левом меню.
-
При создании плейлиста вам будет предложено ввести его название — вы увидите соответствующее поле, в котором сможете ввести любое название.
-
Преимущество плейлистов Spotify в том, что вы можете добавлять в них любые песни из вашей библиотеки Spotify, а затем делиться этими плейлистами с вашими друзьями. Найдите любую песню, исполнителя или альбом в строке поиска. Эта музыка должна находиться в базе Spotify, чтобы вы могли ее добавить.
- Перетяните файлы на иконку с плейлистом.
-
Все песни, которые вы будете добавлять, будут появляться внизу списка. Расположите их в удобной для вас последовательности с помощью простого перетягивания.
-
В Spotify есть возможность делиться своим плейлистом с другими, и они смогут прослушать его с помощью своей учетной записи. Чтобы поделиться плейлистом, нажмите на нем правой кнопкой и выберите Поделиться (Share). Вы можете поделиться им в Facebook, Tumblr, и Twitter.
Реклама


-
Откроется новое окно, в котором вы сможете ввести название своего плейлиста и его описание. По умолчанию в качестве названия будет установлена текущая дата. Нажмите Создать плейлист, когда будете готовы.
-
Если вы подписаны на Полный доступ (All-Access), вы можете добавлять любую музыку из библиотеки Google Music. Если же вы не подписаны на Полный доступ, вы можете добавлять любую музыку, которую вы приобрели или загрузили в свою личную библиотеку.
- Перетяните музыку, которую хотите добавить, на ваш плейлист в левом меню.
-
Расположите песни в удобной для вас последовательности простым перетягиванием. Вы также можете комбинировать плейлисты, нажав кнопку меню, которая появляется при наведении на название плейлиста, и выбрав Добавить плейлист в плейлист.
-
Выберите плейлист и над списком песен нажмите Перемешать плейлист. Воспроизведение начнется автоматически, и плейлист будет перемешан.
Реклама


-
Чтобы создать новый плейлист, вам нужно открыть видео, которое вы хотите добавить.
-
Она расположена в одной строке с кнопкой Нравится и кнопками О видео и Поделиться.
-
Если вы хоть раз добавляли видео в Избранное или Просмотреть позже, вам будет предложено выбрать эти плейлисты. Вы также можете ввести название нового плейлиста, чтобы добавить в него видео.
- Во время создания нового плейлиста вы можете сделать его Личным, доступным Для всех, или Для тех, у кого есть ссылка. Плейлисты Для всех могут быть просмотрены всеми пользователями, в то время как Личные будут доступны только тем, кого вы назначите сами. Если вы выберете последний вариант, плейлист будет доступен любому человеку, у которого есть прямая ссылка на него.
- Вы также можете добавлять видео в верхнюю часть списка вместо нижней, отметив соответствующее поле во время создания плейлиста.
-
Добавив несколько видео в плейлист, скорее всего, вам захочется настроить их последовательность. В левом меню нажмите Плейлисты и выберите плейлист, который хотите организовать.
- После того, как вы открыли плейлист, вверху нажмите Изменить плейлист.
- Перемещайте вкладки в левой части каждого плейлиста, чтобы изменить последовательность видео.
Реклама


-
Если вы первый раз запускаете Windows Media Center, вам нужно будет подождать, пока программа создаст библиотеку из файлов на вашем жестком диске.
-
При помощи прокручивания мышкой пролистайте список вверх или вниз, пока не будет выделен пункт Музыка, далее выберите Музыкальная библиотека.
-
Нажмите на Альбомы, Исполнители, Жанры или любой другой параметр, чтобы отсортировать ваши музыкальные файлы.
-
-
- Воспроизведение песни начнется немедленно. Вы можете нажать кнопку Пауза, если прежде вы хотите полностью сформировать свой плейлист.
-
Пользуйтесь стрелкой назад в левом верхнем углу, чтобы вернуться в библиотеку.
-
Повторяйте это действие, пока не добавите в плейлист все желаемые песни.
-
Пользуйтесь стрелкой назад, чтобы вернуться на главное окно Windows Media Center, далее нажмите Сейчас играет + Очередь.
-
-
Введите подходящее название для вашего плейлиста Media Center и нажмите Сохранить.
Реклама


Об этой статье
Эту страницу просматривали 27 501 раз.