Before updating, please refer to the Windows release information status for known issues to confirm your device is not impacted.
Stay Secure with Essential Windows Updates: After October 14, 2025, Windows 10 will no longer receive free software updates, technical support, or security fixes. This means your PC will be more vulnerable to security threats and malware. Consider Upgrading to Windows 11: Move to the security, speed, and innovation that Windows 11 PCs provide, available at every price point. Upgrading to Windows 11 ensures you continue to receive the latest security updates, features, and technical support, keeping your PC safe and efficient. For more information on preparing for Windows 10 end of support, see our Windows blog post.
Create Windows 10 installation media
To get started, you will first need to have a license to install Windows 10. You can then download and run the media creation tool. For more information on how to use the tool, see the instructions below.

-
Here’s when to use these instructions:
- You have a license to install Windows 10 and are upgrading this PC from Windows 7 or Windows 8.1.
- You need to reinstall Windows 10 on a PC you’ve already successfully activated Windows 10.
If you are installing Windows 10 on a PC running Windows XP or Windows Vista, or if you need to create installation media to install Windows 10 on a different PC, see Using the tool to create installation media (USB flash drive, DVD, or ISO file) to install Windows 10 on a different PC section below.
Note: Before you install Windows 10, check to make sure your PC meets the system requirements for Windows 10. We also recommend going to the PC manufacturer’s website for any additional info about updated drivers and hardware compatibility.
- Select Download tool, and select Run. You need to be an administrator to run this tool.
- On the License terms page, if you accept the license terms, select Accept.
- On the What do you want to do? page, select Upgrade this PC now, and then select Next.
-
After downloading and installing, the tool will walk you through how to set up Windows 10 on your PC. All Windows 10 editions are available when you select Windows 10, except for Enterprise edition. For more information on Enterprise edition, go to the Microsoft 365 admin center.
- If you don’t have a license to install Windows 10 and have not yet previously upgraded to it, you can purchase a copy here: get-windows-10
- If you previously upgraded to Windows 10 on this PC and you’re reinstalling it, you don’t need to enter a product key. Your copy of Windows 10 will automatically activate later using your digital license.
- When Windows 10 is ready to install, you’ll see a recap of what you’ve chosen, and what will be kept through the upgrade. Select Change what to keep to set whether you would like to Keep personal files and apps, or Keep personal files only, or choose to keep Nothing during the upgrade.
- Save and close any open apps and files you may be running, and when you’re ready, select Install.
- It might take some time to install Windows 10, and your PC will restart a few times. Make sure you don’t turn off your PC.
-
Follow these steps to create installation media (USB flash drive or DVD) you can use to install a new copy of Windows 10, perform a clean installation, or reinstall Windows 10.
Before you download the tool make sure you have:
- An internet connection (internet service provider fees may apply).
- Sufficient data storage available on a computer, USB or external drive for the download.
- A blank USB flash drive with at least 8GB of space or blank DVD (and DVD burner) if you want to create media. We recommend using a blank USB or blank DVD, because any content on it will be deleted.
- When burning a DVD from an ISO file, if you are told the disc image file is too large you will need to use Dual Layer (DL) DVD Media.
Check a few things on the PC where you want to install Windows 10:
- 64-bit or 32-bit processor (CPU). You’ll create either a 64-bit or 32-bit version of Windows 10. To check this on your PC, go to PC info in PC settings or System in Control Panel, and look for System type.
- System requirements. Make sure the PC meets the system requirements for Windows 10. We also recommend going to the PC manufacturer’s website for additional info about updated drivers and hardware compatibility.
- Language in Windows. You’ll need to choose the same language when you install Windows 10. To see what language you’re currently using, go to Time and language in PC settings or Region in Control Panel.
- Edition of Windows. You should also choose the same edition of Windows. To check what edition you’re currently running, go to PC info in PC settings or System in Control Panel, and look for Windows edition. Windows 10 Enterprise isn’t available in the media creation tool. For more info, go to the Microsoft 365 admin center.
- Microsoft Office products. If you just purchased a new device that includes Office 365, we recommend redeeming (installing) Office before upgrading to Windows 10. To redeem your copy of Office, please see Download and install Office 365 Home, Personal, or University on your PC. For more information, check How to upgrade to Windows 10 on new devices that include Office 365.
Using the tool to create installation media:
- Select Download tool now, and select Run. You need to be an administrator to run this tool.
- If you agree to the license terms, select Accept.
- On the What do you want to do? page, select Create installation media for another PC, and then select Next.
-
Select the language, edition, and architecture (64-bit or 32-bit) for Windows 10. This table will help you decide which edition of Windows 10 you’ll choose:
Your current edition of Windows Windows 10 edition Windows 7 Starter
Windows 7 Home Basic
Windows 7 Home Premium
Windows 7 Professional
Windows 7 Ultimate
Windows 8/8.1
Windows 8.1 with Bing
Windows 8 Pro
Windows 8.1 Pro
Windows 8/8.1 Professional with Media Center
Windows 8/8.1 Single Language
Windows 8 Single Language with Bing
Windows 10 Home
Windows 10 ProWindows 10 Windows 8/8.1 Chinese Language Edition
Windows 8 Chinese Language Edition with BingWindows 10 Home China - Select which media you want to use:
- USB flash drive. Attach a blank USB flash drive with at least 8GB of space. Any content on the flash drive will be deleted.
- ISO file. Save an ISO file to your PC, which you can use to create a DVD. After the file is downloaded, you can go to location where the file is saved, or select Open DVD burner, and follow the instructions to burn the file to a DVD. For more info about using an ISO file, see Additional methods for using the ISO file to install Windows 10 section below.
- After the installation media is created, follow the steps below to use it.
-
After completing the steps to install Windows 10, please check that you have all the necessary device drivers installed. To check for updates now, select the Start button, and then go to Settings > Update & Security > Windows Update, and select Check for updates. You may also wish to visit your device manufacturer’s support site for any additional drivers that may be needed.
Note: Drivers for Surface devices may be found on the Download drivers and firmware for Surface page.
Using the installation media you created (click to show more or less information)
Before you install Windows 10, it’s a good idea to save any work and back up your PC before you start. If you used the media creation tool to download an ISO file for Windows 10, you’ll need to burn it to a DVD before following these steps.
- Attach the USB flash drive or insert the DVD on the PC where you want to install Windows 10.
- Restart your PC.
If your PC does not automatically boot to the USB or DVD media, you might have to open a boot menu or change the boot order in your PC’s BIOS or UEFI settings. To open a boot menu or change the boot order, you’ll typically need to press a key (such as F2, F12, Delete, or Esc) immediately after you turn on your PC. For instructions on accessing the boot menu or changing the boot order for your PC, check the documentation that came with your PC or go to the manufacturer’s website. If you do not see the USB or DVD media device listed within the boot options, you may need to reach out to the PC manufacturer for instructions for temporarily disabling Secure Boot in your BIOS settings.
If changing the boot menu or order doesn’t work, and your PC immediately boots into the OS you want to replace, it is possible the PC had not fully shut down. To ensure the PC fully shuts down, select the power button on the sign-in screen or on the Start menu and select Shut down.
- On the Install Windows page, select your language, time, and keyboard preferences, and then select Next.
- Select Install Windows.
Additional methods for using the ISO file to install Windows 10 (click to show more or less information)
If you downloaded an ISO file for Windows 10, the file is saved locally at the location you selected. If you have a third-party DVD burning program installed on your computer that you prefer to use for creating the installation DVD, that program might open by going to the location where the file is saved and double-clicking the ISO file, or right-click the ISO file, select Open with and choose your preferred DVD burning software.
If you want to use the Windows Disk Image Burner to create an installation DVD, go to the location where the ISO file is saved. Right-click the ISO file and select Properties. On the General tab, click Change and select Windows Explorer for the program you would like to use to open ISO files and select Apply. Then right-click the ISO file and select Burn disc image.
If you want to install Windows 10 directly from the ISO file without using a DVD or flash drive, you can do so by mounting the ISO file. This will perform an upgrade of your current operating system to Windows 10.
To mount the ISO file:
- Go to the location where the ISO file is saved, right-click the ISO file and select Properties.
- On the General tab, click Change… and select Windows Explorer for the program you would like to use to open ISO files and select Apply.
- Right-click the ISO file and select Mount.
- Double-click the ISO file to view the files within. Double-click setup.exe to start Windows 10 setup.
*Your use of the media creation tools on this site is governed by the Microsoft Terms of Use for this website.
If you plan to perform a clean install of Windows Server 2022 (or an older version), you will need to create a USB bootable drive that you can use to start the server and continue with the setup. You can complete this task in at least two ways, and in this guide, you will learn how.
Unlike Windows 11 and 10, Microsoft doesn’t offer a Media Creation tool to download the ISO or create a USB flash drive to install the server version of the operating system. However, it’s possible to create a Windows Server bootable USB drive using commands or through third-party apps like Rufus.
This guide will teach you the steps to create a Windows Server USB flash.
- Create Windows Server 2022 bootable USB media with Rufus
- Create Windows Server 2022 bootable USB copying files to USB
Create Windows Server 2022 bootable USB media with Rufus
To create a Windows Server 2022 bootable USB with Rufus, use these steps:
-
Open Windows Server 2022 download page.
-
Click the “Download the ISO” link.

-
Register with the form and download the ISO file.
-
Click the Download now button.

-
Click the “ISO downloads 64-bit edition” option to download the file.
-
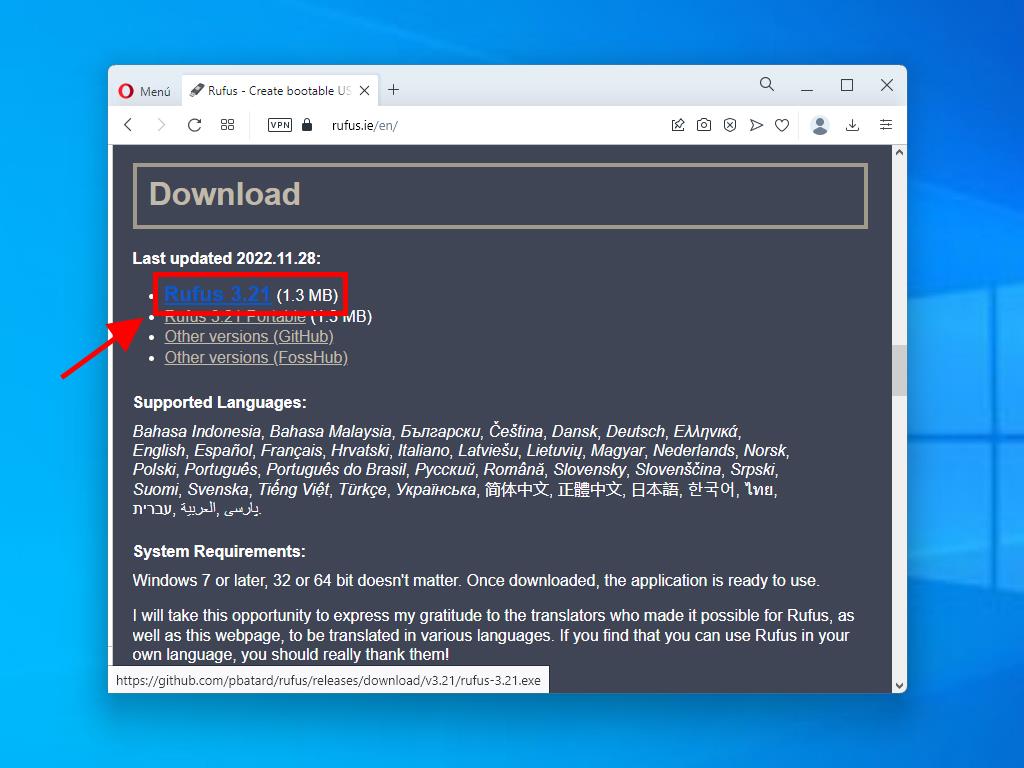
Open Rufus website.
-
Under the “Download” section, click the link to download the latest version.
-
Double-click the rufus.3.xx.exe file to launch the tool.
-
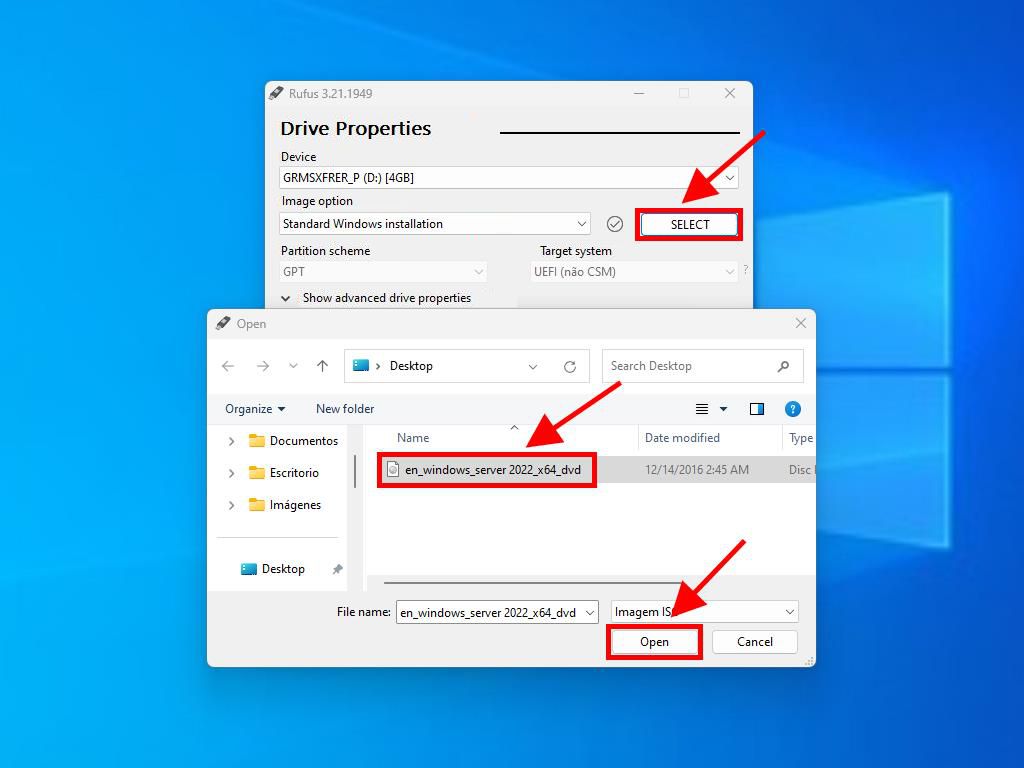
Under the “Device” section, select the USB flash drive to create the bootable media.
-
Under the “Boot selection” section, select the “Disk or ISO image” option.
-
Click the Select button.

-
Select the “Windows Server 2022 ISO” file.
-
Click the Open button.
-
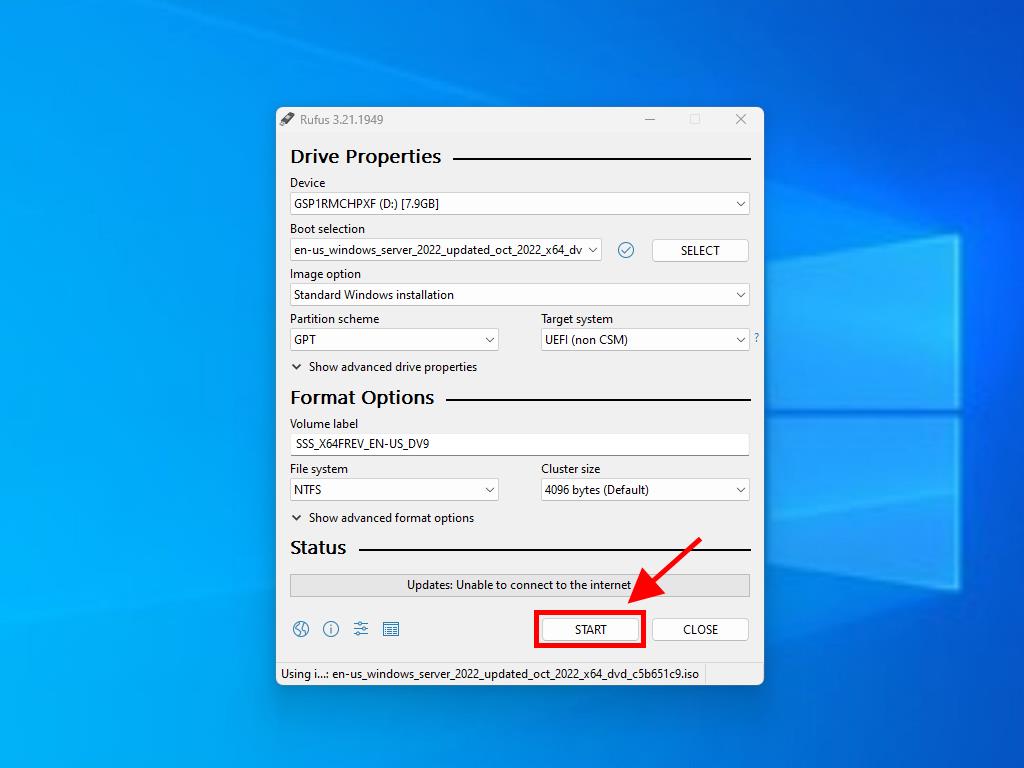
Under the “Image option” setting, select the “Standard Windows Installation” option.
-
Under the “Partition scheme” section, select the GPT option.
-
Under the “Target system” section, select the UEFI (non-CSM) option.
-
Under the “Volume label” section, confirm a name for the USB flash drive. For example, “Server 2022 USB.”
-
Use the default settings for the File system and Cluster size options.
-
Check the Quick format option.
-
Check the “Create extended label and icon files” option.
-
Click the Start button.
-
Clear the “Customize Windows installation” settings.
-
Click the OK button.
-
Click the OK button again.


Once you complete the steps, you can proceed to install the server version of Windows on the device.
Create Windows Server 2022 bootable USB copying files to USB
To create a Windows Server 2022 bootable USB through Command Prompt, use these steps:
-
Open Start.
-
Search for Command Prompt, right-click the top result, and select the Run as Administrator option.
-
Type the following command to open DiskPart and press Enter:
diskpart
-
Type the following command to find out the USB flash drive and press Enter:
list disk
-
Type the following command to select the drive and press Enter:
select disk 2
In the command, replace “2” with the number of the USB removable drive.
-
Type the following commands to erase the flash drive and press Enter:
clean

-
Type the following command to create a primary partition on the drive and press Enter:
create partition primary
-
Type the following command to select the new partition and press Enter:
select partition 1
-
Type the following command to activate the partition and press Enter:
active
-
Type the following command to make the Windows Server 2022 USB flash drive bootable and press Enter:
format FS=FAT32 quick
-
Type the following command to set a drive letter and press Enter:
assign letter=S
In the command, change “S” for any available letter to use.
-
Type the following command to exit the DiskPart tool without closing Command Prompt and press Enter:
exit
-
Type the following command to mount the Windows Server 2022 ISO file and press Enter:
PowerShell Mount-DiskImage -ImagePath "E:\SERVER_EVAL_x64FRE_en-us.iso"
In the command, change the path with the location of the ISO file.
-
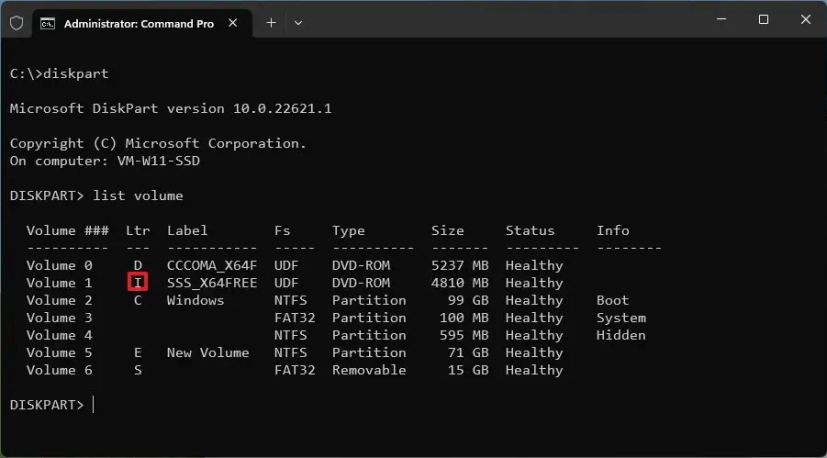
(Optional) Type the following command to start DiskPart and press Enter:
diskpart
-
(Optional) Type the following command to find the drive letter for the mounted ISO file and press Enter:
list volume
-
Type the following command to quit the DiskPart tool and press Enter:
exit
-
Type the following command to access the Windows Server 2022 ISO file and press Enter:
I:
In the command, change “I” for the drive letter of the mounted ISO file.
-
Type the following command to enter the “boot” folder in the ISO file and press Enter:
cd boot
-
Type the following command to update the volume boot code on the flash drive and press Enter:
bootsect /nt60 S:
-
Type the following command to copy all the Windows Server 2022 files from the ISO to the USB flash drive and press Enter:
xcopy G:\*.* S:\ /E /F /H
In the command, change the “G” and “S” drive letters with the correct drive letters for the Windows Server 2022 ISO image and the USB drive respectively.


After you complete the steps, you can use the USB flash drive to perform an in-place upgrade or clean installation of Windows Server 2022.
These introductions should also work to create a USB bootable drive for previous versions of Windows Server, including 2019 and 2016.
We may earn commission for purchases using our links to help keep offering the free content. Privacy policy info.
All content on this site is provided with no warranties, express or implied. Use any information at your own risk. Always backup of your device and files before making any changes. Privacy policy info.
İndir / Download: https://github.com/ny4rlk0/WindowsMediaCreationTool/archive/refs/heads/main.zip
Admin Olarak Çalıştır / Run as Admin : MediaCreationTool.bat
Not just an Universal MediaCreationTool wrapper script with ingenious support for business editions,

A powerful yet simple windows 10 / 11 deployment automation tool as well!
If you had no success launching the script so far, this latest version will work
Presets
1 Auto Upgrade with detected media, script assists setupprep for upgrading directly
— can keep files and apps on more scenarios where os and target edition does not match
— can switch detected edition by adding EditionID to script name
— can troubleshoot upgrade failing by addingno_updateto script name
— auto defaults to 11, so pass version as well for 10:auto 21H2 MediaCreationTool.bat
2 Auto ISO with detected media in current folder directly (or C:\ESD if run from zip)
— can override detected media by adding edition name / language / arch to script name
— example:21H1 Education en-US x86 iso MediaCreationTool.bat
3 Auto USB with detected media in specified usb target
— for data safety, this is not fully automated — must select the usb drive manually in GUI
4 Select with user picked Edition, Language, Arch (x86,x64,both) — on specified target
— implicit choice, includes setup override files (disable by adding
defto script name)
5 MCT Defaults runs unassisted, creating media without script modification
— no added files, script passes
products.xmlto MCT and quits without touching media
1-4 presets will modify created media in the following ways:
— write
auto.cmdto run on demand for auto upgrade with edition switch and skip tpm
— write$ISO$folder content (if it exists) at the root of the media
if you previously used $OEM$ content, must now place it in$ISO$\sources\$OEM$\
— writesources\PID.txtto preselect edition at media boot or within windows (if configured)
— writesources\EI.cfgto prevent product key prompt on Windows 11 consumer media (11 only)
— writeAutoUnattend.xmlin boot.wim to enable local account on Windows 11 Home (11 only)
— patchwinsetup.dllin boot.wim to remove windows 11 setup checks when booting from media (11 only)
— can disable by addingdefto script name for a default, untouched MCT media
Simple deployment
auto.cmd is behind Auto Upgrade preset via GUI
Can run it fully unnatended by renaming script with auto MediaCreationTool.bat
Makes it easy to upgrade keeping files and apps when the OS edition does not match the media
Should allow upgrade from Ultimate, PosReady, Embedded, LTSC or Enterprise Eval as well
Generated script is added to the created media so you can run it again at any time
It is fairly generic — it will detect available editions in install.esd, pick a suitable index,
then set EditionID in the registry to match; can even force another edition, keeping files and apps!
On 11, it will try to skip setup checks (can disable this behavior with script var)
Finally, it sets recommended setup options with least amount of issues on upgrades
Let’s say the current OS is Enterprise LTSC 2019, and you use the business media to upgrade:
auto.cmd selects Enterprise index and adjust EditionID to Enterprise in the registry (backed up as EditionID_undo)
Maybe you also want to switch edition,
ex. by renaming the script toProfessionalWorkstation MediaCreationTool.bat:
auto.cmd selects Professional index and sets EditionID to ProfessionalWorkstation in the registry.Let’s say the OS is Windows 7 Ultimate or PosReady, and you use the consumer media to upgrade:
auto.cmd selects Professional index, and sets EditionID to Professional or Enterprise, respectively.
In all cases, the script tries to pick an existing index, else a compatible one to keep files and apps on upgrade.Let’s say you have a dozen PCs spread with versions: 7, 8.1, 10 and editions: Ultimate, Home, Enterprise LTSB..
If you need to upgrade all to the latest 10 version and only use Pro, you could rename the script as:
auto 21H2 Pro MediaCreationTool.batCan even add a VL / MAK / retail product key in the same way to take care of licensing differences.
The script also picks up any$ISO$folder in the current location — for $OEM$ branding, configuration, tweaks etc.
Changelog
No need to right-click Run as Admin, script will ask itself. Directly saving the Raw files no longer breaks line endings
We did it! We broke the previous gist  So this is the new home. Thank you all!
discuss on MDL
2018.10.10: reinstated 1809 [RS5]! using native xml patching for products.xml; fixed syntax bug with exit/b
2018.10.12: added data loss warning for RS5
2018.11.13: RS5 is officially back! + greatly improved choices dialog - feel free to use the small snippet in your own scripts
2019.05.22: 1903 [19H1]
2019.07.11: 1903 __release_svc_refresh__ and enable DynamicUpdate by default to grab latest CU
2019.09.29: UPDATED 19H1 build 18362.356 ; RS5 build 17763.379 and show build number
            added LATEST MCT choice to dinamically download the current version (all others have hard-coded links)
2019.11.16: 19H2 18363.418 as default choice (updated hard-coded links)
2020.02.29: 19H2 18363.592
2020.05.28: 2004 19041.264 first release
2020.10.29: 20H2 and aniversary script refactoring to support all MCT versions from 1507 to 20H2!!!
2020.10.30: hotfix utf-8, enterprise on 1909+
2020.11.01: fix remove unsupported options in older versions code breaking when path has spaces.. pff
2020.11.14: generate latest links for 1909,2004; all xml editing now in one go; resolved known cannot run script issues
2020.11.15: one-time clear of cached MCT, as script generates proper 1.0 catalog for 1507,1511,1703 since last update
            fixed compatibility with naked windows 7 powershell 2.0 / IPv6 / optional import $OEM$ / 1803+ business typo
            updated executables links for 1903 and 2004
2020.11.17: parse first commandline parameter as version, example: MediaCreationTool.bat 1909
2020.12.01: attempt to fix reported issues with 1703; no other changes (skipping 19042.630 leaked esd because it is broken)
2020.12.11: 20H2 19042.631; fixed pesky 1703 decryption bug on dual x86 + x64; improved cleanup; label includes version
2021.03.20: pre-release 21H1; optional auto upgrade or create media presets importing $OEM$ folder and key as PID.txt
2021.05.23: 21H1 release; enhanced script name args parsing, upgrade from embedded, auto.cmd / PID.txt / $OEM$ import
2021.06.06: create iso directly; enhanced dialogs; args from script name or commandline; refactoring is complete!
2021.08.04: done fiddling
2021.09.03: 21H2, both 10 and 11 [unreleased]
2021.09.25: Windows 11
            with Skip TPM Check on media boot as well as on dynamic update (standalone toggle script available)
            final touches for improved script reliability; enhanced auto upgrade preset; win 7 powershell 2.0 compatible
2021.09.30: fix Auto Setup preset not launching.. automatically
2021.10.04: fix for long standing tr localization quirks; Skip TPM Check v2 (ifeo-based instead of wmi)
2021.10.05: 11 22000.194 Release (rofl W11 MCT has limited capabilities, so still using 21H1 MCT because it works fine)
2021.10.09: outstanding refactoring around Windows 11 MCT; minimize while waiting MCT; unified 7 - 11 appearence
2021.10.20: create generic iso if no edition arg; use Downloads folder; no 11 setup checks on boot in VirtualBox; fixes #2
2021.10.23: 11 22000.258
            more intuitive presets; 11 setup override via AutoUnattend.xml or via boot.wim (for VirtualBox 5.x) with FIX arg
            only reliable ui automation; enhanced script output
2021.11.03: multiple download methods; improved automation; improved auto.cmd; moved autounattend.xml to boot.wim
            revising 11 setup bypass (wip) - not being content with any methods is the reason why I've not updated in a while
2021.11.09: skip windows 11 upgrade checks with setup.exe (not just auto.cmd); no server label; local account on 11 home
            auto.cmd has more fixes to keep files and apps on upgrade; reliable ui automation; alternative downloaders
2021.11.15: 11 22000.318
            write output to script folder (or C:\ESD if run from zip); style: more consistent separation of arguments
            20H2 builds with esd size above 4GB that had to be reverted at 19042.631: en,de,es,pt,fr,it,jp,zh (MCT limits)
2021.11.16: 10 19044.1288 - official release of 10 21H2
            10 19043.1348 - newest 10 build - don't ask why ms is releasing these as such, it's not the first time
2021.12.07: skip windows 11 upgrade checks only via auto.cmd - just ignore server label, please
2021.12.15: fix regression with 1507-1709 not getting the correct fallback esd; fix dev '-noe' not autoclosing script
2021.12.22: improved auto.cmd handling of mismatched OS and target edition, obey 'def', 'auto' upgrades 7 to 10, not 11
2022.03.16: prevent launch errors when run from non-canonical paths; USBLayout progress; pickup $ISO$ dir to add on media
            DU in 11: auto installs 22000.556 atm; older skip_11_checks, without Server label; Home offline local account
2022.03.18: fix regression with Auto Upgrade; removed powershell -nop arg (issue #41); enhanced 11 AutoUnattend.xml
2022.03.20: stable - all issues ironed out; improved script ui; upgrade keeping files from Eval editions too
            last squash I promise ;)
habibzain Follow
Just husband, father and enthusiastic men about System Administration. Love to write short article about it. Perhaps can help and be useful for others.
1 min read
If we want to install windows server on a bare metal device, the traditional way is to burn the ISO to a CD/DVD. But what is the maximum size of the DVD? The largest DVD storage size is around 4.4 GB. The problem occurs is the ISO file size of the Windows Server installer is 6.5GB.
Hmm… Of course it won’t fit if the Windows Server ISO file is burned to a DVD. It could be split, split into 2 DVDs. But it’s a lot of effort to do.
Basically making bootable for windows is easy. Especially for Windows 10 or Windows 11. We just download the Windows Creation Tool and plug in the USB. It will automatically download the installer itself online and stored on the USB.
But what if we want to create a bootable USB for windows server? Unfortunately the Windows Creation Tool does not have a menu to create a bootable Windows Server. So we have to look for other alternative tools that can make Windows Server bootable.
Make Bootable Windows Server with “diskpart”
Step 1. Insert the USB drive on your PC. Go to Start and type cmd in the search box. Click on Run as administrator to open a command prompt.
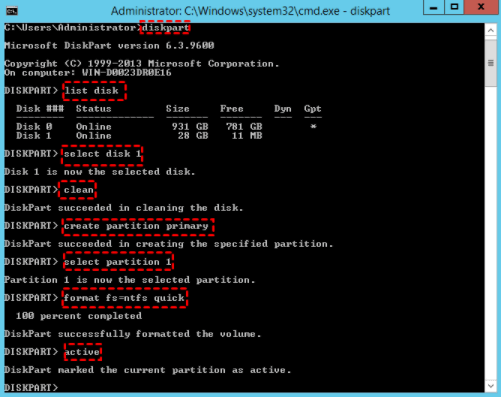
Step 2. Type command diskpart and press enter.
Step 3. Type the following command one by one and press enter:
- list disk and press enter to appear disk list.
- select disk x
Where ‘x’ is the number of your flash drive.
Type the following commands one by one:
- clean.
- create partition primary.
- select partition 1.
Next we will select the partition as per your own requirement.
- format fs=ntfs quick (if you want to create UEFI bootable USB, type “format fs=fat32 quick”).
- active.
Step 4. Type Exit and press enter. It will close the diskpart command.
- assign letter= r or other available letter.
Then type “Exit” to leave the Diskpart command environment.
Step 4. Find the Windows Server setup ISO in your computer and double click on it to mount the ISO.
Step 5. Copy the entire contents of the mounted ISO drive to your bootable USB flash drive.
Step 6. Now, back to the Command Prompt window again and run the following command.
H:cd\boot\ bootsect.exe /nt60 R:to build the boot sector code in the specified partition. (H:\ is the drive letter of the mounted Windows ISO and R:\ is the destination USB drive letter)
We have built a Bootable USB from ISO by following the steps outlined above.
Make Bootable Windows Server with RUFUS
Rufus is third party tool open source for make USB bootable for Linux Distro. But we can use rufus to create bootable USB for windows server.
Step 1. Download Rufus Software and run it.
Plug USB drive and file ISO windows server. Set parameter like image below. And then start.

Rufus is easiest solution open source to make Bootable Windows Server.
reference:
- https://www.diskpart.com/server-2016/windows-server-2016-bootable-usb-7201.html
- https://rufus.ie/en/
Let's Buy Me Coffee.https://saweria.co/habibzain https://ko-fi.com/habibzain
Once you’ve downloaded the installation file (Windows Server 2022 .iso), create a bootable USB drive (pendrive) to perform the installation.
Note: You’ll need a USB device with a minimum memory of 16GB.
The application you can use for this process is:
Rufus
- Download it for free here.
- Scroll down and download the most up-to-date version of Rufus in the Download section.
- Connect the USB and then open the Rufus programme.
- Click on Select and find the Windows Server 2022 .iso file you want to set up.
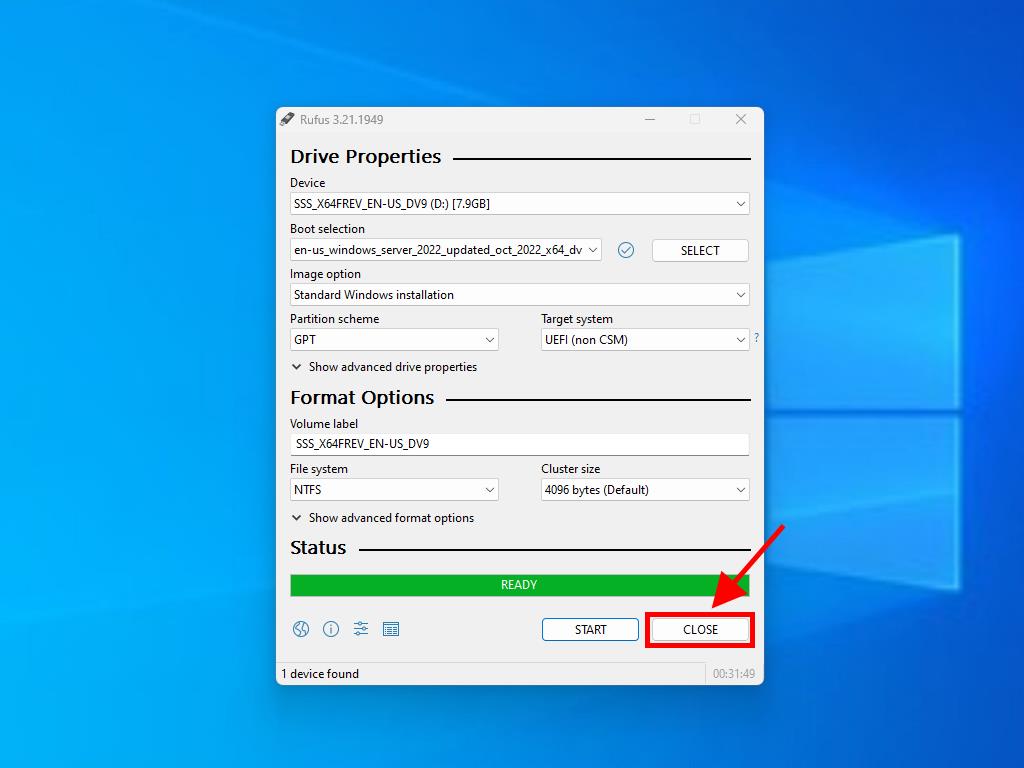
- Finally, click on Start and wait for the programme to create the bootable USB drive.
- Once the setup is complete (Prepared progress bar), click on Close and you’ll be ready to install Windows Server 2022.
Note: It will show a popup window called Customize Windows Installation, select option 3 Disable Data Collection and wait for the programme to create the bootable USB drive.