
Overview
The Windows NTFS v3.0 file system has supported some form of file and directory pointing, call NTFS junction point since Windows 2000 (Windows NT 5.0). Junction points are a type of NTFS reparse point; they can only link to directories on a local volume; junction points to remote shares are unsupported.
Unfortunately each revision of Windows until Windows7/8 has used a different method of implementing these pointers.
- The Windows 2000 and Windows 2003 Resource Kits include a program called linkd, to create junction points
- Windows XP default includes fsutil reparsepoint.
- Windows NT 6.0 and later operating systems include an mklink command-line utility for creating junction points.
- Mark Russinovich at Windows Sysinternals released his own junction tool called junction which provided more complete functionality.
- Junction Link Magic: Freeware GUI lets you create junction points with Windows 2000, XP, 2003, Vista, Windows Server 2008 and Windows 7.
Dfference between a shortcut, a symbolic link and a hard link
A shortcut is actually a file that points to an additional file.
It is an antiquated pointing system from the Windows 95 era that many applications do not recognise.
Shortcuts usually do not only use disk space, they also break and linger behind right after the target has been deleted, renamed or moved.
A symbolic is like a shortcut but as a file it really is registered for the hard drive partition. It doesn’t use any disk space and all programs recognise each the link and also the target.
A symbolic link can point to any file or folder either locally around the computer or via network using SMB path.
A hard link is is actually a tiny different and may not be used over multiple partitions which means you’ll be able to not have a link on drive C: pointing to a file on drive D:.
A file hard link points to and duplicates a target as a mirrored copy however the copy will not use any additional space on the hark drive. So 3 hard links that mirrored a 2 GB file would in total only use 2 GB around the partition instead of 6 GB.
Importantly if either the hard link or the target are deleted the other links retain the data.
Modifications for the file of either the target or the links automatically propagate to all other things.
A junction is actually a hard link for directories but a little different to hard link that you are able to produce junctions that span several partitions. Once more a directory junction and its content is stored on the partition however they do not use any additional space.
Any changes for the content within either the target or the links will automatically propagate except where the target directory is deleted or renamed. In that case all hard links that point for the target will break and linger on the partition.
List of Tools / Commands
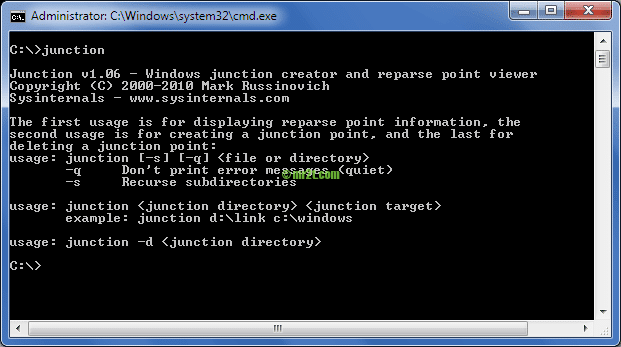
junction
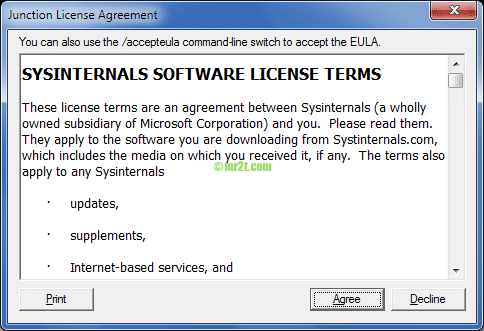
By download Junction v1.06 and extract to C:\Windows\System32 or include the extracted folder to %PATH% system variables.
The first use junction will prompt the License Agreement windows as below :
Junction Parameters :
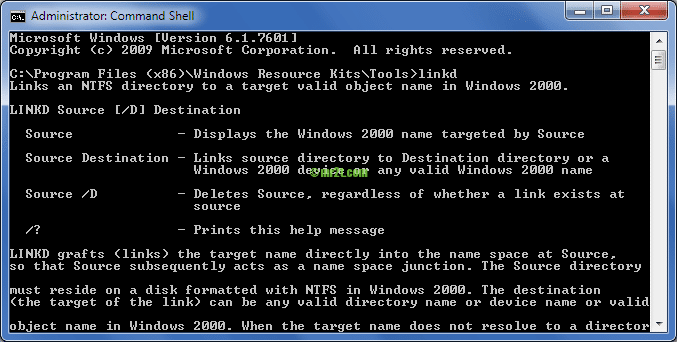
linkd
As you known Windows XP don’t have command operate the NTFS junction point. With junction or Microsoft® Windows® Server 2003 Resource Kit Tools you can create/delete a junction point easier.
Beyond the linkd.exe the rktools.exe are a set of tools to help administrators streamline management tasks such as Active Directory, Spooler Cleaner, Group Policy Monitor, Traffic Control Monitor and more tools included (from above link see under Details sections)
Open the Command Shell under Program Files -> Windows Resource Kit Tools to access the linkd command.
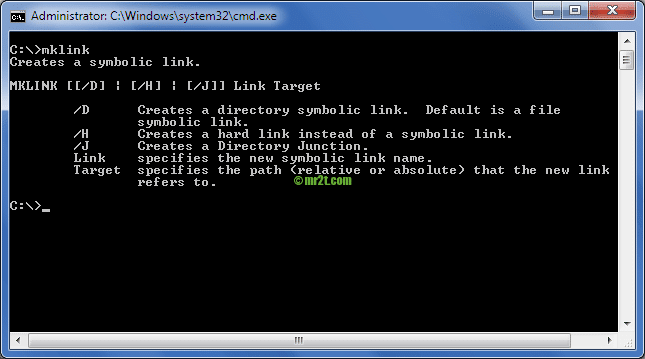
mklink
Windows Vista or 7/8 come with NTFS junction point command. You can creates a symbolic link/directory symbolic, hard link and directory junction.
And delete junction point on DOS with fsutil command
|
fsutil reparsepoint delete JUNCTION_POINT_PATH |
Junction Link Magic
Junction Link Magic is freeware which is automatically lists existing junction points, and it offers an easy interface to add, modify or remove junction points.
Display Junction Point
dir /A
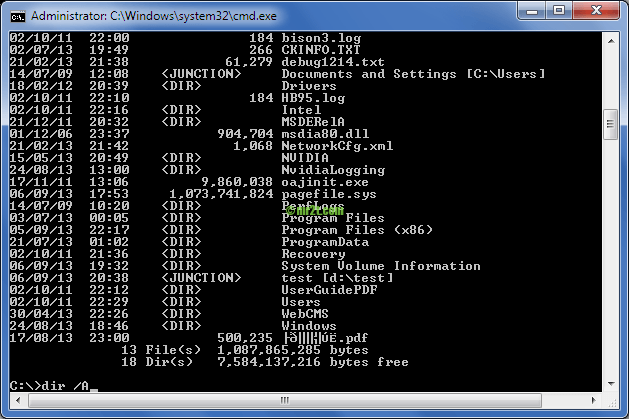
Note. 06/09/13 20:38 <JUNCTION> test [d:\test] ; c:\test is the junction directory to target d:\test
Directory junction icon in Window Explorer
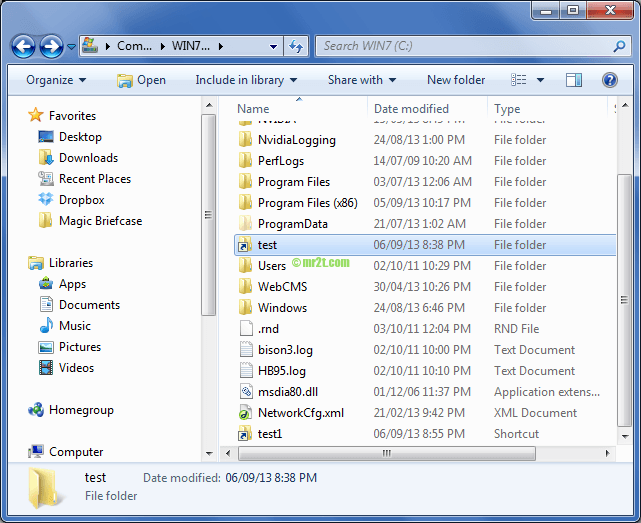
Note. same icons but different type of both :
- test – Directory Junction to D:\test
- test1 – Shortcut (test1.lnk) to D:\test
Limitation
The NTFS junction points aren’t supported by Windows boot process, so it’s impossible to pointing certain system folders as following:
- folder containing hiberfil.sys (if it’s configured to be outside root directory)
- \\Windows
- \\Windows\\System32
- \\Windows\\Config
However it is possible to redirect non-critical folders:
- \\Users
- \\Documents and Settings
- \\Program Files
- \\Program Files (x86)
Resources
- NTFS Junction Point – http://en.wikipedia.org/wiki/NTFS_junction_point
- Junction By Mark Russinovich – http://technet.microsoft.com/en-us/sysinternals/bb896768.aspx
- Windows Server 2003 Resource Kit Tools – http://www.microsoft.com/en-us/download/details.aspx?id=17657
Recent How to Map a Folder to another Folder in Windows Search Terms:
- January 10, 2023 at 10:37 PM — Mapfolder exe (1)
Download Article
Download Article
Tired of browsing through long paths? There is a way you can map a drive letter to a long path. This will save a lot of time with frequently accessed folders. For example, you can map a long path like D:\Documents\John\Letters to the drive letter X.
-

On Windows Vista or Windows 7, open the command prompt as default user, not as Administrator. The reason will be explained later.
-
For example: SUBST X: «D:\Documents\John\Letters».
Advertisement
-
You should see a newly created drive letter X:, with which you can access your mapped folder directly.
-
/D
-

To automatically map your folder when your system starts, put the SUBST command in a batch file, and put the batch file in your Autostart folder in the start menu. Advanced users can use the windows task scheduler, however this is not covered here.
-
These mappings are only created for the user who originally issued the SUBST command. When you login as «John», and you open a command prompt as «Administrator» and execute the SUBST command, «John» will not be able to see any mapped drive letters because the mapping was created for «Administrator». This is why you need to open the command prompt as a default user in Windows Vista and Windows 7. When using the task scheduler, again make sure that the command is executed under the default user account.


Advertisement
-
-
-

You will be able to rename this mapped drive to anything you want.
-
Type the server and share name of the computer or folder you want or Click Browse to find the computer or folder, in the Folder box.
-


Advertisement
Add New Question
-
Question
In Win 10 I have used the SUBST method to successfully map a local folder to a drive letter. However, whenever I delete a file from the «drive» it bypasses the recycle bin and gets deleted permanently.
Just drag them into the recycle bin. Or go to C: > Users > Username. Right-click on any folder of this location and click Properties > Location tab. Click on Move and browse the root drive (Which is mapped from before) and then hit Select Folder. Then click OK and when the dialog box appears hit Yes. Just repeat these steps for every user on the PC.
Ask a Question
200 characters left
Include your email address to get a message when this question is answered.
Submit
Advertisement
Thanks for submitting a tip for review!
About This Article
Thanks to all authors for creating a page that has been read 167,530 times.
Is this article up to date?
TL;DR:
- Why It Matters: Modern systems may have millions of files. Mapping a frequently used folder to a drive letter saves time and streamlines navigation.
- What You’ll Learn: Multiple methods for mapping folders—from using the built-in Subst command to third-party GUI tools and advanced registry tweaks.
- Key Tip: Choose the method that fits your technical comfort level and workflow.
With hard drives having such huge capacities these days, it’s not unheard of for some people to have millions of files spread across their system. When you have a lot of files it is really important that everything is stored in a well ordered directory structure so files can be found more easily. For the less organized there are tools to quickly search the contents of your drives.
Even if the overall directory structure of your system is efficient there might be several folders you access often that are found several layers down. An easy solution to get quick access to one of these folders is mapping it to a drive letter. This is a simple method and means instead of constantly drilling down through sub folders, just click on the drive in Explorer and you are taken directly there.
Of the 26 drive letters available on your system, probably only a few are in use. That leaves several free letters that could be used for this purpose. Although it’s easy to map a network folder to a drive letter, mapping a local folder to a drive letter is slightly more difficult. Here are some ways to do it.
Using the Windows Subst Command
Windows has included a command to substitute a folder for a drive letter since the days of Windows NT in the early 1990’s. The Subst command is pretty much unchanged in how it works and is still present in the latest versions of Windows 10.
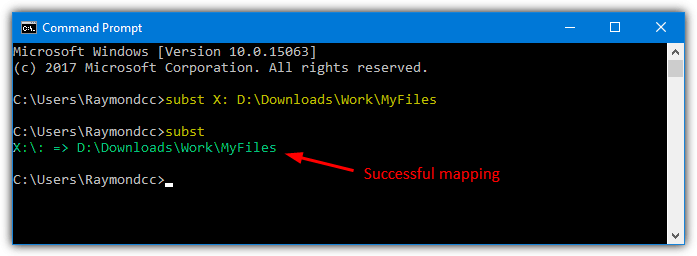
Usage is quite simple, open a Command Prompt (press Start and type cmd). Type Subst and as an argument supply the drive letter you want to map the folder to, then add the full path to the folder.
Subst [Drive:] [Pathtofolder]
A simple example would be:
Subst X: D:\downloads\work\myfiles
Make sure to enclose the folder path in quotes if it contains spaces. Type Subst without arguments to check the mapping has worked as you are not notified if it was successful.
To remove the mapping enter the drive letter and add the /D argument:
SUBST X: /D
Mapping a folder to a drive letter with Subst isn’t permanent and you will lose the association after rebooting or logging off. Therefore, the delete command is only needed to remove the mapping immediately without restarting.
Forcing Subst to Run on Startup
If you want the mapping to work all the time, a simple solution is to run Subst automatically during every boot. This can be done via the registry. It is recommended less experienced users try one of the more automatic solutions before using this.
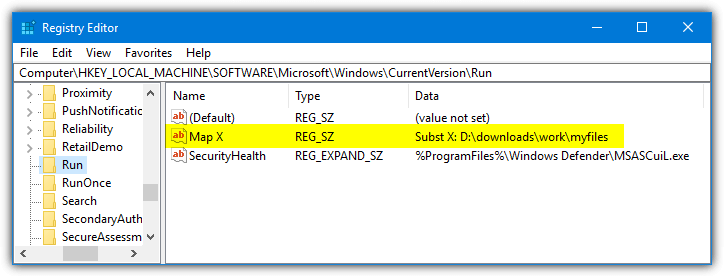
1. Open Regedit and navigate to the following key:
HKEY_LOCAL_MACHINE\SOFTWARE\Microsoft\Windows\CurrentVersion\Run
For the permanent mapping to only affect the currently logged on user, go to:
HKEY_CURRENT_USER\Software\Microsoft\Windows\CurrentVersion\Run
2. Right click on Run > New > String Value. Give it a name such as “Map X”
3. Double click on the name and for Value data enter the Subst command like above. For example:
Subst X: D:\downloads\work\myfiles
Close Regedit and after you reboot or logon, the Subst mapping will automatically be created.
A Subst GUI Frontend Tool
vSubst is a small, portable tool weighing in at only 18KB in size. The original developer website is now gone but the program is still freely available and perfectly usable. This is a pretty useful frontend GUI for the Subst command.
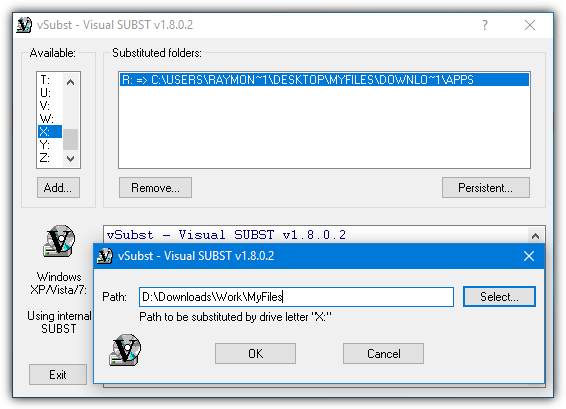
After launching vSubst, select the desired drive letter to map the folder to, then click Add. A small dialog will popup where you can manually type the path or locate it with the Select button. The new mapping will immediately appear in the substituted folders list. Just highlight an entry and press Remove to delete the drive and free up the letter.
The Persistent button will place an entry for vSubst in the Users Run startup key in the registry, similar to the manual method above. The vSubst executable will be copied to the Windows folder so make sure to run vSubst as administrator or the copy to Windows might fail.
Download vSubst
Run Subst From a Batch Script
You can easily make your own batch script with just a couple of lines but this ready made script called Psubst is more Advanced. Its main purpose is to make drives mapped in Subst persistent so they survive a reboot. Use this script from Command Prompt or another script (run as administrator) like you would use Subst.
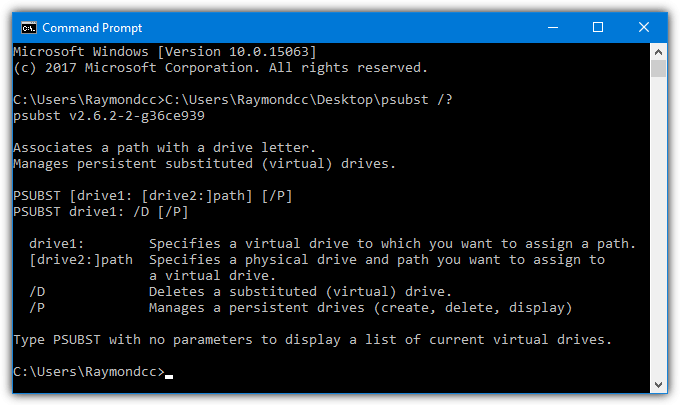
The arguments are virtually the same as Subst. The only difference is adding /P to the command will make the mapping persistent and it will remain after a reboot. It does this by adding an entry to Dos devices in the registry.
Psubst [Drive:] [Pathtofolder] /P (e.g. Psubst X: D:\downloads\work\myfiles /P)
“Psubst [Drive:] /D /P” will remove a persistent drive, “Psubst /P” will list current persistent drives, and “Psubst [Drive:] /D” will just remove a normal mapped drive. Adding a mapping with /P will only add its entry to the registry which will take effect on the next reboot. To also map the folder immediately you will need to run the same command again but without /P.
Download Psubst
Using a program that can convert a batch file into an executable, Psubst can be made into a standard .EXE file. You can do this yourself by using a Bat to Exe tool.
Create a Mapped Folder with a Third Party Tool
Visual Subst is a simple to use tool that allows you to create a number of drive mappings quickly and easily. The program is portable and only 137KB in size. Although it uses the same API as Subst, the mappings created in Visual Subst are not visible when using Subst on the command line.
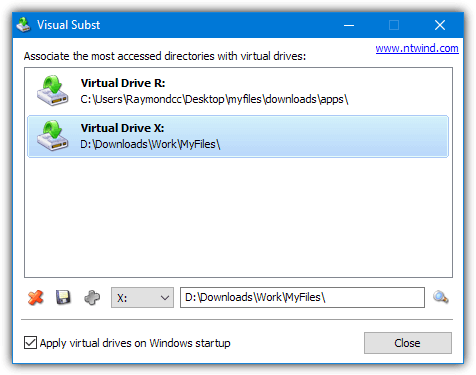
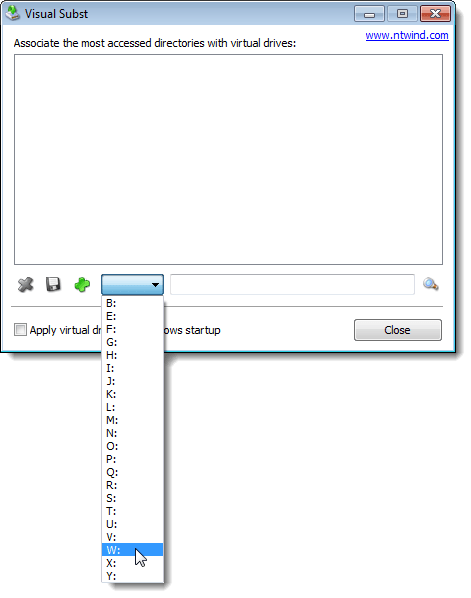
Select the drive letter from the drop down menu and enter the path to the folder manually or browse for it by pressing the magnifying glass on the right. Then press the Plus button to assign the mapping and it will appear in the main window.
Checking the box at the bottom will silently run Visual Subst during startup to assign the drive letters. Delete the mapped drive with the X button or save any changes to a current mapping with the disc icon.
Download Visual Subst
Map a Folder to a Drive Letter Directly in the Registry
This next method has a couple of advantages over the Subst command. Not only does it add the mapped drive automatically on every boot, the drive letter is associated with the folder before any applications are launched. That means the drive letter can be used by other applications during boot. This option is not recommended for inexperienced users.
1. Open Regedit and navigate to the following key:
HKEY_LOCAL_MACHINE\SYSTEM\CurrentControlSet\Control\Session Manager\DOS Devices
This key will associate virtual drive names with paths and it does so very early in the boot process.
2. Right click on DOS Devices > New > String value, enter the drive letter to map the folder to, including the colon.
3. Double click on the drive letter and enter the following as a path:
\??\[Fullpathtofolder]
blockquote>
For example:
\??\D:\Downloads\Work\MyFiles
blockquote>
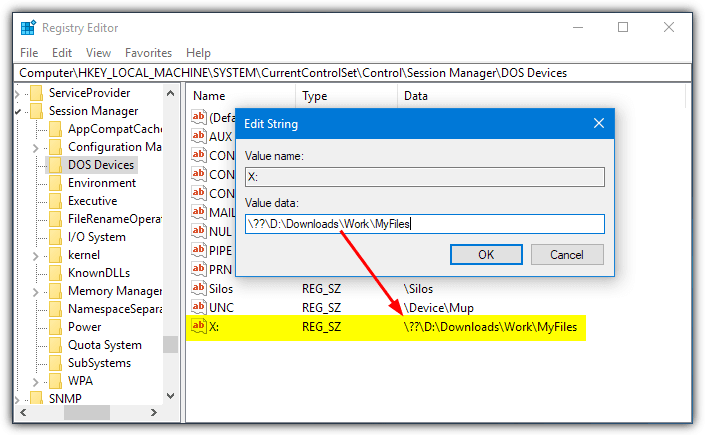
4. Close the registry editor and reboot the computer as this key is only read during startup. Upon rebooting, the mapping will show in Explorer in the list of hard drives.
If you decide to create a .REG file to add or edit Dos devices, add a second backslash to every backslash in the folder path. It won’t work otherwise. An example .REG file of the above would be:
Windows Registry Editor Version 5.00
[HKEY_LOCAL_MACHINE\SYSTEM\CurrentControlSet\Control\Session Manager\DOS Devices]
“X:”=”\\??\\D:\\Downloads\\Work\\MyFiles”
Map a Folder via the Windows User Interface
There’s an option to map a network folder to a drive letter in Windows Explorer. It’s not possible to map a local folder in this window by using the browse button because it only displays network locations. However, with creative use of network paths, it’s easy to map a local folder to a drive letter from the Map Network Drive window.
1. In Windows Vista or 7 open Explorer, press Alt and go to Tools > “Map network drive”. In Windows 10 or 8 open Explorer and make sure you are in the Computer tab. Press “Map network drive”.
2. In the Drive box drop down, select the drive letter to assign to the folder.
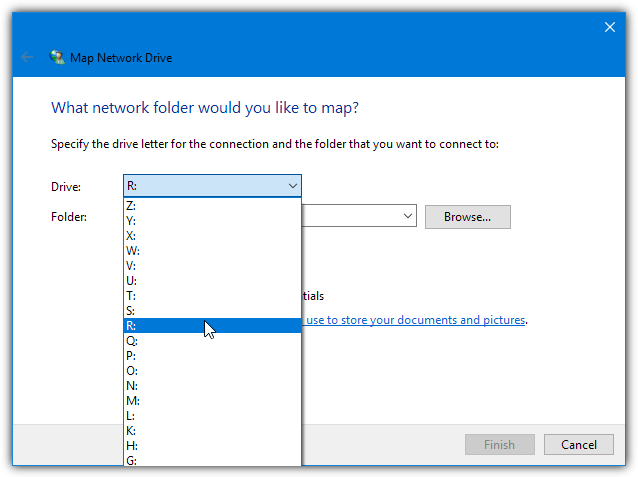
3. For Folder do not press Browse but Instead enter the following into the text box using your own arguments:
\\Localhost\[Drive]$\Pathtofolder
or:
\\Computername\[Drive]$\Pathtofolder
Using just Localhost should be fine for most users. Otherwise, use Computername which is the computer’s name. Find the name in System Properties. Right click Computer/This PC > Properties or press Win+Pause.
For Drive you must use a drive letter in the path and substitute the colon for a dollar sign ($). A couple of examples would be:
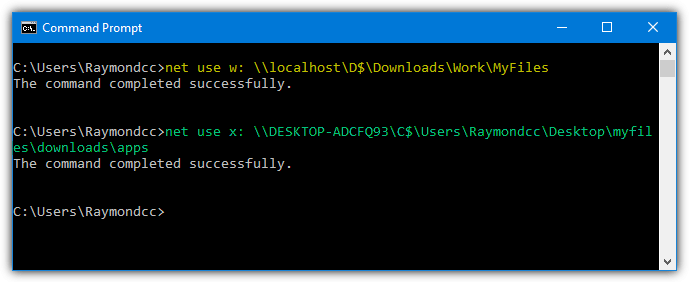
\\localhost\D$\downloads\work\myfiles
or using the computer name:
\\MyDesktopPC\C$\users\raymondcc\desktop\myfiles\downloads\apps

4. Leave the “Reconnect at sign-in” option checked if you want have the folder mapped to the drive letter every time your computer starts or you log on. Press Finish when done.
To remove the mapped folder simply right click on its drive in Explorer and select Disconnect.
Mapping Folders Using the Windows Net Command
The Net command in Windows is able to view, edit or manage many aspects related to the network. It is even powerful enough to change user account passwords or create/delete user accounts. Here we are using the Net Use command which manages shared resource connections. The syntax is as follows:
Net Use [Driveletter:] \\Localhost\[Drive]$\Pathtofolder
or:
Net Use [Driveletter:] \\Computername\[Drive]$\Pathtofolder
Enter the drive letter you want to map the folder to as Driveletter (including colon). For the path to the folder you can use either Localhost or the Computername like the method above. Make sure to use a dollar sign instead of a colon for Drive.
Although a mapped drive should automatically appear the next time you logon, an extra argument can be added in case it doesn’t. Simply append “/P:yes” to make the drive persistent and force reconnect at logon. Use “/P:No” to force the drive to disconnect at logoff.
To delete the mapping from the command line, simply use:
Net Use [driveletter:] /Delete
Use an asterisk instead of a drive letter to delete all currently mapped drives.
Net Use * /Delete
The Net Use command has an advantage over Subst because it doesn’t constantly try to connect if the folder is not available. Subst will constantly try to connect which can have an adverse effect on system performance.
Common Mistakes to Avoid
- Incorrect Folder Paths:
Always enclose folder paths in quotes if they contain spaces. - Registry Editing Errors:
Back up your registry before making any changes, and double-check your entries to avoid system issues. - Assuming Persistence:
Remember, methods like Subst are temporary unless configured for persistence via the registry, a batch script, or a GUI tool.
To maximize the organization of your hard drive, a robust directory structure is key to finding files easily. For better search capabilities, tools like Everything can instantly index your drives for quick searches. If you’re looking to free up storage, Anti-Twin can help you identify and remove duplicate files.
By applying these tips and tools, you can efficiently manage your files and keep your hard drive organized, making it easier to find what you need when you need it.
,
This guide explore all the available ways to map a network drive on windows 10/11. Mapping a network drive is the process of assigning a drive letter to a shared network folder, so that you can easily access the shared folder’s data through File Explorer.
As in Windows 7 and 8 operating systems, Windows 10/11 makes it easy to assign a drive letter to network shared folder(s) in order to quickly and easily access your network folder and its files directly from File Explorer.
Mapping a network drive in Windows 10/11 can be done via File Explorer, Command Prompt and PowerShell, and this article provides step-by-step instructions on how to do this.
How to Map a Network Shared Folder to a Drive Letter in Windows 10/11.
Method 1: Map a Network Drive using File Explorer.
Using File Explorer is probably the most common way to map a network shared folder to a drive letter in Windows 10/11.
1. Open File Explorer and select This PC from the left-hand side panel.
2. Now, either right-click on This PC and choose Map network drive, or choose the same option on the Computer options-toolbar above.

3. At the ‘Map Network Drive’ window, do the following and click Finish:
a. Choose a Drive letter to assign to the network drive (or leave the default «Z:»).
b. Type in «Folder» box the full path* of the network shared folder that you want to map as a network drive, or click Browse to locate and select the shared folder on the network.
* Note: The folder path to the network shared folder must be typed in one of the following ways:**
- \\Computer-Name\Name-of-Shared-Folder
- \\Computer-IP-Address\Name-of-Shared-Folder
Where…
- Computer-Name = the name of the network computer with the shared folder. (e.g. «desktop1» in this example)
- Computer-IP-Address = the IP Address of the network computer with the shared folder.
- Name-of-Shared-Folder = the name of the shared folder (e.g. «shared_folder» in this example)
c. Select the Reconnect at sign-in check box if you want to make the mapping permanent so that you connect to the network shared folder every time you connect to your computer.
d. Select the Connect using different credentials check box, if the credentials required to connect/access the shared folder are different from what you use to log on to Windows.

4. (Optional) Type the credentials to access the network shared folder if prompted and click OK.
5. When, done the network drive will now show up in File Explorer under the This PC section.
Method 2. Map Network Drive using RUN Command.
If you know the Name or the IP Address on the computer with the shared folder, you can assign a drive letter to a network shared folder as follows:
1. Press Windows + R keys to open the «Run» command box.
2. In RUN command box, type one of the following commands, to view the shares on the network computer and press Enter:*
- \\Computer-Name
- \\Computer-IP-Address
* Notes: In the above command replace:
1. The «Computer-Name» with the name of the network computer with the shared folder e.g. «Desktop1»
2. The «Computer-IP-Address« with the IP address of the network computer with the shared folder e.g. «192.168.1.70»
Example. To view the shares on computer «desktop1» with IP address «192.168.1.70», you can type either:
- \\desktop1
- \\192.168.1.70

3. After pressing Enter, type the credentials to connect to the network PC (if prompted) and check the Remember my credentials check box, if you want to map the drive permanent.

4. Right-click on the shared folder that you want to map to a network drive and select Map network drive.

5. Finally, choose the drive letter that you to map the shared folder to, and hit Finish. The mapped network drive will shown on File Explorer.

Method 3: Mapping a Network Drive Using Command Prompt.
Another way to map a network drive in Windows is by using the «net use» command. To do that:
1. Open Command Prompt and use one of the following command to map the network shared folder and press Enter:*
- net use X: \\Computer-Name\Name-of-Shared-Folder
- net use X: \\Computer-IP-Address\Name-of-Shared-Folder
* Note: In the above commands replace:
-
- The letter «X» with the desired drive letter you want to map the shared folder to (e.g. «Y» in this example).
-
- The «Computer-Name«, with the name of the network computer with the shared
folder. (e.g. «DESKTOP-AIFS0G0» in this example) - The «Computer-IP-Address«, with the IP Address of the network computer with
the shared folder. - The «Name-of-Shared-Folder«, with the name of the shared folder (e.g.
«Public» in this example)
- The «Computer-Name«, with the name of the network computer with the shared
Example1: The following command will assign the drive letter «Y» to the «Public» shared folder on the «DESKTOP-AIFS0G0» computer:
- net use Y: \\DESKTOP-AIFS0G0\Public

2. To map a network drive and let Windows to automatically assign a drive letter, type an asterisk after typing «net use»:
- net use * \\Computer’s-Name-OR-IP\Name-of-Shared-Folder
* Note: The asterisk (*) option in the command above instructs Windows to allocate any drive letter that is not currently in use to the mapped shared folder. e.g.
- net use * \\DESKTOP-AIFS0G0\Public

3. To map a network drive using different credentials than the one you use to sign-in to Windows and make the mapping permanent, give the following command:*
- net use X: \\Computer’s-Name\Name-of-Shared-Folder PASSWORD /user:USERNAME /persistent:yes
* Notes:
1. In the above commands replace the «PASSWORD» and the «USERNAME«, with the credentials for the network share.
2. The «persistent» option keeps the folder mapped even after reboot.
Example: To authenticate on the «DESKTOP-AIFS0G0» computer with username «admin» and password «12345» and to map the shared folder «Public» to drive letter «H:», give the following command:
- net use H: \\DESKTOP-AIFS0G0\Public 12345 /user:admin /persistent:yes

When you finish the steps, the network folder will be mapped on the device and will appear in File Explorer.
Method 4: Map Network Drive Using PowerShell on Windows 10/11
Finally, you can use PowerShell in Windows 10/11 to map to a drive letter a network shared folder.
1. Open Windows PowerShell.
2. In PowerShell, give the following command to map the network drive and hit Enter:*
- New-PSDrive -Name «X» -PSProvider «FileSystem» -Root «\\Computer-Name-OR-IP\Name-of-Shared-Folder» -Persist
* Note: In the above command replace:
- The letter «X» with the desired drive letter you want to map the shared folder to (e.g. «H» in this example).
- The «Computer-Name-OR-IP«, with the name or the IP Address of the network computer with the shared folder. (e.g. «192.168.1.70» in this example)
- The «Name-of-Shared-Folder«, with the name of the shared folder (e.g. «Public» in this example)
Example: New-PSDrive -Name «H» -PSProvider «FileSystem» -Root «\\192.168.1.70\Public» -Persist

3a. To map a network drive using different credentials than the ones you use to log into Windows, provide the following PowerShell command and hit Enter:
- New-PSDrive -Name «X» -PSProvider «FileSystem» -Root «\\Computer-Name-OR-IP\Name-of-Shared-Folder» -Persist -Credential USERNAME
* Note: In the above command replace the USERNAME with the username for the network share. e.g. «Admin» in this example:
- New-PSDrive -Name «H» -PSProvider «FileSystem» -Root «\\192.168.1.70\Public» -Persist -Credential Admin

3b. At the «credential request» window, type the password for the network share and hit OK.

3c. After completing the steps, the shared network folder will be mapped to your computer and will show up in File Explorer.

Final Words.
In summary, mapping a network drive in Windows 10/11 is a simple process that makes accessing network resources effortless. You can map a network drive using Windows Explorer, Command Prompt, or PowerShell and have the shared folders as if they were on your own computer.
That’s it! Which method worked for you?
Let me know if this guide has helped you by leaving your comment about your experience. Please like and share this guide to help others.
If this article was useful for you, please consider supporting us by making a donation. Even $1 can a make a huge difference for us in our effort to continue to help others while keeping this site free:
- Author
- Recent Posts
Konstantinos is the founder and administrator of Wintips.org. Since 1995 he works and provides IT support as a computer and network expert to individuals and large companies. He is specialized in solving problems related to Windows or other Microsoft products (Windows Server, Office, Microsoft 365, etc.).
If there are folders that you access frequently, this post shows you how to quickly access these folders in Windows Explorer without having to enter the full path to the folder. We will discuss three ways to map folders to drive letters.
Method 1: Use the subst DOS Command
First, we will use an old DOS command, called subst, that allows you to assign a drive letter to any folder in Windows.
For this example, we will assign a drive letter for the following folder: C:\Users\Lori Kaufman\Documents\My Work.
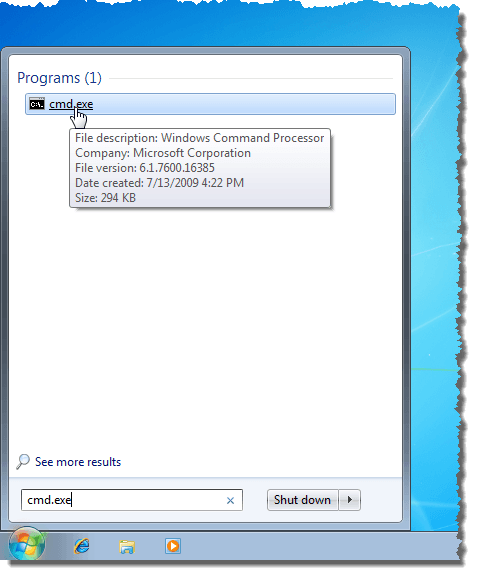
Open the Start menu and enter “cmd.exe” (without the quotes) in the Search programs and files box. Click cmd.exe in the results to open the command prompt window.
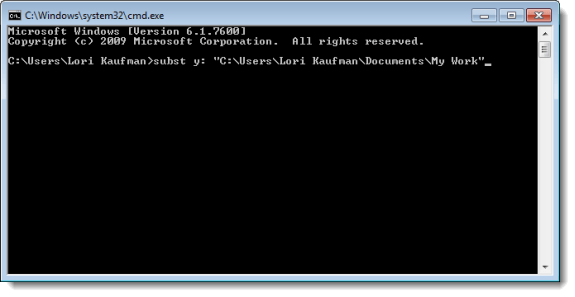
In the command prompt window, type the following command to associate drive “Y:” with the folder.
subst y: “C:\Users\Lori Kaufman\Documents\My Work”
NOTE: If there are spaces in the path name, be sure to put quotes around the full path.
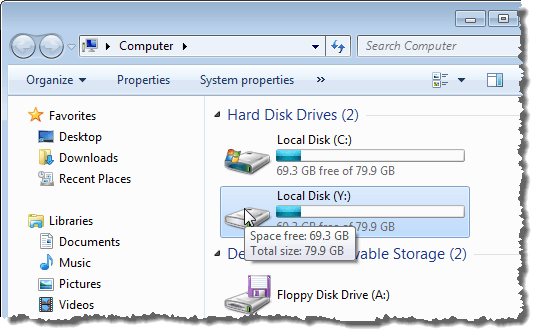
Now, when we open Windows Explorer, we see a new drive labeled Y: that will directly open the My Work folder.
Use this same process to assign different drive letters to all your frequently used directories. However, the subst command cannot be used with mapped network folders.
Method 2: Use the psubst Utility
A disadvantage of using the subst command is that these virtual drives are temporary and will be removed as soon as you shutdown or restart the computer or log off. However, you can solve this by using the free psubst utility, which operates like the subst command but it creates permanent virtual drives that are persistent even after rebooting your computer.
Download the psubst utility from
https://github.com/ildar-shaimordanov/psubst
Now go ahead and read my post on how to use psubst to map a folder to a drive letter.
Method 3: Use a Graphical Tool
If you would rather use a graphical tool to map drive letters to folders, there is a free utility called, Visual Subst, that’s like a graphical version of the psubst utility.
Download Visual Subst from
http://www.ntwind.com/software/utilities/visual-subst.html
To install Visual Subst, double-click on the .exe file you downloaded.

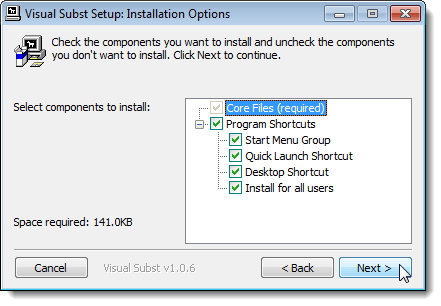
On the Installation Options screen, select the check boxes for the Program Shortcuts you want to install and click Next.
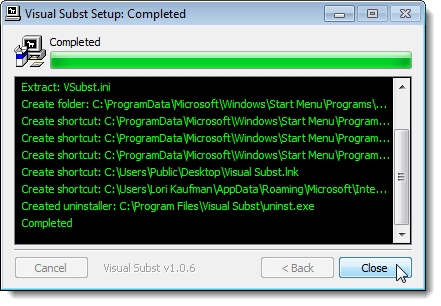
When the setup is completed, click Close. Double-click the shortcut to start the program. You can also start it from the Start menu.
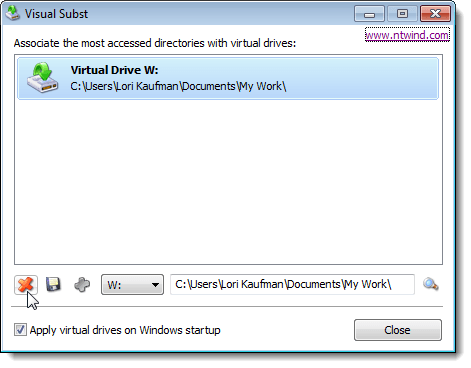
The main Visual Subst window displays. Select a desired drive letter from the drop-down list.
To select a folder to map to the selected drive letter, click the Browse button to the right of the edit box.
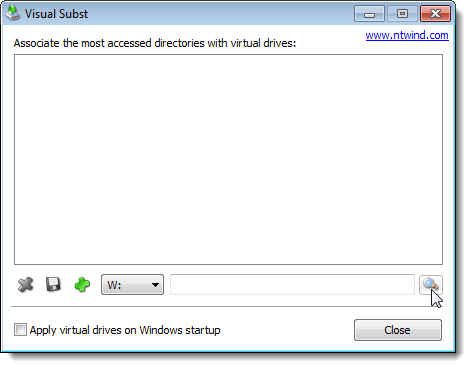
On the Browse For Folder dialog box, navigate to the folder you want to map, select it, and click OK.
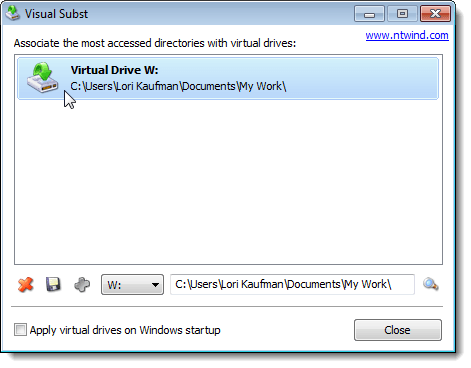
To map the selected folder to the selected drive letter, click the green plus button on the button bar to the left of the drive letter drop-down list.

The virtual drive is added to the list. Add more virtual drives by selecting a drive letter and a corresponding folder and adding it to the list as described above.
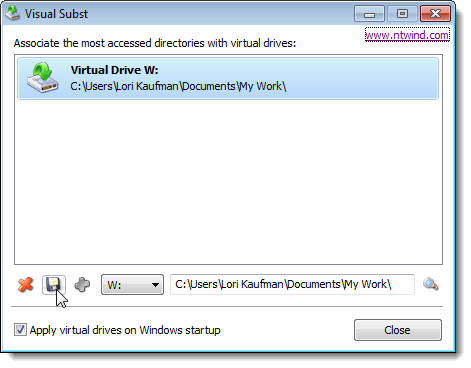
If you want the virtual drives you defined available automatically when you start Windows, select the Apply virtual drives on Windows startup check box so there is a check mark in the box.
To save the settings for Visual Subst, click the floppy disk button on the button bar. A file with the .ini extension is saved in the same directory where Visual Subst was installed.
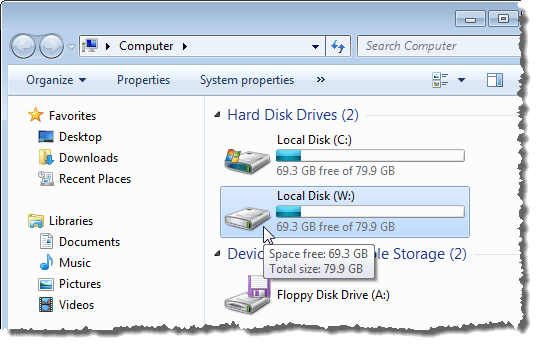
The mapped folders display as Hard Disk Drives in Windows Explorer.
If you want to remove the mapping for a folder, open Visual Subst again and select the virtual drive from the list. Click the red X button on the button bar.
Mapping folders to drive letters can save you a lot of time and Visual Subst makes adding virtual drives easy. Visual Subst works in Windows 2000, Windows XP, and later versions of Windows including Windows 7, 8 and 10. Enjoy!
Related Posts
- How to Use Event Viewer to Troubleshoot Windows Problems
- How to Boot into Safe Mode in All Versions of Windows
- How to Reset Your Computer Password If You Lock Yourself Out
- 14 Command Prompt (CMD) Commands Windows Users Should Know
- Change from Public to Private Network in Windows