
В Windows 11 и 10 существует возможность подключения диска в виде пути на другом диске. То есть вместо назначения букв каждому диску или разделу диска вы при желании можете сделать так, чтобы все они отображались в рамках одного диска.
В этой инструкции — о том, как подключить диск в виде папки в другом расположении в Параметрах, Управлении дисками или с помощью командной строки.
Параметры
Описываемая возможность доступна в приложении «Параметры». Для подключения диска в виде папки с их помощью достаточно выполнить следующие шаги:
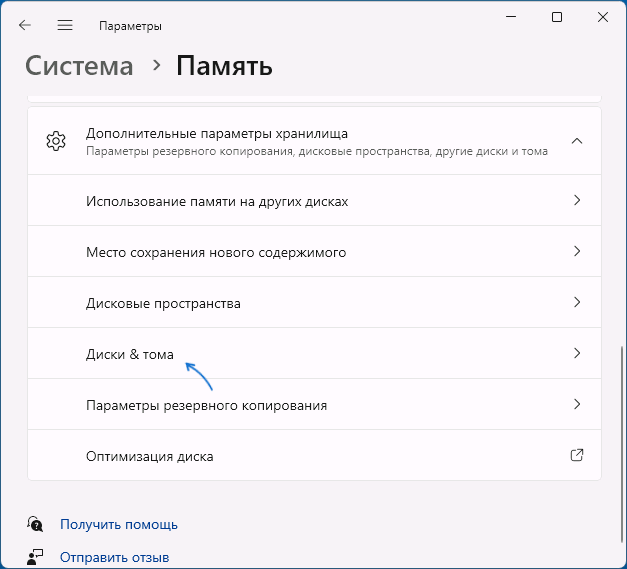
- Откройте Параметры — Система — Память — Дополнительные параметры хранилища — Диски и тома.

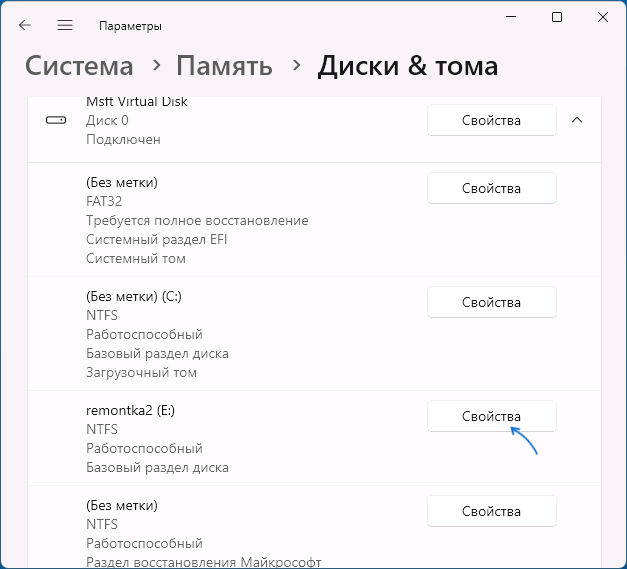
- Нажмите «Свойства» справа от диска, который нужно подключить.
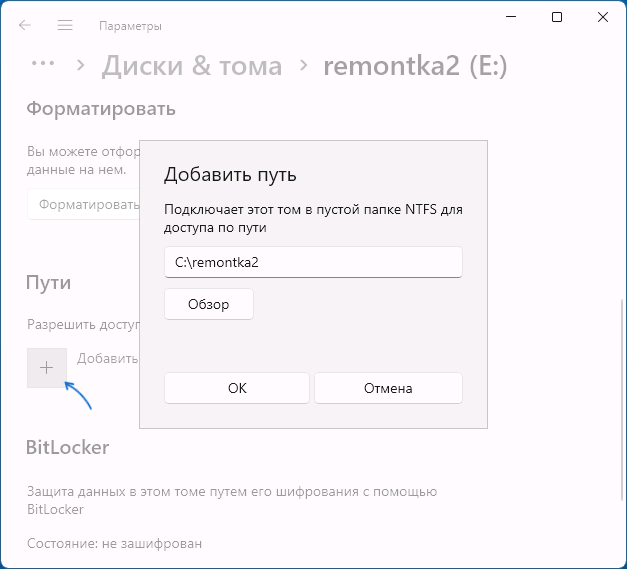
- В разделе «Пути» нажмите «Добавить».
- Укажите путь к любой (обязательно пустой) папке на диске, в рамках которого нужно отображать содержимое выбранного диска и нажмите «Ок».
Готово, теперь при открытии соответствующей папки или при обращении к ней каким-либо образом вы будете получать доступ к содержимому выбранного диска.
При необходимости вы можете удалить букву диска, который вы подключили в виде папки: прямо в этом же окне «Параметров», нажав по кнопке «Сменить букву диска» и выбрав «Нет», либо другими способами: в командной строке или утилите «Управление дисками».
Управление дисками
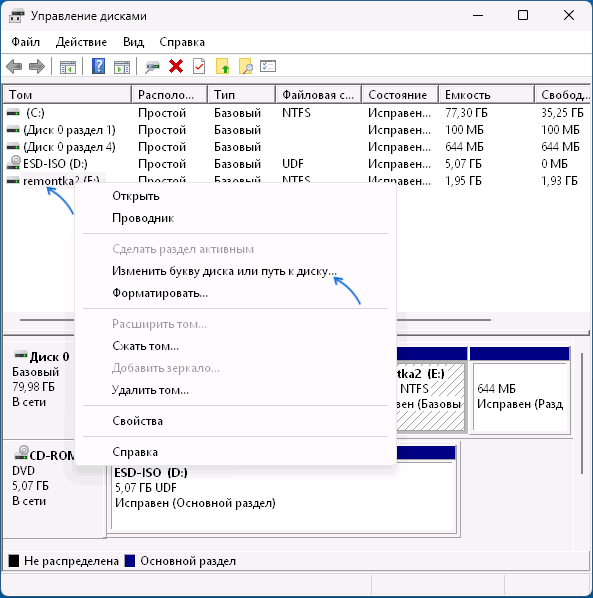
То же самое можно выполнить в «Управление дисками»:
- Откройте «Управление дисками» через контекстное меню кнопки «Пуск», нажав по ней правой кнопкой мыши и выбрав нужный пункт меню, либо с помощью команды Win+R — diskmgmt.msc
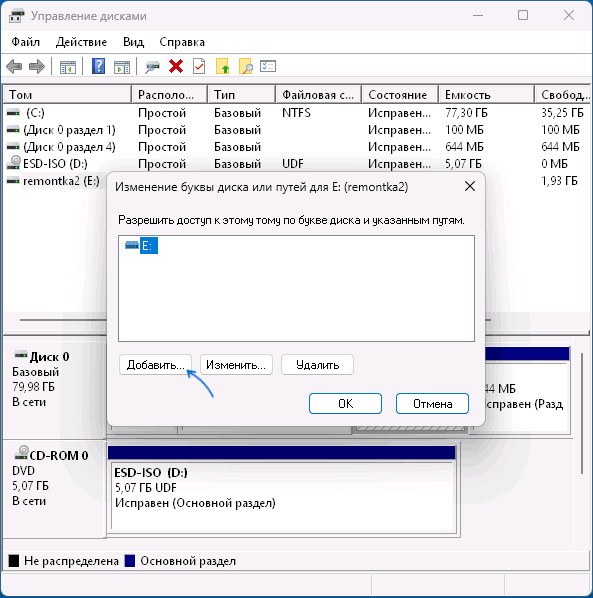
- Нажмите правой кнопкой мыши по диску, который нужно подключить как папку на другом диске и выберите пункт «Изменить букву диска или путь к диску».

- Нажмите кнопку «Добавить».
- Выберите пункт «Подключить том как пустую NTFS-папку», нажмите «Обзор» и укажите путь к пустой папке на нужном диске, нажмите «Ок».
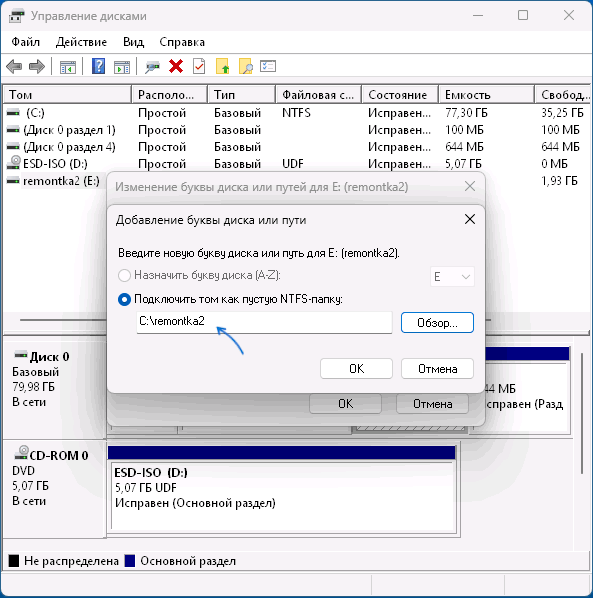
Готов, диск будет подключен как папка на другом диске. Как и в предыдущем случае вы можете удалить букву с диска, если не хотите, чтобы он отображался в виде отдельного диска в «Проводнике».
Командная строка
И ещё один метод — командная строка и утилита DISKPART. Порядок действий:
- Запустите командную строку от имени администратора.
- По порядку введите следующие команды, заменив N на номер нужного раздела (который мы подключаем), а C:\Folder на путь к нужной папке:
diskpart
list volume
select volume N
assign mount=C:\Folder
exit
Готово, диск будет подключен как папка.
Если в будущем вам потребуется отключить диск, подключенный в виде папки, используйте те же команды, но предпоследнюю замените на remove mount=C:\Folder
Удаление подключения в виде папки ни в командной строке ни другими способами: в «Параметрах» или «Управлении дисками» не приведёт к удалению данных с диска: если нужно, вы сможете назначить ему букву или подключить к другой папке и пользоваться как обычно.
(Image credit: Mauro Huculak)
On Windows 10, when your hard drive starts running out of space, the usual solution is to add another drive. While this works, over time, you could end up with a cluttered list of drives, making data management less efficient.
Instead of relying on solutions like Storage Spaces or RAID (Redundant Array of Independent Disks) to merge multiple drives into a single volume, Windows 10 offers a simpler, more organized alternative, which includes mounting a hard drive to a folder instead of assigning it a drive letter. This method not only reduces the number of drive letters but also improves storage organization.
This approach is especially useful when sharing a folder over a network and running low on space. Rather than creating a new network share, you can mount an additional hard drive within the existing shared folder, instantly expanding its storage without disrupting access.
In this how-to guide, I’ll explain two ways to mount a hard drive as a folder on your device using the Disk Management console.
Recent updates
These instructions has been updated to ensure accuracy and reflect changes to the process in the operating system.
How to assign folder path mount-point to drive with data on Windows 10
To mount a drive with data as a folder with Disk Management, use these steps:
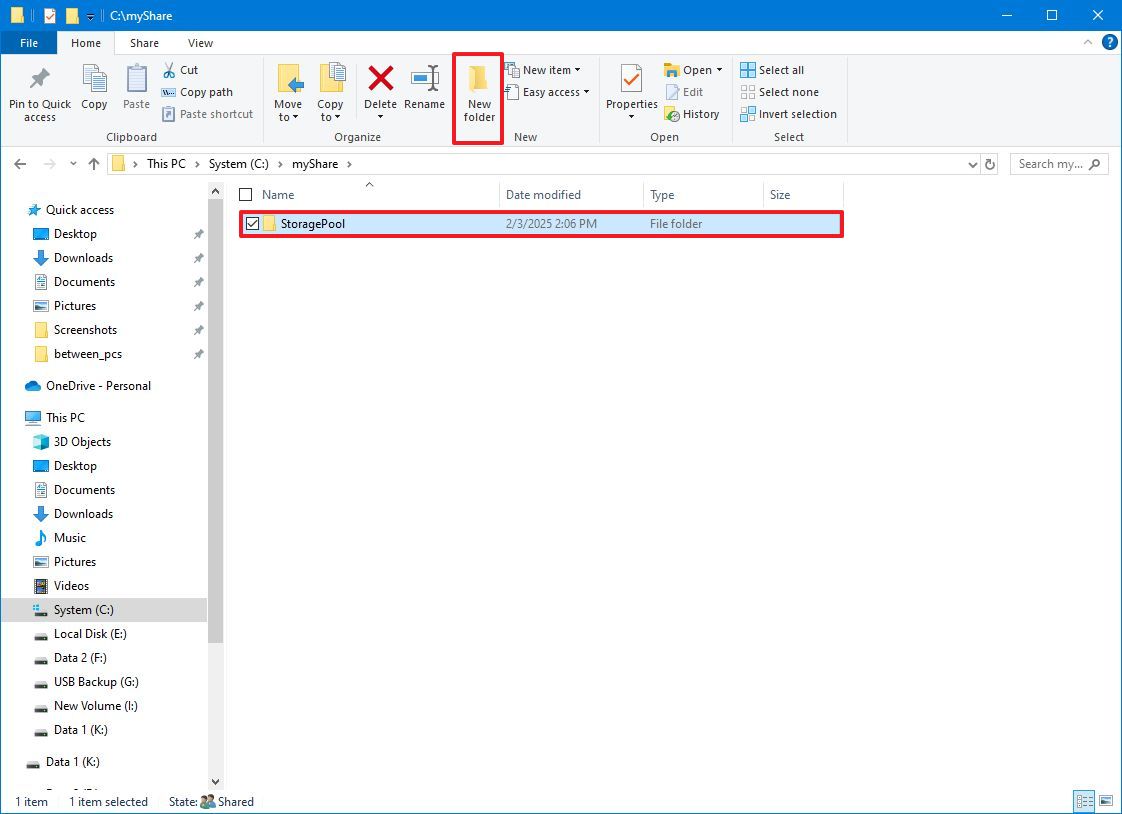
- Open File Explorer.
- Open the folder location where you want the mount point to appear.
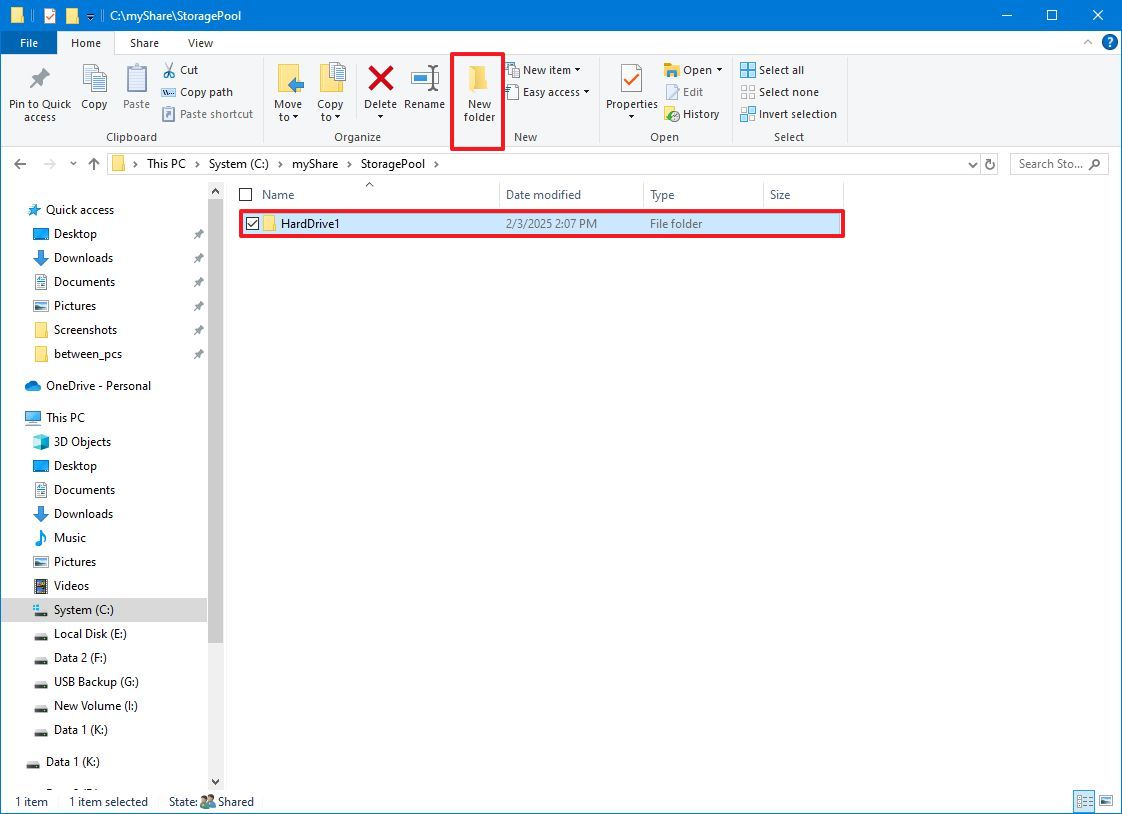
- Click the New folder button on the «Home» tab.
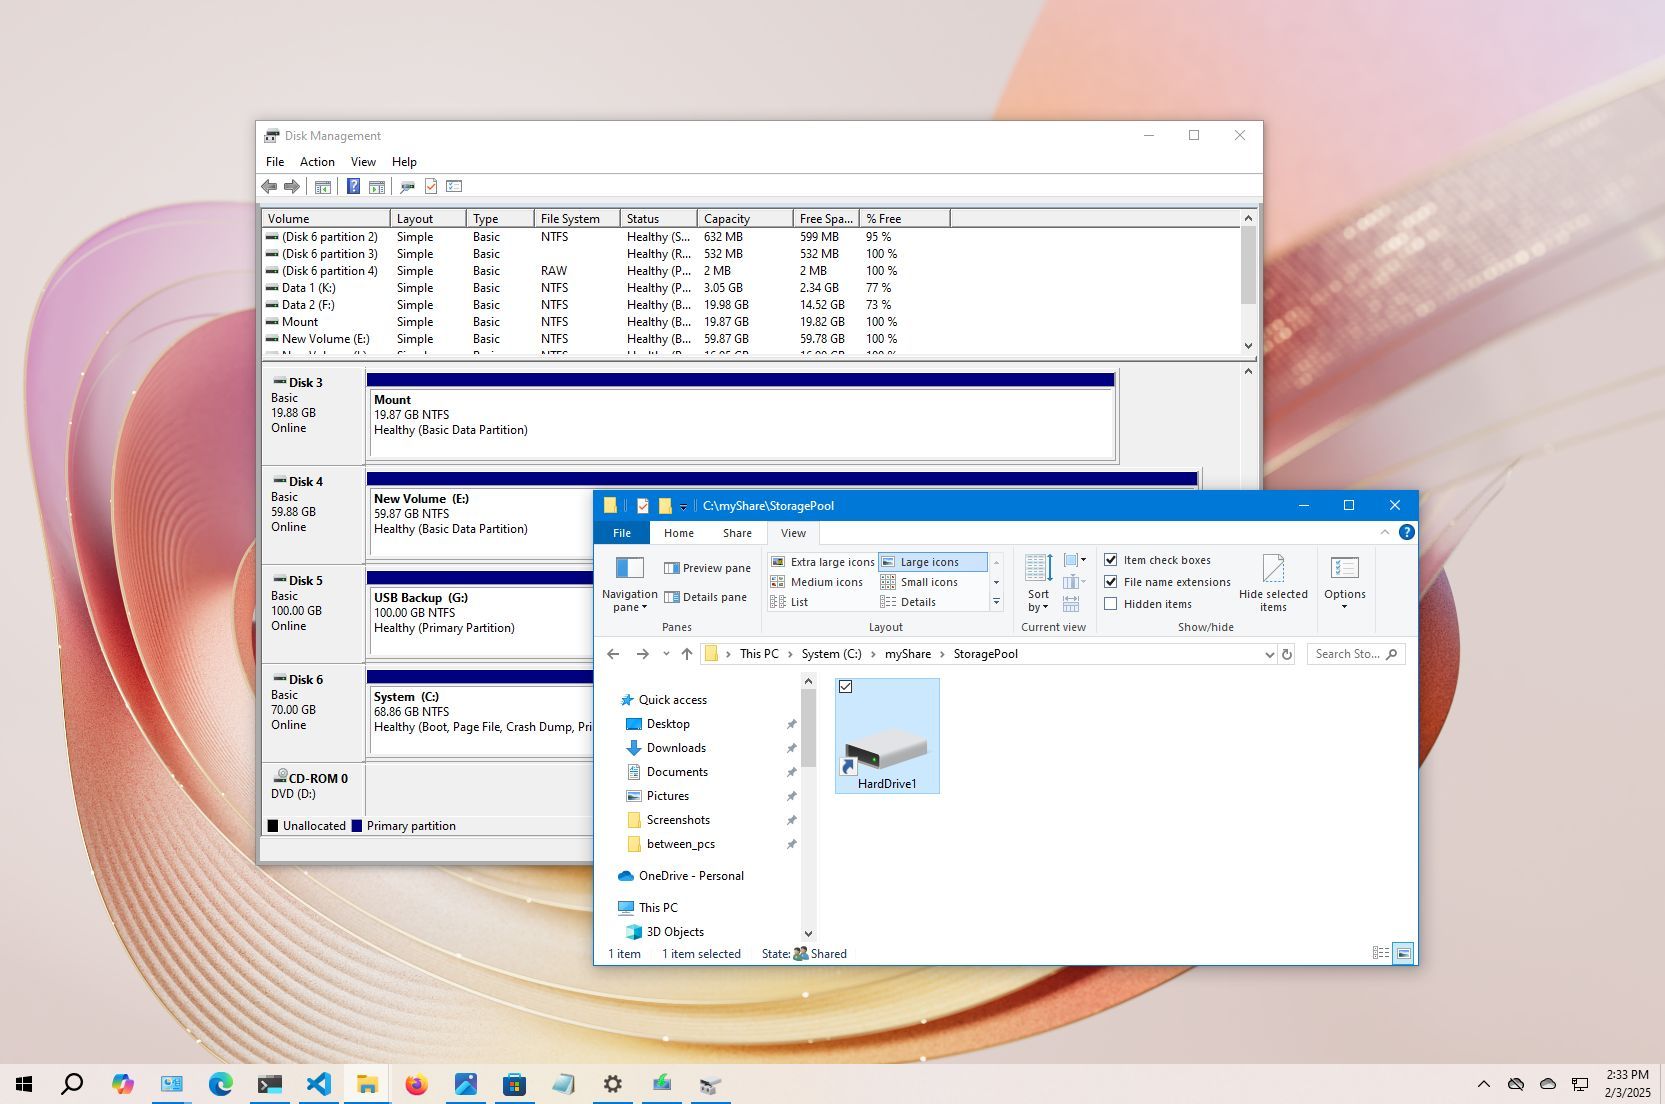
- Confirm a name for the folder, such as «StoragePool.»
- Open the newly created folder.
- Click the New folder button on the «Home» tab to create a folder to mount the drive, such as HardDrive1.
- (Optional) Repeat step 6 to create an additional folder depending on the number of hard drives you want to mount as folders.
- Open Start.
- Search for Disk Management and click the top result to open the console.
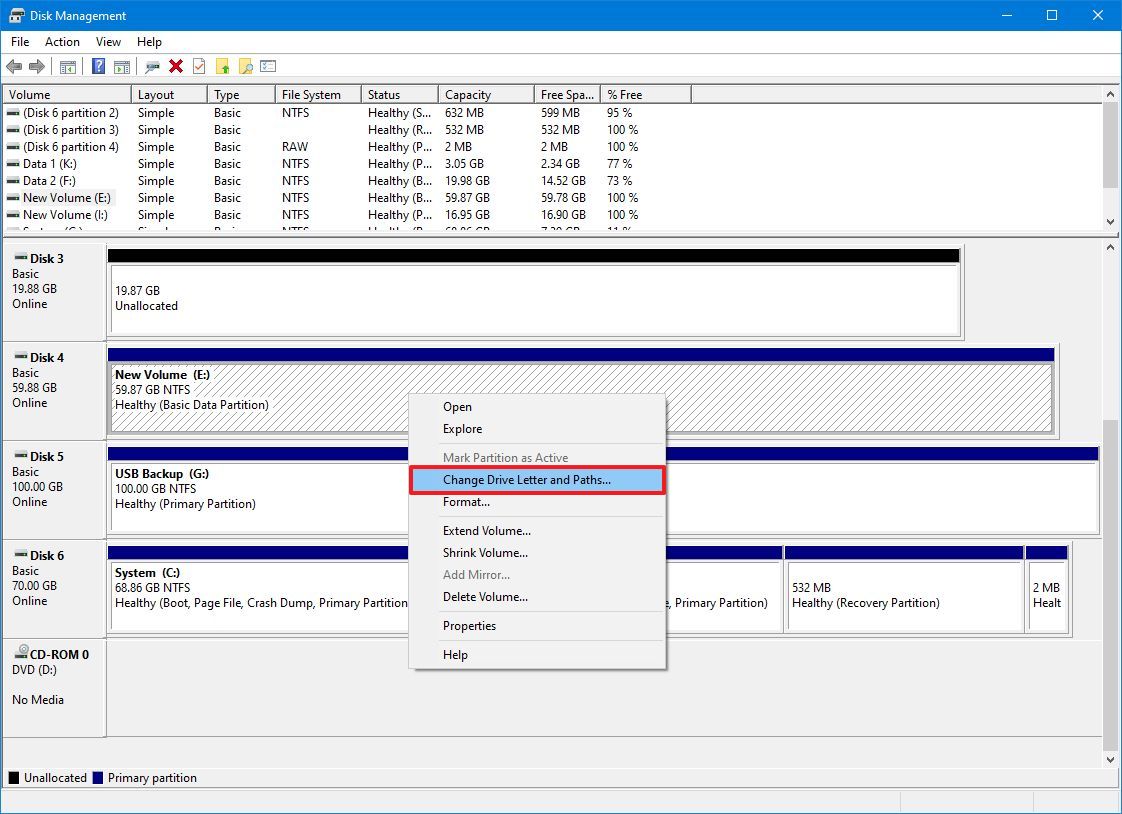
- Right-click the drive you want to mount and select the «Change Drive Letter and Paths» option.
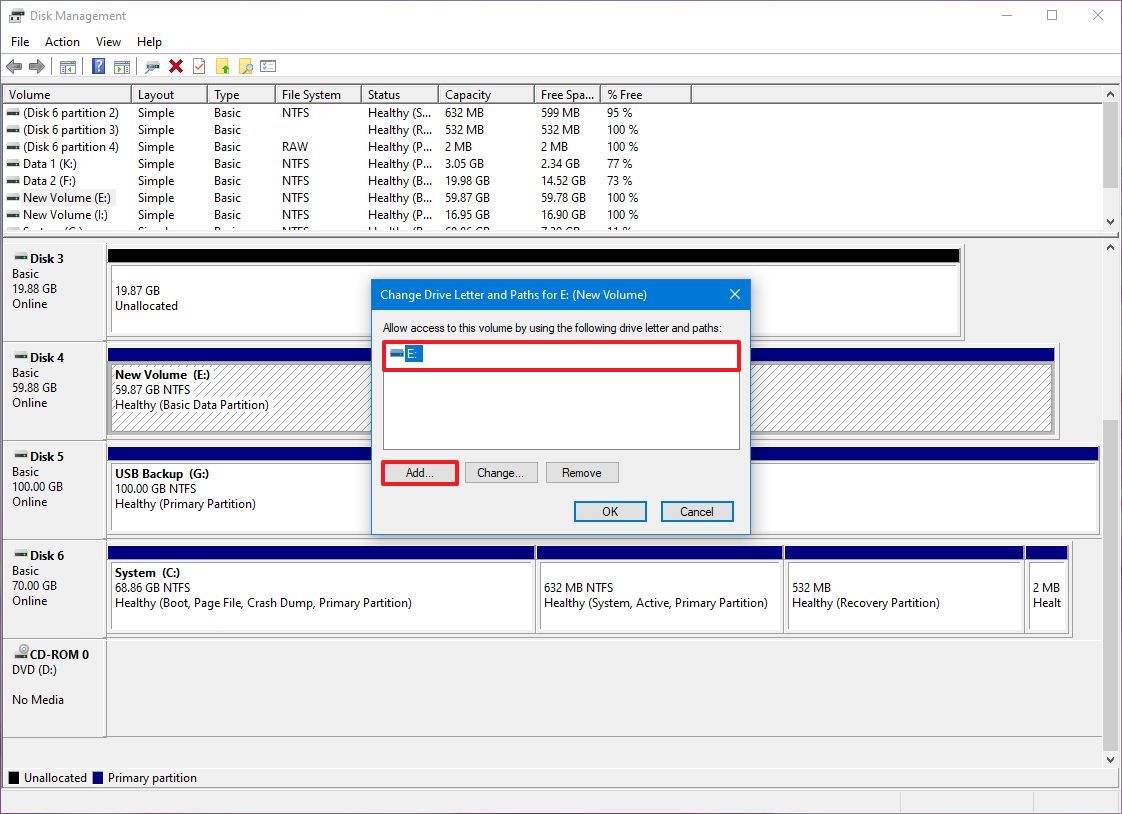
- Click the Add button.
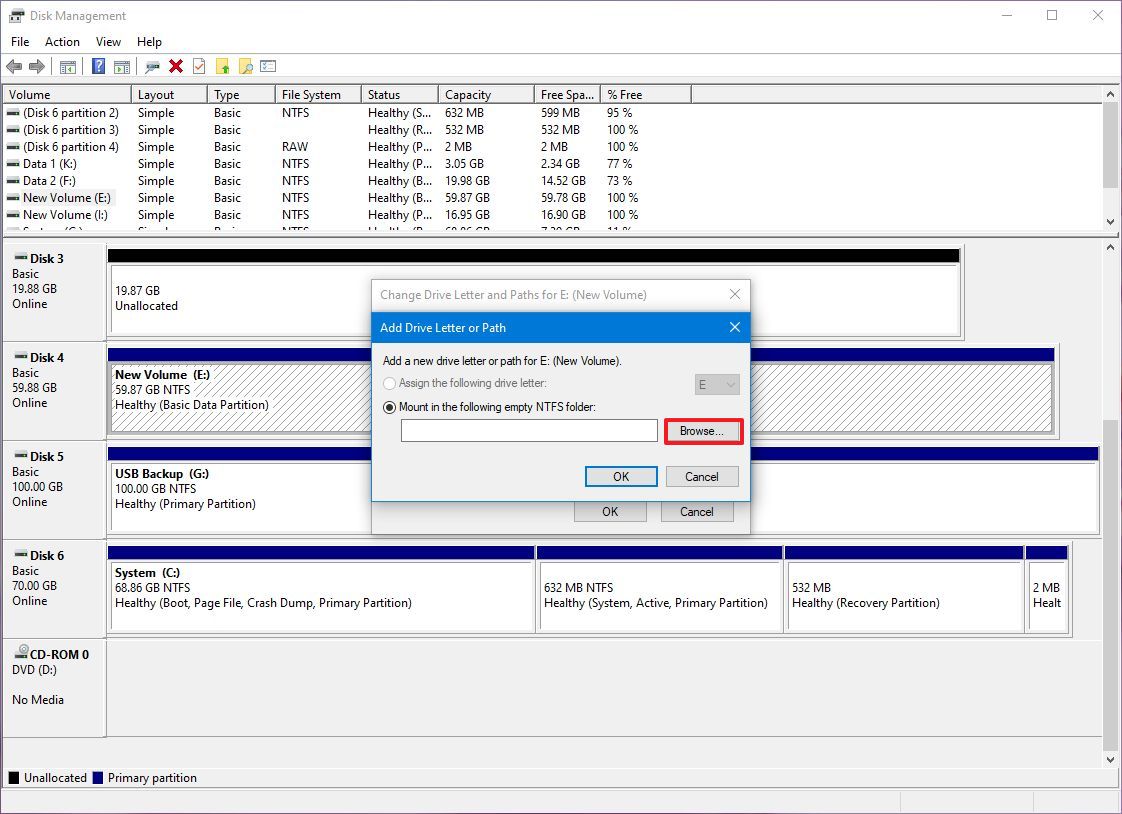
- Select the «Mount in the following empty NTFS folder» option.
- Click the Browse button.
- Select the folder you created on step 6.
- Click the OK button.
- Click the OK button again.
- (Optional) Right-click the drive again and select the «Change Drive Letter and Paths» option.
- Select the current drive letter (not the mount point).
- Click the Remove button.
- Click the Yes button.
Once you complete the steps, the secondary hard drive will now be accessible from the folder location you created.
How to assign folder path mount-point to drive without data on Windows 10
To mount an empty drive as a folder with Disk Management, use these steps:
All the latest news, reviews, and guides for Windows and Xbox diehards.
- Open File Explorer.
- Open the folder location where you want the mount point to appear.
- Click the New folder button on the «Home» tab.
- Confirm a name for the folder, such as StoragePool.
- Open the newly created folder.
- Click the New folder button on the «Home» tab to create a folder to mount the drive, such as HardDrive1.
- (Optional) Repeat step 6 to create an additional folder depending on the number of hard drives you want to mount as folders.
- Open Start.
- Search for Disk Management and click the top result to open the console.
- Right-click the empty drive you want to mount as a folder and select the «New Simple Volume» option.
- Click the Next button.
- Click the Next button again.
- Select the «Mount in the following empty NTFS folder» option.
- Click the Browse button.
- Select the folder you created in step 6.
- Click the OK button.
- Click the Next button again.
- Select the «Format this volume with the following settings» option.
- Use the default settings for «file system,» «allocation unit size,» and «volume label» options.
- Check the «Perform a quick format» option.
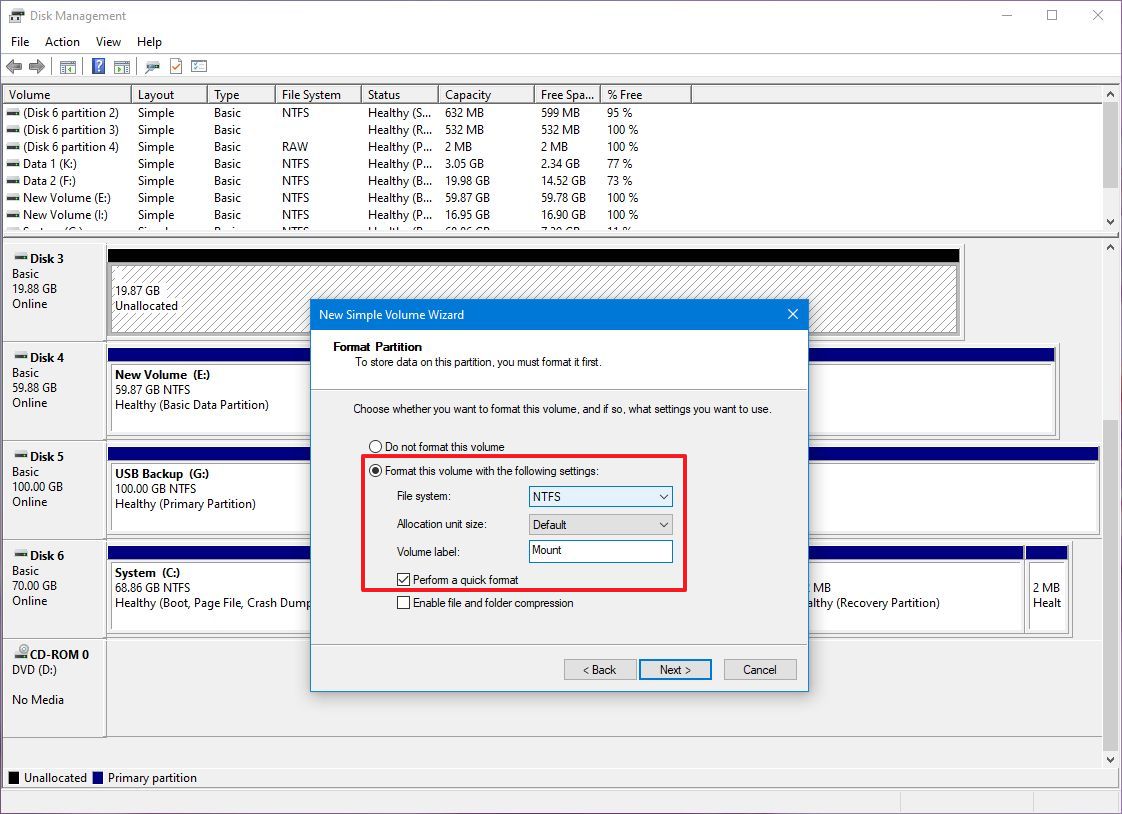
- Click the Next button.
- Click the Finish button.
After you complete the steps, the new drive will be formatted and mounted as a folder from the specified folder.
When using this solution, each drive will continue to work independently without redundancy, which means that if a drive fails, you will lose the data on that drive but not on the others. If you have important data, it is always recommended to periodically create a backup.
More resources
Find in-depth guides, troubleshooting tips, and the latest updates on Windows 11 and 10 here:
- Windows 11 on Windows Central — All you need to know
- Windows 10 on Windows Central — All you need to know
Mauro Huculak has been a Windows How-To Expert contributor for WindowsCentral.com for nearly a decade and has over 15 years of experience writing comprehensive guides. He also has an IT background and has achieved different professional certifications from Microsoft, Cisco, VMware, and CompTIA. He has been recognized as a Microsoft MVP for many years.

This tutorial will show you how to add (assign) or remove (unassign) mount point folder paths for a drive or volume in Windows 10 and Windows 11.
You can mount (make a drive accessible) in a folder rather than a drive letter if you want. This makes the drive appear as just another folder.
When you mount an internal or external drive in an empty folder, you will be able to access the contents of the drive from the path of the folder. The contents of the drive will still physically be located on the drive. Anything you save into this folder will actually be saved to the drive.
You can mount a drive or volume with or without a drive letter as an empty folder.
You can use this folder’s path to save, copy, move, etc… to the drive.
Reference:
You can mount drives only in empty folders on basic or dynamic NTFS volumes.
If you mount an external or removable drive in a folder and disconnect the drive, the folder will not open until the drive is connected again.
Contents
- Option One: Mount or Unmount Drive to a Folder in Settings
- Option Two: Mount Drive to a Folder in Windows Terminal
- Option Three: Mount Unallocated Drive without Drive Letter to a Folder in Disk Management
- Option Four: Mount Drive with or without Drive Letter to a Folder in Disk Management
- Option Five: Unmount Drive from Folder in Disk Management
- Option Six: Unmount Drive from Folder by Deleting Folder
Option One
Mount or Unmount Drive to a Folder in Settings
This option is only available in Windows 11.
1 Open Settings (Win+I).
2 Click/tap on System on the left side, and click/tap on Storage on the right side. (see screenshot below)

3 Click/tap on Advanced storage settings to expand it open, and click/tap on Disks & volumes. (see screenshot below)

4 Click/tap on Properties for the drive (partition or volume) you want to add or remove mount point folder paths for. (see screenshot below)

5 Do step 6 (add) or step 7 (remove) below for what you want.
6 Add Mount Point Folder Path to Drive
A) Click/tap on the Add button under Paths. (see screenshot below)

B) Perform the following steps: (see screenshots below)
- Click/tap on Browse.
- Navigate to and select or create an empty folder you want.
- Click/tap on Select Folder.
- Click/tap on OK.


C) Go to step 8.
7 Remove Mount Point Folder Path from Drive
A) Click/tap on the path you want to remove to expand it open. (see screenshot below)
B) Click/tap on Remove, and go to step 8.

8 When finished, you can close Settings if you like.
Option Two
Mount Drive to a Folder in Windows Terminal
You must be signed in as an administrator to use this option.
1 Open Windows Terminal (Admin), and select either Windows PowerShell or Command Prompt.
2 Copy and paste diskpart into Windows Terminal (Admin), and press Enter. (see screenshot below)
3 Copy and paste list volume into Windows Terminal (Admin), and press Enter.
4 Make note of the volume number (ex: «2») of the drive you want to mount to a folder.
5 Type the command below into Windows Terminal (Admin), and press Enter.
select volume ###
Substitute ### in the command above with the actual volume number (ex: «2») of the drive you want to mount to an empty folder from step 4.
For example: select volume 2
6 Type the command below into Windows Terminal (Admin), and press Enter.
assign mount="Full path of empty folder"
Substitute Full path of empty folder in the command above with the actual full path (ex: «C:\Users\Brink\Desktop\My mounted drive») of the empty folder you want to mount the drive to.
For example: assign mount="C:\Users\Brink\Desktop\My mounted drive"
7 You can now close Windows Terminal (Admin) if you like.

Option Three
Mount Unallocated Drive without Drive Letter to a Folder in Disk Management
1 Open Disk Management (diskmgmt.msc).
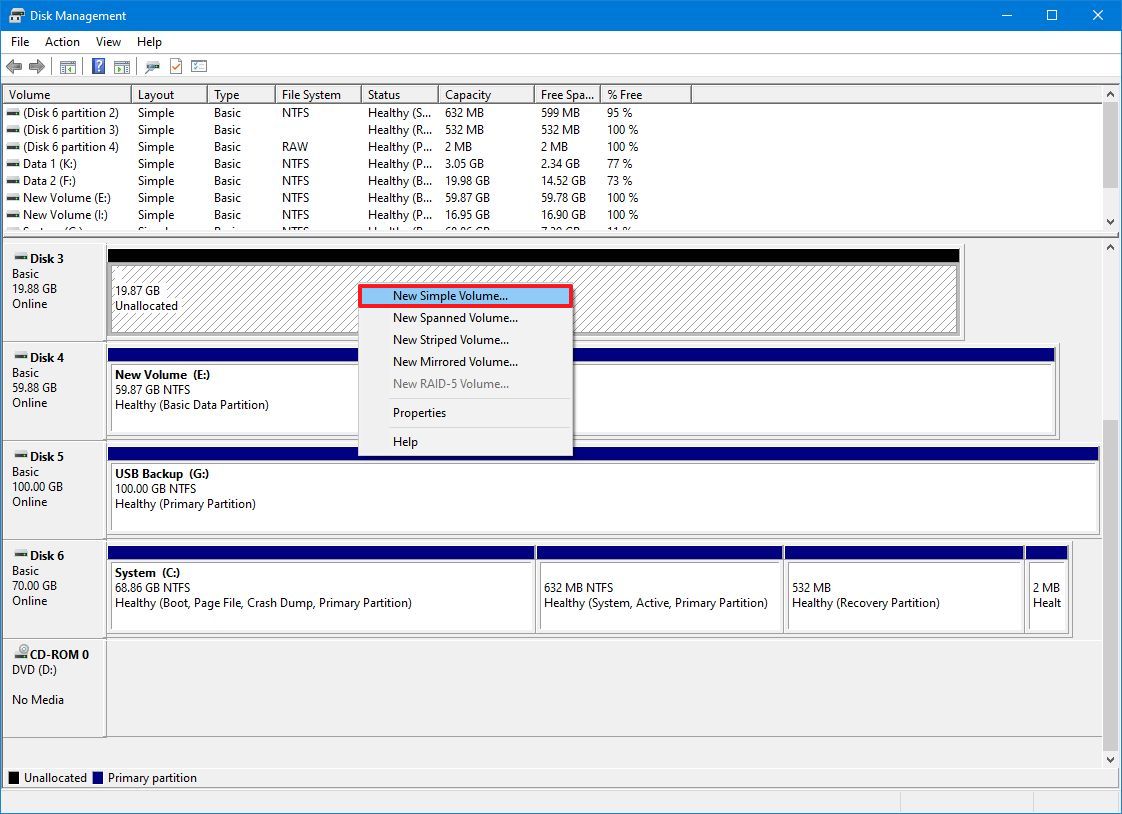
2 Right click or press and hold on the unallocated drive you want to mount to a folder, and click/tap on the New Simple Volume. (see screenshot below)

3 Click/tap on Next. (see screenshot below)

4 Click/tap on Next. (see screenshot below)
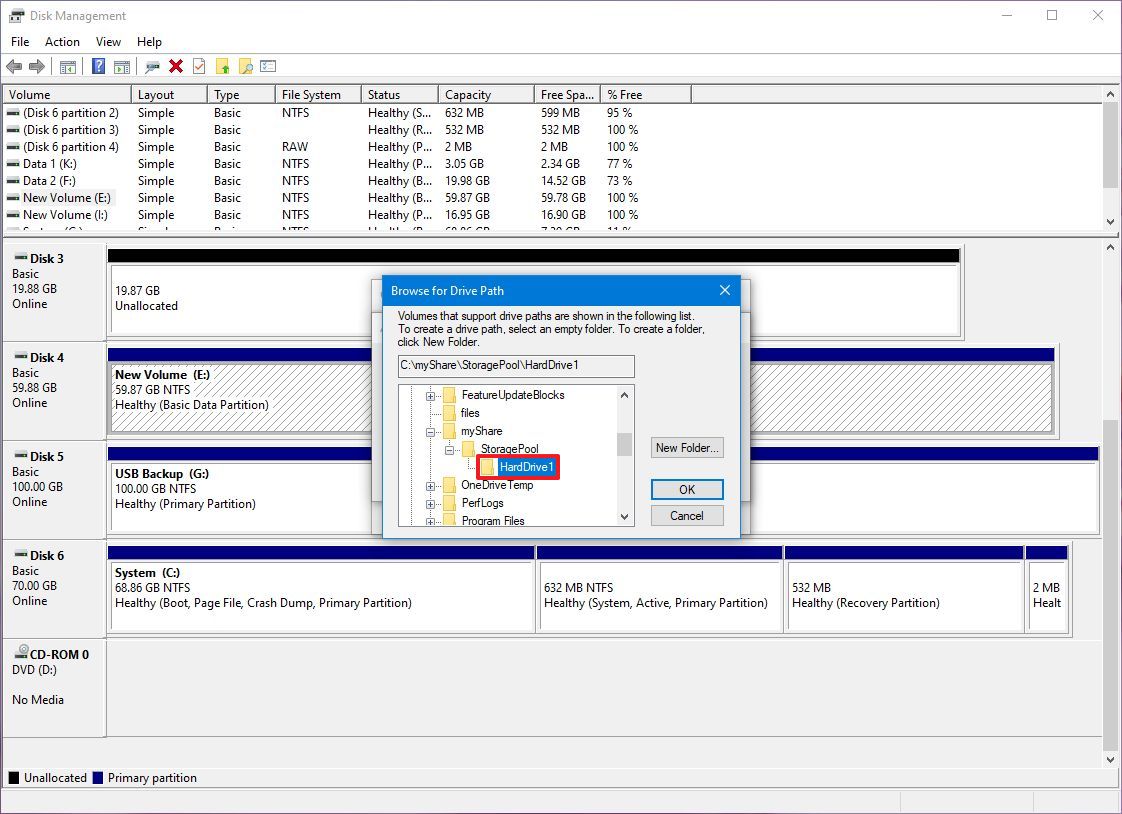
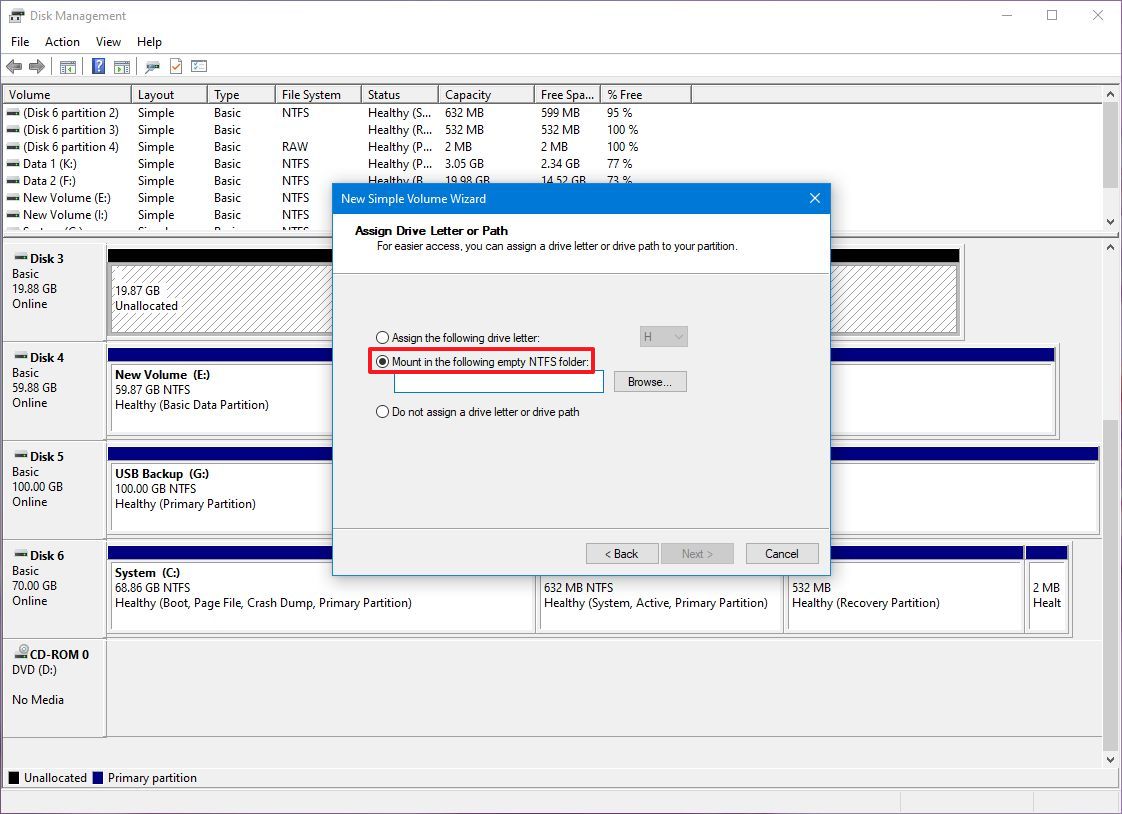
5 Perform the following steps: (see screenshots below)
- Select (dot) Mount in the following empty NTFS folder.
- Click/tap on the Browse button.
- Navigate to and select the empty folder you want to mount the drive to.
- Click/tap on OK.
- Click/tap on Next.

6 Type a name (volume label) you want for the drive, and click/tap on Next. (see screenshot below)
7 Click/tap on Finish. (see screenshot below)
9 You can now close Disk Management if you like.
Option Four
Mount Drive with or without Drive Letter to a Folder in Disk Management
1 Open Disk Management (diskmgmt.msc).
2 Right click or press and hold on the unallocated drive you want to mount to a folder, and click/tap on the Change Drive Letter and Paths. (see screenshot below)

3 Click/tap on Add. (see screenshot below)

4 Perform the following steps: (see screenshots below)
- Select (dot) Mount in the following empty NTFS folder.
- Click/tap on the Browse button.
- Navigate to and select the empty folder you want to mount the drive to.
- Click/tap on OK.
- Click/tap on Ok.

5 You can now close Disk Management if you like.
Option Five
Unmount Drive from Folder in Disk Management
This will not delete the contents on the drive.
1 Open Disk Management (diskmgmt.msc).
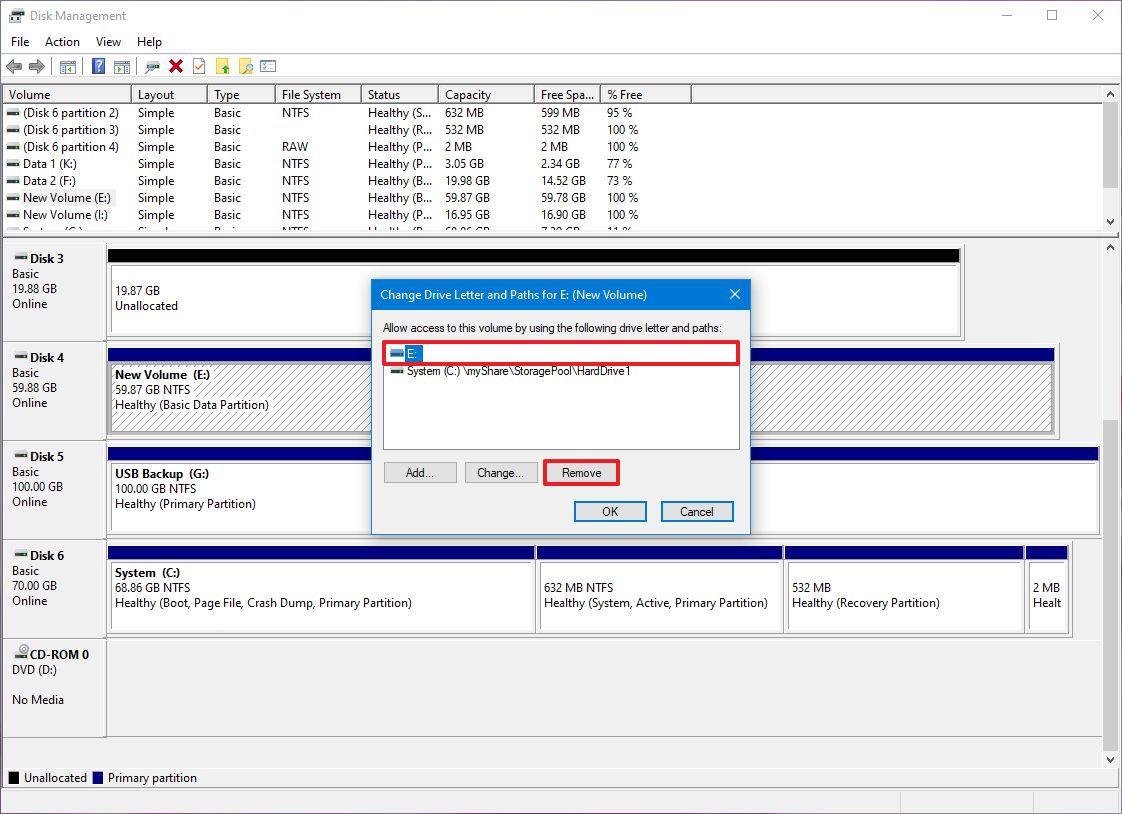
2 Right click or press and hold on the unallocated drive you want to unmount from a folder, and click/tap on the Change Drive Letter and Paths. (see screenshot below)

3 Select the mount point folder path you want to remove, and click/tap on Remove. (see screenshot below)
4 Click/tap on Yes to confirm. (see screenshot below)

5 You can now close Disk Management if you like.
Option Six
Unmount Drive from Folder by Deleting Folder
This will not delete the contents on the drive.
1 Delete the folder mounted by a drive.
2 Empty the Recycle Bin to permanently delete this mount point folder path.
That’s it,
Shawn Brink
- To mount a drive as a folder on Windows 11, open Settings > System > Storage > Disks & volumes, click “Properties” for the drive, click “Add,” and choose the folder mount point.
- You can perform this configuration for a drive that is already formatted or through the partition wizard.
- Alternatively, you can mount a drive to a folder from Disk Management or Command Prompt (the same steps will work on PowerShell).
On Windows 11 (and 10, including older versions), it’s possible to mount a drive as a folder, and in this guide, I will explain how to complete this configuration.
If you have a computer with multiple drives or partitions, instead of assigning a drive letter to each storage, you can mount it as a folder within another location on your system. This approach can be useful for organizing your storage or accessing data in a specific way without using a lot of letter assignments.
Regardless of the reason, Windows offers different ways to mount a drive as a folder through the Disk Management tool and Command Prompt. On Windows 11, you can also use the “Disks & volumes” settings to perform this configuration.
In this guide, I will explain the different ways to mount a drive as a folder on Windows 11 as well as on Windows 10. You can also refer to these instructions on older versions of the operating system, including Windows 8.1, Windows 7, and older.
- How to mount a drive as a folder from Settings app
- How to mount a drive as a folder from Disk Management
- How to mount a drive as a folder from Command Prompt
How to mount a drive as a folder from Settings app
On Windows 11 (and higher releases), you can mount a drive as a folder in at least two ways from the “Disks & volumes” experience from the Settings app.
From formatted drive with data
To mount a hard drive as a folder on Windows 11 from the Settings app, use these steps:
-
Open Settings.
-
Click on System.
-
Click the Storage page.
-
Click “Advanced storage settings” under the “Storage management” section.
-
Click the “Disks & volumes” setting.

-
Click on the hard drive with the partition to mount.
-
Click the Properties button.

-
Click the Add button for the “Paths” settings.
-
Click the Browse button.
-
Open the empty folder to mount the drive.
Quick tip: Windows 11 offers multiple ways to create a new folder through File Explorer, Command Prompt, and PowerShell.
-
Click the Select Folder button.
-
Click the OK button.


From new drive without data
To mount a new partition as a folder from the Settings app, use these steps:
-
Open Settings.
-
Click on System.
-
Click the Storage page.
-
Click “Advanced storage settings” under the “Storage management” section.
-
Click the “Disks & volumes” setting.
-
Click on the hard drive with the partition to mount.
-
Choose the “Create Simple Volume” option for unallocated space.
-
(Optional) Choose the “None” option for the “Drive Letter” setting.
-
Select the appropriate settings for the new volume (as applicable).
-
Open the Advanced settings.
-
Click the Browse button.

-
Open the empty folder to mount the drive.
-
Click the Select Folder button.
-
Click the Format button.


Once you complete the steps, the storage will appear as another folder in File Explorer. Using this approach, you can still assign a drive letter to a partition, but it’s not required since you can access the storage from the mount point.
If you want to remove the folder mount point, open Settings > System > Storage > Disks & volumes, click “Properties” for the drive, click on the mount point, and click the “Remove” button.
How to mount a drive as a folder from Disk Management
The Disk Management tool is available for both Windows 11 and 10 (and even for older versions), and it allows you to mount a hard drive as a folder similar to the “Disks & volumes” settings.
From formatted drive with data
To mount a drive as a folder from the Disk Management tool, use these steps:
-
Open Start.
-
Search for Create and format hard disk and click on the top result to open the Disk Management tool.
-
Right-click the volume to mount as a folder and choose the “Change Drive Letter and Paths” option.

-
Select the current drive letter.
Quick note: The Disk Management tool doesn’t allow the mounting of a drive as a folder when a drive letter has already been assigned. As a result, you will have to remove the drive letter before mounting the storage as a folder.
-
Click the Remove button.
-
Click the Yes button.
-
Right-click the volume to mount as a folder and choose the “Change Drive Letter and Paths” option.
-
Click the Add button.
-
Choose the “Mount in the following empty NTFS folder” option.
-
Click the Browse button.
-
Select the empty folder to mount the drive.
-
Click the OK button.
-
Click the OK button again.


From new drive without data
To mount a new partition as a folder from the Disk Management app, use these steps:
-
Open Start.
-
Search for Create and format hard disk and click on the top result to open the Disk Management tool.
-
Right-click the Unallocated space for the drive to mount as a folder and choose the “New Simple Volume” option.
-
Click the Next button.
-
Choose the volume size in megabytes.

-
Click the Next button.
-
Choose the “Mount in the following empty NTFS folder” option.
-
Click the Browse button.
-
Select the empty folder to mount the drive.
-
Click the OK button.
-
Click the Next button.
-
Select the appropriate settings for the new volume (as applicable).
-
Click the Next button.
-
Click the Finish button.


After you complete the steps, the storage should now be accessible from the folder location you specified in the wizard.
If you want to remove the folder mount point, open Disk Management, right-click the volume to mount as a folder, choose the “Change Drive Letter and Paths” option, select the current folder mount point, and click the “Remove” button.
How to mount a drive as a folder from Command Prompt
On Windows 11, 10, and older versions, you can also use Command Prompt to mount a hard drive as a folder.
From formatted drive with data
To mount a drive as a folder from Command Prompt, use these steps:
-
Open Start.
-
Search for Command Prompt, right-click the top result, and select the Run as administrator option.
-
Type the following command to start diskpart and press Enter:
diskpart
-
Type the following command to view the available volumes and press Enter:
list volume
-
Type the following command to select the volume to mount as a folder and press Enter:
select volume 1
In the command, change “1” for the number of volumes to mount.
-
Type the following command to mount a hard drive as a folder and press Enter:
assign mount=C:\MyDriveFolder
In the command, change
C:\MyDriveFolderfor the path to the folder mount point.

If you want to remove the mount point to a folder, you can use the same instructions, but in step 6, run the remove mount=C:\MyDriveFolder command. You can also assign a new drive letter to the partition on Windows 11 if you want to access the storage.
From new drive without data
To mount a new partition as a folder from Command Prompt, use these steps:
-
Open Start.
-
Search for Command Prompt, right-click the top result, and select the Run as administrator option.
-
Type the following command to start diskpart and press Enter:
diskpart
-
Type the following command to view the available drives and press Enter:
list disk
-
Type the following command to select a disk and press Enter:
select disk 0
In the command, change “0” to the disk number you want to partition.
-
Type the following command to create a primary partition and press Enter:
create partition primary

-
(Optional) Type the following command to view the available volumes and press Enter:
list volume
-
Type the following command to format the partition with the NTFS file system and press Enter:
format fs=ntfs quick
-
Type the following command to mount a hard drive as a folder and press Enter:
assign mount=C:\MyDriveFolder
In the command, change
C:\MyDriveFolderfor the path to the folder mount point.


Once you complete the steps, the hard drive will be accessible from the folder mount point you assigned in Command Prompt.
If you want to remove the mount point to a folder, follow the “From formatted drive” instructions, but in step 6, run the remove mount=C:\MyDriveFolder command.
This process won’t delete the data already on the partition when assigning a mount point or changing the drive letter. However, it’ll break the connection to any app installation hosted in that particular storage, but usually, this is not the case as apps are typically installed on the main system hard drive.
Have you encountered a situation where while partitioning your hard disk drive, you have exhausted all drive letters from A – Z? You are probably baffled so as to where to go now, right? Well! You can mount a folder as a drive on your Windows 10 computer. Read the blog from start to end and we’ll tell you how you can use this neat trick to get out of the soup.
Also Read: How To Delete A Partition On Windows 10
Why Choose To Mount A Hard Drive As A NTFS Folder?

Let’s rephrase this question and put it this way, when would you need to mount a folder as a drive on Windows 10. In a situation when you have exhausted all the drive letters from A-Z and see the Assign the following drive letter path disabled, you can mount the folder as a drive.
That’s not the only situation where you may want to mount a hard drive as an NTFS folder. Even if you can assign drive letters, you might just not want to end up creating so many drive letters. After all, scouring data from so many drives can be painfully tough. That’s when you go with the second option Mount in the following empty NTFS folder. We’ll talk about how you can reach these options in a little while.
How To Mount Folder As Drive In Windows 10 –
1. Open File Explorer and search for the folder location where you want to mount the drive
2. Click on the New Folder under File
3. Rename the folder e.g. Storage (you can rename the folder with the name of your choice) and click it open
4. When inside this newly created folder, again click on the New Folder under File and rename it as TempStorage (you can rename the folder with the name of your choice)
5. Now, right-click on Start and select Disk Management

6. Right-click on the drive that you wish to mount and then choose Change Drive Letter and Paths.

7. Click on Add
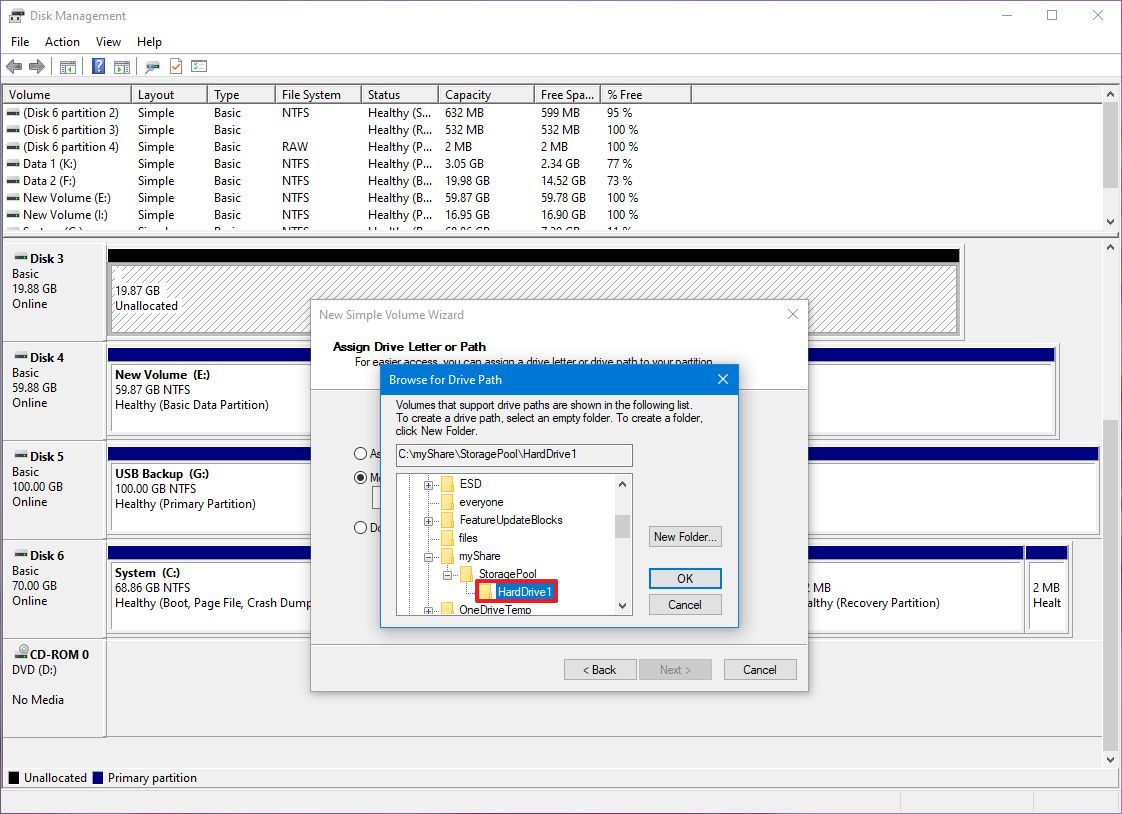
8. Click the Mount in the following empty NTFS folder and then click on the Browse button that you will find next to the empty area

9. Select the folder you created back in step no.4 i.e. TempStorage and click on OK. Click on the OK button once again
What If I Want To Access The Newly Created Secondary Hard Drive From The Folder Itself?
Here are the steps to do that –
1. Again right-click on the drive and then click on Change Drive Letter and Paths
2. Select the current drive letter and not the mount-point
3. Click on the Remove button and then click on the Yes option
But, What If Someone Accidently (Or Knowingly) Deletes This Newly Created Folder?
Now, let’s consider a scenario. Let’s say, someone knowingly or unknowingly deletes this newly created folder. Are you now going to lose all your data – the various folders and subfolders? Needn’t sweat! The actual data is still safe on the physical drive and this newly created folder was just a path.
Food for thought – When you mount a folder as a drive, isn’t that a way to guard your data?
Writer’s Tip –
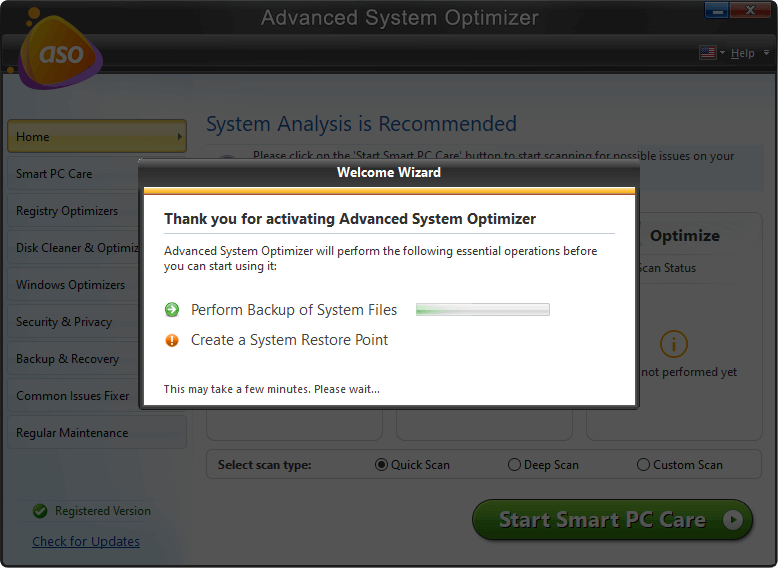
To optimize and clean your disk drivers, here’s how you can use Advanced Disk Optimizer for your maximum advantage –
Click Here to Download Advanced System Optimizer
1. Download and install Advanced System Optimizer
2. From the left-hand side click on Disk Cleaner & Optimizers
3. To check your disk drives or file system for issues you can click on the Disk Tools and then choose the problematic drive, which will then be analyzed for problems
4. For clearing fragments and improve the efficiency of your disk drives, you can click on the Disk Optimizer
Price: US$ 49.95
Compatibility: Windows 10/8.1/8/7 (32 and 64 bit)
Wrapping Up
Creating partitions on a hard disk drive can be beneficial when you want to organize data more efficiently or when you want to extend your existing storage. But, with the time you may want to switch to a better option, and mounting a drive as a folder can just be what you are looking for.
And, with the help of this blog, we’ve done that. If the blog’s been of help, do give it a thumbs up and share it with others. You can also subscribe to our YouTube channel where we frequently post interesting, interactive, and exhaustive videos on everything tech under the sun.
Next Read:
Disk Analyzer Pro- A Tool To Keep Your Hard Drive Organized
How Safe is to Recover Deleted Files in Windows 10 Hard Drive?