
Tests the accessibility of
WMI counters
WMI stands for «Windows Management Instrumentation» and is the technology
from Microsoft for monitoring and management of Windows based systems.
WMI works like a database and offers a variety of useful monitoring values of computers running Microsoft Windows. Products like Paessler’s PRTG Network Monitor make use of the WMI functionality to monitor computers in network environments. WMI allows a process to read out data for many Windows configuration parameters as well as current system status values. Access can take place locally or remotely via a network connection. WMI is based on COM and DCOM and is integrated in Windows 2000, XP, 2003, Vista and later.
As WMI access over a network is not quite trivial, the Paessler WMI Tester is a tool for testing the accessibility of WMI in a quick and easy-to-use way.
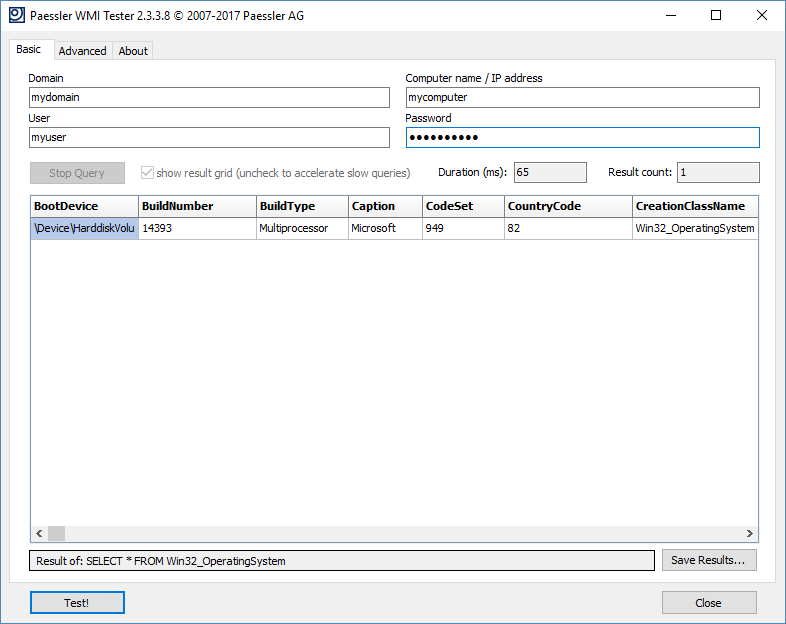
WMI Tester main screen
Basic Usage
After starting Paessler WMI Tester you can enter the following data:
- Domain: the Windows domain in which the computer you want to test is in. Leave empty when testing your own machine or a domainless machine (i.e. a standalone computer or a computer in a workgroup).
- Host: the name of the computer you want to test. Leave empty when testing your own machine.
- User: the name of the user that is allowed to log in on the machine you want to test. You MUST leave this empty when testing your own machine.
- Password: the password of the user. You MUST leave this empty when testing your own machine.
Now click the “Test!” button. After a short time you will either see a result table showing information about the Windows system on the machine or an error message if something went wrong.
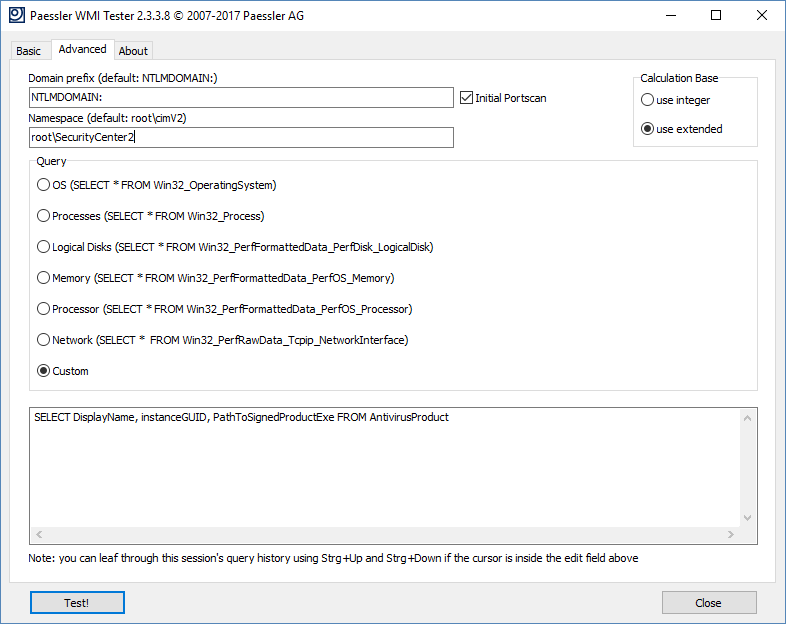
WMI Tester advanced tab
Advanced Usage
On this tab you can enter:
- Domain prefix: will be added internally to the Host name (usually you can leave this at NTLMDOMAIN)
- Namespace: the name space the WMI query will use, standard is root\CIMV2
- Query: choose between six predefined query sets (operating system, processes, logical disks, memory, processor, network) or enter your own query (if you know how WMI works!)
iThis Freeware program is provided free for Paessler customers, mainly as an add-on for PRTG Network Monitor. Please understand that we can not provide technical support for this program.
History
- V2.3.3.8 (September 5th 2017): Maintenance release
- V2.3.3.7 (January 12th 2017): Maintenance release
- V2.3.2.7 (May 4th 2016): Maintenance release
- V2.3 (February 5th 2013): Updated contact data
- V2.1 (December 21st 2009): Updated
- V2.0.1 (December 2008): Updated
- V1.1.2 (October 10th 2007): Initial Release
wbemtest.exe: Windows Management Instrumentation Tester
Overview
wbemtest.exe, also known as the Windows Management Instrumentation Tester, is a powerful built-in utility in Windows operating systems. It provides a graphical user interface (GUI) for interacting with the WMI (Windows Management Instrumentation) infrastructure. WMI is a core management technology that allows administrators and developers to monitor and control managed resources on local or remote computers. wbemtest.exe is not a virus, and it is a legitimate component of Windows. However, like any powerful tool, it could be used maliciously if an attacker gains access to a system.
Origin and Purpose
wbemtest.exe is developed by Microsoft and is included as part of the standard Windows installation. Its primary purpose is to provide a user-friendly way to:
- Explore the WMI Namespace: Browse the hierarchical structure of WMI classes and instances.
- Execute WMI Queries (WQL): Run queries using the WMI Query Language (WQL), which is similar to SQL, to retrieve information about the system.
- Modify WMI Objects: Create, modify, and delete WMI instances (with appropriate permissions).
- Test WMI Providers: Verify the functionality of WMI providers, which are components that expose managed resources to WMI.
- Register for Event Notifications: Subscribe to WMI events to monitor changes in the system.
- Run Methods: Execute methods exposed by WMI classes.
- Connect to remote system: Test WMI connection and query from remote computers.
In essence, wbemtest.exe is a versatile tool for troubleshooting, scripting, and system administration tasks related to WMI.
Security Implications
Is it a virus?
No, wbemtest.exe is not a virus. It’s a legitimate Microsoft tool.
Can it be misused?
Yes. While wbemtest.exe itself is not malicious, its capabilities can be leveraged by attackers who have gained access to a system (e.g., through social engineering, phishing, or exploiting vulnerabilities). An attacker with sufficient privileges could use wbemtest.exe to:
- Gather System Information: Reconnaissance to identify system details, installed software, user accounts, network configuration, etc.
- Modify System Settings: Alter configurations, disable security features, or create backdoors.
- Execute Malicious Code: Indirectly, by manipulating WMI objects or triggering events that lead to code execution.
- Move Laterally: Connect to other systems on the network using WMI and repeat the above.
Therefore, while wbemtest.exe is a legitimate tool, its presence and usage should be monitored, especially in sensitive environments. It’s crucial to ensure that only authorized users with appropriate permissions can access and utilize it.
Usage Guide
Here’s a detailed guide on how to use wbemtest.exe:
-
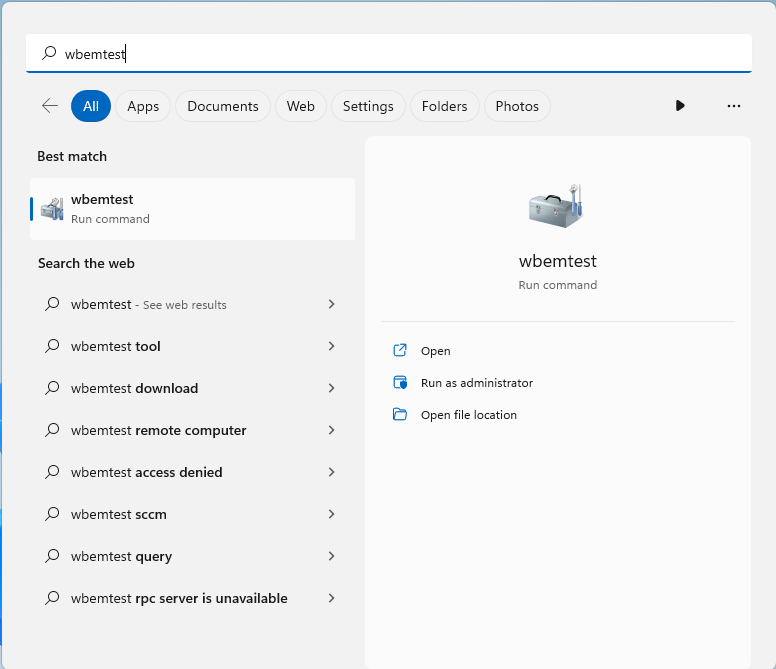
Launching wbemtest.exe:
- Press
Win + Rto open the Run dialog. - Type
wbemtestand press Enter.
- Press
-
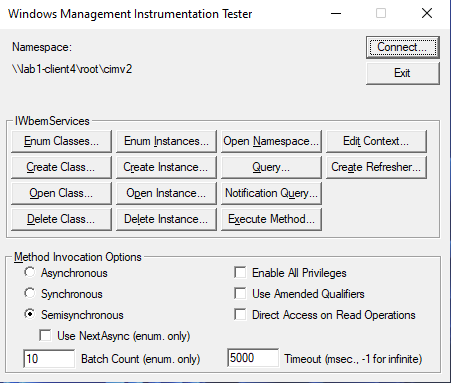
The Main Interface:
The main window presents several buttons and options. The most important ones are:
- Connect…: This is the starting point. It allows you to connect to a WMI namespace, either on the local machine or a remote computer.
- Enum Classes…: Enumerates (lists) WMI classes within a specified namespace.
- Enum Instances…: Enumerates instances of a specific WMI class.
- Exec Query…: Executes a WQL query.
- Open Class…: Opens a specific WMI class by name.
- Open Instance…: Opens a specific instance of a WMI class.
- Create Class…: Creates a new WMI class (requires appropriate permissions).
- Delete Class…: Deletes a WMI class (requires appropriate permissions).
- Notification Query…: Registers for event notifications based on a WQL query.
- Exec Method…: Executes a method of a WMI class instance.
-
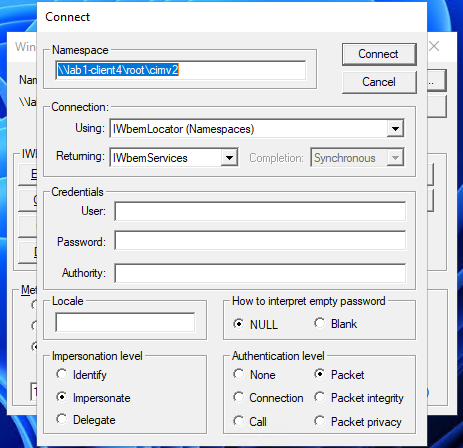
Connecting to a Namespace:
- Click Connect….
- The «Connect» dialog appears.
- Namespace: The default namespace is usually
root\cimv2, which contains most of the core system information. You can connect to other namespaces, such asroot\subscription(for event subscriptions) or namespaces provided by specific applications. You can also connect to remote computers. Input\\computer_name\root\cimv2, replacingcomputer_namewith the target computer’s name or IP address. - Credentials: By default,
wbemtest.exeuses your current user credentials. You can specify different credentials by clicking «Change…» This is essential for connecting to remote machines or accessing namespaces that require elevated privileges. Use domain account if connect to a remote computer in a domain. - Options: The advanced options, including Authority(like Kerberos, NTLM)
- Click Connect.
-
Enumerating Classes:
- After connecting to a namespace, click Enum Classes….
- The «Superclass Info» dialog appears.
- Enter superclass name: Leave this blank to enumerate all root-level classes in the namespace. You can enter a specific class name to enumerate its subclasses.
- Recursive: Select this to enumerate all classes recursively, including all subclasses of subclasses.
- Immediate Only: Select this to enumerate only the immediate subclasses of the specified superclass (or root classes if no superclass is specified).
- Click OK.
- A «Query Result» window will display the enumerated classes. Double-clicking a class in the list will open it.
-
Enumerating Instances:
- Click Enum Instances….
- The «Class Object» dialog appears.
- Enter superclass name: Enter the name of the WMI class whose instances you want to enumerate (e.g.,
Win32_Process,Win32_LogicalDisk,Win32_OperatingSystem). - Click OK.
- A «Query Result» window will display the instances. Double-clicking an instance will open it, showing its properties and values.
-
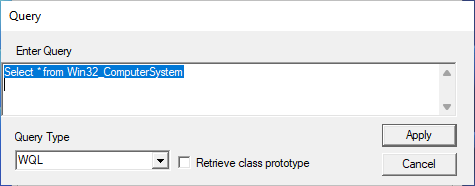
Executing Queries (WQL):
- Click Exec Query….
- The «Query» dialog appears.
- Query Language: Usually WQL.
- Query: Enter your WQL query. Examples:
SELECT * FROM Win32_Process: Retrieves all properties of all running processes.SELECT Name, ProcessId FROM Win32_Process: Retrieves only the Name and ProcessId properties.SELECT * FROM Win32_LogicalDisk WHERE DeviceID = "C:": Retrieves information about the C: drive.SELECT * FROM Win32_NetworkAdapterConfiguration WHERE IPEnabled = True: Retrieves information about enabled network adapters.
- Click Apply.
- A «Query Result» window will display the results. Double-clicking an instance will open it.
-
Notification Queries (Event Subscriptions):
- Click Notification Query…
- The «Query» dialog appears.
- Query Language: Usually WQL.
- Query: Input WQL for events. Examples:
SELECT * FROM __InstanceModificationEvent WITHIN 5 WHERE TargetInstance ISA 'Win32_Process' AND TargetInstance.Name = 'notepad.exe': Notify if notepad.exe has any modification within 5 seconds.SELECT * FROM __InstanceCreationEvent WITHIN 10 WHERE TargetInstance ISA 'Win32_Process': Notify within 10 seconds if any process created.SELECT * FROM __InstanceDeletionEvent WITHIN 1 WHERE TargetInstance ISA 'Win32_Service' AND TargetInstance.Name = 'Spooler': Notify if printer service(Spooler) is stopped.
- Click Apply.
wbemtestwill wait for events. A new window will pop up if events happen.
-
Executing Methods:
- First, you need to open a class instance (e.g., by using «Enum Instances…» or «Exec Query…»).
- In the instance view, double-click a method in the «Methods» section (it will have a small icon next to it). Not all classes have methods.
- The «Method Parameters» dialog appears.
- In Parameters: If the method requires input parameters, you’ll need to provide them. This often involves creating an instance of a parameter class and setting its properties.
- Out Parameters: The method may return output parameters. After execution, you can view these values.
- Click Execute!.
- The «Method Result» dialog will show the outcome of the method execution, including any return values or error codes.
-
Saving MOF(Managed Object Format):
When opening a class or instance, you can clickSave Objectto save class/instance data as MOF file.
Example Scenarios
- Troubleshooting High CPU Usage: Use
SELECT * FROM Win32_Processto identify processes consuming excessive CPU resources. - Checking Disk Space: Use
SELECT * FROM Win32_LogicalDisk WHERE DriveType = 3to get information about local hard drives, including free space. - Monitoring Service Status: Use a notification query like
SELECT * FROM __InstanceModificationEvent WITHIN 1 WHERE TargetInstance ISA 'Win32_Service'to monitor changes in service states. - Retrieving System Information: Use
SELECT * FROM Win32_OperatingSystemto get detailed information about the operating system. - Listing installed software: Use
SELECT * from Win32_Productto get information about the installed software.
Conclusion
wbemtest.exe is an essential tool for anyone working with WMI. Its intuitive interface and powerful capabilities make it indispensable for system administrators, developers, and security professionals. Understanding its features and potential for misuse is critical for maintaining a secure and well-managed Windows environment. While it is not a virus, it can be a powerful tool in the wrong hands, so its use should be carefully considered and monitored.
Интерактивная работа с объектами WMI
При изучении WMI очень полезно с помощью графических утилит просматривать иерархическую структуру классов и связи между различными объектами CIM. Для просмотра объектной модели WMI можно воспользоваться специальный тестер WMI (стандартная программа в операционных системах Windows 2000/XP) или утилитами из разработанного Microsoft дополнительного пакета WMI Tools.
Тестер WMI (WBEMTest)
Тестер WMI (wbemtest.exe) — это графическая утилита, с помощью которой можно взаимодействовать с инфраструктурой WMI на локальном или удаленном компьютере. С помощью тестера WMI можно решать следующие задачи:
- подсоединяться к определенному пространству имен CIM;
- создавать и удалять классы и экземпляры классов;
- получать список имеющихся классов и экземпляров классов CIM;
- просматривать и изменять свойства и квалификаторы классов или экземпляров классов;
- выполнять методы классов и экземпляров классов;
- составлять и выполнять запросы на языке WQL;
- выводить код MOF для классов и экземпляров управляемых ресурсов.
Исполняемый файл wbemtest.exe является стандартным компонентом WMI в любой операционной системе; устанавливается он в каталог %SystemRoot%\System32\Wbem. После запуска этого файла появляется диалоговое окно Тестер инструментария управления Windows (Windows Management Instrumentation Tester), с помощью которого можно получить доступ ко всем функциям тестера WMI (рис. 11.6).
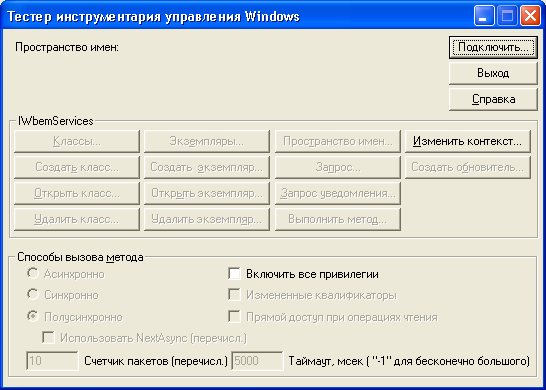
Рис.
11.6.
Тестер WMI
Сразу после запуска большинство кнопок этого диалогового окна недоступны — ими можно будет воспользоваться только после подключения к подсистеме WMI. До подключения можно установить флажок Включить все привилегии (Enable all privileges), что позволит средствами WMI выполнять операции, для которых необходимы специальные привилегии в операционных системах Windows NT/2000/XP (например, перезагрузку компьютера).
Отметим, что работа с тестером WMI предполагает хорошее знание структуры CIM и умение составлять запросы на языке WQL. Для первоначального ознакомления и изучения структуры объектной модели WMI лучше воспользоваться пакетом WMI Tools.
Административные утилиты WMI (WMI Tools)
В состав разработанных Microsoft административных утилит WMI входят несколько приложений, имеющих сходный интерфейс.
- WMI CIM Studio. Это наиболее универсальное приложение, которое может быть использовано для просмотра и редактирования в репозитории CIM классов и их экземпляров. С помощью WMI CIM Studio можно также выполнять методы классов и объектов, просматривать ассоциации между различными классами, выполнять запросы на языке WQL, генерировать и компилировать файлы MOF для классов и объектов. Короче говоря, утилита WMI CIM Studio обладает практически теми же возможностями, что и тестер WMI (wbemtest.exe), однако имеет гораздо более удобный интуитивный интерфейс. Как и работа с тестером WMI, использование WMI CIM Studio предполагает довольно хорошее знание структуры репозитория CIM и названий нужных классов.
- WMI Object Browser. Эта утилита предназначена для просмотра и редактирования объектов (экземпляров классов) в репозитории CIM, а также для вызовов их методов. Особенностью WMI Object Browser является то, что информация об объектах представлена в виде иерархического дерева, где в качестве корневого объекта может использоваться произвольный экземпляр выбранного нами класса. Само дерево объектов строится с помощью ассоциированных классов, что помогает извлекать информацию об управляемых ресурсах, не обладая глубокими знаниями о структуре репозитория CIM и используемых классах.
- WMI Event Registration Tool. Данная утилита предоставляет графический интерфейс для регистрации и конфигурирования постоянных потребителей событий WMI. Здесь можно создавать или изменять фильтры событий, определять постоянных потребителей и устанавливать связи между ними и фильтрами событий.
- WMI Event Viewer. Это вспомогательное приложение является постоянным потребителем событий, позволяющим сортировать и просматривать подробную информацию о полученных событиях.
Если эти утилиты нужно установить в Windows 2000/XP/Server 2003, то инсталляционный файл WMITools.exe можно свободно скачать с сервера Microsoft (http://download.microsoft.com/download/.NetStandardServer/Install/V1.1/NT5XP/EN-US/WMITools.exe).
В случае же Windows 9x/NT 4.0 необходимо установить комплект инструментальных средств разработки SDK WMI, в состав которого также входят все описанные утилиты. Инсталляционный файл wmisdk.exe можно свободно скачать с сервера Microsoft (http://download.microsoft.com/download/platformsdk/x86wmi/1.1/W9XNT4/ EN-US/wmisdk.exe).
Административные утилиты WMI реализованы в виде элементов ActiveX, которые встроены в страницы HTML, поэтому для их корректной работы необходимо, чтобы в системе был установлен браузер Microsoft Internet Explorer 5.0/6.0. Кроме этого, пользователь, который производит установку утилит WMI на компьютер, должен обладать правами администратора.
Подключение к пространству имен WMI
Для запуска любой из трех основных административных утилит WMI (WMI CIM Studio, WMI Object Browser или WMI Event Registration Tool) нужно выбрать соответствующий одноименный пункт в меню Пуск | Программы | WMI Tools (Start | Programs | WMI Tools). Первым шагом после запуска во всех этих утилитах является подключение к какому-либо пространству имен на локальном или удаленном компьютере с помощью диалогового окна Connect to namespace (рис. 11.7).
Рис.
11.7.
Ввод пространства имен WMI для подключения
По умолчанию в этом окне предлагается подключиться к пространству имен CIMV2 на локальном компьютере (root\CIMV2). Путь к нужному пространству имен на локальном или удаленном компьютере можно либо написать вручную, либо выбрать это пространство с помощью кнопки Browse For Namespace.
Если компьютер, к которому предполагается подключиться, доступен в сети, то его можно найти и выбрать с помощью кнопки Network Neighborhood.
После ввода в поле Machine Name имени нужного компьютера, следует выбрать интересующее нас пространство имен из списка. Для этого нужно в поле Starting Namespace написать название корневого пространства имен (обычно это Root) и нажать на кнопку Connect. В результате на экран выводится диалоговое окно Login (в заголовке этого окна отображается также название запущенного приложения), в котором можно указать имя пользователя и пароль для учетной записи, от имени которой происходит подключение к пространству имен (рис. 11.8).
Рис.
11.8.
Диалоговое окно WMI CIM Studio Login
Напомним, что к пространству имен на локальном компьютере может получить доступ только текущий пользователь, поэтому в случае локальной машины флажок Login as current user установлен, а поля Username, Password и Authority недоступны для редактирования. К пространству имен на удаленной машине можно подключаться как от имени текущего пользователя (для этого следует установить флажок Login as current user), так и от имени другого пользователя (в этом случае нужно снять флажок Login as current user и внести в поля Username и Password имя пользователя в виде domain\user и пароль соответственно).
Также в окне Login с помощью кнопки Options>> можно настроить дополнительные параметры подключения к инфраструктуре WMI (задать уровни олицетворения и проверки подлинности протокола DCOM, а также указать требуемые привилегии операционной системы).
После нажатия кнопки OK в окне Login и подключения к структуре WMI на нужном компьютере, в окне Browse For Namespace появится иерархический список всех классов из репозитория CIM на этом компьютере (рис. 11.9).
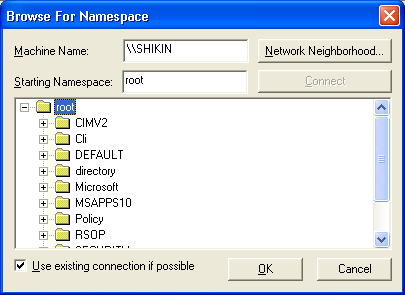
Рис.
11.9.
Выбор нужного пространства имен из списка
Выбрав требуемое пространство имен из списка и нажав кнопку OK, мы вновь попадаем в диалоговое окно Login (см. рис. 11.8), где нужно ввести необходимую информацию и нажать кнопку OK.
Замечание
Независимо от способа подключения пользователь должен иметь доступ к выбранному пространству имен WMI.
Для изучения структуры классов WMI можно воспользоваться утилитой WMI CIM Studio или WMI Object Browser.
WMI CIM Studio
Утилита WMI CIM Studio является универсальным инструментом при работе со схемой CIM, которая позволяет:
- осуществлять навигацию по иерархическому дереву классов CIM;
- формировать список всех экземпляров определенного класса;
- добавлять новые и удалять существующие классы или экземпляры классов (объекты);
- просматривать и изменять (если это возможно) свойства, методы, квалификаторы и ассоциации классов или объектов;
- выполнять методы классов или объектов;
- генерировать для класса или объекта его описание на языке MOF и компилировать имеющийся MOF-файл в репозиторий CIM.
Приложение WMI CIM Studio реализовано в виде двух окон, которые открываются в браузере Internet Explorer (рис. 11.10).
Левое окно называется проводником классов (Class Explorer), а правое — просмотрщиком классов (Class Viewer). Выбрав класс в левом окне, можно просмотреть информацию о нем в правом окне.
WMI Object Browser
Утилита WMI Object Browser позволяет осуществлять навигацию по иерархическому дереву объектов WMI, просматривать и редактировать (если это возможно) свойства, методы, квалификаторы и ассоциации экземпляров классов, а также выполнять методы этих экземпляров. Главное отличие WMI Object Browser от WMI CIM Studio состоит в том, что в WMI CIM Studio мы пользуемся списком классов CIM в выбранном пространстве имен WMI, а в WMI Object Browser на экран выводится дерево объектов, причем в качестве корневого объекта здесь может использоваться произвольный экземпляр выбранного нами класса, а само дерево объектов строится с помощью ассоциативных классов (рис. 11.11).
Можно сказать, что утилита WMI Object Browser разработана, в большей мере, для применения системными администраторами, которые могут не иметь детального представления о назначении конкретных классов WMI и о структуре CIM вообще. Здесь вся информация (схема), которая содержится в репозитории CIM, представлена в более понятном и наглядном виде, чем в WMI CIM Studio. Например, по умолчанию корневым объектом в пространстве имен CIMV2 на локальном или удаленном компьютере является экземпляр класса Win32_ComputerSystem, у которого значение свойства Name совпадает с именем этого компьютера. Поэтому в корне дерева стоит объект с именем компьютера, а ниже в иерархическом порядке располагаются все его зависимые объекты (логические и физические компоненты этого компьютере).
Таким образом, даже человеку, который не владеет глубокими знаниями о схеме классов WMI, в WMI Object Browser наглядно видно представление компьютера в качестве дерева его составных частей, причем каждую часть здесь можно детально изучить и произвести с ней необходимые манипуляции, не прибегая к помощи никаких дополнительных программных средств.
Напомним, что для запуска WMI Object Browser, как и других административных утилит WMI, нужно выбрать одноименный пункт в меню Пуск | Программы | WMI Tools (Start | Programs | WMI Tools), после чего производится подключение к нужному пространству имен на локальном или удаленном компьютере.
Внешне утилита WMI Object Browser очень похожа на WMI CIM Studio, здесь также имеются два окна, которые открываются в браузере Internet Explorer (см. рис. 11.11). Левое окно называется проводником объектов (Object Explorer), а правое — просмотрщиком объектов (Object Viewer). Выбрав объект в левом окне, можно просмотреть информацию о нем в правом окне.
What is WBEMtest?
WBEMtest is a Windows Management Instrumentation Tester tool built into all Windows NT based operating systems. It provides a graphical interface to WMI and its capable of performing the following tasks:
- Enumerate, open, create, and delete WMI classes.
- Enumerate, open, create, and delete WMI instances.
- Query WMI data using a SQL like syntax (WQL).
- Execute methods declared on instances or classes.
- Remote access to WMI providers.
What is WMI? Without getting too far off the topic of this blog, Windows Management Instrumentation (WMI) is a Microsoft implementation of Web-Based Enterprise Management (WBEM). WBEM is an industry standard for accessing and managing information in an enterprise environment. WMI relies on Windows Remote Management (WinRM) or DCOM to create WMI connections. Having a working understanding of WMI in important to understand the function of WBEMtest. You can read more about WMI and its architecture here.
What are the WBEMtest use cases?
WBEMtest can be used in a wide variety of WMI interactions. Many modern applications, including Microsoft Endpoint Configuration Manager, rely on the Windows Management Instrumentation (WMI) for essential functions. WBEMtest can be a useful tool in the troubleshooting/debugging of those applications such as ensuring the health of the WMI provider/repository, validate correct access permissions on namespaces or instance data, and testing WMI connectivity. Other use cases include:
- Querying application-specific namespaces to verify data stored within the repository.
- Manually invoke application-specific methods declared on classes or instance data.
- Test for or gather more detailed information for error messages emitted from the WMI provider.
- Explore WMI namespaces to understand schemas defined by an application in the repository.
- Build useful WMI queries.
- Ensuring the Windows Management Instrumentation Windows Service is running on the local or remote computer.
- Ensuring the correct firewall rules are enabled for remote WMI connection.
How to use WBEMtest?
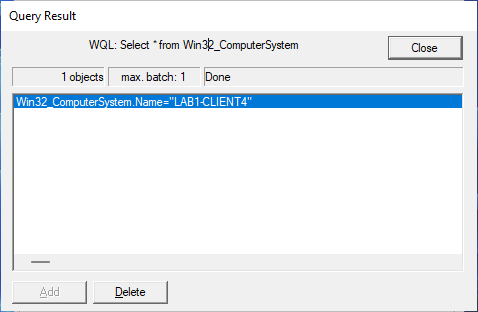
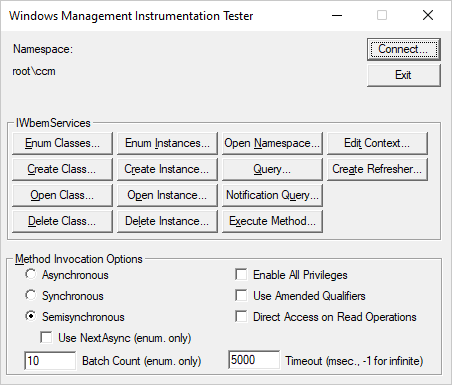
Since WBEMtest is part of the Windows family of operating systems it can be started by simply typing ‘WEBMtest’ into the start menu or into Run. If a remote host is unavailable, you will receive an error message with specific details about the error. This is useful when trying to troubleshoot a potentially broken provider. In this example, we will use WBEMtest to execute a WQL query on a remote host in the rootcimv2 namespace.
- Type ‘wbemtest’ into the start menu to launch WBEMtest.

- Fill in the namespace field with the host and namespace and click ‘Connect…’ to connect to the local computer or remote host. Here you can optionally input user credentials.

- All UI controls should become active. From here you can enumerate classes and instances, perform Create or Delete operations, query using WQL, execute methods, or invoke a number of other functions. Click on the ‘Query…’ button to enter a WMI query.

- Run an example query from cimv2 to enumerate instance data and click ‘Apply’. The query syntax is WQL (Windows Management Instrumentation Query Language) and is very similar to SQL queries.


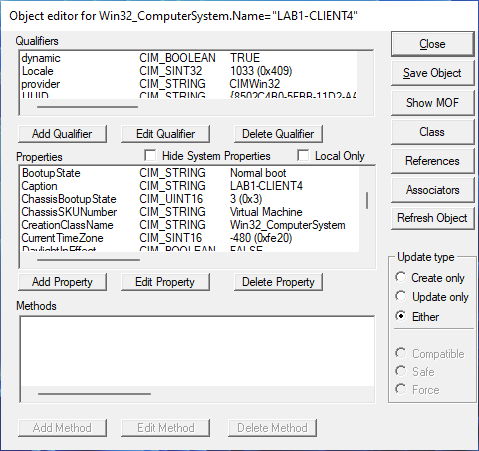
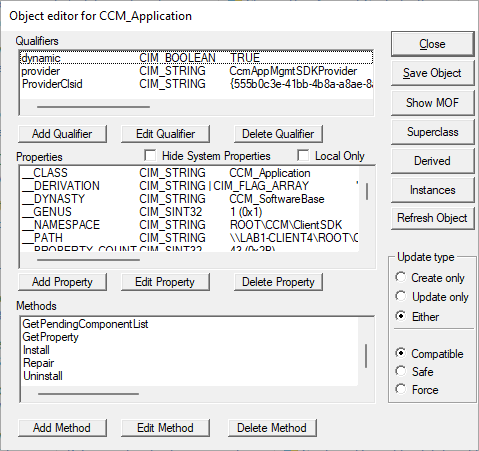
The object editor is a powerful tool that allows you to edit the schema and instance data. It is a common window to see throughout WBEMtest. You’ll want to exercise caution here as making edits can potentially break applications which rely on it. Also note you can Add/Edit/Delete method declarations in a schema.
How can WBEMtest help troubleshoot Microsoft Endpoint Configuration Manager?
The cool thing with WBEMtest is that it can be used to troubleshoot, view, or execute on data that exists within the site server or its clients. Site server data will be housed in ROOTSMS or client data in ROOTccm. Using WBEMtest to verify connection to either of these WMI namespaces provides useful information during troubleshooting issues with a site server or client. I’ve frequently used WBEMtest to test WMI connectivity to a client using the site server account or the client installation account. I’ll go over a couple of examples of its usefulness in managing Configuration Manager clients.
Example 1 – Get a list of deployed applications
Suppose you’ve deployed a new application, and you suspect a client has not received the advertisement for some reason. You can use WBEMtest to connect to the remote computer to verify if CCM client has received the new deployment.
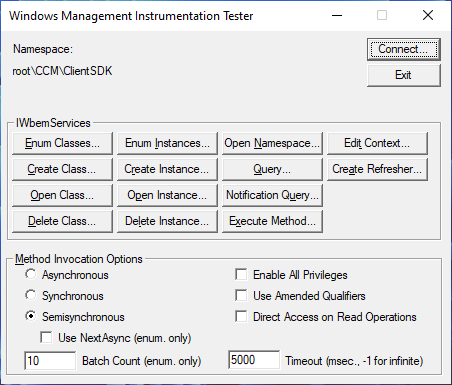
- Use the steps above to connect to the remote machine under the ‘rootCCMClientSDK’ namespace.

- Next, we will want to enumerate instances of the class CCM_Application. Click on the ‘Enum Instances…’ button and enter CCM_Application as the superclass name.
- In this example there are two applications that are deployed to this machine. They show up as separate instances of the CCM_Application class. You can double-click an instance to bring up the application deployment metadata via the object editor.
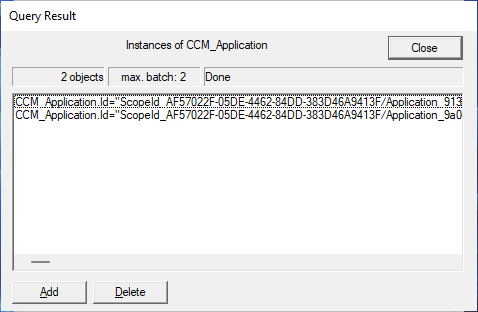
If an application is missing from this list which you know you have deployed to this client, then we know a potential problem may exist. The client may have simply not yet invoked an application deployment evaluation cycle, the client may be unhealthy, or another underlying problem may exist. Alternately, if you wish to perform some action on an application deployment, there are a number of methods attached to CCM_Application which can be invoked.
Example 2 – Run a CCM client action
So now you’ve determined the first step would be to force refresh the machine policy and run an application deployment policy. While it is true you can do this on a client from the Configuration Manager console, we want to invoke it from WMI using WBEMtest! All the actions that exist within the CCM client ‘Actions’ tab are backed by a corresponding WMI method on the SMS_Client class instance. There are also several more actions that can be invoked outside of what is available in the CCM client ‘Actions’ tab or the context menu in Configuration Manager.
- Connect to a client with WBEMtest using the steps above. Connect to the ‘rootccm’ namespace.
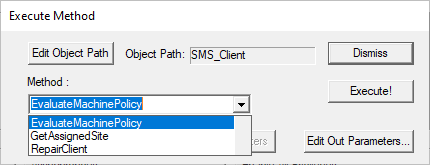
- Click on ‘Execute Method..’, enter in the class name ‘SMS_Client’ and click ‘OK’.
- A number of methods are selectable and executable from the drop-down list. Select EvaluateMachinePolicy and click ‘Execute’.

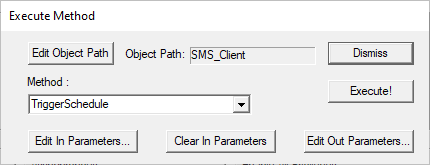
The most versatile method available in ‘SMS_Client’ is the ;riggerSchedule; method. It will allow you to invoke a number of client actions by passing a ScheduleId to the method as a parameter. A full list of ScheduleIds is available here. As an example, we will invoke an Application Deployment evaluation.
- Select the ‘TriggerSchedule’ method on SMS_Client. This method requires parameters.
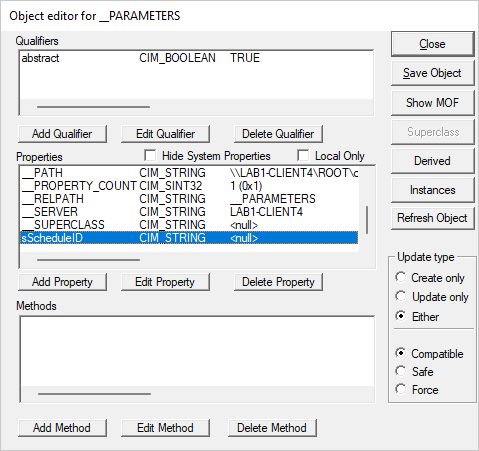
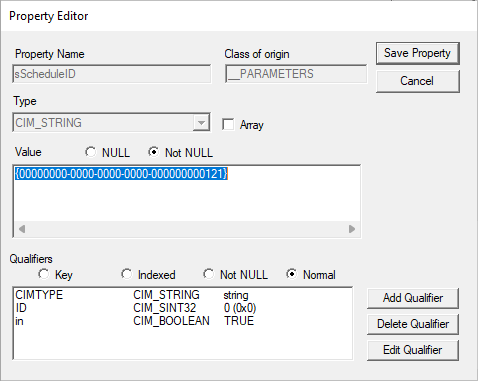
- Click on ‘Edit In Parameters…” to open the object editor. Find ‘sScheduleId’ property and click the ‘Edit Property’ button.
- Click the ‘Not NULL’ radio button and enter in the appropriate ScheduleId then click ‘Save Property’. This will take you back to the Object editor. Click the ‘Save Object’ button to save the parameter set.

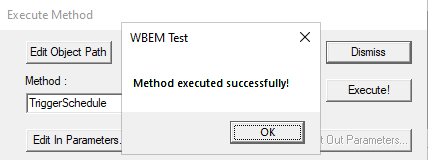
- Click the ‘Execute’ button on the ‘Execute Method’ window.

Summary
Hopefully this demonstrates how WBEMtest is a useful tool for troubleshooting, querying data, validating data, and executing actions. Best of all: it is built into every recent Microsoft operating system. For those who run Microsoft Endpoint Configuration Manager sites, this tool is highly valuable to troubleshoot or interact with site servers, components, and clients. There are many Configuration Manager actions/data that is exposed through WMI and tools to interact with it become invaluable to a Systems Administrator.

WBEMTEST – A Tool for Learning About WMI Objects
WBEMTEST is a built-in Windows program which will show you the WMI objects, classes and methods. My best advice is to start with ScriptomaticV2 rather than WBEMTEST. That said, although WBEMTEST is clunky, it does expose more details of each WMI property.
Topics for WBEMTEST
- Launching WBEMTEST
- The Secret to Getting Started with WBEMTEST
- WMI Tutorial Learning Points for WBEMTEST
- Scenario – When to use WBEMTEST
- Summary – WBEMTEST
Launching WBEMTEST
To launch WBEMTEST, all that you need to do is type the name WBEMTEST in the run dialog box.
This executable is available on Windows 2000 and later machines.
‘
The Secret to Getting Started with WBEMTEST
A reminder of our mission: To find the precise names of WMI objects and properties, which we will then use in the heart of our VBScripts. Once you have opened WBEMTEST, there are two crucial points in initializing this tool, knowing what to put in the Connect Namespace box, and finding the Recursive radio button.
I say again, mostly I favour Scriptomatic over WBEMTEST, however if you wish to run WBEMTEST, beware there is knack to getting started, look out for these three settings:.
1) Once you launch WBEMTEST, note that the Namespace says: root\default. We want to change this to CIMV2, so click on the Connect… Button. When a second dialog box appears, crucially, change root\default to root\cimv2, now click another Connect button.
2) Now about 15 buttons should come alive. Click on Enum Classes (Top left button see diagram).
3) Move the radio button to Recursive, and click OK. There is no need to type anything in the Enter superclass name, dialog box. I have to confess that when I am in a rush, instead of selecting Recursive, I click on OK the result is most disappointing. More haste – less speed. So remember Recursive.
You should have reached your goal and now you should see a display of all the CIM objects.
Guy Recommends: WMI Monitor and It’s Free!
Windows Management Instrumentation (WMI) is one of the hidden treasures of Microsoft’s operating systems. Fortunately, SolarWinds have created a Free WMI Monitor so that you can discover these gems of performance information, and thus improve your scripts.
Take the guess work out of which WMI counters to use when scripting the operating system, Active Directory or Exchange Server. Give this WMI monitor a try – it’s free.
Download your free copy of WMI Monitor
Tutorial Learning Points for WBEMTEST.
In many ways WBEMTEST reminds me of ADSI Edit, both tools expose not only the object structure and properties, but also the actual values.
Classes whose names begin with Win32_ are Microsoft extension classes. These represent Windows-specific managed resources. Scroll down the Query Result dialog until you reach the Win32_Process class, and double-click the class name to open the Object editor for Win32_Process dialog. The Object editor dialog reveals the properties and methods of the class that we just selected.
After you run your newly created GetProcesses.vbs script, you can verify the script’s results using WMI Tester. In the Object editor for Win32_Process dialog, click Instances. The resulting Query Result dialog lists the instances of the processes running on your computer. Double-click on a specific process instance to view the details for that instance.
Scenario – When to use WBEMTEST
If you need more detail than you see with Scriptomatic or your VBScript editor, then turn to WBEMTEST. By drilling down, you can see the properties, methods and even the values. This knowledge will give you ideas for scripts, moreover you will have the correct spelling of the names for your properties. When it comes to pure WMI research, it this extra properties detail that gives WBEMTEST the edge over Scriptomatic v2.
See how you could use WBEMTEST in PowerShell
Summary – WBEMTEST
WBEMTEST is built-in to Windows 2000 and later programs. There are three vital steps to get started. Connect to Root\cimv2, Enum Classes, and click on the Recursive button. Thereafter, you can study the huge amount of detail that WBEMTEST provides about your operating system’s objects and their properties.
If you like this page then please share it with your friends
See more VBScript WMI examples:
• WMI Tutorial • WMI Who Logged On • WMI WBEMTest • Free WMI Monitor • Free WMI Monitor
• WMI Secrets • VBScript Services • WMI Techniques • WMI Scriptomatic
• WMI Home • WMI Moniker • Import CSVDE – Free Utility • VBScript Echo • WMI VBScript