
Символическая ссылка (симлинк, символьная ссылка, Symbolic link) это специальный файл на файловой системе, которые сам не содержит данных, а является по сути ярлыком, указывающим на какой-то другой объект (файл или папку). При обращении к симлику операционная система считает, что это оригинальный файл (папка) и работает с ними совершенно прозрачно.
Символические ссылки используются в Windows довольно часто для системных файлов и каталогов. Пользователь может их применять, когда нужно перенести часть “тяжелых” файлов на другой диск, но чтобы Windows считала, что файлы все еще находятся в исходном каталоге (например в ситуациях, когда нужно экономить место на SSD, перенеся некоторые каталоги на более медленный и емкий SSD, не нарушая работоспособности программ). Можно использовать симлинки на SMB файловом сервере, когда каталоги с разных LUN должны быть доступны через одну точку входа.
В Windows есть три типа файловых ссылок для NTFS томов: жесткие, мягкие (симлинки), точки соединения (Junction point).
- Hard Links (жесткие ссылки) – могут указывать только на локальный файл, но не на папку. Такой файл – это ссылка на другой файла на этом же диске без фактического дублирования самого файла. У него отображается такой же размер и свойства, как у целевого файла (но реальное место на диске он не занимает);
- Junction Points (Directory Hard Link, точка соединения) – могут указывать только на папку (на этом же или на другом разделе);
- Symbolic Links (мягкая ссылка, симлинк) – могут указывать на локальный файл, папку и сетевой каталог на удаленном компьютере (UNC), поддерживаются относительные пути.
В подавляющем большинстве случаев вам будет достаточно функционала symbolic link, как наиболее универсального средства создания ссылки на любой объект.
Как создать символическую ссылку в Windows?
Для создания символических и жестких ссылок в Windows можно использовать встроенную утилиты mklink или PowerShell.
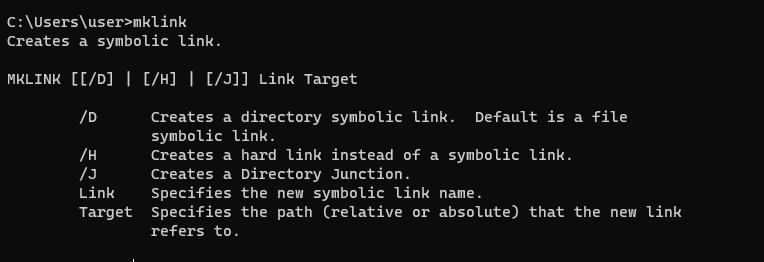
Синтаксис у утилиты
mklink
простой. Чтобы создать символическую ссылку на файл, нужно указать имя ссылки и целевой объект, на который она должна указывать. Можно указать тип ссылки:
/D
— символьная (мягкая) ссылка на каталог,
/H
— жесткая ссылка,
/J
– точка соединения (Junction point).
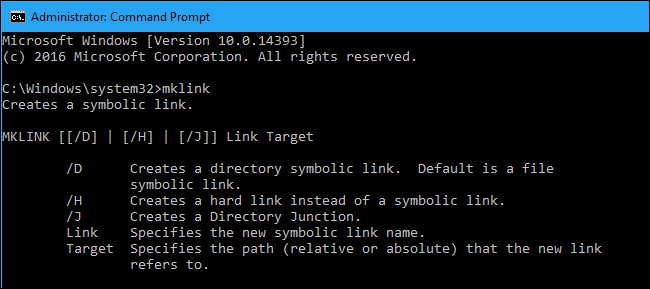
Чтобы использовать mklinkдля создания символических ссылок нужно запустить командную строку с правами администратора. Иначе при запуске команды появится ошибка “
You do not have sufficient privilege to perform this operation
”.
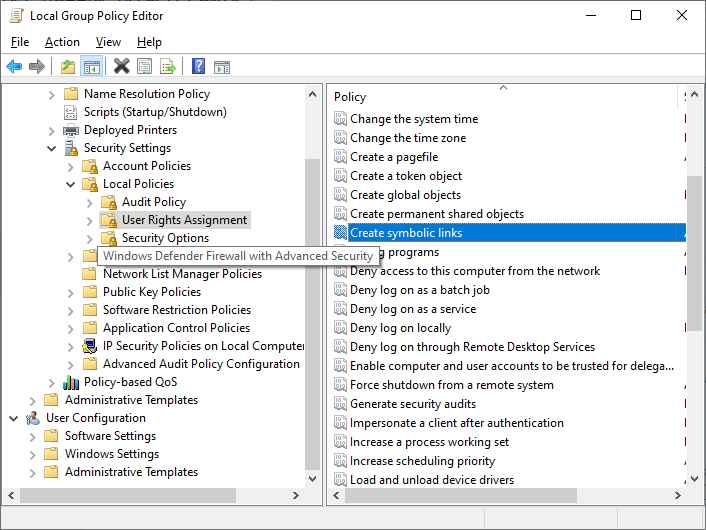
Если вам нужно разрешить создавать символические ссылки обычным пользователям, нужно добавить группу пользователей в параметр групповой политики Create Symbolic Links (Computer configuration -> Window Settings -> Security settings -> User Rights Assignment в редакторе GPO). По умолчанию в этой политике добавлена только локальная группа «Administrators». Обновите локальные политики после изменения параметра: gpupdate /force
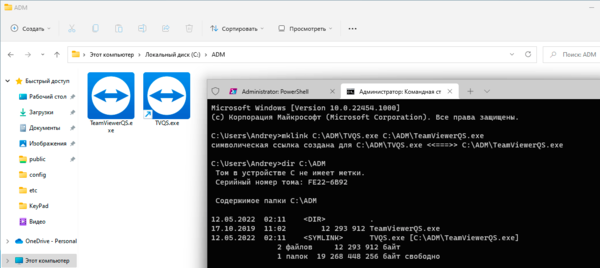
Создадим в каталоге C:\PS символическую ссылку на файл notepad.exe:
mklink C:\PS\note.exe c:\Windows\System32\notepad.exe
Должно появится сообщение:
symbolic link created for C:\PS\note.exe <<===>> c:\Windows\System32\notepad.exe
Теперь для запуска процесса notepad.exe можно использовать символическую ссылку note.exe.
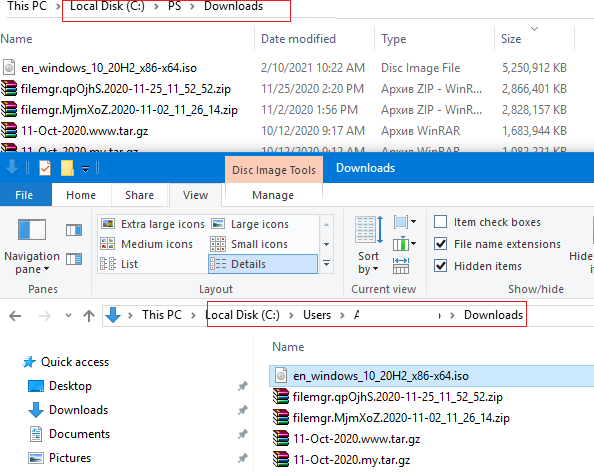
Теперь создадим в этом каталоге симлинк на другой каталог на этом же диcке:
mklink /D “C:\PS\Downloads” “C:\Users\user\Downloads”

Теперь при переходе в каталог C:\PS\Downloads вы будете видеть содержимое каталога, на который он ссылается.
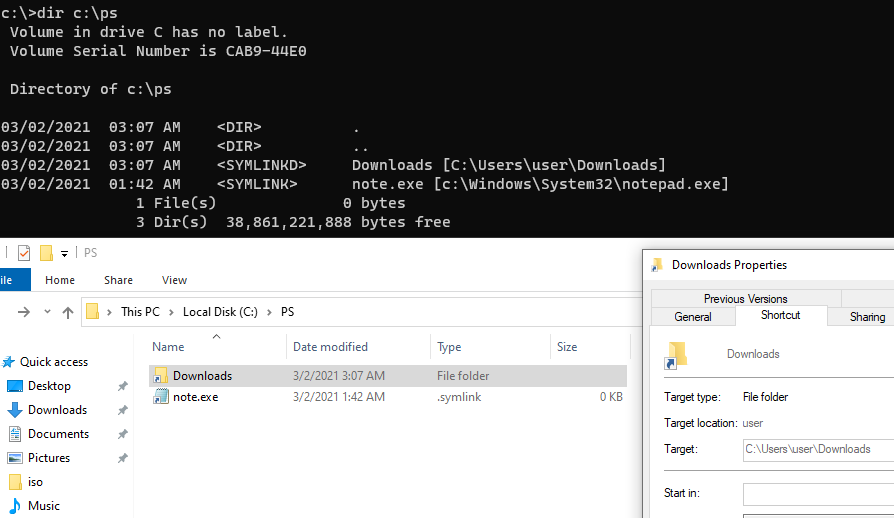
Выведем содержимое каталога C:\PS:
Dir c:\ps
Как вы видите, в атрибутах некоторых файлов указано, что это symlink/simlinkd. Также указан объект, на который они ссылаются. В Windows File Explorer симлинки отображаются с иконками ярлыков, а в их свойствах можно посмотреть целевой объект на который они ссылаются.
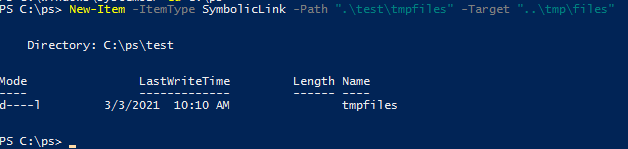
Также можно создать символически ссылки в Windows 10 с помощью PowerShell (в этом примере я использую относительные пути, чтобы создать символическую ссылку):
New-Item -ItemType SymbolicLink -Path ".\test\tmpfiles" -Target "..\tmp\files"
Можно создать символическую ссылку на сетевую папку на удаленном компьютере/сервере. Адрес сетевой папки нужно указывать в формате UNC. Следующий пример создаст симлинк на сетевой каталог на сервере:
mklink /D c:\ps\share \\mskfs01\Share
Например, подключим административную шару C$ с удаленного компьютера по IP адресу:
mklink /D c:\remotePC\server1 \\192.168.31.15\С$
Если при доступе к сетевой папке через симлинк, вы получили ошибку
The symbolic link cannot be followed because its type is disabled
проверьте разрешенные способы использования символических ссылок на вашем компьютере:
fsutil behavior query SymlinkEvaluation
Local to local symbolic links are enabled.
Local to remote symbolic links are enabled.
Remote to local symbolic links are disabled.
Remote to remote symbolic links are disabled.

Чтобы включить использование символических ссылок на удаленные ресурсы, выполните команды:
fsutil behavior set SymlinkEvaluation R2R:1
fsutil behavior set SymlinkEvaluation R2L:1
Вы можете работать с символическими ссылками, как с обычными объектами файловой системы, можно переименовать, переносить или удалить их. Система автоматически изменит настройки таких симлинков, чтобы они указывали на верные целевые объекты.
Для удаления симлинков используются обычные команды, как и для удаления файлов:
Del c:\ps\note.exe
RD c:\ps\downloads
Как найти и вывести все символические ссылки на диске?
В Windows нет простых инструментов для просмотра и управления всеми симлинками на диске.
Вы можете вывести список всех символических ссылок на диске с помощью команды:
dir /AL /S C:\ | find "SYMLINK"
-
/A
– вывести файлы с атрибутом L (симлинк); -
/S
–выполнить команду рекурсивно для всех вложенных каталогов; -
C:\
— укажите имя диска, на котором нужно найти все символические ссылки (если вы не хотите сканировать весь диск, укажите путь к нужному каталогу)

Также можно вывести список всех символических ссылок на диске с помощью PowerShell. Для этого нужно просканировать все каталоги и найти NTFS объекты с атрибутом ReparsePoint:
Get-ChildItem -Path C:\ -Force -Recurse -ErrorAction 'silentlycontinue' | Where { $_.Attributes -match "ReparsePoint"}
Quick Links
-
How to Create Symbolic Links with mklink
-
How to Create Symbolic Links with a Graphical Tool
-
How to Delete Symbolic Links
Summary
- Symbolic links are advanced shortcuts in Windows 11 and Windows 10 that can point to a file or folder, redirecting applications to access them as if they were in a different location.
- There are two types of symbolic links: soft links, which redirect to the location where files are stored, and hard links, which make it appear as though the file or folder exists at the location of the symbolic link.
- Symbolic links can be created using the mklink command in Command Prompt, with different options for creating symbolic links to files or directories. Alternatively, you can use the Link Shell Extension, a graphical tool, to create symbolic links with more options.
Windows 11 and Windows 10 both support symbolic links — also known as symlinks — that point to a file or folder on your system. You can create them using the Command Prompt or a third-party tool called Link Shell Extension.
What Are Symbolic Links?
Symbolic links are basically advanced shortcuts. Create a symbolic link to an individual file or folder, and that link will appear to be the same as the file or folder to Windows — even though it’s just a link pointing at the file or folder.
For example, let’s say you have a program that needs its files at C:\Program. You’d really like to store this directory at D:\Stuff, but the program requires that its files be at C:\Program. You could move the original directory from C:\Program to D:\Stuff, and then create a symbolic link at C:\Program pointing to D:\Stuff. When you relaunch the program, it will try to access its directory at C:\Program. Windows will automatically redirect it to D:\Stuff, and everything will just work as if it were in C:\Program.
This trick can be used for all sorts of things, including syncing any folder with programs like Dropbox, Google Drive, and OneDrive.
There are two type of symbolic links: Hard and soft. Soft symbolic links work similarly to a standard shortcut. When you open a soft link to a folder, you will be redirected to the folder where the files are stored. However, a hard link makes it appear as though the file or folder actually exists at the location of the symbolic link, and your applications won’t know any better. That makes hard symbolic links more useful in most situations.
Note that Windows doesn’t actually use the terms «hard link» and «soft link». Instead, it uses the terms «hard link» and «symbolic link». In the Windows documentation, a «symbolic link» is the same thing as a «soft link». However, the mklink command can create both hard links (known as «hard links» in Windows) and soft links (known as «symbolic links» in Windows).
How to Create Symbolic Links with mklink
You can create symbolic links using the mklink command in a Command Prompt window as Administrator or as a regular user. To do this without an Administrator Command Prompt window, you must first enable Developer Mode from Settings > Update & Security > For Developers.
To open Command Prompt as admin, click the Start button, search «cmd» or «Command Prompt,» then select «Run as Administrator».
Windows 11 doesn’t require administrative privileges to create symbolic links.
Without any extra options, mklink creates a symbolic link to a file. The below command creates a symbolic, or «soft», link at Link pointing to the file Target :
mklink Link Target
Use /D when you want to create a soft link pointing to a directory. like so:
mklink /D Link Target
Use /H when you want to create a hard link pointing to a file:
mklink /H Link Target
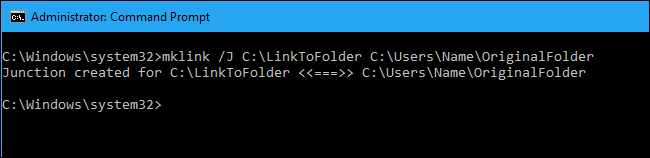
Use /J to create a hard link pointing to a directory, also known as a directory junction:
mklink /J Link Target
So, for example, if you wanted to create a directory junction (a hard link to a folder) at «C:\LinkToFolder» that pointed to «C:\Users\Name\OriginalFolder,» you’d run the following command:
mklink /J C:\LinkToFolder C:\Users\Name\OriginalFolder
You’ll need to put quotation marks around paths with spaces. For example, if the folders are instead named «C:\Link To Folder» and «C:\Users\Name\Original Folder,» you’d use the following command instead:
mklink /J "C:\Link To Folder" "C:\Users\Name\Original Folder"
If you see the message «You do not have sufficient privilege to perform this operation.», you need to launch the Command Prompt as Administrator before running the command.
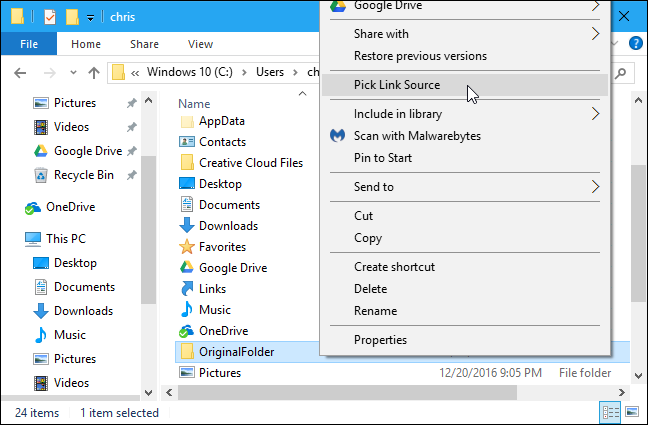
If you’re like to do this with a graphical tool, download Link Shell Extension. Be sure to download the appropriate prerequisite package before the tool itself — both are linked to on the tool’s download page.
Once it’s installed, locate the file or folder you want to create a link to, right-click it, and select «Pick Link Source» in the menu.
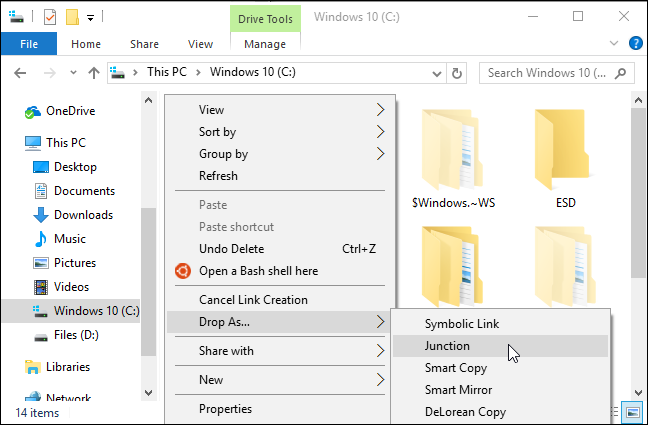
You can then right-click inside a different folder, point to the «Drop As» menu and select «Hardlink» to create a hard link to a file, «Junction» to create a hard link to a directory, or «Symbolic Link» to create a soft link to a file or directory.
How to Delete Symbolic Links
To get rid of a symbolic link, you can simply delete it like you would any other file or directory. Just be careful to delete the link itself rather than the file or directory it’s linking to.
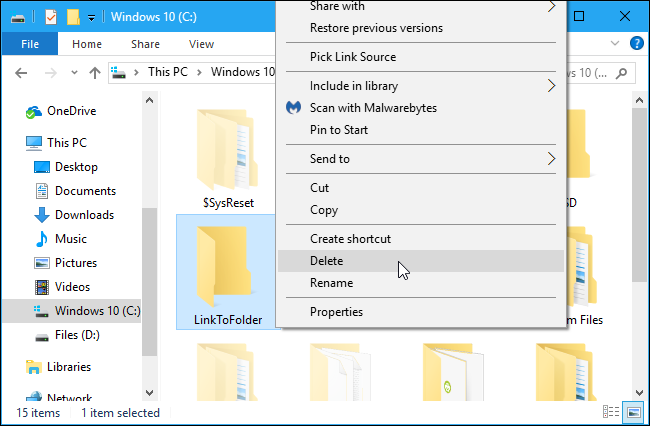
That is a major advantage of a symbolic link — you can freely delete the symbolic link whenever you want without worrying about the associated files or folders.
When you work with shared resources on a network, you may need to quickly get the link to a shared network folder and paste it into a chat window. Or, for example, you might want to know how to create a hyperlink to a file stored locally on your computer and use it to share that file with other users of your PC. Although it’s not exactly easy to figure out how, both Windows 11 and Windows 10 allow you to copy a file path as a link and to create links to a folder or even a library. Without further ado, here are the answers to questions like “How do I create a link to a file or folder?” and “How do I copy a file path as a link?”:
NOTE: This guide covers Windows 11 and Windows 10. Everything works the same in both operating systems. If you don’t know what your version of Windows is, read: How to tell what Windows I have (11 ways).
Method 1: How to create a link to a file, folder, or library in Windows using the Sharing Wizard
If you want to create a link to a file, folder, or library, you can use the Sharing Wizard. This wizard is enabled by default, both in Windows 11 and Windows 10. However, while in Windows 10, it works for all the items we mentioned, including files, in Windows 11, you can only use it for folders and libraries. To learn more about it, read this guide and follow it to share files, folders, or libraries: How to share folders, files, and libraries with the network, in Windows. Essentially, what you need to do is open File Explorer, navigate to the file, folder, or library you want to hyperlink, and right-click on it to see its context menu. Then, if you’re on Windows 10, select “Give access to” and click or tap on Specific people. If you’re using Windows 11, click “Show more options”, and only then go to “Give access to > Specific people.”

How to start the sharing wizard
Follow the steps of the sharing wizard and, during the final step of the process, when it informs you that the file, folder, or library is shared, don’t close the wizard.
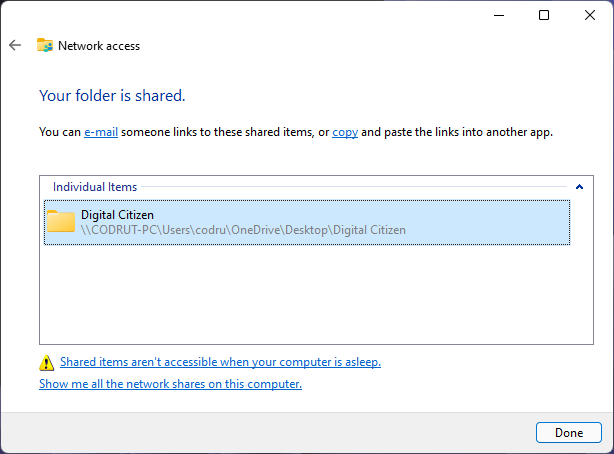
The sharing wizard from Windows 11
Look carefully beneath the “Your file/folder/library is shared” notification. There, Windows says that “You can e-mail someone links to these shared items, or copy and paste the links into another app.”
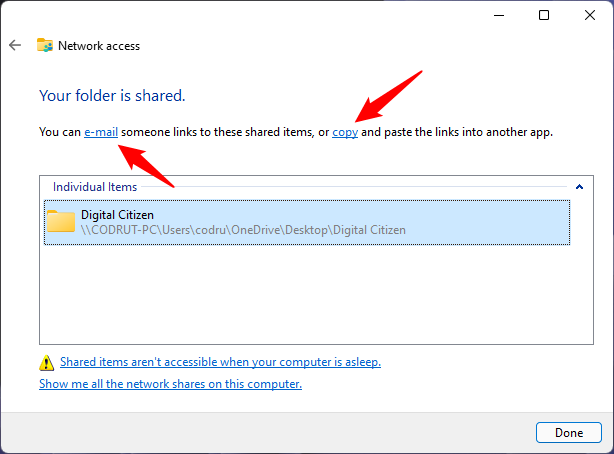
The e-mail and copy links from the last step of the sharing wizard
If you click or tap the e-mail link, your default email client is opened, and the direct link is automatically pasted into a new message. And that’s how to send a link to a file via email.
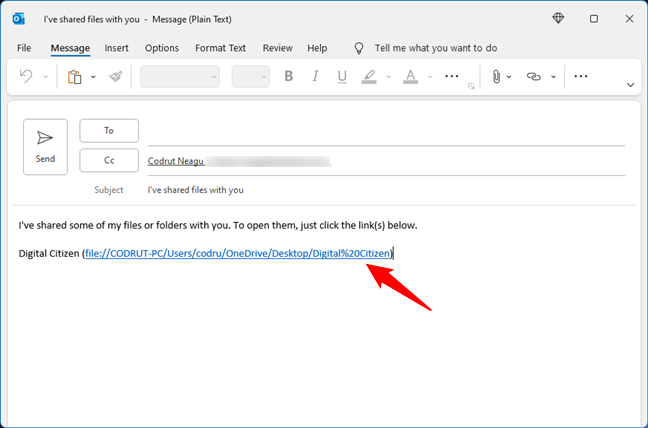
Sending an email with the shared file link
If you press the “copy” link, the link to the shared resource is copied to the clipboard, and you can then paste it into other programs.

Copy and paste a shared file link
Method 2: How to create a link to a file, folder, or library on a shared drive using File Explorer
The second method applies to files, folders, and libraries that you’ve already shared on your Windows computer. If you’re wondering how to create a link to a file on a shared drive, this method works for that too.
Open File Explorer, go to the Network section, and double-click or double-tap on the PC that stores the file, folder, or library you want to link.
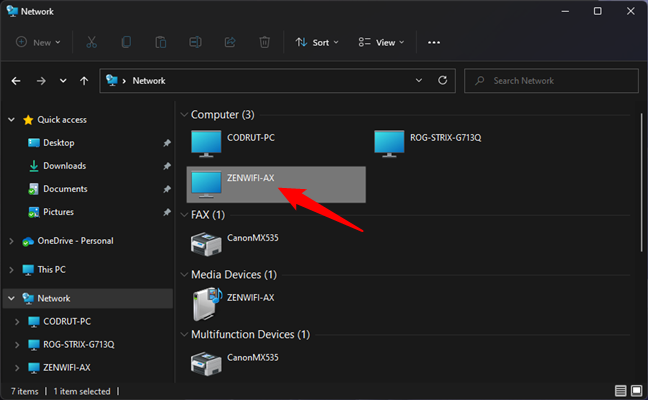
A computer/storage device from the local network
This shows you a list of all the folders that are shared with the network. Browse until you find the specific file, folder, or library for which you want the direct link.
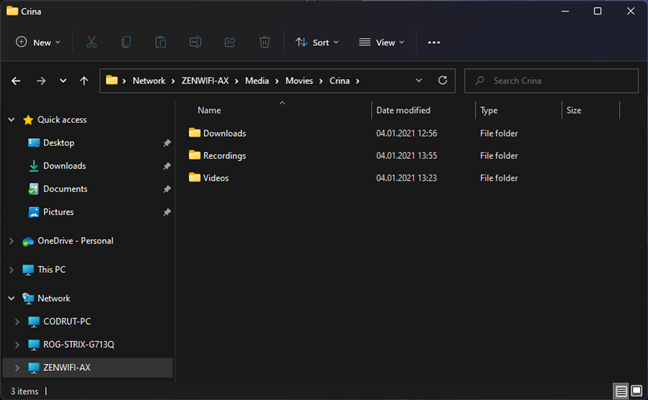
The folders and files shared on a network device
If you’re using Windows 10, hold down Shift on your keyboard and right-click on the file, folder, or library for which you want a link. If you’re using Windows 11, simply right-click on it. Then, select “Copy as path” in the contextual menu.
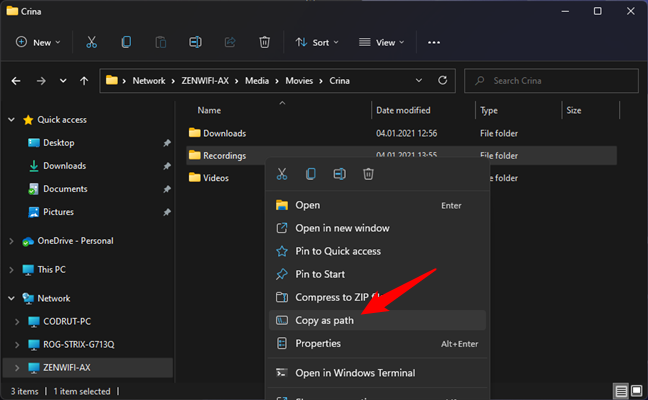
Copy path for a file in File Explorer
Alternatively, in Windows 10, you can also select the item (file, folder, library) and click or tap on the “Copy as path” button from File Explorer’s Home tab in Windows 10.
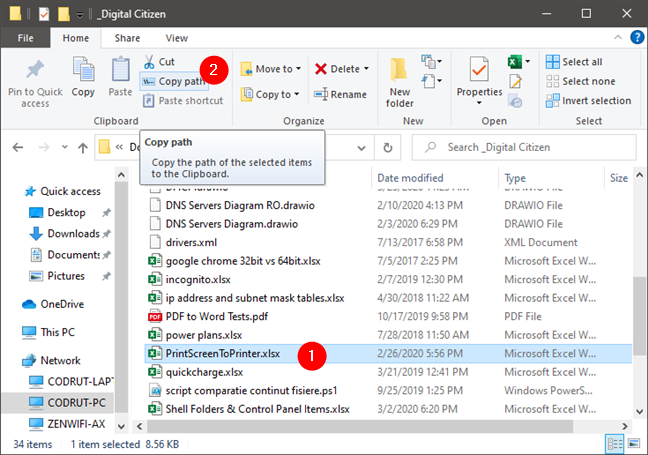
Copy path for a file in File Explorer, on Windows 10
In Windows 11, press See more (the three-dot button) from the top toolbar and select Copy path from the menu displayed.

Copy path for a file in File Explorer, on Windows 11
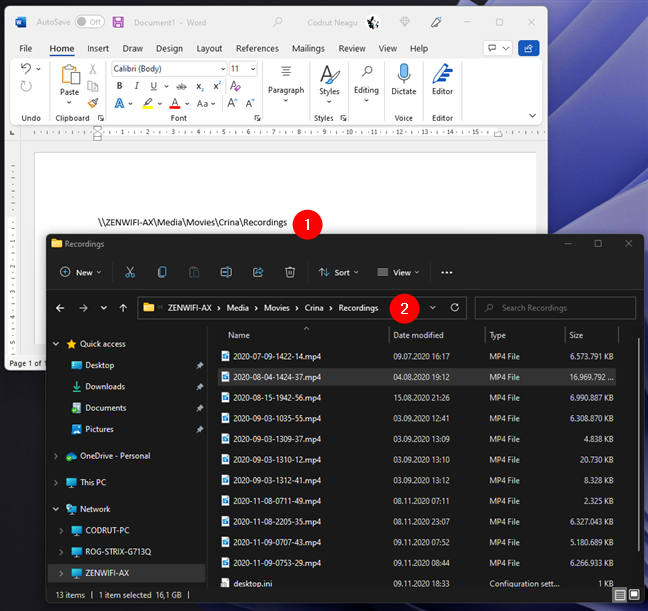
Then, paste the link into the app or document you need it in. You should have something similar to this:
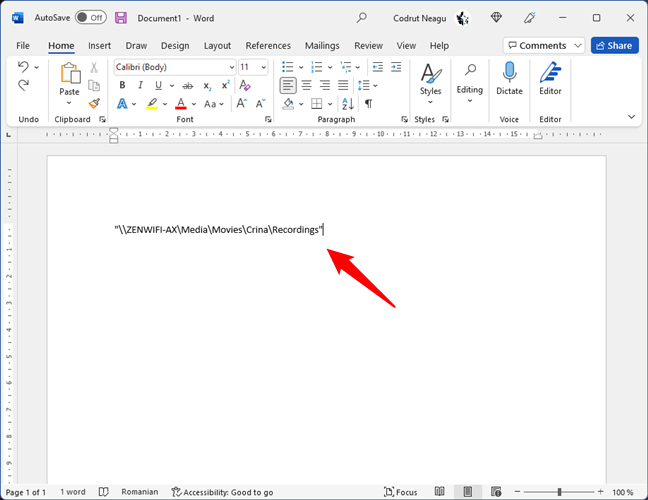
Copy and paste the file link in a document
For the folder, library, or file link(s) to be active, press Enter to make it clickable in the Office application where you copied it. When you Ctrl + click the link, File Explorer opens the shared file, folder, or library, if the network computer sharing that resource is available.

Making the file link clickable
My file path link doesn’t work! Why?
In some cases, the file links you create might not work. There are several possible causes. Here’s what you can try:
Regardless of whether you wanted to create a link to a file, folder, or library, in some apps, you might have to type “file:///” before the network path, like this:
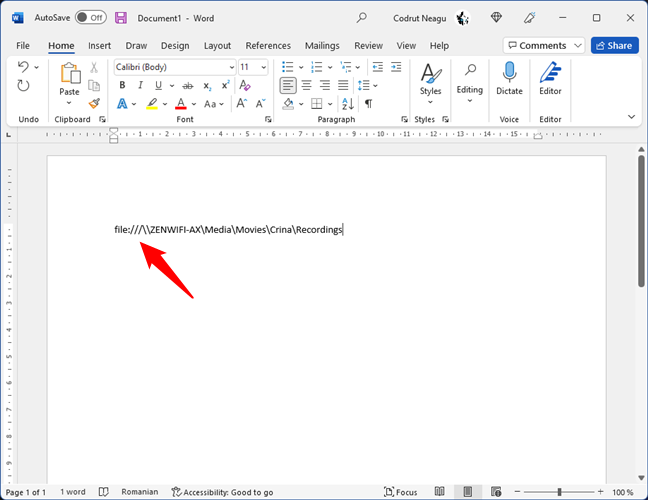
The file link starts with the word file followed by the signs below
In other cases, depending on the apps in which you want to place the file links, you might also have to manually replace all the blank spaces in the link paths with this text: %20. Here’s an example:
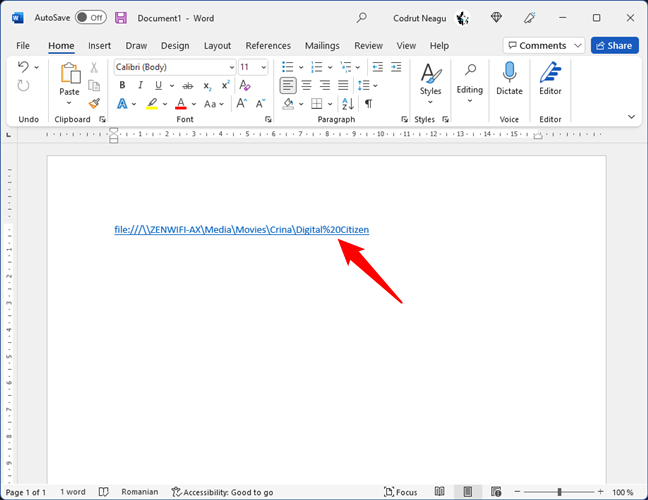
Blank spaces can be replaced with %20 encodings
There’s also the possibility that on some older versions of Windows, or in other operating systems, the backslashes from the network paths aren’t recognized. In that case, you can try to replace all the backslashes (\) with forward slashes (/).
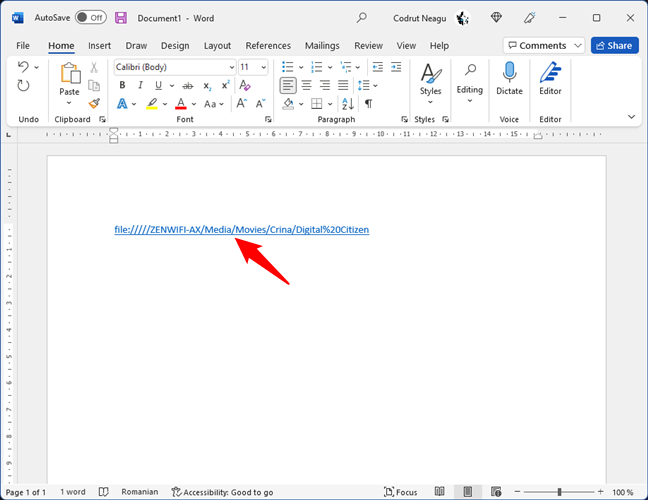
Backslashes can be replaced by forwarding slashes
Finally, note that, whatever you do, in some apps, file links simply don’t work as regular links. Such is the case with most web browsers and chat apps, which treat these local links as security threats. However, even so, the user who gets your file link can still use the link to get to that file, folder, or library. All he or she has to do is copy and paste the link in the address bar of (his or her) File Explorer and press Enter.
Copy and paste a file link in File Explorer’s address bar
Do you use file hyperlinks?
We hope that you’ve found these tips useful. If you know other ways to generate the link to the files, folders, or libraries shared in a network, don’t hesitate to let us know. Comment below, and let’s share all the ways to generate links in Windows.
Last Updated :
08 Sep, 2020
A symbolic link is used to describe a file, that doesn’t store any data. Symbolic Links on Windows contains a reference to another file or directory in the respective of an absolute or you can say to the relative path. The type of path (relative/absolute) is defined during the creation of the link.
Most operating systems offer support for Symbolic Links in one way or another. Linux and Windows both provide support for generic Symbolic Links with some OS exclusive features, i.e. Windows allows for the creation of Junction points which are folder soft links with a little different working. In this article, we will take a look at the creation of symbolic links on Windows using mklink command found in the command processor (cmd) of the OS.
Note –
The command requires administrator privileges to execute.
Types of symlinks :
- Hard Links
- Soft Links
Description of the command :
MKLINK [[/D] | [/H] | [/J]] Link Target

       /D      Creates a directory symbolic link.  Default is a file
               symbolic link.
       /H      Creates a hard link instead of a symbolic link.
       /J      Creates a Directory Junction.
       Link    Specifies the new symbolic link name.
       Target  Specifies the path (relative or absolute) that the new link
               refers to.
Note –
The above text could be obtained by executing the mklink command without any arguments.
Creating a soft link to a file :
In order to create a soft link, the syntax of the command is:
mklink Link_path Target_path
- Where Link_path is the name (or path) to the symbolic link which is to be created.
- Target_path is the path which the new link will refer to.
Example –
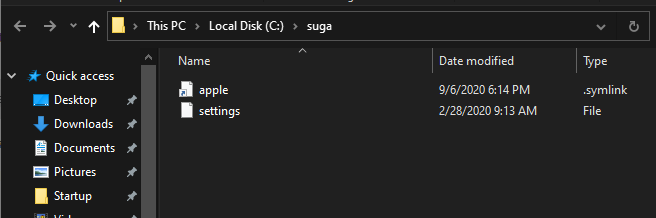
There exists the a file with the path C:\suga\settings
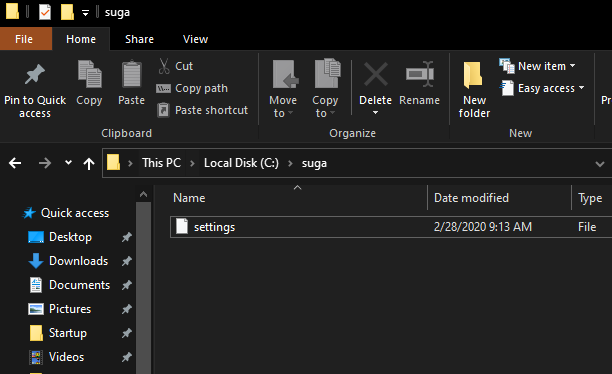
In order to create a soft link of the file on the same path with a different name (ex. apple), the command would look as follows.
mklink "C:\suga\apple" "C:\suga\settings"
Note –
In the above command, both paths are absolute.
After the execution of the above command, a soft link to the file will be created appears as follows.
The same method could be used for creating a soft link to a directory as well, the only difference being that the /D switch needs to be added to the command.
making the syntax :
mklink /D Link_path Target_path
Creating a hard link to a file :
In order to create a soft link, the syntax of the command is as follows.
mklink /H Link_path Target_path
Example –
In this example, we would use the same file as the one used in the last example, located at C:\suga\settings. In order to create a hard link of the file at the same path with a different name (ex. moba) the command would look as follows:
mklink /H "C:\suga\moba" "C:\suga\settings"
After the execution of the above command, a hard link to the file will be created appearing as follows :
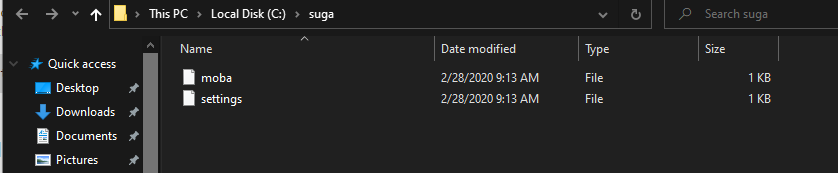
Hard links could not be created for directories, therefore unlike the previous example, both paths (Link & Target) should point to a file only.
Жесткие и символические ссылки давно знакомы и активно используются Linux-администраторами, в то время как их Windows коллеги используют их гораздо реже, а некоторые вообще не знают о такой возможности. Тем не менее такая возможность в Windows существует и позволяет значительно упростить некоторые сценарии работы с папками и файлами. В данной статье мы рассмотрим все виды ссылок, доступные в среде ОС Windows, а также разные способы работы с ними, начиная от командной строки и заканчивая PowerShell.
Онлайн-курс по устройству компьютерных сетей
На углубленном курсе «Архитектура современных компьютерных сетей» вы с нуля научитесь работать с Wireshark и «под микроскопом» изучите работу сетевых протоколов. На протяжении курса надо будет выполнить более пятидесяти лабораторных работ в Wireshark.
Жесткие ссылки (HardLink)
Жесткие ссылки представляют собой дополнительную запись в файловой таблице раздела для существующего файла. Таким образом жесткая ссылка ничем не отличается от исходного файла, но файл при этом не копируется физически и остается на диске в единственном экземпляре. При изменении файла по любой из жестких ссылок, остальные обновляются автоматически (что логично, так как файл один).
Мы можем переименовывать, копировать, перемещать (в пределах логического тома) ссылки — размер занимаемого места при этом не изменится. При удалении ссылок файл продолжает существовать до тех пор, пока не будет удалена последняя жесткая ссылка на него. Фактически отличить, где находится оригинальный файл, а где жесткая ссылка невозможно, по сути, файл на разделе это и есть жесткая ссылка.
Жесткая ссылка может существовать только в пределах логического тома, поддерживается файловыми системами NTFS и ReFS начиная со сборки 19536.
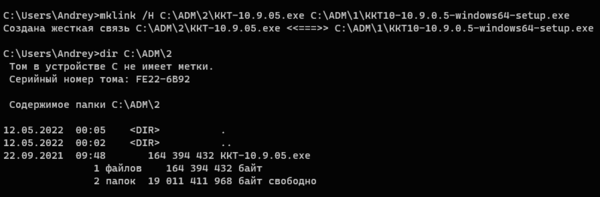
Для создания жесткой ссылки можно воспользоваться утилитой mklink:
mklink /H C:\Folder1\LinkFileName C:\Folder\FileNameГде ключ /H предписывает создать именно жесткую ссылку, далее следует путь к новому файлу и целевому файлу, на который мы делаем ссылку. Путь можно указывать как абсолютные, так и относительные, в имени создаваемого файла не забывайте указывать расширение.
Ссылки можно создавать и при помощи PowerShell, для этого воспользуйтесь командой:
New-Item -ItemType HardLink -Path C:\Folder1\LinkFileName -Target C:\Folder\FileNameКоманда другая, но принцип тот же самый: -ItemType — тип создаваемой ссылки, в нашем случае жесткая ссылка, -Path — путь к создаваемому файлу ссылки, -Target — файл на который мы делаем ссылку.

Можно ли сделать жесткую ссылку на директорию? Нет, только на файлы.
Вроде бы все понятно, но если внимательный читатель заглянет в свойства папки с жесткой ссылкой, то он увидит, что ее размер равен исходному файлу, если сделаем в ней еще одну жесткую ссылку — двум исходным файлам. Как так? Не стоит переживать, все нормально. Для операционной системы жесткая ссылка ничем не отличается от обычного файла и при подсчете свободного места учитывается размер каждой ссылки, но на самом деле на диске хранится единственная копия. В этом можно убедиться, если одновременно с созданием жестких ссылок контролировать свободное место на диске.
При желании мы можем провернуть даже такой фокус:

Какой вывод можно сделать из того, что мы увидели и где нам могут пригодиться жесткие ссылки? Прежде всего для предоставления пользователям доступа к объемным архивам, образам или инсталляционным пакетам. Скажем у вас есть файловый сервер и несколько отделов, каждому из которых нужно предоставить доступ к одному и тому же большому файлу. При этом вы можете не бояться, что кто-то удалит файл, он удалит его только у себя в директории, для остальных пользователей он останется доступен.
Но при этом надо очень внимательно относиться к вопросу одновременного редактирования файла, так как он существует в единственном экземпляре, но доступен по множеству ссылок в этом сценарии могут возникнуть самые разные коллизии.
Точки соединения (Junction)
Очень старая технология, поддерживаемая еще начиная с Windows 2000, позволяет сделать один из каталогов псевдонимом другого каталога. Чем-то напоминает символические ссылки, но в крайне упрощенном варианте. В качестве цели можно использовать только локальные папки, но при этом нет ограничения по размещению их на одном томе. Т.е. целевая папка может находиться на диске C:, а точка соединения для нее на диске D: и все будет работать. Точки соединения поддерживаются файловыми системами NTFS и ReFS.
Для создания точки соединения можно использовать mklink:
mklink /J D:\LinkFolder C:\FolderКлюч /J указывает на создание точки соединения, далее следует папка каталога-псевдонима и папка целевого каталога. При любом изменении целевого каталога (перемещение, переименование, удаление) точка соединения перестает работать.
Обратите внимание, что данная папка в проводнике отображается как ярлык, а выводе команды dir как точка соединения.
Это же действие в PowerShell:
New-Item -ItemType Junction -Path D:\LinkFolder -Target C:\FolderКомментировать здесь особо нечего, краткость не входит в число добродетелей PowerShell, но не оставляет места догадкам, все просто и понятно.
Зачем сейчас нужны точки соединения? После появления в NT 6.0 настоящих символических ссылок не нужны, но вы можете встретиться с ними как в устаревших системах, так и в современных, где они могут присутствовать в виде наследия. Поэтому знать о них и уметь с ними работать современному администратору надо.
Символические ссылки (SymbolicLink)
Пожалуй, самый популярный вид связи, позволяет создавать множество псевдонимов для файлов или каталогов размещая их на любых поддерживаемых локальных файловых системах. В качестве цели могут быть использованы как локальные, так и сетевые объекты. При создании символической ссылки можно использовать как абсолютные, так и относительные пути. Но в последнем случае вы не можете перемещать ссылку — она перестанет работать. Символические ссылки поддерживаются начиная с NT 6.0 (Vista и Server 2008) и работают с файловыми системами NTFS и ReFS.
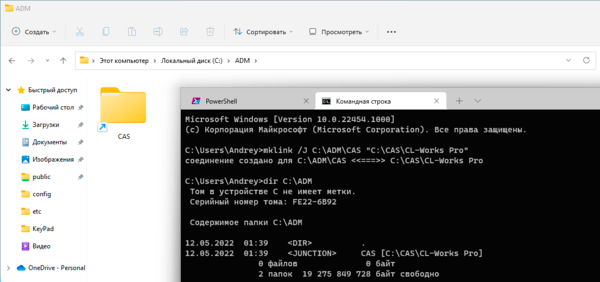
Для создания символических ссылок можно использовать mklink, без параметров она создает симлинк для файла:
mklink C:\Folder1\LinkFileName C:\Folder\FileNameПри создании ссылки не забываем указать расширения для файла. Как и в случае с точкой соединения символическая ссылка отображается в виде ярлыка и обозначается в выводе команды dir:
Для создания символической ссылки на директорию добавьте ключ /D:
mklink /D D:\LinkFolder C:\FolderВ PowerShell все проще, тип объекта будет определен автоматически:
New-Item -ItemType SymbolicLink -Path C:\Folder1\LinkFileName -Target C:\Folder\FileNameЕсли в качестве цели указан файл — будет создана ссылка на файл, каталог — ссылка на каталог.
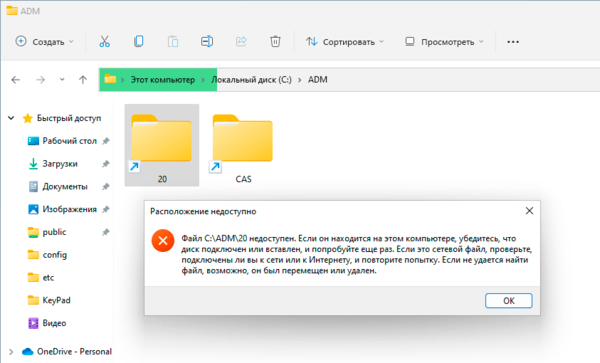
При переименовании, перемещении или удалении исходного файла или каталога все символические ссылки работать перестанут:
При копировании символической ссылки за пределы локального тома будет скопирован исходный файл, даже если целевой том поддерживает работу со ссылками, но это не мешает создать новую ссылку на другом томе.
Онлайн-курс по устройству компьютерных сетей
На углубленном курсе «Архитектура современных компьютерных сетей» вы с нуля научитесь работать с Wireshark и «под микроскопом» изучите работу сетевых протоколов. На протяжении курса надо будет выполнить более пятидесяти лабораторных работ в Wireshark.