
Choose your billing country/region:
Что такое защита электронной почты?
Специальная система защиты позволяет обезопасить корпоративную электронную почту от компрометации и фишинга. Узнайте, как организовать такую защиту почты и всей среды.
- Подробнее
Определение защиты электронной почты
Защита электронной почты — это меры, которые предпринимаются, чтобы исключить несанкционированный доступ к учетным записям и сообщениям электронной почты, а также их утрату или компрометацию. Для повышения безопасности в этой сфере компании могут настраивать необходимые политики и использовать инструменты для защиты от вредоносных программ, спама и фишинга. Киберпреступники организуют атаки на электронную почту, потому что она является удобной отправной точкой для доступа к другим учетным записям и устройствам. Кроме того, в работе с электронной почтой большое значение имеет человеческий фактор. Достаточно одного неосторожного перехода по ссылке, чтобы вызвать кризис всей корпоративной системы безопасности.
Почему важно защищать электронную почту
Электронная почта более двух десятилетий является основным средством коммуникации на рабочем месте. Ежедневно по всему миру отправляется и принимается более 333 миллиардов сообщений, а каждый сотрудник в среднем получает 120 писем в день. Это открывает большие возможности для киберпреступников. Они организуют атаки на электронную почту с целью кражи ценной корпоративной информации. Для этого применяются вредоносные программы, фишинг и множество других методов. Большинство кибератак (94 %) начинаются с электронного письма с вредоносным содержимым. По данным Центра приема жалоб на мошенничество в Интернете при ФБР, в 2020 году ущерб от киберпреступлений составил более 4,1 миллиарда долларов США (USD). При этом сильнее всего компании пострадали от взлома корпоративной почты. Такие атаки могут привести к серьезным последствиям: значительным финансовым и репутационным потерям, а также утрате важных данных.
Преимущества защиты электронной почты
Для компании любого размера важно уделять большое внимание безопасности электронной почты. Специальные решения защищают коммуникацию сотрудников и устраняют киберугрозы. Вот что это дает бизнесу:
- Снижаются риски, связанные с ущербом для репутации и доходов компании. Атаки на электронную почту могут привести к огромным расходам, сбоям в работе и другим серьезным последствиям.
- Повышается продуктивность. Надежные решения для защиты электронной почты позволяют компаниям сократить количество сбоев в работе и время простоя из-за кибератак. С такими инструментами службы безопасности могут оптимизировать реагирование на угрозы и действовать на опережение даже в случае изощренных атак.
- Обеспечивается соблюдение законов о защите данных, например регламента GDPR. Это помогает избежать косвенного ущерба от кибератак, связанного со сбоями в работе компании, судебными издержками и штрафами регулирующих органов.
Рекомендации по защите электронной почты
Ландшафт угроз для электронной почты стремительно меняется. В ответ на это компании внедряют передовые методы защиты, чтобы сотрудники взаимодействовали в безопасной среде. Вот несколько рекомендаций:
- Регулярно обучайте сотрудников, чтобы свести к минимуму риск ошибок, вызванных человеческим фактором. Персонал часто считают первой линией защиты компании, поэтому люди должны понимать важность защиты электронной почты.
- Инвестируйте в обучение пользователей, чтобы они умели распознавать признаки фишинговых атак и другие индикаторы вредоносных действий.
- Перейдите на решение для защиты электронной почты, которое обладает расширенным функционалом обеспечения безопасности.
- Реализуйте многофакторную проверку подлинности (MFA), чтобы предотвратить риск компрометации учетных записей. Вход в систему с использованием более одного способа идентификации — это простой способ защитить корпоративные данные.
- Проверьте, защищают ли ваши инструменты корпоративную почту от компрометации с применением спуфинга и олицетворения.
- Переместите процессы и транзакции с высоким уровнем риска в системы с более строгой проверкой подлинности.
Типы угроз для электронной почты
Организации сталкиваются с целым рядом сложных атак: от захвата учетных записей и компрометации корпоративной почты до целевого фишинга и вишинга. Все эти угрозы можно разделить на несколько групп.
Кража данных
Кража данных — это несанкционированная передача данных за пределы организации (вручную или с помощью вредоносных программ). Утечка конфиденциальных данных может дорого обойтись компании. Шлюзы безопасности электронной почты помогают избежать отправки такой информации без авторизации.
Вредоносные программы
Основная цель вредоносных программ — нарушить работу компьютеров и компьютерных систем. Среди них распространены вирусы, черви, программы-шантажисты и программы-шпионы.
Спам
Спам — это нежелательные сообщения электронной почты, которые рассылаются массово и без согласия получателей. Компании используют такие письма в коммерческих целях. Мошенники же применяют спам, чтобы распространять вредоносные программы, обманом заставлять людей раскрывать конфиденциальную информацию или вымогать деньги.
Олицетворение
Олицетворение происходит, когда киберпреступники выдают себя за другого человека или организацию, чтобы заполучить деньги или данные посредством электронной почты. Компрометация корпоративной почта — это один из таких примеров. Мошенник выдает себя за сотрудника, чтобы похитить информацию у компании или ее клиентов и партнеров.
Фишинг
При фишинге злоумышленники выдают себя за другого человека или организацию, чтобы обманным путем заставить жертв раскрыть ценную информацию. Например, так они могут заполучить учетные данные для входа в систему и другие конфиденциальные сведения. Различают несколько типов таких атак: целевой фишинг, вишинг и уэйлинг.
Средства защиты электронной почты
Специальные средства для обеспечения безопасности помогают компаниям защитить учетные записи и сообщения электронной почты от киберугроз. Лучший способ организовать безопасную среду — создать и поддерживать политику использования почты. Ее нужно донести до сотрудников, чтобы они были в курсе основных рекомендаций. Вот несколько распространенных средств защиты электронной почты, которые доступны отдельным пользователям, учебным заведениям, сообществам и организациям:
- Функции отключения сканируют входящую, исходящую и внутреннюю почту на наличие вредоносных ссылок и вложений.
- Шифрование данных защищает сообщения почты от перехвата киберпреступниками.
- Средства контроля сканируют вложенные или встроенные изображения и контент на наличие вредоносных программ и блокируют их загрузку.
- Спам-фильтры отсеивают нежелательные сообщения электронной почты, например массовые рассылки.
- Системы аутентификации оценивают надежность отправителей.
Безопасность электронной почты
Атаки на электронную почты становятся все более изощренными. Это требует внедрения надежных систем безопасности для защиты своих данных, репутации и доходов. В таких условиях компаниям стоит обратить внимание на решения, которые предлагают интегрированную защиту от угроз для приложений, устройств, электронной почты, удостоверений, данных и облачных рабочих нагрузок.
Подробные сведения о защите электронной почты
Защита от угроз
Узнайте, как защитить компанию от современных атак.
Безопасность электронной почты
Защитите корпоративную среду от изощренных угроз, например взлома электронной почты или фишинговых атак.
Стратегия «Никому не доверяй»
Для комплексной защиты применяйте упреждающий подход к кибербезопасности в рамках модели «Никому не доверяй» .
Вопросы и ответы
-
Любому человеку, который пользуется электронной почтой, стоит озаботиться ее защитой. Жертвами кибератак могут стать как отдельные лица, так и целые компании. Без плана обеспечения безопасности электронной почты и применения необходимых систем защиты пользователи будут уязвимы для различных угроз: кражи данных, вредоносных программ, фишинга и спама.
-
Атаки на электронную почту обходятся компаниям в миллиарды долларов в год. К наиболее серьезным угрозам относятся кража данных, олицетворение, вредоносные программы, фишинг и спам. В зависимости от масштаба и интенсивности такие атаки могут оказать существенное влияние на деятельность организации.
-
При отправке сообщения электронной почты оно проходит через несколько серверов, прежде чем попасть к получателю. Почтовый сервер — это компьютерная система со специальным серверным программным обеспечением и протоколами, которые позволяют устройствам подключаться к сетям и обращаться к информации в Интернете.
Компаниям важно использовать безопасные почтовые серверы, поскольку угрозы, связанные с электронной почтой, постоянно развиваются. Вот несколько способов усилить защиту:
- Настройте протокол DKIM, который позволяет получателям проверять, было ли сообщение электронной почты отправлено авторизованным владельцем домена.
- Для почтового ретранслятора выберите вариант, в котором он не будет открытым, чтобы не пропускать спам и другие угрозы. Настройте его так, чтобы пользователи могли отправлять сообщения только на определенные адреса и домены.
- Настройте инфраструктуру политики отправителей, чтобы иметь возможность задать, с какого IP-адреса могут отправляться электронные письма в вашем домене.
- Используйте списки блокировок DNS (DNSBL), чтобы блокировать вредоносные сообщения и домены.
- Применяйте систему идентификации сообщений, создания отчетов и определения соответствия по доменному имени (DMARC) для мониторинга своего домена.
-
Шифрование электронной почты — это процесс защиты конфиденциальных данных. Простой текст, который можно легко прочитать, преобразуется в зашифрованный с помощью специальных алгоритмов. Такой текст доступен для чтения только получателям с ключом.
-
Вот 5 вопросов, которые помогут вам оценить безопасность своей электронной почты:
1. Вы используете надежный пароль, который состоит из прописных и строчных букв, цифр и специальных символов?
2. Вы используете шифрование при отправке конфиденциальной информации?
3. Вы активировали двухфакторную проверку подлинности, при которой для входа в систему требуется ввести пароль и код, сгенерированный мобильным устройством?
4. Вы установили на своих устройствах антивирусное программное обеспечение?
5. Вы проверяете вложения и ссылки, прежде чем открывать их или нажимать на них?
In today’s computerized age, protection and security are foremost concerns. Ensuring delicate data, such as individual and money related data, amid e-mail communication is significant. Windows 11 offers strong features and improved security conventions, making it less demanding than ever to send encrypted emails. In this article, we’ll explore step-by-step information on how to send encrypted emails in Windows 11, guaranteeing your messages stay secure and private.
Contents
- Understanding Encryption in Windows 11 PC and Laptop
- Setting Up a Digital Certificate:
- Configuring Encryption Settings:
- Composing and Sending an Encrypted Email:
- Decoding an Encrypted Email:
- Verifying the Recipient’s Encryption Capability:
- Managing Encryption Certificates:
- Conclusion:
Understanding Encryption in Windows 11 PC and Laptop
Mail encryption includes encoding the content of your messages so that as it were the expecting beneficiary can decode and study them. Windows 11 utilizes the S/MIME (Secure/Multipurpose Internet Mail Extensions) convention, permitting for email encryption and digital signing. By implementing S/MIME, you’ll ensure your email communications’ confidentiality, integrity, and realness.
Setting Up a Digital Certificate:
You must get a digital certificate some time recently by sending encrypted emails to Windows 11. A digital certificate acts as a digital ID, confirming your personality and permitting others to encrypt messages particularly for you. Follow these steps to set up a digital certificate:
a. Open the “Settings” app in Windows 11 and explore “Accounts” and after that “Email & accounts.”
b. Under the “Digital certificates” area, tap “Get a digital certificate.”
c. Select a certification authority from the accessible choices and take after the instructions to get your digital certificate.
d. Once you have received your digital certificate, it’ll be automatically introduced on your framework.
Configuring Encryption Settings:
After procuring your digital certificate, it’s basic to design the encryption settings in Windows 11. This guarantees that outgoing emails are encrypted by default. Here’s how you’ll set up encryption settings:
a. Open the “Mail” app in Windows 11.
b. Click on the gear symbol found within the lower-left corner to get to “Settings.”
c. Within the settings menu, select “Compose and reply.”
d. Under the “Encrypt” area, enable “Encrypt new messages by default.”
e. Save your changes and near the settings menu.
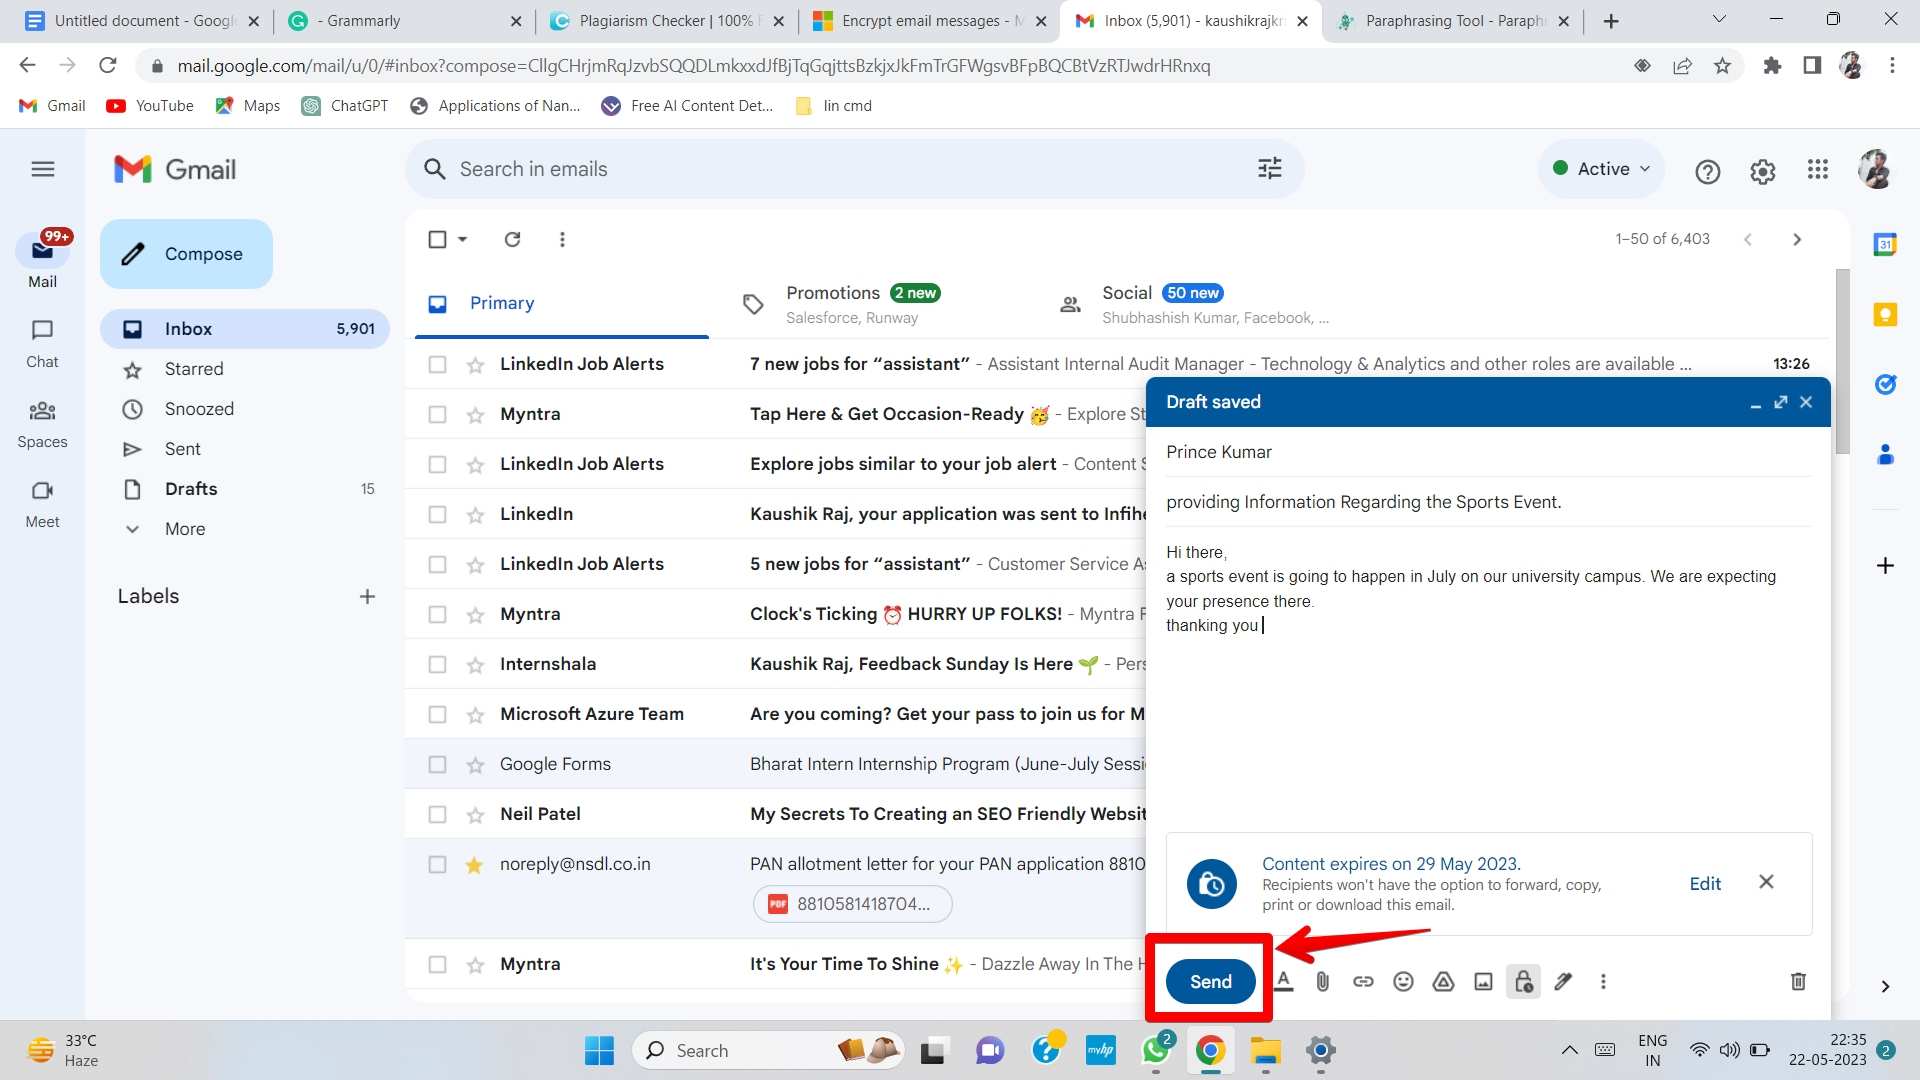
Composing and Sending an Encrypted Email:
Presently that your encryption settings are arranged, you’ll compose and send encrypted emails. Follow these steps:
a. Open the “Mail” app and press the “Compose” button to compose a new email.
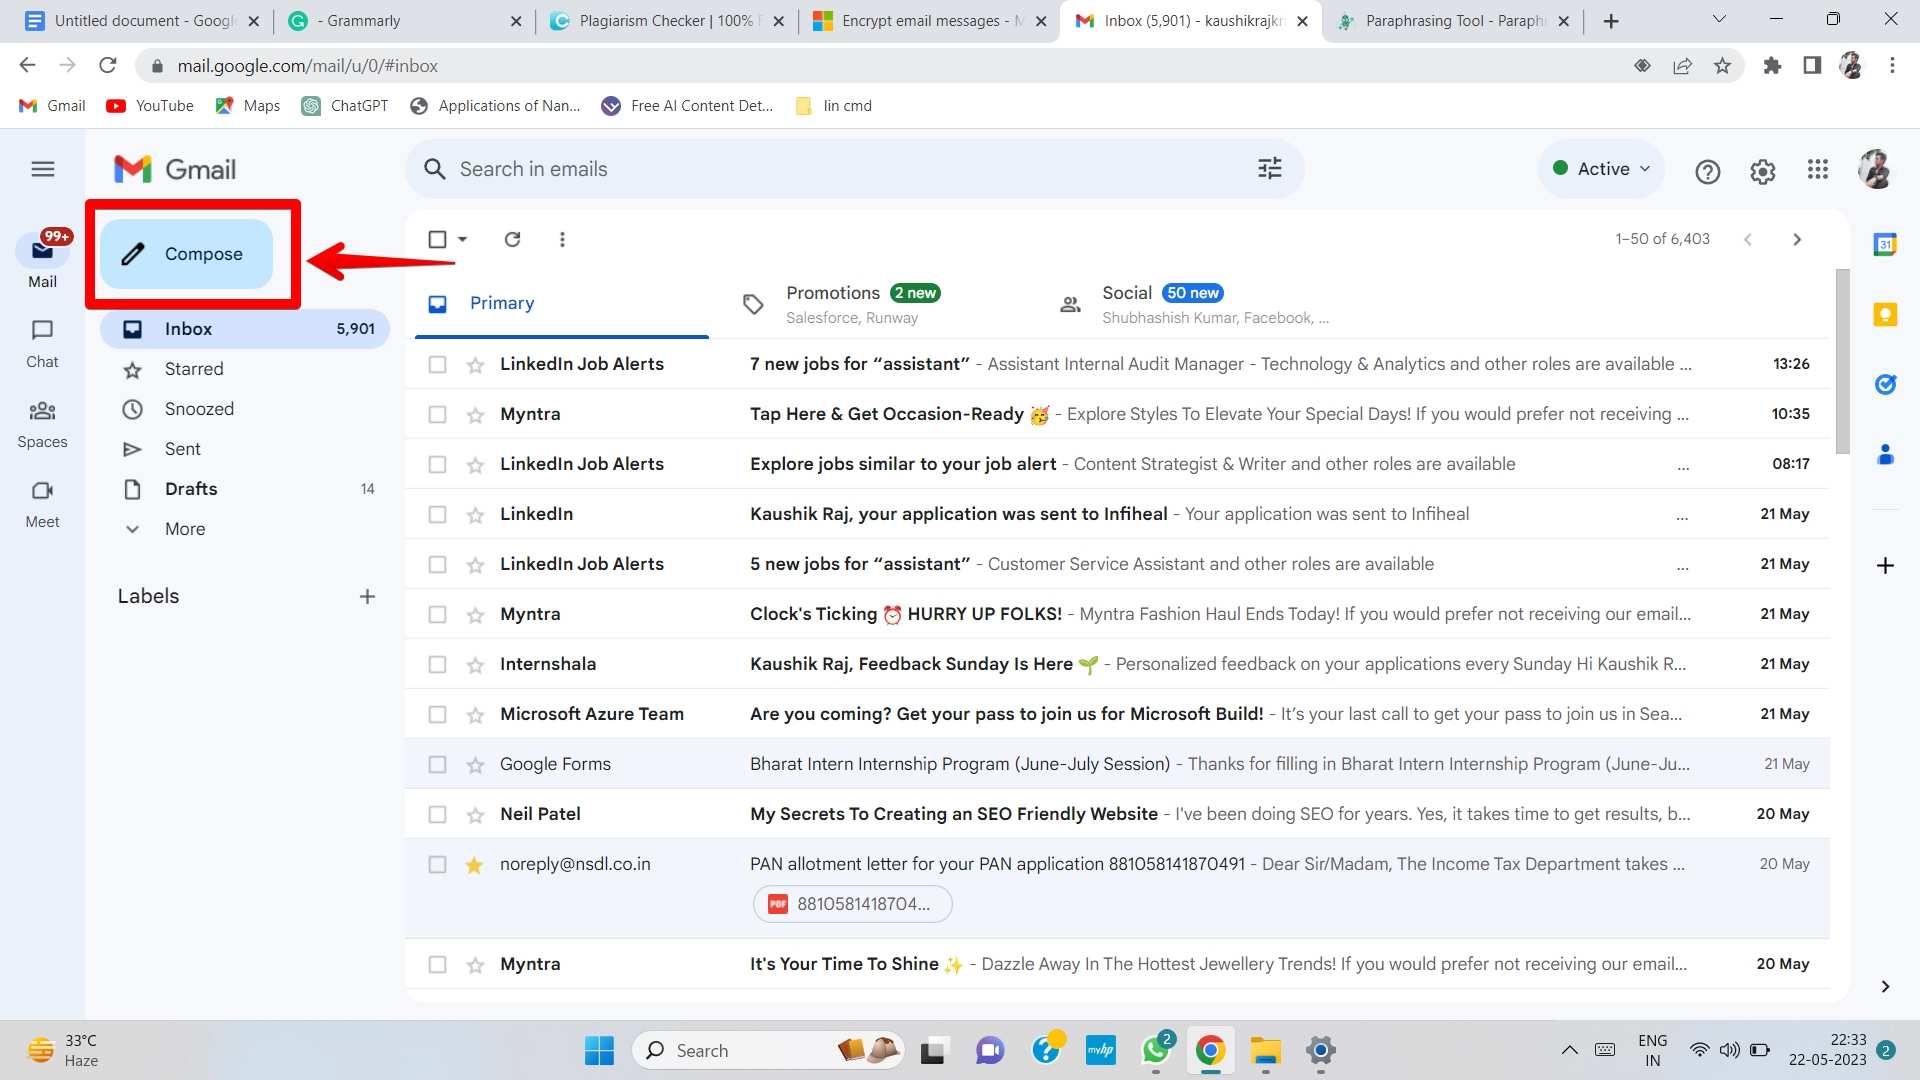
b. Fill in the recipient’s mail address, subject, and message content.
c. Press on the “confidential mode” tab found within the lower-right corner of the email composition window.
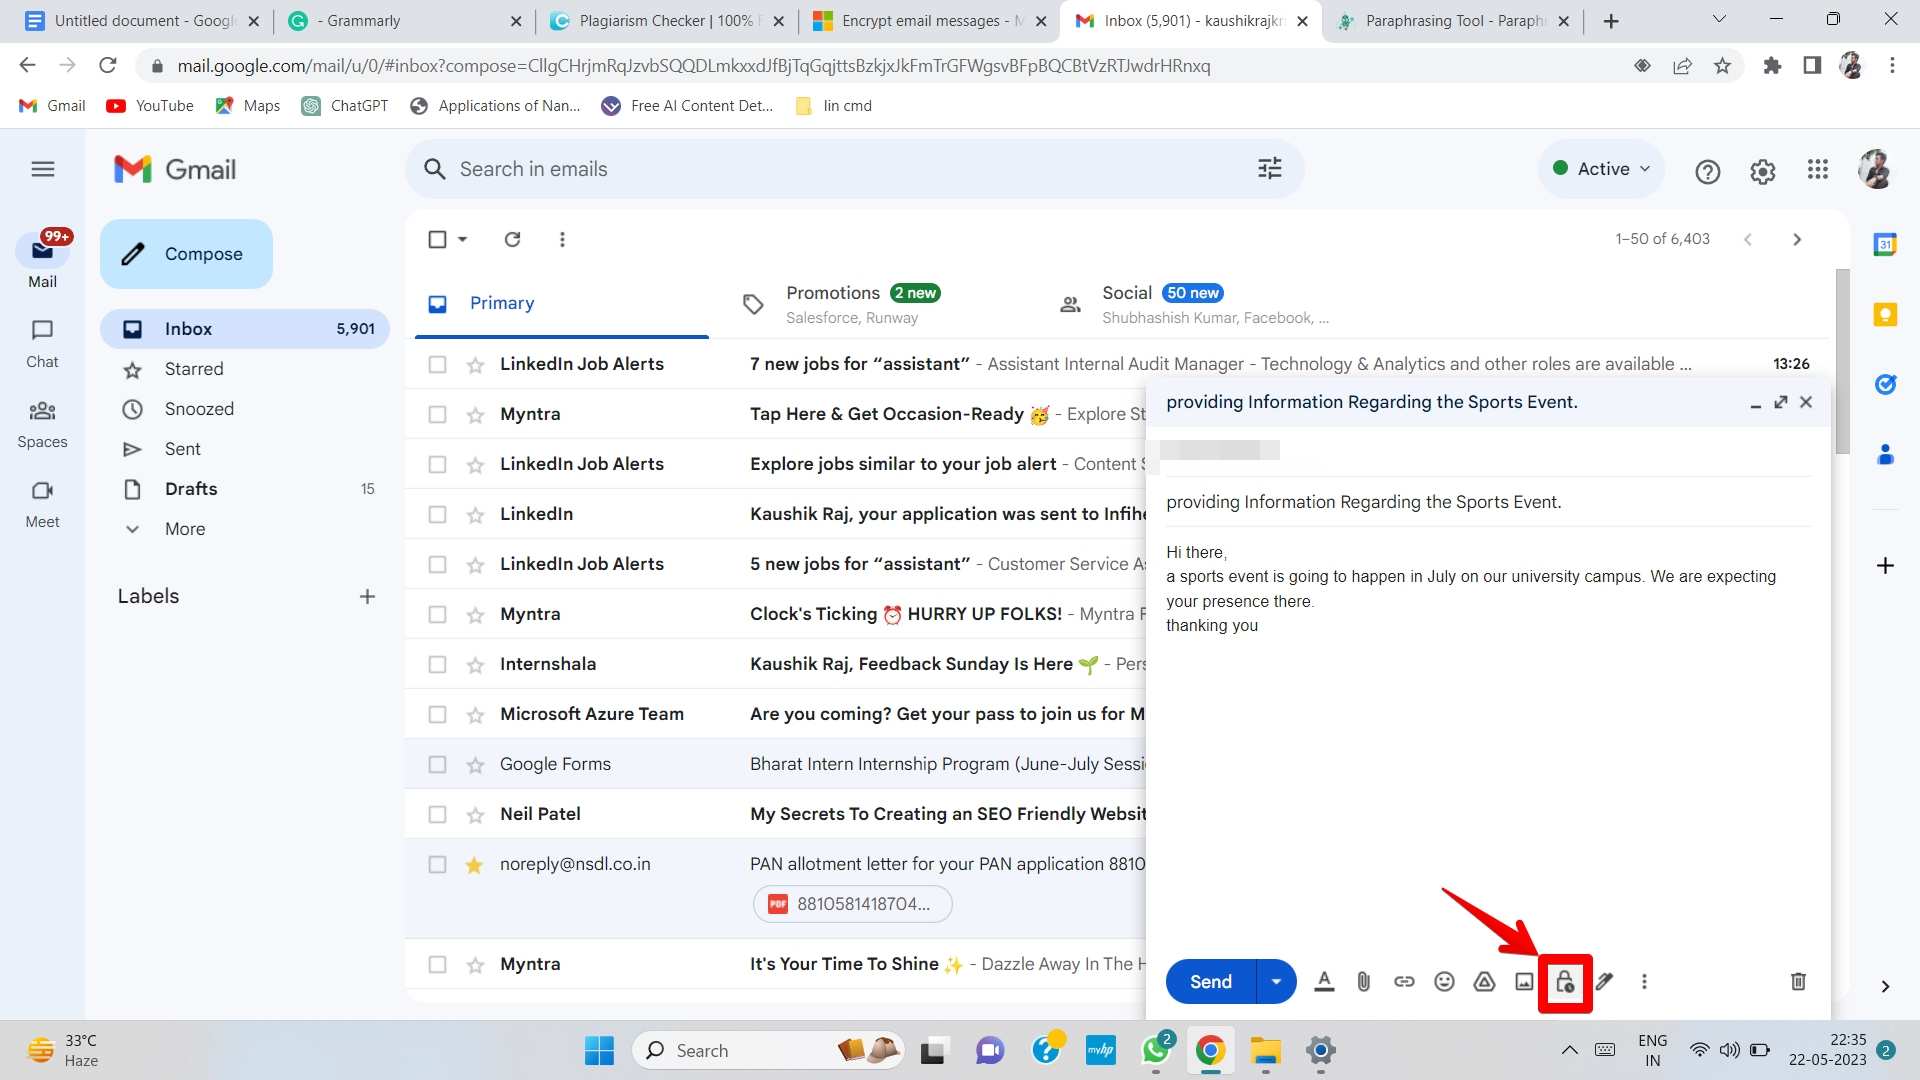
d. Under the “confidential mode” area, press “set expiry option” and “set passcode” to encrypt the email.
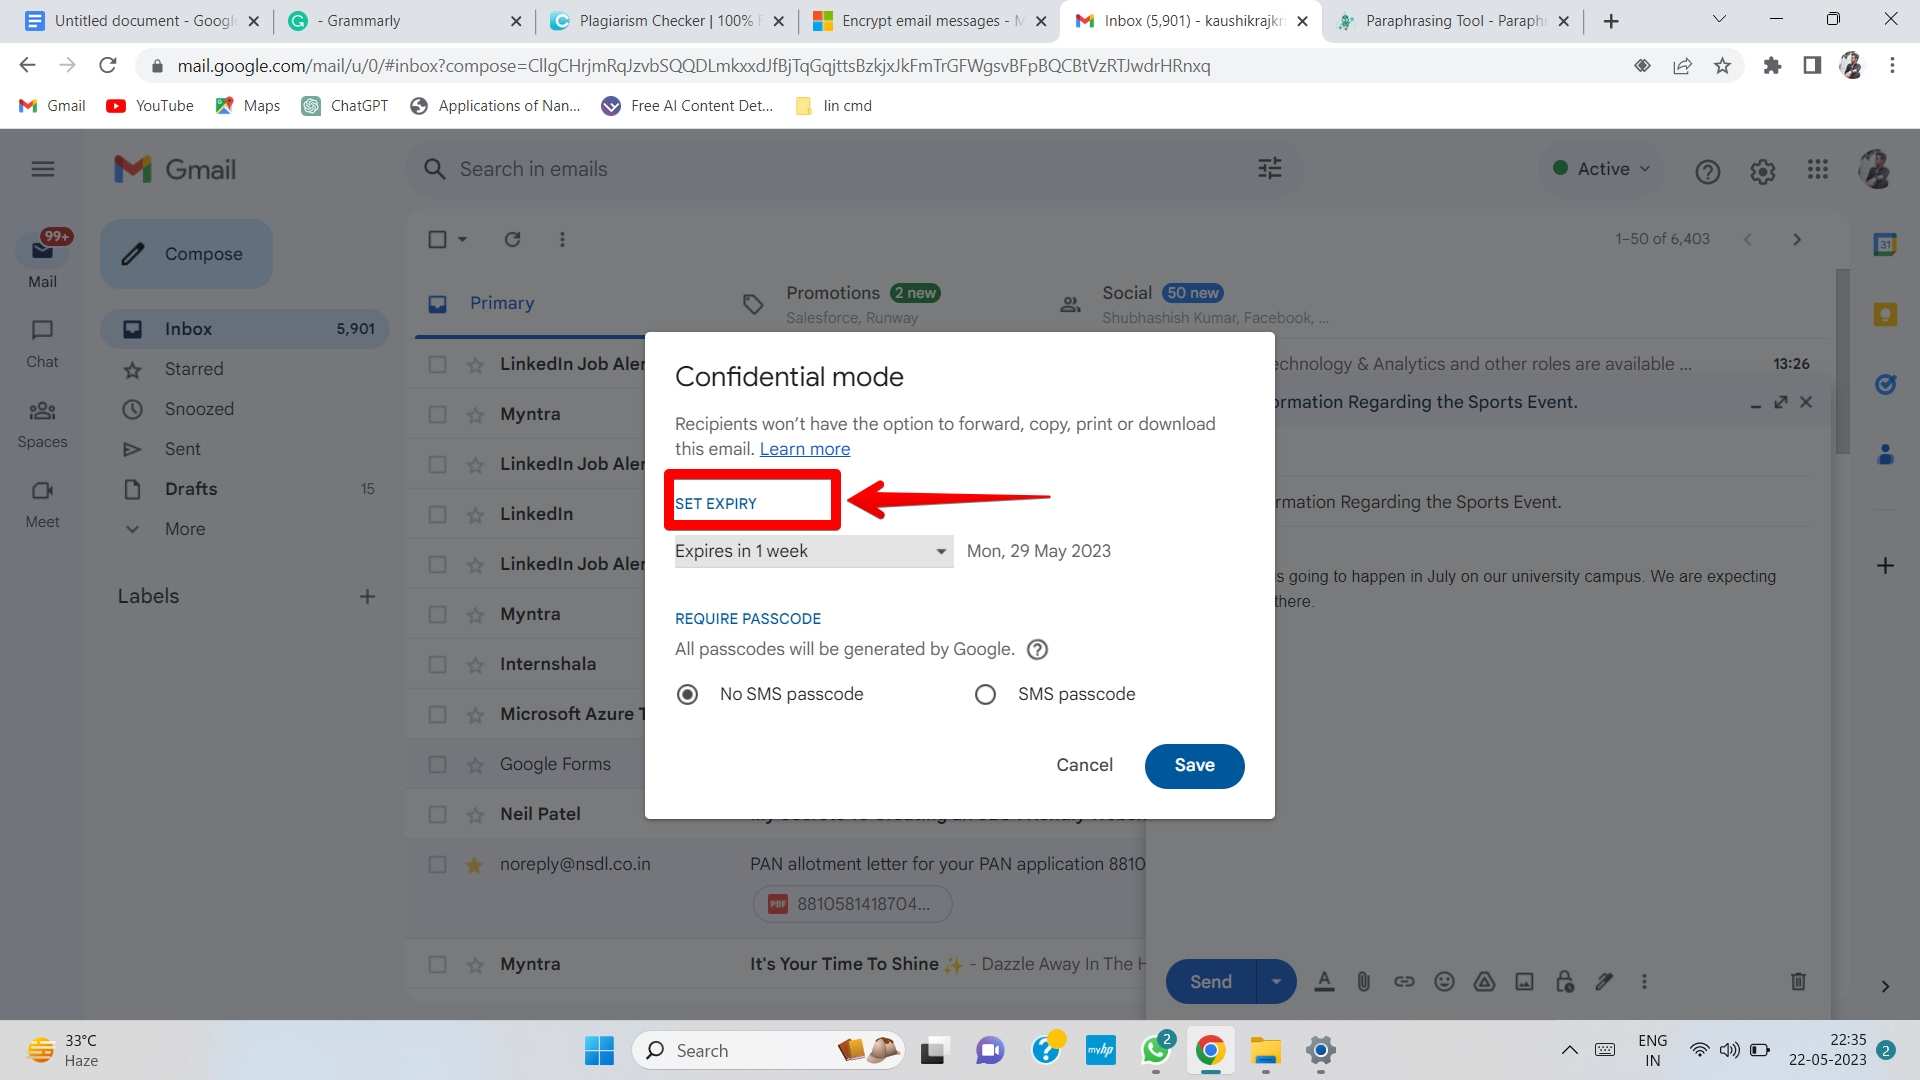
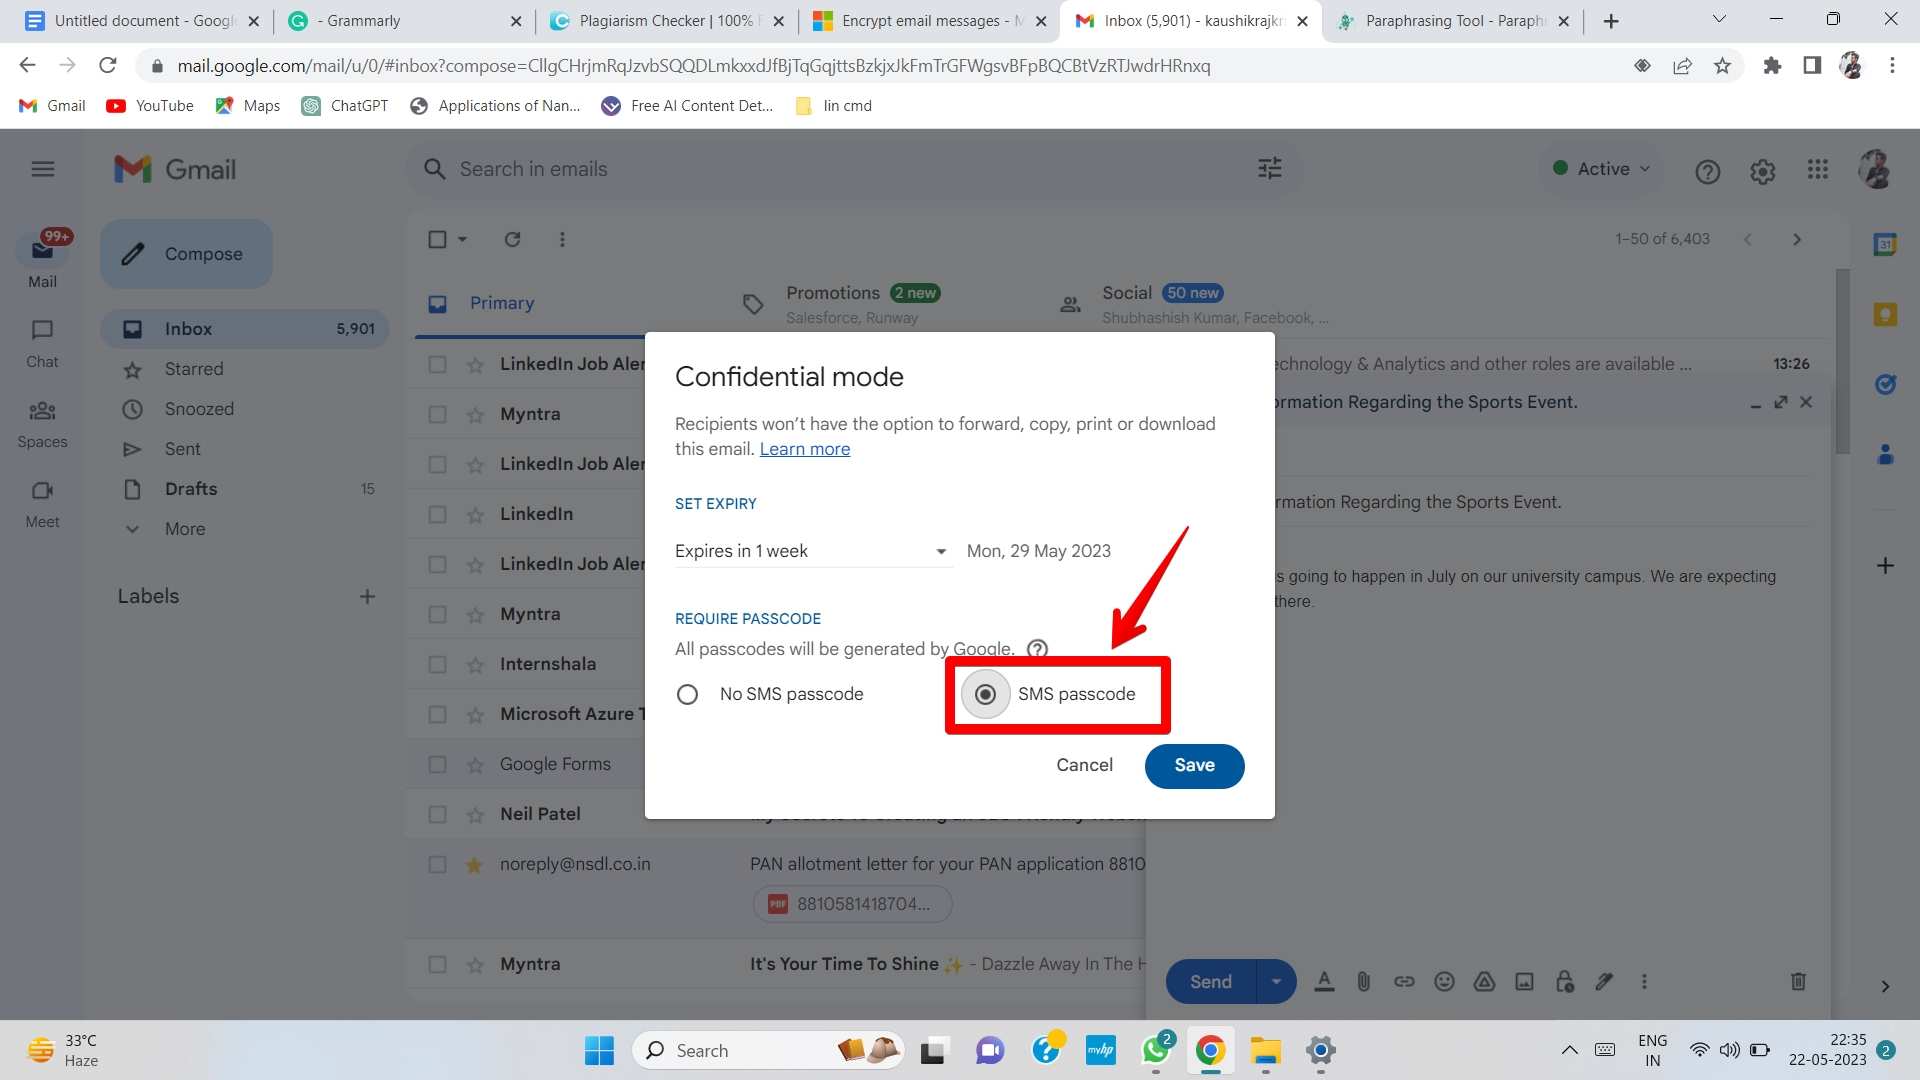
e. Once satisfied with the e-mail, tap the “Send” button to deliver the encrypted message.
Decoding an Encrypted Email:
Once you get an encrypted mail in Windows 11, the Mail app naturally decrypts it, provided you have the matching private key related along with your digital certificate. Decrypting an email is effortless:
a. Open the Mail app and find the encrypted email in your inbox.
b. Double-click on the email to open it.
c. The Mail app naturally decrypts the mail, permitting you to read its contents.
d. React to the email as you would with any other regular message.
Verifying the Recipient’s Encryption Capability:
Some time recently sending an encrypted email, guaranteeing that the recipient’s email client supports encryption and features a valid advanced certificate is essential. This confirmation handle makes a difference to ensure that the encrypted e-mail can be decrypted at the recipient’s conclusion. Here’s how to confirm the recipient’s encryption capability:
a. Communicate with the recipient in advance and inquire about their encryption capability.
b. Inquire the recipient to share their digital certificate or give you with their open key.
c. Import the recipient’s digital certificate or public key into your Windows 11 Mail app.
d. Once imported, you’ll then select the recipient’s e-mail address whereas composing an mail, and Windows 11 will consequently encrypt the message for them.
e. In the event that the recipient does not have encryption capabilities, consider utilizing alternative secure communication strategies, such as secure file-sharing platforms or encrypted messaging apps.
Managing Encryption Certificates:
Over time, you’ll have to manage your encryption certificates in Windows 11. This may involve renewing expired certificates, importing modern ones, or denying old ones. Here are some key points to consider when overseeing encryption certificates:
a. To resume an expired certificate, contact your certification specialist and follow their particular renewal process. Once you get the renewed certificate, it’ll replace the terminated one automatically.
b. To import a new certificate, get the certificate file (usually in .pfx or .p12 format) from the certification specialist and take after the consequence process inside the Windows 11 Mail app.
c. To revoke a certificate, contact your certification specialist and take after their revocation handle. Revoking a certificate nullifies it, avoiding its future use for encryption.
d. Review and manage your encryption certificates to guarantee validity and maintain a secure e-mail communication environment.
Conclusion:
Sending encrypted emails in Windows 11 guarantees the security and security of your delicate data amid communication. You’ll set up a secure email environment by getting a digital certificate, arranging encryption settings, confirming the recipient’s encryption capability, and overseeing your encryption certificates. Remember to remain vigilant and consider additional security measures to protect your emails past encryption. With these practices in place, you can certainly send encrypted emails and protect your private data in Windows 11.
Spam and Phishing Emails have been troubling users for a very long time, but nowadays, spammers are getting more advanced in their approach, and you never know when you will walk straight into a spam or phishing email. Fortunately, In Windows Mail and Outlook.com, you can save yourself from Spam and Phishing emails, and this article talks precisely about that only. This article will tell you how to block spam and phishing emails in Windows Mail App and Outlook.com. Please make sure that you read this article till the end.

Why Block Spam And Phishing Emails?
Spam and Phishing emails significantly threaten your device, data, and privacy. A Spam email can contain malicious files, false advertisements, obscene imagery, trackers, and whatnot. You don’t want spam and phishing emails cluttering your inbox when email accounts are widely used for official purposes. On the other hand, phishing emails disguise themselves as important emails with links to websites designed to steal your data.
You won’t be able to distinguish between a phishing email and a real one. Phishing emails are designed to make you enter your credentials and other confidential information on websites where the data is directly sent to the scammer. Blocking such emails will not only protect your device and privacy but also save you time and help you boost your productivity.
How To Block Spam And Phishing Emails In Windows Mail?
It isn’t much you can do to prevent yourself from spam and phishing emails in Windows Mail. To prevent spam and phishing emails in the Windows Mail app, you can mark a specific mail from the spam sender as junk, and all the upcoming emails from that sender will be sent to the junk folder. Here’s how to do it:
- Open Windows Mail Application.
- Once opened, open a specific spam email from the sender.
- In the top right corner, click on the triple-dot icon, and then click on Mark as Junk.
- Once marked as junk, all the upcoming emails from the sender will be sent to the junk folder automatically.
- To access the junk folder, click on the triple line icon in the corner, which will open a menu. In the Folders section of the menu on the left pane, click on More, then select Junk to open the junk folder.


Windows Mail app is an email client and not an email service provider. So it can’t offer you greater control over blocking spam and phishing emails as it cannot change the email service provider’s settings. However, you can prevent spam and phishing emails to a greater extent on Outlook.com. Let’s proceed with our next section for that.
How To Block Spam And Phishing Emails In Outlook.com?
There are three ways you can prevent receiving spam or phishing emails in your inbox, which are pretty compelling. Here they are:
- By Blocking The Sender
- Create A Rule In Outlook
- Use Safe Senders Or Blocked Senders List
Let’s have a detailed look at these methods.
1] Blocking A Sender In Outlook.com
Blocking a sender in Outlook.com will ultimately restrict the sender from sending you bulk emails, and they won’t know that you’ve blocked them. The emails the sender will send you won’t reach you in any way, and you won’t be able to view them, so keep that in mind. Here’s how to do it:
- Open Outlook.com and ensure you are logged in to the respective email account.
- Once in, open a specific mail from the sender. Now, you’ll see a triple dot icon in the top right corner above the Mail view area. Click on it.
- Select Block from the triple dot menu, then select the Block Sender option.


If you want to block multiple senders, select specific emails from all the senders you wish to block, and then perform all the above-listed steps.
2] Creating A Rule In Outlook.com To Prevent Spam And Phishing
You can create a rule in Outlook to prevent your inbox from receiving spam and phishing emails. Rules in Outlook.com are preset instructions that execute when a particular event occurs. It means that you can instruct your Outlook inbox to delete the mail every time one is received containing a spam term in the subject. Here’s how to do it:
- Open Outlook.com and ensure you are logged in to the respective email account.
- Head to Settings from the top right corner (Gear icon). Then select the View all Outlook settings option.
- Once the setting window opens, head over to the Rules section from the left pane, then click on Add a new rule option.
- Now, type in a new name for your rule. After that, select a condition. You can select from various condition categories. i.e., people, my name is, subject, keyword, marked with, the message includes, message size, received, and all messages.

- If you wish to prevent spam from coming from a specific sender, selecting the From option from the People category in conditions is recommended.
- Now, select an action from various action categories, i.e., organize, mark message, route.

- To prevent yourself from spam, it is recommended to either select the Delete option from Organize category or Mark as junk option from the Mark message category.


Now, setting a rule will act every time the said condition occurs. With our recommended rule setup, you’ll be able to delete or directly send all the emails from a specific sender to a junk folder.
3] Use Blocked Senders And Domains List
The block senders and domains list works like the first method but provides a faster way to block multiple spammers without selecting them. You can even block an entire domain. Here’s how to do it:
- Open Outlook.com and ensure you are logged in to the respective email account.
- Open Outlook settings from the top right corner by clicking the gear icon, then selecting the View all Outlook settings option.
- In All settings, head over to the Junk Email section. Now, you’ll see a Blocked senders and domains section. Click on the add button below it.

- Now, proceed by typing in the addresses of spammers. Enter the domain name if you wish to block senders from an entire domain.

Conclusion:
Well, this was all for our article on how to block spam and phishing emails in the Windows mail app and Outlook.com. If you wish to prevent spam from reaching your inbox first, ensure that your email address is shared with trusted sites only.
You can also create an alternate email address for unimportant conversations and sign up on websites. A lot of spam can be reduced by unsubscribing to newsletters and mail lists and checking the privacy policy before submitting details. We hope you found the article to be insightful. Please make sure you share it with everyone.
You can learn about phishing by reading an article on Pharming, a new form of phishing, and more on the Security Category.
Is It Safe To Open A Spam Email?
It is generally safe to open a spam email on your computer. Spam emails are generally filled with trackers, so your activity can be tracked when you open the email. To ensure your device is not harmed during this, don’t download any files attached to the email, and refrain from clicking on any links. Most email services also prevent images from being downloaded in such emails.
How To Prevent My Email From Receiving Spam?
To prevent your email from receiving spam, you can mask your email address. You can also unsubscribe from multiple newsletters and mail lists using online tools such as Unroll Me. Always ensure you share your email address with sites you trust.
When it comes to ensuring the security of your Microsoft Outlook connecting to Windows, there are crucial steps that need to be taken. Did you know that a weak or compromised connection can make your personal and professional information vulnerable to hackers? Protecting your Outlook connection is essential to safeguarding your data and maintaining the privacy of your communications.
One of the most significant aspects of fixing Windows security for Microsoft Outlook connecting is to ensure that your email settings are properly configured. This involves checking the SSL/TLS settings, enabling two-factor authentication, and updating to the latest version of Outlook to benefit from the latest security patches. By implementing these measures, you can create a more secure connection that reduces the risk of unauthorized access and protects your sensitive information.
If you’re experiencing issues with Microsoft Outlook connecting due to Windows Security, here’s a step-by-step guide to fix it:
- Open Windows Security by clicking on the Windows Start menu and typing «Windows Security.»
- Click on «Virus & threat protection.»
- Scroll down to «Manage settings» and click on it.
- Under «Virus & threat protection settings,» toggle off Real-time protection.
- Try connecting Outlook again. If it works, the issue was with real-time protection.
Introduction: Understanding Windows Security and Microsoft Outlook Connectivity
In today’s digital age, security is paramount when it comes to using technology for communication. For many professionals, Microsoft Outlook is their go-to email client, offering a wide range of features and functionalities. However, there are instances where users may encounter issues with Windows Security blocking the connection between Microsoft Outlook and the server. This can be frustrating and hinder productivity, but fear not, as we have prepared this comprehensive guide to help you fix Windows Security Microsoft Outlook connecting issues.
Understanding Windows Security
Before we delve into the solutions, it’s crucial to have a clear understanding of Windows Security. Formerly known as Windows Defender Security Center, Windows Security is the built-in antivirus and security suite provided by Microsoft for Windows 10 users. It includes various features such as Firewall & Network Protection, App & Browser Control, Device Security, and more.
Windows Security is designed to protect your computer from malware, viruses, and other security threats. However, in some cases, it might mistakenly detect certain applications or services as potential threats, resulting in blocking the connection between Microsoft Outlook and the server. This can cause inconvenience and hinder your ability to send or receive emails, access calendar events, or synchronize data.
Now, let’s explore some common causes for Windows Security Microsoft Outlook connecting issues and the corresponding solutions to help you troubleshoot and resolve the problem effectively.
Incorrect Firewall Settings
One potential cause of connectivity issues between Microsoft Outlook and the email server is incorrect firewall settings. Windows Security’s Firewall & Network Protection feature acts as a barrier, regulating the incoming and outgoing network traffic on your computer. If the firewall settings are misconfigured or restrict the necessary communication, it can prevent Microsoft Outlook from establishing a secure connection.
To address this, follow these steps:
- Open Windows Security by clicking on the Windows Start button and typing «Windows Security.»
- In the Windows Security window, click on «Firewall & Network Protection.»
- Click on «Allow an app through firewall.»
- Locate Microsoft Outlook in the list of applications and ensure that both the private and public checkboxes are selected.
- Save the changes and restart Microsoft Outlook to check if the issue has been resolved.
Outdated Antivirus Software
Another common cause of Windows Security Microsoft Outlook connecting issues is having outdated antivirus software installed on your computer. Antivirus programs often include their own security features, which might conflict with certain aspects of Windows Security, leading to connectivity problems.
To resolve this issue, follow these steps:
- Open the antivirus software installed on your computer.
- Navigate to the settings or preferences section.
- Look for an option related to email scanning or email protection.
- Disable the email scanning feature or add Microsoft Outlook to the list of trusted applications.
- Save the changes and restart Microsoft Outlook.
Credential Manager Conflicts
In some cases, conflicts within the Credential Manager can also cause issues with connecting Microsoft Outlook to the server. The Credential Manager is a Windows feature that stores the credentials needed for secure logins on websites, network shares, and other services.
To resolve Credential Manager conflicts, follow these steps:
- Open the Control Panel on your computer.
- Navigate to «User Accounts» or «Credential Manager».
- Click on «Manage Windows Credentials» or «Manage your credentials.»
- Look for any credentials related to Microsoft Outlook or the email server you are using.
- Select the credential and click on «Remove» or «Delete.»
- Restart Microsoft Outlook and enter your credentials again when prompted.
Proxy Server Settings
Proxy server settings can also interfere with the connection between Microsoft Outlook and the server. Proxy servers act as intermediaries between your computer and the internet, and if misconfigured, they can prevent Outlook from connecting successfully.
To adjust proxy server settings, follow these steps:
- Open Microsoft Outlook.
- Go to the «File» menu and click on «Options.»
- In the Outlook Options window, click on «Advanced» and scroll down to the «Network» section.
- Click on «Connection Settings.»
- Ensure that the option «Automatically detect settings» is checked, or configure the proxy server settings according to your network requirements.
- Save the changes and restart Microsoft Outlook.
By following these steps, you should be able to resolve most Windows Security Microsoft Outlook connecting issues and establish a seamless communication channel between your email client and the server.

How to Fix Windows Security Microsoft Outlook Connecting
If you are experiencing issues with connecting Microsoft Outlook due to Windows Security, there are several steps you can take to fix the problem.
1. Check your antivirus software: Ensure that your antivirus software is not blocking the connection between Outlook and Windows Security. You may need to add Outlook as an exception or temporarily disable your antivirus software to test the connection.
2. Update Outlook: Make sure you have the latest version of Outlook installed. Outdated versions may have compatibility issues with Windows Security.
3. Verify Windows Security settings: Check your Windows Security settings to ensure that Outlook is allowed access and is not being blocked by any firewall or security features. You can add Outlook to the list of allowed apps or create an exception if necessary.
4. Restart computer: Sometimes, simply restarting your computer can resolve connectivity issues between Outlook and Windows Security.
By following these steps, you should be able to fix any issues with Windows Security blocking the connection between Microsoft Outlook and your computer.
Key Takeaways — How to Fix Windows Security Microsoft Outlook Connecting
- Restart your computer and reinstall Microsoft Outlook.
- Check your internet connection and ensure it is stable.
- Disable any antivirus or firewall software that may be blocking the connection.
- Update your Windows operating system and Microsoft Outlook to the latest versions.
- Reset your Windows Security settings and configure them for Microsoft Outlook.
Frequently Asked Questions
In this section, we will address some common concerns regarding fixing issues with Windows Security and Microsoft Outlook connecting. Here are the answers to frequently asked questions:
1. Why am I unable to connect to Microsoft Outlook after a Windows Security update?
If you are unable to connect to Microsoft Outlook after a Windows Security update, it could be due to various reasons. One common cause is that the update may have disrupted the settings or configurations necessary for Outlook to establish a connection. Additionally, certain security features in Windows could be preventing Outlook from accessing the necessary resources.
To resolve this issue, you can try the following steps:
2. My Microsoft Outlook keeps prompting for Windows Security credentials. How can I stop this?
If Microsoft Outlook keeps prompting for Windows Security credentials, it can be frustrating and disrupt your workflow. This issue is often caused by incorrect settings or configurations. To stop the continuous prompts, you can try the following solutions:
First, ensure that your account settings are correctly configured in Outlook. Verify that the username, password, and server information are accurate. You can also try resetting the saved credentials to resolve any authentication issues. Additionally, check if any third-party antivirus or firewall software is interfering with Outlook’s connection and temporarily disable them to see if that resolves the issue.
3. After updating Windows Security, my Outlook is unable to send or receive emails. What should I do?
If your Outlook is unable to send or receive emails after updating Windows Security, it could be due to changes in the security settings or configurations. To fix this issue, you can try the following steps:
First, check if your email account settings are correct. Verify the incoming and outgoing server addresses, ports, and security settings. Next, ensure that your antivirus or firewall software is not blocking Outlook’s access to the internet. Temporarily disabling these applications can help identify if they are causing the problem. Finally, you can try repairing your Outlook installation to resolve any potential issues with the software itself.
4. Outlook is showing a security alert when I try to connect after a Windows Security update. What does this mean?
If you are seeing a security alert in Outlook after a Windows Security update, it indicates that the connection to the mail server is not secure. This can occur if the server’s digital certificate is expired or if the server is using an unsupported encryption protocol. To resolve this issue, you can try the following steps:
First, check if the date and time settings on your computer are correct. An incorrect date or time can cause certificate errors. Next, ensure that your antivirus or firewall software is not interfering with Outlook’s connection. Finally, contact your email provider or IT department for assistance in updating the server’s certificate or configuring the encryption settings in Outlook.
5. How can I ensure a secure connection between Microsoft Outlook and Windows Security?
To ensure a secure connection between Microsoft Outlook and Windows Security, you can follow these best practices:
First, keep your Windows Security and Outlook software up to date with the latest patches and updates. Regular updates often include security enhancements and bug fixes that can improve the connection between the two applications. Additionally, use strong and unique passwords for your email accounts to prevent unauthorized access. Finally, enable two-factor authentication for your email accounts to add an extra layer of security when connecting to Outlook.
In summary, fixing Windows Security while connecting Microsoft Outlook requires a few simple steps. First, ensure that your antivirus software is up to date and not blocking the connection. Next, check your firewall settings to make sure Outlook is allowed through. If necessary, add an exception for Outlook in your firewall settings.
If you’re still having trouble, try repairing or reinstalling Microsoft Office. This can fix any issues with the Outlook application itself. Additionally, make sure your Windows operating system is updated to the latest version, as this can often resolve underlying compatibility issues.
Readers help support Windows Report. We may get a commission if you buy through our links.
Read our disclosure page to find out how can you help Windows Report sustain the editorial team. Read more
Security-wise, Windows 10 is probably the most secure Windows iteration to date. However, that enforced security something functions without any logic whatsoever.
And even if there’s any logic, they did a subpar job explaining why something happens when it does. Let’s take the Windows Security pop-up that blocks the connection to Wi-Fi networks and asks for your credentials.
To make things even worse, this is the password protection most users never set. Some associate it with Outlook but it doesn’t seem to be the case every time. Fortunately, there’s a solution to this issue.
Few of them, to be exact. So make sure to check them out below.
How to get rid of the Windows Security pop-up in Windows 10?
- Disable Password Protected Sharing
- Change Outlook settings
- Check Credential Manager
- Reset Network settings
1. Disable Password Protected Sharing
It might come as a surprise but there are multiple reasons for this unpleasant occurrence. One that’s common includes HomeGroup sharing. If you have multiple PCs connected via HomeGroup sharing, you’ll need to disable the password protection.
That’s a common bug that bothered users on Windows XP and it seems it found its place in Windows 10, as well. Here’s how to do it easily in Windows 10:
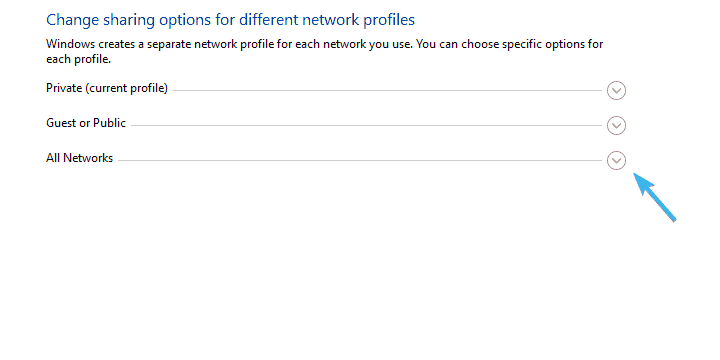
- In the Windows Search bar, type Advanced sharing and open ”Manage advanced sharing settings”.
- Expand All networks.

- Navigate to the bottom and select to Turn off password protected sharing.
- Save changes and exit.

2. Change Outlook settings
Outlook security settings are the most common reason for the Windows Security pop-up. Now, there are a lot of variations on the subject and various solutions roaming around. However, the most probable solution is hidden within Outlook’s Account settings.
Here’s what you need to do in order to disable repetitively occurring Windows Security prompts:
- Open Outlook.
- Open ”File” from the main menu.
- Choose Info and then Account Settings.
- Choose the E-mail tab.
- Right-click on the account that inflicts Windows Security prompt and select Change.
- Select More settings.
- Under the Security tab, uncheck the ”Always prompt for login credentials” box and confirm changes.
- Click OK and save changes.
On the other hand, if you’re still constantly annoyed by Windows Security pop-up asking to sign in with who-knows-what credentials, make sure to check the additional steps.
3. Check Credential Manager
Some users managed to resolve the issue at hand by deleting certain credential inputs from the Credential Manager. During the creation process of an Outlook account, you might have made a slight mistake.
It seems that it’s related to credentials check input, forcing the Windows Security pop-up to reoccur frequently. Follow these steps to delete Outlook-related inputs from the Credential Manager:
- In the Search bar, type Credential and open Credential Manager.
- Open Windows Credentials.
- Look at the Generic section for Outlook-related credentials.
- Expand everything associated with Outlook and click Remove.
- Restart your PC and look for changes.
If you need more info on how to add, delete, or edit files in Credential Manager, we’ve prepared a complete guide that will help you understand better what it does and how to navigate it.
4. Reset Network settings
Finally, you can try resetting network settings. For some users, the issues started after small Wi-Fi network issues, which are common for various reasons. It seems that resetting the network fixes relentless credential pop-ups.
If you’re not sure how to reset network settings in Windows 10, follow the steps below:
- Press Windows key + I to summon the Settings app.
- Open Network & Internet.
- Select Status from the left pane.
- Scroll to the bottom and click on Network Reset.
- Enter your Wi-Fi credentials and reconnect.


If Windows 10 forgets your network credentials, check out this simple guide to quickly solve the problem.
That should be it. We hope that at least one of the enlisted solutions helped you address the bothersome Windows Security prompt.
In case you have an alternative solution or questions regarding the ones we posted, make sure to tell us. You can do so in the comments section below.
RELATED STORIES YOU SHOULD CHECK OUT:
- How to fix error code 20 on Outlook
- HP error 75: Quick solutions to fix it when it pops up
- This Windows 10 pop-up bug makes gaming impossible [FIX]
- ‘Do you want to view in fullscreen’: How to disable the pop-up
Aleksandar Ognjanovic
Aleksandar’s main passion is technology. With a solid writing background, he is determined to bring the bleeding edge to the common user. With a keen eye, he always spots the next big thing surrounding Microsoft and the Windows OS.
Focused on Windows errors and how to solve them, he also writes about the OS’s latest features as well as its interface.
In his free time, he likes to read, listen to music, and enjoy the nature. Hiking is one of his newly found passions.