
Frequently Asked Questions
Windows on Raspberry imager
Why does the installation process keep failing?
Please check that:
- you’re using the latest version of WoR
- your SD Card / USB drive are not failing (try with other hardware)
- your anti-virus solution doesn’t interfere with the deployment process (temporarily disable it)
If it fails at the Installing drivers stage, then there’s probably an issue with the Windows installation on your PC. In this case, you can try to:
- reinstall the operating system
- run the WoR imager in a virtual machine, and passthrough the target drive
- tell the tool to use a custom version of DISM.
If you want to do the latter, you’ll first have to download and install a copy of the Windows ADK, then add the following path: adkInstallPath\Assessment and Deployment Kit\Deployment Tools\ARCH\DISM to the settings.ini file.
Replace adkInstallPath with the path where you’ve installed the ADK. (it’s C:\Program Files (x86)\Windows Kits\10 by default)
Replace arch with the architecture of your machine (amd64, x86)
Why does the image installation process take a very long time?
Try temporarily disabling any anti-virus software. Windows Defender is known to slow down the process quite significantly.
If this doesn’t help, then the target drive may be too slow.
OK, but flashing Raspberry Pi OS or any other Linux distro is waaaaay faster. Are you really telling me that the drive is slow?
Sort of. Linux distros for Raspberry Pi usually come packaged in the .img format, which is a sector-by-sector copy of a disk drive. In other words, someone has shared an image of their SD card. (which, by the way, is an illegal thing to do for Windows, due to copyright reasons)
Now, why is this faster to install?
It’s faster to install because an .img file is copied sequentially to your drive. Very cheap or old devices usually have decent sequential speed, but poor random I/O performance. The latter is what matters for Windows images, as they’re file-based rather than sector-based.
Where can I report issues?
For Rockchip devices:
UEFI: https://github.com/edk2-porting/edk2-rk3588?tab=readme-ov-file#reporting-issues
Drivers: https://github.com/worproject/Rockchip-Windows-Drivers/issues
Windows on Raspberry PE-based installer
Why does the installation fail with code 121 (The semaphore timeout period has expired)?
We’ve seen this happen on drives that are too slow (e.g.: SD cards that are not A1-rated or better). The only solution is getting a drive that has better random I/O speeds.
General
Is Raspberry Pi 5 or newer supported?
The short answer is: no, we don’t offer support for Raspberry Pi boards anymore.
There have been some efforts in this direction through https://github.com/worproject/rpi5-uefi, which does allow Windows 11 to boot with basic hardware support, but there are no plans to improve it any further.
We strongly encourage you to contact Raspberry Pi (or post to the forums) and let them know that you care about official Windows and UEFI support on their boards.
Does Windows 11 work?
All builds of Windows 11 can run on Rockchip RK3588 devices.
Windows 11 build 25163 is the last one than can boot on the Raspberry Pi 4 and older.
Recent insider builds no longer work as they make extensive use of the new atomic instructions introduced in ARMv8.1.
The UEFI now supports Secure Boot, and software TPM 2.0 may also be implemented in the future. But there’s a new ARMv8.1 CPU requirement which the Raspberry Pi doesn’t meet (it has ARMv8.0).
Boards with less than 4 GB of RAM will also encounter the RAM requirement.
The checks are currently present only in setup.exe, but our imager replaces it when doing a clean installation.
Feature updates depend on setup.exe, so you’ll have to bypass those checks. More details here: How to perform OS updates.
Where can I find Windows images?
See the Getting Windows Images guide.
How can I update the drivers?
Download the latest driver package ZIP for your Raspberry Pi model from: https://github.com/worproject/RPi-Windows-Drivers/releases
To update the drivers from another computer (recommended):
- Launch Command Prompt as administrator.
- Run
Dism /Image:E: /Add-Driver /Driver:"PathToDrivers" /Recurse /ForceUnsigned
ReplacePathToDriverswith the path to the extracted driver package.
ReplaceE:with the letter of the Windows partition on your Raspberry Pi boot drive.
To update the drivers directly on your Raspberry Pi (might lead to crashes):
- Launch Command Prompt as administrator.
- Run
pnputil.exe /add-driver "PathToDrivers\*.inf" /subdirs /install /reboot(the device may reboot)
ReplacePathToDriverswith the path to the extracted driver package.
How can I access the boot partition (to edit config.txt or update the firmware)?
There’s a tool that can help you do that: Boot partition mount utility
Why am I getting the ‘Windows Setup could not configure…’ error?
The «Windows Setup could not configure Windows to run on this computer’s hardware.» error usually occurs when the power was interrupted during the first boot process.
This can be fixed by re-installing the image.
Does the built-in Wi-Fi, Bluetooth, (insert device here) work?
You can find the current hardware support status here: https://github.com/worproject/RPi-Windows-Drivers#status
And no, we don’t have an estimated time of arrival (ETA) for anything.
Why am I not able to use any USB devices?
Some outdated guides may tell you to use winpatch. This is no longer required and will break the USB driver.
I keep getting the ‘Why did my PC restart?’ screen. What should I do?
We don’t currently know the exact cause of this issue, but we’ve seen it happen on slow SD cards / USB drives. So make sure to try a faster storage drive.
Note: sequential speeds don’t matter as much as random I/O ones do.
Why drivers that work on my PC don’t work on the Raspberry Pi?
Your PC most probably has an x86 Intel/AMD processor, while Raspberry Pi has a totally different CPU architecture.
Only ARM64 drivers are supported on Windows 10 ARM64.
We highly suggest asking the hardware vendor for ARM64 drivers. If enough people contact them, they may prioritize the request.
USB serial drivers?
Silicon Labs CP210x
https://www.silabs.com/documents/public/software/CP210x_Universal_Windows_Driver.zip
FTDI
Direct download: https://ftdichip.com/wp-content/uploads/2022/02/CDM-v2.12.36.4-for-ARM64-Signed-Distributable.zip
Manual download (see the Windows Desktop ARM target): https://ftdichip.com/drivers/d2xx-drivers/
CH34x
Manual download: http://www.wch.cn/downloads/CH341SER_ZIP.html
Other devices
Controllers that show up as a standard serial port, like Arduino boards with ATmega16u2, should work too.
You can also use the built-in serial pins on the GPIO header if you have the latest driver package installed.
USB Wi-Fi drivers?
RTL8187-based adapter
https://drive.google.com/drive/folders/1KSCIgzjdhCeZzxsGFZu2t2lyduq2jO65 (made by @emp4u2)
Examples of adapters with this chipset: NETGEAR WG111v2
Other chipsets are NOT currently supported, but feel free to try anyway.
USB sound cards?
Yes. Most of them should work.
Devices that don’t need 3rd party drivers are the most likely to work.
Can I run x86 / x64 apps?
Yes, you can run most x86 apps on Windows 10 ARM64.
x64 app support is currently available in the latest insider builds of Windows, and it’s significantly faster than the x86 layer.
How can I see the CPU temperature and other hardware info?
Use the PiMon app from the Downloads page.
Why (insert application name here) doesn’t work?
Some apps may not work as expected, and we can’t really do anything about it. Please contact the app developer / hardware vendor for support.
Only 3 GB of RAM are available. How can I fix this?
- keep pressing the ESC key after plugging in the power cord, until you see the UEFI setup screen.
- go to
Device Manager->Raspberry Pi Configuration->Advanced Configurationand changeLimit RAM to 3 GBtoDisabled. - press ESC several times to go back, then Y to save the settings when prompted and finally reboot the board.
How long does the first boot process take?
This mostly depends on the speed of your boot drive.
Something may have went wrong if:
- 10 minutes have passed and you’re not seeing the spinning dots
- 1 hour has passed and you’re still staring at the spinning dots
How long does the ISO download process take?
It depends on the speed of your internet connection, CPU and storage, thus we cannot tell you an average time.
The ISO download script has failed. What can I do?
- redownload the script and try again.
- if you’ve used https://uup.rg-adguard.net, try https://uupdump.net and vice versa.
In case this still doesn’t solve the issue and you’re not able to figure out the cause, UUPDump has a Discord server linked in the header of their website. People there may be able to help you.
You can also join the community servers for this project.
How can I delete the ISO download folder? It says that I don’t have access.
This is a common issue with scripts from https://uup.rg-adguard.net. They fail / forget to unmount a WIM image.
To fix this, identify the stubborn mount folder, then execute the following command in a Command prompt window running as Administrator:
dism /unmount-image /mountdir:"YourStubbornMountDir" /discard
Can I use virtualization software? (Hyper-V, WSL2)
Not yet. While the CPU supports it, the UEFI doesn’t properly inform the OS about this.
Enabling the Virtual Machine Platform will leave the system in an unbootable state!
How can I access the GPIO?
See:
- https://www.nuget.org/packages/System.Device.Gpio
- https://github.com/dotnet/iot
- https://docs.microsoft.com/en-us/samples/microsoft/windows-universal-samples/iot-gpio (Windows.Devices.Gpio is not easily accessible in WoR, so it’s recommended to use the libraries above)
How can I use the built-in PWM controller(s)?
See: https://github.com/raspberrypi/windows-drivers/tree/master/drivers/pwm/bcm2836#using-pwm-driver-from-kerneluser-mode
Can I use Windows Update?
See: How to perform OS updates
Does it work on the Compute Module (CM)?
It works on the Compute Module 3.
Compute Module 4 (with or without eMMC) is know to freeze at the UEFI boot screen. See: https://github.com/pftf/RPi4/issues/146
Even if you manage to get it booting on the CM4, USB support will require an 1 GB RAM limit. PCIe also won’t work.
Will my case fan work?
If it needs any additional installation in Linux, then it will likely not work. The fan control services / scripts must be ported to Windows.
If it’s a simple PWM fan, the UEFI can toggle it on boot. You just need to enable this functionality in the UEFI setup menu and connect the PWM signal pin accordingly.
How can I activate Windows?
With a regular license key.
Windows licenses are NOT architecture-specific, so you can use any key that you’d normally use on your PC.
Is this project legal?
See: https://www.raspberrypi.org/forums/viewtopic.php?p=1706253#p1706253 (some things in that post are outdated, like USB needing patches & such, but the legal aspect is still relevant today)
Also see the replies on this thread: https://www.raspberrypi.org/forums/viewtopic.php?f=29&t=318599.
tl;dr: It’s as legal as running Windows on your PC.
We don’t share any copyrighted files. You can generate Windows images from files publicly available on Microsoft servers.
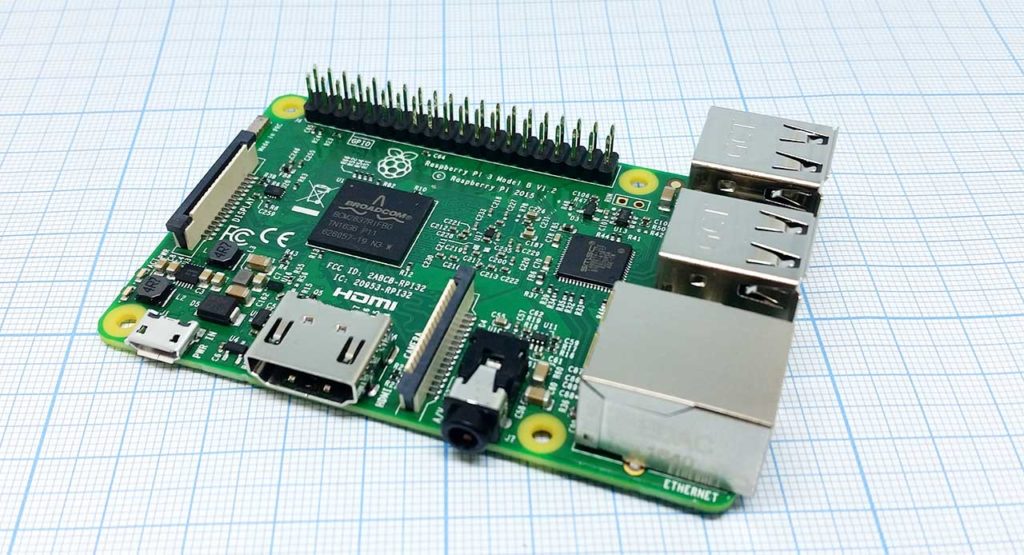
Плата микрокомпьютера Raspberry Pi 3
Честно говоря, идея опробовать одноплатный компьютер Raspberry пришла ко мне неожиданно. Опыт по Arduino и прочим ESP имеется, с «большими» ПК и серверами тоже. А вот промежуточный вариант, представленный сонмой разнокалиберных устройств, мной как-то совсем не изучен. А еще мне хотелось опробовать в деле, что же такое Windows IoT и для чего можно применить новинку от Microsoft. Выбор устройства оказался совсем очевидным: Raspberry Pi 3 с 1 Гб ОЗУ на борту, самое что ни на есть популярнейшее устройство. Конечно, различные Pine64 поджимают, но тут популярность играет на руку. Чем выше популярность, тем меньше проблем совместимости.
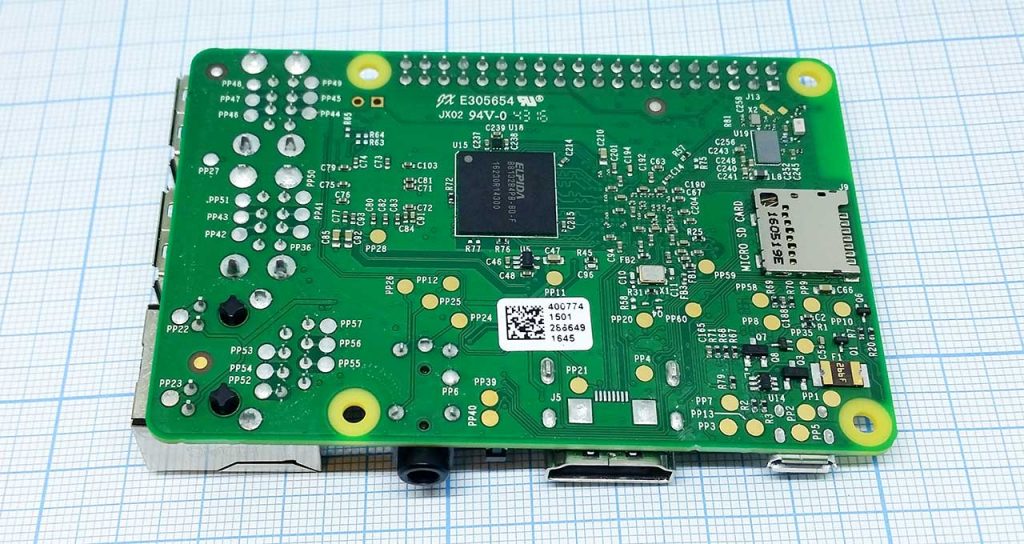
Обратная сторона Raspberry Pi 3. Виден чип ОЗУ.
И вот, спустя месяц ожидания, хорошо упакованная коробчонка с Raspberry обосновалась на моем столе. Я сразу же взял полный комплект: плата, мощный блок питания, радиаторы для чипов и пластиковый корпус. Придраться к комплектации и качеству изготовления сможет только самый мерзкий и дотошный критик. Все оборудование сделано на совесть. Плата с отмытым флюсом, пайка надежная, USB-порты на месте все, как и должно быть. Блок питания не свистит и не греется с избытком. Радиаторы чистые, с комплектным скотчем 3M для приклейки их к чипам. Корпус из пластика, хоть и маркий, но удобный в использовании. Если требуется, его можно открыть и протереть плату тряпочкой. А через многочисленные отверстия отлично подключаются кабеля для внешних устройств. Ладно, хватит описывать то, что давно всем известно. Настало время установки Windows.
Я еще помню времена, когда Windows устанавливался с дискетки. Потом уже операционка поставлялась на CD-диске, затем на DVD. А сейчас же все делается посредством простых «флешек». С Windows IoT и Raspberry все немного иначе.

Микрокомпьютер Raspberry Pi 3 в пластиковом блестящем корпусе и с установленными радиаторами
Существует как минимум два способа установки Windows IoT на Raspberry. Первый способ — воспользоваться услугами официального сайта Raspberry и скачать либо готовый образ Windows IoT, либо загрузить его через специализированный установщик NOOBS. Второй способ изобретен Microsoft. Он немного хитрее и именно им я и воспользуюсь. Да, способ применим только если на вашем рабочем компьютере используется зарегистрированная версия Windows 10. Иначе путь может быть осилен только первым способом.
Шаг 1. Скачиваем Windows IoT Dashboard
Dashboard — специальная утилита, позволяющая подготавливать носители, а в случае Raspberry Pi 3 это MicroSD, для запуска Windows IoT. Скачать утилиту можно с сайта Microsoft. Для бесплатной загрузки и использования доступны только две версии Windows IoT: Core и Insider Preview. Различий между ними не так много. Core — стабильная система, подходящая для большинства разработчиков, а Insider Preview позволят энтузиастам испытывать легкое волнение от новых «фич» и «багов».
Для версии Core существует одно, не очень существенное ограничение. Тут можно запускать только одно приложение UWP (Universal Windows Platform). Вернее, запускать их можно несколько, но активным в один момент времени будет только одно. Аналогичным образом работает и Insider Preview. В общем-то обе эти системы ориентированы на устройства с ограниченными ресурсами, к которым относится и Raspberry. Поэтому ограничение вполне разумное. А если хочется большего, то придется приобретать версию Enterprise.
Шаг 2. Подготавливаем карту памяти, устанавливаем на нее систему
Все делается в том же Dashboard. Выбираем тип платы, вставляем карту памяти, вводим сетевое имя устройства, меняем пароль. Кстати, по умолчанию, а иногда пароль, введенный на стадии подготовки карты не срабатывает, используется связка Administrator/p@ssw0rd в качестве пары логина и пароля. Тут же можно прописать и подключение к вашей Wi-Fi сети.
Если выбранный дистрибутив не был ранее скачен на компьютер, то Dashboard автоматически его скачивает. Далее происходит запись на карту памяти.
Шаг 3. Первый запуск Raspberry с Windows IoT на борту
После установки карты памяти, можно смело подключать плату к сети Ethernet (или не подключать, если настроен Wi-Fi), да подавать питание. Первая загрузка происходит дольше, чем все последующие, поскольку происходит первичное развертывание операционной системы. В моем случае первичная загрузка заняла минуты три или четыре. Первичная настройка может производиться в полностью Headless режиме, нет необходимости подключать дисплей или клавиатуру. Что, согласитесь, очень удобно, особенно если устройство у вас уже физически интегрировано куда-нибудь в подвал и приварено стальной арматурой к бетонному блоку, чтобы вандалы не уволокли.
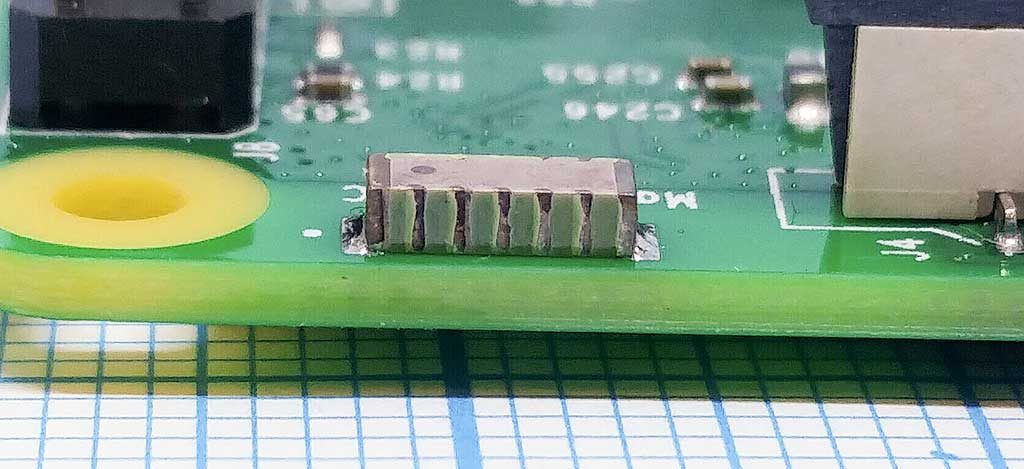
Антенна с поддержкой Wi-Fi и Bluetooth на чипе у Raspberry Pi 3
Кстати, на Raspberry 3 есть два светодиода. Красный сигнализирует, что питание на плату подается. А зеленый горит, когда есть обращения к карте памяти. С Windows IoT зеленый светодиод бесполезен, по крайней мере в текущей редакции системы. Он ничего не сигнализирует, просто не горит и все.
Шаг 4. Дальнейшая настройка
После прохождения первоначальной настройки к устройству уже можно обращаться по сети и использовать его на полную. Если же в сети его, по каким-то причинам, не видно. То тогда придется подключить монитор и клавиатуру, а затем выполнить настройку сети через интерфейс Windows IoT.
Если же с сетью все в порядке, то основным способом настройки системы является Web-интерфейс. Попасть в него можно через тот же Dashboard. В разделе My Devices отображаются все ваши Windows IoT устройства доступные в вашей сети. Жмакаем правой кнопкой и выбираем панель управления устройством.
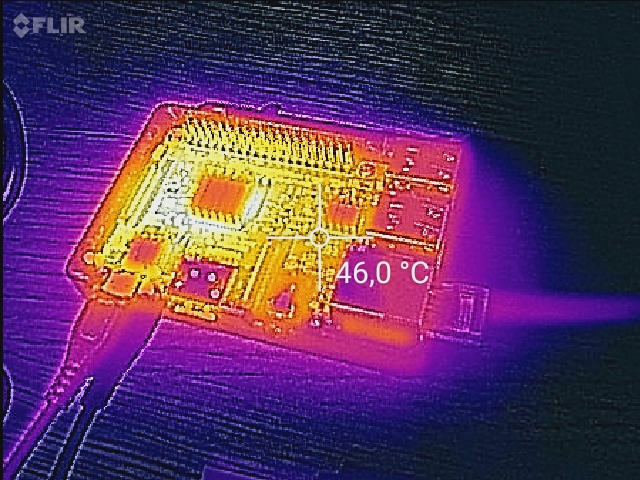
Под нагрузкой (установка апдейтов) плата греется до существенных значений. Радиаторы холоднее, чем сама плата, видимо используемый скотч 3M не очень здорово проводит тепло. Необходимо отклеить радиаторы от чипов, заменить скотч на нормальный термоинтерфейс.
Кстати, на удивление, отрабатывает Web-сервер в Windows IoT куда быстрее, чем даже на моем микросервере. Через интерфейс можно настроить все, что положено настраивать обычному пользователю, включая пароль доступа, пин-код для удаленной отладки и прочее вкусности. Не обойдены стороной и любимые Microsoft обновления для системы. Да, Windows IoT обновляется аналогично своим собратьям для больших ПК. Процесс обновления кстати не быстрый, а железо раскаляется от нагрузки.
Отдельно хочу упомянуть про мониторинг нагрузки на плату. На соответствующей вкладке доступны различные показометры, что вполне удобно, хотя бы с целью определения нагрузки на плату самой операционной системой. Графики наглядны и отображают сведения в режиме реального времени.
Что еще? Я заметил, что Dashboard хитро подготавливает карту памяти для записи. Вне зависимости от ее объема он ее форматирует как карту на 64 Гб. Возможно, что такой подход нужен для установки Windows IoT, но вот после, когда передумаете использовать Windows IoT, стоит не забыть и переформатировать карту под ее истинный размер. Иначе могут возникать различные коллизии, например, операционная система видит, что на карте осталось еще куча места, поэтому не ограничивает себя и пишет множество данных на карту, не стирая старое. А потом бац и система становится нестабильной, вплоть до невозможности ее загрузки.
Как управлять Raspberry с установленной Windows IoT
Вариантов тут несколько. Самое первое и самое простое, что может прийти в голову — использование монитора и клавиатуры. Подключаем и попадаем в интерфейс Windows IoT. Тут же можно слегка подшаманить сетевые настройки, перезагрузить плату, запустить установленные приложения.
Если вариант прямого управления не подходит, то можно (и даже нужно) управлять платой по сети. В настоящее время для этих целей присутствует целых три способа. Можно управлять Windows IoT через штатное средство Windows PowerShell. Легче всего подключиться к удаленной системе все через тот же Dashboard. Либо можно воспользоваться подключением по SSH. Тут уж подключаться можно вообще с любой системы, хоть из-под Windows, хоть с Android, а в Linux SSH так вообще стандартное средство. Даю наводку, для Windows можно использовать сверхпопулярный терминал PutTTY.
Но к плате можно подключиться и иным способом. Прямиком в графический интерфейс. Для этого необходимо включить удаленный доступ на плате, лучше всего это сделать через веб-интерфейс (самая нижняя вкладка). А затем скачать через Windows Store приложение для доступа к Windows IoT. Его вызов возможен так же через Dashboard. К моему стыду, мне так и не удалось подключиться к плате при помощи графического интерфейса. Приложение просто отказывалось подключаться и все, а все советы по поводу модификации конфигурационного файла не помогали, т.к. в актуальной версии Windows IoT эти советы уже внедрены в конфигурацию. Тем не менее, такая возможность существует.
Что можно запускать на Windows IoT?
Самый интересный для меня вопрос. На текущий момент (начало весны 2017), Windows IoT очень стремительно развивается и постоянно модернизируется. Но выбор ПО, вернее программных платформ, для системы ограничен. Microsoft делает ставку исключительно на UWP, как на новую парадигму ПО, работающего одинаково на всех устройства экосистемы Windows. Поэтому приложения UWP должны работать на Windows IoT Core почти без вопросов. Другое дело, что они будут так работать, но на текущий момент могут наблюдаться несовместимости, связанные с неполноценной поддержкой всех API доступных в UWP. Кроме UWP можно попробовать запустить Win32 приложения, по слухам от очевидцев, работать нормально с ними все равно не выйдет. Никакого ввода-вывода от приложений Win32 добиться не выйдет, только доступ извне, например, по сети на каком-то порту.
Для чего и выводы
Эксперимент по скрещиванию продукции Microsoft и крошечного компьютера Raspberry можно считать успешным. Связка работает, обновления ставятся, в сети видно. Вот только совсем непонятно для чего его использовать. Запустить нужное мне ПО под Windows IoT не представляется возможным. Тот же SoftEther VPN или FAR даже и не установить на плате. Нужных мне UWP приложений под рукой тоже нет. Остается только заниматься разработкой. А вот тут у Microsoft запасен такой козырь в рукаве, против которого мало кто сдюжит. Разрабатывать приложения, на множестве языков, для Windows IoT можно с использованием среды Visual Studio. С использованием всей ее мощи, включая развитые средства профилирования и отладки.
Но и тут есть одно, небольшое «но». Да, Raspberry обладает хорошо развитым интерфейсом связи с внешним миром. К плате можно подключить, хоть черта лысого. Да и производительности предостаточно. Но на мой взгляд, при наличии копеечных плат ESP8266 делающий все тоже самое, только куда дешевле и немного проще, целесообразность использования почти полноценного компьютера с реальной операционной системой и чрезмерной производительностью, излишне. Для реализации простых проектов по автоматизации ресурсов ESP8266 более чем достаточно. Впрочем, наверняка найдутся задачи, в которых Windows IoT вкупе с платами типа Raspberry придутся как нельзя кстати, но произойдет сие скорее всего в корпоративном секторе, например, некоторые банкоматы, наконец-то перейдут с уже устаревшей OS/2 на современную платформу.
Если же попытаться сформулировать вывод, например, для чего мне нужна плата Raspberry, то очень быстро приходишь к выводу, что в принципе ни для чего. Все, что мне нужно запрограммировать в плане автоматизации или поумневшего дома, отлично реализуется на чипах ESP и куда дешевле. Делать из Raspberry какой-то Hub при наличии полноценных серверов — тоже смысла не много. Разве что только установить на Raspberry операционную систему семейства Linux и организовать очередной серверок? Кстати, именно так я и поступлю.
Полезные ссылки:
Официальный FAQ по Windows IoT от Raspberry
Официальный сайт Microsoft по Windows IoT
Официальные образы операционных система для Raspberry и загрузчик NOOBS.
Время на прочтение4 мин
Количество просмотров90K

В середине июля 2020 года эксперты портала Tom’s Hardware опубликовали инструкцию по установке Windows 10 на Raspberry Pi 4. Вдобавок они проверили, как работают некоторые сторонние программы (GIMP Photo Editor, Arduino IDE и Python 3.8) в этой связке микрокомпьютера на ARM и последней версии Windows.
Вопрос «зачем» тут не особо уместен, так как экспериментаторам был важен сам факт того, что это можно сделать и все будет работать. Да, медленно и с тормозами и проблемами, но будет.
Официально, единственная операционная система Microsoft для Raspberry Pi — это устаревшая на текущий момент версия Windows 10 IoT Core, которая, например, позволяет выполнять код Visual Studio на микрокомпьютере, но там даже нет графического интерфейса. Тем не менее, разработчики (например, проект «Windows on Raspberry Pi» в Discord) своими силами сделали необходимы программы и нашли способ по установке и запуску полноценной версии Windows 10 на Raspberry Pi 4.
Эксперты портала Tom’s Hardware дополнительно уведомили, что они не могут ручаться за безопасность или законность любых пользовательских файлов, созданных сообществом «Windows on Raspberry Pi», поэтому все действия далее они делали на свой страх и риск.
В 2019 году эксперты портала Tom’s Hardware уже попытались установить Windows 10 на Raspberry Pi 3, но тогда этот трудный процесс у них закончился по большей части проблемами, ошибками и тормозами после установки.
В настоящее время даже после всех стараний команды проекта «Windows on Raspberry», после установки Windows 10 на Raspberry Pi 4 не работают встроенные в микрокомпьютер порт Ethernet, модули Wi-Fi, Bluetooth и GPIO, аудио через HDMI также недоступно. Для сетевого подключения нужно использовать Wi-Fi USB-адаптер, а для вывода звука Bluetooth через USB-адаптер.
Для установки Windows 10 на Raspberry Pi 4 понадобятся:
- последняя версия Raspberry Pi 4 с 4GB или 8GB ОЗУ;
- карта памяти microSD на 16 GB или больше;
- ПК с Windows 10 и доступом в сеть интернет для создания нужной загрузочной сборки;
- адаптер USB to Ethernet или WiFi dongle;
- Bluetooth dongle (если нужен Bluetooth).
Инструкция по установке Windows 10 на Raspberry Pi 4:
- нужно скачать и распаковать на ПК последнюю версию инструмента WoR 2.0.0 alpha 3, там будет архив на 4.7G;
- зайти на Windows on Raspberry Pi Discord server в разделе Downloads channel скачать последнюю стабильную версию Windows on ARM (0.2.1), ссылка на этот файл PublicFlukeByte.iso;
- запустить WoR Alpha tool и выбрать язык установки;
- вставить в ПК карту памяти и выбрать ее в WoR Alpha tool в разделе «Select device», там же выбрать режим «Raspberry Pi 4 experimental mode»;
- далее в разделе «Select image» указать место расположения на ПК ранее скаченного файла PublicFlukeByte.iso;
- далее в разделе «Select drivers» выбрать опцию «Use the latest package available on the server.»;
- далее в разделе «UEFI firmware» выбрать опцию «Use the latest firmware available on the server.»;
- потом нужно проверить конфигурацию загрузочной сборки и начат ее записать на карту памяти, причем запись может продолжаться более двух часов, в зависимости от параметров карты памяти;
- скачать и распаковать на ПК патч для Raspberry Pi 4 по активации USB-портов и 3 ГБ ОЗУ в Windows 10, скопировать файл winpatch.exe в корень диска C: на ПК;
- пропатчить сборку на карте памяти: в командной строке на ПК выполнить
«winpatch X:\Windows\System32\drivers\USBXHCI.SYS 910063E8370000EA 910063E8360000EA 3700010AD5033F9F 3600010AD5033F9F», где Х — буква диска с картой памяти; - рекомендуется также «разогнать» в настройках Raspberry Pi, но тогда лучше заранее обеспокоиться установкой на микрокомпьютер системы охлаждения, для этого необходимо в файле config.txt на загрузочном карте памяти выставить параметры: «over_voltage=6» и «arm_freq=2000»;
- теперь можно извлечь загрузочную карту памяти из ПК, вставить ее в Raspberry Pi 4 и начать стандартную установку ОС Windows 10;
- после окончания процесса установки Windows 10 на Raspberry Pi 4 необходимо активировать в ОС возможность полноценно использовать 3 ГБ ОЗУ, для этого нужно под администратором в командной строке запустить: «bcdedit /deletevalue {default} truncatememory», далее необходимо перезагрузить микрокомпьютер;
- далее можно подключить сетевые USB-адаптеры, настроить их и скачивать и устанавливать из интернета необходимые для работы приложения, включая браузеры и другое ПО.
Эксперты портала Tom’s Hardware установили на Raspberry Pi 4 с Windows 10 браузер Microsoft Edge, программы GIMP Photo Editor, Arduino IDE и Python 3.8 с оболочкой Python REPL. Все программы запускались и работали нормально. По скорости работы с этой ОС микрокомпьютер оказался на уровне Intel Celeron или Atom начального уровня. Время загрузки ОС Windows 10 составило 2 минуты 12 секунд. Просмотр видео в YouTube возможен, но со средними настройками разрешения роликов. Из проблем — на эту сборку не удалось установить редактор кода Visual Studio Code. Также не работал модуль Python под названием GPIO Zero, который используется для взаимодействия с GPIO Raspberry Pi. Возможно, что в будущем эти моменты будут доработаны разработчиками проекта «Windows on Raspberry Pi».
Ранее в феврале 2020 года Raspberry Pi Foundation выпустил обновленную версию (v1.2) Raspberry Pi 4, в которой было исправлено несколько проблем, включая совместимость с различными USB-C кабелями. Тогда микрокомпьютер не распознавал некоторые кабели как источник питания из-за проблем со схемой питания.
В конце мая 2020 года в продажу поступила 8-гигабайтная модель Raspberry Pi 4. Она доступна по цене в $75. Вдобавок создатели портативного ПК сняли с продажи версию с 1 ГБ оперативной памяти, теперь за $35 можно приобрести Raspberry Pi 4 с 2 ГБ ОЗУ.
См. также:
- «Raspberry Pi Foundation захостила свой сайт на Raspberry Pi 4. Теперь этот хостинг доступен всем»
- «Протокол UASP ускоряет передачу файлов на Raspberry Pi 4 в полтора раза»
- «Любитель подключил PCIe к Raspberry Pi без контроллера USB»
A few months ago, I posted a video titled Enterprise SAS RAID on the Raspberry Pi… but I never actually showed a SAS drive in it. And soon after, I posted another video, The Fastest SATA RAID on a Raspberry Pi.
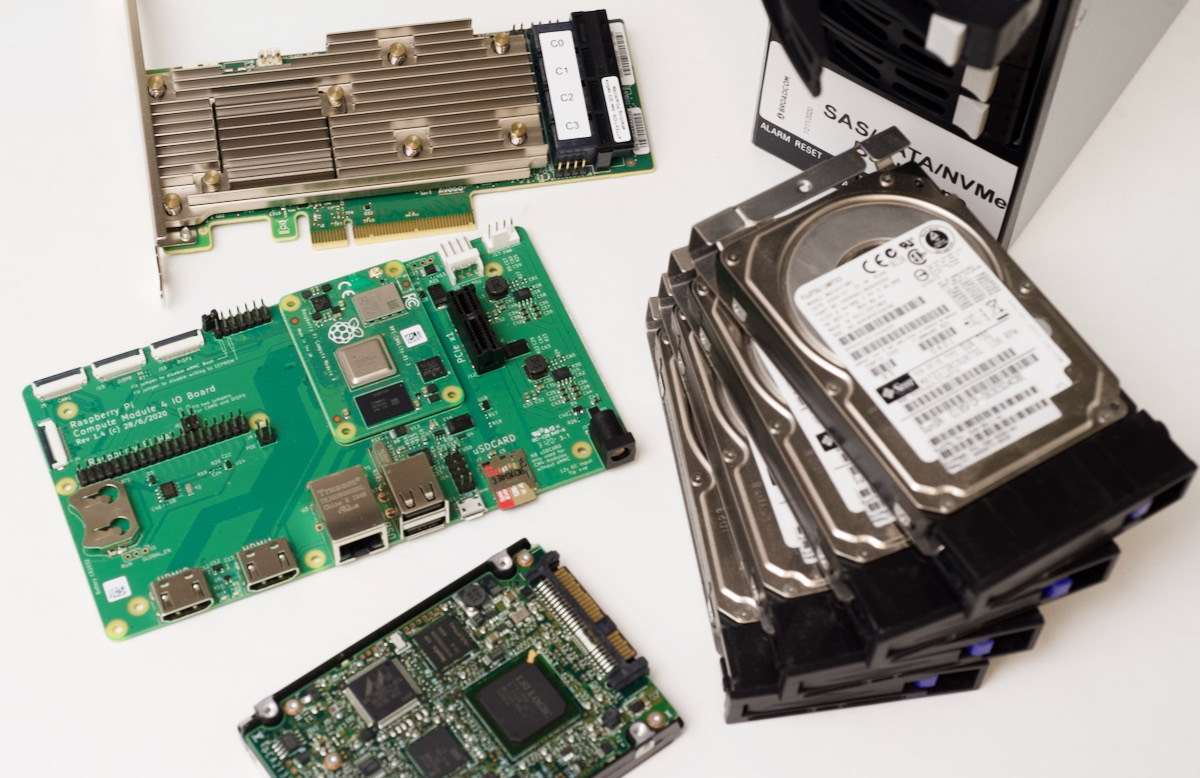
Well now I have actual enterprise SAS drives running on a hardware RAID controller on a Raspberry Pi, and it’s faster than the ‘fastest’ SATA RAID array I set up in that other video.
A Broadcom engineer named Josh watched my earlier videos and realized the ancient LSI card I was testing would not likely work with the ARM processor in the Pi, so he was able to send two pieces of kit my way:
- A Broadcom MegaRAID 9460-16i Tri-Mode storage controller
- A Broadcom-designed reference ‘Universal Backplane’ following the SFF-TA-1005 standard
After a long and arduous journey involving multiple driver revisions and UART debugging on the card, I was able to bring up multiple hardware RAID arrays on the Pi.
This blog post is also available in video form on my YouTube channel:
SAS RAID
But what is SAS RAID, and what makes hardware RAID any better than the software RAID I used in my SATA video?
The drives you might use in a NAS or a server today usually fall into three categories:
- SATA
- SAS
- PCI Express NVMe
All three types can use solid state storage (SSD) for high IOPS and fast transfer speeds.
SATA and SAS drives might also use rotational storage, which offers higher capacity at lower prices, though there’s a severe latency tradeoff with that kind of drive.
RAID, which stands for Redundant Array of Independent Disks, is a method of taking two or more drives and putting them together into a volume that your operating system can see as if it were just one drive.
RAID can help with:
- Redundancy: A hard drive (or multiple drives, depending on RAID type) can fail and you won’t lose access to your data immediately.
- Performance: multiple drives can be ‘striped’ to increase read or write throughput (again, depending on RAID type).
Extra caching configuration (to separate RAM or even to dedicated faster ‘cache’ drives) can speed up things even more than is possible on the main drives themselves, and hardware RAID can provide even better data protection with separate flash storage that caches write data if power is gone.
Caveat: If you can fit all your data on one hard drive, already have a good backup system in place, and don’t need maximum availability, you probably don’t need RAID, though.
I go into a lot more detail on RAID itself in my Raspberry Pi SATA RAID NAS video, so check that out to learn more.
Now, back to SATA, SAS, and NVMe.
All three of these describe interfaces used for storage devices. And the best thing about a modern storage controller like the 9460-16i is that you can connect to all three through one single HBA (Host-Bus Adapter).
If you can spend a couple thousand bucks on a fast PC with lots of RAM, software RAID solutions like ZFS or BTRFS offer a lot of great features, and are pretty reliable.
But on a system like my Raspberry Pi, software-based RAID takes up much of the Pi’s CPU and RAM, and doesn’t perform as well. (See this excellent post about /u/rigg77’s ZFS experiment).
The fastest disk speed I could get with software mdadm-based RAID was about 325 MB/sec, and that was with RAID 10. Parity calculations may make that maximum speed even lower!

Using hardware RAID allowed me to get over 400 MB/sec. That’s a 20% performance increase, AND it leaves the Pi’s CPU free to do other things.
We’ll get more into performance later, but first, I have to address the elephant in the room.
Why enterprise RAID on a Pi?
People are always asking why I test all these cards—in this case, a storage card that costs $600 used—on low-powered Raspberry Pis. I even have a 10th-gen Intel desktop in my office, so, why not use that?
Well, first of all, it’s fun, I enjoy the challenge, and I get to learn a lot since failure teaches me a lot more than easy success.
But with this card, there are two other good reasons:
First: it’s great for a little storage lab.
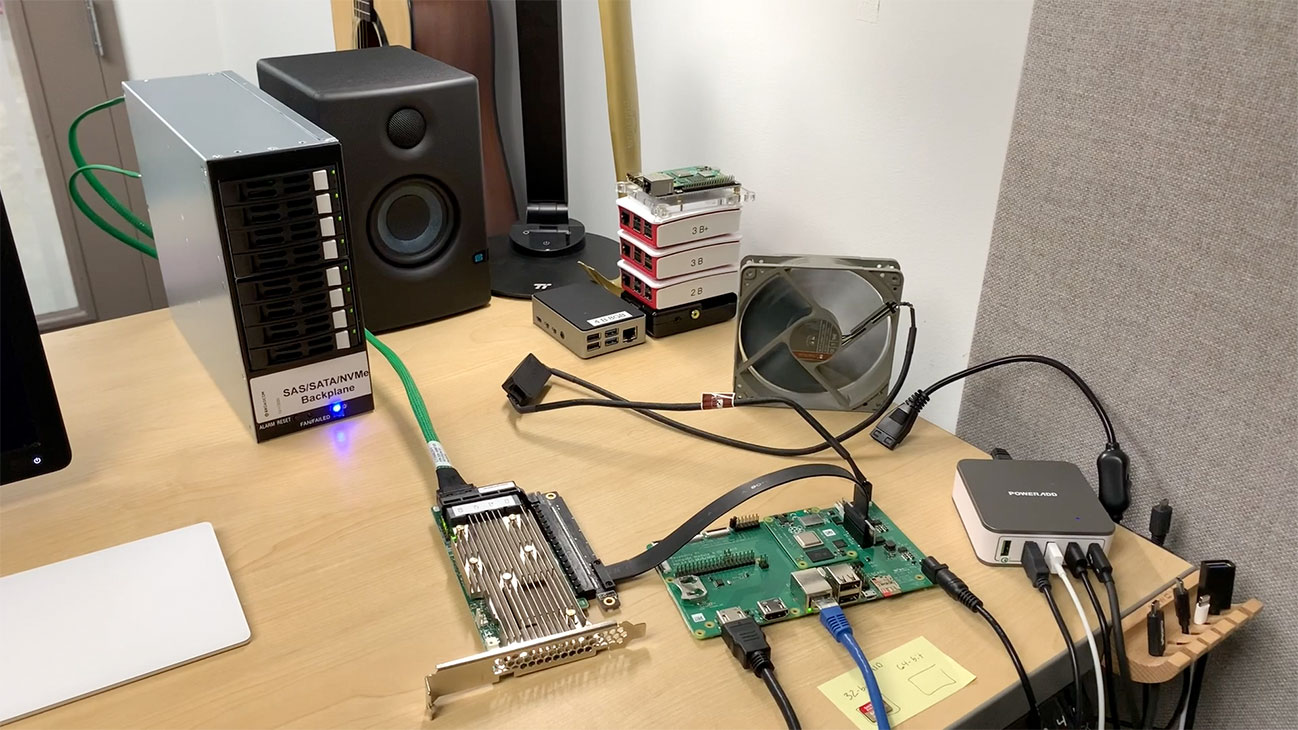
In a tiny corner of my desk, I can put 8 drives, an enterprise RAID controller, my Pi, and some other gear for testing. When I do the same thing with my desktop, I quickly run out of space. The burden of having to go over to my other «desktop computer» desk to test means I am less likely to set things up on a whim to try out some new idea.
Second: using hardware RAID takes the IO burden of the Pi’s already slow processor.
Having a fast dedicated RAID chip and an extra 4 GB of DDR4 cache for storage gives the Pi reliable, fast disk IO.
If you don’t need to pump through gigabytes per second, the Pi and MegaRAID together are more energy efficient than running software RAID on a faster CPU. That setup used 10-20W of power.
My Intel i3 desktop running by itself with no RAID card or storage attached idles at 25W but usually hovers around 40W—twice the power consumption, without a storage card installed.
A Pi-based RAID solution isn’t going to take over Amazon’s data centers, though. The Pi just isn’t built for that. But it is a compelling storage setup that was never possible until the Compute Module 4 came along.
Broadcom MegaRAID 9460-16i
The MegaRAID card Josh sent is PCIe Gen 3.1 and supports x8 lanes of PCIe bandwidth.
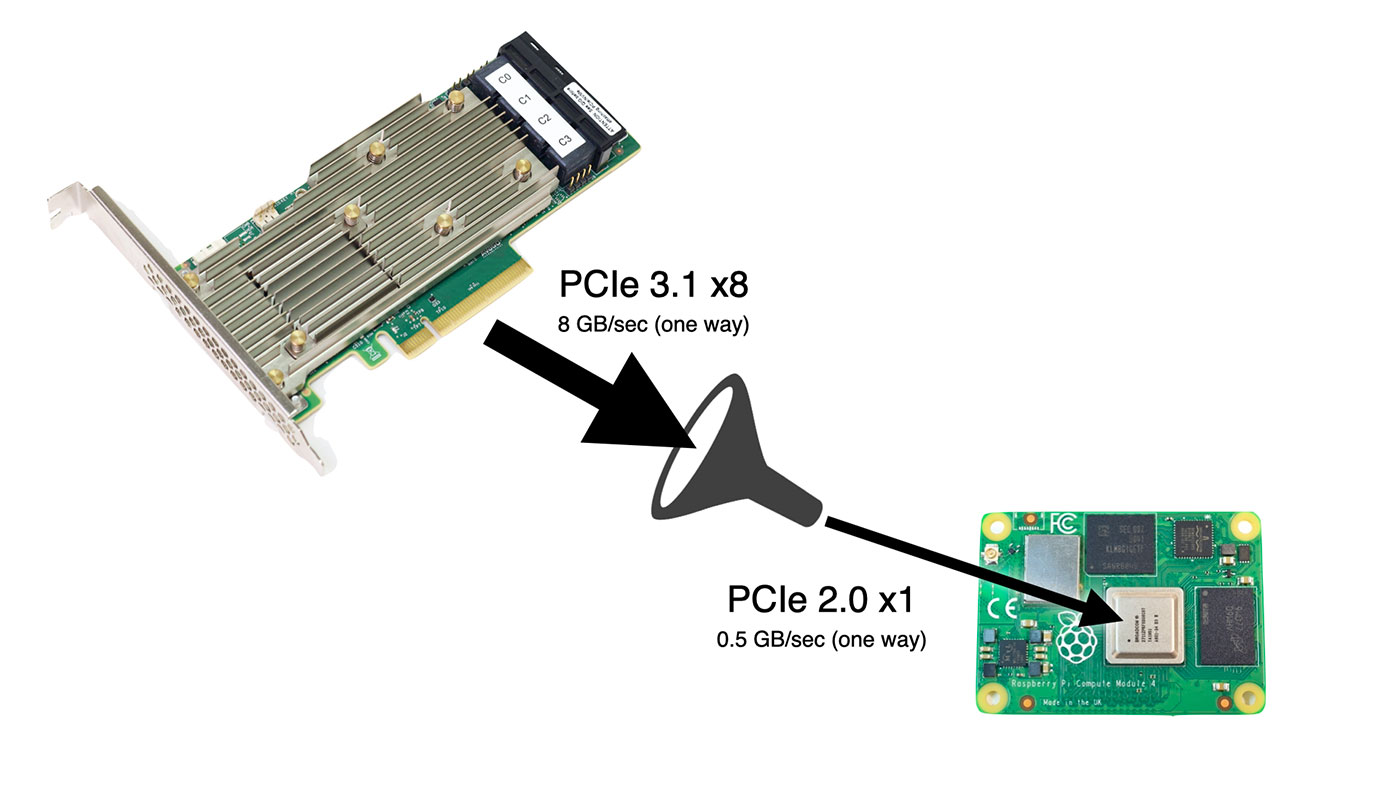
Unfortunately, the Pi can only handle x1 lane at Gen 2 speeds, meaning you can’t get the maximum 6+ GB/sec of storage throughput—only 1/12 that. But the Pi can use four fancy tricks this card has that the SATA cards I tested earlier don’t:
- SAS RAID-on-Chip, a computer in its own regard, taking care of all the RAID storage operations. The Pi’s slow CPU is saved from having to manage RAID operations.
- 4 GB DDR4 SDRAM cache, speeding up IO on slower drives, and saving the Pi’s precious 1/2/4/8 GB of RAM.
- Optional CacheVault flash backup: plug in a super capacitor, and if there’s a power outage, it dumps all the memory in the card’s write cache to a built-in flash storage chip.
- Tri-mode ports allow you to plug any kind of drive into the card (SATA, SAS, or NVMe), and it will work with it.
It also does everything internal to the RAID-on-Chip, so even if you plug in multiple NVMe drives, you won’t bottleneck the Pi’s poor little CPU (with it’s severely limited IO bandwidth). Even faster processors can run into bandwidth issues when using multiple NVMe drives.
Oh, and did I mention it can connect up to 24 NVMe drives or a whopping 240 SAS or SATA drives to the Pi?
I, for one, would love to see a 240 drive petabyte Pi NAS…
Getting the card to work
Josh sent over a driver, some helpful compilation suggestions, and some utilities with the card.
I had some trouble compiling the driver at first, and ran into a couple problems immediately:
- The
raspberrypi-kernel-headerspackage didn’t exist for the 64-bit Pi OS beta (it has since been created), so I had to compile my own headers for the 64-bit kernel. - Raspberry Pi OS didn’t support MSI-X, but luckily Phil Elwell committed a kernel tweak to Pi OS that enabled it (at least at a basic level) in response to a forum topic on getting the Google Coral TPU working over PCIe.
With those two issues resolved, I cross-compiled the Pi OS kernel again, and fan into another issue: the driver assumed it would have CONFIG_IRQ_POLL=y for IRQ polling functionality, but that wasn’t set by default for the Pi kernel, therefore I had to recompile again to get that option working.

Finally, thinking I was in the clear, I found that the kernel headers and source from my cross-compiled kernel weren’t built for ARM64 like the kernel itself, and rather than continue debugging my cross-compile environment, I bit the bullet and did the full 1-hour compile on the Raspberry Pi itself.
An hour later, the driver compiled without errors for the first time.
I excitedly ran sudo insmod megaraid_sas.ko, and then… it hung, and after five minutes, printed the following in dmesg:
[  372.867846] megaraid_sas 0000:01:00.0: Init cmd return status FAILED for SCSI host 0
[  373.054122] megaraid_sas 0000:01:00.0: Failed from megasas_init_fw 6747
Things were getting serious, because two other Broadcom engineers joined a conference call with Josh and I, and they had me pull off the serial UART output from the card to debug PCIe memory addressing issues!
We found the driver would work on 32-bit Pi OS, but not the 64-bit beta. Which was strange, since in my experience drivers have often worked better under the 64-bit OS.
A few days later, a Broadcom driver engineer sent over patch which fixed the problem, which was related to the use of the writeq function, which is apparently not well supported on the Pi. Josh filed a bug report to the Pi kernel issue queue about it: writeq() on 64 bit doesn’t issue PCIe cycle, switching to two writel() works.
Anyways, the driver finally worked, and I could see the attached storage enclosure being identified in the dmesg output!
Setting up RAID with StorCLI
StorCLI is a utility for managing RAID volumes on the MegaRAID card, and Broadcom has a comprehensive StorCLI reference on their website.
The command I used to set up a 4-drive SAS RAID 5 array went like this:
sudo ./storcli64 /c0 add vd r5 name=SASR5 drives=97:4-7 pdcache=default AWB ra direct Strip=256
- I named the
r5arraySASR5 - The array uses drives 4-7 in storage enclosure ID 97
- There are a few caching options.
- I set the strip size to 256 KB (which is typical for HDDs—64 KB would be more common for SSDs).
I created two RAID 5 volumes: one with four Kingston SA400 SATA SSDs, and another with four HP ProLiant 10K SAS drives.
I used lsblk -S to make sure the new devices, sda and sdb, were visible on my system. Then I partitioned and formatted them with:
sudo fdisk /dev/sdXsudo mkfs.ext4 /dev/sdX
At this point, I had a 333 GB SSD array, and an 836 GB SAS array. I mounted them and made sure I could read and write to them.
Storage on boot
I also wanted to make sure the storage arrays were available at system boot, so I could share them automatically via NFS, so I installed the compiled driver module into my kernel:
- I copied the module into the kernel drivers directory for my compiled kernel:
sudo cp megaraid_sas.ko /lib/modules/$(uname -r)/kernel/drivers/ - I added the module name, ‘megaraid_sas’, to the end of the /etc/modules file:
echo 'megaraid_sas' | sudo tee -a /etc/modules - I ran
sudo depmodand rebooted, and after boot, everything came up perfectly.
One thing to note is that a RAID card like this can take a minute or two to initialize, since it has its own initialization process. So boot times for the Pi will be a little longer if you want to wait for the storage card to come online first.
A note on power supplies: I used a couple different power supplies when testing the HBA. I found that if I used a lower-powered 12V 2A power supply, the card seemed to not get enough power, and would endlessly reboot itself. I switched to this 12V 5A power supply, and the card ran great. (I did not attempt using an external powered ‘GPU riser’, since I have had mixed experiences with them.)
Performance
With this thing fully online, I tested performance with fio.
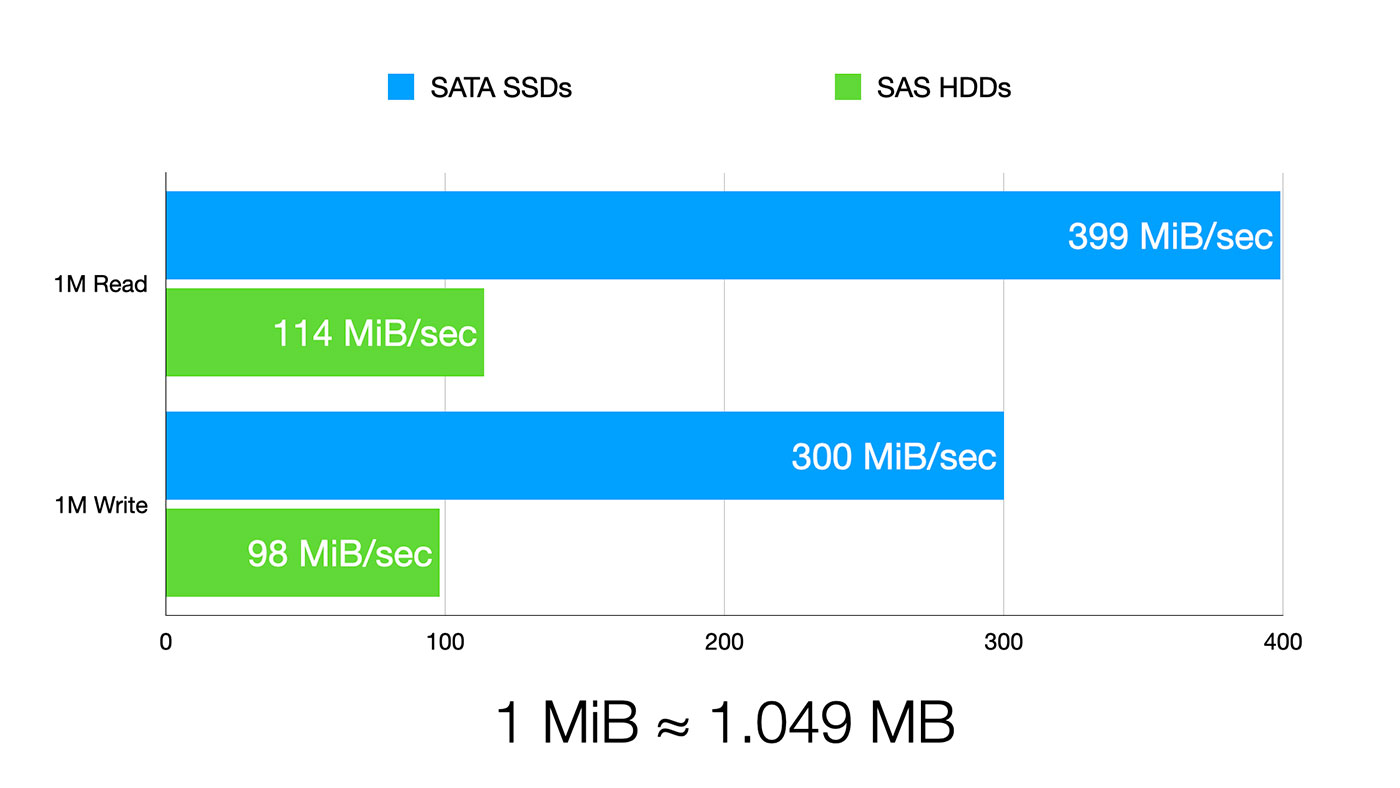
For 1 MB random reads, I got:
- 399 MiB/sec on the SSD array
- 114 MiB/sec on the SAS array
For 1 MB random writes, I got:
- 300 MiB/sec on the SSD array
- 98 MiB/sec on the SAS drives
Note: 1.000 MiB = 1.024 MB
These results show two things:
First, even cheap SSDs are still faster than spinning SAS drives. No real surprise there.
Second, the limit to the SSD speed is the Pi’s PCIe bus. I’m able to get 3.35 Gbps of bandwidth, and that’s actually better than the bandwidth I could pump through an ASUS 10G network adapter, which could only get up to 3.27 gigabits.
There are tons of other tests I could do, but I wanted to see how the drives performed for network storage, so I installed Samba and NFS and ran more benchmarks.
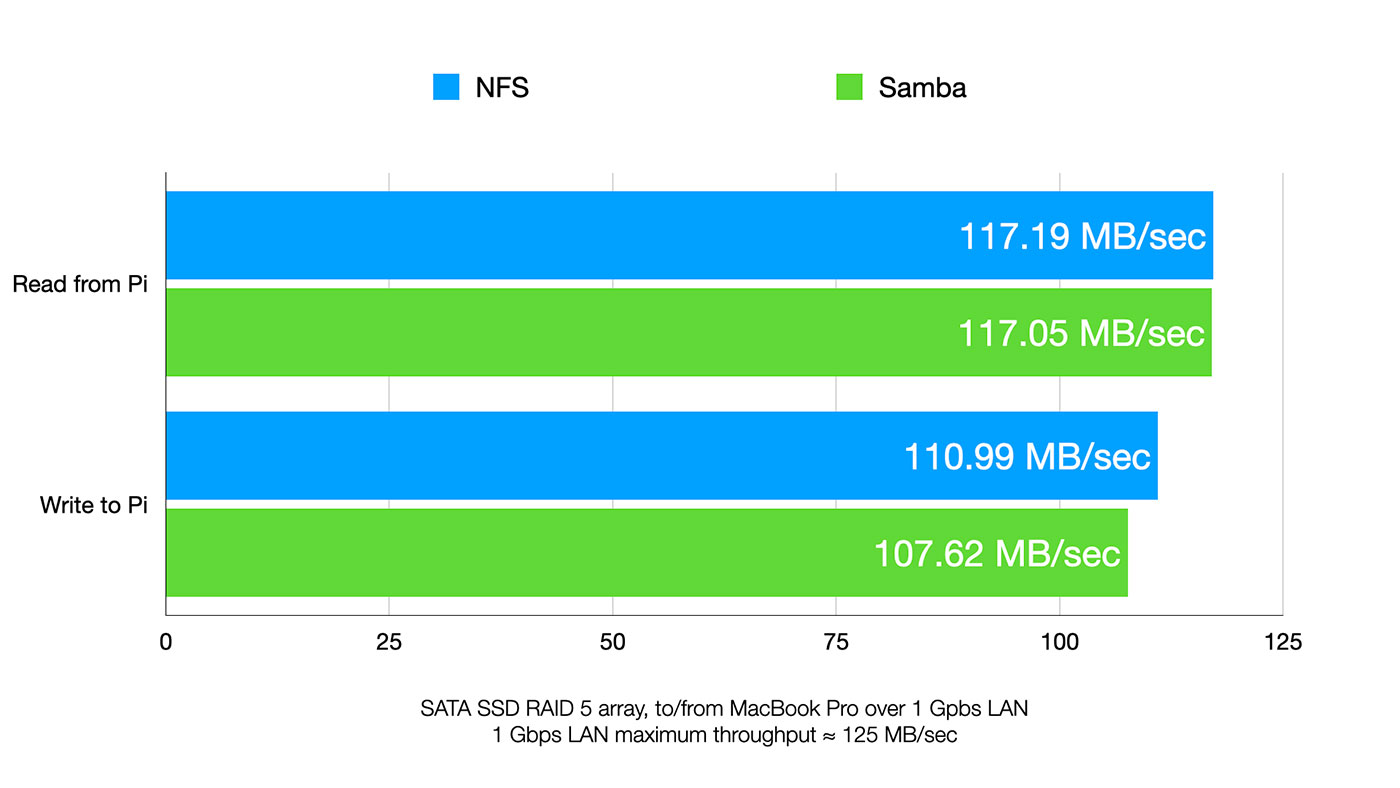
I was amazed both Samba and NFS got almost wire speed for reads, meaning the Pi was able to feed data to my Mac as fast as the gigabit interface could pump it through.
If you remember from my SATA RAID video, the fastest I could get with NFS was 106 MB/sec, and that speed fluctuated when packets were queued up while the Pi was busy sorting out software RAID.
With the storage controller handling the RAID, the Pi was staying a solid 117 MB/sec continuously, during 10+ GB file copies.
PCIe Switches and 2.5 Gbps Networking
What about 2.5 GbE networking? I actually have two PCIe switches, and a few different 2.5 Gbps NICs I’ve already successfully used with the Pi. So I tried using both switches and a few NICs, and unfortunately I couldn’t get enough power through the switch for both the NIC and the power-hungry storage controller.
I even pulled out my 600W PC PSU, but accidentally fried it when I tried shorting the PS_ON pin to power it up. Oops.
Watch me zap the PSU (and luckily, not myself) here.
So 2.5 Gbps performance will, unfortunately, have to wait until I get a new power supply.
Conclusion
Finally, I have true hardware SAS RAID running on the Raspberry Pi. Josh was actually first to do it, though, on 32-bit Pi OS.
The driver we were testing is still pre-release, though. If you run out and buy a MegaRAID controller today, you’ll have some trouble getting it working on the Pi until the changes make it into the public driver.
Am I going to recommend you buy this $1000 HBA for a homemade Pi-based NAS? Maybe not. But there is a lower-end version you can get, the 9440-8i. Still has all the high-end features, and it’s less than $200 used on eBay (Dell server pulls, mostly).
Even that might be overkill, though, if you just want to build a cheap NAS and only use SATA drives. I’ll be covering more inexpensive NAS options soon, so subscribe to this blog’s RSS feed, or subscribe to my YouTube channel to follow along!
Привет друзья! В предыдущих статьях мы узнали, что программный RAID 1 массив — это зеркальное отображение ваших данных на нескольких жёстких дисках, если один накопитель выходит из строя, то вся информация остаётся на другом в сохранности. Мы с вами купили два одинаковых винчестера и объединили их программно в независимый массив недорогих дисков, но данная инструкция не подойдёт, если вы захотите установить на RAID 1 операционную систему Windows, в этом случае придётся действовать чуть сложнее.
Как настроить RAID 1 массив и установить на него Windows 7, 8.1, 10
После прочтения предыдущих статей о создании программного RAID 1 массива средствами операционной системы вы конечно зададите вопрос: «А как установить саму систему на RAID 1 массив или может существует возможность переноса уже готовой и настроенной Windows с программами на рейд массив. Ведь неожиданно сломаться может и винчестер с установленной операционкой, а не только второстепенный жёсткий диск с файлами?» Потеря операционной системы со всеми установленными приложениями, при отсутствии резервной копии, может вывести из работы на несколько дней любую организацию, поэтому я считаю обязательным создание RAID 1 массива на рабочем месте и установки на него Windows.
- Примечание: Друзья, кроме RAID 1 массива, ещё существует RAID 0 массив, способный увеличить быстродействие Вашей операционной системы в два раза.
В сегодняшней статье мы соберём RAID 1 массив из двух жёстких дисков на материнской плате ASUS и установим на него Windows 10
{banner_google1}
Друзья, конечно можно ничего не устанавливать заново, а просто включить в БИОС технологию RAID, а затем перенести на него существующую винду с помощью различных программ, но сделаем мы это в следующих статьях, а сегодня произведём простую установку системы.
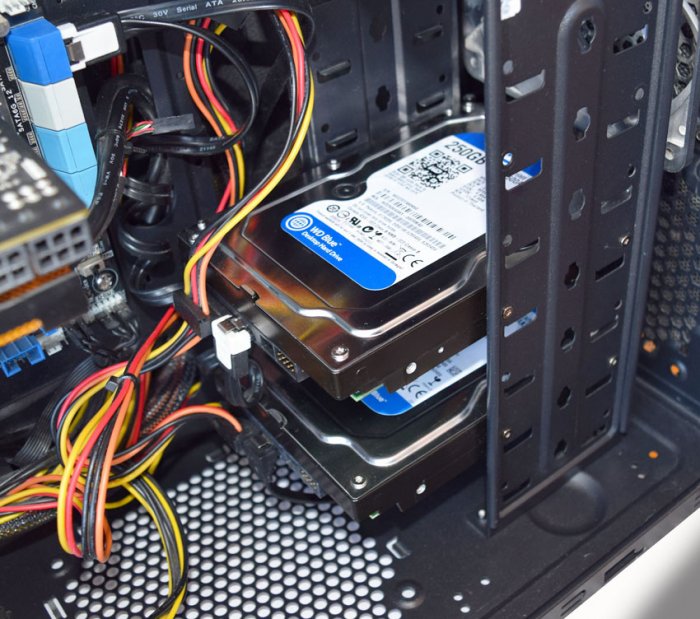
Если вы хотите собрать RAID 1 массив и установить на него операционку, то опять же понадобится два жёстких диска или два твердотельных накопителя SSD, и ваша материнская плата должна поддерживать технологию RAID. Для примера возьмём два винчестера объёмом по 250 ГБ каждый.
Устанавливаем винчестеры в системный блок.
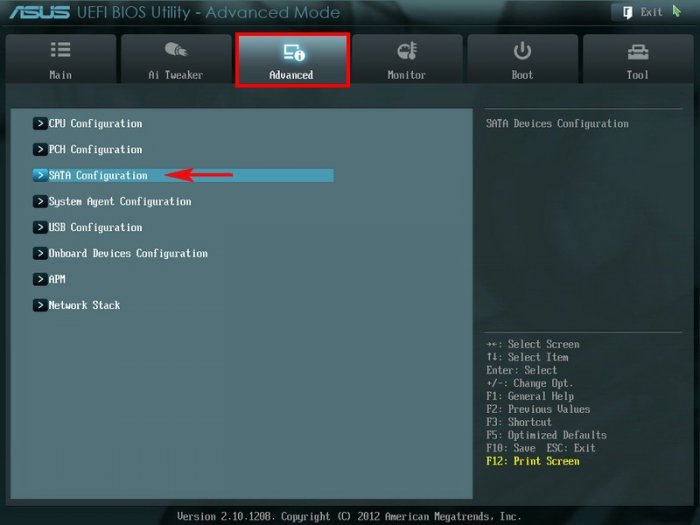
Чтобы настроить систему с массивом RAID, первым делом нужно включить соответствующую опцию в BIOS и делается это очень просто. Невозможно в одной статье описать соответствующие настройки всех существующих типов БИОС, в этой статье я включу RAID на материнской плате ASUS, а в следующих статьях постараюсь показать подобные настройки на материнских платах GIGABYTE и ASRock.
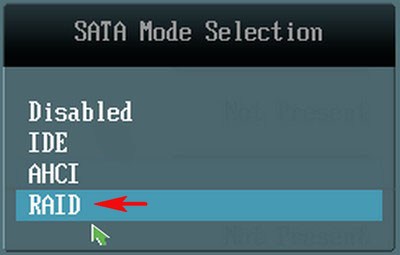
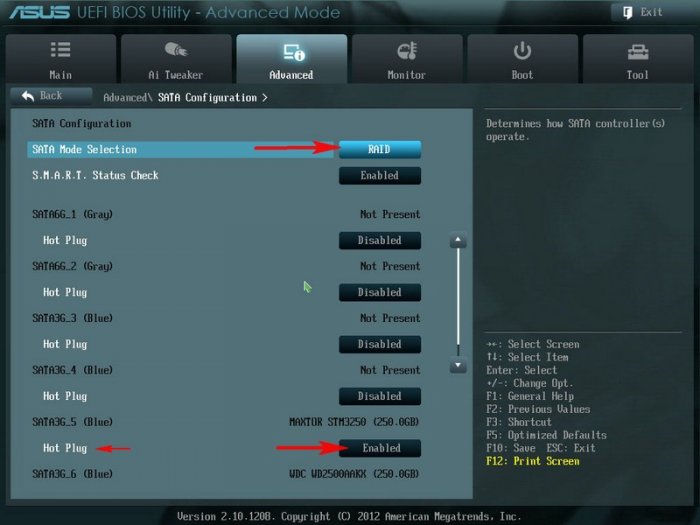
Включаем компьютер и входим в БИОС с помощью нажатия DEL при загрузке. Переходим на вкладку Advanced, опция SATA Configuration
SATA Mode Selection выставляем в положение RAID.
HotPlug — (горячее подключение) выставляем в Enabled для жёстких дисков объединяемых в массив.
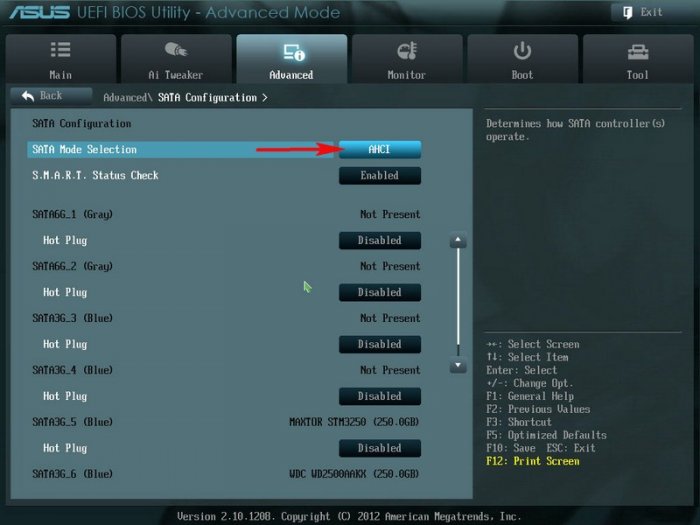
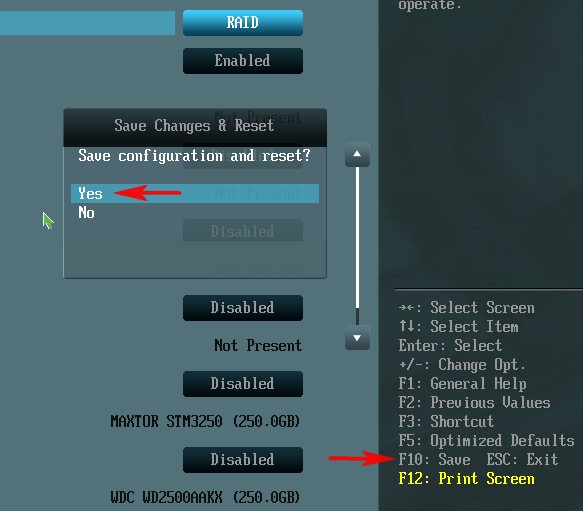
Для сохранения внесённых изменений жмём F10 и выбираем Yes. Происходит перезагрузка.
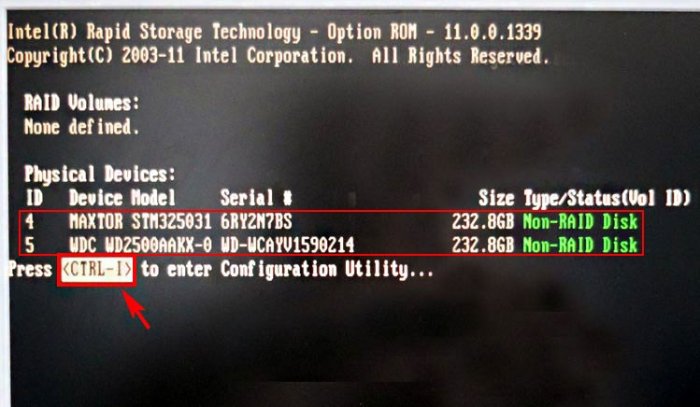
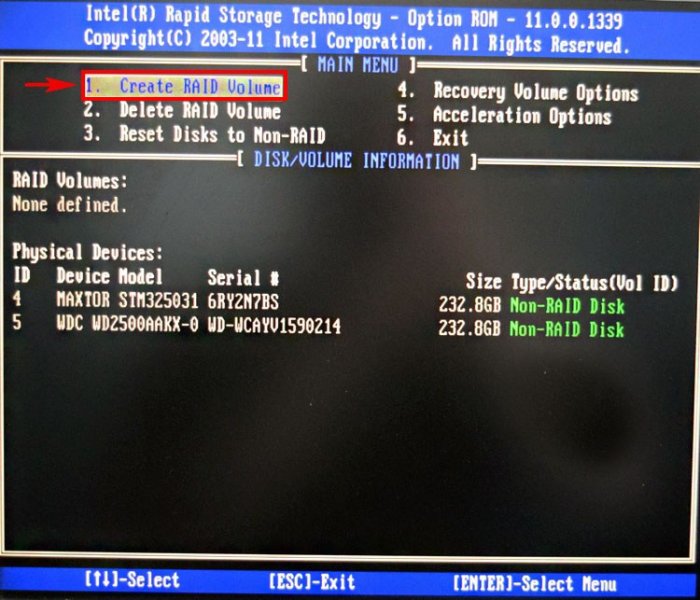
После включения в БИОС технологии RAID, на экране монитора при загрузке на несколько секунд возникнет предложение нажать клавиатурное сочетание (CTRL-I), чтобы войти в настройки конфигурации RAID.
Также видно два подключенных к портам 4 и 5 жёстких диска SATA: Maxtor и WD, находящихся пока не в RAID-массиве (Non-RAID Disk). Нажимаем CTRL-I.
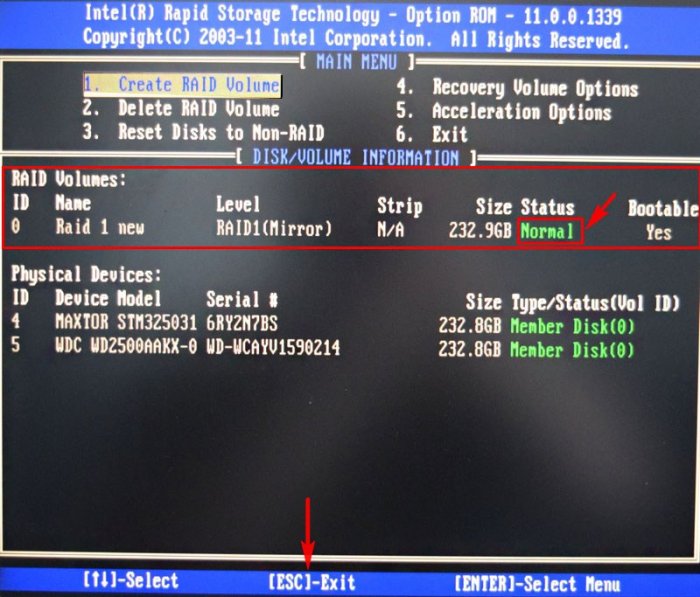
В начальном окне настроек выбираем с помощью стрелок на клавиатуре Create a RAID Volume (Создать том RAID) и жмём Enter.
В данном окне производим основные настройки RAID-массива.
Name (название RAID-массива). Жмём на клавишу «пробел» и вводим наименование,
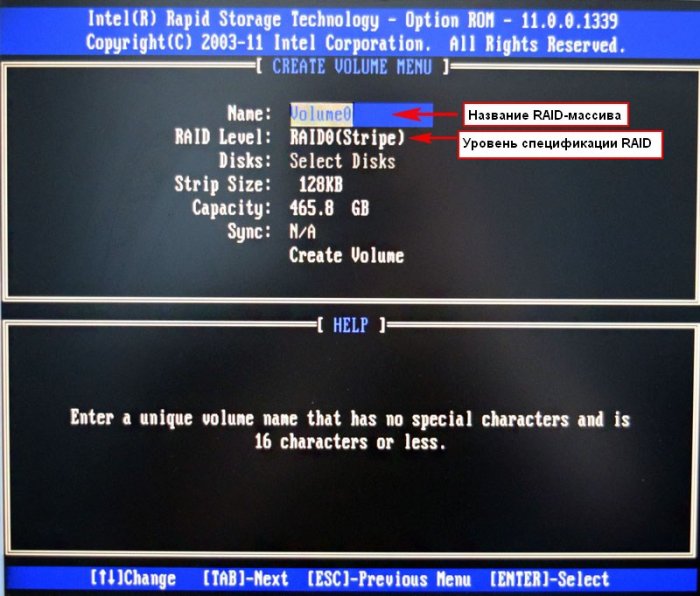
например «RAID 1 new» и жмём Enter. Передвигаемся ниже с помощью клавиши Tab.
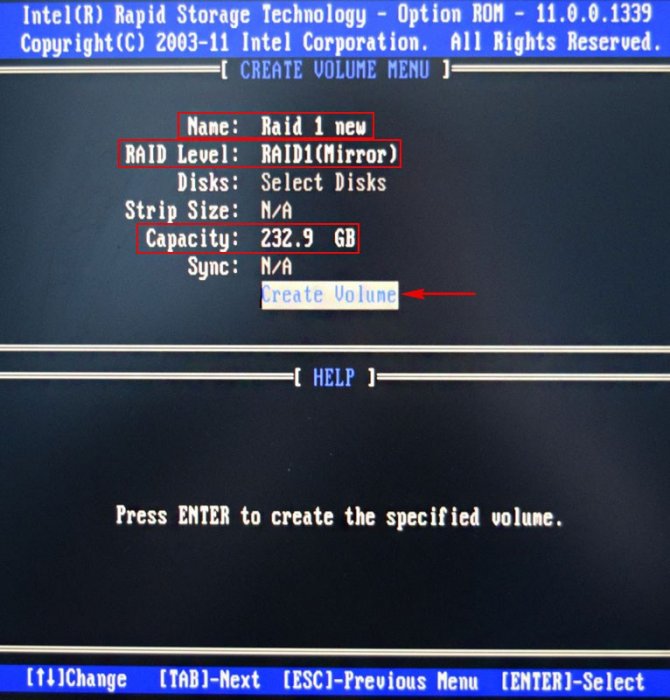
RAID Level: (Уровень RAID). Мы будем создавать RAID1(Mirror) -«зеркалирование» — при отказе одного из дисков, точная копия данных останется на другом диске и контроллер сразу переключиться на использование дублирующего диска. Выбираем этот уровень с помощью стрелок на клавиатуре.
Capacity (объём) выставляется автоматически. Объём двух наших дисков 500 ГБ превращаются в 250 ГБ, так как мы используем уровень RAID1(Mirror) и два наших винчестера работают как один.
Больше ничего не меняем и передвигаемся к последнему пункту Create Volume и жмём Enter.
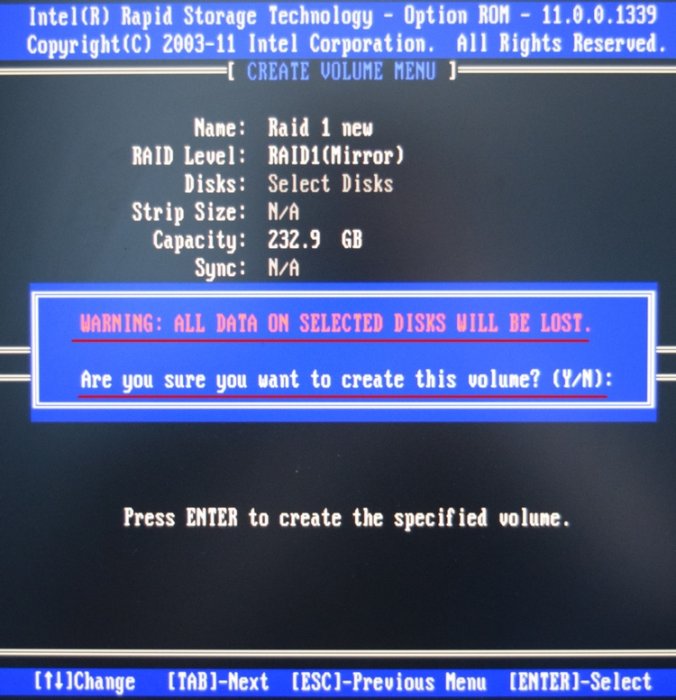
Выходит предупреждение:
WARNING: ALL DATA ON SELECTED DISKS WILL BE LOST.
Are you sure you want to create this volume? (Y/N):
ВНИМАНИЕ: ВСЕ ДАННЫЕ на выбранных дисках будут потеряны.
Вы уверены, что хотите создать этот объем ? (Y / N):
Жмём Y (Да) на клавиатуре.
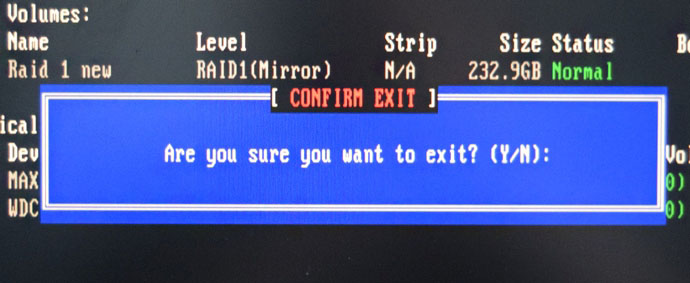
RAID 1 создан и находится со статусом Normal (нормальный). Для выхода жмём на клавиатуре клавишу Esc
Are you sure you want to exit (Вы уверены что хотите выйти? Нажимаем Y (Да).
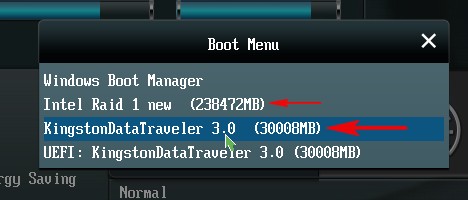
Компьютер перезагружается. Входим в загрузочное меню и выбираем загрузку с установочной флешки Kingston содержащей файлы Windows 10. Если в загрузочное меню компьютера вы попасть не можете, тогда смените приоритет загрузки на флешку в БИОС.
Как видим, только что созданный нами RAID 1 массив с названием «RAID 1 new» тоже находится в загрузочном меню.
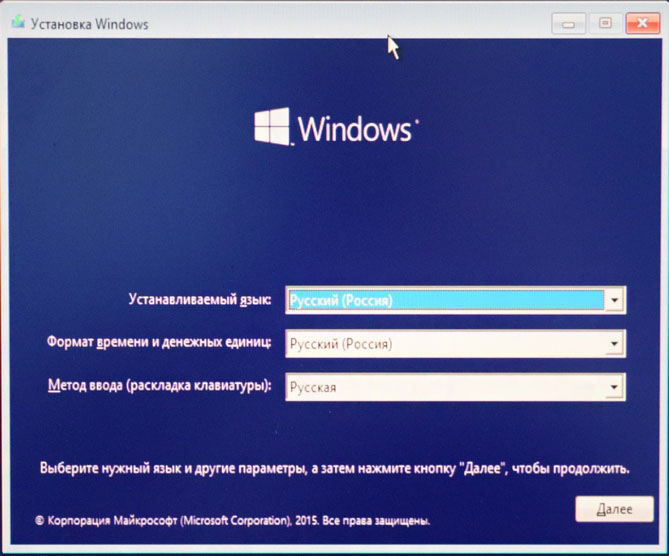
Загружаемся с флешки в программу установки Windows 10. Далее действуем как при обычной установке операционной системы.
{banner_google1}
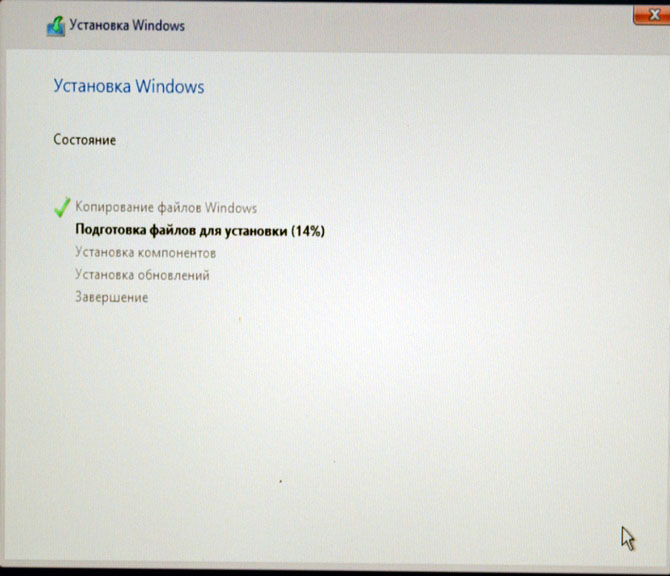
Далее
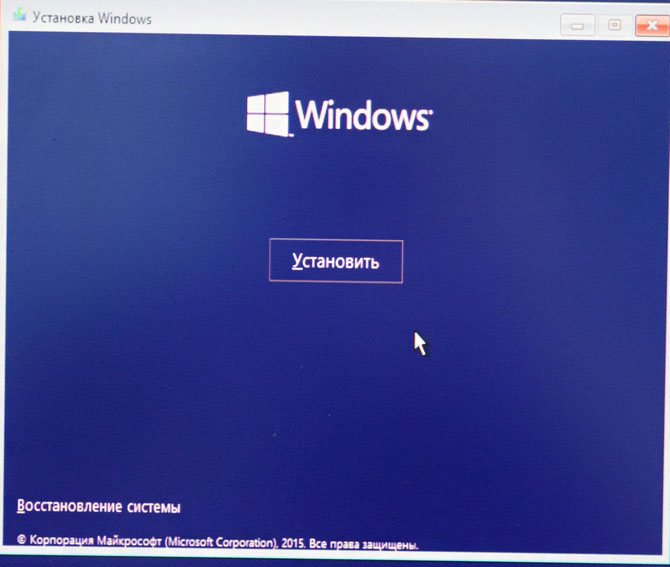
Установить
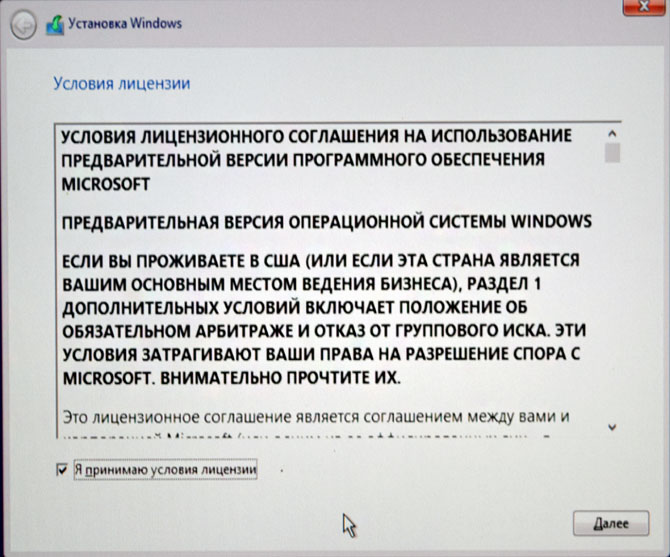
Принимаем лицензионное соглашение
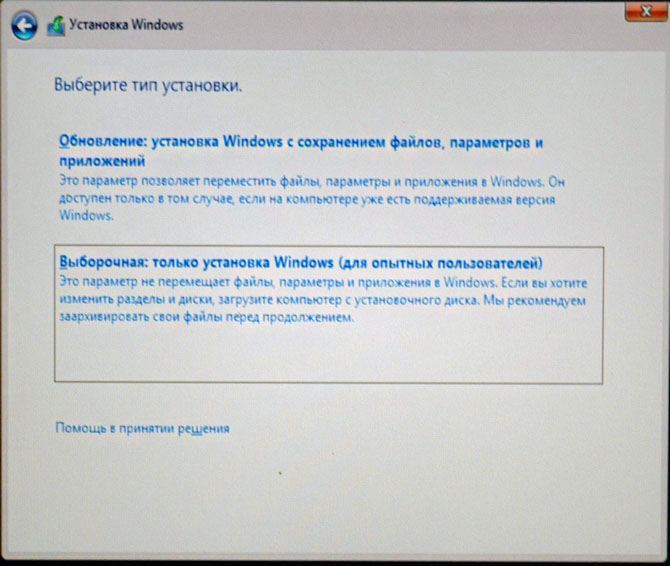
Выборочная: Только установка Windows
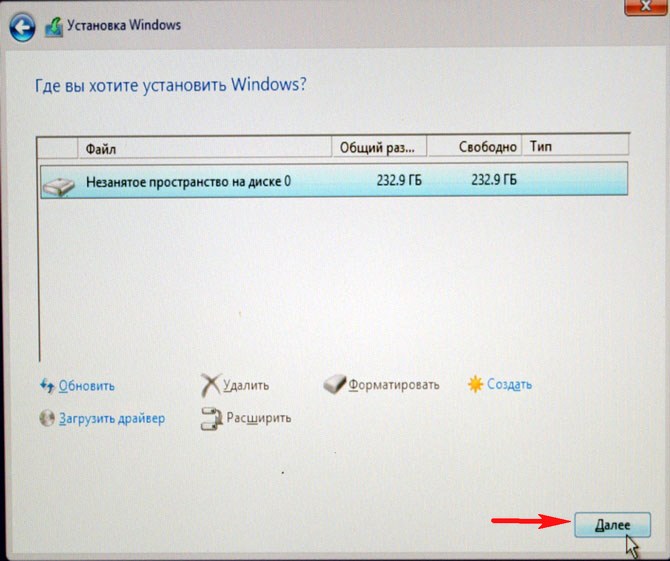
Два жёстких диска объединённых в RAID-массив установщик Win 10 видит как один.
{banner_google1}
Если хотите, можете создать разделы. Далее

Пропустить этот шаг

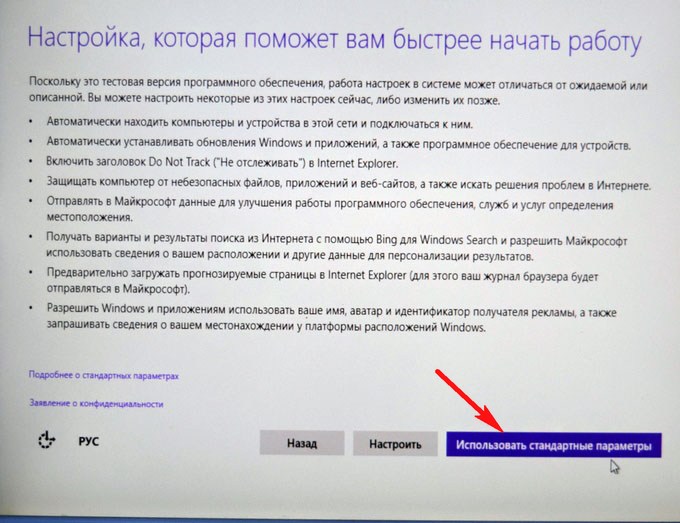
Использовать стандартные параметры
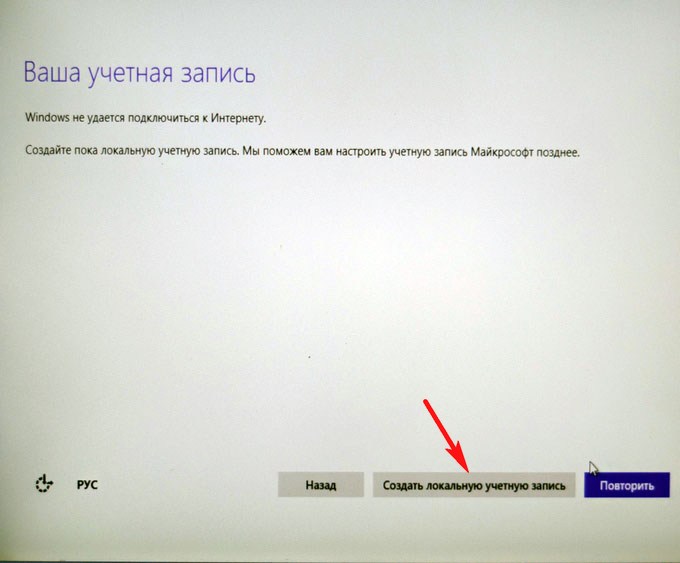
Создать локальную учётную запись
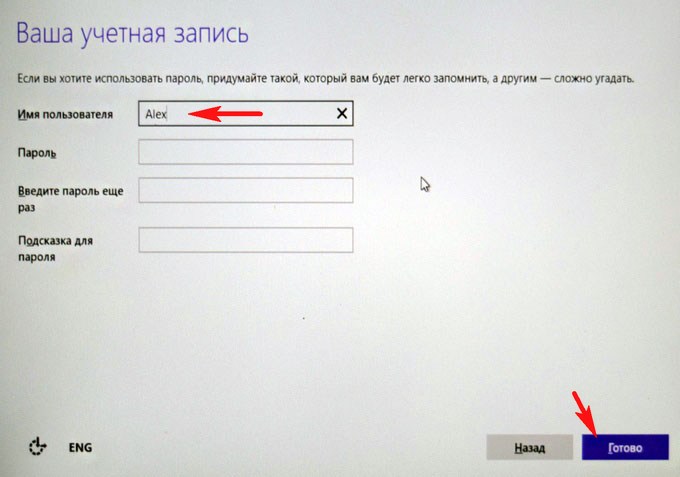
Вводим имя учётной записи и жмём Готово.

Windows 10 установлена на RAID 1 массив.
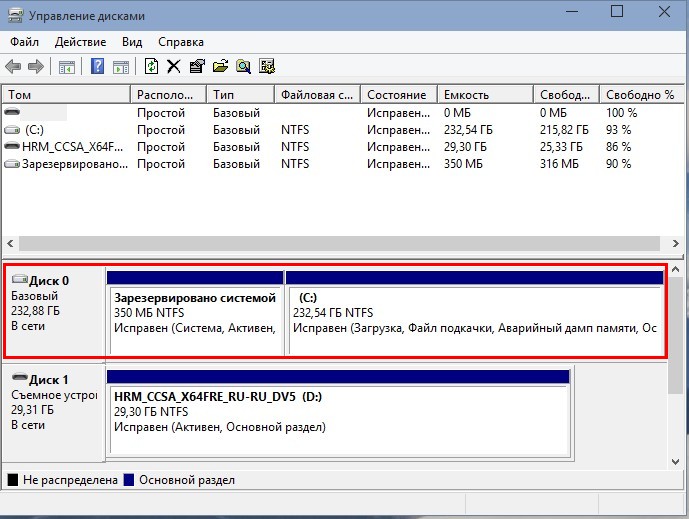
Диспетчере устройств.
Управление дисками.
RAID 1 массив и флешка с Windows 10.
Друзья, если один жёсткий диск в независимом массиве вышел из строя, то операционная система загрузится со второго исправного винчестера, то есть с вашими данными ничего не случится, а вот как воссоздать RAID — массив, об этом поговорим в следующей статье.
Статья на эту тему: Создание RAID-массива или Зеркалирование дисков в новейшей Windows 10 Fall Creators Update