
The best free video editing software, Windows Movie Maker, can help you make a wonderful video with your pictures as well as videos. With the best free video editing software, you can save your Movie Maker project to MP4, but you can also publish it on OneDrive, Facebook, Vimeo, YouTube, and Flickr.
Windows Movie Maker, a free video editing software released by Microsoft, can help you effectively and quickly create your own videos for your friends as well as family. However, do you know how to save Movie Maker project after finishing editing your movie?
Don’t worry if you don’t know how to save Movie Maker to MP4. Now, this post will tell you how to save a Movie Maker file as a video as well as show you the steps for creating your own custom settings for exporting video.
Note: As of January 10th, 2017, Windows Movie Maker was officially discontinued. Now, fortunately, MiniTool Solution Ltd., a professional company based in Canada, has saved the links to the archived files for you. You can download the best free video software from MiniTool.
How to Save Movie Maker Project Using the Recommended Settings
Windows Movie Maker offers the recommended settings for you to save Movie Maker to MP4 video which can be uploaded, shared and burned.
As long as you choose the recommended settings free Movie Maker will take a look at the size and bit rate of your source videos and choose settings according to what it thinks will produce the best balance between file size and video quality.
Now, let’s look at the detailed steps on how to save a Movie Maker file as a video.
Step 1. Launch Windows Movie Maker, open a new project, import your videos and pictures, split and trim your movie, add transitions as well as effects to enhance your movie, and add Titles and Credits to complete the movie as you like.
Watch Video
Click the Play button to learn how to split and trim a video.
Step 2. Go to the ribbon and then click the Save movie button found in the Share section on the Home tab. This will bypass all the complicated video settings that you might not understand and bring you right to the Save Movie dialog.
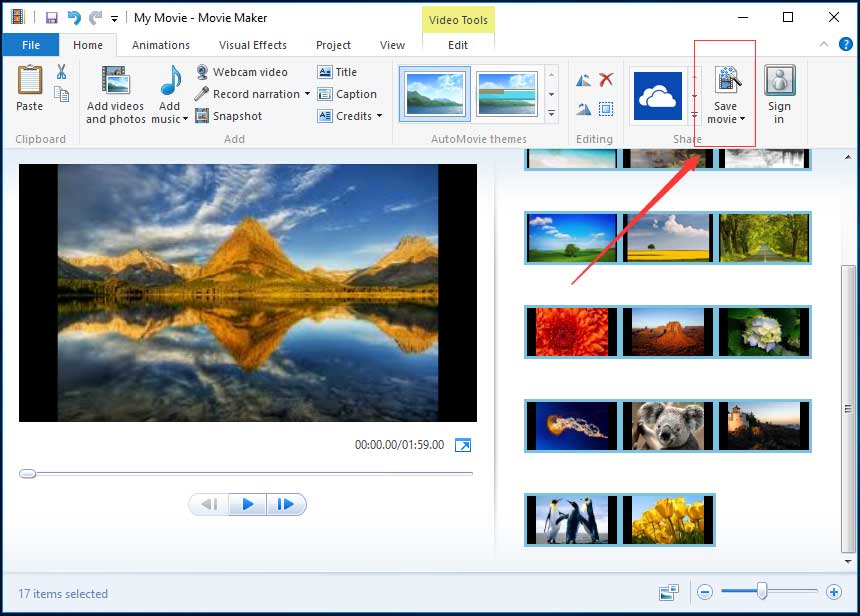
You can click the triangle next to Save movie and hold your mouse over the Recommended for this project to learn the detailed information if you are curious to what video settings Windows Movie Maker deemed optimal for your project, as shown below.
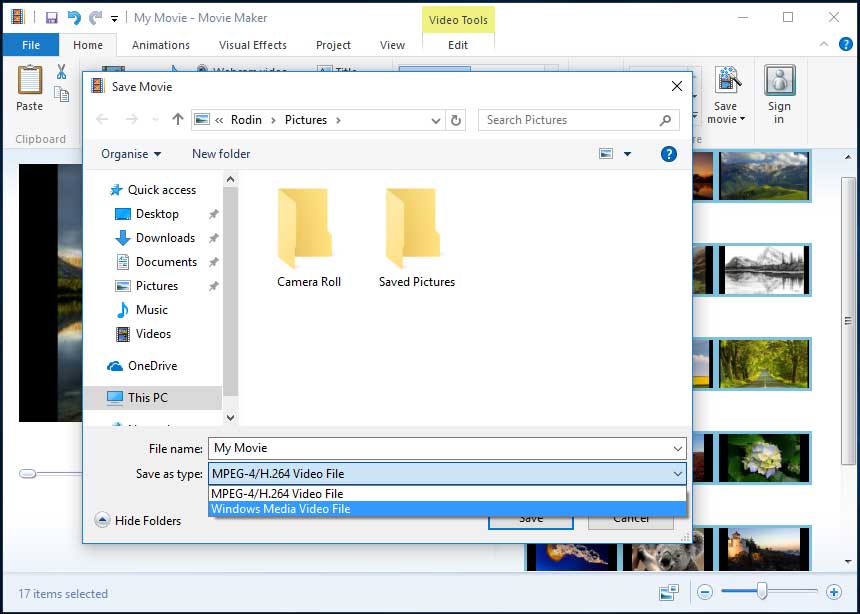
Step 3. Type your file name and choose your video file type: MPEG Video File (*.mp4) or Windows Media Video File (*.wmv).
For most people, the recommended settings will be sufficient for most purposes. You can convert Movie Maker file to MP4 or WMV, and then you are able to share it, upload it or burn it as you see fit.
Hi! I saved Windows Movie Maker project to MP4 without any difficulty. I want to share it with you. Click to Tweet
However, if you plan on sharing your movie via a specific means such as email or a DVD, you are suggested to check out some of Windows Movie Maker’s pre-set video settings. Now, I guess you might be wondering:
“How can I save Movie Maker videos by using the pre-set video settings?”
Want to know the answer?
How to Save Movie Maker Project Using the Preset Video Settings
The best free video editing software offers a few pre-set video settings and these settings are optimized based on what you plan on doing with the file once they are saved.
The steps as follows:
Step 1. Click the small triangle on the Save movie button. After that, you will find these pre-set video settings in the drop-down menu. These settings are optimized for a number of devices as shown below.
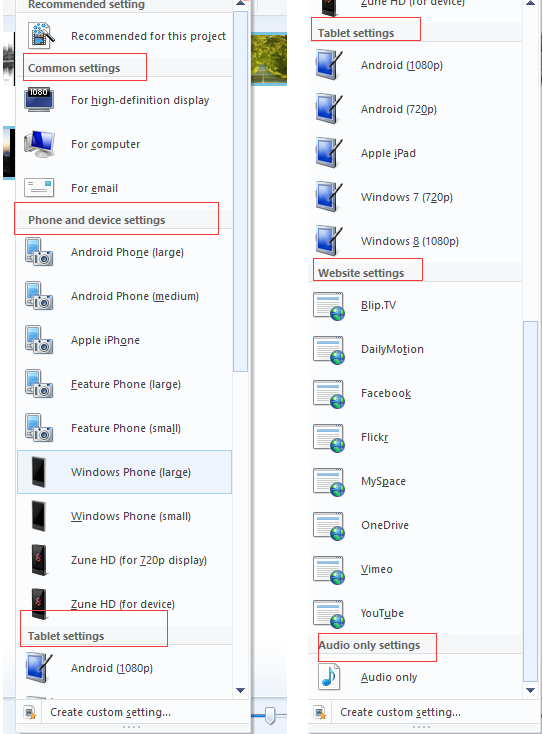
Common settings: For high-definition display, For computer, Burn a DVD, and For email.
The Burn a DVD option is available only in Windows 7. If you choose this option, the file will be saved to the location of your choice and then loaded into a new Windows DVD Maker project.
Phone and device settings: Android phone (large), Android phone (medium), Apple iPhone, Feature phone (large), Feature phone (small), Window phone (large), Windows phone (small), Zune HD (for 720p display), and Zune HD (for device).
Tablet settings: Android (1080p), Android (720p), Apple iPad, Windows 7(720p), and Windows 8(1080p).
Website settings: Bilp.TV, Dailymotion, Facebook, Flickr, MySpace, OneDrive, Vimeo, and YouTube.
Audio only settings: Audio only.
Step 2. Hold over yout mouse over an option in order to see the details, and then choose a suitable setting like For high-definition display, and pick a location to save the file and then click or tap Save button.
See! it is very easy to save a Movie Maker file as a video.
However, what should you do if you don’t want to choose the existing present settings to convert Windows Movie Maker video to MP4 or WMV? Is it possible to publish your video by using more specific options?
Of course, you can!
Windows Movie Maker allows you to create a custom setting of your own to use. Now, I guess you might be wondering:
“How do I create your own custom setting in Windows Movie Maker?”
Please continue reading!
How to Save Movie Maker Project by Creating New Custom Settings
After editing your movie on Windows Movie Maker, you can try the following 6 steps to optimize the video for playback on specific devices.
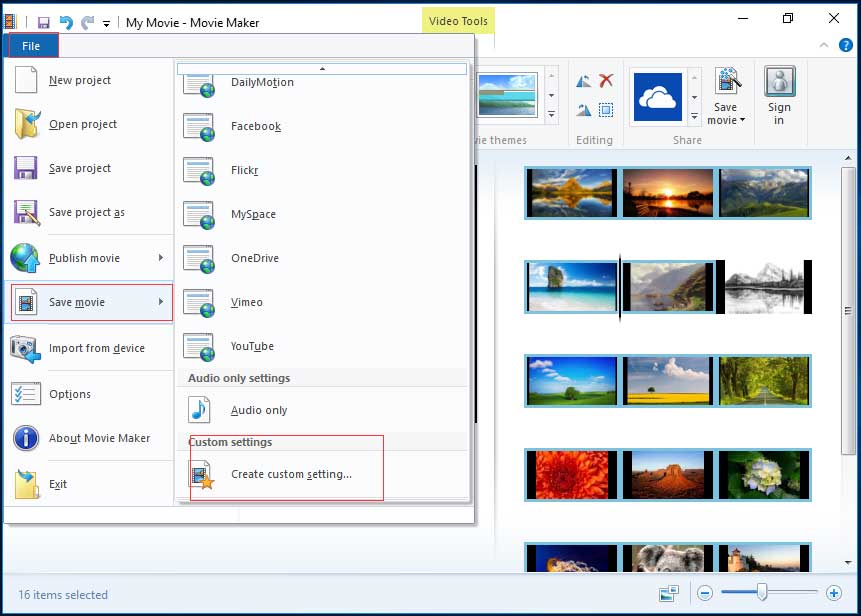
Step 1. Click on the File button located on the top-left corner of the free video editing software window to open the file panel.
Step 2. Click on the Save movie button to open up a new sub-menu to the right.
Step 3. Scroll down the sub-menu and click on Create custom setting button at the very end of the sub-menu.
Step 4. Now, input the following information:
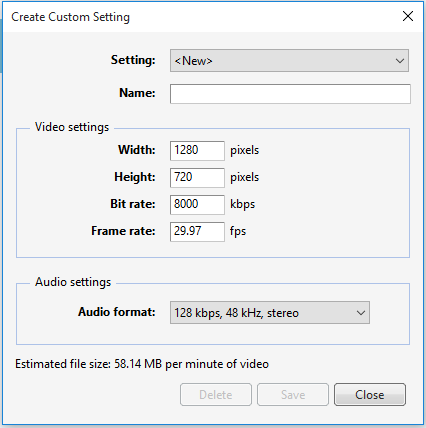
- Setting: Click on the setting’s drop-down list. You either can choose, “<New>,” to start from scratch or select any of the existing settings from the list.
- Name: Give this new export setting a name (for example, Wild China).
- Width & Height: Enter your source file’s original width as well as height. If you wish to export your video at a smaller frame size, edit these values. If you aren’t sure, leave them as-is.
- Bit rate: This can affect the level of detail in your video. Although lower bit rates lead to smaller file sizes and faster uploads, you had better set this higher for improved quality.
- Frame rate: This will affect the smoothness of motion and animations in your video. For basic slideshows you can choose 24fps because photos don’t have to be particularly high. For full motion video it’s not usually necessary to go above 30fps.
- Audio format: Click on the drop-down list and select the audio settings you want. The higher the bit rate (kbps), the better the quality, but it also means a bigger file size. 192 kbps, 48 kHz, stereo is considered CD quality, but 128kbps is passable for video.
Step 5. Check the estimated file size.
As long as you make an adjustment on the settings an estimated file size is displayed at the bottom of the window. The higher you set them, the better the quality and the file size will be larger. Of course, the quality won’t exceed the source material.
Step 6. Click Save after you finish these settings. Then, your video will be saved as a Windows Movie Maker video settings file (.wlvs). After saving, you will find that this file will be added to your list of video settings in the Save movie menu as shown below.
Hi! I now have 3 ways to save Windows Movie Maker project with ease. Share them with more people. Click to Tweet
3 Useful Tips About Using Windows Movie Maker
Windows Movie Maker Supports Many File Types.
Windows Movie Maker is able to support almost any video, audio and photo format.
The formats for import are:
Video Files: mp4, mov, 3gp, avi, rmvb, swf, flv, mkv, mpg, vob, wmv
Audio Files: mp3, aac, amr, flac, m4a, m4r, mmf, wav, wv, ape
Image Files: jpg, png, gif, bmp, ico, jpeg, pcx, tga, tiff, webp
The formats for export are:
mp4, m4a, wmv
Upload A Windows Movie Maker Video
After saving Windows Movie Maker project you can share it with your friends or upload it to YouTube, Facebook, and other famous social platforms. As a matter of fact, with Windows Movie Maker you can directly upload your video to OneDrive, YouTube, Facebook, Flickr, Vimeo, etc.
You can click on the icon of a video-sharing website like YouTube in the Share group under the Home button to directly upload your current Movie Maker video. Then, choose the suitable resolution of your movie to publish it.
Error – Windows Movie Maker Cannot Save the Movie?
According to a survey, we find some users will get the following error message when they save Windows Movie Maker project:
Windows Movie Maker cannot save the movie to the specified location. Verify that the original source files used in your movie are still available, that the saving location is still available, and that there is enough free disk space available, and then try again.
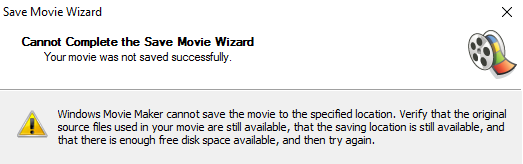
If you encounter this error, you should try the following solutions:
- Make sure your computer has enough memory for the processing of your project.
- Close all other tasks before converting the Windows Movie Maker file as a video.
- Do not edit corrupted file in the free video editing software.
- Make sure your source files are not locked by any type of, “Folder Lock,” software. Many users of “Folder Lock” software have problems when the locked folders include those with the source files used by a project.
- Reinstall Windows Movie Maker.
Bottom Line
Now, it’s your time to convert your Windows Movie Maker video to MP4 or WMV.
If you have any questions or suggestions about how to save Movie Maker project, don’t hesitate to leave a comment in the following part or send us an email via [email protected]. We provide 24*7 Technical Support.
Как сохранить фильм в Киностудии на компьютер
На чтение 3 мин. Просмотров 3.2k. Опубликовано
После создания проекта необходимо правильно сохранить фильм в Киностудии. Функции видео редактора предусматривают возможность выбора формата перед сохранением. По умолчанию программа конвертирует ролики в WMV, но это можно изменить. Рассмотрим, как это сделать в несколько кликов.
Навигация
- Особенности форматов
- Как сохранить видео в MP4
- Альтернативный способ
Особенности форматов
Киностудия Windows Live – это любительский видео редактор, который работает с файлами в формате WMV. С другими типами видео он не всегда работает корректно. Некоторые модификации приложения сохраняют ролики в MP4, но иногда приходится совершать дополнительные действия для этого.
Киностудия не сможет редактировать защищенные цифровые файлы. Они защищены правами, а также в них встроена кодировка DRM.
Перед тем, как сохранить созданный проект в MP4, выставите пропорции видео. Это пригодится, если ролик будет выкладываться в интернете.
Чтобы отрегулировать пропорции кадра, перейдите в раздел «Проект» и выберите стандартные пропорции (4:3) или широкоформатные (16:9).

Для видеохостинга Youtube используется широкоформатное видео.
Затем можно переходить к выбору формата и сохранению видео. Для этого следуйте инструкции:
- Перейдите на вкладку «Главная».
- Нажмите на кнопку «Сохранить фильм», которая находится в панели инструментов справа.
- Появится меню, где можно выбрать параметры ролика.
- Кликните по пункту «Рекомендуемые для этого проекта».

- В открывшемся Проводнике в строке снизу выберите формат MPEG-4. Дайте имя проекту.
- Нажмите на кнопку «Сохранить».


Запустится процесс конвертации. Формат распространен, поэтому будет воспроизводиться практически на любом устройстве.

По окончанию процедуры появится окно, где будет предложено воспроизвести готовое видео, открыть папку, где оно расположено или закрыть это окно.

Чтобы убедиться, что все прошло хорошо, найдите отредактированный файл, щелкните по нему правой кнопкой мыши и в контекстном меню выберите «Свойства». Во вкладке «Общие» есть строка «Тип файла», напротив которой отображается формат видео.
Видеоредактор предлагает подходящие настройки формата и разрешения для определенных устройств или видеохостингов.
Альтернативный способ
Если через редактор сохранить видео в формате MP4 не получилось, можно воспользоваться любым конвертером. Для этого подойдет VSDC Free Video Converter. Он занимает немного места на жестком диске ПК, но при этом работает со многими основными форматами.
На его примере пошагово рассмотрим, как конвертировать ролик:
- Нажмите на кнопку «Открыть файлы» и выберите нужное видео.

- Когда в поле появится видео дорожка, нужно выбрать конечный формат. Для этого нажмите на кнопку MOV.
- В строке снизу найдите Balanced Quality – Video: MPEG-4 и нажмите на нее.
- Кликните по кнопке «Конвертировать файлы».


Приложение позволяет преобразовывать файлы в другие форматы. Например, из MP4 в WMV.
Аналогичный продукт от Microsoft – Windows Movie Maker не работает с форматом MPEG-4,он сохраняет видео только в AVI. Киностудия наоборот – не работает c AVI, а только с MP4.
Киностудия Windows Live предназначена для создания видеороликов для дальнейшей их выгрузки на видеохостинги, а также для записи на DVD. Сохранить ролик в формате MP4 можно через инструменты видео редактора. В другом случае, для этого есть специальные конвертеры, которые преобразуют файл в любой формат.
Windows Live Movie Maker Tutorial Pdf Digital Technology Software Universal in its appeal, this image weaves a mesmerizing tapestry of details and hues, transcending specialized interests to captivate a wide and diverse audience. Its enchanting fusion of elements serves as a magnetic force, drawing enthusiasts from diverse backgrounds into its world of beauty and fascination. In this captivating tableau, a symphony of colors, textures, and shapes harmonizes to create a visual experience that transcends niche boundaries. Its enduring allure sparks wonder and appreciation across all interests and walks of life.

Download Windows Live Movie Maker 15 4 3555 This image, a harmonious blend of artistry and creativity, invites all to admire its captivating essence. A mesmerizing fusion of colors, textures, and shapes transcends niche boundaries, leaving an indelible mark on all who behold it. Within this captivating image, an intricate tapestry of elements unfolds, resonating with a wide spectrum of interests and passions. Its timeless beauty and meticulous details invite viewers from diverse backgrounds to explore its captivating narrative. Within this captivating image, intricate details and vibrant colors come together seamlessly, creating a harmonious symphony for the eyes. Rich hues cascade like a waterfall, from deep indigos to sun-kissed oranges, inviting viewers from diverse niches to appreciate its timeless allure. With its mesmerizing interplay of colors, textures, and forms, this image extends a universal invitation, inviting individuals from various niches to explore its boundless and enduring charm. Its timeless allure speaks to the hearts and minds of all who encounter it.

How To Save A Project In Windows Movie Maker Manual Moviezilla Within this captivating image, intricate details and vibrant colors come together seamlessly, creating a harmonious symphony for the eyes. Rich hues cascade like a waterfall, from deep indigos to sun-kissed oranges, inviting viewers from diverse niches to appreciate its timeless allure. With its mesmerizing interplay of colors, textures, and forms, this image extends a universal invitation, inviting individuals from various niches to explore its boundless and enduring charm. Its timeless allure speaks to the hearts and minds of all who encounter it. Within this striking image, a radiant harmony of colors, shapes, and textures captures the imagination and admiration of people from all walks of life. Its rich interplay of elements creates a visual experience that transcends niche limitations, leaving a lasting impression. With its rich tapestry of visual elements, this image extends an open invitation to individuals from various niches, inviting them to immerse themselves in its boundless and captivating charm. Its harmonious composition resonates with the hearts and minds of all who encounter it.

Easy Tutorial How To Open Windows Live Movie Maker Projects Into Nero Within this striking image, a radiant harmony of colors, shapes, and textures captures the imagination and admiration of people from all walks of life. Its rich interplay of elements creates a visual experience that transcends niche limitations, leaving a lasting impression. With its rich tapestry of visual elements, this image extends an open invitation to individuals from various niches, inviting them to immerse themselves in its boundless and captivating charm. Its harmonious composition resonates with the hearts and minds of all who encounter it.
Why save it like this?
edit
The normal save you use (on the file menu) saves your work in Windows Movie Maker format, which cannot be uploaded to the internet, played in media players or burned to discs. So you must click on SAVE TO MY COMPUTER to save it in one of the ‘proper’ formats, such as WMV (Windows Media Video).
- If the movie tasks are not displayed (at the far left of the screen) then click on the TASKS tab below HELP.
- Under FINISH MOVIE, click on SAVE TO MY COMPUTER.
- Follow the instructions in the wizard. When selecting your format, take these things into consideration: if you transferred your video to your computer DV-AVI or wish to burn the finished video to DVD, then choose DV-AVI. If you captured your video and save it in DV-AVI the quality will be just as it was before you started — uncompressed. Otherwise, just choose RECOMMENDED.
If your video size exceeds your computer’s available RAM, it will not save and the time estimate will be ridiculously large. Eventually, the computer will give up and display a message about Virtual Memory being too low. An example of one of movie maker’s many shortcomings.
-
Playing
6.
Titles & Credits in Movie MakerA lesson with Internet Marketing
View lesson
With images and video set on the Timeline in Windows Movie Maker, it is time to add credits and titles! In this lesson, learn how to design and size titles.
With images and video set on the Timeline in Windows Movie Maker, it is time to add credits and titles! In this lesson, learn how to design and size titles.
-
Playing
7.
Saving Files in Movie MakerA lesson with Internet Marketing
View lesson
After completing a video project in Windows Movie Maker, you need to save! In this lesson, learn how to save files in a format that meets production needs.
After completing a video project in Windows Movie Maker, you need to save! In this lesson, learn how to save files in a format that meets production needs.
-
Playing
8.
Movie Maker Upload & Trim OptionsA lesson with Internet Marketing
View lesson
Learn how to work with video inside Windows Movie Maker! Learn about uploading video content, trimming and setting start and end points, and isolating clips.
Learn how to work with video inside Windows Movie Maker! Learn about uploading video content, trimming and setting start and end points, and isolating clips.
-
Playing
9.
Using AutoMovie in Movie MakerA lesson with Internet Marketing
View lesson
In this quick Windows Movie Maker lesson, learn how to enter titles, customize text, and preview the results to produce high quality, edited video!
In this quick Windows Movie Maker lesson, learn how to enter titles, customize text, and preview the results to produce high quality, edited video!
-
Playing
10.
WebCam Video in Movie MakerA lesson with Internet Marketing
View lesson
Learn one last technique for creating video in Windows Movie Maker that does not require any advanced equipment. All you need is a webcam!
Learn one last technique for creating video in Windows Movie Maker that does not require any advanced equipment. All you need is a webcam!
Did you enjoy this lesson?