
You may want to create Windows 10 live USB for various purposes. This type of drive helps to make your operating system portable and run it on different computers. What is a Windows 10 live USB? How can you create a live Windows USB 10? This article has come to your rescue to help answer these questions. EaseUS will give a detailed description of Windows 10 live USB and discuss 3 free ways to create Win 10 live USB drives.
| Methods | Description | Effectiveness | Difficulty |
| 1️⃣Using Bootable USB Creator | Create Windows bootable live USB with/without the ISO file and offer the one-stop solution for the Windows ISO image download and installation process. | High. Do it with several simple clicks. | ⭐ |
| 2️⃣Using Media Creation Tool | Download and install the tool and create a bootable USB with many steps. | Medium. You might meet the Tool not working error. | ⭐⭐ |
| 3️⃣Using Rufus | Takes several simple clicks to create a live bootable USB, but you must download the Windows 10 ISO file first. | Medium. You might encounter the Rufus can’t create bootable USB error. | ⭐⭐ |
3 Ways to Create Live Windows 10 USB on Laptop/PC
If you want to create live Windows 10 USB for your laptop or PC, this section will discuss 3 reliable methods. Read on as we discuss the steps for each method in detail.
Way 1. Using Professional Bootable USB Creator
The easiest and quickest way to create a Windows 10 live USB is to use a professional USB creator tool like EaseUS OS2Go. It allows you to create a portable Windows installation USB drive and use it on any device. The tool lets you run a fully functional Windows 11/10/8.1/8/7 setup on a media USB flash drive or external hard drive.
EaseUS OS2Go allows you to create an emergency bootable disk and install Windows 10 from USB from BIOS. You can bypass all the «minimum requirements» restrictions and successfully install Windows 11. For example, it lets you install Windows 11 without a secure boot and TPM. Moreover, the tool allows you to run Mac apps on your Windows PC without limitations.
The main features of EaseUS OS2Go include the following:
- Create a Windows bootable USB drive without an ISO file
- Run Windows 10 from USB without installing it on any PC
- Directly create a Windows installation from an ISO file
- Install Windows 10 without a Microsoft account
- Clone Windows 11/10/8/7 to a USB as a portable Windows
- Install 2 operating systems on one computer simultaneously
Download a free version of EaseUS OS2Go on your computer today if you want a professional Windows USB creator. It’s easy to start with this software since the user steps are quite straightforward. Try it out now.
Step 1. Install EaseUS OS2Go on your Windows computer, it will display your system drive’s used space. Plug in a USB drive that is larger than the system drive used space. Choose the target USB drive and click Next to continue.

Step 2. EaseUS OS2Go will notify you that the following operation would delete all data on your drive. Make sure that you have backed up all the important data. Click the Continue button to proceed.

Step 3. Adjust disk layout. The default disk layout on the target drive will be exactly the same as the resource drive. You could also edit the layout according to your needs. Tick the option there if you’re using a Solid State Drive as the Windows bootable drive. Next, click Proceed.

Step 4. Then EaseUS OS2Go will start to create the portable USB drive. It usually takes a while depending on your OS and Network condition. When the progress reaches 100%, the USB drive should be bootable now.

Step 5. Insert the portable Windows USB and start your computer. Press the required key (F2, DEL, F10…) to access BIOS. Choose to boot from the USB disk.
Note: Please make sure that the boot mode (UEFI or Legacy) of the portable USB and your target computer are the same, otherwise you may not be able to boot.
Is this article helpful? Post it on your social media to help others if it can solve your problems.
Way 2. Using Windows 10 Media Creation Tool
You’ll first need to download the Media Creation Tool to a computer with an internet connection to use this method. Once done, you can create a live USB because it already has a Windows 10 live USB ISO download. Follow the steps below:
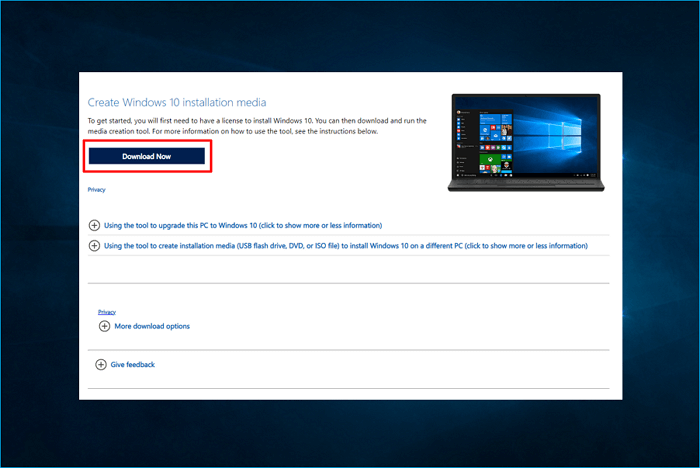
Step 1. Visit the Microsoft Windows 10 download page and click the «Download now» button. This allows you to download the «MediaCreationTool.exe» file to your computer. Install the Tool on your PC and launch it.
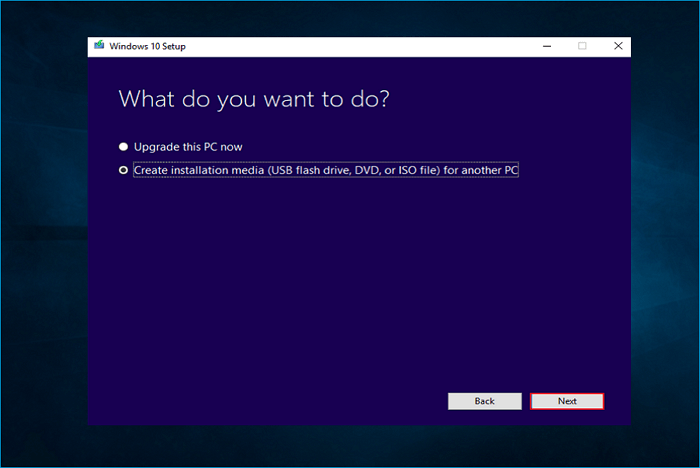
Step 2. Tap Create installation media (USB…) for another PC and press Next.
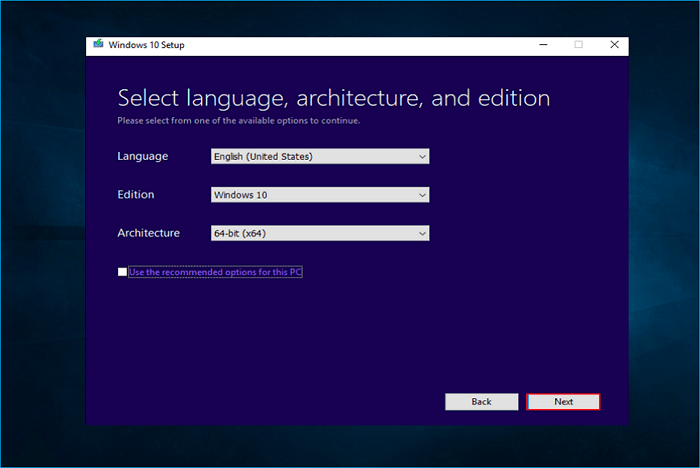
Step 3. Set the Windows 10 Edition, Language, and Architecture. After that, press Next.
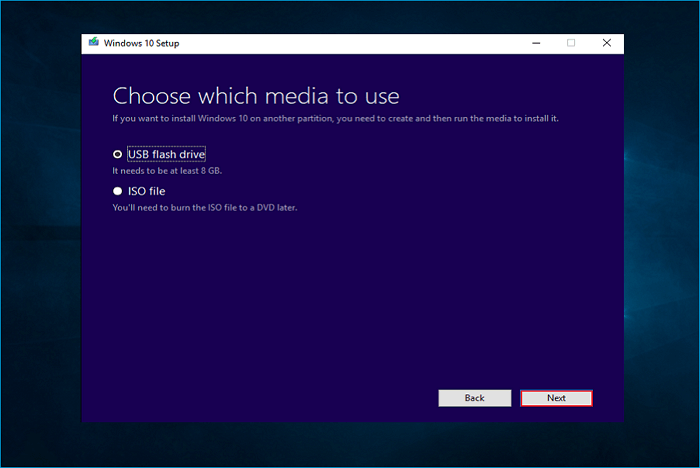
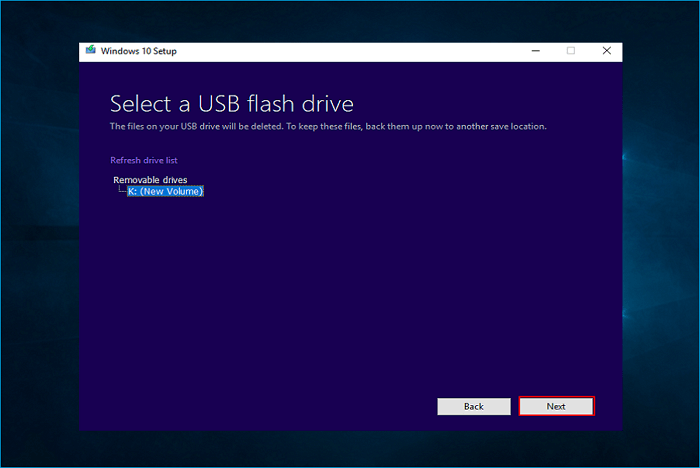
Step 4. Select the USB flash drive and press Next. (Ensure the USB has a capacity of at least 8GB.)
Step 5. Select the USB drive connected to your computer and press Next.
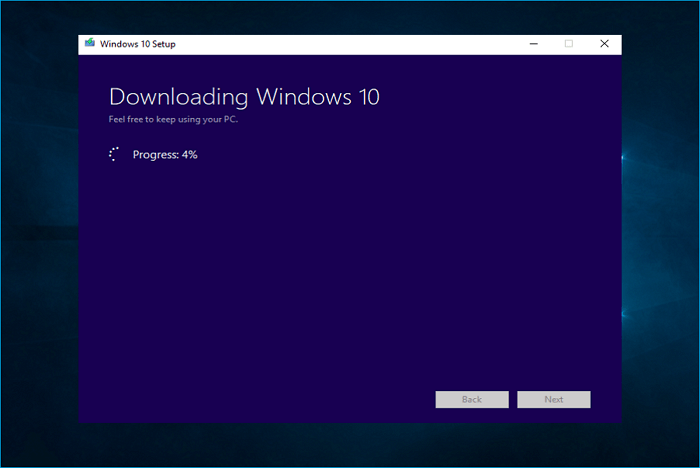
Step 6. The Windows Tool will download Windows 10 to your chosen USB.
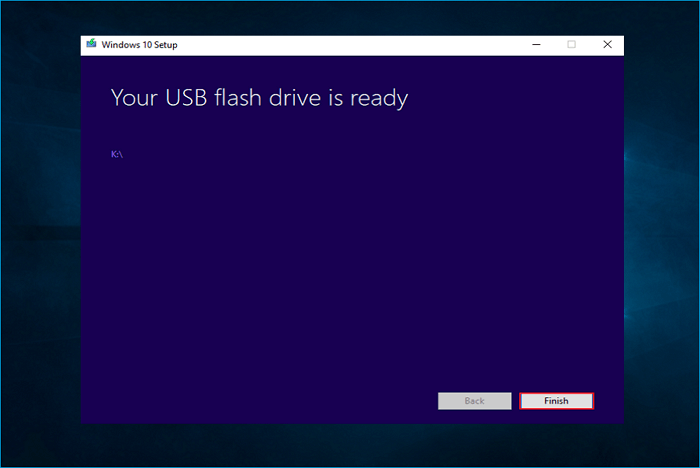
Step 7. After downloading, the Tool will create a bootable Windows 10 USB drive. When the message reads «Your USB flash drive is ready», you can tap Finish to exit the Tool.
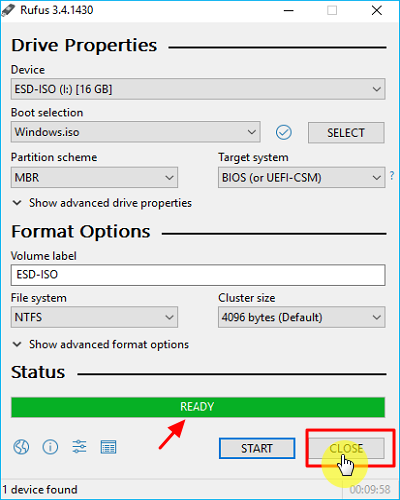
Way 3. Using Rufus
Rufus is a free & open-source tool for Microsoft Windows to format and create a bootable USB flash drive or Live USB. If you want to create a live USB with Rufus, you need first go to the Windows 10 download page to get the Windows 10 ISO file. After that, you can follow the steps below to use it.
Step 1. Download, install, and launch Rufus on your computer.
Step 2. Click «Select» and pick the Windows 10 ISO file you want to make bootable.
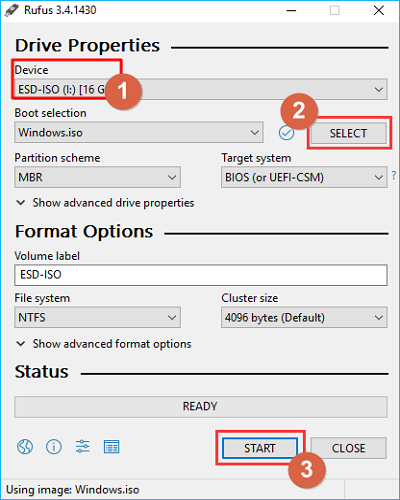
Step 3. Next, click the drop-down menu next to «Image option,» «Partition scheme,» and «Target system» to make your preferred selections.
Step 4. Click the start button to initiate the Windows 10 live USB creation process. Stay patient until the process finishes. It will display «Ready» under the status bar once done. That’s how to create a Windows 10 bootable USB from ISO using Rufus.
You can read the following article to know the difference between Rufus and Windows Media Creation Tool.
Bonus Tip: How to Run Windows 10 from USB Drive
Once you’ve created a bootable live USB drive, the next step is to try running Windows using it. Below are the steps to run Windows 10 installation from a USB drive:
Step 1. Shut down and reboot your PC, then press ESC, DEL, F2, or F10, depending on your computer model, to enter the BIOS setup.
Step 2. Once on BIOS, click the «Advanced» tab to open the «Boot menu.»
Step 3. Select the preferred «Boot mode» for your computer and pick «USB drive» under «UEFI boot order.» Save your changes and exit BIOS.
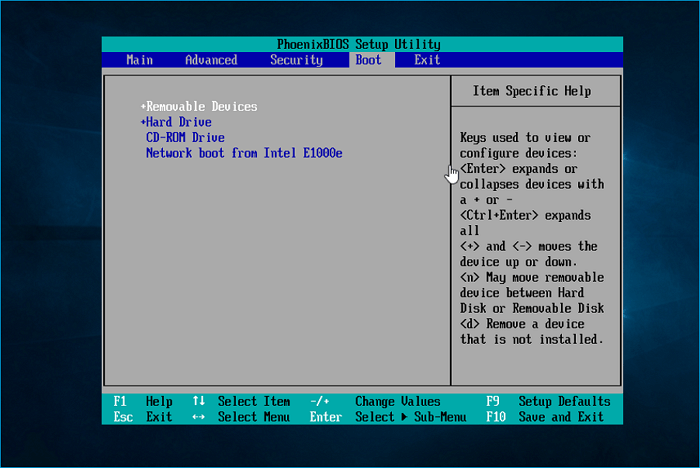
Step 4. Reboot your PC, insert the bootable live USB, and repeatedly press F9 to enter the boot menu. Select your bootable drive from the list. This allows you to proceed to Windows setup and installation.
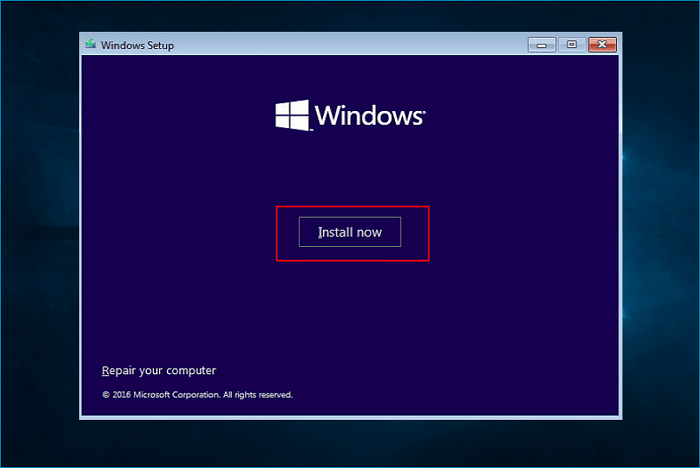
Step 5. Select your language, then click «Next.» Select «Install Now» when the next screen displays. Follow the onscreen instructions to install a new Windows version on your computer. Stay patient until the process finishes.
Read the following article to learn detailed information about how to run/install Windows 10 from a USB drive.
How to Install Windows 10 on New Hard Drive from USB
This article tells you how to install Windows 10 on a new hard drive from a USB flash drive. Read more >>
What Is Windows 10 Live USB & Why Do You Need One
Windows 10 live USB is a bootable flash drive containing a copy of your entire operating system. A Windows 10 live ISO USB lets you alter the booted OS anytime and supports writable storage. With a Windows 10 live USB, you can perform data recovery, system administration, save settings or install new software packages on your system.
A live USB is portable and allows you to run your operating system anytime without carrying your computer. This type of drive is also important in saving internal disc space since it allows you to install large programs.
Is this article helpful? Post it on your social media to help others if it can solve your problems.
To Sum Up
This article has outlined 3 ways to create Windows 10 live USB. They include using a professional USB creator, Media Creation Tool, and Rufus. The most recommended method is using a professional USB creator like EaseUS OS2Go. This software allows you to conveniently create a portable Windows USB drive for your Windows 11/10/8.1/8/7 PC.
OS2Go allows you to run your operating system via USB on any PC. Also, it allows you to bypass Windows 11 installation system requirements and use it on your PC without any restrictions. Do you want to start using a professional USB creator today? Ensure you download and install EaseUS OS2Go on your PC.
FAQs How to Create Live USB Windows 10
Below are common questions about how to create a live USB Windows 10.
1. Is live USB same as bootable USB?
There’s a difference between the two. A bootable USB only allows you to boot and install Windows but destroys all existing files. On the other hand, a live USB allows you to boot and install Windows but also store the changes made. This means the live USB is portable and allows you to run your OS on multiple computers.
2. How to make bootable USB Windows 10 without ISO file?
It’s possible to create a bootable USB without an ISO file via Command Prompt on Windows 10. You’ll just need to launch CMD as an administrator on your PC and then input a string of commands to make your drive bootable.
3. How to make bootable usb windows 10 using command prompt?
Follow the steps below to make a bootable USB Windows 10 via Command Prompt:
Step 1. Place the USB drive on your computer and launch Command Prompt as an admin.
Step 2. Type diskpart and hit Enter. Next, type list disk, then Enter to display all connected disks.
Step 3. To select your USB drive, type select disk followed by its drive number or letter, then press Enter.
Step 4. Next, type the following commands one after the other and press enter after each:
- clean
- create partition primary
- select partition 1
- format fs=ntfs quick
- active
Step 5. Type exit, then press Enter to quit Diskpart. Close the CMD window.
Step 6. Copy all files from your operating system’s installation disk and paste them to the bootable USB drive.
4. How to create Windows 10 bootable USB without Media Creation Tool?
If you don’t want to create a Windows 10 bootable USB using a Media Creation tool, you can use a professional USB creator Tool like EaseUS OS2Go or WinToUSB. This software allows you to create a portable Windows installation USB drive and run it on any computer. It allows you to use your system anywhere alongside your applications, preferences, and passwords. Ensure you download EaseUS OS2Go and try it out today.
Windows Live USB Setup
Learn how to create a fully functional Live Windows USB that runs Windows directly from an external USB drive, without using third-party tools like WinToUSB. With this method, you can install Windows on a USB drive and seamlessly use it across both PCs and Macs, without altering the internal system.
This allows you to work on the same projects and files on different machines, eliminating the need for file transfers between devices. Whether you’re on a Windows PC or a Mac, your external drive will boot directly into your personalized Windows environment, enabling a smooth, portable computing experience.
Author
- @iamthemag
Appendix
Windows 7:
-
Microsoft officially ended support for Windows 7 on January 14, 2020. This means that the operating system no longer receives security updates, bug fixes, or technical support from Microsoft.
-
After this date, PCs running Windows 7 are more vulnerable to security risks, as they will not receive patches for newly discovered vulnerabilities. Microsoft recommends upgrading to a newer version of Windows, like Windows 10 or 11, for continued security and feature updates.
Windows 8:
-
Windows 8 reached the end of mainstream support on January 9, 2018, meaning it stopped receiving new features and non-security updates.
-
The end of extended support, which includes security updates, was on January 10, 2023. Like Windows 7, after this date, Windows 8 no longer receives any updates, making systems that still run it more susceptible to security risks. Microsoft encourages upgrading to a newer operating system for improved security and functionality.
Note:
Both Windows 7 and 8 can still be used, but continued use is not recommended due to the lack of security updates and the increasing risk of vulnerabilities
ISO Files
- Windows 7 ISO
- Windows 8 x64 ISO
- Windows 8.1 x64 & x86 ISO
- Windows 10 ISO
- Windows 11 ISO
Installation
First, download your desired ISO file and extract it. For example take Windows 10.
Step 1: Prepare the Flash Drive
-
Open Run by pressing
Windows key + R. -
Open Command Prompt as Administrator by typing
cmdand pressingCtrl + Shift + Enter. -
In the Command Prompt, type the following commands to prepare your USB flash drive:

diskpart
list disk
select disk <disk no.>  # Select your flash drive
clean
create partition primary
format fs=exfat quick    # Use 'format fs=ntfs quick' for PC
assign
-
Once the drive is formatted, extract the Windows 10 ISO and copy all files to the flash drive.
Step 2: Install Windows on External Drive or External USB
-
Connect the flash drive to your PC or Mac.
-
Boot from the USB flash drive by selecting it from the boot menu.
-
On the installation screen, you may encounter errors like:
-
To bypass these errors, press
Shift + F10to open a Command Prompt.
Step 3: Set Up Partitions on the External SSD/HDD or USB
- In the Command Prompt, type the following commands to set up the partitions on your external SSD or HDD:
diskpart
list volume  # Find the letter of your USB flash drive
select disk <disk no.>  # Select your external SSD or HDD
clean
convert gpt

# Create Recovery Partition
create partition primary size=450
format quick fs=ntfs label="Windows RE Tools"
assign letter="T"
set id="de94bba4-06d1-4d40-a16a-bfd50179d6ac"
gpt attributes=0x8000000000000001

# Create EFI Partition
create partition efi size=260
format quick fs=fat32 label="System"
assign letter="S"

# Create MSR Partition
create partition msr size=128

# Create Windows Partition
create partition primary size=372000  # Adjust the size as needed for Windows
format quick fs=ntfs label="Windows"
assign letter="W"

# Create Recovery Image Partition
create partition primary size=4096
format quick fs=ntfs label="Recovery Image"
assign letter="R"
set id="de94bba4-06d1-4d40-a16a-bfd50179d6ac"
gpt attributes=0x8000000000000001

list volume
Step 4: Copy Windows Installation Files
Now we need to copy the necessary Windows 10 installation files from the flash drive to different partitions on the SSD. Execute the following commands:
md R:\RecoveryImage

# Replace 'D' with your USB flash drive letter
copy D:\sources\install.wim
R:\RecoveryImage\install.wim
Note: Change the Index to the Windows 10 version you want to install.
# Replace 'D' with your USB flash drive letter
dism /Get-WimInfo /WimFile:D:\sources\install.wim
cd X:\Windows\System32
dism /Apply-Image /ImageFile:R:\RecoveryImage\install.wim /Index:6 /ApplyDir:W:\  # Adjust the index as needed
md T:\Recovery\WindowsRE
copy W:\Windows\System32\Recovery\winre.wim T:\Recovery\WindowsRE\winre.wim

bcdboot W:\Windows /s S: /f UEFI

W:\Windows\System32\reagentc /setosimage /path R:\RecoveryImage /target W:\Windows /index 6
W:\Windows\System32\reagentc /setreimage /path T:\Recovery\WindowsRE /target W:\Windows
Restart again and choose EFI boot.
Follow on-screen instructions to install Windows 10.
Step 5: Configuring for Mac Compatibility (Optional)
To use the SSD with a Mac, restart your Mac and hold ⌘ + R to enter recovery mode.
- Allow booting from external media for Macs with Apple’s T2 security chips.
- Set the security level to «None».
- Restart again and choose EFI Boot from the boot options.
- Follow the on-screen instructions to install Windows 10.
- Install the Windows Support Software from the USB flash drive, and you’re good to go.
Опубликовано:
Данная инструкция поможет разобраться, как самостоятельно создать мультизагрузочную USB флешку, подготовить ее в качестве инструмента реанимации системы, а также сделать носитель для установки операционных систем Windows и Linux. В качестве программы для работы с флеш-накопителем будем использовать Rufus. В качестве образа для флешки с Windows LiveCD мы будем использовать 2k10.
Создание загрузочной флешки 2k10
Загрузка с флешки и запуск Windows LiveCD
Установка операционной системы с флешки
Загрузочная флешка 2k10
1) Образ 2k10 постоянно обновляется, поэтому первым делом найдем его свежую версию. Просто вбиваем в поисковой системе 2k10 — первые 3 ссылки, как правило, содержат то, что нам нужно. Например, я загрузил образ с форума usbtor. Также данный образ можно загрузить на различных торрент-трекерах.
2) Теперь загрузим Rufus — переходим на сайт https://rufus.ie. Скачиваем программу:

3) Создаем загрузочную флешку. Вставляем ее в USB-разъем компьютера и убеждаемся, что на ней нет важных данных. Запускаем скачанный Rufus.
Проверяем, что выбрана нужная нам флешка:

Кликаем по ВЫБРАТЬ и выбираем наш загрузочный образ 2k10:

Выбираем подходящую схему раздела:

* в данном примере выбрана схема MBR — она является универсальной и с ее помощью можно загрузиться с нашей флешки на любом компьютере (на некоторых компьютерах необходимо отключить UEFI или включить режим совместимости CSM). Если мы выберем схему GPT, то загрузиться с такой флешки можно будет на компьютерах с UEFI.
Остальные опции настраиваем по желанию. Кликаем по СТАРТ:

… программа выкинет предупреждение, что данные на накопителе будут уничтожены. Еще раз убеждаемся в отсутствии важных файлов на флешке и соглашается.
Начнется процесс создания загрузочной флешки. Ждем его окончания.
Загрузка с флешки
Процедура состоит из следующих шагов:
- Подключаем флешку к компьютеру.
- Заходим в биос.
- Настраиваем приоритет загрузки с флешки.
- Система загрузит меню 2k10.
Разберем последующие шаги подробнее. Когда перед нами появится меню, выбираем один из вариантов загрузки системы Windows LiveCD:

* в данном примере мы загружаем LiveCD WinPE на основе Windows 10. Нам также доступны Windows 7 и 8.
Ждем загрузки и можем приступить к работе:

Установка операционной системы с флешки 2k10
Одно из удобств загрузочной флешки 2k10 заключается в простом добавлении дистрибутивов операционных систем. Для этого просто вставляем флешку в компьютер — открываем ее в проводнике. Переходим в каталог 2k10\User.Image — и в него копируем файл ISO-образа с операционной системой. Мы готовы к установке системы.
Название файла образа не должно содержать пробелы. С ними загрузчик, почему-то, не отображает его в списке образов для загрузки.
Теперь загружаемся с флешки до окна с меню. Выбираем пункт Start Grub4Dos menu:

В следующем окне выбираем загрузку образов из папки 2k10/User.Image:

… и выбираем наш образ с операционной системой — начнется его загрузка.
Содержание статьи:
- Как создать LiveUSB-флешку
- С Windows (Windows PE)
- C антивирусом (NOD32, Dr.Web и др.)
- Вопросы и ответы: 9
Доброго времени суток!
При различных проблемах с компьютером довольно часто приходится прибегать к специальным загрузочным LiveCD («живым» дискам).
Суть такого диска (флешки) в том, что вы можете загрузить с него полноценную операционную систему за несколько минут, не устанавливая ее на жесткий диск! К тому же, почти на большинстве таких дисках будут присутствовать полезные утилиты для восстановления ОС, просмотра и редактирования популярных документов, файлов и т.д.
Когда может понадобиться LiveCD:
- если вдруг Windows не загружается (еще хуже, если нужно срочно скопировать файлы с диска, на котором система);
- при необходимости изменения разделов диска, форматирования и пр.;
- при вирусном заражении системы;
- если не удалятся какие-то папки, файлы и др.
В этой статье покажу на примере, как создать два таких LiveCD (лучше даже сказать LiveUSB) и записать их на флешку: один с антивирусом (NOD 32 или Dr.Web), другой с Windows и сервисными утилитами. Чтобы в случае чего — быть готовым во все оружие!
👉 В помощь!
Лучшие LiveCD для аварийного восстановления Windows
*
Как создать LiveUSB-флешку
(диск CD|DVD создается аналогично)
С Windows (Windows PE)
Windows PE — это минимальная версия операционной системы, с ограниченными службами. Обычно, используется для подготовки компьютера к установке Windows, для настройки и запуска установки ОС. Так же на ее базе создаются так называемые LiveCD/USB.
Обычно, в большинстве случаев Windows PE распространяется в ISO-образах (производителей таких образов много, как и их содержание может быть разным). Далее этот образ нужно записать на флешку или диск, и загрузиться с него.
Чуть ниже я рассмотрю каждый шаг подробно…
*
AOMEI PE Builder
Официальный сайт: https://www.ubackup.com/
Бесплатный инструмент, чтобы создать загрузочную ОС Windows PE на USB-носителе или CD/DVD диске. Кроме этого, хочу отметить, что в этой программе вы можете добавить свои драйвера и любые программы в процессе создания такого ISO-образа.
Скачать программу можно с официального сайта (ссылка выше). Работает во всех версиях ОС Windows: 7, 8, 10 (32/64 bits).
ВОЗМОЖНОСТИ (ЧТО БУДЕТ ВКЛЮЧЕНО В ОБРАЗ ISO):
- На данном LiveCD уже будут интегрированы «Backupper Standard» и «Partition Assistant» (от того же производителя). С помощью них вы сможете: создавать и восстанавливать резервные копии дисков, изменять, расширять, копировать, объединять разделы жесткого диска;
- Есть родная среда восстановления Windows (очень полезно, при повреждении загрузчика в ОС);
- Имеется архиватор 7Z для работы с архивами;
- Есть утилита Bootice — для восстановления главных загрузочных записей;
- IrfanView — просмотр картинок и фото;
- Notepad++ — очень удобный блокнот (txt, php, inf и др. файлы можно открыть и редактировать);
- Everything — легкий и быстрый поиск файлов на диске;
- Ntpwedit — программа для редактирования и сброса паролей в Windows;
- Recuva — спец. утилита для восстановления файлов на дисках и флешках (о том, как в Recuva искать удаленные документы на диске, можете узнать здесь: https://ocomp.info/kak-vosstanovit-dokument-word.html);
- SumatraPDF — просмотр PDF, ePub, MOBI, CHM, XPS, DjVu, CBZ, CBR файлов;
- QtWeb — удобный интернет-браузер, и многое другое…
*
Как создать ISO c Windows PE в AOMEI PE Builder
Скачивание и установку программы опускаю (ничего сложного, всё стандартно). Далее, после запуска, появляется первый экран приветствия, сообщающий вам особенности данного ПО. Нажмите кнопку «Next» (далее).
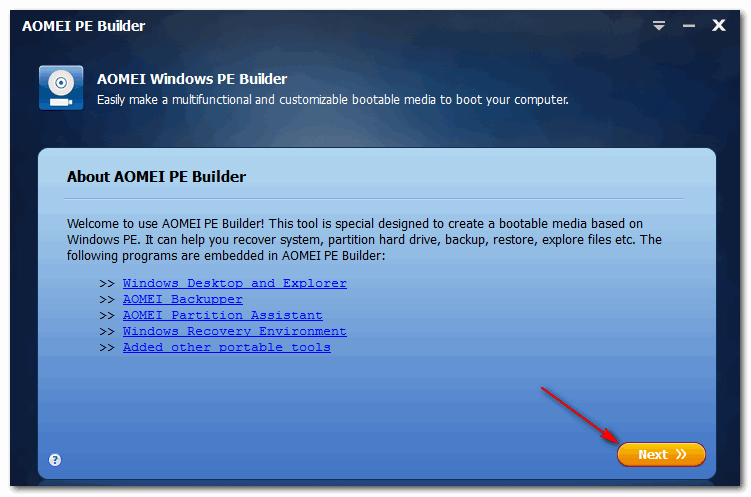
Начало работы
Снова нужно нажать «Next», чтобы приступить к созданию загрузочного носителя.

Предупреждение
В этом шаге вы можете добавить различные файлы, программы и драйвера на свой создаваемый образ. Учтите, кстати, что AOMEI PE Builder уже по умолчанию включил многие популярные программы для работы (браузер, блокнот, утилита для восстановления файлов и т.д.).
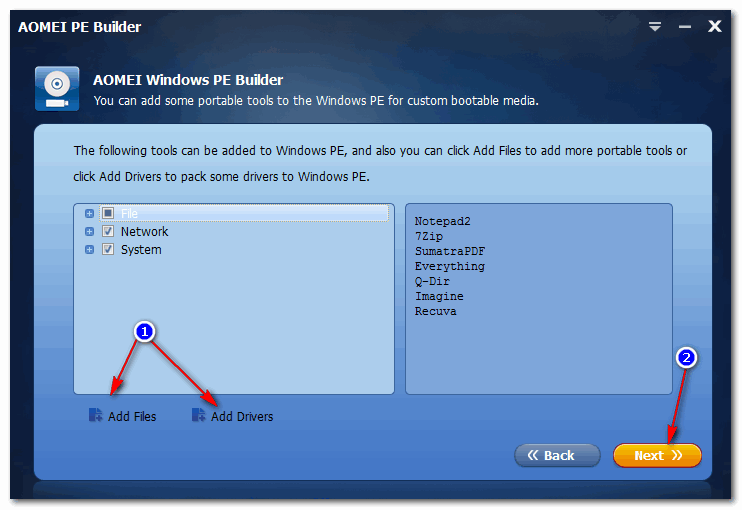
Добавление драйверов и программ, файлов
В этом шаге вас попросят указать загрузочный носитель: CD/DVD-диск, USB-диск, или просто экспортировать и создать ISO-образ. Можете сразу выбрать то, что вам нужно, я же рассмотрю универсальный вариант, и создам ISO.
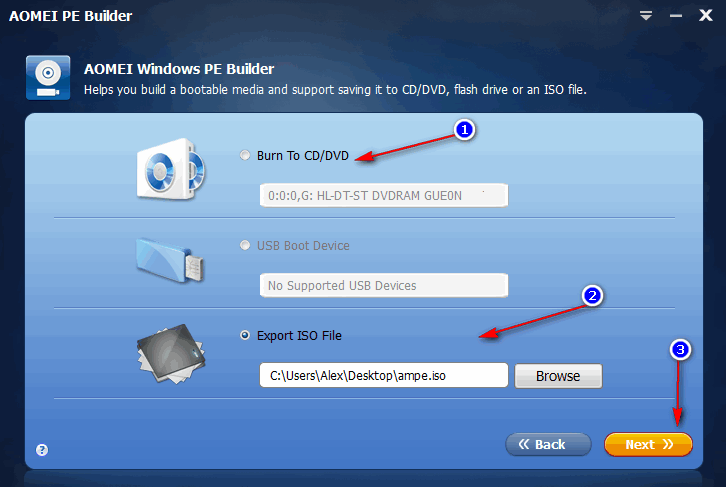
Выбор носителя. Есть возможность создания загрузочного ISO
Последний штрих: осталось дождаться, пока все файлы будут упакованы в ISO-образ. Процесс, в среднем, занимает 5-10 мин. (зависит еще от того, какие файлы вы добавили в предыдущих шагах).

Создание ISO файла
*
Как записать полученный ISO с Windows PE на диск или флешку
Будем считать, что ISO-образ у Вас есть (либо создали сами, по инструкции выше, либо где-то загрузили готовый). Самый простой способ записать ISO на диск или флешку — воспользоваться программой 👉 UltraISO.
👉 В помощь!
Подробное описание и ссылку на загрузку программы UltraISO вы сможете найти в этой статье
(в ней так же приведены и другие полезные утилиты для создания загрузочных носителей)
Кратко рассмотрю, как в ней записать образ:
1) Сначала устанавливаете и запускаете программу (UltraISO).
2) Нажимаете меню Файл/открыть и указываете ваш ISO файл.
3) Для создания загрузочной флешки: нажмите Самозагрузка/Записать образ жесткого диска (для диска CD/DVD — Инструменты/записать образ CD). Скриншот ниже в помощь. 👇
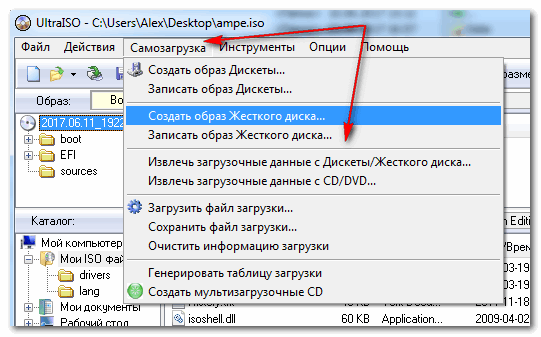
Записать образ жесткого диска
4) Далее укажите нужный носитель (например, флешку) в пункте Disk Drive, укажите метод записи — USB-HDD (для DVD — указывать ничего не нужно), и нажмите кнопку Записать/GO.
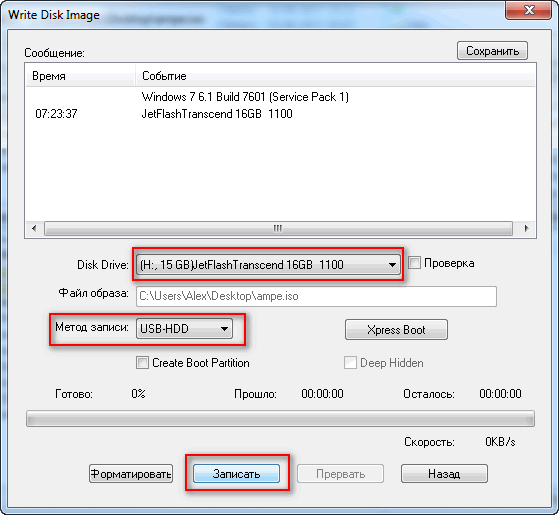
Записать диск
5) Через 5-10 мин. флешка или диск будут записаны. Можно приступить к тестированию…
*
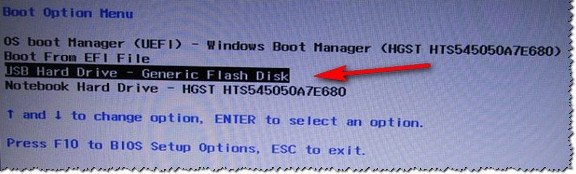
Как загрузиться с LiveUSB-флешки (диска)
- Необходимо сначала настроить соответствующим образом BIOS, либо, что еще лучше, вызвать загрузочное меню (Boot Menu). Чтобы не повторяться, рекомендую 👉 ознакомиться с этой статьей;
- Далее из списка загрузочных устройств выбрать нашу флешку:

Пример Boot Menu — выбор загрузки с флешки
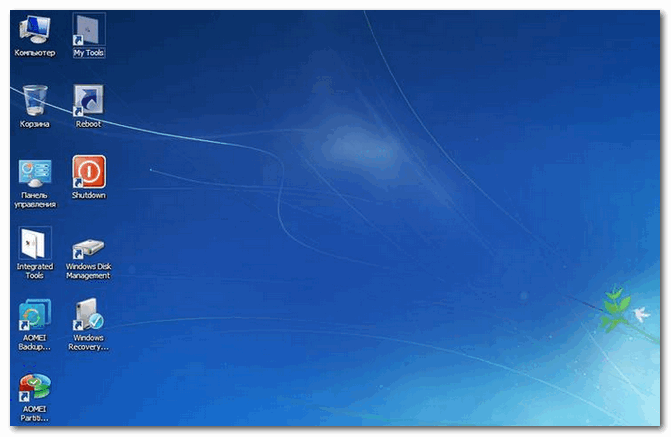
- Далее должно появиться сообщение, что начата загрузка файлов (Loading Files…).
Loading (загрузка)
- Собственно, далее должен появиться рабочий стол, как в классической Windows (такой же, как если бы она была установлена на жесткий диск). Пример показан на фото ниже. Рассматривать, как работать далее — не вижу смысла, т.к. все программы на русском языке, да и пользоваться ими можно также, как в обычной Windows.

После загрузки: привычный рабочий стол, так сразу и не скажешь, что Windows была загружена с флешки
*
C антивирусом (NOD32, Dr.Web и др.)
Во многих образах ISO с Windows PE уже есть включенные в их состав антивирусы. Тем не менее, не могу в этой статье обойти стороной загрузочные ISO-образы от разработчиков популярных антивирусных продуктов.
Скачав такой ISO-файл с сайта разработчика и записав его на флешку (диск), Вы можете загрузиться с него и проверить свой диск и систему на наличие вирусов (в некоторых случаях, при вирусном заражении, Windows не загружается, пожалуй, только такие диски и выручают).
Рекомендуемые LiveDisk
1) NOD32
Сайт: https://www.esetnod32.ru/download/utilities/livecd/
Хороший LiveCD, который можно быстро записать на флешку или диск, и также быстро проверить им компьютер на вирусное ПО. Отличается своим небольшим размером и достаточно эффективным поиском разного рода вредоносного ПО. Кстати, рекомендую иметь оба диска: и с NOD32, и с Dr.Web.
2) Dr.Web (аптечка сисадмина)
Сайт: https://free.drweb.ru/aid_admin/

Бесплатный продукт для аварийного восстановления системы с CD/DVD-диска или USB-накопителя. Поможет, если рекламное ПО или вирусы повредили загрузку ОС. Такой диск поможет не только очистить ПК, но и перенести важную информацию на сменные носители.
Важно! Утилита для записи работает в Windows (32/64-бит). Для загрузки с флешки — BIOS вашего компьютера должен поддерживать устройство USB-HDD (примечание: все современные версии БИОС поддерживают данный режим).
*
👉 Запись загрузочного ISO от антивируса NOD32
Для работы понадобиться утилита WinSetupFromUSB.
WinSetupFromUSB
Сайт: http://www.winsetupfromusb.com/
Одна из самых удобных и популярных программ для записи загрузочных флешек. Программа позволяет создавать загрузочные флешки с различными ОС Windows: 2000, XP, Vista, 7, 8, Linux ISO и т.д.
В общем, в нашем случае, она без проблем сможет создать загрузочный носитель из образа ISO с антивирусным продуктом.
После запуска программы, нужно:
- Выбрать USB-флешку;
- Далее поставить галочку напротив пункта Auto Format it with FBinst (все данные на флешке будут удалены!). Кстати, остальные настройки должны выставиться автоматически, см. скрин ниже;
- Затем в пункте «Linux ISO/Other Grub4Dos compatible ISO» выберите наш скачанный (созданный) образ ISO от разработчиков антивирусного ПО (я взял образ с NOD32);
- последний шаг — нажать кнопку GO, и ждать окончания записи.
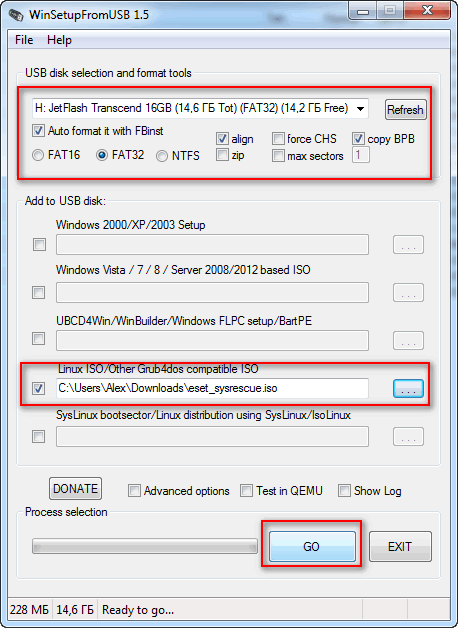
Настройки записи WinSetupFromUSB
Кстати, WinSetupFromUSB переспросит еще раз вас о том, что точно ли произвести форматирование флешки и удалить все данные на ней.
Переспрашивает
Если все прошло хорошо и данные на флешку все были записаны — Вы увидите окно Job Done (работа завершена).
Флешка записана — Job Done
*
Как загрузиться с такой флешки:
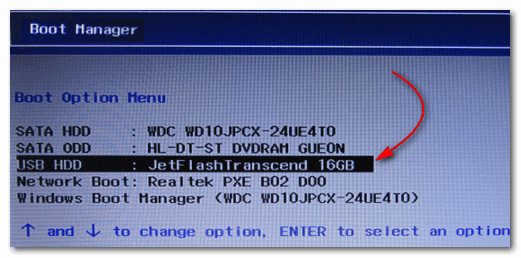
- В принципе, также как с флешки, которую мы создали в первом разделе данной статьи. Достаточно вызвать 👉 Boot Menu, затем выбрать из перечня устройств, с которых можно загрузиться, нашу флешку;

Загрузочное меню — выбор флешки
Примечание: если при загрузке образа ISO у вас появятся ошибки, возможно следует в настройках BIOS перевести Boot Mode (режим загрузки) с UEFI на Legacy (поддержку загрузки старых ОС, загрузочных образов и пр.). О настройке BIOS 👉 в картинках см. в этой статье;
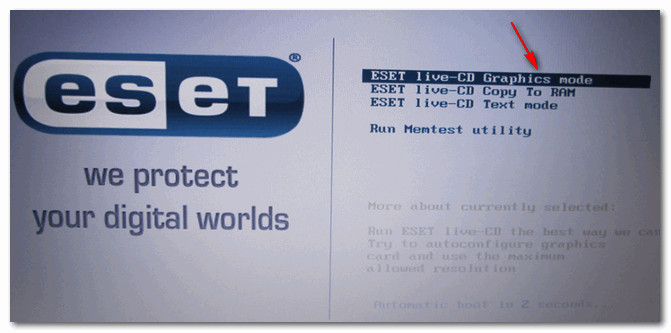
- Далее должно появиться окно GRUB4DOS (если записывали флешку в программе WinSetupFromUSB) — достаточно выбрать строку с «ESET…» и нажать Enter;

Загрузка NOD32
- Затем начнется загрузка антивирусного LiveCD: когда увидите экран приветствия, обратите внимание, что справа есть несколько режимов загрузки: графический, текстовый, тестирование памяти и пр. По умолчанию, будет загружен графический (самый оптимальный для большинства пользователей, работать в нем — всё равно, что если бы Вы загрузились в обычной Windows).

Окно приветствия ESET — выбор режима загрузки (графический, текстовый)
- графический интерфейс в общем-то классический, работать легко, как в классическом проводнике… (см. скриншот ниже 👇).

ESET NOD 32 LiveCD — скриншот


*
На этом всё…
Надеюсь дал боле-менее исчерпывающий ответ по поводу LiveCD.
На статью буду частенько ссылаться в своих прочих инструкциях.
Удачи!
👋
Первая публикация: 16.02.2019
Корректировка: 16.04.2020