
It’s often useful to know what logical and physical drives are available to Windows, and sometimes this needs to be done from the command line.
Here’s a handy command to return a list of logical drives in Windows.
wmic logicaldisk get caption,description,drivetype,providername,volumename
The Win32_LogicalDisk WMI class represents a data source that resolves to an actual local storage device on a computer system running Windows. While Caption, Description, DriveType, ProviderName, and VolumeName are useful in most cases, more properties are available, and a complete list is available at http://msdn.microsoft.com/en-us/library/windows/desktop/aa394173(v=vs.85).aspx. The output will be formatted as a table, the properties will be the column headings, and they will be placed into alphabetical order.
Caption is the drive letter of the logical disk. The Name property also returns the drive letter.
Description is the type of disk. For example: Local Fixed Disk, CD-ROM Disc, or Removable Disk.
DriveType is returned as an integer that corresponds to the type of disk drive the logical disk represents (and this matches the Description, making DriveType sort of superfluous).
0 = Unknown
1 = No Root Directory
2 = Removable Disk
3 = Local Disk
4 = Network Drive
5 = Compact Disc
6 = RAM Disk
ProviderName is the network path to the logical device.
VolumeName is the volume name of the logical disk.
Physical drives
And here is a command to return a list of physical drives.
wmic diskdrive list brief /format:list
The Win32_DiskDrive WMI class represents a physical disk drive as seen by a computer running Windows. Like the Win32_LogicalDisk WMI class, it has lots of properties, as listed at http://msdn.microsoft.com/en-us/library/windows/desktop/aa394132(v=vs.85).aspx.
For simplicity, though, and ease of reading in command window, wmic diskdrive list brief /format:list does the trick, particularly in combination with wmic logicaldisk.
To list the physical disks in Windows and obtain the names such as "\\.\PhysicalDrive0", you can use various methods. Here are a few popular methods:
1. Using Command Prompt and
diskpart
- Open Command Prompt with administrative privileges.
- Type the following command and press Enter:
- Once the
diskpartutility starts, type:This will list all physical disks connected to the system, identified by "Disk 0," "Disk 1," etc.
2. Using PowerShell
To get a list of physical disks using PowerShell:
- Open PowerShell with administrative privileges.
- Run the following command:
This will display a list of all the physical drives on the system, along with their properties.
3. Using WMIC (Windows Management Instrumentation Command-line)
- Open Command Prompt with administrative privileges.
- Type the following command and press Enter:
This will list the physical drives, typically named as "\\.\PhysicalDrive0", "\\.\PhysicalDrive1", etc.
4. Using Device Manager
- Press
Win + Xand select "Device Manager."- Expand the "Disk drives" node.
This will show a list of physical drives connected to the system.5. Using a Script in WMI (Windows Management Instrumentation) through PowerShell
Here's a more detailed PowerShell script that utilizes WMI to list physical drives and additional information:
Get-WmiObject -Query "SELECT * FROM Win32_DiskDrive" | ForEach-Object { Write-Output "Device ID: $($_.DeviceID)" Write-Output "Manufacturer: $($_.Manufacturer)" Write-Output "Model: $($_.Model)" Write-Output "Serial Number: $($_.SerialNumber)" Write-Output "" }This script will produce detailed information about each physical drive on your system.
Summary
diskpartandlist diskin Command Prompt.Get-Diskin PowerShell.wmic diskdrive get namein Command Prompt.- Viewing in Device Manager.
- WMI query script in PowerShell.
Choose the method that suits you best based on your environment and requirements.
If you frequently work with the Command Prompt or PowerShell, you may need to copy files from or to an external drive, and many other times, you may need to display the drives within the console window. In this post, we will show you how you can list hard drives using Command Prompt or PowerShell in Windows 11/10.

First, let’s see how to list hard drives using the Command Prompt on Windows 11/10.
If you need to simply list the drives, you may use WMIC. Windows Management Instrumentation (WMI) is the infrastructure for management data and operations on Windows-based operating systems.
Open a command prompt, and type the following command:
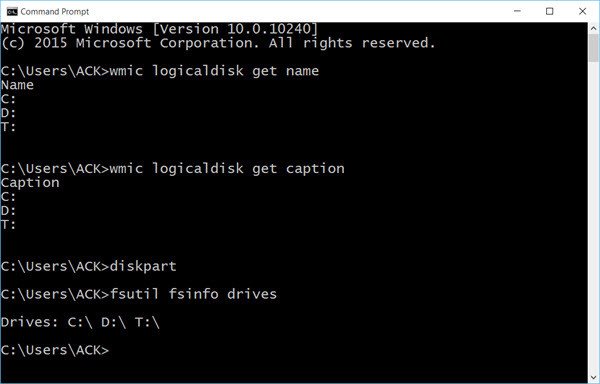
wmic logicaldisk get name
Press Enter and you will see the list of Drives.
You can also use the following parameter:
wmic logicaldisk get caption
Using the following will display Device ID and volume name as well:
wmic logicaldisk get deviceid, volumename, description
Windows also includes an additional command-line tool for file, system, and disk management, called Fsutil. This utility helps you list files, change the short name of a file, find files by SID’s (Security Identifier), and perform other complex tasks. You can also use fsutil to display drives. Use the following command:
fsutil fsinfo drives
It will show mapped drives too.
You can also use diskpart to get a list of drives and more details. The Diskpart utility can do everything the Disk Management console can do, and more! It’s invaluable for scriptwriters or anyone who prefers working at a command prompt.
Open CMD and type diskpart. Next, use the following command:
list volume
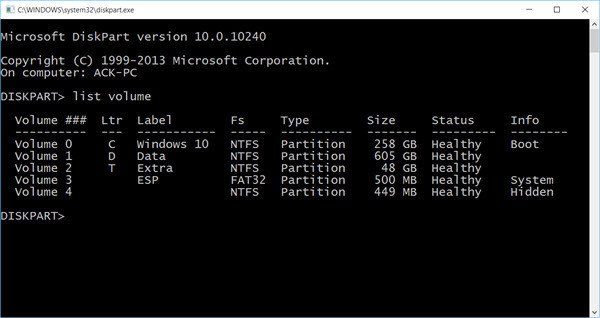
You will see that the console displays the Volume number and letter, label, formatting type, partition type, size, status, and other information.
List Hard Drives using PowerShell
You can also list hard drives using the Windows PowerShell on your Windows 11/10 computer. Let’s see how to do that.
To display drives using PowerShell, type powershell in the same CMD windows and hit Enter. This will open a PowerShell window.
To get the list of all hard drives installed on and connected to your computer via Windows PowerShell, use the following command:
Get-Disk

The above command will show the following information of the hard disks and removable storage drives:
- Disk Number
- Friendly name
- Serial number
- Health status
- Operational status
- Total size
- Partition style
If you want to get information on a particular hard disk, you can type its disk number. In this case, the command will be:
Get-Disk -Number 0

In the above command, 0 is the disk number.

If you want to get information about the removable storage devices connected to your computer through a USB cable, use the following command in Windows PowerShell:
Get-Disk | Where-Object -FilterScript {$_.Bustype -Eq "USB"}
If you want to get information on hard drives regarding the used space and free space, use the following command in Windows PowerShell:
get-psdrive -psprovider filesystem

The above command shows the used and free space of all hard drives installed on and connected to your computer.
I hope this helps.
How to run DiskPart in PowerShell?
DiskPart is a separate command line utility in Windows 11/10 that is used to manage your computer’s hard drives. You can execute various commands in DiskPart to list all your hard drives, format your hard drive(s), create partitions on a hard drive, etc. You cannot run it in PowerShell. However, you can launch it through PowerShell. Open PowerShell, type diskpart, and hit Enter. You will receive a UAC prompt. Click Yes to launch the DiskPart utility.
How do I see all drives?
You can see all drives on your Windows 11/10 computer in different ways. You can use the DiskPart utility to list all hard drives and hard drive partitions. If you are not familiar with the command line tool, you can use Disk Management to view all your hard drives. Press the Win + X keys and select Disk Management. When Disk Management opens up, you can view all the hard drives installed on and connected to your computer.
Now see how you can get a list of all Device Drivers using Command Prompt and how to use PowerShell to get physical Disk information.
To list all available drives in the Command Prompt (cmd), you can use the `wmic logicaldisk get name` command.
wmic logicaldisk get name
Understanding CMD
What is Command Prompt?
Command Prompt, often abbreviated as CMD, is a command-line interpreter application available in most Windows operating systems. It allows users to execute commands in a text-based interface, providing a powerful alternative to the graphical user interface (GUI) for operating system management and file manipulation.
Why Use CMD to List Drives?
Using CMD to list drives offers several advantages:
- Speed: CMD executes commands more quickly than navigating through a GUI.
- Efficiency: It allows users to perform multiple tasks without switching between different windows.
- Automation: CMD commands can be scripted, enabling batch operations.
How to View Files in Cmd: A Simple Guide
Using the Diskpart Command
What is Diskpart?
Diskpart is a powerful disk management tool within Windows that allows users to manage disks, partitions, and volumes. It gives you granular control over your drives and is particularly useful for listing both physical and logical drives on your system.
How to Use Diskpart to List Drives
To utilize Diskpart for listing drives, follow these steps:
-
Open CMD as Administrator
To run commands that might require elevated permissions, start CMD as an administrator. Right-click on the Start Menu, type `cmd`, and select Run as administrator. -
Enter Diskpart Command
Once CMD is open, type the Diskpart command:diskpart -
List Drives
After entering Diskpart, you can list all physical drives connected to your system by typing:list disk -
Explanation of Output
The output will display each disk connected to your computer, showing the Disk Number, Status, Size, and Free Space. This breakdown helps you quickly understand the configuration of your drives.
Using the WMIC Command
What is WMIC?
WMIC stands for Windows Management Instrumentation Command-line. It allows you to access various system information, including hardware and software details, through a command-line interface.
How to Use WMIC to List Drives
To list drives using WMIC, follow these steps:
-
Open CMD
Again, ensure that you have CMD open, preferably as an administrator for broader access. -
Execute WMIC Command
To list all logical drives accessible on your computer, input the following command:wmic logicaldisk get name -
Explanation of Output
The command will return the names of all logical drives (like C:, D:, E:, etc.) currently recognized by Windows. This is useful for quickly identifying the drive letters available on your system.
Using Helper Commands
Using the DIR Command
While primarily used to display the contents of a directory, the DIR command can help you view drive letters by checking what is stored on specific drives.
To use the DIR command, type:
dir C:
Replace `C:` with any other drive letter you want to check. The command will list all files and folders present in that drive, confirming its existence.
Using the FSUTIL Command
FSUTIL is a command-line utility that provides various file system tasks. To quickly list all drives accessible on your machine, use:
fsutil fsinfo drives
The output will display all logical drives available, providing a quick reference to all drives present.
How to List Files in Cmd Like a Pro
Additional Tips for Managing Drives with CMD
Accessing Drive Properties
When using the WMIC command, you can expand the detail level to get information about different properties of drives. For example:
wmic logicaldisk get name, description, filesystem
This command returns a list of drives along with their descriptions and file system types (like NTFS, FAT32), which is excellent information for the user.
Creating and Managing Partitions
If you’re looking to partition a drive, Diskpart commands can come in handy. After listing drives, you could create a new partition by entering Diskpart and then using:
create partition primary
However, this requires careful attention, as creating partitions can lead to data loss if not managed correctly.
Checking Drive Health
To ensure your drives are functioning correctly, you can run a check on any specific drive with the following command:
chkdsk C: /f
This command scans for and repairs file system errors on the specified drive. Always remember to replace `C:` with the appropriate drive letter you wish to check.
How to List the Files in Cmd: A Quick Guide
Troubleshooting
Common Issues When Listing Drives
You may encounter errors or issues when using CMD to list drives. One common error is «Access Denied,» which usually occurs when CMD isn’t run as an administrator. Ensure that you launch CMD with elevated privileges to avoid these issues.
FAQs
-
Can I list USB drives with CMD?
Yes, both Diskpart and WMIC can be used to list USB drives. -
What are the differences between logical and physical drives in CMD?
Logical drives represent partitions on your disks that can be accessed directly (like C:), while physical drives refer to the actual hard drives or SSDs installed in your machine.
How to Flush DNS in Cmd: A Quick Guide
Conclusion
Understanding how to list drives in CMD is invaluable for anyone seeking to manage their system efficiently. CMD provides a quick and powerful way to access drive information without the need for graphical interfaces. The tools discussed in this guide, including Diskpart, WMIC, and other commands, equip you with the knowledge to navigate your drives effectively.
Take charge of your computer management and explore the CMD interface further to unlock its full potential!
How to View All Drives in «This PC» on Windows
Understanding how to view all drives in «This PC» on Windows is essential for anyone looking to effectively manage their files and storage. Windows, as one of the most commonly used operating systems, provides various ways to navigate, manage, and access storage devices, both internal and external. This article will walk you through the different methods to view all drives, guide you in troubleshooting common issues, and provide tips to efficiently manage your drives.
Understanding «This PC»
«This PC,» formally known as «My Computer» in earlier versions of Windows, serves as the primary interface for users to access the files and folders on their computer. It displays the available drives, including local storage (hard drives and SSDs), optical drives (CD/DVD), and any external drives (USB flash drives, external hard disks) connected to the system.
When accessing «This PC,» users can also see their libraries (Documents, Pictures, Music, Videos), which can be configured to include files from various drives. Recognizing how to access and manage these drives is crucial for organizing and retrieving data efficiently.
Accessing «This PC»
Before diving into ways to view all drives, it’s essential to know how to access «This PC.» There are several methods:
-
Using the File Explorer:
- Click on the File Explorer icon in the taskbar (it looks like a folder).
- From the navigation pane on the left, click on «This PC.»
-
Using the Start Menu:
- Click on the Start button or press the Windows key on your keyboard.
- Type «This PC» and select the application from the search results.
-
Using Keyboard Shortcuts:
- Press
Windows + Eto open the File Explorer, and then click «This PC» from the left pane.
- Press
Once you have opened «This PC,» you will see an overview of all drives connected to your computer as well as their available storage.
Viewing All Drives in «This PC»
When you open «This PC,» you will typically see the following types of drives listed:
- Local Drives: These are the internal storage devices, usually labeled as C:, D:, or E:, etc.
- Removable Drives: External devices like USB flash drives or external hard drives will also show up here.
- Network Drives: If you are connected to a network, mapped drives from other computers or storage solutions may appear.
Key Areas of «This PC»
-
Devices and Drives:
This is the main area where all drives will be displayed. You can identify drives by their labels and the icons indicating their type (hard disk, removable disk, etc.). -
Storage Capacity:
Each drive will show a visual representation of its storage space, indicating how much space is used and how much remains free. -
Icons and Labels:
Drives are represented with different icons, which signify their type. For example, a hard disk will have a different icon than a USB drive.
Refreshing the View
If you have connected a new drive and it does not appear in «This PC,» refreshing the view may help. Here’s how to do it:
- Right-click anywhere in the blank space of the «This PC» window and select «Refresh,» or simply press
F5on your keyboard.
Troubleshooting Drive Visibility Issues
Sometimes, not all drives may be visible in «This PC.» Below are some common reasons and troubleshooting steps to resolve these issues.
1. Check Physical Connections
For external drives, first ensure that they are correctly plugged into your computer. Check for the following:
- USB Connection Issues: If using a USB drive, try a different USB port on your computer.
- Power Supply Issues: External hard drives may require an external power source; check that it is connected.
2. Using Disk Management
Windows has a built-in tool called Disk Management that provides detailed information about all drives connected to your system. Here’s how to access it:
- Press
Windows + Xor right-click on the Start button. - Select «Disk Management» from the menu.
In Disk Management, you’ll see a list of all drives attached to your computer, including those that are not visible in «This PC,» such as unallocated space. If a drive is listed here but not in «This PC,» it may need to be formatted or assigned a drive letter.
3. Assigning a Drive Letter
If a drive does not have a letter assigned to it, it will not appear in «This PC.» Here’s how to assign a drive letter:
- Open Disk Management (as guided above).
- Locate the drive that is missing a letter.
- Right-click on the drive and select «Change Drive Letter and Paths.»
- Click «Add,» choose a letter from the dropdown, and click «OK.»
4. Formatting a New Drive
If you have purchased a new drive, it may not show up in «This PC» until formatted. Here’s how to format a drive:
- In Disk Management, right-click on the new drive.
- Select «Format,» choose the file system (NTFS is recommended for Windows), and allocate a volume label.
5. Checking Drive Status
You may need to check if there is an issue with the drive itself, such as corruption or failure. To do so, right-click on the drive in «This PC» or Disk Management and select «Properties.» Under the «Tools» tab, you can run a check for errors.
Viewing Different Drive Types
Different types of drives may be formatted and used differently. Understanding these variations can help you know what to expect when viewing all drives.
Internal Hard Drives
Internal hard drives are primarily used to store the operating system, applications, and user files. Viewing these drives in «This PC» typically gives you a general sense of your storage capacity. They usually carry a letter, usually «C:», for the system’s primary drive.
Solid State Drives (SSD)
SSDs are faster than traditional hard drives and are increasingly common in modern computers. They may also show up in «This PC» just like traditional hard drives.
External USB Drives
USB flash drives and external hard drives are removable and often used for additional storage or backups. They typically appear as «Removable Disk» in «This PC.»
Network Drives
If you are connected to a network, network drives may also display in this section. These drives can be configured differently and may require login credentials to access.
Managing Your Drives
Once you’ve successfully viewed all drives in «This PC,» managing them effectively is crucial for optimal performance and organization.
1. Organizing Files and Folders
Keep your files organized by creating folders according to topics, projects, or file types. Utilize libraries in Windows to consolidate access to files scattered across drives.
2. Backing Up Data
Regularly back up your important files. You can use File History in Windows to regularly back up to an external drive or a cloud service.
3. Disk Cleanup
Windows has a built-in Disk Cleanup tool that can help you clear temporary files and free up space on your drives. You can access it by searching for «Disk Cleanup» in the Start menu.
4. Upgrading Storage
If you’re running low on storage space frequently, consider upgrading to larger internal drives or investing in faster external SSDs.
5. File Compression
To save space, consider compressing larger files or folders. Windows allows you to compress files by right-clicking on the file or folder, selecting «Send to,» and then clicking «Compressed (zipped) folder.»
6. Managing Installations
If you have multiple drives, consider installing applications on a drive other than your main OS drive (often C:). This can improve performance and organization.
Conclusion
Viewing all drives in «This PC» and managing them effectively are essential skills for anyone using Windows. With a variety of built-in tools and straightforward methods available, users can easily access, troubleshoot, and manage the drives on their systems. Understanding these processes ensures that you can not only locate your files efficiently but also optimize your system’s performance and storage capacity.
By maintaining a clear structure for file organization, regularly backing up important data, and being proactive about drive management, you can create a robust digital workspace that enhances your productivity and peace of mind. As technology continues to evolve, being adept at managing your digital assets will only become more crucial.