
Do you want to learn how to list drives in Command Prompt (CMD) and PowerShell? This guide from EaseUS covers two methods: using Command Prompt (cmd) and PowerShell, Windows’ built-in command-line tools.
Command Prompt and PowerShell are powerful interfaces in Windows. While the Command Prompt has long been used for executing commands, PowerShell offers advanced capabilities. Both tools let users interact with the system through text-based commands, making tasks efficient.
- Warning
- It’s important to exercise caution when working on the command line. Typos or incorrect commands can lead to unintended consequences. If you’re unsure about a command, research it further before proceeding. And always back up critical data before making system changes.
When it comes to listing drives using Command Prompt (CMD), you have two main methods: Diskpart and WMIC. Let’s learn how to list drives via CMD.
#1. Diskpart
Diskpart is a powerful command-line utility specifically designed for managing disk drives and partitions. Here’s how to list your drives using Diskpart:
Step 1. Open Command Prompt, just type CMD in the Windows search box and click on it to open it.

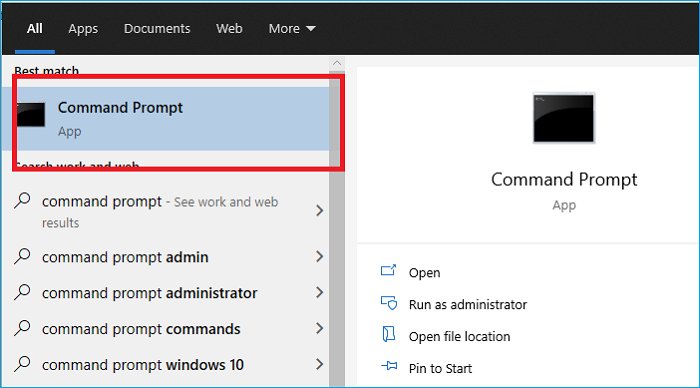
Step 2. In the Command Prompt, type the following commands one by one and press «Enter» after each one.
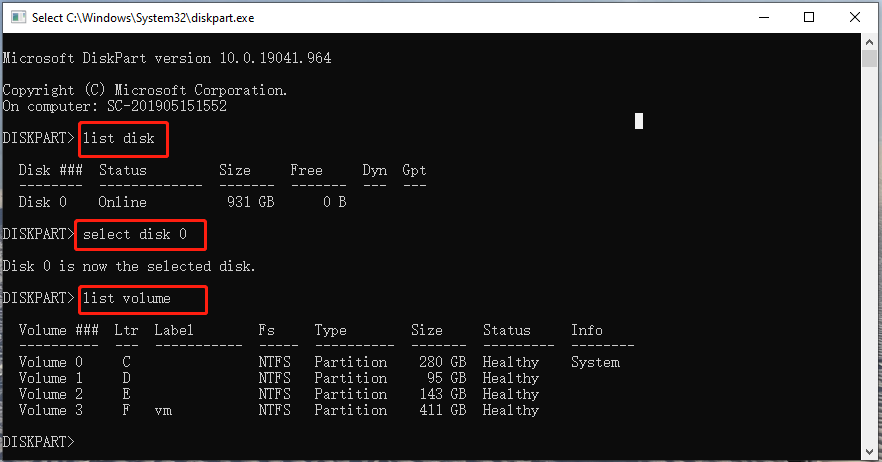
diskpart
list disk
select disk X (Replace «X» with the disk number)
list volume/list partition
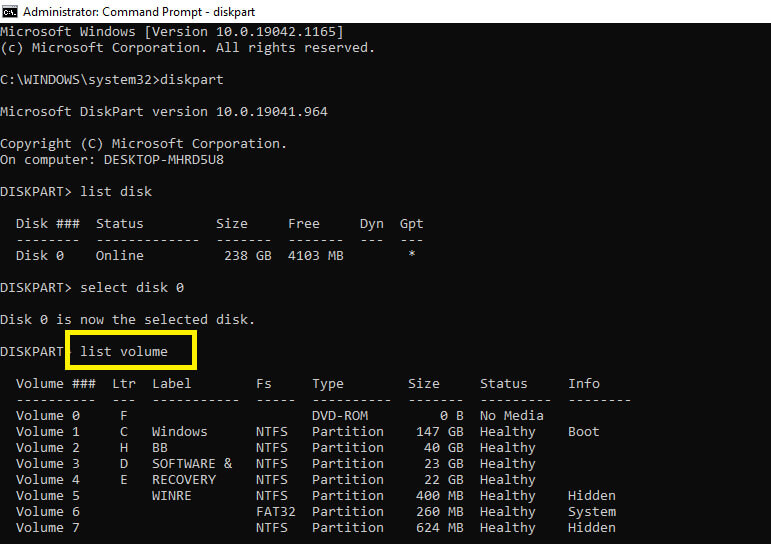
Now, you can see a list of drives on the disk, including partition/volume number, label, letter, file system, size, and status. After list drives via Diskpart, you can use this utility to perform more operations:
#2. WMIC
The WMIC (Windows Management Instrumentation for Management) is another versatile tool that allows you to query various system components, including disk drives. Here’s how to list your drives using WMIC:
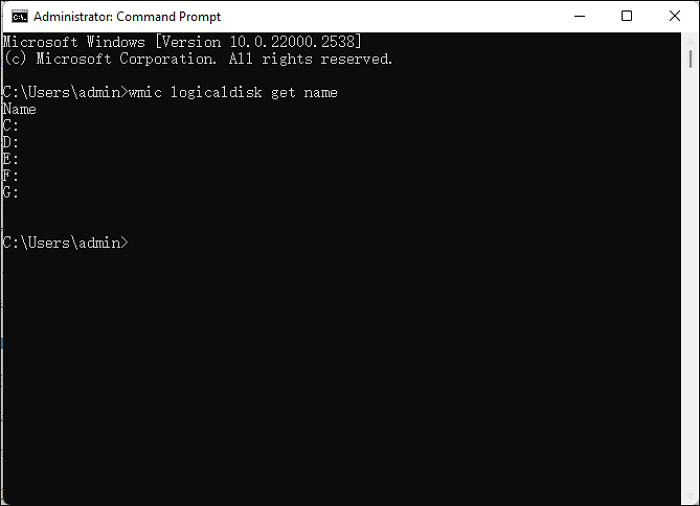
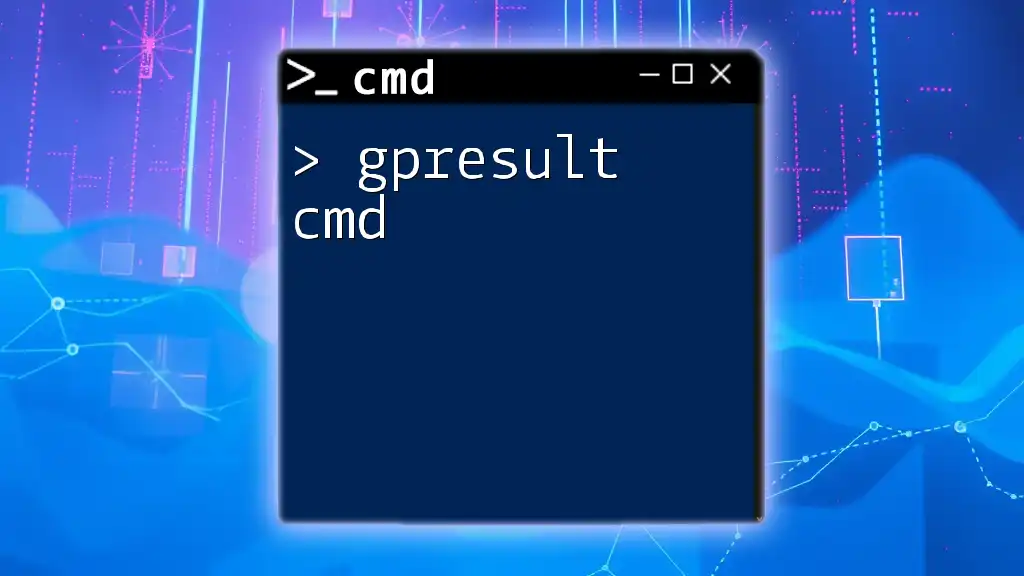
Step 1. Open Command Prompt, type one of the following commands and press the «Enter» button.
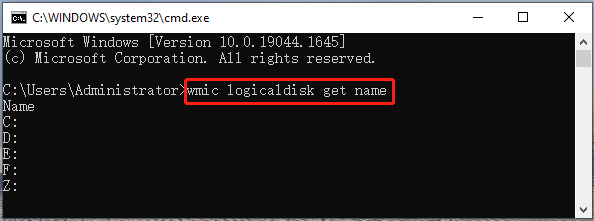
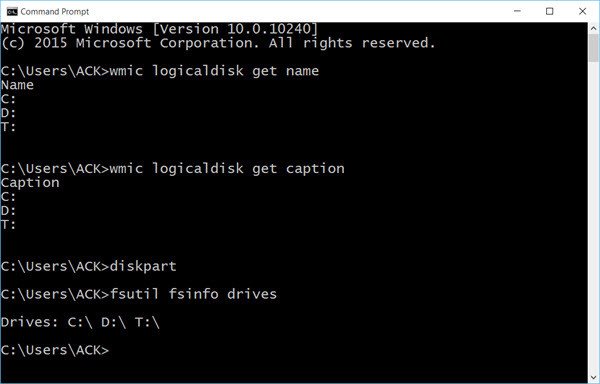
wmic logicaldisk get name
wmic logicaldisk get caption
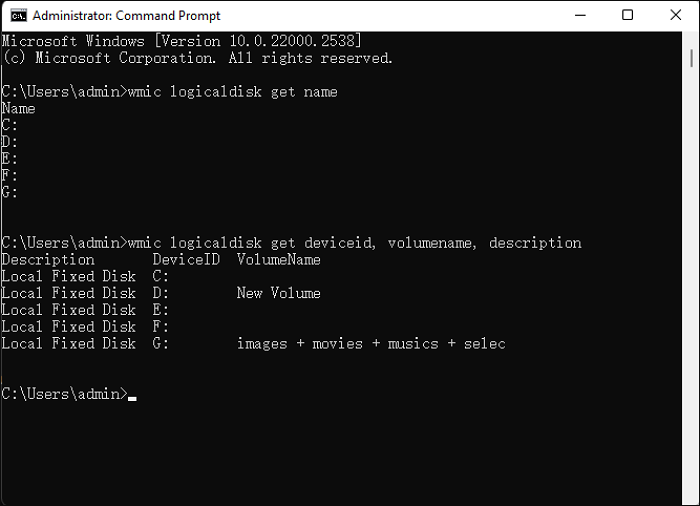
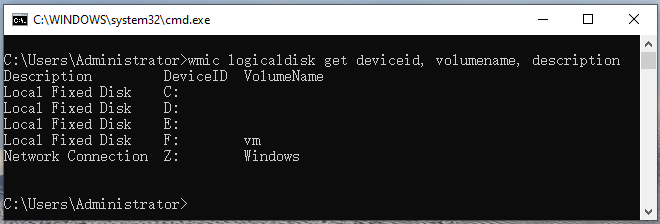
Step 2. If you want to see the Device ID and volume name, enter the following command and press «Enter.» Alternatively, you can use the fsutil fsinfo drives command to list drives on your computer.
wmic logicaldisk get deviceid, volumename, description
PowerShell List Drives
Let’s shift gears and see how PowerShell, another powerful command-line tool, works to list drives. PowerShell offers a more modern and object-oriented approach to system administration than CMD. Here’s how to list your drives using PowerShell:
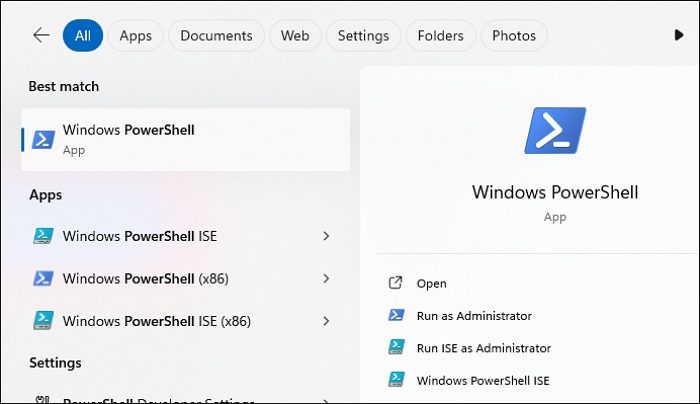
Step 1. Search PowerShell in the Windows search box and click on it to open it.
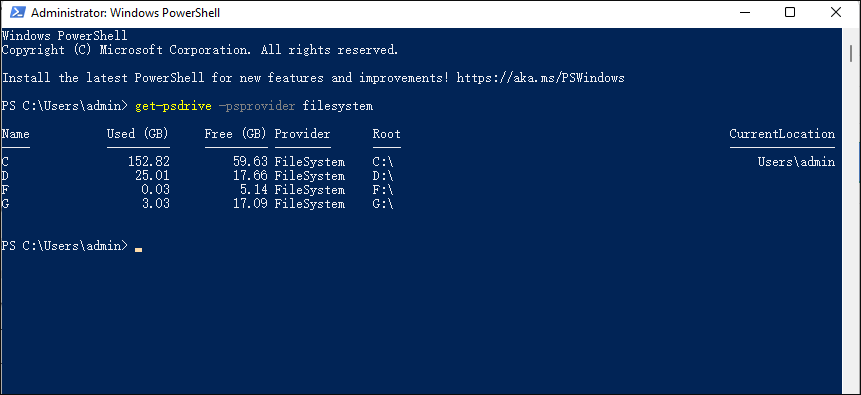
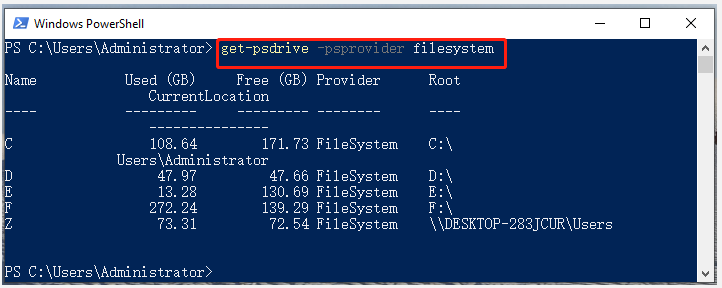
Step 2. Type the following command and press the «Enter» button.
get-psdrive -psprovider filesystem
Is the information in this article useful to you? Feel free to share it with other users.
Better Alternative Than CMD/PowerShell List Drives
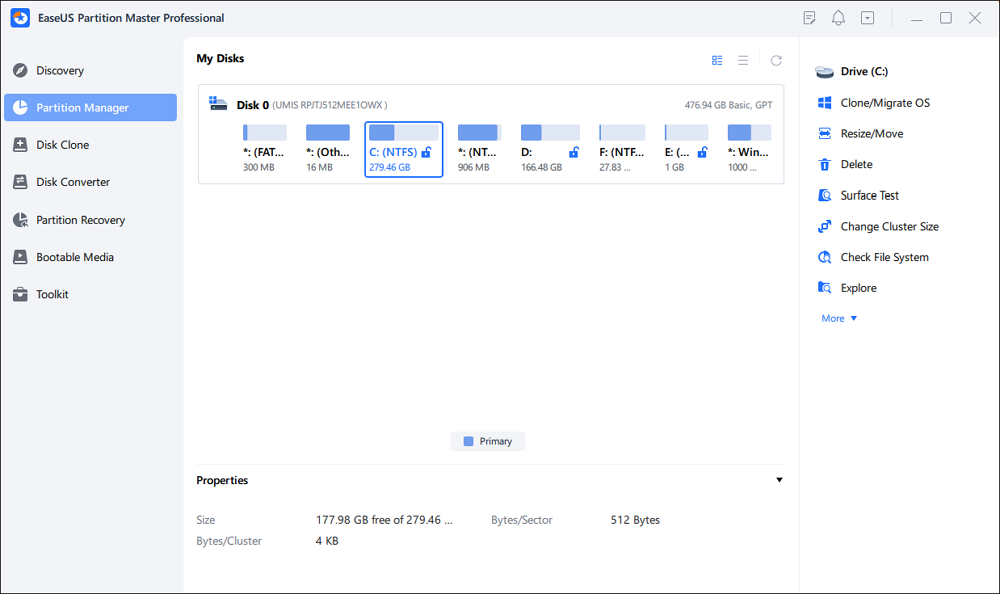
If you’re seeking simpler alternatives to Command Prompt and PowerShell because of their intricate command lines, EaseUS Partition Master Professional is worth considering for streamlined drive management. With its user-friendly interface, managing your drives becomes effortless.
Here are some advantages of the tool:
- Convert FAT32 to NTFS without data loss.
- Support for NTFS, FAT32, exFAT, and EXT2/3/4 formats.
- Easily extend partitions with non-adjacent unallocated space.
- Securely wipe entire disks to prevent data recovery.
- Seamlessly transfer Windows system to new HDD/SSD.
- Convert disks between GPT and MBR partition styles without losing data.
Why struggle with complex command-line interfaces when you can accomplish disk management tasks easily with EaseUS Partition Master? Download this powerful tool today and experience its convenience and efficiency.
Conclusion
This guide explored two methods for listing drives in Windows: the tried-and-true Command Prompt (CMD) with its diskpart and WMIC utilities and the more modern PowerShell. While both offer powerful tools, navigating cryptic commands can be a barrier for some users.
EaseUS Partition Master simplifies drive management with a clear graphical interface. No more deciphering complex syntax! This software empowers you to not only view your drives but also perform various tasks such as formatting, extending partitions, migrating your OS, and even securely wiping disks.
Don’t forget to share knowledge with others!
List Drives in Command Prompt and PowerShell FAQs
Have questions about how to list drives in Command Prompt and PowerShell? Follow these FAQs.
1. How to get a list of all drives in CMD?
There are two main methods for listing all drives in CMD:
- Using diskpart: This utility offers a comprehensive view, including details like disk size and partition style. Follow the steps outlined in the previous section on «CMD List Drives» to utilize diskpart for listing drives.
- Using WMIC: This versatile tool provides information about logical disks (partitions with drive letters). The commands wmic logicaldisk get name or wmic logicaldisk get caption will display a list of drive letters associated with your partitions.
2. How to get disk info from CMD?
You can get disk info from CMD via diskpart:
- Open Command Prompt, type the following commands one by one and press «Enter» after each one.
- diskpart
- list disk
- select disk (Type the disk number)
- list volume/list partition
3. Are PowerShell and CMD the same?
No. CMD is a classic text-based command prompt, while PowerShell is a newer, more object-oriented tool for system administration.
The `disk list` command, which is typically accessed through the Diskpart utility, allows users to display all the disks connected to their computer, providing vital information for disk management.
Here’s how you can use it:
diskpart
list disk
Understanding the Disk List Command
The disk list cmd is a vital component in the Windows Command Prompt that allows users to view all connected disks on their system. This command is part of the Diskpart utility, which is an advanced disk management tool available within Windows.
What is the Disk List Command?
The `list disk` command is specifically designed to provide a quick overview of all disk drives connected to a computer. It shows essential details about each disk, including its number, status, size, and available free space. This command is crucial for users who need to manage their disks effectively, perform troubleshooting, or organize their data across multiple drives.
Syntax of the List Disk Command
To run the command, users first need to access the Diskpart utility. The command syntax appears as follows:
diskpart
list disk
This simple command structure allows users to gather crucial information about the disks on their machine.
Mastering Cmd Disklist: Your Quick Guide to Disk Management
How to Access the Disk List CMD Command
Opening Command Prompt
To use the disk list cmd, you must first open the Command Prompt. Here’s how to do it:
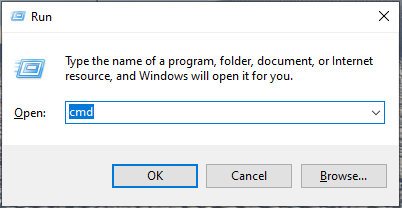
- Press Win + R to open the Run dialog.
- Type `cmd` and press Enter. This will launch the Command Prompt window.
Navigating to the Diskpart Utility
Once you have Command Prompt open, the next step is to access the Diskpart tool, which will allow you to run the `list disk` command.
diskpart
After entering this command, you’ll switch to the Diskpart command-line interface, where you can start managing your disks.
Mastering The List Disk Cmd Command In Minutes
Executing the List Disk Command
Step-by-Step Execution
After successfully entering Diskpart, executing the disk list cmd is straightforward. Just type:
list disk
Then, press Enter. You will see a list of all the disks connected to your computer.
Example Output
Upon execution, the output of the command will look something like this:
Disk ### Status         Size     Free     Dyn  Gpt
----------- ------------- ------- ------- ------- ---
Disk 0      Online        500 GB  200 GB
Disk 1      Online        1 TB    500 GB
Each column in this output provides critical information:
- Disk Number: This serves as a unique identifier for each disk.
- Status: Indicates whether the disk is available or has issues.
- Size: Displays the total capacity of the disk.
- Free: Shows the amount of free space available on the disk.
- Dyn: Indicates if the disk is dynamic (as opposed to basic).
- Gpt: Shows whether the disk uses GUID Partition Table (GPT) format.
List Disk Cmd Windows: Quick Guide to Disks Management
Practical Applications of the List Disk Command
Identifying Available Disks
The disk list cmd allows users to quickly identify the disks connected to their system. This capability is essential when troubleshooting issues related to external drives, or when planning to partition a new hard drive.
Troubleshooting Drive Issues
In some cases, you may plug in an external drive, and it doesn’t appear in Windows Explorer. Running the `list disk` command can help diagnose the issue by revealing whether the disk is recognized by the system.
For example, if the command displays the external drive but shows that the status is «Offline,» this could indicate a problem with the drive that needs further investigation.
Mastering Diskpart Cmd Windows 10: Your Quick Guide
Using Filters with the List Disk Command
Determining Specific Disk Information
If you want to gather more specific information about a disk, you can do this after selecting the disk using its identifier.
select disk 0
detail disk
This code snippet allows users to focus on specific disks to view additional details, such as partition information and file system formats.
Common Flags and Options
While the `list disk` command itself doesn’t have numerous optional flags, being proficient in the `select` and `detail` commands can greatly enhance your command-line experience in Diskpart.

Mastering IIS Reset Cmd: A Quick Guide for Everyone
Tips for Effective Use
Best Practices
To maximize the utility of the disk list cmd, consider performing regular checks on your disks. Establishing a routine to review disk statuses can help prevent issues before they escalate.
Common Mistakes to Avoid
One common pitfall is forgetting to run the Command Prompt as an Administrator. Running CMD without administrative privileges can lead to insufficient access errors when trying to execute certain commands in Diskpart.
Mastering Taskkill Cmd: A Quick Guide to Terminate Tasks
Conclusion
The disk list cmd command is an essential tool for anyone looking to manage their disks effectively. Understanding how to access and use this command can significantly enhance your ability to diagnose, troubleshoot, and maintain your disk drives. Regular practice using CMD commands can ultimately lead to greater efficiency and better management of your computer’s resources.
Mastering The Cmd List Command: Quick Tips For Success
Additional Resources
If you wish to expand your knowledge beyond the disk list cmd, consider exploring additional commands such as `list volume` or utilizing comprehensive guides available online.
Mastering Gpresult Cmd: Quick Guide to User Insights
FAQs
What Platforms Support CMD Commands?
The Command Prompt and its various commands are supported on all Windows operating systems, making it a versatile tool for disk management.
Can I Use the Disk List Command Remotely?
While the disk list cmd is primarily designed for local disk management, remote management options and tools exist, allowing for operations on disks connected to other machines, depending on system configurations and network setups.
Why Is Disk Management Important?
Effective disk management is crucial for maintaining data organization, optimizing performance, preventing data loss, and facilitating troubleshooting measures when issues arise in your computing environment.
Listing drives is done for various reasons in different scenarios by the users. They can use command Prompt (cmd) or PowerShell commands to view the list of all drives with other information. Both provide quick and easy access to the information regarding drives. Here are some of the use cases where one might need to access the drives list through the command prompt and PowerShell:
- A list of drives is accessed when the user wants to see the information about all drives. E.g. drive size, drive letter, drive type, and free space available on each drive.
- It is used to automate tasks. For example, using PowerShell to automatically and periodically check the drive status and generate storage reports.
- The user may sometimes need to check the drive information quickly through the command prompt when he needs to troubleshoot the system. It also helps identify problems. For example, a drive not being recognized or issues with mounted drives.
- Users may need to integrate command line operations into batch scripts to automate the system administration tasks.
- For an enterprise, MDM solutions like Airdroid business can use PowerShell scripts to remotely get information about any device’s drive and use it for troubleshooting or support.
- Storage status of any device can be remotely accessed and managed using a drive list generated through PowerShell scripts or Command Prompt.
Let’s now have a look at the step-by-step process on how you can list drives from the command prompt and PowerShell.
- Part 1 :How to List Drives Using Command Prompt?
- Part 2 :How to List Drives Using PowerShell?
- Part 3 :How to Run DiskPart in PowerShell?
- Part 4 :Troubleshooting Common Issues
Part 1: How to List Drives Using Command Prompt?
You can get a complete list of all drives by using the command prompt (CMD). There are three ways to do so using CMD. Let’s discuss each one of them in detail.
Method 1: Using WMIC Command
- Step 1: Open the command prompt and type any of these commands:
wmic logicaldisk get name
wmic logicaldisk get caption
Press Enter key.
-

- Step 2: Use the command
fsutil fsinfo drivesand press Enter. You will get a list of drives on your computer. Or else you can also use the following command if you want to see the device ID and volume name:wmic logicaldisk get deviceid, volumename
-

Method 2: Using Diskpart
Diskpart is among the oldest and most used tools for listing and managing drives and partitions. Here are the steps to follow in order to get a list of drives using Diskpart:
- Step 1: Open the command prompt by typing CMD in the search box and clicking ‘Command Prompt’ from the list that appears.
-

- Step 2: Now type the commands given below in sequence and press enter key after typing each command:
diskpart
list disk
select disk X
(Replace «X» with the disk number)
list volume
or
list partition
-

It will give you a list of drives on your computer along with the letter, size, label, volume number, and health status.
Method 3: Using Dir Command
You can get a list of all files in a directory by using ‘Dir’ command in the command prompt. It will show you the contents of the directory.
When the dir command is executed alone, without parameters, it shows the disk’s volume label and serial number along with the list of directories and files. You will see a result like this one below with and without parameters:

You can use the dir command with a combination of other options to list the files in a customized manner, e.g., here are some of the commonly used commands along with the list type they generate:
/A: Displays files with specified attributes.
/B: Uses bare format (no heading information or summary).
/O: Specifies the order in which files are sorted.
/S: Displays files in specified directory and all subdirectories.
Part 2: How to List Drives Using PowerShell
Another way of getting the list of drives on your computer is by using PowerShell commands. Given below are the four common ways in which PowerShell can be used to list the drives.
1 Get-PSDrive
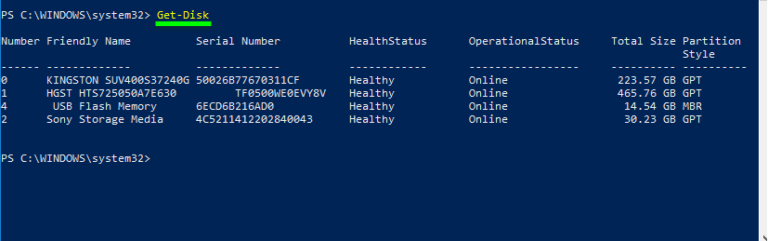
2 Get-Disk
You can use the Get-Disk cmdlet to retrieve detailed information about the drives, including their health status and total size.
3 Use CMD Command
- Step 1: In PowerShell, use this CMD command to list the mapped drives:
Net use
- Step 2: To get the mapped drives on remote devices, use the following command:
Invoke-Command -ComputerName RemoteComputer -ScriptBlock{Net use}
4 WMI and CimInstance
Use WMI method with classname Win32_MappedLogicalDisk to get mapped network drives list.
- Local Computer:
Get-CimInstance -ClassName Win32_MappedLogicalDisk | Select SystemName, DeviceID, ProviderName
- Remote Computer:
Get-CimInstance -ClassName Win32_MappedLogicalDisk -ComputerName RemoteSystem | Select SystemName, DeviceID, ProviderName
5 Use Get-PSDrive Method
Run this cmdlet to list drives on the local computer:
- Local Computer:
Get-PSDrive
- Network Drives:
Get-PSDrive | where{$_.DisplayRoot -match "\\"} - Remote Computer:
Invoke-Command –ComputerName RemoteComputer -ScriptBlock{Get-PSDrive | where{$_.DisplayRoot -match "\\"}}
6 Specific Disk Information
You can use this cmdlet in PowerShell if you want to get information about a specific hard disk:
Get-Disk -Number 6
Replace the number above with the number of disks for which you need information. Press enter, and you will get results.

7 USB Storage Information
You can also get detailed information about a USB or any other removable storage devices connected to your computer using the following command for PowerShell:
Get-Disk | Where-Object -FilterScript {$_.Bustype -Eq "USB"}
Part 3: How to Run DiskPart in PowerShell
You can access DiskPart through PowerShell and list the drives on your computers and even perform functions like creating partitions or volumes, deleting them, or even formatting them.
- Step 1: Open PowerShell by searching for it in the search box, right-click on ‘Windows PowerShell’ in the search results and click ‘Run as Administrator’.
- Step 2: Once PowerShell is open, type ‘Diskpart’ and press the enter key.
- Step 3: Now, to get the list of disks, you can type ‘list disk’ and press enter. This will provide you the information including disk number, total size, free space, and more.
- Step 4: Similarly, you can use ‘list partition’ command and press enter to access the information about the partition.
4 Troubleshooting Common Issues
Sometimes, you may encounter problems while trying to run Command Prompt or PowerShell to list the drives. Here are some of the common issues faced by the users along with their solutions.
1 Why is the Command Not Recognized?
Cause: The command was entered incorrectly or the command prompt is not running as an administrator.
Solution:
- Check the command syntax: Make sure the command is entered correctly without typos. For example,
wmic logicaldisk get nameshould be complete. - Run as administrator: Some commands require elevated privileges to run. Right-click the command prompt icon and select «Run as administrator».
2 Why Am I Getting Access Error?
Cause: Insufficient user permissions or incorrect file/directory permissions.
Solution:
- Verify user permissions: Make sure the current user has the permissions required to execute the command. If necessary, log in with an administrator account.
- Check file/directory permissions: If the operation involves a specific file or directory, right-click the file or directory, select «Properties», and check the permission settings in the «Security» tab.
3 Why is the Drive not Found?
Cause: The drive is not connected properly or is not recognized by the system.
Solution:
- Check the physical connection: Make sure the drive is properly connected to the computer.
- Refresh the drive list: Enter
diskpartin the command prompt, and then enterrescanto refresh the drive list.
4 Why Is the Drive Information Incorrect?
Cause: Cache issue or system information not updated.
Solution:
- Refresh system information: Restart the computer or use the
diskpartcommand to refresh the drive information. - Use the latest tools: Make sure you are using the latest version of the Command Prompt or PowerShell tool.
AirDroid Business is an Windows and Android device management solution that can be used to enroll, manage, and monitor large fleet devices. With the centralized platform, organizations are able to deploy smartphones, tablets, rugged devices and others dedicated devices like kiosks and digital signage.
It’s available for Cloud Deployment & On-Premises Deployment.
Key features include: remote access & control, Google Play apps & enterprise’s apps management, policy, single & multi-apps kiosk mode, alerts & automated workflows, geofencing & location tracking, file transfer, notification, user management, reports, etc.
14-days Free Trial
-
Home
-
Partition Manager
- CMD List Drives: How to List Drives in Command Prompt? [Answered]
By Ariel | Follow |
Last Updated
Sometimes you may to need list all drives on your systems. How to list drives in CMD/PowerShell? This post of MiniTool provides a full guide on PowerShell/CMD list drives and a professional tool to manage your drives.
When formatting a drive or copying files from a drive to another drive, you may need to use the CMD or Windows PowerShell tool to list drives. However, many people don’t know how to list drives in Command Prompt or PowerShell, like a user from the superuser forum:
Is there a way to list the available drives from cmd.exe? (Other than manually typing c: d: …) and seeing which ones return errors.https://superuser.com/questions/139899/see-available-drives-from-windows-cli
How to List Drives in CMD
Command Prompt, also known as CMD, is the command-line interpreter in Windows operating system. You can input certain commands in the Command Prompt window to take corresponding actions. If you want to list drives of your systems, you can use the WMIC (Windows Management Instrumentation for Management) or Diskpart command.
List Drives CMD via WMIC:
Step 1. Press Win + R keys to open the Run dialog box, and then type cmd in it and press Ctrl + Shift + Enter keys together to open the elevated Command Prompt window.
Step 2. To let CMD list drives, type one of the following commands and hit Enter.
- wmic logicaldisk get name
- wmic logicaldisk get caption
Step 3. If you want to display the Device ID and volume name, type the following command and hit Enter. Also, you can run the fsutil fsinfo drives command to list drives on your computer
wmic logicaldisk get deviceid, volumename, description
List Drives CMD via Diskpart:
DiskPart is a disk partition management tool that uses command lines to perform operations. It can be used to list drives CMD as well. Here’s how to use it.
Step 1. Open the Command Prompt window again as we explained above.
Step 2. Type the following commands in order and hit Enter after each one. Then you will see a list of drives on the disk, including partition/volume number, label, letter, file system, size, and status.
- diskpart
- list disk
- select disk *
- list volume/list partition
How to List Drives in PowerShell
PowerShell is a command-line tool like CMD. Here you can let PowerShell list drives as well. To do so, follow the steps below:
Step 1. Open the Run dialog box, and then type powershell in it and hit Enter.
Step 2. In the Windows PowerShell window, type the following command and hit Enter.
get-psdrive -psprovider filesystem
How to let PowerShell/CMD list drive letters? Now, I believe that you already have known the answer.
Better Choice Than PowerShell/CMD List Drives
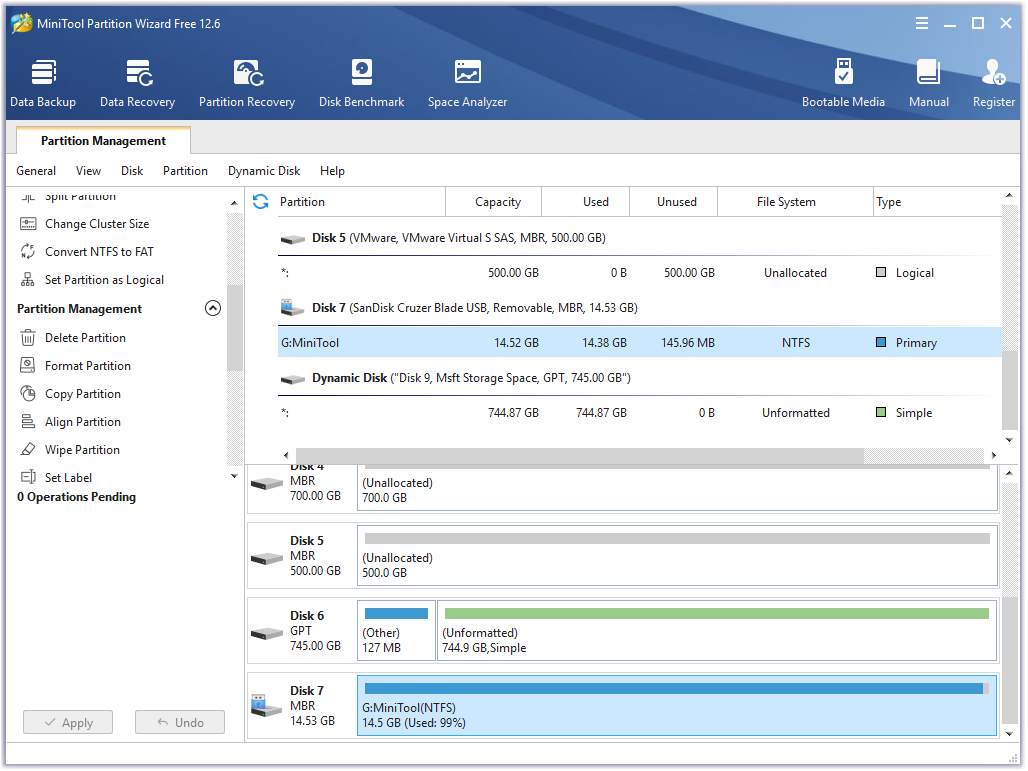
Although both of the two Windows tools can help you list drives, you may encounter some limitations to further managing drives/disks with them. For example, you can’t format a drive larger than 32GB to FAT32 using CMD. If you want to manage your hard disk or partitions more effectively, it’s highly recommended that you use a professional tool like MiniTool Partition Wizard.
MiniTool Partition Wizard DemoClick to Download100%Clean & Safe
It is a popular partition manager trusted by millions of users around the world. With this tool, you can not only obtain the drive information easily but do many other powerful tasks, including create/extend/move/format/wipe partition, convert NTFS to FAT32 without data loss, convert MBR to GPT, migrate OS, rebuild MBR, recover data, etc.
About The Author
Position: Columnist
Ariel has been working as a highly professional computer-relevant technology editor at MiniTool for many years. She has a strong passion for researching all knowledge related to the computer’s disk, partition, and Windows OS. Up till now, she has finished thousands of articles covering a broad range of topics and helped lots of users fix various problems. She focuses on the fields of disk management, OS backup, and PDF editing and provides her readers with insightful and informative content.
If you frequently work with the Command Prompt or PowerShell, you may need to copy files from or to an external drive, and many other times, you may need to display the drives within the console window. In this post, we will show you how you can list hard drives using Command Prompt or PowerShell in Windows 11/10.

First, let’s see how to list hard drives using the Command Prompt on Windows 11/10.
If you need to simply list the drives, you may use WMIC. Windows Management Instrumentation (WMI) is the infrastructure for management data and operations on Windows-based operating systems.
Open a command prompt, and type the following command:
wmic logicaldisk get name
Press Enter and you will see the list of Drives.
You can also use the following parameter:
wmic logicaldisk get caption
Using the following will display Device ID and volume name as well:
wmic logicaldisk get deviceid, volumename, description
Windows also includes an additional command-line tool for file, system, and disk management, called Fsutil. This utility helps you list files, change the short name of a file, find files by SID’s (Security Identifier), and perform other complex tasks. You can also use fsutil to display drives. Use the following command:
fsutil fsinfo drives
It will show mapped drives too.
You can also use diskpart to get a list of drives and more details. The Diskpart utility can do everything the Disk Management console can do, and more! It’s invaluable for scriptwriters or anyone who prefers working at a command prompt.
Open CMD and type diskpart. Next, use the following command:
list volume
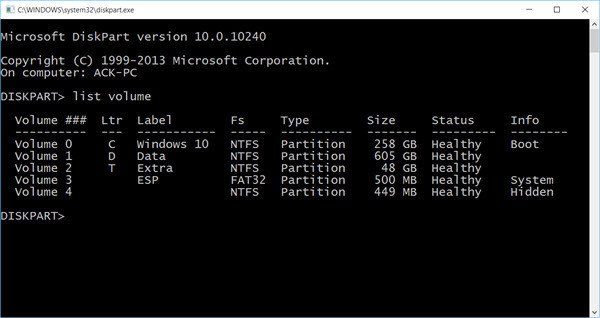
You will see that the console displays the Volume number and letter, label, formatting type, partition type, size, status, and other information.
List Hard Drives using PowerShell
You can also list hard drives using the Windows PowerShell on your Windows 11/10 computer. Let’s see how to do that.
To display drives using PowerShell, type powershell in the same CMD windows and hit Enter. This will open a PowerShell window.
To get the list of all hard drives installed on and connected to your computer via Windows PowerShell, use the following command:
Get-Disk

The above command will show the following information of the hard disks and removable storage drives:
- Disk Number
- Friendly name
- Serial number
- Health status
- Operational status
- Total size
- Partition style
If you want to get information on a particular hard disk, you can type its disk number. In this case, the command will be:
Get-Disk -Number 0

In the above command, 0 is the disk number.

If you want to get information about the removable storage devices connected to your computer through a USB cable, use the following command in Windows PowerShell:
Get-Disk | Where-Object -FilterScript {$_.Bustype -Eq "USB"}
If you want to get information on hard drives regarding the used space and free space, use the following command in Windows PowerShell:
get-psdrive -psprovider filesystem

The above command shows the used and free space of all hard drives installed on and connected to your computer.
I hope this helps.
How to run DiskPart in PowerShell?
DiskPart is a separate command line utility in Windows 11/10 that is used to manage your computer’s hard drives. You can execute various commands in DiskPart to list all your hard drives, format your hard drive(s), create partitions on a hard drive, etc. You cannot run it in PowerShell. However, you can launch it through PowerShell. Open PowerShell, type diskpart, and hit Enter. You will receive a UAC prompt. Click Yes to launch the DiskPart utility.
How do I see all drives?
You can see all drives on your Windows 11/10 computer in different ways. You can use the DiskPart utility to list all hard drives and hard drive partitions. If you are not familiar with the command line tool, you can use Disk Management to view all your hard drives. Press the Win + X keys and select Disk Management. When Disk Management opens up, you can view all the hard drives installed on and connected to your computer.
Now see how you can get a list of all Device Drivers using Command Prompt and how to use PowerShell to get physical Disk information.