
KVM/QEMU Windows guest drivers (virtio-win)
This repository contains KVM/QEMU Windows guest drivers, for both
paravirtual and emulated hardware. The code builds and ships as part
of the virtio-win RPM on Fedora and Red Hat Enterprise Linux, and the
binaries are also available in the form of distribution-neutral ISO
and VFD images. If all you want is use virtio-win in your Windows
virtual machines, go to the
Fedora virtIO-win documentation
for information on obtaining the binaries.
If you’d like to build virtio-win from sources, clone this repo and
follow the instructions in Building the Drivers.
Note that the drivers you build will be either unsigned or test-signed
with Tools/VirtIOTestCert.cer, which means that Windows will not load
them by default. See Microsoft’s driver signing page
for more information on test-signing.
If you want to build cross-signed binaries (like the ones that ship in
the Fedora RPM), you’ll need your own code-signing certificate.
Cross-signed drivers can be used on all versions of Windows except for
the latest Windows 10 with secure boot enabled. However, systems with
cross-signed drivers will not receive Microsoft support.
If you want to produce Microsoft-signed binaries (fully supported,
like the ones that ship in the Red Hat Enterprise Linux RPM), you’ll
need to submit the drivers to Microsoft along with a set of test
results (so called WHQL process). If you decide to WHQL the drivers,
make sure to base them on commit eb2996de or newer, since the GPL
license used prior to this commit is not compatible with WHQL.
Additionally, we ask that you make a change to the Hardware IDs so
that your drivers will not match devices exposed by the upstream
versions of KVM/QEMU. This is especially important if you plan to
distribute the drivers with Windows Update, see the
Microsoft publishing restrictions for more details.
Обновлено:
Опубликовано:
После установки гостевой операционной системы Windows на гипервизор KVM мы можем столкнуться с проблемой отсутствия драйверов. Как правило, больше всего неудобств вызывает отсутствие сетевых драйверов. Мы рассмотрим универсальный способ установки драйверов на Windows, который установлен на виртуальную машину KVM.
Предполагается, что наш KVM установлен на операционную систему семейства Linux, например, CentOS или Ubuntu. Все команды в данной инструкции будут выполняться из командной строки.
Загрузка драйверов и их монтирование
Первым делом загрузим ISO образ с набором драйверов и примонтируем его к операционной системе. Для этого заходим на хост виртуализации по SSH и вводим команду:
wget https://fedorapeople.org/groups/virt/virtio-win/direct-downloads/stable-virtio/virtio-win.iso -P /data/kvm/iso/
* где https://fedorapeople.org/groups/virt/virtio-win/direct-downloads/stable-virtio/virtio-win.iso — источник файла iso с драйверами KVM; /data/kvm/iso/ — каталог на сервере, в который мы загрузим образ.
* если при вводе команды система выдаст ошибку, необходимо установить wget командой yum install wget или apt-get install wget.
Дожидаемся загрузки файла на сервер, после чего создаем конфигурационный файл для монтирования образа в операционную систему:
vi /etc/libvirt/qemu/guest-virtio-drivers.xml
Добавляем в него следующее:
<disk type=’file’ device=’cdrom’>
<driver name=’qemu’ type=’raw’/>
<source file=’/data/kvm/iso/virtio-win.iso’/>
<target dev=’hdb’ bus=’ide’/>
<readonly/>
<address type=’drive’ controller=’0′ bus=’0′ target=’0′ unit=’1’/>
</disk>
* /data/kvm/iso/virtio-win.iso — путь до файла, который мы загрузили на сервер. В данном файле мы создали описание для монтирования устройства cdrom.
С помощью созданного файла XML мы монтируем ISO образ в CDROM на виртуальной машине:
virsh update-device WIN /etc/libvirt/qemu/guest-virtio-drivers.xml
* где WIN — имя виртуальной машины.
Установка драйверов
Подключаемся к виртуальной машине с помощью VNC. Мы должны увидеть примонтированный CD-ROM с драйверами virtio:

Кликаем правой кнопкой мыши по пуск и выбираем Диспетчер устройств:

* в ранних версиях Windows необходимо кликнуть правой кнопкой мыши по Мой компьютер — Управление — Диспетчер устройств.
В разделе «Другие устройства» кликаем правой кнопкой мыши по устройству, для которого необходим драйвер и выбираем Обновить драйверы:
В открывшемся окне выбираем Выполнить поиск драйверов на этом компьютере:

… и выбираем наш CD-ROM с драйверами:

Если система выдаст предупреждение безопасности, кликаем по Установить:

Драйвер установлен. Повторяем процедуру для каждого устройства, для которого система не смогла установить драйвер.
KVM Windows guest drivers, also known as VirtIO drivers, are software components that enhance performance and provide optimized support for running Windows virtual machines (VMs) on KVM-based hypervisors. Bobcares, as a part of our Windows Hosting Support offers solutions to every query that comes our way.
Overview
- An Introduction on KVM Windows Guest Drivers
- Key Components
- How to Set up KVM Windows Guest Drivers?
- Advantages
- Use-cases
- Conclusion
An Introduction on KVM Windows Guest Drivers
Linux can be used as a hypervisor with the open-source virtualization technology KVM (Kernel-based Virtual Machine). It makes it possible for the Linux kernel to operate as a host for a number of other virtual machines (VMs), each running a different operating system. There are specific drivers needed to maximize performance and guarantee smooth communication between the virtualized hardware and the Windows guest when running Windows as a guest operating system on a KVM hypervisor. Most people call these drivers “KVM Windows guest drivers.”
Key Components
1. Virtio Drivers: Virtio is a standard that helps virtual machines run efficiently by optimizing network and disk performance.
For Windows VMs, specific Virtio drivers are needed:
- Speeds up network connections: Virtio Network (virtio-net)
- Improves disk performance: Virtio Block (virtio-blk)
- Enhances performance for SCSI disks: Virtio SCSI
- Manages memory by adjusting it based on usage: Virtio Balloon
- Boosts graphics performance: Virtio GPU (virtio-vga)
2. QEMU Guest Agent: This runs inside the virtual machine to help the KVM host communicate with the guest OS. It enables tasks like freezing the file system for backups and synchronizing time with the host.
3. SPICE/Remote Desktop Drivers: SPICE drivers optimize remote desktop access for Windows VMs, improving multimedia quality and user interactions.
4. Balloon Driver: Manages memory by adjusting allocation based on the guest’s needs, freeing up unused memory when possible.
5. Virtio Input Devices: These drivers ensure smooth performance for peripherals like keyboards and mice, reducing latency for better interaction.
How to Set up KVM Windows Guest Drivers?
To easily install Virtio drivers for a Windows virtual machine, we must download the Virtio Drivers ISO from the KVM community or Red Hat. Then, attach the ISO to the virtual machine, and use Windows Device Manager or an installer inside the guest OS to install drivers like network and storage. This ensures full support for KVM hardware.
Advantages
Performance: Without these drivers, emulated hardware would be used by Windows guests. This can drastically lowers performance, especially for I/O tasks like disk access and networking.
Stability and Compatibility: Windows systems can correctly interface with the virtualized hardware thanks to the guest drivers. System crashes or instability can result from missing or incompatible drivers.
Resource Efficiency: High-density virtual machine environments require the more economical use of the host’s CPU, memory, and disk resources, which these drivers provide.
Enhanced Features: These guest drivers are necessary for the correct operation of features like live migration, dynamic memory allocation, and snapshots.
Use-cases
Server Virtualization: These drivers aid in ensuring seamless, high-performance operation in server environments where Windows servers are virtualized on Linux hosts via KVM.
Desktop virtualization: These drivers support optimal network, graphics, and input responsiveness when a Windows desktop is operating as a virtual machine on a KVM hypervisor.
Cloud Infrastructure: To guarantee the best possible performance for Windows virtual machines (VMs) operating in cloud environments, Virtio drivers are essential to many cloud platforms that use KVM hypervisors, like OpenStack.
[Want to learn more? Click here to reach us.]
Conclusion
KVM Windows guest drivers are essential for optimizing performance and ensuring compatibility when running Windows virtual machines on a KVM hypervisor. These drivers, like Virtio for network and disk operations, and SPICE for remote access, enhance communication between the host and the Windows guest, improving stability, efficiency, and resource management.
Our Experts ensure proper installation and configuration of these drivers. It is crucial for achieving near-native performance and ensuring features like live migration and snapshots function correctly.
If you want to run Microsoft Windows 11 as a guest virtual machine on KVM, you must take some extra steps to ensure it runs smoothly. So, in this tutorial, I’ll show you how to properly install a Windows 11 virtual machine on KVM.
If you’re interested in dual booting Windows 11 with Ubuntu on your current hardware, check out my other blog, ‘How to Properly Dual-boot Windows 11 and Ubuntu’.
Before you begin, make sure you have met the following requirements:
- You have installed the KVM hypervisor on your computer. If not, see my other guide, ‘How Do I Properly Install KVM on Linux’.
- You have installed or downloaded the virtio drivers for Windows guests on your host system. If not, see the section ‘Install VirtIO Drivers for Windows Guests’.
- You downloaded the official Windows 11 installation ISO image. You can get the ISO from the ‘Download Windows 11’ page.
So let’s get started.
Table of Contents
- 1. Configure Windows 11 Virtual Hardware
- 1.1. Configure Default Virtual Hardware Using the Wizard
- 1.2. Configure Chipset and Firmware
- 1.3. Enable Hyper-V Enlightenments
- 1.4. Enable CPU Host-Passthrough
- 1.5. Configure the Storage
- 1.6. Mount the VirtIO-Win.ISO Image
- 1.7. Configure Virtual Network Interface
- 1.8. Remove the USB Tablet Device
- 1.9. Add QEMU Guest Agent Channel
- 1.10. Enable Trusted Platform Module (TPM)
- 2. Install a Windows 11 Virtual Machine on KVM
- 3. Enable Hardware Security on Windows 11
- 4. Optimize Windows 11 Performance
- 4.1. Disable SuperFetch
- 4.2. Disable Windows Web Search
- 4.3. Disable useplatformclock
- 4.4. Disable Unnecessary Scheduled Tasks
- 4.5. Disable Unnecessary Startup Programs
- 4.6. Adjust the Visual Effects in Windows 11
- 5. Conclusion
- 6. Watch on YouTube
1. Configure Windows 11 Virtual Hardware
Start the Virtual Machine Manager application.
Before you begin creating a Windows 11 guest virtual machine, you must first enable XML editing because you will need to add the Hyper-V XML component later in this section.
Go to Edit > Preferences and Enable XML editing.
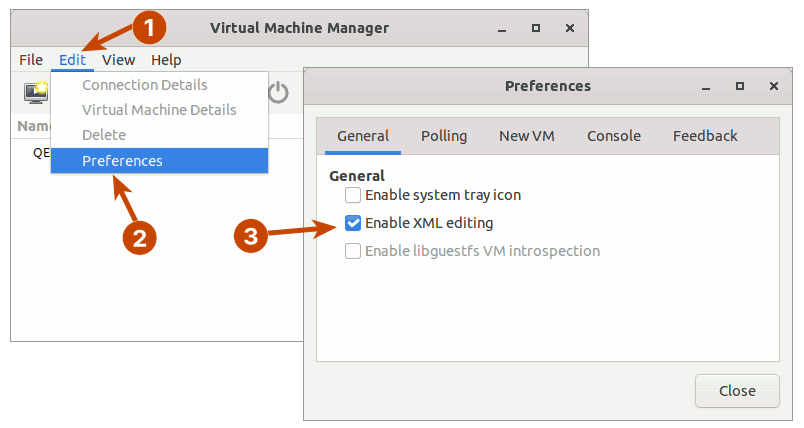
After that, click the computer icon in the upper left corner.
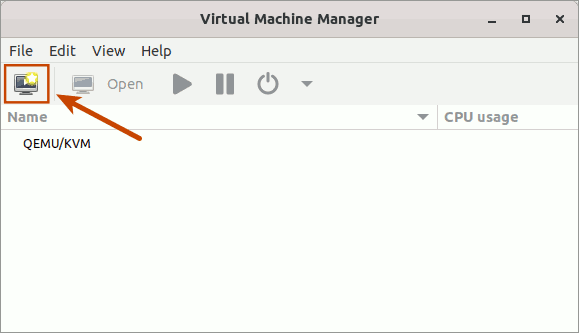
This will launch a wizard that will guide you through the process of creating a new virtual machine in five easy steps.
1.1. Configure Default Virtual Hardware Using the Wizard
The Virtual Machine Manager wizard lets you quickly create a guest virtual machine with the default settings. Once that’s done, you can make additional changes to the settings to ensure that the Windows 11 virtual machine runs smoothly.
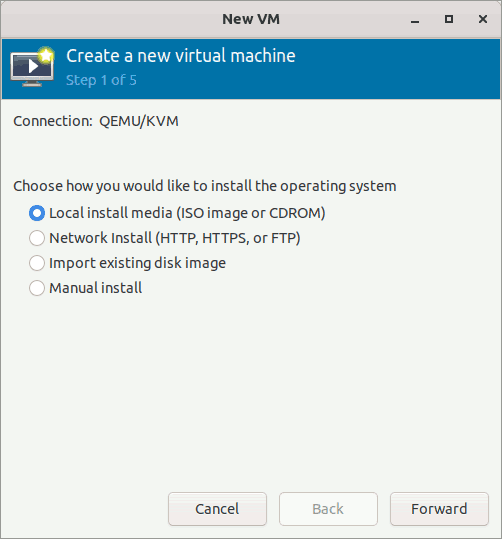
STEP 1: Choose how you would like to install the operating system.
As you are installing Windows 11 from an ISO image, choose the first option. Then click the Forward button.
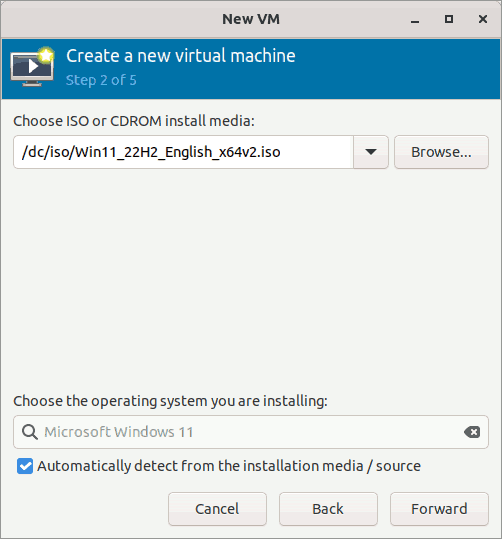
STEP 2: Choose ISO installation media.
Provide the location of the Windows 11 ISO installer image. Then click the Forward button.
STEP 3: Choose Memory and CPU settings.
Set the amount of host memory and virtual CPUs that will be assigned to the guest virtual machine. I’ll set the guest memory to 6 GiB and the virtual CPUs to 2. You can, however, change this based on your RAM and CPU availability. Click the Forward button to continue.

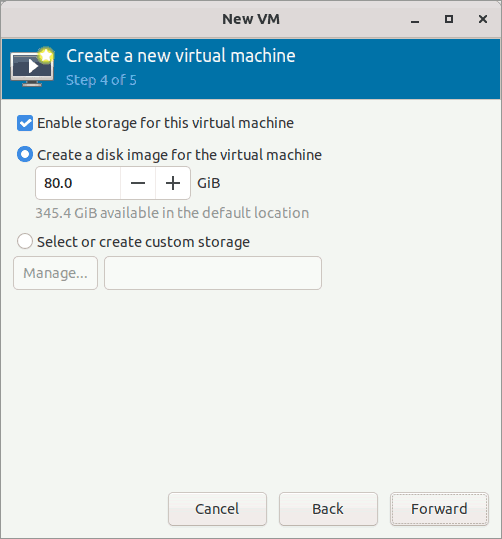
STEP 4: Enable storage for this virtual machine.
Set the disk image size for the virtual machine. The disk image that is created will be of the type QCOW2, which is a copy-on-write format. The QCOW2’s initial file size will be smaller, and it will only grow as more data is added. So I’ll set the disk image size to 80 GiB, but you can change it to suit your needs. To install Windows 11, you need to have a disk space of 64 GiB or greater.
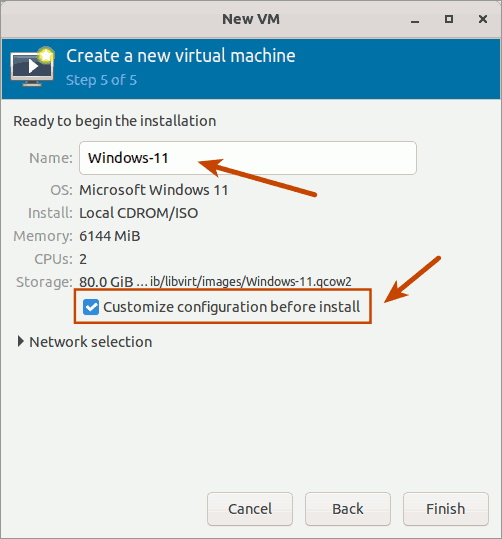
STEP 5: Set the name of the virtual machine.
This is the final configuration screen of the Virtual Machine Creation Wizard. Give the guest virtual machine a name. I’ll set it to ‘Windows-11‘, but you can change it to anything you want.
Also, ensure that the ‘Customize configuration before install‘ checkbox is selected. Click the Finish button to finish the wizard and proceed to the advanced options.
You will now be in the advanced options window.
1.2. Configure Chipset and Firmware
In the Overview section, make sure the chipset is set to Q35 and the firmware is set to UEFI.

The Q35 chipset natively supports PCIe and provides improved PCI-E pass-through support.
The UEFI firmware option, on the other hand, enables Secure Boot, which is required for Windows 11. When using the UEFI firmware, you can take internal snapshots while the guest is shut down but not while it is running.
1.3. Enable Hyper-V Enlightenments
Hyper-V Enlightenments allow KVM to emulate the Microsoft Hyper-V hypervisor. This improves the performance of the Windows 11 virtual machine.
For more information, check out the pages ‘Hyper-V Enlightenments’ and ‘Hypervisor Features’.
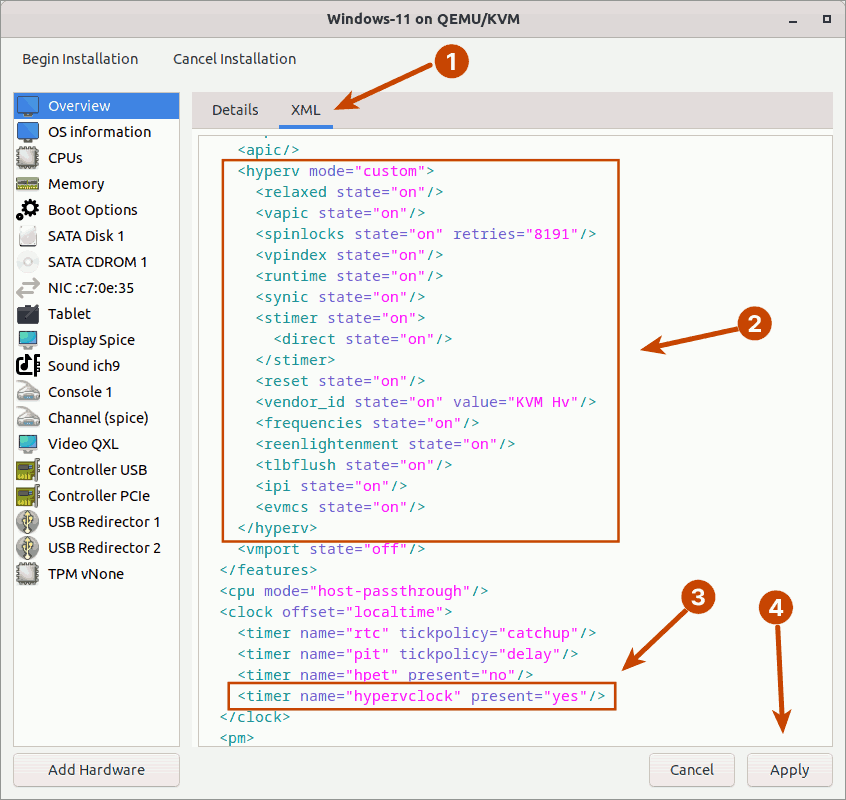
Click the XML tab and add or replace the highlighted XML in the <hyperv> and <timer> in <clock> sections.
Note: If you have an AMD processor, you cannot use the ‘hv-evmcs‘ feature. This VMCS feature is only available for Intel platforms.
You must remove the line ‘<evmcs state="on"/>‘ from the following XML. I’ve highlighted it in bold.
Thanks to Benjamin Poirier for suggesting this.
The XML for <hyperv> is:
<hyperv mode="custom">
  <relaxed state="on"/>
  <vapic state="on"/>
  <spinlocks state="on" retries="8191"/>
  <vpindex state="on"/>
  <runtime state="on"/>
  <synic state="on"/>
  <stimer state="on">
    <direct state="on"/>
  </stimer>
  <reset state="on"/>
  <vendor_id state="on" value="KVM Hv"/>
  <frequencies state="on"/>
  <reenlightenment state="on"/>
  <tlbflush state="on"/>
  <ipi state="on"/>
  <evmcs state="on"/>
</hyperv>
The XML for the <timer> in the <clock> section is:
<clock offset="localtime">
  ...
  <timer name="hypervclock" present="yes"/>
</clock>
1.4. Enable CPU Host-Passthrough
Select the CPUs section in the left panel. Ensure that host-passthrough is enabled.
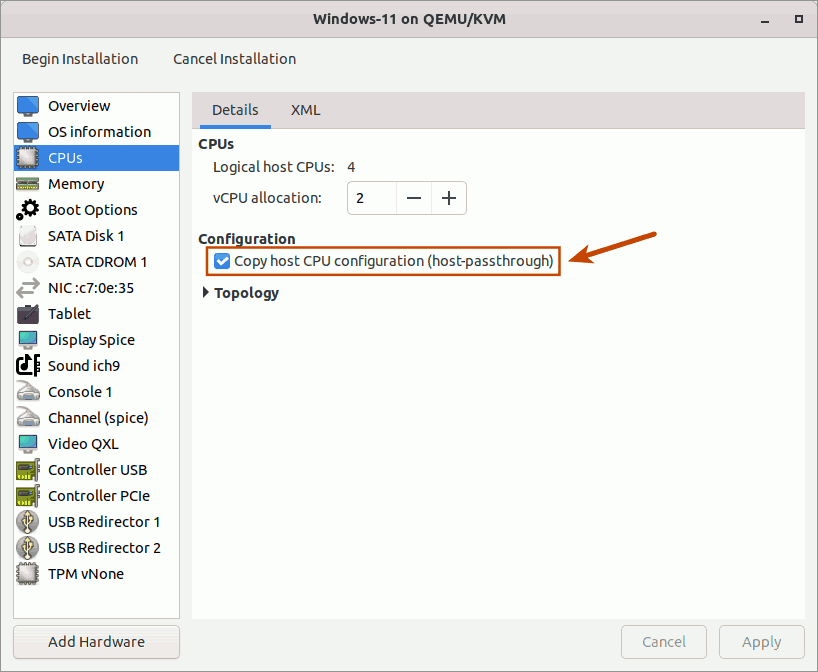
When the mode is set to host-passthrough, the host CPU’s model and features are exactly passed on to the guest virtual machine. This causes the virtual machine to run close to the host’s native speed. This is the recommended and default option as well.
1.5. Configure the Storage
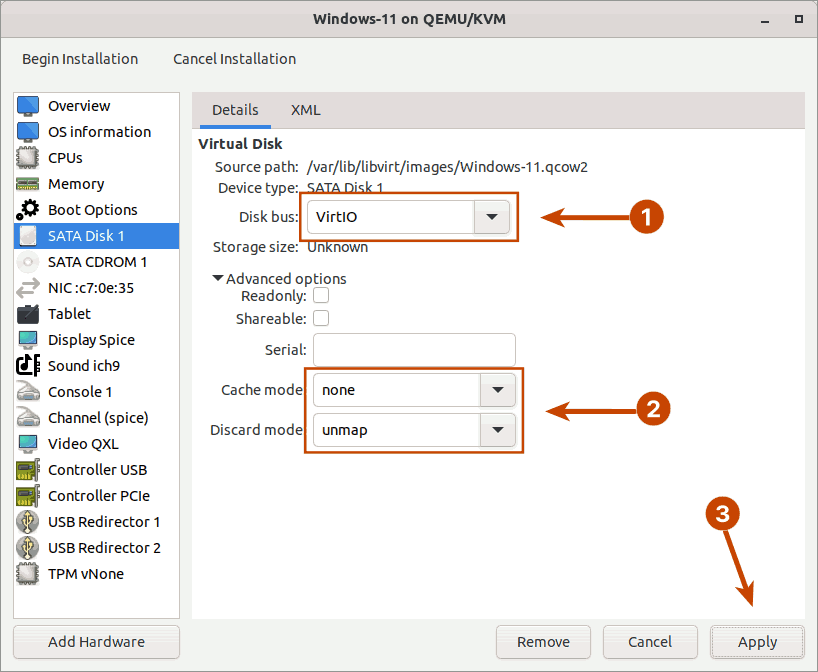
From the left panel, select SATA Disk 1.
Change the disk bus from SATA to VirtIO. VirtIO is preferred over other emulated storage controllers as it is specifically designed and optimized for virtualization.
Set the cache mode to none. In this mode, the host page cache is bypassed, and I/O occurs directly between the hypervisor user space buffers and the storage device. In terms of performance, it is equivalent to direct disk access on your host.
Set the discard mode to unmap. When you delete files in the guest virtual machine, the changes are reflected immediately in the guest file system. The qcow2 disk image associated with the VM on the host, however, does not shrink to reflect the newly freed space. When you set the discard mode to unmap, the qcow2 disk image will automatically shrink to reflect the newly freed space.
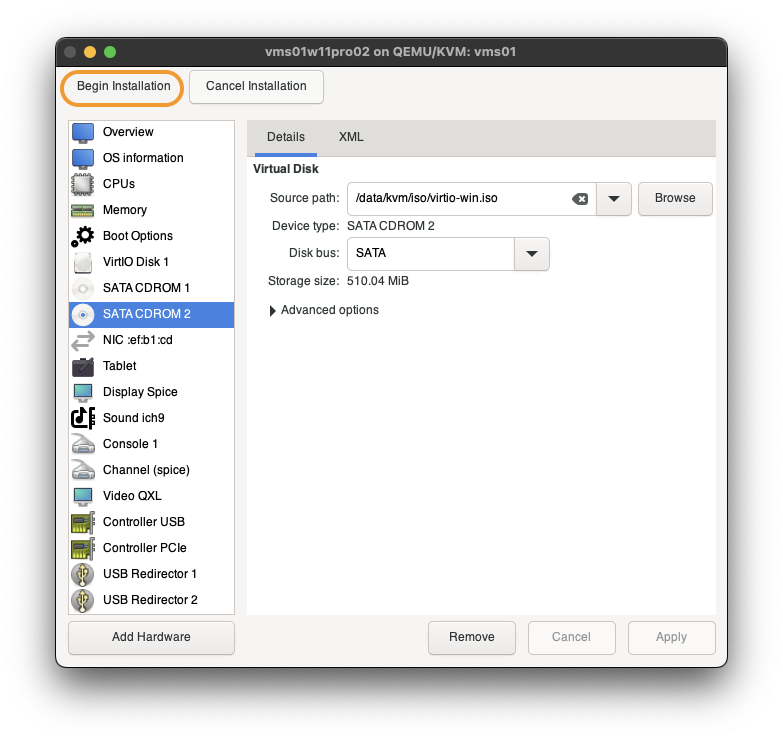
1.6. Mount the VirtIO-Win.ISO Image
VirtIO drivers are para-virtualized drivers for KVM guests. Microsoft, unfortunately, does not provide these drivers. When installing a Microsoft Windows virtual machine, you must install certain VirtIO drivers.
As a result, you must mount the virtio-win.iso image file, which contains the VirtIO drivers for Windows. This requires the addition of a second CDROM.
Click the Add Hardware button, then select CDROM device as the Device type in the window that appears and mount the virtio-win.iso image file.
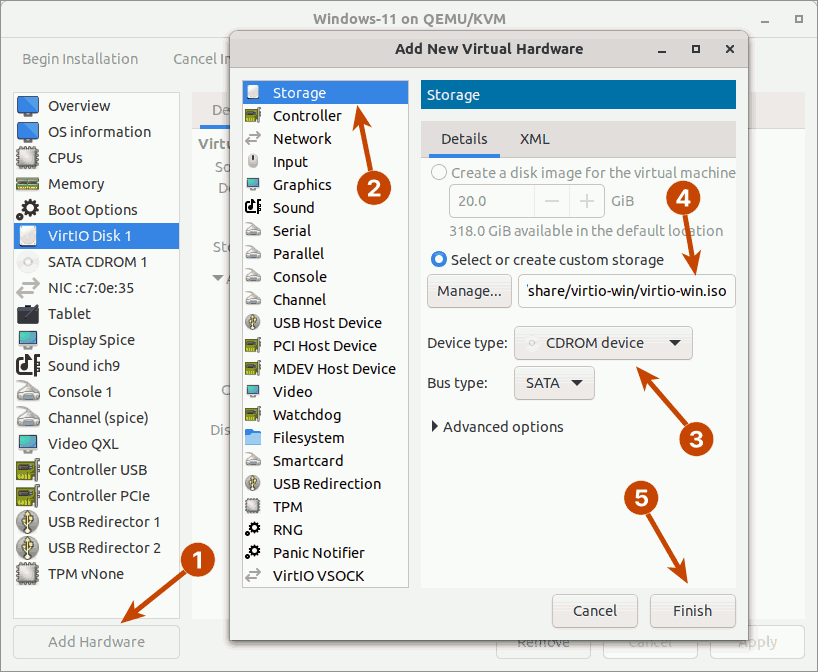
If you’re using Fedora as your KVM host, the ISO image will be located at /usr/share/virtio-win/.
If you haven’t already installed or downloaded virtio-win.iso, see the section titled ‘Install VirtIO Drivers for Windows Guests’ in my other blog post titled ‘How Do I Properly Install KVM on Linux’.
1.7. Configure Virtual Network Interface
In the NIC section, change the device model to virtio. The network VirtIO driver is specifically designed and optimized for virtualization. As a result, there will be no processing overhead, and the performance of the guest virtual machine will naturally improve.

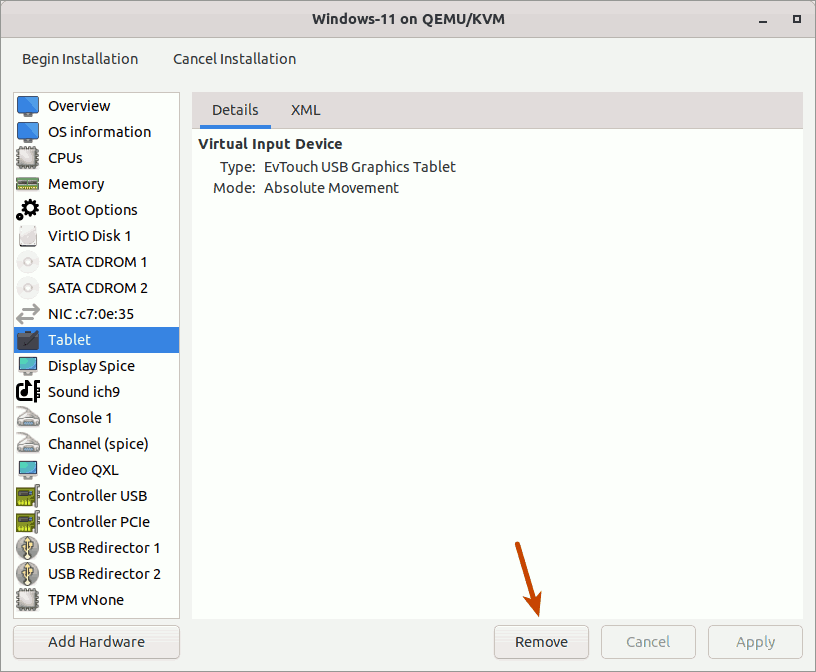
1.8. Remove the USB Tablet Device
In a Windows virtual machine, removing the USB tablet device can reduce idle CPU usage and context switches. As a result, the performance of the Windows 11 virtual machine will improve.
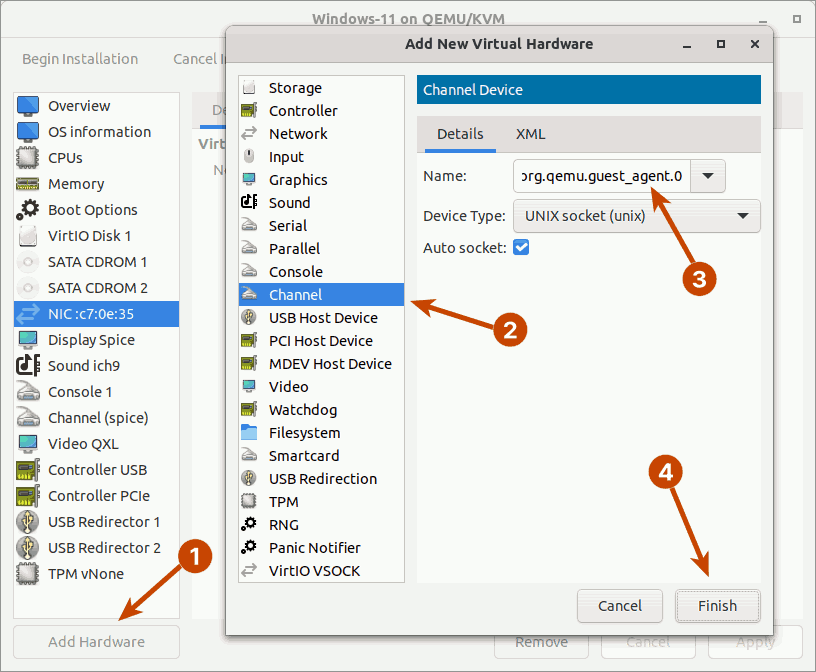
1.9. Add QEMU Guest Agent Channel
The QEMU Guest Agent Channel establishes a private communication channel between the host physical machine and the guest virtual machine. This enables the host machine to issue commands to the guest operating system using libvirt. The guest operating system then responds to those commands asynchronously.
For example, after creating the Windows 11 guest virtual machine, you can shut it down from the host by issuing the following command:
$ sudo virsh shutdown Windows-11 --mode=agentThis shutdown method is more reliable than virsh shutdown --mode=acpi because it guarantees to shut down a cooperative guest in a clean state. If the agent is not present, libvirt must rely on injecting an ACPI shutdown event, which some guests ignore and thus do not shut down. You can also use the same syntax to reboot (virsh reboot).
Some of the commands you can try, among many others, are:
### Query the guest operating system's IP address via the guest agent.
$ sudo virsh domifaddr Windows-11 --source agent

### Show a list of mounted filesystems in the running guest.
$ sudo virsh domfsinfo Windows-11

### Instructs the guest to trim its filesystem.
$ sudo virsh domfstrim Windows-11
So, add a QEMU guest agent channel to the Windows 11 guest virtual machine.
Click the Add Hardware button to open the Add New Virtual Hardware window, and select Channel. Then, from the drop-down list, select ‘org.qemu.guest_agent.0‘ and click Finish to apply.
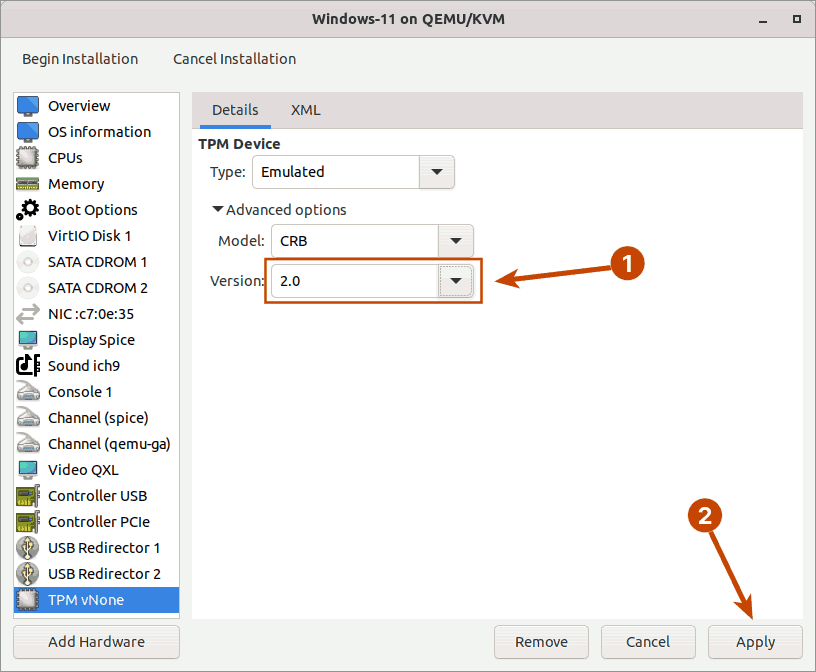
1.10. Enable Trusted Platform Module (TPM)
Enable the Trusted Platform Module (TPM). TPM technology is designed to provide hardware-based, security-related functions. Windows 11 requires TPM version 2.0.
All of the virtual hardware and settings needed to install Microsoft Windows 11 have been configured. To begin the installation of Windows 11, click the ‘Begin Installation‘ button in the upper left corner of the window.

2. Install a Windows 11 Virtual Machine on KVM
Now that you have finished configuring Windows 11 virtual hardware and have clicked the ‘Begin Installation’ button, the Windows 11 installation starts.
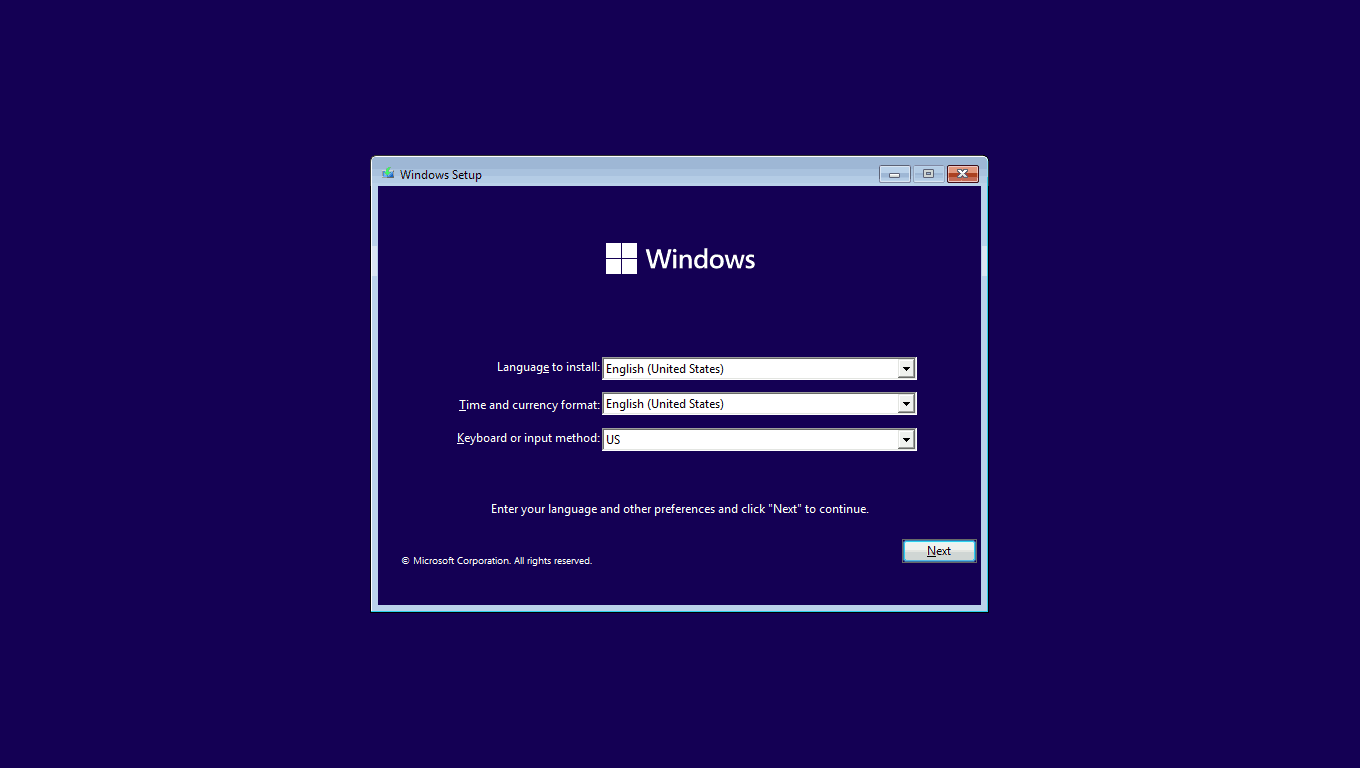
On the screen that appears, choose your language, time and currency format, and keyboard from the list of available options. Then press the Next button.
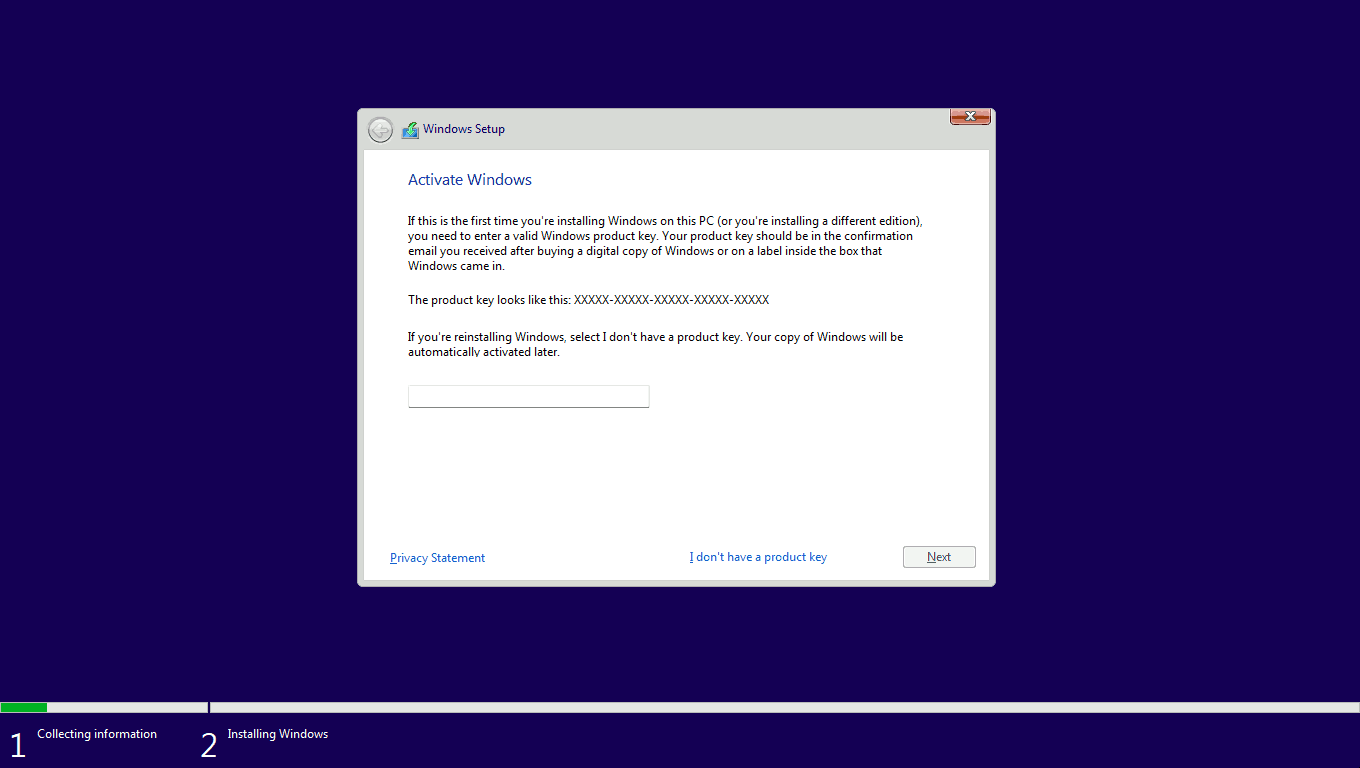
On the following screen, click Install Now. The Windows activation screen will appear. If you have a product key, enter it here. Otherwise, choose I don’t have a product key.
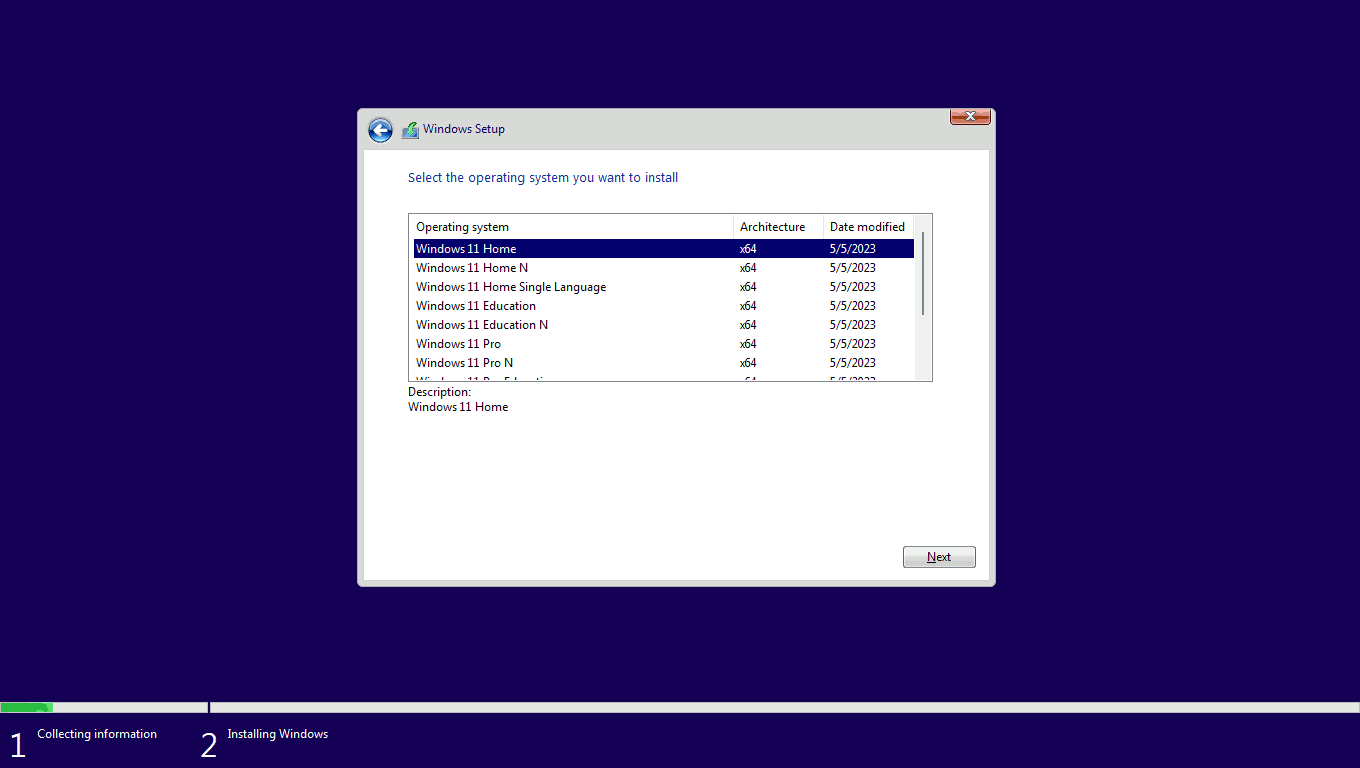
Choose the Windows version you want to install. I’ll be installing Windows 11 Home for this tutorial.
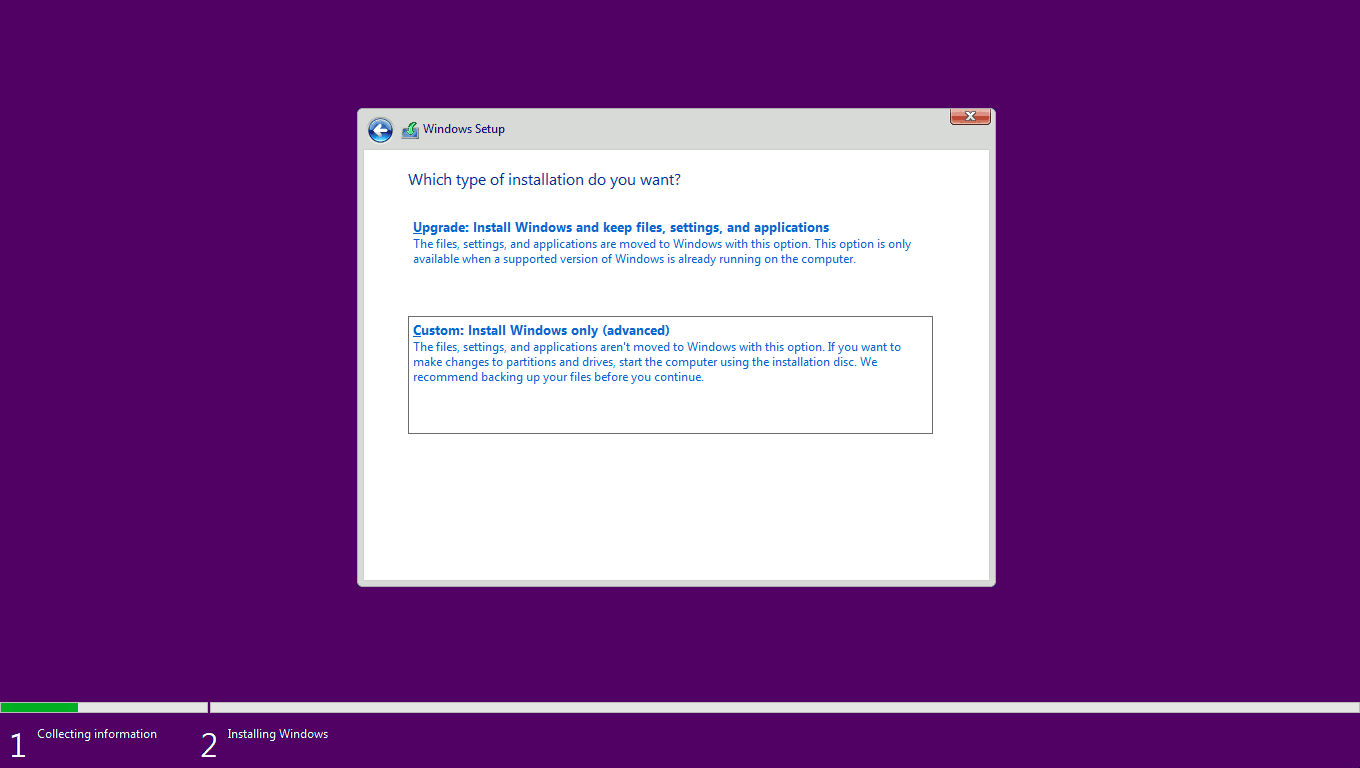
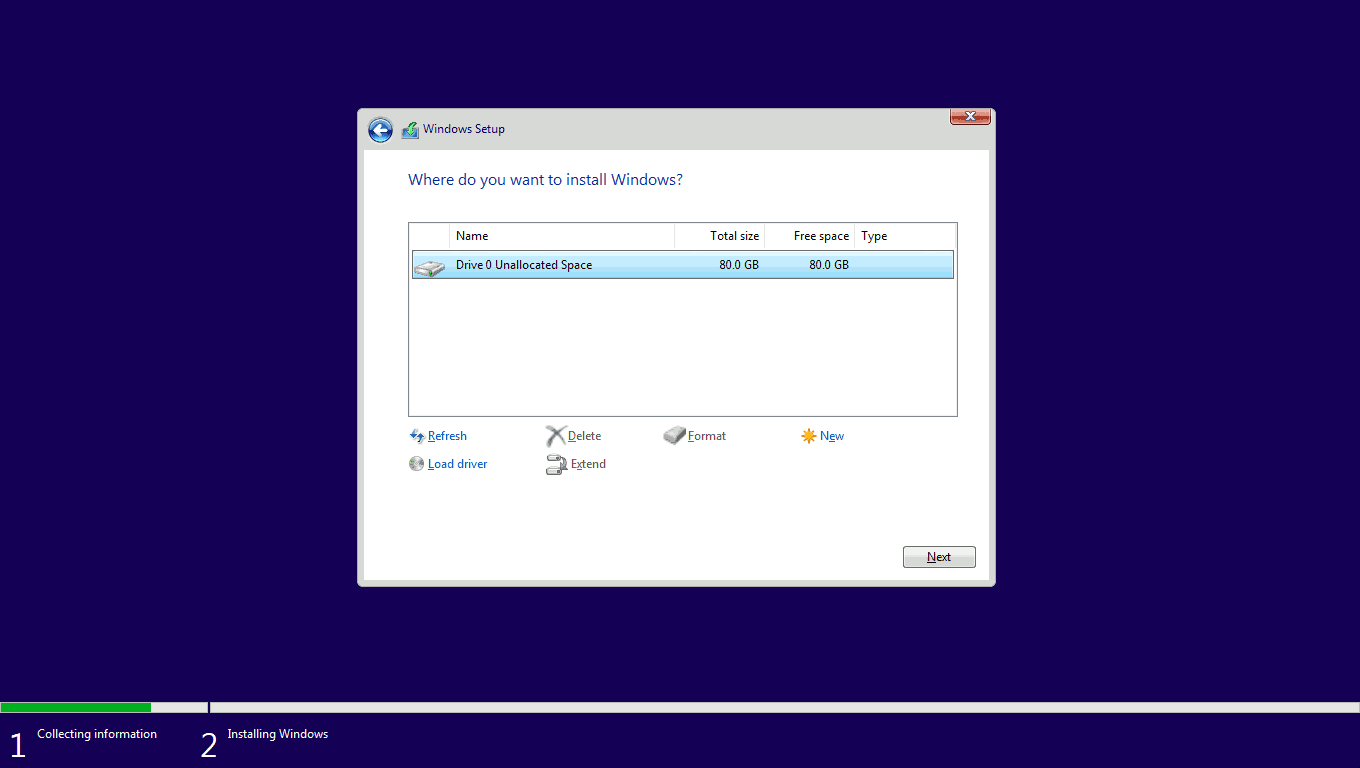
When you get to the type of installation screen, choose Custom: Install Windows only (advanced).
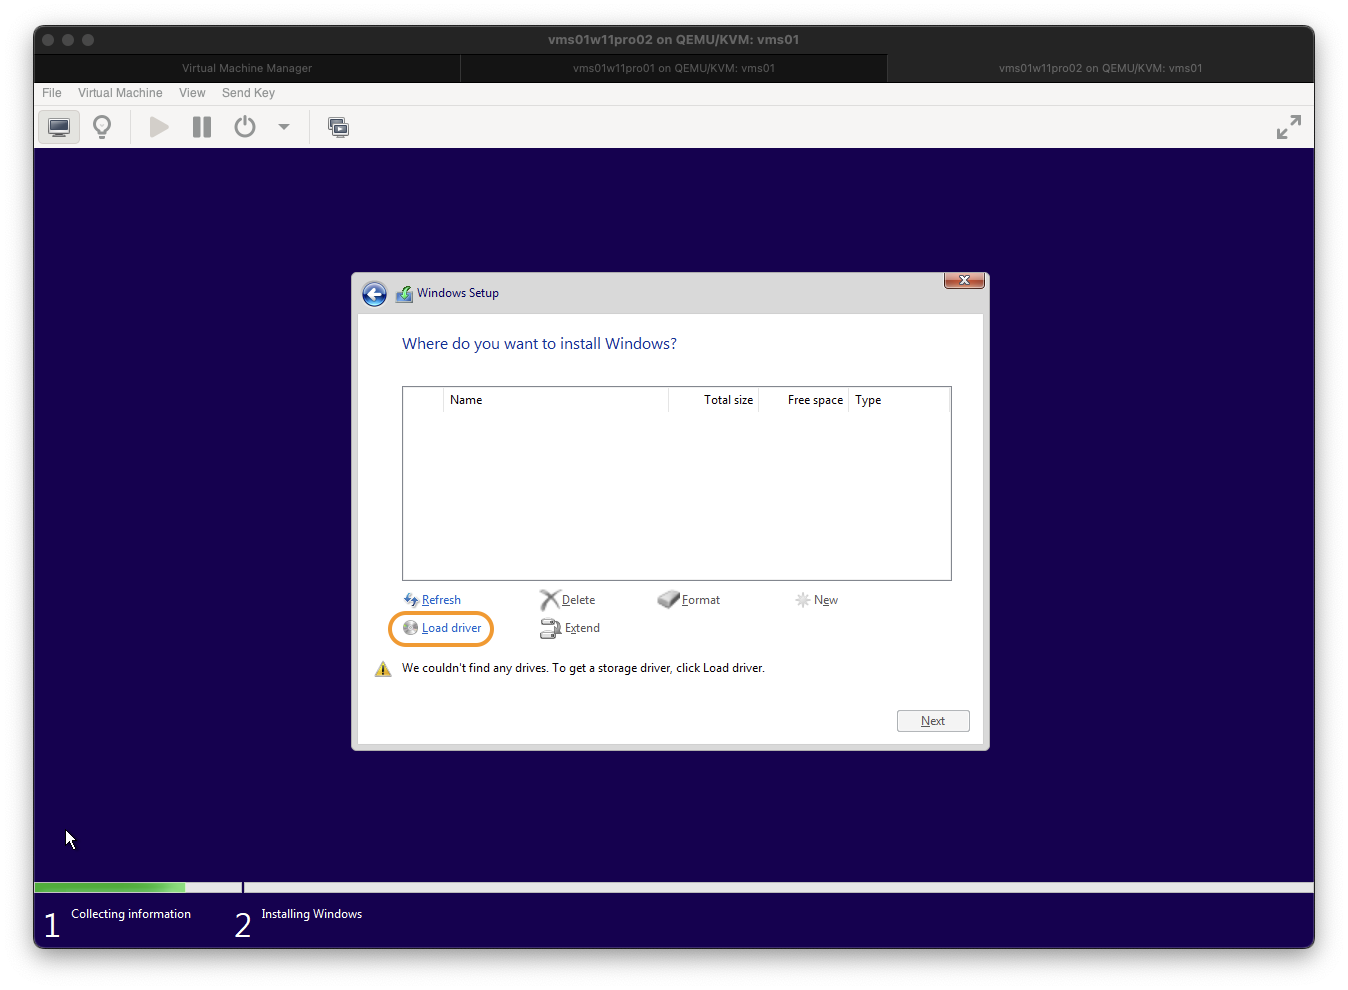
You must now select the disk on which Windows 11 will be installed. However, as you can see, the installer was unable to find any drives.
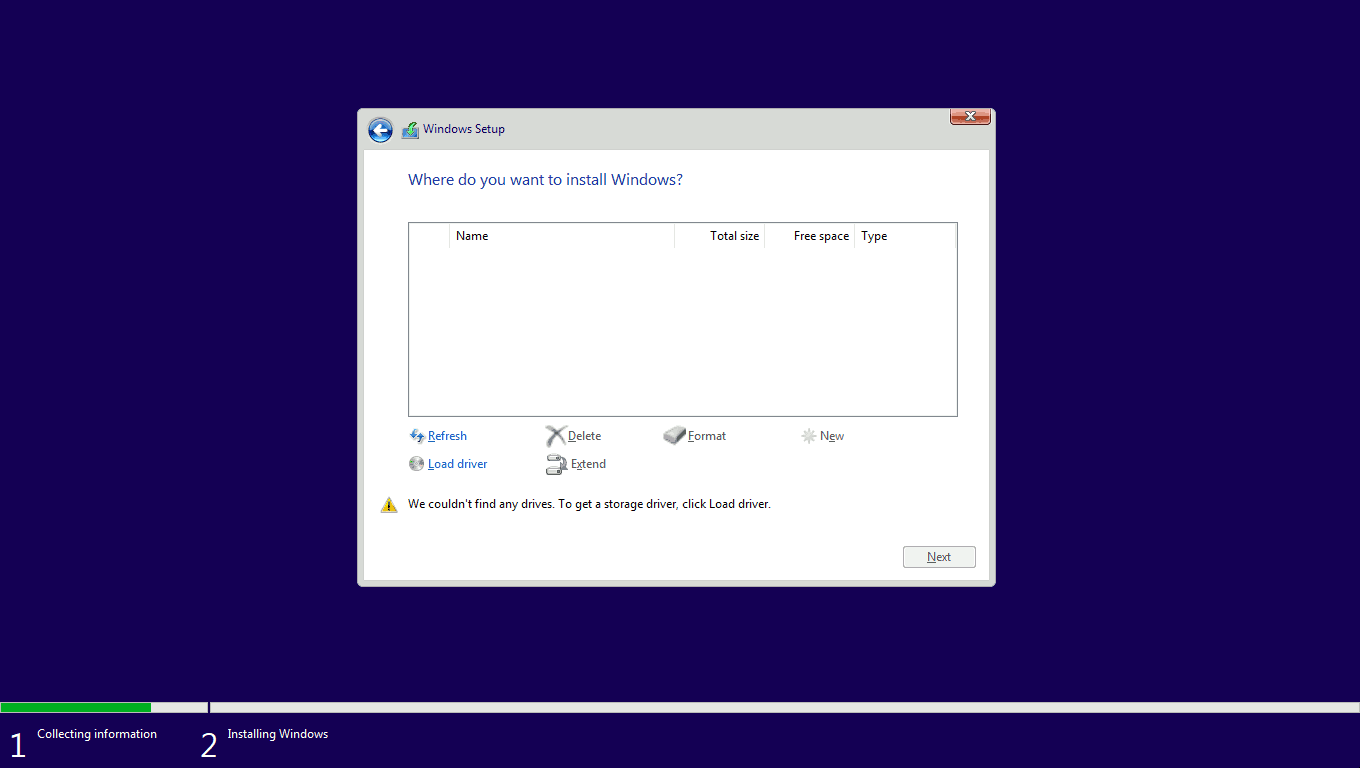
This is because you selected the VirtIO disk bus when configuring Windows 11 virtual hardware. VirtIO devices are not natively recognized by Windows, so you must manually install the drivers.
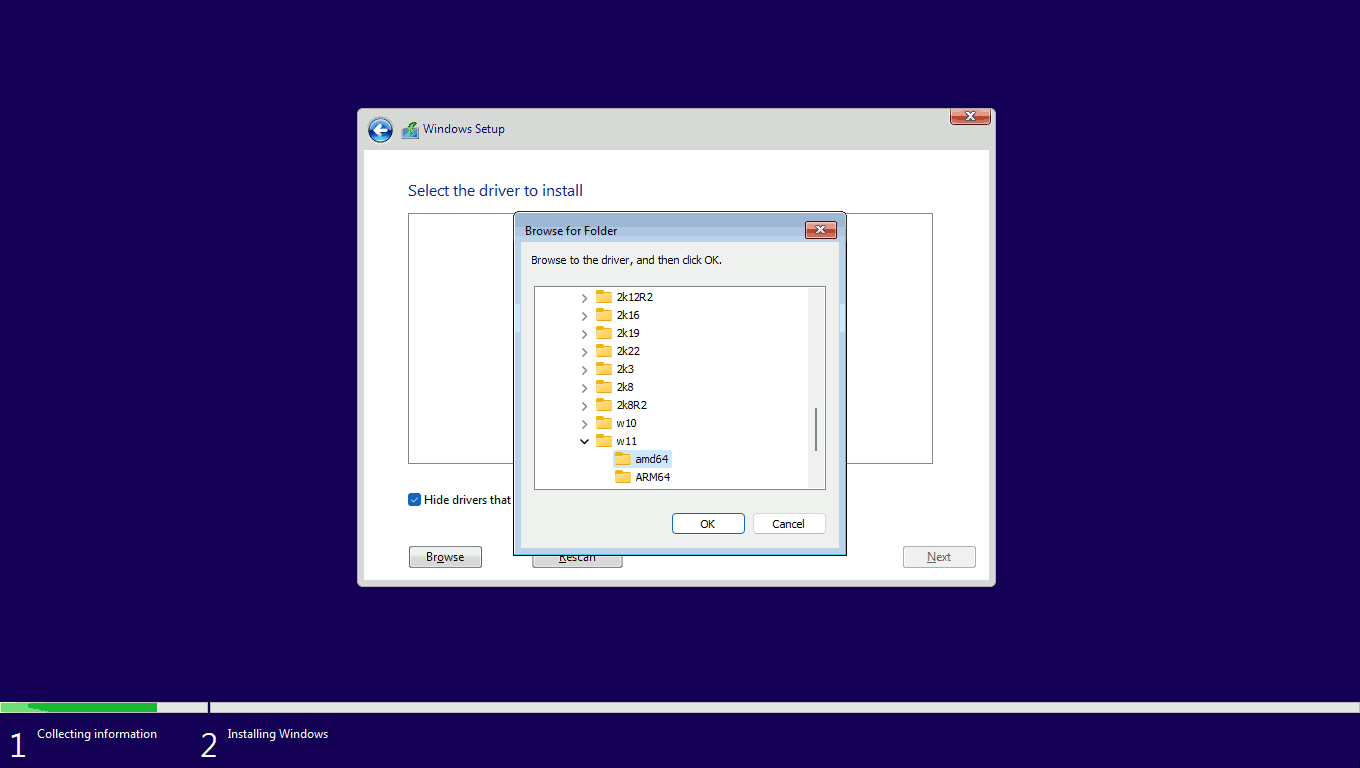
To install the VirtIO disk driver, click Load driver, then Browse, expand the CD Drive (E:), expand Viostor, expand w11, select amd64, and click OK.
Click Next to install.
As you can see, the disk is now visible after installing the VirtIO storage driver.
But don’t proceed with the installation just yet. You still need to install the VirtIO network driver.
Repeat the procedure for the network device as well. Click Load driver again, then Browse, expand the CD Drive (E:), expand NetKVM, expand w11, select amd64, and click OK.
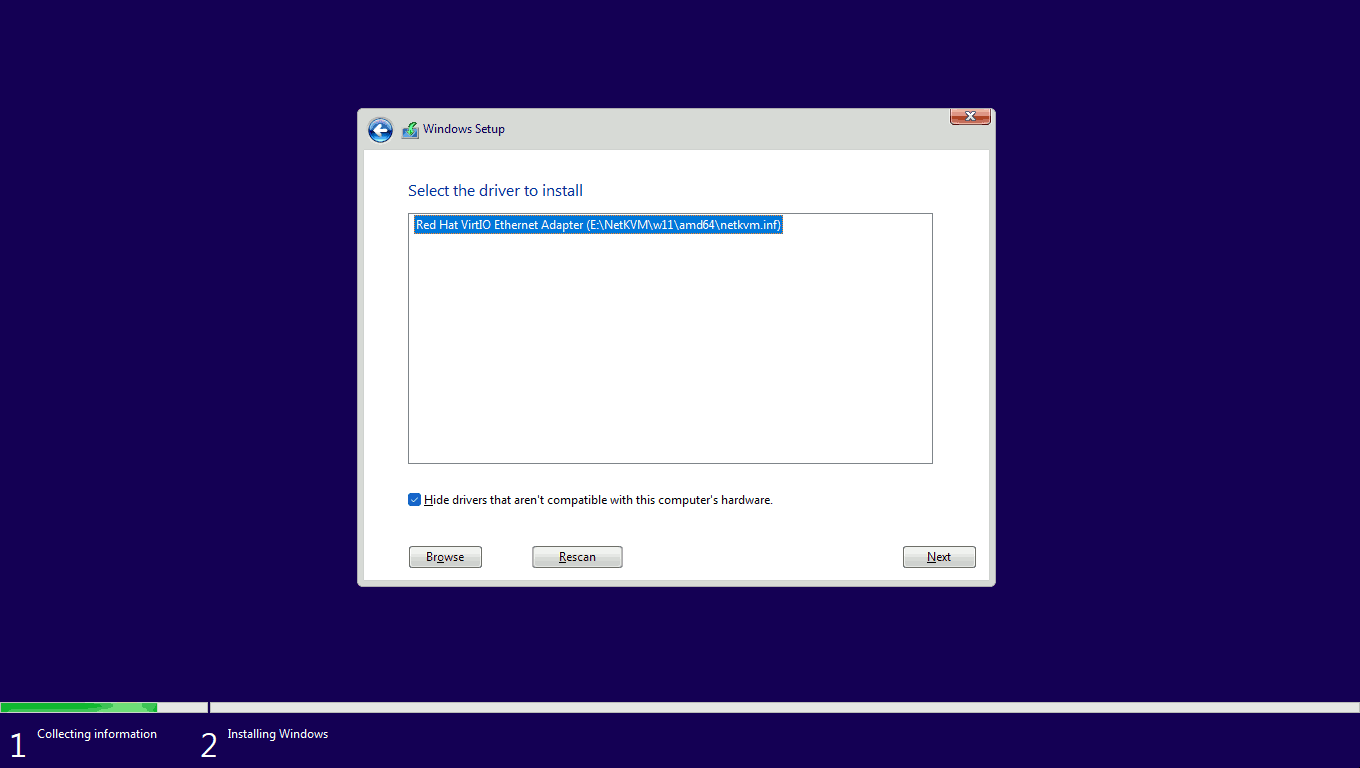
After installing the VirtIO network device driver, click the Next button to proceed with the installation.
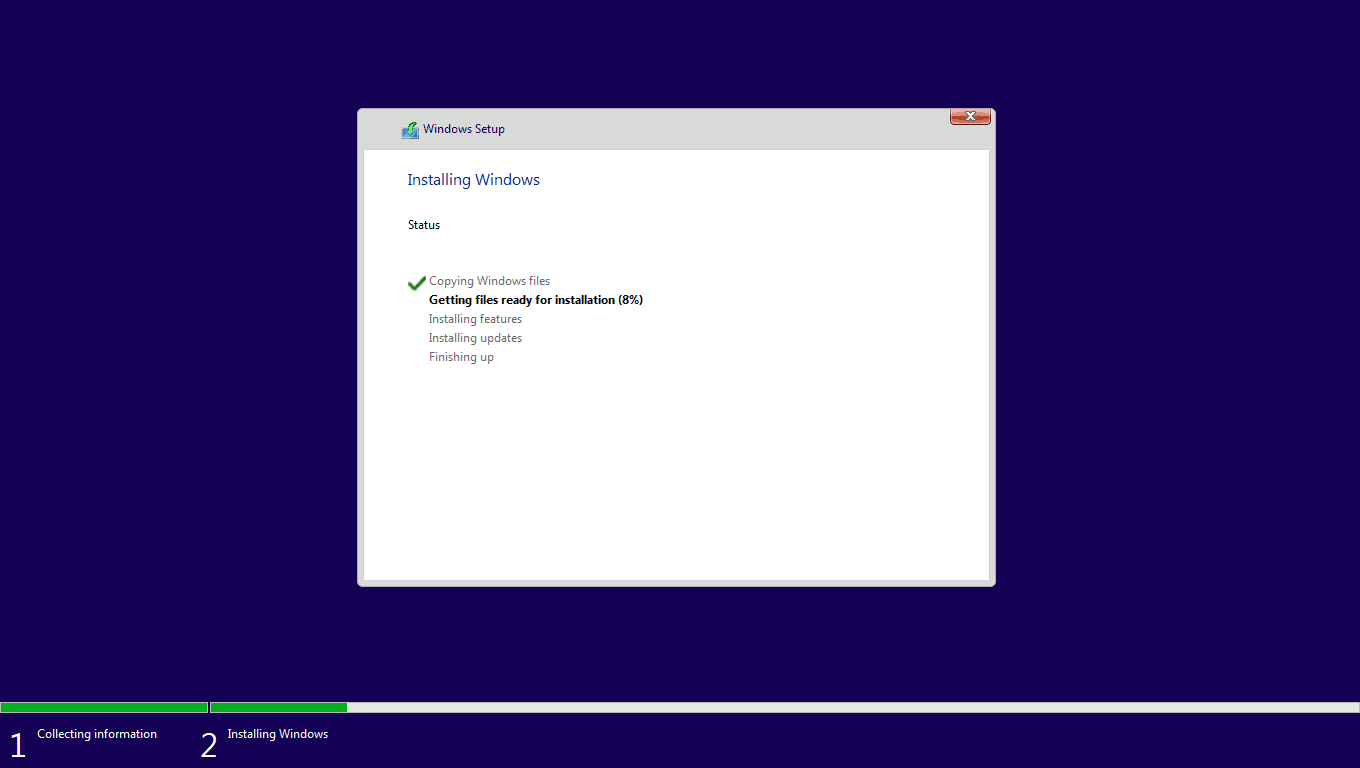
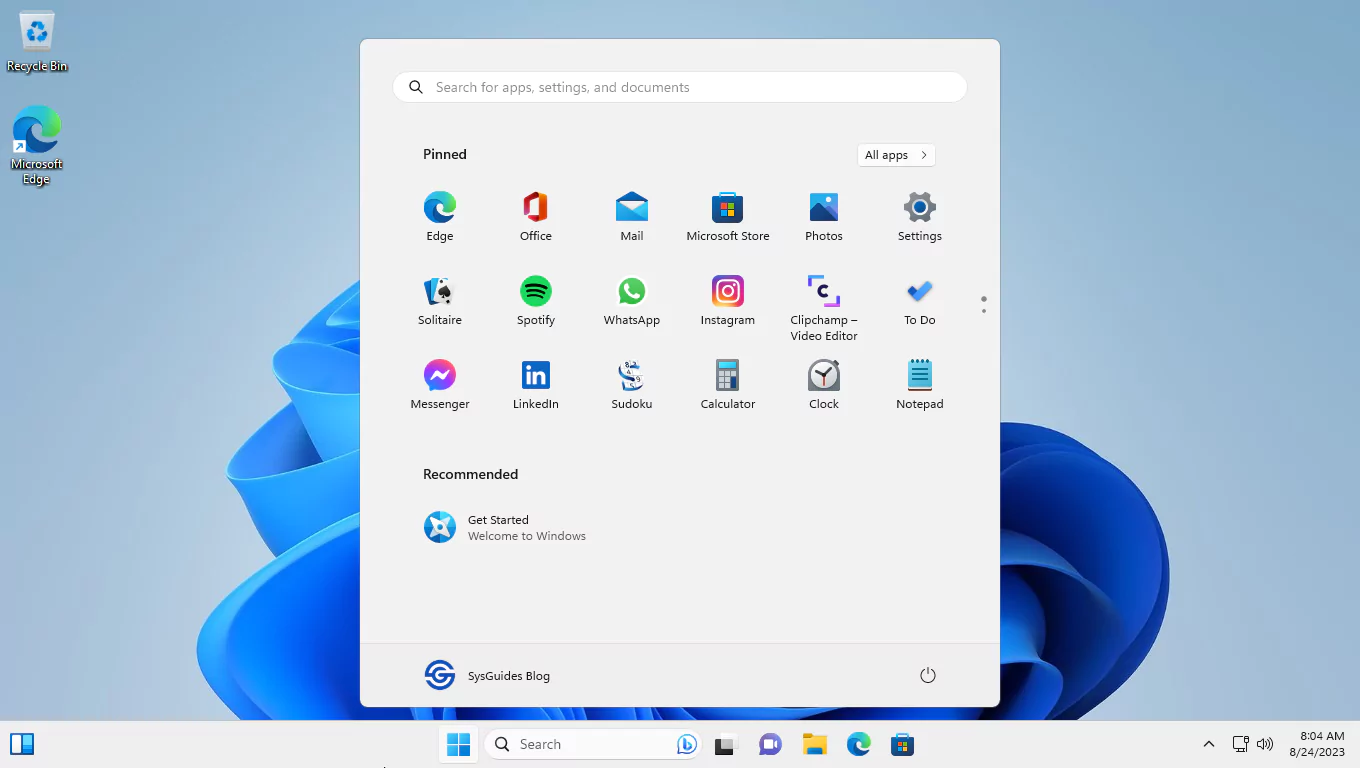
The next installation steps are all about personalization. Complete the installation according to your needs, and you will be taken to the desktop environment once it is finished.
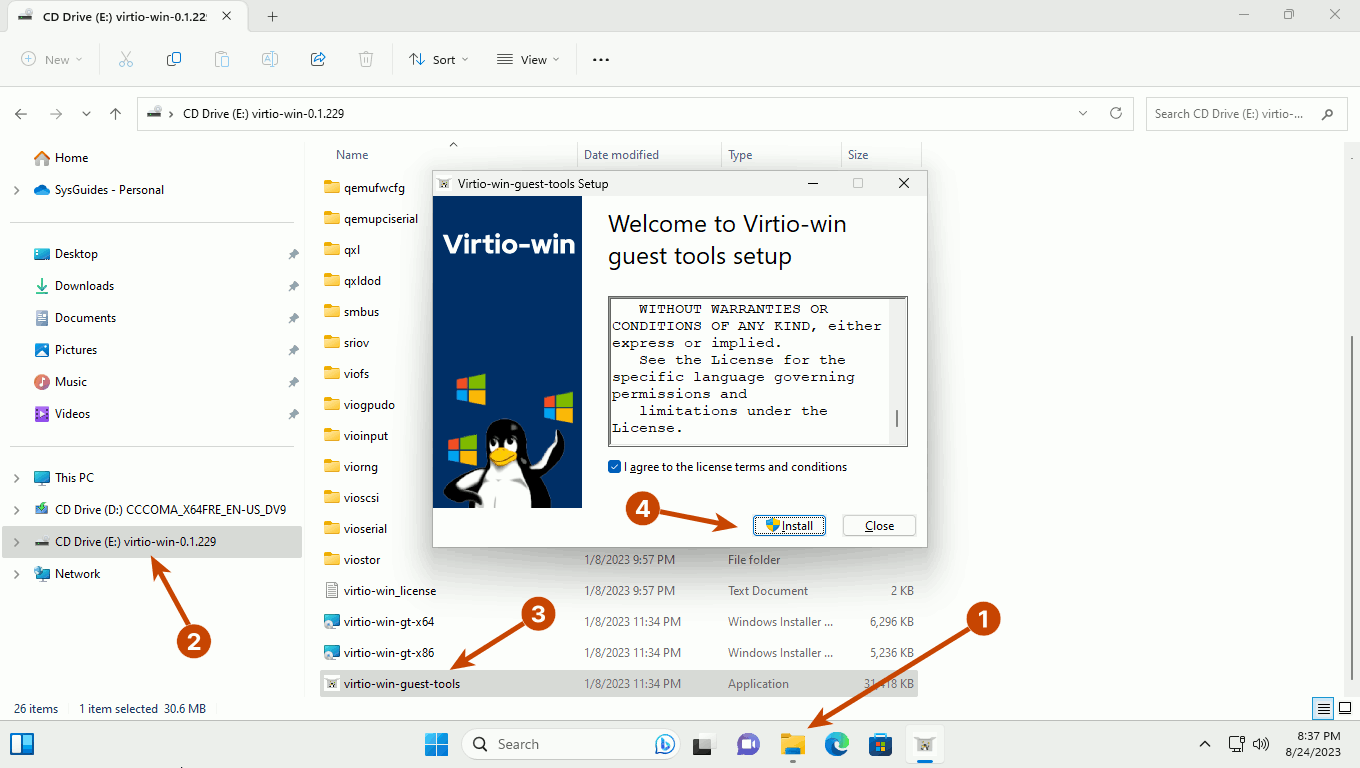
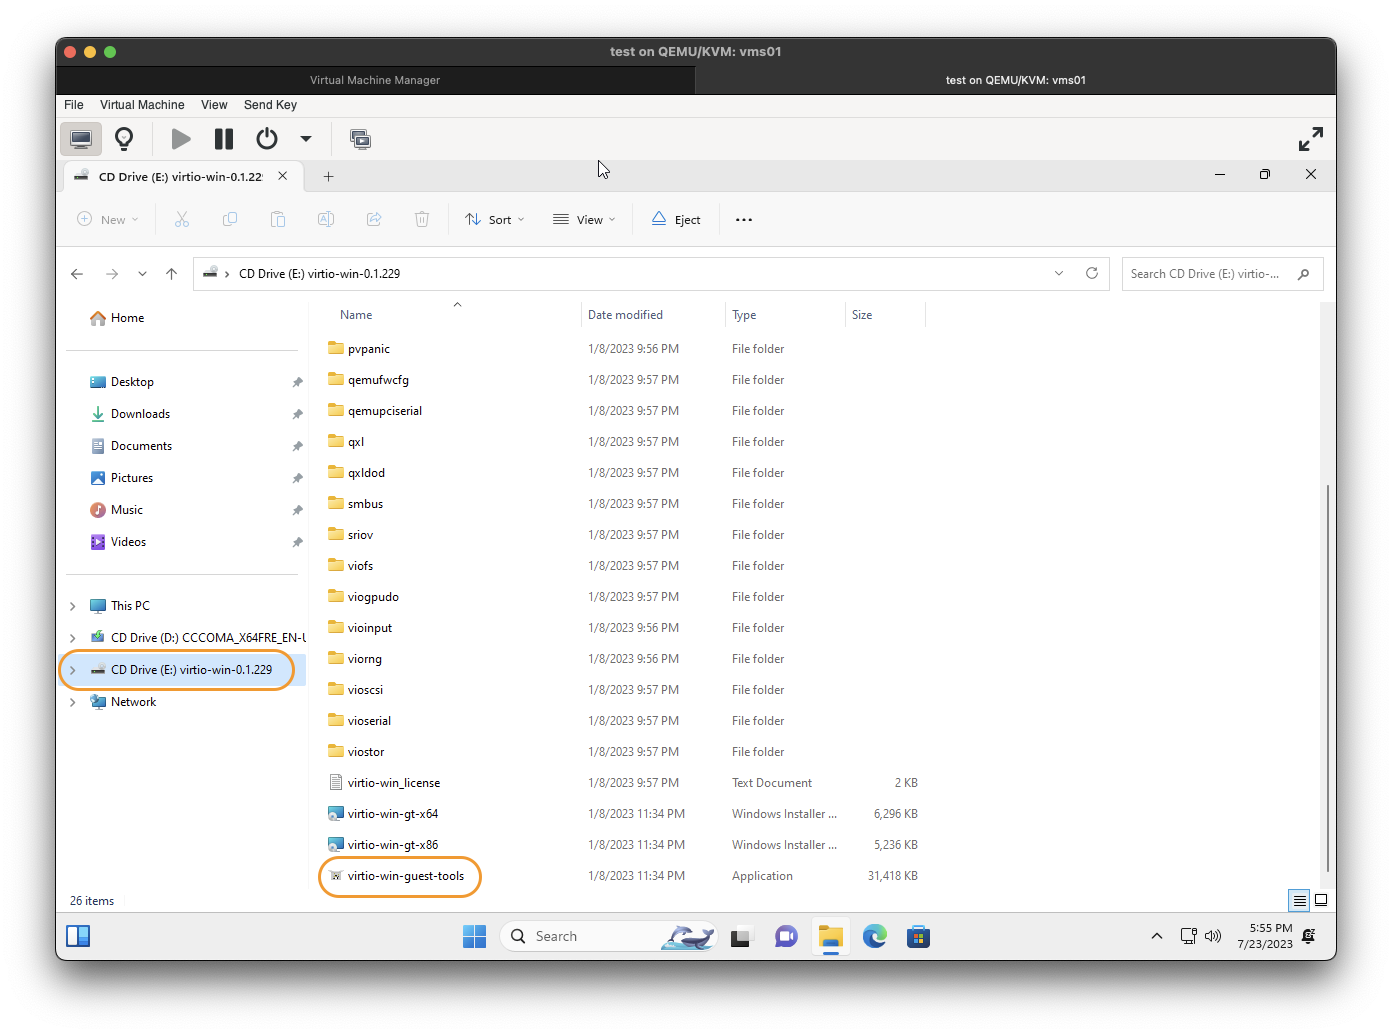
Finally, you must install VirtIO Windows Guest Tools. This package includes some optional drivers and services that will boost SPICE performance and integration. This includes the QXL video driver as well as the SPICE guest agent for copy and paste, automatic resolution switching, and other features.
So launch Windows Explorer, navigate to the CD Drive (E:), and double-click the virtio-win-guest-tools package to install it.
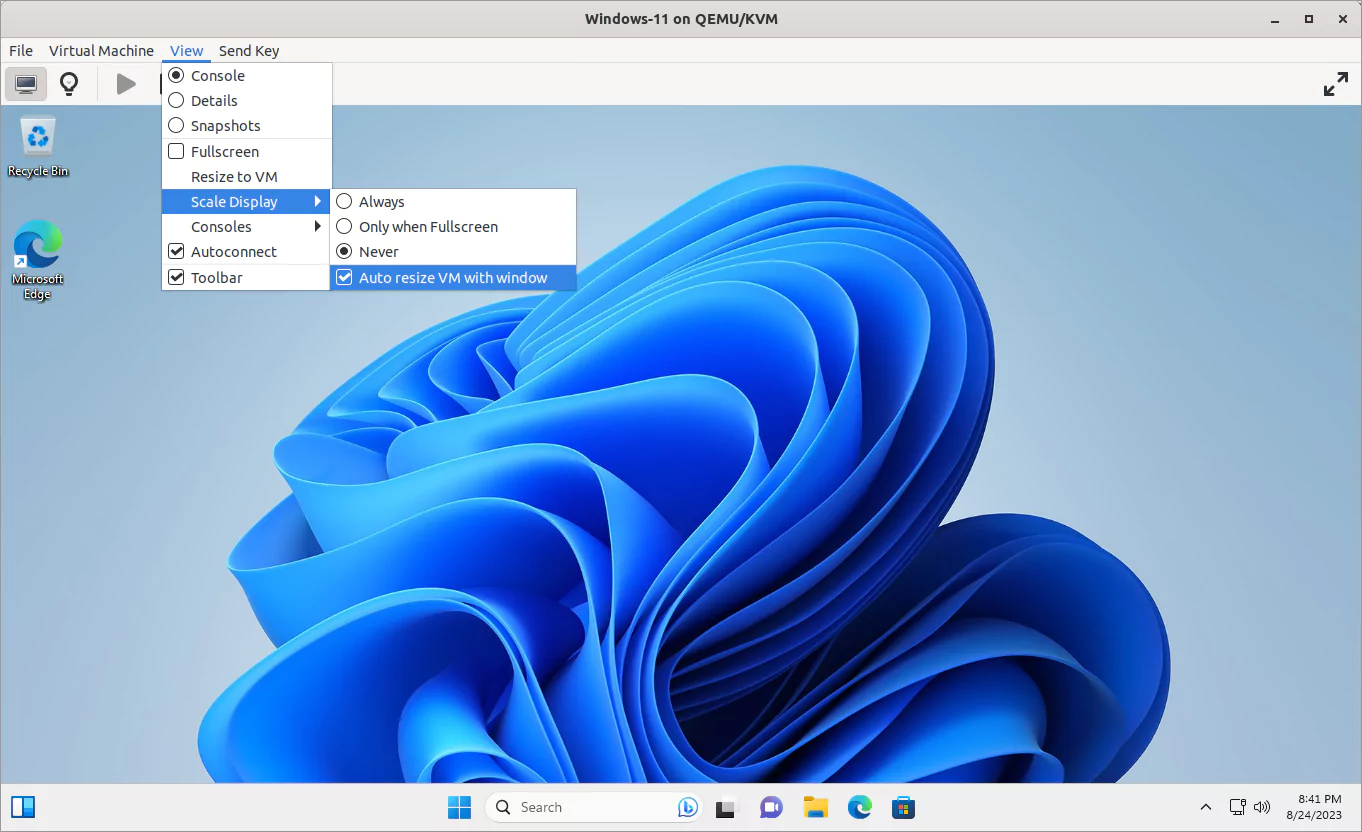
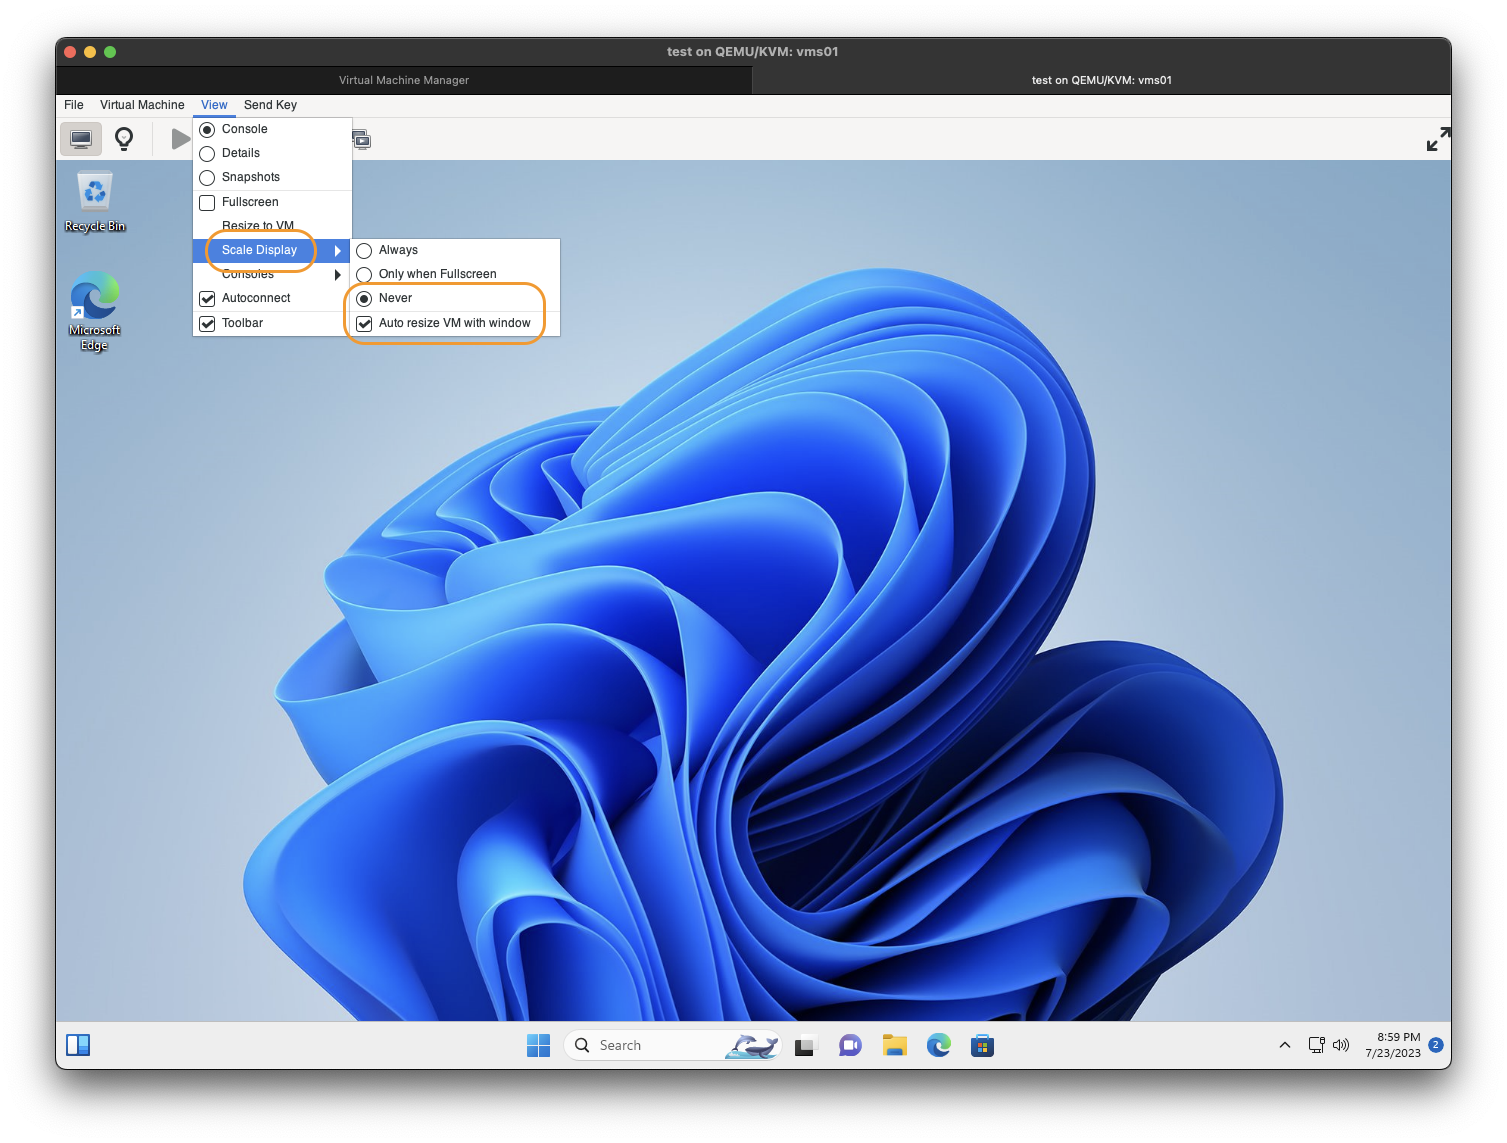
After installing the guest tools, on the Windows-11 KVM window, click View, Scale Display, and check the ‘Auto resize VM with window‘ option. This will enable the Windows 11 guest window to automatically resize as you scale it.
The Windows 11 operating system installation is now complete. Shut down the Windows 11 virtual machine.
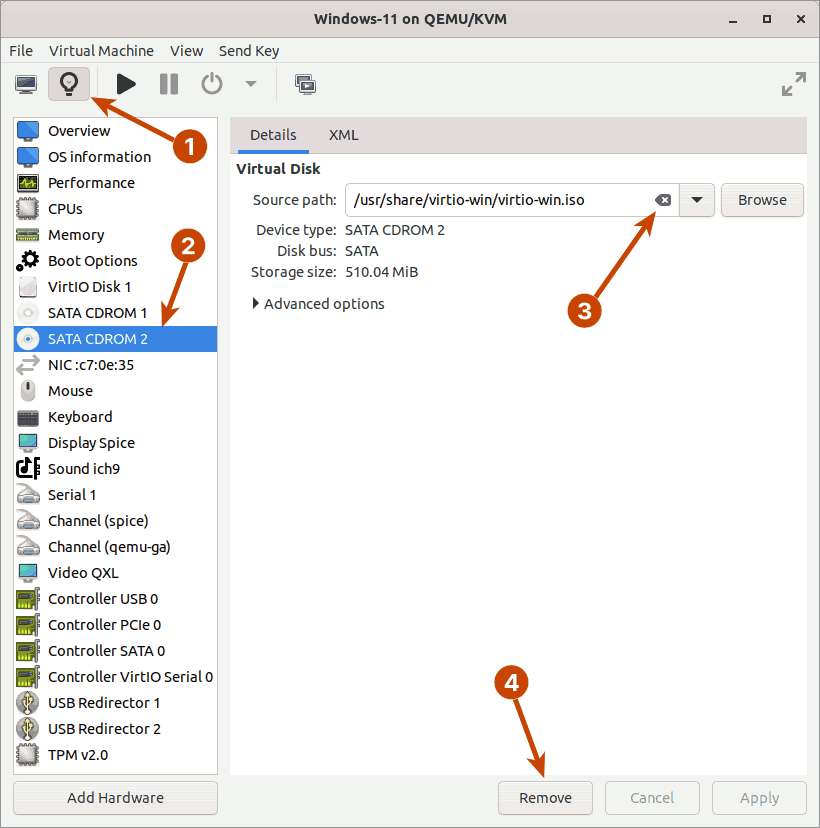
Now that you’ve installed guest tools, you don’t need the second CDROM drive. Click the lightbulb icon to access the hardware details. Unmount the virtio-win.iso image and then remove the second CDROM drive.
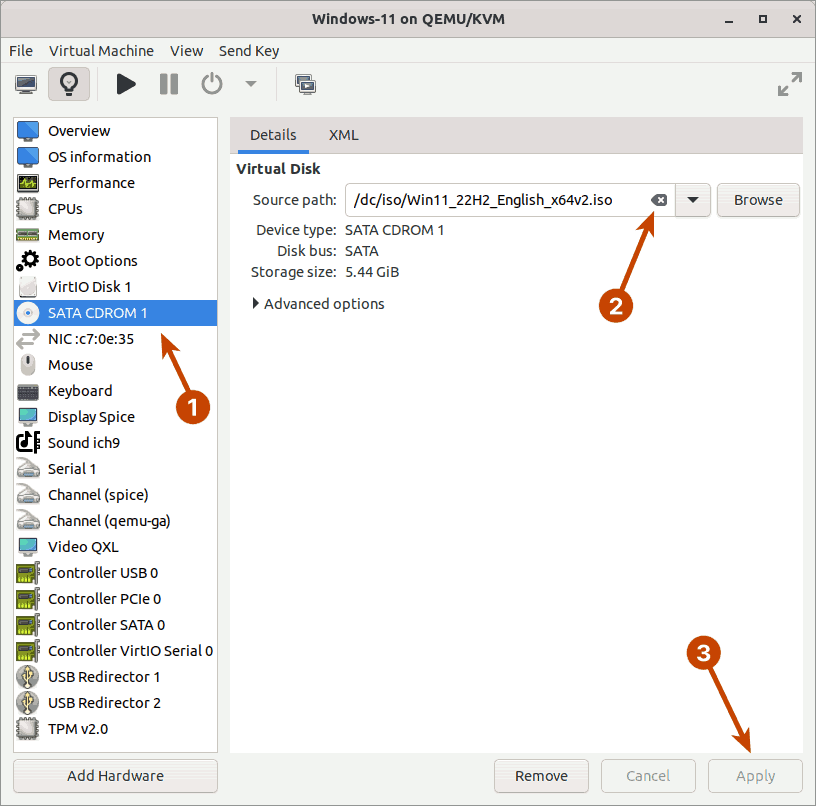
Unmount the ISO image of the Windows 11 installer from the first CDROM drive as well.
3. Enable Hardware Security on Windows 11
With the Q35 chipset selected, Secure Boot and TPM 2.0 enabled, and the latest WHQL-certified VirtIO drivers installed, your Windows 11 guest virtual machine already has standard security.
You can check if your VM passes standard security by opening the Device Security page.
To access the Device Security page, navigate to Settings > Privacy & Security > Windows Security > Device Security.

To make Windows 11 even more secure, you can enable Core Isolation.
Core isolation safeguards against malware and other attacks by separating computer processes from your operating system and device.
But before attempting to enable this feature, make sure that your processor supports it.
Your processor must meet the Windows Processor Requirements to enable this feature. If your processor is not on the list, skip this section and proceed to the next one.
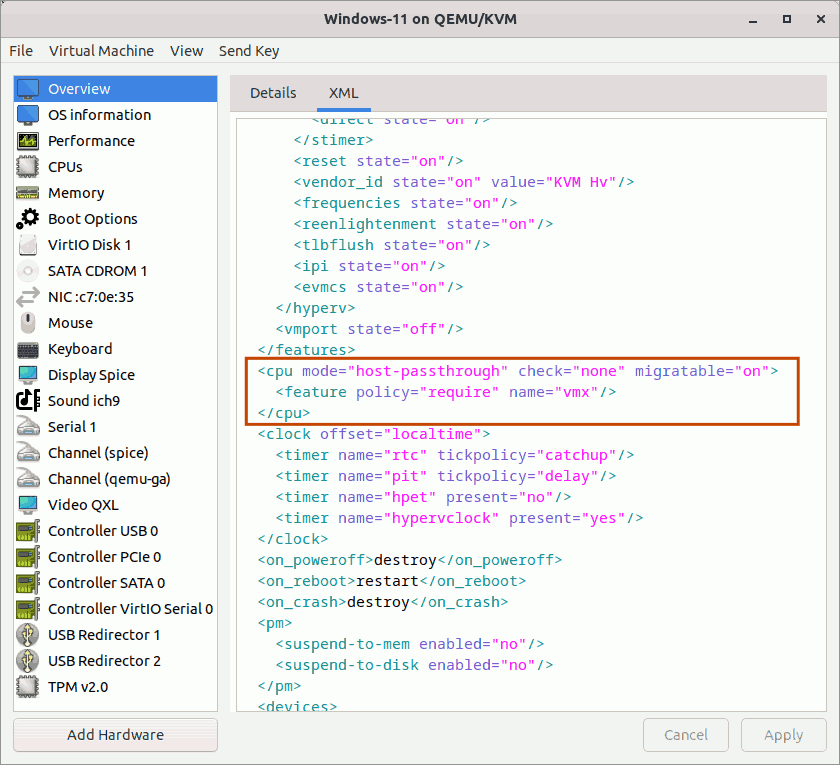
Shut down your Windows 11 guest virtual machine. Open the virtual hardware details page, then click the Overview option on the left panel and the XML tab on the right.
Under the <cpu> section, specify the CPU mode and add the policy flag.
Replace this:
<cpu mode="host-passthrough" check="none" migratable="on"/>
With this:
<cpu mode="host-passthrough" check="none" migratable="on">
  <feature policy="require" name="vmx"/>
</cpu>
If you’re using AMD CPUs, replace vmx with the svm policy flag.
Start your Windows 11 guest virtual machine and navigate to the Core isolation details page.
To access the Core isolation details page, navigate to Settings > Privacy & Security > Windows Security > Device Security > Core isolation details.
Toggle the Memory Integrity switch to enable it. When prompted, restart the Windows 11 VM.

After the reboot, check the security level of your device once more. Go to the Device Security page by navigating to Settings > Privacy & Security > Windows Security > Device Security.
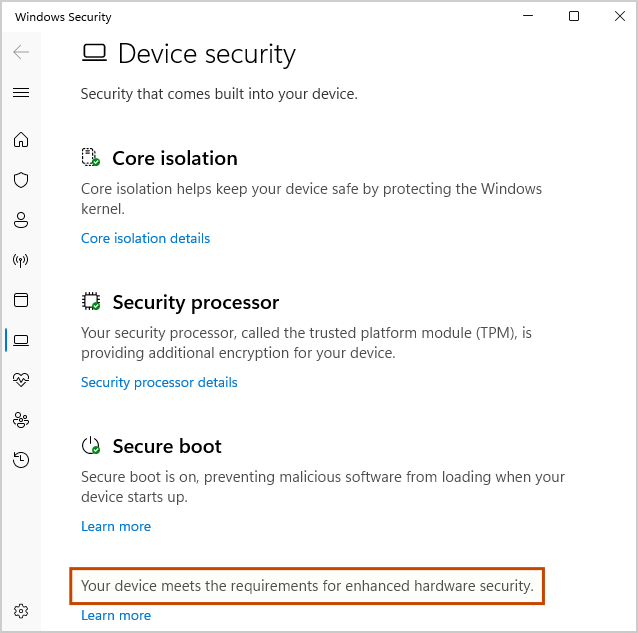
You now have a Windows 11 guest virtual machine running with enhanced hardware security.
4. Optimize Windows 11 Performance
Configuring or disabling a number of Windows processes and features can help optimize the performance of a Windows 11 guest virtual machine.
The following are some suggestions for improving performance:
4.1. Disable SuperFetch
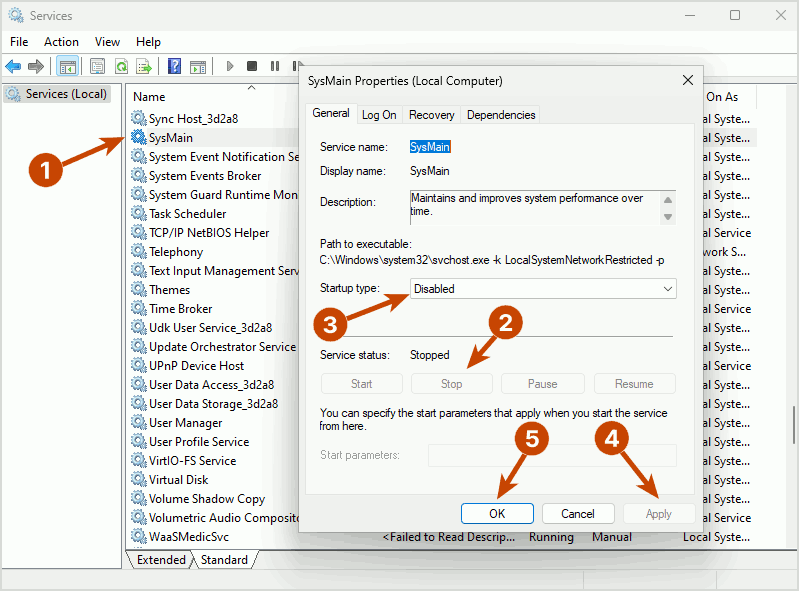
SuperFetch, also known as SysMain, is a standard Windows feature that preloads the apps you use the most frequently. Although Superfetch is useful, it consumes a significant amount of CPU and RAM as a background service.
To disable Superfetch, type services into the search box and press [Enter] to open the Services window.
In the Services window, look for SysMain. Right-click it and select Properties. Then disable the service.
4.2. Disable Windows Web Search
When you search for something in the Windows Search box or Start menu, you may have to wait a few seconds as Windows retrieves your search results along with a list of suggested web results from Bing. Although this is a useful feature, you may dislike it and wish to disable it.
To disable web results on Windows 11, follow these steps:
- Enter regedit into the search box and press [Enter] to launch the Registry Editor.
- Browse to: Computer\HKEY_CURRENT_USER\Software\Policies\Microsoft\Windows.
- Right-click the Windows key, select New, and then select the Key option. Enter Explorer as the key name and press [Enter].
- Now, right-click on the newly created Explorer key, select New, and then the DWORD (32-bit) Value option. Name the DWORD DisableSearchBoxSuggestions and press [Enter].
- Double-click the newly created DWORD DisableSearchBoxSuggestions and change its value from 0 to 1.
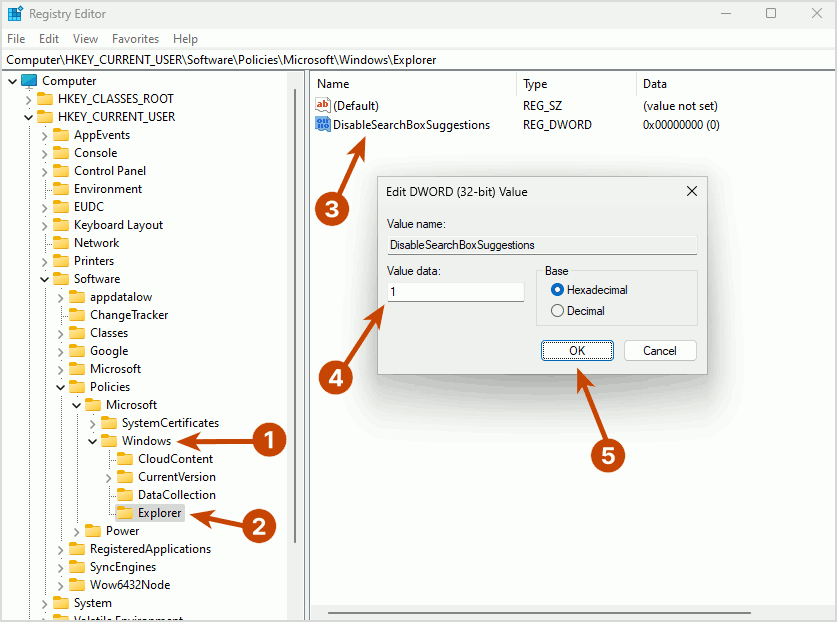
Close the Registry Editor window and restart your computer. You will now have fast-loading search results that do not retrieve results from the web.
4.3. Disable useplatformclock
When the Hyper-V extensions are enabled, setting the useplatformclock option in bcdedit to «yes» results in poor performance. As a result, disable this feature.
Open the Terminal as an Administrator and type the following command, then press [Enter].
C:\> bcdedit /set useplatformclock No4.4. Disable Unnecessary Scheduled Tasks
Review and disable any unnecessary scheduled tasks.
To get a list of all scheduled tasks, open the Terminal as an Administrator and run the following command:
C:\> Get-ScheduledTaskUse the command below to search for tasks that have the word ‘schedule‘ in their name.
C:\> Get-ScheduledTask -TaskName '*schedule*'

TaskPath                                TaskName                         State
--------                                --------                         -----
\Microsoft\Windows\Defrag\              ScheduledDefrag                  Ready
\Microsoft\Windows\Diagnosis\           Scheduled                        Ready
\Microsoft\Windows\UpdateOrchestrator\  Schedule Maintenance Work        Disabled
\Microsoft\Windows\UpdateOrchestrator\  Schedule Scan                    Ready
\Microsoft\Windows\UpdateOrchestrator\  Schedule Scan Static Task        Ready
\Microsoft\Windows\UpdateOrchestrator\  Schedule Wake To Work            Disabled
\Microsoft\Windows\UpdateOrchestrator\  Schedule Work                    Ready
\Microsoft\Windows\Windows Defender\    Windows Defender Scheduled Scan  Ready
\Microsoft\Windows\WindowsUpdate\       Scheduled Start                  Ready
I’m only going to disable the ScheduledDefrag task. It is entirely up to you which other scheduled tasks you wish to disable.
C:\> Disable-ScheduledTask -TaskPath '\Microsoft\Windows\Defrag\' -TaskName ScheduledDefrag

TaskPath                    TaskName         State
--------                    --------         -----
\Microsoft\Windows\Defrag\  ScheduledDefrag  Disabled
4.5. Disable Unnecessary Startup Programs
Some programs start automatically and run in the background when you turn on your computer. You can disable these programs so that they do not start when your computer boots.
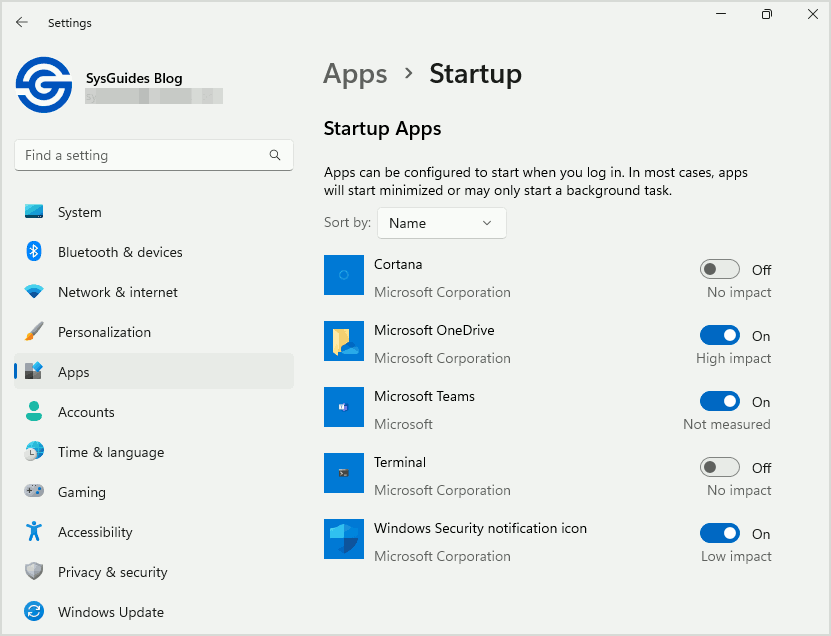
To stop a program from starting automatically, navigate to Settings > Apps > Startup. Then, turn off all programs that you don’t need or use frequently.
4.6. Adjust the Visual Effects in Windows 11
Many visual effects, such as animations and shadow effects, are included in Windows 11. These are visually appealing, but they can consume additional system resources and slow down your computer.
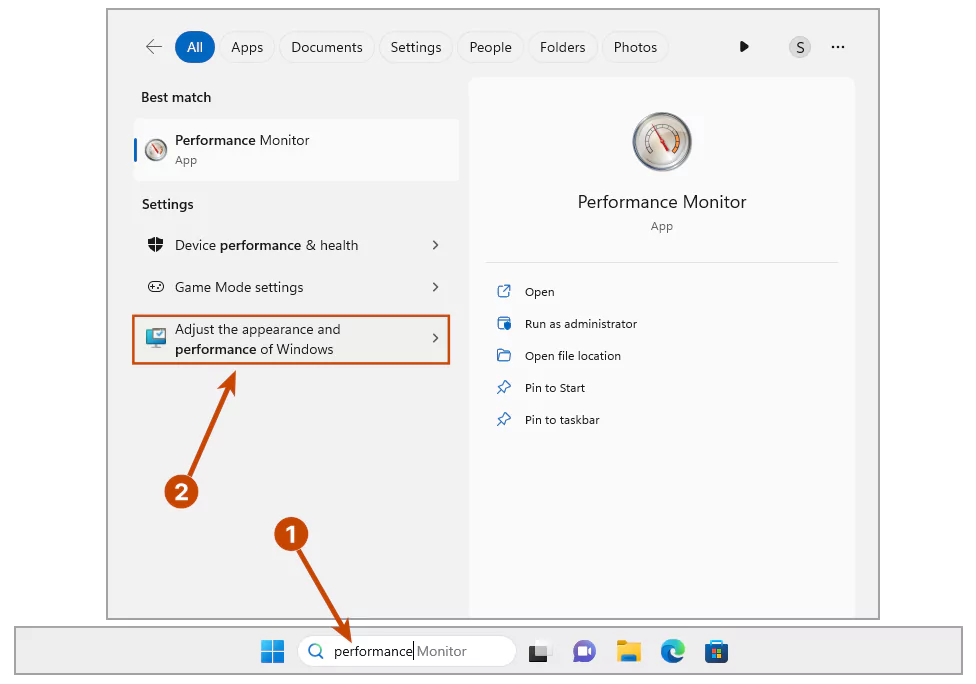
To disable visual effects in Windows, first type performance in the Search box, then select Adjust the appearance and performance of Windows from the list of results.
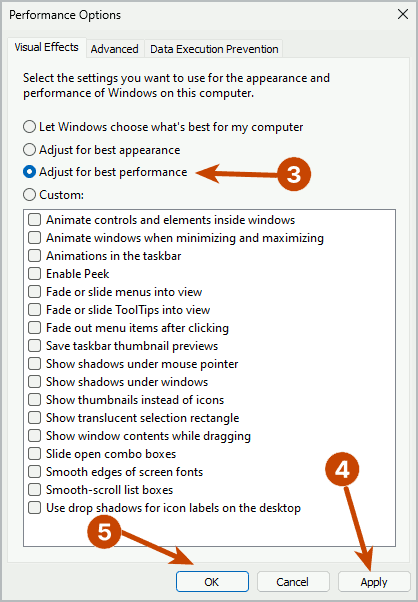
On the Visual Effects tab, select Adjust for best performance > Apply.
The process of properly installing a Windows 11 Virtual Machine on KVM has now been completed.
5. Conclusion
You can boost the performance of the Windows 11 guest virtual machine even further by turning off antivirus software, uninstalling unwanted software, and so on. These, however, are beyond the scope of this tutorial. You can look up optimizing Windows 11 on the internet, and there are numerous guides available.
If you want to share the host system files with your Windows guest virtual machine, please see my other blog on how to share files between the KVM host and Windows guest virtual machine using Virtiofs.
6. Watch on YouTube
☰ Table of Content
Working KVM drives and guest tools.
This walkthrough also apply to Windows 10.
Download Drivers
Get virtio drivers before installing Windows 11 in KVM. As we need the driver iso during the installation process.
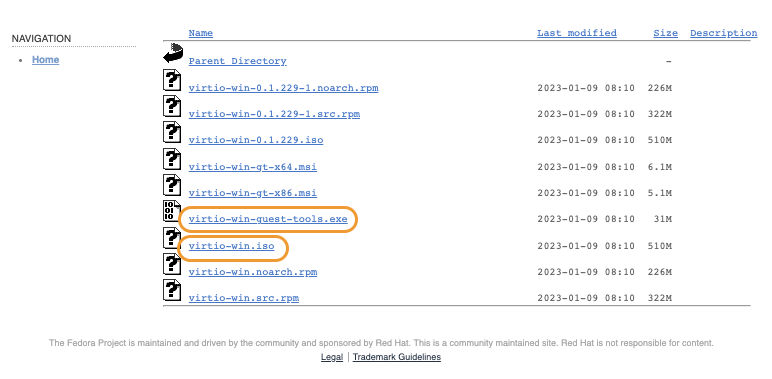
Go to following URL:
https://fedorapeople.org/groups/virt/virtio-win/direct-downloads/latest-virtio/
Download virtio-win.iso and virtio-win-guest-tools.exe.
| File | Direct Link | Usage |
|---|---|---|
virtio-win.iso |
link | Required during installation. Provide network and storage drivers. |
virtio-win-guest-tools.exe |
link | Required after installation. Provide dynamic screen resizing for remote connection. |
Setup KVM
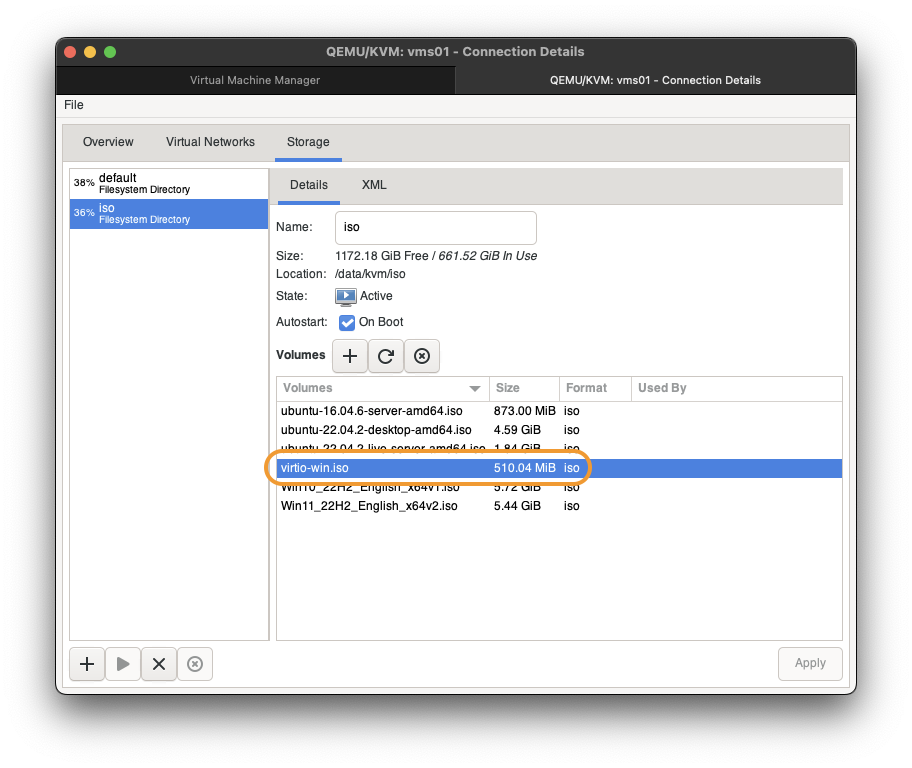
Prepare ISO
On KVM host, put both Windows iso and virtio-win.iso into KVM storage pool. The default location is /var/lib/libvirt/images/.
If done correctly, they should show up in KVM storage pool like following.
Create VM
Start KVM creation.
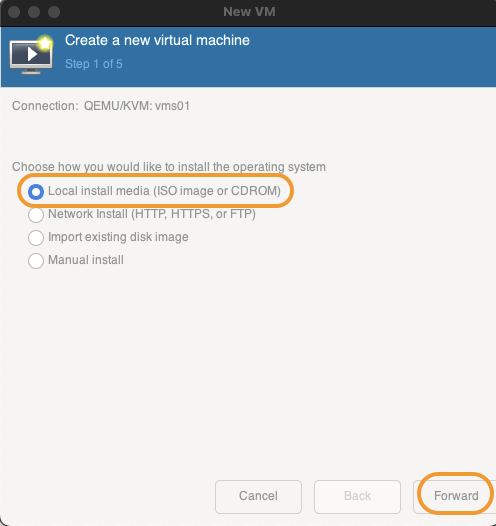
-
Choose local media. Then
Forward.
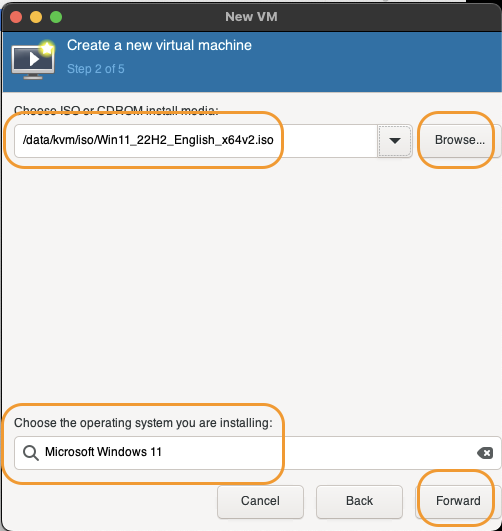
-
Select Windows ISO either by drop down or
Browse....
If operating system was not detect automatically, typeMicrosoftin the box and you should be presented with a pop up menu. ChooseMicrosoft Windows 11.
ThenForward.
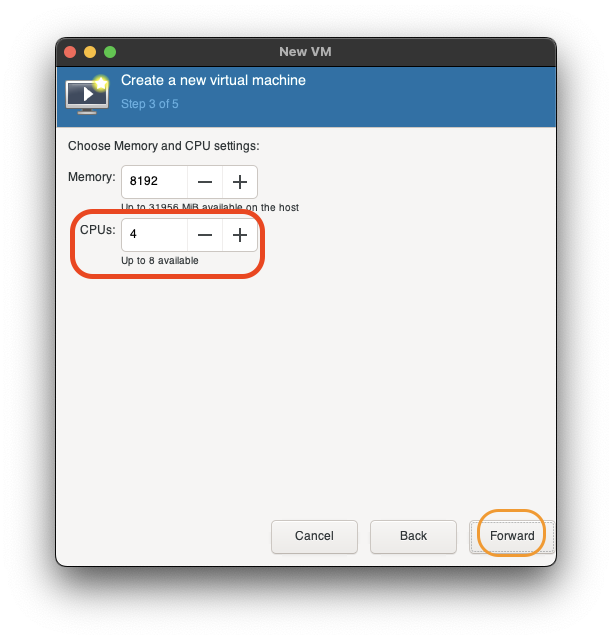
-
Set memory size. Then
Forward.CPUwill be override in customization steps.
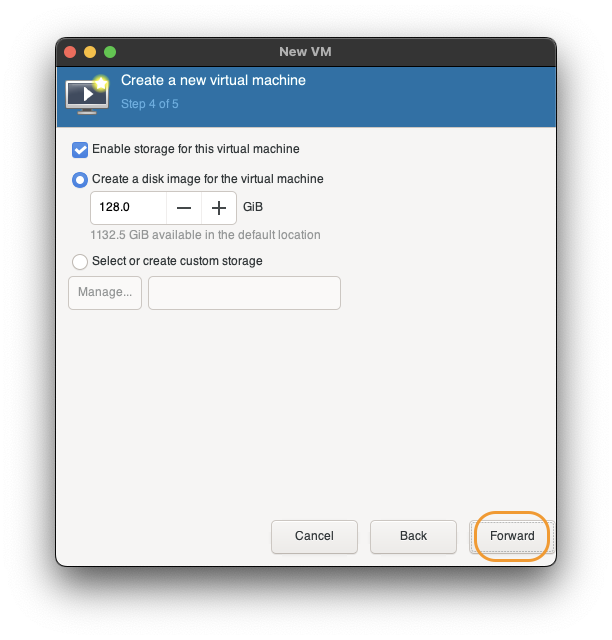
-
Set disk size. Then
Forward.
-
Set name of new VM.
CheckmarkCustomize configuration before install.
ThenFinish.
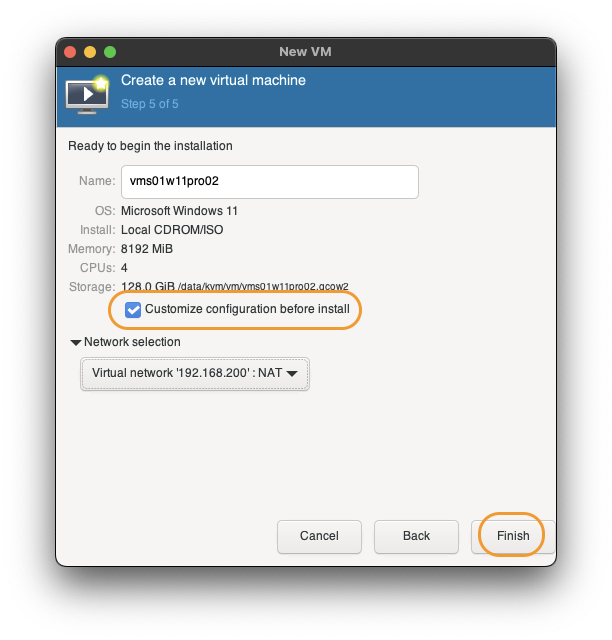
Customization screen will pop up. Continue to next section.
Customize VM
We will set VM to use VirtIO, TPM.
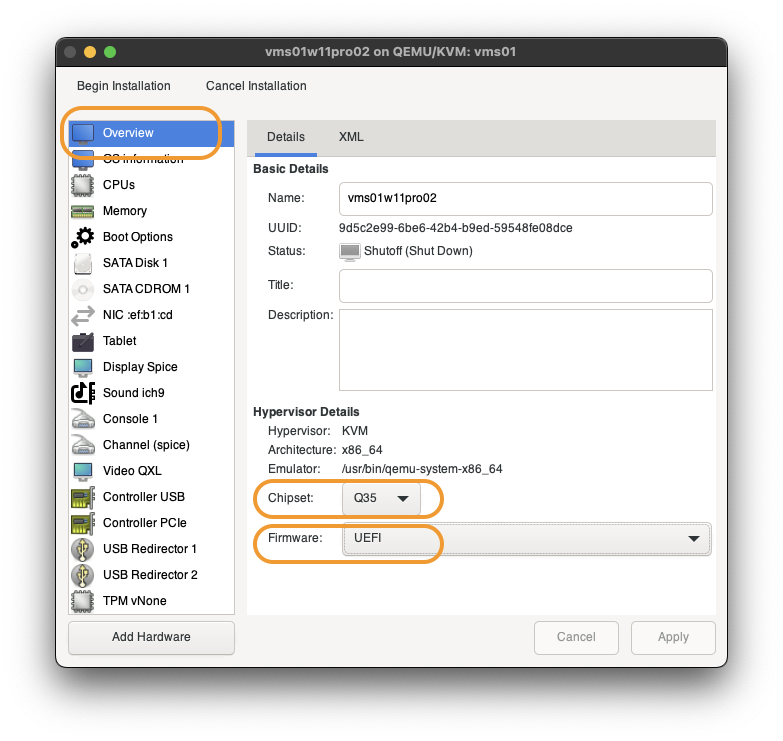
-
In
OverviewChipsetshould beQ35Firmwareshould beUEFI
-
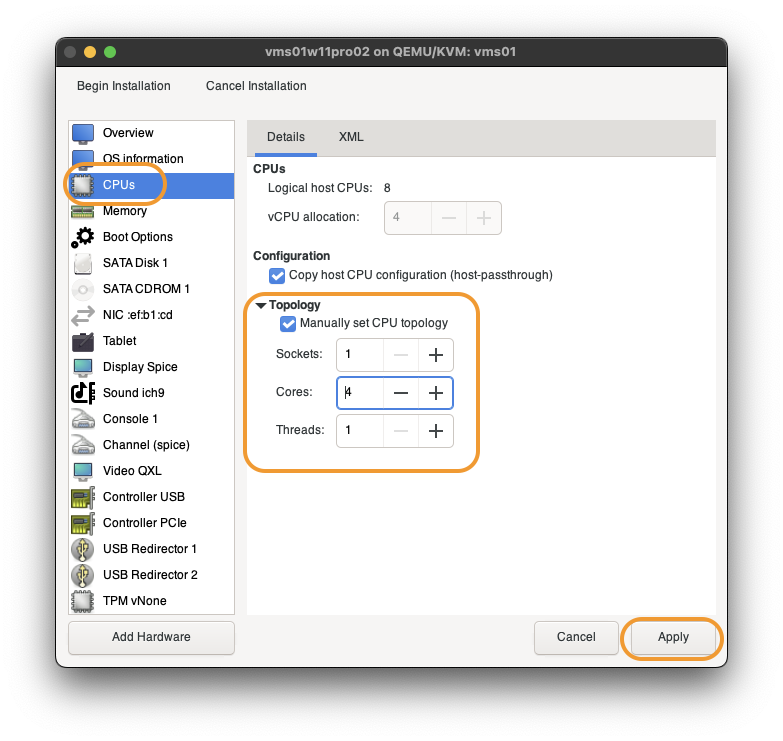
In
CPUs(IMPORTANT)
Windows Home only use 1 CPU socket, Windows Pro only use 2 CPU sockets. IfvCPUis used to assign more cpu, Windows VM will only use 1(home) or 2(pro) CPUs and become extremely slow. We have to useTopologyinstead.
CheckmarkManually set CPU topology.
SetSocketsto 1.
SetCoresto your desire value.
ThenApply.
-
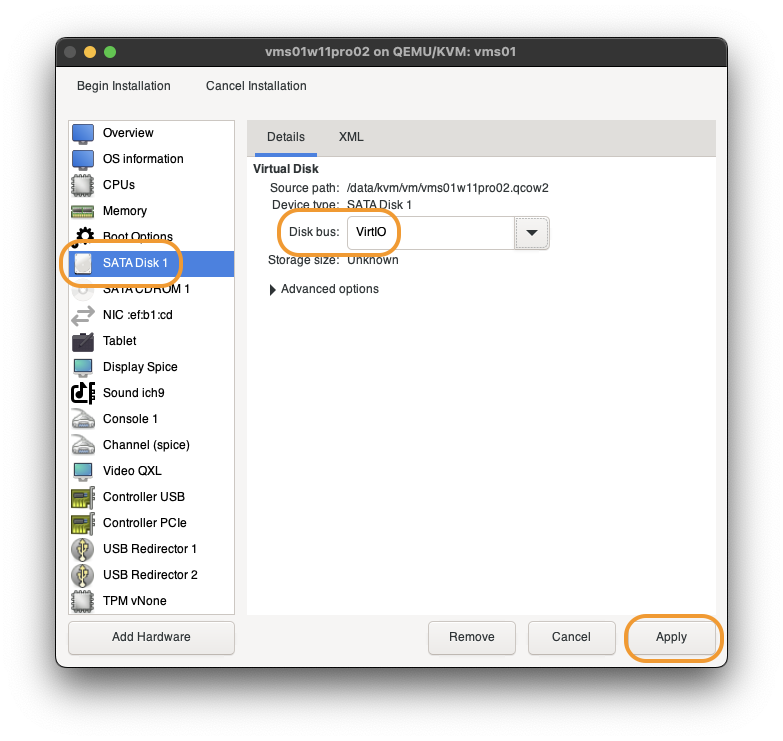
In
SATA Disk 1, changeDisk BustoVirtIO. ThenApply.
-
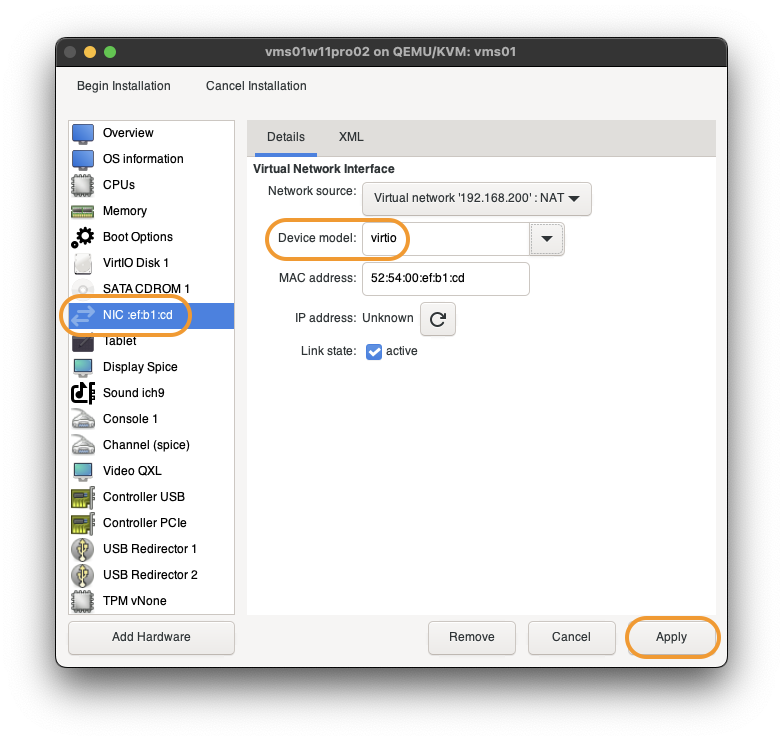
In
NIC ..., changeDevice modeltovirtio. ThenApply.
-
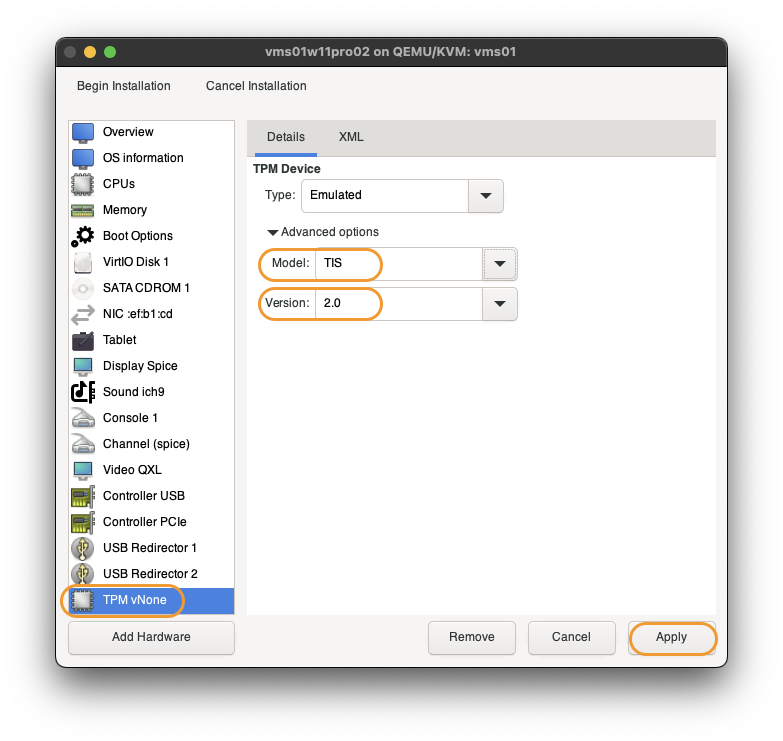
In
TPM vNone,
SetModeltoTIS.
SetVersionto2.0.
ThenApply.
-
Click
Add Hardwareto open add hardware pop up.
InStorage:
ClickSelect or create custom storage
ClickManageand assignvirtio-win.iso.
SetDevice typetoCDROM device.
ThenFinish.
This allow us to add storage and network drivers during Windows installation.
-
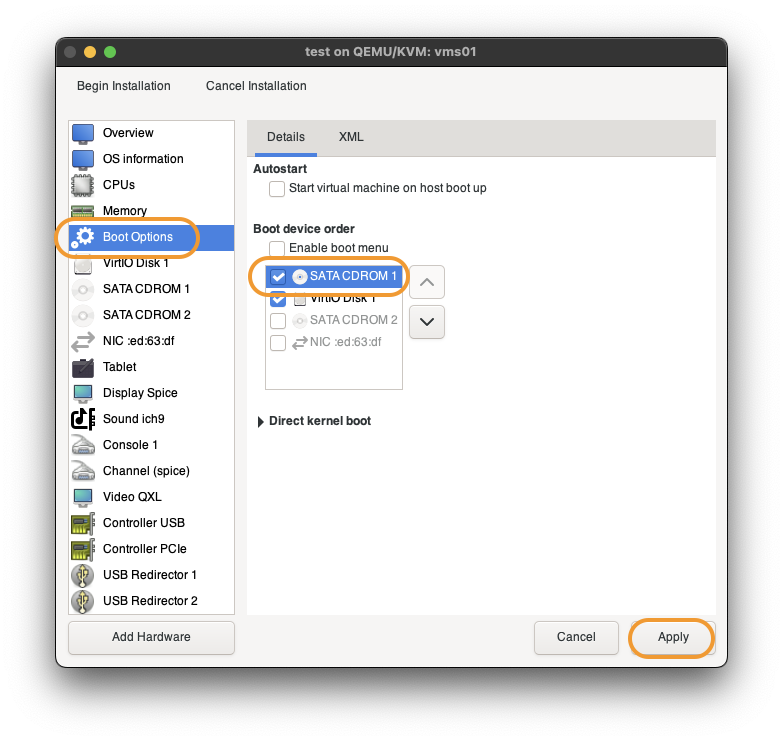
Click
Boot Options.
CheckmarkSATA CSROM 1and move it to the top.
ThenApply.
-
Click
Begin Installationto start Windows installation.

Windows Installation
We will not go through every single screen for Windows 11 setup, but only a few points:
Press A Key
When VM start, you have to press a key to boot CD(ISO). Else it will enter EFI prompt and you have to restart the VM again. You only have a few seconds to do it.
Loading Drivers
When we reach the disk screen, it will be empty. We will be loading both the storage driver and network driver.
-
Click
Load driver
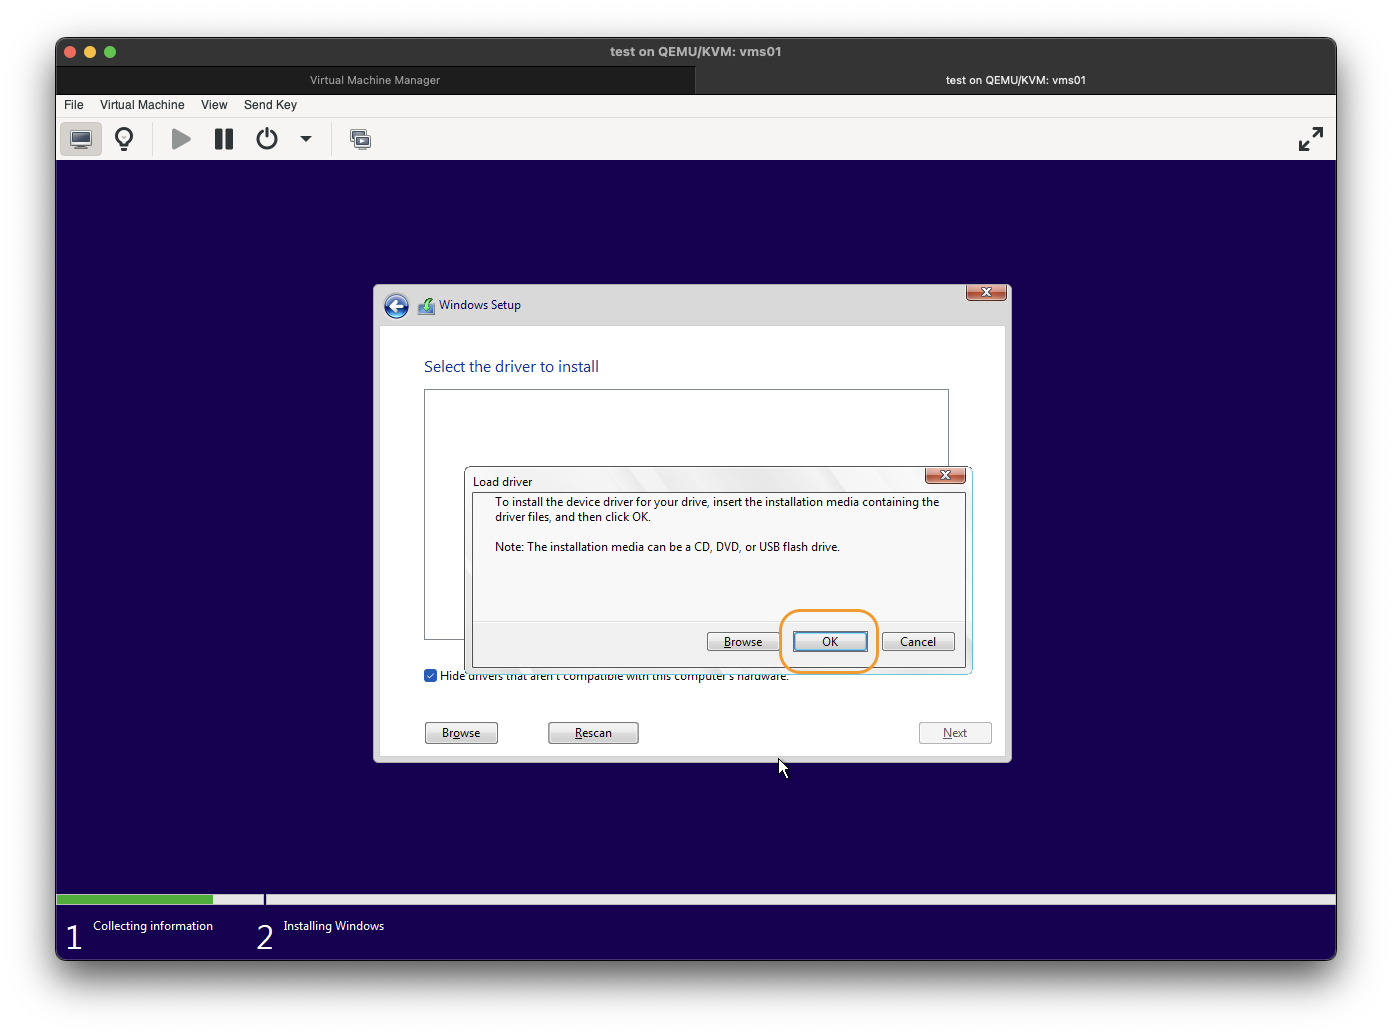
-
Click
OK.
-
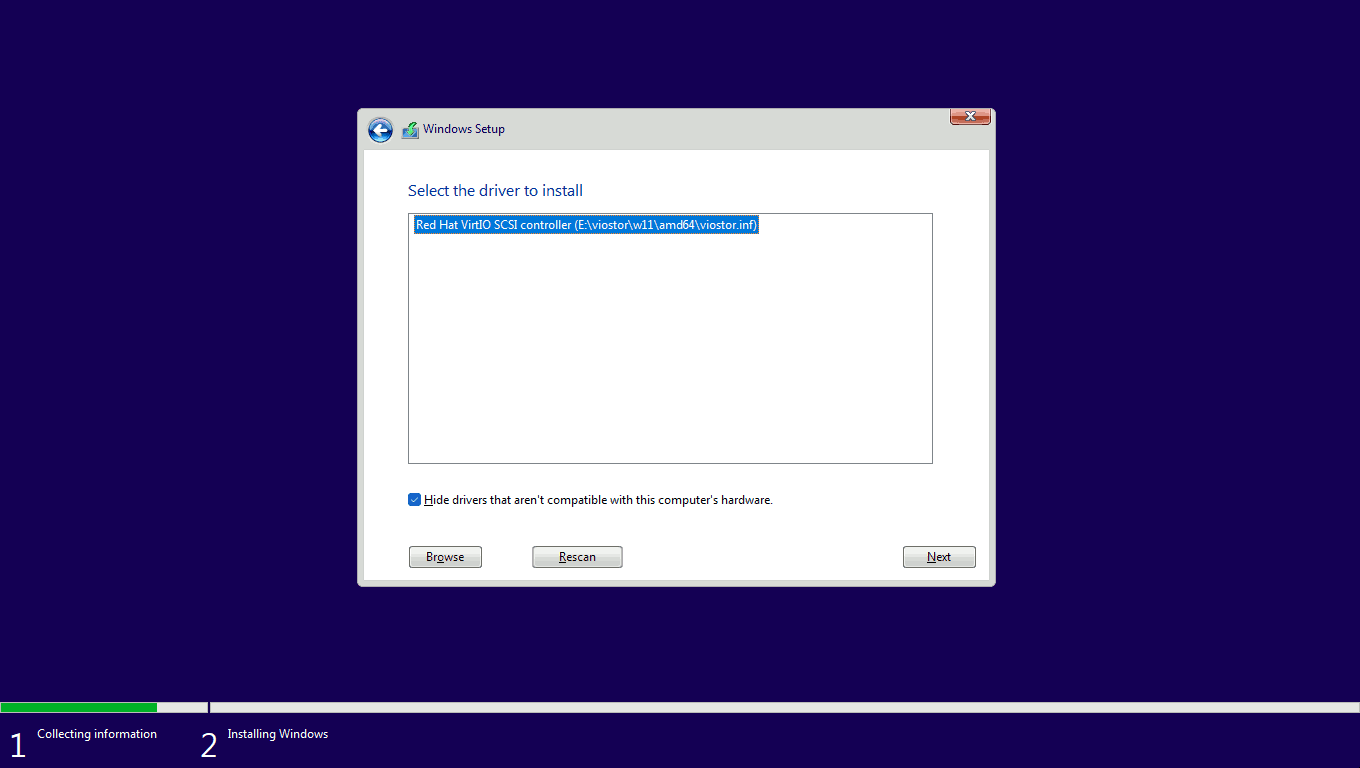
Select
Red Hat VirtIO SCSI controllerwithw11in the path.
ThenNext.
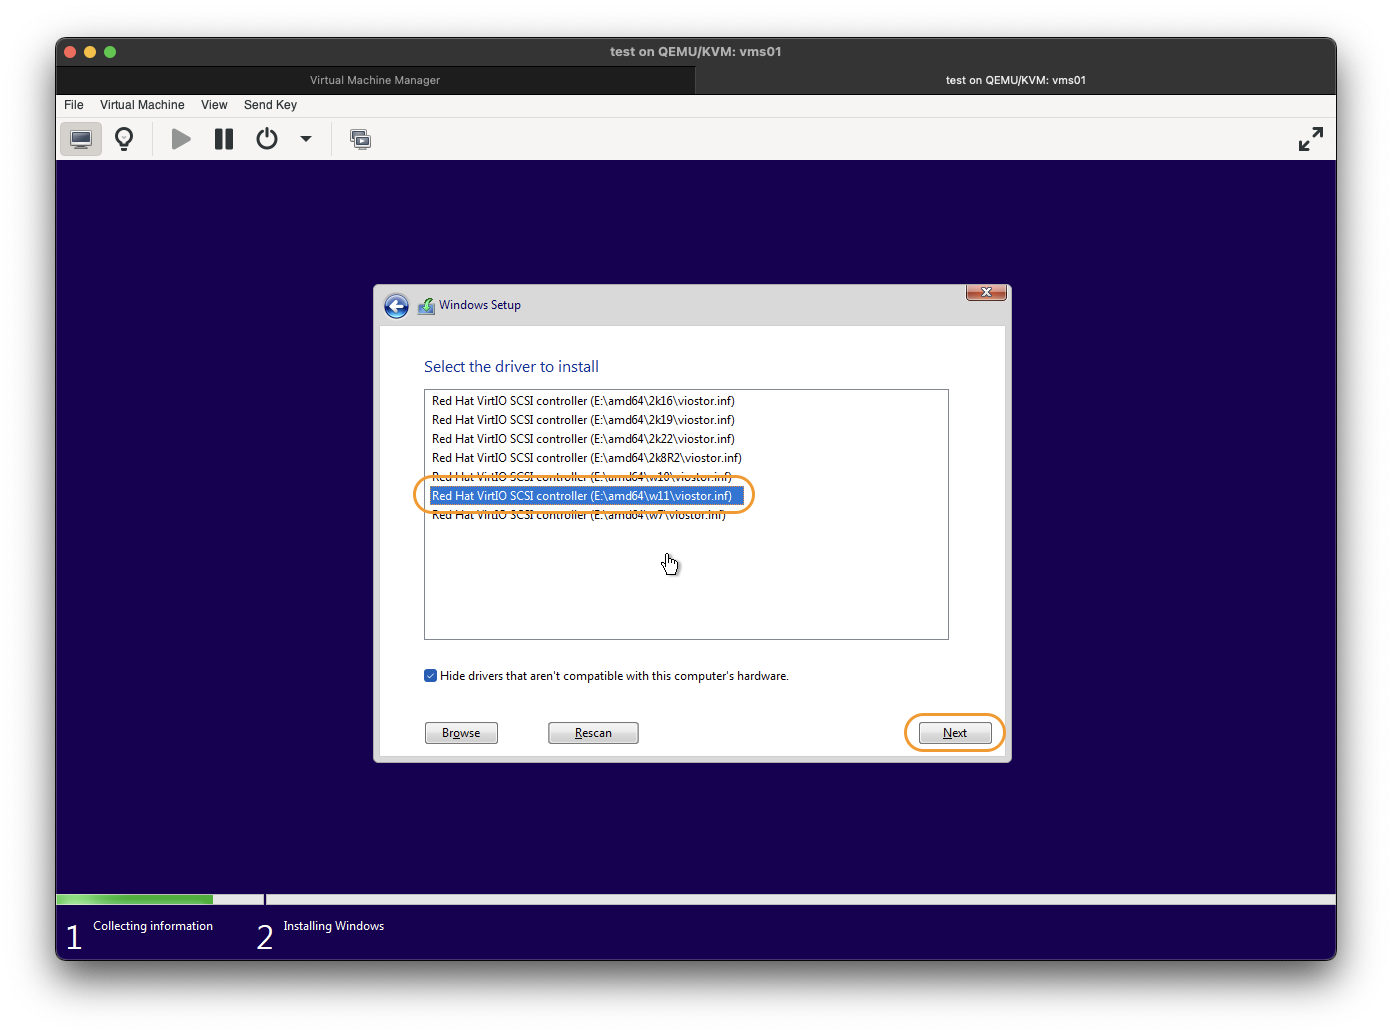
The above not only load the VirtIO SCSI driver, but also the network driver.
Finish the installation process and boot into Windows. Do not remote the virtio-win ISO yet. We still need it in next phase.
VirtIO Guest Tool
After Windows installation and initial setup, go CDROM drive with wirtio-win, run virtio-win-guest-tools.exe. That will install all remaining drivers and most importantly, the display driver allow for remote resizing.
Turn on auto resize in virt-manager.
John Siu
Update: 2023-07-23
comments powered by